1
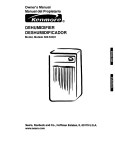
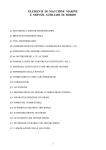
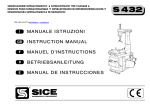
Owner's Manual
Manuel del Propietario
®
DEHUMIDIFIER
DESHUMIDIFICADOR
Model, Modelo 580.53509_o580.537013o0
/
/
Sears, Roebuck and Co., Hoffman Estates, IL 60179 U.S.A.
www.sears.com
TABLE OF CONTENTS ................................ 2
CLEANING THE WATER BUCKET .............. 8
WARRANTY ..................................................
2
REMOVING AND EMPTYING
SAFETY ........................................................
3
THE WATER BUCKET ..................................
8
MAINTENANCE
............................................
9
Grille and case .........................................
9
Air filter .....................................................
9
Important Safety Instructions ...................... 3
ELECTRICAL
REQUIREMENTS
.................. 4
OPERATION .................................................
5
Features ...................................................
5
Cleaning inside the unit ............................ 9
Control Panel ...........................................
6
General cleaning ......................................
Water bucket cleaning .............................. 9
INSTALLING YOUR DEHUMIDIFIER .............. 7
Defrost Control .........................................
TROUBLESHOOTING
7
................................ 10
ESPAI_IOL ...................................................
CHOOSING THE PROPER LOCATION ....... 7
AUTOMATIC
9
MASTER PROTECTION AGREEMENTS
SHUT OFF .............................. 7
11
...23
SERVICE NUMBERS .................... Back cover
FULL ONE YEAR WARRANTY ON DEHUMIDIFIER
For one year from the date of purchase, if the Dehumidifier is operated and maintained
acoording to the owners instructions fumished with the product, Sears will repair the
Dehumidifier free of charge, if defective in materials or workmanship.
FULL FIVE YEAR WARRANTY ON SEALED
REFRIGERATION SYSTEM
For five years from the date of purchase, when this Dehumidifier is operated and maintained according
to owner's instructions furnished with the product, Seals will repair the sealed refrigeration system
(conststing of refrigerant, connecting tubing, and compressor motor) free of charge, if defective in
roatedal or wod_rnanship.
WARRANTY SERVICE IS AVAILABLE BY RETURNING UNIT TO THE NEAREST SEARS
SERVICE CENTER IN THE UNITED STATES. CALL 1-800-4-MY-HOME ® FOR NEAREST
SERVICE CENTER TO YOU.
This warranty applies only while this Dehumidifier is used in the United States.
This wan'anty gives you specific legal rights, and you may also have other rights which vary from state to
state.
Sears, Roebuck and Co., D/817WA, Hoffman Estates, IL 60179 U.S.A.
-2-
IMPORTANT
SAFETY
INSTRUCTIONS
The safety instructions below will tell you how to use your dehumidifier to avoid harm to yourself
or damage to your dehumidifier.
ELECTRICAL
T_FORYOURSAFETY
DO not store or use gasoline or other
flammable vapors and liquids in the V_ff=ty of
this or any other appliance. Read product
labels for flammability and other warnings.
The complete electrical rating of your new
dehumidifier is stated on the sedal plate. Refer
to the rating when checking the electrical
requirements.
• Be sure the dehum'_lifier is properly
grounded. To minimize shock and fire
hazards, proper grounding is important. The
power cord is equipped with a three-prong
grounding plug for protection against shock
hazards.
_PREVENTACCIDENTS
To reduce the risk of fire, elecfficel shock, or
injury to persons when using your
dehumidifier, follow basic precautk)ns,
including the following:
• Your dehumidifier must be used in a properly
grounded wall receptacle. If the wall
receptacle you intend to use is not
adequately grounded or protected by a time
delay fuse or circuit breaker, have a qualified
eleckician install the proper receptacle.
• Do not use an extension cord oran
adapter plug.
• Be sure the electrical service is adequate for
the model you have chosen.
_
Avoid fire hazard or electdc shock.
Do not use an extension cord or an adapter ping.
Do not remove any prong from the power cord.
Grounding type
wall receptacle
Do not under any
dmumstances cut,
remove, or bypass
the grounding prong
from I_I$ plug.
Power supplycord II
with 3-prong
grounding plug
INFORMATION
\
-3-
I
OBSERVE ALL LOCAL CODES AND
ORDINANCES.
DO NOT, UNDER ANY CIRCUMSTANCES,
REMOVE THE POWER SUPPLY CORD
GROUND PRONG.
ELECTRICAL GROUND IS REQUIRED ON
THIS APPUANCE.
A 115-volt 60 Hz, AC only, 15A fused and
properly grounded electrical supply is required.
A time delay fuse or time delay circuit breaker
is recommended. Use a dedicated circuit,
serving only this appliance.
Electrical Shock Hazard
Plug into a grounded 3 prong outlet.
Do not remove ground prong.
Do not use an adapter.
Do not use an extension cord.
DO NOT USE AN EXTENSION CORD.
RECOMMENDED
GROUNDING
Failure to follow these instnJcUonscan result
in death, fire, or electrical shock.
METHOD
For your personal safety, this appliance must
be grounded. This appliance has a power
supply cord with a 3-prong grounding plug. To
minimize possd)te shock hazard, the cord must
be plugged into a m_ng grounding type wall
receptacle and grounded in accordance with
the National Electdcal Code (ANSI/NFPA 70)
latest edition and all local codes and
ordinances. If a mating wall receptacle is not
avaltabte, it is the t:__.i'sonal
respensit_ity and
obHga_on of the customer to have a properly
grounded 3-prong wall receptacle installed by a
qualified electrician.
reseptade
Ground
prong
supply
cord
-4-
FEATURES
I To reduce the risk of fire, electric shock, or injury to persons, read the important SAFETY
| instructions section before operating this appliance.
I
I
I
I
1. Control panel
2. Front grille
3. Power cord
4. Cabinet
5. Air filter
1
2
6. Water bucket
6
5
-5-
CONTROL PANEL
Your dehumidif'_r control panel contains a Bucket Full indicator, a Humidity indicator, a Power
Control, Humidity Control, Fan Speed Control and Timer Control.
Bucket Full indicator --This lightglowswhen thewater bucketisfull and needsto be emptied.
It also glowswhen the bucketis not properlypositioned.
Power-- Operationstartswhen this buttonis pressedand stopswhen the buttonis pressedagain.
Humidity Control -- This buttoncontrolsthe humidityin the room.
• e : To raise the humiditysetting
• • : To lowerthe humiditysetting
• The humiditycan be set withina range of 35%-70% RH(RelativeHumidity)by 5%
increments.
• if you push e buttononce again at 35% RH,
on isdisplayedand Unit operateswithoutRH.
Fan Speed -- This controls the speed of the airflow.
• When Fan Speed button is pressed,the fan speed mode changesfrom High .-) Low-_ High.
Energy Timer -- Press this buttonto selecttype of operation.
• Select Constantfer uninterruptedoperation.
• Selecteither 3 or 6 Hr. On/Off for cycledoperation.
The unitwilloperatefor 3 or 6 hours,and then shut off completely for 3 or 6 hours.
The cycle repeatsuntilyou change the eeiting.
• When Energy Timerbutton is pressed,the Timer indicatorlightsshift as follows:
ContinuOus On,,,],3 Hr. On/Off _ 6 Hr. On/Off _ Continuous On
Auto Restart--
Once power is restoredalter a poweroutage, the unitbeginsoperaUngat itsprevious
operation settingsafter a 2 minutedelay.
TO OPERATE THE DEHBMIDIRER:
1. Plugthe powercord intoan electricaloutlet.Pressthe powerbutton.
2. Set the HumidityControlanywhere between 35%-70% RH(RelativeHumidity)for normaloperation.
If you need drier air, press the • HumidityControl button.
ff you need moister air, pressthe • HumidityControl button.
3. Press the Power buttonto stop the unitmanually.
4. Pressthe Timer buttonto set the amountof lime you want the unitto run.
At the end of that time, the unitwill shutoff.
The Timer can be set for: Continuous On, 6 hoursor 3 hours.
5. If you want to controlthe speed of airflow,press Fan Speed button.Each time that the Fan Speed button
is pressed,the fan speed mode is shifted:High"-) Low -> High
Note: Be careful not to lose the water bucket.
This dehumidifier doesn't run If the water bucket is not Installed properly.
-6-
• Install the dehumidifier on a level floor strong enough to
supportthe unitwith a full bucket ol water.
12~18"
• For best performance, allow at least 12-18 inchesof air
space on all sides of the unit for good air circulation.
• Keep all outside doom, windows, and other openings dosed
when operating the dehumidifier. Humid outdoor air will add
to the unit'swork load.
• Install your dehumidifier in an area where the temperature
will not fall below 65°F (18°C). At temperatures below this,
the coils can become covered with frost, which may reduce
dehumidifyingperformance.
DEFROST CONTROL
When the defrost control senses frost build-upon the
evaporator coil, it will automaticallyshut off the compressor.
The fan will continueto run to draw air across the coil and
melt the frost. When the coil is defrosted, the compressor will
automatica_y restart and dehumidifyingresume.
LFI
(is'c)
The defrost feature in the 580.53701 model will
cominuously ¢ycte up to temperatwe ol 4S°F (S°C).
• Use the dehumid'd"mrin a basement to help
prevent moisture damage.
o Use the dehumidifier in cooking, laundry,
bathing, and dishwashing areas that have
excessive moisture.
o Use the dehumidifier to prevent moisture
damage anywhere books or valuables are
stored.
When the bucket is full, or when the bucket is not in the proper position,the Bucket Full light tums on
and the unit automatically shuts off.
Also, when bucket is out of position,the unit will bsep 3 times.
The bucket must be replaced in the proper position for tho dehumldffier to work. The light will
be on and the dehumidifier will not run if the bucket Is not in the proper po61tion.
-7-
m
t. Pull out the bucket cover.
• Placethumbat position_ and
pulloutward.Race otherhandat
position _) andpullup,
1. Empty the bucket manually.
Ck_n Inside of bucket with
brush or dampened cloth.
• We recommendusinga mild
detergentsolution.
2..Attach a length of garden hose to the threaded bucket drain
nose conne_ion to carry water to the drain.
When the bucket isfull, pull out
The buckethas a threaded hose
and emptyit intoa large sinkor tub connectionwhich can be leftopen.
and then replaceit properly.
Drilla 1/4" (6.4 ram)hole in the
• Do not overlJghtenthe hose when centerof the hose connection,
connectingit to the bucket.Use a Once opened,the hose connection
rubberwasher and tightenby
hand firmlywithoutstrippingthe
plachcthreads.
• Be carefulwhile takingout the
bucket as it can cause damage.
• Please do not shake strongly
when you camj the bucket.It can
cause to breakage ofthe handle
or bucketcover.
3. Replacethe bucket cover.
• Makesuretabs(_and _)are
placedas shown.
• When being attachedto the
bucketdrain hoseconnection,be
sure the hose doesn'tkink or
bend. It shouldHefiat from the
dehumidifierto the drain.
willcontinually drainwater from the . The hose attachmentwillaccepta
bucket.
standardgarden hosefilling.You
• The nozzlecannotbe fixed after
can attacha screw-oncapto use
puncture.Use an ordinal7garden the bucketwithouta hose.
hose cap to reclese if necessary.
• When insertingthe bucketintothe
unit.liftingup the bottomtip of the
bucketlightlymakes insertion
easily.
It is advisable to can'y the bucket
by suppodingit from the bottom.
-8-
GRILLE AND CASE
To clean the case: Use water and a mild
detergent. Do not use bleach or an abrasive
cleaner.
To clean the grille: Use a vacuum with an
attachment or brush.
AIR FILTER
The air filter is on the beck of the dehumidifier.
It should be checked and cleaned at least
every 30 days or more often if necessary.
I=P
TO REMOVE:
First pull out the air filter by pressing the filter
hooks. Then release two tabs at the bottom
side of the filter.
Wash air filter with warm water and a mild
detergent. Rinse and dry it.
Once dry, replace in unit.
CLEANING INSIDE THE UNIT
After removing the air filter, clean the coil on
the inside with a soft brush to remove any soft
and wet soil.
NOTE: Do not allow water to enter the
electrical/machine comparbnent through the
circular opening behind the coil.
Do not spray the coil with a hose.
Be carefull Sharp edgesl
GENERAL CLEANING
• Dust the front grille and the side panels with a
soft brush or use the dusting attachment of
your vacuum.
• If cabinet paint chips, you can touch up the
paint wi_ a good grade enamel to prevent msL
WATER BUCKET
CLEANING
- Every few weeks, rinse the inside of the water
bucket with a mild detergent to prevent
growth of mold, mildew, and becteda.
-9-
Dehumidifier
does not start
Dehumidifier
does not dry the
air as it should
Dehumidifier
too much
runs
Frost appears on
the coils
Fan noise
Water on floor
The dehumidifier power
cord is unplugged
The fuse is blown or circuit
bmaker is tripped.
• Make sure the dehumidifier plug is pushed
completely into the outlet
• Check the house fuse or circuit breaker box
and replace the fuse or reset the breaker
Water bucket is full
• The dehumidifier automatically turns off
when this occurs Empty the bucket
Bucket is not installed.
• Make sure the bucket is in the right place
Did not allow enough time
to remove the moisture.
• When first installed, allow at least 3 or4
days to maintain the desired dryness
Airflow is restricted.
• Make sure there are no curtains, blinds or
furniture blocking the front or back of the
dehumidifer.
The Humidity Controi may
not be set low Humidity.
• Press the • Humidity Control button to
lower the humidity.
Doors and windows may
not be closed tightly.
• Check thet all doors, windows and other
openings are securely closed.
Clelhesdryermaybeblowing
moisture-laden
air intotheroom.
• Install the dehumidifier away from the dryer.
The dryer should he vented to the outside.
Room temperature is too
low.
• The unit will not operate satisfactorily if the
room temperature is below 650F (18°C)
Area to be dehumidified is
too large.
• Check with your dealer to see if the capacity
is adequate.
• Close all doors and windows to the outside.
Doorsandwisdowsareopm.
Dehumidifier has been
recently fumed on or room
temperature is below 65"F.
(18°C.).
• This is normal Frost will usually disappear
within 60 minutes
Air is moving through the
dehumidifisr.
• This is normal.
Bucket drain hose
• Check the hose if one is attached.
connection may be loose.
Water bucket is not all the
way in.
• See Removing and Emptying The Water
Bucket.
10-
JNDICE DE MATERIAS ................................ 11
LIMPIEZA DEL REClPIENTE DE AGUA ...... 17
GARANTiA
REMOClON Y VACIADO DEL
REClPIENTE DE AGUA ............................... 17
SEGURIDAD
..................................................
11
................................................ 12
Importantes instrucciones de seguridad .... 12
MANTENIMIENTO
...................................... 18
REQUERIMIENTOS ELI_CTRICOS ............ 13
La rejilla y el gabinete .............................. 18
FUNClONAMIENTO
Filtro de aire ..........................................
.................................... 14
18
....................................... 14
Limpieza intema de la unidad ................ 18
Panel de control ...................................... 15
Limpieza de la unidad ............................ 18
INSTALACION DEL DESHUMIDIFICADOR ... 16
Limpieza del recipiente de agua ............. 18
Control de descongelamiento ................. 16
SOLUCl6N DE PROBLEMAS .................... 19
Caracteristicas
SELECClON
DEL LUGAR ADECUADO ...16
APAGADO AUTOMATICO .......................... 16
ACUERDOS DE PROTECCl6N
ESPEClALIZADA .......................................... 23
PAPA PEDIRSERVIClO.................CubiertaTrase'a
UN AI_IO DE GARANTJA EN TODAS LAS PARTES DEL
DESHUMIDIFICADOR
Dumnte un afio a parUr de la compra, si el deshumidificadores usado y mantenido de acuerdo con
las instruccionesdel usualio adjuntas o suministradas con el aparato, Sears reparard el
deshumidificadorsin costo alguno si _te muestm defectos en los materiales o mano de obra.
ClNCO AI_IOS DE GARANTJA COMPLETA
EN EL SISTEMA
DE
REFRIGERACION
Dumnte dnco ailos a partir de la compra, si el deshumidificadores usado y mantenido de acuerdo
con las instruccionesdel usuario adjuntas o suministradas con el aparato, Sears repara_ el
sistema de refrigeraci6nsellado (el cual consta de refrigerante, los tubos conectores y el motor
compresor) si 6ste muestra defectos en los materiales o mano de obra.
SE OFRECE SERVIClO DE GARANllA AL REGRESAR LA UNIDAD AL CENTRO DE
SERVICIO SEARS MAS CERCANO EN TODOS LOS ESTADOS UNIDOS. LLAME
1-800-4-MY-HOME ® PARA A MAS CERCANO CENTRO DEL SERVICIO A USTED.
Esta garantia s61olJenevarKlezmientrasel deshumidificadorse est6 usandoen los EstadosUnidos.
Esta garantia le confiere demchos legales especificos, pero usted podda gozar de otros
derechos que pueden vadar de Estado a Estado.
Sears, Roebuck and Co., D/817WA, Hoffman Estates, IL 60179 U.S.A.
-11 -
IMPORTANTES INSTRUCClONES
DE SEGURIDAD
Las instrucciones de seguridad que abajo se enuncian describen c6mo usar el deshumidificador
y evitar dar_osa su persona o al aparato.
_POR
SU PROPIA SEGURIDAD
INFORMACION
ELECTRICIDAD
No almacene ni use gasolina u otros vapores
o liquidos inflamables cerca de este u otros
aparatos d_cos.
Lea las etiquetas del
producto para conocer su nivel de
inflamabilidad y oh'as advertendas.
Los valores completos de la electricidad de su
nuevo deshumidificador aparecen en la placa
del nQmero de sede. Refi_rase a dichos
calores al verificar los requedmientos
el6ctdcos.
• Cercibrese de que el deshumidificador estd
adecuadamente conectado a tierra. Para
EVITE ACCIDENTES
Para redudr el riesgo de incendio, choque
el6ctdco o daf3os corporales al usar su
deshumidificador, siga las precauciones
b,_sicas que se indican a continuaci6n:
reducir al n_ximo el peligro de choques y de
incendio, es importante la correcta conexibn
a tierra. El cable de alimentaci_ estd
equipado con una clavija dotada de conexibn
a Uerra de 3 tenminales para protegerlo
contra el peligro de choques ek_'icos.
• Cerci6rese de que el suministro de energia
eldctrica sea adecuado para el modelo que
ha seleccionado.
• Su deshumidif'mador debe usarse estando
adecuadamente conectado a tierra y
enchufado a un contacto de pared apropiado.
Si el oontacto de pared que desea utilizar no
est_ adecuadamente conectado a tierra o
protegido por un fusible de retardo o pot un
disyuntor de drcuito, pida que un electddsta
calificado le instale un buen contacto de
Evite el desgo de incendio
o choque eld_ffico. No use cable el_aico
de extenskSn ni adaptadores. No quite
ninguna de las terminales de la clavija del
cable de alimentaci6n ek_rica.
Toma de corriente
de pared con
conexi6na
tie_a.
SOBRE LA
pared.
• No use cable el6ctdco de extensi6n ni
adaptadoms.
quite o evite el uso de
la conexi6na tierra de
esta davija.
Cable de alimentaci6ncon !
davija dotadade conexi6n
a tierra de 3 terminales.
\
-12-
RESPETE
TODOSLOSCODIGOSY
REGLAMENTOS.
BAJONINGUNACIRCUNSTANCIA
CORTE,
QUITEO EVITEEL USODELA CONEXlON
A TERRADEESTACLAVIJA.
ESTEAPARATONECESITA
SER
CONECTADO
A TERRA.
Se requiereunaalimentaci6n
el_ctricaCA,
adecuadamente
conectada
a tierraconun
fusiblede 15A,de60Hzy de 115V. Se
recomienda
unfusiblederetardoo un
disyuntorde drcuitoque alimente solamente a
este aparato.
NO USE CABLE ELF:CTRICO DE
EXTENSION.
ML_I'ODO RECOMENDADO
TIERRA
DE CONEXlON A
Pot su propia seguridad este aparato debe
conectarse a fierra. Este aparato viene
equipado con un cable de alimentacibn y una
clavija de kes tenminales. PaPa reducir al
m_dmo el peligro de choque ek_=drico,el cable
debe estar conectado a una conexi6n de pared
con conexJbn a tJerra,y esta conexi_n debe
hacerse de acuerdo con la Oltima edick_ndel
(7.,bdigoElddrico National (ANSI/NFPA 70), asi
como con los cbdigos y reglamentos locales. Si
no existe una conexibn de pared adecuada, el
cliente tiene la responsabilidad y la obligacibn
de mandar instalar, con un eledricis_
calirmado, una conexi6n de pared adecuada de
tres terminales con conexibn a tierra.
-13-
Peligrode choqueel_aico
Conecteen una cone_n de paredde 3 terminales
No quite la terminalde conexi6na lien'a
No use adaptadores
No use cableelq_b'ico
de extensi_
Si no se siguenestasinskucdones, puede
ocasionarsela muerte,un incendioo unchoque
ek_rico.
Cable dealimentaci6n con
davija dotada de
conexibn a fierra
de 3 tenminales.
Toma de cordente
de pared con
.---,_"_
', 11
conexi6n a tierra.
Terminal de
conexk_ a tiena.
f
Bajo ninguna
dmunstancia code, quite o
evite el uso de la conexibn
a tierra de esta davija.
/
CARACTERJSTICAS
1. Placa decoraUva
2. Rejilla frente
3. Cable alimentacidn
4. Armario
1
5. Filtro de aire
2
4
6. Tanque de agua
- 14-
PANEL DE CONTROL
Elpaneldecofltrddesudeshun_lirzcador
indoyeunindicador
derecipiente
deaguaIleno(B_
Full),_ _
del_
deIxrnedad(Hunkl_), unbot_ndeencendido
y apagado
(PowerContrd),unbot_ decort_ddelniveldehumedad
(Humid_
control),
unco_d develoddad
delvenP_ador
(FanSpeedCmtrol),y unbot6ndecor_ temporizadoi"
_
_).
Indicadorderedpientedeaguaneno(1_
FullIndicator)-Esteindicador
se endende
cuando
elrecipie_e_ _
_
ilenoy necesita
_.
Tamb_ seendendecuando
elrecip_e dea9uanoest_colocado
¢o_mente.
Bot6nde ence_lidoy apagado(Power)- B deshumiditcador
con_,enza
a fundonar
cuandose opaline
estebot6ny dejade
haoerlo
alvolvera opdmirto.
Bo_nde conf¢ol
delniveldehumedad(HumidityControl)- Eslebot6ncontrola
elniveldehumedad
enlahabitaci6n.
•o: Pareelevarelvalordelniveldehumedad
• o: Pararedodrelvalordelrdvel
dehomedad
• B niveldehumedad
puedefija_eenunrangode35%a 70%dehumedad
relaliva,
enk_rementos
deon5%de_
_z
•Siopimeelbot_e denuevo
unavezaJcanzado
unn'_ldehumedad
reb_de135%,semuestra
OnylaunkJadopera
Sinunniveldehumedad
_
Bol6ndecontroldevelocidaddeivenlgador(FanSpeed)- Estebot_ confzola
laveloddad
delgujodeaim.
• Cuandoseopdmeelbotbndecontrol
develoddad
delvenlJlador,
elmododevelockJad
_ _r
vada_ H_ e L_
-)
-*eaja
Botbnlempodzador
deenergia(EnergyTenet)- OptimaeslebotMparaseleccionar
ellJpo
defuncionamiento.
• Selecdone
Co_t (Consta_)paraunfunoionamie_o
inin_mpido.
• Seleccione
bien3 o6 HrOn/Offparefuncionamiento
cicico,enddosde3 o6 hobs.
Launidad
fundon_ dorante
3o 6 horasy luegoseapaga__omptetamente
durante
okas3 o6 horn.
B ddoserepi_hastaquecambieelmododefundmamienb.
• Cua_doseoprined bo_ tempodzador
deenergb,bs lutesindicadoms
deltempodzador
varianse_ _ _
a
confinuack_:
Continuous
On-) 3 HrOn/Off-)6 _ On/Off-.)Conf_uous
On(Ence_lido
sininterrupc_-z,e_
y
apegado
cada3 hobs-) encendido
y apag_do
cada6 hobs-) encen_do
sininte_rulx:k_
)
Reencendido
autom_co(AutoReslad)- Una_ezvuekelaek_bicidad
despu_deunaintenupc_n
delm_
_,
b
orkladcomienza
a fundonar
denuevo
enlospa.'amdaos
defuncionamiento
an_edores
_
deonfJempo
deespera
de2 minubs.
FUNCIONAMIENTODEL DESHUMIDIFICADOR
1.Conecteel enchufeen unatomade pared.Pulseel bot_ndeer_er_do.
2. Conligure
el conlxol
de humedadenlreel 35%HR(Humedad
Rela_a) y 70%HR(Humedad
Relaf_a)papaobtenetun
fundonamienb
normal.
Si Ixe6ereunmayorgradodesequedadenel aim,optimael o bok_n
deconboldehumedad(Humi_ _
Si pre6ereunmayor9_,ado
dehumedaden elaire,optimael obot_n de_
dehumedad(HuB_ _)
3. Pulseelbo_n deencendido
paradelenerlaunidad_mente.
4. Apriebel bolondel Relo_
al conjunblaca_dad de _mpe ustedquierequelaunidada _.
Afinesdeese gempo,la unidadap_ga'a.
B Relojse puedeporterpara:la Consfinuous,
3 horaso 6 horas.
5. Si deseaconbolarlavdocidaddela conientedeaire,pulsed Ix_n develocidad
del ventflador.
Cadavezq_ _
es_e10ot_n,
secambiar'_
el mododevelocidad
delvenblador:.
Alto.-) bajo...z,
_.
Nora:esimportante
nopettiereltanquedd agua.
Estedeshumklfficadorno funcionar_zi no 8ene el tmque de aguadebldamenteinstalado.
-15-
/
• Instale
d deshumkificador
enunpisonivelado
b soflcienteme_te
s_do¢omoparesqx_r lauridadconelrecipiente
Beno
de
agua
12~18"
•Pm Iograr
unra_moren(fmento,
dejeune_pacio
ibrede12a
18pelga_entodoelespacio
quedrcunde
aJaparato
cond)jeto
demadener
unabuena
circulac__ aim
• Manlengatodas
_s pue_s,venta_as
y o_ras
m_'adas
deSe
cenadas
aloperar
eldeshur_t_adorElairelu_medo
dd
=tedorh=_ queelaparato
trabaje
ene_ceso
• Inst_esudeduai_z6cs_r
ert,nw_naen qaelatemperature
no
bajea menosde _°F (18"C).A me_temper_ura,elseq_-_din
delapamtopoddacul_'se de escarcha.
PerIotnnlod desempe6ode dehumiclying
se puedereducic.
CONTROLDE DESCONGELAMIENTO
Cua_10
elc0_d de_iento
d_edalal0enaci_
de
es_ha enelsaper_ delevap0r_,a_0_e
descon_
d c0mpresor.
Bve_lad_seguirdlmd0_ando
paralinerqued are
_se porelsequinydetrita
laescad_Cuand0
sedadela
esc_cha,
d compr_or
arranca
dersuevo
autor_dicame_e
ycondenza
a ha_ deshuimi_r,
aci_
AI acdonarla fond6n"defrost(descongelar)
• enel nmdelo
580.53701elddo operar_contunuamente
basraalcanzar
los43°F(_'C)
(wc)
• Useel deshumkificadoren un s_tanopara ayudara evitarlos
dar_,os
que causala humedad.
• Use el deshumk:ificador
al cocirBr,al lavarla ropa,;31ba_rse yen
lugaresen que lavala vajiilael*=
que haydenBsiadahumedad.
• Use el deshumk:ificador
paraevitarlosdafiosquecausala
humedaden librosy objetosvaliososaJmacenados.
Cuando el cubo esta repleto, o cuando el cubo no esta en la posicion apropiada, el Cubo Repleto
_ero prende y la unidad apaga automaUcamente.
Tambien, cuando cubo es fuera de posicion, la unidad hace pip pip 3 times.
La cubeta debe set re-ubicado en la posici6n apropiada pare que el deshumedecedor
funcione. La Ioz sor_ encendida y el deshumedecedor no funcionarii si la cubeta no estd
en la posicidn apropiada.
-16-
1. Saquelatapadd redpientede agu_ 2. Umpie el Interior de recipiente 3. Vuelva a colocar la tapa del
• Coloqueel pulgaren la posicibn
con un cepigoo paflo ht_medo.
redplente de agua en su lugar.
_) y fire hada afuera.Coloquela
* Recomendamos
utilizaruna
• Aseg_resede que los salientes
olramano enla posic_ _) y tire
solud6njabonosasuave.
_)y @ est_ncelocadossegt)n
hada arnba.
mueslrala ilusS"aci6n.
1. Vaciado manual del recipiente
Z __C,_te
u_ man
g,Fa.,
de.jarCn
ataconemn
deroses
para_mnoum_
oeonmaJeoe_mcqHnte oe agua,pare Ilevarel agua hastael desd_e
Cuandoelredpienteest6ge_o,
S_lUeloy vacieloe_ unapalanganao
cubelay luegovuelvaa colocarlo
ensu
lugarde modeadecuado.
B redpie_te5erieunaco_exi_nde
• Asegdrese
de q_ela mar_jueta
nose
roscaparamanguera
quepuede
elevanise tue_ceunavezurddea Is
dejarseabierta.Taladreunodflcio
de
cmexi_nde drenajedelredpiente.
6,4 mmde di_etm (1/4")enel cenbo Deberiair deformaplanadesdeel
• Noaprietedemasiado
la mangu_aal dela cone_bnparamanguera.
Una
deshumidificader
_
eldessg_.
conectmta
al recipiente.
USficeuna
vezal_de, el odf_ioparalamanguera • B (_podl_ paramangueras
admire
arandelade gomay ap_tela a marK) drenm_elaguadelredpientede modo mangueras
dejadin esl_ndar.Puede
conSnuo.
5rmemen_sinromperlaslirasde
colocarunalapaderoscaparautiizar
pl_slico.
• Nopuedecelocarse
la boquilla
el recipiente
sinms_juera.
•Tengacuidadoal sacarel recipiente, despudsdeabrirel odflcio.UUliceuna
puestoque puedecausardatios.
lapade manguerade jardinnormal
• No_te elredp_teduramel
paravolvera oenarlosifuera
tiansp_. Puedecausarla roturadel nec_.
ma ode latapadel recipiente.
• LarK3era
elevaci(_de la puntainfedor
Esaco.seja_banspo_r
el
redpientesosteni_xt_opotla pa_
inferior.
del recipiente
alcolocado
_ la unidad
facilibsuinse_k_n.
-17-
/
LA REJILLA
Y EL GABINETE
Para limpiar el gabinete: Use agua y un
detergente suave. No use blanqueador ni
limpiadores abrasives.
Para limpiar la rejilla: Use una aspiradora con
un cono o cepino.
FILTRO DE AIRE
El filtm de aire se encuentra en la parte
posterior del deshum'_lificador. Debe revisarse
y limpiarse cuando menos cada 30 dias o rnbs
frecuentemente si es necesario.
PARA RETIRARLO:
i¢P
Flexione el flltro en la esquina inferior derecha
y deslice la esquina superior derecha hacia la
izquierda. L_velo con agua jabonesa tibia.
Enju_guelo y d6jelo secar antes de volverlo a
colocar.
UMPIEZA INTERNA DE LA UNIDAD
Despu_s de quitar el filtro de aire, limpie el
serpentin intemo con un copillo suave papa
quitar las partJceles no adherides o h0medes.
NOTA: No deje que el agua entre en el
comparlJmiento el(_ctdco/mec_ncio en la
abertura drcular situada detr_s del seq_erdin.
No rocie el serpentin con manguera.
LIMPIEZA
GENERAL
• Quite el polvo de la rejilla y de los paneles
laterales con un cepillo suave o use el cepillo
de su espiradora.
- Si el gabinete se despostilla, puede retocar la
pintura con un esmalte de buena ca,dad papa
evitar que se oxide.
LIMPIEZA DEL RECIPIENTE DE
AGUA
- Cada dos o tres semanas, enjuague el
interior del recipien_ con detergente suave
papa evitar la fonnacibn de moho, humedad o
bacterias.
- 18-
B deshum/diflcador no
a/Tar/ca.
B des/_ndd/f/cador
no
secad tire €omo
de/deal
[] cable de aliment_6n del
deshumiclificadorest_ desendlu_do.
• Cerc_rese de que la clavija del cable de
alimentacibn del deshumidificador est6 bien
puesta en la conexibn de pared
El fusible es_ quemadoo el
disyuntordel cireuitoest_ ab'wrto.
• Revise la caja del disyuntor del circuito del
fusible y cambie el fusible o vuelva a cerrar
el disyuntor
[] recipiente de agua est_ lien<).
• El deshumidificador se apaga
autorn_ticarnente cuando eslro sucede
Vacie el recipiente de agua
Elrecipientedeaguanoest_
imtalado.
• Cerctbrese de que el recipiente est6 en el
lugar correcto.
No ha de, do sufidente tiempo pera
que seque el a/re,
• Cuando se instala por primera vez, deje que
pasen 3 o 4 dias papa que se mantenga la
sequedad deseada.
• Cerci6rese de que no haya cortinas,
persianas o muebles que bloqueen la parte
anterior o posterior del deshurnidiflcador.
Hay escasa drculaci6n de aim.
B de=/imlffdiWcodor
babaJl detain/ado
Se fonna es_rc_
e/serpent_
en
Puede
qued cot_rol
deImudad.o est6
qa=lom m valorb surldentmmte
Imjo.
Laspuertasy ventmasnoesttn bien
cerradas.
• Pulse el O botbn de control de humedad a
humedad baja.
[] secador de mpa podrlaestar
generando aJreh_medo en el rednto,
• Instale el deshumidificador lejos de la
secadora de ropa. _:sta debe arrojar el aire
caliente fuera del recinto.
La tornperaturadel rednto est_
demasiado baja.
• La unidad no funcionar_ saUsfactodamente
si la temperatura del recinto es inferior a
65"F (18°C)
B volunten doare po_deshumidificar
es excesivo,
- Vedflque con su vendedor si la capacidad
es la adecuada
I.as puedas y ventanasesttn
abierl_,
- Cierre todas las puertas y ventanas que den
al exterior.
El deshurnidificadorha sido
encen_do hace poco o la
tomperaturadei mcintoes infedor a
• Es normal. La escarcha normalmente
desaparecer_ en 60 rninutos
• Revise que todas las puertas, ventanas y
otras aberturas est_n bien cerradas.
(tre).
B veatffadm'/lace
m/_
Hay drculaci6n de aim alrededor del
deshumldificador.
• Es normal.
Hal _
La €ona:i6n de la manguerade
drenadeque mal red#ente de _lua
• Revise si la manguera es_6 Instalada
El mcipiontede agua no estt blen
€olocado.
• Verifique la poslci6n correcta del Redplente
de Agua, P_llna 9.
en e/l_so.
-19-
o 20 -