1
IBM
IBM 16X Max
RAM-Read
DVD-ROM Drive
User’s Guide
Note: Before using this information and the product it supports, read the information
under “Appendix E. Product warranty and notices” on page E-1.
First Edition (April 2001)
© Copyright International Business Machines Corporation 2001. All rights reserved.
US Government Users Restricted Rights – Use, duplication or disclosure restricted by
GSA ADP Schedule Contract with IBM Corp.
Safety: read first
Before installing this product, read the Safety Information.
Antes de instalar este produto, leia as Informações de Segurança.
Pred instalací tohoto produktu si prectete prírucku bezpecnostních instrukcí.
Læs sikkerhedsforskrifterne, før du installerer dette produkt.
Ennen kuin asennat tämän tuotteen, lue turvaohjeet kohdasta Safety
Information.
Avant d’installer ce produit, lisez les consignes de sécurité.
Vor der Installation dieses Produkts die Sicherheitshinweise lesen.
Prima di installare questo prodotto, leggere le Informazioni sulla Sicurezza.
Lees voordat u dit product installeert eerst de veiligheidsvoorschriften.
Les sikkerhetsinformasjonen (Safety Information) før du installerer dette
produktet.
© Copyright IBM Corp. 2001
iii
Antes de instalar este produto, leia as Informações sobre Segurança.
Pred inštaláciou tohto zariadenia si pečítaje Bezpečnostné predpisy.
Antes de instalar este producto lea la información de seguridad.
Läs säkerhetsinformationen innan du installerar den här produkten.
iv
IBM 16X Max RAM-Read DVD-ROM Drive: User’s Guide
Contents
Safety: read first
.
.
.
.
.
.
.
.
.
.
.
.
.
.
.
.
.
.
.
. iii
About this book . . .
Registering your option .
.
.
.
.
.
.
.
.
.
.
.
.
.
.
.
.
.
.
.
.
.
.
.
.
.
.
.
.
.
.
.
.
. vii
. vii
Installation and user’s guide. . . . . . . . . . .
Product description . . . . . . . . . . . . . .
Installation requirements. . . . . . . . . . . . .
Before you begin . . . . . . . . . . . . . . .
Handling precautions . . . . . . . . . . . . .
Drive controls and connectors . . . . . . . . . .
Installing the drive. . . . . . . . . . . . . . .
Step 1. Opening the computer . . . . . . . . . .
Step 2. Unpacking the drive . . . . . . . . . .
Step 3. Setting the configuration jumpers . . . . . .
Step 4. Mounting the drive in the bay . . . . . . .
Step 5. Attaching the cables to the drive . . . . . .
Step 6. Completing the hardware installation . . . . .
Step 7. Setting up your computer for DVD video playback
Enabling the DMA settings . . . . . . . . . . .
Step 8. Installing the MPEG Decoding Software . . . .
Viewing a DVD movie . . . . . . . . . . . . .
DVD region codes . . . . . . . . . . . . . .
Using the DVD-RAM Read function . . . . . . .
Care and maintenance . . . . . . . . . . . . .
Caring for a CD or DVD . . . . . . . . . . .
Caring for the DVD-ROM drive . . . . . . . . .
Manually ejecting a disc . . . . . . . . . . .
. .
. .
. .
. .
. .
. .
. .
. .
. .
. .
. .
. .
. .
. .
. .
. .
. .
. .
. .
. .
. .
. .
. .
. .
. .
. .
. .
. .
. .
. .
. .
. .
. .
. .
. .
. .
. .
. .
. .
. .
. .
. .
. .
. .
. .
. .
. 1-1
. 1-1
. 1-1
. 1-2
. 1-2
. 1-3
. 1-4
. 1-4
. 1-4
. 1-5
. 1-6
. 1-6
. 1-7
. 1-8
. 1-8
. 1-8
. 1-9
. 1-9
. 1-10
. 1-11
. 1-11
. 1-12
. 1-12
Appendix A. Product specifications .
.
.
.
.
.
.
.
.
.
.
.
. A-1
Appendix B. Problem solving .
.
.
.
.
.
.
.
.
.
.
.
. B-1
.
.
Appendix C. Customizing the device-driver configuration settings
Changing the Windows 95, Windows 98, Windows Me, and Windows NT
device drivers . . . . . . . . . . . . . . . . . . . .
Changing the Auto Insert Notify and DMA parameters for Windows 95,
Windows 98, and Windows Me . . . . . . . . . . . . .
Changing the Windows 2000 DMA parameter setting . . . . . . .
Enabling DMA for Windows NT 4.0 . . . . . . . . . . . . .
Appendix D. Help and service information .
© Copyright IBM Corp. 2001
.
.
.
.
.
.
.
.
.
C-1
C-1
C-1
C-1
C-2
. D-1
v
Warranty information on the World Wide Web .
Online technical support . . . . . . . .
Telephone technical support . . . . . . .
.
.
.
.
.
.
.
.
.
.
.
.
.
.
.
.
.
.
.
.
.
.
.
.
. D-1
. D-1
. D-1
Appendix E. Product warranty and notices . . . . . . . . . . E-1
IBM Statement of Limited Warranty . . . . . . . . . . . . . . E-1
Part 1 - General Terms . . . . . . . . . . . . . . . . . E-1
Part 2 - Country-unique Terms . . . . . . . . . . . . . . E-4
Trademarks. . . . . . . . . . . . . . . . . . . . . . E-12
Federal Communications Commission (FCC) statement . . . . . . . E-13
vi
IBM 16X Max RAM-Read DVD-ROM Drive: User’s Guide
About this book
®
This manual contains instructions for installing and using the IBM 16X Max
RAM-Read DVD-ROM. The manual is divided into the following parts:
Part 1: Installation and user’s guide
This guide contains the product description and installation instructions in the
following languages:
v English
v French
v Spanish
v Italian
v Brazilian Portuguese
v Traditional Chinese
v Japanese
Part 2: Appendixes
This section contains device-driver, problem-solving, help and service,
warranty, and notice information.
Note: The illustrations in this manual might be slightly different from your
hardware.
Registering your option
Thank you for purchasing this IBM product. Please take a few moments to
register your product and provide us with information that will help IBM to
better serve you in the future. Your feedback is valuable to us in developing
products and services that are important to you, as well as in developing better
ways to communicate with you. Register your option on the IBM Web site at
http://www.ibm.com/pc/register
IBM will send you information and updates on your registered product unless
you indicate on the Web site questionnaire that you do not want to receive
further information.
© Copyright IBM Corp. 2001
vii
viii
IBM 16X Max RAM-Read DVD-ROM Drive: User’s Guide
Installation and user’s guide
This section contains the product description, hardware and software
®
installation instructions, and operating information for the IBM 16X Max
RAM-READ DVD-ROM Drive.
Product description
This option package is intended for multimedia applications. The drive comes
®
®
with a CD containing MPEG-2 decoding software for Microsoft Windows 98,
®
Windows 95, Microsoft Windows 2000 Professional, Microsoft Windows NT
4.0 Workstation, and Microsoft Windows Millennium Edition (Me).
In addition to this guide, your option package includes the following:
v One IBM 16X Max DVD-ROM Drive
v One package of four mounting screws (M3 x 5-mm, slotted)
v One IDE cable
v One audio “Y” cable
v One MPEG-2 decoding software CD
v One laser safety guide
Contact your place of purchase if an item is missing or damaged. Be sure to
retain your proof of purchase; it might be required to receive warranty service.
See “Appendix D. Help and service information” on page D-1 for technical
support information.
Your drive can read many DVD and CD formats, including DVD video,
DVD-RAM, video CD, and audio CD formats. However, you must install the
included MPEG-2 decoding software to play video files. The drive also reads
multiple-session, extended architecture (XA) discs, such as the Kodak Photo
CD. This drive delivers data at up to 40 times the standard CD-ROM drive
speed (40X), for CD-ROM and CD-R media. This drive delivers data at up to
16 times the standard DVD-ROM drive speed (16X) for DVD media. This drive
is designed for installation in a personal computer that uses integrated drive
electronics (IDE) or enhanced IDE (EIDE) architecture.
Installation requirements
Be sure that your computer meets the following system requirements before
installing the drive:
®
®
v Minimum microprocessor: Intel Pentium 133MHz or Intel Pentium II
233MHz if you will be using the MPEG-2 decoding software
v Minimum RAM: 32 MB
© Copyright IBM Corp. 2001
1-1
v Windows 98, Windows 95 OSR2, Windows 2000, Windows NT 4.0, or
Windows Me operating system
v An available drive bay
v An available IDE connection
v 40 MB available hard disk space
v Audio adapter supporting 44.1 or 48 kHz sampling rate
v Optional stereo speakers
v AGP 2X video with overlay support for MPEG-2 decoding software
Before you begin
Before you install the DVD-ROM drive, read the information in this section on
handling precautions and on using the drive controls and connectors.
Handling precautions
Use the following handling precautions to protect your drive.
v Keep the DVD-ROM drive in the antistatic bag until you are ready to install
the drive. Limit your movement when installing; movement can cause static
electricity buildup.
v Handle the drive with care. Dropping or jarring the drive can damage the
components inside the drive housing.
v Do not force insertion of the IDE or power cables. Doing so might damage
the connector or the drive.
1-2
IBM 16X Max RAM-Read DVD-ROM Drive: User’s Guide
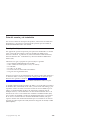
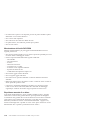
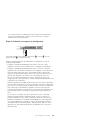
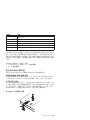
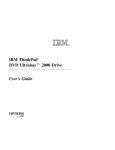
Drive controls and connectors
The following diagrams show the location and functions of the drive controls
and connectors.
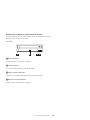
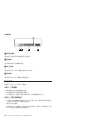
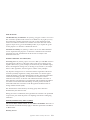
Front view of the drive
«1¬Disc drawer
This drawer is where you load and unload a disc.
«2¬Busy indicator
This light comes on when the drive reads from, or plays a disc.
«3¬Emergency eject hole
This hole provides access to the eject mechanism to remove a disc from the
drive.
«4¬Open/Close button
This button opens and closes the disc drawer when you push it.
Installation and user’s guide
1-3
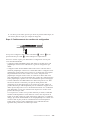
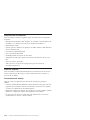
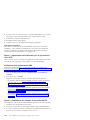
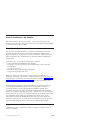
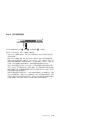
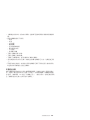
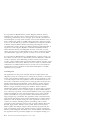
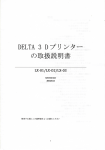
Rear view of the drive
Pin 1
«1¬Audio-out connector
This connector transmits the analog audio signals to an audio adapter.
«2¬Configuration pins
These pins are used to set the drive configuration.
«3¬IDE port
This connects the DVD-ROM drive to the IDE cable.
«4¬Power connector
This connects the DVD-ROM drive to the power cable.
Installing the drive
Follow these steps to install the DVD-ROM drive:
Step 1. Opening the computer
1. Turn off the computer and all attached devices.
2. Unplug all power cords from the computer and all attached devices.
3. Remove the cover from the computer. Refer to your computer
documentation for instructions on removing the computer cover.
Step 2. Unpacking the drive
1. Before opening the antistatic bag that the drive is packed in, touch the bag
to an unpainted metal surface for at least two seconds. This drains the
static electricity from the package and your body.
2. Remove the drive from the bag.
If you must put the drive down, place the antistatic bag on a flat, padded
surface, such as a magazine, and place the drive on the antistatic bag.
1-4
IBM 16X Max RAM-Read DVD-ROM Drive: User’s Guide
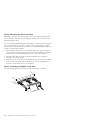
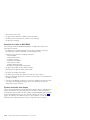
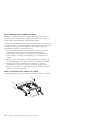
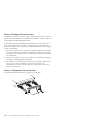
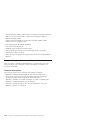
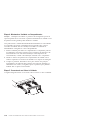
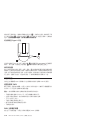
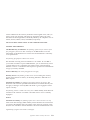
Step 3. Setting the configuration jumpers
You can configure your drive as master «1¬, slave «2¬, or cable-select «3¬, as
shown.
Use the following guidelines to determine the correct configuration for your
DVD-ROM drive.
v Configure the DVD-ROM drive as a master if it will be the only device that
is connected to an IDE cable. This is the preset configuration.
v Configure the DVD-ROM drive as a slave if it will be the second device on
an IDE cable. Be sure to configure the other device as a master. In some
cases, a hard disk drive might require a “master with slave present” jumper
setting when another device on the same cable is configured as a slave. For
more information on setting configuration jumpers on other devices, refer to
the documentation that comes with your computer device.
v Some non-IBM computers use special ATA cables with two wires reversed in
the device connectors so that the drives can be configured by the cable
instead of by jumper position. Use the cable-select position only for
computers that are equipped with these special cables. See the
documentation that comes with your computer to determine if your ATA
adapter requires that you place the jumpers in the cable-select position.
If you place the jumpers in the cable-select position, the IDE cable
automatically assigns the master and slave settings based on the position of
the drive on the cable. You must use the cable-select setting for this cabling
system whether the DVD-ROM drive is the only device or the second device
connected to the cable. The drive closest to the IDE controller is
automatically the master drive. Any other devices on the IDE cable must
also be set to cable-select.
Installation and user’s guide
1-5
Step 4. Mounting the drive in the bay
Attention: Be sure to use the mounting screws in the option package when
you are driving screws directly into the drive. Using screws that are too long
might damage the drive.
You can mount the DVD-ROM drive horizontally or vertically in the computer.
If you mount the drive vertically, you must secure any discs that you place
into the drive before the drive tray is closed, or the DVD-ROM drive will not
be able to read the disc properly.
1. Slide the drive into the bay. Your computer might have specific required
procedures for installing storage devices. For more information on storage
devices, refer to the documentation that comes with your computer.
2. Align the drive-bay screw holes with the threaded holes in the drive
housing or mounting bracket.
3. Thread the screws in loosely to check their position. Two screws are usually
used on each side. Verify that the alignment is correct; then tighten the
screws to secure the drive. Do not overtighten.
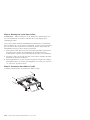
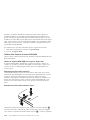
Step 5. Attaching the cables to the drive
The following diagram shows where to connect the cables to the drive.
1-6
IBM 16X Max RAM-Read DVD-ROM Drive: User’s Guide
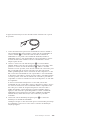
The following is an illustration of the internal audio cable that comes with
your option package.
1. The internal audio cable has a split-connector end and a single-connector
end. Connect one of the split-connector ends «1¬to the audio-out connector
on the DVD-ROM drive. If you have another CD-ROM, CD-RW or
DVD-ROM drive, attach the other split-connector end to the audio-out
connector on this drive. Attach the single-connector end to your sound
card.
2. Attach a 40-pin IDE-cable connector «2¬to the IDE connector on the drive.
Align the cable so that the color-coded edge is closest to the power cable
connector «3¬. Use the IDE cable that is provided with this option if there
is no cable attached to the IDE port. The IDE cable can have up to three
connectors. For the best signal quality when you are connecting only one
device to the IDE cable, connect one end of the cable to the IDE port, and
connect the other end of the cable to the device. Do not use the middle
connector. Use the IDE cable that is provided with this option if there is no
cable attached to the computer IDE port, or if there is only one device
connector on the computer IDE cable.
If you are connecting two devices to the IDE cable, connect one end of the
cable to the IDE port, and connect the master and slave devices to the
remaining connectors on the other end. Many computers have two cables
for attaching up to four ATA devices. For best performance, attach fast
devices (hard disk drives) to the cable that is connected to the primary IDE
port, and connect the DVD-ROM drive or other slower devices (CD-ROM
drives, tape drives, removable media) to the cable that is connected to the
secondary IDE port.
3. Attach a four-pin power cable «3¬to the power connector on the DVD-ROM
drive.
Be sure that the cables will not be pinched or crowded by the computer
cover and that all other cable and power connections are secure.
Step 6. Completing the hardware installation
1. Be sure that the DVD-ROM drive is securely mounted and that the
connectors are firmly attached.
2. Be sure that the cables do not interfere with the computer cover, and that
they do not block the power-supply fan blades or airflow paths.
Installation and user’s guide
1-7
3. Reinstall the computer cover.
4. Reconnect all external devices.
5. Plug all power cords into the wall outlets.
What to do next
If you will be using the drive as a data-only DVD-ROM drive, or as a
CD-ROM drive, you have completed the installation and do not need to install
support software. For more information on maintaining your drive, see “Care
and maintenance” on page 1-11.
Step 7. Setting up your computer for DVD video playback
This section provides instructions on enabling DMA settings so you can play
DVD movies with your DVD-ROM drive.
Enabling the DMA settings
Check the operating system for your computer. Instructions for enabling DMA
are included in “Appendix C. Customizing the device-driver configuration
settings” on page C-1.
1. Click Start, then click Settings, and then click Control Panel.
2. Double-click System.
Read the version number under System.
v If your version number is 4.00.950B or 4.00.95C, follow the instructions
under “Changing the Auto Insert Notify and DMA parameters for
Windows 95, Windows 98, and Windows Me” on page C-1.
v If your version number is 5.00.2195, follow the instructions under
“Changing the Windows 2000 DMA parameter setting” on page C-1.
v If your version number is 4.00.1381, follow the instructions under
“Enabling DMA for Windows NT 4.0” on page C-2.
Step 8. Installing the MPEG Decoding Software
To install the MPEG-2 Decoding software do the following:
1. Close any programs that are running.
2. Insert the MPEG-2 decoding software CD into your DVD-ROM drive.
3. If the Installation window opens automatically, go to Step 8. Otherwise,
continue with Step 4.
4. Click Start.
5. Click Run.
6. Type X:\DVDPLAYR\SETUP.EXE, where X is the drive letter for your
DVD-ROM drive.
7. Click OK.
8. Follow the on-screen instructions to complete the installation.
1-8
IBM 16X Max RAM-Read DVD-ROM Drive: User’s Guide
Viewing a DVD movie
After you install the DVD-ROM drive, configure DMA, and install
DVD-viewing software, you can view a DVD movie.
DVD Express will start automatically when you insert a DVD. If you want to
start DVD Express manually, follow these instructions:
1. Click Start, then click Programs, and then click Mediamatics DVD Express.
2. Click Mediamatics DVD Player.
The DVD movie player window appears. For more information on how to
use the DVD movie player, refer to the DVD Express online help by
pressing F1.
DVD region codes
Regional coding helps protect the contents of a DVD. The world is divided into
six regions. Specific content can be viewed only in the region where it is
appropriate. For example, the content for Region 1 (U.S. and Canada) can be
viewed only in the U.S. and Canada. You can verify the region code of the
DVD by looking at the region code symbol on the back of the content
packaging.
Region code
Region
1
U.S., Canada
2
Europe, Middle East, South Africa, Japan
3
Southeast Asia, Taiwan, Korea
4
Latin America, Australia, New Zealand
5
Former Soviet Union, the rest of Africa, India
6
People’s Republic of China
You will be prompted for the initial region selection. If you insert a DVD with
a different region code than the initial region code, DVD Express will ask if
you want to change the region code setting. You can change the region code
from your initial setting up to four times after setting the initial region code.
After the region code has been changed from its initial setting four times, it is
fixed and can no longer be changed. To change the region code, an encrypted
DVD of the new region must be in the DVD-ROM drive.
To display the region code status, follow these instructions:
1. In the DVD Express windows, click DVD Options.
2. Click DVD Region.
Installation and user’s guide
1-9
Using the DVD-RAM Read function
This section contains information on using the DVD-ROM drive with
DVD-RAM discs.
Using single-and double-sided DVD-RAM media
DVD-RAM media is available in single-sided and double-sided versions.
Versions with 2.6 GB and 4.7 GB are available in Type I or Type II cartridges.
The 5.2 GB and 9.4 GB versions are double-sided and only available in Type I
cartridges.
Removing the disc from the cartridge
DVD-RAM Type II discs may be removed from the cartridge for use in
DVD-ROM drives, with DVD-RAM Read capabilities. To access the data on
both sides of the media, you must remove the disc from the drive, turn it over,
and re-insert it into the drive, for convenience, double-sided media are labeled
side A and side B. DVD-RAM Type I discs cannot be removed from the
cartridge and cannot be read by this drive.
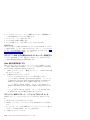
Removing the disc from the Type II cartridge
Using the tip of a ball point pen, push and break the lock pin tab«1¬. To
remove the disc, use a ball point pen to push down on the cartridge lid lock
«2¬ and pull the cartridge lid «3¬ out to eject the disc. With the cartridge lid
open the disc will eject. Do not touch the recording side of the disc when
handling the bare media.
1-10
IBM 16X Max RAM-Read DVD-ROM Drive: User’s Guide
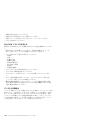
Returning the disc to the Type II cartridge
To return the disc to the Type II cartridge, align the label side of the disc
«1¬with the DVD-RAM cartridge label side. Insert the disc and close the
cartridge lid «2¬. A clicking sound will ensure the lid door is closed.
Precautions for handling
Be careful when handling the removed disc. Debris, dust particles, fingerprints,
smears, or scratches may effect and damage recording and playback of the
disc. To clean dust or other debris use a CD Cleaning Kit. Use a soft, dry cloth
to clean the disc. Do not use solvents to clean the disc surface. When labeling a
disc, write only on the printed label side using a soft felt-tip marker. Keep out
of direct sunlight, high temperatures, and humidity. Do not attach labels to
either side of the disc.
Care and maintenance
This section includes information on taking care of your DVD-ROM drive and
the CDs and DVDs that you use with the drive.
Caring for a CD or DVD
Digital discs are high-density media that must be handled with care and kept
clean to ensure that they remain readable. The following precautions help to
prolong the life of your discs.
Attention: Wiping a disc using a circular motion can damage the disc and
cause data loss.
v Handle the disc by the edges or the center hole. Do not touch the surface of
the disc.
v To remove dust or fingerprints, wipe the disc from the center to the edge
with a soft, lint-free cloth.
v Do not write on the surface.
v Do not place the disc in direct sunlight.
v Do not use commercial cleaners to clean the disc.
Installation and user’s guide
1-11
v Do not bend the disc.
Caring for the DVD-ROM drive
To protect your DVD-ROM drive during operation, observe the following
precautions:
v Do not move the drive when it is in use. Doing so might cause data error or
damage the drive.
v Avoid exposing the drive to the following conditions:
– High humidity
– High temperature
– Excessive dust
– Mechanical vibration
– Sudden shock or dropping
– Placement on an inclined surface
– Direct sunlight
– Sudden temperature changes
v Do not insert foreign objects into the drive.
v Do not stack objects on the drive.
v Do not remove the drive cover or attempt to service the drive.
v Remove any discs from the disc drawer and make sure that the drawer is
closed before moving the drive unit.
v Keep the original packing materials. If you need to ship the drive unit to a
different location, use the original packing materials to ensure that the drive
is transported safely.
Manually ejecting a disc
If a drive becomes defective and will not allow the disc to eject, turn off the
computer and straighten a large paper clip to form a tool. The straightened
end must extend at least 45 mm (1.8 in.). Insert the extended end into the
emergency eject hole on the front of the drive (see “Front view of the drive” on
page 1-3). Push the paper clip until the tray opens. Gently pull out the tray
until you can remove the disc.
1-12
IBM 16X Max RAM-Read DVD-ROM Drive: User’s Guide
Guide d’installation et d’utilisation
Cette section comporte la description du produit, les instructions d’installation
matérielle et logicielle et les informations d’utilisation pour l’unité de
DVD-ROM IBM 16X Max avec lecture de DVD-RAM.
Description de produit
Cette option est destinée aux applications multimédia. L’unité est fournie avec
un CD contenant des logiciels de décodage MPEG-2 pour Microsoft Windows
98, Windows 95, Microsoft Windows 2000 Professionnel, Microsoft Windows
NT 4.0 Workstation et Microsoft Windows Millennium Edition (Me).
Outre ce guide, l’option contient :
v Une unité de DVD-ROM IBM 16X Max
v Quatre vis de montage (M3 x 5 mm, à tête fendue)
v Un câble IDE
v Un câble audio “Y”
v Un CD de logiciels MPEG-2
v Un manuel de consignes de sécurités relatives à l’utilisation des lasers
Prenez contact avec le lieu d’achat du produit si un élément manque ou est
endommagé. Conservez votre preuve d’achat ; elle vous sera peut-être
demandée pour bénéficier des services de garantie. Reportez-vous à
l’«Annexe D. Help and service information» à la page D-1 pour plus
d’informations sur l’assistance technique.
L’unité peut lire de nombreux formats de DVD et de CD, y compris les DVD
vidéo, DVD-RAM, CD vidéo et CD audio. Cependant, vous devez installer les
logiciels MPEG-2 fournis pour lire les fichiers vidéo. L’unité peut également
lire les disques multi-sessions à architecture étendue (XA), comme les CD
Photo Kodak. Elle transmet les données à une vitesse pouvant aller jusqu’à 40
fois celle des unités de CD-ROM standard (40X) pour les supports CD-ROM et
CD-R. Elle transmet les données à une vitesse pouvant aller jusqu’à 16 fois
celle des unités de CD-ROM standard (16X) pour les supports DVD. Elle est
conçue pour être installée sur un ordinateur personnel utilisant l’architecture
IDE (integrated drive electronics) ou EIDE (enhanced IDE).
Configuration minimale
Assurez-vous que votre ordinateur dispose des éléments suivants avant
d’installer l’unité :
v Microprocesseur : Intel Pentium 133 MHz, ou Intel Pentium II 233 MHz si
vous désirez utiliser les logiciels de décompression MPEG-2
© Copyright IBM Corp. 2001
1-13
v Mémoire RAM minimale : 32 Mo
v Système d’exploitation Windows 98, Windows 95 OSR2, Windows 2000,
Windows NT 4.0 ou Windows Me
v Une baie d’unité disponible
v Une connexion IDE disponible
v 40 Mo d’espace disponible sur le disque dur
v Une carte audio prenant en charge une fréquence d’échantillonnage de 44,1
ou 48 kHz
v Des haut-parleurs stéréo (facultatif)
v Une carte vidéo AGP 2X avec prise en charge de fonds de page pour les
logiciels MPEG-2
Avant de commencer
Avant d’installer l’unité de DVD-ROM, lisez les informations de cette section
sur les précautions de manipulation et l’utilisation des boutons et des
connecteurs de l’unité.
Précautions pour la manipulation
Pour protéger l’unité, respectez les précautions suivantes :
v Conservez l’unité de DVD-ROM dans sa pochette antistatique jusqu’au
moment de l’installation. Limitez les mouvements pendant l’installation, car
ceux-ci provoquent une accumulation d’électricité statique.
v Manipulez l’unité avec soin. Si vous faites tomber l’unité ou qu’elle subit des
secousses, les composants internes peuvent être endommagés.
v N’insérez pas les câbles IDE ou les cordons d’alimentation en force. Cela
peut endommager le connecteur ou l’unité.
1-14
IBM 16X Max RAM-Read DVD-ROM Drive: User’s Guide
Boutons de contrôle et connecteurs de l’unité
Le schéma suivant présente l’emplacement et les fonctions des boutons de
contrôle et des connecteurs de l’unité.
Vue avant
«1¬Plateau du disque
Permet l’insertion ou le retrait du disque.
«2¬Voyant d’activité
Ce voyant s’allume lorsque l’unité lit un disque.
«3¬Orifice d’éjection d’urgence
Fournit l’accès au dispositif d’éjection pour retirer un disque.
«4¬Bouton d’ouverture/fermeture
Permet d’ouvrir et de refermer le plateau.
Guide d’installation et d’utilisation
1-15
Vue arrière
«1¬Connecteur de sortie audio
Ce connecteur transmet les signaux audio analogiques à une carte audio.
«2¬Broches de configuration
Ces broches servent à configurer l’unité.
«3¬Port IDE
Ce port permet de connecter l’unité de DVD-ROM à un câble IDE.
«4¬Connecteur d’alimentation
Permet de connecter l’unité de DVD-ROM au cordon d’alimentation.
Installation de l’unité
Pour installer l’unité de DVD-ROM, procédez comme suit :
Etape 1. Ouverture de l’ordinateur
1. Mettez l’ordinateur hors tension et tous les périphériques qui y sont
connectés.
2. Débranchez tous les cordons d’alimentation de l’ordinateur et des
périphériques connectés.
3. Retirez le carter de l’ordinateur. Pour plus d’informations, reportez-vous à
la documentation de l’ordinateur.
Etape 2. Déballage de l’unité
1. Avant d’ouvrir la pochette antistatique contenant l’unité, mettez la pochette
en contact avec une surface métallique non peinte pendant au moins deux
secondes afin de décharger l’électricité statique présente sur l’emballage.
2. Retirez l’unité de la pochette.
1-16
IBM 16X Max RAM-Read DVD-ROM Drive: User’s Guide
Si vous devez poser l’unité, posez-la par dessus la pochette antistatique, sur
une surface plane et souple, par exemple un magazine.
Etape 3. Positionnement des cavaliers de configuration
Vous pouvez configurer l’unité comme unité maître «1¬, esclave «2¬ ou en
position sélection par câble «3¬, comme indiqué. Les emplacements
Suivez les conseils ci-après pour déterminer la configuration correcte pour
votre unité de DVD-ROM.
v Configurez l’unité DVD-ROM comme unité maître si elle doit être le seul
périphérique connecté sur le câble IDE. Il s’agit de la configuration par
défaut.
v Configurez l’unité de DVD-ROM comme unité esclave si elle doit être le
deuxième périphérique connecté sur le câble IDE. Veillez à configurer l’autre
périphérique comme maître. Dans certains cas, un disque dur peut requérir
un positionnement de cavalier ″maître avec esclave″ lorsqu’un autre
périphérique configuré comme esclave est connecté au même câble. Pour
plus d’informations sur le positionnement des cavaliers de configuration des
autres périphériques, reportez-vous à la documentation qui les accompagne.
v Certains ordinateurs non IBM utilisent des câbles ATA spéciaux avec deux
fils inversés dans les connecteurs pour que les unités puissent être
configurées par le câble plutôt que par la position du cavalier. Utilisez la
position sélection par câble uniquement pour les ordinateurs équipés de ces
câbles spéciaux. Reportez-vous à la documentation fournie avec l’ordinateur
pour déterminer si votre carte ATA nécessite de placer les cavaliers sur la
position sélection par câble.
Si vous placez les cavaliers sur la position sélection par câble, le câble IDE
attribue automatiquement la valeur maître et esclave selon la position de
l’unité sur le câble. Utilisez la valeur sélection par câble pour ce système de
câblage, que l’unité de DVD-ROM soit le seul périphérique sur le câble ou le
second. L’unité la plus proche du contrôleur IDE est automatiquement
l’unité maître. Tous les autres périphériques sur le câble IDE doivent
également être positionnés sur sélection par câble.
Guide d’installation et d’utilisation
1-17
Etape 4. Montage de l’unité dans la baie
Avertissement : Veillez à utiliser les vis de fixation de l’option lorsque vous
les vissez directement sur l’unité. L’utilisation de vis trop longues peut
endommager l’unité.
Vous pouvez monter l’unité de DVD-ROM horizontalement ou verticalement
dans l’ordinateur. Si vous la montez verticalement, vous devez fixer les disques
que vous insérez dans l’unité avant de refermer le plateau, sinon l’unité de
DVD-ROM ne pourra pas lire le disque correctement.
1. Faites glisser l’unité dans la baie. Des procédures spécifiques peuvent être
nécessaires pour installer des périphériques de stockage. Pour plus
d’informations, reportez-vous à la documentation fournie avec l’ordinateur.
2. Alignez les orifices de vissage de la baie sur les orifices taraudés du boîtier
de l’unité ou de la patte de fixation.
3. Serrez légèrement les vis pour assurer leur position. Chaque côté comporte
généralement deux vis. Vérifiez que l’alignement est correct, puis serrez les
vis, sans forcer, pour fixer l’unité.
Etape 5. Connexion des câbles à l’unité
Le schéma suivant montre où connecter les câbles à l’unité.
1-18
IBM 16X Max RAM-Read DVD-ROM Drive: User’s Guide
Voici une illustration du câble audio interne fourni avec l’option.
1. Le câble audio interne dispose d’une extrémité à double connecteur et
d’une extrémité à simple connecteur. Connectez un des connecteurs de
l’extrémité double «1¬ à la sortie audio de l’unité de DVD-ROM. Si vous
disposez d’une autre unité de CD-ROM, CD-RW ou de DVD-ROM,
connectez l’autre connecteur de l’extrémité double à la sortie audio de cette
unité. Connectez le connecteur de l’extrémité simple à la carte audio.
2. Connectez le connecteur 40 broches du câble IDE «2¬au connecteur IDE de
l’unité. Positionnez le câble afin que le côté portant le code couleur soit le
plus proche du connecteur d’alimentation «3¬. Utilisez le câble IDE fourni
avec cette option si aucun câble n’est connecté au port IDE. Le câble IDE
peut comporter jusqu’à trois connecteurs. Pour une meilleure qualité de
signal lorsque vous ne connectez qu’une seule unité au câble IDE, insérez
une extrémité du câble dans le port IDE et connectez l’autre extrémité sur
le périphérique. N’utilisez pas le connecteur central. Utilisez le câble IDE
fourni avec cette option si aucun câble n’est connecté au port IDE de
l’ordinateur ou si le câble IDE de l’ordinateur ne comporte qu’un seul
connecteur de périphérique.
Si vous connectez deux périphériques au câble IDE, connectez une
extrémité au port IDE, et les unités maître et esclave sur les autres
connecteurs. De nombreux ordinateurs disposent de deux câbles pour
connecter jusqu’à quatre unités ATA. Pour de meilleures performances,
connectez les unités rapides (disques durs) sur le câble connecté au port
IDE principal et connectez l’unité de DVD-ROM ou d’autres unités lentes
(unités de CD-ROM, unités de bande ou de support amovible) au câble
connecté au port IDE secondaire.
3. Connectez un cordon d’alimentation à quatre broches «3¬au connecteur
d’alimentation de l’unité de DVD-ROM.
Veillez à ce que les câbles ne soient pas écrasés ou tassés par le carter de
l’ordinateur et que tous les autres câbles et cordons d’alimentation soient
correctement branchés.
Etape 6. Fin de l’installation matérielle
1. Assurez-vous que l’unité de DVD-ROM est correctement montée et que les
connecteurs sont fermement insérés.
Guide d’installation et d’utilisation
1-19
2. Vérifiez que les câbles ne sont pas gênés par le carter de l’ordinateur et
qu’ils ne bloquent pas les pales du ventilateur du bloc d’alimentation ni la
circulation de l’air.
3. Remettez en place le carter de l’ordinateur.
4. Reconnectez tous les périphériques externes.
5. Branchez tous les cordons d’alimentation sur les prises murales.
Etapes suivantes
Si vous souhaitez utiliser l’unité comme DVD-ROM de données uniquement
ou comme unité de CD-ROM, l’installation est terminée et vous n’avez pas
besoin d’installer le logiciel de support. Pour plus d’informations sur
l’entretien de l’unité, reportez-vous à la section «Entretien» à la page 1-24.
Etape 7. Configuration de l’ordinateur pour la lecture de DVD
vidéo
Cette section fournit des instructions sur l’activation des paramètres DMA pour
permettre la lecture des films DVD avec votre unité de DVD-ROM.
Activation des paramètres DMA
Vérifiez le système d’exploitation de l’ordinateur. Les instructions concernant
l’activation des paramètres DMA se trouvent à l’«Annexe C. Customizing the
device-driver configuration settings» à la page C-1.
1. Cliquez sur Démarrer, puis cliquez sur Paramètres, et enfin sur Panneau
de configuration.
2. Cliquez deux fois sur Système.
Lisez le numéro de version sous Système.
v Si le numéro de version est 4.00.950B ou 4.00.95C, suivez les instructions
de la section «Changing the Auto Insert Notify and DMA parameters for
Windows 95, Windows 98, and Windows Me» à la page C-1.
v Si le numéro de version est 5.00.2195, suivez les instructions de la section
«Changing the Windows 2000 DMA parameter setting» à la page C-1.
v Si le numéro de version est 4.00.1381, suivez les instructions de la section
«Enabling DMA for Windows NT 4.0» à la page C-2.
Etape 8. Installation des logiciels de décompression MPEG
Pour installer les logiciels MPEG-2, procédez comme suit :
1. Fermez tous les programmes en cours de fonctionnement.
2. Insérez le CD des logiciels de décompression MPEG-2 dans l’unité de
DVD-ROM.
3. Si la fenêtre d’installation s’affiche automatiquement, passez à l’étape 8.
Sinon, passez à l’étape 4.
4. Cliquez sur Démarrer.
1-20
IBM 16X Max RAM-Read DVD-ROM Drive: User’s Guide
5. Cliquez sur Exécuter.
6. Tapez X:\DVDPLAYR\SETUP.EXE, où X est la lettre de l’unité de DVD.
7. Cliquez sur OK.
8. Suivez les instructions qui s’affichent à l’écran.
Visualisation d’un film DVD
Une fois l’unité de DVD-ROM installée, le mode DMA configuré et le logiciel
de visualisation DVD installé, vous pouvez regarder un film DVD.
DVD Express démarre automatiquement lorsque vous insérez un DVD. Si vous
souhaitez démarrer DVD Express manuellement, procédez comme suit :
1. Cliquez sur Démarrer, puis sur Programmes, et enfin sur Mediamatics
DVD Express.
2. Cliquez sur Mediamatics DVD Player.
La fenêtre du lecteur de films DVD s’affiche. Pour plus d’informations sur
l’utilisation du lecteur de films DVD, reportez-vous à l’aide en ligne de
DVD Express en appuyant sur F1.
Codes régionaux
Les codes régionaux permettent de protéger le contenu d’un DVD. Le monde
est divisé en six régions. Un contenu spécifique ne peut être visualisé que dans
la région où il est approprié. Par exemple, un DVD de la région 1 (Etats-Unis
et Canada) n’est lisible qu’aux Etats-Unis et au Canada. Vous pouvez vérifier le
code régional du DVD en consultant le symbole correspondant au dos de
l’emballage du DVD.
Code régional
Région
1
Etats-Unis, Canada
2
Europe, Moyen-Orient, Afrique du Sud, Japon
3
Asie du Sud-Est, Taïwan, Corée
4
Amérique latine, Australie, Nouvelle-Zélande
5
Ancienne Union soviétique, le reste de l’Afrique, Inde
6
République Populaire de Chine
Un message vous invite à saisir le choix de région initial. Si vous insérez un
DVD avec un code régional différent du code initial, DVD Express demande si
vous souhaitez modifier le paramètre de code régional. Vous pouvez modifier
le code régional par rapport à la valeur initiale jusqu’à quatre fois. Une fois
que le code régional a été modifié quatre fois après la définition initiale, il est
fixé et ne peut plus être modifié. Pour modifier le code régional, un DVD
chiffré de la nouvelle région doit être inséré dans l’unité de DVD-ROM.
Guide d’installation et d’utilisation
1-21
Pour afficher l’état du code régional, procédez comme suit :
1. Dans la fenêtre DVD Express, cliquez sur DVD Options.
2. Cliquez sur DVD Region.
Utilisation de la fonction de lecture de DVD-RAM
La présente section contient les informations concernant l’utilisation de l’unité
de DVD-ROM avec des disques DVD-RAM.
Utilisation de supports DVD-RAM à simple et à double face
Les supports DVD-RAM existent en simple face et en double face. Les versions
à 2,6 Go et 4,7 Go sont disponibles en cartouches de type I ou en cartouche de
type II. Les versions 5,2 Go et 9,4 Go sont double face, et sont disponibles en
cartouches de type I uniquement.
Retrait du disque de la cartouche
Les disques DVD-RAM de type II peuvent être retirés de leur cartouche pour
être utilisés dans des unités de DVD-ROM disposant de la fonction de lecture
de DVD-RAM. Pour avoir accès aux données des deux faces du support, vous
devez retirer le disque de l’unité, le retourner puis le réinsérer dans l’unité.
Pour une plus grande facilité d’emploi, les supports à double face sont
étiquetés face A et face B. Les DVD-RAM de type I ne peuvent pas être retirés
de leur cartouche et ne peuvent pas être lus dans cette unité.
Retrait du disque d’une cartouche de type II
A l’aide de la pointe d’un stylo à bille, cassez le taquet de blocage «1¬ en
appuyant dessus. Utilisez la pointe du stylo à bille pour abaisser le verrou du
couvercle de la cartouche «2¬ et ouvrez le couvercle «3¬ pour éjecter le disque.
Une fois le couvercle ouvert, le disque va s’éjecter. Ne touchez pas la face
d’enregistrement lorsque vous manipulez le disque à nu.
1-22
IBM 16X Max RAM-Read DVD-ROM Drive: User’s Guide
Remise en place du disque dans une cartouche de type II
Pour réinsérer le disque dans une cartouche de type II, faites correspondre le
côté étiqueté du disque «1¬ avec le côté étiqueté de la cartouche. Insérez le
disque et fermez le couvercle de la cartouche «2¬. Vous devez entendre un clic
qui vous indique que la cartouche est bien refermée.
Précautions de manipulation
Soyez prudent lorsque vous manipulez un disque retiré de sa cartouche. Les
débris, la poussière, les empreintes de doigts, les salissures et les égratignures
peuvent gêner ou empêcher l’enregistrement ou la lecture du disque. Pour
nettoyer le disque de la poussière ou d’autres débris, utilisez un kit de
nettoyage de CD. Servez-vous d’un chiffon doux et sec. N’utilisez pas de
solvant. Lorsque vous étiquetez un disque, écrivez uniquement du côté de
l’étiquette, à l’aide d’un feutre à pointe souple. Evitez l’exposition à la lumière
directe du soleil et aux températures élevées, et évitez l’humidité. N’étiquetez
aucune face du disque.
Entretien
Cette section comporte des informations sur l’entretien de l’unité de
DVD-ROM et des CD et DVD utilisés avec celle-ci.
Entretien d’un CD ou d’un DVD
Les disque numériques sont des supports de haute densité qui doivent être
manipulés avec soin et conservés propres pour s’assurer qu’ils restent lisibles.
Les précautions suivantes permettent de prolonger la vie de vos disques.
Avertissement : N’effectuez pas de mouvements circulaires lorsque vous
essuyez le CD. Vous pourriez l’endommager et perdre des données.
v Tenez le disque par la tranche ou par le centre. Ne touchez pas la surface du
disque.
v Pour retirer la poussière ou les traces de doigt, essuyez le disque en partant
du centre vers les bords à l’aide d’un chiffon doux non pelucheux.
Guide d’installation et d’utilisation
123
v N’écrivez pas sur le CD.
v Ne placez pas le disque à la lumière directe du soleil.
v N’utilisez pas de nettoyants du commerce sur le disque.
v Ne pliez pas le disque.
Entretien de l’unité de DVD-ROM
Pour protéger l’unité de DVD-ROM pendant son utilisation, observez les
précautions suivantes :
v Ne déplacez pas l’unité lorsqu’elle est en cours d’utilisation. Cela peut
provoquer des erreurs de données ou endommager l’unité.
v N’exposez pas l’unité aux conditions suivantes :
– Forte humidité
– Températures élevées
– Poussière excessive
– Vibrations mécaniques
– Choc brutal ou chute
– Lumière directe du soleil
– Brusques changements de température
v Ne placez pas l’unité sur une surface inclinée.
v N’insérez pas d’objets étrangers dans l’unité.
v Ne posez pas d’objets sur l’unité.
v Ne retirez pas le carter de l’unité et n’essayez pas de la réparer.
v Retirez tout disque du plateau et assurez-vous que celui-ci est refermé avant
de déplacer l’unité.
v Conservez l’emballage d’origine. Si vous devez expédier l’unité sur un autre
site, utilisez les emballages d’origine pour vous assurer que l’unité est
transportée en toute sécurité.
Ejection manuelle d’un disque
Si un l’unité est détériorée et refuse d’éjecter le disque, mettez l’ordinateur hors
tension et redressez un grand trombone pour en faire un outil. L’extrémité
redressée doit faire au moins 45 mm. Insérez l’extrémité dépliée dans l’encoche
d’éjection manuelle située sur la face avant de l’unité (voir ″vue avant″ à la
page 1-15). Enfoncez le trombone jusqu’à ce que le plateau s’ouvre. Tirez
doucement sur le plateau jusqu’à ce que vous puissiez retirer le disque.
1-24
IBM 16X Max RAM-Read DVD-ROM Drive: User’s Guide
Guía del usuario y de instalación
Esta sección contiene la descripción del producto, instrucciones de instalación
del hardware y del software e información de operación para la Unidad de
®
DVD-ROM RAM-READ Max 16X de IBM .
Descripción del producto
Este paquete de opción está pensado para aplicaciones multimedia. La unidad
viene con un CD que contiene el software decodificador MPEG-2 para
®
®
Microsoft Windows 98, Windows 95, Microsoft Windows 2000 Professional,
®
Microsoft Windows NT 4.0 Workstation y Microsoft Windows Millennium
Edition (Me).
Además de esta guía, el paquete de opción incluye lo siguiente:
v Una Unidad de DVD-ROM Max 16X de IBM
v Cuatro tornillos de montaje (M3 x 5 mm, con ranura)
v Un cable IDE
v Un cable “Y” de audio
v Un CD de software de decodificación MPEG-2
v Una guía sobre seguridad de láser
Póngase en contacto con el establecimiento de compra si falta algún elemento o
se observan daños. Conserve la prueba de compra; puede ser necesaria para
disfrutar de la garantía. Consulte el “Apéndice D. Help and service
information” en la página D-1 si desea obtener información sobre el soporte
técnico.
La unidad puede leer muchos formatos de DVD y CD, incluyendo los formatos
de DVD de vídeo, DVD-RAM, CD de vídeo y CD de audio. Sin embargo, para
reproducir archivos de vídeo es necesario instalar el software MPEG-2 que se
incluye. La unidad también lee discos de arquitectura ampliada (XA) de
múltiples sesiones, como Kodak Photo CD. Esta unidad transfiere datos a un
máximo de 40 veces la velocidad de una unidad de CD-ROM estándar (40X)
para soportes de CD-ROM y CD-R. Esta unidad transfiere datos a un máximo
de 16 veces la velocidad de una unidad de DVD-ROM estándar (16X) para
soportes de DVD. Esta unidad está diseñada para ser instalada en un sistema
personal que utilice arquitectura IDE (electrónica integrada de unidad) o EIDE
(IDE ampliada).
© Copyright IBM Corp. 2001
1-25
Requisitos de la instalación
Antes de instalar la unidad, asegúrese de que el sistema reúna los siguientes
requisitos:
®
®
v Microprocesador mínimo: Intel Pentium de 133 MHz o Intel Pentium II de
233 MHz si va a utilizarse el software de decodificación MPEG-2
v RAM mínima: 32 MB
v Sistema operativo Windows 98, Windows 95 OSR2, Windows 2000, Windows
NT 4.0 o Windows Me
v Una bahía de unidad disponible
v Una conexión IDE disponible
v 40 MB disponibles de espacio de disco duro
v Adaptador de audio que soporte una frecuencia de muestreo de 44,1 ó 48
kHz
v Altavoces estéreo opcionales
v Vídeo AGP 2X con soporte de superposición para el software de
decodificación MPEG-2
Antes de empezar
Antes de instalar la unidad de DVD-ROM, lea la información de esta sección
sobre las precauciones de manejo y sobre la utilización de los conectores y
controles de la unidad.
Precauciones de manejo
Tenga en cuenta las siguientes precauciones de manejo para proteger la
unidad.
v Guarde la unidad de DVD-ROM en la bolsa antiestática hasta que todo esté
preparado para instalarla. Limite los movimientos al instalar; éstos pueden
ocasionar un aumento de la electricidad estática.
v Manipule la unidad con cuidado. Si la unidad cae o sufre sacudidas, pueden
dañarse los componentes internos del alojamiento de la unidad.
v No fuerce la inserción de los cables IDE o de alimentación. Si se fuerza,
puede dañarse el conector o bien la unidad.
1-26
Unidad de DVD-ROM RAM-Read Max de 16X: Guía del usuario
Controles y conectores de la unidad
Los diagramas siguientes muestran la ubicación y las funciones de los
controles y conectores de la unidad.
Vista frontal de la unidad
«1¬Bandeja del disco
Esta bandeja es el lugar donde se carga y descarga el disco.
«2¬Indicador de ocupado
Esta luz se enciende cuando la unidad lee o escribe en un disco, o cuando lo
reproduce.
«3¬Orificio de expulsión de emergencia
Este orificio proporciona acceso al mecanismo de expulsión para extraer un
disco de la unidad.
«4¬Botón de apertura/cierre
Al pulsarlo, este botón abre y cierra la bandeja del disco.
Guía del usuario y de instalación
1-27
Vista posterior de la unidad
«1¬Conector de salida de audio
Este conector transmite las señales análogas de audio a un adaptador de audio.
«2¬Patillas de configuración
Estas patillas se utilizan para establecer la configuración de la unidad.
«3¬Puerto IDE
Conecta la unidad de DVD-ROM al cable IDE.
«4¬Conector de alimentación
Conecta la unidad de DVD-ROM con el cable de alimentación.
Instalación de la unidad
Siga estos pasos para instalar la unidad de DVD-ROM:
Paso 1. Operación de abrir el sistema
1. Apague el sistema y todos los dispositivos conectados.
2. Desenchufe todos los cables de alimentación del sistema y todos los
dispositivos conectados.
3. Desmonte la cubierta del sistema. Consulte la documentación del sistema si
necesita instrucciones sobre la extracción de la cubierta del sistema.
Paso 2. Desembalaje de la unidad
1. Antes de abrir la bolsa antiestática donde se encuentra la unidad, ponga la
bolsa en contacto con una superficie metálica no pintada durante un
mínimo de dos segundos. Esto elimina la electricidad estática del paquete y
del cuerpo del usuario.
2. Extraiga la unidad de la bolsa.
1-28
Unidad de DVD-ROM RAM-Read Max de 16X: Guía del usuario
Si necesita soltar la unidad, coloque la bolsa antiestática sobre una
superficie plana y aislante, como por ejemplo una revista, y coloque la
unidad en la bolsa antiestática.
Paso 3. Configuración de los puentes de configuración
Puede configurar la unidad como maestra «1¬, esclava «2¬ o selección por
cable «3¬, tal como se muestra.
Utilice las siguientes directrices para determinar la configuración correcta de la
unidad de DVD-ROM.
v Configure la unidad de DVD-ROM como maestra si va a ser el único
dispositivo conectado a un cable IDE. Esta es la configuración preestablecida.
v Configure la unidad de DVD-ROM como esclava si va a ser el segundo
dispositivo de un cable IDE. Asegúrese de configurar el otro dispositivo
como maestro. En algunos casos, una unidad de disco duro puede requerir
una configuración de puente “maestro con presencia de esclavo” cuando
otro dispositivo del mismo cable está configurado como esclavo. Si desea
obtener más información sobre el establecimiento de puentes de
configuración en otros dispositivos, consulte la documentación que viene con
el dispositivo del sistema.
v Algunos sistemas no IBM utilizan cables ATA especiales con dos cables
invertidos en los conectores de dispositivo de modo que se puedan
configurar las unidades según el cable y no según la posición del puente.
Utilice la posición de selección por cable sólo para sistemas que estén
equipados con estos cables especiales. Consulte la documentación que viene
con el sistema para determinar si el adaptador ATA requiere la colocación de
los puentes en la posición de selección por cable.
Si coloca los puentes en la posición de selección por cable, el cable IDE
asigna automáticamente los valores de maestro y esclavo basándose en la
posición de la unidad en el cable. Es necesario utilizar el valor de selección
por cable para este sistema de cableado tanto si la unidad de DVD-ROM es
el único dispositivo como si es el segundo dispositivo conectado al cable. La
unidad más cercana al controlador IDE es automáticamente la unidad
maestra. Cualquier otro dispositivo del cable IDE también se deberá
establecer en selección por cable.
Guía del usuario y de instalación
1-29
Paso 4. Montaje de la unidad en la bahía
Atención: Asegúrese de utilizar los tornillos de montaje incluidos en el
paquete de opción a la hora de fijar tornillos directamente en la unidad. Si
utiliza tornillos demasiado largos, puede dañar la unidad.
La unidad de DVD-ROM se puede montar horizontalmente o verticalmente en
el sistema. Si monta la unidad verticalmente, debe introducir bien los discos en
la unidad antes de que se cierre la bandeja de la unidad o la unidad de
DVD-ROM no podrá leer correctamente el disco.
1. Deslice la unidad en la bahía. Es posible que el sistema requiera unos
procedimientos específicos para la instalación de dispositivos de
almacenamiento. Para obtener más información sobre dispositivos de
almacenamiento, consulte la documentación que se suministra con el
sistema.
2. Alinee los orificios de tornillo de la bahía de unidad con los orificios de
rosca del alojamiento o de la pieza de sujeción de montaje de la unidad.
3. Enrosque los tornillos sin apretarlos para comprobar su posición.
Normalmente se utilizan dos tornillos en cada lado. Verifique que la
alineación sea correcta y, a continuación, apriete los tornillos para fijar la
unidad. No los apriete demasiado.
Paso 5. Conexión de los cables a la unidad
El diagrama siguiente muestra por dónde se conectan los cables a la unidad.
1-30
Unidad de DVD-ROM RAM-Read Max de 16X: Guía del usuario
La siguiente ilustración muestra el cable de audio interno que viene con el
paquete de opción.
1. El cable de audio interno dispone de un extremo con dos conectores (un
conector dividido) y de otro extremo con un solo conector. Conecte el
extremo que tiene dos conectores «1¬al conector de salida de audio de la
unidad de DVD-ROM. Si dispone de otra unidad de CD-ROM, CD-RW o
DVD-ROM, conecte el otro extremo de conector dividido al conector de
salida de audio de esta unidad. Conecte el extremo que tiene un solo
conector a la tarjeta de sonido.
2. Conecte un conector de cable IDE de 40 patillas «2¬al conector IDE de la
unidad. Alinee el cable de manera que el borde con código de color sea el
que quede más cerca del conector del cable de alimentación «3¬. Utilice el
cable IDE que se proporciona con esta opción si no hay ningún cable
conectado al puerto IDE. El cable IDE puede tener hasta tres conectores.
Para obtener una calidad de señal óptima al conectar sólo un dispositivo al
cable IDE, conecte un extremo del cable al puerto IDE y conecte el otro
extremo del cable al dispositivo. No utilice el conector del medio. Utilice el
cable IDE que se proporciona con esta opción si no hay ningún cable
conectado al puerto IDE del sistema o si sólo hay un conector de
dispositivo en el cable IDE del sistema.
Si está conectando dos dispositivos al cable IDE, conecte un extremo del
cable al puerto IDE y conecte los dispositivos maestro y esclavo a los
conectores restantes del otro extremo. Muchos sistemas tienen dos cables
para conectar un máximo de cuatro dispositivos ATA. Para obtener un
rendimiento óptimo, conecte los dispositivos rápidos (unidades de disco
duro) al cable que se conecta con el puerto IDE primario y conecte la
unidad de DVD-ROM u otros dispositivos menos rápidos (unidades de
CD-ROM, unidades de cinta, soportes extraíbles) al cable que se conecta
con el puerto IDE secundario.
3. Conecte un cable de alimentación de cuatro patillas «3¬al conector de
alimentación de la unidad de DVD-ROM.
Asegúrese de que la cubierta del sistema no apriete ni atrape los cables y
que todas las demás conexiones de alimentación y cables estén bien fijados.
Paso 6. Finalización de la instalación de hardware
1. Asegúrese de que la unidad de DVD-ROM esté bien montada y de que los
conectores estén conectados con firmeza.
Guía del usuario y de instalación
1-31
2. Asegúrese de que los cables no impidan la correcta colocación de la
cubierta del sistema y de que no bloqueen las alas del ventilador de la
fuente de alimentación o las vías de flujo de aire.
3. Vuelva a instalar la cubierta del sistema.
4. Vuelva a conectar todos los dispositivos externos.
5. Enchufe todos los cables de alimentación en las tomas de red.
Qué hacer a continuación
Si va a utilizar la unidad como unidad de DVD-ROM de sólo datos o como
unidad de CD-ROM, ha completado la instalación y no es necesario instalar
software de soporte. Para obtener más información sobre el mantenimiento de
la unidad, consulte “Cuidados y mantenimiento” en la página 1-36.
Paso 7. Configuración del sistema para la reproducción de
vídeo DVD
Esta sección proporciona instrucciones sobre la habilitación de los valores
DMA para poder reproducir películas DVD con la unidad de DVD-ROM.
Habilitación de los valores DMA
Compruebe cuál es el sistema operativo del sistema. Las instrucciones para
habilitar DMA se incluyen en “Apéndice C. Personalización de los valores de
configuración de los controladores de dispositivo” en la página C-1.
1. Pulse Inicio y luego pulse Configuración y Panel de control.
2. Efectúe una doble pulsación sobre Sistema.
Lea el número de versión bajo Sistema.
v Si el número de versión es 4.00.950B o 4.00.95C, siga las instrucciones
que se encuentran bajo “Cambio de los parámetros Notificación de
autoinserción y DMA para Windows 95, Windows 98 y Windows Me” en
la página C-1.
v Si el número de versión es 5.00.2195, siga las instrucciones que se
encuentran bajo “Cambio del valor de parámetro DMA de Windows
2000” en la página C-1.
v Si el número de versión es 4.00.1381, siga las instrucciones que se
encuentran bajo “Habilitación de DMA para Windows NT 4.0” en la
página C-2.
Paso 8. Instalación del Software de decodificación MPEG
Para instalar el software de decodificación MPEG-2, siga estos pasos:
1. Cierre todos los programas que se estén ejecutando.
2. Inserte el CD del software de decodificación MPEG-2 en la unidad de
DVD-ROM.
1-32
Unidad de DVD-ROM RAM-Read Max de 16X: Guía del usuario
3. Si la ventana de Instalación se abre automáticamente, vaya al Paso 8. En
caso contrario, continúe con el Paso 4.
4. Efectúe una pulsación sobre Inicio.
5. Efectúe una pulsación sobre Ejecutar.
6. Escriba X:\DVDPLAYR\SETUP.EXE, donde X ies la letra de unidad de la
unidad de DVD-ROM.
7. Efectúe una pulsación sobre Aceptar.
8. Siga las instrucciones de la pantalla para completar la instalación.
Visualización de una película DVD
Después de instalar la unidad de DVD-ROM, configurar DMA e instalar el
software de visualización de DVD, puede ver una película DVD.
DVD Express se iniciará automáticamente al insertar un DVD. Si desea iniciar
DVD Express manualmente, siga estas instrucciones:
1. Pulse Inicio y luego pulse Programas y Mediamatics DVD Express.
2. Pulse Reproductor DVD de Mediamatics (Mediamatics DVD Player).
Aparecerá la ventana de reproducción de películas DVD. Para obtener más
información sobre cómo utilizar el reproductor de películas DVD, consulte
la ayuda en línea de DVD Express pulsando F1.
Códigos de región de DVD
La codificación regional ayuda a proteger el contenido de un DVD. El mundo
se ha dividido en seis regiones. Determinado contenido sólo puede verse en la
región donde es apropiado. Por ejemplo, el contenido para la Región 1
(E.E.U.U. y Canadá) puede verse sólo en los E.E.U.U. y en Canadá. Se puede
verificar el código de región del DVD mirando el símbolo de código de región
que se encuentra en la parte posterior del paquete que contiene el DVD.
Código de región
Región
1
E.E.U.U, Canadá
2
Europa, Oriente medio, África del Sur, Japón
3
Asia Sudoriental, Corea
4
América Latina, Australia, Nueva Zelanda
5
Antigua Unión Soviética, el resto de África, India
6
República Popular de la China
Se le solicitará la selección de la región inicial. Si inserta un DVD con un
código de región distinto del código de región inicial, DVD Express le
preguntará si desea cambiar el valor del código de región. Puede cambiar el
código de región desde la configuración inicial un máximo de cuatro veces
Guía del usuario y de instalación
1-33
después de establecer el código de región inicial. Después de cambiar cuatro
veces el código de región después del valor inicial, éste queda fijo y ya no se
podrá cambiar más. Para cambiarlo, debe haber un DVD cifrado de la nueva
región en la unidad de DVD-ROM.
Para visualizar el estado del código de región, siga estas instrucciones:
1. En las ventanas de DVD Express, pulse Opciones de DVD (DVD
Options).
2. Pulse Región DVD (DVD Region).
Utilización de la función DVD-RAM Read
Esta sección contiene información acerca de la utilización de la unidad de
DVD-ROM con discos DVD-RAM.
Utilización de soportes DVD-RAM de una y dos caras
Los soportes DVD-RAM se encuentran disponibles en versiones de una y de
dos caras. Las versiones de 2,6 GB y 4,7 GB se encuentran disponibles en
cartuchos Type I o Type II. Las versiones de 5,2 GB y 9,4 GB tienen dos caras y
sólo se encuentran disponibles en cartuchos Type I.
Cómo extraer el disco del cartucho
Los discos DVD-RAM Type II pueden extraerse del cartucho para utilizarlos en
unidades de DVD-ROM con funciones DVD-RAM Read. Para acceder a los
datos de ambas caras del soporte, deberá extraer el disco de la unidad, darle la
vuelta y volver a insertarlo en la unidad. Para su comodidad, los soportes de
dos caras llevan las etiquetas Cara A y Cara B. Los discos DVD-RAM Type I no
pueden extraerse del cartucho ni pueden leerse en esta unidad.
Cómo extraer el disco del cartucho Type II
Utilizando la punta de un bolígrafo, presione y rompa la pestaña de
bloqueo«1¬. Para extraer el disco, utilice un bolígrafo para presionar en sentido
descendente la tapa de cierre del cartucho «2¬ y tire de la tapa del cartucho
«3¬ para expulsar el disco. El disco se expulsará cuando la tapa del cartucho
esté abierta. No toque la cara grabada del disco si manipula directamente el
soporte.
1-34
Unidad de DVD-ROM RAM-Read Max de 16X: Guía del usuario
Cómo guardar el disco en el cartucho Type II
Para guardar el disco en el cartucho Type II, alinee la cara del disco que tiene
la etiqueta «1¬con la cara del cartucho DVD-RAM que también tiene la
etiqueta. Inserte el disco y cierre la tapa del cartucho «2¬. Se oirá un clic
cuando la tapa se haya cerrado.
Precauciones durante el manejo
Tenga cuidado cuando manipule el disco extraído. La suciedad, las partículas
de polvo, las huellas digitales, las manchas y los arañazos pueden dañar la
grabación y afectar a la reproducción del disco. Para limpiar el polvo y la
suciedad, utilice un kit de limpieza de CD. Utilice un paño suave y seco para
limpiar el disco. No utilice disolventes para limpiar la superficie del disco.
Cuando etiquete un disco, escriba sólo sobre la cara que lleva la etiqueta
impresa utilizando un rotulador de punta suave. Manténgalo alejado de la luz
solar directa, de las temperaturas elevadas y de la humedad. No adhiera
etiquetas en ninguna cara del disco.
Cuidados y mantenimiento
Esta sección incluye información sobre cómo cuidar la unidad de DVD-ROM y
los CD y DVD que utilice con la unidad.
Cuidado de un CD o DVD
Los discos digitales son soportes de alta densidad que deben manejarse con
cuidado y mantenerse limpios para asegurar que permanezcan legibles. Las
precauciones siguientes serán de ayuda para prolongar la vida de los discos.
Atención: Si se frota un disco siguiendo movimientos circulares, se puede
dañar el disco y ocasionar alguna pérdida de datos.
v Maneje el disco sujetándolo por los bordes o el orificio central. No toque la
superficie del disco.
v Para eliminar polvo o huellas, frote el disco desde el centro hacia el borde
con un paño suave y sin pelusa.
Guía del usuario y de instalación
1-35
v No escriba sobre la superficie.
v No deje el disco bajo la luz solar directa.
v No utilice productos de limpieza para limpiar el disco.
v No doble el disco.
Cuidado de la unidad de DVD-ROM
Para proteger la unidad de DVD-ROM durante el funcionamiento, tenga en
cuenta las precauciones siguientes:
v No mueva la unidad cuando ésta esté en uso. Si lo hace puede ocasionar un
error de datos o dañar la unidad.
v Evite la exposición de la unidad a las condiciones siguientes:
– Alta humedad
– Altas temperaturas
– Polvo excesivo
– Vibración mecánica
– Sacudidas bruscas o caídas
– Colocación en una superficie inclinada
– Luz solar directa
– Cambios súbitos de temperatura
v No inserte objetos extraños en la unidad.
v No apile objetos encima de la unidad.
v No extraiga la cubierta de la unidad ni intente arreglarla.
v Extraiga el disco de la bandeja, si lo hay, y asegúrese de que la bandeja se
encuentre cerrada antes de mover la unidad.
v Guarde los materiales del empaquetado original. Si necesita enviar la unidad
a otro sitio, utilice los materiales del empaquetado original para asegurar
que la unidad se transporte con seguridad.
Expulsión manual de un disco
Si la unidad tiene algún problema y no permite la expulsión del disco, apague
el sistema y estire un clip para papeles grande para formar una herramienta. El
extremo estirado debe tener una extensión mínima de 45 mm (1,8 pulgadas).
Inserte el extremo extendido en el orificio de expulsión de emergencia que se
encuentra en la parte frontal de la unidad (consulte “Vista frontal de la
unidad” en la página 1-27). Empuje el clip hasta que se abra la bandeja. Tire de
la bandeja con cuidado hasta que pueda extraer el disco.
1-36
Unidad de DVD-ROM RAM-Read Max de 16X: Guía del usuario
Guida per l’utente e all’installazione
Questa sezione contiene le istruzioni sull’installazione del software e
sull’hardware, la descrizione del prodotto e le informazioni sul funzionamento
®
del prodotto IBM Unità DVD-RAM con lettura RAM a 16X.
Descrizione del prodotto
Questo pacchetto di opzioni è previsto per le applicazioni multimediali. L’unità
viene fornita con un CD contenente il software di decodifica MPEG-2 per
®
®
Microsoft Windows 98, Windows 95, Microsoft Windows 2000 Professional,
®
Microsoft Windows NT 4.0 Workstation e Microsoft Windows Me (Millennium
Edition).
Oltre a questa guida, il pacchetto di opzioni include quanto segue:
v Un’unità DVD-ROM a 16X IBM
v Un pacchetto di quattro viti di fissaggio (M3 x 5-mm, fissate)
v Un cavo IDE
v Un cavo “Y” audio
v Un CD del software di decodifica MPEG-2
v Una guida sulla sulla sicurezza relativa al laser
Se un componente è mancante o danneggiato, contattare il punto di vendita.
Conservare la ricevuta di acquisto per poter usufruire della garanzia. Per
informazioni sul supporto tecnico, consultare la sezione “Appendice D.
Informazioni sull’assistenza tecnica” a pagina D-1.
L’unità riesce a leggere diversi formati DVD e CD, inclusi i formati video
DVD, DVD-RAM, CD video e CD audio. Tuttavia, è necessario installare il
software di decodifica MPEG-2 incluso per riprodurre i file video. L’unità legge
sessioni multiple, i dischi con struttura estesa (XA), quali, ad esempio, i CD
fotografici Kodak. Questa unità distribuisce dati sino a 40 volte la velocità
dell’unità CD-ROM standard (40X), CD-ROM e CD-R. Questa unità distribuisce
dati sino a 16 volte la velocità dell’unità DVD-ROM standard (16X) e DVD.
Questa unità è designata per l’installazione relativa ad elaboratori che
utilizzano la struttura IDE (Integrated Drive Electronics) o EIDE (Enhanced
IDE).
Requisiti di installazione
Prima di installare l’unità verificare che l’elaboratore soddisfi i seguenti
requisiti del sistema:
®
®
v Microprocessore minimo: Intel Pentium a 133 MHz o Intel Pentium II a 233
MHz se si utilizza il software di decodifica MPEG-2
© Copyright IBM Corp. 2001
1-37
v Memoria RAM minima: 32 MB
v Sistema operativo Windows 98, Windows 95 OSR2, Windows 2000, Windows
NT 4.0 o Windows Me
v Un vano dell’unità disponibile
v Una connessione IDE disponibile
v Spazio del disco fisso disponibile 40 MB
v Adattatore audio che supporta una velocità di campionamento 44.1 o 48 kHz
v Altoparlanti stereo facoltativi
v Video AGP 2X con supporto della funzione di sovrapposizione per il
software di decodifica MPEG-2
Prima di iniziare
Prima di installare l’unità DVD-ROM, consultare le informazioni, contenute in
questa sezione, sulle precauzioni per la manutenzione e sull’utilizzo dei
connettori e dei controlli dell’unità.
Precauzioni per la manutenzione
Per proteggere l’unità utilizzare le seguenti precauzioni per la manutenzione.
v Conservare l’unità DVD-ROM in un imballo antistatico fino a quando non si
è pronti per effettuare l’installazione dell’unità. Limitare i movimenti
durante l’installazione; il movimento può generare elettricità statica.
v Maneggiare l’unità con cura. Il trasporto o la caduta dell’unità può
danneggiare i componenti interni.
v Non forzare l’inserimento dei cavi IDE o dei cavi di alimentazione.
Operando in questo modo, è possibile danneggiare il connettore o l’unità.
1-38
unità DVD-ROM con lettura RAM a 16X IBM: Guida per l’utente
Connettori e controlli dell’unità
I seguenti diagrammi illustrano l’ubicazione e le funzioni dei connettori e dei
controlli dell’unità.
Vista anteriore dell’unità
«1¬Cassetto del disco
Questo cassetto è il punto in cui viene caricato e scaricato un disco.
«2¬Indicatore di segnale occupato
Questo indicatore si accende quando l’unità viene letta o riproduce un disco.
«3¬Foro di espulsione manuale
Questo foro fornisce l’accesso al meccanismo di espulsione per rimuovere un
disco dall’unità.
«4¬Pulsante Apri/Chiudi
Questo pulsante apre e chiude il cassetto del disco quando viene esercitata una
leggera pressione su di esso.
Guida per l’utente e all’installazione
1-39
Vista inferiore dell’unità
Pin 1
«1¬Connettore per emissione audio
Questo connettore trasmette i segnali audio analogici ad un adattatore audio.
«2¬Piedini di configurazione
Questi piedini sono utilizzati per impostare la configurazione dell’unità.
«3¬Porta IDE
Questa porta collega l’unità DVD-ROM al cavo IDE.
«4¬Connettore di alimentazione
Questo connettore collega l’unità DVD-ROM al cavo di alimentazione.
Installazione dell’unità
Per installare l’unità DVD-ROM, seguire tale procedura:
Passo 1. Apertura dell’elaboratore
1. Spegnere l’elaboratore e tutte le unità collegate.
2. Scollegare tutti i cavi di alimentazione dall’elaboratore e tutte le unità
collegate.
3. Rimuovere il coperchio dall’elaboratore. Per le istruzioni sulla rimozione
del coperchio dell’elaboratore, consultare la documentazione relativa
all’elaboratore.
Passo 2. Disimballaggio dell’unità
1. Prima di aprire l’imballo antistatico in cui è contenuta l’unità, mettere in
contatto l’imballo con una superficie metallica per almeno due secondi. In
questo modo, si riduce l’elettricità statica presente nell’involucro di
protezione e nel proprio corpo.
1-40
unità DVD-ROM con lettura RAM a 16X IBM: Guida per l’utente
2. Rimuovere l’unità dall’imballo.
Se è necessario poggiare l’unità, posizionare l’imballo antistatico su una
superficie piana, come una rivista e posizionare l’unità sull’imballo
antistatico.
Passo 3. Impostazione dei cavallotti di configurazione
E’ possibile configurare l’unità come unità principale «1¬, secondaria «2¬ o
selezione del cavo «3¬, come illustrata dalla figura.
Per determinare la corretta configurazione relativa all’unità DVD-ROM
utilizzare le seguenti indicazioni.
v Configurare l’unità DVD-ROM come unità principale se essa è l’unica unità
collegata ad un cavo IDE. Questa è la configurazione preimpostata.
v Configurare l’unità DVD-ROM come unità secondaria se è la seconda unità
collegata ad un cavo IDE. Configurare l’altra unità come unità principale. In
alcuni casi, è possibile che un’unità disco fisso richieda l’impostazione di
cavallotto “principale con una seconda unità presente” quando un’altra
unità, collegata allo stesso cavo, viene configurata come secondaria. Per
ulteriori informazioni sull’impostazioni dei cavallotti di configurazione su
altre unità, consultare la documentazione fornita con l’unità dell’elaboratore.
v Alcuni elaboratori non IBM utilizzano i cavi ATA speciali con due prese
invertite nei connettori dell’unità in modo tale che le unità possono essere
configurate dal cavo piuttosto che dalla posizione del cavallotto. Utilizzare la
posizione di selezione del cavo solo per gli elaboratori che sono forniti con
questi cavi speciali. Per determinare se l’adattatore ATA richiede
l’inserimento dei cavallotti nella posizione di selezione del cavo, consultare
la documentazione fornita con l’elaboratore.
Se i cavallotti vengono inseriti nella posizione di selezione del cavo, il cavo
IDE assegna automaticamente le impostazioni principali e secondarie basate
sulla posizione dell’unità sul cavo. E’ necessario utilizzare l’impostazione di
selezione del cavo per il collegamento dei cavi del sistema se l’unità
DVD-ROM è l’unica unità o l’unità secondaria collegata al cavo. L’unità più
vicina all’unità di controllo IDE è automaticamente l’unità principale. E’
necessario impostare tutte le altre unità del cavo IDE come selezione del
cavo.
Guida per l’utente e all’installazione
1-41
Passo 4. Fissaggio dell’unità nel vano
Avvertenza: Utilizzare le viti di fissaggio, comprese nel pacchetto di opzione
quando si desidera installare le viti direttamente nell’unità. L’utilizzo delle viti
troppo lunghe potrebbe danneggiare l’unità.
E’ possibile fissare l’unità DVD-ROM orizzontalmente o verticalmente. Se si
fissa l’unità verticalmente, è necessario collegare i dischi, inseriti nell’unità,
prima di chiudere il vassoio dell’unità o l’unità DVD-ROM non riesce a leggere
il disco correttamente.
1. Far scorrere l’unità nel vano. L’elaboratore potrebbe disporre di specifiche
procedure richieste per l’installazione delle unità di memoria. Per ulteriori
informazioni sulle unità di memoria, consultare la documentazione fornita
con l’elaboratore.
2. Allineare i fori delle viti tra il vano e l’unità con i fori filettati del supporto
di fissaggio o dell’alloggiamento dell’unità.
3. Per verificare la corretta posizione, inserire le viti in maniera allentata. Di
solito, due viti vengono utilizzate su ciascun lato. Verificare che
l’allineamento sia corretto; quindi serrare le viti per fissare l’unità. Non
serrare eccessivamente.
Passo 5. Collegamento dei cavi all’unità
Il seguente diagramma illustra dove collegare i cavi all’unità.
1-42
unità DVD-ROM con lettura RAM a 16X IBM: Guida per l’utente
Di seguito viene riportata un’illustrazione del cavo audio interno fornito con il
pacchetto di opzioni.
1. Il cavo interno audio dispone di un’estremità del connettore duale ed
un’estremità del connettore singolo. Collegare una delle estremità di un
connettore duale «1¬ al connettore di emissione audio sull’unità
DVD-ROM. Se si dispone di un’altra unità CD-ROM, CD-RW o DVD-ROM,
collegare l’altra estremità del connettore duale al connettore di emissione
audio di questa unità. Collegare l’estremità del connettore singolo alla
scheda audio.
2. Collegare un connettore di cavo IDE a 40 piedini «2¬al connettore IDE
sull’unità. Allineare il cavo in modo tale che il margine colorato sia più
vicino al connettore del cavo di alimentazione «3¬. Utilizzare il cavo IDE
fornito con questa opzione se non è presente alcun cavo collegato alla porta
IDE. Il cavo IDE può dispone sino a tre connettori. Per una migliore qualità
di segnale, quando si collega solo un’unità al cavo IDE, collegare
un’estremità del cavo alla porta IDE e collegare l’altra estremità del cavo
all’unità. Non utilizzare il connettore intermedio. Utilizzare il cavo IDE
fornito con questa opzione se non è presente alcun cavo collegato alla porta
IDE oppure se è presente solo un connettore dell’unità sul cavo IDE
dell’elaboratore.
Se si collega due unità al cavo IDE, collegare un’estremità del cavo alla
porta IDE e collegare le unità principale e secondaria ai connettori restanti
all’altra estremità. Diversi elaboratori dispongono di due cavi per il
collegamento sino a quattro unità ATA. Per ottenere migliori prestazioni,
collegare l’unità veloce (unità disco fisso) al cavo collegato alla porta IDE
primaria e collegare l’unità DVD-ROM o l’altra unità inferiore (unità
CD-ROM, unità nastro, unità amovibili) al cavo collegato alla porta IDE
secondaria.
3. Collegare un cavo di alimentazione a quattro piedini «3¬ al connettore di
alimentazione dell’unità DVD-ROM.
Accertarsi che i cavi non siano schiacciati o raccolti dal coperchio
dell’elaboratore e che tutte le altre connessioni di alimentazione e tutti gli
altri cavi siano fissati correttamente.
Passo 6. Completamento dell’installazione dell’hardware
1. Accertarsi che l’unità DVD-ROM sia fissata correttamente e che i connettori
sia collegati correttamente.
Guida per l’utente e all’installazione
1-43
2. Accertarsi che i cavi non intralcino il coperchio dell’elaboratore e che non
blocchino la ventola dell’alimentatore o il canale del flusso d’aria.
3. Reinstallare il coperchio dell’elaboratore.
4. Ricollegare tutte le unità esterne.
5. Collegare tutti i cavi di alimentazione alle prese elettriche.
Operazioni necessarie
Se si utilizza l’unità come un’unità DVD-ROM di soli dati o come unità
CD-ROM, è stata completata l’installazione e non è necessario installare il
software di supporto. Per ulteriori informazioni sulla gestione dell’unità,
consultare la sezione “Manutenzione” a pagina 1-48.
Passo 7. Impostazione dell’elaboratore per la riproduzione
video DVD
Questa sezione fornisce le istruzioni sull’abilitazione delle impostazioni DMA
in modo da poter riprodurre i filmati DVD con l’unità DVD-ROM.
Abilitazione delle impostazioni DMA
Verificare il sistema operativo. Le istruzioni sull’abilitazione DMA sono
contenute nella sezione “Appendice C. Personalizzazione delle impostazioni di
configurazione del driver di periferica” a pagina C-1.
1. Fare clic su Start, quindi fare clic su Impostazioni e su Pannello di
controllo.
2. Fare doppio clic su Sistema.
Leggere il numero della versione, contenuto nella finestra Sistema.
v Se il numero della versione è 4.00.950B o 4.00.95C, seguire le istruzioni
contenute nella sezione “Modifica della notifica di inserimento
automatico e dei parametri DMA per Windows 95, Windows 98 e
Windows Me” a pagina C-1.
v Se il numero della versione è 5.00.2195, seguire le istruzioni contenute
nella sezione “Modifica delle impostazioni di parametro DMA in
Windows 2000” a pagina C-1
v Se il numero della versione è 4.00.1381, seguire le istruzioni contenute
nella sezione “Abilitazione del modo DMA per Windows NT 4.0” a
pagina C-2.
Passo 8. Installazione del software di decodifica MPEG
Per installare il software di decodifica MPEG-2, procedere nel modo seguente:
1. Chiudere tutti i programmi in esecuzione.
2. Inserire il CD del software di decodifica MPEG-2 nell’unità DVD-ROM.
3. Se viene visualizzata la finestra Installazione automaticamente, andare al
Passo 8. In caso contrario, continuare con il Passo 4.
1-44
unità DVD-ROM con lettura RAM a 16X IBM: Guida per l’utente
4. Fare clic su Start/Avvio
5. Fare clic su Esegui.
6. Immettere X:\DVDPLAYR\SETUP.EXE, dove X indica la lettera
identificativa dell’unità DVD-ROM.
7. Fare clic su OK.
8. Seguire le istruzioni visualizzate per completare l’installazione.
Visualizzazione di un filmato DVD
Una volta installata l’unità DVD-ROM, configurare DMA ed installare il
software per la visualizzazione del filmato DVD, è possibile visualizzare un
filmato DVD.
Quando viene inserito un DVD, DVD Express verrà avviato automaticamente.
Se si desidera avviare DVD Express manualmente, seguire tali istruzioni:
1. Fare clic su Start/Avvio, quindi fare clic su Programmi e su Mediamatics
DVD Express.
2. Fare clic su Mediamatics DVD Player.
Viene visualizzata la finestra relativa alla riproduzione del filmato DVD.
Per ulteriori informazioni sull’utilizzo del programma per la riproduzione
del filmato DVD, consultare la guida in linea di DVD Express, premendo il
tasto F1.
Codice regione DVD
La codifica regionale consente di proteggere il contenuto di un filmato DVD.
Le nazioni di tutto il mondo sono divise in sei regioni. E’ possibile visualizzare
solo il contenuto specifico in relazione alla regione a cui appartiene a ciascuna
nazione. Ad esempio, il contenuto della Regione 1 (che comprende Stati Uniti e
Canada) possono essere visualizzati soltanto negli Stati Uniti e Canada. E’
possibile verificare il codice della regione del filmato DVD controllando il
simbolo del codice sul retro della confezione.
Codice regione
Regione
1
Stati Uniti, Canada
2
Europa, Medio Oriente, Sud Africa, Giappone
3
Sud-est asiatico, Taiwan, Corea
4
America latina, Australia, Nuova Zelanda
5
Ex Unione Sovietica, il resto dell’Africa, India
6
Repubblica popolare cinese
Verrà richiesta la selezione della regione iniziale. Se viene inserito un filmato
DVD con un diverso codice di regione rispetto a quello iniziale, DVD Express
Guida per l’utente e all’installazione
1-45
richiede se si desidera modificare le impostazioni del codice regionale. E’
possibile modificare il codice della regione dall’impostazione iniziale sino a
quattro volte dopo l’impostazione del codice della regione iniziale. Una volta
modificato il codice della regione dalle proprie impostazioni iniziali per quattro
volte, viene regolato e non è possibile più modificarlo. Per modificare il codice
della regione, è necessario che sia presente un DVD crittografato della nuova
regione nell’unità DVD-ROM.
Per visualizzare lo stato del codice della regione, seguire tali istruzioni:
1. Nella finestra DVD Express, fare clic su Opzioni DVD.
2. Fare clic su Regione DVD.
Utilizzo della funzione di lettura DVD-RAM
Questa sezione contiene le informazioni sull’utilizzo dell’unità DVD-ROM con i
dischi DVD-RAM.
Utilizzo di supporti DVD-RAM con singolo o doppio lato
Il supporto DVD-RAM è disponibile in versione lato singolo o doppio. Le
versioni con 2,6 GB e 4,7 GB sono disponibili in cartucce Tipo I o Tipo II. Le
versioni 5,2 GB e 9,4 GB dispongono di due lati e sono disponibili solo in
cartucce Tipo I.
Rimozione del disco dalla cartuccia
I dischi DVD-RAM Tipo II possono essere rimossi dalla cartuccia per essere
utilizzati in unità DVD-ROM, con capacità di lettura DVD-RAM. Per accedere
ai dati su entrambi i lati del supporto, è necessario rimuovere il disco
dall’unità, capovolgerlo e reinserirlo nell’unità, ad esempio, lo strumento con
doppio lato viene fornito con lato A e lato B. I dischi DVD-RAM Tipo I non
possono essere rimossi dalla cartuccia e non possono essere letti da questa
unità.
Rimozione del disco dalla cartuccia Tipo II
Utilizzando la punta di una penna a sfera, spingere e bloccare il piedino «1¬.
Per rimuovere il disco, utilizzare la punta di una penna a sfera per spingere
verso il basso il coperchio di chiusura della cartuccia «2¬ e staccare il coperchio
1-46
unità DVD-ROM con lettura RAM a 16X IBM: Guida per l’utente
della cartuccia «3¬ per espellere il disco. Una volta aperto il coperchio della
cartuccia, il disco può essere rimosso. Non toccare il lato di registrazione del
disco maneggiando il supporto senza copertura. .
Riposizionamento del disco nella cartuccia Tipo II
Per riposizionare il disco nella cartuccia Tipo II, allineare il lato dell’etichetta
del disco «1¬ al lato dell’etichetta della cartuccia DVD-RAM. Inserire il disco e
chiudere il coperchio della cartuccia «2¬. L’emissione di un piccolo segnale
acustico segnala la corretta chiusura della porta del coperchio.
Precauzioni
Maneggiare con cura il disco durante la rimozione. Frammenti, polvere,
particelle, impronti, impurità potrebbero danneggiare la registrazione e la
riproduzione del disco. Per pulirlo utilizzare il kit di pulizia del CD. Utilizzare
un panno morbido e asciutto per pulire il disco. Non utilizzare solventi per
pulire la superficie del disco. Durante l’etichettatura del disco, scrivere solo sul
lato dell’etichetta stampata utilizzando una pennarello con punta morbida.
Tenere lontano dalla luce del sole diretta, dalle alte temperature e dall’umidità.
Non attaccare etichette su entrambi i lati del disco.
Manutenzione
Questa sezione include le informazioni sulla manutenzione dell’unità
DVD-ROM e i CD e DVD utilizzati con l’unità.
Manutenzione di un CD o DVD
I dischi digitali sono strumenti a densità elevata che devono essere gestiti con
cura e pulizia appropriata in modo da essere leggibili. Le seguenti precauzioni
consentono di prolungare la durata dei dischi.
Avvertenza: Muovendo il panno in senso circolare, potrebbe verificarsi la
perdita dei dati.
v Afferrare il disco per le estremità o per il foro centrale. Non toccare la
superficie del disco.
Guida per l’utente e all’installazione
1-47
v Per rimuovere la polvere o le impronte, passare un panno morbido e pulito
dall’interno verso l’esterno del disco.
v Non scrivere sulla superficie.
v Non collocare il disco alla luce diretta del sole.
v Per pulire il disco, non utilizzare prodotti per la pulizia.
v Non curvare il disco.
Manutenzione dell’unità DVD-ROM
Durante il funzionamento, per proteggere l’unità DVD-ROM osservare le
seguenti precauzioni:
v Non spostare l’unità quando è in uso. Questa operazione potrebbe provocare
un errore di dati o danneggiare l’unità.
v Evitare l’esposizione dell’unità nelle seguenti condizioni:
– Alta umidità
– Alta temperatura
– Polvere
– Vibrazione meccanica
– Urti improvvisi o cadute
– Posizione su una superficie inclinata
– Esposizione diretta al sole
– Cambiamenti di temperatura improvvisi
v Non inserire oggetti esterni nell’unità.
v Non raccogliere oggetti sull’unità.
v Non rimuovere il coperchio dell’unità o tentare di effettuare assistenza
sull’unità.
v Rimuovere qualsiasi disco dal relativo cassetto e verificare che il cassetto sia
chiuso prima di spostare l’unità.
v Conservare i materiali da imballaggio originale. Se è necessario fornire
l’unità su una diversa ubicazione, utilizzare i materiali da imballaggio
originale per verificare che l’unità venga trasportata in modo sicuro.
Espulsione manuale di un disco
Se un’unità diventa difettosa e non è possibile espellere un disco, spegnere
l’elaboratore e inserire una graffetta nel foro per l’espulsione di emergenza.
L’estremità di una graffetta deve essere di almeno 45 mm. Inserire l’estremità
estesa nel foro per l’espulsione di emergenza, posto sulla parte anteriore
dell’unità (consultare la sezione “Vista anteriore dell’unità” a pagina 1-39).
Inserire un fermaglio fino a quando il vassoio viene aperto. Estrarre il vassoio
delicatamente fino a quando è possibile rimuovere il disco.
1-48
unità DVD-ROM con lettura RAM a 16X IBM: Guida per l’utente
Guia de Instalação e do Usuário
Esta seção contém a descrição do produto, as instruções de instalação do
hardware e do software e informações operacionais da Unidade de DVD-ROM
®
de Leitura RAM 16X Max da IBM .
Descrição do Produto
Este pacote de opcionais destina-se a aplicativos de multimídia. A unidade
vem com um CD que contém o software de decodificação MPEG-2 para o
®
®
Microsoft Windows 98, Windows 95, Microsoft Windows 2000 Professional,
®
Microsoft Windows NT 4.0 Workstation e Microsoft Windows Millennium
Edition (Me).
Além deste guia, o pacote de opcionais inclui o seguinte:
v Uma Unidade de DVD-ROM 16X Max da IBM
v Um pacote com quatro parafusos de montagem (M3 x 5-mm, para slot)
v Um cabo IDE
v Um cabo de áudio “Y”
v Um CD do software de decodificação MPEG-2
v Um guia de segurança sobre laser
Entre em contato com o fornecedor se algum item estiver faltando ou
danificado. Certifique-se de guardar o comprovante de compra; ele poderá ser
solicitado para o recebimento do serviço de garantia. Consulte “Appendix D.
Help and service information” na página D-1 para obter informações sobre
suporte técnico.
A unidade pode ler muitos formatos de DVD e CD, incluindo formatos de
vídeo em DVD, DVD-RAM, CD de vídeo e CD de áudio. No entanto, é
necessário instalar o software de decodificação MPEG-2 incluído para
reproduzir os arquivos de vídeo. A unidade também lê discos de múltiplas
sessões de arquitetura estendida (XA), como o Kodak Photo CD. Esta unidade
fornece dados até 40 vezes a velocidade da unidade de CD-ROM padrão (40X),
para CD-ROM e mídia CD-R. Esta unidade fornece dados até 16 vezes a
velocidade da unidade de DVD-ROM padrão (16X) para mídia DVD. Esta
unidade é projetada para ser instalada em um computador pessoal que utiliza
arquitetura IDE (Integrated Drive Electronics) ou EIDE (Enhanced IDE).
Requisitos de Instalação
Certifique-se de que o computador atenda aos seguintes requisitos antes de
instalar a unidade:
© Copyright IBM Corp. 2001
1-49
®
®
v Microprocessador mínimo: Intel Pentium 133 MHz ou Intel Pentium II 233
MHz se você estiver utilizando o software de decodificação MPEG-2
v Mínimo de RAM: 32 MB
v Sistema operacional Windows 98, Windows 95 OSR2, Windows 2000,
Windows NT 4.0 ou Windows Me
v Um compartimento de unidade disponível
v Uma conexão IDE disponível
v 40 MB de espaço disponível em disco rígido
v Placa de áudio que suporte taxa de amostragem de 44,1 ou 48 kHz
v Alto-falantes estéreos opcionais
v Vídeo AGP 2X com suporte de sobreposição para software de decodificação
MPEG-2
Antes de Começar
Antes de instalar a unidade de DVD-ROM, leia as informações nesta seção
sobre precauções com o manuseio e sobre como utilizar os controles e os
conectores da unidade.
Tomando Precauções
Siga estas precauções com o manuseio para proteger a unidade:
v Mantenha a unidade de DVD-ROM em uma bolsa antiestática até o
momento de instalá-la. Limite seus movimentos durante a instalação;
movimentos podem causar acúmulo de eletricidade estática.
v Manuseie a unidade com cuidado. Derrubar ou sacudir a unidade pode
danificar os componentes dentro de seu invólucro.
v Não force a inserção do IDE ou dos cabos de alimentação. Isso pode
danificar o conector ou a unidade.
1-50
Unidade de DVD-ROM de Leitura RAM 16X Max da IBM: Guia do Usuário
Controles e Conectores da Unidade
Os seguintes diagramas mostram a localização e as funções dos controles e
conectores da unidade.
Vista frontal da unidade
«1¬Gaveta do disco
Essa gaveta é o local onde você carrega e descarrega um disco.
«2¬Indicador de ocupado
Este indicador acende quando a unidade lê ou reproduz um disco.
«3¬Orifício de ejeção de emergência
Esse orifício fornece acesso ao mecanismo de ejeção para remover um disco da
unidade.
«4¬Botão Abrir/Fechar
Esse botão abre e fecha a gaveta do disco quando pressionado.
Guia de Instalação e do Usuário
1-51
Vista posterior da unidade
«1¬Conector de saída de áudio
Esse conector transmite os sinais de áudio analógicos para uma placa de áudio.
«2¬Pinos de configuração
Esses pinos são utilizados para definir a configuração da unidade.
«3¬Porta IDE
Conecta a unidade de DVD-ROM ao cabo IDE.
«4¬Conector de alimentação
Conecta a unidade de DVD-ROM ao cabo de alimentação.
Instalando a Unidade
Siga estas etapas para instalar a unidade de DVD-ROM:
Etapa 1. Abrindo o Computador
1. Desligue o computador e todos os dispositivos conectados.
2. Desconecte todos os cabos de alimentação do computador e de todos os
dispositivos conectados.
3. Remova a tampa do computador. Consulte a documentação do computador
para obter instruções sobre a remoção da tampa do computador.
Etapa 2. Desempacotando a Unidade
1. Antes de abrir a bolsa antiestática na qual está a unidade, toque a bolsa em
uma superfície de metal não pintada por pelo menos dois segundos. Isso
faz com que a eletricidade estática da embalagem e de seu corpo seja
drenada.
2. Remova a unidade da bolsa.
1-52
Unidade de DVD-ROM de Leitura RAM 16X Max da IBM: Guia do Usuário
Se você precisar retirar a unidade da bolsa, coloque a bolsa antiestática
sobre uma superfície plana, revestida, como uma revista, e coloque a
unidade sobre a bolsa antiestática.
Etapa 3. Definindo os Jumpers de Configuração
Você pode configurar sua unidade como mestre «1¬, escrava «2¬ ou para
seleção de cabo «3¬, conforme mostrado.
Utilize as seguintes diretrizes para determinar a configuração correta da
unidade de DVD-ROM.
v Configure a unidade de DVD-ROM como mestre, se ela for o único
dispositivo conectado a um cabo IDE. Essa é a configuração predefinida.
v Configure a unidade de DVD-ROM como escrava, se ela for o segundo
dispositivo em um cabo IDE. Certifique-se de configurar o outro dispositivo
como um mestre. Em alguns casos, uma unidade de disco rígido pode
requerer uma definição de jumper “mestre com a presença de um escravo”
quando outro dispositivo no mesmo cabo está configurado como um
escravo. Para obter mais informações sobre a definição de jumpers de
configuração em outros dispositivos, consulte a documentação fornecida com
o dispositivo do computador.
v Alguns computadores não-IBM utilizam cabos ATA com dois fios invertidos
nos conectores do dispositivo para que as unidades possam ser configuradas
pelo cabo em vez de pela posição do jumper. Utilize a posição de seleção de
cabo somente para computadores equipados com esses cabos especiais.
Consulte a documentação fornecida com o computador para determinar se a
placa ATA requer que você coloque os jumpers na posição de seleção de
cabo.
Se você colocar os jumpers na posição de seleção de cabo, o cabo IDE
atribuirá automaticamente as definições mestre e escrava com base na
posição da unidade no cabo. Utilize a definição seleção de cabo para esse
sistema de cabeamento se a unidade de DVD-ROM for o único dispositivo
ou o segundo dispositivo conectado ao cabo. A unidade mais próxima ao
controlador IDE será automaticamente a unidade mestre. Todos os outros
dispositivos no cabo IDE também devem ser definidos para a posição de
seleção de cabo.
Guia de Instalação e do Usuário
1-53
Etapa 4. Montando a Unidade no Compartimento
Atenção: Certifique-se de utilizar os parafusos de montagem do pacote de
opcional quando estiver colocando os parafusos diretamente na unidade. O uso
de parafusos muito grandes poderá danificar a unidade.
Você pode montar a unidade de DVD-ROM horizontalmente ou verticalmente
no computador. Se montar verticalmente, deverá prender todos os discos
colocados na unidade antes de a bandeja ser fechada ou a unidade de
DVD-ROM não conseguirá ler o disco adequadamente.
1. Deslize a unidade para dentro do compartimento. O computador pode ter
procedimentos necessários específicos para a instalação de dispositivos de
armazenamento. Para obter mais informações sobre dispositivos de
armazenamento, consulte a documentação fornecida com o computador.
2. Alinhe os orifícios dos parafusos do compartimento de unidade com os
orifícios rosqueados no invólucro da unidade ou no suporte de montagem.
3. Coloque os parafusos, deixando-os soltos para verificar suas posições.
Normalmente, são utilizados dois parafusos em cada lado. Verifique se o
alinhamento está correto; em seguida, aperte os parafusos para prender a
unidade. Não os aperte excessivamente.
Etapa 5. Conectando os Cabos à Unidade
O seguinte diagrama mostra o local onde se deve conectar os cabos à unidade.
1-54
Unidade de DVD-ROM de Leitura RAM 16X Max da IBM: Guia do Usuário
A seguir há uma ilustração do cabo de áudio interno fornecido com o pacote
de opcionais.
1. O cabo de áudio interno possui uma extremidade de conector dividido e
uma extremidade de conector simples. Conecte uma das extremidades do
conector dividido «1¬ao conector de saída de áudio na unidade de
DVD-ROM. Se você possuir outra unidade de CD-ROM, CD-RW ou
DVD-ROM, conecte a outra extremidade do conector dividido ao conector
de saída de áudio nesta unidade. Conecte a extremidade do conector
simples à placa de som.
2. Conecte o conector do cabo IDE de 40 pinos «2¬ ao conector IDE da
unidade. Alinhe o cabo para que a borda codificada por cores fique o mais
próxima ao conector do cabo de alimentação «3¬. Utilize o cabo IDE
fornecido com esse opcional, se não houver nenhum cabo conectado à porta
IDE. O cabo IDE pode ter até três conectores. Para obter um sinal da
melhor qualidade quando estiver conectando um único dispositivo ao cabo
IDE, conecte uma extremidade do cabo à porta IDE e a outra extremidade
ao dispositivo. Não utilize o conector do meio. Utilize o cabo IDE fornecido
com esse opcional, se não houver nenhum cabo conectado à porta IDE do
computador ou se houver somente um conector de dispositivo no cabo IDE
do computador.
Se estiver conectando dois dispositivos ao cabo IDE, conecte uma
extremidade do cabo à porta IDE e conecte os dispositivos mestre e escravo
aos conectores restantes na outra extremidade. Muitos computadores têm
dois cabos para conexão de até quatro dispositivos ATA. Para obter o
melhor desempenho, conecte dispositivos rápidos (unidades de disco
rígido) ao cabo conectado à porta IDE primária e conecte a unidade de
DVD-ROM ou outros dispositivos mais lentos (unidades de CD-ROM,
unidades de fita, mídia removível) ao cabo conectado à porta IDE
secundária.
3. Conecte um cabo de alimentação de quatro pinos «3¬ao conector de
alimentação na unidade de DVD-ROM.
Certifique-se de que os cabos não ficarão presos ou amontoados pela tampa
do computador e que todos os outros cabos e conexões de alimentação
estejam protegidos.
Guia de Instalação e do Usuário
1-55
Etapa 6. Concluindo a Instalação do Hardware
1. Certifique-se de que a unidade de DVD-ROM esteja montada com
segurança e que os conectores estejam firmemente conectados.
2. Certifique-se de que os cabos não interfiram na tampa do computador e
que eles não bloqueiem as lâminas do ventilador da fonte de alimentação
ou as passagens do fluxo de ar.
3. Reinstale a tampa do computador.
4. Reconecte todos os dispositivos externos.
5. Conecte todos os cabos de alimentação às tomadas de parede.
O Que Fazer em Seguida
Se você utilizar a unidade como uma unidade de DVD-ROM somente para
dados, ou como uma unidade de CD-ROM, a instalação estará concluída e não
haverá necessidade de instalar software de suporte. Para obter mais
informações sobre a manutenção da unidade, consulte a seção “Cuidados e
Manutenção” na página 1-60.
Etapa 7. Configurando o Computador para Reprodução de
Vídeo em DVD
Esta seção fornece instruções sobre a ativação de definições DMA para que
você possa reproduzir filmes de DVD com a unidade de DVD-ROM.
Ativando as Definições DMA
Verifique o sistema operacional do computador. As instruções para ativar DMA
estão incluídas em “Appendix C. Customizing the device-driver configuration
settings” na página C-1.
1. Clique em Iniciar, Configurações e, em seguida, em Painel de Controle.
2. Dê um clique duplo em Sistema.
Leia o número da versão em Sistema.
v Se o número da versão for 4.00.950B ou 4.00.95C, siga as instruções em
“Changing the Auto Insert Notify and DMA parameters for Windows 95,
Windows 98, and Windows Me” na página C-1.
v Se o número de versão for 5.00.2195, siga as instruções na seção
“Changing the Windows 2000 DMA parameter setting” na página C-1.
v Se o número da versão for 4.00.1381, siga as instruções em “Enabling
DMA for Windows NT 4.0” na página C-2.
Etapa 8. Instalando o Software de Decodificação MPEG
Para instalar o software de Decodificação MPEG-2, proceda da seguinte
maneira:
1. Feche todos os programas que estiverem sendo executados.
1-56
Unidade de DVD-ROM de Leitura RAM 16X Max da IBM: Guia do Usuário
2. Insira o CD do software de decodificação MPEG-2 na unidade de
DVD-ROM.
3. Se a janela Instalação for aberta automaticamente, vá para a Etapa 8. Caso
contrário, continue com a Etapa 4.
4. Clique em Iniciar.
5. Clique em Executar.
6. Digite X:\DVDPLAYR\SETUP.EXE, onde X é a letra da unidade da
unidade de DVD-ROM.
7. Clique em OK.
8. Siga as instruções na tela para concluir a instalação.
Exibindo um Filme de DVD
Depois de instalar a unidade de DVD-ROM, configurar o DMA e instalar o
software de exibição de DVD, você poderá exibir um filme de DVD.
O DVD Express iniciará automaticamente quando você inserir um DVD. Se
quiser iniciar o DVD Express manualmente, siga estas instruções:
1. Clique em Iniciar, Programas e, em seguida, em Mediamatics DVD
Express.
2. Clique em Mediamatics DVD Player.
A janela de reprodução do filme de DVD será exibida. Para obter mais
informações sobre a reprodução de filme de DVD, consulte o auxílio online
do DVD Express pressionando F1.
Códigos de Região do DVD
A codificação regional ajuda a proteger o conteúdo de um DVD. O mundo está
dividido em seis regiões. O conteúdo específico pode ser exibido somente na
região adequada. Por exemplo, o conteúdo da Região 1 (EUA e Canadá) pode
ser exibido somente nos EUA e no Canadá. Você pode verificar o código de
região do DVD através do símbolo de código de região na parte posterior da
embalagem do conteúdo.
Código de região
Região
1
EUA e Canadá
2
Europa, Oriente Médio, África do Sul e Japão
3
Sudeste da Ásia, Taiwan, Coréia
4
América Latina, Austrália, Nova Zelândia
5
Antiga União Soviética, o restante da África e Índia
6
República Popular da China
Guia de Instalação e do Usuário
1-57
Será solicitado que você selecione a região inicial. Se você inserir um DVD com
um código de região diferente do código de região inicial, o DVD Express
perguntará se deseja alterar a definição do código de região. Você pode alterar
o código de região a partir da definição inicial até quatro vezes depois de
definir o código de região inicial. Após o código ser alterado de sua definição
inicial por quatro vezes, ele ficará fixo e não poderá mais ser alterado. Para
alterá-lo, um DVD criptografado da nova região deverá ser inserido na
unidade de DVD-ROM.
Para exibir o status do código de região, siga estas instruções:
1. Nas janelas do DVD Express, clique em Opções de DVD.
2. Clique em Região do DVD.
Utilizando a Função Leitura de DVD-RAM
Esta seção contém informações sobre como utilizar a unidade de DVD-ROM
com discos DVD-RAM.
Utilizando Mídia de DVD-RAM de Face Simples e Dupla Face
A mídia de DVD-RAM está disponível nas versões de face simples e dupla
face. As versões com 2.6 GB e 4.7 GB estão disponíveis nos cartuchos Tipo I ou
Tipo II. As versões 5.2 GB e 9.4 GB são de dupla face e estão disponíveis
apenas nos cartuchos Tipo I.
Removendo o Disco do Cartucho
Os discos DVD-RAM Tipo II podem ser removidos do cartucho para serem
utilizados em unidades de DVD-ROM, com capacidades de Leitura em
DVD-RAM. Para acessar os dados em ambos os lados da mídia, você deve
remover o disco da unidade, virá-lo e inseri-lo novamente na unidade. Para
maior conveniência, a mídia de dupla face possui as etiquetas lado A e lado B.
Os discos de DVD-RAM Tipo I não podem ser removidos do cartucho e não
podem ser lidos por esta unidade.
Removendo o disco do cartucho Tipo II
Utilizando a ponta de uma caneta esferográfica, empurre e force a presilha do
pino da trava«1¬. Para remover o disco, utilize uma caneta esferográfica para
1-58
Unidade de DVD-ROM de Leitura RAM 16X Max da IBM: Guia do Usuário
empurrar a trava da tampa do cartucho «2¬ e puxe a tampa do cartucho «3¬
para fora para ejetar o disco. Com a tampa do cartucho aberta, o disco será
ejetado. Não toque no lado de gravação do disco quando manusear a mídia
exposta.
Retornando o disco ao cartucho Tipo II
Para retornar o disco ao cartucho Tipo II, alinhe o lado da etiqueta do disco
«1¬com o lado da etiqueta do cartucho de DVD-RAM. Insira o disco e feche a
tampa do cartucho «2¬. Um som de clique irá garantir que a porta esteja
fechada.
Precauções de Manuseio
Tenha cuidado ao manusear o disco removido. Partículas de poeira, sujeira,
marcas de dedo, manchas ou riscos podem afetar e danificar a gravação e
reprodução do disco. Para tirar o pó do disco ou outros tipos de sujeira, use
um Kit de Limpeza de CD. Utilize um pano macio e seco para limpar o disco.
Não utilize solventes para limpar a superfície do disco. Ao identificar um
disco, escreva apenas no lado etiquetado, utilizando um marcador de texto
com ponta macia. Não exponha o disco à luz direta do sol, temperaturas altas
e umidades. Não cole etiquetas em nenhum dos lados do disco.
Cuidados e Manutenção
Esta seção inclui informações sobre cuidados com a unidade de DVD-ROM e
com os CDs e DVDs utilizados na unidade.
Cuidados com um CD ou DVD
Os discos digitais são mídias de alta densidade que devem ser manuseadas
com cuidado e mantidas limpas para garantir que permaneçam legíveis. As
seguintes precauções ajudam a prolongar a vida útil dos discos.
Atenção: Limpar um disco com movimentos circulares pode danificar o disco
e provocar perda de dados.
Guia de Instalação e do Usuário
1-59
v Segure o disco pelas bordas ou pelo orifício central. Não toque na superfície
do disco.
v Para remover poeira ou digitais, limpe o disco do centro para a borda com
um pano macio e sem fiapos.
v Não escreva na superfície.
v Não exponha o disco à luz direta do sol.
v Não utilize produtos de limpeza comerciais para limpar o disco.
v Não dobre o disco.
Cuidados com a Unidade de DVD-ROM
Para proteger a unidade de DVD-ROM durante a operação, observe as
seguintes precauções:
v Não mova a unidade durante seu uso. Isso pode causar erro de dados ou
danificar a unidade.
v Evite expor a unidade às seguintes condições:
– Umidade elevada
– Temperatura elevada
– Poeira excessiva
– Vibração mecânica
– Choque repentino ou queda
– Colocação sobre uma superfície inclinada
– Luz direta do sol
– Mudanças bruscas de temperatura
v Não insira objetos estranhos na unidade.
v Não empilhe objetos sobre a unidade.
v Não remova a tampa da unidade ou tente fazer reparos nela.
v Remova todos os discos da gaveta de discos e certifique-se de que a gaveta
esteja fechada antes de mover a unidade.
v Mantenha os materiais de embalagem originais. Se precisar transportar a
unidade para um local diferente, utilize os materiais de embalagem originais
para garantir que a unidade seja transportada com segurança.
Ejetando um Disco Manualmente
Se uma unidade apresentar defeitos e não permitir a ejeção do disco, desligue
o computador e endireite um clipe de papel para formar uma ferramenta. A
extremidade do clipe aberto deve estender-se a pelo menos 45 mm (1,8 pol.).
Insira a extremidade estendida no orifício de ejeção de emergência na parte
frontal da unidade (consulte “Vista Frontal da Unidade” na página 1-51).
Empurre o clipe de papel até que a bandeja seja aberta. Cuidadosamente, puxe
a bandeja para fora até que possa remover o disco.
1-60
Unidade de DVD-ROM de Leitura RAM 16X Max da IBM: Guia do Usuário
wΓU
®
]t IBM 16X Max RAM-READ DVD ≈úíBwΘPnΘw
ⁿAH@ΩTC
úí
∩MnΘA≤hCΘ{íC≈H@AΣñti≤
®
®
Microsoft Windows 98BWindows 95BMicrosoft Windows 2000
®
ProfessionalBMicrosoft Windows NT 4.0 WorkstationAHMicrosoft Windows
Millennium Edition (Me) MPEG-2 XnΘC
úΓUA∩MnΘ]tUCG
v @í IBM 16X Max DVD ≈
v wM≤]M3 x 5 τAtí
v @° IDE u
v @°T Y u
v @ MPEG-2 XnΘ
v @≈pgwΓU
½Y≥laAMgPsCOdRAHKoOA
CpNΣΩTA\D-1y²D. Help and service informationzC
z≈i¬h DVD M CD µíA]A DVD vB DVD-RAMBv
M CD µíCúLAzwt MPEG-2 XnΘα±v
C≈]α¬h½Ñq@B[c (XA) Ap Kodak Photo
CDC≈ CD-ROM M CD-R Ωt
¬iF CD-ROM ≈t 40 (40X)C≈ DVD CΘΩt
¬iF DVD
≈t 16 (16X)Coí≈Yw∩b Integrated Drive Electronics
(IDE) [j¼ IDE (EIDE) [cºHqúñw]pC
wD
w≈ºeA²TwzqúXUCtDG
®
®
v pLBzGIntel Pentium 133MHz Intel Pentium II 233MHz]YzN
MPEG-2 XnΘ
v p RAMG32 MB
v Windows 98BWindows 95 OSR2BWindows 2000BWindows NT 4.0 Windows
Me @t
v i≈≈
v i IDE su
v 40 MB iwí
© Copyright IBM Corp. 2001
1-61
v Σ 44.1 48 kHz vtd
v i∩ΘΓz
v π½Σ AGP 2X °T]≤ MPEG-2 X
u@
bw DVD ≈ºeA²\¬ñ÷@N≈ε
MYΩTC
@wI
UC@wIO@≈C
v N DVD ≈OsbRqUñAnwXCwún⌠NA
e÷úRqC
v phB≈C
¿n≈iαla≈ñ≤C
v únjóíJ IDE quCoiαY≈C
1-62
IBM 16X Max RAM-Read DVD ≈: ΓU
≈εPY
Uπ≈εYmM\αC
≈
1½L
o½L±JXC
2úLⁿO
oⁿOb≈¬±GC
3≥µhX
oú
hX≈εAX≈ñC
4}/÷¼÷s
ϕz÷úo÷sAª}÷¼½LC
wΓU
1-63
≈I
Pin 1
1TΘXY
oYiN±TTΘtdC
2tm}
o}]w≈tmC
3IDE s≡
os≡iN DVD ≈s IDE uC
4qY
oYiN DVD ≈squC
w≈
ϕUCBJAw DVD ≈G
BJ 1. }qú
1. ÷¼qúΣmqC
2. qúΣmquC
3. UqúC÷UqúíA\qúíσ≤C
BJ 2. }≈]
1. b}]≈RqUºeA²NUlMWú≈ϕ
GϕCoi±XM≤¡ΘRqC
2. qUñX≈C
pGz±U≈A²NRqU±mb¡ZQ¡]p°xϕ
AMßAN≈±mbRqUWC
1-64
IBM 16X Max RAM-Read DVD ≈: ΓU
Step 3. ]wtm⌡
ziN≈[cDn 1 2 u∩ 3ApC
UChPw DVD ≈TtmC
v pG DVD ≈NO@ IDE umANª[cDnmC
oOw]tmC
v pG DVD ≈NO IDE uWGmANª[cmC
NΣªm[cDnmCbYípUAϕP@°uWt@
m[cmAwiαnDuDn/sv]wC÷bΣ
ªmW]wtm⌡÷ΩTA\qúmHíσ≤C
v YD IBM qúSϕ ATA uAΣñΓ°≈ubmY αA
]i!u]D⌡mtm≈Cu∩toSϕuq
úu∩mC\qúHíσ≤Pz ATA tdO
nbu∩m±m⌡C
pGzN⌡m≤u∩mWA IDE u
uW≈mA
ⁿwDn]wCL DVD ≈O@GumAzú
∩uwtu∩]wC
a± IDE ε≈Y¿
Dn≈C IDE uWΣª⌠≤m]ú]¿u∩C
wΓU
1-65
BJ 4. N≈J≈
i: NCb≈WA∩MnΘñⁿC
!°iα≈ⁿlC
ziHN DVD ≈H⌠¡Φíw≤zqúñCpGzHΦ
íw≈Ab÷¼≈½LºeA²TwnAhP DVD ≈LkT¬ΩC
1. N≈J≈ñCzqúbwxsmiαnSϕ{F
\qúHíσ≤oxsm÷ΩTC
2. N≈≈∩≈w[WC
3. CWdmCqACΓTwCT{w
∩⌠ßAAW≥Tw≈C%NCo!≥C
BJ 5. su≈
Uπus≈mC
1-66
IBM 16X Max RAM-Read DVD ≈: ΓU
UC∩MnΘHíTuC
1. íTu≈YMµYCNΣñ@≈Y 1 DVD
≈WTΘXYCpGzt@í CD-ROMBCD-RW DVD ≈ANt@≈Y≈WTΘXYCNµYW
dC
2. N 40 } IDE uY 2 s≈W IDE YC ∩uA
úPCΓΣt
±quY 3CpGqúñ IDE s≡SuA
H≤MnΘñ IDE uCIDE u
hiTYCD
TΦAϕzus@m IDE uANu@W IDE
s≡ANut@mC%ñíYCpGqúñ
IDE s≡SuAOqú IDE uWu@mYAh
H≤MnΘñ IDE uC
pGznNΓm IDE uANΣñ@°uW IDE s≡A
NDnmWbt@lYChqúúΓ°uA
hi
s ATA mCF
αANm]w≈sWD
n IDE s≡uAN DVD ≈ΣªCm]CD-ROM ≈Ba≈BiΓ½CΘsW IDE s≡uC
3. N 4 }qu 3 s DVD ≈WqYC
TwuúQqú
δABΣªuMqsú≥K
¡TC
BJ 6. ¿wΘw@
1. T{ DVD ≈wgABYíw¡TsC
2. Twuú½¬
qúA]úϕq
¡÷
q⌠C
3. ½s
qúC
4. ½ssímC
5. NquíqíyWC
U@B
pG≈On@Ω DVD ≈ CD-ROM ≈Ahzw¿
w@AúwΣnΘCp÷≈@ΩTA\1-71
y@P@zC
BJ 7. w∩ DVD v±]wqú
ú
÷ DMA ]wíA²zi DVD ≈± DVD vC
wΓU
1-67
DMA ]w
dqú@tC÷ DMA íA\C-1y²C.
Customizing the device-driver configuration settingszC
1. ÷@U}lAMß÷@U]wAA÷@UεxC
2. s÷ΓUtC
dutvUXC
v pGXO 4.00.950B 4.00.95CAϕC-1yChanging the Auto
Insert Notify and DMA parameters for Windows 95, Windows 98, and Windows
MezñⁿC
v pGXO 5.00.2195AϕC-1yChanging the Windows 2000
DMA parameter settingzñⁿC
v pGXO 4.00.1381AϕC-2yEnabling DMA for Windows
NT 4.0zñⁿC
BJ 8. w MPEG XnΘ
Ynw MPEG-2 XnΘA⌡µUCBJG
1. ÷¼b⌡µñ⌠≤{íC
2. N MPEG-2 XnΘíJ DVD ≈C
3. Y}uwv°íA⌡BJ 8ChA≥iµBJ 4C
4. ÷@Uu}lvC
5. ÷@Uu⌡µvC
6. ΘJ X:\DVDPLAYR\SETUP.EXEAΣñ X O DVD ≈≈NC
7. ÷@UuTwvC
8. ϕ⌡Wⁿ¿wC
[ DVD v
bw DVD ≈B[c DMAAw DVD ±nΘºßAYi[ DVD
vC
ϕzíJ DVD ADVD Express NCpGznΓ DVD
ExpressAϕUCⁿG
1. ÷@U}lB÷@U{íAMß÷@U Mediamatics DVD ExpressC
2. ÷@U Mediamatics DVD ±{íC
YX{ DVD v±{í°íC÷p≤ DVD v±{í÷Ω
TA÷ F1 ΣA\ DVD Express uWíC
DVD X
Xi≤UO@ DVD eCyp¿'CSweuαbΣA
[CpAubⁿΩ[jα[@]ⁿΩM[jvC
zidv]IXτ DVD XC
1-68
IBM 16X Max RAM-Read DVD ≈: ΓU
X
1
ⁿΩB[j
2
wBñFBnDBΘ
3
nBxWBΩ
4
BⁿwBDwBΦ⌡
5
e¼pADwΣlBL
6
ñH%@MΩ
zNQúΘJl∩CpGzíJΣXPlXúP DVD A DVD Express NzOn≤X]wCb]wlXºßA
z
hiql]w≤XCbΣl]w≤XºßA
XYTwAA]úα≤CYn≤XADVD ≈ñs[K
DVDC
YnπX¼AAϕUCⁿG
1. buDVD Expressv°íñA÷@U DVD ∩C
2. ÷@U DVD C
DVD-RAM ¬\α
ñtp≤ DVD ≈P DVD-RAM ÷ΩTC
µ DVD-RAM CΘ
DVD-RAM CΘµΓCType I Type II dXñú
2.6 GB M
4.7 GB C5.2 GB 9.4 GB Aub Type I dXñú
C
qdXñX
bπ DVD-RAM ¬\αUAiqdXñX DVD-RAM Type II AH
≤ DVD ≈CYnsCΘΓΩAzq≈ñXBNª
AMß½síJ≈F≥≤ΦK qACΘú A M B C
DVD-RAM Type I LkqdXñXABLk!≈¬C
q Type II dXñX
wΓU
1-69
lººyAúΘΩwwdΩ 1CYnXAlº
VUdX\Ω 2AMßXdX\ 3 hXCϕdX\}AN
hXCbBzSCΘAúnI²sC
N± Type II dX
YnN±
Type II dXAN 1 P DVD-RAM dX
∩⌠C íJAMß÷WdX≈\ 2FÑniTw≈\w÷WC
@wI
pBzXC
hB#BⁿB$ϕ¬vTlaN²
M±CYnMz#Σª
hAMzπCXn«¼Mz
Cún»MzCbAní≥YºbLΩ
WgC≈ΘgB¬¬πCúnN
K⌠@ΣC
@P@
]t÷@ DVD ≈Hb≈ñM DVD ΩTC
@ DVD
O@¬KCΘApHO«bAHTOiH≥¬Σ
ñΩCHUO°RwIC
i:
⌠@°laPΩyóC
v uΣtHñípCúnIϕC
v bMú#ⁿAHLn¼qñít°C
v úiHbϕWgrC
v únN±mbºUC
v úncΓMΣ»MzC
v úns&C
DVD ≈Oi
NUCwIAHKb@O@z DVD ≈G
1-70
IBM 16X Max RAM-Read DVD ≈: ΓU
v ≈bñA%[HCo≥iαPΩ
la
≈C
v K≈S≤UC¼pG
– ¬π
– ¬
– Lh#
– ≈±
– rPn
¿
– m≤ϕ
– Θg
– @P∩
v únb≈ñíJº½C
v únb≈W∩±½ΘC
v ún°U≈A]únµ≈C
v q½LñXATwb≈µºeA½Lw÷
WC
v Od]≈CpGzN≈µúPmA
]≈HTOαwBe≈C
ΓhX
pG≈óLkhXA÷¼qúqAMßj¼Owϕu
πC@°n 45 τ]1.8 TCNíJ≈e≥
µhX]\ 1-63 u≈vCJOwA½L}
εCaX½LAiXεC
wΓUt
1-71
1-72
IBM 16X Max RAM-Read DVD ≈: ΓU
$s9H<k*hSf<6<:&,$I
®
33GO"IBM b"? 16 \. RAM j<I DVD-ROM Ii$VN=Jb
@"O<I&'"H=UH&'"N$s9H<k}!"*hS`nN?aNps
rb@7^9#
=Jb@
3N*W7gs&QC1<8O"^kAaG#"&"Wj1<7gsQG9#3
®
®
NIi$VKO"Microsoft Windows 98"Windows 95"Microsoft Windows
®
2000 Professional"Microsoft Windows NT 4.0 Workstation"*hS Microsoft
Windows Millennium Edition (Me) Q MPEG-2 G3<I&=UH&'"r^`
CD ,U07F$^9#
\qN[+K"*W7gs&QC1<8KO!NJ\,^^l^9#
v 1 fN IBM b"? 16 \. DVD-ROM Ii$V
v hjU1M8 4 \ (M3 x 5 mm"9mCHU-) r 1 q_K7?bN
v IDE 1<Vk 1 \
v *<G#* “Y” 1<Vk 1 \
v MPEG-2 G3<I&=UH&'" CD 1 g
v Laser Safety Guide 1 t
J\,T-";}7F$klgKO"X~hK4"m/@5$#N}q^?O/
l8CHN5(O,:]I7F*$F/@5$#]Z5<S9ru1kNK,W
Jlg,"j^9#F/K+k&5]<HpsKD$FO" D-1 Z<8N
XAppendix D, Help and service informationYr2H7F/@5$#
3NIi$VO"DVD SG*"DVD-RAM (4.7 GB/2.6 GB Single Sided Type
II aG#"N_)"SG* CD"*<G#* CD A0JI"?/N DVD *hS
CD A0rI_hk3H,G-^9#?@7"SG*&U!$krF89kK
O"U0N MPEG-2 G3<I&=UH&'"r$s9H<k9k,W,"j^
9#3NIi$VO"Kodak Photo CD JI"^kA;C7gsNH%"<-F
/Ac< (XA) G#9/bI_hj^9#\Ii$VO"CD-ROM aG#"*
hS CD-R aG#"Nlg"8` CD-ROM Ii$VNGb 40 \N.Y
(40X) GG<?rI_hj^9#\Ii$VO"DVD aG#"Nlg"8`
DVD-ROM Ii$VNGb 16 \N.Y (16X) GG<?rI_hj^9#\I
i$VO"IDE ^?OH% IDE (EIDE) "<-F/Ac<rHQ9kQ<=J
k&3sTe<?<K$s9H<k9kh&_W5lF$^9#
$s9H<kWo
Ii$VrhjU1k0K",:"*H$N3sTe<?<,!N79F`Wo
r~?7F$k3HrN'7F/@5$#
© Copyright IBM Corp. 2001
1-73
®
®
v ^$/mWm;C5<: Intel Pentium 133MHz Je"^?O MPEG-2 G3
<I&=UH&'"rHQ9klgO Intel Pentium II 233MHz Je
v RAM: 32 MB JeG"k3H
v Windows 98"Windows 95 OSR2"Windows 2000"Windows NT 4.0" "k$
O Windows Me *Zl<F#s0&79F`
v HQD=JIi$V&Y$,"k3H
v HQD=J IDE \3]<H,"k3H
v HQD=JO<IG#9/&9Z<9, 40 MB "k3H
v 44.1 ^?O 48 kHz 5sWjs0&l<Hr5]<H9k*<G#*&"@
W?<,"k3H
v *W7gsN9Fl*&9T<+<,"k3H
v MPEG-2 G3<I&=UH&'"QN*<P<l$N5]<Hrw(? AGP
2X SG*,"k3H
nHrOak0K
DVD-ROM Ii$VrhjU1k0K"3NaK-\5lF$kh7eNmU
v`H"Ii$VN)f!=*hS3M/?<NHQKD$FNb@r*I_/
@5$#
h7eNmU
*H$NIi$Vr]n9k?aK"!Nh7eNmUK>CF/@5$#
v DVD-ROM Ii$VO"hjU1`w,G-k^GSEI_^K~lF*^9#hjU1~KO"HNN\0rG.BK^(F/@5$#\0Khj
EE$,/89kD=-,"j^9#
v Ii$VO5EK7$^9#Ii$VrnH7?j605;kH"Ii$V
NbtN3s]<MsH,;}9kD=-,"j^9#
v IDE 1<VkdE;1<Vkr5}K97~^J$G/@5$#5}K97
~`H"3M/?<^?OIi$Vr;}9klg,"j^9#
1-74
IBM 16X Max RAM-Read DVD-ROM Drive: User’s Guide
Ii$VN)f!=H3M/?<
!N^O"Ii$VN)f!=H3M/?<NLV*hS!=r(7?bNG
9#
Ii$VN5L^
1G#9/&Imo<
3NImo<,G#9/rP7~l9kljG9#
2HQf=(i$H
Ii$VG"G#9/+iNI_hj"^?OG#9/NF8,TolF$kH
-K"3Ni$H,*sKJj^9#
3soQSPj
3Nj+i"G#9/rIi$V+ihjP9?aNSP!=K"/;9G-^
9#
4*<Ws / /m<:&\?s
3N\?sr!9H"G#9/&Imo<,+D7^9#
$s9H<k*hSf<6<:&,$I
1-75
Ii$VNXL^
1*<G#*PO3M/?<
3N3M/?<O""Jm0&*<G#*.fr*<G#*&"@W?<K>w
7^9#
2=.Ts
3liNTsO"Ii$V=.r_j9kH-KHQ7^9#
3IDE ]<H
3lO"DVD-ROM Ii$Vr IDE 1<VkK\37^9#
4E;3M/?<
3lO"DVD-ROM Ii$VrE;1<VkK\37^9#
Ii$VNhjU1
DVD-ROM Ii$VrhjU1kjgO"!NH*jG9#
9FCW 1. 3sTe<?<r+1k
1. 3sTe<?<H"\35lF$k9YFNuVNE;rZj^9#
2. 3sTe<?<H"\35lF$k9YFNuVNE;3<I&Wi0r4
-^9#
3. 3sTe<?<+i+P<rhj07^9#3sTe<?<N+P<rhj
09}!KD$FO"*H$N3sTe<?<NqAr2H7F/@5$#
9FCW 2. Ii$Vr+-9k
1. Ii$V,~CF$kSEI_^r+1k0K"3sTe<?<NIu5l
F$J$b0LK^r/J/Hb 2 CV\(5;^9#3&9kH"^4H
4+,NHN+iEE$,|n5l^9#
2. Ii$Vr^+ihjP7^9#
1-76
IBM 16X Max RAM-Read DVD-ROM Drive: User’s Guide
Ii$VrV/,W,"klgKO"(oJIN?iJLKSEI_^rV
-"=NeKIi$VrV-^9#
9FCW 3. =.8csQ<r_j9k
Ii$VO"e^K(9h&K^9?< 1"9l<V 2"^?O1<Vk&
;l/H 3 H7F=.G-^9#
!N,$Ii$sr2MK7F"*H$N3sTe<?<KgC?57$=.r
haF/@5$#
v *H$N DVD-ROM Ii$V, IDE 1<VkK\35l?#lNuVG"
klgKO^9?<H7F=.7^9#3l,)lPY~N_jG9#
v *H$N DVD-ROM Ii$V, IDE 1<VkeN 2 V\NuVG"kl
gKO9l<VH7F=.7^9#b&l}NuV,^9?<H7F=.5
lF$k3Hr,:N+aF/@5$#lgKhCFO"181<VkeN
LNuV,9l<VH7F=.5lF$kH"O<IG#9/,V9l<V
,8_9k^9?<WN8csQ<_jr,WH9klg,"j^9#=N
>NuVN=.8csQ<N_jKD$F\7/O"=N3sTe<?<u
VKU0NqAr2H7F/@5$#
v ltN IBM J0N3sTe<?<GO"2 DNo$d<,uV3M/?<G
UKJCF$kClJ ATA 1<VkrHQ9kbN,"j^9#3N1<
VkGO"Ii$Vr"8csQ<LVGOJ/1<VkKhCF=.9k
3H,G-^9#V1<Vk&;l/HWLVO"3NCl1<Vkrw(
?3sTe<?<NlgK@14HQ/@5$#*H$N3sTe<?<K
U0NqAr2H7F"=N ATA "@W?<GOV1<Vk&;l/HW
LVK8csQ<r[V9k,W,"k+I&+rN'7F/@5$#
V1<Vk&;l/HWLVK8csQ<r[V9kH"IDE 1<VkO"
=N1<VkeNIi$VNLVKpE$F^9?<H9l<VN_jrd
jvF^9#*H$N DVD-ROM Ii$V,=N1<VkK\35l?#l
NuVG"CFb"2 V\NuVG"CFb"3N[~79F`GOV1<
Vk&;l/HW_jrHQ9k,W,"j^9# IDE 3sHm<i<Kl
Va$Ii$V,+0*K^9?<&Ii$VKJj^9# IDE 1<Vke
K>NuV,"klgO"=lib4tV1<Vk&;l/HWK_j7J
1lPJj^;s#
$s9H<k*hSf<6<:&,$I
1-77
9FCW 4. Ii$VrY$KhjU1k
EW: M8rIi$VK>\hjU1klgKO",:3N*W7gs&QC
1<8K~CF$khjU1M8rHQ7F/@5$#99.kM8rHQ9k
H"Ii$Vr;}9klg,"j^9#
DVD-ROM Ii$VO"3sTe<?<K#}~GbD}~GbhjU1il
^9#Ii$VrD}~KhjU1?lgO"Ii$V&Hl$rDak0KG
#9/,Ii$VKNBK^~5lF$k3HrN'9k,W,"j^9#G#
9/,NBK^~5lF$J$H"DVD-ROM Ii$VOG#9/r57/I
_hl^;s#
1. Ii$Vr9i$I5;FY$K~l^9#3sTe<?<KhCFO"1uVrhjU1kNKCLJjg,,WJlg,"j^9#=NjgKD
$FO"=N3sTe<?<KU0NqAr2H7F/@5$#
2. Ii$V&Y$NM8jr"Ii$V&O&8s0NM8jNLVKgo;
^9#
3. M8rK/ya"LVrN'7^9#Lo">&KM8r 2 \:DHQ7^
9#LV,57$+N'7F+i"M8ryaF"Ii$VrGj7^9#
M8rya9.J$G/@5$#
9FCW 5. 1<VkrIi$VK\39k
!N^Nh&K"1<VkrIi$VK\37^9#
1-78
IBM 16X Max RAM-Read DVD-ROM Drive: User’s Guide
!N^O"*W7gs&QC1<8KU0Nbt*<G#*&1<VkG9#
1. bt*<G#*&1<VkKO"2 DK,t7?3M/?<,U$F$k<
H"3M/?<, 1 DU$F$k<H,"j^9#2 DK,t7?&AN$
:l+N< 1 r"DVD-ROM Ii$VN*<G#*PO3M/?<K\
37^9#>K CD-ROM"CD-RW ^?O DVD-ROM Ii$Vr*}AG
"lP"2 DK,t7?3M/?<N>}N<r"=NIi$VN*<G#
*PO3M/?<K\37^9#3M/?<, 1 DU$F$k}N<O"5
&sI&+<IK\37^9#
2. 40 Ts IDE 1<Vk&3M/?< 2 rIi$VN IDE 3M/?<K\
37^9#',15l?<,E;1<Vk&3M/?< 3 &KJkh&
K"1<VkN~-rgo;^9# IDE ]<HK1<Vk,\35lF$
J$lgKO"3N*W7gsKU0N IDE 1<VkrHQ7F/@5
$#IDE 1<VkKO3M/?<,Gb 3 DU$F$^9#IDE 1<Vk
KuVr 1 f@1\39klgK".fJArGbK9kKO"1<VkN
l}N<K"k3M/?<r IDE ]<HK\37"1<VkN>}N<K
"k3M/?<ruVK\37^9#?sfN3M/?<OHQ7J$G/
@5$#3sTe<?<N IDE ]<HK1<Vk,\35lF$J$l
g"^?O3sTe<?<N IDE 1<VkKuV3M/?<, 1 D7+J
$lgKO"3N*W7gsKU0N IDE 1<VkrHQ7F/@5$#
IDE 1<VkKuVr 2 f\39klgK".fJArGbK9kKO"
1<VkNl}N<K"k3M/?<r IDE ]<HK\37"^9?<H
9l<VNuVO"1<VkN>}N<K"kDjN3M/?<K\37^
9#?/N3sTe<?<Nlg"Gb 4 fN ATA uV,\3G-k 2
\N1<Vk,U$F$^9#QU)<^s9rGbK9kKO"b.uV
(O<IG#9/) rWi$^j< IDE ]<HK\35l?1<VkK\3
7"DVD-ROM Ii$VJIN.YNY$uV (CD-ROM Ii$V"'$
F<W&Ii$V"j`<PVk&aG#") O;+s@j< IDE ]<HK
\35l?1<VkK\37^9#
3. 4 TsE;1<Vk 3 r DVD-ROM Ii$VNE;3M/?<K\37
^9#
1<Vk`,3sTe<?<N+P<KO5^l?j"!5l?j7F$J
$+rN'7">N1<VkdE;N\3b9YFNBKTolF$k+N
+aF/@5$#
9FCW 6. O<I&'"NhjU1r0;9k
1. DVD-ROM Ii$V,NBKhjU1ilF*j"3M/?<,7C+j\
35lF$k+N'7^9#
$s9H<k*hSf<6<:&,$I
1-79
2. 1<Vk,3sTe<?<&+P<NYbKJCF$?j"E;!=NU!
s^?OS$)rU5$G$J$+N'7^9#
3. 3sTe<?<&+P<rhjU1^9#
4. 9YFN0U1uVrF\37^9#
5. 9YFNE;3<I&Wi0rIN3s;sHK97~_^9#
!KT&3H
3NIi$VrG<?lQ DVD-ROM Ii$V"^?O CD-ROM Ii$VH
7FHQ9klg"$s9H<kO3lG0;G9#5]<H&=UH&'"r
$s9H<k9k,WO"j^;s#Ii$VN]iKD$F\7/O" 1-83
Z<8NX*j~lH]iYr2H7F/@5$#
9FCW 7. DVD SG*F8N?aK3sTe<?<r_j9k
33GO"DVD-ROM Ii$V rHQ7F DVD `<S<rF8G-kh&
K"DMA _jrHQD=K9kjgrb@7^9#
DMA _jrHQD=K9k
HQ7F$k3sTe<?<N*Zl<F#s0&79F`rN'7F/@5
$#DMA rHQD=K9kb@O" C-1 Z<8NXAppendix C, Customizing
the device-driver configuration settingsYK"j^9#
1. V9?<HWr/jC/7F"V_jWr/jC/7"V3sHm<k QM
kWr/jC/7^9#
2. V79F`Wr@Vk/jC/7^9#
V79F`WN<K=(5lF$kP<8gsVfr+F/@5$#
v P<8gsVf, 4.00.950B"^?O 4.00.95C NlgO" C-1 Z<8N
XChanging the Auto Insert Notify and DMA parameters for Windows 95,
Windows 98, and Windows MeYK-\5l?X(K>CF/@5$#
v P<8gsVf, 5.00.2195 NlgO" C-1 Z<8NXChanging the
Windows 2000 DMA parameter settingYK-\5l?X(K>CF/@5
$#
v P<8gsVf, 4.00.1381 NlgO" C-2 Z<8NXEnabling DMA
for Windows NT 4.0YK-\5l?X(K>CF/@5$#
9FCW 8. MPEG G3<I&=UH&'"N$s9H<k
MPEG-2 G3<I&=UH&'"r$s9H<k9kKO"!Nh&K7^
9#
1. BTfNWm0i`,"lP/m<:7^9#
2. MPEG-2 =UH&'"&=UH&'" CD r DVD-ROM Ii$VK^~7
^9#
3. $s9H<k&&#sI&,+0*K*<Ws7?i"9FCW 8 XJsG
/@5$#=lJ0NlgO"9FCW 4 r31^9#
4. V9?<HWr/jC/7^9#
1-80
IBM 16X Max RAM-Read DVD-ROM Drive: User’s Guide
5. VU!$k>rXj7FBTWr/jC/7^9#
6. X:¥DVDPLAYR¥SETUP.EXE H~O7^9#33G"X Of<6<N
DVD-ROM Ii$VNIi$V>G9#
7. VOKWr/jC/7^9#
8. hLeNX(K>CF"$s9H<kr0;7^9#
DVD `<S<N=(
DVD-ROM Ii$VNhjU1"DMA N=."*hS DVD =(=UH&'
"N$s9H<k,Qs@i"DVD `<S<r+k3H,G-^9#
DVD r^~9kH"DVD Express ,+0*KO07^9#DVD Express rj
0GO09klgO"!NjgGT$^9#
1. V9?<HWr/jC/7F"VWm0i`Wr/jC/7"
VMediamatics DVD ExpressWr/jC/7^9#
2. VMediamatics DVD PlayerWr/jC/7^9#
DVD `<S<&Wl$d<N&#sI&,=(5l^9#DVD `<S<&
Wl$d<N\7$HQ!KD$FO"F1 -<r!7F DVD Express N*
si$s&XkWr2H7F/@5$#
DVD NOh3<I
Oh3<IO"DVD NbFr]n9k?aNbNG9#$&O 6 DNOhK
,1ilF*j"CjN3sFsDO:v9kOhG7++k3H,G-^;
s#?H(P"Oh 1 (FqH+J@) QN3sFsDO"FqH+J@Nqb
@1G+k3H,G-^9#DVD NOh3<IO"3sFsDNQC1<8"
LK"kOh3<I&7s\kr+lPN'G-^9#
Oh3<I
Oh
1
Fq"+J@
2
|\"h<mCQ"fl"n"Uj+
3
ln"8""fQ"Zq
4
iFs"aj+"*<9Hij""Ke<8<isI
5
l=S(H"."n"Uj+J0N"Uj+"$sI
6
fZM1&Bq
i|NOh3<IN*rrRMkWmsWH,P5l^9#i|NOh3<IH
[JkOh3<IN DVD r^~9kH"Oh3<IN_jrQ99k+I&
+ DVD Express KRMil^9#i|NOh3<Ir_j7?e"Oh3<I
ri|_j+i 4 s^GQ9G-^9#Oh3<Iri|_j+i 4 sQ97
?eO"Oh3<IOGj5l"Q9G-J/Jj^9#Oh3<IrQ99k
KO"Ef=5l?77$OhN DVD , DVD-ROM Ii$VK~CF$k,
W,"j^9#
$s9H<k*hSf<6<:&,$I
1-81
Oh3<INu7r=(9kKO"!NjgGT$^9#
1. DVD Express N&#sI&bG"VDVD *W7gsWr/jC/7^9#
2. VDVD OhWr/jC/7^9#
DVD-RAM I_hj!=NHQ
3NaKO"DVD-RAM G#9/N DVD-ROM Ii$VGNHQKX9kp
s,"j^9#
RL DVD-RAM aG#"*hS>L DVD-RAM aG#"NHQ
DVD-RAM aG#"O"RLNP<8gsH>LNP<8gsH,"j^9#
2.6 GB NP<8gsH 4.7 GB NP<8gs,"?$W I +<HjC8^?
O?$W II +<HjC8GHQD=G9#5.2 GB NP<8gsH 9.4 GB N
P<8gsO>LG"?$W I +<HjC8GN_"HQD=G9#
+<HjC8+iNG#9/Nhj07
DVD-RAM ?$W II G#9/O"DVD-RAM I_hj=Or}D DVD-ROM
Ii$VGHQ9k?aK"+<HjC8+ihj093H,G-^9#aG#
"N>LNG<?K"/;99kKO"G#9/rIi$V+ihj07F"V
7"b&lYIi$VK^~7>93H,,WG"X9e">LaG#"KO
A LH B LNiYk,U$F$^9#DVD-RAM ?$W I G#9/O"+<
HjC8+ihjP93HOG-:"3NIi$VGI_hk3HOG-^;
s#
?$W II +<HjC8+iNG#9/Nhj07
\<kZsNZshrHCF"mC/&Ts&?V 1 r!7FKj^9#G
#9/rhj09KO"\<kZsG+<HjC8NU?NmC/ 2 r!7
<2"+<HjC8NU? 3 r0&Kz$F"G#9/rSP7^9#+<
HjC8NU?r+/H"G#9/,SP5l^9#gNaG#"r7&]K
O"G#9/N-?LK(iJ$h&K7F/@5$#
1-82
IBM 16X Max RAM-Read DVD-ROM Drive: User’s Guide
G#9/r?$W II +<HjC8Ka9
G#9/r?$W II +<HjC8Ka9KO"G#9/NiYk,"k}NL
1 r"DVD-RAM +<HjC8NiYk,"kLKgo;^9#G#9/r
^~7F+<HjC8NU? 2 rD8^9#+ACH$&;,7?i"U?
NbOD^CF$^9#
hj7$K]7FNmUv`
hj07?G#9/r7&]O"=,mU7F/@5$#KR"[3jNYR"
Xf"w_"^?OzC+-}JIO"G#9/N?;HF8KFA7;}r?
(kD=-,"j^9#[3j=N>NKRr/j<Ks09kKO"CD /j
<Ks0&-CHrHQ7^9#G#9/rU/KO"@i+$%$?[rHQ
7F/@5$#G#9/N=Lr/j<Ks09kNKO^rHQ7J$G/@
5$#G#9/KiYkU19k]O"Zsh,U'kHN@i+$^<+<r
HQ7F"u~5lF$kiYkL@1Kq/h&K7F/@5$#>M|wN
v?klj"b9KJklj"LlkljKV+J$G/@5$#G#9/N>
LKiYkrU1FOJj^;s#
*j~lH]i
33GO"DVD-ROM Ii$VH"Ii$VGHQ9k CD H DVD N*j~
lKD$Fb@7^9#
CD ^?O DVD N*j~l
G#8?k&G#9/Ob)YaG#"G9#I_hjD=JuVK]D?a
K"G#9/O5EKhj7$"oK-l$K7F*/,W,"j^9#G#9
/Nw?rdP9?aK"!NmUv`riCF/@5$#
EW: G#9/r_~}~KU/H"G#9/r;}7"G<?,I_hlJ
/Jk3H,"j^9#
v G#9/rhj7&]O"o^?Of{Njr}A"G#9/N-?LKO
(lJ$G/@5$#
v [3jdXfrhj|/KO"1P)ANJ$@i+$[Gf{+ioK~
+CFG#9/rU$F/@5$#
$s9H<k*hSf<6<:&,$I
1-83
v -?LKq-~_r7J$G/@5$#
v >M|wNv?kljKG#9/rV+J$G/@5$#
v TNN/j<J<rHQ7FG#9/r/j<Ks07J$G/@5$#
v G#9/rJ2J$G/@5$#
DVD-ROM Ii$VN*j~l
0nfN DVD-ROM Ii$Vr]n9k?aK"!NmUv`riCF/@5
$#
v HQfOIi$Vr\07J$G/@5$#HQfK\09kH"G<?&
(i<,/87?j"Ii$Vr;}7?j9k3H,"j^9#
v Ii$Vr!Nh&Jro<KV+J$G/@5$#
– b>Y
– b9
– ?LN[3j
– !#*J60
– ^cJWbdn<
– 9$?LXN_V
– >M|w
– ^cJ9YQ=
v Ii$VKG#9/J0N*r^~7J$G/@5$#
v Ii$VNeK*rQ_EMJ$G/@5$#
v Ii$VN+P<rhj07?j"Ii$Vr,r7?j7J$G/@5
$#
v Ii$VuVr\09k0K"G#9/&Imo<+iG#9/rhjP
7"Imo<,D8F$k3HrN'7F/@5$#
v X~~N-q`O]I7F*$F/@5$#Ii$VuVrLNljK?w
9k,W,"klgKO""w5lkIi$VNB4rN]9k?aK"X
~~N-q`rHQ7F/@5$#
G#9/Nj0SP
Ii$V,Nc7FG#9/rSPG-J/JC?lgO"3sTe<?<NE
;r*UK7"g-Jf/jCWr^C90K-P7F"3lr;qH7FH$
^9#^C90K-P7?H-"/J/Hb 45 mm N95,,WG9#-P
7?/jCWNh<rIi$V0LN[^SPjK^~7 (1-75Z<8NXIi
$VN5L^Yr2H)"Hl$,+/^Gf/jCWr!7~_^9#G#9
/rhjP93H,G-k^G"Hl$rE+Kz-P7^9#
1-84
IBM 16X Max RAM-Read DVD-ROM Drive: User’s Guide
Appendix A. Product specifications
This appendix includes the following information:
v Physical specifications
v Power requirements
v Environmental requirements
v Drive write/read speeds
v Drive performance
v Format capabilities
Physical specifications
The physical specifications1 of the 16X Max RAM-READ DVD-ROM drive are
listed in the following table.
Physical specifications:
Height
41.3 mm (1.63 in.)
Width
146mm (5.75 in.)
Length
180 mm (7.06 in.)
Weight
1000 g (2.2 lb.)
Power requirements
The following table lists the power specifications by voltage level for the 16X
Max RAM-READ DVD-ROM drive. The power specifications are measured at
the drive power connector and are nominal values.
Power
specifications
Voltage
AVG
MAX
At Voltage
5V dc
650 mA
2000 mA
At Voltage
12V dc
800 mA
3300 mA
1. Product-description data represents IBM’s design objectives and is provided for comparative
purposes; actual results might vary, based on a variety of factors. This product data does not
constitute a warranty. Data is subject to change without notice.
© Copyright IBM Corp. 2001
A-1
The following table lists the environmental specifications for the 16X Max
RAM-Read DVD-ROM drive. You can mount the drive vertically or
horizontally.
Environmental Requirements:
Specification
Operational
Nonoperational
Temperature
(noncondensing)
+5° C to +45° C (+41° F
to +113° F)
-30° C to +60° C (-22° F to
140° F)
Relative humidity
(noncondensing)
15% to 85%
10% to 90%
Read speeds2
Media
Read Speed
DVD Single Layer
6.7 to 16X (Full CAV)
DVD Dual Layer
5 to 12X (Full CAV)
DVD Video
3.3 to 8X (Full CAV)
DVD-R - 3.95 GB
1 to 2.3X (Full CAV)
DVD-R - 4.7 GB
1 to 2.3X (Full CAV)
DVD-RAM - 2.6 GB
2X ZCLV
DVD-RAM - 4.7 GB
2X ZCLV
CD-ROM/CD-R
17 to 40X (Full CAV)
CD-RW
10 to 24X (Full CAV)
CD-I/Video CD
4.3 to 10X (Full CAV)
CD-DA (DAE)
12X CLV
CD-DA (Audio-Out)
4X to 10X (Full CAV)
2. The 16X Max RAM-Read DVD-ROM cannot read DVD-RAM Type I Media.
A-2
IBM 16X Max RAM-Read DVD-ROM Drive: User’s Guide
Appendix B. Problem solving
Computer problems can be caused by hardware, software, or user error. Using
the information in this section, you might be able to solve problems yourself or
gather helpful information that you can pass on to a service technician. You
might also need to refer to your computer, operating-system, or sound-adapter
documentation.
Review the following list for any problem description that might fit your
situation.
Transporting data with DVD-RAM Media
DVD-RAM Media can be read on any IBM DVD-ROM drive which has
RAM-read compatibility, but certain requirements must be satisfied. Your
system either must have a 2.0 compliant UDF reader or you must finalize the
media before it can be read.
If you do not have a 2.0 compliant UDF reader:
After data is written to the DVD-RAM media, it must be finalized before it
can be read in an IBM DVD-ROM with RAM-read drive. Finalizing the media
does not prevent the user to write more data. The DVD-RAM media may be
finalized more than once. It is impossible for the IBM DVD-ROM with
RAM-read drive to read the media which has not been finalized.
If you have a 2.0 compliant UDF reader:
Unfinalized DVD-RAM media can be read.
Obtaining a 2.0 compliant UDF reader:
Free third party UDF reader software, such as VOB InstantRead, can be
downloaded from http://www.vob.de/us/Downloads.htm
Third party software is not supported by IBM. Use at your own risk with no
warranties expressly written or implied.
v Your computer or DVD-ROM drive does not operate correctly, or the busy
indicator light does not come on.
Take the following actions:
1. Check that the disc is loaded with the label side up.
2. Check that all devices are properly connected to the computer and to the
electrical outlet.
© Copyright IBM Corp. 2001
B-1
3. Turn off the computer, unplug the cables for your computer and all
attached devices, and remove the computer cover.
4. Check that all power and IDE cables are securely attached. Disconnect
the IDE cable and check for bent or misaligned pins. If you do not find
any problems, reconnect the interface cable. Replace the computer cover,
and reattach all cables and power cords. Turn on the computer, restart
the operating system, and attempt to open the loading tray by pressing
the Open/Close button. If the tray fails to open and the busy indicator
does not light, turn off the computer and try using another 4-pin dc
power cable.
5. Check that the color-coded edge on the IDE cable aligns with pin 1 on
the IDE port and is closest to the power cable on the DVD-ROM drive.
See “Step 5. Attaching the cables to the drive” on page 1-6.
6. Check the DVD-ROM drive and any other device on the IDE cable for
the proper settings. See “Step 3. Setting the configuration jumpers” on
page 1-5.
7. If the middle connector on the IDE cable is attached to the IDE port on
the system board, remove the connector and reattach the cable. If there is
only one device on the IDE port, attach the connector at one end of the
cable to the IDE port and the connector at the other end to the device,
leaving the middle connector (if there is one) open.
If there are two devices on the IDE port, attach the connector at one end
of the cable to the IDE port. If there is a hard disk drive, attach it to the
connector at the other end of the cable, and attach the DVD-ROM drive
to the middle connector.
v You cannot access the DVD-ROM drive, or the DVD-ROM (CD-ROM)
icon is not displayed.
When the DVD-ROM drive is properly installed, a DVD-ROM or CD-ROM
icon is displayed in the My Computer window. Double-click My Computer.
If a CD-ROM icon is not present in the window that opens, verify that the
drive has been properly installed. Verify that the configuration jumper is set
properly. See “Step 3. Setting the configuration jumpers” on page 1-5. Restart
your computer. If a drive icon is still not found, continue with the following
steps.
1. Click Start, then click Settings, and then click Control Panel.
2. Click System.
3. Click the Device Manager tab.
4. Double-click View Devices by Type.
5. Select Hard Disk Controllers from the list displayed in the Device
Manager window. Verify that there are no conflicts with the controller.
The device status indicates whether the controller is working properly.
B-2
IBM 16X Max RAM-Read DVD-ROM Drive: User’s Guide
6. Select CD-ROM from the list that is displayed in the Device Manager
window. Verify that a CD-ROM device is present in the list and that no
conflicts exist. The device status indicates whether the device is working
properly.
7. Click OK.
8. Close all windows and restart the computer.
If the device icon is still not present, check cable connections and
device-jumper settings, and resolve any conflicts that might exist.
v The DVD-ROM drive is not recognized by the operating system, or the
drive performs erratically.
Some computers have Compatible and High Performance modes for mass
storage devices. Normally, the DVD-ROM drive functions better under the
High Performance mode. However, if your drive is not functioning properly
in that mode, you might need to use the Compatible mode.
Use the following procedure to check the configuration-setup information for
your computer.
1. Access your system configuration utility program. Pressing F1 at system
startup does this on most IBM computers.
2. Select Devices.
3. Scroll down to the Mass Storage Devices section.
Refer to the documentation that comes with your computer for additional
details on selecting IDE performance modes.
v The disc cannot be read.
Take the following actions:
1. The disc might be dirty; clean it as described in “Caring for a CD or
DVD” on page 1-11.
2. The disc might be defective; try another disc.
3. The disc is not ISO-9660, High Sierra Group (HSG), or Universal Disc
Format (UDS) compatible. Check with your place of purchase.
v There is no sound from the disc.
1. Check that you are not using a data CD.
2. Adjust the audio-adapter volume control. See the documentation that
comes with your audio adapter and audio-CD player program.
3. Turn off the computer, unplug the cables from the electrical outlets for
your computer and all attached devices, and remove the computer cover.
Ensure that the audio-signal cable connects the DVD-ROM drive with the
sound adapter.
v You receive a common error message.
Take the following actions for these common error messages:
– CDR-103
Appendix B. Problem solving
B-3
The disc in the DVD-ROM drive is not High Sierra, ISO 9660, or UDF
format. The DVD-ROM drive does not support the media.
– CDR-101
The “not ready reading the drive” situation occurs if you try to access the
DVD-ROM drive before the drive is ready. The busy indicator lights when
you attempt to access the drive after loading a disc into the loading tray.
Wait until the busy indicator is no longer lit before attempting to access
the drive.
v The connectors on the audio cables that are provided do not fit the
connector on your audio adapter.
Some audio adapters might require a special cable. See the documentation
that comes with your audio adapter.
You might have to separately purchase an audio cable for the DVD-ROM
drive. If you are using an IBM computer or IBM audio adapter, refer to
“Appendix D. Help and service information” on page D-1.
v “Unable to Create Overlay Window” message appears when you use DVD
Express with Windows 95, Windows 98, or Windows 2000.
1. Your video device driver needs an update to enable overlay support.
Contact the manufacturer of your video card or your computer for
updates. Some drivers are provided on the MPEG-2 CD.
2. The resolution of your screen might be too high. Try setting the screen to
800 x 600 x 16 bpp at 60 hz.
v DVD movies do not start automatically when inserted into the DVD-ROM
drive.
1. Autoplay is turned off. Follow these instructions to turn on Autoplay:
a. Click Start, then click Control Panel, and then click Device Manager.
b. Check Auto Insert Notification.
2. DVDs that contain both programs and DVD Video content will autoplay
the program content. To view the video content, start DVD Express
manually. For more information on starting DVD Express manually, see
“Viewing a DVD movie” on page 1-9.
v Video appears to be choppy or is dropping frames.
1. Ensure that DMA is turned on for your computer hard disk drive
controller.
2. The resolution of your screen might be too high. Try setting the screen to
800 x 600 x 16 bpp at 60 hz.
3. If your computer processor has less power than a Pentium II 450, some
jerkiness is normal on certain DVDs.
v Cannot read CD media (data or audio) on Windows 2000 or Windows NT
systems without restarting system.
1. IBM Rapid Access II Keyboard driver may be interfering with the
operation of the CD drive.
B-4
IBM 16X Max RAM-Read DVD-ROM Drive: User’s Guide
a. Remove the Rapid Access II Keyboard driver via Add/Remove
programs in the Control Panel.
b. If you have a Rapid Access II Keyboard and wish to restore its
function, you will need to go to the IBM Support Web site to
download the latest drivers (Version 1007 or higher).
Appendix B. Problem solving
B-5
Appendix C. Customizing the device-driver
configuration settings
Changing the Windows 95, Windows 98, Windows Me, and
Windows NT device drivers
Windows 95, Windows 98, and Window Me have two device-driver
configuration parameters: Auto Insert Notify and DMA.
The Auto Insert Notify parameter enables the computer to start audio CD
software as soon as a CD is inserted into the Slimline drive.
The DMA parameter improves computer performance by having the computer
DMA controller handle moving data from the CD to memory, freeing the
computer microprocessor to perform more important tasks. For example,
activating DMA might make movies and games run more smoothly because
the microprocessor will be allocating more processing time to video.
Changing the Auto Insert Notify and DMA parameters for
Windows 95, Windows 98, and Windows Me
To change these parameter settings from the Windows 95, Windows 98, or
Windows Me desktop:
1. Click Start --> Settings --> Control Panel.
2. Double-click System.
3. Select Device Manager.
4. Double-click CD-ROM.
5. Click Properties.
6. Select Settings.
7. Click Auto Insert Notification or DMA.
8. Click OK.
Changing the Windows 2000 DMA parameter setting
To change the DMA parameter setting for Windows 2000, do the following:
1. Select Start-->Settings-->Control Panel.
2. Double-click System.
3. Click the Hardware tab.
4. Click Device Manager.
5. Click the IDE ATA/ATAPI controller to open up the tree.
6. Double-click the device that corresponds to your CD-ROM port. It is
either Primary IDE or Secondary IDE.
7. Click the Advanced Settings tab.
© Copyright IBM Corp. 2001
C-1
8. Select the Transfer Mode pull-down and select DMA if available.
9. Click OK.
10. Click Close to close the System Properties window. A message is
displayed, informing you that the system settings have changed.
11. Click OK to restart the computer.
Enabling DMA for Windows NT 4.0
Enabling DMA for Windows NT 4.0 requires installing a DMA bus master IDE
controller driver. This may have been installed at the factory, or you have to
install it yourself. To determine if an IDE Bus Mastering driver is installed,
follow these steps:
1. Log on as an administrator.
2. Double-click My Computer.
3. Click Start.
4. Select Settings.
5. Click Control Panel.
6. Double-click Devices.
7. Select the ATAPI device.
8. If the status is ’Started’, you do not have a DMA bus master IDE controller
driver installed.
If your computer does not have an DMA bus master IDE controller driver, you
must go to the Web site for the manufacturer of the system board in your
computer, and download and install the Windows NT 4.0 DMA device driver.
The instructions for installing the driver are provided on the manufacturer’s
Web site.
Note: Carefully read the instruction that come with your driver. Some versions
of Bus Master drivers do not support CD recordable devices.
The following is a list of manufacturer Web Sites that contain Windows NT 4.0
DMA device drivers for your system boards:
v IBM: http://www.ibm.com
v Intel: http://www.intel.com
v VIA: http://via.com.tw
v ALi: http://ali.com.tw
C-2
IBM 16X Max RAM-Read DVD-ROM Drive: User’s Guide
Appendix D. Help and service information
This section contains information on how to obtain warranty information on
the World Wide Web and online and telephone technical support.
Warranty information on the World Wide Web
The IBM Machine Warranties Web site at
http://www.ibm.com/servers/support/machine_warranties/ contains a
worldwide overview of the IBM Limited Warranty for IBM Machines, a
glossary of terms used in the Statement of Limited Warranty, Frequently Asked
Questions (FAQ), and links to Product Support Web pages. The IBM Statement
of Limited Warranty is available from this Web site in 29 languages in Portable
Document Format (PDF).
Online technical support
Online technical support is available during the life of your product. Online
assistance can be obtained through the Personal Computing Support Web site.
Online technical support
IBM Personal Computing Support Web site
http://www.ibm.com/pc/support
During the warranty period, assistance for replacement or exchange of
defective components is available. In addition, if your IBM option is installed
in an IBM computer, you might be entitled to service at your location. Your
technical support representative can help you determine the best alternative.
Telephone technical support
Installation and configuration support through the HelpCenter will be
withdrawn or made available for a fee, at IBM’s discretion, 90 days after the
option has been withdrawn from marketing. Additional support offerings,
including step-by-step installation assistance, are available for a nominal fee.
To assist the technical support representative, have available as much of the
following information as possible:
v Option name
v Option number
v Proof of purchase
© Copyright IBM Corp. 2001
D-1
v Computer manufacturer, model, serial number (if IBM), and manual
v Exact wording of the error message (if any)
v Description of the problem
v Hardware and software configuration information for your system
If possible, be at your computer. Your technical support representative might
want to walk you through the problem during the call.
For the support telephone number and support hours by country, refer to the
following table or to the enclosed technical support insert. If the number is not
provided, contact your IBM reseller or IBM marketing representative. Response
time may vary depending on the number and nature of the calls received.
Support 24 hours a day, 7 days a week
Canada (Toronto only)
416-383-3344
Canada (all other)
1-800-565-3344
U.S.A. and Puerto Rico
1-800-772-2227
All other countries
Go to http://www.ibm.com/pc/support/,
and click HelpCenter Phone List.
D-2
IBM 16X Max RAM-Read DVD-ROM Drive: User’s Guide
Appendix E. Product warranty and notices
This section contains the warranty period for your product and the IBM
Statement of Limited Warranty.
Machine - 16X Max RAM-Read DVD-ROM Drive Warranty period* - One Year
* Contact your place of purchase for warranty service information. Some IBM Machines are
eligible for on-site warranty service depending on the country where service is performed.
IBM Statement of Limited Warranty
Part 1 - General Terms
This Statement of Limited Warranty includes Part 1 - General Terms and Part 2
- Country-unique Terms. The terms of Part 2 replace or modify those of Part 1.
The warranties provided by IBM in this Statement of Limited Warranty apply
only to Machines you purchase for your use, and not for resale, from IBM or
your reseller. The term “Machine” means an IBM machine, its features,
conversions, upgrades, elements, or accessories, or any combination of them.
The term “Machine” does not include any software programs, whether
pre-loaded with the Machine, installed subsequently or otherwise. Unless IBM
specifies otherwise, the following warranties apply only in the country where
you acquire the Machine. Nothing in this Statement of Limited Warranty
affects any statutory rights of consumers that cannot be waived or limited by
contract. If you have any questions, contact IBM or your reseller.
The IBM Warranty for Machines
IBM warrants that each Machine 1) is free from defects in materials and
workmanship and 2) conforms to IBM’s Official Published Specifications
(“Specifications”). The warranty period for a Machine is a specified, fixed
period commencing on its Date of Installation. The date on your sales receipt is
the Date of Installation unless IBM or your reseller informs you otherwise.
If a Machine does not function as warranted during the warranty period, and
IBM or your reseller are unable to either 1) make it do so or 2) replace it with
one that is at least functionally equivalent, you may return it to your place of
purchase and your money will be refunded.
Extent of Warranty
The warranty does not cover the repair or exchange of a Machine resulting
from misuse, accident, modification, unsuitable physical or operating
© Copyright IBM Corp. 2001
E-1
environment, improper maintenance by you, or failure caused by a product for
which IBM is not responsible. The warranty is voided by removal or alteration
of Machine or parts identification labels.
THESE WARRANTIES ARE YOUR EXCLUSIVE WARRANTIES AND
REPLACE ALL OTHER WARRANTIES OR CONDITIONS, EXPRESS OR
IMPLIED, INCLUDING, BUT NOT LIMITED TO, THE IMPLIED
WARRANTIES OR CONDITIONS OF MERCHANTABILITY AND FITNESS
FOR A PARTICULAR PURPOSE. THESE WARRANTIES GIVE YOU
SPECIFIC LEGAL RIGHTS AND YOU MAY ALSO HAVE OTHER RIGHTS
WHICH VARY FROM JURISDICTION TO JURISDICTION. SOME
JURISDICTIONS DO NOT ALLOW THE EXCLUSION OR LIMITATION
OF EXPRESS OR IMPLIED WARRANTIES, SO THE ABOVE EXCLUSION
OR LIMITATION MAY NOT APPLY TO YOU. IN THAT EVENT, SUCH
WARRANTIES ARE LIMITED IN DURATION TO THE WARRANTY
PERIOD. NO WARRANTIES APPLY AFTER THAT PERIOD.
Items Not Covered by Warranty
IBM does not warrant uninterrupted or error-free operation of a Machine.
Any technical or other support provided for a Machine under warranty, such
as assistance via telephone with “how-to” questions and those regarding
Machine set-up and installation, will be provided WITHOUT WARRANTIES
OF ANY KIND.
Warranty Service
To obtain warranty service for a Machine, contact IBM or your reseller. If you
do not register your Machine with IBM, you may be required to present proof
of purchase.
During the warranty period, IBM or your reseller, if approved by IBM to
provide warranty service, provides without charge certain types of repair and
exchange service to keep Machines in, or restore them to, conformance with
their Specifications. IBM or your reseller will inform you of the available types
of service for a Machine based on its country of installation. At its discretion,
IBM or your reseller will 1) either repair or exchange the failing Machine and
2) provide the service either at your location or a service center. IBM or your
reseller will also manage and install selected engineering changes that apply to
the Machine.
Some parts of IBM Machines are designated as Customer Replaceable Units
(called “CRUs”), e.g., keyboards, memory, or hard disk drives. IBM ships CRUs
to you for replacement by you. You must return all defective CRUs to IBM
within 30 days of your receipt of the replacement CRU. You are responsible for
E-2
IBM 16X Max RAM-Read DVD-ROM Drive: User’s Guide
downloading designated Machine Code and Licensed Internal Code updates
from an IBM Internet Web site or from other electronic media, and following
the instructions that IBM provides.
When warranty service involves the exchange of a Machine or part, the item
IBM or your reseller replaces becomes its property and the replacement
becomes yours. You represent that all removed items are genuine and
unaltered. The replacement may not be new, but will be in good working order
and at least functionally equivalent to the item replaced. The replacement
assumes the warranty service status of the replaced item. Many features,
conversions, or upgrades involve the removal of parts and their return to IBM.
A part that replaces a removed part will assume the warranty service status of
the removed part.
Before IBM or your reseller exchanges a Machine or part, you agree to remove
all features, parts, options, alterations, and attachments not under warranty
service.
You also agree to
1. ensure that the Machine is free of any legal obligations or restrictions that
prevent its exchange;
2. obtain authorization from the owner to have IBM or your reseller service a
Machine that you do not own; and
3. where applicable, before service is provided:
a. follow the problem determination, problem analysis, and service request
procedures that IBM or your reseller provides;
b. secure all programs, data, and funds contained in a Machine;
c. provide IBM or your reseller with sufficient, free, and safe access to
your facilities to permit them to fulfill their obligations; and
d. inform IBM or your reseller of changes in a Machine’s location.
IBM is responsible for loss of, or damage to, your Machine while it is 1) in
IBM’s possession or 2) in transit in those cases where IBM is responsible for
the transportation charges.
Neither IBM nor your reseller is responsible for any of your confidential,
proprietary or personal information contained in a Machine which you return
to IBM or your reseller for any reason. You should remove all such information
from the Machine prior to its return.
Limitation of Liability
Circumstances may arise where, because of a default on IBM’s part or other
liability, you are entitled to recover damages from IBM. In each such instance,
regardless of the basis on which you are entitled to claim damages from IBM
(including fundamental breach, negligence, misrepresentation, or other contract
Appendix E. Product warranty and notices
E-3
or tort claim), except for any liability that cannot be waived or limited by
applicable laws, IBM is liable for no more than
1. damages for bodily injury (including death) and damage to real property
and tangible personal property; and
2. the amount of any other actual direct damages, up to the charges (if
recurring, 12 months’ charges apply) for the Machine that is subject of the
claim. For purposes of this item, the term “Machine” includes Machine
Code and Licensed Internal Code.
This limit also applies to IBM’s suppliers and your reseller. It is the
maximum for which IBM, its suppliers, and your reseller are collectively
responsible.
UNDER NO CIRCUMSTANCES IS IBM LIABLE FOR ANY OF THE
FOLLOWING: 1) THIRD-PARTY CLAIMS AGAINST YOU FOR DAMAGES
(OTHER THAN THOSE UNDER THE FIRST ITEM LISTED ABOVE); 2)
LOSS OF, OR DAMAGE TO, YOUR RECORDS OR DATA; OR 3) SPECIAL,
INCIDENTAL, OR INDIRECT DAMAGES OR FOR ANY ECONOMIC
CONSEQUENTIAL DAMAGES, LOST PROFITS OR LOST SAVINGS,
EVEN IF IBM, ITS SUPPLIERS OR YOUR RESELLER IS INFORMED OF
THEIR POSSIBILITY. SOME JURISDICTIONS DO NOT ALLOW THE
EXCLUSION OR LIMITATION OF INCIDENTAL OR CONSEQUENTIAL
DAMAGES, SO THE ABOVE LIMITATION OR EXCLUSION MAY NOT
APPLY TO YOU.
Governing Law
Both you and IBM consent to the application of the laws of the country in
which you acquired the Machine to govern, interpret, and enforce all of your
and IBM’s rights, duties, and obligations arising from, or relating in any
manner to, the subject matter of this Agreement, without regard to conflict of
law principles.
Part 2 - Country-unique Terms
AMERICAS
BRAZIL
Governing Law: The following is added after the first sentence:Any litigation
arising from this Agreement will be settled exclusively by the court of Rio de
Janeiro.
NORTH AMERICA
E-4
IBM 16X Max RAM-Read DVD-ROM Drive: User’s Guide
Warranty Service: The following is added to this Section: To obtain warranty
service from IBM in Canada or the United States, call 1-800-IBM-SERV
(426-7378).
CANADA
Governing Law: The following replaces “laws of the country in which you acquired
the Machine” in the first sentence: laws in the Province of Ontario.
UNITED STATES
Governing Law: The following replaces “laws of the country in which you acquired
the Machine” in the first sentence: laws of the State of New York.
ASIA PACIFIC
AUSTRALIA
The IBM Warranty for Machines: The following paragraph is added to this Section:
The warranties specified in this Section are in addition to any rights you may
have under the Trade Practices Act 1974 or other similar legislation and are
only limited to the extent permitted by the applicable legislation.
Limitation of Liability: The following is added to this Section: Where IBM is in
breach of a condition or warranty implied by the Trade Practices Act 1974 or
other similar legislation, IBM’s liability is limited to the repair or replacement
of the goods or the supply of equivalent goods. Where that condition or
warranty relates to right to sell, quiet possession or clear title, or the goods are
of a kind ordinarily acquired for personal, domestic or household use or
consumption, then none of the limitations in this paragraph apply.
Governing Law: The following replaces “laws of the country in which you acquired
the Machine” in the first sentence: laws of the State or Territory.
CAMBODIA, LAOS, AND VIETNAM
Governing Law: The following replaces “laws of the country in which you acquired
the Machine” in the first sentence:laws of the State of New York.
The following is added to this Section: Disputes and differences arising out of or
in connection with this Agreement shall be finally settled by arbitration which
shall be held in Singapore in accordance with the rules of the International
Chamber of Commerce (ICC). The arbitrator or arbitrators designated in
conformity with those rules shall have the power to rule on their own
competence and on the validity of the Agreement to submit to arbitration. The
Appendix E. Product warranty and notices
E-5
arbitration award shall be final and binding for the parties without appeal and
the arbitral award shall be in writing and set forth the findings of fact and the
conclusions of law.
All proceedings shall be conducted, including all documents presented in such
proceedings, in the English language. The number of arbitrators shall be three,
with each side to the dispute being entitled to appoint one arbitrator.
The two arbitrators appointed by the parties shall appoint a third arbitrator
before proceeding upon the reference. The third arbitrator shall act as chairman
of the proceedings. Vacancies in the post of chairman shall be filled by the
president of the ICC. Other vacancies shall be filled by the respective
nominating party. Proceedings shall continue from the stage they were at when
the vacancy occurred.
If one of the parties refuses or otherwise fails to appoint an arbitrator within 30
days of the date the other party appoints its, the first appointed arbitrator shall
be the sole arbitrator, provided that the arbitrator was validly and properly
appointed.
The English language version of this Agreement prevails over any other
language version.
HONG KONG AND MACAU
Governing Law: The following replaces “laws of the country in which you acquired
the Machine” in the first sentence: laws of Hong Kong Special Administrative
Region.
INDIA
Limitation of Liability: The following replaces items 1 and 2 of this Section:
1. liability for bodily injury (including death) or damage to real property and
tangible personal property will be limited to that caused by IBM’s
negligence;
2. as to any other actual damage arising in any situation involving
nonperformance by IBM pursuant to, or in any way related to the subject
of this Statement of Limited Warranty, IBM’s liability will be limited to the
charge paid by you for the individual Machine that is the subject of the
claim.
JAPAN
Governing Law: The following sentence is added to this Section:Any doubts
concerning this Agreement will be initially resolved between us in good faith
and in accordance with the principle of mutual trust.
E-6
IBM 16X Max RAM-Read DVD-ROM Drive: User’s Guide
NEW ZEALAND
The IBM Warranty for Machines: The following paragraph is added to this Section:
The warranties specified in this Section are in addition to any rights you may
have under the Consumer Guarantees Act 1993 or other legislation which
cannot be excluded or limited. The Consumer Guarantees Act 1993 will not
apply in respect of any goods which IBM provides, if you require the goods
for the purposes of a business as defined in that Act.
Limitation of Liability: The following is added to this Section: Where Machines
are not acquired for the purposes of a business as defined in the Consumer
Guarantees Act 1993, the limitations in this Section are subject to the
limitations in that Act.
PEOPLE’S REPUBLIC OF CHINA (PRC)
Governing Law: The following replaces this Section: Both you and IBM consent to
the application of the laws of the State of New York (except when local law
requires otherwise) to govern, interpret, and enforce all your and IBM’s rights,
duties, and obligations arising from, or relating in any manner to, the subject
matter of this Agreement, without regard to conflict of law principles.
Any disputes arising from or in connection with this Agreement will first be
resolved by friendly negotiations, failing which either of us has the right to
submit the dispute to the China International Economic and Trade Arbitration
Commission in Beijing, the PRC, for arbitration in accordance with its
arbitration rules in force at the time. The arbitration tribunal will consist of
three arbitrators. The language to be used therein will be English and Chinese.
An arbitral award will be final and binding on all the parties, and will be
enforceable under the Convention on the Recognition and Enforcement of
Foreign Arbitral Awards (1958).
The arbitration fee will be borne by the losing party unless otherwise
determined by the arbitral award.
During the course of arbitration, this Agreement will continue to be performed
except for the part which the parties are disputing and which is undergoing
arbitration.
EUROPE, MIDDLE EAST, AFRICA (EMEA)
THE FOLLOWING TERMS APPLY TO ALL EMEA COUNTRIES: The terms of
this Statement of Limited Warranty apply to Machines purchased from IBM or
an IBM reseller.
Warranty Service:
Appendix E. Product warranty and notices
E-7
If you purchase an IBM Machine in Austria, Belgium, Denmark, Estonia,
Finland, France, Germany, Greece, Iceland, Ireland, Italy, Latvia, Lithuania,
Luxembourg, Netherlands, Norway, Portugal, Spain, Sweden, Switzerland or
United Kingdom, you may obtain warranty service for that Machine in any of
those countries from either (1) an IBM reseller approved to perform warranty
service or (2) from IBM. If you purchase an IBM Personal Computer Machine
in Albania, Armenia, Belarus, Bosnia and Herzegovina, Bulgaria, Croatia,
Czech Republic, Georgia, Hungary, Kazakhstan, Kirghizia, Federal Republic of
Yugoslavia, Former Yugoslav Republic of Macedonia (FYROM), Moldova,
Poland, Romania, Russia, Slovak Republic, Slovenia, or Ukraine, you may
obtain warranty service for that Machine in any of those countries from either
(1) an IBM reseller approved to perform warranty service or (2) from IBM.
If you purchase an IBM Machine in a Middle Eastern or African country, you
may obtain warranty service for that Machine from the IBM entity within the
country of purchase, if that IBM entity provides warranty service in that
country, or from an IBM reseller, approved by IBM to perform warranty service
on that Machine in that country. Warranty service in Africa is available within
50 kilometers of an IBM authorized service provider. You are responsible for
transportation costs for Machines located outside 50 kilometers of an IBM
authorized service provider.
Governing Law:
The applicable laws that govern, interpret and enforce rights, duties, and
obligations of each of us arising from, or relating in any manner to, the subject
matter of this Statement, without regard to conflict of laws principles, as well
as Country-unique terms and competent court for this Statement are those of
the country in which the warranty service is being provided, except that in 1)
Albania, Bosnia-Herzegovina, Bulgaria, Croatia, Hungary, Former Yugoslav
Republic of Macedonia, Romania, Slovakia, Slovenia, Armenia, Azerbaijan,
Belarus, Georgia, Kazakhstan, Kyrgyzstan, Moldova, Russia, Tajikistan,
Turkmenistan, Ukraine, and Uzbekistan, the laws of Austria apply; 2) Estonia,
Latvia, and Lithuania, the laws of Finland apply; 3) Algeria, Benin, Burkina
Faso, Cameroon, Cape Verde, Central African Republic, Chad, Congo, Djibouti,
Democratic Republic of Congo, Equatorial Guinea, France, Gabon, Gambia,
Guinea, Guinea-Bissau, Ivory Coast, Lebanon, Mali, Mauritania, Morocco,
Niger, Senegal, Togo, and Tunisia, this Agreement will be construed and the
legal relations between the parties will be determined in accordance with the
French laws and all disputes arising out of this Agreement or related to its
violation or execution, including summary proceedings, will be settled
exclusively by the Commercial Court of Paris; 4) Angola, Bahrain, Botswana,
Burundi, Egypt, Eritrea, Ethiopia, Ghana, Jordan, Kenya, Kuwait, Liberia,
Malawi, Malta, Mozambique, Nigeria, Oman, Pakistan, Qatar, Rwanda, Sao
Tome, Saudi Arabia, Sierra Leone, Somalia, Tanzania, Uganda, United Arab
Emirates, United Kingdom, West Bank/Gaza, Yemen, Zambia, and Zimbabwe,
this Agreement will be governed by English Law and disputes relating to it
E-8
IBM 16X Max RAM-Read DVD-ROM Drive: User’s Guide
will be submitted to the exclusive jurisdiction of the English courts; and 5) in
Greece, Israel, Italy, Portugal, and Spain any legal claim arising out of this
Statement will be brought before, and finally settled by, the competent court of
Athens, Tel Aviv, Milan, Lisbon, and Madrid, respectively.
THE FOLLOWING TERMS APPLY TO THE COUNTRY SPECIFIED:
AUSTRIA AND GERMANY
The IBM Warranty for Machines: The following replaces the first sentence of the
first paragraph of this Section: The warranty for an IBM Machine covers the
functionality of the Machine for its normal use and the Machine’s conformity
to its Specifications.
The following paragraphs are added to this Section:
The minimum warranty period for Machines is six months. In case IBM or
your reseller is unable to repair an IBM Machine, you can alternatively ask for
a partial refund as far as justified by the reduced value of the unrepaired
Machine or ask for a cancellation of the respective agreement for such Machine
and get your money refunded.
Extent of Warranty: The second paragraph does not apply.
Warranty Service: The following is added to this Section: During the warranty
period, transportation for delivery of the failing Machine to IBM will be at
IBM’s expense.
Limitation of Liability: The following paragraph is added to this Section: The
limitations and exclusions specified in the Statement of Limited Warranty will
not apply to damages caused by IBM with fraud or gross negligence and for
express warranty.
The following sentence is added to the end of item 2: IBM’s liability under this item
is limited to the violation of essential contractual terms in cases of ordinary
negligence.
EGYPT
Limitation of Liability: The following replaces item 2 in this Section: as to any
other actual direct damages, IBM’s liability will be limited to the total amount
you paid for the Machine that is the subject of the claim. For purposes of this
item, the term “Machine” includes Machine Code and Licensed Internal Code.
Applicability of suppliers and resellers (unchanged).
Appendix E. Product warranty and notices
E-9
FRANCE
Limitation of Liability: The following replaces the second sentence of the first
paragraph of this Section:In such instances, regardless of the basis on which you
are entitled to claim damages from IBM, IBM is liable for no more than: (items
1 and 2 unchanged).
IRELAND
Extent of Warranty: The following is added to this Section: Except as expressly
provided in these terms and conditions, all statutory conditions, including all
warranties implied, but without prejudice to the generality of the foregoing all
warranties implied by the Sale of Goods Act 1893 or the Sale of Goods and
Supply of Services Act 1980 are hereby excluded.
Limitation of Liability: The following replaces items one and two of the first
paragraph of this Section:1. death or personal injury or physical damage to your
real property solely caused by IBM’s negligence; and 2. the amount of any
other actual direct damages, up to 125 percent of the charges (if recurring, the
12 months’ charges apply) for the Machine that is the subject of the claim or
which otherwise gives rise to the claim.
Applicability of suppliers and resellers (unchanged).
The following paragraph is added at the end of this Section: IBM’s entire liability
and your sole remedy, whether in contract or in tort, in respect of any default
shall be limited to damages.
ITALY
Limitation of Liability: The following replaces the second sentence in the first
paragraph:In each such instance unless otherwise provided by mandatory law,
IBM is liable for no more than: 1. (unchanged) 2. as to any other actual damage
arising in all situations involving nonperformance by IBM pursuant to, or in
any way related to the subject matter of this Statement of Warranty, IBM’s
liability, will be limited to the total amount you paid for the Machine that is
the subject of the claim. Applicability of suppliers and resellers (unchanged).
The following replaces the third paragraph of this Section: Unless otherwise
provided by mandatory law, IBM and your reseller are not liable for any of the
following: (items 1 and 2 unchanged) 3) indirect damages, even if IBM or your
reseller is informed of their possibility.
SOUTH AFRICA, NAMIBIA, BOTSWANA, LESOTHO AND SWAZILAND
E-10
IBM 16X Max RAM-Read DVD-ROM Drive: User’s Guide
Limitation of Liability: The following is added to this Section: IBM’s entire
liability to you for actual damages arising in all situations involving
nonperformance by IBM in respect of the subject matter of this Statement of
Warranty will be limited to the charge paid by you for the individual Machine
that is the subject of your claim from IBM.
UNITED KINGDOM
Limitation of Liability: The following replaces items 1 and 2 of the first paragraph
of this Section:
1. death or personal injury or physical damage to your real property solely
caused by IBM’s negligence;
2. the amount of any other actual direct damages or loss, up to 125 percent of
the charges (if recurring, the 12 months’ charges apply) for the Machine
that is the subject of the claim or which otherwise gives rise to the claim;
The following item is added to this paragraph: 3. breach of IBM’s obligations
implied by Section 12 of the Sale of Goods Act 1979 or Section 2 of the Supply
of Goods and Services Act 1982.
Applicability of suppliers and resellers (unchanged).
The following is added to the end of this Section: IBM’s entire liability and your
sole remedy, whether in contract or in tort, in respect of any default shall be
limited to damages. This publication was developed for products and services
offered in the U.S.A.
IBM may not offer the products, services, or features discussed in this
document in other countries. Consult your local IBM representative for
information on the products and services currently available in your area. Any
reference to an IBM product, program, or service is not intended to state or
imply that only that IBM product, program, or service may be used. Any
functionally equivalent product, program, or service that does not infringe any
IBM intellectual property right may be used instead. However, it is the user’s
responsibility to evaluate and verify the operation of any non-IBM product,
program, or service.
IBM may have patents or pending patent applications covering subject matter
described in this document. The furnishing of this document does not give you
any license to these patents. You can send license inquiries, in writing, to:
IBM Director of Licensing
IBM Corporation
North Castle Drive
Armonk, NY 10504-1785
U.S.A.
Appendix E. Product warranty and notices
E-11
The following paragraph does not apply to the United Kingdom or any
country where such provisions are inconsistent with local law:
INTERNATIONAL BUSINESS MACHINES CORPORATION PROVIDES THIS
PUBLICATION “AS IS” WITHOUT WARRANTY OF ANY KIND, EITHER
EXPRESS OR IMPLIED, INCLUDING, BUT NOT LIMITED TO, THE IMPLIED
WARRANTIES OF NON-INFRINGEMENT, MERCHANTABILITY OR FITNESS
FOR A PARTICULAR PURPOSE. Some states do not allow disclaimer of
express or implied warranties in certain transactions, therefore, this statement
may not apply to you.
This information could include technical inaccuracies or typographical errors.
Changes are periodically made to the information herein; these changes will be
incorporated in new editions of the publication. IBM may make improvements
and/or changes in the product(s) and/or the program(s) described in this
publication at any time without notice.
IBM may use or distribute any of the information you supply in any way it
believes appropriate without incurring any obligation to you. Any references in
this publication to non-IBM Web sites are provided for convenience only and
do not in any manner serve as an endorsement of those Web sites. The
materials at those Web sites are not part of the materials for this IBM product,
and use of those Web sites is at your own risk. Any performance data
contained herein was determined in a controlled environment. Therefore, the
result obtained in other operating environments may vary significantly. Some
measurements may have been made on development-level systems and there is
no guarantee that these measurements will be the same on generally available
systems. Furthermore, some measurements may have been estimated through
extrapolation. Actual results may vary. Users of this document should verify
the applicable data for their specific environment.
Trademarks
The following terms are trademarks of the IBM Corporation in the United
States or other countries or both:
IBM
HelpCenter
Microsoft, Windows, and Windows NT are trademarks or registered
trademarks of Microsoft in the United States or other countries or both.
Intel and Pentium are registered trademarks of the Intel Corporation.
Other company, product, and service names may be trademarks or service
marks of others.
E-12
IBM 16X Max RAM-Read DVD-ROM Drive: User’s Guide
Federal Communications Commission (FCC) statement
Note: This equipment has been tested and found to comply with the limits for
a Class B digital device, pursuant to Part 15 of the FCC Rules. These limits are
designed to provide reasonable protection against harmful interference in a
residential installation. This equipment generates, uses, and can radiate radio
frequency energy and, if not installed and used in accordance with the
instructions, may cause harmful interference to radio communications.
However, there is no guarantee that interference will not occur in a particular
installation. If this equipment does cause harmful interference to radio or
television reception, which can be determined by turning the equipment off
and on, the user is encouraged to try to correct the interference by one or more
of the following measures:
v Reorient or relocate the receiving antenna.
v Increase the separation between the equipment and receiver.
v Connect the equipment into an outlet on a circuit different from that to
which the receiver is connected.
v Consult an IBM authorized dealer or service representative for help.
Properly shielded and grounded cables and connectors must be used in order
to meet FCC emission limits. Proper cables and connectors are available from
IBM authorized dealers. IBM is not responsible for any radio or television
interference caused by using other than recommended cables and connectors or
by unauthorized changes or modifications to this equipment. Unauthorized
changes or modifications could void the user’s authority to operate the
equipment.
This device complies with Part 15 of the FCC Rules. Operation is subject to the
following two conditions: (1) this device may not cause harmful interference,
and (2) this device must accept any interference received, including
interference that may cause undesired operation.
Responsible party:
International Business Machines Corporation
New Orchard Road
Armonk, NY 10504
Telephone: 1-919-543-2193
Tested To Comply
With FCC Standards
FOR HOME OR OFFICE USE
Industry Canada Class B emission compliance statement
Appendix E. Product warranty and notices
E-13
This Class B digital apparatus complies with Canadian ICES-003.
Avis de conformite a la reglementation d’Industrie Canada
Cet appareil numérique de classe B est conforme à la norme NMB-003 du
Canada.
Deutsche EMV-Direktive (electromagnetische Verträglichkeit)
Dieses Gerät ist berechtigt in Übereinstimmung mit dem deutschen EMVG
vom 9.Nov.92 das EG-Konformitätszeichen zu führen.
Der Aussteller der Konformitätserklärung ist die IBM UK, Greenock.
Dieses Gerät erfüllt die Bedingungen der EN 55022 Klasse B.
European Union - emission directive
This product is in conformity with the protection requirements of EU Council
Directive 89/366/ECC on the approximation of the laws of the Member States
relating to electromagnetic compatibility.
IBM can not accept responsibility for any failure to satisfy the protection
requirements resulting from a non-recommended modification of the product,
including the fitting of non-IBM option cards.
This product has been tested and found to comply with the limits for Class B
Information Technology Equipment according to CISPR 22/European Standard
EN 55022. The limits for Class B equipment were derived for typical residential
environments to provide reasonable protection against interference with
licensed communication devices.
Union Européenne - Directive Conformité électromagnétique
Ce produit est conforme aux exigences de protection de la Directive
89/336/EEC du Conseil de l’UE sur le rapprochement des lois des États
membres en matière de compatibilité électromagnétique.
IBM ne peut accepter aucune responsabilité pour le manquement aux exigences
de protection résultant d’une modification non recommandée du produit, y
compris l’installation de cartes autres que les cartes IBM.
Ce produit a été testé et il satisfait les conditions de l’équipement informatique
de Classe B en vertu de CISPR22/Standard européen EN 55022. Les conditions
pour l’équipement de Classe B ont été définies en fonction d’un contexte
E-14
IBM 16X Max RAM-Read DVD-ROM Drive: User’s Guide
résidentiel ordinaire afin de fournir une protection raisonnable contre
l’interférence d’appareils de communication autorisés.
Unione Europea - Directiva EMC (Conformidad électromagnética)
Este producto satisface los requisitos de protección del Consejo de la UE,
Directiva 89/336/CEE en lo que a la legislatura de los Estados Miembros sobre
compatibilidad electromagnética se refiere.
IBM no puede aceptar responsabilidad alguna si este producto deja de
satisfacer dichos requisitos de protección como resultado de una modificación
no recomendada del producto, incluyendo el ajuste de tarjetas de opción que
no sean IBM.
Este producto ha sido probado y satisface los límites para Equipos Informáticos
Clase B de conformidad con el Estándar CISPR22 y el Estándar Europeo EN
55022. Los límites para los equipos de Clase B se han establecido para entornos
residenciales típicos a fin de proporcionar una protección razonable contra las
interferencias con dispositivos de comunicación licenciados.
Union Europea - Normativa EMC
Questo prodotto è conforme alle normative di protezione ai sensi della
Direttiva del Consiglio dell’Unione Europea 89/336/CEE sull’armonizzazione
legislativa degli stati membri in materia di compatibilità elettromagnetica.
IBM non accetta responsabilità alcuna per la mancata conformità alle
normative di protezione dovuta a modifiche non consigliate al prodotto,
compresa l’installazione di schede e componenti di marca diversa da IBM.
Le prove effettuate sul presente prodotto hanno accertato che esso rientra nei
limiti stabiliti per le le apparecchiature di informatica Classe B ai sensi del
CISPR 22/Norma Europea EN 55022. I limiti delle apparecchiature della Classe
B sono stati stabiliti al fine di fornire ragionevole protezione da interferenze
mediante dispositivi di comunicazione in concessione in ambienti residenziali
tipici.
Appendix E. Product warranty and notices
E-15
Japanese statement of compliance for products less than or equal to 20 A per
phase
E-16
IBM 16X Max RAM-Read DVD-ROM Drive: User’s Guide
IBMR
Part Number: 71P7285
Printed in the United States of America
on recycled paper containing 10%
recovered post-consumer fiber.
*71P7285*