1
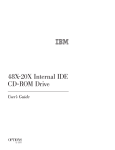
48X-20X Internal IDE
CD-ROM Drive
User’s Guide
Note: Before using this information and the product it supports, read the information
under Appendix D, ″Product warranties and notices″ on page D-1.
First Edition (September 2000)
© Copyright International Business Machines Corporation 2000. All rights reserved.
US Government Users Restricted Rights – Use, duplication or disclosure restricted by
GSA ADP Schedule Contract with IBM Corp.
Contents
About this book .
Safety information
.
.
.
.
.
.
.
.
.
.
.
.
.
.
.
.
Part 1: Installation and user’s guide .
.
.
.
.
.
.
.
.
.
.
.
.
.
.
.
.
.
.
.
.
.
.
.
.
. v
. vii
. 1-1
Appendix A. Customizing device driver configuration settings
.
.
. A-1
Appendix B. Problem solving .
.
.
.
.
.
.
.
.
.
.
. B-1
Appendix C. Help and service information .
.
.
.
.
.
.
.
.
.
. C-1
Appendix D. Product warranties and notices .
.
.
.
.
.
.
.
.
. D-1
© Copyright IBM Corp. 2000
.
.
.
.
.
.
.
.
.
.
.
iii
iv
48X-20X Internal IDE CD-ROM Drive: User’s Guide
About this book
This manual contains instructions for installing, configuring, and
®
troubleshooting the IBM 48X-20X Internal IDE CD-ROM Drive. The manual is
divided into the following parts:
Part 1: Installation and user’s guide
This part contains the product description and expanded installation
instructions in the following languages:
v English
v French
v Spanish
v Italian
v Brazilian Portuguese
v Traditional Chinese
v Japanese
Part 2: Appendixes
The appendixes contain inofrmation about product specifications, problem
solving, warranties, and help and service. It also contains the product
warranties and notices.
Note: The illustrations in this manual might be slightly different from your
hardware.
Registering your option
Thank you for purchasing this IBM product. Please take a few moments to
register your product and provide us with information that will help IBM to
better serve you in the future. Your feedback is valuable to us in developing
products and services that are important to you, as well as in developing better
ways to communicate with you. Register your option on the IBM Web site at
http://www.ibm.com/pc/register
IBM will send you information and updates on your registered product unless
you indicate on the Web site questionnaire that you do not want to receive
further information.
© Copyright IBM Corp. 2000
v
vi
48X-20X Internal IDE CD-ROM Drive: User’s Guide
Safety information
Before installing this product, read the Safety Information.
Antes de instalar este produto, leia as Informações de Segurança.
Pred instalací tohoto produktu si prectete prírucku bezpecnostních instrukcí.
Læs sikkerhedsforskrifterne, før du installerer dette produkt.
Ennen kuin asennat tämän tuotteen, lue turvaohjeet kohdasta Safety
Information.
Avant d’installer ce produit, lisez les consignes de sécurité.
Vor der Installation dieses Produkts die Sicherheitshinweise lesen.
Prima di installare questo prodotto, leggere le Informazioni sulla Sicurezza.
Lees voordat u dit product installeert eerst de veiligheidsvoorschriften.
Les sikkerhetsinformasjonen (Safety Information) før du installerer dette
produktet.
© Copyright IBM Corp. 2000
vii
Antes de instalar este produto, leia as Informações sobre Segurança.
Pred inštaláciou tohto zariadenia si pečítaje Bezpečnostné predpisy.
Antes de instalar este producto lea la información de seguridad.
Läs säkerhetsinformationen innan du installerar den här produkten.
viii
48X-20X Internal IDE CD-ROM Drive: User’s Guide
Part 1: Installation and user’s guide
®
The IBM 48X-20X Internal IDE CD-ROM Drive can read a compact disc (CD)
containing approximately 680 MB1 of information. It is designed for installation
in a personal computer that uses the integrated drive electronics (IDE) or the
enhanced IDE architecture.
The CD-ROM device delivers data up to 48 times the standard CD-ROM
speed, delivering data at up to 7200 KB2 per second. The drive reads compact
discs that meet the ISO-9660 and High-Sierra Group (HSG) standards. It also
reads multiple-session, extended architecture (XA) discs, such as the Kodak
Photo CD.
Product description
In addition to this book, the option package includes:
v 48X-20X Internal IDE CD-ROM Drive
v One “Y” audio cable, one audio cable
v Four mounting screws (M3 x 5 mm, slotted)
v One IDE cable for connecting two IDE devices
v Laser Safety Guide for CD-ROM drives
Contact your place of purchase if an item is missing or damaged. Be sure to
retain your proof of purchase. It might be required to receive warranty service.
You can find information on how to get help, technical support, and warranty
service in “Appendix C. Help and service information” on page C-1. Before
calling for technical support, refer to “Appendix B. Problem solving” on
page B-1.
Before you begin
Determine whether your computer meets the minimum requirements; see
“System requirements” on page 1-2 for details. Read the following information
before you start your installation.
You must complete the following steps to install the drive:
1. Determine which IDE connector to use and the corresponding configuration
setting.
1. MB equals approximately 1 000 000 bytes when referring to storage capacity.
2. KB equals approximately 1024 bytes when referring to data transfer speeds.
© Copyright IBM Corp. 2000
1-1
2. Place or change the configuration jumper on the drive (and possibly make
changes to the configuration jumpers of other devices).
If you do not understand these procedures or are unsure about your ability to
perform all the procedures described, have a qualified computer technician
install the CD-ROM drive for you.
System requirements
Before you begin installing the drive, be sure your computer meets the
following system requirements.
v Minimum microprocessor: 80486
v Minimum RAM: 4 MB
v 5.25-inch diskette drive
v Available IDE connection
v Available internal power connection
v Available drive bay
v One of the following operating systems:
– Microsoft
®
®
Windows 95
– Microsoft Windows
®
®
98
®
– Microsoft Windows NT 4.0
– Microsoft Windows 2000 Professional
– Microsoft Windows Millennium Edition (Me)
Handling instructions
To protect your device during installation, observe the following precautions:
v Handle the drive with care. Dropping or jarring the drive can damage the
components inside the drive housing.
v Keep the device in its antistatic bag until you are ready to install the drive in
your computer. Limit your movements. Movement can cause static electricity
buildup.
v Do not force insertion of the power cable. Doing so might damage the
connector or the drive.
1-2
48X-20X Internal IDE CD-ROM Drive: User’s Guide
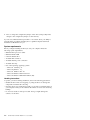
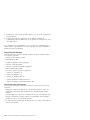
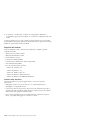
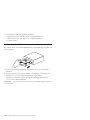
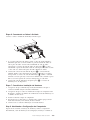
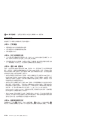
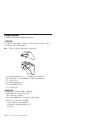
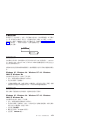
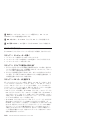
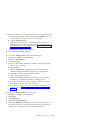
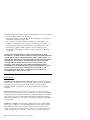
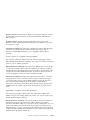
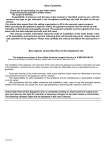
Front view of the drive
Refer to the illustration to identify parts that might be referred to in the
installation instructions.
1Headphone jack. Plug headphones in here for audio output.
2Volume control. Adjust this dial to control volume.
3CD tray. Use the CD tray to load a CD into the drive.
4Busy indicator. This light comes on when the drive reads a data CD or
plays an audio CD.
5Manual-eject hole. Use this to eject the CD tray if the Eject/Load button is
not operating correctly.
6Eject/Load button. Push this button to open or close the CD tray.
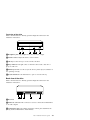
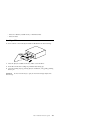
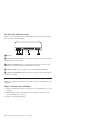
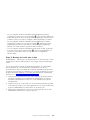
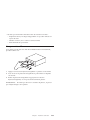
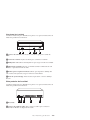
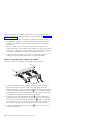
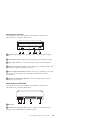
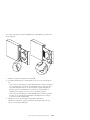
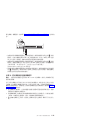
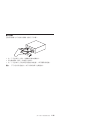
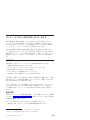
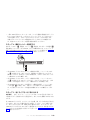
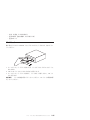
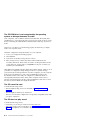
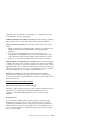
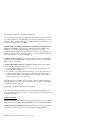
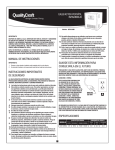
Back view of the drive
Refer to the illustration to identify parts that might be referred to in the
installation instructions.
1Reserved.
2Audio-out connector. This connector is used to connect the CD-ROM drive
to an audio adapter.
3Configuration pins. The jumper placement on these pins determines the
priority of the CD-ROM drive on the IDE bus.
Part 1: Installation and user’s guide
1-3
4IDE connector. This is used to connect the CD-ROM drive to the IDE cable.
5DC power connector. This is used to connect the dc power cord to the
CD-ROM drive.
Installing the drive
Follow these steps to install the CD-ROM drive in your computer.
Step 1. Opening the computer
1. Turn off the computer and all attached devices.
2. Unplug the power cords for the computer and all attached devices.
3. Remove the cover from the computer.
Step 2. Unpacking the drive
1. Before opening the antistatic bag that the drive is packed in, touch it to an
unpainted metal surface for at least two seconds. This will drain the static
electricity from the package and your body.
2. Remove the drive from the antistatic bag. If you must put the drive down,
place the antistatic bag on a flat padded surface, such as a magazine, and
place the drive on the antistatic bag.
Step 3. Selecting the IDE port
Newer computers typically have two IDE ports, each of which can support two
devices. Typically, the IDE port to which your hard disk drive is connected is
the primary IDE port. The other IDE port is the secondary port. The IDE port
and the cable position that you select determine which configuration jumper
setting that you use for the drive.
v If you have two IDE ports, connect the CD-ROM drive to the secondary IDE
port on your system board or IDE adapter. If the CD-ROM drive is the only
device on the secondary IDE port, use the primary configuration setting. If
the CD-ROM drive is the second device on the secondary port, use the
secondary configuration setting.
v If you must attach the CD-ROM drive to the primary IDE port (the same
port as a hard disk drive or other fast device), use the secondary setting for
the CD-ROM drive and the primary setting for the faster device. In some
instances, you might need to change the hard disk drive configuration
setting to master-with-secondary-present when attaching a secondary device
on the same cable. For further information on setting configuration jumpers
on other devices, refer to the documentation that came with your computer
or with the device in question.
v Some non-IBM computers support the cable-select setting, where the
position of the device on the cable determines whether a device is primary
1-4
48X-20X Internal IDE CD-ROM Drive: User’s Guide
or secondary. See the documentation that came with your computer to
determine if your computer supports this setting.
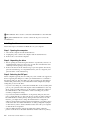
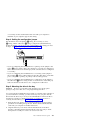
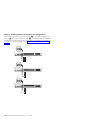
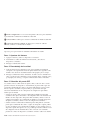
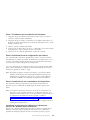
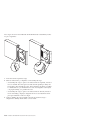
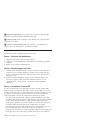
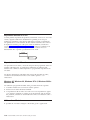
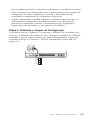
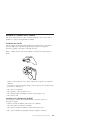
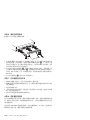
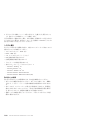
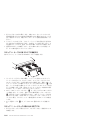
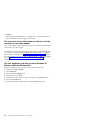
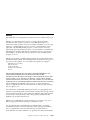
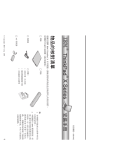
Step 4. Setting the configuration jumper
The illustration shows the primary 1setting, the secondary (or slave)
2setting, and the cable-select 3setting. Configure the CD-ROM drive by
placing the jumper over the set of pins corresponding to the setting you chose
in Step 3. See “Step 3. Selecting the IDE port” on page 1-4.
v If you are configuring the CD-ROM device as primary, set the jumper to the
master 1 device setting. (This is how the drive is set when it is shipped.) If
there is a second device on the IDE port, make sure that device is configured
as secondary.
v If you are configuring the CD-ROM device as secondary, set the jumper to
the secondary 2 device setting. Make sure that the other device on the IDE
port is configured as primary (or primary-with-secondary-present).
v If you are configuring the CD-ROM device as cable-select, set the jumper to
the cable-select 3 device setting. If there is another device on the IDE port,
make sure that the second device is also configured for cable-select.
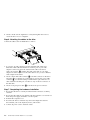
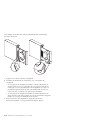
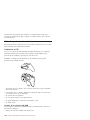
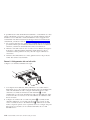
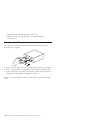
Step 5. Mounting the drive in the bay
Attention: Be sure to use the M3 x5 mm mounting screw in the option
package. Using screws that are too long might damage the drive
You can mount the CD-ROM drive horizontally or vertically in the computer. If
you mount the drive vertically, you must secure any CDs you place into the
drive before the drive tray is closed, or the CD-ROM drive will not be able to
read the CD correctly. For further instructions on securing your CDs in a
vertically mounted drive, go to “Loading a CD” on page 1-9.
1. Slide the drive into the bay. Your computer might have specific required
procedures for installing storage devices. Refer to the documentation that
came with your computer for further instructions.
2. Align the drive-bay screw holes with the threaded holes in the drive
housing or mounting bracket; then thread the screws in loosely to check
their positions. Usually two screws are used on each side.
Part 1: Installation and user’s guide
1-5
3. Check to make sure the alignment is correct; then tighten the screws to
secure the drive. Do not overtighten.
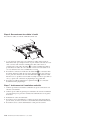
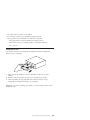
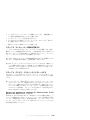
Step 6. Attaching the cables to the drive
Connect the cables to the CD-ROM drive as follows.
1. If you have an audio adapter, locate the included audio cables and
determine which cable best fits the CD audio-in port on your audio
adapter. Connect one end of the selected audio cable to the device
audio-out connector 1, and the other end of the cable to your audio
adapter CD audio-in port. Save the other cable in case you use a different
audio adapter in the future.
2. Attach a 40-pin IDE cable connector 2to the IDE connector on the drive.
Align the cable so that the color-coded edge is closest to the power cable
connector 3. Use the IDE cable provided with this option if there is no
cable attached to the IDE port or if there is only one device connector on
the IDE cable.
3. Attach a four-pin power cable 3 to the device dc power connector.
Step 7. Completing the hardware installation
1. Be sure that the drive is securely mounted and the connectors are firmly
attached.
2. Be sure that the cables do not interfere with the computer cover and do not
block the power-supply fan blades or air-flow paths.
3. Reinstall the computer cover.
4. Reconnect all devices and check any devices that might have become
disconnected, such as the keyboard, mouse, and monitor.
5. Connect all power cords to electrical outlets.
1-6
48X-20X Internal IDE CD-ROM Drive: User’s Guide
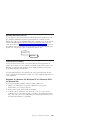
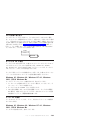
Step 8. Updating your computer configuration
After you have completed the hardware installation, restart your computer.
Usually, the configuration-setup information screen is displayed. If this screen
is not displayed, check your computer documentation for information about
accessing the configuration or setup utility program.
To see the configuration information for most IBM computers, press the F1
button during startup. When you have finished reviewing the information,
save the changes and exit.
Note: Some older computers with one IDE port might not display the
CD-ROM drive information when you review the configuration-setup
information. You still can use the CD-ROM drive in this situation if you
have correctly completed the installation.
Step 9. Installing device drivers
This section contains the instructions for installing device drivers for the
CD-ROM drive, based on the operating system you are using.
Note: User requirements vary; the device driver settings for that operating
system can be customized. If your computer does not work well with
the default settings given in the installation instructions in this section,
refer to “Appendix A. Customizing device driver configuration settings”
on page A-1 for information on customizing your device driver
configuration settings.
Device driver for Windows 95, Windows 98, Windows NT, Windows
2000, and Windows Me
Windows 98 and Windows Me automatically detect the CD-ROM drive and do
not present any installation screens. If the driver installation screens are
displayed after your operating system starts, follow the instructions on the
screen to install the device drivers. Consult the documentation that comes with
your operating system for more information.
Part 1: Installation and user’s guide
1-7
Use and care of the drive
This section includes instructions for the proper care of CDs and the care and
operation of your CD-ROM drive.
Caring for a CD
CDs are high-density media that must be handled with care and kept clean to
insure that they remain readable. These precautions will help to prolong the
life of your CDs.
Attention: Wiping a CD using a circular motion might cause loss of data.
v Handle the CD by the edges or by the center hole. Do not touch the data
surface of the CD.
v To remove dust or fingerprints, wipe the CD from the center to the edge
with a soft, lint-free cloth.
v Do not write on the surface.
v Do not place the CD in direct sunlight.
v Do not use commercial cleaners to clean the CD.
v Do not bend the CD.
Caring for the CD-ROM drive
To protect your CD-ROM drive during operation, observe the following
precautions.
v Remove an CD from the drive before moving the drive.
v Do not insert foreign objects into the drive.
v Do not remove the drive cover or attempt to service the drive.
v Do not operate the drive under any of the following conditions:
– High temperature, high humidity, or direct sunlight
1-8
48X-20X Internal IDE CD-ROM Drive: User’s Guide
– Excessive vibration, sudden shock, or inclined surface
– Excessive dust
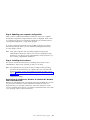
Loading a CD
To load a CD into a horizontally mounted CD-ROM drive do the following:
1. Press the Eject/Load button. The tray slides out of the drive.
2. Insert the CD into the loading tray with the label facing up.
3. Close the loading tray by pressing Eject/Load button, or by gently pushing
the tray in.
Attention: Do not force the tray to open; do not insert foreign objects into
the CD tray.
Part 1: Installation and user’s guide
1-9
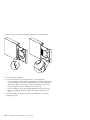
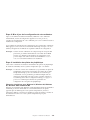
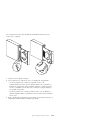
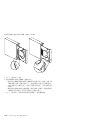
To load a CD into a vertically mounted CD-ROM drive do the following:
1. Press the Eject/Load button.
2. Look at the illustrations and compare them to your loading tray.
v If your loading tray looks like the left illustration, insert the CD carefully
so that the edges of the CD are underneath the tabs on the loading tray.
These plastic tabs cover the edges of the CD and hold it in place. The
tabs are attached to the tray itself and cannot be moved.
v If your loading tray looks like the right illustration, insert the CD into
the tray, and gently push the movable tab forward to hold the CD in
place.
3. Close the loading tray by pressing the Eject/Load button, or by gently
pushing the tray in.
1-10
48X-20X Internal IDE CD-ROM Drive: User’s Guide
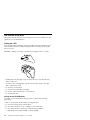
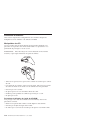
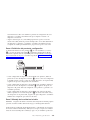
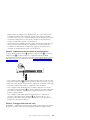
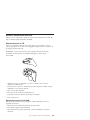
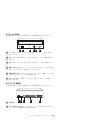
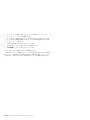
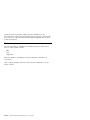
Manually ejecting a CD
If you press the Eject/Load button and the tray does not slide out, turn off the
computer. Straighten a large paper clip to form a tool, as shown in the
illustration below. The straightened end must extend at least 45 mm (1.8 in.).
Insert the extended end into the manual-eject hole on the front of the drive
(see “Front view of the drive” on page 1-3 ). Push the paper clip into the hole
until the tray opens. Gently pull out the tray until you can remove the CD.
45 mm
1.8 in
Playing an audio CD
To play an audio CD, you must have an audio-CD program installed in your
computer. Windows 98, Windows Me, Windows NT, and Windows 2000
applications include audio CD player programs.
For more information on using your audio playback software, see the
documentation that comes with your operating system or your computer.
Windows 95, Windows 98, Windows NT 4.0, Windows 2000,
or Windows Me
To use the audio utility do the following:
1. Turn on your computer and start your operating system, if you have not
already done so.
2. Insert an audio CD into the CD-ROM drive.
3. The CD begins playing. If the CD does not start playing, or if you have
problems with the audio, check the documentation that comes with your
audio adapter or computer for problem-solving information.
Using a data CD
Data CDs can contain data files, games, or applications.
Windows 95, Windows 98, Windows NT 4.0, Windows 2000,
or Windows Me
To read a data CD do the following:
1. Turn on your computer and start your operating system, if you have not
already done so.
Part 1: Installation and user’s guide
1-11
2. Insert an data CD into the CD-ROM drive. Many program CDs will
automatically start at this point. If the CD does not automatically start, go
on to step 3.
3. Double-click My Computer.
4. Verify that the CD-ROM icon is displayed.
5. Double-click the CD-ROM icon.
6. Verify that you can view files on the CD.
If you are unable to select the CD-ROM icon or view data, see “Appendix B.
Problem solving” on page B-1 or see “Appendix C. Help and service
information” on page C-1 for service information.
1-12
48X-20X Internal IDE CD-ROM Drive: User’s Guide
Chapitre 1 : Installation et utilisation
L’unité de CD-ROM interne IDE 48X-20X d’IBM est capable de lire un disque
compact (CD) contenant environ 680 Mo1 d’informations. Elle a été conçue
pour s’installer dans un ordinateur personnel qui dispose de l’architecture IDE
(integrated drive electronics) ou E-IDE (IDE améliorée).
Cette unité de CD-ROM lit les données à une vitesse jusqu’à 48 fois supérieure
à celle d’une unité de CD-ROM standard, en transférant jusqu’à 7200 ko2 par
seconde. L’unité peut lire les disques compacts conformes aux standards
ISO-9660 et High-Sierra Group (HSG). Elle peut également lire des disques
multi-sessions à architecture étendue (XA), tels que les CD Photo Kodak.
Description du produit
Outre ce manuel, la boîte de l’option contient :
v Une unité de CD-ROM interne IDE 48X/20X
v Un câble audio en “Y”, un câble audio standard
v Quatre vis de fixation (M3 x 5 mm, rainurées)
v Un câble IDE servant à raccorder deux périphériques IDE
v Un manuel relatif aux précautions d’utilisation du laser des unités de
CD-ROM
Prenez contact avec votre revendeur si l’un de ces éléments manque ou est
endommagé. Vous pouvez être amené à fournir la preuve d’achat. Sa
présentation est habituellement nécessaire pour faire jouer la garantie.
Vous trouverez des informations sur la manière d’obtenir de l’aide, sur le
support technique et sur les conditions de la garantie à l’annexe C, Help and
service information, à la page C-1. Avant d’appeler le support technique,
consultez l’annexe B, Problem solving, à la page B-1.
1. Un Mo correspond approximativement à 1 000 000 octets en terme de capacité de stockage.
2. Un ko représente environ 1024 octets en terme de vitesse de transfert de données.
© Copyright IBM Corp. 2000
1-13
Avant de commencer
Déterminez si votre ordinateur dispose des caractéristiques minimum requises ;
consultez la section «Configuration système requise» pour plus de
renseignements. Lisez les informations ci-après avant de commencer
l’installation.
Vous devez accomplir les opérations suivantes pour installer l’unité :
1. Déterminez quel connecteur IDE utiliser et le paramètre de configuration
correspondant.
2. Placez ou déplacez le cavalier de configuration de l’unité (et
éventuellement, modifiez aussi les cavaliers de configuration d’autres
périphériques).
Si vous ne comprenez pas ces opérations ou n’êtes pas certain de pouvoir
effectuer toutes celles qui sont décrites, demandez à un technicien informatique
qualifié d’installer l’unité de CD-ROM à votre place.
Configuration système requise
Avant de commencer l’installation de l’unité, vérifiez que votre ordinateur
satisfait aux conditions système suivantes.
v Microprocesseur : 80486 minimum
v Mémoire vive : 4 Mo minimum
v Unité de disquette 5 pouces 1/4
v Connecteur IDE disponible
v Connexion d’alimentation interne disponible
v Baie d’unité disponible
v Un des systèmes d’exploitation suivants :
– Microsoft Windows 95
– Microsoft Windows 98
– Microsoft Windows NT 4.0
– Microsoft Windows 2000 Professional
– Microsoft Windows Millennium Edition (Me)
1-14
48X-20X Internal IDE CD-ROM Drive: User’s Guide
Précautions de manipulation
Afin de protéger votre périphérique lors de l’installation, observez les
consignes suivantes :
v Manipulez l’unité avec précaution. Si vous heurtez ou laissez tomber l’unité,
vous risquez d’endommager ses composants internes.
v Conservez l’unité dans sa pochette antistatique jusqu’à ce vous soyez prêt à
l’installer dans votre ordinateur. Limitez vos mouvements. Ceux-ci peuvent
provoquer l’accumulation d’électricité statique.
v Ne forcez pas en insérant le câble d’alimentation. Sinon, vous risquez
d’endommager le connecteur ou l’unité.
Vue de la face avant de l’unité
Reportez-vous à l’illustration pour identifier les éléments qui sont mentionnés
dans les instructions d’installation.
«1¬Prise pour écouteurs. Branchez vos écouteurs sur cette sortie audio.
«2¬Réglage du volume. Tournez cette molette pour régler le volume.
«3¬Plateau du CD. Chargez un CD dans l’unité en le plaçant sur ce plateau.
«4¬Voyant de fonctionnement. Il s’allume lorsque l’unité lit un CD de données
ou joue un CD audio.
«5¬Trou d’éjection manuelle. Utilisez-le pour éjecter le plateau du CD si le
bouton Ejection/Chargement ne fonctionne pas correctement.
«6¬Bouton Ejection/Chargement. Appuyez sur ce bouton pour ouvrir ou
fermer le plateau du CD.
Chapitre 1 : Installation et utilisation
1-15
Vue de la face arrière de l’unité
Reportez-vous à l’illustration pour identifier les éléments qui sont mentionnés
dans les instructions d’installation.
«1¬Réservé.
«2¬Connecteur de sortie audio. Ce connecteur est utilisé pour raccorder l’unité
de CD-ROM à une carte audio.
«3¬Broches de configuration. Le positionnement du cavalier sur ces broches
détermine la priorité de l’unité de CD-ROM sur le bus IDE.
«4¬Connecteur IDE. Il sert à connecter l’unité de CD-ROM au câble IDE.
«5¬Connecteur d’alimentation. Il permet de raccorder le cordon d’alimentation
à l’unité de CD-ROM.
Installation de l’unité
Effectuez les opérations suivantes pour installer l’unité de CD-ROM dans votre
ordinateur.
Etape 1. Ouverture de l’ordinateur
1. Mettez l’ordinateur hors tension, ainsi que tous les périphériques qui y sont
connectés.
2. Débranchez les cordons d’alimentation de l’ordinateur, ainsi que ceux de
tous les périphériques connectés.
3. Retirez le carter de l’ordinateur.
1-16
48X-20X Internal IDE CD-ROM Drive: User’s Guide
Etape 2. Déballage de l’unité
1. Avant d’ouvrir la pochette antistatique dans laquelle l’unité est emballée,
placez-la contre une surface en métal nu pendant au moins deux secondes.
Ceci a pour effet de décharger l’électricité statique accumulée sur
l’emballage et sur votre corps.
2. Retirez l’unité de la pochette antistatique. S’il vous faut poser l’unité, placez
la pochette antistatique sur une surface plane (un magazine, par exemple)
et placez l’unité sur la pochette antistatique.
Etape 3. Sélection du port IDE
Les ordinateurs les plus récents comportent généralement deux ports IDE,
chacun pouvant prendre en charge deux périphériques. Habituellement, le port
IDE auquel votre unité de disque dur est connectée est le port IDE primaire.
L’autre port IDE est le port secondaire. Le port IDE et le positionnement choisi
pour le câble IDE déterminent la position du cavalier de configuration que
vous utiliserez pour l’unité.
v Si vous avez deux ports IDE, connectez l’unité de CD-ROM au port IDE
secondaire de la carte principale ou de la carte IDE. Si l’unité de CD-ROM
est le seul périphérique sur le port IDE secondaire, utilisez la position
primaire. Si l’unité de CD-ROM est le deuxième périphérique connecté au
port secondaire, utilisez la position secondaire.
v Si vous devez connecter l’unité de CD-ROM au port IDE primaire (le même
port que celui dédié à l’unité de disque dur ou à un autre périphérique
rapide), utilisez la position secondaire pour l’unité de CD-ROM et la
position primaire pour le périphérique plus rapide. Dans certaines
circonstances, vous devrez changer le paramétrage de la configuration de
l’unité de disque dur pour la placer sur maître-avec-présence-d’unsecondaire lorsque vous raccorderez un périphérique secondaire sur le même
câble. Pour plus d’informations sur le paramétrage des cavaliers de
configuration d’autres périphériques, reportez-vous à la documentation
fournie avec votre ordinateur ou avec le périphérique concerné.
v Certains ordinateurs non IBM supportent le paramétrage sélection-câble
dans lequel la position du périphérique sur le câble détermine si ce
périphérique est primaire ou secondaire. Consultez la documentation fournie
avec votre ordinateur pour déterminer s’il supporte ce paramétrage.
Chapitre 1 : Installation et utilisation
1-17
Etape 4. Positionnement du cavalier de configuration
L’illustration représente la position primaire «1¬, la position secondaire (ou
esclave) «2¬ et la position sélection-câble «3¬. Configurez l’unité de CD-ROM
en plaçant le cavalier sur le groupe de broches correspondant au paramétrage
que vous avez choisi à l’étape 3. Voir «Etape 3. Sélection du port IDE» à la
page 1-17.
1-18
48X-20X Internal IDE CD-ROM Drive: User’s Guide
v Si vous configurez l’unité de CD-ROM comme périphérique primaire,
positionnez le cavalier sur la position maître «1¬ (c’est la position définie sur
l’unité telle qu’elle est livrée). Si un deuxième périphérique est présent sur le
port IDE, assurez-vous qu’il est configuré comme périphérique secondaire.
v Si vous configurez l’unité de CD-ROM comme périphérique secondaire,
positionnez le cavalier sur la position secondaire «2¬. Vérifiez que l’autre
périphérique présent sur le port IDE est configuré comme périphérique
primaire (ou comme maître-avec-présence-d’un-secondaire).
v Si vous configurez l’unité de CD-ROM en mode sélection-câble, positionnez
le cavalier sur la position sélection-câble «3¬. Si un autre périphérique est
présent sur le port IDE, assurez-vous qu’il a aussi la configuration
sélection-câble.
Etape 5. Montage de l’unité dans la baie
Avertissement : Vérifiez que vous utilisez bien les vis de fixation M3 x 5 mm
fournies dans la boîte. L’utilisation de vis trop longues risque d’endommager
l’unité.
Vous pouvez monter l’unité de CD-ROM horizontalement ou verticalement
dans l’ordinateur. Si vous montez l’unité verticalement, vous devrez
positionner le CD en le verrouillant dans l’unité de CD-ROM avant de fermer
le plateau, sinon la lecture ne s’effectuera pas. Pour plus de détails sur la façon
de placer de manière adéquate vos CD dans une unité montée verticalement,
reportez-vous à «Chargement d’un CD» à la page 1-23.
1. Glissez l’unité à l’intérieur de la baie. Votre ordinateur peut nécessiter des
procédures spécifiques pour l’installation de périphériques de stockage.
Consultez la documentation fournie avec votre ordinateur pour plus de
renseignements.
2. Alignez les trous de vis de la baie avec les trous filetés du boîtier de l’unité
ou de l’étrier de fixation, puis serrez légèrement les vis afin de vérifier leurs
positions. Habituellement, on utilise deux vis de chaque côté.
3. Vérifiez que l’alignement est correct, puis serrez un peu plus les vis afin
d’immobiliser l’unité. Ne les serrez pas trop fort.
Chapitre 1 : Installation et utilisation
1-19
Etape 6. Raccordement des câbles à l’unité
Raccordez les câbles à l’unité de CD-ROM comme suit.
1. Si vous disposez d’une carte son, examinez les câbles audio fournis et
déterminez celui qui s’adapte le mieux au port d’entrée CD audio de votre
carte son. Raccordez l’une des extrémités du câble audio choisi au
connecteur de sortie audio de l’unité «1¬, et l’autre extrémité du câble au
port d’entrée CD audio de votre carte son. Conservez l’autre câble au cas
où vous utiliseriez une carte son différente à l’avenir.
2. Raccordez le connecteur à 40 broches du câble IDE «2¬au connecteur IDE
de l’unité. Alignez le câble de sorte que le bord repéré par une couleur se
trouve près du connecteur du cordon d’alimentation «3¬. Utilisez le câble
IDE livré avec ce produit si aucun câble n’est déjà raccordé au port IDE ou
s’il n’y a qu’un seul connecteur de périphérique sur le câble IDE.
3. Raccordez un câble d’alimentation à quatre broches «3¬ au connecteur
d’alimentation du périphérique.
Etape 7. Achèvement de l’installation matérielle
1. Vérifiez que l’unité est maintenue solidement et que les connecteurs sont
enfoncés correctement.
2. Vérifiez que les câbles ne gênent pas la fermeture du carter de l’ordinateur
et ne bloquent pas les pales du ventilateur de l’alimentation ou les grilles
d’aération.
3. Réinstallez le carter de l’ordinateur.
4. Raccordez tous les périphériques et vérifiez qu’aucun autre dispositif, tel
que le clavier, la souris ou l’écran n’a été malencontreusement déconnecté.
5. Raccordez tous les cordons d’alimentation à leur prise de courant.
1-20
48X-20X Internal IDE CD-ROM Drive: User’s Guide
Etape 8. Mise à jour de la configuration de votre ordinateur
Après avoir terminé l’installation matérielle, redémarrez votre ordinateur.
Généralement, l’écran de configuration apparaît. Si ce n’est pas le cas,
consultez la documentation de votre ordinateur pour savoir comment accéder à
l’utilitaire de configuration.
Pour examiner les informations de configuration sur la plupart des ordinateurs
IBM, appuyez sur la touche F1 au moment du démarrage. Lorsque vous avez
terminé, enregistrez les modifications et quittez l’utilitaire de configuration.
Remarque : Certains anciens ordinateurs ne comportant qu’un seul port IDE
peuvent ne pas afficher d’informations sur l’unité de CD-ROM
lorsque vous affichez les informations de configuration. Vous
pouvez malgré tout utiliser l’unité de CD-ROM dans ce cas si
vous avez correctement effectué son installation.
Etape 9. Installation des pilotes de périphérique
Cette section contient les instructions d’installation des pilotes de périphérique
de l’unité de CD-ROM, selon le système d’exploitation que vous utilisez.
Remarque : Les besoins varient selon l’utilisateur ; les paramètres du pilote de
périphérique peuvent être personnalisés en fonction du système
d’exploitation employé. Si votre ordinateur ne fonctionne pas
correctement avec les paramètres par défaut indiqués dans les
instructions d’installation de cette section, consultez l’annexe A,
Customizing device driver configuration settings, à la page A-1
pour savoir comment personnaliser les paramètres de
configuration de votre pilote de périphérique.
Pilotes de périphérique pour Windows 95, Windows 98, Windows
NT, Windows 2000 et Windows Me
Windows 98 et Windows Me détectent automatiquement l’unité de CD-ROM et
n’affichent pas d’écran d’installation. Si l’écran d’installation des pilotes
apparaît après le démarrage de votre système d’exploitation, suivez les
instructions affichées à l’écran pour installer les pilotes de l’unité. Consultez la
documentation fournie avec votre système d’exploitation pour plus
d’informations.
Chapitre 1 : Installation et utilisation
1-21
Précautions d’utilisation
Cette section comporte des renseignements sur la manière adéquate de
manipuler les CD et d’utiliser votre unité de CD-ROM.
Manipulation des CD
Les CD sont des supports haute densité qui doivent être manipulés avec
précaution et ne pas être salis afin de rester lisibles. Ces précautions vous
permettront de prolonger la vie de vos CD.
Avertissement : Evitez de nettoyer les CD en effectuant un mouvement
circulaire, ce qui risque d’entraîner une perte de données.
v Tenez les CD par le bord ou par leur trou central. Ne touchez pas la surface
des CD.
v Pour retirer de la poussière ou des traces de doigts, nettoyez le CD à partir
du centre en allant vers les bords avec un chiffon doux non pelucheux.
v N’écrivez pas sur la surface.
v Ne placez pas les CD sous la lumière directe du soleil.
v N’utilisez pas de produits du commerce pour nettoyer vos CD.
v Ne pliez pas les CD.
Précautions d’utilisation de l’unité de CD-ROM
Pour protéger votre unité de CD-ROM en fonctionnement, observez les
précautions suivantes.
v Retirez le CD présent dans l’unité avant de déplacer cette dernière.
v N’insérez pas d’objets étrangers dans l’unité.
v Ne retirez pas le couvercle et ne tentez pas de réparer vous-même l’unité.
1-22
48X-20X Internal IDE CD-ROM Drive: User’s Guide
v Ne faites pas fonctionner l’unité dans l’une des situations suivantes :
– Température élevée, fort degré d’hygrométrie ou exposition directe aux
rayons du soleil
– Vibration excessive, choc violent ou surface inclinée
– Environnement très poussiéreux
Chargement d’un CD
Pour charger un CD dans une unité de CD-ROM montée horizontalement,
procédez comme suit :
1. Appuyez sur le bouton Ejection/Chargement. Le plateau sort de l’unité.
2. Posez le CD sur le plateau de chargement en positionnant son étiquette
vers le haut.
3. Fermez le plateau de chargement en appuyant sur le bouton
Ejection/Chargement, ou en repoussant doucement le plateau.
Avertissement : Ne tentez pas de forcer l’ouverture du plateau ; ne placez
pas d’objets étrangers sur le plateau.
Chapitre 1 : Installation et utilisation
1-23
Pour charger un CD dans une unité de CD-ROM montée verticalement,
procédez comme suit :
1. Appuyez sur le bouton Ejection/Chargement.
2. Examinez les illustrations et comparez-les avec votre plateau de
chargement.
v Si votre plateau de chargement ressemble à celui de l’illustration de
gauche, insérez le CD avec précaution de sorte que les bords du CD
soient logés sous les ergots du plateau de chargement. Ces ergots en
plastique bloquent les bords du CD et le maintiennent en place. Les
ergots sont fixés au plateau et ne peuvent pas être retirés.
v Si votre plateau de chargement ressemble à celui de l’illustration de
droite, insérez le CD dans le plateau et poussez doucement la languette
mobile vers l’avant pour maintenir le CD en place.
3. Fermez le plateau de chargement en appuyant sur le bouton
Ejection/Chargement, ou en repoussant doucement le plateau.
1-24
48X-20X Internal IDE CD-ROM Drive: User’s Guide
Ejection manuelle d’un CD
Si vous appuyez sur le bouton Ejection/Chargement et que le plateau ne sort
pas, éteignez l’ordinateur. Dépliez un grand trombone, comme le montre
l’illustration ci-dessous. L’extrémité dépliée doit s’étendre sur au moins 45 mm.
Insérez l’extrémité dépliée dans le trou d’éjection manuelle situé sur la face
avant de l’unité (voir «Vue de la face avant de l’unité» à la page 1-15). Poussez
le trombone dans le trou jusqu’à ce que le plateau s’ouvre. Tirez doucement le
plateau vers vous jusqu’à ce que vous puissiez retirer le CD.
45 mm
1.8 in
Lecture d’un CD audio
Pour pouvoir lire un CD audio, vous devez disposer d’un programme de
lecture de CD audio sur votre ordinateur. Parmi les applications fournies avec
Windows 98, Windows Me, Windows NT et Windows 2000 se trouvent des
programmes de lecture de CD audio.
Pour plus d’informations sur l’utilisation de votre logiciel de lecture de CD
audio, consultez la documentation fournie avec votre système d’exploitation ou
votre ordinateur.
Windows 95, Windows 98, Windows NT 4.0, Windows 2000
ou Windows Me
Pour faire fonctionner l’utilitaire audio, procédez comme suit :
1. Mettez votre ordinateur sous tension et démarrez votre système
d’exploitation, si ce n’est pas déjà fait.
2. Insérez un CD audio dans l’unité de CD-ROM.
3. La lecture du CD commence. Si le CD n’est pas lu ou si vous avez des
problèmes avec la reproduction audio, consultez la documentation fournie
avec votre carte son ou votre ordinateur pour obtenir des informations sur
la manière de remédier à ce problème.
Chapitre 1 : Installation et utilisation
1-25
Utilisation d’un CD de données
Les CD de données peuvent contenir des fichiers de données, des jeux ou des
applications.
Windows 95, Windows 98, Windows NT 4.0, Windows 2000
ou Windows Me
Pour lire un CD de données, procédez comme suit :
1. Mettez votre ordinateur sous tension et démarrez votre système
d’exploitation, si ce n’est pas déjà fait.
2. Insérez un CD de données dans l’unité de CD-ROM. De nombreux CD de
logiciels démarrent automatiquement à ce moment. Si le CD ne démarre
pas automatiquement, passez à l’étape 3.
3. Cliquez deux fois sur Poste de travail.
4. Vérifiez que l’icône du CD-ROM est affichée.
5. Cliquez deux fois sur l’icône du CD-ROM.
6. Vérifiez que la liste des fichiers présents sur le CD apparaît.
Si vous ne pouvez pas sélectionner l’icône du CD-ROM ou afficher les fichiers
qu’il renferme, consultez l’annexe B, Problem solving, à la page B-1 ou
reportez-vous à l’annexe C, Help and service information, à la page C-1 pour
des informations de dépannage.
1-26
48X-20X Internal IDE CD-ROM Drive: User’s Guide
Parte 1: Instalación y guía del usuario
®
La unidad de CD ROM IBM IDE interna 48X-20X puede leer un disco
compacto (CD) que contenga aproximadamente 680 MB 1. Está diseñada para
su instalación en un PC que utilice la electrónica de unidades integradas (IDE)
o la arquitectura IDE mejorada.
El dispositivo de CD ROM distribuye los datos a una velocidad de hasta 48
veces la de un CD ROM normal, enviando datos a hasta 7200 KB 2. La unidad
puede leer los discos compactos que se ajustan a los estándares ISO-9660 y
High-Sierra Group (HSG). También lee discos multisesión y arquitectura
ampliada (XA) como, por ejemplo, los CD de fotografías de Kodak.
Descripción del producto
Además de este manual, el paquete opcional incluye:
v Una unidad de CD ROM IDE interna 48X-20X
v Un cable de audio “Y”, un cable de audio
v Cuatro tornillos de montaje (M3 x 5 mm, con ranura)
v Un cable IDE para conectar dos dispositivos IDE
v La guía de seguridad láser para las unidades de CD ROM
Póngase en contacto con el punto de venta si falta algún artículo o si está
dañado. Asegúrese de guardar la prueba de compra. Es posible que la necesite
para recibir el servicio de garantía.
Puede obtener información acerca de cómo obtener ayuda, soporte técnico y
servicio de garantía en el “Apéndice C. Help and service information” en la
página C-1. Antes de llamar al soporte técnico, consulte “Apéndice B.
Resolución de problemas” en la página B-1.
Antes de empezar
Determine si el sistema satisface los requisitos mínimos; consulte el apartado
“Requisitos del sistema” en la página 1-28 para obtener más detalles. Lea la
información siguiente antes de empezar con la instalación.
Debe realizar los pasos siguientes para instalar la unidad:
1. Un MB representa aproximadamente 1 000 000 de bytes en cuanto a la capacidad de
almacenamiento de la información.
2. Un KB representa aproximadamente 1024 bytes en cuanto a la velocidad de transferencia de datos
por segundo.
© Copyright IBM Corp. 2000
1-27
1. Determine el conector IDE que debe utilizar y los valores de configuración
correspondientes.
2. Coloque el puente de configuración en la unidad o cámbielo (y
posiblemente realice modificaciones en los puentes de configuración de los
otros dispositivos).
Si no entiende estos procedimientos o no está seguro de su habilidad para
realizar todos los procedimientos descritos, deje que un técnico cualificado en
informática instale el CD ROM.
Requisitos del sistema
Antes de empezar a instalar la unidad, asegúrese de que el sistema satisface
los requisitos siguientes.
v Microprocesador mínimo: 80486
v RAM mínima: 4 MB
v Unidad de disquetes de 5,25 pulgadas
v Conexión a IDE disponible
v Conexión a alimentación interna disponible
v Bahía de unidad disponible
v Uno de los sistemas operativos siguientes:
– Microsoft
®
– Microsoft Windows
®
®
Windows 95
®
98
®
– Microsoft Windows NT 4.0
– Microsoft Windows 2000 Professional
– Microsoft Windows Millennium Edition (Me)
Instrucciones de manipulación
Para proteger el dispositivo durante la instalación, observe las precauciones
siguientes:
v Manipule la unidad con cuidado. Si la unidad sufre golpes o caídas, los
componentes del interior del alojamiento de la unidad pueden resultar
dañados.
v Guarde el dispositivo en la bolsa antiestática hasta que esté preparado para
instalar la unidad en el sistema. Limite sus movimientos. El movimiento
puede hacer que se cree electricidad estática.
v No fuerce la inserción del cable de alimentación. Si lo hace, podría dañar el
conector o la unidad.
1-28
Unidad de CD ROM IDE interna 48X-20X: Guía del usuario
Vista frontal de la unidad
Consulte la ilustración para identificar las piezas a las que las instrucciones de
instalación pueden hacer referencia.
«1¬Conector de auriculares. Conecte los auriculares aquí para la salida de
audio.
«2¬Control de volumen. Ajuste este botón para controlar el volumen.
«3¬Bandeja del CD. Utilice la bandeja del CD para cargar un CD en la unidad.
«4¬Indicador de Ocupado. Esta luz se enciende cuando la unidad lee un CD
de datos o reproduce un CD de audio.
«5¬Orificio para la expulsión manual. Utilícelo para expulsar la bandeja del
CD si el botón de ejecución/carga no funciona correctamente.
«6¬Botón de ejecución/carga. Pulse este botón para abrir o cerrar la bandeja
del CD.
Vista posterior de la unidad
Consulte la ilustración para identificar las piezas a las que las instrucciones de
instalación pueden hacer referencia.
«1¬Reservado.
«2¬Conector de salida de audio. Este conector se utiliza para conectar la
unidad de CD ROM a un adaptador de audio.
Parte 1: Instalación y guía del usuario
1-29
«3¬Pins de configuración. La colocación del puente sobre estos pins determina
la prioridad de la unidad de CD ROM en el bus IDE.
«4¬Conector IDE. Se utiliza para conectar la unidad de CD ROM al cable IDE.
«5¬Conector de corriente continua. Se utiliza para conectar el cable de
corriente continua a la unidad de CD ROM.
Instalación de la unidad
Siga estos pasos para instalar la unidad de CD ROM en el sistema.
Paso 1. Apertura del sistema
1. Apague el sistema y todos los dispositivos conectados.
2. Desenchufe los cables de alimentación del sistema y de todos los
dispositivos conectados.
3. Extraiga la cubierta del sistema.
Paso 2. Desembalaje de la unidad
1. Antes de abrir la bolsa antiestática en la que la unidad está embalada,
acérquela a una superficie de metal sin pintar durante dos segundos como
mínimo. Esto atraerá la electricidad estática del paquete y de su cuerpo.
2. Extraiga la unidad de la bolsa antiestática. Si debe colocar la unidad hacia
abajo, coloque la bolsa antiestática en una superficie plana acolchada como,
por ejemplo, una revista, y coloque la unidad sobre la bolsa antiestática.
Paso 3. Selección del puerto IDE
Los sistemas nuevos suelen tener dos puertos IDE, a cada uno de los cuales
pueden conectarse dos dispositivos. Generalmente, el puerto IDE al que está
conectada la unidad de disco duro es el puerto IDE primario. El otro puerto
IDE es el puerto secundario. El puerto IDE y la posición del cable que
seleccione determinarán el valor del puerto de configuración que deberá
utilizar para la unidad.
v Si tiene dos puertos IDE, conecte la unidad de CD ROM al puerto IDE
secundario de la placa del sistema o del adaptador IDE. Si la unidad de CD
ROM es el único dispositivo del puerto IDE secundario, utilice el valor de
configuración primario. Si la unidad de CD ROM es el segundo dispositivo
del puerto secundario, utilice el valor de configuración secundario.
v Si debe conectar la unidad de CD ROM al puerto IDE primario (el mismo
puerto que la unidad de disco duro o algún otro dispositivo rápido), utilice
el valor secundario para la unidad de CD ROM y el valor primario para el
dispositivo rápido. En algunos casos, es posible que necesite cambiar el valor
de configuración de la unidad de disco duro a maestro con secundario
presente al conectar un dispositivo secundario al mismo cable. Para obtener
1-30
Unidad de CD ROM IDE interna 48X-20X: Guía del usuario
más información sobre cómo definir los puentes de configuración de otros
dispositivos, consulte la documentación que acompaña al sistema o al
dispositivo en cuestión.
v Algunos sistemas que no son de IBM proporcionan soporte al valor de
selección de cable, donde la posición del dispositivo en el cable determina si
un dispositivo es primario o secundario. Consulte la documentación que
acompaña al sistema para determinar si proporciona soporte a este valor.
Paso 4. Definición del puente de configuración
La ilustración muestra el valor primario «1¬, el valor secundario (o esclavo)
«2¬ y el valor de selección de cable «3¬. Configure la unidad de CD ROM
colocando el puente sobre el conjunto de pins correspondientes al valor que
haya seleccionado en el paso 3. Consulte el apartado “Paso 3. Selección del
puerto IDE” en la página 1-30.
v Si está configurando el dispositivo de CD ROM como primario, defina el
puente en el valor de dispositivo maestro «1¬. (Así es como está configurada
la unidad cuando se envía). Si hay un segundo dispositivo en el puerto IDE,
asegúrese de que esté configurado como secundario.
v Si está configurando el dispositivo de CD ROM como secundario, defina el
puente en el valor de dispositivo secundario «2¬. Asegúrese de que el otro
dispositivo del puerto IDE esté configurado como primario (o primario con
secundario presente).
v Si está configurando el dispositivo de CD ROM como selección de cable,
defina el puente en el valor de dispositivo «3¬ de selección de cable. Si hay
otro dispositivo en el puerto IDE, asegúrese de que el dispositivo secundario
también esté configurado para selección de cable.
Paso 5. Montaje de la unidad en la bahía
Atención: Asegúrese de utilizar el tornillo de montaje M3 x5 mm del paquete
opcional. Si utiliza tornillos demasiados largos, la unidad podría dañarse.
Puede montar la unidad de CD ROM horizontal o verticalmente en el sistema.
Si monta la unidad verticalmente, debe fijar los CD que coloque en la unidad
antes de cerrar la bandeja de la unidad ya que, si no, la unidad no podrá leer
Parte 1: Instalación y guía del usuario
1-31
el CD correctamente. Para obtener instrucciones acerca de cómo asegurar los
CD en una unidad montada verticalmente, consulte el apartado “Carga de un
CD” en la página 1-35.
1. Deslice la unidad dentro de la bahía. Es posible que el sistema necesite
procedimientos específicos para instalar dispositivos de almacenamiento.
Consulte la documentación que acompaña al sistema para obtener más
información.
2. Alinee los orificios para los tornillos de la bahía de la unidad con los
orificios perforados en el alojamiento de la unidad o en la pieza de sujeción
de montaje; a continuación, pase los tornillos sin apretarlos para comprobar
su posición. Normalmente se utilizan dos tornillos en cada lado.
3. Compruebe que la alineación sea correcta; a continuación, apriete los
tornillos para que la unidad quede fijada. No apriete demasiado.
Paso 6. Conexión de los cables a la unidad
Conecte los cables a la unidad de CD ROM de la forma siguiente:
1. Si tiene un adaptador de audio, busque los cables de audio incluidos y
determine qué cable se ajusta mejor al puerto de entrada de CD del
adaptador de audio. Conecte un extremo del cable de audio seleccionado al
conector de salida de audio del dispositivo «1¬ y el otro extremo al puerto
de entrada de audio del CD del adaptador de audio. Guarde el otro cable
por si utiliza un adaptador de audio distinto en el futuro.
2. Conecte un conector de cable IDE de 40 pins «2¬ al conector IDE de la
unidad. Alinee el cable de forma que el lado con códigos de color quede
más cerca del conector del cable de alimentación «3¬. Utilice el cable IDE
que se proporciona con esta opción si no hay ningún cable conectado al
puerto IDE o si sólo hay un conector de dispositivos en el cable IDE.
3. Conecte un cable de alimentación de 4 pins «3¬ al conector de corriente
continua del dispositivo.
1-32
Unidad de CD ROM IDE interna 48X-20X: Guía del usuario
Paso 7. Finalización de la instalación del hardware
1. Asegúrese de que la unidad esté montada de forma segura y de que los
conectores estén conectados firmemente.
2. Asegúrese de que los cables no interfieran con la cubierta del sistema y no
bloqueen las palas del ventilador de la fuente de alimentación ni las vías de
entrada y salida de aire.
3. Vuelva a instalar la cubierta del sistema.
4. Conecte todos los dispositivos de nuevo y compruebe si se ha desconectado
algún dispositivo como el teclado, el ratón o el monitor.
5. Conecte todos los cables de alimentación a tomas de corriente.
Paso 8. Actualización de la configuración del sistema
Una vez finalizada la instalación del hardware, vuelva a arrancar el sistema.
Normalmente se visualiza la pantalla de información de configuración. Si no se
visualiza esta pantalla, busque información en la documentación del sistema
acerca de cómo acceder al programa de configuración.
Para ver la información de configuración de la mayor parte de sistemas IBM,
pulse el botón F1 durante el arranque. Cuando haya terminado de revisar la
información, guarde los cambios y salga.
Nota: Es posible que algunos sistemas más antiguos con un puerto IDE no
muestren la información de la unidad de CD ROM cuando repase la
información de configuración. En este caso, todavía puede utilizar la
unidad de CD ROM si ha completado la instalación correctamente.
Paso 9. Instalación de los controladores de dispositivos
Este apartado contiene las instrucciones para instalar controladores de
dispositivos para la unidad de CD ROM, según el sistema operativo que
utilice.
Nota: Los requisitos del usuario varían; los valores de los controladores de
dispositivos para el sistema operativo no pueden personalizarse. Si el
sistema no funciona bien con los valores por omisión proporcionados en
las instrucciones de instalación de este apartado, consulte el
“Apéndice A. Personalización de los valores de configuración de los
controladores de dispositivos” en la página A-1 para obtener
información sobre cómo personalizar los valores de configuración de los
controladores de dispositivos.
Controlador de dispositivo para Windows 95, Windows 98,
Windows NT, Windows 2000 y Windows Me
Windows 98 y Windows Me detectan de forma automática la unidad de CD
ROM y no muestran ninguna pantalla de instalación. Si se visualizan las
pantallas de instalación después de arrancar el sistema operativo, siga las
Parte 1: Instalación y guía del usuario
1-33
instrucciones de la pantalla para instalar los controladores de dispositivos.
Consulte la documentación que acompaña al sistema operativo para obtener
más información.
Utilización y cuidado de la unidad
Este apartado incluye instrucciones para el cuidado adecuado de los CD y del
funcionamiento de la unidad de CD ROM.
Cuidado de un CD
Los CD son soportes de alta densidad que deben manipularse con cuidado y
mantenerse limpios para garantizar que continúen siendo legibles. Estas
precauciones le ayudarán a prolongar la vida de los CD.
Atención: Si limpia un CD utilizando un movimiento circular puede
producirse una pérdida de datos.
v Aguante el CD por el borde o por el orificio central. No toque la superficie
de los datos del CD.
v Para eliminar polvo o huellas, limpie el CD desde el centro hacia el borde
con un trapo suave que no deje hilos.
v No escriba sobre la superficie.
v No coloque el CD bajo la luz directa del sol.
v No utilice limpiadores comerciales para limpiar el CD.
v No doble el CD.
Cuidado de la unidad de CD ROM
Para proteger la unidad de CD ROM durante su funcionamiento, observe las
precauciones siguientes.
v Extraiga un CD de la unidad antes de moverla.
1-34
Unidad de CD ROM IDE interna 48X-20X: Guía del usuario
v No inserte objetos extraños en la unidad.
v No extraiga la cubierta de la unidad ni intente repararla.
v No haga funcionar la unidad en las condiciones siguientes:
– Altas temperaturas, mucha humedad o luz directa del sol
– Vibraciones excesivas, sacudidas súbitas o superficies inclinadas
– Polvo excesivo
Carga de un CD
Para cargar un CD en una unidad de CD ROM montada horizontalmente,
realice los pasos siguientes:
1. Pulse el botón de expulsión/carga. La bandeja se desliza fuera de la
unidad.
2. Inserte el CD en la bandeja de carga con la etiqueta hacia arriba.
3. Cierre la bandeja de carga pulsando el botón de expulsión/carga o
empujando la bandeja hacia dentro con suavidad.
Atención: No fuerce la bandeja para abrirla; no inserte objetos extraños en la
bandeja del CD.
Parte 1: Instalación y guía del usuario
1-35
Para cargar un CD en una unidad de CD ROM montada verticalmente, realice
los pasos siguientes:
1. Pulse el botón de expulsión/carga.
2. Mire las ilustraciones y compárelas con la bandeja de carga.
v Si la bandeja de carga se parece a la ilustración de la izquierda, inserte el
CD con cuidado de forma que los bordes del CD queden por debajo de
las lengüetas de la bandeja de carga. Estas lengüetas de plástico recubren
los bordes del CD y lo mantienen en su sitio. Las lengüetas están sujetas
a la propia bandeja y no pueden moverse.
v Si la bandeja de carga se parece a la ilustración de la derecha, inserte el
CD en la bandeja y empuje la lengüeta móvil con suavidad hacia fuera
para que mantener el CD en su lugar.
3. Cierre la bandeja de carga pulsando el botón de expulsión/carga o
empujando la bandeja hacia dentro con suavidad.
1-36
Unidad de CD ROM IDE interna 48X-20X: Guía del usuario
Expulsión de un CD manualmente
Si pulsa el botón de expulsión/carga y la bandeja no se desliza hacia fuera,
apague el sistema. Enderece un clip grande para formar una herramienta,
como se muestra en la ilustración siguiente. El extremo enderezado debe tener
por lo menos 45 mm (1,8″). Inserte el extremo enderezado en el orificio de
expulsión manual de la parte frontal de la unidad (consulte el apartado “Vista
frontal de la unidad” en la página 1-29). Vaya introduciendo el clip en el orificio
hasta que se abra la bandeja. Estire la bandeja hacia fuera con suavidad hasta
que pueda extraer el CD.
Reproducción de un CD de audio
Para reproducir un CD de audio, debe tener instalado un programa de audio
en el sistema. Entre las aplicaciones de Windows 98, Windows Me, Windows
NT y Windows 2000 se incluyen programas de reproducción de CD de audio.
Para obtener más información acerca de cómo utilizar el software para la
reproducción del audio, consulte la documentación que se incluye con el
sistema operativo o con el sistema.
Windows 95, Windows 98, Windows NT 4.0, Windows 2000 o
Windows Me
Para utilizar el programa de utilidad de audio, realice los pasos siguientes:
1. Encienda el sistema y arranque el sistema operativo si todavía no lo ha
hecho.
2. Inserte un CD de audio en la unidad de CD ROM.
3. El CD se empezará a oir. Si el CD no empieza a oirse o si tiene problemas
con el audio, compruebe la documentación que acompaña al adaptador de
audio o al sistema para obtener información sobre la resolución de
problemas.
Utilización de un CD de datos
Los CD de datos pueden contener archivos, juegos o aplicaciones.
Windows 95, Windows 98, Windows NT 4.0, Windows 2000 o
Windows Me
Para leer un CD de datos, realice los pasos siguientes:
Parte 1: Instalación y guía del usuario
1-37
1. Encienda el sistema y arranque el sistema operativo si todavía no lo ha
hecho.
2. Inserte un CD de datos en la unidad de CD ROM. Muchos CD de
programas empezarán de forma automática en este momento. Si el CD no
empieza automáticamente, vaya al paso 3.
3. Pulse dos veces el botón sobre Mi PC.
4. Verifique que se visualice el icono de CD ROM.
5. Pulse dos veces el botón sobre el icono CD ROM.
6. Verifique que puede ver los archivos del CD.
Si no puede seleccionar el icono de CD ROM o ver los datos, consulte el
“Apéndice B. Resolución de problemas” en la página B-1 o el “Apéndice C.
Help and service information” en la página C-1 para obtener información sobre
cómo repararlo.
1-38
Unidad de CD ROM IDE interna 48X-20X: Guía del usuario
Parte 1: Guida per l’utente e all’installazione
®
L’unità CD-ROM con IDE interno IBM 48X-20X è in grado di leggere un CD
(compact disc) che contiene circa 680 MB1 di informazioni. Essa è designata per
l’installazione relativa ad un elaboratore che utilizza la struttura IDE
(integrated drive electronics) o EIDE (enhanced IDE).
L’unità CD-ROM distribuisce i dati sino a 48 volte rispetto alla velocità del
CD-ROM standard, distribuendo i dati sino a 7200 KB2 al secondo. L’unità
legge i CD che soddisfano gli standard ISO-9660 e HSG (High-Sierra Group).
Legge anche sessioni multiple, i dischi con struttura estesa (XA), come i CD
fotografici Kodak.
Descrizione del prodotto
Oltre a questo manuale, il pacchetto di opzioni include:
v Unità CD-ROM con IDE interno 48X-20X
v Un cavo audio “Y”, un cavo audio
v Quattro viti di fissaggio (M3 x 5 mm)
v Un cavo IDE per la connessione di due unità IDE
v Guida relativa alla sicurezza del laser per le unità CD-ROM
Se un componente è mancante o danneggiato, contattare il punto di vendita.
Conservare la ricevuta di acquisto. E’ possibile usufruire della garanzia.
E’ possibile rilevare le informazioni relative all’assistenza tecnica, al supporto
tecnico e alla garanzia nella sezione “Appendice C. Informazioni sull’assistenza
tecnica” a pagina C-1. Prima di contattare l’assistenza tecnica, consultare la
sezione “Appendice B. Risoluzione dei problemi” a pagina B-1.
Prima di iniziare
Determinare se l’elaboratore soddisfi i requisiti minimi; per le informazioni
dettagliate, consultare la sezione “Requisiti del sistema” a pagina 1-40. Prima di
avviare l’installazione, leggere le seguenti informazioni.
E’ necessario completare la seguente procedura per installare l’unità:
1. Determinare il connettore IDE da utilizzare e l’impostazione della
configurazione corrispondente.
1. MB equivale circa 1 000 000 byte relativa alla capacità della memoria.
2. KB equivale circa 1024 byte relativi alle velocità di trasferimento dati.
© Copyright IBM Corp. 2000
1-39
2. Posizionare o modificare il cavallotto di configurazione dell’unità (e
possibilmente apportare le modifiche ai cavallotti di configurazione di altre
unità).
Se tali procedure non sono state comprese oppure l’utente non è sicuro della
propria abilità nell’eseguire tutte le procedure descritte, rivolgersi ad un tecnico
qualificato per installare l’unità CD-ROM.
Requisiti del sistema
Prima di installare l’unità, verificare che l’elaboratore soddisfi i seguenti
requisiti del sistema.
v Microprocessore minimo: 80486
v Memoria RAM minima: 4 MB
v Unità minidisco da 5,25″
v Connessione IDE disponibile
v Connessione di alimentazione interna disponibile
v Vano dell’unità disponibile
v Uno dei seguenti sistemi operativi:
– Microsoft
®
®
Windows 95
– Microsoft Windows
®
98
®
®
– Microsoft Windows NT 4.0
– Microsoft Windows 2000 Professional
– Microsoft Windows Me (Millennium Edition)
Gestione delle istruzioni
Durante l’installazione, per proteggere l’unità, osservare le seguenti
precauzioni:
v Maneggiare l’unità con cura. Il trasporto o la caduta dell’unità può
danneggiare i componenti interni.
v Conservare l’unità in un involucro di protezione da elettricità statica fino a
quando si desidera installarla nell’elaboratore. Limitare i propri movimenti.
Il movimento può generare elettricità statica.
v Non forzare l’inserimento dei cavi di alimentazione. Operando in questo
modo, è possibile danneggiare il connettore o l’unità.
1-40
Unità CD-ROM con IDE interno 48X-20X: Guida per l’utente
Vista anteriore dell’unità
Per individuare le parti che potrebbero fare riferimento alle istruzioni
sull’installazione, consultare l’illustrazione.
«1¬Connettore per cuffie. Per l’emissione audio, collegare le cuffie in questo
punto.
«2¬Controllo del volume. Regolare questa finestra per il controllo di volume.
«3¬Vassoio CD. Utilizzare il vassoio del CD per caricare un CD nell’unità.
«4¬Indicatore di segnale occupato. Questo indicatore si accende quando l’unità
legge un CD di dati o riproduce un CD audio.
«5¬Foro di espulsione manuale. Utilizzare tale foro per espellere il vassoio del
CD nel caso in cui il pulsante di caricamento/espulsione non funziona
correttamente.
«6¬Pulsante di caricamento/espulsione. Premere tale pulsante per aprire o
chiudere il vassoio del CD.
Vista posteriore dell’unità
Per individuare le parti che potrebbero fare riferimento alle istruzioni
sull’installazione, consultare l’illustrazione.
«1¬Riservato.
«2¬Connettore di emissione audio. Questo connettore viene utilizzato per
collegare l’unità CD-ROM ad un adattatore audio.
Parte 1: Guida per l’utente e all’installazione
1-41
«3¬Piedini di configurazione. La posizione del cavallotto su questi piedini
determina la priorità dell’unità CD-ROM sul bus IDE.
«4¬Connettore IDE. Questo connettore viene utilizzato per collegare l’unità
CD-ROM al cavo IDE.
«5¬Connettore di alimentazione DC. Tale connettore viene utilizzato per
collegare il cavo di alimentazione dc all’unità CD-ROM.
Installazione dell’unità
Per installare l’unità CD-ROM, seguire tale procedura.
Passo 1. Apertura dell’elaboratore
1. Spegnere l’elaboratore e tutte le unità collegate.
2. Scollegare i cavi di alimentazione dell’elaboratore e di tutte le periferiche
collegate.
3. Rimuovere il coperchio dall’elaboratore.
Passo 2. Disimballaggio dell’unità
1. Prima di aprire l’imballo antistatico in cui è contenuta l’unità, metterlo in
contatto con una superficie metallica per almeno due secondi. In questo
modo, si riduce l’elettricità statica presente nell’involucro di protezione e
nel proprio corpo.
2. Rimuovere l’unità dall’imballo di protezione da elettricità statica. Se è
necessario poggiare l’unità, posizionare l’imballo antistatico su una
superficie piana, come una rivista e posizionare l’unità sull’imballo
antistatico.
Passo 3. Selezionare la porta IDE
Di solito, gli elaboratori nuovi dispongono di due porte IDE, ognuna delle
quali è in grado di supportare due unità. Di solito, la porta IDE su cui viene
collegata l’unità disco fisso è la porta IDE primaria. L’altra porta IDE è la porta
secondaria. La porta IDE e la posizione del cavo selezionata determinano
l’impostazione del cavallotto di configurazione utilizzata per l’unità.
v Se si dispone di due porte IDE, collegare l’unità CD-ROM alla porta IDE
secondaria della scheda di sistema o dell’adattatore IDE. Se l’unità CD-ROM
è l’unica unità della porta IDE secondaria, utilizzare l’impostazione di
configurazione primaria. Se l’unità CD-ROM è la seconda unità della porta
secondaria, utilizzare l’impostazione di configurazione secondaria.
v Se è necessario collegare l’unità CD-ROM alla porta IDE primaria (la stessa
porta dell’unità disco fisso o di un’altra unità veloce), utilizzare
l’impostazione secondaria per l’unità CD-ROM e l’impostazione primaria per
l’unità più veloce. In alcuni esempi, potrebbe essere necessario modificare
1-42
Unità CD-ROM con IDE interno 48X-20X: Guida per l’utente
l’impostazione di configurazione dell’unità disco fisso come impostazione
secondaria insieme a quella principale, quando viene collegata un’unità
secondaria sullo stesso cavo. Per ulteriori informazioni sull’impostazione dei
cavallotti di configurazione su altre unità, consultare la documentazione
fornita con l’elaboratore oppure con l’unità in uso.
v Alcuni elaboratori non IBM supportano l’impostazione di selezione del cavo,
dove la posizione dell’unità del cavo determina se un’unità è primaria o
secondaria. Per determinare se l’elaboratore supporta tale impostazione,
consultare la documentazione fornita con l’elaboratore.
Passo 4. Impostazione del cavallotto di configurazione
La figura illustra l’impostazione «1¬ primaria, l’impostazione «2¬ secondaria e
l’impostazione «3¬ di selezione del cavo. Configurare l’unità CD-ROM
posizionando il cavallotto sulla serie di piedini corrispondenti all’impostazione
selezionata nel Passo 3. Consultare la sezione “Passo 3. Selezionare la porta
IDE” a pagina 1-42.
v Se si configura l’unità CD-ROM come primaria, impostare il cavallotto come
impostazione dell’unità «1¬ primaria. Questa modalità è il modo in cui viene
impostata l’unità quando viene fornita. Se è presente una seconda unità sulla
porta IDE, verificare che l’unità sia configurata come secondaria.
v Se si configura l’unità CD-ROM come secondaria, impostare il cavallotto
come impostazione dell’unità «2¬ secondaria. Verificare che l’altra unità della
porta IDE sia configurata come primaria (oppure impostazione secondaria
insieme a quella primaria).
v Se si configura l’unità CD-ROM come selezione del cavo, impostare il
cavallotto come impostazione dell’unità «3¬ di selezione del cavo. Se è
presente un’altra unità sulla porta IDE, verificare che la seconda unità sia
configurata come selezione del cavo.
Passo 5. Fissaggio dell’unità nel vano
Avvertenza: Utilizzare la vite di fissaggio da M3 x5 mm fornita nel pacchetto
di opzione. L’utilizzo delle viti troppo lunghe potrebbe danneggiare l’unità
Parte 1: Guida per l’utente e all’installazione
1-43
E’ possibile fissare l’unità CD-ROM orizzontalmente o verticalmente. Se si fissa
l’unità verticalmente, è necessario collegare i CD, inseriti nell’unità, prima di
chiudere il vassoio dell’unità o l’unità CD-ROM non riesce a leggere il CD
correttamente. Per ulteriori istruzioni sul fissaggio dei CD in un’unità fissata
verticalmente, consultare la sezione “Caricamento di un CD” a pagina 1-48.
1. Far scorrere l’unità nel vano. L’elaboratore potrebbe disporre di specifiche
procedure richieste per l’installazione delle unità di memoria. Per ulteriori
istruzioni, consultare la documentazione fornita con l’elaboratore.
2. Allineare i fori delle viti tra il vano e l’unità con i fori filettati del supporto
di fissaggio o dell’alloggiamento dell’unità; quindi inserire le viti per
verificare le relative posizioni. Di solito, due viti vengono utilizzate su
ciascun lato.
3. Verificare che l’allineamento sia corretto; quindi serrare le viti per fissare
l’unità. Non serrare eccessivamente.
Passo 6. Collegamento dei cavi all’unità
Collegare i cavi all’unità CD-ROM come segue.
1. Se si dispone di un adattatore audio, individuare i cavi audio inclusi e
determinare il cavo che si adatta in modo migliore alla porta di immissione
audio CD dell’adattatore audio. Collegare un’estremità del cavo audio
selezionato al connettore di emissione audio dell’unità «1¬ e l’altra
estremità del cavo alla porta di immissione audio CD dell’adattatore audio.
Conservare l’altro cavo nel caso in cui viene utilizzato un adattatore audio
diverso in futuro.
2. Collegare un connettore di cavo IDE a 40 piedini «2¬ al connettore IDE
sull’unità. Allineare il cavo in modo tale che il margine colorato sia più
vicino al connettore del cavo di alimentazione «3¬. Utilizzare il cavo IDE
fornito con questa opzione se non è presente alcun cavo collegato alla porta
IDE oppure se è presente solo un connettore dell’unità sul cavo IDE
dell’elaboratore.
1-44
Unità CD-ROM con IDE interno 48X-20X: Guida per l’utente
3. Collegare un cavo di alimentazione a quattro piedini «3¬ al connettore di
alimentazione dc dell’unità.
Passo 7. Completamento dell’installazione dell’hardware
1. Verificare che l’unità sia fissata correttamente e che i connettori siano
collegati correttamente.
2. Verificare che i cavi no intralcino il coperchio dell’elaboratore e che non
blocchino la ventola dell’alimentatore o il canale del flusso d’aria.
3. Reinstallare il coperchio dell’elaboratore.
4. Ricollegare tutte le unità e verificare qualsiasi unità che potrebbe essere
scollegata, come la tastiera, il mouse ed il video.
5. Collegare tutti i cavi di alimentazione alle prese elettriche.
Passo 8. Aggiornamento della configurazione
dell’elaboratore
Una volta terminata l’installazione dell’hardware, riavviare l’elaboratore. Di
solito, vengono visualizzate le informazioni relative all’impostazione e alla
configurazione. Se tale pannello non viene visualizzato, per le informazioni
relative all’accesso del programma per l’impostazione o per la configurazione,
consultare la documentazione dell’elaboratore.
Per visualizzare le informazioni di configurazione relative alla maggior parte
degli elaboratori IBM, premere il pulsante F1 durante l’avvio. Una volta
terminata la visualizzazione delle informazioni, salvare le modifiche apportate
ed uscire.
Nota: E’ possibile che alcuni elaboratori vecchi, dotati di una porta IDE, non
visualizzino le informazioni relative all’unità CD-ROM, quando vengono
visualizzate di nuovo le informazioni di impostazione e di
configurazione. Se l’installazione è stata completata correttamente è
anche possibile utilizzare l’unità CD-ROM.
Passo 9. Installazione dei driver di periferica
Questa sezione contiene le istruzioni relative all’installazione dei driver di
periferica dell’unità CD-ROM, in base al sistema operativo in uso.
Nota: I requisiti dell’utente variano; è possibile personalizzare le impostazioni
dei driver di periferica del sistema operativo in uso. Se l’elaboratore non
funziona con le impostazioni predefinite, fornite dalle istruzioni
sull’installazione in questa sezione, consultare la sezione “Appendice A.
Personalizzazione delle impostazioni di configurazione dei driver di
periferica” a pagina A-1 per le informazioni sulla personalizzazione delle
impostazioni di configurazione dei driver di periferica.
Parte 1: Guida per l’utente e all’installazione
1-45
Driver di periferica per Windows 95, Windows 98, Windows NT,
Windows 2000 e Windows Me
I sistemi operativi Windows 98 e Windows Me rilevano automaticamente
l’unità CD-ROM e non visualizzano alcun pannello di installazione. Se i
pannelli di installazione del driver vengono visualizzati dopo l’avvio del
sistema operativo, seguire le istruzioni visualizzate per installare i driver di
periferica. Per ulteriori informazioni, consultare la documentazione fornita con
il sistema operativo in uso.
1-46
Unità CD-ROM con IDE interno 48X-20X: Guida per l’utente
Utilizzo e manutenzione dell’unità
Questa sezione comprende le istruzioni relative alla manutenzione corretta dei
CD e al funzionamento dell’unità CD-ROM.
Manutenzione di un CD
I CD sono strumenti a densità elevata che devono essere gestiti con cura e
pulizia appropriata in modo da essere leggibili. Tali precauzioni consentono di
prolungare la durata dei CD.
Avvertenza: Non passare il panno sulla superficie del CD facendo dei
movimenti circolari perché ciò potrebbe danneggiare i dati in modo
irreversibile.
v Afferrare il CD per le estremità o per il foro centrale. Non toccare la
superficie dei dati del CD.
v Per rimuovere la polvere o le impronte, passare un panno morbido e pulito
dall’interno verso l’esterno del CD.
v Non scrivere sulla superficie.
v Non collocare il CD alla luce diretta del sole.
v Per pulire il CD, non utilizzare prodotti per la pulizia.
v Non curvare il CD.
Manutenzione dell’unità CD-ROM
Durante il funzionamento, per proteggere l’unità CD-ROM osservare le
seguenti precauzioni:
v Rimuovere un CD dall’unità prima di spostare l’unità.
v Non inserire oggetti esterni nell’unità.
v Non rimuovere il coperchio dell’unità o tentare di effettuare assistenza
sull’unità.
Parte 1: Guida per l’utente e all’installazione
1-47
v Non utilizzare l’unità nelle seguenti condizioni:
– Temperatura elevata, umidità elevata o luce diretta del sole
– Vibrazioni eccessive, urti improvvisi o superficie inclinata
– Polvere eccessiva
Caricamento di un CD
Per caricare un CD in un’unità CD-ROM fissata orizzontalmente, procedere nel
modo seguente:
1. Premere il pulsante di espulsione/caricamento. Il vassoio viene estratto
dall’unità.
2. Inserire il CD nel vassoio di caricamento con l’etichetta rivolta verso l’alto.
3. Chiudere il vassoio di caricamento premendo il pulsante di
espulsione/caricamento oppure esercitando una leggera pressione sul
vassoio verso l’interno dell’unità.
Avvertenza: Non estrarre con forza il vassoio; non inserire oggetti esterni nel
vassoio del CD.
1-48
Unità CD-ROM con IDE interno 48X-20X: Guida per l’utente
Per caricare un CD in un’unità CD-ROM fissata verticalmente, procedere nel
modo seguente:
1. Premere il pulsante di espulsione/caricamento.
2. Consultare le illustrazioni e confrontarle con il vassoio di caricamento in
uso.
v Se il vassoio di caricamento è simile all’illustrazione a sinistra, inserire il
CD con attenzione, in modo che i bordi del CD siano posizionati al di
sotto della linguetta del vassoio di caricamento. Queste linguette di
plastica coprono i bordi del CD e lo posizionano correttamente. Le
linguette sono collegate al vassoio e non è possibile spostarle.
v Se il vassoio di caricamento è simile all’illustrazione a destra, inserire il
CD nel vassoio ed premere leggermente sulla linguetta in avanti per
posizionare il CD correttamente.
3. Chiudere il vassoio di caricamento premendo il pulsante di
espulsione/caricamento oppure esercitando una leggera pressione sul
vassoio verso l’interno dell’unità.
Parte 1: Guida per l’utente e all’installazione
1-49
Espulsione manuale di un CD
Se viene premuto il pulsante di espulsione/caricamento ed il vassoio non viene
estratto, spegnere l’elaboratore. Raddrizzare la graffetta per la carta per
formare uno strumento, come riportato nella figura seguente. L’estremità di
una graffetta deve essere di almeno 45 mm. Inserire l’estremità estesa nel foro
di espulsione manuale, posto sulla parte anteriore dell’unità (consultare la
sezione “Vista anteriore dell’unità” a pagina 1-41). Premere la graffetta per la
carta nel foro fino a quando viene aperto il vassoio. Estrarre il vassoio
delicatamente fino a quando è possibile rimuovere il CD.
45 mm
1.8 in
Riproduzione di un CD audio
Per riprodurre un CD audio, è necessario disporre di un programma audio CD
installato sull’elaboratore. Le applicazioni di Windows 98, Windows Me,
Windows NT e Windows 2000 comprendono i programmi di riproduzione di
CD audio.
Per ulteriori informazioni sull’utilizzo del software di riproduzione audio,
consultare la documentazione fornita con il sistema operativo o con
l’elaboratore.
Windows 95, Windows 98, Windows NT 4.0, Windows 2000 o
Windows Me
Per utilizzare il programma di utilità audio, procedere nel modo seguente:
1. Accendere l’elaboratore ed avviare il sistema operativo.
2. Inserire un CD audio nell’unità CD-ROM.
3. La riproduzione del CD inizia. Se il CD non avvia la riproduzione oppure
se si verificano problemi con l’audio, per le informazioni sulla risoluzione
dei problemi, consultare la documentazione fornita con l’adattatore audio o
l’elaboratore.
Utilizzo di un CD dati
E’ possibile che i CD dati contengano i file di dati, giochi o applicazioni.
1-50
Unità CD-ROM con IDE interno 48X-20X: Guida per l’utente
Windows 95, Windows 98, Windows NT 4.0, Windows 2000 o
Windows Me
Per leggere un CD dati, procedere nel modo seguente:
1. Accendere l’elaboratore ed avviare il sistema operativo.
2. Inserire un CD dati nell’unità CD-ROM. Diversi CD di programma
vengono avviati automaticamente. Se il CD non viene avviato
automaticamente, andare al passo 3.
3. Fare doppio clic su Risorse del computer.
4. Verificare che sia visualizzata l’icona CD-ROM.
5. Fare doppio clic sull’icona CD-ROM.
6. Verificare che sia possibile visualizzare i file sul CD.
Se non si è in grado di selezionare l’icona CD-ROM oppure visualizzare i dati,
per le informazioni sull’assistenza tecnica, consultare la sezione “Appendice B.
Risoluzione dei problemi” a pagina B-1 o “Appendice C. Informazioni
sull’assistenza tecnica” a pagina C-1.
Parte 1: Guida per l’utente e all’installazione
1-51
1-52
Unità CD-ROM con IDE interno 48X-20X: Guida per l’utente
Parte 1: Instalação e Guia do Usuário
®
A Unidade de Disco de CD-ROM IDE Interna IBM 48X-20X pode ler um disco
compacto (CD) contendo aproximadamente 680 MB1 de informações. Ela foi
projetada para ser instalada em um computador pessoal que utiliza a
arquitetura IDE (Integrated Drive Electronics) ou EIDE (Enhanced Integrated
Drive Electronics) avançada.
O dispositivo de CD-ROM fornece dados até 48 vezes a velocidade do
CD-ROM padrão, fornecendo dados em até 7200 KB2 por segundo. A unidade
lê discos compactos que atendem aos padrões ISO-9660 e High-Sierra Group
(HSG). Ela também lê discos de múltiplas sessões de arquitetura estendida
(XA), como o Kodak Photo CD.
Descrição do Produto
Além deste manual, o pacote de opcionais inclui:
v Unidade de Disco de CD-ROM IDE Interna 48X-20X
v U cabo de áudio “Y” e um cabo de áudio
v Quatro parafusos de montagem (M3 x 5 mm, para slot)
v Um cabo IDE para a conexão de dois dispositivos IDE
v Guia de Segurança do Laser para unidades de CD-ROM
Entre em contato com o fornecedor se algum item estiver faltando ou
danificado. Certifique-se de guardar o comprovante de compra. Ele pode ser
necessário para a solicitação do serviço de garantia.
Você pode localizar mais informações sobre como obter auxílio, suporte técnico
e serviço de garantia no “Apêndice C. Informações de Auxílio e Serviços” na
página C-1. Antes de ligar para o suporte técnico, consulte o “Apêndice B.
Resolução de Problemas” na página B-1.
Antes de Começar
Determine se o computador atende aos requisitos mínimos; consulte
“Requisitos do Sistema” na página 1-54 para obter detalhes. Leia as seguintes
informações antes de começar a instalação.
1. MB equivale aproximadamente a 1 000 000 bytes quando refere-se à capacidade de
armazenamento
2. KB equivale aproximadamente a 1024 bytes quando refere-se a velocidades de transferência de
dados
© Copyright IBM Corp. 2000
1-53
Você deve concluir as seguintes etapas para instalar a unidade:
1. Determine qual conector IDE utilizará e a definição de configuração
correspondente.
2. Posicione o jumper de configuração na unidade ou altere-o (e
possivelmente faça alterações nos jumpers de configuração de outros
dispositivos).
Se não entender esses procedimentos ou não tiver certeza sobre sua habilidade
em executar todos os procedimentos descritos, peça a um técnico de
computador qualificado que instale sua unidade de CD-ROM.
Requisitos do Sistema
Antes de começar a instalar a unidade, assegure-se de que o computador
atenda aos seguintes requisitos do sistema.
v Microprocessador mínimo: 80486
v Quantidade mínima de RAM: 4 MB
v Unidade de disquete de 5,25 pol.
v Conexão IDE disponível
v Conexão de alimentação interna disponível
v Compartimento de unidade disponível
v Um dos seguintes sistemas operacionais:
– Microsoft
®
®
Windows 95
– Microsoft Windows
®
98
®
®
– Microsoft Windows NT 4.0
– Microsoft Windows 2000 Professional
– Microsoft Windows Millennium Edition (Me)
Instruções de Manuseio
Para proteger o dispositivo durante a instalação, observe as seguintes
precauções:
v Manuseie a unidade com cuidado. Soltar ou balançar a unidade poderá fazer
com que os componentes dentro do invólucro da unidade sejam danificados.
v Mantenha o dispositivo em sua bolsa antiestática até o momento de
instalação da unidade no computador. Limite seus movimentos. Eles podem
causar acúmulo de eletricidade estática.
v Não force a inserção do cabo de alimentação. Isso pode danificar o conector
ou a unidade.
1-54
Unidade de Disco de CD-ROM IDE Interna 48X-20X: Guia do Usuário
Vista Frontal da Unidade
Consulte a ilustração para identificar as partes que podem ser mencionadas
nas instruções de instalação.
«1¬Tomada do fone de ouvido. Conecte os fones de ouvido nessa tomada para
a saída de áudio.
«2¬Controle de volume. Ajuste esse indicador para controlar o volume.
«3¬Bandeja de CD. Utilize a bandeja de CD para carregar um CD na unidade.
«4¬Indicador de ocupado. Essa luz acende quando an unidade lê um CD de
dados ou reproduz um CD de áudio.
«5¬Orifício de ejeção manual. Utilize-o para ejetar a bandeja de CD se o botão
Ejetar/Carregar não estiver operando corretamente.
«6¬Botão Ejetar/Carregar. Pressione esse botão para abrir ou fechar a bandeja
de CD.
Vista Posterior da Unidade
Consulte a ilustração para identificar as partes que podem ser mencionadas
nas instruções de instalação.
«1¬Reservado.
«2¬Conector de saída de áudio. Esse conector é utilizado para conectar a
unidade de CD-ROM a uma placa de áudio.
Parte 1: Instalação e Guia do Usuário
1-55
«3¬Pinos de configuração. O posicionamento dos jumpers nesses pinos
determina a prioridade da unidade de CD-ROM no barramento IDE.
«4¬Conector IDE. Esse conector é utilizado para conectar a unidade de
CD-ROM ao cabo IDE.
«5¬Conector de alimentação CC. Esse conector é utilizado para conectar o
cabo de alimentação CC à unidade de CD-ROM.
Instalando a Unidade
Siga estas etapas para instalar a unidade de CD-ROM no computador.
Etapa 1. Abrindo o Computador
1. Desligue o computador e todos os dispositivos conectados.
2. Desconecte os cabos de alimentação do computador e de todos os
dispositivos conectados.
3. Remova a tampa do computador.
Etapa 2. Desembalando a Unidade
1. Antes de abrir a bolsa antiestática na qual a unidade vem embalada,
encoste a bolsa em uma superfície de metal não-pintada por pelo menos
dois segundos. Isso drenará a eletricidade estática da embalagem e de seu
corpo.
2. Retire a unidade da bolsa. Se você precisar retirar a unidade da bolsa,
ponha a bolsa antiestática sobre uma superfície plana e revestida, como
uma revista, e coloque a unidade sobre a bolsa antiestática.
Etapa 3. Selecionando a Porta IDE
Os computadores mais novos têm geralmente duas portas IDE e cada uma
pode suportar dois dispositivos. Em geral, a porta IDE à qual a unidade de
disco rígido está conectada é a porta IDE primária. A outra porta IDE é a porta
secundária. A porta IDE e a posição do cabo selecionada determinam qual
posicionamento do jumper de configuração é utilizado para a unidade.
v Se houver duas portas IDE, conecte a unidade de CD-ROM à porta IDE
secundária na placa de sistema ou na placa IDE. Se a unidade de CD-ROM
for o único dispositivo na porta IDE secundária, utilize a definição de
configuração primária. Se a unidade de CD-ROM for o segundo dispositivo
na porta secundária, utilize a definição de configuração secundária.
v Se você precisar conectar a unidade de CD-ROM à porta IDE primária (a
mesma porta da unidade de disco rígido ou de outro dispositivo veloz),
utilize a definição secundária para a unidade de CD-ROM e a definição
primária para o dispositivo mais veloz. Em alguns casos, pode ser necessário
alterar a definição de configuração da unidade de disco rígido para mestre
1-56
Unidade de Disco de CD-ROM IDE Interna 48X-20X: Guia do Usuário
com secundário presente, ao conectar um dispositivo secundário no mesmo
cabo. Para obter mais informações sobre o posicionamento dos jumpers de
configuração em outros dispositivos, consulte a documentação que
acompanha o computador ou o dispositivo em questão.
• Alguns computadores não-IBM suportam a definição seleção de cabo, na
qual a posição do dispositivo no cabo determina se um dispositivo é
primário ou secundário. Consulte a documentação que acompanha o
computador para determinar se ele suporta essa definição.
Etapa 4. Definindo o Jumper de Configuração
A ilustração mostra a definição «1¬ primária, a definição «2¬ secundária (ou
escravo) e a definição «3¬ seleção de cabo. Configure a unidade de CD-ROM,
colocando o jumper sobre o conjunto de pinos correspondentes à definição
escolhida na Etapa 3. Consulte a “ Etapa3. Selecionando a Porta IDE” na
página 1-4.
Parte 1: Instalação e Guia do Usuário
1-57
v Se estiver configurando a unidade de CD-ROM como primária, defina o
jumper para o dispositivo «1¬ mestre. (Essa é a forma como a unidade é
vem definida.) Se houver um segundo dispositivo na porta IDE, certifique-se
de ele esteja configurado como secundário.
v Se estiver configurando a unidade de CD-ROM como secundária, defina o
jumper para o dispositivo «2¬ secundário. Certifique-se de que o outro
dispositivo na porta IDE esteja configurado como primário (ou primário com
secundário presente).
v Se estiver configurando a unidade de CD-ROM como seleção de cabo, defina
o jumper para o dispositivo «3¬ seleção de cabo. Se houver outro dispositivo
na porta IDE, certifique-se de que o dispositivo secundário também esteja
configurado para seleção de cabo.
Etapa 5. Montando a Unidade no Compartimento
Aviso: Assegure-se de utilizar o parafuso de montagem M3 x 5 mm incluído
no pacote de opcionais. O uso de parafusos muito longos pode danificar a
unidade.
Você pode montar a unidade de CD-ROM no computador na posição
horizontal ou vertical. Se montá-la na posição vertical, será necessário prender
os CDs que forem colocados na unidade antes de a bandeja da unidade ser
fechada ou a unidade de CD-ROM não poderá ler o CD corretamente. Para
obter mais instruções sobre como prender os CDs em uma unidade montada
na posição vertical, vá para “Carregando um CD” na página 1-62.
1. Deslize a unidade para dentro do compartimento. O computador poderá
ter procedimentos específicos requeridos para instalação de dispositivos de
armazenamento. Consulte a documentação que acompanha o computador
para obter instruções adicionais.
2. Alinhe os orifícios de parafusos do compartimento de unidade com os
orifícios alinhados no invólucro da unidade ou no suporte de montagem;
então rosqueie levemente os parafusos para verificar suas posições.
Normalmente, são utilizados dois parafusos de cada lado.
3. Verifique se o alinhamento está correto; em seguida, aperte os parafusos
para prender a unidade. Não os aperte em excesso.
1-58
Unidade de Disco de CD-ROM IDE Interna 48X-20X: Guia do Usuário
Etapa 6. Conectando os Cabos à Unidade
Conecte os cabos à unidade de CD-ROM, conforme segue.
1. Se você tiver uma placa de áudio, localize os cabos de áudio incluídos e
determine qual cabo se encaixa melhor na porta de entrada de áudio do
CD na placa de áudio. Conecte uma extremidade do cabo de áudio
selecionado ao conector de saída de áudio do dispositivo «1¬ e a outra
extremidade à porta de entrada de áudio do CD da placa de áudio. Guarde
o outro cabo caso utilize uma placa de áudio diferente no futuro.
2. Conecte um conector de cabo IDE de 40 pinos «2¬ao conector IDE da
unidade. Alinhe o cabo de maneira que a borda codificada por cor fique
mais próxima ao conector do cabo de alimentação «3¬. Utilize o cabo IDE
fornecido com este opcional, se não houver nenhum cabo conectado à porta
IDE ou se houver apenas um conector de dispositivo no cabo IDE.
3. Conecte um cabo de alimentação de quatro pinos «3¬ ao conector de
alimentação CC do dispositivo.
Etapa 7. Concluindo a Instalação do Hardware
1. Assegure-se de que a unidade esteja montada firmemente e de que os
conectores também estejam conectados firmemente.
2. Assegure-se de que os cabos não interfiram na tampa do computador nem
bloqueiem o caminho das lâminas do ventilador da fonte de alimentação ou
o caminho do fluxo de ar.
3. Instale novamente a tampa do computador.
4. Reconecte todos os dispositivos e verifique todos aqueles que possam ter
ficado desconectados, como teclado, mouse e monitor.
5. Conecte todos os cabos de alimentação às tomadas elétricas.
Step 8. Atualizando a Configuração do Computador
Depois de ter concluído a instalação do hardware, reinicie o computador.
Normalmente, a tela de informações de configuração/instalação é exibida. Se
Parte 1: Instalação e Guia do Usuário
1-59
isso não ocorrer, verifique a documentação do computador para obter
informações sobre como acessar o programa utilitário de configuração ou
instalação.
Para ver as informações de configuração da maioria dos computadores IBM,
pressione o botão F1 durante a inicialização. Quando terminar de rever as
informações, salve as alterações e saia.
Nota: Alguns computadores mais antigos com uma porta IDE podem não
exibir as informações da unidade de CD-ROM, durante a revisão das
informações de configuração/instalação. Ainda é possível utilizar a
unidade de CD-ROM nessa situação, se você tiver concluído
corretamente a instalação.
Etapa 9. Instalando Drivers de Dispositivo
Esta seção contém as instruções de instalação de drivers de dispositivo para a
unidade de CD-ROM, com base no sistema operacional que você está
utilizando.
Nota: Os requisitos do usuário variam; as definições do driver de dispositivo
para o sistema operacional podem ser personalizadas. Se o computador
não funcionar bem com as definições padrão fornecidas nas instruções
de instalação nesta seção, consulte o “Apêndice A. Personalizando
Definições de Configuração do Driver de Dispositivo” na página A-1
para obter informações sobre como personalizar as definições de
configuração do driver de dispositivo.
Driver de Dispositivo para Windows 95, Windows 98, Windows NT,
Windows 2000 e Windows Me
O Windows 98 e o Windows Me detectam automaticamente a unidade de
CD-ROM e não apresentam nenhuma tela de instalação. Se as telas de
instalação do driver forem exibidas após o início do sistema operacional, siga
as instruções na tela para instalar os drivers de dispositivo. Consulte a
documentação que acompanha o sistema operacional para obter mais
informações.
1-60
Unidade de Disco de CD-ROM IDE Interna 48X-20X: Guia do Usuário
Utilização e Cuidados com a Unidade
Esta seção inclui instruções sobre o cuidado adequado com os CDs e sobre o
cuidado e a operação da unidade de CD-ROM.
Cuidando de um CD
CDs são mídias de alta densidade que devem ser manuseadas com cuidado e
mantidas limpas para garantir que permaneçam legíveis. As seguintes
precauções ajudam a prolongar a vida útil dos CDs.
Aviso: Limpar um CD com um movimento circular pode causar perda de
dados.
v Segure o CD nas bordas ou no orifício central. Não toque em sua superfície
de dados.
v Para remover poeira ou digitais, limpe o CD do centro para a borda com um
pano macio e sem fiapos.
v Não escreva na superfície.
v Não exponha o CD à luz direta do sol.
v Não utilize produtos de limpeza comerciais para limpar o CD.
v Não entorte o CD.
Cuidados com a Unidade de CD-ROM
Para proteger a unidade de CD-ROM durante a operação, observe as
precauções a seguir:
v Remova um CD da unidade antes de mover a unidade.
v Não insira objetos estranhos na unidade.
v Não remova a tampa da unidade ou tente fazer reparos nela.
v Não opere a unidade sob quaisquer uma das seguintes condições:
Parte 1: Instalação e Guia do Usuário
1-61
– Temperatura alta, umidade alta ou luz direta do sol
– Vibração excessiva, choque repentino ou superfície inclinada
– Poeira excessiva
Carregando um CD
Para carregar um CD em uma unidade de CD-ROM montada na posição
horizontal, faça o seguinte:
1. Pressione o botão Ejetar/Carregar. A bandeja desliza para fora da unidade.
2. Insira o CD na bandeja de carregamento com a etiqueta voltada para cima.
3. Feche a bandeja de carregamento pressionando o botão Ejetar/Carregar ou
empurrando cuidadosamente a bandeja para dentro.
Aviso:
de CD.
1-62
Não force a bandeja a abrir; não insira objetos estranhos na bandeja
Unidade de Disco de CD-ROM IDE Interna 48X-20X: Guia do Usuário
Para carregar um CD em uma unidade de CD-ROM montada na posição
vertical, faça o seguinte:
1. Pressione o botão Ejetar/Carregar.
2. Veja as ilustrações e compare-as com a sua bandeja de carregamento.
v Se ela for parecida com a ilustração esquerda, insira o CD
cuidadosamente de forma que suas bordas fiquem sob as presilhas na
bandeja de carregamento. Essas presilhas de plástico cobrem as bordas
do CD e o mantêm no local. Elas estão conectadas à própria bandeja e
não podem ser movidas.
v Se ela for parecida com a ilustração direita, insira o CD na bandeja e
empurre cuidadosamente a presilha móvel para frente a fim de manter o
CD no local.
3. Feche a bandeja de carregamento pressionando o botão Ejetar/Carregar ou
empurrando cuidadosamente a bandeja para dentro.
Parte 1: Instalação e Guia do Usuário
1-63
Ejetando Manualmente um CD
Se você pressionar o botão Ejetar/Carregar e a bandeja não deslizar para fora,
desligue o computador. Endireite um clipe de papel grande para formar uma
ferramenta, conforme mostrado na ilustração a seguir. A extremidade do clipe
aberto deve estender-se a pelo menos 45 mm (1,8 pol). Insira a extremidade
estendida no orifício de ejeção manual na parte frontal da unidade (consulte
“Vista Frontal da Unidade” na página 1-55). Empurre o clipe de papel no
orifício até que a bandeja seja aberta. Puxe cuidadosamente a bandeja para fora
até que o CD possa ser removido.
Reproduzindo um CD de Áudio
Para reproduzir um CD de áudio, é necessário que um programa de CD de
áudio esteja instalado no computador. Os aplicativos Windows 98, Windows
Me, Windows NT e Windows 2000 incluem programas de reprodução de CD
de áudio.
Para obter mais informações sobre o uso do software de reprodução de áudio,
consulte a documentação que acompanha o sistema operacional ou o
computador.
Windows 95, Windows 98, Windows NT 4.0, Windows 2000
ou Windows Me
Para utilizar o utilitário de áudio, faça o seguinte:
1. Ligue o computador e inicie o sistema operacional, se ainda não o tiver
feito.
2. Insira o CD de áudio na unidade de CD-ROM.
3. O CD começa a tocar. Se isso não ocorrer ou se você tiver problemas com o
áudio, verifique a documentação que acompanha a placa de áudio ou o
computador para obter informações sobre soluções de problemas.
Utilizando um CD de Dados
CDs de dados contêm arquivos de dados, jogos ou aplicativos.
Windows 95, Windows 98, Windows NT 4.0, Windows 2000
ou Windows Me
Para ler um CD de dados, faça o seguinte:
1-64
Unidade de Disco de CD-ROM IDE Interna 48X-20X: Guia do Usuário
1. Ligue o computador e inicie o sistema operacional, se ainda não o tiver
feito.
2. Insira o CD de dados na unidade de CD-ROM. Muitos CDs de programas
iniciarão automaticamente nesse ponto. Se isso não ocorrer, vá para a etapa
3.
3. Dê um clique duplo em Meu Computador.
4. Verifique se o ícone de CD-ROM é exibido.
5. Dê um clique duplo no ícone CD-ROM.
6. Verifique se você pode exibir os arquivos no CD.
Se não puder selecionar o ícone de CD-ROM ou exibir dados, consulte o
“Apêndice B. Resolução de Problemas” na página B-1 ou o “Apêndice C.
Informações de Auxílio e Serviços” na página C-1 para obter informações sobre
serviço.
Parte 1: Instalação e Guia do Usuário
1-65
1-66
Unidade de Disco de CD-ROM IDE Interna 48X-20X: Guia do Usuário
1 í≈GwΓU
®
IBM 48X-20X í IDE ≈iH¬]t 680 MBCb]pWAoí
≈iw≤ Integrated Drive Electronics (IDE) Enhanced IDE (EIDE) [cHqúC
≈mΩ¬tiF@δ≈ 48 tAΩeqiFCϕ
7200 KBC≈iH¬X ISO-9660 High-Sierra Group (HSG) µíC]iH¬hÑq@Bí[c (XA) @ΦíApA
Kodak Photo CDAN²¿C
úí
úFΓUºAú]tFUCM≤G
v 48X-20X í IDE ≈
v @° “Y” Tu@°Tsu
v w]M3 x 5 mm, tí
v @°sΓ IDE m IDE u
v ≈pgwΓU
½Y≥laAMgPsCOdzRCϕznDΓ
ßAAiαzú÷Rσ≤C
C-1y²C. Help and service informationz σ≤ñúz÷p≤o≤
UBNΣAHOAÑΩTCbzNΣAºeA²
B-1y²B. Problem solvingz Añ÷eC
u@
YnTwzqúOXCDF\ 1-68ytDz Añ
ΩTCbz}lwºeA²¬UCΩTC
w≈Az¿UCwBJG
1. Mwn@ IDE sH∩tm]w≤C
2. wm≤≈Wtm⌡ (°íp∩Σª÷mtm⌡)C
pGzúAWz{AOúTwzOαµ¿{Aó
Xµ
NH≤Uzw≈C
1. Ωq (CD)C 1 MB Ñ≤ 1,000,000 ΩTxsq
2. ΣñA1 KB Ñ≤ 1024 Ωxsq
© Copyright IBM Corp. 2000
1-67
tD
bw≈ºeA²TwzqúXUCtDG
v LBzCDG 80486
v RAM CDG 4 MB
v 5.25 Tní≈
v sbi IDE sum
v sbiqu
v sbi≈≈
v qúwwUCΣñ@@tG
– Microsoft
®
®
Windows 95
– Microsoft Windows
®
®
98
®
– Microsoft Windows NT 4.0
– Microsoft Windows 2000 Professional
– Microsoft Windows Millennium Edition (Me)
hBBzN
bwíAFnO@zmAϕuUCwIG
v phB≈C¿n≈iαla≈ñ≤C
v N≈Os≤Rq]UñA@znwXCbXw
≈A±Cz@C⌠N≈e÷PRqúC
v quYπΦVAHúijµíJquCjµíJquYA
iαY≈C
1-68
48X-20X í IDE ≈: ΓU
≈
\UCHOUí≈≤AHKyßiHQwíñU
ⁿ
C
1 ≈íC BTΘXAbBíJ≈C
2qεC πBΦAYi
εqC
3CD ½LC CD ½LiN CD ⁿJw≈ñC
4úLⁿOCoⁿOG
Aϕw≈b¬ΩAOb±
TC
5ΓhCpG≈hX/ⁿJ÷sLku@AΓh
hXC
6hX/ⁿJ÷sC ÷@Uo÷sYi}÷¼½LC
ß°
\UCHOUí≈≤AHKyßiHQwíñU
ⁿ
C
1OdC
2TΘXYC oYs≈PtdC
3tm}C b}W⌡iHXXUtmAMw≈bIDE yWu²C
4IDE sC osiN≈s IDE uC
1 í≈GwΓU
1-69
5DC qsC osOs≈ DC quC
w≈
ϕUCBJN≈wzqúñC
BJ 1. }qú
1. ÷¼qúΣmqC
2. εúqúmquC
3. úqúC
BJ 2. ε≈]
1. b}]≈RqUºeA²bWú≈ϕGϕ
CiH±sb≤]WHz¡WRqC
2. qRqUñX≈CpGz±U≈A²NRqU±mbQ
¡]p°xϕWAMßAN≈±mbRqUWC
BJ 3. ∩ IDE s≡
qAbs¼qúñΓ IDE s≡AC@s≡iHΣΓí
≈C@δÑAqúñw≈sDn IDE s≡Ct@ IDE s
≡Yn IDE s≡Cz∩ IDE s≡MumAPtm⌡
]wftαmB@C
v pGzqúñΓ IDE s≡AN≈sD≈O IDE tdW
n IDE s≡CpGbn IDE s≡Wus≈@
mAN
}]wDntmCpG≈ns≡WG
mAh
N}]wntm]wC
v pGzN≈sDn IDE s≡]YPw≈Σªt
m@P@s≡Ah]w≈ns≡A²t
mDns≡CbYípUApGP@°uΩn
mANw≈]wuDnBsbnmv
(master-with-secondary-present)C÷omW⌡]wΩTA\H
≤qúΣªwΘmσ≤íC
v YD IBM tCqúiHΣuu∩]wv\αAiHHms
≤uWmMwmDnnmCpGzqúπΣu
∩]w\αA\H≤zqúñ÷σ≤C
BJ 4. tm⌡]w
πFDn 1 ]wBn] 2 ]wAHu∩ 3
]wCN⌡zbBJ 3 ñ∩]wwm≤∩}WAYit
1-70
48X-20X í IDE ≈: ΓU
m≈C÷ΩTA\ 1-70 yBJ 3. ∩ IDE s≡z A
eC
v pGznN≈mtm¿DnmAN⌡]wDn 1 m]wC(z≈btµfANwgz¿@]w)CpGb IDE s
≡WsbGmATwmtmnmC
v pGznN≈mtm¿nmAN⌡]wn 2 m]wCdTwt@sb≤P@ IDE s≡WmAtm¿
DnmAO]wuDnBsbnmv
(primary-with-secondary-present) ]wC
v pGznN≈mtm¿u∩mAN⌡]wu∩
3 m]wCpG IDE s≡WPsbΣªmAdTw
m]]wu∩C
BJ 5. N≈w≈ñ
i:
H≤]ñ M3 x5 mm wC°iα
la≈C
ziHN≈H⌠¡ Φíw≤zqúñCpGzH Φíw
≈Ahb÷¼≈½LºeA²TwnAhPqúLk
T¬ΩC÷≤ w≈ñTwíA\ 1-75
yⁿJz eC
1. N≈J≈ñCbzqúwxsmiαnSϕ{C
H≤zqúñ÷σ≤C
2. N≈≈W∩≈ⁿ½[WFMß²≥
WAT{ΣmLCqACΓTwC
3. dTww∩⌠FMßAW≥HTw≈CúiHCo
≥C
1 í≈GwΓU
1-71
BJ 6. su
ϕUCΦít≈uC
1. pGzqúñtdA∩tdWiHftT¼s
≡TuCNTu@
sΘXY 1 WANt@
stdWT¼s≡WC¼ΣªuAHK
N≤½tdßiHftC
2. N 40 w IDE uY 2 s≈W IDE YWC∩uA
úPCΓΣt±quY 3CpGqúñ IDE s≡SuA
O IDE uWu@mYAhH≤∩]ñ
IDE uC
3. N 4-wqu 3 s DC qYWC
BJ 7. ¿wΘw@
1. T{≈wgABYíw¡TsC
2. Twuú½¬!qúA]úϕq¡
÷q⌠
C
3. ½s!qúC
4. ½ssímAdOm¿uFd
!pΣ
LB½°ÑÑC
5. NímquíqíyWC
BJ 8. ≤sqútm
bz¿wΘw@ºßA½szqúCqAπtm]me
CpGπeAd\qúíσ≤AHo÷tmw{
í÷ΩTC
Ynd\jh IBM qútmΩTAbí÷U F1 ÷sCϕz°
÷]wΩTºßAxs≤Mß⌠°C
1-72
48X-20X í IDE ≈: ΓU
: ∩Yu@ IDE s≡¼qúÑAϕzb°tm]mΩTAi
αΣú÷≈÷ΩTCYOboípUAunzw{
TLAz!MßiH≈C
BJ 9. w≈mX{í
z@tA"OQw≈mX{í@PΦíC
: HDúPFiH@tqmX{í
]wCpGzqúñwíw]]w!LkB
@Ah A-1y²A. Customizing device driver configuration
settingsz Añ÷qmX{ítm]w÷ΩTC
Windows 95BWindows 98BWindows NTBWindows 2000 Windows Me mX{í
Windows 98 M Windows Me ≈Búπ⌠≤weCp
Gbz@tºßAπX{íweAeWⁿw
mX{íC÷ΩTA\H≤@tíσ≤C
1 í≈GwΓU
1-73
≈POi
úz÷P≈POiíC
Oi
"≤@¬KCΘAHnpOHTOΣñtΩTi¬CU
CN
iH°RC
i:
HΩΦV°iαy¿ΣñΩyóC
v HΓΣtñípCúntΩϕC
v Mú#
ⁿAHXnL¼"ñíVΣt°C
v úiHbϕWgrC
v iH²≤ΘUC
v úiHMΣ»MC
v úiH⌠Ns%C
≈Oi
YnO@B@ñ≈AϕUCwIG
v b≈ºeA²XΣñC
v únNΣL½≤íJ≈ñ
v únµε°≈A]únµ≈
v KbUCú}⌠ñ≈G
– ¬B¬πΘg⌠ñ
– gB≡oϕW
– Lh#
1-74
48X-20X í IDE ≈: ΓU
ⁿJ
YnNⁿJ⌠¡w≈A⌡µUCBJG
1. ÷@UuhX/ⁿJv÷sC≈½LXC
2. N@WAmJ½LñC
3. ÷@UuhX/ⁿJv÷sON½LVJAYi÷¼½LC
i:
úiHjON½LXFiHNº½íJ½LñC
1 í≈GwΓU
1-75
YnNⁿJ½w≈A⌡µUCBJG
1. ÷@UuhX/ⁿJv÷sC
2. d±z≈ⁿJ½LíC
v pGz≈½L
O¬ñ½LApaíJA²
Σt≤ⁿJ½LdΩUΦCoªdΩdϕΣtA
HO≤TmWCodΩO≤½LWABOLkNΣ
XC
v pGz½L
OkANíJ½LñAMßaN
idΩVeXAYiNTwbTmWC
3. ÷@UuhX/ⁿJv÷sON½LVJAYi÷¼½LC
1-76
48X-20X í IDE ≈: ΓU
ΓhX
pGz÷UuhX/ⁿJv÷sA²½LLkhXA²÷¼qúCpU
AN@Ow¿@uπC
° 45 τ]1.8 T.
N@
íJ≈eΦOWΓh]\ 1-69y≈
z AeC NOwVeJA½L}εCpaN½LXAM
ßXzC
45 mm
1.8 in
±T
Yn±TAzqúñwgwT CD ±{íC Windows
98BWindows MeBWindows NT Windows 2000 {íñYwg]t
T±{íC
÷p≤T±nΘ÷ΩTA\H≤z@tqú÷σ
≤C
Windows 95BWindows 98BWindows NT 4.0BWindows
2000 Windows Me
YnT{íA⌡µUCBJG
1. ²A}qúz@tC
2. NTíJ≈ñC
3. }lCpG±AOTΦXFDA
dH≤tdqúñσ≤AHoMD÷ΩTC
Ω
ΩñiαxsΩBC{íÑΩC
Windows 95BWindows 98BWindows NT 4.0BWindows
2000 Windows Me
Yn¬ΩA⌡µUCBJG
1. ²A}qúz@tC
2. NΩíJ≈ñCAjí≈{íCpGñ
{íAiµBJ 3C
3. s÷ΓUqúC
4. τOπ CD-ROM C
5. s÷ΓU CD-ROM C
1 í≈GwΓU
1-77
6. dT{ziH°WC
pGzLk∩ CD-ROM O°ñΩA\ B-1y²
B. Problem solvingz C-1y²C. Help and service informationz Ñσ
≤eHMDNΣA÷ΩTC
1-78
48X-20X í IDE ≈: ΓU
Q<H 1: $s9H<k*hSf<6<:&,$I
IBM b"? 48 \. CD-ROM Ii$V (IDE) O"s 680 MB1 N3sQ/
H&G#9/ (CD) rI_hk3H,G-^9#\=JO"Integrated Drive
Electronics (IDE) "<-F/Ac<^?OH% IDE "<-F/Ac<rHQ9
kQ<=Jk&3sTe<?<KhjU1k_WKJCF$^9#
®
CD-ROM uVO"8` CD-ROM .YNGb 48 \ (Gb 7200 KB2 / C) G
G<?r>w7^9#\Ii$VO"ISO-9660 H High-Sierra Group (HSG) 8
`r~?93sQ/H&G#9/rI_hj^9#3N>"^kA;C7gs"
H%"<-F/Ac< (XA) G#9/ (Kodak U)H CD JI) bI_hj^
9#
=Jb@
\qN>K"\*W7gs&QC1<8KO!NJ\,^^lF$^9#
v b"? 48 \. CD-ROM Ii$V (IDE)
v “Y” *<G#*&1<Vk 1 \"*<G#*&1<Vk 1 \
v hjU1QM8 4 \ (M3 x 5 mm"BU-)
v 2 fN IDE GP$9\3Q IDE 1<Vk 1 \
v CD-ROM Ii$VKX9kl<6<NB4eNjzJ\,T-";}7F$klgKO"*ce2NNd9K4"m/@5$#N}
q^?O/l8CHN5(O,:]I7F*$F/@5$#]Z5<S9ru1
k?aKs(raailklg,"j^9#
XkW";Q5]<H"*hS]Z5<S9r~j9k}!O" C-1 Z<8N
XAppendix C. Help and service informationYK-\5lF$^9#;Q5]<
HKEC9k0K" B-1 Z<8NXAppendix B. Problem solvingYr2H7F
/@5$#
Oak0K
*H$N3sTe<?<,G.Wor~?7F$k+=L7F/@5$#\YK
D$FO" 1-80Z<8NX79F`WoYr2H7F/@5$#hjU1rOa
k0K!Npsr*I_/@5$#
\Ii$VrhjU1kKO"!N9FCWrB\7F/@5$#
1. HQ9k IDE 3M/?<H"P~9k=._jMrhj7^9#
1. MB O"-1hNFLr(9lg"s 1 000 000 P$HKjv7^9#
2. KB O"G<?>w.Yr(9lg"s 1024 P$HKjv7^9#
© Copyright IBM Corp. 2000
1-79
2. \Ii$VeG=.8csQ<rhjU1k+"r97^9 (lgKhCF
O">NGP$9N=.8csQ<rQ97^9)#
e-Njg,h/}rG-J$lg"^?Ob@7?jgr9YFBTG-k+
I&+o+iJ$lgO"lgN3sTe<?<;QTK CD-ROM Ii$VN
hjU1reoCFBT7FbiCF/@5$#
79F`Wo
\Ii$VNhjU1r+O9k0K"*H$N3sTe<?<,!N79F`
WoKgCF$k+N'7F/@5$#
v ^$/mWm;C5<: 80486 Je
v RAM: 4 MB Je
v 5.25 $sANG#91CH&Ii$V
v IDE \3,HQD=G"k3H
v btE;\3,HQD=G"k3H
v Ii$V&Y$,HQD=G"k3H
v !N*Zl<F#s0&79F`N&AN 1 D
®
®
– Microsoft Windows 95
®
– Microsoft Windows 98
®
®
– Microsoft Windows NT 4.0
– Microsoft Windows 2000 Professional
– Microsoft Windows Millennium Edition (Me)
hj7$eNb@
hjU1fK\GP$9r]n9k?a"!NmUv`riCF/@5$#
v \Ii$VO5EKhj7CF/@5$#\Ii$VrnH7?j"Wbr
?(kH"Ii$V&O&8s0btN=.tJr;}9k*=l,"j^
9#
v \GP$9O"3sTe<?<XNhjU1`w,0;9k^G"SEI_
^K~l?^^K7F*$F/@5$#hjU1~N0nOG.BK^(^
9#0/3HKhCF"EE$,_Q5lkD=-,"j^9#
v E;1<Vkr5}K^~7J$G/@5$#3M/?<d\Ii$Vr;
}9klg,"j^9#
1-80
48X-20X Internal IDE CD-ROM Drive: User’s Guide
\Ii$VN5L^
3N^r2H7F"hjU1b@KPF/kFtrN'7F*$F/@5$#
«1¬ XCI[s&8cC/# *<G#*POrT&KO"XCI[sr33K
97~sG/@5$#
«2¬ \je<`&3sHm<k# 3N@$dkO"\je<`r4a9kNK
HQ7^9#
«3¬ CD Hl$# CD Hl$O"CD rIi$VK;CH9kNKHQ7^
9#
«4¬ HQf$sG#1<?<# 3Ni$HO"\Ii$V,G<? CD rI_
hC?j"*<G#* CD rF89kH*sKJj^9#
«5¬ soQhjP7j# $8'/H/;CH&\?s,57/n07F$J$l
gK"CD Hl$r$8'/H9kNKHQ7^9#
«6¬ $8'/H/;CH&\?s# 3N\?sr!7F"CD Hl$r+$?
j"D8?j7^9#
\Ii$VNXL^
3N^r2H7F"hjU1b@KPF/kFtrN'7F*$F/@5$#
«1¬ =sQ_#
«2¬ *<G#*PO3M/?<#3N3M/?<O" CD-ROM Ii$Vr*<
G#*&"@W?<K\39kNKHQ5l^9#
Q<H 1: $s9H<k*hSf<6<:&,$I
1-81
«3¬ =.Ts#3liNTseN8csQ<N[VKhj"IDE P9GN
CD-ROM Ii$VN%hgL,h^j^9#
«4¬ IDE 3M/?<#\ CD-ROM Ii$Vr IDE 1<VkK\37^9#
«5¬ DC E;3M/?<#DC E;3<Ir\ CD-ROM Ii$VK\37^
9#
\Ii$VNhjU1
\ CD-ROM Ii$Vr3sTe<?<KhjU1kjgO"!NH*jG9#
9FCW 1. 3sTe<?<r+/
1. 3sTe<?<H\3GP$9r9YF*UK7^9#
2. 3sTe<?<H9YFN\3GP$9NE;3<INWi0r07^9#
3. 3sTe<?<N+P<rhj07^9#
9FCW 2. Ii$Vr-q+ihjP9
1. \Ii$V,~lilF$kSEI_^r+1k0K"=N^r"Iu5l
F$J$b0LK/J/Hb 2 CV(l5;^9#3lKhCF"=NQC
1<8HMN+iEE$,|n5l^9#
2. \Ii$VrSEI_^+ihjP7^9#\Ii$VrV+J1lPJi
J$lg"?iG@i+JLNe ((oNeJI) KSEI_^r_-"=
NSEI_^NeK\Ii$VrV-^9#
9FCW 3. IDE ]<Hr*r9k
77$?$WN3sTe<?<Nlg"Lo 2 DN IDE ]<H,"j"F]
<H, 2 fNGP$9r5]<H7^9#lLK"1 DN IDE ]<H,Wi
$^j< IDE ]<HH7FO<I&G#9/K\37"b&l}N IDE ]<
H,;+s@j<&]<HHJj^9#*r7? IDE ]<HH1<VkLVK
hCF"\Ii$VGHQ9k=.8csQ<,h^j^9#
v IDE ]<H, 2 D"klg"\ CD-ROM Ii$Vr"79F`&\<I+
IDE "@W?<eN;+s@j< IDE ]<HK\37^9#\ CD-ROM I
i$V,;+s@j< IDE ]<HeN#lNGP$9G"klg"^9?<
K_j7^9#\ CD-ROM Ii$V,;+s@j<&]<HeN 2 f\N
GP$9G"klgO"9l<VK_j7^9#
v \ CD-ROM Ii$VrWi$^j< IDE ]<H (O<I&G#9/^?O
>Nb.GP$9H18]<H) K\37J1lPJiJ$lgO"\
CD-ROM Ii$Vr9l<VK_j7"hjb.NGP$9r^9?<K_
j7^9#lgKhCFO"181<VkeG9l<V&GP$9r\39
kH-KO<I&G#9/N=._jMrV9l<V,8_9k^9?<W
KQ97J1lPJiJ$3H,"j^9#>NGP$9eGN=.8cs
Q<N_jN\YKD$FO"*H$N3sTe<?<+:vNGP$9K
U0NqAr2H7F/@5$#
1-82
48X-20X Internal IDE CD-ROM Drive: User’s Guide
v ltN IBM J0N3sTe<?<GO"1<Vk*rN_jM,5]<H5
lF$kbNb"j^9#3liN3sTe<?<GO"1<VkeNGP
$9NLVKhCF"=NGP$9,^9?<+9l<V+,h^j^9#
*H$N3sTe<?<,3N_jMr5]<H9k+I&+N'9kK
O"*H$N3sTe<?<KU0NqAr2H7F/@5$#
9FCW 4. =.8csQ<r_j9k
^GO"^9?< «1¬ _jM"9l<V «2¬ _jM"*hS1<Vk*r «3¬
_jMr(7F$^9#\ CD-ROM Ii$Vr=.9kKO"9FCW 3 G
*r7?_jMKP~9kTsN;CHNeK8csQ<rV-^9#1-82Z<
8NX9FCW 3. IDE ]<Hr*r9kYr2H7F/@5$#
v \ CD-ROM GP$9r^9?<H7F=.9klg"8csQ<r^9?
< «1¬ K_j7^9#(\Ii$VO"PY~K3N_jKJCF$^9#)
IDE ]<HeK 2 f\NGP$9,"klgO"=NGP$9,9l<VH
7F=.5lF$k+N'7^9#
v \ CD-ROM GP$9r9l<VH7F=.9klg"8csQ<r9l<
V «2¬ K_j7^9#IDE ]<HeNb&l}NGP$9,^9?< (^?
O9l<V,8_9k^9?<) H7F=.5lF$k+N'7^9#
v \ CD-ROM GP$9r1<Vk*rH7F=.9klg"8csQ<r1
<Vk*r «3¬ K_j7^9# IDE ]<HeKLNGP$9,"klg
O"2 f\NGP$9b1<Vk*rQK=.5lF$k+N'7F/@5
$#
9FCW 5. \Ii$VrY$KhjU1k
M8v`:
,:"*W7gs&QC1<8N M3 x 5 mm hjU1QM8r
4HQ/@5$#HQ9kM8,9a.kH"\Ii$Vr;}9k*=l,"
j^9#
\ CD-ROM Ii$VO"3sTe<?<bKD"#"IAiN~-KbhjU
1il^9#\Ii$VrDKhjU1klg"Ii$V&Hl$rD8k0
K"\Ii$VK~l? CD rGj9k,W,"j^9#=&7J$H"\
CD-ROM Ii$V,=N CD r57/I_hlJ/Jj^9#DKhjU1?
Ii$VbG CD rGj9k}!KD$F\7/O"1-87Z<8NXCD N;C
HYKJsG/@5$#
Q<H 1: $s9H<k*hSf<6<:&,$I
1-83
1. \Ii$VrY$NfK^~7^9#*H$N3sTe<?<KhCFO"
-1uVrhjU1kNKCLJjg,Wa5lklg,"j^9#5iK
\7$X(KD$FO"*H$N3sTe<?<KU0NqAr2H7F/
@5$#
2. Ii$V&Y$NM8jr"Ii$V&O&8s0^?OhjU1bqbN
M83U-NjHLVr=m(^9#=NeK"M8rK/L7F_F"=
NLVrA'C/7^9#Lo"=l>lN&K 2 \NM8rHQ7^9#
3. LVgo;,57$+N'7F+i"M8ryaF\Ii$VrGj7^
9#-D/yaa.J$h&K7F/@5$#
9FCW 6. 1<Vkr\Ii$VK\39k
!Nh&K7F"1<Vkr\ CD-ROM Ii$VK\37^9#
1. *<G#*&"@W?<,"klg"QC1<8K^^lF$k*<G#
*&1<Vkr+D1F"IN1<Vk,"*<G#*&"@W?<eN
CD *<G#*~O]<HKGb,g9k+r=G7^9#*r7?*<G
#*&1<VkNl}N<rGP$9&*<G#*PO3M/?< «1¬ K\
37"1<VkN>}N<r*<G#*&"@W?<N CD *<G#*~O
]<HK\37^9#-h"[Jk*<G#*&"@W?<rHQ9klg
N?aK"b& 1 \N1<VkOHCF*$F/@5$#
2. 40 Ts IDE 1<Vk&3M/?< «2¬ r"\Ii$VeN IDE 3M/?
<K\37^9#1<Vkr"',15l?&,E;1<Vk&3M/?<
«3¬ KGba/Jkh&KLVgo;7^9# IDE ]<HK1<Vk,\
35lF$J$lg"^?O IDE 1<VkeKGP$9&3M/?<, 1
D7+J$lg"3N*W7gsHloKs!5l? IDE 1<VkrHQ
7^9#
3. 4 TsE;1<Vk «3¬ r"GP$9N DC E;3M/?<K\37^
9#
9FCW 7. O<I&'"NhjU1r0;9k
1. \Ii$V,7C+jHhjU1il"3M/?<,57/\35lF$k
+N'7^9#
1-84
48X-20X Internal IDE CD-ROM Drive: User’s Guide
2. 1<Vk,3sTe<?<N+P<NYbKJCF$?j"E;!=NU!
sN),dLwP)r827F$J$+N+a^9#
3. 3sTe<?<&+P<r5LjhjU1^9#
4. GP$9r9YFF\37"-<\<I"^&9"bK?<JI"hj07
?D=-N"kGP$9rA'C/7^9#
5. E;3<Ir9YFE;3s;sHK\37^9#
9FCW 8. 3sTe<?<N=.r979k
O<I&'"NhjU1r0;7?i"3sTe<?<rFO07^9#Lo"
=.;CH"CWpshL,=(5l^9#3NhL,=(5lJ$lgO"*
H$N3sTe<?<NqAr2H7F"=.^?O;CH"CW&f<F#j
F#<&Wm0i`XN"/;9}!rN'7F/@5$#
[HsIN IBM 3sTe<?<GO=.psr=(9kKO"O0~K F1 r
!7^9#3NpsN97rN'7"Q9r]I7F*;7^9#
m: IDE ]<H, 1 D7+J$?$WN3sTe<?<NfKO"=.;CH
"CWpsr=(9kH-K"CD-ROM Ii$Vpsr=(7J$bN,
"j^9#3Nh&Ju7Gb"hjU1,57/0;7F$kBj"\
CD-ROM Ii$VrHQG-^9#
9FCW 9. GP$9&Ii$P<r$s9H<k9k
3N;/7gsGO"HQ7F$k*Zl<F#s0&79F`Kp$F"\
CD-ROM Ii$VQNGP$9&Ii$P<N$s9H<k}!KD$Fb@
7^9#
m: f<6<KhCF"Wo,[JCF$^9#3N*Zl<F#s0&79F
`NGP$9&Ii$P<_jMO+9?^$:G-^9#3N;/7gs
N$s9H<kb@G(7?GU)kHN_jMGO"*H$N3sTe<
?<,&^/!=7J$lg"GP$9&Ii$P<N=._jMN+9?
^$:KD$FNpsO" A-1 Z<8NXAppendix A. Customizing device
driver configuration settingsYr2H7F/@5$#
Windows 95"Windows 98"Windows NT"Windows 2000"*hS
Windows Me QNGP$9&Ii$P<
Windows 98 *hS Windows Me O"CD-ROM Ii$Vr+0*K!P7"$
s9H<khLr=(7^;s#*Zl<F#s0&79F`,+O5l?eK
$s9H<khL,=(5l?i"hLNX(K>$"GP$9&Ii$P<r
$s9H<k7F/@5$#\7/O"*H$N*Zl<F#s0&79F`K
U0NqAr2H7F/@5$#
Q<H 1: $s9H<k*hSf<6<:&,$I
1-85
Ii$VNHQHj~l
3N;/7gsKO"CD N57$j~l*hS\ CD-ROM Ii$VNj~l
*hS`nKD$FNX(,-\5lF$^9#
CD Nj~l
CD Ob)YaG#"G9#I_hjD=JuVK]D?aK"5EKhj7
$"oK-l$K7F*/,W,"j^9#*H$N CD Nw?rdP9?a
K"!NmUv`riCF/@5$#
M8v`:
CD r_~}~KU/HG<?,:olk*=l,"j^9#
v CD O"o^?Of{Njr}CFhj7CF/@5$#CD NG<?LKO
(lJ$G/@5$#
v [3j^?OXfrhj|/KO"@i+/"1PNJ$[G CD rf{+
ioK~+CFU$F/@5$#
v =LK-~7J$G/@5$#
v CD r>M|wK"FJ$G/@5$#
v TNN/j<J<rHQ7F CD r/j<Ks07J$G/@5$#
v CD rJ2J$G/@5$#
CD-ROM Ii$VNj~l
0nfN CD-ROM Ii$Vr]n9k?aK"J<NmUv`riCF/@5
$#
v Ii$Vr\09k0K"CD rIi$V+ihjP7F/@5$#
v Ii$VK[*r^~7J$G/@5$#
v Ii$V&+P<rhj07?j"Ii$Vr]i7h&H7J$G/@5
$#
v !NINroNbHGbIi$VrT07J$G/@5$#
1-86
48X-20X Internal IDE CD-ROM Drive: User’s Guide
– b9"b>Y"^?O>M|w
– aYN60"^cJWb"^?O9$?L
– aYN[3j
CD N;CH
#KhjU1il? CD-ROM Ii$VK CD r;CH9kKO"!Nh&K
7F/@5$#
1. $8'/H/;CH&\?sr!7^9#Hl$,Ii$V+i9i$I7F
PF-^9#
2. CD r CD Hl$KiYkreK~1F^~7^9#
3. $8'/H/;CH&\?sr!9+"Hl$r=CH!7~lF"CD Hl
$r D8^9#
M8v`:
Hl$r5}K+3&H7J$G/@5$#CD Hl$K[*r^
~7J$G/@5$#
Q<H 1: $s9H<k*hSf<6<:&,$I
1-87
DKhjU1il? CD-ROM Ii$VK CD r;CH9kKO"!Nh&K
7F/@5$#
1. $8'/H/;CH&\?sr!7^9#
2. ^r+F"*H$N CD Hl$HfS7F/@5$#
v *H$N CD Hl$,8N^KwF$klgO"CD No, CD Hl$
eN?VNb&KJkh&K CD r5EK^~7^9#3liNWi9A
C/N?VO CD Nor$$"jjNLVK]}7^9#?VOHl$+
NKhjU1ilF*j"\09k3HOG-^;s#
v *H$N CD Hl$,&N^KwF$klgO" CD rHl$K^~
7"\0D=J?Vr0}K=CH!7F CD rjjNLVK]}7^
9#
3. $8'/H/;CH&\?sr!9+"Hl$r=CH!7~lF"CD Hl
$rD8^9#
1-88
48X-20X Internal IDE CD-ROM Drive: User’s Guide
CD rj0GhjP9
$8'/H/;CH&\?sr!7F"Hl$,9i$I7FPF3J$lg
O"3sTe<?<NE;rZCF/@5$#g?N/jCWr^C90K-P
7F"<^K(9h&JD<kK7^9#^C90K-P7?<O"/J/Hb
45 mm O-SF$k,W,"j^9#-P7?<rIi$VN0LK"kso
QhjP7jK^~7^9 (1-81 Z<8NX\Ii$VN5L^Yr2H
7F/
@5$ )#Hl$,+/^G"/jCWrjK!7~l^9#CD rhjP;k
h&KJk^G"Hl$r =CHz-P7^9#
45 mm
1.8 in
*<G#* CD NF8
*<G#* CD rF89kKO"*H$N3sTe<?<K*<G#* CD W
m0i`r$s9H<k7F*/,W,"j^9#Windows 98"Windows
Me"Windows NT"*hS Windows 2000 "Wj1<7gsKO"*<G#*
CD Wl$d<&Wm0i`,H_~^lF$^9#
*<G#*F8=UH&'"NHQ!KD$F\7/O"*H$N*Zl<F#
s0&79F`^?O3sTe<?<KU0NqAr2H7F/@5$#
Windows 95"Windows 98"Windows NT 4.0"Windows
2000"^?O Windows Me
*<G#*&f<F#jF#<rHQ9kKO"!Nh&K7^9#
1. 3sTe<?<NE;r^@*sK7F$J$lgO"33G*sK7"*
Zl<F#s0&79F`rO07^9#
2. *<G#* CD r CD-ROM Ii$VK^~7^9#
3. CD NF8,+O7^9#CD ,F8r+O7J$+"*<G#*Kdj,
"klgO"*H$N*<G#*&"@W?<^?O3sTe<?<KU0
NqArA'C/7F"djrhpsr4Y^9#
G<? CD NHQ
G<? CD O"G<?&U!$k"2<`"^?O"Wj1<7gsr}?9
k3H,G-^9#
Windows 95"Windows 98"Windows NT 4.0"Windows
2000"^?O Windows Me
G<? CD rI_hkKO"!Nh&K7^9#
Q<H 1: $s9H<k*hSf<6<:&,$I
1-89
1. 3sTe<?<NE;r^@*sK7F$J$lgO"33G*sK7"*
Zl<F#s0&79F`rO07^9#
2. G<? CD r CD-ROM Ii$VK^~7^9#?/NWm0i` CD
O"3N~@G+0*K+O5l^9#CD ,+0*K+O5lJ$lg
O"9FCW 3 KJ_^9#
3. V^$ 3sTe<?Wr@Vk/jC/7^9#
4. VCD-ROMW"$3s,=(5lk3HrN'7^9#
5. VCD-ROMW"$3sr@Vk/jC/7^9#
6. CD eNU!$kr=(G-k3HrN'7^9#
VCD-ROMW"$3sr*r9k+"G<?r=(9k3H,G-J$lgO"
B-1 Z<8NXAppendix B. Problem solvingYr2H9k+" C-1 Z<8N
XAppendix C. Help and service informationYG5<S9psr2H7^9#
1-90
48X-20X Internal IDE CD-ROM Drive: User’s Guide
Appendix A. Customizing device driver configuration
settings
This section contains information about how to customize and configure device
drivers.
Changing the Windows 98 and Windows Me device-driver
settings
Windows 98 and Windows Me have two device-driver configuration
parameters: Auto Insert Notify and DMA. These are ordinarily setup
automatically by Windows. If you need to set them up, the following
procedures will help.
The Auto Insert Notify parameter enables the computer to start audio CD
software as soon as a CD is inserted into the CD-ROM drive.
The DMA parameter improves computer performance by having the computer
DMA controller handle moving data from the CD to memory, freeing the
computer microprocessor to perform more important tasks. For example,
activating DMA might make movies and games run more smoothly because
the microprocessor will have more time to perform video tasks.
To change these parameter settings from Windows 98 or Windows Me, do the
following steps. (This also pertains to setting Auto Insert Notification for
Windows NT 4.0.)
1. Click Start-->Settings-->Control Panel.
2. Double-click System.
3. Click the Device Manager tab; double-click CD-ROM; select the CD-ROM
driver listed; then click the Properties button.
4. Click the Settings tab.
5. Under Options, click the box next to either Auto Insert Notification or
DMA.
6. Click OK.
Changing the Windows 2000 desktop device driver
To change the Windows 2000 desktop device driver, follow these steps:
1. Click Start-->Settings-->Control Panel.
2. Double-click System.
3. Click the Hardware tab.
4. Click the Device Manager button.
© Copyright IBM Corp. 2000
A-1
5. Click the IDE ATA/ATAPI controller to open the tree.
6. Double-click the device that corresponds to the port of your CD-ROM. It
will either be Primary IDE or Secondary IDE.
7. Click the Advanced Settings tab.
8. Select the Transfer Mode pull-down and select DMA if available.
9. Click OK.
10. Click Close to close the System Properties window. A message displays,
informing you that the system settings have changed.
A-2
48X-20X Internal IDE CD-ROM Drive: User’s Guide
Appendix B. Problem solving
Computer problems can be caused by hardware, software, or user error. Using
the information in this section, you might be able to solve problems yourself or
gather helpful information you can pass on to a service technician. You might
also need to refer to your computer, operating-system, or audio-adapter
publications.
Problem descriptions
Review the following list for any problem descriptions that might fit your
situation.
Your computer or CD-ROM drive does not operate correctly
or the Busy indicator light does not come on.
Take the following actions:
1. Make sure that the CD is inserted with the label side up or facing out if the
drive is installed vertically.
2. Make sure that all devices are properly connected to the computer and the
electrical outlet.
3. Turn off the computer, unplug the cables from the electrical outlets for your
computer and all attached devices, and remove the computer cover.
4. Make sure that all power and IDE cables are securely attached. Disconnect
the IDE cable and check for bent or misaligned pins. If you do not find any
problems, reconnect the cable. Replace the computer cover, and reattach all
cables and power cords. Turn on the computer and attempt to open the CD
tray by pressing the Eject/Load button. If the tray fails to open and the
Busy indicator light does not display, turn off the computer and try
replacing the 4-pin dc power cable.
5. Make sure that the color-coded edge on the IDE cable aligns with pin 1 on
the IDE port and is closest to the power cable on the CD-ROM drive. See
“Step 6. Attaching the cables to the drive” on page 1-6.
6. Make sure that the IDE cable is connected to the correct IDE port
connection. See “Step 3. Selecting the IDE port” on page 1-4 for more
information.
7. Check the CD-ROM drive and any other device on the IDE cable for the
proper jumper configuration settings. See “Step 4. Setting the configuration
jumper” on page 1-5 for more information.
8. Check to see if the middle connector on the IDE cable is attached to the
IDE port on the system board. If it is, remove the connector and reattach
the cable correctly. The middle port is used only if you are connecting two
devices to the IDE port. If there are two devices on the IDE port, attach the
© Copyright IBM Corp. 2000
B-1
connector at one end of the cable to the IDE port. Attach the CD-ROM
drive or any other slower device to the middle connector, and attach the
other end connector to your hard disk drive or other device. If you are
connecting only one device to an IDE port, attach one end of the cable to
the IDE port and the other end connector to the device; leave the middle
connector open.
You cannot access the CD-ROM drive, or the CD-ROM icon
does not display (Windows 95, Windows 98, Windows NT
4.0, Windows 2000, or Windows Me)
When the CD-ROM drive is installed, a CD-ROM icon appears in theMy
Computerwindow.
To verify that the icon is there do the following:
1. Double-click My Computer.
2. Look for an icon for the CD-ROM drive.
If a CD-ROM icon is not present in the window that displays:
1. Make sure that the drive has been properly installed.
2. Make sure that the configuration jumper is set properly. See “Step 4. Setting
the configuration jumper” on page 1-5.
3. Restart your computer.
If the device icon is still not present, check cable connections and configuration
jumper settings on other devices, and resolve any conflicts that might exist.
If a drive icon is still not found after you try the above procedures, continue
with the following steps.
If you are using Windows 95, Windows 98, or Windows Me follow these
instructions:
1. Click Start-->Settings-->Control Panel.
2. Double click System.
3. Click the Device Managertab.
4. At the top of the box, click View Devices by Type.
5. Double-click Hard Disk Controllersto list the available controllers. Make
sure that there are no conflicts with the controller by doing the following:
a. Click to select a controller from the list.
b. Click the Properties button.
c. On the General tab, under Device Status, there is a statement that
indicates whether that controller is working properly. Click OK to
return to the Device Manager tab in the System Properties window.
B-2
48X-20X Internal IDE CD-ROM Drive: User’s Guide
6. Check to see if there is a conflict between devices by doing the following:
a. In the System Properties window, double-click CD-ROM to list the
available devices, and click to select one from the list.
b. Click the Properties button.
c. Under Device Status, there is a statement indicating whether the
CD-ROM device is working properly. If there is a conflict and one or
both of the devices are nonworking, refer to “Appendix C. Help and
service information” on page C-1.
7. Click OK in the System Properties window.
8.
Shut down and restart the computer.
If you are using Windows NT 4.0, follow these instructions:
1. Click Start --> Settings --> Control Panel.
2. Double-click SCSI Adapters.
3. Click the Device tab.
4. Check to see that neither controller has conflicts by doing the following:
a. Click to select a controller.
b. Click Properties.
c. Click the Card Info tab; under the Device Status section, there is a
statement indicating whether the controller is working properly.
d. Click OK to return to the SCSI Adapter window.
e. Click to select another controller.
f. Click the Card Infotab; under the Device Status section, check the
statement to see whether the controller is working properly.
g. If you have more than two SCSI controllers, use the above steps to
check the device status of the other controller(s).
h. If you discover a conflict and one or more of the controllers is not
working, refer to “Appendix C. Help and service information” on
page C-1.
If you are using Windows 2000, follow these steps:
1. Click Start --> Settings --> Control Panel.
2. Click System.
3. Click Hardware tab.
4. Click the Device Managerbutton.
5. Double-click Hard Disk Controllers to list the available controllers. Look
for yellow circles with an exclamation point to indicate any conflicts. If
conflicts occur, see Appendixes B or C for further instruction.
Appendix B. Problem solving
B-3
The CD-ROM drive is not recognized by the operating
system, or drive performance is erratic.
Some computers, such as IBM PS/ValuePoint models 6472, 6482, 6484, 6492,
and 6494, have a compatible mode and a high performance mode for mass storage
devices. Normally, the CD-ROM drive functions better under high performance
mode.
However, if your drive is not functioning properly in that mode, you might
need to use compatible mode.
Check the configuration-setup information for your computer.
1. Access your configuration utility program.
2. Select Devices.
3. Scroll down to the Mass Storage Devices section.
4. Mass Storage Devices contains the entries Primary IDE Mode and
Secondary IDE mode. These entries are used to set the performance mode
of each IDE port. Set the mode to Compatible for the port on which you
installed your CD-ROM drive.
Other IBM and non-IBM computers might have similar settings. Check to see if
your BIOS or configuration-setup utility provides for compatible and high
performancemodes for IDE performance. For these computers, use the compatible
mode for slower IDE devices, such as this CD-ROM drive. Refer to the
documentation that comes with your computer for additional details on
selecting IDE performance modes. Many older computers will not have a
selection of IDE performance modes. If the CD-ROM drive still does not read
the data CD, the CD-ROM drive might be defective.
The CD cannot be read.
Consider the following actions.
v The CD might be dirty; clean it as described in “Caring for a CD” on
page 1-8.
v The CD might be defective; try another CD.
v The CD is not ISO-9660 or High Sierra Group (HSG) compatible. Check with
your place of purchase.
The CD does not play sound.
Consider the following actions.
v Check that you are using an audio CD and not a data CD.
v Adjust the volume control on the drive. See “Front view of the drive” on
page 1-3 if headphones are connected to the front of the drive.
B-4
48X-20X Internal IDE CD-ROM Drive: User’s Guide
v Adjust the audio-adapter volume control. See the documentation that comes
with your sound adapter and audio-CD player program.
v Turn off the computer, unplug the cables from the electrical outlets for your
computer and all attached devices, and remove the computer cover. Check
that the audio-signal cable connects the CD-ROM with the audio adapter.
You receive a common error message.
These are some common error messages and actions to take when they are
displayed.
v CDR-101
The Not ready reading the drivesituation occurs if you try to access the
CD-ROM drive before the drive is ready. The Busy indicator light comes on
when you attempt to access the drive after loading a CD into the CD tray.
Wait until the Busy indicator light turns off before attempting to access the
drive.
Appendix B. Problem solving
B-5
v CDR-103
The CD in the CD-ROM drive is not a High Sierra or an ISO 9660 format.
The CD-ROM drive does not support this format.
The connectors on the audio cables provided do not fit the
connector on your audio adapter.
Some audio adapters might require special cable.s See the documentation that
comes with your audio adapter.
You might have to purchase separately an audio cable for the CD-ROM drive.
The audio-out connector on the CD-ROM drive requires a MPC-2 compliant
Molex 70066-G connector. (See “Back view of the drive” on page 1-3 to locate
the audio connector.) If you are using an IBM computer or IBM audio adapter,
refer to “Appendix C. Help and service information” on page C-1 for
assistance.
The front headphone jack does not work (Windows 98,
Windows 2000, and Windows Me).
If the front headphone jack does not work, do the following steps:
1. Right-click on My Computer.
2. Select Properties.
3. Select the Device Manager tab.
4. Open the tree to CD-ROM.
5. Double-click on the device or select it and press the Properties button.
6. Select the Properties tab.
7. Uncheck the “Enable Digital audio for this CD-ROM device” box.
B-6
48X-20X Internal IDE CD-ROM Drive: User’s Guide
Appendix C. Help and service information
This section contains information on how to obtain online and telephone
technical support.
Online technical support
Online technical support is available during the life of your product. Online
assistance can be obtained through the Personal Computing Support Web site.
Online technical support
IBM Personal Computing Support Web site
http://www.ibm.com/pc/support
During the warranty period, assistance for replacement or exchange of
defective components is available. In addition, if your IBM option is installed
in an IBM computer, you might be entitled to service at your location. Your
technical support representative can help you determine the best alternative.
Telephone technical support
Installation and configuration support through the HelpCenter will be
withdrawn or made available for a fee, at IBM’s discretion, 90 days after the
option has been withdrawn from marketing. Additional support offerings,
including step-by-step installation assistance, are available for a nominal fee.
To assist the technical support representative, have available as much of the
following information as possible:
v Option name
v Option number
v Proof of purchase
v Computer manufacturer, model, serial number (if IBM), and manual
v Exact wording of the error message (if any)
v Description of the problem
v Hardware and software configuration information for your system
If possible, be at your computer. Your technical support representative might
want to walk you through the problem during the call.
© Copyright IBM Corp. 2000
C-1
For the support telephone number and support hours by country, refer to the
following table or to the enclosed technical support insert. Support phone
numbers are also available by clicking HelpCenter phone list on the IBM
support Web page at
http://www.ibm.com/pc/support
If the number is not provided, contact your IBM reseller or IBM marketing
representative. Response time may vary depending on the number and nature
of the calls received.
Support 24 hours a day, 7 days a week
Canada (Toronto only)
416-383-3344
Canada (all other)
1-800-565-3344
U.S.A. and Puerto Rico
1-800-772-2227
C-2
48X-20X Internal IDE CD-ROM Drive: User’s Guide
Appendix D. Product warranties and notices
Warranty Statements
The warranty statements consist of two parts: Part 1 and Part 2. Part 1 varies
by country. Part 2 is the same for both statements. Be sure to read both the
Part 1 that applies to your country and Part 2.
v United States, Puerto Rico, and Canada (Z125-4753-05 11/97) (see “IBM
Statement of Limited Warranty for United States, Puerto Rico, and Canada
(Part 1 - General Terms)”)
v Worldwide except Canada, Puerto Rico, Turkey, and United States
(Z125-5697-01 11/97) (see “IBM Statement of Warranty Worldwide except
Canada, Puerto Rico, Turkey, United States (Part 1 - General Terms)” on
page D-5)
v Worldwide Country-Unique Terms (see “Part 2 - Worldwide
Country-Unique Terms” on page D-8)
IBM Statement of Limited Warranty for United States, Puerto
Rico, and Canada (Part 1 - General Terms)
This Statement of Warranty includes Part 1 - General Terms and Part 2 Country-unique Terms.The terms of Part 2 may replace or modify those of Part
1.The warranties provided by IBM in this Statement of Warranty apply only to
Machines you purchase for your use, and not for resale, from IBM or your reseller.
The term ″Machine″ means an IBM machine, its features, conversions, upgrades,
elements, or accessories, or any combination of them. The term ″Machine″ does not
include any software programs, whether pre-loaded with the Machine, installed
subsequently or otherwise. Unless IBM specifies otherwise, the following warranties
apply only in the country where you acquire the Machine. Nothing in this Statement
of Warranty affects any statutory rights of consumers that cannot be waived or limited
by contract. If you have any questions, contact IBM or your reseller.
Machine - 48X-20X CD-ROM Drive
Warranty period* - One (1) year
* Contact your place of purchase for warranty service information. Some IBM Machines are
eligible for on-site warranty service depending on the country where service is performed.
The IBM Warranty for Machines
IBM warrants that each Machine 1) is free from defects in materials and
workmanship and 2) conforms to IBM’s Official Published Specifications. The
warranty period for a Machine is a specified, fixed period commencing on its
© Copyright IBM Corp. 2000
D-1
Date of Installation. The date on your sales receipt is the Date of Installation,
unless IBM or your reseller informs you otherwise.
During the warranty period IBM or your reseller, if approved by IBM to
provide warranty service, will provide repair and exchange service for the
Machine, without charge, under the type of service designated for the Machine
and will manage and install engineering changes that apply to the Machine.
If a Machine does not function as warranted during the warranty period, and
IBM or your reseller are unable to either 1) make it do so or 2) replace it with
one that is at least functionally equivalent, you may return it to your place of
purchase and your money will be refunded. The replacement may not be new,
but will be in good working order.
Extent of Warranty
The warranty does not cover the repair or exchange of a Machine resulting
from misuse, accident, modification, unsuitable physical or operating
environment, improper maintenance by you, or failure caused by a product for
which IBM is not responsible. The warranty is voided by removal or alteration
of Machine or parts identification labels.
THESE WARRANTIES ARE YOUR EXCLUSIVE WARRANTIES AND
REPLACE ALL OTHER WARRANTIES OR CONDITIONS, EXPRESS OR
IMPLIED, INCLUDING, BUT NOT LIMITED TO, THE IMPLIED
WARRANTIES OR CONDITIONS OF MERCHANTABILITY AND FITNESS
FOR A PARTICULAR PURPOSE. THESE WARRANTIES GIVE YOU
SPECIFIC LEGAL RIGHTS AND YOU MAY ALSO HAVE OTHER RIGHTS
WHICH VARY FROM JURISDICTION TO JURISDICTION. SOME
JURISDICTIONS DO NOT ALLOW THE EXCLUSION OR LIMITATION
OF EXPRESS OR IMPLIED WARRANTIES, SO THE ABOVE EXCLUSION
OR LIMITATION MAY NOT APPLY TO YOU. IN THAT EVENT, SUCH
WARRANTIES ARE LIMITED IN DURATION TO THE WARRANTY
PERIOD. NO WARRANTIES APPLY AFTER THAT PERIOD.
Items Not Covered by Warranty
IBM does not warrant uninterrupted or error-free operation of a Machine.
Unless specified otherwise, IBM provides non-IBM machines WITHOUT
WARRANTIES OF ANY KIND.
Any technical or other support provided for a Machine under warranty, such
as assistance via telephone with “how-to” questions and those regarding
Machine set-up and installation, will be provided WITHOUT WARRANTIES
OF ANY KIND.
D-2
48X-20X Internal IDE CD-ROM Drive: User’s Guide
Warranty Service
To obtain warranty service for the Machine, contact your reseller or IBM. In the
United States, call IBM at 1-800-772-2227. In Canada, call IBM at
1-800-565-3344. (In Toronto, call 416-383-3344.) You may be required to present
proof of purchase.
IBM or your reseller provides certain types of repair and exchange service,
either at your location or at a service center, to keep Machines in, or restore
them to, conformance with their Specifications. IBM or your reseller will
inform you of the available types of service for a Machine based on its country
of installation. IBM may repair the failing Machine or exchange it at its
discretion.
When warranty service involves the exchange of a Machine or part, the item
IBM or your reseller replaces becomes its property and the replacement
becomes yours. You represent that all removed items are genuine and
unaltered. The replacement may not be new, but will be in good working order
and at least functionally equivalent to the item replaced. The replacement
assumes the warranty service status of the replaced item.
Any feature, conversion, or upgrade IBM or your reseller services must be
installed on a Machine which is 1) for certain Machines, the designated,
serial-numbered Machine and 2) at an engineering-change level compatible
with the feature, conversion, or upgrade. Many features, conversions, or
upgrades involve the removal of parts and their return to IBM. A part that
replaces a removed part will assume the warranty service status of the
removed part.
Before IBM or your reseller exchanges a Machine or part, you agree to remove
all features, parts, options, alterations, and attachments not under warranty
service.
You also agree to
1. ensure that the Machine is free of any legal obligations or restrictions that
prevent its exchange;
2. obtain authorization from the owner to have IBM or your reseller service a
Machine that you do not own; and
3. where applicable, before service is provided
a. follow the problem determination, problem analysis, and service request
procedures that IBM or your reseller provides,
b. secure all programs, data, and funds contained in a Machine,
c. provide IBM or your reseller with sufficient, free, and safe access to
your facilities to permit them to fulfill their obligations, and
d. inform IBM or your reseller of changes in a Machine’s location.
Appendix D. Product warranties and notices
D-3
IBM is responsible for loss of, or damage to, your Machine while it is 1) in
IBM’s possession or 2) in transit in those cases where IBM is responsible for
the transportation charges.
Neither IBM nor your reseller is responsible for any of your confidential,
proprietary or personal information contained in a Machine which you return
to IBM or your reseller for any reason. You should remove all such information
from the Machine prior to its return.
Production Status
Each IBM Machine is manufactured from new parts, or new and used parts. In
some cases, the Machine may not be new and may have been previously
installed. Regardless of the Machine’s production status, IBM’s appropriate
warranty terms apply.
Limitation of Liability
Circumstances may arise where, because of a default on IBM’s part or other
liability, you are entitled to recover damages from IBM. In each such instance,
regardless of the basis on which you are entitled to claim damages from IBM
(including fundamental breach, negligence, misrepresentation, or other contract
or tort claim), IBM is liable for no more than
1. damages for bodily injury (including death) and damage to real property
and tangible personal property; and
2. the amount of any other actual direct damages, up to the greater of U.S.
$100,000 (or equivalent in local currency) or the charges (if recurring, 12
months’ charges apply) for the Machine that is the subject of the claim.
This limit also applies to IBM’s suppliers and your reseller. It is the
maximum for which IBM, its suppliers, and your reseller are collectively
responsible.
UNDER NO CIRCUMSTANCES IS IBM LIABLE FOR ANY OF THE
FOLLOWING: 1) THIRD-PARTY CLAIMS AGAINST YOU FOR DAMAGES
(OTHER THAN THOSE UNDER THE FIRST ITEM LISTED ABOVE); 2)
LOSS OF, OR DAMAGE TO, YOUR RECORDS OR DATA; OR 3) SPECIAL,
INCIDENTAL, OR INDIRECT DAMAGES OR FOR ANY ECONOMIC
CONSEQUENTIAL DAMAGES (INCLUDING LOST PROFITS OR
SAVINGS), EVEN IF IBM, ITS SUPPLIERS OR YOUR RESELLER IS
INFORMED OF THEIR POSSIBILITY. SOME JURISDICTIONS DO NOT
ALLOW THE EXCLUSION OR LIMITATION OF INCIDENTAL OR
CONSEQUENTIAL DAMAGES, SO THE ABOVE LIMITATION OR
EXCLUSION MAY NOT APPLY TO YOU.
D-4
48X-20X Internal IDE CD-ROM Drive: User’s Guide
IBM Statement of Warranty Worldwide except Canada,
Puerto Rico, Turkey, United States (Part 1 - General Terms)
This Statement of Warranty includes Part 1 - General Terms and Part 2 Country-unique Terms.The terms of Part 2 may replace or modify those of Part
1. The warranties provided by IBM in this Statement of Warranty apply only to
Machines you purchase for your use, and not for resale, from IBM or your reseller.
The term ″Machine″ means an IBM machine, its features, conversions, upgrades,
elements, or accessories, or any combination of them. The term ″Machine″ does not
include any software programs, whether pre-loaded with the Machine, installed
subsequently or otherwise. Unless IBM specifies otherwise, the following warranties
apply only in the country where you acquire the Machine. Nothing in this Statement
of Warranty affects any statutory rights of consumers that cannot be waived or limited
by contract. If you have any questions, contact IBM or your reseller.
Machine - 48X-20X CD-ROM Drive
Warranty period* - One (1) year
* Contact your place of purchase for warranty service information. Some IBM Machines are
eligible for on-site warranty service depending on the country where service is performed.
The IBM Warranty for Machines
IBM warrants that each Machine 1) is free from defects in materials and
workmanship and 2) conforms to IBM’s Official Published Specifications. The
warranty period for a Machine is a specified, fixed period commencing on its
Date of Installation. The date on your sales receipt is the Date of Installation,
unless IBM or your reseller informs you otherwise.
During the warranty period IBM or your reseller, if approved by IBM to
provide warranty service, will provide repair and exchange service for the
Machine, without charge, under the type of service designated for the Machine
and will manage and install engineering changes that apply to the Machine.
If a Machine does not function as warranted during the warranty period, and
IBM or your reseller are unable to either 1) make it do so or 2) replace it with
one that is at least functionally equivalent, you may return it to your place of
purchase and your money will be refunded. The replacement may not be new,
but will be in good working order.
Extent of Warranty
The warranty does not cover the repair or exchange of a Machine resulting
from misuse, accident, modification, unsuitable physical or operating
environment, improper maintenance by you, or failure caused by a product for
Appendix D. Product warranties and notices
D-5
which IBM is not responsible. The warranty is voided by removal or alteration
of Machine or parts identification labels.
THESE WARRANTIES ARE YOUR EXCLUSIVE WARRANTIES AND
REPLACE ALL OTHER WARRANTIES OR CONDITIONS, EXPRESS OR
IMPLIED, INCLUDING, BUT NOT LIMITED TO, THE IMPLIED
WARRANTIES OR CONDITIONS OF MERCHANTABILITY AND FITNESS
FOR A PARTICULAR PURPOSE. THESE WARRANTIES GIVE YOU
SPECIFIC LEGAL RIGHTS AND YOU MAY ALSO HAVE OTHER RIGHTS
WHICH VARY FROM JURISDICTION TO JURISDICTION. SOME
JURISDICTIONS DO NOT ALLOW THE EXCLUSION OR LIMITATION
OF EXPRESS OR IMPLIED WARRANTIES, SO THE ABOVE EXCLUSION
OR LIMITATION MAY NOT APPLY TO YOU. IN THAT EVENT, SUCH
WARRANTIES ARE LIMITED IN DURATION TO THE WARRANTY
PERIOD. NO WARRANTIES APPLY AFTER THAT PERIOD.
Items Not Covered by Warranty
IBM does not warrant uninterrupted or error-free operation of a Machine.
Unless specified otherwise, IBM provides non-IBM machines WITHOUT
WARRANTIES OF ANY KIND.
Any technical or other support provided for a Machine under warranty, such
as assistance via telephone with “how-to” questions and those regarding
Machine set-up and installation, will be provided WITHOUT WARRANTIES
OF ANY KIND.
Warranty Service
To obtain warranty service for the Machine, contact your reseller or IBM. You
may be required to present proof of purchase.
IBM or your reseller provides certain types of repair and exchange service,
either at your location or at a service center, to keep Machines in, or restore
them to, conformance with their Specifications. IBM or your reseller will
inform you of the available types of service for a Machine based on its country
of installation. IBM may repair the failing Machine or exchange it at its
discretion.
When warranty service involves the exchange of a Machine or part, the item
IBM or your reseller replaces becomes its property and the replacement
becomes yours. You represent that all removed items are genuine and
unaltered. The replacement may not be new, but will be in good working order
and at least functionally equivalent to the item replaced. The replacement
assumes the warranty service status of the replaced item.
D-6
48X-20X Internal IDE CD-ROM Drive: User’s Guide
Any feature, conversion, or upgrade IBM or your reseller services must be
installed on a Machine which is 1) for certain Machines, the designated,
serial-numbered Machine and 2) at an engineering-change level compatible
with the feature, conversion, or upgrade. Many features, conversions, or
upgrades involve the removal of parts and their return to IBM. A part that
replaces a removed part will assume the warranty service status of the
removed part.
Before IBM or your reseller exchanges a Machine or part, you agree to remove
all features, parts, options, alterations, and attachments not under warranty
service.
You also agree to
1. ensure that the Machine is free of any legal obligations or restrictions that
prevent its exchange;
2. obtain authorization from the owner to have IBM or your reseller service a
Machine that you do not own; and
3. where applicable, before service is provided
a. follow the problem determination, problem analysis, and service request
procedures that IBM or your reseller provides,
b. secure all programs, data, and funds contained in a Machine,
c. provide IBM or your reseller with sufficient, free, and safe access to
your facilities to permit them to fulfill their obligations, and
d. inform IBM or your reseller of changes in a Machine’s location.
IBM is responsible for loss of, or damage to, your Machine while it is 1) in
IBM’s possession or 2) in transit in those cases where IBM is responsible for
the transportation charges.
Neither IBM nor your reseller is responsible for any of your confidential,
proprietary or personal information contained in a Machine which you return
to IBM or your reseller for any reason. You should remove all such information
from the Machine prior to its return.
Production Status
Each IBM Machine is manufactured from new parts, or new and used parts. In
some cases, the Machine may not be new and may have been previously
installed. Regardless of the Machine’s production status, IBM’s appropriate
warranty terms apply.
Limitation of Liability
Circumstances may arise where, because of a default on IBM’s part or other
liability, you are entitled to recover damages from IBM. In each such instance,
regardless of the basis on which you are entitled to claim damages from IBM
Appendix D. Product warranties and notices
D-7
(including fundamental breach, negligence, misrepresentation, or other contract
or tort claim), IBM is liable for no more than
1. damages for bodily injury (including death) and damage to real property
and tangible personal property; and
2. the amount of any other actual direct damages, up to the greater of U.S.
$100,000 (or equivalent in local currency) or the charges (if recurring, 12
months’ charges apply) for the Machine that is the subject of the claim.
This limit also applies to IBM’s suppliers and your reseller. It is the
maximum for which IBM, its suppliers, and your reseller are collectively
responsible.
UNDER NO CIRCUMSTANCES IS IBM LIABLE FOR ANY OF THE
FOLLOWING: 1) THIRD-PARTY CLAIMS AGAINST YOU FOR DAMAGES
(OTHER THAN THOSE UNDER THE FIRST ITEM LISTED ABOVE); 2)
LOSS OF, OR DAMAGE TO, YOUR RECORDS OR DATA; OR 3) SPECIAL,
INCIDENTAL, OR INDIRECT DAMAGES OR FOR ANY ECONOMIC
CONSEQUENTIAL DAMAGES (INCLUDING LOST PROFITS OR
SAVINGS), EVEN IF IBM, ITS SUPPLIERS OR YOUR RESELLER IS
INFORMED OF THEIR POSSIBILITY. SOME JURISDICTIONS DO NOT
ALLOW THE EXCLUSION OR LIMITATION OF INCIDENTAL OR
CONSEQUENTIAL DAMAGES, SO THE ABOVE LIMITATION OR
EXCLUSION MAY NOT APPLY TO YOU.
Part 2 - Worldwide Country-Unique Terms
ASIA PACIFIC
AUSTRALIA: The IBM Warranty for Machines: The following paragraph is
added to this Section: The warranties specified in this Section are in addition to
any rights you may have under the Trade Practices Act 1974 or other
legislation and are only limited to the extent permitted by the applicable
legislation.
Extent of Warranty: The following replaces the first and second sentences of
this Section: The warranty does not cover the repair or exchange of a Machine
resulting from misuse, accident, modification, unsuitable physical or operating
environment, operation in other than the Specified Operating Environment,
improper maintenance by you, or failure caused by a product for which IBM is
not responsible.
Limitation of Liability: The following is added to this Section: Where IBM is
in breach of a condition or warranty implied by the Trade Practices Act 1974,
IBM’s liability is limited to the repair or replacement of the goods or the
supply of equivalent goods. Where that condition or warranty relates to right
to sell, quiet possession or clear title, or the goods are of a kind ordinarily
D-8
48X-20X Internal IDE CD-ROM Drive: User’s Guide
acquired for personal, domestic or household use or consumption, then none
of the limitations in this paragraph apply.
PEOPLE’S REPUBLIC OF CHINA: Governing Law: The following is added to
this Statement: The laws of the State of New York govern this Statement.
INDIA: Limitation of Liability: The following replaces items 1 and 2 of this
Section:
1. liability for bodily injury (including death) or damage to real property and
tangible personal property will be limited to that caused by IBM’s
negligence;
2. as to any other actual damage arising in any situation involving
nonperformance by IBM pursuant to, or in any way related to the subject
of this Statement of Warranty, IBM’s liability will be limited to the charge
paid by you for the individual Machine that is the subject of the claim.
NEW ZEALAND: The IBM Warranty for Machines: The following paragraph
is added to this Section: The warranties specified in this Section are in addition
to any rights you may have under the Consumer Guarantees Act 1993 or other
legislation which cannot be excluded or limited. The Consumer Guarantees Act
1993 will not apply in respect of any goods which IBM provides, if you require
the goods for the purposes of a business as defined in that Act.
Limitation of Liability: The following is added to this Section: Where
Machines are not acquired for the purposes of a business as defined in the
Consumer Guarantees Act 1993, the limitations in this Section are subject to the
limitations in that Act.
EUROPE, MIDDLE EAST, AFRICA (EMEA)
The following terms apply to all EMEA countries.
The terms of this Statement of Warranty apply to Machines purchased from an
IBM reseller. If you purchased this Machine from IBM, the terms and
conditions of the applicable IBM agreement prevail over this warranty
statement.
Warranty Service
If you purchased an IBM Machine in Austria, Belgium, Denmark, Estonia,
Finland, France, Germany, Greece, Iceland, Ireland, Italy, Latvia, Lithuania,
Luxembourg, Netherlands, Norway, Portugal, Spain, Sweden, Switzerland or
United Kingdom, you may obtain warranty service for that Machine in any of
those countries from either (1) an IBM reseller approved to perform warranty
service or (2) from IBM.
Appendix D. Product warranties and notices
D-9
If you purchased an IBM Personal Computer Machine in Albania, Armenia,
Belarus, Bosnia and Herzegovina, Bulgaria, Croatia, Czech Republic, Georgia,
Hungary, Kazakhstan, Kirghizia, Federal Republic of Yugoslavia, Former
Yugoslav Republic of Macedonia (FYROM), Moldova, Poland, Romania, Russia,
Slovak Republic, Slovenia, or Ukraine, you may obtain warranty service for
that Machine in any of those countries from either (1) an IBM reseller
approved to perform warranty service or (2) from IBM.
The applicable laws, Country-unique terms and competent court for this
Statement are those of the country in which the warranty service is being
provided. However, the laws of Austria govern this Statement if the warranty
service is provided in Albania, Armenia, Belarus, Bosnia and Herzegovina,
Bulgaria, Croatia, Czech Republic, Federal Republic of Yugoslavia, Georgia,
Hungary, Kazakhstan, Kirghizia, Former Yugoslav Republic of Macedonia
(FYROM), Moldova, Poland, Romania, Russia, Slovak Republic, Slovenia, and
Ukraine.
The following terms apply to the country specified:
EGYPT: Limitation of Liability: The following replaces item 2 in this Section:
2. as to any other actual direct damages, IBM’s liability will be limited to the
total amount you paid for the Machine that is the subject of the claim.
Applicability of suppliers and resellers (unchanged).
FRANCE: Limitation of Liability: The following replaces the second sentence
of the first paragraph of this Section: In such instances, regardless of the basis
on which you are entitled to claim damages from IBM, IBM is liable for no
more than: (items 1 and 2 unchanged).
GERMANY: The IBM Warranty for Machines: The following replaces the first
sentence of the first paragraph of this Section: The warranty for an IBM
Machine covers the functionality of the Machine for its normal use and the
Machine’s conformity to its Specifications.
The following paragraphs are added to this Section: The minimum warranty
period for Machines is six months.
In case IBM or your reseller are unable to repair an IBM Machine, you can
alternatively ask for a partial refund as far as justified by the reduced value of
the unrepaired Machine or ask for a cancellation of the respective agreement
for such Machine and get your money refunded.
Extent of Warranty: The second paragraph does not apply.
D-10
48X-20X Internal IDE CD-ROM Drive: User’s Guide
Warranty Service: The following is added to this Section: During the warranty
period, transportation for delivery of the failing Machine to IBM will be at
IBM’s expense.
Production Status: The following paragraph replaces this Section: Each
Machine is newly manufactured. It may incorporate in addition to new parts,
re-used parts as well.
Limitation of Liability: The following is added to this Section: The limitations
and exclusions specified in the Statement of Warranty will not apply to
damages caused by IBM with fraud or gross negligence and for express
warranty.
In item 2, replace ″U.S. $100,000″ with "EUR 500,000."
The following sentence is added to the end of the first paragraph of item 2:
IBM’s liability under this item is limited to the violation of essential contractual
terms in cases of ordinary negligence.
IRELAND: Extent of Warranty: The following is added to this Section: Except
as expressly provided in these terms and conditions, all statutory conditions,
including all warranties implied, but without prejudice to the generality of the
foregoing all warranties implied by the Sale of Goods Act 1893 or the Sale of
Goods and Supply of Services Act 1980 are hereby excluded.
Limitation of Liability: The following replaces items one and two of the first
paragraph of this Section: 1. death or personal injury or physical damage to
your real property solely caused by IBM’s negligence; and 2. the amount of
any other actual direct damages, up to the greater of EUR 500,000 or
125 percent of the charges (if recurring, the 12 months’ charges apply) for the
Machine that is the subject of the claim or which otherwise gives rise to the
claim.
Applicability of suppliers and resellers (unchanged).
The following paragraph is added at the end of this Section: IBM’s entire
liability and your sole remedy, whether in contract or in tort, in respect of any
default shall be limited to damages.
ITALY: Limitation of Liability: The following replaces the second sentence in
the first paragraph: In each such instance unless otherwise provided by
mandatory law, IBM is liable for no more than: (item 1 unchanged) 2) as to any
other actual damage arising in all situations involving non-performance by
IBM pursuant to, or in any way related to the subject matter of this Statement
of Warranty, IBM’s liability, will be limited to the total amount you paid for the
Machine that is the subject of the claim.
Appendix D. Product warranties and notices
D-11
Applicability of suppliers and resellers (unchanged).
The following replaces the second paragraph of this Section: Unless otherwise
provided by mandatory law, IBM and your reseller are not liable for any of the
following: (items 1 and 2 unchanged) 3) indirect damages, even if IBM or your
reseller is informed of their possibility.
SOUTH AFRICA, NAMIBIA, BOTSWANA, LESOTHO AND SWAZILAND:
Limitation of Liability: The following is added to this Section: IBM’s entire
liability to you for actual damages arising in all situations involving
nonperformance by IBM in respect of the subject matter of this Statement of
Warranty will be limited to the charge paid by you for the individual Machine
that is the subject of your claim from IBM.
TURKIYE: Production Status: The following replaces this Section: IBM fulfills
customer orders for IBM Machines as newly manufactured in accordance with
IBM’s production standards.
UNITED KINGDOM: Limitation of Liability: The following replaces items 1
and 2 of the first paragraph of this Section:
1. death or personal injury or physical damage to your real property solely
caused by IBM’s negligence;
2. the amount of any other actual direct damages or loss, up to the greater of
Pounds Sterling 150,000 or 125 percent of the charges (if recurring, the 12
months’ charges apply) for the Machine that is the subject of the claim or
which otherwise gives rise to the claim.
The following item is added to this paragraph: 3. breach of IBM’s obligations
implied by Section 12 of the Sale of Goods Act 1979 or Section 2 of the Supply
of Goods and Services Act 1982.
Applicability of suppliers and resellers (unchanged).
The following is added to the end of this Section: IBM’s entire liability and
your sole remedy, whether in contract or in tort, in respect of any default will
be limited to damages.
NORTH AMERICA
CANADA: Warranty Service: The following is added to this section: To obtain
warranty service from IBM, call 1-800-565-3344. In Toronto, call 416-383-3344.
UNITED STATES OF AMERICA: Warranty Service: The following is added to
this section: To obtain warranty service from IBM, call 1-800-772-2227.
D-12
48X-20X Internal IDE CD-ROM Drive: User’s Guide
Notices
This publication was developed for products and services offered in the U.S.A.
IBM may not offer the products, services, or features discussed in this
document in other countries. Consult your local IBM representative for
information on the products and services currently available in your area. Any
reference to an IBM product, program, or service is not intended to state or
imply that only that IBM product, program, or service may be used. Any
functionally equivalent product, program, or service that does not infringe any
IBM intellectual property right may be used instead. However, it is the user’s
responsibility to evaluate and verify the operation of any non-IBM product,
program, or service.
IBM may have patents or pending patent applications covering subject matter
described in this document. The furnishing of this document does not give you
any license to these patents. You can send license inquiries, in writing, to:
IBM Director of Licensing
IBM Corporation
North Castle Drive
Armonk, NY 10504-1785
U.S.A.
The following paragraph does not apply to the United Kingdom or any
country where such provisions are inconsistent with local law:
INTERNATIONAL BUSINESS MACHINES CORPORATION PROVIDES THIS
PUBLICATION “AS IS” WITHOUT WARRANTY OF ANY KIND, EITHER
EXPRESS OR IMPLIED, INCLUDING, BUT NOT LIMITED TO, THE IMPLIED
WARRANTIES OF NON-INFRINGEMENT, MERCHANTABILITY OR FITNESS
FOR A PARTICULAR PURPOSE. Some states do not allow disclaimer of
express or implied warranties in certain transactions, therefore, this statement
may not apply to you.
This information could include technical inaccuracies or typographical errors.
Changes are periodically made to the information herein; these changes will be
incorporated in new editions of the publication. IBM may make improvements
and/or changes in the product(s) and/or the program(s) described in this
publication at any time without notice.
IBM may use or distribute any of the information you supply in any way it
believes appropriate without incurring any obligation to you.
Any performance data contained herein was determined in a controlled
environment. Therefore, the result obtained in other operating environments
may vary significantly. Some measurements may have been made on
development-level systems and there is no guarantee that these measurements
Appendix D. Product warranties and notices
D-13
will be the same on generally available systems. Furthermore, some
measurements may have been estimated through extrapolation. Actual results
may vary. Users of this document should verify the applicable data for their
specific environment.
Trademarks
The following terms are trademarks of the IBM Corporation in the United
States or other countries or both:
IBM
PS/2
HelpCenter
Microsoft, Windows, and Windows NT are trademarks of the Microsoft
Corporation.
Other company, product, and service names may be trademarks or service
marks of others.
D-14
48X-20X Internal IDE CD-ROM Drive: User’s Guide
48X-20X CD-ROM Drive
Federal Communications Commission (FCC) statement
Note: This equipment has been tested and found to comply with the limits for
a Class B digital device, pursuant to Part 15 of the FCC Rules. These limits are
designed to provide reasonable protection against harmful interference in a
residential installation. This equipment generates, uses, and can radiate radio
frequency energy and, if not installed and used in accordance with the
instructions, may cause harmful interference to radio communications.
However, there is no guarantee that interference will not occur in a particular
installation. If this equipment does cause harmful interference to radio or
television reception, which can be determined by turning the equipment off
and on, the user is encouraged to try to correct the interference by one or more
of the following measures:
v Reorient or relocate the receiving antenna.
v Increase the separation between the equipment and receiver.
v Connect the equipment into an outlet on a circuit different from that to
which the receiver is connected.
v Consult an IBM authorized dealer or service representative for help.
Properly shielded and grounded cables and connectors must be used in order
to meet FCC emission limits. Proper cables and connectors are available from
IBM authorized dealers. IBM is not responsible for any radio or television
interference caused by using other than recommended cables and connectors or
by unauthorized changes or modifications to this equipment. Unauthorized
changes or modifications could void the user’s authority to operate the
equipment.
This device complies with Part 15 of the FCC Rules. Operation is subject to the
following two conditions: (1) this device may not cause harmful interference,
and (2) this device must accept any interference received, including
interference that may cause undesired operation.
Responsible party:
International Business Machines Corporation
New Orchard Road
Armonk, NY 10504
Telephone: 1-919-543-2193
Tested To Comply
With FCC Standards
FOR HOME OR OFFICE USE
Appendix D. Product warranties and notices
D-15
Industry Canada Class B emission compliance statement
This Class B digital apparatus complies with Canadian ICES-003.
Avis de conformite a la reglementation d’Industrie Canada
Cet appareil numérique de classe B est conforme à la norme NMB-003 du
Canada.
Deutsche EMV-Direktive (electromagnetische Verträglichkeit)
Dieses Gerät ist berechtigt in Übereinstimmung mit dem deutschen EMVG
vom 9.Nov.92 das EG-Konformitätszeichen zu führen.
Der Aussteller der Konformitätserklärung ist die IBM UK, Greenock.
Dieses Gerät erfüllt die Bedingungen der EN 55022 Klasse B.
European Union - emission directive
This product is in conformity with the protection requirements of EU Council
Directive 89/366/ECC on the approximation of the laws of the Member States
relating to electromagnetic compatibility.
IBM can not accept responsibility for any failure to satisfy the protection
requirements resulting from a non-recommended modification of the product,
including the fitting of non-IBM option cards.
This product has been tested and found to comply with the limits for Class B
Information Technology Equipment according to CISPR 22/European Standard
EN 55022. The limits for Class B equipment were derived for typical residential
environments to provide reasonable protection against interference with
licensed communication devices.
Union Européenne - Directive Conformité électromagnétique
Ce produit est conforme aux exigences de protection de la Directive
89/336/EEC du Conseil de l’UE sur le rapprochement des lois des États
membres en matière de compatibilité électromagnétique.
IBM ne peut accepter aucune responsabilité pour le manquement aux exigences
de protection résultant d’une modification non recommandée du produit, y
compris l’installation de cartes autres que les cartes IBM.
Ce produit a été testé et il satisfait les conditions de l’équipement informatique
de Classe B en vertu de CISPR22/Standard européen EN 55022. Les conditions
D-16
48X-20X Internal IDE CD-ROM Drive: User’s Guide
pour l’équipement de Classe B ont été définies en fonction d’un contexte
résidentiel ordinaire afin de fournir une protection raisonnable contre
l’interférence d’appareils de communication autorisés.
Unione Europea - Directiva EMC (Conformidad électromagnética)
Este producto satisface los requisitos de protección del Consejo de la UE,
Directiva 89/336/CEE en lo que a la legislatura de los Estados Miembros sobre
compatibilidad electromagnética se refiere.
IBM no puede aceptar responsabilidad alguna si este producto deja de
satisfacer dichos requisitos de protección como resultado de una modificación
no recomendada del producto, incluyendo el ajuste de tarjetas de opción que
no sean IBM.
Este producto ha sido probado y satisface los límites para Equipos Informáticos
Clase B de conformidad con el Estándar CISPR22 y el Estándar Europeo EN
55022. Los límites para los equipos de Clase B se han establecido para entornos
residenciales típicos a fin de proporcionar una protección razonable contra las
interferencias con dispositivos de comunicación licenciados.
Union Europea - Normativa EMC
Questo prodotto è conforme alle normative di protezione ai sensi della
Direttiva del Consiglio dell’Unione Europea 89/336/CEE sull’armonizzazione
legislativa degli stati membri in materia di compatibilità elettromagnetica.
IBM non accetta responsabilità alcuna per la mancata conformità alle
normative di protezione dovuta a modifiche non consigliate al prodotto,
compresa l’installazione di schede e componenti di marca diversa da IBM.
Le prove effettuate sul presente prodotto hanno accertato che esso rientra nei
limiti stabiliti per le le apparecchiature di informatica Classe B ai sensi del
CISPR 22/Norma Europea EN 55022. I limiti delle apparecchiature della Classe
B sono stati stabiliti al fine di fornire ragionevole protezione da interferenze
mediante dispositivi di comunicazione in concessione in ambienti residenziali
tipici.
Appendix D. Product warranties and notices
D-17
D-18
48X-20X Internal IDE CD-ROM Drive: User’s Guide
Part Number: 71P7279
Printed in the United States of America
on recycled paper containing 10%
recovered post-consumer fiber.
*71P7279*