1
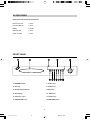
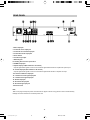
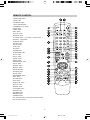
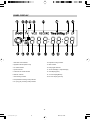
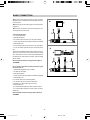
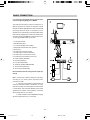
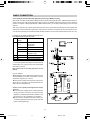
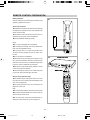
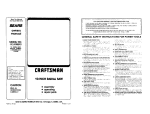
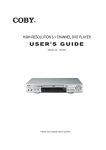
DVD + H.D.D.VIDEO RECORDER
HY-DVDR
INSTRUCTION MANUAL
Please read the I/M carefully before connection
-1-
DVR-˵Ã÷Êé.p65
1
03-9-16, 15:18
TABLE OF CONTENTS
SAFETY INFORMATION ------------------------------- 3
CHAPTER (For DVD Only) ----------------------- 14
FEATURES ------------------------------------------------ 4
SUB-T ------------------------------------------------- 14
PRECAUTIONS ------------------------------------------ 4
BOOK/MARK ---------------------------------------- 14
ACCESSORIES ------------------------------------------ 5
AUDIO SETTING(For VCD Only) ---------------- 14
FRONT PANEL ------------------------------------------- 5
2. Receive TV Programs -------------------------- 14
REAR PANEL --------------------------------------------- 6
Search TV Programs -- ---------------------------- 14
REMOTE CONTROL ------------------------------------ 7
T/SHIFT- ---------------------------------------------- 14
VFD DISPLAY -------------------------------------------- 8
3. RECORD ------------------------------------------ 15
BASIC CONNECTION ---------------------------------- 9
AV INPUT Record ----------------------------------- 15
REMOTE CONTROL PREPARATION ------------- 12
TV Programs Recorde ----------------------------- 15
DISC Record ----------------------------------------- 15
OPERATION -------------------------------------------- 13
Picture Quality -------------------------------------- 15
Preparation ------------------------------------------- 13
RECODE PROG ------------------------------------ 15
1. DVD PLAYER Preparation -------------------- 13
PLAY -- ------------------------------------------------ 13
SETUP ---------------------------------------------------- 15
STOP - ------------------------------------------------ 13
SYSTEM SETUP ----------------------------------- 15
PREV/NEXT- ----------------------------------------- 13
TV CHANNEL MANAGER ------------------------ 16
FB/FF- ------------------------------------------------ 13
HARD DISC MANAGER -------------------------- 16
SLOW ------------------------------------------------- 13
RECORD SCHDULE ------------------------------- 16
PAUSE/STEP --------------------------------------- 13
DVD PLAYER SETUP ----------------------------- 16
NUMBER (0-9 ,+10,-- button) ------------------- 13
AUTO OVERLAY ----------------------------------- 16
MUTE -------------------------------------------------- 13
DEFAULT SETUP ----------------------------------- 16
VOL+/VOL- ------------------------------------------ 13
ANGLE ------------------------------------------------ 13
Appendix -------------------------------------------- 17
AUDIO ------------------------------------------------- 13
DISC Handing and Maintenance ---------------- 17
ZOOM ------------------------------------------------- 13
Player Maintenance -------------------------------- 17
DISPLAY ---------------------------------------------- 14
Definition Of Terms --------------------------------- 17
PBC ---------------------------------------------------- 14
FAQ ---------------------------------------------------- 17
DIGEST ----------------------------------------------- 14
A-B REPEAT ---------------------------------------- 14
For Your Reference ------------------------------ 19
REPEAT ---------------------------------------------- 14
Specifications --------------------------------------- 19
CLEAR ------------------------------------------------ 14
Troubleshooting ------------------------------------- 20
P/N ----------------------------------------------------- 14
GO TO ------------------------------------------------ 14
TITLE (For DVD Only) ----------------------------- 14
-2-
DVR-˵Ã÷Êé.p65
2
03-9-16, 15:18
SAFETY INFORMATION
Dear customers,
We take this opportunity to thank you for purchasing this DVR/DVD/VCD /CD Recorder player. We strongly recommend
that you study carefully the operation instructions before attempting to operate the unit and that you have noted the listed
precautions.
Note
This unit can be used only where the power supply is 240V 50Hz.
Caution
uDVR/DVD/VCD/CD RECORDER PLAYER IS A CLASS 1 LASER PRODUCT. HOWEVER THIS DVD/CD PLAYER
USES A VISIBLE LASER BEAM WHICH COULD CAUSE HAZARDOUS RADIATION EXPOSURE IF DIRECTED. BE
SURE TO OPERATE THE DVD/VCD/CD PLAYER CORRECTLY AS INSTRUCTED WITHOUT OPENING CABINET
AND LOADER COVER.
uWHEN THIS PLAYER IS PLUGGED IN, DO NOT PLACE YOUR EYES CLOSE TO THE OPENING OF THE DISC
TRAY AND OTHER OPENINGS TO LOOK INSIDE THE PLAYER.
uWHEN THIS PLAYER IS PLUGGED, DO NOT REMOVE THE PROTECTIVE CAP ON THE OPTICAL OUTPUT
SCART. RED BEAM EMITTED WILL HARM YOUR EYES ESPECIALLY TO CHILDREN WHEN YOU LOOK AT
OPTICAL OUTPUT SCART. ALWAYS PUT ON THE PROTECTIVE CAP WHEN THE SCART IS IDLE.
uRADIOACTIVE DANGER MAY BE CAUSED IF YOU DO NOT FOLLOW THE METHOD STIPULATED HERE FOR
THE OPERATION, ADJUSTMENT OR CONTROL.
uPLEASE CONSIGN THE MAINTENANCE TO THE PROFESSIONAL TECHNICIAN.
WARNING
uTO REDUCE THE RISK OF FIRE OR ELECTRIC SHOCK, DO NOT EXPOSE THIS EQUIPMENT TO RAIN OR
MOISTURE.
uTO REDUCE THE RISK OF FIRE OR ELECTRIC SHOCK, AND ANNOYING INTERFERENCE, USE THE RECOMMENDED ACCESSORIES.
Manufactured under license from Dolby Laboratories.“Dolby”,“Pro Logic”, and the double-D symbol are trademarks of
Dolby Laboratories. Confidential unpublished works. © 1992-1997 Dolby Laboratories. ALL rights reserved.
Copy Protection
This DVD player supports Macrovision copy protection. On DVD disc that include a copy protection code, if the contents
of the DVD disc are copied using a VCR, the copy protection code prevents the videotape copy from playing normally.
Apparatus Claims of U.S. Patent Nos.4,631,603; 4,577,216; 4,819,098 and 4,907,093 licensed for limited viewing
uses only
This product incorporates copyright protection technology that is protected by method claims of certain U.S. patents
and other intellectual property rights owned by Macrovision Corporation and other right owners. Use of this copyright
protection technology must be authorized by Macrovision Corporation, and is intended for home and other limited
viewing uses only, unless authorized by Macrovision Corporation. Reverse engineering or disassembly is prohibited.
-3-
DVR-˵Ã÷Êé.p65
3
03-9-16, 15:18
FEATURES
PRECAUTIONS
More functions than DVD player:
Video playback,hard disc record, family entertainment
Two different optional input modes :AV,RFTV signal.
Two different modes output:Composite video,S-video.
Digital audio output: optical/coaxial output jack.
5.1 channel analogue audio output.
Independent recorder:
Built- in TV tuner.Support TV program receiving,independent recorder,recorder quality up to the DVD.
Four record quality mode available.
Support record auto overlay.
cord.
uRemove the dust, dirt, etc. on the plug at regular intervals.
uIf the unit has been dropped or damaged, turn off the
power and disconnect the AC power cord.
uIf you find smoke, bad smells or noises from the unit,
turn off the power and disconnect the AC power cord.
Placement
The internal parts may be seriously damaged if the unit
is placed in the areas of :
u direct sunlight or heating radiators, or closed
automobiles;
uhigh temperature (over 35°C) or humidity (over 90%) ;
uexcessive dust;
ustrong magnetic or static electricity ;
uvibration, impact or where the surface is titled.
Timing plan
Support one time.everyday.everyweek total 10 task
plan
Perfect preset recording and play back TV programs.
The user can set the startup of recording and play back
program,time span freely. Through the edit of preset
program list, you can record distant TV program, including serial TV program.
program copy:
DVD/VCD program contents are copied and saved
directly.
Built-in AC3 decoder, support DTS and Dolby digital
Acrobatic playback:third levels of speed of 2x,4x and
8x.shift slow.stepwise play.
Time shifting:
Real time record
advantage T/Shifting function. When watching TV
program, press the “T/SHIFT” key, then the unit will enter
a status of recording while playing. When you come back
later, you can resume watching TV from where you paused.
Operation advantage
VFD display
Intelligent upgrate
Compatible with DVD-VIDEO.VCD.SVCD.HDCD.CD.
CD-R.CD-RW.MP3.JPEG CD disc.
Non-use Periods
uTurn off the power when the unit is not in use.
uIt should be unplugged when the unit is idle for a long
period of time.
No fingers or other objects inside
uTouching the internal parts of this unit is dangerous,
and may cause serious damage to the unit and even
human injury.
uDo not try to disassemble this unit.
uDo not put any other object on the disc tray.
Keep away from water and magnets
uKeep the unit away from flower vases, tubs, sinks, etc.
If liquids are spilled into the unit, serious damage could
occur.
uNever bring magnetic objects near the unit such as
speakers.
Stacking
uPlace the unit in a horizontal position, and do not put
anything heavy on it.
uDo not put the unit on amplifiers or other equipment,
which may become hot.
Please read these precautions before operating this unit:
Power cord protection
To avoid any malfunctions of the unit, and to protect against
electrical shock, fire or human injury, please observe the
following:
uHold the plug firmly when connecting the AC power
cord to this unit or disconnecting it.
uDo not connect or disconnect the AC power cord when
your hands are wet.
uKeep the AC power cord away from heating appliances.
uNever put any heavy object on the AC power cord.
uDo not attempt to repair or reconstruct the AC power
Condensation
Moisture may form on the lens in the following conditions:
uIn a steamy or very humid room
uImmediately after a heater is turned on
if moisture forms inside this unit, it may not operate
properly. In this case, turn on the power for about 1 hour
to evaporate it.
-4-
DVR-˵Ã÷Êé.p65
4
03-9-16, 15:18
ACCESSORIES
Plese check and confirm the accessories:
Remote Control
1 piece
Instruction Manual
1 piece
Battery
2 pieces
Warranty card
1 piece
3-Way AV cable
1 piece
FRONT PANEL
1. STANDBY switch
7. PLAY button
2. Disc tray
8. STOP buiion
3. Remote Control Sensor
9. REC button
4. VFD display
10. DVD button
5. Channel+/- button
11. TV/AV button
6. OPEN/CLOSE button
12.TIME SHIFT button
-5-
DVR-˵Ã÷Êé.p65
5
03-9-16, 15:18
REAR PANEL
1.Video output jack
2. 5.1channel centre output jack
3. 5.1channel surround left output jack
4. 5.1channel front left output jack
5. Power Switch
6. TV antenna input jack
7. Exhausting Fan
It is working when the unit is powered on.
8. S-VIDEO output jack
9. Optical output jack (Not available for TV channel)
Outputs digital audio signals and can be connected to digital audio decoder or amplifer with optical input
10. Coaxial output jack (Not available for TV channel)
Outputs digital audio signals and can be connected to digital audio decoder or amplifer with input
11.5.1channel subwoofer output jack
12. 5.1channel surround right output jack
13. 5.1channel front right output jack
14. AV Video input jack
15. AV channel left input jack
16. AV channel right input jack
17.AC Power Cord
Note:
Take out the plug and keep the power cord well when the player is idle for a long period in order to avoid electricity
leakage and shock resulted from scratched power cord
-6-
DVR-˵Ã÷Êé.p65
6
03-9-16, 15:18
REMOTE CONTROL
1.OPEN/CLOSE button
2.TITLE button
3.A-B REPEAT button
4. SUB-T (Subtitle) button
5. NUMBER(0-9.+10.--)button
6.MUTE button
7.AUDIO button
8.REC button
9.CH+.CH- button
10.DISPLAY button
11. Direction button: 5(up) button, 6(down) button, 3
(left) button, 4(right) button
12.RETURN button
13.SLOW button
14.STOP button
15.FB button
16.FF button
17.ZOOM button
18.LANGUAGE button
19.VOL- botton
20.VOL+ botton
21.PREV button
22.NEXT button
23.STEP/PAUSE button
24.PLAY button
25.ENTER button
26.SETUP button
27.DVD shift button
28.T/SHIFT button
29.TV/AV button
30.BOOK/MARK button
31.R/L button
32.CLEAR button
33.P/N button
34.PBC mode button
35.GO TO button
36.ANGLE button
37.CHAPTER button
38.PROG button
39.POWER button
40.DIGEST button
41.REPEAT button
Note: The same button on remote control and front panel
have the same functions.
-7-
DVR-˵Ã÷Êé.p65
7
03-9-16, 15:18
PANEL DISPLAY
1. DVD disc mode indicator
10. Playback running indicator
2. playback indicator (DVD or HD)
11. DTS indicator
3. TV mode indicator
12. Dolby digital indicator
4. pause indicator
13. 14.TITLE Display or chapter Display
5. VCD/ CD disc mode indicator
15. Time Display(Hour)
6. Record indicator
16. 17.Time Display(Minute)
7. Time shifting indicator
18.19. Time Display (second)
8. SP (Standard recording mode) indicator
9. LP (Long play recording mode) indicator
-8-
DVR-˵Ã÷Êé.p65
8
03-9-16, 15:18
BASIC CONNECTION
u Ensure that the power switch of this unit and other
equipment to be connected is turned off before commencing connection
uRead through the instructions before connecting other
equipment
uEnsure that you observe the color-coding when connecting audio and video cords
A: Connecting to TV set
1. TV set (not included)
2. DVR Record player
3. To S-video input connector of TV set (not included)
4. 75ohm Antenna input jack (antenna cable not included)
5. Video/Audio cord
6. To composite video input connector of TV set (yellow)
7. To TV Set audio input left and right connector.(white,
red)
To get the best possible image quality, please use the Svideo cord. Connect the unit to the TV set with S-video
input, and set the TV set to S-video input. Meanwhile set
the OSD menu’s video output to S-video. Then the image
will be clearer.
Recommendation: Set the analogue audio output as
2 CHANNEL
B: Connection with External Antenna/CATV signal
Source and TV set
1. Audio/Video equipment (not included)
2. TV SET (not included)
3. DVR Record player
4. 75ohm Antenna input jack (Antenna cable not supplied)
5. Video/Audio cord.
6. To TV set video input connector(yellow).
7. To TV set audio input connector (white,red).
8. S-video. to TV set S-video input connector .
9. Video/Audio cord .
10. to Audio/Videot equipment video output connector.
11. to Audio/Videot equipment audio output connector
(white,red)
Recommendation: Set the analogue audio output up
2 CHANNEL
-9-
DVR-˵Ã÷Êé.p65
9
03-9-16, 15:18
BASIC CONNECTION
C: Connecting to AV amplifier with 5.1 channel input
connector supporting Dolby AC-3 or MPEG2
This DVR Recorder Player contains a Dolby(AC-3) or
MPEG2 decoder.this enables the playback of DVR
Recoder with Dobly digital,MPEG1/2 audio or linear PCM
processing.When the player is connected to an AV
amplifier with 5.1channel input connectors,theater quality
audio could be enjoyed at your home when playing a disc
recorded in Dolby digital,MPEG1/2 audip or linear PCM.
you can enjoy theater-quality at your home.
1. TV set (not included)
2. DVR Recorder player
3. 5.1 Channel Amplifer (not included)
4. Video/Audio cords/S-video cord (optional)
5. Audio cords
6. To audio input connector (center)
7. To audio input connector (subwoofer)
8. To audio input connector(surround L,R)
9. To audio input connector(front round L,R)
10. Center speaker (CENTER)
11. Front left speaker(FL)
12. Front right speaker(FR)
13. Subwoofer speaker(SUBWOOFER)
14. Surround left speaker (SL)
15. Surround right speaker(SR)
Recommendation: Set the analogue audio output up 6
channel
Note:1. Choose right “AUDIO” settings for this player
according to your audio system requirement after
connection is made
2. If the type of the speaker connected does not
satisfy the channels recorded in an MPEG 2 or Linear
PCM disc. The disc will not be played in all channels but
in 2 channels(i.e. even if the front speakers and the center
speakers are connected, a disc recorded in 5 channels
will be played back only in 2 channel
3 . DVDs recorded in Linear PCM/96KHZ sampling
will also be played back only in 2 channels.
-10-
DVR-˵Ã÷Êé.p65
10
03-9-16, 15:18
BASIC CONNECTION
D: Connecting to a decoder with Dolby digital (AC-3)processing or MPEG processing
When DVDs recorded in Dolby digital or MPEG audio are played, Dolby digital bit stream or MPEG audio bit stream is
output from the player’s OPTICAL digital audio output connector or COAXIAL digital audio output connector. When the
player is connected to a Dolby digital decoder or MPEG audio decoder, you can enjoy theater-quality at your home.(see
Graph E)
Take off the protective cap of optical cables and point each end of optical cables at DVD player and the amplifier with
optical input and the locating slot of optical jack, make sure they have been connected firmly. Keep the cap well and put
it into its output jacks again to avoid dust and other sending-out laser which may cause hazard when the jacks not in use.
Concerning the audio output from the unit’s coaxial digital audio output connector
DISC
SOUNDRECORDING DIGITAL OUTPUT SETTING
DVD
DOLBY DIGITAL
DIGITAL SIGNAL
(AC-3)
RAW OR PCM
DTS
DTS RAW
LINEAR PCM
LINEAR PCM12
MPEG1/MPEG2
AUDIO BITSTREAM OR PCM(2
FORMAT
48KHz/16bit
CHANNEL (16bit)
VCD
MPEG1
CD
LINERPCM
PCM(44.1KHz SAMPLING)
PCM(44.1KHz SAMPLING)
MP3
MP3
PCM(44.1KHz SAMPLING)
*1 Sound having 96KHz sampling is converted to 48 kHZ
sampling when it is output from the unit’s coaxial digital
audio output connector
Note: Please refer to the setup operations for set
method.
For your reference:
uDolby Digital(AC-3) is a digital sound compression technique developed by the Dolby Laboratories Licensing
Corporation. Supporting 5.1-channel
uLinear PCM is a signal-recording format used in CDs.
While CDs are recorded in 44.1KHz/16bit,DVDs are
48KHz /16 bit up to 96KHz/24 bit.
Caution for the optical/coaxial digital audio output
connector
uDo not connect an amplifier (with an optical/coaxial digital input connector) which does not contain the Dolby
Digital(AC-3) or MPEG audio decoder otherwise it may
be harmful to your ears and destroy your speakers.
uChoose “RAW” in the digital audio setup to effect Optical/ Coaxial digital output when playing disc with DTS
output or Dolby digital ouput
-11-
DVR-˵Ã÷Êé.p65
11
03-9-16, 15:18
REMOTE CONTROL PREPARATION
Battery Installation
Insert the batteries while observing the positive(+) and
negative(-) polarities as Figure A
Service life of batteries
uThe batteries normally last for about one year although
this depends on operation and for what operations the
remote control is used.
uIf the remote control unit fails to work even when it is
operated near the player, replace the batteries
uUse size AAAUM-4 batteries(2 pieces)
Notes:
uDo not use rechargeable (Ni-Cd) batteries
uDo not attempt to recharge, short circuit, disassemble,
heat or throw the batteries into fire
u Do not drop, step on or impact the remote control
otherwise this may damage the parts or lead to malfunction
uDo not mix old and new batteries
uIf the remote control is not going to be used for a long
time, remove the batteries. Otherwise, electrolyte may
leak which may lead not only to malfunctioning but also
to burns if contact is made with the electrolyte
uWipe away any electrolyte leaking inside the remote
control, and install new batteries
uIf any electrolyte should come into contact with parts
of your body, wash it off thoroughly with water
Remote control operation range
uThe operation range of the remote control is no more
than about 5m from and within about 60 degrees of the
front of the unit (Figure B)
u The operating distance may vary according to the
brightness of the room
Note:
uDo not point bright lights at the remote control sensor
uDo not place objects between the remote control unit
and the remote control sensor
uDo not use remote control while simultaneously operating the remote control of any other equipment
-12-
DVR-˵Ã÷Êé.p65
12
03-9-16, 15:18
OPERATIONS
Preparation
uTurn on TV set and select AV as the TV input
SLOW
uSwitch on the related equipment if the player has been
Press SLOW button on remote control during playback
connected to amplifier etc.
of a disc and the unit works slow playing. There are 3
uMost of the functions are operated by remote control .
levels of speed available:1/2, 1/4,1/8.
Either the operation of the remote control or front panel
Note: Some discs have no such function.
will be affected when their buttons indicate the same
PAUSE/STEP
function
Press PAUSE/STEP button during play, the player will enter
1. DVD player Operation
the still picture mode. If the button is pressed again, the
PLAY
disc is advanced by one frame (step). When the button is
1. Connect AC power cord to AC outlet.
kept pressed, consecutive frame advance works. To re-
2. Switch on the power, VFD shows relative information
turn to the normal play mode, press PLAY button.
that means power supply is normal.
Note: Some discs have no such function.
Note: full screen display indicates initial self checking. A
few seconds later it will display “TV”
NUMBER (0-9.+10,-- button)
3. Press DVD button to work under DVD mode
Press NUMBERl(0-9.+10) button and then press OK but-
4. Press OPEN/CLOSE button to open disc tray. “OPEN”
ton allows you to access directly any desired track when
will be displayed on the lower right of TV screen.
a disc is playing.
5. Press (OPEN/CLOSE)button again to close the disc
Note: -- button has no function under DVD mode
tray CLOSE is displayed on the lower right of TV screen
during closing, then it will display LOADING.
MUTE
6. After the disc is loaded, press PLAY button to play back
Press MUTE button during playback, the player shows
MUTE and there is no audio output (silence), press( MUTE)
disc loaded.
or VOL-.VOL+ or press PLAY again to cancel MUTE
display.
STOP
Press STOP button to stop playing.
VOL+/VOLPREV/NEXT
Press VOL+/VOL-button during play may change volume
Press PREV button or NEXT button on remote control dur-
for audio output.
ing playback, a chapter (DVD/VCD) or track (CD) is
Note:VOL button loses function for coaxial/optical digital
skipped back or ahead correspondently each time the
output.
button is pressed
ANGLE
FF/FB
Press ANGLE continuously during playback to toggle
Press FF/FB on the remote control during playback and
available angles if the disc has multi-angle function.
the unit will enter FF/FB status.The speed of FF/FB is relatively slow from the beginning. When pressed again, the
AUDIO(L/R)
speed will become faster. The more times that you press
Press AUDIO button during playback to toggle between
the buttons, the faster the fast forward or reverse speed
available audio language recorded on the disc if the disc
will be. There are 3 levels of speed available: x2, x4, x8. To
has multi-language.
return to normal play,press PLAY button on the player or
ZOOM
remote control.
Note: Some discs including MP3 disc have no such
Press ZOOM button during play or pause status to zoom
function.
up the current picture.
-13-
DVR-˵Ã÷Êé.p65
13
03-9-16, 15:18
OPERATIONS
TITLE (DVD Only)
Press TITLE button on remote control when during
playback,a title list on the disc (depends on discs)will be
displayed on TV monitor.
Use direction button or number button to select your
preferred title then press ENTER to start to play.
DISPLAY
Press DISPLAY during playback to show the disc’s relevant information on TV screen (such as playing time,
tItle,chapter,playback status).
PBC
Press PBC button to open or close PBC play mode under
the normal status.
Note: Only VCD disc has such function
CHAPTER (DVD Only)
Press CHAPTER button on remote control during playback,
chapter list on the disc(depends on disc)will be displyed
on TV monitor,
Use direction button or number button to select your preferred title then press ENTER to start play.
DIGEST
Press DIGEST button to open DIGEST play mode under
the normal status.
Note: Only VCD disc has such function
SUB-T
Press SUB-T button to select your preferred subtitle during playback
Note:The function is valid only for DVD disc with multi
subtitle
A-B REPEAT
Press A-B button during playback at the point where repeat
play is to commence(A) then press again at the point
where repeat play is to be concluded(B). Repeat playback
between point(A) and point(B) starts.
Press A-B button once more ,and TV screen appears
OFF or press STOP button to return to normal play.
Note: Some DVD discs and MP3 discs have no such
function
BOOK/MARK
Press BOOK/MARK button to enter BOOK/MARK picture
during playback, then press ENTER button to confirm the
location of BOOK/MARK. There are five MARKS available
in total. After finishing, press 1,2, 3, 4 or 5 number button
to play from the location of BOOK/MARK you setup.
REPEAT
Press REPEAT button to select the desired track,title and
disc during playback, and then the unit will playback according to your selection. Press REPEAT button or STOP
button to cancel repeat playback.
AUDIO (VCD Only)
Press AUDIO button to to display EFFECT SETUP including BASS/TREBLE/ 3D which could be adjusted by direction button.
CLEAR
When setting program or searching, you will need to input a number. Press CLEAR button to clear the number
when the input number is incorrect.
2. RECEIVE TV PROGRAM
Press TV/AV button to enter TV playback mode, and then
press SETUP button to enter TV CHANNEL MANAGER
AUTO search picture. Press ENTER button to start to
search channel and saved automatically. After finishing,
press number button(0,9,--) or (CH+,CH-) to select the
channel you like. Please refer to page 16 for the details
of TV channel manager
P/N
Press P/N button to choose PAL and NTSC during
playback.
Note: Choose AUTO or correct setting system to match
disc format in order to get good picture and sound quality.
T/SHIFT
When watching TV program, press T/SHIFT button, then
the unit will enter a status of recording while playing. You
can then leave it. When you come back a while later, you
can press FB button to move backward fast to the part
you have missed from continuity, or press FF button to
move forward fast to skip the advertisement programs
and gradually catch up with the program being played
GO TO
Press GO TO button during playbacking ,for VCD , it will
display” TRACK SEARCH and TIME” picture on the top
left of the TV screen.
For DVD , it will display “SEARCH TITLE/CHAPTER/TIME’
picture according. Please input what you want by number
button and direction button, then press ENTER to confirm
the setup
Note: Some discs have no such function.
-14-
DVR-˵Ã÷Êé.p65
14
03-9-16, 15:18
OPERATIONS
3.RECORD
AV INPUT RECORD
You can transmit AV input video signal and stereo audio
again to return to the upper level menu and the current
selection and input will be stored. If you want to cancel
the current operation and return to the upper level menu
signal to the unit and playback or record.And press TV/
AV button and set the unit up to AV status. If you want to
in the course of input or selection, please press RETURN
button.
record the signal from AV input video and stereo audio,
please press REC button to playback and record
SYSTEM SETUP
simultaneously. Press STOP button to stop the recording.
TV PROGRAM RECORD
Press SETUP button to enter SETUP MENU. Use cursor
to select the SYSTEM SETUP option, the corresponding
function of each submenu is described as the following:
Press REC button to simultaneously playback and record.
And press STOP button to stop recording.
1. PICTURE SETUP
RECORD QUALITY
It is an adjustment of the quality parameter of the DVR
output video signal. ie. Default, Brightness, Contrast,
The recording quality of the unit can be classified as four
levels in ascending order, i.e. SEP EP,LP and SP
Color.The current value of the video parameters is shown
on the bottom of the screen. Move the cursor to the
The higher the image quality is, the more space the
image occupies on the hard disc and the shorter the
recording time. Thus, the user should select proper
submenu option by pressing 5or6. Press CH+, CHand ENTER to change the setup.
Note: This setup has nothing to do with DVD player.
image quality and hard disc capacity.
Determine the image quality before recording.
2. DATE/TIME SETUP
Note: Do not change the image quality during recording.
The following is a map of image quality and recording
User can move the cursor by pressing direction button
(5.6.3or4) and then press number button to modify
time under standard configuaration(40G)
Image Quality
Continuous Recording Time
SP(very good)
10:22:17
the option. Press ENTER button to confirm setup and
return.
LP(good)
EP(common)
13:38:13
23:03:44
3.RECORD QUALITY
There are four levels of record image quality for user to
SEP(poor)
49:19:45
select, i.e. SP,LP,EP and SEP.Move the cursor by pressing
direction button(5.6) and press ENTER button to confirm
PROG
Press PROG button to access to the recorded program
when the unit is not in the DVR playing status. And select
the change.
it by direction button and ENTER button. And press STOP
button to stop playbacking it.
There are four levels of time shifting for user to select, i.
e, 30 MINUTES, 60 MINUTES, 90 MINUTES and 120
SETUP
MINUTES.Move the cursor by pressing direction button
5 6) and press ENTER button to confirm the change.
4.TIME SHIFTING SETUP
Choose the options in the SYSTEM SETUP menu and
then implement the setup operation in each of the selected
option window. The method for entering into the SYSTEM
SETUP menu is to press SETUP button on the remote
control when the unit is not in the DVR playing status.And
then setup the seven items, ie. SYSTEM SETUP, TV
CHANNEL MANAGER, HARD DISK MANAGER, RECORD
SCHEDULE, DVD PLAYER SETUP, AUTO OVERLAY
DEFAULT SETUP. Please press 5or6button to move
cursor to highlight the option, and press ENTER button to
confirm the selection.
When all the options are set up in a window, press ENTER
-15-
DVR-˵Ã÷Êé.p65
15
03-9-16, 15:18
SETUP
5. OSD LANGUAGE SETUP
ENGLISH OSD language is available.
1. SYSTEM INFO: Display the information about the built-in hard
disc.
6. POWER ON MODE
It is a setup to decide which status the unit is in when power on
2. SCAN DISC: To scan the hard disc, press ENTER button to
confirm the start of the scanning to the hard disc. Press the
RETURN button to return to the upper level menu.
NORMAL MODE: After started, the unit is in DVR starting status,
and the starting image is shown on the screen.
TIME SHIFTING: Under this setup, the unit will be in the TIME
SHIFTING status when power on.
3. FORMAT DISC: To format the hard disc, press ENTER button
to confirm the start of the scanning to the hard disc. Press the
RETURN button to return to the upper level menu.
RECORD SCHEDULE
Under the homepage, move cursor by pressing 5or6)button
and ENTER button to access to RECORD SCHEDULE. Then move
the cursor by pressing direction button 5 6 3or4),number
button(0-9) and ENTER button to confirm the change.
7. VERSION NUMBER
It is to show the software version information.
TV CHANNEL MANAGER
This submenu is used to manage the TV channels. Move the
cursor by pressing direction button 5 6 3or4) and press
ENTER button to confirm the change of the following four options available.
DVD PLAYER SETUP
Under the homepage, move cursor by pressing 5or6)button
and ENTER button to access to DVD PLAYER SETUP page.
Move the cursor by pressing direction button 5 6 3or4)
and press ENTER button to confirm the change of the following
six options available.
1. SORT:.Realign all the channels currently searched according
to your own needs.by pressing direction button.
CHANNEL SORT
SKIP
CHANNEL NUMBER
NEW NUMBER
1. ANALOGUE AUDIO OUTPUT: Select the analogue audio output as 2 CHANNEL and 5.1 CHANNEL. Press ENTER button to
confirm OK and return to the upper lever menu.
OPEN
01
02
2. DIGITAL AUDIO OUTPUT: Select the digital audio output as
the DOLBY DTS, LPCM format. Press ENTER button to confirm
OK and return to the upper level menu.
Press ENTER button to activate SORT function when cursor
moves to SORT option.
1) Press direction button (left or right button) to choose OPEN but
not CLOSE to activate skip function
2) Press direction button (down button) to change desired new
number, press ENTER Button to confirm the change.
3) Press SETUP button or RETURN button to exit SORT menu.
4) The new channel (02) will be skipped from channel list by
pressing CH+/- during searching;
5) The new number stores the channel to be sorted. Press new
number (02) to display sorted channel (01).
3. VIDEO SYSTEM: Select the TV SYSTEM as NTSC or PAL.
Press ENTER button to confirm OK and return to the upper level
menu.
4.SCREEN ASPECT: Select the video output width-height ratio
as 16:9 WS/4:3 PS/4:3 LS.Press ENTER button to confirm OK
and return to the upper level menu
5. VIDEO : Select the video output as COMP or S-VIDEO.Press
ENTER button to confirm OK and return to the upper level menu
2. AUTO: Press the ENTER button and enter the TV program
automatic search status. The unit will search all TV available
channels. The principle and function are the same as remote
controlling a TV. Press ENTER button when cursor points AUTO
option to search TV channel
automatically.
6. RETURN HOMEPAGE: Press ENTER button to return to the
homepage.
AUTO OVERLAY
Under the homepage, move cursor by pressing 5or6)button
and ENTER button to access to AUTO OVERLAY page. Then
move the cursor by pressing direction button 5 6)and ENTER
button to confirm the change of the following two options
Subtitle
available.
Audio
1. DVD
ENABLE: When the hard disc is full, the new recorded program will overlay the old ones automatically.
OSD
2. DISABLE: When the hard disc is full, the unit will not continue
recording. It will not resume recording until you clear the hard
disc.
3. MANUAL: You can use this option to search an unique channel.
Press ENTER button when cursor points MANUAL option to search
TV channel by hand.
MANUAL SEARCH
CHANNEL 2
BAND
Press direction button to change channel and press ENTER button to store current TV channel into the new channel number.
for example, current channel is 2 and change it to 3, Press
ENTER button to store the change and exit the setup menu.
DEFAULT SETUP
Under the homepage, press ENTER button to access the DEFAULT SETUP page when cursor moves on it. Then it will display the following options:
4. FINE: Finely tune the parameters of the current program for
better resolution. Press direction button to choose better resolution and press ENTER button to cofirm the change.
DEFAULT
RETURN
HARD DISC MANAGER
This submenu helps you to manage the built-in hard disc. Move
the cursor by pressing direction button 5 6 3or4) and press
ENTER button to confirm the change of following three options
available.
Note: After changing OSD setting, press ENTER button when
cursor on DEFAULT option then OSD will return to factory default
setting. Please note RETURN option is used to return to upper
menu.
-16-
DVR-˵Ã÷Êé.p65
16
03-9-16, 15:18
APPENDIX
APPENDIX
Handling Precautions Maintenance
Hold the disc by the edge so the surface will not be soiled
with fingerprints. Fingerprints, dirt and scratches can
cause skipping and distortion.
Do not use record cleaning sprays, benzene, thinner, static
electricity prevention liquids or any other solvent.
Be careful not to drop or bend the disc.
Do not try to close the disc tray when the disc is not installed properly.
Be sure to store the disc in its exclusive case when not in
use.
Handling
Wipe gently with a soft, damp (water only) cloth. Move the
cloth from the centre hole towards the outer edge.
Improper disc storage
The discs may be damaged if they are stored in the following places:
Areas exposed to direct sunlight
Humid or dusty areas
Areas directly exposed to a heat outlet or heating appliance
PBC
The language is indicated on TV screen to imply operation
or disc information.
Audio
Language recorded on discs and the maximum
languages are up to 8.
Time
This indicates the play time elapsed from the start of a
disc of a title. lt can be used to find a specific scene
quickly(it may not work with some discs).
Title Number
These numbers are recorded on DVD discs. When a
disc contains two or more movies, these movies are
numbered as title 1, title 2, etc.
Track Number
These numbers are assigned to the tracks which are
recorded on audio CDs. They enable specific tracks to
be located quickly.
Maintenance
Be sure to turn the unit off and disconnect the AC power
cord before maintaining the unit.
Keep the unit clean. If the surfaces are extremely dirty,
wipe the unit with a dry soft cloth.
Never use alcohol, benzene or other chemicals. Do not
use compressed air to remove dust.
Ask the technician to maintain the unit when problems
appear.
Note:
1.During play pirate or non-standard disc,the unit may
work atypically, in this status turn off the unit and restart it.
2. With the restriction of some discs the unit may not be
able to display.
3.The unit may play MP3 disc atypically due to the format
of disc, in this status repeat the operation or restart to
turn on the unit.
FAQ(Frequently Asked Questions)
1. What is DVD digital video recorder and player
DVD digital video recorder and player (herein are referred
as DVR) is the newest electronic entertainment product
combining DVD player with digital hard disc recorder,
which is high-tech outcome with the computer technology,
multi-media technology, communication network
technology, digital video and digital TV technology
development to date. it satisfies the family user’s many
requirements for DVD playing, TV program recording,
daily life recording and house safety guard, raising
consumption upsurge of new generation family
entertainment product after DVD.
2.What is DVR?
The DVR adopts hard disc as the signal storage media.
It also adopts real-time capture, real-time compression,
and real-time coding and storage technologies for
analogue video signal to realize the large capacity and
long time digital video recording realization should be
based on embedded computer and embedded operation
system. Hence, while realizing the digital video recording
function, DVR also such functions as timing recording.
Alarm trigger recording, time shifting, copy, network
transport and monitoring. In addition, the function
increase can be achieved only via upgrade software.
Definition of Terms
ANGLE
Recorded onto some DVD discs are scenes which have
been simultaneously shot from a number of different
angles (i.e. the same scene is shot from the front, left
side and right side, etc.) scene from different angles.
CHAPTER NUMBER
These numbers are recorded on DVD discs. A title is
subdivided into many sections. Each of which is
numbered, and specific parts of video presentations can
be searched quickly using these numbers.
3.Advantages of DVR
Huge capacity hard disc for long time information storage.
For example, 40G hard disc can record image and sound
information for almost 20 hours under MPEG-2
compression and coding standard.
Hard disc will be affected little by the environment.
Unusable situation resulting from long time storage will
not occur.
The content stored in the hard disc can be played many
times without damage.
The content is stored in the disc in data file mode, which
DVD disc
This refers to a high-density optical disc where highquality pictures and sound have been recorded by means
of digital signals. lncorporating a new video compression
technology (MPEG2) and high-density recording
technology,DVD enables esthetically pleasing full-motion
video to be recorded over long periods of time (for
instance, a whole movie can be recorded).
Subtitles
These are the printed lines appearing at the bottom of
the screen which translate or transcribe the dialogue.
They are recorded on DVD discs and up to 32 languages.
-17-
DVR-˵Ã÷Êé.p65
17
03-9-16, 15:18
APPENDIX
APPENDIX
DVR’s unique Time Shifting technology can resolve these
problems absolutely to eliminate your troubles.
First, please confirm the proper connection between DVR
and TV. Then, turn on the TV power. If your DVR output
signal has been connected to AV IN(such as AV 1 input
terminal) of the TV, please switch your TV to AV 1 input
status. And then turn on DVR power and start DVR to
enter RF TV signal input status.
Next, please activate Time Shifting function: Press T/
SHIFTING button on the remote control, DVR enters Time
Shifting status. All current TV program content can be
recorded automatically in its special buffer area. There
are 30 minutes, 60 minutes, 90 minutes and 120 minutes recording time for your selection.
At this moment, you can either watch other TV program
via remote control or do other thing. Do not worry;DVR
will record the program for your continuously.
If you are free now, please sit down and change the TV
back to AV 1 input status. Press the Fast backward button FF on the remote control to reverse to the position you
require. DVR will start to play program according to your
requirement. When the advertisement you hate or the
content you do not want to watch appears, you can use
fast forward function to skip.
You can perform such operation as fast backward, fast
forward, slow play and pause at your pleasure. So watch
TV program is as convenient and fast as watching disc.
The above function and operation is also suitable for AV
signal recording of DVR. With DVR, your entertainment
will have no trouble. it can provide you with the mose
considerate and convenient service.
For example, if you connect DVR output signal to AV 1 IN
(AV 1 input) terminal of the TV, then switch the TV channle
to AV 1 status first. Next turn on DVR power, start DVR,
select the channel you want, activate DVR time shifting
function. Then DVR can record the TV program
automatically. it is suppored that the time now is 6:00pm.
If you select 120 minutes of Time Shifting in the system
setup, then from 6:00pm to 8:00pm, DVR will automatically record the 120 minutes’TV program without
stopping. You can watch at your will.
If the hard disc space can not meet 2 hours’ recording
requirement , then the DVR automatic recording time will
be reduced accordingly.
Note: If you turn off DVR power, the program recorded
via DVR Time Shifting will be saved no longer. While,
the program recorded via normal recording will still be
saved
can be copied directly to computer or other unit via various interfaces and will not cause copy loss for image
and sound at all.
The information source stored in the hard disc can be
held flexibly and can be deleted at any time if it is
unnecessary, which will not affect other information. The
hard disc space can be used repeatedly. It inherits the
advantage of tape recording system and avoids the disadvantage of disc recording system.
The storage and read speed of the data in disc carries is
fast and accurate. The interruption and mosaic case
seldom occur.
The video and audio data is stored in file mode. It is easy
to perform search, deletion, name change and security
lock protection.
After digitalizaion, the video and audio can be transported
via network in real time.
Thus, it can be used in both live relay and security lock.
4. What is real-time coding/decoding technology?
Real-time coding/decoding technology refers that DVR
can collect the original video and audio data in real time
for processing, convert it into standard MPEG-1 or MPEG2 format video/audio code flow, then store it in the hard
disk in file mode or send it out via network without any
data stock and loss. To realize continuous audio image
playing, the frame rate should be over 24. Therefore, the
real-time coding/decoding technology requires the entire system speed to be fast enough. Otherwise, only
through reducing the image quality and data quantity can
the requirement be met.
5. What is time shifting function?
When you watch TV, you may have confronted the following problems:
1)The ball game is so breathtaking.How wonderful if you
could watch the score scene again.
2)The wonderful serial program is played from 6:30. But
you still have much housework to be done, and you can
watch the program only from 7:00. You wish to watch
from the beginning at 7:00, and skip the advertisement to
keep the same pace with the normal program.
3)You have to spend a long time listening to a call and
miss part of the program
4)There can be many advertisements in your favourite
program, which can be annoying.
At this moment, do you have a pity? Would you have a
sudden idea: Can TV programs be played backward, fast
forward, fast backward, and be paused at random just
like the disc?
-18-
DVR-˵Ã÷Êé.p65
18
03-9-16, 15:18
FOR YOUR REFERENCE
u Specification
TV tuner
uTV receive system:PAL B/G
Power requirement: AC240V, 50Hz
antenna impedance:75
Power consumption 40W
un-balance.
Signal system: PAL/NTSC
utune receive frequency:
Operating temperature range: +5~+35°C
VHF-L:46.25~168.25MHz
Operating humidity range: 5~90% (no condensation)
VHF-H :175.25 ~447.25MHz
UHF:455.25 ~855.25MHz
Disc played
1. DVD-video disc
Record part
u12cm single-sided, single-layer
uAudio S/N rate:(S/N) :80 dB
u12cm single-sided, double-layer
uAudio frequency(20Hz~20KHz):
u8cm single-sided, single-layer
uVideo S/N rate:(S/N):55dB
uVideo bandwidth(+3/-6db):
u8cm single-sided, double-layer
utime shifting:30.60.90.120min
u12cm disc
u8cm disc
Preset Australia TV channel up to 100 channels
Specifications are subject to change without prior
3. CD disc
u12cm disc
notice.
u8cm disc
Video output
uOutput level:1 +/- 0.2Vp-p(75 ohm)
uHorizontal resolution: >450 lines
uS/N ratio: >60dB
)
Audio output(load impedance:10K
uoutput level:1.8 + 0.2/-0.8Vrms (1KHz OdB)
0.2%(JIS-A 1KHz.)
dymamic range
uS/N ratio
80dB (JIS-A 1KHz.)
90dB(JIS-A 1KHz.)
Digital audio output:
Coaxial/Optical digital output.
-19-
DVR-˵Ã÷Êé.p65
5MHz
urecord time:(40G HD):9~49 hours
2. VCD-video disc
udistortion:
2dB
19
03-9-16, 15:18
FOR YOUR REFERENCE
uTroubleshooting
Check the chart below for a possible cause of the problem you are experencing before requesting service for this unit.
Some simple checks or a minor adjustment on your part may eliminate the problem and restore proper operation.
Let the technician maintain the unit.
symptom
Possible reason
l
Suggested solution
The power cord is not in the socket
l
Firmly insert the power cord into the
socket
Remote control doesn’ t l
work
l
The batteries have been exhausted..
The front end of the remote control is
not aimed at the infrared sensor of
the DVR.
l
l
Use new batteries
Please aim at the sensor of the unit.
l
The video cable is not connected or
properly connected
The TV is not switched to video mode
l
Connect properly according to the
system connection diagram.
Switch the TV to video mode.
No power
Black TV screen
l
l
No playback
l
l
l
The unit is not compatible with disc
No disc
The disc was inverted when being
loaded
l
l
l
Use a compatible disc with unit.
Load disc
Load disc once again with the side
Up with figures/words upwards
No sound
l
The audio cable is not connected or
properly connection.
Audio initial function setup error
External amplifier operation error
l
Connect the cables properly according
to the diagram
Set up once again.
Operate the amplifier properly..
Dirty Disc
Scratches on the disc/
disc distortion
l
l
l
Discontinuous
sound
and distorting image
l
l
l
l
l
Clean the disc surface with clean soft
cloth
Change the disc with a new one
Disable sign appears on
the let bottom of TV
screen
l
Improper operation, the current status
does not support the operation
l
Please refer to the function operation
instruction carefully
No
images
when
recording with AV input
l
No
connection
connection.
l
Please connect the DVR according to
the diagram.
No
sound
when
recording with AV input
l
Improper audio cable connection
l
Please connect the audio cable to the
DVR according to diagram.
Failure
to
directly
complete DVD copy
l
The unit doesn’ t support disc copy of
this type
l
Try another DVD
Failure
to
directly
complete VCD/CD copy
l
The unit doesn’ t support disc copy of
this type
l
Try another VCD/CD
No response
operation
l
The DVR malfunctioned because of
thunder, static electricity or other
interferences
l
Power off and then power on.
to
any
or
improper
-20-
DVR-˵Ã÷Êé.p65
20
03-9-16, 15:18