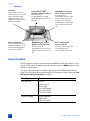
1
hp photosmart
7700 series
basics guide
hp photosmart 7700 series
© Copyright 2003 Hewlett-Packard Company
All rights are reserved. No part of this document may be photocopied, reproduced, or translated to another language without
the prior written consent of Hewlett-Packard Company.
The information contained in this document is subject to change without notice. Hewlett-Packard shall not be liable for errors
contained herein or for consequential damages in connection with the furnishing, performance, or use of this material.
HP, the HP logo, and Photosmart are property of Hewlett-Packard Company.
IBM is a registered trademark of International Business Machines Corporation.
The Secure Digital logo is a trademark of the SD Association.
Microsoft and Windows are registered trademarks of Microsoft Corporation.
CompactFlash, CF, and the CF logo are trademarks of the CompactFlash Association (CFA).
Sony Memory Stick is a registered trademark of Sony Corporation.
MultiMediaCard is a trademark of Infineon Technologies AG of Germany, and is licensed to the MMCA (MultiMediaCard
Association).
xD-Picture Card is a trademark of Fuji Photo Films Co., Ltd.,Toshiba Corporation, and Olympus Optical Co., Ltd.
SmartMedia is a trademark of Toshiba Corporation.
Mac, the Mac logo, and Macintosh are registered trademarks of Apple Computer, Inc.
Pentium is a registered trademark of Intel Corporation.
Other brands and their products are trademarks or registered trademarks of their respective holders.
The embedded software in your printer is based in part on the work of the Independent JPEG Group.
The copyrights to certain photos within this document are retained by the original owners.
Regulatory Model Identification Number
For regulatory identification purposes, your product is assigned a Regulatory Model Number. The Regulatory Model Number
for your product is SDGOA-0377. This regulatory number should not be confused with the marketing name (hp photosmart 7700
series printer) or product numbers (Q3015A, Q3016A).
safety information
Always follow basic safety precautions when using this product to reduce risk of injury from fire or electric shock.
•
•
•
•
•
•
•
•
•
•
Warning! To prevent fire or shock hazard, do not expose this product to rain or any type of moisture.
Warning! Potential shock hazard.
Read and understand all instructions in the HP Photosmart Setup Guide.
Use only a grounded electrical outlet when connecting the unit to a power source. If you do not know whether the outlet is
grounded, check with a qualified electrician.
Observe all warnings and instructions marked on the product.
Unplug this product from wall outlets before cleaning.
Do not install or use this product near water or when you are wet.
Install the product securely on a stable surface.
Install the product in a protected location where no one can step on or trip over the power cord, and where the power cord
will not be damaged.
If the product does not operate normally, see the troubleshooting information in the HP Photosmart Printer Help.
There are no operator serviceable parts inside. Refer servicing to qualified service personnel.
Use in a well-ventilated area.
contents
basics guide
1
get started . . . . . . . . . . . . . . . . . . . . . . . . . . . . . . . . . . . . 1
2
set the defaults on your printer . . . . . . . . . . . . . . . . . . . . 15
3
print from a memory card. . . . . . . . . . . . . . . . . . . . . . . . 21
welcome . . . . . . . . . . . . . . . . . . . . . . . . . . . . . . . . . . . . . . . 1
find information . . . . . . . . . . . . . . . . . . . . . . . . . . . . . . . . 2
view the hp photosmart printer help . . . . . . . . . . . . . . . . . . 2
print the hp photosmart printer help . . . . . . . . . . . . . . . . . . 2
what’s in the box . . . . . . . . . . . . . . . . . . . . . . . . . . . . . . . . . 3
printer parts . . . . . . . . . . . . . . . . . . . . . . . . . . . . . . . . . . . . . 4
front . . . . . . . . . . . . . . . . . . . . . . . . . . . . . . . . . . . . . . . . 4
back. . . . . . . . . . . . . . . . . . . . . . . . . . . . . . . . . . . . . . . . 4
control panel . . . . . . . . . . . . . . . . . . . . . . . . . . . . . . . . . . 5
indicator lights . . . . . . . . . . . . . . . . . . . . . . . . . . . . . . . . . 5
input bay . . . . . . . . . . . . . . . . . . . . . . . . . . . . . . . . . . . . 6
menu structure . . . . . . . . . . . . . . . . . . . . . . . . . . . . . . . . . . . 6
paper information . . . . . . . . . . . . . . . . . . . . . . . . . . . . . . . . . 7
load paper in the in tray . . . . . . . . . . . . . . . . . . . . . . . . . . 8
load paper in the photo tray . . . . . . . . . . . . . . . . . . . . . . . 9
print cartridge information . . . . . . . . . . . . . . . . . . . . . . . . . . 10
supported print cartridges . . . . . . . . . . . . . . . . . . . . . . . . 10
install or replace print cartridges . . . . . . . . . . . . . . . . . . . 11
ink-backup printing mode . . . . . . . . . . . . . . . . . . . . . . . . 13
print cartridge storage . . . . . . . . . . . . . . . . . . . . . . . . . . 14
keep or discard print settings after printing. . . . . . . . . . . . . . . 15
set the number of copies . . . . . . . . . . . . . . . . . . . . . . . . . . . 16
set the photo size . . . . . . . . . . . . . . . . . . . . . . . . . . . . . . . . 16
set borderless printing . . . . . . . . . . . . . . . . . . . . . . . . . . . . . 17
set paper detection . . . . . . . . . . . . . . . . . . . . . . . . . . . . . . . 18
unmark camera-selected photos . . . . . . . . . . . . . . . . . . . . . . 18
revert to the factory default settings . . . . . . . . . . . . . . . . . . . . 19
set LCD screen language and country/region . . . . . . . . . . . . . 19
set print quality. . . . . . . . . . . . . . . . . . . . . . . . . . . . . . . . . . 20
supported memory cards . . . . . . . . . . . . . . . . . . . . . . . . .
supported file formats . . . . . . . . . . . . . . . . . . . . . . . . .
insert a memory card . . . . . . . . . . . . . . . . . . . . . . . . . . .
remove a memory card . . . . . . . . . . . . . . . . . . . . . . . . . .
decide which photos to print or to send via e-mail . . . . . . . .
view photos from the LCD screen . . . . . . . . . . . . . . . . .
use 9-up view mode . . . . . . . . . . . . . . . . . . . . . . . . . .
print a photo index page . . . . . . . . . . . . . . . . . . . . . .
print a proof sheet . . . . . . . . . . . . . . . . . . . . . . . . . . .
. . 21
. . 22
. . 22
. . 25
. . 26
. . 26
. . 26
. . 27
. . 28
i
scan a proof sheet . . . . . . . . . . . . . . . . . . .
select a photo . . . . . . . . . . . . . . . . . . . . . .
deselect a photo . . . . . . . . . . . . . . . . . . . .
print photos from a memory card . . . . . . . . . . .
print unmarked photos on a memory card. . .
print camera-selected photos . . . . . . . . . . . .
print new photos . . . . . . . . . . . . . . . . . . . .
...
...
...
...
...
...
...
....
....
....
....
....
....
....
...
...
...
...
...
...
...
29
30
30
30
31
31
32
4
print from the direct-printing port . . . . . . . . . . . . . . . . . . 33
5
print from your computer . . . . . . . . . . . . . . . . . . . . . . . . 37
6
troubleshooting . . . . . . . . . . . . . . . . . . . . . . . . . . . . . . . 45
7
specifications . . . . . . . . . . . . . . . . . . . . . . . . . . . . . . . . . 53
connect your hp digital camera to the direct-printing port . . . . 33
adjust print settings . . . . . . . . . . . . . . . . . . . . . . . . . . . . 34
connect your notebook computer to the direct-printing port . . . 35
print from your Windows PC . . . . . . . . . . . . . . . . .
print from a software application . . . . . . . . . . . .
print borderless photos from your Windows PC . .
use the Windows PC taskbar icons . . . . . . . . . .
print from your Macintosh . . . . . . . . . . . . . . . . . . .
print from a software application (OS X or OS 9).
....
....
....
....
....
....
...
...
...
...
...
...
37
37
38
39
42
42
hardware problems . . . . . . . . . . . . . . . . . . . . . . . . . . . . . . 45
printing problems . . . . . . . . . . . . . . . . . . . . . . . . . . . . . . . . 46
error messages. . . . . . . . . . . . . . . . . . . . . . . . . . . . . . . . . . 50
recommended paper . . . . . . . . . . . . . . . . . . . . . . . . . . . . . 53
printer specifications . . . . . . . . . . . . . . . . . . . . . . . . . . . . . . 54
index. . . . . . . . . . . . . . . . . . . . . . . . . . . . . . . . . . . . . . . 57
ii
hp photosmart 7700 series
get started
1
welcome
Thank you for purchasing an HP Photosmart 7700 Series printer! With your new
photo printer, you can print beautiful photos, save photos to your computer, and
create fun and easy projects.
For information about:
basics guide
•
Printing photos stored on your memory card, see print from a memory card
on page 21.
•
Printing camera-selected photos stored on your memory card, see print
camera-selected photos on page 31.
•
Printing camera-selected photos by connecting your HP direct-printing
digital camera to your printer, see print from the direct-printing port on
page 33.
•
Printing borderless photos from your Windows® PC, see print borderless
photos from your Windows PC on page 38.
•
Printing borderless photos from your Macintosh®, see print from a
software application (OS X or OS 9) on page 42.
•
Saving photos to your computer, see the HP Photosmart Printer Help. For
information, see view the hp photosmart printer help on page 2.
•
Adding borders, changing photo color effects, cropping photos, and other
creative features, see the HP Photosmart Printer Help. For information, see
view the hp photosmart printer help on page 2.
•
E-mailing photos to your friends and family, see the HP Photosmart Printer
Help. For information, see view the hp photosmart printer help on page 2.
1
chapter 1
find information
Your new printer comes with the following documentation to help you get started
and take full advantage of your printer’s capabilities:
•
Setup Guide — The HP Photosmart Setup Guide contains quick and easy
instructions to help you set up your printer and install the printer software.
•
Basics Guide — The HP Photosmart 7700 Series Basics Guide is the
booklet you are reading. This booklet describes the basic features of your
printer and contains hardware troubleshooting information.
•
Setup & Support Reference Guide — The HP Photosmart Setup & Support
Reference Guide explains how to install and set up the software that comes
with your printer. This guide contains software troubleshooting information,
describes how to get support from www.hp.com/support, and explains
how to contact HP support.
•
HP Photosmart Printer Help — The HP Photosmart Printer Help describes
how to use the more advanced features of your new printer. The Printer
Help includes information about printer care and maintenance, advanced
troubleshooting, and error messages.
After you have installed the HP Photosmart printer software on your
computer, you can view and print the HP Photosmart Printer Help. For more
information, see the next section.
view the hp photosmart printer help
–
Windows PC: From the Start menu, select Programs (in Windows XP,
select All Programs); Hewlett-Packard; Photosmart 140, 240, 7200,
7600, 7700, 7900 Series; Photo & Imaging Director. From the Photo &
Imaging Director, click Help.
–
Macintosh: Insert the HP Photosmart CD. In the User Docs folder, select
your language, then double-click the photosmart 7760.html file.
print the hp photosmart printer help
2
–
Windows PC: Click Print in the top navigation bar of the HP Photosmart
Printer Help window.
–
Macintosh: Click in the frame you want to print. From the File menu,
select Print, or click Print in the top navigation bar of the browser.
hp photosmart 7700 series
get started
what’s in the box
1
9
2
8
5
6
4
7
3
Your printer box contains the following items:
Note: Some contents may vary by country and region.
basics guide
1
The HP Photosmart 7700 Series printer
2
A photo paper storage bag
3
The HP Photosmart 7700 Series Setup Guide
4
TThe HP Photosmart 7700 Series Basics Guide and the HP Photosmart
Setup & Support Reference Guide
5
The HP Photosmart 7700 Series printer software CD
6
A print cartridge protector
7
The HP #57 tri-color print cartridge and the HP #58 photo print cartridge
8
A power supply (power supplies may vary in appearance or have an
additional power cord)
9
A faceplate
3
chapter 1
printer parts
front
Out tray
Remove this tray to load
small media and to clear a
paper jam
Top cover
Lift the top cover to change
the print cartridges
Paper catch
Lift this tray to load paper
LCD screen
Use this screen to view your
photos and menu options
Input bay door
Lift this door to access the
memory card slots and the
direct-printing port
Paper catch extension
Flip this guide open to
catch the printed paper
Photo tray slider
Move this slider to engage
or disengage the photo tray
Paper width guide
Adjust this guide to fit
close to the edge of the
paper in the In tray
In tray
Place paper or envelopes
in this tray for printing
Paper length guide
Adjust this guide to fit close to
the end of the paper in the In
tray
Photo tray
Lift the paper catch to load
photo paper in the photo
tray
back
Power cord connection
Use this to connect the
power cord included with
the printer
Rear access door
Remove this door to clear a
paper jam
4
USB port
Use this port to connect the
printer to your computer
hp photosmart 7700 series
get started
control panel
PRINT NEW PHOTOS
Press this button to
automatically print the most
recent photos on yourthat
have not yet been printed
ON
Press this button to turn
on the printer or put it
into power-save mode
ZOOM +/ZOOM –
Press ZOOM + to enter
into Zoom mode or
press ZOOM – to view
nine photos on the
printer’s LCD screen at
a time
SELECT PHOTOS
Use these arrows to view
all photos or to move the
selection box on a
zoomed photo
SIZE
Press this button to adjust
the print size of your photos
SAVE
Press this button to save
photos from a memory
card to your computer
E-MAIL
Press this button to send a
photo to an E-mail address
ROTATE
Press this button to rotate
the currently displayed
photo
MENU
Press this button to view the
printer menu
OK
Press this button to select
the current photo, to answer
questions on the LCD
screen, or to select menu
options
COPIES
Press this button to select
the number of copies you
want to print
SELECT PHOTOS
Use these arrows to view
selected photos, to
move the selection box
on a zoomed photo, or
to view menu selections
PRINT
Press this button to
print selected photos
from a memory card
CANCEL
Press this button to deselect
photos, to exit a menu, or to
stop an action you have
requested
Tip: Press and hold a button to change its value rapidly. For example, press
button to move rapidly through the photos
and hold the SELECT PHOTOS
on a memory card.
indicator lights
On/Attention light
On (Green)
The power is on
Off
The printer is in
power-save mode
Blinking (Green)
The printer is busy
Blinking (Red)
The printer requires
attention
basics guide
Memory card light
On
The memory card is
inserted correctly
Off
No memory card is
inserted
Blinking
Information is being
transmitted between
the memory card and
the printer or
computer
5
chapter 1
input bay
Input bay
Use this bay to insert a
memory card or to connect
your HP direct-printing
digital camera or your
notebook computer to the
direct-printing port
CompactFlash™/IBM®
Microdrive memory card slot
You can insert a
CompactFlash or an IBM
Microdrive memory card into
this slot
Direct-printing port
Use this port to connect a
notebook computer or an
HP direct-printing digital
camera to the printer
MultiMediaCard™/Secure
™
Digital memory card slot
You can insert a
MultiMediaCard or a Secure
Digital memory card into this
slot
SmartMedia™/xD-Picture
Card™ memory card slot
You can insert a
SmartMedia memory card
into the upper portion of
this slot or an xD-Picture
Card memory card into the
lower right portion of this
slot
Sony® Memory Stick
memory card slot
You can insert a supported
Sony Memory Stick
memory card into this slot
menu structure
Use this section to review options that are available from the main menu on your
printer’s LCD screen. To access the menu options, press the MENU button on the
printer’s control panel.
For more information about submenu options, see the HP Photosmart Printer
Help. For information about accessing the HP Photosmart Printer Help, see view
the hp photosmart printer help on page 2.
6
Menu Option
Choices
Print special
Print all
Create album
Print range
Print index page
Print proof sheet
Scan proof sheet
Enhance image
Photo brightness
Add frame
Add color effect
hp photosmart 7700 series
get started
Menu Option
Choices
Tools
Slide show
Print quality
Print sample page
Print test page
Clean cartridges
Calibrate printer
Preferences
After printing
# of copies
Photo size
Video print
Add date/time
Borderless
Exif printing
Improve contrast
Extend colors
Paper detect
Camera selections
Restore defaults
Language
paper information
You can print on a wide variety of paper types and sizes, from index cards and
photo paper to envelopes and transparencies. For best results, use paper
designed specifically for your projects. For example, if you are printing a photo,
be sure to print on HP premium plus photo paper for the best photo quality.
Note: If you are printing from the computer and using HP specialty paper,
select the paper type when you set the print settings. For more information,
see print from your computer on page 37.
For a list of available HP-designed inkjet papers, or to purchase supplies, go to:
•
www.hpshopping.com (U.S.)
•
www.hp-go-supplies.com (Europe)
•
www.hp.com/paper (Asia/Pacific)
•
www.jpn.hp.com/supply/inkjet (Japan)
Different countries have different paper sizes. For instance, Europe uses A4
paper while the U.S. uses letter-size paper. To change the paper sizes that are
available from the printer’s LCD screen, change the LCD screen language and
country/region settings. For more information, see set LCD screen language and
country/region on page 19.
basics guide
7
chapter 1
Your printer supports the following paper tray accessories that you can purchase
separately:
–
Automatic Two-Sided Printing Accessory (HP C8955A) for double-sided
printing
–
250-sheet plain paper tray (HP Q3447A), which holds a half ream of
plain paper
load paper in the in tray
You can print using many different types of paper in the In tray, including plain
paper, HP photo paper, and HP premium inkjet transparency film. For more
information about supported paper types and sizes, see specifications on
page 53.
To load paper in the In tray:
8
1
Lift the paper catch.
2
Pull out the paper length guide on the In tray and slide the paper width
guide as far to the left as it will go.
3
Place a stack of paper in the In tray.
–
Load the paper with the side to be printed facing down.
–
Always load paper in the portrait orientation, with the shortest edge
toward you.
–
Be careful not to use too much or too little paper. It may be difficult for
the printer to pick up a sheet of paper when there are only one or two
sheets in the In tray. Check that the stack of paper contains several
sheets, but is no higher than the top of the paper length guide. For
more information about the amount of paper to load in the In tray, see
specifications on page 53.
–
Use one type and size of paper at a time. Do not mix paper types or
sizes in the In tray.
hp photosmart 7700 series
get started
4
Adjust the paper width guide and the paper length guide to fit close to the
edges of the paper without bending the paper. This adjustment helps the
paper feed straight into the printer.
5
Lower the paper catch.
6
Pull out the photo tray slider until it stops. This action disengages the photo
tray so the printer uses the paper in the In tray.
load paper in the photo tray
Use the photo tray when you want to print on 4 x 6 inch (10 x 15 cm) photo
paper or L-size cards (3.5 x 5 inches, 90 x 127 mm).
Note: For information about storing and handling the photo paper, see the
HP Photosmart Printer Help.
Tip: If you want to print 4 x 6 inch (10 x 15 cm) borderless photos, be sure
to use HP premium plus photo paper, glossy 4 x 6 borderless. If you are
printing from the control panel, check that your printer is set to print
borderless photos. If you are printing from a software application, select the
appropriate borderless paper size from the Print dialog box.
When you use the photo tray, you can leave paper in the In tray. If you run out
of photo paper in the photo tray, the printer continues to print using paper from
the In tray.
Tip: To print many photos at once, load the In tray with additional photo
paper.
To load paper in the photo tray:
1
Pull out the photo tray slider until it stops. This action disengages the photo
tray.
2
Lift the paper catch.
3
Pull out the photo tray paper length guide and slide the photo tray paper
width guide as far to the left as it will go.
4
Place approximately 15 sheets of photo paper in the photo tray with the
side to be printed facing down. If you are using tabbed paper, insert the
paper so the tab feeds in last. The printed photo faces up on the paper
catch.
Note: If you overload the photo tray, the printer may not be able to pick up
the photo paper.
basics guide
9
chapter 1
5
Adjust the photo tray paper length guide and paper width guide to fit close
to the edges of the paper without bending the paper. This adjustment helps
the paper feed straight into the printer.
6
Lower the paper catch.
7
Push the photo tray slider forward until it stops. The photo tray disappears
from view in the photo tray window. This action engages the photo tray.
print cartridge information
Your printer prints in color and in black and white. HP provides a range of print
cartridges so that you can choose the best print cartridges for your project.
supported print cartridges
Your printer supports the following print cartridges. Installing a print cartridge
that is not in this table may invalidate your printer warranty.
To print...
Use these print cartridges...
Color or black and white HP #57 (C6657A) — Tri-color print cartridge
documents
and
HP #56 (C6656A) — Black print cartridge
Color photos
HP #57 (C6657A) — Tri-color print cartridge
and
HP #58 (C6658A) — Photo print cartridge
Black and white photos
HP #57 (C6657A) — Tri-color print cartridge
and
HP #59 (C9359A) — Photo gray print cartridge
When you install a print cartridge, match the number on the print cartridge to
the number on the print cartridge latch. The printer holds two print cartridges at
a time.
10
hp photosmart 7700 series
get started
Caution! Check that you are using the correct print cartridges. Also, note
that HP does not recommend modifying or refilling HP print cartridges.
Damage that results from modifying or refilling HP print cartridges is not
covered by HP’s warranty.
You can interchange the following print cartridges in the right print cartridge
carrier depending on your printing needs:
•
HP #56 (C6656A) — Black print cartridge
•
HP #58 (C6658A) — Photo print cartridge
•
HP #59 (C9359A) — Photo gray print cartridge
install or replace print cartridges
To get the best performance from your printer, use only genuine HP factory-filled
print cartridges.
To get maximum use from your print cartridges, turn off the printer when it is not
in use. Do not unplug the printer or turn off the power source (such as a power
strip) until the On/Attention light is off. Turning off the printer allows the printer
to store the print cartridges properly.
To install or replace the print cartridges:
basics guide
1
If the printer is off, press the ON button on the printer’s control panel to turn
on the printer.
2
Load plain paper in the In tray so the printer can print a calibration page
after you install the print cartridges.
3
Lift the top cover of the printer.
4
Push down on the print cartridge latch and pull it forward. The print
cartridge latch pops open.
11
chapter 1
5
If you are replacing a print cartridge, slide out the old print cartridge and
recycle or discard it.
Note: For information about recycling print cartridges, go to www.hp.com/
recycle.
6
Take the new print cartridge out of its package.
7
Grasp the pink tab and gently peel off the plastic tape. Make sure you
remove only the plastic tape. Be sure to install the print cartridge
immediately after removing the tape; ink nozzles exposed longer than one
minute may dry out and cause printing problems later. Once the tape is
removed, do not attempt to replace it.
Caution! Do not touch the ink nozzles or the copper contacts on the print
cartridge. Touching these parts may cause the print cartridge to fail.
12
hp photosmart 7700 series
get started
8
9
Insert the print cartridge:
–
Hold the print cartridge so the copper contacts go into the printer first.
Line up the ridges on the left and right sides of the top of the print
cartridge with the grooves on the inside of the print cartridge cradle.
–
Carefully slide the print cartridge into the cradle under the metal bar,
then firmly push the print cartridge in until it stops.
–
Push down on the print cartridge latch until it locks.
Close the top cover and press the OK button. The printer prints a
calibration page.
Your printer and print cartridges are calibrated to give you optimal printing
results. You can discard the calibration page.
ink-backup printing mode
Ink-backup Printing Mode allows you to keep printing even if one of your print
cartridges fails or runs out of ink. If you receive a print cartridge error message
on the printer’s LCD screen or your computer monitor, remove the print cartridge
and close the top cover to enter Ink-backup Printing Mode. You will see a
message reminding you that you are in Ink-backup Printing Mode.
Printing in Ink-backup Printing Mode slows the printer and affects its print quality.
Ink-backup Printing Mode will be used for all print jobs until the missing print
cartridge is replaced. For more information about replacing print cartridges, see
install or replace print cartridges on page 11.
basics guide
13
chapter 1
print cartridge storage
The print cartridge protector is designed to keep your print cartridge from drying
out when it is not being used. Whenever you remove a print cartridge from the
printer, store it in the print cartridge protector that came with your printer.
Note: It is important that you place the print cartridge into the print
cartridge protector when it is not installed in the printer. Failure to properly
store the print cartridge can cause the print cartridge to fail.
•
To insert a print cartridge into the print cartridge protector, slide it into the
print cartridge protector at a slight angle and snap it securely into place.
•
To remove the print cartridge from the print cartridge protector, press down
and back on the top of the print cartridge protector to release the print
cartridge, and then slide the print cartridge out of the print cartridge
protector.
Once you have placed the print cartridge into the print cartridge protector, you
can store the print cartridge in the print cartridge storage area located in your
printer.
14
hp photosmart 7700 series
set the defaults on your printer
2
Your printer comes with default settings for features such as number of copies to
print, photo size, language setting for the LCD screen, and other settings. You
can change these settings to your preferences using the printer’s control panel.
Note: When you print from your computer, the control panel settings on the
printer do not apply. The software on your computer overrides the default
settings you set using the printer’s control panel.
For more information about other default setting options available from the
control panel, see the HP Photosmart Printer Help.
keep or discard print settings after printing
You can choose whether to keep or discard your current print settings and photo
selections after each print job. The printer’s default setting is to ask for print
settings each time you print.
1
On the printer’s control panel, press the MENU button.
2
Press the SELECT PHOTOS
button until Preferences appears highlighted
on the LCD screen, and then press the OK button.
3
button until After printing appears
Press the SELECT PHOTOS
highlighted on the LCD screen, and then press the OK button.
4
Select from the following options:
5
basics guide
–
Always if you want the printer to always keep the current print settings
after a print job
–
Never if you want the printer to reset all print settings to the default
settings after a print job
–
Ask if you want the printer to ask after each print job whether to keep
the current print settings
With your selection highlighted on the LCD screen, press the OK button.
15
chapter 2
set the number of copies
By default, your printer prints one copy of each photo. You can set the printer to
print up to 99 copies of each photo.
This setting applies whenever you select photos and press the OK button to print
them. You can override this setting for the currently displayed photo by pressing
the COPIES button and changing the number of copies for that photo before
printing. If you override the setting for a currently displayed photo, all other
photos will still use the number of copies set in the Preferences menu.
1
On the printer’s control panel, press the MENU button.
2
Press the SELECT PHOTOS
button until Preferences appears highlighted
on the LCD screen, and then press the OK button.
3
button until # of copies appears highlighted
Press the SELECT PHOTOS
on the LCD screen, and then press the OK button.
4
Press the SELECT PHOTOS
or
button to increase or decrease the
default number of copies, and then press the OK button.
set the photo size
You can print the photos from a memory card in a variety of sizes. Different
countries and regions have different paper and photo sizes. For instance, Europe
uses 8.27 x 11.7 inch (210 x 297 mm) paper while the U.S. uses 8.5 x 11 inch
(216 x 280 mm) paper. To change the paper and photo sizes that are available
from the printer’s LCD screen, you must change the printer’s language and
country/region settings. For more information, see set LCD screen language and
country/region on page 19.
You can select your default photo size from the following sizes:
16
Country/region
Photo sizes
U.S./Canada
(inches)
4x6
2 1/2 x 3 1/4
3x4
3 1/2 x 5
5x7
8 x 10
8 1/2 x 11
Combo
Europe (cm)
6x8
9 x 13
10 x 15
13 x 18
15 x 21
18 x 24
20 x 25
21 x 30
Combo
hp photosmart 7700 series
set the defaults on your printer
Note: Combo prints five photos on one sheet—two photos at 4 x 6 inch (10
x 15 cm) and three photos at 2.5 x 3.25 inch (6 x 8 cm).
The default size applies whenever you select photos and print them by pressing
the OK button. You can override the default for the currently displayed photo by
pressing the SIZE button and changing the size before printing.
1
On the printer’s control panel, press the MENU button.
2
Press the SELECT PHOTOS
button until Preferences appears highlighted
on the LCD screen, and then press the OK button.
3
button until Photo size appears highlighted
Press the SELECT PHOTOS
on the LCD screen, and then press the OK button.
4
Press the SELECT PHOTOS
or
button until the photo size you want
appears on the LCD screen, and then press the OK button.
set borderless printing
By default, your printer prints photos without borders so that photos print to the
edges of the photo paper. If you choose to turn this feature on, photos on the
supported paper sizes will print without borders. If you choose to turn this feature
off, all photos will print with borders.
Borderless printing is supported for 4 x 6 inch (10 x 15 cm) paper, 8.5 x 11
inch (216 x 280 mm) paper, and 8.27 x 11.7 inch (210 x 297 mm) paper.
Paper in other sizes will have borders even if you turn borderless printing on. This
is not an error; it is caused by the way the printer handles the paper.
Note: Paper size availability varies by country/region.
If you print on 4 x 6 inch (10 x 15 cm) photo paper that does not have a tab,
the photo will be borderless on all sides. On 4 x 6 inch photo paper with 0.5
inch tab (10 x 15 cm with 1.25 cm tab), the photo prints without borders on
three sides and with a small border on the bottom edge.
Note: Borderless printing is not the default setting when you print photos
from your computer. The software application you are using to print photos
determines the setting.
basics guide
1
On the printer’s control panel, press the MENU button.
2
Press the SELECT PHOTOS
button until Preferences appears highlighted
on the LCD screen, and then press the OK button.
3
button until Borderless appears highlighted
Press the SELECT PHOTOS
on the LCD screen, and then press the OK button.
4
Press the SELECT PHOTOS
the OK button.
button to highlight On or Off, and then press
17
chapter 2
set paper detection
The printer automatically detects the paper size and type by scanning the paper
in the In tray or the photo tray. You can set the printer to ask for the paper size
and type each time you print by turning the paper detection sensor off. By
default, this option is set to On.
Note: The printer does not automatically detect the paper type and size
when borderless printing is turned on. For more information, see set
borderless printing on page 17.
Note: The Paper detection setting applies to print jobs that you start from
the printer’s control panel. If you want the printer to use its auto sensors
when you start print jobs from your computer, select Automatic as the paper
type in the printer preferences dialog box. For more information, see the HP
Photosmart Printer Help.
1
On the printer’s control panel, press the MENU button.
2
button until Preferences appears highlighted
Press the SELECT PHOTOS
on the LCD screen, and then press the OK button.
3
Press the SELECT PHOTOS
button until Paper detect appears highlighted
on the LCD screen, and then press the OK button.
4
Press the SELECT PHOTOS
the OK button.
button to highlight On or Off, and then press
unmark camera-selected photos
After printing camera-selected photos from your printer, a message appears on
the LCD screen asking if you want to unmark the photos. You can change this
setting so that the printer will automatically unmark your photos, never unmark
your photos, or ask if you want to unmark your photos.
1
On the printer’s control panel, press the MENU button.
2
Press the SELECT PHOTOS
button until Preferences appears highlighted
on the LCD screen, and then press the OK button.
3
Press the SELECT PHOTOS
button until Camera selections appears
highlighted on the LCD screen, and then press the OK button.
4
Select from the following:
5
18
–
Always if you want the printer to unmark the camera-selected photos
after printing
–
Never if you want the printer to leave the camera-selected photos
marked after printing
–
Ask if you want the printer to ask each time after you print cameraselected photos
With your selection highlighted on the LCD screen, press the OK button.
hp photosmart 7700 series
set the defaults on your printer
revert to the factory default settings
If you made adjustments to the default settings, you can reset the printer to the
original factory settings at any time. To revert to the factory default settings,
follow these steps.
Note: The language and country/region settings you chose will not change
if you revert back to the factory default settings.
1
On the printer’s control panel, press the MENU button.
2
Press the SELECT PHOTOS
button until Preferences appears highlighted
on the LCD screen, and then press the OK button.
3
Press the SELECT PHOTOS
button until Restore defaults appears
highlighted on the LCD screen, and then press the OK button.
4
Press the SELECT PHOTOS
the OK button.
button to highlight Yes or No, and then press
set LCD screen language and country/region
Use the Language option to change the language of the LCD screen prompts on
the printer. The country/region setting determines what photo and paper sizes
the printer’s LCD screen displays. To change the language and country/region
settings on your printer, follow these steps.
Note: The language and country/region settings will not change if you
revert to the factory default settings. You can change the language and
country/region settings only by following the steps in this section.
1
On the printer’s control panel, press the MENU button.
2
Press the SELECT PHOTOS
button until Preferences appears highlighted
on the LCD screen, and then press the OK button.
3
button until Language appears highlighted
Press the SELECT PHOTOS
on the LCD screen, and then press the OK button.
A list of languages appears on the LCD screen.
4
Press the SELECT PHOTOS
button until your desired language appears
highlighted on the LCD screen, and then press the OK button.
5
button to highlight Yes to confirm your
Press the SELECT PHOTOS
language selection, and then press the OK button.
A list of countries and regions appears on the LCD screen.
6
Press the SELECT PHOTOS
button until your desired country or region
appears highlighted on the LCD screen, and then press the OK button.
The prompts and options on your printer’s LCD screen now appear in the
language you selected.
basics guide
19
chapter 2
set print quality
When printing photos, you can change the print quality from the control panel.
Best quality is the default print quality and produces the best quality prints.
Normal quality conserves ink and prints faster. To change the print quality, follow
these steps.
Note: The Normal print quality setting applies to only the next print job. The
print quality is reset to Best quality when the print job is complete or is
cancelled.
1
On the printer’s control panel, press the MENU button.
2
Press the SELECT PHOTOS
button until Tools appears highlighted on the
LCD screen, and then press the OK button.
3
button until Print quality is highlighted on the
Press the SELECT PHOTOS
LCD screen. Press the OK button.
4
Select from the following:
5
20
–
Best to print the highest quality photos
–
Normal to print normal quality photos
With your selection highlighted on the LCD screen, press the OK button.
hp photosmart 7700 series
3
print from a memory card
It’s easy to print high-quality photos for yourself, family, and friends. If your
digital camera uses a memory card to store photos, you can insert the memory
card into the printer to print your photos. Messages on the printer’s LCD screen
guide you through the process—you don’t have to turn on your computer or even
have your printer connected to a computer!
Note: You can also print photos using your computer. For more information,
see print from your computer on page 37.
supported memory cards
Your HP Photosmart printer can read the following memory cards:
CompactFlash Association (CFA) certified Type I and II, IBM Microdrive,
MultiMediaCard, Secure Digital, SmartMedia, Sony Memory Sticks, xDPicture Card
These cards are manufactured by several vendors and are available in a variety
of storage capacities. You can purchase memory cards where you purchased
your digital camera or at most computer supply stores.
Caution! Using any other type of memory card may damage the memory
card and the printer.
IBM Microdrive
Sony Memory Sticks
basics guide
CompactFlash
Type I and II
Secure Digital
SmartMedia
MultiMediaCard
xD-Picture Card
21
chapter 3
supported file formats
You can print certain file formats directly from the memory card. If your digital
camera supports file formats that are not supported by your printer, you must first
save the photos to your computer and then print them using a software
application.
For more information about supported image and video file formats, see printer
specifications on page 54.
For more information about saving files to your computer, see the HP Photosmart
Printer Help.
insert a memory card
After you have taken pictures with your digital camera, remove the memory card
from your camera and insert it into your printer to view the photos. You can print
photos immediately or save the photos to your computer.
When the memory card is inserted correctly, the memory card light blinks and
then remains solid.
Caution! Do not pull out the memory card while the memory card light is
blinking. Removing a memory card while it is being accessed may damage
the printer or the memory card, or corrupt the information on the memory
card. For more information, see remove a memory card on page 25.
To insert a memory card:
1
Lift the Input bay door.
2
Remove any memory cards that are already inserted into any of the
memory card slots.
Caution! Do not pull out a memory card while the memory card light is
blinking. For more information, see remove a memory card on page 25.
3
Hold the memory card so the correct side faces up. To determine the
correct orientation of your memory card, see the table after these steps.
If you are using a Sony Memory Stick Duo™ memory card, attach the
adapter that came with the memory card before you insert it into the
printer’s memory card slot.
4
Insert the memory card into the appropriate memory card slot. The end
with the metal contacts or pinholes must go into the printer first.
Caution! Inserting the memory card any other way may damage the
memory card or the printer.
5
Gently push the memory card into the printer until it stops. The memory
card may not insert all the way into the printer. Forcing the memory card
into the printer too far may damage the memory card or the printer.
If you insert a SmartMedia memory card upside down, the red On/
Attention light will begin blinking. Remove the memory card and reinsert it
properly.
22
hp photosmart 7700 series
print from a memory card
Note: If you have camera-selected photos stored on the memory card, a
message appears on the LCD screen asking if you want to print the cameraselected photos. For more information, see print camera-selected photos on
page 31 and unmark camera-selected photos on page 18.
Memory card
Memory card slot How to hold and insert the memory card
CompactFlash
Type I or II
Top left slot
• Front label faces up, and if the label has an arrow,
the arrow points toward the printer
• Pinholes insert into the printer first
IBM Microdrive
Top left slot
• Front label faces up, and if the label has an arrow,
the arrow points toward the printer
• Pinholes insert into the printer first
MultiMediaCard
Bottom left slot
• Label faces up, angled corner is on the right, and
arrow points toward the printer
• Metal contacts face down
basics guide
23
chapter 3
Memory card
Memory card slot How to hold and insert the memory card
Secure Digital
Bottom left slot
• Label faces up and angled corner is on the right
• Metal contacts face down
SmartMedia
Upper portion of
the top right
double slot
• Angled corner is on the left, and if the label has an
arrow, the arrow points toward the printer
• Metal contacts face down
Sony Memory
Sticks
Bottom right slot
• Angled corner is on the left and arrow points
toward the printer
• Metal contacts face down
24
hp photosmart 7700 series
print from a memory card
Memory card
Memory card slot How to hold and insert the memory card
xD-Picture Card
Lower right portion • Label faces up and arrow points toward the printer
• Metal contacts face down
of the top right
double slot
remove a memory card
Use the procedures in this section to safely remove the memory card from the
printer’s memory card slot.
Caution! Do not pull out the memory card while the memory card light is
blinking. A blinking light means that the printer is accessing the memory
card. Wait until the memory card light remains solid. Removing a memory
card while it is being accessed may damage the printer and the memory
card or corrupt the information on the memory card.
remove the memory card when the printer is not connected to a computer
`
Once the memory card light stops blinking, gently pull the memory card to
remove it from the printer’s memory card slot.
remove the memory card when the printer is connected to a Windows PC
1
If the memory card light is blinking, wait for it to stop.
2
With the memory card still inserted in the printer, right-click the memory
card icon in the Windows taskbar.
3
When the menu appears, select Prepare to remove card.
4
When prompted on the computer screen, click OK.
It is now safe to remove the memory card from the printer.
5
Pull the memory card to remove it from the printer’s memory card slot.
remove the memory card when the printer is connected to a Macintosh computer
basics guide
1
With the memory card still inserted in the printer, drag the memory card
icon from the desktop to the Trash.
2
Wait until the memory card light stops blinking, then remove the memory
card from the printer’s memory card slot.
25
chapter 3
decide which photos to print or to send via e-mail
You can decide which photos to print or send via E-mail by viewing the photos
on the printer's LCD screen, printing a photo index page, or by printing a proof
sheet.
You can view the photos on the printer’s LCD screen, print a photo index page,
or print a proof sheet to decide which photos you want to print. A photo index
page shows thumbnail views and index numbers of the photos on the memory
card. A proof sheet shows thumbnail views of all photos stored on the memory
card and provides spaces for you to select photos to print, specify the number of
copies to print, and select photo size and layout.
For more information about printing photos from a memory card, see print
photos from a memory card on page 30.
You can view the photos on your printer’s LCD screen or print an index page to
decide which photos you want to send via E-mail. For more information about
sending photos via E-mail, see the HP Photosmart Printer Help.
view photos from the LCD screen
After you insert a memory card into the printer, you can use the SELECT PHOTOS
or
button to view all the photos on the memory card, press the OK button
or
to select the currently displayed photo, and use the SELECT PHOTOS
button to view only the photos you have selected.
Press the arrows briefly to view the photos one by one. Press and hold the arrows
to view the photos rapidly. When you reach the last photo in either direction, the
printer cycles back to the first or last photo and continues.
If you would like to view nine photos on the LCD screen at a time, see use 9-up
view mode on page 26.
You can use the printer’s LCD screen to view the first 2000 photos on a memory
card. If your memory card contains more than 2000 photos, save the photos to
your computer and access them from there.
For more information about saving photos to your computer, see the HP
Photosmart Printer Help.
use 9-up view mode
After you insert a memory card into the printer, you can view nine photos at a
time on the LCD screen.
Photos that you select using the 9-up view mode will print using the default
settings selected in the Preferences menu. Press the ZOOM - button to exit 9-up
view mode and return to normal view mode to change the settings for the current
photo. For more information about changing the settings for selected photos, see
the HP Photosmart Printer Help.
26
1
Insert a memory card into the printer’s memory card slot and wait for the
first photo stored on the memory card to appear on the LCD screen.
2
On the printer’s control panel, press the ZOOM – button to view nine
photos on the LCD screen at a time.
hp photosmart 7700 series
print from a memory card
3
Use the arrows on the SELECT PHOTOS button to scroll through the photos.
4
Press the ZOOM + button to view the highlighted photo in normal view
mode
Note: At this point, you can enhance the photo, rotate the photo, or change
the default settings for the photo displayed on the LCD screen. For more
information, see the HP Photosmart Printer Help.
5
Once you are finished viewing the photo or making changes to the photo
before printing, you can return to 9-up view mode by pressing the ZOOM –
button.
6
Press the OK button to select the highlighted photo. The printer icon
displays in the bottom right corner of the selected photo.
Note: You can use the printer’s LCD screen to view the first 2000 photos on
a memory card. If your memory card contains more than 2000 photos, save
the photos to your computer and access them from there. For more
information about saving photos to your computer, see the HP Photosmart
Printer Help.
print a photo index page
A photo index page shows thumbnail views and index numbers of the photos on
the memory card. The photos appear in the order in which they are stored on
the memory card. Depending on the number of photos stored on the memory
card, a photo index page could be several pages long. To accommodate the
maximum number of photos on each photo index page, the printer may change
the orientation of the photos.
Index numbers appear in the lower left corner of each thumbnail. Use the index
numbers to decide which photos to print. If you use your digital camera or
computer to add or delete photos from the memory card, reprint a photo index
page to see the new index numbers.
Note: The index number on the photo index page may be different than the
index number associated with the photo in your digital camera.
1
Insert a memory card into the printer’s memory card slot and wait for the
first photo stored on the memory card to appear on the LCD screen.
2
On the printer’s control panel, press the MENU button.
3
Press the SELECT PHOTOS
button until Print Special appears highlighted
on the printer’s LCD screen, and then press the OK button.
4
button until Print index page appears
Press the SELECT PHOTOS
highlighted on the printer’s LCD screen, and then press the OK button.
An index page prints all photos stored on the memory card.
For more information, see select a photo on page 30 and print photos from a
memory card on page 30.
basics guide
27
chapter 3
print a proof sheet
A proof sheet, which may be several pages long, shows thumbnail views of all
the photos stored on the memory card. A proof sheet is different than a photo
index page because it provides spaces for you to select photos to print, specify
the number of copies to print, and select the photo size and layout. It is a simple
and convenient way to make prints directly from a memory card.
You can use the photo number on the proof sheet to select which photos to print.
The photo number on the proof sheet may be different than the photo number
associated with the photo in your digital camera. If you add or delete photos
from your memory card, reprint the proof sheet to see the new photo numbers.
1
Insert a memory card into the printer’s memory card slot and wait for the
first photo stored on the memory card to appear on the LCD screen.
2
Load several sheets of plain paper in the printer’s In tray.
3
On the printer’s control panel, press the MENU button.
4
Press the SELECT PHOTOS
button until Print special appears highlighted
on the printer’s LCD screen, and then press the OK button.
5
Press the SELECT PHOTOS
button until Print proof sheet appears
highlighted on the printer’s LCD screen, and then press the OK button.
6
Press the SELECT PHOTOS
7
28
button to select from the following:
–
New photos—Select to print a proof sheet of any photos that have not
previously been printed from the control panel, and then press the OK
button
–
All photos—Select to print a proof sheet of all photos on the memory
card, and then press the OK button
Press the OK button to print the proof sheet.
hp photosmart 7700 series
print from a memory card
Once the proof sheet has printed, you can mark the proof sheet to indicate the
photos you want to print, the size of the photos, and the number of photo copies
you want to print. You can then scan the proof sheet into the printer, and the
printer will print the selected photos to your specifications. For more information
about how to select photos on a proof sheet then scan it into the printer, see the
next section.
scan a proof sheet
After you print a proof sheet, you can use it to print specific photos from your
memory card.
1
Select the photos you want to print by filling in the circle below each photo
with a dark pen.
2
Select only one choice each in the number of copies section and the layout
section.
Note: If you make more than one selection in either of these sections, an
error appears on the LCD screen, and you will need to print a new proof
sheet and start over.
3
Make sure that the memory card is inserted in the memory card slot on the
printer’s control panel.
4
On the printer’s control panel, press the MENU button.
5
button until Print special appears highlighted
Press the SELECT PHOTOS
on the printer’s LCD screen, and then press the OK button.
6
Press the SELECT PHOTOS
button until Scan proof sheet appears
highlighted on the printer’s LCD screen, and then press the OK button.
A message appears on the LCD screen instructing you how to insert the
proof sheet.
7
Load the proof sheet in the In tray with the printed side facing down and
the top of the page facing toward the printer.
8
Press the OK button to start the scanning process.
After the proof sheet is scanned, a message appears on the LCD screen
prompting you to load the correct paper for the print job.
9
Load the correct paper for printing your photos in the In tray, and then
press the OK button to print the photos that you selected.
Note: The printer can only scan one proof sheet at a time. Repeat steps 1–
9for each proof sheet you want to scan.
basics guide
29
chapter 3
select a photo
Once you have decided which photos on your memory card you want to print,
you can use the printer’s control panel to select those photos for printing. For
more information, see decide which photos to print or to send via e-mail on
page 26.
1
Insert a memory card into the printer’s memory card slot and wait for the
first photo stored on the memory card to appear on the LCD screen.
2
Press the SELECT PHOTOS
on the memory card.
3
Press the OK button when the photo you want to print appears on the LCD
screen. The print settings and a printer icon appear on the LCD screen to
indicate a photo has been selected.
or
button to navigate through the photos
To select additional photos, repeat steps 2 and 3. Once you have finished
selecting your photos, you can print them. For more information, see print
photos from a memory card on page 30.
deselect a photo
You can use the printer’s control panel to deselect photos that you do not want
to print.
1
Press the SELECT PHOTOS
on the memory card.
2
When the photo you want to deselect is displayed on the LCD screen, press
the CANCEL button. The printer deselects the currently displayed photo and
returns the print settings for the photo to the default settings.
or
button to navigate through the photos
Note: To deselect all selected photos, press the CANCEL button twice. All
selected photos will be deselected.
print photos from a memory card
Your printer can print digital photos that are stored on your memory card. Digital
photos may be unmarked or camera-selected. For a list of supported digital
photo file types, see specifications on page 53.
Note: Before you start printing, make sure that you have paper loaded in
the appropriate tray. For more information, see paper information on
page 7.
For more information about printing photos from a memory card, see the HP
Photosmart Printer Help.
30
hp photosmart 7700 series
print from a memory card
print unmarked photos on a memory card
Unmarked digital photos are standard digital photos that you stored on the
memory card but have not marked for printing. Not all digital cameras allow you
to mark your photos for printing.
1
Insert a memory card into the printer’s memory card slot.
2
Press the SELECT PHOTOS
on the memory card.
3
Press the OK button when the photo you want to print appears on the
printer’s LCD screen.
or
button to navigate through all photos
To print multiple photos, repeat steps 2 and 3 until all photos you want to
print are selected.
Note: At this point, you can print multiple copies of the selected photos. You
can also change the default size of the selected photos. For more
information, see the HP Photosmart Printer Help.
4
Press the PRINT button to begin printing the selected photos.
print camera-selected photos
Camera-selected photos are photos you marked for printing using your digital
camera. Not all digital cameras allow you to mark your photos for printing.
When you select photos using your camera, the camera creates a Digital Print
Order Format (DPOF) file that identifies which photos have been selected for
printing.
Your printer can read the DPOF file from the memory card so you do not have to
reselect the photos to print. Review the documentation that came with your digital
camera to see if it supports camera-selected photos. Your printer supports DPOF
file format 1.1.
1
Use your digital camera to select the photos you want to print. For more
information, see the documentation that came with your camera.
2
Insert the memory card into the printer’s memory card slot.
3
The printer automatically recognizes the camera-selected photos on the
memory card and asks if you want to print them. Press the SELECT PHOTOS
button to highlight Yes, and then press the OK button.
4
A message appears on the printer’s LCD screen asking if you are using 4 x
6 inch (10 x 15 cm) photo paper. If you are, press the SELECT PHOTOS
button to highlight Yes, and then press the OK button.
If you are not using 4 x 6 inch (10 x 15 cm) paper, press the SELECT
PHOTOS
button to highlight No, and then press the OK button. The
printer automatically determines the size of the loaded paper.
The printer prints the camera-selected photos.
For more information, see the following topics:
basics guide
•
unmark camera-selected photos on page 18
•
connect your hp digital camera to the direct-printing port on page 33
31
chapter 3
print new photos
The PRINT NEW PHOTOS button allows you to print all photos on a memory card
that have not previously been printed from the memory card.
Each time you insert a memory card into the printer’s memory card slot and print
photos using the printer’s control panel, the printer tags the photos so that the
next time you insert the same memory card, the printer will “remember” that the
photos have already been printed. If you take new photos and store them on the
same memory card, then the next time you insert the memory card into the
printer’s memory card slot you can use the PRINT NEW PHOTOS button to print
only the new photos you have taken since you last inserted the memory card.
Note: If you print or modify your photos using a computer, the tags on the
photos placed by the printer might be removed, causing previously printed
photos to be selected as new photos.
1
Insert a memory card into the printer’s memory card slot and wait for the
first photo stored on the memory card to appear on the LCD screen.
2
Press the PRINT NEW PHOTOS button to print any photos on the memory
card that have not previously been printed.
A print summary with the number of new photos selected to print appears
on the LCD screen.
Note: At this point, you can print multiple copies of the selected photos. You
can also change the default size of the selected photos. For more
information, see the HP Photosmart Printer Help.
3
32
Press the PRINT button to start printing all new photos.
hp photosmart 7700 series
print from the direct-printing port
4
For quick and easy printing, your printer allows you to connect a notebook
computer or an HP direct-printing digital camera to the direct-printing port
located on the front of the printer.
To print using the direct-printing port, you must first install the HP Photosmart
printer software on your notebook computer using the USB port located in the
back of your printer. The first time you connect your notebook computer to the
direct-printing port, your operating system will automatically reconfigure the
software so you can print using that port. For information about installing the
software on your notebook computer, see the HP Photosmart Setup Guide that
came with your printer.
Note: If your direct-printing digital camera has a docking station, you can
connect the docking station to the printer’s USB port. For more information,
see the documentation that came with the docking station.
connect your hp digital camera to the direct-printing port
Your printer allows you to print beautiful photos from an HP direct-printing digital
camera without using your computer.
To see a list of the HP direct-printing digital cameras that work with your printer,
go to www.hp.com/support, select your country or region, and type directprinting digital cameras in the search window.
After you use your HP direct-printing digital camera to select photos for printing,
you can print your photos by connecting your camera to the direct-printing port.
To print by connecting your hp direct-printing digital camera to your printer:
basics guide
1
Use the Share menu on your HP direct-printing digital camera to select the
photos you want to print. For more information, see the documentation that
came with your camera.
2
Connect the digital camera to the direct-printing port on the front of your
printer using the USB cable that came with the camera. The direct-printing
port is located under the input bay door, to the left of the memory card
slots.
33
chapter 4
3
4
When you connect your digital camera to the printer, a Print Setup menu
appears on the camera’s LCD screen. Use this menu to:
–
Change the photos you have selected for printing
–
Select the paper type
–
Select the paper size
When you are ready to print, follow the instructions on your camera’s LCD
screen.
Note: For more information about selecting photos on your digital camera,
see the documentation that came with your digital camera.
adjust print settings
When you print directly from your HP direct-printing digital camera, the printer
uses the print settings that you selected using your camera. You cannot adjust the
print settings from your printer.
If you want to adjust the print settings using features that are not available from
your digital camera, you can use these options:
•
Save the photos to your Windows PC and adjust them using the HP Photo
& Imaging software. For more information, see the HP Photo & Imaging
software help.
•
Save the photos to your Macintosh and use photo editing software to
adjust the photos. For more information about how to save photos to your
Macintosh, see the HP Photosmart Printer Help.
•
Remove the memory card from the camera, insert it in your printer, and
adjust the print settings from the printer’s control panel. For more
information, see print from a memory card on page 21 and the HP
Photosmart Printer Help.
For more information about printing camera-selected photos, see print cameraselected photos on page 31.
34
hp photosmart 7700 series
print from the direct-printing port
connect your notebook computer to the direct-printing port
For quick and easy printing, your printer allows you to connect a notebook
computer to the direct-printing port located in the front of the printer.
To print from your notebook computer:
1
Connect one end of a USB cable to the notebook computer, then connect
the other end of the cable to the direct-printing port located on the front of
the printer. The direct-printing port is located under the input bay door, to
the left of the memory card slots.
2
Using your software application, open the file you want to print.
3
Follow the steps appropriate for your operating system:
If you are using a Windows PC:
a. From the File menu of the software application, select Print.
b. To access more advanced settings, click Properties (may be titled
Preferences in some operating systems).
c. Select the settings appropriate for your project and click OK.
If you are using a Macintosh:
a. From the File menu of the software application, select Page Setup.
b. In the Format for pop-up menu, select photosmart 7700 series.
c. Select the page attributes (paper size, borderless or bordered photos,
orientation, and scaling percentage).
If you are using OS 9, the borderless option appears as a check box. If
you are using OS X, the borderless options appear under the Paper
Size pop-up menus.
d. Click OK.
e. From the File menu in your software application, select Print.
f.
Select the print settings appropriate for your project. Use the pop-up
menus to open the other panels.
g. Click Print (OS X) or OK (OS 9) to begin printing.
basics guide
35
chapter 4
36
hp photosmart 7700 series
print from your computer
5
You can use your printer with Windows PC or Macintosh software applications
that allow printing.
If you already know how to use a printer with your computer, you are ready to
begin printing as usual. If you are new to printing, or if you have questions, use
this chapter to learn more.
When you print from your computer, the control panel settings on the printer do
not apply; the software on your computer overrides the printer’s settings.
print from your Windows PC
Before you begin, make sure your printer is connected to your computer, the
printer software that came in the box is installed, and there is paper in the printer.
For more information about setup, see the HP Photosmart Setup Guide that came
with your printer. For information about loading paper, see load paper in the in
tray on page 8.
print from a software application
1
From the File menu in your software application, select Print.
Depending on the software application you are using and the operating
system running on your computer, a Print dialog box may appear or the HP
Photosmart Series Properties or Printing Preferences dialog box may
appear.
2
basics guide
Select the pages and the number of copies you want print.
37
chapter 5
3
To access the printing properties tabs, you may have to click Properties or
Preferences. For information about the HP Photosmart Series printing
properties, see the HP Photosmart Printer Help.
Note: The Properties button may be labeled Preferences and the Print
dialog box may be different for each software application.
Note: Depending on the operating system running on your computer, the
HP Photosmart Series Properties dialog box may be titled HP Photosmart
Printing Preferences.
To learn more about the available settings, click the ? in the upper right
corner of the printing properties dialog box, then click the item you want
more information about. You can also click Help.
4
Select other settings appropriate for your project. If you clicked Properties
or Preferences to view the tabs, click OK to close the window.
5
Click OK to begin printing.
print borderless photos from your Windows PC
Borderless printing is supported for 4 x 6 inch photo paper (100 x 150 mm),
8.5 x 11 inch (216 x 280 mm) paper, L-size paper (3.5 x 5 inches, 90 x 127
mm), and Hagaki cards (3.9 x 5.8 inches, 100 x 148 mm).
Note: To print borderless photos from your computer, you must print from a
software application that supports borderless printing. HP recommends
using the HP Photo & Imaging software that you installed with your printer
to achieve true borderless results. If you print using other imaging software,
you may have to adjust the photo scaling to achieve borderless results.
38
hp photosmart 7700 series
print from your computer
1
Open the photo in a software application and from the File menu, select
Print.
2
On the Print dialog box, click Properties or Preferences to access the HP
Photosmart Series printing properties. If the software application you are
using does not have a Properties or Preferences button on the Print dialog
box, then skip to the next step. For more information, see print from a
software application.
3
Select the Paper/Quality tab on the Print dialog box.
4
Click the Borderless Printing check box.
5
From the Size is list, select a borderless paper size. Borderless paper sizes
are clearly marked Borderless on the list.
Note: Scroll through the Size is list to see all available borderless paper
sizes.
6
Select other settings appropriate for your project, and then click OK to
return to the Print dialog box.
7
Click OK to begin printing.
use the Windows PC taskbar icons
After you install the printer software, two icons appear in the Windows taskbar:
•
hp photosmart printer icon
•
hp photosmart memory card icon
These icons help you perform a variety of tasks.
Printer icon
basics guide
Memory card icon
39
chapter 5
hp photosmart printer icon
Use the HP Photosmart printer icon in the Windows taskbar to open the HP
Photosmart Series Properties dialog box, select a default printer, or open the HP
Photosmart Series Toolbox.
40
•
When you click the printer icon, the printing properties dialog box
appears. You can change the default print settings in this dialog box.
•
When you right-click the printer icon, a menu appears. Make your
selection from the following menu items:
–
Change default print settings—Click to open the printing properties
dialog box.
–
Open HP Photosmart Series Toolbox—Click to open the HP Photosmart
Series Toolbox.
–
HP Photosmart Series—Select the HP Photosmart Series printer you
want to use from the list of installed printers. A check mark indicates the
currently selected printer.
–
Exit—Click to close the menu and remove the printer icon from the
taskbar. Restart your computer to make this icon appear again. To
close the menu without removing the printer icon from the taskbar, click
anywhere outside the menu.
hp photosmart 7700 series
print from your computer
hp photosmart memory card icon
Use the HP Photosmart memory card icon to determine the status of your printer,
access the files stored on your memory card, and display connection messages
on your computer screen.
The appearance of the icon tells you the status of the printer:
When the memory card icon is green, a memory
card is inserted in the printer and the printer is
ready to access the files stored on the memory
card.
When the memory card icon is gray, a memory
card is not inserted in the printer.
When a red “x” appears on the memory card icon,
the connection between the printer and the
computer has been lost. To print from the computer
you must re-establish communication. For
information about re-establishing communication,
see the HP Photosmart Printer Help.
When you right-click the memory card icon, a menu appears. Make your
selection from the following menu items:
basics guide
–
Open F: HP Photosmart Series—Click to open Windows Explorer,
where you can move, copy, delete, or open files. You can also doubleclick the memory card icon to open Windows Explorer. Note that “F:”
may not be the drive letter assigned by your computer.
–
Prepare to remove card—Click to prepare the memory card for safe
removal from the printer.
–
Show disconnect warning—Click if you want a warning message to
appear when the printer loses communication or attempts to regain
communication with your computer. A check mark indicates a
connection message will appear.
–
Show safe to remove card message—Click if you want a message to
appear notifying you when it is safe to remove the memory card from
the printer. A check mark indicates a message will appear.
41
chapter 5
print from your Macintosh
Before you begin, make sure your printer is connected to your computer, the
printer software that came in the box is installed, and there is paper in the printer.
For more information about setup, see the HP Photosmart Setup Guide that came
with your printer. For information about loading paper, see load paper in the in
tray on page 8.
Note: To print borderless photos from your computer, you must print from a
software application that supports borderless printing. If you are using OS
X, HP recommends using the iPhoto application that came with the
operating system.
print from a software application (OS X or OS 9)
The following steps are specific to OS X. For OS 9, the steps may be slightly
different. Be sure you have selected your HP Photosmart printer in the Print
Center (OS X) or in the Chooser (OS 9) before you begin printing. For more
information, see the reference guide that came with your printer.
1
From the File menu in your software application, select Page Setup.
The Page Setup dialog box appears.
2
In the Format for pop-up menu, select photosmart 7700 series (OS X only).
Note: In OS 9, select photosmart 7700 series in the Chooser.
42
hp photosmart 7700 series
print from your computer
3
Select the page attributes:
–
Select the paper size.
–
Select whether you would like to print borderless or bordered photos.
If you are using OS 9, the borderless option appears as a check box. If
you are using OS X, the borderless options appear under the Paper
Size pop-up menus.
–
Select the orientation.
–
Enter the scaling percentage.
4
Click OK.
5
From the File menu in your software application, select Print.
The Print dialog box appears.
Note: If you are using OS X, the Copies & Pages panel opens. If you are
using OS 9, the General panel opens.
6
Verify that your HP Photosmart 7700 Series printer is listed in the Print
Center’s printer list. (OS X) or that it is selected in the Chooser (OS 9)
before you begin printing.
7
Select the print settings appropriate for your project. Use the pop-up menus
to open the other panels.
To learn more about the settings, click the ? in the lower left corner of the
dialog box (OS X only).
Note: Your photosmart printer is not a PostScript printer.
8
basics guide
Click Print (OS X) or OK (OS 9) to begin printing.
43
chapter 5
44
hp photosmart 7700 series
troubleshooting
6
Your HP Photosmart printer is designed to be reliable and easy to use. This
chapter answers frequently asked questions and contains information about the
following topics:
•
hardware problems
•
printing problems
•
error messages
For more troubleshooting information about software installation, see the
reference guide that came with your printer. For advanced troubleshooting
information, see the HP Photosmart Printer Help. For information about viewing
the printer help, see view the hp photosmart printer help on page 2.
hardware problems
The troubleshooting section of the HP Photosmart Printer Help contains more
detailed solutions. For information about viewing the printer help, see view the
hp photosmart printer help on page 2.
Before contacting HP support, read this section for troubleshooting tips or go to
the online support services at www.hp.com/support.
Note: HP recommends using a USB cable of less than 10 feet (3 meters) in
length to minimize injected noise due to potential high electromagnetic
fields.
Problem
Possible cause
Solution
The On/Attention light is
The printer is processing
blinking green but the printer is information.
not printing.
Wait a moment for the printer
to finish processing the
information.
The On/Attention light is
blinking red.
Try the following:
• Check the printer’s LCD
screen and the computer
monitor for instructions.
• If you have a digital
camera connected to the
printer, check the camera’s
LCD screen for instructions.
• If this does not work, turn
off the printer. Unplug the
printer’s power cord, wait
one minute, then plug it in
again. Turn on the printer.
basics guide
The printer requires attention.
45
chapter 6
Problem
Possible cause
Solution
The On/Attention light is
blinking amber.
An unrecoverable error has
occurred.
Turn off the printer. Unplug the
printer’s power cord, wait one
minute, then plug it in again.
Turn on the printer. If this does
not work, go to www.hp.com/
support or contact HP support.
printing problems
Before contacting HP support, read this section for troubleshooting tips or go to
the online support services at www.hp.com/support.
Note: HP recommends using a USB cable of less than 10 feet (3 meters) in
length to minimize injected noise due to potential high magnetic fields.
Problem
Possible cause
Solution
The printer does not generate
borderless photo output.
You need to select the
appropriate paper size.
For instructions on setting the
paper size for borderless
photos, see set borderless
printing on page 17 and print
from your computer on
page 37.
Printing is very slow.
Your computer may have less Check the amount of RAM
than the recommended system (system memory) and the
requirements.
processor speed of your
computer. For information on
the system requirements, see
the HP Photosmart Printer Help.
46
Too many software programs
may be running at the same
time.
Close all unnecessary software
programs.
You may have Extend Colors
turned on.
Turn off the option by using the
printer’s MENU button. For
more information, see the HP
Photosmart Printer Help.
You may be using outdated
printer software.
Update the version of the
printer software you are using.
For more information, see the
HP Photosmart Printer Help.
You may have chosen
Maximum dpi (Windows) or
High Resolution (Macintosh).
See the Troubleshooting
section of the HP Photosmart
Printer Help for instructions on
how to deselect Maximum dpi
(Windows) or High Resolution
(Macintosh).
hp photosmart 7700 series
troubleshooting
Problem
Possible cause
The printer does not print new There are no new photos on
photos on the memory card.
the memory card or the photos
have already been printed
from the printer’s control
panel. For more information,
see print new photos on
page 32.
Solution
Select and print the desired
photos. For more information,
see decide which photos to
print or to send via e-mail on
page 26.
Photo paper does not feed into If you are trying to print on 4 x Engage the photo tray by
the printer correctly.
6 inch (10 x 15 cm) paper,
gently pushing the photo tray
Hagaki cards, or L-size cards, slider towards the printer.
the photo tray may not be
engaged.
The photo paper guides may
not be adjusted correctly.
Make sure that the photo
paper width guide and the
photo paper length guide fit
close to the edges of the paper
without bending the paper.
Your printer may be in an
Try the following:
extremely high or low humidity • Insert the photo paper as
environment.
far as it will go into the
photo tray.
• Load one sheet of photo
paper at a time.
The photo paper may be
curled.
basics guide
If the photo paper is curled,
place the paper in a plastic
bag and gently bend it the
opposite direction of the curl
until the paper lies flat. If the
problem persists, use photo
paper that is not curled.
47
chapter 6
Problem
Possible cause
Solution
There may be too much paper
Paper does not feed into the
loaded in the In tray.
printer correctly.
OR
Plain paper does not come out
of the printer correctly.
Remove some paper from the
In tray and try printing again.
For paper-loading instructions,
see load paper in the in tray
on page 8.
The paper guides may not be
adjusted correctly.
Make sure that the paper width
guide and the paper length
guide fit close to the edges of
the paper without bending the
paper.
Two or more pieces of paper
are stuck together
Remove the paper from the
paper tray and leaf through
the stack so the sheets of paper
do not stick together, then
reload the paper and try
printing again. For paperloading instructions, see paper
information on page 7.
Windows PC only
Photos are not printing
correctly from your Windows
PC.
You may have used your
application’s Page Setup
dialog box to select the paper
size or type.
Use the printing properties
dialog box to select the paper
size or type. For more
information, see the HP
Photosmart Printer Help.
No page came out of the
printer.
The paper jammed while
printing.
1 Turn off the printer, then
unplug it from the power
source.
2 Remove the rear access door
and remove the jammed
paper.
For more information, see the
troubleshooting section in the
HP Photosmart Printer Help for
instructions on clearing a paper
jam.
The document printed at an
angle or is off-center.
The paper may not be loaded Load the paper correctly. For
correctly.
paper-loading instructions, see
load paper in the in tray on
page 8.
The print cartridge may not be For more information, see the
properly calibrated.
instructions for calibrating a
print cartridge in the care and
maintenance section in the HP
Photosmart Printer Help.
48
hp photosmart 7700 series
troubleshooting
Problem
Possible cause
Solution
Print quality is poor.
You may be printing in Inkbackup Printing Mode. The
printer enters Ink-backup
Printing Mode when one of the
print cartridges is missing.
Replace the missing print
cartridge with a new one. For
more information, see install or
replace print cartridges on
page 11.
You may have magnified the
photo too much.
Press the ZOOM – button one
or more times to reduce the
magnification.
You may not be using the best Load the best paper type for
paper type for your output.
your output. For more
information, see
recommended paper on
page 53.
You may be printing on the
wrong side of the paper.
Make sure the paper is loaded
with the side to be printed
facing down.
You may have selected a lowresolution setting on your
digital camera.
Reduce the size of the image
and try printing again. For
better results in the future, set
your digital camera to a higher
photo resolution.
You may not have selected the Select the correct paper type
correct paper type in the
from your software
printer software.
application’s Print dialog box.
You may need to clean the
print cartridges.
basics guide
Clean the print cartridges from
the printer’s control panel. For
more information, see the HP
Photosmart Printer Help.
49
chapter 6
error messages
Before contacting HP support, read this section for troubleshooting tips or go to
the online support services at www.hp.com/support.
Message
Problem
Solution
PAPER JAM. CLEAR JAM THEN
PRESS OK.
The paper jammed while
printing.
1 Turn off the printer, then
unplug it from the power
source.
2 Remove the rear access door
and remove the jammed
paper.
For more information, see the
troubleshooting section in the
HP Photosmart Printer Help for
instructions on clearing a paper
jam.
UNSUPPORTED MEDIA SIZE. JOB
WAS CANCELLED. PRESS OK.
Your printer does not support
the provided paper size.
Press the OK button, then load
a supported paper size. For
more information about
supported sizes, see
specifications on page 53.
PAPER SIZE MISMATCH.
The paper size changed in the Load the correct paper size in
middle of the print process.
the photo tray and press the
OK button. For paper-loading
instructions, see load paper in
the photo tray on page 9.
AUTOMATIC PAPER SENSOR
FAILED.
The automatic paper sensor is Press the OK button and try
obstructed or damaged.
printing again. If this does not
work, go to www.hp.com/
support or contact HP support.
Test both print cartridges to see
ONE OR MORE CARTRIDGES HAVE One or both of the print
FAILED. REMOVE ALL CARTRIDGES, cartridges is old or damaged. if one or both of the print
THEN REINSERT EACH CARTRIDGE
cartridges failed. For testing
BY ITSELF AND CLOSE THE COVER
instructions, see the HP
TO SEE IF IT HAS FAILED.
Photosmart Printer Help. For
information about replacing
print cartridges, see install or
replace print cartridges on
page 11.
50
hp photosmart 7700 series
troubleshooting
Message
Problem
Solution
CARTRIDGE SERVICE STATION IS
STUCK.
There is an obstruction
blocking the path of the
cartridge service station.
1 Open the main door. The
print cartridge service
station is located beneath
the print cartridge cradle.
2 Move the print cartridge
cradle to the left to access
the print cartridge service
station.
3 Clear any obstruction and
press the OK button to
continue.
PRINT CARTRIDGE JAM. CLEAR JAM The print cartridge cradle is
THEN PRESS OK.
stuck.
Clear any obstruction in the
print cartridge cradle path,
and press the OK button to
continue.
PHOTO IS CORRUPTED.
OR
SOME PHOTOS ARE CORRUPTED.
One or more photos selected
for printing are corrupt and
cannot be accessed.
Try saving the photos to the
computer using your digital
camera rather than your
memory card. For more
information, see the HP
Photosmart Printer Help.
CARD ACCESS ERROR.
OR
FILE DIRECTORY STRUCTURE IS
CORRUPTED.
OR
CANNOT DISPLAY THIS PHOTO.
The memory card contains
image formats that the printer
does not support or the file is
corrupted. For a list of
supported image formats, see
specifications on page 53.
Save the photos to your
computer and access them
from there. For more
information, see the HP
Photosmart Printer Help.
CAN NOT PRINT PHOTOS.
Some files specified for a print Save the files to your computer
job have errors.
and print from your computer.
For more information, see the
HP Photosmart Printer Help.
CAN NOT SCAN PROOF SHEET.
PLEASE PRINT A NEW PROOF
SHEET. PRESS OK.
The proof sheet is smeared or
has stray marks.
CAN NOT DETECT THE PROOF
SHEET. PLEASE PRINT A NEW
PROOF SHEET. PRESS OK.
You may have placed the proof 1 Insert the proof sheet into the
In tray with the printed side
sheet with the printed side
facing down.
facing up.
2 Try scanning again. For
more information, see scan a
proof sheet on page 29.
basics guide
Print a new proof sheet. For
more information, see print a
proof sheet on page 28.
51
chapter 6
Message
Problem
Solution
The printer did not receive the Try the following:
DATA WAS NOT RECEIVED.
data that the computer sent to • Make sure the USB cable is
OR
securely attached to both
NO RESPONSE FROM COMPUTER. it.
the computer and the USB
port on the back of the
printer.
• Verify that you are using a
high-quality USB cable that
is less than 10 feet (3
meters) in length.
52
hp photosmart 7700 series
specifications
7
This chapter lists recommended papers for your printer and provides selected
printer specifications.
Note: For a complete list of printer specifications and system requirements,
see the HP Photosmart Printer Help.
recommended paper
For a list of available HP-designed inkjet papers, or to purchase supplies, go to:
•
www.hpshopping.com (U.S.)
•
www.hp-go-supplies.com (Europe)
•
www.hp.com/paper (Asia/Pacific)
•
www.jpn.hp.com/supply/inkjet (Japan)
Note: You can also purchase HP-designed inkjet paper at most computer
and office supply stores.
HP photo papers
Best for
Sizes
HP premium plus photo paper • 4 x 6 inch (10 x 15 cm)
borderless prints
• High-value prints
• Important photos
• High-resolution images from
scanners or digital cameras
• Photo enlargements or
reprints to frame or give as
gifts
Letter (8.5 x 11 inches, 216 x
280 mm)
A4 (8.27 x 11.7 inches, 210 x
297 mm)
4 x 6 inches with 0.5 inch tab
(10 x 15 cm with 1.25 cm tab)
4 x 6 inches (10 x 15 cm)
HP premium photo paper
• Making and sharing photos
with friends and families
• Medium- to high-resolution
images from scanners and
digital cameras
• Medium value prints from
parties, team events, or
celebrations
Letter (8.5 x 11 inches, 216 x
280 mm)
A4 (8.27 x 11.7 inches, 210 x
297 mm)
4 x 6 inches with 0.5 inch tab
(10 x 15 cm with 1.25 cm tab)
HP everyday photo paper
• Everyday photos, short-term
or one-time uses
• E-mail or internet photos for
bulletin boards or
refrigerators
• Kid’s photos
• Testing and proofing
Letter (8.5 x 11 inches, 216 x
280 mm)
A4 (8.27 x 11.7 inches, 210 x
297mm)
basics guide
53
chapter 7
printer specifications
54
Connectivity,
maximum
HP JetDirect External Print Servers: 175x, 310x,
380x
Connectivity,
standard
USB: Front and back ports
Windows 98, 2000 Professional, ME, XP Home,
and XP Professional
Mac OS 9 v9.1 or later, OS X v10.1 through 10.2
Image file formats
JPEG Baseline
TIFF 24-bit RGB uncompressed interleaved
TIFF 24-bit YCbCr uncompressed interleaved
TIFF 24-bit RGB packbits interleaved
TIFF 8-bit gray uncompressed/packbits
TIFF 8-bit palette color uncompressed/packbits
TIFF 1-bit uncompressed/packbits/1D Huffman
In tray capacity
25 sheets of photo paper
100 sheets of plain paper
20 - 40 cards (depending on thickness)
15 envelopes
20 sheets of banner paper
20 sheets of labels
25 transparencies
25 sheets of iron-on transfers
Media sizes
Photo paper (4 x 6 inches, 10 x 15 cm)
Photo paper with tab (4 x 6 inches with 0.5 inch
tab, 10 x 15 cm with 1.25 cm tab)
Index cards (4 x 6 inches, 10 x 15 cm)
Hagaki cards (3.9 x 5.8 inches, 100 x 148 mm)
A6 cards (4.1 x 5.8 inches, 105 x 148 mm)
L-size cards (3.5 x 5 inches, 90 x 127 mm)
L-size cards with tab (3.5 x 5 inches with 0.5 inch
tab, 90 x 127 mm with 12.5 mm tab)
Banner paper (8.5 x 234 inch, 216 x 5969 mm)
hp photosmart 7700 series
specifications
Media sizes, standard Photo paper
3 x 3 inches to 8.5 x 14 inches (76 x 76 mm to
216 x 356 mm)
Plain paper
Letter, 8.5 x 11 inches (216 x 280 mm)
Legal, 8.5 x 14 inches (216 x 356 mm)
Executive, 7.5 x 10 inches (190 x 254 mm)
A4, 8.27 x 11.7 inches (210 x 297 mm)
A5, 5.8 x 8.3 inches (148 x 210 mm)
B5, 6.9 x 9.8 inches (176 x 250 mm)
Cards
Hagaki, 3.9 x 5.8 inches (100 x 148 mm)
L-size, 3.5 x 5 inches (90 x 127mm)
L-size with tab, 3.5 x 5 with 0.5 inch tab (90 x 127
mm with 12.5 mm tab)
Index, 3 x 5 inches, 4 x 6 inches, and 5 x 8 inches
(76 x 127 mm, 10 x 15 cm, and 127 x 203 mm)
A6, 4.1 x 5.8 inches (105 x 148 mm)
Envelopes
No. 9, 3.875 x 8.875 inches (98.4 x 225.4 mm)
No. 10, 4.125 x 9.5 inches (105 x 240 mm)
A2 Invitation, 4.375 x 5.75 inches (110 x 146
mm)
DL, 4.33 x 8.66 inches (110 x 220 mm)
C6, 4.5 x 6.4 inches (114 x 162 mm)
Custom
3 x 5 inches to 8.5 x 14 inches (76 x 127 mm to
216 x 356 mm)
Transparencies
Letter, 8.5 x 11 inches (216 x 280 mm)
A4, 8.27 x 11.7 inches (210 x 297 mm)
Label sheets
Letter, 8.5 x 11 inches (216 x 280 mm)
A4, 8.27 x 11.7 inches (210 x 297 mm)
Banner paper
(8.5 x 234 inch, 216 x 5969 mm)
Media specifications, Recommended maximum length: 14 inches (356
maximum
mm)
Recommended maximum width: 8.5 inches (216
mm)
Recommended maximum thickness: 11.5 mil (292
µm) per sheet
basics guide
55
chapter 7
Media types
Paper (plain, inkjet, photo, and banner)
Envelopes
Transparencies
Labels
Cards (index, greeting, Hagaki, A6, L-size)
Iron-on transfers
Memory cards
CompactFlash Type I and II
IBM Microdrive
MultiMediaCard
Secure Digital
SmartMedia
Sony Memory Sticks
xD-Picture Card
Memory cardPrinting: Supported images and video file formats
supported file formats Saving: All file formats
56
Out tray capacity
20 sheets of photo paper
50 sheets of plain paper
10 cards
10 envelopes
20 transparencies
20 sheets of banner paper
25 sheets of labels
25 sheets of iron-on transfers
Paper trays
One letter-size tray
One 4 x 6 inch (10 x 15 cm) photo tray
Photo tray capacity
15 sheets of photo paper
Print cartridges
1
1
1
1
USB support
USB: Front and back ports
Windows 98, 2000 Professional, ME, XP Home,
and XP Professional
Mac OS 9 v9.1 or later, OS X v10.1 through 10.2
HP recommends that the USB cable be less than
10 feet (3 meters) in length
Video file formats
Motion JPEG AVI
Motion JPEG Quicktime
MPEG-1
black HP #56 (C6656A)
tri-color HP #57 (C6657A)
color photo HP #58 (C6658A)
gray photo HP #59 (C9359A)
hp photosmart 7700 series
index
B
# of copies, 16
after printing, 15
borderless printing, 17
country/region, 19
DPOF, 18
language, 19
paper detect, 18
photo size, 16
print quality, 20
restore defaults, 19
structure, 6
borderless printing, 17
problems, 46
C
camera-selected photos
print, 31
unmark, 18
control panel, 5
copies
set number of copies, 16
D
default settings, 19
DPOF, 18
print camera-selected
photos, 31
E
error messages, 50
H
hardware problems, 45
hp photosmart printer help
print, 2
view, 2
I
icons
memory card, 41
printer, 40
index page, 27
indicator lights, 5
ink-backup printing mode, 13
L
LCD screen
language, 19
view photos, 26
M
memory card
icon, 41
insert, 22
remove, 25
slots, 6
supported cards, 21
memory cards
supported file formats, 22
menu
basics guide
P
paper
feed problems, 47
information, 7
load the in tray, 8
load the photo tray, 9
print quality, 20
recommended, 53
set paper detection, 18
photo
sizes, 16
photos
borderless printing, 17
print photo index page, 27
set photo size, 16
use 9-up view mode, 26
view from LCD screen, 26
print
camera-selected photos
(DPOF), 31
from a Macintosh, 42
from a Windows PC, 37
ink-backup printing
mode, 13
photo index page, 27
problems, 45
proof sheet, 28
quality, 20
print cartridges
install, 11
replace, 11
store, 14
supported, 10
printer
icon, 40
specifications, 54
printer parts
back, 4
control panel, 5
front, 4
indicator lights, 5
memory card slots, 6
printing preferences, 15
problems
borderless printing, 46
hardware, 45
paper feed, 47
printing, 45
slow printing, 46
proof sheet
print, 28
scan, 29
R
recommended paper, 53
remove a memory card, 25
replace print cartridges, 11
S
set
borderless printing, 17
country/region, 19
factory default settings, 19
LCD screen language, 19
number of copies, 16
paper detection, 18
photo size, 16
print quality, 20
printing preferences, 15
unmark DPOF files, 18
specifications
printer, 54
store print cartridges, 14
T
troubleshoot
borderless printing
problems, 46
error messages, 50
hardware problems, 45
paper feed problems, 47
printing problems, 45
slow printing, 46
57
index
basics guide
58
DECLARATION OF CONFORMITY
according to ISO/IEC Guide 22 and EN 45014
______________________________________________________________________
Manufacturer's Name:
Hewlett-Packard Company
Manufacturer's Address:
16399 West Bernardo Drive
San Diego CA 92127, USA
declares, that the product
Regulatory Model Number (RMN): SDGOA-0377
Product Name:
Photosmart 7760 (Q3015A)
Model Number(s): Photosmart 7760 (Q3015A)
conforms to the following Product Specifications:
Safety:
IEC 60950: 3rd Edition:1999
EN 60950:2000
UL1950/CSA22.2 No.950, 3rd Edition:1995
NOM 019-SFCI-1993
GB4943:2001
EMC:
CISPR 22:1997 / EN 55022:1998 Class B
CISPR 24:1997 / EN 55024:1998
IEC 61000-3-2:1995 / EN 61000-3-2:1995
IEC 61000-3-3:1994 / EN 61000-3-3:1995
Supplementary Information:
The Product herewith complies with the requirements of the Low Voltage Directive 73/23/EEC and the
EMC Directive 89/336/EEC and carries the CE marking accordingly.
1) The product was tested in a typical configuration.
7 March 2003
Date
Steve Smith, Hardware Test & Regs MGR.
European Contact for regulatory topics only: Hewlett Packard GmbH, HQ-TRE, Herrenberger Strasse 140,
D-71034 Böblingen Germany. (FAX +49-7031-14-3143)
Printed on recycled paper
Printed in U.S., 5/03
ENERGY STAR® is a U.S. registered mark.
As an ENERGY STAR® partner,
Hewlett-Packard Company has determined that this
product meets the ENERGY STAR® guidelines for
energy efficiency.
www.hp.com
© 2003 Hewlett-Packard Company
*Q3015-90168*
*Q3015-90168*
Q3015-90168
v1.3.0