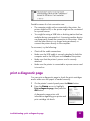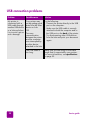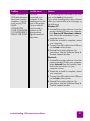
1
hp photosmart
7550
basics guide
© Copyright 2002 Hewlett-Packard Company
All rights are reserved. No part of this document may be photocopied, reproduced, or translated to another
language without the prior written consent of Hewlett-Packard Company.
The information contained in this document is subject to change without notice. Hewlett-Packard shall not be
liable for errors contained herein or for consequential damages in connection with the furnishing, performance,
or use of this material.
HP, the HP logo, and Photosmart are property of Hewlett-Packard Company.
The Secure Digital logo is a trademark of the SD Association.
Microsoft and Windows are registered trademarks of Microsoft Corporation.
CompactFlash, CF, and the CF logo are trademarks of the CompactFlash Association (CFA).
Mac, the Mac logo, and Macintosh are registered trademarks of Apple Computer, Inc.
IBM is a registered trademark of International Business Machines Corporation.
Other brands and their products are trademarks or registered trademarks of their respective holders.
The copyrights to certain photos within this document are retained by the original owners.
contents
1 get started . . . . . . . . . . . . . . . . . . . . . . . . . . . . . . . . . . . . . . . . . 1
welcome. . . . . . . . . . . . . . . . . . . . . . . . . . . . . . . . . . . . . . . . . . . . . . . . . . 1
printer parts . . . . . . . . . . . . . . . . . . . . . . . . . . . . . . . . . . . . . . . . . . . . . . . 2
back . . . . . . . . . . . . . . . . . . . . . . . . . . . . . . . . . . . . . . . . . . . . . . . . . . 2
front . . . . . . . . . . . . . . . . . . . . . . . . . . . . . . . . . . . . . . . . . . . . . . . . . . 3
control panel . . . . . . . . . . . . . . . . . . . . . . . . . . . . . . . . . . . . . . . . . . . . 4
card slots . . . . . . . . . . . . . . . . . . . . . . . . . . . . . . . . . . . . . . . . . . . . . . . 5
indicator lights . . . . . . . . . . . . . . . . . . . . . . . . . . . . . . . . . . . . . . . . . . . 5
paper information . . . . . . . . . . . . . . . . . . . . . . . . . . . . . . . . . . . . . . . . . . . 6
load paper in the IN tray . . . . . . . . . . . . . . . . . . . . . . . . . . . . . . . . . . . . 6
load photo paper in the photo tray . . . . . . . . . . . . . . . . . . . . . . . . . . . . . 7
print cartridge information . . . . . . . . . . . . . . . . . . . . . . . . . . . . . . . . . . . . . 8
use reserve mode . . . . . . . . . . . . . . . . . . . . . . . . . . . . . . . . . . . . . . . . . 9
install or replace the print cartridges . . . . . . . . . . . . . . . . . . . . . . . . . . . . 9
use the control panel . . . . . . . . . . . . . . . . . . . . . . . . . . . . . . . . . . . . . . . . 11
use the buttons . . . . . . . . . . . . . . . . . . . . . . . . . . . . . . . . . . . . . . . . . . 11
use the indicator lights . . . . . . . . . . . . . . . . . . . . . . . . . . . . . . . . . . . . . 12
menu map . . . . . . . . . . . . . . . . . . . . . . . . . . . . . . . . . . . . . . . . . . . . . 13
2 use your printer with a camera . . . . . . . . . . . . . . . . . . . . . . . . . 15
print camera-selected photos . . . . . . . . . . . . . . . . . . . . . . . . . . . . . . . . . . . 15
select and print photos. . . . . . . . . . . . . . . . . . . . . . . . . . . . . . . . . . . . . 15
print from a memory card . . . . . . . . . . . . . . . . . . . . . . . . . . . . . . . . . . . . . 16
supported memory cards . . . . . . . . . . . . . . . . . . . . . . . . . . . . . . . . . . . 16
insert a memory card. . . . . . . . . . . . . . . . . . . . . . . . . . . . . . . . . . . . . . 17
decide which photos to print . . . . . . . . . . . . . . . . . . . . . . . . . . . . . . . . 19
print photos from the control panel . . . . . . . . . . . . . . . . . . . . . . . . . . . . 20
contents
i
3 use your printer with a computer . . . . . . . . . . . . . . . . . . . . . . . 21
print from a Windows PC . . . . . . . . . . . . . . . . . . . . . . . . . . . . . . . . . . . . . 21
print from a software application . . . . . . . . . . . . . . . . . . . . . . . . . . . . . 21
use the Windows PC taskbar icons . . . . . . . . . . . . . . . . . . . . . . . . . . . . 22
print from a Macintosh . . . . . . . . . . . . . . . . . . . . . . . . . . . . . . . . . . . . . . . 25
print from a software application (OS X or OS 9.x). . . . . . . . . . . . . . . . . 25
4 troubleshooting . . . . . . . . . . . . . . . . . . . . . . . . . . . . . . . . . . . . 27
Windows PC connection problems . . . . . . . . . . . . . . . . . . . . . . . . . . . . . . 27
Macintosh connection problems . . . . . . . . . . . . . . . . . . . . . . . . . . . . . . . . 28
print a diagnostic page . . . . . . . . . . . . . . . . . . . . . . . . . . . . . . . . . . . . . . 29
USB connection problems . . . . . . . . . . . . . . . . . . . . . . . . . . . . . . . . . . . . . 30
printer problems . . . . . . . . . . . . . . . . . . . . . . . . . . . . . . . . . . . . . . . . . . . 35
printing problems . . . . . . . . . . . . . . . . . . . . . . . . . . . . . . . . . . . . . . . . . . 39
5 specifications . . . . . . . . . . . . . . . . . . . . . . . . . . . . . . . . . . . . . . 53
system requirements . . . . . . . . . . . . . . . . . . . . . . . . . . . . . . . . . . . . . . . . . 53
specifications . . . . . . . . . . . . . . . . . . . . . . . . . . . . . . . . . . . . . . . . . . . . . 54
index . . . . . . . . . . . . . . . . . . . . . . . . . . . . . . . . . . . . . . . . . . . . . . 55
ii
basics guide
get started
welcome
1
1
Thank you for purchasing an HP Photosmart printer! Your new
printer comes with the following documentation to help you get
started and get the most out of your printer:
•
Setup Guide — The HP Photosmart Setup Guide is the
poster that comes with your printer. It contains quick and
easy instructions to help you set up your printer and install
the printer software.
•
Basics Guide — The HP Photosmart 7550 Basics Guide is
the booklet you are reading. It includes a quick reference
guide to help you get acquainted with your new printer. It
describes how to use the basic features of your printer, and
it contains hardware troubleshooting information.
•
Software Setup & Product Support — The HP Photosmart
Software Setup & Product Support booklet explains how to
install and set up the software that comes with your printer.
It contains software troubleshooting information, and it
also describes how to get support from www.hp.com and
how to contact HP Support and Services.
•
HP Photosmart Printer Help — The HP Photosmart Printer
Help is an online guide that describes how to use the more
advanced features of your new printer. It also includes
information on printer care and maintenance as well as a
section on advanced troubleshooting and error messages.
After you have installed the HP Photosmart software on
your computer, you can view and print the HP Photosmart
Printer Help.
get started
1
view the hp photosmart printer help
• Windows PC: From the Start menu, choose Programs,
Hewlett-Packard, Photosmart 130, 230, 7150, 7345,
7350, 7550, and HP Photo & Imaging Director. From
the HP Photo & Imaging Director, click Help.
• Macintosh: Insert the HP Photosmart CD. In the User
Docs folder, select your language, then click the
photosmart 7550.html file.
print the hp photosmart printer help
• Windows PC: Click Print in the top navigation bar of
the HP Photosmart Printer Help window.
• Macintosh: Click in the frame you want to print. From
the File menu, select Print, or click Print in the top
navigation bar of the browser.
printer parts
back
USB port
Use this port to
connect the printer to
your computer
Power cord
connection
Use this to connect the
power cord included
with the printer
2
Rear access door
Remove this door
to clear a paper
jam
basics guide
front
OUT tray
This removable tray
catches your printed
photos or documents
Control panel
For more information,
see control panel on
page 4
LCD
This display
screen shows
photos and menu
options
Camera port
Use this port to
connect an HP
direct-printing
digital camera to
the printer
Side door
Open this cover
to change the
print cartridges
Photo tray
Open the cover to
load 4 x 6 inch
(10 x 15 cm)
photo paper in
the photo tray
Paper width
guide
Adjust this guide
to fit close to the
edge of the paper
in the IN tray
IN tray
Place paper or
envelopes in this
tray for printing
Memory card slots
For more information,
see card slots on
page 5
OUT tray
extension
Adjust this guide
for different
paper lengths
get started: printer parts
Paper length guide
Adjust this guide to
fit close to the end
of the paper in the
IN tray
Photo tray slider
Use this slider to
engage or
disengage the
photo tray
3
control panel
LEFT, RIGHT, UP,
DOWN
Use these arrows to
navigate through
the photos on a
memory card and
through menu
options
POWER
Use this button to
turn the printer
on or off
COPIES
Use this button to
select the number
of copies you
want to print
E-MAIL
Use this button to
E-mail a photo using
a Windows PC or a
Macintosh
COPIES
BRIGHTNESS
SIZE
PRINT
POWER
ZOOM
OK
CANCEL
MENU
OK
Use this button to
select the current
photo, to answer
LCD questions, to
ROTATE
Use this button select menu
options, or to crop
to rotate a
an enlarged photo
photo
4
SIZE
Use this button
to adjust the
print size of
your photos
SAVE
Use this button to
save photos from a
memory card
ROTATE
ZOOM
Use this button
to magnify and
crop a photo
BRIGHTNESS
Use this button
to adjust the
brightness of
your photos
SAVE
E-MAIL
PRINT
Use this button to
print selected
photos from a
memory card
CANCEL
Use this button to
MENU
deselect photos, to
Use this button exit a menu, or to
to access the stop printing,
menu options saving, or E-mailing
basics guide
card slots
CompactFlash/IBM Microdrive
memory card slot
Insert a CompactFlash or IBM
Microdrive memory card into this slot
to view, save, or print your photos
MultiMediaCard/Secure Digital
memory card slot
Insert a MultiMediaCard or Secure
Digital memory card into this slot to
view, save, or print your photos
SmartMedia memory card slot
Insert a SmartMedia memory
card into this slot to view, save,
or print your photos
Memory Stick memory card slot
Insert a Memory Stick memory
card into this slot to view, save,
or print your photos
indicator lights
Print light
On (Green)
The power is on
Off
The power is off
Blinking (Green)
The printer is busy
Blinking (Amber)
The printer requires attention
get started: printer parts
Memory card light (Green)
The memory card is inserted correctly
Off
There is no memory card inserted
Blinking
Information is being transmitted
between the memory card and the
printer or computer
5
paper information
You can print on a wide variety of paper types and sizes, from
index cards and photo paper to envelopes and transparencies.
We recommend using HP-designed inkjet paper for the best
results.
If you are using HP-designed inkjet paper,
remember to set the paper type in the printer
Properties dialog box (Windows PC) or the
Print dialog box (Macintosh).
•
Use the IN tray for all supported paper types and sizes
•
Use the photo tray when printing on 4 x 6 inch
(10 x 15 cm) photo paper
•
Use the envelope slot on the OUT tray when you need to
print a single envelope
For more information on supported paper types and sizes, see
specifications on page 53.
load paper in
the IN tray
1
Lift the OUT tray.
OUT tray
Paper width
guide
IN tray
2
6
Paper length
guide
Photo tray
slider
Pull out the paper length guide on the IN tray and slide the
paper width guide as far to the left as it will go.
basics guide
3
Place a stack of paper in the IN tray.
• Load the paper with the side to be printed facing down.
The printer pulls the paper in, flips it over, and then
prints on the paper; the finished document faces up in
the OUT tray.
• Always load paper in the portrait direction, with the
shortest edge toward you.
• Be careful not to use too much or too little paper. If the
tray contains only one or two sheets, the printer may
have trouble picking up the paper, or the paper may
bend and not feed correctly.
• Use one type and size of paper at a time. Do not mix
paper types or sizes in the IN tray.
load photo
paper in the
photo tray
4
Move the photo tray slider toward you until it stops. This
disengages the photo tray.
5
Adjust the paper width guide and paper length guide to fit
close to the edges of the paper without bending the paper.
This helps the paper feed straight into the printer.
6
Lower the OUT tray.
When you use the photo tray, you can leave paper in the IN
tray.
If you run out of photo paper in the photo tray
during a print job, the printer continues to print
using paper from the IN tray.
1
Move the photo tray slider toward you until it stops. This
disengages the photo tray.
2
Lift the photo tray cover.
3
Load paper in the photo tray with the side to be printed
facing down. If you are using tabbed paper, insert the
paper so the tab feeds in last. The printer pulls the paper
in, flips it over, then prints on the paper; the finished
document faces up in the OUT tray.
• You can load up to 20 sheets of paper in the photo
tray.
• Be careful not to use too much or too little paper. It may
be difficult for the printer to pick up a sheet of paper
when there are only one or two sheets in the photo tray.
get started: paper information
7
Photo tray cover
Photo tray
Photo tray slider
4
Lower the photo tray cover.
5
Move the photo tray slider away from you (toward the
inside of the printer) until it stops against the edge of the
paper. This engages the photo tray.
6
When you finish using the photo tray, move the photo tray
slider toward you until it stops. This disengages the photo
tray so the printer uses the paper in the IN tray.
See the HP Photosmart Printer Help for more information on:
•
Loading a single envelope
•
Loading a stack of envelopes
•
Loading index cards and other small media
•
Loading transparencies
print cartridge information
Your HP Photosmart 7550 printer comes equipped with three
print cartridges:
•
HP #57 (C6657A) — Tri-color print cartridge
•
HP #58 (C6658A) — Photo print cartridge
•
HP #56 (C6656A) — Black print cartridge
Printing with all three print cartridges ensures that you get the
best quality printouts.
8
basics guide
use reserve
mode
Reserve Mode allows you to keep printing if one or two of your
print cartridges fails, runs out of ink, or is incompatible with
your printer. If a print cartridge error message appears on the
LCD, remove the print cartridge and close the side door to enter
Reserve Mode. You will see a message reminding you that the
printer is in Reserve Mode.
Printing in Reserve Mode slows the printer and affects the print
quality.
If you are printing with only a...
The result is...
Black print cartridge
Colors print as grayscale
Tri-color print cartridge
Colors print but black
prints as gray
Photo print cartridge
Colors print as grayscale
Although Reserve Mode allows you to keep
printing, the print quality is reduced. For the
highest print quality, be sure to replace the
missing print cartridge as soon as possible.
install or
replace the print
cartridges
To get the best performance from your printer, use only genuine
HP supplies, including genuine HP factory-filled print
cartridges.
To get maximum use from your print cartridges, use the POWER
button to turn off the printer. Do not unplug the printer or turn
off the power source (such as a power strip) until the Print light
is off. This allows the printer to store the print cartridges in a
protected state.
Caution! Check that you are using the correct print
cartridges. Do not refill print cartridges yourself. Damage
that results from modifying or refilling HP print cartridges is
specifically excluded from the HP printer warranty
coverage.
get started: print cartridge information
9
1
If the printer is off, press the POWER button on the printer’s
control panel to turn the printer on.
2
Load plain paper in the IN tray so the printer can print a
calibration page after you install the print cartridges.
3
Open the side door.
4
Lift the cradle latch of the print cartridge you want to install
or replace by placing your finger under the number on the
latch and pulling out. The print cartridge latch will pop
open.
5
If you are replacing a print cartridge, slide out the old print
cartridge and recycle or discard it.
56
56
58
58
57
57
6
Take the new print cartridge out of its package.
7
Grasp the pink tab and gently peel off the plastic tape.
Make sure you remove only the clear tape. Do not touch or
remove the copper contacts.
Do NOT touch the ink nozzles or the copper
contacts. Touching these parts may cause print
cartridge failure.
8
Insert the print cartridge:
• Hold the print cartridge so the copper contacts go into
the printer first. Line up the ridges on the left and right
sides of the top of the print cartridge with the grooves
10
basics guide
on the inside of the print cartridge cradle. Carefully
slide the print cartridge into the cradle, then firmly push
the cartridge in until it stops.
56
58
57
• Lower the cradle latch. Place your finger on the top of
the latch. Place your thumb under the number on the
latch and hold it forward while pushing the latch down.
Release the latch to lock the print cartridge into place.
9
Close the side door. The printer prints a calibration page.
use the control panel
use the buttons
Your printer’s control panel has several buttons:
•
BRIGHTNESS — Use this button to adjust the brightness of
your photo. Press and hold the button to change the
brightness rapidly.
•
CANCEL — Use this button to deselect photos, to exit a
menu, or to stop printing, saving, or E-mailing.
•
COPIES — Use this button to select the number of copies
you want to print. Press and hold the button to change the
number of copies rapidly.
•
E-MAIL — Use this button to send a photo via E-mail.
•
LEFT, RIGHT, UP, DOWN — Use the LEFT or RIGHT arrow
to scroll through all the photos on a memory card. Use the
UP or DOWN arrow to scroll through menu options or
selected photos. Press and hold the arrows to change the
selection rapidly.
•
MENU — Use this button to access the menu options.
•
OK — Use this button to select the current photo, to
answer LCD questions, to select menu options, or to crop
an enlarged photo.
get started: use the control panel
11
use the
indicator lights
12
•
POWER — Use this button to turn the printer on or off.
•
PRINT — Use this button to print photos from a memory
card.
•
ROTATE — Use this button to rotate the selected photo or
crop box in 90º increments.
•
SAVE — Use this button to save photos from a memory
card to your computer.
•
SIZE — Use this button to adjust the print size of a photo.
Press and hold the button to change the size rapidly.
•
ZOOM — Use this button to change the magnification of
the currently selected photo or to crop the photo.
Your printer’s control panel has two indicator lights:
•
Print light — When this light is on, the power is on. When
this light is blinking green, the printer is busy. When this
light is blinking amber, the printer requires attention.
•
Memory card light — When this light is off, there is no
memory card inserted in a memory card slot. When this
light is green, a memory card is inserted correctly. When
this light is blinking green, information is being transmitted
between the memory card and the printer or computer.
basics guide
menu map
Menu
Add frame
Select from six frame
patterns
Add color effect
Black & white
Sepia
Antique
No effect (default)
Slide show
The printer shows a
slide show of the photos
on the memory card
Create album
Select from three
album page layouts,
then select photos
to fill pages
Print index page
The printer prints
thumbnail versions of
all the photos on the
memory card
Print all
The printer prints all
the photos on the
memory card
Print range
Select a range of
photos to print from
the memory card
Add date/time
On
Off (default)
get started: use the control panel
Print test page
The printer prints a
test page
Print a
diagnostic page
The printer prints a
diagnostic page
Clean cartridges
The printer cleans the
print cartridges
Preferences
*See below
13
Preferences
After printing
Always
Never
Ask (default)
# of copies
Select number from
1 to 99
Photo size
4 x 6 (default)
Combo
3 1/2 x 5
3x4
2 1/2 x 3 1/4
8 x 10
5x7
Borderless
On (default)
Off
Improve colors
On
Off (default)
Extend colors
On
Off (default)
Paper detect
On (default)
Off
Camera
selections
Always
Never
Ask (default)
Restore defaults
Yes
No
Language
14
English
Espaæol
Fran ais
Deutsch
Italiano
Portuguese
Dutch
U.S./Canada
United Kingdom
Europe
Japan
Asia/Pacific
Australia
basics guide
use your printer
with a camera
2
2
Your HP Photosmart 7550 printer lets you print beautiful photos
from your HP direct-printing digital camera without using your
computer.
print camera-selected photos
If you have an HP direct-printing digital camera, you can use
your printer to print camera-selected photos.
select and print
photos
1
Use your camera’s Share menu to select the photos you
want to print.
2
Connect the camera to the camera port on the front of your
printer using the USB cable that came with your camera.
3
When you connect the camera to the printer, the camera’s
Print Setup menu appears. Use this menu to:
• Change the photos you have selected for printing
• Select the paper type
• Select the paper size
use your printer with a camera
15
4
When you are ready to print, follow the instructions on
your camera’s LCD.
To learn more about using camera-selected
photos, see the documentation that came with
your camera.
print from a memory card
If your digital camera uses a memory card to store photos, you
can insert a memory card into the printer to print your photos
without using a computer. The printer LCD guides you through
the process.
Your printer supports seven different memory cards. These
cards are manufactured by several vendors and are available
in a variety of storage capacities. You can purchase memory
cards where you purchased your digital camera or at most
computer supply stores.
supported
memory cards
The printer can read CompactFlash™ Association (CFA)
certified Type I or II, IBM Microdrive™ (up to 528 MB),
SmartMedia™, MultiMediaCard™, Secure Digital™, and
Memory Stick™ memory cards.
Caution! Using any other type of memory card may
damage the memory card and the printer.
16
CompactFlash
Type I or II
IBM Microdrive
(up to 528 MB)
SmartMedia
MultiMediaCard
Secure Digital
Memory Stick
basics guide
If your digital camera supports multiple file types, it may be
able to save photos in several different file formats, such as
JPEG, uncompressed TIFF, FlashPix, and RAW. You can print
JPEG and uncompressed TIFF files directly from the memory
card. To print other file types, save the photos to your computer
and print them using a software application.
insert a memory
card
After you have taken pictures with your digital camera, you can
insert a memory card into your printer to print photos
immediately or use the printer to save the photos to your
computer.
The printer can only access one memory card slot
at a time.
When you insert the memory card correctly, the memory card
light illuminates. The LCD briefly shows the number of photos on
the memory card, then displays the first photo.
Caution! Do not pull out the memory card while the
memory card light is blinking. Removing a memory card
while it is being accessed may damage the printer or the
memory card, or corrupt the information on the memory
card.
insert a CompactFlash or IBM Microdrive memory card
Insert the memory card into the upper left memory card slot so
the front of the memory card faces up. Insert the edge with pin
holes into the printer first.
Caution! Inserting the card any other way may damage
the memory card or the printer.
Gently push the memory card into the printer until it stops. The
card may not insert all the way into the printer. Forcing the card
in too far may result in damage to the memory card and the
printer.
use your printer with a camera: print from a memory card
17
CompactFlash or
IBM Microdrive
memory card
insert a MultiMediaCard or Secure Digital memory card
Insert the memory card into the lower left memory card slot so
the front of the memory card faces up and the side with the
metal contacts faces down. Insert the end with the metal
contacts into the printer first.
Caution! Inserting the card any other way may damage
the memory card or the printer.
Ca
64MB
rd
Gently push the memory card into the printer until it stops. The
card may not insert all the way into the printer. Forcing the card
in too far may result in damage to the memory card and the
printer.
MultiMediaCard
or SecureDigital
memory card
insert a SmartMedia memory card
Insert the memory card into the upper right memory card slot so
the front of the memory card (the black side) faces up and the
side with the metal contacts faces down. Insert the end with the
metal contacts into the printer first.
Caution! Inserting the card any other way may damage
the memory card or the printer.
18
basics guide
Gently push the memory card into the printer until it stops. The
card may not insert all the way into the printer. Forcing the card
in too far may result in damage to the memory card and the
printer.
SmartMedia
memory card
insert a Memory Stick memory card
Insert the memory card into the lower right memory card slot so
the side with the metal contacts faces down. Insert the end with
the metal contacts into the printer first.
Caution! Inserting the card any other way may damage
the memory card or the printer.
Gently push the memory card into the printer until it stops. The
card may not insert all the way into the printer. Forcing the card
in too far may result in damage to the memory card and the
printer.
Memory Stick
memory card
decide which
photos to print
You can decide which photos to print by viewing the photos on
the printer’s LCD or by printing an index page.
use your printer with a camera: print from a memory card
19
view photos on the LCD
1
Insert a memory card into the printer’s memory card slot.
2
Wait for the first photo stored on the memory card to
appear on the LCD, then press the LEFT or RIGHT arrow to
view the photos. Each time you press an arrow, a new
photo appears on the LCD.
print a photo index page
1
Insert a memory card into the printer’s memory card slot.
2
Wait for the first photo stored on the memory card to
appear on the LCD, then press the MENU button on the
printer’s control panel.
3
Press the DOWN arrow until Print index page appears
highlighted on the LCD, then press the OK button.
For information on printing and saving photos from a memory
card, see HP Photosmart Printer Help.
print photos
from the control
panel
Printing photos from a memory card is as easy as inserting the
memory card into the printer’s memory card slot, selecting the
photos you want to print, and pressing the PRINT button.
1
Insert a memory card into the printer’s memory card slot.
2
Wait for the first photo stored on the memory card to
appear on the LCD, then press the LEFT or RIGHT arrow
until the photo you want to print appears on the LCD.
3
Press the COPIES, BRIGHTNESS, or SIZE buttons to adjust
the print settings.
To print more than one photo at a time, press the
OK button to select each photo.
4
Press the PRINT button.
For more information on printing individual or multiple photos,
printing a continuous range of photos, or printing photos in a
variety of sizes, see the HP Photosmart Printer Help.
20
basics guide
use your printer
with a computer
3
3
You can use your HP Photosmart 7550 printer with any
Windows PC or Macintosh software application that allows
printing. You can print all kinds of projects, such as photo
album pages, greeting cards, or newsletters.
If you already know how to use a printer with your computer,
you can begin printing as usual. If you are new to printing, or
if you have questions, use this chapter to learn more.
When you print from your computer, the control panel settings
on the printer do not apply; the software on your computer
overrides the printer’s print settings.
print from a Windows PC
print from a
software
application
1
From your software application’s File menu, select Print.
2
In the Print dialog box, select the pages and the number of
copies you want to print.
use your printer with a computer
21
3
To access more advanced settings, click Properties. Set the
printer properties (such as print quality and paper type)
and click OK.
To learn more about the available settings, click
the ? in the upper right corner of the printer
Properties dialog box, then click the item you want
more information about. You can also click Help.
4
Click OK to begin printing.
See the HP Photosmart Printer Help for more information on:
use the
Windows PC
taskbar icons
22
•
Changing the default print settings
•
Zooming, rotating, and cropping photos
•
Adjusting photo color and brightness
•
Printing photo album and index pages
After you install the printer software, two icons appear in your
Windows taskbar:
•
The HP Photosmart printer icon
•
The HP Photosmart memory card icon
basics guide
These icons help you perform a variety of tasks.
Printer icon
Memory card icon
hp photosmart printer icon
Use the printer icon to access the printer Properties dialog box,
select a default printer, or access the HP Photosmart Toolbox.
•
When you click the printer icon, the printer Properties
dialog box appears.
•
When you right-click the printer icon, the following menu
appears. Make your selection from the menu.
Click to open the
printer Properties
dialog box
Click to open the HP
Photosmart Toolbox
Click to close the menu
and remove the printer
icon from the taskbar. To
close the menu without
removing the printer icon
from the taskbar, click
anywhere outside the
menu
Select the HP Photosmart
printer you want to use
from the list of installed
printers. A check mark
indicates the currently
selected printer
hp photosmart memory card icon
Use the memory card icon to determine the status of your
printer, access the photos stored on your memory card, and
display the connection dialog boxes.
use your printer with a computer: print from a Windows PC
23
The appearance of the icon tells you the status of the printer.
When the memory card icon is green, a
memory card is inserted in the printer and
the printer is ready to access the photos
stored on the memory card.
When the memory card icon is gray, a
memory card is not inserted in the printer.
When a red “x” appears on the memory
card icon, the connection between the
printer and the computer has been lost. To
print from the computer you must re-establish
communication. See Windows PC
connection problems on page 27 for
information about re-establishing
communication.
When you right-click the memory card icon, the following menu
appears. Make your selection from the menu.
Click one of the “Show...”
lines if you want
connection messages to
appear when the printer
loses communication or
attempts to regain
communication with your
computer. A check mark
indicates the message will
appear
24
Click to open
Windows Explorer
where you can move,
copy, delete, or open
photos. You can also
double-click the
memory card icon to
open Windows
Explorer
Click to remove the
memory card from
the printer
basics guide
See the HP Photosmart Printer Help for more information on:
•
Setting the printer properties
•
Using the HP Photosmart Toolbox
•
Using the HP Photo & Imaging Director
print from a Macintosh
print from a
software
application
(OS X or
OS 9.x)
The following steps are specific to OS X. For
OS 9.x, the steps may be slightly different. Be sure
you have selected your Photosmart printer in the
Print Center (OS X) or in the Chooser (OS 9.x)
before you begin printing. For more information,
see the HP Photosmart Software Setup & Product
Support booklet that came with your printer.
1
From your software application’s File menu, select Page
Setup.
2
In the Format for pull-down menu, select Photosmart 7550,
then select the page attributes (such as paper size,
orientation, and scaling) for your project. When you have
finished selecting the page attributes, click OK.
use your printer with a computer: print from a Macintosh
25
3
From your software application’s File menu, select Print.
4
Select the print settings appropriate for your project. Use
the pull-down menu to access the other panels.
5
Click Print (OS X) or OK (OS 9.x) to begin printing.
To learn more about the available settings, click
the ? in the lower left corner of the dialog box
(OS X only).
See the HP Photosmart Printer Help for more information on:
26
•
Changing the default print settings
•
Zooming, rotating, and cropping photos
•
Adjusting photo color and brightness
•
Printing photo album and index pages
basics guide
troubleshooting
4
4
Your HP Photosmart printer is designed to be reliable and easy
to use. This section offers tips and advice for addressing
frequently asked questions. Before you begin, make sure:
•
All the cable connections between your printer and
computer are secure.
•
You are using the most recent version of the software. Go
to www.hp.com to check for software updates. See the HP
Photosmart Software Setup & Product Support booklet that
came with your printer for contact information.
Windows PC connection problems
If you are using your HP Photosmart printer with a Windows
PC, the printer requires a continuous connection to the
computer. The computer uses this communication link to receive
feedback from the printer.
If the connection between your Windows PC and your HP
Photosmart printer is lost, a warning message appears on your
computer screen.
troubleshooting
27
Possible causes of a lost connection are:
•
The computer might not be connected to the printer, the
printer might be off, or the printer might not be connected
to a power source.
•
You might be using a USB hub or docking station that has
multiple devices connected to it. Accessing another device
can temporarily break the connection to the printer. Wait
until the other device is no longer being accessed, or
connect the printer directly to the computer.
Whenever a connection is broken, the Windows taskbar
displays this icon:
.
To reconnect, try the following:
•
Make sure the USB cable is securely attached to both the
computer and to the USB port on the back of the printer.
•
Make sure that the printer’s power cord is securely
attached, that the printer is connected to a power source,
and that it is turned on.
•
If the connection is still broken, right-click the broken
connection memory card icon and select Reconnect hp
photosmart series from the menu.
If an HP Photosmart dialog box appears, click Retry to try
to re-establish a connection.
Macintosh connection problems
If you are using your HP Photosmart printer with a Macintosh
computer, the printer requires a continuous connection to the
computer. The computer uses this communication link to receive
feedback from the printer.
If the connection between your Macintosh computer and your
HP Photosmart printer is lost, a warning message appears on
your computer screen.
28
basics guide
Possible causes of a lost connection are:
•
The computer might not be connected to the printer, the
printer might be off, or the printer might not be connected
to a power source.
•
You might be using a USB hub or docking station that has
multiple devices connected to it. Accessing another device
can temporarily break the connection to the printer. Wait
until the other device is no longer being accessed, or
connect the printer directly to the computer.
To reconnect, try the following:
•
Check all the cable connections
•
Make sure the USB cable is securely attached to both the
computer and to the USB port on the back of the printer
•
Make sure that the printer’s power cord is securely
attached
•
Make sure the printer is connected to a power source and
is turned on
print a diagnostic page
You can print a diagnostic page to check the print cartridges
and to make sure the paper is loaded correctly.
1
On the printer’s control panel press the MENU button.
2
Press the DOWN arrow to highlight
Print a diagnostic page, then press the
OK button.
A diagnostic page prints with
information regarding your printer and
print cartridge ink levels.
troubleshooting: print a diagnostic page
29
USB connection problems
Problem
Possible cause
Solution
My printer is
connected with a
USB cable through
another USB device
or a hub and when
I try to print I get an
error message.
Your printer may
not be getting good
data from the other
device or hub.
OR
Two-way
communication
between the printer
and the computer
was interrupted by
another device
attached to the hub.
Try the following:
• Connect the printer directly to the USB
port on the computer.
• Make sure the USB cable is securely
attached to both the computer and to
the USB port on the back of the printer.
• Try disconnecting other USB devices
from the hub and print your document
again.
The USB cable is
too long.
Make sure you are using a USB cable
length that is supported by your printer.
For more information, see specifications
on page 53.
30
basics guide
Problem
Possible cause
Solution
When I connect a
USB cable between
the printer and my
computer, I get an
error saying YOU
HAVE
CONNECTED
YOUR COMPUTER
TO THE PRINTER’S
FRONT USB PORT.
You have
connected your
computer to the
camera port on the
front of the printer.
This port should
only be used to
connect an HP
direct-printing
digital camera to
the printer.
Try connecting the USB cable to the USB
port on the back of the printer.
If you were installing the printer software
when you received the error message, try
the following:
Windows PC
1 Uninstall the printer software. Insert the
printer software CD into your computer,
click Remove HP Photosmart software,
then follow the instructions on your
computer screen.
2 When the uninstall is complete, restart
your computer.
3 Connect the USB cable to the USB port
on the back of the printer.
4 Reinstall the printer software. For
instructions, see the Software Setup &
Product Support booklet.
Macintosh
1 Uninstall the printer software. Insert the
printer software CD into your computer,
select Uninstall from the Installer, then
follow the instructions on your
computer screen.
2 When the uninstall is complete, restart
your computer.
3 Connect the USB cable to the USB port
on the back of the printer.
4 Reinstall the printer software. For
instructions, see the Software Setup &
Product Support booklet.
troubleshooting: USB connection problems
31
Problem
Possible cause
Solution
Windows PC only
I have connected
my printer using a
USB cable, and
when I try to print I
get a message
saying THERE WAS
AN ERROR
WRITING TO
DOT4.
There is a problem
with the USB
connection.
Try the following:
• Unplug the USB cable from the
computer, then plug it in again.
• Make sure the cable is securely
attached to both the computer and to
the USB port on the back of the printer.
• Restart your computer.
Windows PC only
When I connect a
USB cable between
the printer and my
computer, the New
Hardware Wizard
does not appear.
(continued on next
page)
You may not be
using Windows 98,
2000, ME, or XP.
Make sure your computer’s operating
system is Windows 98, 2000, ME, or XP
and that your computer is connected to
the USB port on the back of the printer
using a USB cable.
Your USB cable
may not be working
or may not be
connected
properly.
Try the following:
• Make sure the USB cable is securely
attached to both the computer and to
the USB port on the back of the printer.
• Disconnect, then reconnect the USB
cable from your printer.
• Unplug the power cord from the
printer, then plug it in again.
• If you are still having problems, try
using another USB cable.
The USB cable is
too long.
Make sure you are using a USB cable
length that is supported by your printer.
For more information, see specifications
on page 53.
32
basics guide
Problem
Possible cause
Solution
(continued from
previous page)
Windows PC only
When I connect a
USB cable between
the printer and my
computer, the New
Hardware Wizard
does not appear.
You may not have
USB enabled.
Unplug the power cord and the USB cable
from the printer, then plug them in again.
OR
Try the following:
1 In Windows 98, 2000, or ME, click
Start, Settings, Control Panel. In
Windows XP, click Start, Control Panel.
2 In Windows 98, 2000, or ME, doubleclick the System icon. In Windows XP,
click Performance and Maintenance,
then click the System icon.
3 In Windows 98, 2000, or ME, click the
Device Manager tab. In Windows XP,
click the Hardware tab, then click
Device Manager.
4 Click the (+) icon next to the Universal
Serial Bus Controller option. If you see
a USB host controller and a USB root
hub listed, USB is probably enabled. If
you do not see these devices listed,
refer to your computer’s documentation
or contact the computer manufacturer
for more information on enabling and
setting up USB.
troubleshooting: USB connection problems
33
Problem
Possible cause
Solution
Windows PC only
When I connected
a USB cable
between the printer
and my computer,
the New Hardware
Wizard appeared
once, but the printer
did not install
completely. Now
the New Hardware
Wizard will not
appear again.
Installation was not
completed, it was
cancelled, or there
was an error.
Try the following:
1 Disconnect the USB cable from your
computer.
2 Unplug the power cord from the
printer, then plug it in again.
3 Uninstall the printer software. Insert the
printer software CD into your computer,
click Remove HP Photosmart software,
then follow the instructions on your
computer screen.
4 When the uninstall is completed, restart
your computer.
5 Reconnect the USB cable to your
computer. Make sure the cable is
securely attached to the USB port on
the back of the printer.
6 Reinstall the printer software. For
instructions, see the Software Setup &
Product Support booklet.
Windows PC only
When I connect a
USB cable between
the printer and my
computer, an
UNKNOWN
DEVICE message
appears.
Static electricity has
built up in the cable
between your
computer and
printer.
OR
You may have a
defective USB
cable.
OR
Your USB cable
may not be
connected
properly.
OR
The software could
not identify the
printer; the printerUSB connection
may be defective.
Try the following:
1 Disconnect the USB cable from your
printer.
2 Disconnect the power cord from the
printer.
3 Wait approximately 10 seconds.
4 Plug the power cord back into the
printer.
5 Plug the USB cable back into the port
on the back of the printer.
6 If UNKNOWN DEVICE continues to
appear in the New Hardware Wizard,
check www.hp.com for updates or
contact HP Support and Services. For
contact information, see the Software
Setup & Product Support booklet that
came with your printer.
34
basics guide
Problem
Possible cause
Solution
Macintosh only
My printer is
connected with a
USB cable through
another USB device
or a hub and my
printer and
computer have lost
communication.
Your printer may
not be getting good
data from the other
device or hub.
OR
Two-way
communication
between the printer
and the computer
was interrupted by
another device
attached to the hub.
Try the following:
• Connect the printer directly to the USB
port on the computer.
• Make sure the USB cable is securely
attached to both the computer and to
the USB port on the back of the printer.
• Try disconnecting other USB devices
from the hub and print your document
again.
The USB cable is
too long.
Make sure you are using a USB cable
length that is supported by your printer.
For more information, see specifications
on page 53.
printer problems
Problem
Possible cause
Solution
Printing is very
slow.
(continued on next
page)
Your computer may
have less than the
recommended
system
requirements.
Check the amount of free RAM (memory)
and the processor speed of your
computer. For information on the system
requirements, see specifications on
page 53.
Too many software
programs may be
running at the same
time.
Close all unnecessary software programs.
troubleshooting: printer problems
35
Problem
Possible cause
Solution
(continued from
previous page)
Printing is very
slow.
(continued on next
page)
You may be using
outdated printer
software.
Check www.hp.com for the most recent
software updates. For contact
information, see the Software Setup &
Product Support booklet that came with
your printer.
Windows PC
Use HP’s Web Update software to check
the version of the printer driver you are
using.
Macintosh
Use the Print dialog box (OS 9.x) or the
Print Center (OS X) to check the version of
the printer driver you are using.
You may be
printing a complex
document
containing graphics
or photographs.
OR
You may be trying
to print a high
resolution photo.
Try the following:
• Free up some space on your hard disk.
Having less than 100MB of free space
on your computer’s hard disk can
mean longer processing time.
• Be patient. Large, complex documents
containing graphics or photographs
print slower than text documents.
A page may be
drying in the OUT
tray.
If this is the case, the LCD displays this
message: “Page is drying... To start next
page, remove wet page and press OK.”
You can either follow these directions or
simply wait. Printing continues once the
ink is dry.
36
basics guide
Problem
Possible cause
Solution
(continued from
previous page)
Printing is very
slow.
(continued on next
page)
You may have
chosen 4800x1200
Optimized dpi.
Windows PC
1 On the Quality tab of the printer
Properties dialog box, set the Print
Quality to Best and set the Paper Type
to Photo Paper. Under High Resolution
Control, select PhotoREt instead of
4800x1200 Optimized dpi.
2 Try printing again.
Macintosh
1 On the Paper Type/Quality panel,
deselect High Resolution Photo.
2 Try printing again.
You may be using a
USB hub and other
USB devices are in
use.
Try the following:
• Connect the USB cable directly from
the computer to the USB port on the
back of the printer; do not use a hub.
• Avoid using other devices attached to
a hub while printing.
The Paper Type
option may be set
to Automatic.
When the paper type is set to Automatic,
the printer scans the paper to determine
the appropriate paper type. This may take
a few extra seconds. To avoid this, select
a specific paper type before printing.
Windows PC
• Select the appropriate paper type on
the Quality tab of the printer Properties
dialog box.
Macintosh
• Select the appropriate paper type on
the Paper Type/Quality panel of the
Print dialog box.
You may be
printing in Reserve
Mode. The printer
enters Reserve
Mode when one of
the print cartridges
is missing.
Replace the missing print cartridge with a
new one.
troubleshooting: printer problems
37
Problem
Possible cause
Solution
(continued from
previous page)
Printing is very
slow.
You may have
selected the
Improve colors or
Extend colors
settings from the
printer’s control
panel.
Turn these settings off to speed up the
printing process. For more information,
see the set defaults on your printer section
of Printer Help.
The printer will not
turn on.
The printer may
have drawn too
much power.
Unplug the printer’s power cord and wait
approximately 10 seconds. Reconnect the
power cord and press the POWER button
to turn the printer on.
The printer is
plugged into a
power strip and the
power strip is
turned off.
Turn the power strip on.
The Print light is
blinking green but
the printer is not
printing.
The printer may be
processing
information.
Be patient. The printer needs some time to
finish processing the information.
The Print light is
blinking amber.
The printer needs
attention.
Try the following:
1 Check the printer’s LCD and the
computer monitor for instructions.
2 If this does not work, and you have a
digital camera connected to the printer,
check the camera’s LCD for
instructions.
3 If this does not work, turn the printer
off. Unplug the printer’s power cord,
wait one minute, then plug it in again.
Turn the printer on.
38
basics guide
Problem
Possible cause
Solution
The Print light is
blinking red.
An unrecoverable
error has occurred.
Try the following:
1 Turn the printer off. Unplug the printer’s
power cord, wait one minute, then plug
it in again. Turn the printer on.
2 If this does not work, check
www.hp.com or contact HP Support
and Services. For contact information,
see the Software Setup & Product
Support booklet that came with your
printer.
Windows PC only
The broken
connection memory
card icon appears
in the taskbar.
There is a
connection or
communication
problem between
the printer and the
computer.
Click the memory card icon, then click
Connect in the dialog box. If there is still a
connection problem, try the following:
• Check that the USB cable is securely
attached to both the computer and the
USB port on the back of the printer.
• Unplug the USB cable from the
computer, then plug it in again.
• Unplug the power cord from the
printer, then plug it in again.
The printer cannot
recognize the file
on the memory
card.
Your memory card
contains file types
the printer cannot
read.
Set your camera to save the photos in file
types the printer supports. For a list of
supported file types, see the specifications
section of the Printer Help. For instructions
on setting your camera to save specific
file types, see the documentation that
came with your camera.
printing problems
Problem
Possible cause
Solution
Photo paper does
not feed into the
printer correctly.
(continued on next
page)
The photo tray is
not engaged.
Engage the photo tray by moving the
photo tray slider away from you until it
stops against the edge of the paper.
troubleshooting: printing problems
39
Problem
Possible cause
Solution
(continued from
previous page)
Photo paper does
not feed into the
printer correctly.
You are in an
extremely high or
low humidity
environment.
Try the following:
• Insert the photo paper as far as it will
go into the photo tray.
• Load one sheet of photo paper at a
time.
Paper does not feed
into the printer
correctly.
OR
Paper does not
come out of the
printer correctly.
There may be too
much paper loaded
in the IN tray.
Remove some paper from the IN tray and
try printing again.
The paper guides
may not be
adjusted correctly.
Make sure that the paper width guide and
the paper length guide fit close to the
edges of the paper without bending the
paper.
The paper may be
For a list of supported paper weights, see
too thin or too thick. the specifications section of the Printer
Help.
No page came out
of the printer.
(continued on next
page)
40
The paper may be
wrinkled or bent.
Try using different paper.
The printer needs
attention.
Read the LCD for instructions.
Power may be off
or there may be a
loose connection.
Try the following:
• Make sure the power is on.
• Make sure the power cord is securely
connected.
You may not have
any paper in the IN
tray.
Check that paper is loaded correctly in
the IN tray. For paper-loading
instructions, see load paper in the IN tray
on page 6.
The printer’s side
door may be open.
Close the printer’s side door.
basics guide
Problem
Possible cause
Solution
(continued from
previous page)
No page came out
of the printer.
(continued on next
page)
There may be a
paper jam.
Try the following:
• Check the LCD for instructions.
• Remove the paper from the IN tray and
the OUT tray.
• If you were printing labels, make sure a
label did not become unglued from the
label sheet while going through the
printer.
If the paper is still jammed, try the
following:
1 Turn the printer off.
2 Unplug the printer. Open the rear
access door by turning the knob
counter-clockwise. Remove the door.
3 Gently remove the jammed paper from
the printer, then replace the rear access
door.
4 Plug the printer back in and turn it on.
5 When you have cleared the paper
jam, print your document again.
If you experience paper jams when
printing on 4 x 6 inch (10 x 15 cm)
photo paper, try the following:
• Insert the photo paper as far as it will
go into the photo tray.
• Load one sheet of photo paper at a
time.
The print cartridge
cradle may be
stuck.
Try the following:
• Check the LCD for error messages.
• Remove any paper from the print
cartridge cradle’s path, then press the
OK button.
A problem may
exist with one of the
print cartridges.
Try the following:
• Check the LCD for error messages.
• Print a diagnostic page and replace
the print cartridges if necessary.
troubleshooting: printing problems
41
Problem
Possible cause
Solution
(continued from
previous page)
No page came out
of the printer.
The printer may still
be processing
information.
For more information, see printer
problems on page 35.
Macintosh OS 9.x
only
No page came out
of the printer.
Not enough
memory is
allocated in the
system’s
PrintMonitor
application.
Allocate more memory to the application
in the Get Info dialog box.
A blank page came
out of the printer.
The print cartridge
may be out of ink.
Print a diagnostic page and replace the
print cartridges if necessary.
You may have
previously started a
print job and then
cancelled it.
If you cancel a print job before the file
starts printing, the printer may have
already loaded paper in preparation for
printing. When you start the next print
job, the printer ejects the blank page
before continuing with the current job.
You may be trying
to print a fax.
Try the following:
1 Save the fax in a graphic format, such
as TIFF.
2 Place it in a word processing document
and print it from there.
You are printing in
Reserve Mode with
only the black print
cartridge installed
and with borderless
printing turned on.
The printer cannot
print borderless
4 x 6 inch
(10 x 15 cm)
photos in
grayscale.
Replace the missing print cartridges with
new ones.
OR
Turn borderless printing off.
For more information on printing in
Reserve Mode, see use reserve mode on
page 9.
42
basics guide
Problem
Possible cause
Solution
The document or
photo did not print
using the selected
print settings.
The printer’s default
print settings may
be different than the
application’s print
settings. An
application’s print
settings override the
printer’s default
settings.
Windows PC
• From the application’s File menu, select
Print, then click Properties to set the
desired print settings.
Macintosh
• From the application’s File menu, select
Print and set the desired print settings.
You may have set
the print settings
differently for an
individual photo;
these settings
override the
printer’s default
settings.
1 Deselect the photo if it is not already
deselected.
2 Set the printer’s default settings to your
liking, then print the photo again. The
photo should print using the defaults.
The paper type is
set as Automatic,
but when preparing
to print, the printer
ejects the paper.
The printer may be
placed in direct
sunlight, which
overwhelms the
automatic paper
sensor.
Move the printer out of direct sunlight.
Parts of the
document are
missing or are in
the wrong place.
(continued on next
page)
You may have
selected the
incorrect paper
orientation.
Windows PC
• Make sure you have selected the
correct orientation (portrait or
landscape) on the Layout tab of the
printer Properties dialog box and in the
application’s Page Setup dialog box.
Macintosh
• Make sure you have selected the
correct orientation (portrait or
landscape) in the Page Setup dialog
box.
troubleshooting: printing problems
43
Problem
Possible cause
Solution
(continued from
previous page)
Parts of the
document are
missing or are in
the wrong place.
You may have
selected an
incorrect paper
size.
Windows PC
• Make sure you have selected the
correct paper size on the Layout tab of
the printer Properties dialog box and in
the application’s Page Setup dialog
box.
Macintosh
• Make sure you have selected the
correct paper size in the Page Setup
dialog box.
You may have
selected incorrect
margins in your
application.
Make sure the margins are within the
printable areas. For more information,
see the specifications section of the Printer
Help.
You may have
accidentally left
Poster Printing
(Windows PC) or
Tiling (Macintosh)
on.
Windows PC
• Deselect Poster Printing on the
Features tab of the printer Properties
dialog box.
Macintosh
• On the Layout panel in the Print dialog
box, set the Pages Per Sheet to 1.
You may have
incorrectly scaled
text or graphics, or
there may be file
format problems
within the
document.
Make sure the text and graphics are
scaled correctly and that the file formats
are compatible within your document.
Paper may not be
loaded correctly.
Try the following:
• Make sure the paper is correctly
oriented in the IN tray.
• Make sure the paper width guide and
the paper length guide fit close to the
edges of the paper.
For paper-loading instructions, see load
paper in the IN tray on page 6.
The document
printed at an angle
or is off-center.
(continued on next
page)
44
basics guide
Problem
Possible cause
Solution
(continued from
previous page)
The document
printed at an angle
or is off-center.
The print cartridges
may not be
properly
calibrated.
Windows PC
• Go to the Device Services tab of the HP
Photosmart Toolbox and click
Calibrate the Printer.
Macintosh
• Go to the Calibrate panel in the HP
Inkjet Utility and click Align.
Print quality is poor.
(continued on next
page)
You may be
printing in Reserve
Mode. The printer
enters Reserve
Mode when one or
two of the print
cartridges is
missing.
Replace the missing print cartridge(s) with
a new one.
You are printing in
Reserve Mode with
only the black print
cartridge installed
and borderless
printing turned on.
Replace the missing print cartridges, or
turn off borderless printing. For more
information on printing in Reserve Mode,
see use reserve mode on page 9.
You may have
enlarged the photo
too much.
Press the ZOOM button one or more times
to reduce the magnification.
The print cartridge
may be running out
of ink.
Print a diagnostic page.
OR
Windows PC
• Check the ink levels of the print
cartridges from the Estimated Ink Level
tab of the HP Photosmart Toolbox.
Macintosh
• Check the ink level status in the HP
Inkjet Utility.
If the print cartridge is running out of ink,
replace the print cartridge.
troubleshooting: printing problems
45
Problem
Possible cause
Solution
(continued from
previous page)
Print quality is poor.
(continued on next
page)
You may not be
using the best
paper type for your
output.
Try the following:
• Make sure you are using a paper type
intended for the printer. Use HPdesigned inkjet paper for best results.
For more information on paper types,
see specifications on page 53.
• Choose paper that is specifically
designed for the output (photographs,
transparencies, etc.) rather than plain
paper.
You may be
printing on the
wrong side of the
paper.
Make sure the paper is loaded with the
side to be printed facing down.
You may not have
selected the correct
paper type in the
printer software.
Windows PC
• Make sure you have selected the
correct paper type on the Quality tab
of the printer Properties dialog box.
Macintosh
• Make sure you have selected the
correct paper type on the Paper Type/
Quality panel in the Print dialog box.
You may need to
clean the print
cartridges.
On the printer’s control panel, press the
MENU button, press the DOWN arrow to
select Clean Print Cartridges, then press
the OK button.
OR
Windows PC
• From the Device Services tab of the HP
Photosmart Toolbox, click Clean the
Print Cartridges.
Macintosh
• From the Clean panel in the HP Inkjet
Utility, click Clean.
46
basics guide
Problem
Possible cause
Solution
(continued from
previous page)
Print quality is poor.
(continued on next
page)
If black prints still
show white streaks
after cleaning the
print cartridges,
and you have
determined that the
print cartridges are
not low on ink, you
may have dropped
one of the print
cartridges.
Windows PC
1 Click Best, instead of Everyday or
FastDraft, on the Quality tab of the
printer Properties dialog box.
2 Print using the higher quality for one
day.
3 After one day, switch back to the
desired print quality.
Macintosh
1 Click Best, instead of Everyday or
FastDraft, on the Paper Type/Quality
panel in the Print dialog box.
2 Print using the higher quality for one
day.
3 After one day, switch back to the
desired print quality.
Your print
cartridges may be
out of alignment.
Windows PC
• If the color and black ink are not lining
up on the printed page, go to the
Device Services tab of the HP
Photosmart Toolbox and click
Calibrate the Printer.
Macintosh
• If the color and black ink are not lining
up on the printed page, go to the
Calibrate panel in the HP Inkjet Utility
and click Align.
If the printing
appears faded or
dull, you may be
using Everyday or
FastDraft mode.
Windows PC
• Click Normal or Best, instead of
Everyday or FastDraft, on the Quality
tab of the printer Properties dialog box.
Macintosh
• Click Normal or Best, instead of
Everyday or FastDraft, on the Paper
Type/Quality panel in the Print dialog
box.
troubleshooting: printing problems
47
Problem
Possible cause
Solution
(continued from
previous page)
Print quality is poor.
If the printing
appears faded or
dull, you may be
printing in Reserve
Mode. The printer
enters Reserve
Mode when one of
the print cartridges
is missing.
• Check that all the print cartridges are
correctly installed and are not running
out of ink.
• If you are printing in Reserve Mode,
replace the missing print cartridge with
a new one.
You may not have
selected Best print
quality.
Windows PC
• Click Best on the Quality tab of the
printer Properties dialog box.
Macintosh
• Click Best on the Paper Type/Quality
panel in the Print dialog box.
If the print is
smeared, the
selected print
quality may be
using too much ink
for the paper type.
Windows PC
• Click Everyday or FastDraft, instead of
Best or Normal, on the Quality tab of
the printer Properties dialog box.
OR
• Reduce the amount of ink by clicking
Advanced Features from the Features
tab of the printer Properties dialog box
and using the Ink Volume slider.
Macintosh
• Click Everyday or FastDraft, instead of
Best or Normal, on the Paper Type/
Quality panel in the Print dialog box.
OR
• Reduce the amount of ink. On the
Paper Type/Quality panel in the Print
dialog box, select the Ink tab in the
Print dialog box. Use the sliders to
adjust the ink density.
You may not have
loaded the photo
paper correctly.
Load the photo paper with the side to be
printed facing down. If you are using
tabbed paper, load the paper so the tab
feeds in last.
Photos are not
printing correctly.
(continued on next
page)
48
basics guide
Problem
Possible cause
Solution
(continued from
previous page)
Photos are not
printing correctly.
The photo paper
may not have fed
into the printer
correctly.
Check for a paper jam, then try the
following:
• Insert the photo paper as far as it will
go into the photo tray.
• Load one sheet of photo paper at a
time.
You may not have
selected the
appropriate paper
type or paper size.
Windows PC
1 Select the appropriate HP photo paper
as the paper type on the Quality tab of
the printer Properties dialog box.
2 Select the size of the photo paper as
the Paper Size.
Macintosh
1 In the Page Setup dialog box, select the
size of the photo.
2 On the Paper Type/Quality panel of
the Print dialog box, select Photo Paper
as the paper type, then select the
specific photo paper.
3 Click OK to print your document.
You may have used
your application’s
Page Setup dialog
box to select the
paper size or type.
Windows PC
• From the application’s File menu, select
Print, then click Properties to set the
correct paper size and type.
Macintosh
• From the application’s File menu, select
Page Setup to set the paper size.
• From the application’s File menu, select
Print to set the correct paper type.
One or more of
your print
cartridges may be
low on ink.
Check that all the print cartridges are
correctly installed and are not running out
of ink.
troubleshooting: printing problems
49
Problem
Possible cause
Solution
The photos I
selected for printing
using the numbers
on the camera LCD
did not print.
Different photos
printed instead.
Your camera may
assign numbers to
your photos that do
not match the
numbers that the
printer assigns to
them.
Print a photo index page. Use the number
shown on the photo index page to select
the photos to print. For more information,
see print a photo index page on page 20.
The photos I
marked for printing
in my camera do
not print.
Some digital
cameras, such as
the HP 318 and HP
612, let you mark
photos for printing
on both the
camera’s internal
memory and on the
memory card. If you
move photos from
the camera’s
internal memory to
the memory card,
the marks do not
transfer.
Mark photos for printing after you transfer
them from your camera’s internal memory
to the memory card.
The print quality is
different if the
paper type is set to
Automatic rather
than the specific
paper type.
When the paper
type is set to
Automatic, the print
quality
automatically
changes to Normal.
When the paper
type is set to a
specific paper type,
the default print
quality may be
different.
Windows PC
• Select the appropriate paper type on
the Quality tab of the printer Properties
dialog box, then choose the desired
print quality.
Macintosh
• Select the appropriate paper type on
the Paper Type/Quality panel of the
Print dialog box, then choose the
desired print quality.
50
basics guide
Problem
Possible cause
Solution
The paper type is
set to Automatic,
but the printer does
not use the best
print mode for the
paper.
The paper may be
marked, scratched,
or wrinkled.
OR
The paper may be
dark in color or
contain metallic
fibers.
If the paper is damaged, dark in color, or
contains metallic fibers, the sensor may
not detect paper type and size accurately.
Make sure the paper is clean and free of
scratches or wrinkles, is light-colored, and
does not contain metallic fibers.
Windows PC
• Select the appropriate paper type on
the Quality tab of the printer Properties
dialog box.
Macintosh
• Select the appropriate paper type on
the Paper Type/Quality panel of the
Print dialog box.
The paper may be
letterhead or
stationery with a
preprinted pattern
at the top edge.
Set the paper type manually instead of
selecting Automatic.
See the HP Photosmart Printer Help for more information on:
•
Printing a diagnostic page
•
Software problems
•
USB connection problems
•
Printer problems
•
Printing problems
•
Error messages
troubleshooting: printing problems
51
52
basics guide
5
5
specifications
system requirements
Component
Windows PC minimum
Macintosh minimum
Operating system
Windows 98, 2000
Professional, ME, XP Home,
and XP Professional
Macintosh® OS 9.x, OS X
10.1 or later
Processor
Pentium® ll (or equivalent) or
higher
G3 or greater
RAM
64 MB (128 MB
recommended)
OS 9.x: 64 MB (128 MB
recommended)
OS X: 128 MB
Free disk space
500 MB
300 MB
Video display
800 x 600, 16-bit or higher
800 x 600, 16-bit or higher
CD-ROM drive
4x
4x
Connectivity
USB port and USB cable
USB port and USB cable
Browser
Microsoft® Internet Explorer
5.5 or higher
specifications
53
specifications
See the HP Photosmart Printer Help for additional specifications.
Paper Tray Input
Capacity
100 sheets of letter
24 sheets of 4 x 6 inch (10 x 15 cm) photo
15 envelopes
40 index cards
20 sheets of banner paper
20 sheets of labels
25 transparencies
40 Hagaki cards
Output Capacity
50 sheets of 20 lb. paper, sizes A and A4
20 sheets of 4 x 6 inch (10 x 15 cm) photo
paper
10 envelopes
10 cards
Media Types
Paper (plain, inkjet, photo, and banner)
Envelopes
Transparencies
Labels
Cards (index, greeting, Hagaki)
Iron-on transfers
Memory Card
CompactFlash I, II (includes IBM Microdrive up
to 528 MB)
Memory Stick
MultiMediaCard
Secure Digital
SmartMedia
Dimensions
20.21 x 6.45 x 15.2 inches
(513.4 x 163.9 x 386 mm)
Weight
14.3 lb (6.5 kg)
USB Support
USB 2.0 Full speed (Windows 98, 2000
Professional, ME, XP Home and Professional,
and Mac OS 9.x and OS X 10.1. USB cable
must be no longer than 3 meters
54
basics guide
index
A
I
arrows 4, 11
IBM Microdrive memory card slot 5
B
icons 23
Brightness button 4, 11
buttons, control panel 4, 11
C
camera port 3
camera-selected photos, print 15
Cancel button 4, 11
CompactFlash memory card slot 5
computer. See Windows PC or Macintosh
icons, Windows taskbar 23
IN tray 3, 6
index page 20
indicator lights 5, 12, 17
ink level 29
install print cartridges 9
L
lights, indicator 5, 12, 17
Copies button 4, 11
load
paper in IN tray 6
paper in photo tray 7
D
M
diagnostic page 29
Macintosh
connection problems 28
print from 25
system requirements 53
control panel 4, 11
digital cameras
print from memory cards 16
print photos 15
HP Photosmart 7550 Basics Guide 1
memory cards
card slots 5
icon 23
indicator light 5, 17
inserting 17
print from 16
supported 16
HP Photosmart 7550 Setup Guide 1
MemoryStick memory card slot 5
HP Photosmart 7550 Software Setup & Product
Support booklet 1
Menu button 4, 11
documentation 1
E
E-mail button 4, 11
H
MultiMediaCard memory card slot 5
HP Photosmart Printer Help 1
index
55
O
OK button 4, 11
OUT tray 3
P
Page Setup dialog box (Macintosh) 25
paper
guides 3
load in IN tray 6
load photo paper in photo tray 7
overview 6
photo tray
load photo paper 7
slider 3
photos
index page 20
print camera-selected photos 15
print from memory cards 16
print from the control panel 20
view 20
printer Properties dialog box (Windows
PC) 21
printing problems 39–51
R
rear access door 2
replace print cartridges 9
Reserve Mode 9, 45
Rotate button 4, 12
S
Save button 4, 12
SecureDigital memory card slot 5
side door 3
Size button 4, 12
SmartMedia memory card slot 5
system requirements 53
T
Power button 4, 12
taskbar icons 22, 23
power cord connection 2
troubleshooting
Macintosh connection problems 28
print a diagnostic page 29
printer problems 35–39
printing problems 39–51
USB connection problems 30–35
Windows connection problems 27
print
button 4, 12
dialog box (Macintosh) 25
dialog box (Windows PC) 21
from Macintosh software applications 25
from memory cards 16
from the control panel 20
from Windows PC software applications 21
light 5
photo index page 20
print cartridges
ink level 29
install and replace 9
Reserve Mode 9
printer
control panel 11
diagrams of 2–5
documentation 1
icon 23
problems 35–39
use with computer. See Windows PC or
Macintosh
56
U
USB port 2, 30–35
W
Windows PC
connection problems 27
print from 21
system requirements 53
taskbar icons 22
Z
Zoom button 4
basics guide
Printed on recycled paper
Printed in U.S., 6/02
ENERGY STAR® is a U.S. registered mark.
As an ENERGY STAR® partner,
Hewlett-Packard Company has determined that this
product meets the ENERGY STAR® guidelines for
energy efficiency.
www.hp.com
©2002 Hewlett-Packard Company
Q1605-90188