1
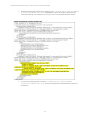
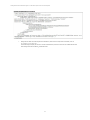
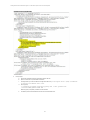
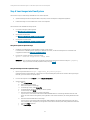
HP CloudSystem Foundation and Enterprise Software Creating Microsoft Windows Virtual Machine Images for Use with ESXi Compute Clusters in HP CloudSystem This paper describes the process for creating Windows VMDK images to use with ESXi cluster compute nodes in a CloudSystem environment. Images are the basis for virtual machine (VM) instances in HP CloudSystem. You can create and import images from underlying hypervisor platforms into CloudSystem. An overview of image concepts CloudSystem is based on HP Cloud OS and OpenStack technology HP CloudSystem Foundation is based on HP Cloud OS, which is based on open source OpenStack cloud technology. Images are uploaded into the CloudSystem image repository, and then users can launch VM instances based on those images. The OpenStack service that manages images is called ‘Glance’. Images are disk files with pre-installed, bootable Windows or Linux operating systems. Images may also have pre-installed applications. Supported image formats and guest operating systems in CloudSystem CloudSystem supports the guest operating systems that are supported by the underlying hypervisor platform. Consult VMware and Red Hat documentation for a list of supported guest operating systems. The following image formats are supported: • For ESXi, images must be in VMDK format. • For KVM, images must be in qcow2 format. CloudSystem Foundation and CloudSystem Enterprise The CloudSystem solution is offered in two packages. Foundation is an Openstack-centric IaaS solution, where images are loaded and used to launch individual VM instances within the OpenStack paradigm. Enterprise is centered on HP Cloud Service Automation (CSA), offering advanced orchestration, complex service design, and a Market place Portal user experience. When provisioning VMs defined in an Enterprise service offering against the CloudSystem Foundation provider, you can use images that were previously uploaded into Foundation. What makes an image “cloud ready”? When creating images to use with virtual machines (VMs) in CloudSystem, keep the following details in mind: • Disk partitions must be able to be resized during launch. OpenStack allows users to select multiple ‘flavors’, which define different sizes of compute resources and boot disks. • The operating system (OS) in the image must support new MAC addresses. Each time an image is launched as a VM, it is assigned new MAC addresses for virtual NICs. • A user login mechanism must be part of the image’s software and configuration. Typically, Remote Desktop Protocol (RDP) is used for Windows and Secure Shell (SSH) is used for Linux. • The root/Administrator account can be disabled and logins can be prohibited. This makes it easier to support the VM instances from central IT. 1 Creating Windows Virtual Machine images for use with ESXi compute clusters in HP CloudSystem • Firewalls are often disabled. OpenStack security groups provide a method for creating and applying firewalls as each VM is instantiated by the end user. If default or minimum firewalls are already set in the image, network troubleshooting can be difficult. • Use a secure user login authentication mechanism that provides each end user with a unique password or key. Configuring passwords into a common image is not a recommended solution. Instead, for Windows, end users should set a password for an account in the launch dialog. For Linux, end users should choose a key pair for the VM instance when the image is created. • OpenStack supports the ‘cloud-init’ mechanism for passing data and scripts to a newly created VM instance. A common practice is to perform final customization of the image when it first boots as a VM instance, using specific information provided in the ‘create’ or ‘launch’ request. • Make sure to log information to the console. When troubleshooting image issues during startup or issues related to networking, it is extremely helpful to have the image log information to its console. You can access the console through the CloudSystem Portal or through the virtualization layer using vSphere client, KVM command line virsh commands, or Virtual Network Computing (VNC). • Confirm the supported guest OS against the underlying hypervisor. VMware guest OS support is fairly broad; Red Hat less so. To ensure a vendor supported configuration, make sure to conform to the vendor’s guest OS support list. • Make use of hypervisor tools and optimizations. CloudSystem provides a complete management environment for images and provisioned VM instances. In addition, the virtualization layers (ESXi or KVM) have a critical role in troubleshooting, development and performance optimization. • Whenever possible, image size should be minimized. Image size impacts actions such as moving, using, and storing images. • You must account for any OS and software licensing for images instantiated as VMs. When a site license is available, it can be configured in the image. Another approach is to connect images to license management frameworks during configuration or after the VM instance is created. Cloud-init tool for cloud images Many of the issues described in the previous list have been solved for Linux and Windows images by the open source project cloud-init. You can find information on cloud-init at https://cloudinit.readthedocs.org/en/latest/. Originally developed for Amazon Web Service (AWS) and Amazon Elastic Compute Cloud (Amazon EC2) images, cloud-init is fully functional in an OpenStack environment.. Where do images come from? Images used in CloudSystem provisioning come from three major sources: 1. 2. 3. Images created in the hypervisor platform and then imported for use into CloudSystem. Images downloaded from a public source and then imported for use into CloudSystem. Snapshots of running VM instances in CloudSystem that are saved as images, and then used to provision new VM instances. Option 1: Creating images from scratch This approach is covered in detail in later sections of this paper. It gives you complete control over the contents, behavior and features of the images used by your users. 2 Creating Windows Virtual Machine images for use with ESXi compute clusters in HP CloudSystem Option 2: Downloading images from a public source Pre-created images for use in OpenStack based clouds are available from various sources. The OpenStack documentation provides a list of some of these publically available images at http://docs.openstack.org/imageguide/content/ch_obtaining_images.html. Many are Linux images supplied directly by the major Linux vendors. An OpenStackcompliant Windows image is provided by Cloud Base at http://www.cloudbase.it. The advantage of publically available images is that the images are ready to use, have cloud-init, and have ‘cloud-ready’ properties. When using images created by another source, consider the following: • • • Security: Do you trust the security and integrity of the image and its provider? Licensing: What are the licensing constraints, if any, associated with the image and the software inside it? Support: Who is supporting the image if you have problems? Option 3: Creating images from snapshots of launched VMs Once you have images loaded in CloudSystem and you have created VM instances, you can take a snapshot of a VM instance and use it as an image. This approach gives you the flexibility to upload simple, customizable images. This option is only available once you uploaded initial images in your environment using option1 or 2. Building a Windows image for use with ESXi compute clusters This section provides a high-level overview of the steps required to create a Windows VMDK image for use in CloudSystem. Some steps are required, while others are optional. • Step 1 Create the source virtual machine in vCenter Server o Two key settings are required for your Windows image to work: SCSI Controller -> LSI Logic SAS Virtual Device Node -> SCSI o Where possible, choose the smallest boot disk size that will work for your Windows version and options. CloudSystem allows users to request a larger boot disk size for the resulting VM at launch so the size only needs to be big enough to support the installation and preparation of the image. • Step 2 Install Windows and customize options o Multiple Windows versions are supported and there are no specific options that are required for your image to boot. That being said, there are a number of aspects that are best practices for images provided as a service to users in a cloud. This step is an opportunity to configure the options, software and settings you want to include in your images. • Step 3 Add VMware tools to the virtual machine o VMware tools are required to allow CloudSystem to shut down VM instances created from the image. Additionally, VMware tools provide the ability to manage the image from within the VMware hypervisor platform. • Step 4 Create an unattended file using Microsoft System Image Manager o Advanced IT deployments leverage Windows Sysprep to set the final settings of the deployed VM at first boot on launch as an alternative to making all settings and customizations when the Windows OS is installed. This allows you to take a common image created to this point and derive additional image variations for users with different settings, such as internationalization. o For simpler use cases and testing, you can skip this step and instead use Step 2 Install Windows and customize options, and optionally, Step 5 Install Cloud-init, to customize the image. • Step 5 Install cloud-init o Cloud-init is the open source mechanism for customizing the operating system of a newly provisioned VM instance. It can be used to handle many actions, particularly passing metadata from the CloudSystem GUI or CLI interfaces into the VM instance for interpretation and execution with scripts you’ve configured into the image. For example, this cloud-init step sets up an administrative user account and lets the requesting user from CloudSystem set the password for it. o If OS customization is not required, then you do not need to perform this step. • Step 6 Run Sysprep o Sysprep prepares the image to use specific Windows values based on unattended files created in Step 4. If you are using cloud-init, this step is required. o If you are not creating an unattended file or using cloud-init, then you do not need to perform this step. All behavior and settings are controlled by the options configured in Step 2. • Step 7 Set required VMware image properties with VMware tools o A VMDK image can be flat or sparse format. The properties must be set correctly before loading the images into CloudSystem. For flat images, fully expand the VMDK image using the vmfstools ‘-d eagerzeroedthick’ option. 3 Creating Windows Virtual Machine images for use with ESXi compute clusters in HP CloudSystem For sparse images, make sure they are already configured as sparse or convert them to sparse using the vmware-vdiskmanager with ‘-t 0’ option. Step 8 Upload the image to CloudSystem o You can upload an image by copying it to the CloudSystem Glance image repository or by entering a link to an HTTP server that hosts the image. In the second scenario, when CloudSystem needs the image for an operation, it fetches it from the HTTP server. o When you copy the image into CloudSystem’s Glance repository, you can use the CloudSystem Portal, the CloudSystem Console, or the Glance CLI. The CLI provides more control and more options and handles larger image sizes than the GUI options. Using the CLI is the recommended best practice when working with Windows VMDKs. Step 9 Set required CloudSystem properties o The CLI tool is used to set the two CloudSystem required properties for Windows VMDKs: vmware_ostype=<OSType> • Example: ‘windows8Server64Guest’ for Windows 2012 vmware_adaptertype=lsiLogicsa o If your image is sparse VMDK format, you are also required to set: vmware_disktype=sparse o Additional image options can be set at this time to establish a minimum disk size and memory for the image to restrict users from requesting an instance with insufficient resources. These are optional. min_disk=<minimum disk size in GB independent of user selected flavor> min_ram=<minimum RAM MB independent of user selected flavor> • • Step 1: Create the virtual machine source in vCenter Server In your VMware development environment, create a virtual machine to use as the source of the image. Most parameters are supported with a wide range of values, but two parameters require specific values in order for the image to work. The two required properties are: • SCSI Controller -> LSI Logic SAS • Virtual Device Node -> SCSI Creating the virtual machine source in vCenter Server Create the virtual machine. Customize the configuration. a. Name and Location -> <Your choice > b. Storage -> <Your choice> c. Virtual Machine Version -> Virtual Machine Version 8 (This is the default) d. Guest Operating System -> Windows Version Example: ‘Microsoft Windows Server 2012 (64-bit)’ e. CPUs Number of virtual sockets -> <Your choice> Number of cores per virtual socket -> <Your choice> In CloudSystem, the actual value for CPUs to support the instance is a function of the OpenStack Nova flavor selected for the instance. The values you set for the VM at this time have no effect. Pick the values you want while you are developing the virtual machine image. 4 Creating Windows Virtual Machine images for use with ESXi compute clusters in HP CloudSystem f. g. h. Memory size -> <Your choice> In CloudSystem, the actual value of RAM is a function of the OpenStack Nova flavor selected for the VM instance and any min_ram value that was set as a property of the image in CloudSystem. Setting the min_ram size is covered in step 7. At this point, just enter a value that allows you to develop the virtual machine image. Network Set the network adapter to ‘E1000’ or ‘E1000E’ E1000 and E1000E drivers are commonly available in Windows by default. Other NIC types could work but you must make sure that you included the driver. Number of NICs -> <Your choice> The number of NICs attached to an instance is determined by the user during provisioning. SCSI Controller -> LSI Logic SAS IMPORTANT: LSI Logic SAS is the only supported value for a Windows VMDK in CloudSystem. i. Create the disk. Capacity –> < Your choice> Best practice is to set the size as small as possible for staging the image. The actual boot disk of the VM is determined by the user when the VM is instantiated. During provisioning, the actual value of the VM’s boot disk is a function of the OpenStack Nova flavor selected for the VM instance and any min_disk value that was set as a property of the image in CloudSystem. Setting the min_disk size is covered in step 7. At this time, just select a value to use while developing the virtual machine. For example, the recommended minimum size reported by Windows 2012 for a standard image with GUI options is 18GB. But it is fairly straightforward to create a ‘hello world’ functional Windows 2012 standard edition image at around 9GB in size. You can work with an image size of 9GB during staging, set a minimum of 40GB for users and then they can use flavors to create VMs based on the image with even larger boot disks. IMPORTANT: If you usually work with ‘hello world’ Linux images, which are generally much smaller (200500MB), then the processing time and storage for these larger Windows images will be considerably larger. Disk Provisioning –> <Your choice> The size and format options of the image and how it is stored as it is moved into and used in CloudSystem is configured later. At this point, choose thick or thin provisioning while you are developing the VM. Set advanced options. Virtual Device Node -> SCSI j. IMPORTANT: SCSI is the only supported value for a Windows VMDK in CloudSystem. Step 2: Install Windows and customize options The purpose of this section is to choose the options in the Windows OS that allow the image to be used as a Windows VMDK. For example, after launching the instance, a user could gain console access via the CloudSystem Portal, but typically the expected interaction is for the user to access the console via Remote Desktop Protocol (RDP). Some of the properties and options can be set using the procedure in step 4. Others are so common to all versions of Windows images that they are best set using this procedure. 5 Creating Windows Virtual Machine images for use with ESXi compute clusters in HP CloudSystem Installing Windows and customizing options 1. Install Windows according to the standard procedures for the version of Windows you plan to use. 2. Customize Windows. a. Enable RDP If the VM is a server with only automated network access, then the CloudSystem Portal console access may be sufficient for troubleshooting and setup tasks. If it is not, enable RDP as the standard interactive interface for access to the VM. b. Set the time-zone c. Set network interfaces to DHCP d. Enable the Windows firewall e. Define the Internet Proxy f. Set IE security settings g. Set Windows update settings h. Add standard corporate packages, such as antivirus and support hooks 3. Disconnect the installation media from the VM. Step 3: Add VMware Tools to the VM VMware tools allow the user to perform a graceful shutdown through the CloudSystem user interfaces. A VM reboot performs a safe guest reboot if VMware tools are present. If VMware tools are not installed, a reboot results in a VM reset (hard reboot). Additionally, VMware tools in an ESXi VM are recommended and provide many benefits. See http://kb.vmware.com/selfservice/microsites/search.do?language=en_US&cmd=displayKC&externalId=340 for more information. Adding VMware tools to the VM Install VMware tools using one of the following two methods: a. Install interactively using instructions from http://kb.vmware.com/selfservice/microsites/search.do?language=en_US&cmd=displayKC&externalId=1018 377 b. Install as a package using instructions from http://kb.vmware.com/selfservice/microsites/search.do?language=en_US&cmd=displayKC&externalId=1036 810 Step 4: Create an unattended file using Microsoft System Image Manager Using an unattended file with Microsoft’s Sysprep tool automates the customization of the image when it is instantiated during first boot. It is a powerful tool for production cloud images. For a simple test image, you can omit this step and rely on the customizations you configured in step 2. If you are also using cloud-init from Cloudbase as described in step 5, the Cloudbase tools will create a small unattended file specifically to integrate cloud-init scripts into the Sysprep and startup process. In this case, you must merge the two unattended files to retain the cloud-init hooks and add in the specific customizations you create in this step. The Microsoft tool for creating unattended files is System Image Manager (SIM) which is a component of the Windows Assessment and Deployment Kit (ADK) http://technet.microsoft.com/en-us/library/hh824947.aspx. Some of the many image attributes that can be controlled with the unattended file are: • Administrator Password This field can be used to set the password in the account to a known value or to force a user to set it interactively at first login. 6 Creating Windows Virtual Machine images for use with ESXi compute clusters in HP CloudSystem • Additional user accounts An IT organization may or may not want users to control the default administrator account. Alternative administrative accounts or user accounts with restricted privileges are set here. The passwords are defined here or set to force the user to set the password on first login. An alternative to defining an account in the unattended file is to use a feature in the Cloudbase cloud-init package that allows you to define a single additional user account, which can also be linked into the password setting mechanism of the CloudSystem Portal instance launch dialog. • Language and keyboard settings Settings for language are documented at http://technet.microsoft.com/en-us/library/hh825682.aspx • Product keys If you are unfamiliar with Sysprep and SIM, the following link provides a good description of how to create a simple answer file http://technet.microsoft.com/en-us/library/cc749317(v=ws.10).aspx. Sample unattended file Creating an unattended file to define the Administrator password 1. Install SIM. You should have the ADK and SIM already set up on a development system. 2. From the OS media you are using, copy the install.wim file to a location on the system that is running SIM. 3. To start SIM, select Start→Programs→Microsoft Windows OPK (or Windows AIK)→Windows System Image Manager. 4. To point to the OS media install.wim, select File→Select Windows Image 5. To start a new answer file, select File→New Answer File. 6. Set the properties for the unattended file. a. From Windows Image, expand the Components box and navigate to the parameters you want to set. b. Right-click and select Add Setting to Pass 7 oobeSystem When the parameters are added, you can edit them from the box in the upper right corner of the screen. 7. Use the Validate Answer File feature to verify the values you entered. 8. To save the unattended file, select File→Save Answer File. The default name for this file is autounattended.xml. Additional parameters to consider setting in a cloud environment include: 7 Creating Windows Virtual Machine images for use with ESXi compute clusters in HP CloudSystem • • • Microsoft – Windows – Shell – Setup o LogonCommands | FirstLogonCommands o LocalAccount Description=<Admin> DisplayName=<Admin> Group=<Administrators> Name=<Admin> Password • Value=<password> Microsoft – Windows – Internationalization – core – WinPE o InputLocale=<locale> o SystemLocale=<locale> o UILanguage=<language> o UserLocale=<language> o SetupUILanguage UILanguage=<language> Microsoft – Windows – Setup o UserData AcceptEula=true ProductKey Key=<product key> WillShowUI=OnError Step 5: Install cloud-init Cloud-init (https://cloudinit.readthedocs.org/en/latest/) is an open source project used with OpenStack to allow tools to integrate images in a cloud. Cloudbase (http://www.cloudbase.it/) developed a Windows version and contributed it to the community. It is available in a source version in github (https://github.com/cloudbase/cloudbase-init). From the Cloudbase website, you can also find the easy-to-use install and configuration tool that is used in this step. The Cloudbase tool automatically generates its own unattended file and offers the option to automatically step into running Sysprep. Do not select this option. You will not have the opportunity to modify the unattended file with the one you created in step 4. Installing cloud-init 1. Make sure all customizations for the operating system are complete. 2. Download the cloud-init installation tool from Cloudbase for Windows. http://www.cloudbase.it/cloud-init-for-windows-instances 3. Install cloud-init on the image. 4. Run CloudbaseInitSetup_Beta. IMPORTANT: When you finish using the setup tool, you will be given the choice to run Sysprep directly. As discussed previously, do not choose this option. It will not allow you to integrate your own unattended file. 5. Complete the Cloudbase-Init Setup Wizard. a. Accept the license agreement. b. On the Custom Setup screen, select the option for Windows Cloud Init (Default) and set the location to C:\Program Files (x86)\Cloudbase Solutions\Cloudbase-Int\(Default). c. On the Configuration options screen, fill in the options that are used to configure the cloudint.conf file. This file is processed by cloud-init scripts when an instance is launched. The .conf files are created in C:\Program Files (86)\Cloudbase Solutions\Cloudbase-Init\conf. i. Username: <Admin> 8 Creating Windows Virtual Machine images for use with ESXi compute clusters in HP CloudSystem ii. Use this field to prompt the cloud-init package to create a user account with this name. This account will not appear in the unattended file and should not be added there. Metadata password: <Check this box> If you check this box, then the cloud-init scripts that run at launch in the VM will look in the block of data (‘metadata’) handed to it from the CloudSystem Nova layer for a password to assign to the account. The metadata password is set by an interactive user in the CloudSystem Portal launch instance dialog as ‘Admin Password’ field. IMPORTANT: You cannot use the CloudSystem Portal to verify that the password entered by the user meets the policy set in the Windows image. For example, if a strong password is set in the Windows OS, the user can enter a password in the CloudSystem Portal that does not conform and no error will occur. The password will not be set in the image. iii. d. e. f. User’s local group: <Administrator> This is the group associated to the account. iv. Network adapter: Intel PRO/1000MT This varies depending on the type of adapter you are using. Make sure to enter the type of network adapter used in your configuration. De-select the Run Sysprep option. If this option is NOT selected, then you will be able to merge your own unattended file before you run Sysprep. Select Finish. Verify the .conf file created by the setup program. Sample .conf file Step 6: Run Sysprep Sysprep prepares the image with specific Windows values that are set on boot based on the unattended files created in step 4. It is also required by the cloud-init package in step 5. If you are not using step 4 or step 5, then you can skip this step. All image behavior and settings configured in Step 2 will be applied to the image. Running Sysprep 1. Take a snapshot of the VM or make a clone. After Sysprep runs, the image is transformed into its first boot configuration. Make all of your customizations before you proceed. Taking a snapshot of the underlying VM before this step could be useful if you need to rollback and correct the image after a trial run. 2. Optional: Create the final unattended file. At this point you will potentially have an unattended file created by the Cloudbase install tool in step 5 and one you created using SIM in step 4. If you have both, you will need to merge them into one file. If you have only one, you can skip this step. 9 Creating Windows Virtual Machine images for use with ESXi compute clusters in HP CloudSystem a. Review the unattended file created by the Cloudbase tool at: C:\Program Files (x86)\Cloudbase Solutions\Cloudbase-Init\conf. The highlighted section in the following example shows the clause that invokes the cloud-int python script. Copy your own custom unattended file to this directory. Sample unattended file created by Cloudbase tool b. Copy the custom unattended file you created to C:\Program Files (x86)\Cloudbase Solutions\Cloudbase-Init\conf. The previous example that sets the Administrator password is shown below. 10 Creating Windows Virtual Machine images for use with ESXi compute clusters in HP CloudSystem Sample with Administrator password c. Merge the two files and make any final modifications, then create a unique name for the file, such as mergedunattended.xml. In the following example, the clause to set the Administrator password in the custom unattended.xml has been merged into the Cloudbase_unattended.xml. 11 Creating Windows Virtual Machine images for use with ESXi compute clusters in HP CloudSystem Sample merged unattended file 3. Run Sysprep: a. Mount the distribution media as the first DVD of the VM. b. Open a command or powershell CLI window. c. Change directory to the Cloudbase configuration directory C:\Program Files (x86)\Cloudbase Solutions\Cloudbase-Init\conf. d. Run Sysprep: c:\windows\system32\Sysprep\sysprep.exe /oobe /generalize /unattend:MergedUnattend.xml When Sysprep completes, it will shut down the VM. e. In VMware, detach the distribution media from the VM DVD drive. 12 Creating Windows Virtual Machine images for use with ESXi compute clusters in HP CloudSystem Step 7: Set required VMware image properties with VMware tools CloudSystem supports two VMDK formats: flat and sparse. • Flat files are generally larger and slower to upload. They consume more storage than a sparse VMDK. To prepare a flat image, you must use vmkfstools with -d eagerzeroedthick. Unlike a sparse image, you do not have to set a specific flat property for use with CloudSystem. IMPORTANT: In flat files, you must use the eagerzeroed thick option with vmkfstools. • Sparse images are smaller, which improves upload times and storage consumption. To prepare a sparse image, you must use vmware-vdiskmanager. To work properly, a sparse file must have a property set in Glance to indicate that it is sparse before it is loaded into CloudSystem. This property is covered in step 8. IMPORTANT: In sparse files, you must use the ‘-t 0’ option with vmwre-vdiskmanager. When choosing between the sparse or flat formats, keep in mind that at launch a sparse file is expanded, which could cause an additional initial delay the first time it is used. Flat images do not have this delay. The image that is cached on the ESX hosts after the initial use is the expanded file, which is the cause of the one-time delay. Preparing a Flat format VMDK You can prepare a flat VMDK on the ESXi server in your development environment. In order to log on to an SSH session and run vmkfstools, you must enable SSH access to the server. 1. Enable SSH access on the ESXi server. a. In VMware vSphere Client, select the ESXi host where you are preparing the image. b. Enable the ESXi SSH shell access by selecting the following options in Configuration→Security: i. Services→Properties→SSH should be set to running ii. Firewall→Properties→Required Services, Secure Shell, SSH Server should be enabled. 2. Open an SSH shell to the ESXi server where the image is being prepared. 3. Change directory to the datastore where the image is stored. 4. Run the following command to review the image size: # ls –l 5. Use the vmkfstools to set eagerzeroedthick : vmkfstools -i <OriginalImage>.vmdk <NewImage>.vmdk -d eagerzeroedthick Preparing a Sparse format VMDK To set the required sparse properties for a sparse VMDK, you must use the vmware-vdiskmanager tool. 1. Download and Install vmware-vdiskmanager on a Windows server. The Virtual Disk Manager Utility is available with a VMware workstation or you can download it separately as a Virtual Disk Development Kit (VDDK). VDDK is available for download at https://www.vmware.com/support/developer/vddk/. The Virtual Disk Manager User Guide is available at http://pubs.vmware.com/vsphere-50/ topic/com.vmware.ICbase/PDF/vddk_disk_utils.pdf. 2. Copy the image VMDK from the development ESXi server to the Windows server and examine the size of the file. 3. From the Windows server, run the VMware-vdiskmanager tool: Vmware-vdiskmanager –r <OriginalImage>.vmdk –t 0 <NewImage>.vmdk 13 Creating Windows Virtual Machine images for use with ESXi compute clusters in HP CloudSystem Step 8: Load images into CloudSystem There are two ways to make images available for users in CloudSystem: • Upload the image into the CloudSystem Glance repository on the CloudSystem management appliance. • Present the image on an accessible HTTP server to CloudSystem. There are three tools available for image upload: • CLI option for images 20 GB or greater. See Using the CLI to upload an image • CloudSystem Portal option See Using the CloudSystem Portal to upload an image • CloudSystem Console option See Using the CloudSystem Console to upload an image Using the CLI option to upload an image 1. Install the CLI package that contains the Glance ‘image-create’ option. For instructions on installing the CLI packages for Windows and Linux, see the HP CloudSystem 8.1 Installation and Configuration Guide in the Enterprise Information Library. 2. From the CLI, run the command to upload an image: glance --insecure image-create <Image Name> IMPORTANT: You can set the CloudSystem properties for the image in the upload command using the --property flag. If you want to add the properties at this point, see step 9. Using the CloudSystem Portal to upload an image 1. Open a supported browser to https://<Appliance_IP>/portal/project. Check the browser upload limitations. Chrome tends to support the largest upload size at 20 GB. If the image is larger than this, you must use the CLI upload option. 2. From the CloudSystem Portal Project tab, select Images & Snapshots. 3. Upload the image: a. Click + Create image. b. Enter a name for the image. c. Enter a description for the image. d. For the image source, select Image File. e. For the image file, browse to the file you want to upload. f. For the format, select VMDK. g. Enter the minimum disk value to assign to the image. If you choose to add a value, it will be the smallest available disk size of the image when launched as a VM. Users can control the size using flavors, but regardless of the value in the flavor, this setting will be the lower limit. h. Enter the minimum RAM value for the image. If you choose to add a value, it will be the lowest RAM available to the image when launched as a VM. Users can control the value using flavors, but regardless of the value in the flavor, this setting will be the lower limit. i. Select the Public check box. j. Click Create image. 14 Creating Windows Virtual Machine images for use with ESXi compute clusters in HP CloudSystem Using the CloudSystem Console to upload an image 1. Open a supported browser to https://<Appliance_IP>. Check the browser upload limitations. Chrome tends to support the largest upload size at 20 GB. If the image is larger than this, you must use the CLI upload option. 2. From the CloudSystem Console, select Images→Actions→Add. 3. Enter the image details: a. In the Specify image field, click the Enter file URL radio button and enter the path to the URL in the field provided. b. Enter a name for the image. c. Enter a description for the image. d. For the OS type, select Microsoft Windows. e. For the disk format, select VMDK. f. For the container format, select bare. g. For the shared field, select Enabled. h. For the Read-only field, select Disabled. i. Click Add. Presenting the image on an HTTP server that is accessible to CloudSystem 1. Move the image to the HTTP server. Configuration of the HTTP server is beyond the scope of this white paper. 2. From the CloudSystem Console, point to the image from CloudSystem. 3. Navigate to Images→Actions→Add. 4. Enter the image details: a. In the Specify image field, click the Enter file URL radio button and enter the path to the URL in the field provided. b. Enter a name for the image. c. Enter a description of the image. d. For the OS type, select Microsoft Windows. e. For the disk format, select VMDK. f. For the container format, select bare. g. For the shared field, select Enabled. h. For the Read-only field, select Disabled. i. Click Add. Step 9: Set required CloudSystem properties Windows VMDKs need the following properties set in CloudSystem: • vmware_ostype=<OSType> (required with CloudSystem) Examples windows8Server64Guest for Windows 2012 windows7Server64Guest for Windows 2008 See VMware documentation for a complete list of Windows related OS type codes. VMware 5.5 documentation: http://pubs.vmware.com/vsphere55/index.jsp?topic=%2Fcom.vmware.wssdk.apiref.doc%2Fvim.vm.GuestOsDescriptor.GuestOsIdentifier.html • vmware_adaptertype=lsiLogicsas (required with CloudSystem) • vmware_disktype=sparse (required if you are using a sparse format VMDK) • min_disk=<Value in GB> (common properties for all images) • min_mem=<Value in MB> (common properties for all images) 15 Creating Windows Virtual Machine images for use with ESXi compute clusters in HP CloudSystem Setting required CloudSystem properties 1. Install the CLI package you plan to use. To set the required properties you will need to use the command line. For instructions on installing the CLI packages for Windows and Linux, see the HP CloudSystem 8.1 Installation and Configuration Guide in the Enterprise Information Library. 2. To confirm that the image is loaded in CloudSystem, run: glance --insecure image-list 3. To confirm that the initial image properties are set, run: glance --insecure image-show <ImageName> 4. Set the properties using the Glance CLI command with the image-update option and –-properties flag: For a Windows 2012 image that is a sparse VMDK glance –-insecure image-update <ImageName> --property vmware_ostype=windows8Server64Guest --property vmware_adaptertype=lsiLogicsas –property vmware_disktype=sparse For a Windows 2012 image that is a flat VMDK glance –insecure image-update <ImageName> --property vmware_ostype=windows8Server64Guest --property vmware_adaptertype=lsiLogicsas 5. To confirm that the image properties are set, run: glance --insecure image-show <ImageName> Test the images by launching them as instances. Verify that the settings you selected are accurate. Learn more about CloudSystem http://www.hp.com/go/CloudSystem http://www.hp.com/go/CloudSystem/docs © Copyright 2014 Hewlett-Packard Development Company, L.P. The information contained herein is subject to change without notice. The only warranties for HP products and services are set forth in the express warranty statements accompanying such products and services. Nothing herein should be construed as constituting an additional warranty. HP shall not be liable for technical or editorial errors or omissions contained herein. 5900-3792a, December 2014 16