1
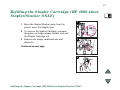
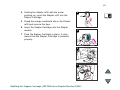
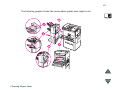
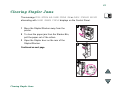
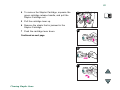
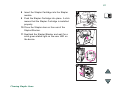
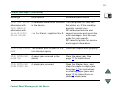
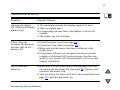
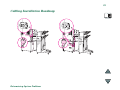
HP 3000-sheet Stacker and
HP 3000-sheet Stapler/
Stacker
(C4779x and C4788x)
User Guide
Contents
2
Copyright and License
Warranty
Copyright Hewlett-Packard Company
1999
The information contained in this
document is subject to change without
notice.
All Right Reserved. Except as allowed by
copyright laws or herein, reproduction,
adaptation, or translation without prior
written permission is prohibited.
The user of this accessory is granted a
license to: a) print hard copies of this
User Guide for PERSONAL, INTERNAL,
or COMPANY use subject to the
restriction not to sell, re-sell, or otherwise
distribute the hard copies; and b) place
an electronic copy of this User Guide on a
network server provided access to the
electronic copy is limited to PERSONAL,
INTERNAL users of this accessory.
Publication number
C4788-90901
First Edition, February 1999
Hewlett-Packard makes no warranty of
any kind with respect to this information.
HEWLETT-PACKARD SPECIFICALLY
DISCLAIMS THE IMPLIED WARRANTY
OF MERCHANTABILITY AND FITNESS
FOR A PARTICULAR PURPOSE.
Hewlett-Packard shall not be liable
for any direct, indirect, incidental,
consequential, or other damage alleged
in connection with the furnishing or use
of this information.
3
Contents
Paper Handling Features . . . . . . . . . . . 4
Output (Unstapled) . . . . . . . . . . . . . 4
Stapling (HP 3000-sheet Stapler/
Stacker) . . . . . . . . . . . . . . . . . . . . . 4
Ordering Information . . . . . . . . . . . . . . 5
User LED Interpretation . . . . . . . . . . . . 6
Using the Device . . . . . . . . . . . . . . . . . 8
Selecting the Output Bin . . . . . . . . . 8
Configuring the Device . . . . . . . . . . . 9
Refilling the Stapler Cartridge
(HP 3000-sheet Stapler/Stacker ONLY) 15
Clearing Paper Jams . . . . . . . . . . . . . 17
Clearing Stapler Jams . . . . . . . .
Control Panel Messages for
the Device . . . . . . . . . . . . . . . .
Determining System Problems . .
Cabling Installation Roadmap
Supported Paper Sizes . . . . . . .
Information Menu . . . . . . . . . . .
Paper Path Test . . . . . . . . . .
Paper Handling Menu . . . . . . . .
Regulatory Information . . . . . . .
Service and Support . . . . . . . . .
. . . . 19
.
.
.
.
.
.
.
.
.
.
.
.
.
.
.
.
.
.
.
.
.
.
.
.
.
.
.
.
.
.
.
.
.
.
.
.
22
26
29
30
33
33
35
36
37
4
Paper Handling Features
Output (Unstapled)
3,000 sheets Letter (20 lb bond)/A4 (80 g/m 2 )
1,500 sheets Ledger (20 lb bond)/A3 (80 g/m 2 )
Stapling (HP 3000-sheet Stapler/Stacker)
2 to 50 sheets of 20 lb bond, or equivalent job height (5 mm)
Multiple staple positions:
One angled
One, two, three, or six
Custom, up to seven staples
Paper Handling Features
5
Ordering Information
The product number for the replacement Stapler refills is C4791A (3 Stapler
refills, 5,000 staples per refill).
Ordering Information
6
User LED Interpretation
Use the following table to interpret the status of the device by referring to the
user LED (see the graphic on the next page).
User LED status
Interpretation
Solid Green
The device is on and ready.
Flashing Amber
The device is not correctly attached to the printer.
One or more bins are full.
The device has a paper jam or staple jam, or a page needs to
be removed from the bins.
Solid Amber
The device is experiencing a hardware malfunction.
Off
The printer is in PowerSave mode. Press GO on the printer’s
Control Panel.
The device is not receiving power. Check the power box
connections, power cables, and C-link cable connections.
Flashing Green
The device is in service mode.
Continued on next page.
User LED Interpretation
7
The following graphic shows the location of the user LED on the device.
User LED Interpretation
8
Using the Device
Selecting the Output Bin
The system has several output locations: the Standard Output Bin, the
Face-up Bin, and the Stacker Bin.
Face-up Bin
Stacker Bin
(Optional Bin 1)
Note
Standard Output Bin
Envelopes, labels, and transparencies are ONLY supported in the
Face-up Bin.
Using the Device
9
Configuring the Device
The device attaches to the left side of the printer. There is a menu in the
printer’s Control Panel called CONFIGURATION OF STKR where you can change
the default offset and default stapler actions.
Note
The network administrator can limit access to the offset and default stapler
actions.
Offset actions
Offset Action: No
When the Job Offset mode is off, all of the jobs are
stacked with no separation.
Offset Action: Yes
When the Job Offset mode is on, the device automatically
separates complete jobs or mopies (multiple original prints
of a single job). Each job or mopy is separated by offsetting
the jobs from each other.
Using the Device
10
Offset actions (continued)
Offset Action: Job
Separator
Using the Device
When the Job Separator action is enabled, the device
automatically separates jobs or mopies. Each job or
mopy is separated by only offsetting the first page.
Note
This offset action is only available for the HP 3000-sheet
Stacker.
11
Note
The user can select the available stapler action through the printer driver
(for example, 1 staple or 2 staples). When selecting any stapler action, the
jobs or mopies are automatically separated by offsetting the jobs or mopies
from each other. If the proper printer driver is not used, the default stapler
action occurs.
Default stapler actions (HP 3000-sheet Stapler/Stacker ONLY)
No Staple
Using the Device
If the default action is set to No Staple, the job is not
stapled.
12
Default stapler actions (HP 3000-sheet Stapler/Stacker ONLY) (continued)
Angled Staple
Note
The illustration shown is for
Letter/A4. See the printer driver
for different paper sizes.
Using the Device
If the default action is set to Angled Staple, the staple
is placed in the corner of the document at a 40 degree
angle.
13
Default stapler actions (HP 3000-sheet Stapler/Stacker ONLY) (continued)
One Staple, Two Staples, Three If the default action is set to One Staple, Two Staples,
Staples, or Six Staples
Three Staples, or Six Staples, one job or mopies are
stapled with the number of staples indicated from one
to six. All of the staples are placed parallel to the edge
closest to the printer. These are predetermined staple
positions.
Note
When using the Six Staples option, if the paper is
narrower than 8.5 in. (216 mm), the job may have less
than six staples.
Note
The illustration shown is for
Letter/A4. See the printer driver
for different paper sizes.
Using the Device
14
Default stapler actions (HP 3000-sheet Stapler/Stacker ONLY) (continued)
Custom
Note
The illustration shown is for
Letter/A4. See the printer driver
for different paper sizes.
Using the Device
If the default action is set to Custom, the network
administrator must define the number of staples (up
to seven) and their location. The users can select this
feature through the printer driver.
Note
Only the network administrator can configure the
Custom action through HP JetAdmin.
15
Refilling the Stapler Cartridge (HP 3000-sheet
Stapler/Stacker ONLY)
1 Move the Stapler/Stacker away from the
printer, open the Stapler door.
1
2 To remove the Stapler Cartridge, squeeze
the green cartridge release handle, and pull
the Stapler Cartridge out.
3 Remove the empty cardboard box and
discard it.
2
Continued on next page.
3
Refilling the Stapler Cartridge (HP 3000-sheet Stapler/Stacker ONLY)
16
4 Holding the Stapler refill with the arrow
pointing up, insert the Stapler refill into the
Stapler Cartridge.
4
5 Grasp the orange cardboard tab on the Stapler
refill and remove the tape.
6 Insert the Stapler Cartridge into the Stapler
module.
5
7 Push the Stapler Cartridge in place. A click
means that the Stapler Cartridge is installed
properly.
6
7
Refilling the Stapler Cartridge (HP 3000-sheet Stapler/Stacker ONLY)
17
Clearing Paper Jams
The message STKR: DETACH AND CLEAR JAM displays on the Control Panel.
1 Move the device away from the printer.
2 Remove paper from any of the indicated areas (A, B, C, D, or E). See the
graphic on the following page.
3 Reattach the device. Wait for the solid green status light on the user LED
on the device.
Note
When clearing paper jams, be very careful not to tear the paper. If a small
piece of paper is left in the device, it could cause additional jams.
Continued on next page.
Clearing Paper Jams
18
The following graphic shows the areas where paper jams might occur.
Clearing Paper Jams
19
Clearing Stapler Jams
The message STKR: DETACH AND CLEAR STAPLE JAM or CHECK STAPLER DEVICE
alternating with CLEAR JAMMED STAPLE displays on the Control Panel.
1 Move the Stapler/Stacker away from the
printer.
1
2 To clear the paper jam from the Stacker Bin,
pull the paper out of the rollers.
3 Open the Stapler door on the rear of the
Stapler/Stacker.
2
Continued on next page.
3
Clearing Stapler Jams
20
4 To remove the Stapler Cartridge, squeeze the
green cartridge release handle, and pull the
Stapler Cartridge out.
4
5 Pull the cartridge lever up.
6 Remove the staple that is jammed in the
Stapler Cartridge.
7 Push the cartridge lever down.
5
Continued on next page.
6
7
Clearing Stapler Jams
21
8 Insert the Stapler Cartridge into the Stapler
module.
8
9 Push the Stapler Cartridge into place. A click
means that the Stapler Cartridge is installed
properly.
10 Close the Stapler door on the rear of the
Stapler/Stacker.
9
11 Reattach the Stapler/Stacker and wait for a
solid green status light on the user LED on
the device.
10
11
Clearing Stapler Jams
22
Control Panel Messages for the Device
The following table explains messages that might display on the printer’s
Control Panel. Messages are listed in alphabetical order.
Printer messages
Message
Description
CHECK STAPLER
A staple jam occurred.
DEVICE
alternates with
CLEAR JAMMED STAPLE
Recommended action
Clear the staple jam. See
page 19 for instructions.
EXTERNAL DEVICE
INITIALIZING
The external device is initializing No action required.
or recovering after clearing a jam
condition.
OUTPUT BIN FULL
alternates with
CLEAR PAPER FROM
FACE UP
The bin-full sensor in the left
Face-up Bin has been reached.
Control Panel Messages for the Device
Empty the Face-up Bin.
23
Printer messages (continued)
Message
Description
Recommended action
OUTPUT BIN FULL
alternates with
CLEAR PAPER FROM
OPTIONAL BIN 1
The Stacker Bin is full.
Empty the Stacker Bin.
STAPLER LOW ON
STAPLES
The Stapler Cartridge has 20 to
50 staples remaining.
No action required.
STAPLER OUT OF
STAPLES
There are no more staples in the Refill the Stapler Cartridge. See
Stapler Cartridge.
page 15 for instructions.
STKR: ATTACH TO
PRINTER
The device is not attached to the Make sure that there is a proper
printer properly.
attachment between the device
and the printer, and wait for a
solid green status light on the
user LED on the device.
Control Panel Messages for the Device
24
Printer messages (continued)
Message
Description
Recommended action
STKR: CALL SERVICE A hardware malfunction occurred
alternates with
in the device.
STKR: ERROR ZZ
alternates with
X is 1 or 2 and Y might be 2 or 3.
66.XY.ZZ OUTPUT
DEVICE FAILURE
Turn the printer off, and turn
the printer on. If the condition
persists, contact your
HP-authorized service and
support provider and report the
error messages. See the user
guide for your specific
HP LaserJet printer for service
and support information.
STKR: CLOSE STAPLER The Stapler door is open or it is
DOOR
not closed properly.
Close the Stapler door properly.
STKR: DETACH AND
CLEAR JAM
A paper jam occurred in the
device.
Clear the paper jam. See
page 17 for instructions.
STKR: DETACH AND
CLEAR STAPLE JAM
A staple jam occurred.
Open the Stapler door, and
clear the paper or staple jam.
See page 17 for instructions
on clearing paper jams and
page 19 for instructions on
clearing staple jams.
Control Panel Messages for the Device
25
Printer messages (continued)
Message
Description
STKR: TRAY OVERLOAD The weight capacity of the
alternates with
stacker bin has been reached.
CLEAR PAPER FROM
OPTIONAL BIN 1
TOO MANY PAGES IN
JOB TO STAPLE
Recommended action
Clear the paper from the
Stacker Bin.
The job height is greater than the See the stapling specifications on
stapler capacity. The height of
page 32 for more information.
the job to be stapled should not
exceed 5 mm.
Control Panel Messages for the Device
26
Determining System Problems
Output does not go to selected bin
Situation
Possible Reason
Job went to a different
bin than was expected.
The selected bin does not support the media used. (See
page 30 for supported paper sizes.)
Note
Envelopes, labels, and transparencies are ONLY supported in the
Face-up Bin.
The Stapler can staple jobs of 2 to 50 sheets or 5 mm of thickness. If the
job is thicker than this, the job is ejected unstapled. The Stacker Bin can
hold a maximum of 3,000 sheets, depending on the paper’s size and weight.
Determining System Problems
27
Problems with the device
Situation
Possible Reason
Job was not stapled.
(HP 3000-sheet Stapler/
Stacker only)
The job height exceeds the stapling capacity (5 mm).
There is a staple jam.
A single-page job was sent to the Stapler; it will not be
stapled.
The Stapler ran out of staples.
Printer does not
recognize the device or
the user LED on the
device is off.
Check the power cords (see page 29).
Check the C-link cables (see page 29).
Make sure that the device has been configured in the
printer driver.
If the printer still does not recognize the device, contact
a dealer or authorized HP service provider. See the user
guide for your specific HP LaserJet printer for service and
support information.
Device does not
power on.
Make sure that the power cord is firmly plugged into both
the device and the power box (see page 29). Remove and
reconnect the power cord.
Turn the printer off, check all of the C-link connections (see
page 29), and turn the printer on.
Determining System Problems
28
Problems with the device (continued)
Situation
Possible Reason
Paper jams and paper
feeding problems.
Make sure that you are using the supported paper weights
and sizes (see page 30).
Check the cables and connectors between the printer and
the device. See page 29 for cabling configurations.
Repeated paper jams between the printer and the device
might mean that the printer and device are set up on an
uneven floor. Level the device. See the installation guide for
instructions.
CAUTION
Using paper outside HP specifications may cause problems for the printer,
requiring repair. This repair is not covered by the Hewlett-Packard warranty
or service agreements. See the paper specifications in the user guide for
your specific HP LaserJet printer.
Determining System Problems
29
Cabling Installation Roadmap
Determining System Problems
30
Supported Paper Sizes
Tray, Bin, or Capacity
Stapler
Face-up Bin
Paper
Weight
Up to 125 sheets
Letter, ISO A4 (landscape
16 to 53 lb bond
Letter (20 lb bond)
orientation only)
(60 to 199 g/m 2 )
A4 (80 g/m 2 )
Legal, Ledger (11 x 17 in.), A3,
JIS B4, JIS Double Postcard,
JPostD, JIS B5, A5, Executive,
JIS Exec, 8K, 16K (portrait
orientation only)
Custom:
Minimum - 190 mm length x
98 mm width
Maximum - 460 mm length x
305 mm width
Universal: See the user guide
for your specific HP LaserJet
printer for size specifications.
Envelopes: COM 10, C5, DL,
Monarch, B5 (portrait
orientation only)
Supported Paper Sizes
31
Tray, Bin, or Capacity
Stapler
Stacker Bin
(Optional
Bin 1)
Paper
Weight
Up to 3,000 sheets Letter, ISO A4 (landscape
16 to 28 lb bond
Letter (20 lb bond)
orientation only)
(60 to 110 g/m 2 )
A4 (80 g/m 2 )
Legal, Ledger (11 x 17 in.), A3,
JIS B4, JIS B5, A5, Executive,
Note
JIS Exec, 8K, 16K (portrait
The Stacker Bin’s
orientation only)
capacity varies
Custom:
depending on the
Minimum - 190 mm length x
paper’s size and
148 mm width
weight. For
Maximum - 460 mm length x
example, using
297 mm width
11 x 17 in. (20 lb
Note
bond), the
Envelopes, transparencies, and
capacity can be
labels are ONLY supported in the
approximately
Face-up Bin.
1,500 sheets.
Supported Paper Sizes
32
Tray, Bin, or Capacity
Stapler
Stapler
Paper
Weight
Maximum 5 mm
Letter, ISO A4 (landscape
16 to 28 lb bond
stack height. For
orientation only)
(60 to 110 g/m 2 )
example, 50 sheets Legal, Ledger (11 x 17 in.), A3,
of 20 lb bond.
JIS B4, JIS B5, A5, Executive,
JIS Executive, 8K, 16K (portrait
Note
orientation only)
The stapling
Note
capacity varies
Envelopes, transparencies, and
depending on the labels are ONLY supported in the
paper’s thickness. Face-up Bin.
For more information such as physical dimensions, paper guidelines, and
environmental specifications, see the user guide supplied with your specific
HP LaserJet printer. Also see the HP LaserJet Printer Family Paper
Specification Guide .
Supported Paper Sizes
33
Information Menu
This control panel menu contains printer information pages that give details
about the printer and its configuration. To print an information page, scroll to
the desired page, and press SELECT.
Paper Path Test
The paper path test can be used to verify that the paper path is working
properly or to troubleshoot problems with a type of paper.
1 Press MENU repeatedly until INFORMATION MENU appears.
2 Press ITEM repeatedly until PRINT PAPER PATH TEST appears.
3 Press SELECT to select the paper path test.
4 Select the input tray, output bin, duplexer (if available), and number of
copies using the - VALUE + key and the SELECT key. After selecting the last
option, the paper path test automatically starts.
For the HP 3000-sheet Stapler/Stacker: To send the output to the Face-up
Bin, select the FACE-UP BIN option. To send the output to the Stacker Bin,
select the OPTIONAL BIN 1 option.
Continued on next page.
Information Menu
34
Note
When running the paper path test to confirm that the stapler is working
correctly, make sure that one of the stapler action options has been
selected. If one has not been selected, the job will not be stapled. Also
make sure that you are selecting and sending more than one copy.
Information Menu
35
Paper Handling Menu
When paper handling settings are correctly configured through the printer’s
Control Panel, you can print by choosing the type and size of paper from the
printer driver or software application.
Item
Values
Explanation
PAPER DEST=
STANDARD
OUTBIN
STANDARD OUTBIN
FACE-UP BIN
OPTIONAL BIN 1
OPTIONAL BIN 1 only appears when an output device
is installed. Set the value to correspond with the
appropriate bin.
Paper Handling Menu
36
Regulatory Information
For regulatory information, see the user guide supplied with your specific
HP LaserJet printer.
Regulatory Information
37
Service and Support
For warranty information, see the user guide supplied with your specific
HP LaserJet printer. For support telephone numbers, see the HP Customer
Care section of the user guide for your specific HP LaserJet printer.
Service and Support