1
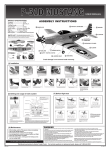
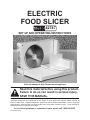
Electric
Food Slicer
42787
Set up And Operating Instructions
Visit our website at: http://www.harborfreight.com
Read this material before using this product.
Failure to do so can result in serious injury.
Save this manual.
Copyright© 2000 by Harbor Freight Tools®. All rights reserved. No portion of this manual or any artwork
contained herein may be reproduced in any shape or form without the express written consent of
Harbor Freight Tools. Diagrams within this manual may not be drawn proportionally. Due to continuing
improvements, actual product may differ slightly from the product described herein. Tools required for
assembly and service may not be included.
For technical questions or replacement parts, please call 1-800-444-3353.
Revised Manual 09j
THANK YOU for choosing a HARBOR FREIGHT TOOLS product. For future reference, please complete
the owner’s record below:
Model_____________
Serial No.______________
Purchase Date________________
SAVE THE RECEIPT, WARRANTY AND THESE INSTRUCTIONS. It is important that you read the entire
manual to become familiar with the unit BEFORE you begin assembly.
Specifications
Power
requirements
Table Size
Base
Blade
Blade RPM
Blade Diameter
Slice Thickness
Cord
Also Included
110 V~ / 60 Hz
8-1/8” x 4-3/4”
12-5/8” x 7”
Stainless Steel
95
6-1/2”
Adjustable - 1/16” to 1/2”
6’ 3-1/2”, 18 AWG X 2C, 2 Prong Polarized
Pusher and Tray
Important safety instructions!
Read all instructions before using this product!
Warning! The warnings, cautions and instructions discussed in this instruction manual
cannot cover all possible conditions and situations that may occur. It must be understood by the operator that COMMON SENSE AND CAUTION ARE FACTORS
WHICH CANNOT BE BUILT INTO THIS PRODUCT, BUT MUST BE SUPPLIED
BY THE OPERATOR.
The Operator
PLEASE REMEMBER:
Do not operate the product if under the influence of alcohol or drugs. Read warning
labels on prescriptions to determine if your judgment/reflexes might be impaired.
Do not wear loose clothing or jewelry as they can be caught in parts.
Wear restrictive hair covering to contain long hair.
Work Area
TO AVOID RISK OF PERSONAL INJURY, EQUIPMENT DAMAGE, FIRE AND SHOCK,
MAKE SURE YOUR WORK AREA IS:
Free of damp, wet or rainy conditions.
SKU 42787
For technical questions, please call 1-800-444-3353.
Page 2
Free of children (never let them handle tools or machinery). Do not allow children to use
the Food Slicer.
Well-lit.
Clean and uncluttered.
Before Operating
Unplug appliance when not in use and before cleaning.
Do not use appliance for other than recommended uses.
To protect against electrical shock, do not immerse cord, plug, motor, motor stand,
motor base, main body or platform in water or any other liquid. Only use the Food Slicer
on a dry, water-free work surface. Always stand on a dry, insulated surface while using.
Avoid contact with moving parts! Never feed food by hand. Always use the Food
Pusher.
Do not use the Food Slicer outdoors.
The Blade is sharp. Be extremely careful when cleaning blade and when the blade is
spinning during operation.
Never use Steel Wool or scouring powder on any part of the Food Slicer.
People with pacemakers should consult their physician(s) before use. Electromagnetic
fields in close proximity to heart pacemaker could cause pacemaker interference or
pacemaker failure.
WARNING: Handling the cord on this product will expose you to lead, a chemical known
to the State of California to cause cancer, and birth defects or other reproductive harm.
Wash hands after handling. (California Health & Safety Code § 25249.5, et seq.)
Grounding/Voltage Warning
Common household current is 110-120 volts. As long as the outlet used with the tool is
rated from 110-120V there will be no complications using it with household receptacles.
Plug the tool into a 110-120V properly grounded outlet protected by a 15-amp Ground
Fault Interrupter.
NEVER try to plug a 110-120V tool into a 220-240V circuit or serious
complications and possible injury to the operator may occur. The
plugs have different shapes to prevent this.
Do NOT modify your plug in any way. If you have any doubt, call a qualified electrician.
REV 09b
SKU 42787
For technical questions, please call 1-800-444-3353.
Page 3
Assembly
Caution! To reduce risk of health hazards:
Before assembling the Food Slicer, thoroughly wipe off all parts with a clean rag
using warm soapy water and a mild anti-bacterial detergent. In addition, the following parts should be cleaned in a dish washer: Food Pusher (3), Blade Assembly
(15), and Food Tray (2).
After assembling the unit (see directions below), test the Food Slicer by running
several slices of day-old bread through the Food Slicer to insure that all parts are
working properly. Clean the Food Slicer after every use. Failure to follow all cleaning instructions and warnings may result in serious illness due to food poisoning.
Your Food Slicer will require assembly prior to use. It is important that your read
the entire manual to become familiar with the unit BEFORE you set up the Food Slicer.
Before assembling your Food Slicer, be sure that you have all parts described in the
Parts List on page 6. During Assembly, it will be helpful to refer to the Assembly Diagram on page 7. The Food Slicer must be cleaned, as described above, before the first
use and after all subsequent uses.
Note: Before assembling your Food Slicer check for damaged parts.
Slice Thickness Gauge
Food Tray (2)
Thickness Guide
Food Pusher (3)
Safety Button (8)
On/Off Button (7)
Blade Assembly (15)
Main Body (1)
Platform (4)
Figure 1 - Set-Up
Unfold the Platform (4) from the Main Body (1). Slide the Food Pusher (3) onto the
Food Tray (2). The arm of the Food Pusher fits over the fence on the Food Tray- see
Figure 1. The Food Tray with the attached Food Pusher (3) slides into the slot on the
Platform (4).
SKU 42787
For technical questions, please call 1-800-444-3353.
Page 4
Operation
Note: Locate the Food Slicer on a non-slip counter surface. The person using the
Food Slicer will be positioned in the area behind the Food Tray (2). The person’s
left hand will be on the Food Pusher (3) with thumb behind the thumb guard. The
person’s right hand will be operating the Safety Button (8) and the ON / OFF Button (7).
Adjusting
Knob (12)
Figure 2-Adjusting Knob
1.
Set the Adjust Knob (12) for the thickness of the slice that you desire. Turn the Adjust Knob (12) clockwise for thicker slices and counterclockwise to make the slices
thinner-see Figure 2.
2.
Slide the Food Tray out away from the Blade and towards the operator. Place the
food to be sliced on the Food Tray. Position the Food Pusher (3) so that it can hold
the food to be sliced as the Food Tray (2) is moved towards the Blade Assembly
(15).
Caution! Keep fingers away from the blade assembly at all times.
3.
In order to slice with the Food Slicer, both the ON/OFF Button (7) and the Safety
Button (8) must be pushed down at the same time. If either is not pushed down,
the Food Slicer will not operate. Use your right hand to operate the ON/OFF Button and the Safety Button.
4.
Your left hand should rest on the outer edge (furthest from the Blade Assembly) of
the Food Pusher (3) with your thumb protected behind thumb guard. When slicing
food, the Food Pusher (3) should push the food towards the Blade Assembly as
you slide the Food Tray (2) back and forth. Move the Food Tray (2) back and forth
steadily across the Blade Assembly (15).
Caution! Keep fingers and hand always behind the Food Pusher
and clear of the spinning Blade Assembly.
5.
To turn off the Food Slicer, take fingers off of the ON / OFF button and the Safety
Button.
SKU 42787
For technical questions, please call 1-800-444-3353.
Page 5
Removing and Replacing the Blade
Caution! When removing and replacing blade, be alert to sharp
blade teeth!
1.
Make certain that the Food Slicer is OFF and UNPLUGGED. Turn the Blade Assembly (15) counterclockwise to unlock it. Pull out the Blade Assembly.
Caution! Before first use and after every other use, clean the
Blade Assembly as described on page 3.
2.
To reinsert the Blade Assembly (15), line up the tabs on the Blade Assembly (15)
with the slots in the Small Gear (11). Once the Blade Assembly is seated with the
Small Gear, turn the Blade Assembly clockwise to lock it in position.
For Best Results
• Chill foods thoroughly before slicing.
• Slice foods wafer thin.
• Foods should be boneless.
• Fish and thin steaks will slice better if partially frozen.
• When slicing warm roasts, make certain to remove strings before slicing.
Maintenance
1.
Never use Steel Wool or scouring powder on any part of the Food Slicer.
2.
To eliminate risk of health hazards: Before assembling the Food Slicer, and with
the electrical plug unplugged, thoroughly wipe off all parts with a clean rag using
warm soapy water and a mild anti-bacterial detergent. In addition, the following
parts should be cleaned in a dishwasher: Food Pusher (3), Blade Assembly (15),
and Food Tray (2).
3.
Clean the Food Slicer after every use. Failure to follow all cleaning instructions
and warnings may result in serious illness due to food poisoning.
STORAGE
Line up the Adjusting Plate (9) with the Blade. Remove the Food Pusher (3) and
Food Tray (2). Fold up the Platform (4) against the Main Body (1). Wrap the Cord (16)
and store it under the Food Slicer. Store the entire unit in a sealed clean plastic bag.
The Food Slicer should be stored in a location that is out of reach of children.
SKU 42787
For technical questions, please call 1-800-444-3353.
Page 6
Unpacking
UNPACK AND CHECK CONTENTS
When unpacking your Food Slicer check to make sure the following parts are
included. If any parts are missing or broken, please call HARBOR FREIGHT TOOLS at
1-800-444-3353.
Parts List
Part
1
2
3
4
5
6
7
8
Description
Main Body
Food Tray
Food Pusher
Platform
Motor Base
Motor Stand
On/Off Button
Safety Button
Parts List
Quantity
1
1
1
1
1
1
1
1
Part
9
11
12
13
14
15
16
17
Description
Adjusting Plate
Small Gear
Adjusting Knob
Spring Stand
Stands
Blade Assembly
Power Cord
Motor
Quantity
1
1
1
1
1
1
1
1
Note: Some Parts are listed and shown for illustration purposes only and are not available individually as replacement parts.
PLEASE READ THE FOLLOWING CAREFULLY
THE MANUFACTURER AND/OR DISTRIBUTOR HAS PROVIDED THE PARTS DIAGRAM IN THIS
MANUAL AS A REFERENCE TOOL ONLY. NEITHER THE MANUFACTURER NOR DISTRIBUTOR
MAKES ANY REPRESENTATION OR WARRANTY OF ANY KIND TO THE BUYER THAT HE OR SHE
IS QUALIFIED TO MAKE ANY REPAIRS TO THE PRODUCT OR THAT HE OR SHE IS QUALIFIED TO
REPLACE ANY PARTS OF THE PRODUCT. IN FACT, THE MANUFACTURER AND/OR DISTRIBUTOR
EXPRESSLY STATES That ALL REPAIRS AND PARTS REPLACEMENTS SHOULD BE UNDERTAKEN
BY CERTIFIED AND LICENSED TECHNICIANS AND NOT BY THE BUYER. THE BUYER ASSUMES
ALL RISK AND LIABILITY ARISING OUT OF HIS OR HER REPAIRS TO THE ORIGINAL PRODUCT
OR REPLACEMENT PARTS THERETO, OR ARISING OUT OF HIS OR HER INSTALLATION OF
REPLACEMENT PARTS THERETO.
SKU 42787
For technical questions, please call 1-800-444-3353.
Page 7
Assembly Diagram
SKU 42787
For technical questions, please call 1-800-444-3353.
Page 8