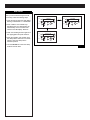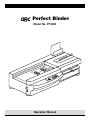
1
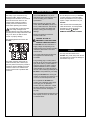
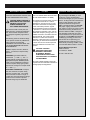
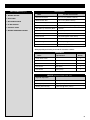
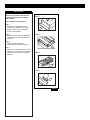
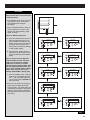
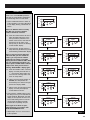
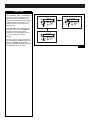
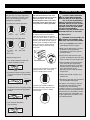
®
Perfect Binder
Model No. PF3200
Operation Manual
SAFETY MESSAGES
The safety of you and others is very
important to GBC. Important safety
messages and information are contained
within this manual as well as on the
machine itself. Please be certain to
carefully read and understand all of
these before operating the machine.
The safety alert symbol precedes
each safety message in this
Operator Manual. This symbol indicates a
potential personal safety hazard that could
hurt you or others, as well as cause
product or property damage.
The following pictorial is found on the
PF-3200:
IMPORTANT SAFEGUARDS
• Use the PF-3200 Binder only for its
intended purpose of binding paper and
covers according to the indicated
specifications.
• Before operating the machine, make
certain that the PF-3200 is placed on a
secure, stable work area. This will help
prevent the machine from falling and
possibly causing personal injury and
damage.
• There are NO user-serviceable parts
inside the machine. To avoid potential
personal injury and/or property or
machine damage,
DO NOT
REMOVE THE MACHINE’S COVER.
CAUTION: IN CASE OF
EMERGENCY, USE THE POWER
CORD AS A MAIN DISCONNECT.
• The socket-outlet shall be located near
the equipment and shall be easily
accessible.
• The grounding plug is a safety feature
and will only fit into the proper grounding
type power outlet. If you are unable to
insert the plug into an outlet, contact a
qualified electrician to have a suitable
outlet installed. Do not alter the plug on
the end of the cordset (if provided) of the
PF-3200. It was provided for your safety.
• Unplug the PF-3200 before moving the
machine or whenever the machine is not
in use for an extended period of time.
• Do not operate the PF-3200 if the
machine has a damaged power supply
cord or plug. Do not operate the
machine after any malfunction, if liquid
has been spilled into the machine, or if
the machine has been damaged in
any way.
• Do not overload electrical outlets beyond
their capacity. To do so can result in fire
or electrical shock.
2
• Do not attempt to service your PF-3200
yourself. Contact an authorized GBC
service representative for any required
repairs or major maintenance for your
PF-3200.
• Retain this Operating Instructions
manual for later use.
• The PF-3200 must be connected to a
supply voltage corresponding to the
electrical rating of the machine operating
instructions (also listed on the serial
number label).
This safety message means that you
could be seriously hurt or killed if you
open the product and expose yourself to
hazardous voltage. NEVER remove the
machine’s outer cover. ALWAYS refer
service requirements to qualified GBC
Personnel.
SERVICE
CLEANING
• You may clean the exterior of the
PF-3200 using a soft, damp cloth. Do not
use detergents or solvents as damage to
the machine may occur.
MAIN CORDSET SELECTION
FCC NOTE
EQUIPMENT MAINTENANCE AGREEMENT
(THE FOLLOWING NOTE APPLIES ONLY
TO THE UNITS RATED 220V 50HZ.)
(THE FOLLOWING NOTE APPLIES ONLY
TO THE UNITS RATED 115V 60HZ.)
By purchasing the PF-3200, you have
invested in a highly capable binding
machine that will give you years of reliable
service. To help protect this investment be
certain to take advantage of the GBC
Equipment Maintenance Agreement
(EMA). The EMA provides your PF-3200
with proper ongoing maintenance and
care, helping to ensure the years of quality
performance and long life built into the
machine. Without an EMA, a charge for
time and labor would result from every
normal maintenance or repair service call.
An EMA for your PF-3200 eliminates this
possibility by providing you with a low,
fixed annual cost for protecting your
valuable machine investment. For full
details about purchasing an EMA, contact
your local GBC Branch Office or contact:
CAUTION: WHEN CHOOSING A
DETACHABLE LINE CORD FOR
USE WITH YOUR PF-3200,
ALWAYS OBSERVE THE
FOLLOWING PRECAUTIONS:
The cordset consist of three parts; the
attachment plug, cordage and appliance
inlet. Each of these components must
have European regulatory approvals for
safety.
The following minimum electrical ratings
for the specific cordset are published for
safety purposes. DO NOT USE
CORDSETS THAT DO NOT MEET THE
FOLLOWING MINIMUM ELECTRICAL
REQUIREMENTS.
PLUG: 3 ampere, 250 volts, 50/60 Hz,
Class 1, 3 conductor, European safety
approved.
CORDAGE: Type H03VV-F3G0.75,
Harmonized ( < HAR > ). The “< >”
symbols indicate cordage approved to
appropriate European standard (NOTE:
“HAR” may be substituted for approval
mark of European safety agency which
approved the cordage. An example would
be “ < VDE > ”.)
This equipment has been tested and found
to comply with the limits for a Class A
digital device, pursuant to Part 15 of the
FCC Rules. These limits are designed to
provide reasonable protection against
harmful interference when the equipment
is operated in a commercial environment.
This equipment generates, uses, and can
radiate radio frequency energy and, if not
installed and used in accordance with the
Operator Manual, may cause harmful
interference to radio communications.
Operation of this equipment in a residential
area is likely to cause harmful interference
in which case the user will be required to
correct the interference at his/her own
expense.
CAUTION: CHANGES
OR MODIFICATIONS NOT
EXPRESSLY APPROVED
BY GENERAL BINDING
CORPORATION COULD VOID
YOUR AUTHORITY TO OPERATE
THE EQUIPMENT.
General Binding Corporation
500 Bond Street
Lincolnshire, IL 60069
Or Call: 1-800-790-7787
This Class A digital apparatus meets all
requirements of the Canadian InterferenceCausing Equipment Regulations.
APPLIANCE CONNECTOR: 3 ampere,
250 volts, 50/60 Hz, European safety
approved, Type IEC 320. The cordset
shall not exceed 3 meters in length. A
cordset with component electrical ratings
greater than the minimum specified
electrical ratings may be substituted.
3
SAFETY INSTRUCTIONS
CAUTION: PF-3200 has
implemented secondary
thermostat to prevent the glue
tank temperature from going over
392°F (200°C). When it occurs, the
power of PF-3200 will be automatically
turned off. You have to wait for the glue
tank to cool down before you can
restart the machine. If this problem
occurs again, call your authorized
dealer for service.
4
2
3
1
In case of EMERGENCY:
1. Press the “EMERGENCY” button when
you encounter a problem during
operation or bookbinding. This will shut
down all the actions of PF-3200, which
include the stations and motors.
Meanwhile, the LED DISPLAY of the
control panel will display and flash the
“STOP” symbol.
5
6
Figure 1
EMERGENCY
2. Correct the problem. Then turn the
“EMERGENCY” stop button to the right
in order to reset the machine. The
“START” LED will be lit.
RESET
EMERGENCY
Note: You can use “OPEN” and
“CLOSE” buttons to open or close the
clamp at this time.
3. This will clear the problem on your
PF-3200. Press the “START” button to
restart your PF-3200. The LED display
of the control panel will display and flash
“LOAD BOOK”.
STOP
STAND BY
NOTCH
MANUAL
FUNCTION
CLEAR
READY
COUNTER
CLOSE
AUTO
PAD
OPEN
START
Note: A. If you receive an error
(ERR=Lx), please refer to the
Appendix and follow the step
1 to 3 to reset your PF-3200.
B. Call for service if the error
message is still there.
4
SPECIFICATIONS
MAIN ASSEMBLIES (Fig. 1)
Model
PF-3200 Perfect Binder
1. NIPPING STATION
Maximum Book Size
12.6" x 15.75" (320mm x 400mm)
Minimum Book Size
3.15" x 1.97" (80mm x 50mm)
Maximum Binding Thickness
1.6" (40mm)
Glue Warm Up
25 minutes (varies depending upon glue type)
5. CONTROL PANEL
Glue Warm Up in Stand-by Mode
5 minutes
6. NIPPING PRESSURE CONTROL
Cycle Speed
360 cycles per hour
Production Speed
Up to 200 books per hour
Power Source
110V, 60 Hz (Option: 220V, 50 Hz)
Power Consumption
10 Amps.
Machine Weight
255 LBS (116 Kg)
Machine Dimension
46"(L) x 22"(W) x 15"(H) (1150x560x370mm)
2. GLUE TANK
3. NOTCHING STATION
4. CLAMP STATION
*Having unpacked your PF-3200, you will find the accessories as follows:
ACCESSORIES
Name
Specification
Quality
Cover-Sheet Holder
1
Bottom Cover
1
Screw Driver
6" (150mm)
1
Hex Wrench
0.16" (4mm)
1
Hex Wrench
0.24" (6mm)
1
ADHESIVE (Part#1725011: Available in 10 lbs. boxes)
Physical Properties:
Appearance/Form:
Opaque clear/Chips
Working Temperature:
320°F (160°C)
Working Glue Viscosity:
1,800 CPS @ 320°F (160°C)
5
INSTALLATION
Note: You must remove the three red
shipping brackets before installing
your PF-3200.
Step 1.
The procedures for installation:
Step 1:
Remove the red shipping bracket
located on the left side of the clamp
station as shown. Then reinstall the
screws in clamp station.
Step 2:
Remove two red shipping brackets that
are located around the nipping station
as shown.
Step 2.
Step 3:
Slide in the glue draining tray
underneath the glue tank as shown.
Step 4:
Place your PF-3200 on a safe, firm and
solid table. Then mount the cover-sheet
holder to the right side of the machine
as shown.
Step 3.
Step 4.
Figure 2
6
CONTROL PANEL
1
2
3
4
5
STAND BY
CLEAR
10
NOTCH
READY
MANUAL
EMERGENCY
FUNCTION
START
PAD
9
No. Symbol
COUNTER
CLOSE
AUTO
OPEN
8
7
6
Function
LED Display / Symbol Example
1
EMERGENCY
Stops all the actions of the machine. Except when “HOT”
shows on the LED display.
“STOP” (flashing)
2
STAND BY / LED
Temporarily lowers the temperature of glue tank so it won’t
burn the glue when the machine is not operated.
STBY00
3
CLOSE
Closes clamp.
4
LED DISPLAY
1. The amount of books bound.
2. Operating status.
3. Perform self-test and stir the hot melt glue.
4. Error messages.
____100
BIND
S-TEST
ERR = L1
5
CLEAR
Clears the display counter for books bound.
____0
6
COUNTER
Displays the current total amount of binding.
____25
7
START / LED
Indicates the “START” button is ready for proceeding
to the next operation.
8
OPEN
Opens clamp.
9
FUNCTION / LED
Select one of the function modes – MANUAL, AUTO, or PAD.
10
NOTCH / LED
Select the notching function during the bookbinding operation.
One of the mode indicators will be lit.
7
STARTUP
1. Turn ON the power switch of PF-3200
as shown. The heater of PF-3200 will
automatically heat the glue to the preset
working temperature and display the
status of the heating processes.
• The 4 leftmost spaces of LED: the
status of heating process (COLD,
WARM, or HOT).
Figure 3
• The 2 rightmost spaces of LED: the
elapsed time of heating.
2. Start of Glue Melting Process. The
status is COLD and the elapsed time is
one minute for this example as shown.
2.
STAND BY
3. Melting glue is processing. The status
is WARM and the elapsed time is 10
minutes for this example as shown.
NOTCH
COLD 01
MANUAL
FUNCTION
START
OPEN
3.
STAND BY
5. When the glue temperature has
reached the working temperature,
PF-3200 performs the self-test and
stirs the melting glue.
6. PF-3200 is ready for bookbinding and
set to MANUAL mode for your desired
operation. At this moment, the control
panel will display and flash “LOAD
BOOK” for your attention. For binding
operations, please refer to the
MANUAL, AUTO and PAD operations.
COUNTER
CLOSE
AUTO
PAD
4. After heating for a while, the glue
temperature has reached HOT status.
The elapsed time is 20 minutes for this
example as shown.
CLEAR
READY
NOTCH
WARM 10
MANUAL
FUNCTION
CLEAR
READY
COUNTER
CLOSE
AUTO
START
PAD
OPEN
4.
STAND BY
NOTCH
HOT 20
MANUAL
FUNCTION
CLEAR
READY
COUNTER
CLOSE
AUTO
START
PAD
OPEN
5.
STAND BY
NOTCH
S-TEST
MANUAL
FUNCTION
CLEAR
READY
COUNTER
CLOSE
AUTO
START
PAD
OPEN
6.
LOAD
STAND BY
NOTCH
NOTCH
READY
MANUAL
FUNCTION
FUNCTION
OPEN
COUNTER
CLOSE
AUTO
START
PAD
CLEAR
READY
MANUAL
COUNTER
CLOSE
AUTO
BOOK
STAND BY
CLEAR
START
PAD
OPEN
Figure 4
8
MANUAL MODE
After the “STARTUP” procedures, the
PF-3200 will automatically set itself
MANUAL operation and flashing “LOAD
BOOK” display. Note that the “NOTCH”
LED is ON.
LOAD
STAND BY
NOTCH
NOTCH
READY
MANUAL
FUNCTION
FUNCTION
AUTO
PAD
NOTCH
B. Then press the “CLOSE” button to
clamp down the book block and you
will see the flashing “PUSH START”
display.
Note: In case you need to adjust the
book block after you have closed the
clamps, you can press the “OPEN”
button twice to release it. The LED
display will show “PUSH CLOSE”. After
you have adjusted the book block, you
have to press and hold the “CLOSE”
button until the clamps close. Then you
will see the flashing “PUSH START”
display again.
C. Press the “START” button. The
LED display of control panel will
show a “←” sign and the clamp
station will move over the notching
station for notching.
2. After the first notching process, the
clamp station will remain to the left side
of PF-3200 and the LED display of the
control panel will display and flash
“LOAD COVER”.
FUNCTION
AUTO
PAD
NOTCH
PAD
NOTCH
FUNCTION
STAND BY
NOTCH
OPEN
CLEAR
READY
MANUAL
FUNCTION
START
PAD
OPEN
‹––––––––––
COUNTER
CLOSE
AUTO
START
PAD
CLEAR
READY
MANUAL
COUNTER
CLOSE
AUTO
OPEN
START
STAND BY
CLEAR
READY
MANUAL
FUNCTION
COUNTER
CLOSE
AUTO
START
OPEN
PUSH
STAND BY
CLEAR
READY
MANUAL
COUNTER
CLOSE
CLOSE
STAND BY
CLEAR
NOTCH
OPEN
START
COUNTER
CLOSE
AUTO
PAD
OPEN
START
LOAD
STAND BY
NOTCH
FUNCTION
NOTCH
FUNCTION
COUNTER
CLOSE
AUTO
START
PAD
CLEAR
READY
MANUAL
COUNTER
CLOSE
AUTO
COVER
STAND BY
CLEAR
READY
MANUAL
3. Center the cover sheet and adjust the
side guide: Measure the width of the
book plus half the thickness of the
spine. Then set side guide accordingly.
PAD
READY
MANUAL
FUNCTION
START
OPEN
PUSH
STAND BY
COUNTER
CLOSE
AUTO
START
1. A. Press the “OPEN” button and place
the book block inside the clamps. Be
sure to follow the label instructions
on the clamp to load the book block
to the RIGHT of the red line, then
slide the book block to the far LEFT
of the clamps and you will see the
flashing “PUSH CLOSE” display.
CLEAR
READY
MANUAL
COUNTER
CLOSE
BOOK
STAND BY
CLEAR
START
PAD
OPEN
4. Place the cover on the nipping station,
the “START” LED will be lit and flashing
“PUSH START”. Then press the
“START” button to move the clamp
station over the nipping station starting
the binding process for the book block
and cover sheet.
BIND
STAND BY
NOTCH
OPEN
MANUAL
FUNCTION
CLEAR
READY
COUNTER
CLOSE
AUTO
PAD
OPEN
START
Figure 5
9
MANUAL MODE (CONT.)
Note: If you accidentally remove or
drop the cover sheet during the
clamping station returning to the
nipping station, the control panel will
show “COVER?”. At this moment, you
have to place the cover on the nipping
station and press “START” button to
resume the process.
5. When the display indicates “PUSH
OPEN”, press the “OPEN” button to
open the clamps. Then, remove the
finished book from the right end of the
clamp station. Having completed one
bound book, the LED display of control
panel will count once for the total
binding amount as shown. Then the
control panel will display and flash
“LOAD BOOK” for binding next book.
6. Repeat step 1 to 5 for more books in
“MANUAL” operation.
STAND BY
NOTCH
COVER ?
MANUAL
FUNCTION
CLEAR
READY
COUNTER
CLOSE
AUTO
START
PAD
PUSH
STAND BY
NOTCH
OPEN
NOTCH
READY
MANUAL
FUNCTION
OPEN
STAND BY
CLEAR
MANUAL
COUNTER
CLOSE
FUNCTION
AUTO
NOTCH
PAD
1
OPEN
CLEAR
READY
MANUAL
FUNCTION
START
OPEN
STAND BY
COUNTER
CLOSE
AUTO
START
PAD
CLEAR
READY
COUNTER
CLOSE
AUTO
START
PAD
OPEN
Figure 6
10
AUTO MODE
Note: All books done in this mode must
be same thickness.
1. In the MANUAL mode, make one book.
Centering the cover to the centered
point and adjust the side guide
accordingly.
2. Press “FUNCTION” button to switch to
“AUTO” operation. The “AUTO” LED
will be lit and display flashing “LOAD
BOOK” as shown.
Note: The “NOTCH” LED is ON.
3. A. Press the “OPEN” button. Be sure to
follow the label instructions on the
clamp to load the book block to the
RIGHT of the red line, then slide the
book block to the far LEFT of the
clamps and you will see the flashing
“PUSH CLOSE” display.
B. Then press the “CLOSE” button to
clamp down the book block and you
will see the flashing “PUSH START”
display.
NOTCH
NOTCH
FUNCTION
AUTO
NOTCH
FUNCTION
NOTCH
4. Place the cover sheet onto the nipping
station when the display is flashing
“LOAD COVER”. The clamp station will
automatically move back to the position
above the nipping station and start the
binding process for the book block and
cover sheet.
FUNCTION
PAD
NOTCH
FUNCTION
STAND BY
NOTCH
PAD
OPEN
CLEAR
READY
MANUAL
FUNCTION
START
OPEN
‹––––––––––
COUNTER
CLOSE
AUTO
START
PAD
CLEAR
READY
MANUAL
COUNTER
CLOSE
AUTO
OPEN
START
STAND BY
CLEAR
READY
MANUAL
C. Press the “START” button. The LED
DISPLAY of control panel will show
the “←” sign. The clamp station will
move to the left side of PF-3200 and
will remain there.
START
OPEN
PUSH
STAND BY
COUNTER
CLOSE
AUTO
START
PAD
CLEAR
READY
MANUAL
COUNTER
CLOSE
AUTO
OPEN
CLOSE
STAND BY
CLEAR
READY
MANUAL
FUNCTION
START
PAD
OPEN
PUSH
STAND BY
COUNTER
CLOSE
AUTO
START
PAD
CLEAR
READY
MANUAL
COUNTER
CLOSE
BOOK
STAND BY
CLEAR
READY
MANUAL
FUNCTION
NOTCH
Note: In case you need to adjust the
book block after you have closed the
clamps, you can press the “OPEN”
button twice to release it. The LED
display will show “PUSH CLOSE”. After
you have adjusted the book block, you
have to press “CLOSE” button until the
clamps close. Then you will see the
flashing “PUSH START” display again.
LOAD
STAND BY
COUNTER
CLOSE
AUTO
PAD
OPEN
START
LOAD
STAND BY
NOTCH
NOTCH
READY
MANUAL
FUNCTION
FUNCTION
OPEN
COUNTER
CLOSE
AUTO
START
PAD
CLEAR
READY
MANUAL
COUNTER
CLOSE
AUTO
COVER
STAND BY
CLEAR
START
PAD
OPEN
Figure 7
11
AUTO MODE (CONT.)
Note: If you accidentally remove or
drop the cover sheet during the
clamping station return to the nipping
station, the control panel will show
“COVER?”. At this moment, you have
to place the cover on the nipping
station and press “START” button to
recover the process.
Having completed one bound book, the
clamp will automatically open and display
“UNLOAD” so that you can remove the
finished book from the right end.
Meanwhile, the LED display of control
panel will count once for the total binding
amount as shown. The PF-3200 will flash
“LOAD BOOK” display.
5. Place the same thickness of book block
onto the clamp as the label instructions
on the clamp. The clamp station will
automatically clamp down the book
block and move to the left. Repeat step
3 to 4 for more books in “AUTO”
operation.
STAND BY
NOTCH
COVER ?
MANUAL
FUNCTION
CLEAR
READY
COUNTER
CLOSE
AUTO
START
PAD
BIND
STAND BY
NOTCH
OPEN
MANUAL
FUNCTION
CLEAR
READY
COUNTER
CLOSE
AUTO
PAD
OPEN
START
STAND BY
NOTCH
UNLOAD
MANUAL
FUNCTION
CLEAR
READY
COUNTER
CLOSE
AUTO
START
PAD
OPEN
2
STAND BY
NOTCH
MANUAL
FUNCTION
CLEAR
READY
COUNTER
CLOSE
AUTO
START
PAD
OPEN
Figure 8
12
PADDING MODE
“PAD” is one of the PF-3200 operations
that apply to special binding applications
such as binding without a cover sheet.
STAND BY
CLEAR
1. Press “FUNCTION” button to switch to
“PAD” operation. The “PAD” LED will be
lit and display flashing “LOAD PAD” as
shown.
NOTCH
READY
MANUAL
FUNCTION
COUNTER
CLOSE
AUTO
START
PAD
OPEN
Note: The “NOTCH” LED is normally
OFF. But you can press “NOTCH”
button to actuate it, if desired.
2. A. Press the “OPEN” button. Be sure to
follow the label instructions on the
clamp to load the pad block to the
RIGHT of the red line, then slide the
pad block to the far LEFT of the
clamps and you will see the flashing
“PUSH CLOSE” display.
LOAD
STAND BY
NOTCH
NOTCH
READY
MANUAL
FUNCTION
FUNCTION
AUTO
COUNTER
CLOSE
AUTO
START
PAD
CLEAR
READY
MANUAL
COUNTER
CLOSE
PAD
STAND BY
CLEAR
START
PAD
OPEN
OPEN
B. Then press the “CLOSE” button to
clamp down the pad block and you will
see the flashing “PUSH START” display.
PUSH
STAND BY
Note: In case you need to adjust the
pad block after you have closed the
clamps, you can press the “OPEN”
button twice to release it. The LED
display will show “PUSH CLOSE”. After
you have adjusted the pad block, you
have to press “CLOSE” button until the
clamps close. Then you will see the
flashing “PUSH START” display again.
NOTCH
B. Having moved to the left position of
PF-3200, the clamp station will
automatically move back to the right
position and display “BIND”.
NOTCH
4. Then press the “OPEN” button to open
the clamp so that you can withdraw the
bound pad block. Meanwhile, the LED
display of control panel will count once
for the total binding amount. Then the
control panel will display and flash
“LOAD PAD” for padding next pad.
NOTCH
FUNCTION
BIND
CLEAR
COUNTER
CLOSE
OPEN
START
PUSH
STAND BY
NOTCH
FUNCTION
OPEN
COUNTER
CLOSE
AUTO
START
PAD
CLEAR
READY
MANUAL
COUNTER
CLOSE
AUTO
OPEN
STAND BY
CLEAR
READY
MANUAL
FUNCTION
OPEN
AUTO
PAD
NOTCH
PAD
READY
MANUAL
FUNCTION
START
OPEN
STAND BY
COUNTER
CLOSE
AUTO
START
PAD
CLEAR
READY
MANUAL
COUNTER
CLOSE
AUTO
OPEN
START
STAND BY
CLEAR
READY
MANUAL
FUNCTION
START
PAD
OPEN
PUSH
COUNTER
CLOSE
AUTO
START
PAD
NOTCH
C. Wait for a few seconds until the LED
display of control panel displays
“PUSH OPEN” as shown.
FUNCTION
CLEAR
READY
MANUAL
COUNTER
CLOSE
AUTO
STAND BY
3. A. Press the “START” button. The LED
display of control panel will show a
“←” sign and the clamp station will
move over the notching station and
return to clamp station.
NOTCH
READY
MANUAL
FUNCTION
CLOSE
STAND BY
CLEAR
START
PAD
OPEN
Note: If glue is too thick on spine,
adjust thickness in accordance with
GLUE ADJUSTMENT Section.
5. Repeat steps 2 to 4 for more books in
“PAD” operation.
Figure 9
13
STANDBY MODE
Press “STANDBY” button, the PF-3200 will
temporarily lower the temperature of glue
tank so it won’t burn the glue when the
machine is not operated. The LED displays
“STBY00” as shown below. Where “00” is
the timer display for the duration of the
standby period.
Press “STANDBY” button again when the
“STANDBY” LED is on, the PF-3200 will
reheat the glue tank to the working
temperature, then the “READY” LED will
be lit and waiting for your desired
operation.
LOAD
STAND BY
NOTCH
14
FUNCTION
STAND BY
NOTCH
FUNCTION
START
PAD
OPEN
STBY 00
COUNTER
CLOSE
AUTO
START
PAD
CLEAR
READY
MANUAL
COUNTER
CLOSE
AUTO
OPEN
CLEAR
READY
MANUAL
Note that you have to wait a few minutes
when LED displays “WARM00” status. The
glue tank of PF-3200 will be reheated,
then the control panel will display and flash
“LOAD BOOK” after “HOT” status.
NOTCH
READY
MANUAL
FUNCTION
BOOK
STAND BY
CLEAR
COUNTER
CLOSE
AUTO
START
PAD
OPEN
Figure 10
GLUE ADJUSTMENT
GLUE ADJUSTMENT
The glue level may require adjustment
when the thickness of the book or pad
varies. Use the following book spine
illustrations for guidelines.
Note that the thickness of the cover
sheet is an important factor for you to
make a good spine. Use only the
suitable thickness of the cover sheet
associated with the appropriate gluemeter position to make a good book.
• Increasing the holt-melt glue when
NIPPING PRESSURE CONTROL
Hollow
OR
The nipping pressure control knob is
located on the left-side of the machine
(next to the power switch). It allows you to
adjust the nipping pressure based on the
thickness of the books and the quality of
the book spine. Normally the thinner the
books, the more the nipping pressure.
The factory setting is set to the mark
on the scale.
Round
• Decreasing hot-melt glue when
Too much
glue on
both sides
OR
Nail head
1. Turn the glue adjustment lock knob
counter clockwise to loosen.
• Turn the knob clockwise to increase the
nipping pressure when round spine
occurs or making thinner books.
2. Increase the amount of glue by sliding
the knob to the right at the appropriate
position.
Glue Replacement:
WARNING: DO NOT ATTEMPT TO
REMOVE THE DRAINING TRAY
UNTIL THE GLUE COOLS DOWN.
1. Warm up the PF-3200 as described in
the STARTUP section on page 5.
2. Make sure the draining tray is covered
by Aluminum foil and positioned
underneath the glue tank so that the
tank drains into it.
6. Remove the glue drain tray and discard
the cold solidified drained glue.
MAX.
GLUE
SCRAPER
Max
Decrease the amount of glue by sliding
the knob to the left at the appropriate
position.
SPINE OF BOOK
MIN.
GLUE
SCRAPER
4. Close (Clockwise) the glue drain Allen
screw when the glue stops flowing.
Wait until the draining tray cools down.
Carefully empty the draining tray and
put a new Aluminum foil on it.
Reposition tray and continue draining
the glue tank.
5. Fill the glue tank with new glue up to
the Max. line.
SPINE OF BOOK
Min
CAUTION: GREAT CARE MUST
BE TAKEN WHEN HANDLING
HOT MOLTEN GLUE. BE SURE
NOT TO PLACE AN EXCESSIVE
AMOUNT OF GLUE IN THE TANK AT
ONE TIME. KEEP IT AT SUCH A LEVEL
THAT THE GLUE WILL NOT GO OVER
THE MAX. LINE IN THE TANK WHILE
THE APPLICATION DRUM IS
ROTATING. THIS WILL PREVENT GLUE
FROM SPILLING OUT OF THE TANK.
3. Use the 6 mm Allen wrench to open
(Counter Clockwise) the glue drain plug,
which is located on top of the glue tank.
• Adjusting the glue level:
Min
REPLENISHING THE GLUE TANK
• Turn the knob counter clockwise to
decrease the nipping pressure when
nail head spine occurs or making
thicker books.
Note that it’s not necessary to drain the
glue frequently if the machine is used
constantly under normal working
conditions. However, in case the glue has
been left unused for a long period of time
with the unit in the “ON” position, and the
quality is found to be unacceptable, use
the glue replacement procedures or call
your authorized dealer.
Max
3. Turn the knob clockwise to
lock the setting
15
MAINTENANCE
After you have finished using the binder
for the day, follow the following steps:
LOAD
STAND BY
1. Close the clamps while the LED display
flashing “LOAD BOOK” or “LOAD PAD”.
NOTCH
4. Press the “START” and “CLEAR” keys,
the clamp station will return to its home
position. Open the clamps to the
maximum position.
5. Turn the PF-3200 off. Clean the clamp
surfaces and wax them.
16
MANUAL
COUNTER
CLOSE
FUNCTION
AUTO
PAD
STAND BY
NOTCH
PAD
OPEN
CLEAR
READY
MANUAL
FUNCTION
COUNTER
CLOSE
AUTO
START
OPEN
NP SVC
CLEAR
READY
START
2. Press “START” and “CLEAR” keys
simultaneously. The clamp station will
automatically move to the left of the
machine and LED display “NP SVC”.
3. Clean the residual glue that might be on
the nipping plates and plate surfaces.
NOTCH
READY
MANUAL
FUNCTION
BOOK
STAND BY
CLEAR
COUNTER
CLOSE
AUTO
PAD
OPEN
START
Figure 11
SETUP FOR TIMERS
To enter the timer setup menu, you will
need to press and hold down both the
“OPEN” and “CLOSE” buttons, then turn
the power on. You should see “SET TR” in
the LED DISPLAY. Press the
“FUNCTION” button to sequentially
display TR1, TR2, TR3, TR4, TR5, TR6,
“SAVE”, “CANCEL”, and “RESET”. Once
you have selected the setting to change,
you need to press the “OPEN” to increase
the time and the “CLOSE” to decrease the
time within their ranges. Press
“FUNCTION” button until you see “SAVE”
in the LED DISPLAY. Then press the
“START” button to change it. Or select
“CANCEL” and press “START” button to
exit. To return all settings to default,
please use “RESET” followed by “START”
button to recover the factory settings.
CAUTION: WE ONLY
RECOMMEND YOU TO
CHANGE TR1.
DEFAULT TIMES FOR TRX
Name
Default Time
Range
Description
TR1
4 sec.
2.0 - 10 sec.
Nipping time.
TR2
1 sec.
0.5 - 5 sec.
Auto mode: After loading the cover, the
delay time before clamp station returns.
TR3
2 sec.
1.0 - 5 sec.
Auto mode: Clamp closing time
for the book.
TR4
1 sec.
0.5 - 5 sec.
Auto mode: Clamp opening time
for the book.
TR5
.5 sec.
0.5 - 5 sec.
Auto mode: The clamp detecting
time right after closing.
TR6
5 sec.
3.0 - 10 sec.
Padding mode: The closing time of
clamp before opening it.
The fastest speed of settings that AUTO mode can perform is: TR1 = 2 sec.,
TR2 = 0.5 sec., TR3 = 1 sec., TR4 = 0.5 sec., TR5 = 0.5 sec.
Note that the book making speed depends on thickness of the book
and the loading technique for the paper and cover.
17
®
General Binding Corporation
Northbrook, IL 60062-4195
http://www.GBC.com
Printed in the U.S.A. Rev. A1 GBC Part # 7301322