1
P3PC-3182-01ENZ0
ScanSnap N1800 Network Scanner
Operator's Guide
Contents
Copyright .................................................................................... 18
Introduction ................................................................................ 24
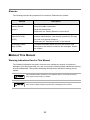
■ About This Manual .............................................................. 25
■ Opening Help ....................................................................... 28
Chapter 1 Overview ................................................................... 30
1.1
Scanner Features ............................................................ 31
■ Basic Uses for Scanned Data ........................................... 31
■ Configure and Manage with Ease ..................................... 32
■ Advanced Security Measures ............................................ 32
1.2
Part Names and Functions ............................................. 34
■ Front View ......................................................................... 34
■ Rear View .......................................................................... 35
■ Removable Parts ............................................................... 36
1.3
User Types and Operations ........................................... 37
1.3.1
1.3.2
1.4
Operations with Administrator Right....................................... 38
■ System Settings ................................................................ 38
■ Network Settings ............................................................... 39
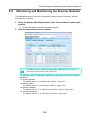
■ Monitoring & Management ................................................ 42
■ Device Test ....................................................................... 44
■ Job Mode Settings ............................................................. 44
Regular User Operations ....................................................... 45
System Requirements .................................................... 46
1.4.1
1.4.2
1.4.3
1.4.4
1.4.5
Requirements for Admin Tool ................................................ 46
Requirements for Central Admin Console.............................. 47
Requirements for Central Admin Server ................................ 48
Requirements for Related Servers......................................... 49
Network Requirements for Central Admin.............................. 52
2
1.4.6
1.4.7
Scanner Requirements for Central Admin ............................. 52
Port Number List .................................................................... 53
Chapter 2 Basic Scanner Operations ...................................... 56
2.1
Turning the Power On/Off .............................................. 57
2.1.1
2.1.2
2.2
Turning the Power On ............................................................ 57
Turning the Power Off ............................................................ 58
Using the Scanner Buttons ............................................ 59
■ Using the Power Button ..................................................... 59
■ Using the Top Cover Scan Button ..................................... 61
2.3
Using the LCD Touch Panel ........................................... 62
2.4
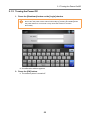
Using the On-Screen Keyboard ..................................... 63
■ Showing/Hiding the On-Screen Keyboard ......................... 63
■ Using the On-Screen Keyboard ........................................ 64
■ Keyboard Layout ............................................................... 64
Chapter 3 Administrator Operations (Overview) ..................... 66
3.1
Operating and Managing Scanners ............................... 67
3.2
Required Scanner Function Settings ............................ 69
Chapter 4 Administrator Operations
(LCD Touch Panel and Admin Tool) ........................... 74
4.1
Windows .......................................................................... 75
4.1.1
4.1.2
4.2
Administrator Windows via the LCD Touch Panel ................. 75
Administrator Windows via the Admin Tool............................ 76
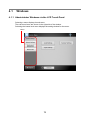
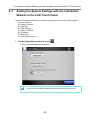
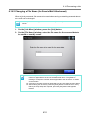
Administrator Login ........................................................ 78
4.2.1
Administrator Login: via the LCD Touch Panel ...................... 78
■ When Automatic Login is Not Set ...................................... 78
■ When Automatic Login is Set ............................................ 79
3
4.2.2
4.2.3
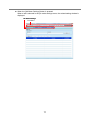
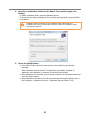
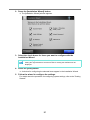
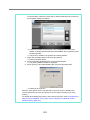
Setting up for Administrator Access via the Admin Tool ........ 80
■ Checking the Internet Explorer Cache Settings ................ 80
■ Setting the Internet Explorer Trusted Sites ....................... 81
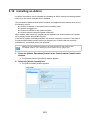
■ Installing the Admin Tool ................................................... 82
■ Uninstalling the Admin Tool ............................................... 86
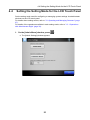
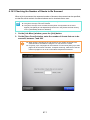
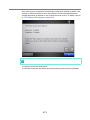
Administrator Login: via the Admin Tool ............................... 87
4.3
Setting the System Settings with the Installation
Wizard on the LCD Touch Panel .................................... 90
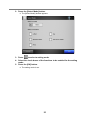
4.4
Setting the Setting Mode for the LCD Touch Panel ..... 92
4.5
Configuring the System ................................................. 94
4.5.1
4.5.2
4.5.3
4.5.4
4.5.5
4.5.6
4.6
Setting the Scan Options ............................................. 102
4.6.1
4.6.2
4.6.3
4.7
Setting the Multifeed Detection Method ............................... 102
Adjusting the Scan Starting Position
(Offset/Magnification) ........................................................... 105
Setting General Scanner Settings........................................ 106
Configuring the Login-Related Settings ..................... 107
4.7.1
4.7.2
4.7.3
4.8
Setting the Scanner Name ..................................................... 94
Setting the Language ............................................................. 96
Setting the Region/Timezone................................................. 97
Setting the Date/Time ............................................................ 98
Setting the Keyboard.............................................................. 99
Managing Certificates .......................................................... 100
■ Importing a Certificate File .............................................. 100
■ Deleting a Certificate File ............................................... 101
Setting the Login Settings .................................................... 107
Setting the Time to Standby Mode ...................................... 110
Changing the Admin Password............................................ 112
Configuring the Network Settings ............................... 113
4.8.1
4.8.2
4.8.3
4.8.4
4.8.5
4.8.6
Giving the Scanner an IP Address ....................................... 113
Setting the DNS Server........................................................ 115
Setting the WINS Server ...................................................... 116
Setting the NTP Server ........................................................ 117
Setting the Proxy Server ...................................................... 118
Checking the Network Connection with a Ping Test ............ 119
4
4.8.7
4.8.8
4.8.9
4.9
Checking the Network Operating Status .............................. 121
■ Checking the Network Status .......................................... 121
■ Setting the Link Speed/Duplex Mode .............................. 122
■ Setting Wake On LAN ..................................................... 122
Setting the Admin Connection.............................................. 123
Setting a Central Admin Server............................................ 125
Configuring the LDAP Settings ................................... 127
4.9.1
4.9.2
4.9.3
Setting the Login LDAP Server ............................................ 127
■ LDAP Search Target ....................................................... 129
Setting the e-Mail LDAP Server ........................................... 133
Setting the LDAP Search Parameters.................................. 135
4.10 Configuring the e-Mail-Related Settings ..................... 137
4.10.1 Setting the e-Mail Server...................................................... 137
4.10.2 Configuring Settings for Sending e-Mail............................... 139
4.10.3 Setting a File Name Format for When Attaching Scanned
Data to e-Mail....................................................................... 140
4.11 Setting the Fax Server .................................................. 142
4.12 Setting Folders for Saving Scanned Data .................. 143
4.12.1 Setting the Network Folders................................................. 143
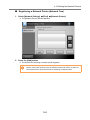
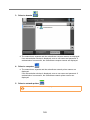
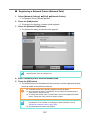
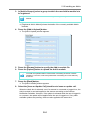
■ Registering a Network Folder (Network Tree) ................. 144
■ Registering a Network Folder (Network Path) ................. 146
■ Renaming a Network Folder ............................................ 147
■ Removing a Network Folder ............................................ 147
■ Viewing the Network Folder Details ................................ 148
4.12.2 Setting the FTP Server Folders............................................ 149
■ Registering an FTP Server Folder ................................... 149
■ Changing the FTP Server Folder Settings ...................... 151
■ Removing an FTP Server Folder ..................................... 151
■ Viewing the FTP Server Folder Details ........................... 152
4.12.3 Setting the SharePoint Folders ............................................ 153
■ Renaming a SharePoint Folder (Display Name) ............. 154
■ Removing a SharePoint Folder ....................................... 155
4.12.4 Setting a File Name Format for When Saving Scanned
Data...................................................................................... 156
5
4.13 Setting the Network Printers ........................................ 159
■ Checking the Printer Drivers ........................................... 160
■ Setting the Printer Properties .......................................... 161
■ Registering a Network Printer (Network Tree) ................ 164
■ Registering a Network Printer (Network Path) ................ 167
■ Renaming a Network Printer ........................................... 168
■ Removing a Network Printer ........................................... 169
■ Viewing the Printer Details .............................................. 169
4.14 Viewing the Scanner Details ........................................ 170
4.14.1 Viewing the System Status .................................................. 170
4.14.2 Viewing the Usage Status .................................................... 171
■ Viewing the Status of Consumable Parts ........................ 171
■ Resetting the Usage Counter .......................................... 171
4.14.3 Viewing the Status of Installed Options................................ 172
4.14.4 Managing the User Log........................................................ 173
■ Viewing the User Log Details .......................................... 173
■ Downloading the User Logs in CSV Format .................... 174
■ Clearing the User Logs .................................................... 174
4.14.5 Managing the System Log ................................................... 175
■ Viewing the System Log Details ...................................... 175
■ Downloading the System Log in CSV Format ................. 176
■ Clearing the System Log ................................................. 176
4.15 Managing the User Data Store and System
Settings .......................................................................... 177
4.15.1 Maintaining the User Data Store .......................................... 177
■ Backing up the User Data Store ...................................... 178
■ Restoring the User Data Store ........................................ 180
■ Clearing the User Data Store .......................................... 180
4.15.2 Maintaining the System Settings.......................................... 181
■ Downloading the System Settings in CSV Format .......... 181
■ Backing up System Settings ............................................ 182
■ Restoring the System Settings ........................................ 183
■ Resetting Factory Defaults .............................................. 184
6
4.16 Maintaining the System ................................................ 185
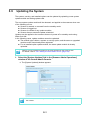
4.16.1 Updating the Scanner's System Software............................ 185
4.16.2 Checking for New Updates .................................................. 187
■ Checking for New Updates Manually .............................. 187
■ Checking for Updates at Scanner Startup ....................... 188
■ Requesting e-Mail Notification When a New Update is
Available ......................................................................... 188
4.16.3 Maintaining Add-in Modules................................................. 189
■ Installing an Add-in Module ............................................. 189
■ Uninstalling an Add-in Module ......................................... 190
■ Viewing the Add-in Status ............................................... 190
■ Uploading an Add-in Settings File ................................... 191
■ Setting the On-Screen Keyboard When Running
an Add-in ....................................................................... 191
4.16.4 Setting the Information Output Level.................................... 192
4.16.5 Obtaining Technical Support................................................ 193
4.16.6 Setting the Destination for Alert Notifications....................... 194
4.16.7 Getting a Screenshot on the LCD Touch Panel ................... 195
4.17 Setting a Job Sequence ............................................... 197
4.17.1 Job Setting Quick User Guide.............................................. 199
4.17.2 Setting a Job Sequence ....................................................... 201
■ Adding a Job Sequence .................................................. 201
■ Cloning a Job Sequence ................................................. 207
■ Editing a Job Sequence .................................................. 207
■ Deleting a Job Sequence ................................................ 208
■ Filtering Job Sequences .................................................. 208
■ Filtering the LDAP List ..................................................... 209
4.17.3 Setting a Job Menu .............................................................. 210
■ Adding a Job Menu ......................................................... 210
■ Cloning a Job Menu ........................................................ 214
■ Editing a Job Menu .......................................................... 214
■ Deleting a Job Menu ....................................................... 215
■ Viewing the Detailed Settings for a Job Menu ................. 215
4.17.4 Setting a Job Group ............................................................. 216
■ Adding a Job Group ........................................................ 216
■ Editing a Job Group ......................................................... 220
■ Deleting a Job Group ...................................................... 220
■ Viewing the Detailed Settings for a Job Group ................ 221
7
■ Assigning Job Menus to Users Not Included in a Job
Group ............................................................................. 221
■ Filtering the LDAP List ..................................................... 223
4.18 Messages ...................................................................... 224
4.18.1 Administrator Window Messages......................................... 225
Chapter 5 Administrator Operations
(Central Admin Console) ........................................... 226
5.1
Function List ................................................................. 227
5.2
Central Admin Console Window ................................. 230
5.3
Central Admin Console Quick Guide .......................... 231
5.4
Pre-settings for Using Central Admin Console .......... 233
5.4.1
5.4.2
5.4.3
5.4.4
5.4.5
Installing the Central Admin Server Software ...................... 233
■ Importing the Certificate .................................................. 237
Installing the Central Admin Console ................................... 238
Setting up a Firewall for the Central Admin Server .............. 240
Configuring the Scanner Settings for Central Admin
Management ........................................................................ 240
Uninstalling the Central Admin Server Software/Central
Admin Console..................................................................... 241
■ Uninstalling the Central Admin Server Software ............. 241
■ Uninstalling the Central Admin Console .......................... 241
5.5
Central Admin Server Login: via the Central Admin
Console .......................................................................... 242
5.6
Setting the Central Admin Server ................................ 245
■ Setting the Operating Environment ................................. 245
■ Changing the Admin Password ....................................... 248
■ Clearing the User Roaming Data .................................... 250
5.7
Setting Scanner Configuration .................................... 251
■ Importing Scanner Configuration ..................................... 254
■ Exporting Scanner Configuration .................................... 255
■ Adding Scanner Configuration ........................................ 256
8
■ Cloning a Scanners Configuration ................................... 257
■ Editing Scanner Configuration ......................................... 257
■ Deleting Scanner Configuration ...................................... 258
■ Viewing the Scanner List ................................................. 259
5.8
Monitoring and Maintaining the Scanner Network .... 260
5.9
Updating the System .................................................... 261
5.10 Installing an Add-in ....................................................... 263
5.11 Updating the Scanner Settings .................................... 266
5.12 Setting the Job Mode .................................................... 269
5.13 Viewing the Update Status Lists ................................. 272
5.14 Viewing the Scanners Operating Status ..................... 274
5.15 Viewing Event Log ........................................................ 275
■ Viewing Event Log ........................................................... 275
■ Downloading Event Log .................................................. 276
■ Clearing All Events .......................................................... 276
5.16 Collecting and Exporting Audit Logs .......................... 277
5.16.1 Collecting Audit Logs ........................................................... 277
5.16.2 Exporting Audit Logs ............................................................ 278
5.16.3 File Format of Audit Logs ..................................................... 279
5.17 Maintaining Central Admin Server Settings ............... 281
5.17.1
5.17.2
5.17.3
5.17.4
Backing Up Central Admin Server Settings ......................... 281
Restoring Central Admin Server Settings ............................ 283
Obtaining Technical Support on the Central Admin Server . 284
Migrating Data to an Updated Version of the Central Admin
Server Software ................................................................... 285
5.18 Messages ....................................................................... 287
5.18.1 Central Admin Console Messages....................................... 287
5.18.2 Event Log ............................................................................. 288
■ System Event Log ........................................................... 288
9
5.18.3 Backup/Restore Command Messages................................. 290
■ Information ...................................................................... 290
■ Error ................................................................................ 290
5.18.4 Audit Log Export Command Messages................................ 295
Chapter 6 Regular User Operations ...................................... 296
6.1
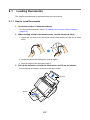
Loading Documents ..................................................... 297
6.1.1
6.1.2
6.2
How to Load Documents...................................................... 297
Loading Documents Using a Carrier Sheet.......................... 300
Using LCD Touch Panel Windows: Regular User ...... 303
6.2.1
6.2.2
6.2.3
[Main Menu] Window............................................................ 303
[Job Menu] Window.............................................................. 304
Regular User Settings Overview .......................................... 305
6.3
Logging in: Regular User Mode ................................... 306
6.4
Sending the Scanned Data by e-Mail .......................... 309
6.4.1
6.4.2
6.4.3
6.4.4
6.5
Sending the Scanned Data by Fax .............................. 324
6.5.1
6.5.2
6.5.3
6.5.4
6.6
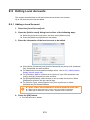
Selecting an e-Mail Target from the e-Mail Address Book... 313
Adding an e-Mail Target to the e-Mail Address Book........... 317
Editing an e-Mail Target in the e-Mail Address Book ........... 321
Deleting an e-Mail Target from the e-Mail Address Book .... 323
Selecting a Fax Number from the Fax Number List ............. 327
Adding a Contact to the Fax Number List ............................ 329
Editing a Contact in the Fax Number List............................. 331
Deleting a Contact from the Fax Number List ...................... 332
Printing the Scanned Data ........................................... 333
6.6.1
6.6.2
6.6.3
Scaling ................................................................................. 337
Positioning............................................................................ 341
Print Side.............................................................................. 343
6.7
Saving the Scanned Data to a Network Folder .......... 344
6.8
Saving the Scanned Data to a SharePoint Folder ...... 348
10
6.9
Setting the Scan Options ............................................. 356
6.9.1
6.9.2
6.9.3
6.9.4
6.9.5
6.9.6
6.9.7
6.9.8
6.9.9
6.9.10
6.9.11
6.9.12
6.9.13
6.9.14
6.9.15
6.9.16
6.9.17
6.9.18
6.9.19
6.9.20
Carrier Sheet........................................................................ 362
Color Mode........................................................................... 363
Paper Size............................................................................ 364
■ Long Page Mode ............................................................. 365
Resolution ............................................................................ 366
Scan Mode ........................................................................... 367
Document Feed Direction .................................................... 368
File Format ........................................................................... 369
Searchable PDF................................................................... 371
Setting a Keyword for the PDF............................................. 373
PDF Password ..................................................................... 378
Compression ........................................................................ 380
Brightness ............................................................................ 383
Contrast................................................................................ 384
Sharpness ............................................................................ 385
Dropout Color....................................................................... 386
Background Removal........................................................... 387
Blank Page Skip................................................................... 388
Page Orientation .................................................................. 389
Multifeed Detection (Layer and Length) ............................... 392
Edge Cropping ..................................................................... 393
6.10 Enabling/Disabling the Scan Viewer ........................... 395
6.11 Editing the Scanned Data in the Scan Viewer ............ 398
6.11.1
6.11.2
6.11.3
6.11.4
6.11.5
6.11.6
Viewing Scanned Data......................................................... 398
Rotating a Scanned Page .................................................... 399
Sorting Pages....................................................................... 399
Scanning an Additional Page ............................................... 400
Deleting a Scanned Page .................................................... 401
Editing Marked Characters to Be Set as Keywords ............. 401
6.12 Checking the User Log ................................................. 402
6.13 Maintenance .................................................................. 403
6.14 Processing a Job .......................................................... 405
6.14.1 Enabling/Disabling the Message Screen ............................. 408
6.14.2 Changing a File Name (for Save/e-Mail Attachment)........... 410
11
6.14.3 Checking the Number of Sheets to Be Scanned.................. 411
6.15 Changing a User Password ......................................... 414
Chapter 7 Scanner Care ......................................................... 416
7.1
Cleaning Supplies and Part to Clean .......................... 417
■ Cleaning Supplies ........................................................... 417
■ Which Parts and When .................................................... 418
7.2
Cleaning the Exterior of the Scanner .......................... 419
■ Cleaning Parts Other Than the LCD Touch Panel .......... 419
■ Cleaning the LCD Touch Panel ....................................... 419
7.3
Cleaning Inside the Scanner ........................................ 420
7.4
Cleaning the Carrier Sheet ........................................... 425
7.5
Replacing Parts ............................................................. 426
7.5.1
7.5.2
7.5.3
7.5.4
7.5.5
7.6
Part Numbers and Replacement Cycle................................ 426
Checking the Consumable Alert Status ............................... 427
Replacing the Pad Assy ....................................................... 428
Replacing the Pick Roller ..................................................... 430
Purchasing the Carrier Sheet............................................... 435
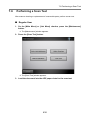
Performing a Scan Test ................................................ 436
■ Regular User ................................................................... 436
■ Administrator ................................................................... 438
7.7
Calibrating the LCD Touch Panel ................................ 439
Chapter 8 Troubleshooting .................................................... 442
8.1
Removing Jammed Documents .................................. 443
8.2
Network Connection Troubleshooting ........................ 446
8.2.1
Basic Network Operation Tests............................................ 446
■ Checking Basic Network Operation with a Ping Test ...... 446
■ Checking the Network Operating Status ......................... 448
12
8.2.2
8.2.3
8.3
■ Checking the NTP Server Settings by Synchronizing the
System Time .................................................................. 449
■ Checking the Mail Server by Sending a Test Mail ........... 450
Other Network Connection Troubleshooting ........................ 451
■ Failure to Connect to a Server Using Its IP Address ....... 451
■ Failure to Connect to a Server Using Its Host Name or
FQDN ............................................................................. 453
■ Failure to Add a Network Printer ..................................... 454
■ Failure to Print on a Network Printer ............................... 455
Failure to Access the Scanner using a Web Browser, Admin
Tool, or Central Admin Server.............................................. 456
Other Troubleshooting ................................................. 459
■ Scanner Cannot Be Turned On ....................................... 460
■ Scanner Does Not Start Up ............................................. 460
■ Data Cannot Be Scanned Properly ................................. 461
■ Scanned Data Is Inappropriate ........................................ 463
■ Cannot Login ................................................................... 464
■ Operation Does Not Work ............................................... 465
8.4
Points to Check before Contacting Your FUJITSU
Scanner Dealer .............................................................. 467
8.4.1
8.4.2
General Details .................................................................... 467
Error Status .......................................................................... 468
■ Problem When Connecting to the Scanner
via Computer .................................................................. 468
■ Document Feed Trouble .................................................. 468
■ Problem with Central Admin Server Software ................. 469
■ Sending an Original Document and Scanned Data ......... 469
8.5
Checking the Scanner Labels ...................................... 470
8.6
Pre-Maintenance Preparations .................................... 471
Appendix A Paper Specifications ........................................... 472
A.1
Paper Size ...................................................................... 473
A.2
Paper Quality ................................................................. 474
A.3
Maximum Document Loading Capacity ...................... 476
13
A.4
Area not to be Perforated ............................................. 477
A.5
Multifeed Detection Conditions ................................... 478
A.6
Conditions for Using the Carrier Sheet ...................... 480
A.6.1 Paper Size............................................................................ 480
A.6.2 Paper Quality ....................................................................... 480
Appendix B Management Settings and Files ....................... 482
B.1
e-Mail Address Setting Values ..................................... 483
B.2
Scanner Configuration File Format ............................. 484
B.2.1 Scanner Configuration File Format (for Importing)............... 484
B.2.2 Scanner Configuration File Format (for Exporting) .............. 485
Appendix C Root Certification Authority ............................... 488
C.1
Root Certification Authority List ................................. 489
Appendix D Scanner Specifications ...................................... 492
D.1
Installation Specifications ............................................ 493
D.2
Basic Scanner Specifications ...................................... 494
D.3
Changing the Functions on the On-Screen
Keyboard ....................................................................... 495
D.3.1 Switching the Keyboard Layout............................................ 495
Appendix E Editing Using User Editor ................................... 496
E.1
What is User Editor? ..................................................... 497
E.2
System Requirements .................................................. 498
E.2.1 Requirements for User Editor............................................... 498
E.2.2 Port Number List .................................................................. 498
14
E.3
Pre-settings ................................................................... 499
E.3.1 Installing User Editor ............................................................ 499
E.3.2 Uninstalling User Editor........................................................ 502
E.4
Windows of User Editor ............................................... 503
E.5
Starting/Exiting User Editor ......................................... 505
■ Starting User Editor ......................................................... 505
■ Exiting User Editor ........................................................... 505
E.6
Viewing the Mail Address Book/Local Accounts ....... 506
■ Loading from a Scanner .................................................. 506
■ Loading from a File .......................................................... 507
■ File Format of Mail Address Book Loaded from a File .... 508
■ File Format of Local Accounts Loaded from a File .......... 509
E.7
Editing an e-Mail Target in the Mail Address Book ... 510
E.7.1 Setting a Group .................................................................... 510
■ Adding a Group ............................................................... 510
■ Changing the Group Name ............................................. 511
■ Deleting a Group ............................................................. 511
E.7.2 Setting a Distribution List ..................................................... 512
■ Adding a Distribution List ................................................. 512
■ Editing a Distribution List ................................................. 513
■ Deleting a Distribution List ............................................... 513
E.7.3 Setting an e-Mail Address .................................................... 514
■ Adding an e-Mail Address ............................................... 514
■ Editing an e-Mail Address ............................................... 515
■ Deleting an e-Mail Address ............................................. 515
E.8
Editing Local Accounts ................................................ 516
E.8.1 Adding a Local Account ....................................................... 516
E.8.2 Editing a Local Account........................................................ 517
E.8.3 Deleting a Local Account ..................................................... 517
E.9
Discarding the Edited Mail Address Book or Local
Accounts ........................................................................ 518
15
E.10 Saving the Mail Address Book/Local Account ........... 519
■ Saving the Edited Information to the Scanner ................. 519
■ Saving the Edited Information to a File ........................... 520
E.11 User Editor Information Shown in User Log .............. 521
Appendix F Compatibility with Different Versions ................ 522
F.1
Updating System Settings from the Central Admin
Server ............................................................................. 523
F.2
Functional Compatibility Between the Scanner and
Central Admin Server ................................................... 524
F.3
Backing Up/Restoring Data Between Different
Versions of the Central Admin Server Software ........ 525
F.4
Event Source Name Output by Central Admin
Server ............................................................................. 526
Appendix G Glossary ............................................................... 528
About Maintenance .................................................................. 534
Index .......................................................................................... 536
16
17
Copyright
NetAdvantage 2007
Copyright© 2000-2007 Infragistics, Inc.
LEADTOOLS for .NET
Copyright© 2005 LEAD Technologies, Inc.
WinPcap3.1
Copyright© 1999 - 2005 NetGroup, Politecnico di Torino (Italy).
Copyright© 2005 - 2006 CACE Technologies, Davis (California).
All rights reserved.
Redistribution and use in source and binary forms, with or without
modification, are permitted provided that the following conditions are met:
1 Redistributions of source code must retain the above copyright notice, this list of
conditions and the following disclaimer.
2 Redistributions in binary form must reproduce the above copyright notice, this list of
conditions and the following disclaimer in the documentation and/or other materials
provided with the distribution.
3 Neither the name of the Politecnico di Torino, CACE Technologies nor the names of
its contributors may be used to endorse or promote products derived from this
software without specific prior written permission.
THIS SOFTWARE IS PROVIDED BY THE COPYRIGHT HOLDERS AND CONTRIBUTORS
"AS IS" AND ANY EXPRESS OR IMPLIED WARRANTIES, INCLUDING, BUT NOT LIMITED
TO, THE IMPLIED WARRANTIES OF MERCHANTABILITY AND FITNESS FOR A
PARTICULAR PURPOSE ARE DISCLAIMED. IN NO EVENT SHALL THE COPYRIGHT
OWNER OR CONTRIBUTORS BE LIABLE FOR ANY DIRECT, INDIRECT, INCIDENTAL,
SPECIAL, EXEMPLARY, OR CONSEQUENTIAL DAMAGES (INCLUDING, BUT NOT
LIMITED TO, PROCUREMENT OF SUBSTITUTE GOODS OR SERVICES; LOSS OF USE,
DATA, OR PROFITS; OR BUSINESS INTERRUPTION) HOWEVER CAUSED AND ON ANY
THEORY OF LIABILITY, WHETHER IN CONTRACT, STRICT LIABILITY, OR TORT
(INCLUDING NEGLIGENCE OR OTHERWISE) ARISING IN ANY WAY OUT OF THE USE
OF THIS SOFTWARE, EVEN IF ADVISED OF THE POSSIBILITY OF SUCH DAMAGE.
This product includes software developed by the University of California, Lawrence Berkeley
Laboratory and its contributors.
This product includes software developed by the Kungliga Tekniska Hogskolan and its
contributors.
This product includes software developed by Yen Yen Lim and North Dakota State University.
18
Portions Copyright© 1990, 1991, 1992, 1993, 1994, 1995, 1996, 1997 The Regents of the
University of California.
All rights reserved.
Redistribution and use in source and binary forms, with or without
modification, are permitted provided that the following conditions are met:
1 Redistributions of source code must retain the above copyright notice, this list of
conditions and the following disclaimer.
2 Redistributions in binary form must reproduce the above copyright notice, this list of
conditions and the following disclaimer in the documentation and/or other materials
provided with the distribution.
3 All advertising materials mentioning features or use of this software must display the
following acknowledgement: "This product includes software developed by the
University of California, Berkeley and its contributors."
4 Neither the name of the University nor the names of its contributors may be used to
endorse or promote products derived from this software without specific prior written
permission.
THIS SOFTWARE IS PROVIDED BY THE INSTITUTE AND CONTRIBUTORS "AS IS" AND
ANY EXPRESS OR IMPLIED WARRANTIES, INCLUDING, BUT NOT LIMITED TO, THE
IMPLIED WARRANTIES OF MERCHANTABILITY AND FITNESS FOR A PARTICULAR
PURPOSE ARE DISCLAIMED. IN NO EVENT SHALL THE REGENTS OR
CONTRIBUTORS BE LIABLE FOR ANY DIRECT, INDIRECT, INCIDENTAL, SPECIAL,
EXEMPLARY, OR CONSEQUENTIAL DAMAGES (INCLUDING, BUT NOT LIMITED TO,
PROCUREMENT OF SUBSTITUTE GOODS OR SERVICES; LOSS OF USE, DATA, OR
PROFITS; OR BUSINESS INTERRUPTION) HOWEVER CAUSED AND ON ANY THEORY
OF LIABILITY, WHETHER IN CONTRACT, STRICT LIABILITY, OR TORT (INCLUDING
NEGLIGENCE OR OTHERWISE) ARISING IN ANY WAY OUT OF THE USE OF THIS
SOFTWARE, EVEN IF ADVISED OF THE POSSIBILITY OF SUCH DAMAGE.
Portions Copyright© 1983 Regents of the University of California.
All rights reserved.
Redistribution and use in source and binary forms are permitted provided that the above
copyright notice and this paragraph are duplicated in all such forms and that any
documentation, advertising materials, and other materials related to such distribution and use
acknowledge that the software was developed by the University of California, Berkeley. The
name of the University may not be used to endorse or promote products derived from this
software without specific prior written permission.
THIS SOFTWARE IS PROVIDED "AS IS" AND WITHOUT ANY EXPRESS OR IMPLIED
WARRANTIES, INCLUDING, WITHOUT LIMITATION, THE IMPLIED WARRANTIES OF
MERCHANTIBILITY AND FITNESS FOR A PARTICULAR PURPOSE.
Portions Copyright© 1995, 1996, 1997 Kungliga Tekniska Hogskolan (Royal Institute of
Technology, Stockholm, Sweden).
All rights reserved.
Redistribution and use in source and binary forms, with or without modification, are permitted
provided that the following conditions are met:
19
1 Redistributions of source code must retain the above copyright notice, this list of
conditions and the following disclaimer.
2 Redistributions in binary form must reproduce the above copyright notice, this list of
conditions and the following disclaimer in the documentation and/or other materials
provided with the distribution.
3 All advertising materials mentioning features or use of this software must display the
following acknowledgement: "This product includes software developed by the
Kungliga Tekniska Hogskolan and its contributors."
4 Neither the name of the University nor the names of its contributors may be used to
endorse or promote products derived from this software without specific prior written
permission.
THIS SOFTWARE IS PROVIDED BY THE INSTITUTE AND CONTRIBUTORS "AS IS" AND
ANY EXPRESS OR IMPLIED WARRANTIES, INCLUDING, BUT NOT LIMITED TO, THE
IMPLIED WARRANTIES OF MERCHANTABILITY AND FITNESS FOR A PARTICULAR
PURPOSE ARE DISCLAIMED. IN NO EVENT SHALL THE INSTITUTE OR
CONTRIBUTORS BE LIABLE FOR ANY DIRECT, INDIRECT, INCIDENTAL, SPECIAL,
EXEMPLARY, OR CONSEQUENTIAL DAMAGES (INCLUDING, BUT NOT LIMITED TO,
PROCUREMENT OF SUBSTITUTE GOODS OR SERVICES; LOSS OF USE, DATA, OR
PROFITS; OR BUSINESS INTERRUPTION) HOWEVER CAUSED AND ON ANY THEORY
OF LIABILITY, WHETHER IN CONTRACT, STRICT LIABILITY, OR TORT (INCLUDING
NEGLIGENCE OR OTHERWISE) ARISING IN ANY WAY OUT OF THE USE OF THIS
SOFTWARE, EVEN IF ADVISED OF THE POSSIBILITY OF SUCH DAMAGE.
Portions Copyright© 1997 Yen Yen Lim and North Dakota State University.
All rights reserved.
Redistribution and use in source and binary forms, with or without modification, are permitted
provided that the following conditions are met:
1 Redistributions of source code must retain the above copyright notice, this list of
conditions and the following disclaimer.
2 Redistributions in binary form must reproduce the above copyright notice, this list of
conditions and the following disclaimer in the documentation and/or other materials
provided with the distribution.
3 All advertising materials mentioning features or use of this software must display the
following acknowledgement: "This product includes software developed by Yen Yen
Lim and North Dakota State University"
4 The name of the author may not be used to endorse or promote products derived
from this software without specific prior written permission.
THIS SOFTWARE IS PROVIDED BY THE AUTHOR "AS IS" AND ANY EXPRESS OR
IMPLIED WARRANTIES, INCLUDING, BUT NOT LIMITED TO, THE IMPLIED
WARRANTIES OF MERCHANTABILITY AND FITNESS FOR A PARTICULAR PURPOSE
ARE DISCLAIMED. IN NO EVENT SHALL THE AUTHOR BE LIABLE FOR ANY DIRECT,
INDIRECT, INCIDENTAL, SPECIAL, EXEMPLARY, OR CONSEQUENTIAL DAMAGES
(INCLUDING, BUT NOT LIMITED TO, PROCUREMENT OF SUBSTITUTE GOODS OR
SERVICES; LOSS OF USE, DATA, OR PROFITS; OR BUSINESS INTERRUPTION)
HOWEVER CAUSED AND ON ANY THEORY OF LIABILITY, WHETHER IN CONTRACT,
STRICT LIABILITY, OR TORT (INCLUDING NEGLIGENCE OR OTHERWISE) ARISING IN
20
ANY WAY OUT OF THE USE OF THIS SOFTWARE, EVEN IF ADVISED OF THE
POSSIBILITY OF SUCH DAMAGE.
Portions Copyright© 1993 by Digital Equipment Corporation.
Permission to use, copy, modify, and distribute this software for any purpose with or without
fee is hereby granted, provided that the above copyright notice and this permission notice
appear in all copies, and that the name of Digital Equipment Corporation not be used in
advertising or publicity pertaining to distribution of the document or software without specific,
written prior permission.
THE SOFTWARE IS PROVIDED "AS IS" AND DIGITAL EQUIPMENT CORP. DISCLAIMS
ALL WARRANTIES WITH REGARD TO THIS SOFTWARE, INCLUDING ALL IMPLIED
WARRANTIES OF MERCHANTABILITY AND FITNESS. IN NO EVENT SHALL DIGITAL
EQUIPMENT CORPORATION BE LIABLE FOR ANY SPECIAL, DIRECT, INDIRECT, OR
CONSEQUENTIAL DAMAGES OR ANY DAMAGES WHATSOEVER RESULTING FROM
LOSS OF USE, DATA OR PROFITS, WHETHER IN AN ACTION OF CONTRACT,
NEGLIGENCE OR OTHER TORTIOUS ACTION, ARISING OUT OF OR IN CONNECTION
WITH THE USE OR PERFORMANCE OF THIS SOFTWARE.
Portions Copyright© 1995, 1996, 1997, 1998, and 1999 WIDE Project.
All rights reserved.
Redistribution and use in source and binary forms, with or without modification, are permitted
provided that the following conditions are met:
1 Redistributions of source code must retain the above copyright notice, this list of
conditions and the following disclaimer.
2 Redistributions in binary form must reproduce the above copyright notice, this list of
conditions and the following disclaimer in the documentation and/or other materials
provided with the distribution.
3 Neither the name of the project nor the names of its contributors may be used to
endorse or promote products derived from this software without specific prior written
permission.
THIS SOFTWARE IS PROVIDED BY THE PROJECT AND CONTRIBUTORS "AS IS" AND
ANY EXPRESS OR IMPLIED WARRANTIES, INCLUDING, BUT NOT LIMITED TO, THE
IMPLIED WARRANTIES OF MERCHANTABILITY AND FITNESS FOR A PARTICULAR
PURPOSE ARE DISCLAIMED. IN NO EVENT SHALL THE PROJECT OR
CONTRIBUTORS BE LIABLE FOR ANY DIRECT, INDIRECT, INCIDENTAL, SPECIAL,
EXEMPLARY, OR CONSEQUENTIAL DAMAGES (INCLUDING, BUT NOT LIMITED TO,
PROCUREMENT OF SUBSTITUTE GOODS OR SERVICES; LOSS OF USE, DATA, OR
PROFITS; OR BUSINESS INTERRUPTION) HOWEVER CAUSED AND ON ANY THEORY
OF LIABILITY, WHETHER IN CONTRACT, STRICT LIABILITY, OR TORT (INCLUDING
NEGLIGENCE OR OTHERWISE) ARISING IN ANY WAY OUT OF THE USE OF THIS
SOFTWARE, EVEN IF ADVISED OF THE POSSIBILITY OF SUCH DAMAGE.
21
Portions Copyright© 1996 Juniper Networks, Inc. All rights reserved.
Redistribution and use in source and binary forms, with or without modification, are permitted
provided that: (1)source code distributions retain the above copyright notice and this
paragraph in its entirety, (2) distributions including binary code include the above copyright
notice and this paragraph in its entirety in the documentation or other materials provided with
the distribution.
The name of Juniper Networks may not be used to endorse or promote products derived
from this software without specific prior written permission.
THIS SOFTWARE IS PROVIDED "AS IS" AND WITHOUT ANY EXPRESS OR IMPLIED
WARRANTIES, INCLUDING, WITHOUT LIMITATION, THE IMPLIED WARRANTIES OF
MERCHANTABILITY AND FITNESS FOR A PARTICULAR PURPOSE.
Portions Copyright© 2001 Daniel Hartmeier
All rights reserved.
Redistribution and use in source and binary forms, with or without modification, are permitted
provided that the following conditions are met:
z Redistributions of source code must retain the above copyright notice, this list of
conditions and the following disclaimer.
z Redistributions in binary form must reproduce the above copyright notice, this list of
conditions and the following disclaimer in the documentation and/or other materials
provided with the distribution.
THIS SOFTWARE IS PROVIDED BY THE COPYRIGHT HOLDERS AND CONTRIBUTOR
"AS IS" AND ANY EXPRESS OR IMPLIED WARRANTIES, INCLUDING, BUT NOT LIMITED
TO, THE IMPLIED WARRANTIES OF MERCHANTABILITY AND FITNESS FOR A
PARTICULAR PURPOSE ARE DISCLAIMED. IN NO EVENT SHALL THE COPYRIGHT
HOLDERS OR CONTRIBUTORS BE LIABLE FOR ANY DIRECT, INDIRECT, INCIDENTAL,
SPECIAL, EXEMPLARY, OR CONSEQUENTIAL DAMAGES (INCLUDING, BUT NOT
LIMITED TO, PROCUREMENT OF SUBSTITUTE GOODS OR SERVICES; LOSS OF USE,
DATA, OR PROFITS; OR BUSINESS INTERRUPTION) HOWEVER CAUSED AND ON ANY
THEORY OF LIABILITY, WHETHER IN CONTRACT, STRICT LIABILITY, OR TORT
(INCLUDING NEGLIGENCE OR OTHERWISE) ARISING IN ANY WAY OUT OF THE USE
OF THIS SOFTWARE, EVEN IF ADVISED OF THE POSSIBILITY OF SUCH DAMAGE.
Portions Copyright 1989 by Carnegie Mellon.
Permission to use, copy, modify, and distribute this program for any purpose and without fee
is hereby granted, provided that this copyright and permission notice appear on all copies
and supporting documentation, the name of Carnegie Mellon not be used in advertising or
publicity pertaining to distribution of the program without specific prior permission, and notice
be given in supporting documentation that copying and distribution is by permission of
Carnegie Mellon and Stanford University. Carnegie Mellon makes no representations about
the suitability of this software for any purpose. It is provided "as is" without express or implied
warranty.
22
WinDump3.9.5
Copyright© 1999 - 2005 NetGroup, Politecnico di Torino (Italy).
Copyright© 2005 - 2006 CACE Technologies, Davis (California).
All rights reserved.
Redistribution and use in source and binary forms, with or without modification, are permitted
provided that the following conditions are met:
1 Redistributions of source code must retain the above copyright notice, this list of
conditions and the following disclaimer.
2 Redistributions in binary form must reproduce the above copyright notice, this list of
conditions and the following disclaimer in the documentation and/or other materials
provided with the distribution.
3 Neither the name of the Politecnico di Torino, CACE Technologies nor the names of
its contributors may be used to endorse or promote products derived from this
software without specific prior written permission.
THIS SOFTWARE IS PROVIDED BY THE COPYRIGHT HOLDERS AND CONTRIBUTORS
"AS IS" AND ANY EXPRESS OR IMPLIED WARRANTIES, INCLUDING, BUT NOT LIMITED
TO, THE IMPLIED WARRANTIES OF MERCHANTABILITY AND FITNESS FOR A
PARTICULAR PURPOSE ARE DISCLAIMED. IN NO EVENT SHALL THE COPYRIGHT
OWNER OR CONTRIBUTORS BE LIABLE FOR ANY DIRECT, INDIRECT, INCIDENTAL,
SPECIAL, EXEMPLARY, OR CONSEQUENTIAL DAMAGES (INCLUDING, BUT NOT
LIMITED TO, PROCUREMENT OF SUBSTITUTE GOODS OR SERVICES; LOSS OF USE,
DATA, OR PROFITS; OR BUSINESS INTERRUPTION) HOWEVER CAUSED AND ON ANY
THEORY OF LIABILITY, WHETHER IN CONTRACT, STRICT LIABILITY, OR TORT
(INCLUDING NEGLIGENCE OR OTHERWISE) ARISING IN ANY WAY OUT OF THE USE
OF THIS SOFTWARE, EVEN IF ADVISED OF THE POSSIBILITY OF SUCH DAMAGE.
This product includes software developed by the University of California, Lawrence Berkeley
Laboratory and its contributors.
Secure iNetSuite 2.5J
Copyright© 2008 Dart Communications
23
Introduction
Thank you for purchasing the Network Scanner ScanSnap N1800.
This easy-to-operate network scanner is used to scan documents for further use.
Trademarks
Microsoft, Windows, Windows Vista, Windows Server, and SharePoint are either registered
trademarks or trademarks of Microsoft Corporation in the United States and/or other
countries.
Adobe, the Adobe logo, Acrobat, and Adobe Reader are either registered trademarks or
trade names of Adobe Systems Incorporated in the United States and/or other countries.
Intel, Pentium, and Intel Core are registered trademarks or trademarks of Intel Corporation in
the United States and other countries.
ABBYY and FineReader are trademarks of ABBYY.
Linux is the registered trademark or trademark of Linus Torvalds in the U.S. and other
countries.
Red Hat is the registered trademark or trademark of Red Hat, Inc. in the United States and
other countries.
ScanSnap and the ScanSnap logo are registered trademarks or trademarks of PFU LIMITED
in Japan.
Other company names and product names are the registered trademarks or trademarks of
the respective companies.
Manufacturer
PFU LIMITED
International Sales Dept., Imaging Business Division, Products Group Solid Square East
Tower, 580 Horikawa-cho, Saiwai-ku, Kawasaki-shi Kanagawa 212-8563, Japan
Phone: (81-44) 540-4538
All Rights Reserved, Copyright© PFU LIMITED 2010
24
Manuals
The following manuals are prepared for the scanner. Read them as needed.
Manual
Description
ScanSnap N1800
Getting Started
(paper)
Provides useful and detailed information on the scanner
setup and cable connections.
Read this manual first.
Referred to as "Getting Started" in this manual.
ScanSnap N1800
Operator's Guide
(PDF)
Contains further information about scanner settings,
scanner administration, and scanner operations, and may
be used as a general reference.
Referred to as "Operator's Guide" in this manual.
ScanSnap N1800
Help (HTML)
Provides information about items on the screens, and
descriptions and actions to take for the messages. Read it
as needed.
■About This Manual
Warning Indications Used in This Manual
The following indications are used in this manual to obviate any chance of accident or
damage to you and people near you, and your property. Warning labels indicate the warning
level and statements. The symbols indicating warning levels and their meanings are as
follows:
WARNING
CAUTION
This indication alerts operators to an operation that, if not strictly observed,
may result in severe injury or death.
This indication alerts operators to an operation that, if not strictly observed,
may result in safety hazards to personnel or damage to the product.
25
Symbols Used in This Manual
Besides warning indicators, the following symbols are also used in this manual:
This symbol alerts operators to particularly important information. Be sure to
read this information.
This symbol alerts operators to helpful advice regarding operations.
This symbol is used to indicate information about administrator operations.
Each operation method is indicated by the following symbols:
z
Administrator operating via the LCD touch panel.
z
Administrator operating via the network interface using the Network Scanner
Admin Tool.
Admin
z Central
Console
Administrator operating via the network interface using the Scanner Central
Admin Console.
This symbol is used to indicate information about regular user operations.
Arrow Symbols in This Manual
Right-arrow symbols (J) are used to connect icons or menu options you should select in
succession.
Example: Select the [Start] menu J [Computer].
Screen Examples in This Manual
Screenshots in this manual are used according to guidelines provided by Microsoft
Corporation.
The screen examples in this manual are subject to change without notice in the interest of
product improvement.
The screen examples used in this manual are of Windows Vista.
The actual windows and operations may differ depending on the operating system that you
are using. If the actual screen differs from the screen examples in this manual, operate by
following the actual displayed screen.
26
Abbreviations Used in This Manual
The following abbreviations are used in this manual:
Abbreviation
Used
Option
Windows
Windows® operating system
Windows XP
Windows® XP Professional operating system
Windows® XP Home Edition operating system
Windows Vista
Windows Vista® Home Basic operating system
Windows Vista® Home Premium operating system
Windows Vista® Business operating system
Windows Vista® Enterprise operating system
Windows Vista® Ultimate operating system
Windows 7
Windows® 7 Starter operating system
Windows® 7 Home Premium operating system
Windows® 7 Professional operating system
Windows® 7 Enterprise operating system
Windows® 7 Ultimate operating system
Windows Server
2003
Windows Server® 2003, Standard Edition
Windows Server® 2003, Enterprise Edition
Windows Server® 2003, Datacenter Edition
Windows Server
2008
Windows Server® 2008 Standard
Windows Server® 2008 Enterprise
Windows Server® 2008 Datacenter
Exchange
Microsoft® Exchange Server 2003
Microsoft® Exchange Server 2007 (supported by 64-bit operating
systems only)
Microsoft® Exchange Server 2010 (supported by 64-bit operating
systems only)
.NET Framework
Microsoft® .NET Framework
SharePoint
Microsoft® Office SharePoint® Server 2007
Microsoft® SharePoint® Server 2010 (supported by 64-bit operating
systems only)
OpenSolaris
OpenSolaris™
27
Abbreviation
Used
Option
Solaris 10
Solaris™ 10 Operating System
Red Hat
Enterprise Linux
Red Hat® Enterprise Linux® 4
Suse Linux
Enterprise Server
Suse® Linux Enterprise Server 10
Internet Explorer
Microsoft® Internet Explorer®
IIS
Microsoft® Internet Information Services
SQL Server 2005
Express Edition
Microsoft® SQL Server™ 2005 Express Edition
Adobe Acrobat
Adobe® Acrobat®
Adobe Reader
Adobe® Reader®
RightFax
RightFax Business Server (Version 9.3)
Intel Pentium III
Processor
Intel® Pentium® III Processor
Scanner
Network Scanner ScanSnap N1800
Carrier sheet
ScanSnap Carrier Sheet
Admin Tool
Network Scanner Admin Tool
User Editor
Network Scanner User Editor
Central Admin
Console
Scanner Central Admin Console
Central Admin
Server
Scanner Central Admin Server
Network Folder
A folder that is set to save scanned data in the file server or FTP
server
SharePoint
Folder
A folder that is set to save scanned data in the SharePoint server
Red Hat® Enterprise Linux® 5
Suse® Linux Enterprise Server 11
■Opening Help
When the [Help] button is available on the window or dialog box that is displayed during the
operation, you can open Help by pressing it.
Help provides information about items on the screens and actions to take for the messages.
On the touch panel, the Help button is displayed as
28
.
29
Chapter 1
Overview
1.1 Scanner Features .................................................................................................. 31
1.2 Part Names and Functions................................................................................... 34
1.3 User Types and Operations ................................................................................. 37
1.4 System Requirements .......................................................................................... 46
30
1.1
Scanner Features
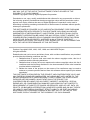
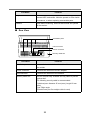
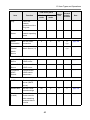
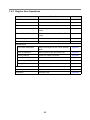
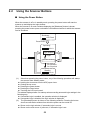
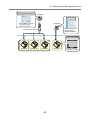
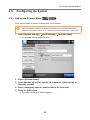
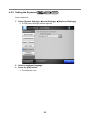
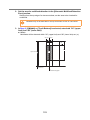
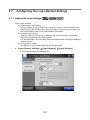
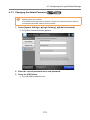
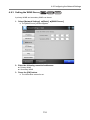
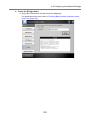
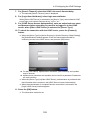
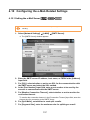
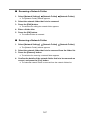
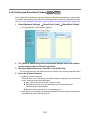
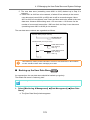
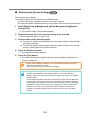
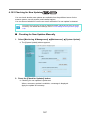
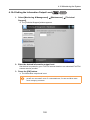
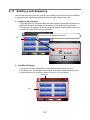
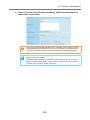
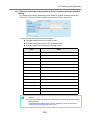
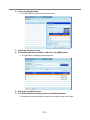
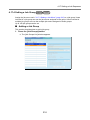
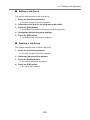
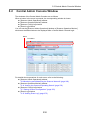
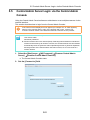
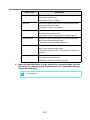
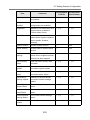
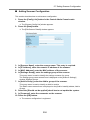
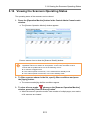
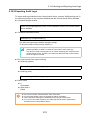
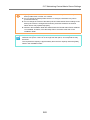
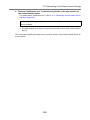
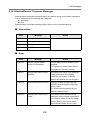
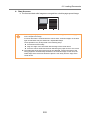
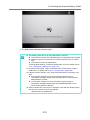
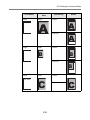
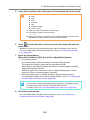
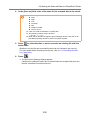
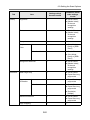
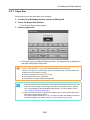
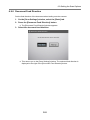
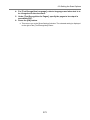
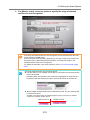
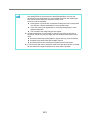
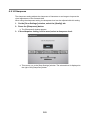
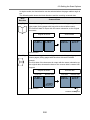
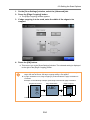
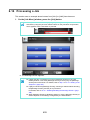
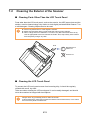
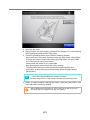
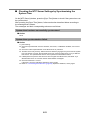
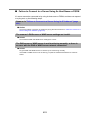
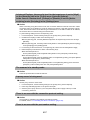
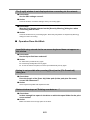
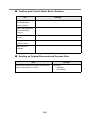
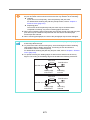
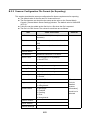
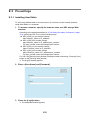
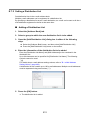
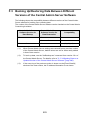
■ Basic Uses for Scanned Data
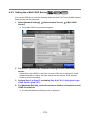
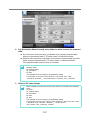
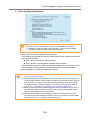
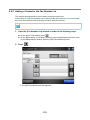
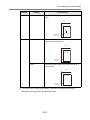
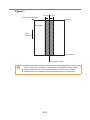
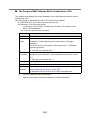
This easy-to-operate network scanner is used to scan documents for further use:
1. Scanned data can be sent as an e-mail attachment.
2. Scanned data can be sent by fax.
3. Scanned data can be printed on a network printer.
4. Scanned data can be saved in a network folder.
5. Scanned data can be saved in a SharePoint folder.
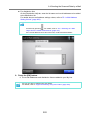
1 Send e-Mail
SMTP Server
Internet
2 Send Fax
Original
Document
Fax Server
3 Print
ᧄⵝ⟎
Scanner
Scanned Data
User
Authentification
Print Server
LDAP Server
SharePoint
Server
5
SharePoint
Folder
31
File Server
or
FTP Server
Save
Save
4 Network
Folder
1.1 Scanner Features
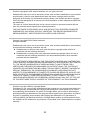
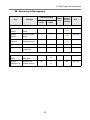
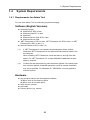
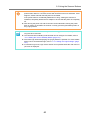
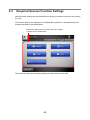
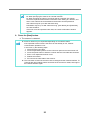
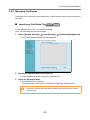
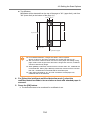
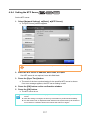
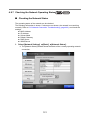
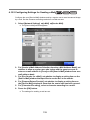
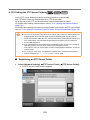
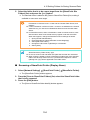
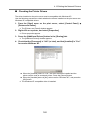
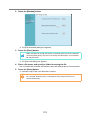
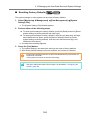
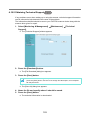
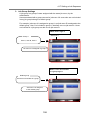
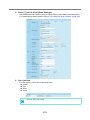
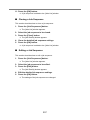
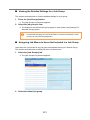
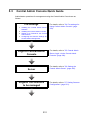
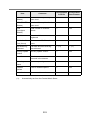
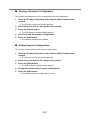
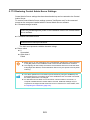
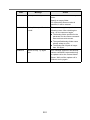
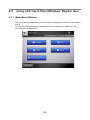
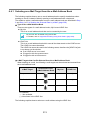
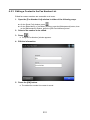
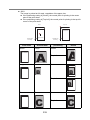
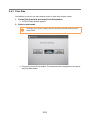
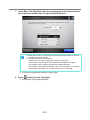
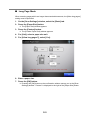
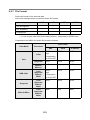
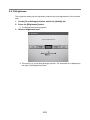
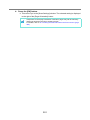
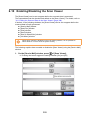
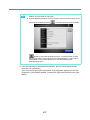
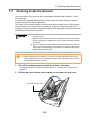
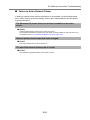
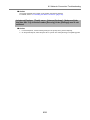
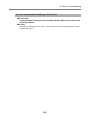
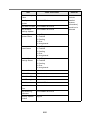
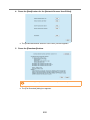
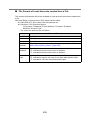
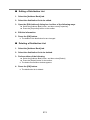
■ Configure and Manage with Ease
Configuration and management of the scanner can be easily performed via the LCD touch
panel on the scanner or via the "Admin Tool" or the "Central Admin Console" installed on
a computer.
Computer
Computer
Admin Tool
Central Admin Console
Central Admin
Server
Set one scanner at
a time via the
network interface
Set multiple scanners
at a time via the
network interface
LCD Touch Panel
Scanner
Scanner
Scanner
Scanner
Directly set one
scanner at a time
z Admin Tool
Application that connects to each scanner and configures the scanner settings.
z Central Admin Console
Application that connects Central Admin Server, which manages multiple
scanners, and manages operating environment and operating status of multiple
scanners.
■ Advanced Security Measures
The following security functions are provided for the scanner.
z Login authentication can restrict user access.
z Scanned data can be converted to password protected PDF files.
z Scanned data can be protected.
Since the scanner is intended to be shared by multiple users, data privacy is an important
factor. The following security measures are used to protect the data against untoward
access:
z Encryption
The scanned data is temporarily stored in the scanner during being e-mailed,
faxed, printed, or saved. Because it is always stored in encrypted form, no one can
read it even if the disk contents are parsed.
z Scanned data deletion
After the scanned data has been e-mailed, faxed, printed or saved, the temporary
data is deleted. Even if an error interrupts this process, leaving some scanned data
in the scanner, this will automatically be deleted at the next start up.
32
z Secure initialize
When initializing the data in the scanner, the free disk space can be also
overwritten with meaningless random data. When the user data store is cleared
from the scanner, the old cipher key is deleted and a new cipher key is generated.
This totally eliminates the possibility of access to any user data remaining in the
free disk space.
There is no input pathway to the scanner for files via external memory media, and input
pathways of files via the network are limited to the minimum. Security patches are
provided to protect the scanner against virus attacks. Taking these measures enables the
scanner to be protected against virus infection.
33
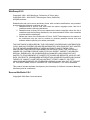
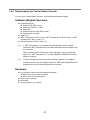
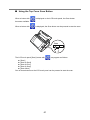
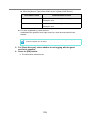
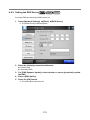
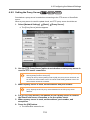
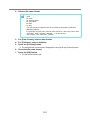
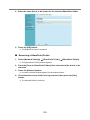
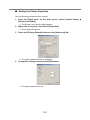
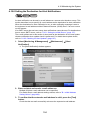
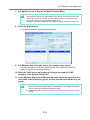
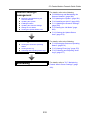
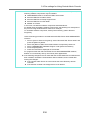
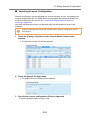
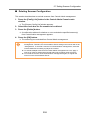
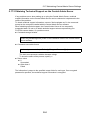
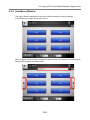
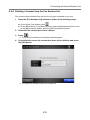
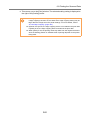
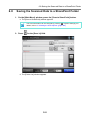
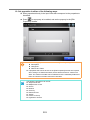
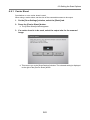
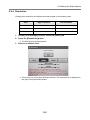
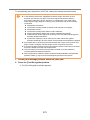
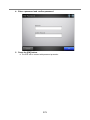
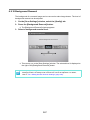
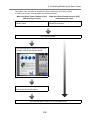
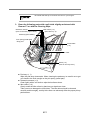
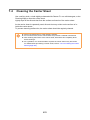
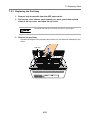
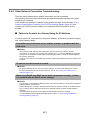
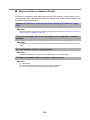
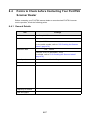
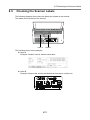
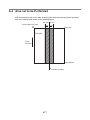
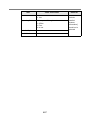
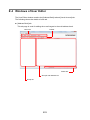
1.2 Part Names and Functions
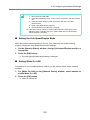
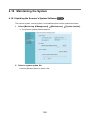
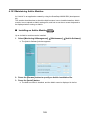
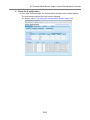
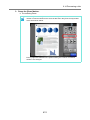
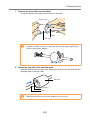
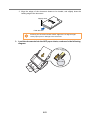
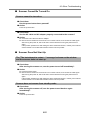
1.2
Part Names and Functions
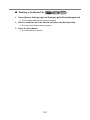
■ Front View
Extension
ADF paper chute
Side guides
Top cover release catch
Power button
Scan button
LCD touch panel
Top cover
Stacker
Part Name
Function
Extension
Can be pulled out and adjusted to the size of the document
being scanned.
ADF paper chute
Holds the documents waiting to be scanned.
Side guides
Adjust to the width of the paper, to prevent skewing of the
scanned pages.
Top cover release catch
Pull to open the top cover.
Power button
Turns on scanner or brings up the [Login] window from
standby mode or power off status. For details, refer to
"Using the Power Button" (page 59).
Scan button
Starts the scan process. For details, refer to "Using the
Top Cover Scan Button" (page 61).
LCD touch panel
Accepts user input and displays the scanner control
windows. The LCD touch panel buttons are used to setup
scans.
For details, refer to "2.3 Using the LCD Touch Panel"
(page 62).
34
Part Name
Function
Top cover
Frames the LCD touch panel, and covers the upper
scanner/ADF mechanism. Must be opened to clean inside
the scanner, or when replacing consumable parts.
Stacker
Open before scanning. Scanned documents are ejected
on the stacker.
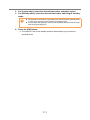
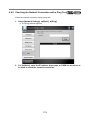
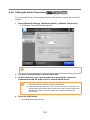
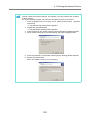
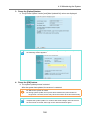
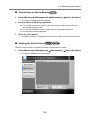
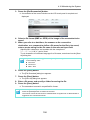
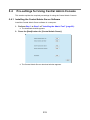
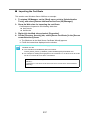
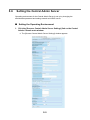
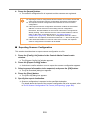
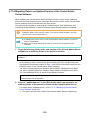
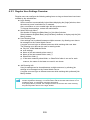
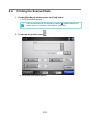
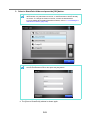
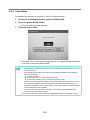
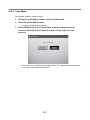
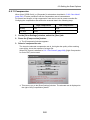
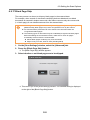
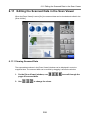
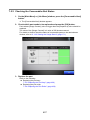
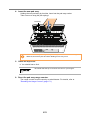
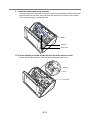
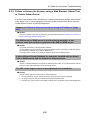
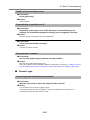
■ Rear View
Ventilation ports
LAN connector
Power connector
Security cable slot
Part Name
Function
Ventilation ports
Lets out the heated air from the inside of the scanner to
the outside.
Power connector
Connects the scanner to the AC adapter.
LAN connector
Connects the scanner to the network.
Security cable slot
Slot for commercially available security cable to prevent
against theft.
The following security cable is recommended.
Cylindrical part: diameter 25 mm (max), length 50 mm
(max)
Type: Right angle
(includes bent part if a straight cable is used)
35
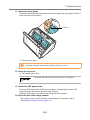
1.2 Part Names and Functions
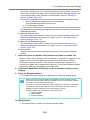
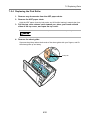
■ Removable Parts
ADF paper chute
Sheet guide
Pick roller
Pad assy
Part Name
ADF paper chute
Sheet guide
Function
Help to guide documents from the ADF paper chute to the
stacker.
Pick roller
Pad assy
36
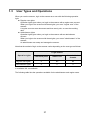
1.3
User Types and Operations
When you use the scanner, login to the scanner as a user with the following operation
right.
z Regular user rights
Operation rights given when you login to the scanner with a regular user account.
When you login to the scanner with these rights, you are a "regular user" of the
scanner.
A regular user can scan documents and then send, print, or save the resulting
data.
z Administrator rights
Operation rights given when you login to the scanner with an administrator
account.
When you login to the scanner with these rights, you are an "administrator" of the
scanner.
An administrator can setup and manage the scanner.
Note that the method of login to the scanner varies depending on the user type as follows:
Login method
Operation rights
LCD touch panel
Admin Tool
Central Admin
Console
Regular user rights
A
NA
NA
Administrator rights
A
A
A
A: available NA: not available
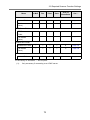
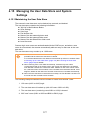
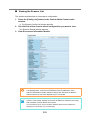
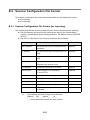
The following table lists the operations available for the administrator and regular users.
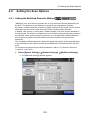
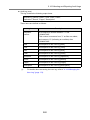
37
1.3 User Types and Operations
1.3.1 Operations with Administrator Right
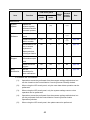
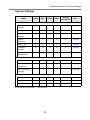
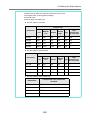
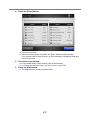
■ System Settings
LCD touch panel
Item
Function
Basic
mode
Advanced
mode
Admin
Tool
Central
Admin
Console
See...
Local Settings
Import
Scanner
Settings
Import scanner
settings
NA
NA
NA
A
page 266
Scanner
Name
Set the scanner
name (*1)
A
A
A
NA
page 94
Language
Selection
Set the language
A
A
A
NA
page 96
Region/
Timezone
Set the region/
timezone (*1)
A
A
A
A
page 97
Date/Time
Set the date/time
(*1)
A
A
A
A
(*2)
page 98
Keyboard
Settings
Set the keyboard
NA
A
A
A
page 99
Certificate
Management
Manage
certificates
NA
A
(*3)
A
A
page 100
Multifeed
Settings
Set the multifeed
detection method
NA
A
A
A
page 102
Scanner
Adjustment
Set the offset and
magnification
settings
NA
A
A
NA
page 105
General
Scanner
Settings
Set general
scanner settings
NA
A
A
A
page 106
Scanner Settings
38
LCD touch panel
Item
Function
Basic
mode
Advanced
mode
Admin
Tool
Central
Admin
Console
See...
Login Settings
Login
Settings
Set the login
settings (*1)
NA
A
A
A
page 107
Standby
Mode
Set the standby
mode and/or
automatic logout
NA
A
A
A
page 110
Admin
Password
Change the
admin password
(*1)
A
A
A
NA
page 112
A: available NA: not available
(*1):
Operations can be performed in the Installation Wizard.
(*2):
The [Date / Time] input field and [Get Time] button cannot be used.
(*3):
Certificates cannot be imported.
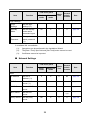
■ Network Settings
LCD touch panel
Item
Function
Basic
mode
Advanced
mode
Admin
Tool
Central
Admin
Console
See...
Basic
IP Address
Set the IP
address (*1)
A
A
A
NA
page 113
DNS Server
Set the DNS
server (*1)
A
A
A
A
page 115
WINS Server
Set the WINS
server
A
A
A
A
page 116
NTP Server
Set the NTP
server
NA
A
A
A
(*2)
page 117
Proxy Server
Set the proxy
server
NA
A
A
A
page 118
39
1.3 User Types and Operations
LCD touch panel
Item
Function
Basic
mode
Advanced
mode
Admin
Tool
Central
Admin
Console
See...
Ping
Check the
network
connection with a
Ping test
A
A
A
NA
page 119
Network
Status
Check the
network operating
status
A
A
A
NA
page 121
Admin
Connection
Set the admin
connection
A
A
A
A
(*3)
page 123
Scanner
Central
Admin
Server
Set the Central
Admin Server (*1)
A
A
A
A
(*4)
page 125
Network Admin
Authentication Server
Login LDAP
Server
Set the login
LDAP server
NA
A
A
A
page 127
e-Mail LDAP
Server
Set the e-mail
LDAP server
NA
A
A
A
page 133
Customize
LDAP
Search
Customize the
LDAP search
parameters
NA
A
A
A
page 135
SMTP server
Set the e-mail
server (SMTP
server)
A
A
A
A
page 137
Send e-Mail
Set the e-mailrelated settings
NA
A
A
A
page 139
File Names
(e-Mail)
Set the file name
format used for
when attaching
scanned data to
e-mails
NA
A
A
A
page 140
e-Mail
40
LCD touch panel
Item
Function
Fax Server
Set the fax server
Admin
Tool
Central
Admin
Console
See...
Basic
mode
Advanced
mode
NA
A
A
A
page 142
A
A
A
A
(*5)
page 143
NA
A
A
A
page 156
Fax
Network Folder
Network
Folder
Set the network
folders
File Names
(Save)
Set the file name
format used for
when saving
scanned data
FTP Server Folder
FTP Server
Folder
Set the FTP
server folders
NA
A
A
A
(*5)
page 143
File Names
(Save)
Set the file name
format used for
when saving
scanned data
NA
A
A
A
page 156
SharePoint Folder
SharePoint
Folder
Set the
SharePoint
folders
NA
NA
A
A
(*5)
page 153
File Names
(Save)
Set the file name
format used for
when saving
scanned data
NA
NA
A
A
page 156
A
A
A
A
(*5)
page 159
Print
Network
Printer
Set the network
printers
A: available NA: not available
(*1):
(*2):
(*3):
(*4):
(*5):
Operations can be performed in the Installation Wizard.
Synchronization not possible.
Contents of the SSL Certificate are not shown.
[Address] and [Port Number] cannot be set.
Printers, folders and SharePoint folders that can be accessed from the Central
Admin Server can be set.
41
1.3 User Types and Operations
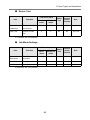
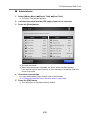
■ Monitoring & Management
LCD touch panel
Item
Function
Basic
mode
Advanced
mode
Admin
Tool
Central
Admin
Console
See...
Status Details
System
Status
View the system
status
A
A
A
A
(*1)
page 170
Usage
Status
View the usage
status
A
A
A
A
(*1)
page 171
Installed
Options
View the status of
installed options
NA
A
A
A
(*1)
page 172
User Log
Manage user logs
A
A
A
NA
page 173
System Log
Manage the
system log
A
A
A
NA
page 175
Data Management
User Data
Store
Maintain the user
data store
NA
A
(*2)
A
NA
page 177
System
Settings File
Maintain the
system settings
NA
A
(*3)
A
NA
page 181
42
LCD touch panel
Item
Function
Basic
mode
Advanced
mode
Admin
Tool
Central
Admin
Console
See...
Maintenance
System
Update
Update the
scanner system
software/check for
released updates
NA
A
(*5)
A
NA
(*4)
page 185
Add-in
Software
View the Add-in
status
NA
A
A
NA
(*1)
page 190
Install/uninstall an
Add-in module
NA
NA
A
A
(*4)
page 189
Set whether or not
the on-screen
keyboard is
displayed when
running an Add-in
NA
A
A
NA
page 191
Set the
information output
level
NA
A
A
NA
page 192
Obtain technical
support
NA
NA
A
NA
page 193
Set the
destination for
alert notifications
NA
A
A
A
page 194
Technical
Support
Alert
Notification
A: available NA: not available
(*1):
Operations cannot be performed from the scanner settings edit window, but
can be viewed on the Central Admin Console [Scanner Details] window.
(*2):
When using the LCD touch panel, only the user data delete operation can be
performed.
(*3):
When using the LCD touch panel, only the system settings reset or clear
operation can be performed.
(*4):
Operations cannot be performed from the scanner settings edit window, but
can be performed from the Central Admin Console [Scanner Admin
Operations] window.
(*5):
When using the LCD touch panel, the update cannot be performed.
43
1.3 User Types and Operations
■ Device Test
LCD touch panel
Item
Function
Basic
mode
Advanced
mode
Admin
Tool
Central
Admin
Console
See...
Screen
Calibration
Calibrate the LCD
touch panel
A
A
NA
NA
page 439
Scan Test
Perform a scan
test
A
A
NA
NA
page 436
Admin
Tool
Central
Admin
Console
See...
A: available NA: not available
■ Job Mode Settings
LCD touch panel
Item
Function
Basic
mode
Advanced
mode
Job
Sequences
Set a job
sequence
NA
NA
A
A
page 201
Job Menus
Set a job menu
NA
NA
A
A
page 210
Job Groups
Set a job group
NA
NA
A
A
page 216
A: available NA: not available
44
1.3.2 Regular User Operations
Item
Function
See...
e-Mail
Send the scanned data by e-mail
page 309
Fax
Send the scanned data by fax
page 324
Print
Print the scanned data
page 333
Save
Save the scanned data to a network
folder
page 344
Scan to SharePoint
Save the scanned data to a SharePoint
folder
page 348
Scan Settings
Set the scan options
page 356
Scan Viewer
Enable/disable the scan viewer
page 395
Edit e-Mail Addresses
Edit e-mail targets in the e-mail address
book
page 321
Edit Fax Numbers
Edit contacts in the fax number list
page 331
Roller Cleaning
Clean the inside of scanner
page 420
Scan Test
Perform a scan test
page 436
Administrator Login
Show the window for administrator login
page 79
Change Password
Change a user password
page 414
Consumable Alert
Indicate when parts need replacing
page 426
User Log
Check user operations
page 402
Job Menu
Process a job
page 405
Maintenance
45
1.4 System Requirements
1.4
System Requirements
1.4.1 Requirements for Admin Tool
For use of the Admin Tool, the following requirements apply:
Software (English Versions)
z Operating System
z Windows XP SP3 or later
z Windows Vista SP1 or later
z Windows 7
z Windows Server 2003 SP2 or later
z Windows Server 2008
z .NET Framework 2.0 SP2 or later, .NET Framework 3.0 SP2 or later, or .NET
Framework 3.5 SP1 or later (*1)
z Internet Explorer 6 SP2 or later (*2)
(*1):
If .NET Framework is not installed, the administrator will be notified.
Download .NET Framework from the Microsoft Web site and install it into
the computer.
When installing .NET Framework, check that there is enough free disk
space. For .NET Framework 2.0, at least 280 MB of additional free disk
space is required.
(*2):
Confirm that the latest security patch has been applied. If the latest patch
has not been applied, download operations (such as manual download)
may not be possible. For Windows XP, "KB933566" must be applied to
Internet Explorer.
Hardware
z Any computer which runs the supported software
32 MB or more of free memory space
64 MB or more of free disk space
z XGA monitor or better
z LAN cable
z Pointing device (e.g. mouse)
46
1.4.2 Requirements for Central Admin Console
For use of the Central Admin Console, the following requirements apply:
Software (English Versions)
z Operating System
z Windows XP SP3 or later
z Windows Vista SP1 or later
z Windows 7
z Windows Server 2003 SP2 or later
z Windows Server 2008
z Admin Tool
z .NET Framework 2.0 SP2 or later, .NET Framework 3.0 SP2 or later, or .NET
Framework 3.5 SP1 or later (*1)
z Internet Explorer 6 SP2 or later (*2)
(*1):
If .NET Framework is not installed, the administrator will be notified.
Download .NET Framework from the Microsoft Web site and install it into
the computer.
When installing .NET Framework, check that there is enough free disk
space. For .NET Framework 2.0, at least 280 MB of additional free disk
space is required.
(*2):
Confirm that the latest security patch has been applied. If not applied,
problems with the window display may arise. MS08-024 (KB947864) and
subsequent security update programs are required.
Hardware
z Any computer which runs the supported software
32 MB or more of free memory space
64 MB or more of free disk space
z XGA monitor or better
z LAN cable
z Pointing device (e.g. mouse)
47
1.4 System Requirements
1.4.3 Requirements for Central Admin Server
For use of the Central Admin Server, the following requirements apply:
Software (English Versions)
z Operating System
z Windows Server 2003 SP2 or later
z Windows Server 2008 (*1)
z .NET Framework 2.0 SP2 or later, .NET Framework 3.0 SP2 or later, or .NET
Framework 3.5 SP1 or later
z Internet Explorer 6 SP2 or later (*2)
z IIS 5.0 or later (*3) (*4)
z SQL Server 2005 Express Edition
(*1):
To use HTTPS, CAPICOM must be previously installed. If CAPICOM is not
installed, the self-signed certificate is not imported for communicating with
HTTPS.
(*2):
Confirm that the latest security patch has been applied.
(*3):
A Web server function of IIS 5.0 or later must be installed.
(*4):
When installing IIS 7.0 or later, make sure to install the following
components.
z IIS-WebServer
z IIS-CommonHttpFeatures (IIS-StaticContent/IIS-DefaultDocument/
IIS-HttpErrors)
z IIS-ApplicationDevelopment (IIS-ASPNET/IIS-NetFxExtensibility/IISISAPIExtensions/IIS-ISAPIFilter)
z IIS-HealthAndDiagnostics (IIS-HttpLogging/IIS-RequestMonitor)
z IIS-Security (IIS-RequestFiltering)
z IIS-Performance (IIS-HttpCompressionStatic)
z IIS-WebServerManagementTools
z IIS-ManagementConsole
Hardware
z Any computer which runs the supported software
Intel Pentium III Processor, 1 GHz and above, or equally interchangeable
processor
512 MB or more of free memory space
700 MB or more of free disk space
z XGA monitor or better
z LAN cable
48
1.4.4 Requirements for Related Servers
For related servers, the following requirements apply:
Server
LDAP server
Operating System
Windows Server 2003
Function
Active Directory
Windows Server 2008
OpenSolaris
OpenLDAP
Solaris10
Red Hat Enterprise Linux
Suse Linux Enterprise Server
SMTP Server
Windows Server 2003
SMTP, Exchange
Windows Server 2008
File Server
Windows Server 2003
Windows Shared Folder
Windows Server 2008
OpenSolaris
Samba
Solaris10
Red Hat Enterprise Linux
Suse Linux Enterprise Server
SharePoint Server
Windows Server 2003
SharePoint
Windows Server 2008
FTP Server
Windows Server 2003
FTP
Windows Server 2008
Print Server
Windows Server 2003
Windows Shared Printer (*)
Windows Server 2008
DNS Server
Windows Server 2003
DNS
Windows Server 2008
WINS Server
Windows Server 2003
WINS
Windows Server 2008
DHCP Server
Windows Server 2003
Windows Server 2008
49
DHCP
1.4 System Requirements
Server
NTP Server
Operating System
Windows Server 2003
Function
NTP
Windows Server 2008
Red Hat Enterprise Linux
Fax Server
Windows Server 2003
RightFax
Windows Server 2008
(*):
To use as network printer, Windows XP compatible printer driver must be
installed.
LDAP Server
LDAP (Lightweight Directory Access Protocol) is a protocol for accessing a directory
databases over a TCP/IP network. It can be used to administrator networked users e-mail
addresses and operating environments.
When connected using encryption (SSL), this is called the "LDAPS Server".
The LDAP server can be used to perform the following:
z User authentication at login
z Finding or entering e-mail addresses in an address book
SMTP Server
SMTP (Simple Mail Transfer Protocol) is a protocol for sending e-mail.
The SMTP server can be used to perform the following:
z Sending the scanned data as an e-mail
z Sending the scanned data by fax
File Server
The file server shares the disk on a server with other computers on a network, and
enables use of the disk from an external computer.
Using this file server enables scanned data to be saved to a file server network folder.
SharePoint Server
SharePoint is the collective name for the elements of an Internet Explorer based
document management platform provided by Microsoft.
Using a SharePoint server enables scanned data to be saved to a SharePoint folder on
the SharePoint server.
50
FTP Server
FTP (File Transfer Protocol) is a standard network protocol used for copying files between
hosts on the network based on TCP/IP.
An FTP server which connects with SSL encryption is called an "FTPS Server".
Using this FTP server enables scanned data to be saved to an FTP server network folder.
Print Server
The print server refers to the computer or device used when multiple client computers use
a printer on the network. It receives print requests from the client computers on the
network and delivers them to the printer connected with the print server.
z Windows XP compatible printer drivers must be registered.
z Printer must be able to spool print jobs (to hard disk or memory). Contact your
printer dealer if uncertain whether your printer has a spool function.
z Printers that allow the status of print errors to be easily checked (via an LCD control
panel, or similar) are recommended.
DNS Server
The function of DNS servers is the translation (resolution) of humanly memorable host
names and FQDN into the corresponding numeric IP addresses.
WINS Server
The WINS server handles name registration requests from WINS clients and registers
their names and IP addresses with the server database. The WINS server responds to
NetBIOS name queries submitted by clients and returns the IP address of the queried
name if it is listed in the server database. In addition, when a DNS name resolution fails,
the query can be transferred to the WINS server.
DHCP Server
DHCP (Dynamic Host Configuration Protocol) is an auto-configuration protocol used for
an IP network. Network administrator intervention is not required when the DHCP server
is used because it assigns the IP addresses of scanners as well as computers
automatically.
NTP Server
NTP (Network Time Protocol) is a protocol to synchronize the time of computers on the
network with the correct time.
It is used when a client makes a time query through the network.
Fax Server
The fax server refers to the computer equipped with a fax modem or a dedicated fax
board connected with a telephone line. It is used for sending faxes.
This scanner supports the following fax servers:
z RightFax Business Server (Version 9.3)
This fax server can be used to send the scanned data by fax.
51
1.4 System Requirements
1.4.5 Network Requirements for Central Admin
This section describes the required network conditions for Central Admin.
For Central Admin, the following network conditions are required.
z HTTP/HTTPS communication is possible from the Central Admin Server to the
scanner
z HTTP/HTTPS communication is possible from the scanner to the Central Admin
Server
z HTTP/HTTPS communication is possible from the Central Admin Console to the
Central Admin Server
z Wake-On-LAN Magic Packet routing is possible from the Central Admin Server to
the scanner (when Wake-On-LAN is used)
The connection between a scanner and Central Admin Server has the following
limitations.
z Communication via an HTTP proxy is not supported.
z Networks where IP addresses using NAT/NAPT are not supported.
1.4.6 Scanner Requirements for Central Admin
Up to 1,000 scanners can be managed with Central Admin.
If 1,000 scanners are registered on the server, no more scanners can be registered as
targets for central admin. If the number of scanners exceeds 1,000, multiple Central
Admin Servers will be prepared. The target scanners for each server should not exceed
1,000.
52
1.4.7 Port Number List
Function
From/To
Admin Tool
Connection
Admin Tool D Scanner
Central Admin
Server
Connection
Port Number
Protocol
Number
80 (HTTP) (*1)
6 (TCP)
443 (HTTPS) (*1)
6 (TCP)
Central Admin Server D
Scanner
80 (HTTP) (*1)
6 (TCP)
443 (HTTPS) (*1)
6 (TCP)
Scanner D Central
Admin Server
20444 (HTTP/HTTPS) (*1)
6 (TCP)
Central Admin
ConsoleD
Central Admin Server
10444 (HTTP/HTTPS) (*1)
6 (TCP)
Central Admin Server D
LDAP server
389 (LDAP)
6 (TCP)
636 (LDAPS)
6 (TCP)
3268 (Active Directory Global
Catalog)
6 (TCP)
3269 (Active Directory Global
Catalog over SSL)
6 (TCP)
Central Admin Server D
Print server
137,138,139,445 (SMB)
6 (TCP)
17 (UDP)
Central Admin Server D
File server
137,138,139,445 (SMB)
6 (TCP)
17 (UDP)
Central Admin Server D
FTP server
20,21 (FTP) (*1)
6 (TCP)
Central Admin Server D
FTPS server
989,990 (FTPS) (*1)
6 (TCP)
Central Admin Server D
SMTP server
25 (SMTP) (*1)
6 (TCP)
Central Admin Server D
Proxy server
Free
6 (TCP)
Central Admin Server
SharePoint link
30444 (HTTP/HTTPS) (*1)
6 (TCP)
DHCP Server
Scanner D DHCP server
67 (DHCP)
17 (UDP)
DNS Server
Scanner D DNS server
53 (DNS)
17 (UDP)
WINS Server
Scanner D WINS server
1512 (WINS)
17 (UDP)
53
1.4 System Requirements
From/To
Synchronization
Scanner D SNTP server
123 (SNTP)
17 (UDP)
Proxy Server
Scanner D Proxy server
Free
6 (TCP)
Authentication/
e-Mail
Address Search
Scanner D LDAP server
389 (LDAP) (*1)
6 (TCP)
636 (LDAPS) (*1)
6 (TCP)
3268 (Active Directory Global
Catalog) (*1)
6 (TCP)
3269 (Active Directory Global
Catalog over SSL) (*1)
6 (TCP)
25 (SMTP) (*1)
6 (TCP)
465 (SMTP over SSL) (*1)
6 (TCP)
587 (SMTP over STARTTLS)
(*1)
6 (TCP)
25 (SMTP) (*1)
6 (TCP)
465 (SMTP over SSL) (*1)
6 (TCP)
587 (SMTP over STARTTLS)
(*1)
6 (TCP)
Sending e-Mail
Sending Fax
Scanner D SMTP server
Scanner D SMTP server
Port Number
Protocol
Number
Function
Print
Scanner D Print server
137,138,139,445 (SMB)
6 (TCP)
17 (UDP)
SharePoint
Server
Scanner D SharePoint
server
80 (HTTP) (*1)
6 (TCP)
443 (HTTPS) (*1)
6 (TCP)
FTP Server
Scanner D FTP server
20,21 (FTP) (*1)
6 (TCP)
FTPS Server
Scanner D FTPS server
989,990 (FTPS) (*1)
6 (TCP)
Saving to a
Folder
Scanner D File server
137,138,139,445 (SMB)
6 (TCP)
17 (UDP)
Ping
Scanner D Another
computer or server
—
1 (ICMP)
(*1):
Changing the Port Number is possible
54
55
Chapter 2
Basic Scanner Operations
2.1 Turning the Power On/Off .................................................................................... 57
2.2 Using the Scanner Buttons .................................................................................. 59
2.3 Using the LCD Touch Panel ................................................................................. 62
2.4 Using the On-Screen Keyboard ........................................................................... 63
56
2.1
Turning the Power On/Off
2.1.1 Turning the Power On
CAUTION
Do not move or shake the scanner when it is turned on.
This may damage components in the scanner and cause data to be lost.
1. Press the power button.
D After the scanner starts up, the [Login] window appears.
After turning the power off, wait for at least 10 seconds before turning the power
back on again.
57
2.1 Turning the Power On/Off
2.1.2 Turning the Power Off
1. Press the [Shutdown] button on the [Login] window.
To turn the power of the scanner off, make sure to press the [Shutdown] button.
Do not turn the power of the scanner off forcibly by pressing and holding down
the power button for 4 seconds. It may cause the scanner to function
abnormally.
D A confirmation window appears.
2. Press the [OK] button.
D The scanner power is turned off.
58
2.2
Using the Scanner Buttons
■ Using the Power Button
When the scanner is off or in standby mode, pressing the power button will start the
scanner up and display the login window.
When the scanner is on and a window displaying the [Shutdown] button is shown,
pressing the power button opens a shutdown confirmation window via which the scanner
can be shutdown.
Shutdown
LED Dark
Press Button
Operating
LED Lit
Login Window
Login
Press Button(*1)
Operation Windows
Press Button(*2)
No operation
for set period
Standby
LED Lit
(*1)
Other than pressing the power button, any of the following operations will startup
the scanner from standby mode.
z Loading the documents into the ADF paper chute.
z Closing the top cover.
z Pressing the power button.
z Pressing the Scan button.
z Touching the LCD touch panel.
The window displayed after a re-startup varies according automatic login settings in the
following way:
z If automatic login is enabled, the operation window is displayed.
z If automatic login is disabled, the login window in displayed.
(*2) The [Shutdown] button is shown on the following windows. Pressing the button
shows a confirmation window from which the power can be turned off.
z Shown on the login window, if automatic login is not set.
z Shown on the main menu or job menu, if automatic login is set.
59
2.2 Using the Scanner Buttons
z When the scanner is starting up or in standby mode, be careful to never hold the
power button down for 4 seconds, as this will cause the scanner to shutdown. If this
happens, saved scanned data may become unusable.
If the power button is accidentally held down too long, causing the scanner to
shutdown, temporally detach the AC adaptor to ensure that the power is completely
off.
z After turning the power off, wait for at least 10 seconds before turning the power
back on again. To shutdown the scanner correctly, press the [Shutdown] button on
the [Login] window.
z When the scanner is left in standby mode for a long period of time, it may take a
long time to be resumed.
z The idle time before standby mode entered can be changed. For details, refer to
"4.7.2 Setting the Time to Standby Mode" (page 110).
z Automatic login without displaying the [Login] window is possible. For more details
about how to set automatic login, refer to "4.7.1 Setting the Login Settings" (page
107).
z If automatic login is set, login via the Admin Tool is possible while the main menu or
job menu is displayed.
60
■ Using the Top Cover Scan Button
When a button with
is displayed on the LCD touch panel, the Scan button
becomes available.
When a button with
is displayed, the Scan button can be pressed to start the scan.
Scan
The LCD touch panel [Scan] button with
may appear as follows:
z [Scan]
z [Scan & Send]
z [Scan & Print]
z [Scan & Save]
z [Scan More]
One of those buttons on the LCD touch panel can be pressed to start the scan.
61
2.3 Using the LCD Touch Panel
2.3
Using the LCD Touch Panel
When using the LCD touch panel, buttons only need to be lightly pressed to select them.
For details about the LCD touch panel, refer to the following:
z "4.1.1 Administrator Windows via the LCD Touch Panel" (page 75)
z "6.2 Using LCD Touch Panel Windows: Regular User" (page 303)
z Do not use a pen or other hard object on the LCD touch panel.
The LCD touch panel may be damaged.
z If the screen is dirty, this may cause the LCD touch panel to malfunction. Clean the
screen if it is visibly dirty.
For details, refer to "Cleaning the LCD Touch Panel" (page 419).
62
2.4
Using the On-Screen Keyboard
On the LCD touch panel, the on-screen keyboard can be used to enter text in the input
field on the window.
The on-screen keyboard can be used in the following ways.
■ Showing/Hiding the On-Screen Keyboard
To show/hide the on-screen keyboard, press the following button displayed on the LCD
touch panel.
Button
Description
Press this button to show the on-screen keyboard.
The on-screen keyboard is displayed to enable entering characters.
This button is displayed while the on-screen keyboard is enabled.
Pressing this button hides the on-screen keyboard.
This button is displayed when there is no input field in the window.
In this state, the keyboard cannot be displayed.
When you touch any input field, the on-screen keyboard is displayed. In the [Login]
window, the on-screen keyboard is automatically displayed.
For an Add-in, you can use the [Add-in Software] window to set the on-screen
keyboard not to be displayed when running an Add-in.
When you display the on-screen keyboard when running an Add-in, you can change
the display location of the button used for displaying the on-screen keyboard.
63
2.4 Using the On-Screen Keyboard
■ Using the On-Screen Keyboard
Key
Function
Tab
Switches focus to the input field.
Enter
Performs the following.
z Closes the on-screen keyboard if it is displayed.
z Inserts a line feed when multiple lines are input in the input field.
z Commits the input in the [Login] window.
When logged in via the LCD touch panel, the administrator cannot select the menu
items using the on-screen keyboard. Select buttons in the menu by pressing the
LCD touch panel.
■ Keyboard Layout
A keyboard layout can be selected on the [Keyboard Settings] window. The on-screen
keyboard is compliant with the QWERTY layout. The French on-screen keyboard is
compliant with the AZERTY layout. The keyboard layout of the on-screen keyboard can
be switched by pressing a specific key. For details, refer to "D.3 Changing the Functions
on the On-Screen Keyboard" (page 495).
64
65
Chapter 3
Administrator Operations
(Overview)
3.1 Operating and Managing Scanners..................................................................... 67
3.2 Required Scanner Function Settings .................................................................. 69
66
3.1
Operating and Managing Scanners
The administrator can configure and manage the scanner in the following ways.
z LCD touch panel
Scanner settings management can be implemented directly via the scanner's LCD
touch panel.
Setting mode
The administrator can operate the LCD touch panel in the following setting modes.
z Basic mode
A setting mode for Administrators with basic knowledge of computers.
Basic required scanner settings can be performed.
z Advanced mode
A setting mode for Administrators with advanced knowledge of networks and
servers.
Settings which are more advanced than those of Basic mode, such as,
authentication server, server environment, or advanced scanning settings can be
performed.
For details about the configuration of setting modes, refer to "4.4 Setting the Setting
Mode for the LCD Touch Panel" (page 92).
In addition, using the wizard on the LCD touch panel, you can configure minimum
settings required to setup the scanner. You can also use the wizard to restrict the
configurable functions. For details about the configuration with the wizard, refer to "4.3
Setting the System Settings with the Installation Wizard on the LCD Touch Panel"
(page 90).
z Admin Tool
Scanner settings management, and updates can be implemented via the network
interface by using the Admin Tool installed on a computer.
Settings can be performed for one scanner at a time.
z Central Admin Console
Scanner settings management, and updates can be implemented via the network
interface by using the Central Admin Console installed on a computer, for multiple
scanners together.
In this case, settings made with the Central Admin Console are applied to scanners via
a Central Admin Server.
67
3.1 Operating and Managing Scanners
Central Admin Console
Computer
Admin Tool
Set multiple scanners
at a time via the
network interface
Computer
Set one scanner at
a time via the
network interface
Central Admin Server
LCD Touch Panel
Scanner
Scanner
Scanner
68
Scanner
Directly set one
scanner at a time
3.2
Required Scanner Function Settings
Which scanner settings are required differs according to scanner functions to be used by
the user.
The function buttons are displayed on the [Main Menu] window, in accordance with the
settings specified by the administrator.
Buttons are displayed in accordance with the settings
specified by the administrator
The following shows the necessary settings for each function to be used.
69
3.2 Required Scanner Function Settings
System Settings
e-Mail
Fax
Print
Save
Scan to
SharePoint
See ...
Import Scanner
Settings
—
—
—
—
—
page 266
Scanner Name
N
N
N
N
N
page 94
Language
Selection
—
—
—
—
—
page 96
Region /
Timezone
A
A
A
A
A
page 97
Date / Time
A
A
A
A
A
page 98
Keyboard
Settings
N
N
N
N
N
page 99
Certificate
Management
—
—
—
—
—
page 100
Multifeed Settings
—
—
—
—
—
page 102
Scanner
Adjustment
—
—
—
—
—
page 105
General Scanner
Settings
—
—
—
—
—
page 106
Login Settings
—
—
—
—
—
page 107
Standby Mode
—
—
—
—
—
page 110
Admin Password
A
A
A
A
A
page 112
Menu
Local Settings
Scanner Settings
Login Settings
N: Necessary A: Advisable —: Not required
70
Network Settings
e-Mail
Fax
Print
Save
Scan to
SharePoint
See ...
IP address
N
N
N
N
N
page 113
DNS Server
A
A
A
A
A
page 115
WINS Server
A
A
A
A
A
page 116
NTP Server
A
A
A
A
A
page 117
Proxy Server
—
—
—
A
A
page 118
Ping
—
—
—
—
—
page 119
Network Status
—
—
—
—
—
page 121
Admin
Connection
—
—
—
—
—
page 123
Scanner Central
Admin Server
—
—
—
—
—
page 125
Login LDAP
Server
A
(*1)
A
(*1)
A
(*1)
A
(*1)
A
(*1)
page 127
e-Mail LDAP
Server
—
—
—
—
—
page 133
Customize LDAP
Search
—
—
—
—
—
page 135
SMTP Server
N
N
—
—
—
page 137
Send e-Mail
A
—
—
—
—
page 139
File Names
(e-Mail)
A
—
—
—
—
page 140
—
N
—
—
—
page 142
Menu
Basic
Network Admin
Authentication Server
e-Mail
Fax
Fax Server
71
3.2 Required Scanner Function Settings
e-Mail
Fax
Print
Save
Scan to
SharePoint
See ...
Network Folder
—
—
—
N
—
page 143
File Names
(Save)
—
—
—
A
—
page 156
FTP Server
Folder
—
—
—
N
—
page 143
File Names
(Save)
—
—
—
A
—
page 156
SharePoint Folder
—
—
—
—
N
page 153
File Names
(Save)
—
—
—
—
A
page 156
—
—
N
—
—
page 159
Menu
Network Folder
FTP Server Folder
SharePoint Folder
Print
Network Printer
N: Necessary A: Advisable —: Not required
(*1):
Only necessary if connecting to an LDAP server.
72
73
Chapter 4
Administrator Operations
(LCD Touch Panel and Admin Tool)
This chapter provides an explanation of administrator operations (setting up and
managing the scanner) via the scanner's LCD touch panel, or via the network interface
using the Admin Tool. The same operations may also be performed via the scanner
settings edit window and the job mode edit window of the Central Admin Console. For
details about the Central Admin Console windows, refer to "Chapter 5 Administrator
Operations (Central Admin Console)" (page 226).
4.1 Windows ................................................................................................................ 75
4.2 Administrator Login.............................................................................................. 78
4.3 Setting the System Settings with the Installation Wizard on the LCD Touch
Panel ............................................................................................................................ 90
4.4 Setting the Setting Mode for the LCD Touch Panel ........................................... 92
4.5 Configuring the System........................................................................................ 94
4.6 Setting the Scan Options ................................................................................... 102
4.7 Configuring the Login-Related Settings ........................................................... 107
4.8 Configuring the Network Settings ..................................................................... 113
4.9 Configuring the LDAP Settings ......................................................................... 127
4.10 Configuring the e-Mail-Related Settings......................................................... 137
4.11 Setting the Fax Server ...................................................................................... 142
4.12 Setting Folders for Saving Scanned Data....................................................... 143
4.13 Setting the Network Printers............................................................................ 159
4.14 Viewing the Scanner Details ............................................................................ 170
4.15 Managing the User Data Store and System Settings..................................... 177
4.16 Maintaining the System .................................................................................... 185
4.17 Setting a Job Sequence.................................................................................... 197
4.18 Messages ........................................................................................................... 224
74
4.1
Windows
4.1.1 Administrator Windows via the LCD Touch Panel
Selecting a menu displays its sub-menu.
The sub-menu items are shown in the right-side of the window.
Selecting the lowest level menu displays the setting window for the menu.
Menu
75
4.1 Windows
4.1.2 Administrator Windows via the Admin Tool
Administrator windows via the Admin Tool are as follows.
z When the [Scanner Settings] button is pressed
Selecting a menu displays its sub-menu.
Selecting the lowest level menu displays the setting window for the menu.
Menu
Tool Menu
76
z When the [Job Menu Settings] button is pressed
When a tab is selected in the job mode settings menu, the related setting window is
displayed.
Job Mode Settings
Tool Menu
77
4.2 Administrator Login
4.2
Administrator Login
4.2.1 Administrator Login: via the LCD Touch Panel
■ When Automatic Login is Not Set
z The default user name and password for the administrator are set as follows:
User name: admin
Password: password
z The scanner setup can be configured by one user.
1. Enter the user name and password of the administrator.
If [Active Directory Global Catalog] is selected for the login LDAP server, the
[UPN Suffix] input field is displayed.
A UPN suffix is not required when logging in as an administrator. Even if entered,
it is ignored.
2. Press the [Login] button.
D If the user name and password are valid, the [System Settings] window appears.
78
■ When Automatic Login is Set
When automatic login has been set, login to the administrator windows from the regular
user window.
1. From the [Maintenance] window, press the [Administrator Login] button.
D The [Administrator Login] window appears.
2. Enter the administrator user name and password.
3. Press the [OK] button.
D When authenticated, the system settings window is shown.
79
4.2 Administrator Login
4.2.2 Setting up for Administrator Access via the Admin Tool
This section describes the required settings for logging in via the Admin Tool.
The following are required for administrator login via the Admin Tool:
z "4.5.1 Setting the Scanner Name" (page 94)
z "4.7.3 Changing the Admin Password" (page 112)
z "4.8.1 Giving the Scanner an IP Address" (page 113)
z "4.8.8 Setting the Admin Connection" (page 123)
z "4.8.2 Setting the DNS Server" (page 115)
z "4.8.3 Setting the WINS Server" (page 116)
■ Checking the Internet Explorer Cache Settings
Check the Internet Explorer cache settings.
1. From the Internet Explorer [Tools] menu, select [Internet Options].
D The [Internet Options] dialog box appears.
2. On the [General] tab, press the [Settings] button on the [Browsing
history].
D The [Temporary Internet Files and History Settings] dialog box appears.
3. For [Check for newer versions of stored pages], select [Automatically].
4. For [Disk space to use], specify 63 MB or above.
5. Press the [OK] button.
z Different browser versions may require a different set up procedure.
z Do not use a proxy server setting.
If any updates or service packs are available for Internet Explorer, make sure they
are applied.
80
■ Setting the Internet Explorer Trusted Sites
Enter the target scanner URL as Internet Explorer trusted sites.
If not set, connection to a scanner is blocked, and certification cannot be installed.
1. From the Internet Explorer [Tools] menu, select [Internet Options].
D The [Internet Options] dialog box appears.
2. On the [Security] tab, select [Trusted sites].
3. Press the [Sites] button.
D The [Trusted sites] dialog box appears.
4. Clear the [Require server verification (https:) for all sites in this zone]
check box.
5. Enter the URL of the scanner in the [Add this website to the zone] field,
and press the [Add] button.
Example: http://IP_address or scanner_name/
Different browser versions may require a different setup procedure.
If any updates or service packs are available for Internet Explorer, make sure they
are applied.
81
4.2 Administrator Login
■ Installing the Admin Tool
To setup the scanner via the network interface, install the Admin Tool to your computer.
1. To access a scanner, specify the scanner name as a URL using a Web
browser.
According to the settings described in "4.8.8 Setting the Admin Connection" (page 123),
specify the URL in one of the following ways.
z SSL is [Off], no port number change
http://scanner_name or IP_address/
z SSL is [Off], port number change
http://scanner_name or IP_address:port_number/
For port_number, enter the changed port number.
z SSL is [On], no port number change
https:// scanner_name or IP_address/
z SSL is [On], port number change
https://scanner_name or IP_address:port_number/
For port_number, enter the changed port number.
For SSL, the [Security Alert] window is displayed when connecting. Press the [Yes]
button on the [Security Alert] window.
D The [Login] window appears.
2. Enter the user name and password of the administrator.
3. Press the [Login] button.
D The download window appears.
82
4. Press the [Next] button for the Network Scanner Admin Tool download.
D The Network Scanner Admin Tool download window appears.
5. Press the [Download] button.
Downloading is not possible while a scanner operation is in process.
D The [File Download - Security Warning] dialog box appears.
83
4.2 Administrator Login
6. Press the [Run] button.
D The Network Scanner Admin Tool Setup Wizard appears.
Do not close the Web browser or logout until installation is complete.
If .NET Framework is not installed, the Microsoft Web site is accessed when
installing the Admin Tool.
After installing .NET Framework, try again from Step 1.
7. Press the [Next] button.
D The [Select Installation Folder] window appears.
84
8. Specify an installation folder for the Admin Tool and the target user
setting.
To select a different folder, press the [Browse] button.
To check the free space available for the currently selected folder, press the [Disk
Cost] button.
Installation fails if the length of any installation path (folder path plus
installation file name) exceeds 259 characters. Select an installation folder
that respects this limit.
9. Press the [Next] button.
D From here on after, follow the instructions on the window to proceed the
operation.
When "Network Scanner Admin Tool has been successfully installed" is
displayed, the installation is complete. Press the [Close] button.
D After installation is completed, log out from the scanner on the Web browser and
close the Web browser.
D After installation, the Admin Tool can be started by selecting the [Start] menu J
[All Programs] J [Network Scanner] J [Network Scanner Admin Tool].
85
4.2 Administrator Login
z If this tool has already been installed, skip to section "4.2.3 Administrator Login: via
the Admin Tool" (page 87) for details about Admin Tool operations.
z From the Web browser [Tools] menu, select [Internet Options], and note the
following points about the settings shown on the [Internet Options] dialog box.
z In the [Accessibility] dialog box shown when pressing the [Accessibility] button
on the [General] tab, do not change the formatting and user style sheet
settings. If these settings are changed, the displayed style of the Admin Tool
may be corrupted.
z In the [Language Preference] dialog box shown when pressing the
[Languages] button on the [General] tab, move the same language as for the
Central Admin Server operation system to the top. If a different language is
specified, a problem may occur with the input or displays for the Admin Tool.
z On the [Security] tab, if [Security level for this zone] is set to [High], part of the
Admin Tool window may not be correctly displayed.
In this case, on the [Security] tab, add the scanner or Central Admin Server to
the trusted site zone and press the [Default Level] button. Or press the [Custom
Level] button and set [Binary and script behaviors] to [Enable].
z When the font size is large, part of the dialog box may not be shown correctly. In this
case, use a smaller font size.
■ Uninstalling the Admin Tool
This section uses Windows Vista as an example.
Uninstall the Admin Tool from [Control Panel] - [Programs] - [Programs and Features] in
the computer in which it is installed.
Close the Admin Tool before uninstalling.
If the Admin Tool is uninstalled while still open, normal operation of the open Admin
Tool is not guaranteed.
86
4.2.3 Administrator Login: via the Admin Tool
The Admin Tool can be set up to manage the scanner via a computer.
This section explains how to login using the Admin Tool.
When an administrator or user is already logged into a scanner, login via the Admin Tool
is not possible.
However, if automatic login is set, login via the Admin Tool is possible while the main
menu or job menu is displayed.
z If the normal screen display does not appear (for example: an "X" mark appears),
wait for a few minutes and try again. If the problem still occurs, contact your
FUJITSU scanner dealer or an authorized FUJITSU scanner service provider.
z If a button is rapidly pressed many times in succession, a "Connection error"
message may appear. In this case, wait for a few minutes and try again.
z For details about setting up to manage the scanner via a computer, refer to "1.4.1
Requirements for Admin Tool" (page 46).
z The default user name and password for the administrator are set as follows:
User name: admin
Password: password
z The scanner setup can be configured by one user.
z Session timeout time is 20 minutes (fixed). The session timeout time is extended by
a further 20 minutes for the following:
z when a menu button is pressed
z when the [OK] button is pressed
87
4.2 Administrator Login
1. Select the [Start] menu J [All Programs] J [Network Scanner] J
[Network Scanner Admin Tool].
D The Admin Tool is started.
2. Specify the [Connect to] (of the scanner).
Enter the IP address, scanner name, or FQDN for the scanner to be setup or
managed.
z If the port number was changed in "4.8.8 Setting the Admin Connection"
(page 123), enter the port number changed in [Port Number].
z When trying to connect with a port number other than the specified number, it
takes up to 20 seconds before a connection error occurs.
z To use SSL, select the [Use HTTPS] check box.
z If the Admin Tool is started while there is insufficient free memory, a script
error may occur. Try again after ensuring that there is enough free memory.
3. Press the [Connect] button.
D The [Login] window appears.
88
4. Enter a [User Name] and [Password].
5. Press the [Login] button.
D If the user name and password are valid, the [System Settings] window appears.
89
4.3 Setting the System Settings with the Installation Wizard on the LCD Touch Panel
4.3
Setting the System Settings with the Installation
Wizard on the LCD Touch Panel
Using the Installation Wizard on the LCD touch panel, you can set the following items:
z Scanner Name
z Region/Timezone
z Date/Time
z Login Settings
z Admin Password
z IP Address
z DNS Server
z Central Admin Server
1. On the [Admin Menu] window, press
.
D The [Admin Settings] window appears.
For [Show the Installation Wizard at next start up?], you can set whether or
not to show the Installation Wizard immediately after starting the scanner.
90
2. Press the [Installation Wizard] button.
D The [Installation Wizard] window appears.
3. Select the check boxes for items you want to configure with the
Installation Wizard.
When the [Region/Timezone Date/Time] check box is selected, the window for
setting the region/timezone and the window for setting the date/time will be
displayed.
4. Press the [Start] button.
D A window for configuring the selected items appear in the Installation Wizard.
5. Follow the wizard to configure the settings.
For details about the procedure for configuring system settings, refer to the "Getting
Started".
91
4.4 Setting the Setting Mode for the LCD Touch Panel
4.4
Setting the Setting Mode for the LCD Touch Panel
Set the setting mode used for configuring or managing system settings via administrator
windows on the LCD touch panel.
For details about setting modes, refer to "3.1 Operating and Managing Scanners" (page
67).
For details of the operations available in each setting mode, refer to "1.3.1 Operations
with Administrator Right" (page 38).
1. On the [Admin Menu] window, press
D The [Admin Settings] window appears.
92
.
2. Press the [Select Mode] button.
D The [Select Mode] window appears.
3. Press
to select a setting mode.
4. Select the check boxes of the functions to be enabled for the setting
mode.
5. Press the [OK] button.
D The setting mode is set.
93
4.5 Configuring the System
4.5
Configuring the System
4.5.1 Setting the Scanner Name
Set a scanner name to provide a network alias for the scanner.
Do not use a name already being used in the network.
Name duplication will cause a network connection error. For details about how to
deal with such errors, refer to "4.18.1 Administrator Window Messages" (page 225).
1. Select [System Settings] J [Local Settings] J [Scanner Name].
D The [Scanner Name] window appears.
2. Enter a [Scanner Name].
3. In the [Member of] section, specify the scanner as a [Workgroup] or
[Domain] member.
4. Enter a workgroup name or domain name in the input field.
5. Press the [OK] button.
D The restart confirmation window appears.
94
In the following case, the authentication window appears.
z When specifying the scanner as a domain member
z When changing the name of a scanner that is a member of a domain
Check the required authentication information when adding to a domain, and
enter a user name that can be added to the domain and the password.
User names may be up to 256 characters long.
Passwords may be up to 256 characters long. [User Name] and [Password]
are case sensitive.
If the user name and password are valid, the restart confirmation window
appears.
6. Press the [Now] button.
D The scanner is restarted.
z Scanner names may be duplicated depending on the network status.
If the specified scanner name is the same as one already in use, network
communication problems occur.
In this case, try the following steps:
1. Disconnect the LAN cable.
2. Press the [Shutdown] button on the LCD touch panel to turn the scanner off.
3. Press the power button to start the scanner with the LAN cable disconnected.
4. Enter a non-duplicated scanner name.
5. Reboot the scanner.
6. Re-connect the LAN cable to the scanner.
z The connection is lost if the scanner name is changed via the network interface. To
continue with other settings, wait a short time for the scanner to restart, then login to
the network interface again.
95
4.5 Configuring the System
4.5.2 Setting the Language
1. Select [System Settings] J [Local Settings] J [Language Selection].
D The [Language Selection] window appears.
You can select whether or not to display this window again at the next scanner
startup. To display the window again, for "Show the "Language Selection"
screen at next start up?", select [Yes]. To not display this window at next start
up, select [No].
2. Select a language.
Select the desired language for the operating environment.
D This returns to the [Language Selection] window.
3. Press the [OK] button.
D A language setting confirmation message appears in the selected language.
4. Press the [OK] button.
96
4.5.3 Setting the Region/Timezone
Central Admin
Console
1. Select [System Settings] J [Local Settings] J [Region/Timezone].
D The [Region/Timezone] window appears.
2. Select a region/timezone.
3. If you select a region/timezone in which daylight savings time is used,
select whether [Daylight Savings Time] should be on or off.
4. Press the [OK] button.
D The region/timezone is set.
97
4.5 Configuring the System
Central Admin
Console
4.5.4 Setting the Date/Time
1. Select [System Settings] J [Local Settings] J [Date/Time].
D The [Date/Time] window appears.
For Central Admin Console, the [Date/Time] input field and [Get Time] button
cannot be used.
2. Select a date format.
3. Enter the current date and time in the [Date/Time] input field.
Pressing the [Get Time] button refreshes the [Date/Time] input field with the current
value of the internal system date/time.
4. Press the [OK] button.
D The date and time are set.
For the Admin Tool, an adjustment that advances the system time by 20
minutes or more results in a session timeout and causes the scanner to
logout. However, the specified time adjustment will be made.
98
Central Admin
Console
4.5.5 Setting the Keyboard
Set the keyboard.
1. Select [System Settings] J [Local Settings] J [Keyboard Settings].
D The [Keyboard Settings] window appears.
2. Select a keyboard language.
3. Press the [OK] button.
D The keyboard is set.
99
4.5 Configuring the System
4.5.6 Managing Certificates
Certificates to be used for server authentication in SSL communication can be imported or
removed.
■ Importing a Certificate File
Central Admin
Console
X.509 certificate files (*.cer, *.crt) can be imported.
Up to 100 certificate files can be imported.
1. Select [System Settings] J [Local Settings] J [Certificate Management].
D The [Certificate Management] window appears.
2. Specify an authentication certificate file.
D Press the [Browse] button to specify a certificate file.
3. Press the [Import] button.
D The certificate file is imported.
The imported file is saved in the Trusted Root Certificate Authority store.
When a certificate file is distributed from the Central Admin Server, any
previously imported certificates will be deleted, and replaced by the contents
of the new file.
100
■ Deleting a Certificate File
Central Admin
Console
1. Select [System Settings] J [Local Settings] J [Certificate Management].
D The [Certificate Management] window appears.
2. Select a certificate file to be deleted, and press the [Delete] button.
D The delete confirmation window appears.
3. Press the [Yes] button.
D The certificate file is deleted.
101
4.6 Setting the Scan Options
4.6
Setting the Scan Options
4.6.1 Setting the Multifeed Detection Method
Central Admin
Console
"Multifeed" is an error that occurs when two or more sheets are fed simultaneously into
the ADF. The detection of the difference in length is also regarded as multifeed.
By default, multifeed detection monitors for paper overlaps in the central column (25 mm
either side from the center of the document) of the document being scanned.
If stickies, slips, photos, or other paper ("attached paper" from here on) are attached on
the documents, this section is considered to be an overlap causing unnecessary detection
as multifeed. When scanning those documents, you can adjust the multifeed detection
area to ignore a specific area with attachments such as photos and prevent misdetections.
The "intelligent multifeed detection" allows the length and position of the attached paper
to be memorized in the scanner so that the multifeed will not be detected from the next
scan.
For document requirements for multifeed detection, refer to "A.5 Multifeed Detection
Conditions" (page 478).
1. Select [System Settings] J [Scanner Settings] J [Multifeed Settings].
D The [Multifeed Settings] window appears.
102
2. Set the area for multifeed detection in the [Ultrasonic Multifeed Detection
Zone] section.
Starting from the top edge of a document sheet, set the area to be checked for
multifeeds.
Multifeed may not be detected for the top and bottom 30 mm of a document.
3. In Step 2, if [Middle] or [Top & Bottom] is selected, enter both "#1" (upper
limit) and "#2" (lower limit).
z Middle
Multifeeds will be detected within "#1" (upper limit) and "#2" (lower limit) set. (a)
25 mm 25 mm
#1
#2
(a)
Up to 510 mm
Outside of multifeed
detection area
Center of paper
103
4.6 Setting the Scan Options
z Top & Bottom
Multifeeds will be detected from the top of the page to "#1" (upper limit), and from
"#2" (lower limit) to the bottom of the page. (b)
25 mm 25 mm
#1
(b)
#2
Up to 510 mm
(b)
Outside of multifeed
detection area
Center of paper
z For multifeed detection, a length of at least 5 mm is required.
Specify a value for "#2" that is at least 6 mm greater than that for "#1".
z "#2" can have a maximum value of 510 mm. If the paper size setting is long
page mode but the length of the document is longer than 510 mm, multifeed
cannot be detected by length.
z When [Middle] is selected, if the document is shorter than "#1", multifeed will
not be detected. When [Top & Bottom] is selected, if the document is shorter
than "#2", multifeed will not be detected for the bottom part.
z If the values specified for "#1" and "#2" exceed the actual paper size,
multifeeds will not be detected.
4. For [Select the intelligent multifeed detection mode.], select the
multifeed detection mode to be used when a sheet with attached paper is
scanned.
5. Press the [OK] button.
D The document area to be monitored for multifeeds is set.
104
4.6.2 Adjusting the Scan Starting Position (Offset/Magnification)
Usually, it is not necessary to make any setting changes.
Configure the following setting items.
z Offset settings
When the scanned output is found to be displaced relative to the actual documents
being scanned, the scan offsets can be adjusted.
z Length magnification setting
If the scanned output is found to be vertically distorted (stretched or squashed)
relative to the actual documents being scanned, the length magnification in the
vertical scanning direction can be adjusted.
1. Select [System Settings] J [Scanner Settings] J [Scanner Adjustment].
D The [Scanner Adjustment] window appears.
2. Enter a magnification value for the vertical offset in the [Length
Magnification] input field.
3. Enter a value for horizontal offset in the [Horizontal Offset] field.
Enter a value for vertical offset in the [Vertical Offset] field.
4. Press the [OK] button.
D The offset and length magnification settings are set.
105
4.6 Setting the Scan Options
4.6.3 Setting General Scanner Settings
Central Admin
Console
Usually, it is not necessary to make any setting changes.
The operating mode for scanning can be set.
1. Select [System Settings] J [Scanner Settings] J [General Scanner
Settings].
D The [General Scanner Settings] window appears.
2. Set the operating mode for a scan.
"Image Quality" mode is designed to produce high resolution images, but has
the following drawbacks:
z Image file sizes increase and scan speeds decrease.
z At a resolution of 600 dpi, a maximum of 100 pages may be scanned.
z The Background Removal option cannot be used.
3. Press the [OK] button.
D The information entered is set.
106
4.7
Configuring the Login-Related Settings
Central Admin
Console
4.7.1 Setting the Login Settings
Set the login settings.
z Authentication mode setting
Specify whether to use an LDAP server account or a local account saved on the
scanner during the authentication process at login. If both accounts are used, you
can set the search order for the authentication information.
z Automatic login settings
When the scanner is turned on or restarted, the system performs an automatic
login without displaying the [Login] window.
For automatic login, the user name and password specified in the [Login Settings]
window is used.
z Guest account validity
Set whether or not to enable login with the guest account.
1. Select [System Settings] J [Login Settings] J [Login Settings].
D The [Login Settings] window appears.
107
4.7 Configuring the Login-Related Settings
2. For [Authentication Mode], select an authentication mode.
When searching for authentication information in the LDAP server or local account,
the search order of authentication information can be selected.
If [LDAP to Local] or [Local to LDAP] is selected, the operation becomes as
follows.
z If a password error occurred at the first authentication destination, the
authentication process moves to the next destination.
z If an authentication error occurred at the first and next authentication
destinations, a notification of the details of the error that occurred in the first
destination is sent.
3. For [Auto Login], select whether or not to enable automatic login.
z The automatic login setting is applied immediately after an administrator
logout. To change the settings while the [Auto Login] is [ON], perform
administrator login from the [Maintenance] window or perform the login via
the Admin Tool.
z If Central Admin is enabled in a scanner for which automatic login is enabled,
when the scanner is started or resumed from standby mode, preference is
given to checking for available scanner settings, add-in installs and system
settings in the Central Admin Server, over automatic login.
When scanner settings, Add-ins or system settings are available, they are
installed in the scanner. If the number of scanners connecting to the Central
Admin Server exceeds the maximum number possible, the installation is
skipped, and automatic login is performed.
Updates will be applied to the scanner when a logout is performed from the
[Administrator Login] window, when the scanner starts next time, or when the
scanner resumes from standby mode.
4. When [Auto Login] is set to [On], enter a [User Name] and [Password].
The scanner follows the Active Directory user name format when authenticating the
user login.
z For users registered in the LDAP server
z When the [Server Type] of the LDAP server is [Active Directory] or [Active
Directory Global Catalog]
User Name Format
Authentication Process
SAM Account Name
Does not contain @
Authenticate the user login name
(sAMAccountName).
Example: user
User Principal Name
Contains @
Authenticate the user login name
(userPrincipalName).
Example: [email protected]
108
z When the [Server Type] of the LDAP server is [Other LDAP Server]
User Name Format
Authentication Process
uid
Authenticate the user login name (uid).
Example: user
cn
Authenticate the user login name (cn).
Example: user
z For users registered in a local account
Authenticate the specified user login name for a local account saved in the
scanner.
If a UPN suffix is entered for a user name for automatic login, it is ignored.
Even if entered, it is not used.
5. For [Guest Account], select whether or not logging with the guest
account is possible.
6. Press the [OK] button.
D The information entered is set.
109
4.7 Configuring the Login-Related Settings
4.7.2 Setting the Time to Standby Mode
Central Admin
Console
The scanner can be set to automatically log out and then enter a standby state after
specified periods of non-use.
For any window after regular user login, if no operations have been performed for the
specified [Logout after] period of time, the scanner automatically logs the user out.
The scanner does not logout while the following operations are ongoing:
z Scanning documents
z e-Mailing a scan
z Faxing a scan
z Printing a scan
z Saving a scan
z Automatic login is enabled
In the [Login] window or the window which is shown after the scanner is logged in by a
regular user, if no operations are performed for the specified [Standby after] period of
time, the scanner enters standby mode. the LCD touch panel is switched off when the
scanner enters standby mode.
When the power button is pressed, the scanners start up from standby mode.
The window displayed after a re-startup varies according automatic login settings in the
following way:
z If automatic login is enabled, the operation window is displayed.
z If automatic login is disabled, the login window in displayed.
For window transitions, refer to "Using the Power Button" (page 59).
1. Select [System Settings] J [Login Settings] J [Standby Mode].
D The [Standby Mode] window appears.
110
2. For [Logout after], select the desired time before automatic logout.
3. For [Standby after], select the desired time before switching to standby
mode.
z If the [Never] is selected for [Logout after], the selected time for [Standby after]
is used as the wait time before switching to standby mode.
z If a time other than [Never] is selected, set a [Standby after] time that is longer
than the [Logout after] time.
4. Press the [OK] button.
D The scanner is set to first standby and then automatically log out after the
specified times.
111
4.7 Configuring the Login-Related Settings
4.7.3 Changing the Admin Password
If a password is lost or forgotten, login is not possible.
Manage passwords carefully.
If the password has been lost or forgotten, contact your FUJITSU scanner dealer or
an authorized FUJITSU scanner service provider.
1. Select [System Settings] J [Login Settings] J [Admin Password].
D The [Admin Password] window appears.
2. Enter the current password and a new password.
3. Press the [OK] button.
D The new admin password is set.
112
4.8
Configuring the Network Settings
4.8.1 Giving the Scanner an IP Address
An IP address must be set in order to connect the scanner to a network.
1. Select [Network Settings] J [Basic] J [IP Address].
D The DHCP or IP address setting window appears.
2. Select whether or not a DHCP is used.
3. When [Off] is selected, enter the following numerical addresses:
z IP Address
z Subnet Mask
z Default Gateway
4. Press the [OK] button.
D The information entered is set.
113
4.8 Configuring the Network Settings
z If the IP address is the same as one already in use, network communication
problems will occur. In this case, try the following steps:
1. Disconnect the LAN cable.
2. Press the [Shutdown] button on the LCD touch panel to turn the scanner
off.
3. Press the power button to start the scanner with the LAN cable
disconnected.
4. Enter a non-duplicated IP address.
5. Re-connect the LAN cable to the scanner.
z When DHCP is set to [On], the following scanner settings are assigned by the
DHCP server:
z IP Address
z Subnet Mask
z Default Gateway
z DNS Server
z WINS Server
z Domain Suffix
Even if DNS or WINS server is set, priority is given to the scanner settings
over the DHCP settings.
z The connection will be lost if the scanner's IP address is changed via the
network interface. To continue with other settings, login to the network
interface again. If connecting via an IP address, use the new IP address.
114
Central Admin
Console
4.8.2 Setting the DNS Server
A primary DNS and secondary DNS can be set.
1. Select [Network Settings] J [Basic] J [DNS Server].
D The [DNS Server] window appears.
2. Enter the following numerical addresses:
z Primary DNS
z Secondary DNS
3. For [DNS Dynamic Update], select whether or not to dynamically update
the DNS.
4. Enter a [DNS Suffix].
5. Press the [OK] button.
D The information entered is set.
115
4.8 Configuring the Network Settings
Central Admin
Console
4.8.3 Setting the WINS Server
A primary WINS and secondary WINS can be set.
1. Select [Network Settings] J [Basic] J [WINS Server].
D The [WINS Server] window appears.
2. Enter the following numerical addresses:
z Primary WINS
z Secondary WINS
3. Press the [OK] button.
D The information entered is set.
116
Central Admin
Console
4.8.4 Setting the NTP Server
Set the NTP server.
1. Select [Network Settings] J [Basic] J [NTP Server].
D The [NTP Server] window appears.
For Central Admin Console, the time synchronization is not possible.
2. Enter the NTP server IP address, host name, or FQDN.
If an NTP server is not required, leave this field blank.
3. Press the [Sync Time] button.
D The result of the time synchronization for the specified NTP server is shown.
If no error message appears, the NTP server setting is valid.
4. Press the [OK] button on the confirmation window.
5. Press the [OK] button.
D The NTP server is set.
z The system time is automatically synchronized every 6 hours to the specified NTP
server.
z After the setting is changed, the time synchronization is performed immediately.
z For the Admin Tool, an adjustment that advances the system time by 20 minutes or
more results in a session timeout and causes the scanner to logout.
117
4.8 Configuring the Network Settings
Central Admin
Console
4.8.5 Setting the Proxy Server
Set whether a proxy server is used when connecting to the FTP server or SharePoint
server.
When a proxy server is used for update check, an HTTP proxy server should be set.
1. Select [Network Settings] J [Basic] J [Proxy Server].
D The [Proxy Server] window appears.
2. Use the [FTP Proxy Server] option to set whether or not a proxy server is
used for FTP server connection.
To enable the proxy server setting for each FTP server folder, the [FTP Proxy
Server] setting must be set to [On].
If the [FTP Proxy Server] setting is set to [Off], the proxy server cannot be set
for each FTP server folder in the FTP server folder setting window or the FTP
server folder cannot be accessed.
3. When a proxy server is used, set the address and port number.
This scanner uses FTP over HTTP to save data in an FTP server folder via a
proxy. Specify the HTTP proxy server address for the FTP proxy server
address.
4. For [HTTP Proxy Server], set whether or not a proxy server is used for
the SharePoint server connection or for the update check.
5. When a proxy server is used, set the address, port number, and
exceptions.
6. Press the [OK] button.
D The information entered is set.
118
4.8.6 Checking the Network Connection with a Ping Test
Check the network connection using a ping test.
1. Select [Network Settings] J [Basic] J [Ping].
D The [Ping] window appears.
2. For [Address], enter the IP address, host name, or FQDN for the server to
be used to check the network connection.
119
4.8 Configuring the Network Settings
3. Press the [Ping] button.
D A ping test is performed and the results are displayed.
For details about the result, refer to "Checking Basic Network Operation with a
Ping Test" (page 446).
120
4.8.7 Checking the Network Operating Status
■ Checking the Network Status
The operating status of the network can be checked.
The following information is shown. If values are not shown, the network is not working
normally. Refer to "8.2 Network Connection Troubleshooting" (page 446), and check the
settings.
z MAC Address
z IP Address
z Subnet Mask
z Default Gateway
z DNS Server
z WINS Server
1. Select [Network Settings] J [Basic] J [Network Status].
D The [Network Status] window shows the status of the currently operating network
connection.
121
4.8 Configuring the Network Settings
z If connection to LDAP server is not possible, try the following steps:
1. Disconnect the LAN cable.
2. Press the [Shutdown] button on the LCD touch panel to turn the scanner
off.
3. Press the power button to start the scanner with the LAN cable
disconnected.
4. Enter a non-duplicated IP address.
5. Re-connect the LAN cable to the scanner.
z If the DHCP server cannot be reached when DHCP is set to [On], the IP
address is set to "169.254.XXX.YYY" (where XXX and YYY are arbitrary
values between 0 and 255).
■ Setting the Link Speed/Duplex Mode
While the network operating status is correct, if the network is not communicating
properly, change the Link Speed/Duplex Mode settings.
1. On the [Network Status] window, change [Link speed/Duplex mode] to a
fixed mode.
2. Press the [OK] button.
D The Link Speed/Duplex Mode setting is changed.
■ Setting Wake On LAN
Set whether or not to enable Wake On LAN to turn the scanner on/off via the network
interface.
1. For [Wake On LAN] on the [Network Status] window, select whether to
enable Wake On LAN.
2. Press the [OK] button.
D Wake On LAN is set.
122
4.8.8 Setting the Admin Connection
Central Admin
Console
To use the Admin Tool or Central Admin Server for the scanner, perform the connection
settings.
1. Select [Network Settings] J [Network Admin] J [Admin Connection].
D The [Admin Connection] window appears.
For Central Admin Console, contents of the SSL Certificate are not shown.
2. For [SSL], select whether or not to enable SSL.
3. In [Port Number], enter a port number to be used by the scanner to
communicate with the Admin Tool or Central Admin Server.
z Port numbers 135, 139, 445, and numbers from 1025 to 1124 cannot be
specified as they are already reserved in the scanner.
z If port numbers other than HTTP "80", HTTPS "443" are to be specified, it is
recommended that numbers 5000 or above are used. If a port number lower
than 5000 is specified, verify the Admin Tool connectivity with the port
number first.
4. Press the [OK] button.
D The information entered is set.
123
4.8 Configuring the Network Settings
z If the admin connection settings are changed using the Admin Tool, the Admin Tool
is disconnected from the scanner.
If any further actions are required, the Admin Tool will need to be reconnected to the
scanner.
z If SSL is enabled, SSL is also used for communication between the Central Admin
Server and the scanner. When Central Admin is enabled, change the settings on
the Central Admin Console [Scanner Central Admin Server Settings] window.
z The following settings combinations are not possible.
z Port Number "80" and SSL [On]
z Port Number "443" and SSL [Off]
124
4.8.9 Setting a Central Admin Server
Central Admin
Console
If [On] is selected for [Central Admin], scanners can be targeted for Central Admin.
1. Select [Network Settings] J [Network Admin] J [Scanner Central Admin
Server].
D The [Scanner Central Admin Server] window appears.
For Central Admin Console, [Address] and [Port Number] cannot be set.
2. For [Central Admin], select whether or not to enable Central Admin
Server.
If registration with the Central Admin Server is successful, the text will change
to [This scanner's server-side status is: Registered].
Even when setting values are correct, if the network is disconnected or the
Central Admin Server is in a suspended state, registration will fail. In either
case, if the Central Admin is [On], the process will be run again the next time
the scanner is turned on or resumed from the standby mode.
3. Enter the Central Admin Server IP address, host name, or FQDN in the
[Address] input field.
4. In the [Port Number] input field, enter a port number to be used by the
scanner to communicate with the Central Admin Server.
5. For [Roaming Mode], select whether or not to enable roaming mode.
6. For [Job Mode], select whether or not to enable job mode.
125
4.8 Configuring the Network Settings
7. For [Update Scheduler], set whether to enable automatic update for the
scanner systems (including security, installed options), scanner
settings, and Add-ins.
z Automatic updates start when the scanner is in a standby mode or when no
user is logged in while it is turned on.
Even if notifications from the Central Admin Server or Wake-On-LAN cannot
be used, an update can be performed according to the specified date and
time.
z If a user is logged in the scanner at the scheduled date and time, updates
start after the user has logged out.
z When the setting for an automatic update from the Central Admin Server is
distributed to the scanners, if the update is scheduled to start within ten
minutes after the setting was distributed, the setting will not be applied.
To enable new system settings in an environment where update calls cannot
be issued, scanners must be restarted or logged out. In order to prevent
software updates from running at the same time, enable software update
time-period restrictions ("5.6 Setting the Central Admin Server" (page 245)).
System settings can be updated even when software updates are restricted.
z If the scheduled automatic update time is set in both the Central Admin
Console and with the Admin Tool, the most recent settings will be enabled.
8. Press the [OK] button.
D The information entered is set.
D The scanner information is sent to the Central Admin Server.
If the process is successful, the text will change to [This scanner's server-side
status is: Registered].
z For details about the settings required to use SSL for communication between the
Central Admin Server and scanner, refer to "4.8.8 Setting the Admin Connection"
(page 123).
z When user roaming or job settings are enabled, if communication with the Central
Admin Server is not possible, a confirmation message will appear at login. If the
[OK] button is selected, the settings saved in the scanner are used. Selecting the
[Cancel] button returns to the login window.
126
4.9
Configuring the LDAP Settings
4.9.1 Setting the Login LDAP Server
Central Admin
Console
If a login LDAP server is set, user authentication will be checked.
1. Select [Network Settings] J [Authentication Server] J [Login LDAP
Server].
D The [Login LDAP Server] window appears.
2. For [Server Type], set the connection settings for the login LDAP server.
Select [Off] if an LDAP server is not required for user logins. No other settings can
be entered. Press the [OK] button to confirm the setting.
3. For [SSL], select whether or not to enable SSL.
4. Enter the LDAP server IP address, host name, or FQDN in the [Address]
input field
5. In the [Port Number] input field, enter a port number to be used by the
scanner to communicate with an LDAP server.
6. In the [Search Base (DN)] input field, enter the distinguished name of the
LDAP search base.
The LDAP entries under the character string entered here will become the search
target.
For details about the character string to be entered, and connection to the LDAP
search target, refer to "LDAP Search Target" (page 129).
127
4.9 Configuring the LDAP Settings
7. For [Search Timeout], select the LDAP List search timeout delay.
D The selected [Search Timeout] value is displayed.
8. For [Login User Attributes], select login user attributes.
When [Other LDAP Server] is selected for the [Server Type], select whether LDAP
server login users can be searched for by "uid" or "cn".
9. For [LDAP Server Access Authorization], enter an authorized user name
and password when searching for users to be logged in to the LDAP
server, when [Other LDAP Server] is selected for [Server Type].
10. To check the connection with the LDAP server, press the [Connect]
button.
D When the [Server Type] is [Active Directory] or [Active Directory Global Catalog],
the [Authentication] window appears. Enter the authentication details for
confirming access to the LDAP server, and press the [OK] button.
z For the [User Name], alphanumeric characters (case sensitive) and symbols
may be entered.
z Alphanumeric characters and symbols can be used for a password. Passwords
are case sensitive.
D When the [Server Type] is [Other LDAP Server], authentication is performed with
the information that is entered in the [LDAP Server Access Authorization].
D When the authentication is completed and the connection is successful, the
[Login LDAP Server] window appears.
11. Press the [OK] button.
D The information entered is set.
128
■ LDAP Search Target
The search range and method for LDAP server searches differs according to the LDAP
server connection, or search base (DN) settings (Step 2 or Step 6 of "4.9.1 Setting the
Login LDAP Server" (page 127)).
z For connecting with LDAP server (when [Active Directory] or [Other LDAP Server]
is selected in Step 2)
The following shows an example (where the domain name is example.com) for the
[Search Base (DN)] to be entered in Step 6. The italic text represents variable
character strings.
LDAP Tree: Example
example.com
CN=Users
OU=department
Administrator
User A
User B
OU=section A
OU=section B
Example 1
Example 4
User C
Example 3
User D
Example 2
User E
Hereinafter, Active Directory is used an example to describe search targets.
129
4.9 Configuring the LDAP Settings
Example 1: When searching for (administrator, user A, user B)
CN=Users, DC=example, DC=com
Active Directory configuration is as follows.
Example 2: When searching for (user C, user D, user E)
OU=department, DC=example, DC=com
Active Directory configuration is as follows.
130
Example 3: When searching for (user C, user D)
OU=section A, OU=department, DC=example, DC=com
Active Directory configuration is as follows.
Example 4: When searching for all users
no [Search Base (DN)] setting, or DC=example, DC=com
131
4.9 Configuring the LDAP Settings
z For connecting with Global Catalog (when [Active Directory Global Catalog] is
selected in Step 2)
The following shows an example (where the parent domain name is example.com,
and subdomain name is sub.example.com) for the [Search Base (DN)] to be
entered in Step 6. The italic text represents variable character strings.
LDAP Tree: Example
userPrincipalName
example.com
sAMAccountName
CN=Users
Administrator01
User A
userA
[email protected]
User B
OU=department
sub.example.com
OU=section A
User C
User D
OU=section B
User E
CN=Users
Administrator02
User H
userH
[email protected]
User I
OU=department
OU=F
User J
User K
OU=G
User L
Top:sAMAccountName
Bottom:userPrincipalName
Example: When searching in whole domain
no [Search Base (DN)] setting, or DC=example, DC=com
The LDAP search target differs as follows, according to whether a user
logs in with a sAMAccountName or userPrincipalName.
Login Name
Regular User
User A
User H
Login Possible
Top: sAMAccountName
Bottom: userPrincipleName
userA
OK
[email protected]
OK
userH
NG
[email protected]
OK
The SAM Account Name is the Active Directory user login name
(sAMAccountName).
The User Principal Name is the Active Directory user login name
(userPrincipalName).
132
4.9.2 Setting the e-Mail LDAP Server
Central Admin
Console
If an e-mail LDAP server is set, the searches within the LDAP LIST on the [e-Mail Address
Book] window can be performed.
1. Select [Network Settings] J [Authentication Server] J [e-Mail LDAP
Server].
D The [e-Mail LDAP Server] window appears.
2. For [Server Type], set the connection settings for the e-mail LDAP
server.
Select [Use Login LDAP] to reuse the user login LDAP server settings for e-mail
address searches or lookup. No other settings can be entered. Press the [OK]
button to confirm the setting.
3. Perform Step 5 to Step 10 (excluding Step 8) of "4.9.1 Setting the Login
LDAP Server" (page 127).
4. For [Maximum Results], select the maximum number of results for e-mail
LDAP list searches.
D The selected [Maximum Results] value is displayed.
133
4.9 Configuring the LDAP Settings
5. If [Other LDAP Server] is selected for [Server Type], press the [Schema]
button.
D The window for adjusting the search item schema for LDAP search appears.
6. When schema names are assigned to search items, press the [OK]
button.
D The [e-Mail LDAP Server] window appears again.
7. Press the [OK] button.
D The e-mail LDAP server is set.
To use the e-mail LDAP server, use a login user account. If the login LDAP server
and e-mail LDAP server are different, according to the domain configuration or login
name format, it may not be possible to use the e-mail LDAP server. For details, refer
to "LDAP Search Target" (page 129).
134
4.9.3 Setting the LDAP Search Parameters
Central Admin
Console
Set the LDAP search parameters.
LDAP search parameters are search conditions specified for the (left and middle) buttons
displayed on the LDAP List in the [e-Mail Address Book] window.
The buttons are, for example, the [First Name] and [Last Name] buttons on the following
window.
By pressing a search condition button, the display order of the e-mail addresses
registered in the e-mail address book can be changed according to the search condition
specified for the button.
For details about the [e-Mail Address Book] - [LDAP List] tab, refer to "6.4.1 Selecting an
e-Mail Target from the e-Mail Address Book" (page 313).
1. Select [Network Settings] J [Authentication Server] J [Customize LDAP
Search].
D The [Customize LDAP Search] window appears.
135
4.9 Configuring the LDAP Settings
The following shows the correspondence between the administrator
[Customize LDAP Search] window settings, and the regular user search
condition buttons on the [e-Mail Address Book] - [LDAP List] tab.
z Left Button
Determines the setting of the left button on the [LDAP List] tab.
z Middle Button
Determines the setting of the middle button on the [LDAP List] tab.
2. Select the search item(s) to set for the left or middle button.
Multiple search items can be selected.
If multiple items are selected, a search operation tries to find entries containing any
of the search words.
z If no search items are selected for a button, the corresponding search
parameter button on the [e-Mail Address Book] - [LDAP List] tab cannot be
selected.
z If the [Display Name] check box is selected, and the display format for LDAP
search results is [First Name] - [Last Name] or [Last Name] - [First Name],
search results are shown as a "-" if a first name or last name has not been
registered.
Example: When the LDAP search results format is [First Name] - [Last Name] and a
first name is not registered, the search result shows "---- Last Name".
3. For [Result Format], specify the format of the LDAP search result.
4. Enter the button name in the [Button Name] input field.
The characters input here are displayed on the button name on the [LDAP List] tab
in the [e-Mail Address Book] window.
When you change the button names, check the actual button image shown on
the LDAP List in the [e-Mail Address Book] window.
The button image may not show all characters entered.
5. Press the [OK] button.
D The LDAP search parameters are set.
136
4.10 Configuring the e-Mail-Related Settings
Central Admin
Console
4.10.1 Setting the e-Mail Server
e-Mail cannot be sent if authentication is required by the e-mail server before
sending.
1. Select [Network Settings] J [e-Mail] J [SMTP Server].
D The [SMTP Server] window appears.
2. Enter the SMTP server IP address, host name, or FQDN in the [Address]
input field.
3. For [SSL], select whether or not to use SSL for the communication with
the SMTP server and select the SSL method.
4. In the [Port Number] input field, enter a port number to be used by the
scanner to communicate with the SMTP server.
5. For [Monitor Connection Timeout], select whether or not to monitor the
connection timeout.
To monitor the connection timeout, in the [Connection Timeout] input field, enter the
timeout time for connecting to the SMTP server.
6. For [Split Mails], set whether to send split e-mails.
7. For [Segment Size], enter the maximum size for splitting an e-mail.
137
4.10 Configuring the e-Mail-Related Settings
8. Set the [Maximum Attachment Size] for e-mails (total data size when
sending an e-mail).
Set this value so as not to exceed the value of the message size restriction set
in the SMTP server.
9. For [Address Warning Limit], set the maximum number of addresses to
which e-mail can be sent without confirmation. If the number of recipient
addresses specified for an e-mail is then larger than this value, a
warning dialog will be shown to prevent inadvertent transmission of a
mass e-mailing.
10. Press the [Advanced] button.
D The window for setting the SMTP authentication and other details appears.
The Admin Tool does not contain the [Advanced] button. Set whether or not to
perform SMTP authentication, set the user for SMTP authentication, and other
settings on the same window.
11. Set whether or not to use the STMP authentication and set items such as
the user to be authenticated, authentication method, e-mail address to
be used for the guest account.
12. Press the [OK] button.
D The [SMTP Server] window is shown again.
13. Press the [OK] button.
D The SMTP server is set.
138
4.10.2 Configuring Settings for Sending e-Mail
Central Admin
Console
Configure the user [Send e-Mail] window used by a regular user to send a scanned image
by e-mail. Set the character encoding used when e-mails are sent.
1. Select [Network Settings] J [e-Mail] J [Send e-Mail].
D The [Send e-Mail] window appears.
2. For [Sender e-Mail Address Selection from the e-Mail Address Book], set
whether to allow a regular user who logins with the guest account to
enter an e-mail address in [From] on the [Send e-Mail] window from an email address book.
3. For [Bcc Sender for e-Mail], set whether to display a setting item on the
[Send e-Mail] window that specifies to send a Bcc to the sender.
4. For [Request Return Receipt], set whether to display a setting item on
the [Send e-Mail] window to show that the sent e-mail has been opened.
5. For [Character Encoding], select a character encoding for e-mails.
6. Press the [OK] button.
D The settings for sending e-mail are set.
139
4.10 Configuring the e-Mail-Related Settings
4.10.3 Setting a File Name Format for When Attaching Scanned Data to
e-Mail
Central Admin
Console
Set a file name format for when attaching scanned data to an e-mail.
The "File Name" entered on the [Send e-Mail] window is displayed as the default value for
this setting.
z The following file names cannot be used:
z CON
z PRN
z AUX
z CLOCK$
z NUL
z COM0 to COM9
z LPT0 to LPT9
z The following symbols cannot be used for a file name.
\/:*?"<>|
1. Select [Network Settings] J [e-Mail] J [File Names (e-Mail)].
D The [File Names (e-Mail)] window appears.
140
2. Select a file name format.
When multiple file names are selected, file names are created in the following
order.
z Prefix
z Scanner Name
z User Name
z Date
z Time
The date format and delimiter are set according to the [Date Format] and
[Delimiter] settings.
For example, for prefix "file", scanner name "Scanner", user name "user", date
"20101231", time "12:00:30", delimiter "_", the file name is
"file_Scanner_user_20101231_120030".
3. For [Date Format], select a date format.
4. For [Delimiter], select a delimiter.
5. Press the [Preview] button.
D The specified file name format is displayed to the right of the [Preview] button.
6. Check the file name format.
7. Press the [OK] button.
D The file name format is set.
141
4.11 Setting the Fax Server
4.11 Setting the Fax Server
Central Admin
Console
Set the fax server (RightFax).
1. Select [Network Settings] J [Fax] J [Fax Server].
D The [Fax Server] window appears.
2. Enter a monitored fax server (RightFax) e-mail address.
If the fax server setting is not required, leave the field blank.
For details about e-mail address settings values, refer to "B.1 e-Mail Address
Setting Values" (page 483).
3. Press the [OK] button.
D The fax server is set.
142
4.12 Setting Folders for Saving Scanned Data
The following folders can be set as the folders for saving scanned data.
z Network Folder
z FTP Server Folder
z SharePoint Folder
4.12.1 Setting the Network Folders
Central Admin
Console
A list of network folders may be set as [Save] targets for scanned data.
Any accessible file server folder can be specified as a network folder.
Up to 100 network folders and FTP server folders can be added.
For details about setting FTP server folders, refer to "4.12.2 Setting the FTP Server
Folders" (page 149).
A network folder can be added in the following ways.
z Network Tree
Select a network folder from the network tree.
For details, refer to "Registering a Network Folder (Network Tree)" (page 144).
z Network Path
Set a network folder by directly entering the path alias for the file server folder.
For details, refer to "Registering a Network Folder (Network Path)" (page 146).
For details about setting a file name for scanned data to be saved in a network folder,
refer to "4.12.4 Setting a File Name Format for When Saving Scanned Data" (page 156).
Note the following when registering a network folder.
z The network folder is registered as a network path. If the network folder is on a
Windows file server and the length of the full Windows path including the file name
exceeds 259 characters, the scan data will not be saved. Before registering a
(Windows) network folder, check that the length of the full file path+name is not
likely to exceed 259 characters.
z If the selected folder was created using a language foreign to that of the browsing
operating system, the network folder may not register correctly.
If the name of the network folder contains unrecognizable characters, check the
codeset used.
z If the number folders to be displayed is large, they may take a long time to appear.
For a network folder, set a readable and writable folder.
143
4.12 Setting Folders for Saving Scanned Data
■ Registering a Network Folder (Network Tree)
1. Select [Network Settings] J [Network Folder] J [Network Folder].
D The [Network Folder] window appears.
2. Press the [Add] button.
D The window for selecting a network folder appears.
Desired domains may not be shown in the Network Folders. In this case,
directly enter the path alias for the file server, or wait for a few minutes and reopen the window for adding a network folder.
144
3. Select a domain
.
D The network tree expands and the subordinate computer names are displayed.
If an authentication window is displayed, enter a user name and password. If
authentication is successful, the subordinate computer names are displayed.
4. Select a computer
.
D The network tree expands and the subordinate network folder names are
displayed.
If an authentication window is displayed, enter a user name and password. If
authentication is successful, the subordinate network folder names are
displayed.
5. Select a network folder
.
The selected folder will be opened to show any sub-folders, which themselves may
be selected in turn (up to seven levels deep, including the parent domain).
6. Press the [OK] button.
D The selected network folder is added to the network folder list.
The default network folder alias will be the same as the alias selected from the
network tree. For details on changing the folder alias, refer to "Renaming a
Network Folder" (page 147).
145
4.12 Setting Folders for Saving Scanned Data
■ Registering a Network Folder (Network Path)
1. Select [Network Settings] J [Network Folder] J [Network Folder].
D The [Network Folder] window appears.
2. Press the [Add] button.
D The window for selecting a network folder appears.
3. Press the [Network Path] button.
D The window for adding a network folder appears.
4. Enter a network folder alias and network path.
5. Press the [OK] button.
D The network folder is added to the network folder list.
z The default network folder alias will be the same as the alias selected from
the network tree. For details on changing the network folder alias, refer to
"Renaming a Network Folder" (page 147).
z The authentication window may appear.
146
■ Renaming a Network Folder
1. Select [Network Settings] J [Network Folder] J [Network Folder].
D The [Network Folder] window appears.
2. Select the network folder that is to be renamed.
3. Press the [Edit] button.
D The window for editing the network folder appears.
4. Enter a folder alias.
5. Press the [OK] button.
D The network folder is renamed.
■ Removing a Network Folder
1. Select [Network Settings] J [Network Folder] J [Network Folder].
D The [Network Folder] window appears.
2. Select the network folder that is to be removed from the folder list.
3. Press the [Remove] button.
D The window for removing a network folder appears.
4. Confirm the details of the network folder that is to be removed are
correct, and press the [Yes] button.
D The selected network folder is removed from the network folders list.
147
4.12 Setting Folders for Saving Scanned Data
■ Viewing the Network Folder Details
1. Select [Network Settings] J [Network Folder] J [Network Folder].
D The [Network Folder] window appears.
2. Select the desired network folder from the folder list.
3. Press the [Details] button.
D The information for the selected network folder is displayed.
148
4.12.2 Setting the FTP Server Folders
Central Admin
Console
A list of FTP server folders may be set as [Save] targets for scanned data.
Any FTP server folder can be specified as an FTP server folder.
Up to the total of 100 FTP server folders and network folders can be added.
For details about setting network folders, refer to "4.12.1 Setting the Network Folders"
(page 143).
For details about setting a file name for scanned data to be saved in an FTP server folder,
refer to "4.12.4 Setting a File Name Format for When Saving Scanned Data" (page 156).
Note the following when registering an FTP server folder.
z The FTP server folder is registered as a network path. If the FTP server folder is on
a Windows file server and the length of the full Windows path including the file
name exceeds 259 characters, the scan data will not be saved. Before registering a
FTP server folder, check that the length of the full file path+name is not likely to
exceed 259 characters.
z If the selected folder was created using a language foreign to that of the browsing
operating system, the FTP server folder may not register correctly.
If the name of the FTP server folder contains unrecognizable characters, check the
codeset used.
z For FTP path, user name, and password, alphanumeric characters and symbols
with the exception of " \ / : ; * ? " < > | # & % " can be used.
■ Registering an FTP Server Folder
1. Select [Network Settings] J [FTP Server Folder] J [FTP Server Folder].
D The [FTP Server Folder] window appears.
149
4.12 Setting Folders for Saving Scanned Data
2. Press the [Add] button.
D The window for setting an FTP server folder appears.
3. Enter a [Folder Alias] for the FTP server folder.
4. Enter an [FTP Path] for the FTP server folder.
5. Set a [Port Number] for the FTP server.
6. In the [User Name] and [Password] input fields, enter the authentication
information for logging in to the FTP server.
7. For [Authentication], specify whether or not to save the entered [User
Name] and [Password].
8. For [Protocol], specify how to access the FTP server.
9. For [Passive Mode], specify whether or not to access in passive mode.
For the Central Admin Console, to use a Central Admin Server with an
enabled firewall, set the [Passive Mode] to [On].
10. For [Encryption], specify the type of encryption.
11. For [Proxy], specify whether or not a proxy server is to be used.
The [Proxy] setting is only available when a proxy server has been set on the [Proxy
Server] window. For details about proxy server settings, refer to "4.8.5 Setting the
Proxy Server" (page 118).
150
12. Press the [OK] button.
D User authentication may be required to access the FTP server. When the user
name and password are valid, the [FTP Server Folder] window appears again
and the FTP server folder is set.
Select a readable and writable FTP server folder.
■ Changing the FTP Server Folder Settings
1. Select [Network Settings] J [FTP Server Folder] J [FTP Server Folder].
D The [FTP Server Folder] window appears.
2. Select an FTP server folder to be changed.
3. Press the [Edit] button.
D The window for editing the network folder appears.
4. Change the settings.
The [FTP Path] cannot be changed.
5. Press the [OK] button.
D The changed settings are set.
■ Removing an FTP Server Folder
1. Select [Network Settings] J [FTP Server Folder] J [FTP Server Folder].
D The [FTP Server Folder] window appears.
2. Select an FTP server folder that is to be removed from the folder list.
3. Press the [Remove] button.
D The window for removing the FTP server folder appears.
4. Confirm the details of the FTP server folder that is to be removed are
correct, and press the [Yes] button.
D The selected FTP server folder is removed from the network folders list.
151
4.12 Setting Folders for Saving Scanned Data
■ Viewing the FTP Server Folder Details
1. Select [Network Settings] J [FTP Server Folder] J [FTP Server Folder].
D The [FTP Server Folder] window appears.
2. Select the desired FTP server folder from the folder list.
3. Press the [Details] button.
D The information for the selected FTP server folder is displayed.
152
4.12.3 Setting the SharePoint Folders
Central Admin
Console
A list of SharePoint folders may be set as [Scan to SharePoint] targets for scanned data.
For details about setting a file name for scanned data to be saved in a SharePoint folder,
refer to "4.12.4 Setting a File Name Format for When Saving Scanned Data" (page 156).
1. Select [Network Settings] J [SharePoint Folder] J [SharePoint Folder].
D The [SharePoint Folder] window appears.
2. The [Scan to SharePoint] option determines whether users are allowed
to save scanned data in SharePoint folders.
3. Specify a SharePoint server site URL in the [URL] field.
You can also press the list button to select a URL from the recently specified URLs.
4. Press the [Connect] button.
D A [Sign In] window appears.
Enter the user name, password, and domain name for signing in the SharePoint
server, and then press the [OK] button.
z User names may be up to 256 characters long.
z Passwords may be up to 256 characters long. [User Name] and
[Password] are case sensitive.
z Domain names may be up to 64 characters long.
D If the sign in is successful, the available SharePoint server folders are shown in
the [SharePoint Site Folders] list area.
153
4.12 Setting Folders for Saving Scanned Data
5. Select the folder that is to be a save target from the [SharePoint Site
Folders] list, and press the [<<<] button.
D The selected folder is added to the [Scan to SharePoint Folders] list, making it
available to users as a save target.
z To set a SharePoint folder from the Central Admin Server, install .NET
Framework 3.0 Service Pack 1 or later into the Central Admin Server, and
restart it.
z If .NET Framework 3.0 Service Pack 1 or later is not installed in the Central
Admin Server, you cannot set a SharePoint folder from the Central Admin
Server.
z For SharePoint 2010, when a full domain is used to indicate a server, sites
with the same name as the actual site may appear under the actual site.
When this happens, change the SharePoint server settings as follows.
1. Open [Central Administration].
2. Under [Operations], select [Alternate Access Mappings].
3. Select [Edit Public URLs].
4. Change the URL shown in [Default] to a full domain.
5. Select [Save].
z Do not set a folder in which scanned data cannot be saved, such as a
SharePoint library "Slide Library" type.
z Do not set a server site and folder URL path that exceeds 184 characters.
z When a folder is added to [Scan to SharePoint Folders] list, if the specified
folder name already exists in the list, a parenthesized sequence number
(starting from "(2)") will be appended to the folder name.
■ Renaming a SharePoint Folder (Display Name)
1. Select [Network Settings] J [SharePoint Folder] J [SharePoint Folder].
D The [SharePoint Folder] window appears.
2. From the [Scan to SharePoint Folders] list, select the SharePoint folder
that is to be renamed.
3. Press the [Edit] button.
D The [Scan to SharePoint folder details] window appears.
154
4. Enter the name that is to be shown for the selected SharePoint folder.
5. Press the [OK] button.
D The SharePoint folder is renamed.
■ Removing a SharePoint Folder
1. Select [Network Settings] J [SharePoint Folder] J [SharePoint Folder].
D The [SharePoint Folder] window appears.
2. From the [Scan to SharePoint Folders] list, select the folder that is to be
removed.
3. Press the [Remove] button.
D A confirm removal window appears for the selected folder.
4. Check that the correct folder is being removed, then press the [Yes]
button.
D The selected folder is removed.
155
4.12 Setting Folders for Saving Scanned Data
4.12.4 Setting a File Name Format for When Saving Scanned Data
Central Admin
Console
A file name format can be set to be used when scanned data is saved in a network folder,
FTP server folder, or SharePoint folder.
The specified file name format is used for the default value in the [File Name] input field
on the [Save] or [Scan to SharePoint] window for regular users.
z The following file names cannot be used:
z CON
z PRN
z AUX
z CLOCK$
z NUL
z COM0 to COM9
z LPT0 to LPT9
z The following symbols cannot be used for a file name.
\/:*?"<>|
When you save a file in a SharePoint folder, the following symbols cannot be used.
~"#%&*:<>?{|}
z A file name used for saving a file in the SharePoint folder cannot be set via the LCD
touch panel. Set it via the Admin Tool or Central Admin Console.
1. Perform one of the following operations.
z For a network folder
Select [Network Settings] J [Network Folder] J [File Names (Save)].
z For an FTP server folder
Select [Network Settings] J [FTP Server Folder] J [File Names (Save)].
z For a SharePoint folder
Select [Network Settings] J [SharePoint Folder] J [File Names (Save)].
D The [File Names (Save)] window appears.
The following description uses a network folder as an example.
156
2. For [Sub-folder Name Format], set a folder in which to save the scanned
data.
z Do not select a name format for a sub-folder if you save the scanned data
directly in the network folder, FTP server folder, or SharePoint folder.
z Select a name format for a sub-folder if you save the scanned data in the subfolder under the network folder, FTP server folder, or SharePoint folder.
If the specified folder does not exist, it is created.
When multiple folder names are selected, folder names are created in the
following order.
z Scanner Name
z User Name
z Date
The delimiter is set according to the [Delimiter] setting.
For example, for scanner name "Scanner", user name "user", date
"12312010", delimiter "_", the folder name is "Scanner_user_12312010".
3. Select a file name format.
When multiple file names are selected, file names are created in the following
order.
z Prefix
z Scanner Name
z User Name
z Date
z Time
The delimiter is set according to the [Delimiter] setting.
For example, for prefix "file", scanner name "Scanner", user name "user", date
"12312010", time "12:00:30", delimiter "_", the file name is
"file_Scanner_user_12312010_120030".
157
4.12 Setting Folders for Saving Scanned Data
4. For [Seq. Number], select a sequence number format.
If the file name which exceeds the maximum sequence number possible
already exists in the target folder for saving, the sequence numbers are not
added correctly.
The following explains the way in which sequence numbers are added.
z Sequence numbers start from 1. When there are files with file names
containing sequence numbers, sequence numbers following the largest value
will be used.
For example, if the file name is "A", sequence numbers are set to be added in
3 digits, and "A001.pdf" and "A004.pdf" already exist, subsequent file names
are assigned in the following order.
"A005.pdf", "A006.pdf", "A007.pdf", "A008.pdf"...
File names "A002.pdf" and "A003.pdf" are skipped.
z If the sequence number exceeds the setting in the [Seq. Number],
subsequent file names are assigned using the next digit.
For example, if the file name is "A", sequence numbers are set to be added in
3 digits, and "A001.pdf" to "A998.pdf" already exist, subsequent file names
are assigned in the following order.
"A999.pdf", "A1000.pdf", "A1001.pdf", "A1002.pdf"...
z The maximum sequence number is "4294967295". If it is exceeded, the
skipped minimum number is used for the sequence number.
For example, if the file name is "A", sequence numbers are set to be added in
3 digits, and "A001.pdf", "A003.pdf", and "A4294967295.pdf" already exist,
subsequent file names are assigned in the following order.
"A002.pdf", "A004.pdf", "A005.pdf", "A006.pdf"...
5. For [Date Format], select a date format.
6. For [Delimiter], select a delimiter.
7. Press the [Preview] button.
D The specified file name format is displayed to the right of the [Preview] button.
8. Check the file name format.
9. Press the [OK] button.
D The file name format is set.
158
4.13 Setting the Network Printers
Central Admin
Console
Set a printer connected to the network.
The procedure for setting a network printer is as follows.
1. Check the printer driver.
For details, refer to "Checking the Printer Drivers" (page 160).
2. Set the printer properties.
For details, refer to "Setting the Printer Properties" (page 161).
3. Register the network printer.
Up to 100 network printers can be registered.
A network printer can be registered in the following ways.
z Network Tree
Select a network printer from the network tree.
For details, refer to "Registering a Network Printer (Network Tree)" (page 164).
z Network Path
Directly enter the network printer path name.
For details, refer to "Registering a Network Printer (Network Path)" (page 167).
z Read the printer manual beforehand for information about setting a printer, adding a
network printer, and other cautions.
z Make sure that there is enough space in the drive before printing.
z Do not set a virtual printer.
z If a printer connected to different print servers is to be registered as a network
printer multiple times, the software version of the driver should be the same on each
print server.
If the software version of the printer driver differs, printing errors may occur.
159
4.13 Setting the Network Printers
■ Checking the Printer Drivers
The driver installed on the print server must be compatible with Windows XP.
Use the following procedure to check whether the drivers installed on the print server are
Windows XP compatible drivers.
1. From the [Start] menu on the print server, select [Control Panel] J
[Printers and Faxes].
D The [Printers and Faxes] window appears.
2. Right-click on a printer, and select [Properties].
D Printer properties appear.
3. Press the [Additional Drivers] button in the [Sharing] tab.
D The [Additional Drivers] window appears.
4. Check that the [Processor] is "x86" (or Intel), and that [Installed] is "Yes"
for version Windows XP.
z When the [Installed] status is "Yes", the driver has been installed and the
printer can be used as a network printer. Press the [Cancel] button.
z When the [Installed] status is [No], select version "Windows XP", and press the
[OK] button.
D The Windows XP compatible driver is installed.
160
■ Setting the Printer Properties
Use the following procedures to set a printer.
1. From the [Start] menu on the print server, select [Control Panel] J
[Printers and Faxes].
D The [Printers and Faxes] window appears.
2. Right-click on a printer, and select [Properties].
D Printer properties appear.
3. Press the [Printing Defaults] button on the [Advanced] tab.
D The printing defaults window is displayed.
4. Change the settings and press the [OK] button.
D The printer properties are set.
161
4.13 Setting the Network Printers
It is recommended that the same printer be added to the print server multiple times
for each instance of property settings. For example, "for color printing" and "for black
& white printing".
For a color printing example, the procedure for adding a printer is as follows.
1. From the [Start] menu on the print server, select [Control Panel] J [Printers
and Faxes].
D The [Printers and Faxes] window appears.
2. Double-click the [Add Printer].
D The [Add Printer Wizard] window appears.
3. Follow prompts on the window until the [Use Existing Driver] window appears.
4. Select "Keep existing driver [recommended]" and press the [Next] button.
5. Follow the prompts on the window until the [Printer Sharing] window appears.
6. Specify the shared name.
Enter "FUJITSUX.2 (Color)" for color printing.
162
Since the shared name is displayed on the windows of the scanner, it is
recommended to name the printer with an alias that indicates the contents of
the properties settings as follows.
D Follow the prompts on the window. The "Completing the Add Printer
Wizard" message indicates that the printer addition has completed. Press
the [Finish] button.
D The printer is added on the [Printers and Faxes] window.
7. Right-click the added printer and select [Properties].
D Printer properties appear.
8. Press the [Printing Defaults] button on the [Advanced] tab.
D The printing defaults window is displayed.
9. Select [Color] on the [Paper/Quality] tab, and press the [OK] button.
D Printing is set to [Color].
After this, if the printer set for color printing on the print server is added to the
scanner printer list, the user can specify to use this printer already set for color
printing.
For details about adding the printer to the scanner printer list, refer to "Registering a
Network Printer (Network Tree)" (page 164) or "Registering a Network Printer
(Network Path)" (page 167).
163
4.13 Setting the Network Printers
■ Registering a Network Printer (Network Tree)
1. Select [Network Settings] J [Print] J [Network Printer].
D The [Network Printer] window appears.
2. Press the [Add] button.
D The window for selecting a network printer appears.
Some domains may not be shown in the window for selecting a network
printer. In this case, directly enter the network printer path name, or wait for a
few minutes and re-open the window for selecting a network printer.
164
3. Select a domain
.
D The network tree expands and the subordinate computer names are displayed.
If an authentication window is displayed, enter a user name and password. If
authentication is successful, the subordinate computer names are displayed.
4. Select a computer
.
D The network tree expands and the subordinate network printer names are
displayed.
If an authentication window is displayed, enter a user name and password. If
authentication is successful, the subordinate network printer names are
displayed.
5. Select a network printer
.
A network printer that has already registered cannot be added.
165
4.13 Setting the Network Printers
6. Press the [OK] button.
D The window returns to the [Network Printer] window, and the registered network
printer is added to the network printer list.
z Once the network printer is registered, do not change the shared name or
printer alias on the print server.
z To change the shared name or printer alias, remove the registered network
printer first, and then change the share name/printer alias, and register it
again.
The default network printer alias will be the same as the alias selected from
the network tree. For details on changing the folder alias, refer to "Renaming a
Network Printer" (page 168).
166
■ Registering a Network Printer (Network Path)
1. Select [Network Settings] J [Print] J [Network Printer].
D The [Network Printer] window appears.
2. Press the [Add] button.
D The window for selecting a network printer appears.
3. Press the [Network Path] button.
D The window for adding a network printer appears.
Pressing the [Network Tree] button returns to the window for selecting a
network printer from the network tree.
4. Enter a network printer alias and network path.
5. Press the [OK] button.
D The window returns to the [Network Printer] window, and the registered network
printer is added to the network printer list.
z A network printer that is already registered cannot be added.
z Once the network printer is registered, do not change the shared name or
printer alias on the print server.
z To change the shared name or printer alias, remove the registered network
printer, change the name, and then register it again.
z The default network printer alias will be the same as the alias selected from
the network tree. For details on changing the folder alias later, refer to
"Renaming a Network Printer" (page 168).
z The authentication window may appear.
167
4.13 Setting the Network Printers
■ Renaming a Network Printer
1. Select [Network Settings] J [Print] J [Network Printer].
D The [Network Printer] window appears.
2. Select the network printer that is to be renamed.
3. Press the [Edit] button.
D The window for editing the network printer alias appears.
4. Enter a new printer alias.
5. Press the [OK] button.
D The network printer is renamed.
168
■ Removing a Network Printer
1. Select [Network Settings] J [Print] J [Network Printer].
D The [Network Printer] window appears.
2. Select the network printer that is to be removed from the printer list.
3. Press the [Remove] button.
D The window for removing a network printer appears.
4. Confirm the details of the network printer that is to be removed are
correct, and press the [Yes] button.
D The selected network printer is removed from the network printers list.
If removing a network printer is attempted while the network is not connected,
the process may be stopped while "Deleting" is displayed on the window.
Before removing a network printer, check that the network is functioning
normally.
■ Viewing the Printer Details
1. Select [Network Settings] J [Print] J [Network Printer].
D The [Network Printer] window appears.
2. Select the desired network printer from the printer list.
3. Press the [Details] button.
D The information for the selected network printer is displayed.
169
4.14 Viewing the Scanner Details
4.14 Viewing the Scanner Details
Central Admin
Console
4.14.1 Viewing the System Status
1. Select [Monitoring & Management] J [Status Details] J [System Status].
D The system status information is displayed.
170
Central Admin
Console
4.14.2 Viewing the Usage Status
Information about the number of documents that have been scanned and the status of the
scanner's consumable parts (pad assy or pick roller) can be viewed. For details about
replacing consumable parts, refer to "7.5 Replacing Parts" (page 426).
■ Viewing the Status of Consumable Parts
1. Select [Monitoring & Management] J [Status Details] J [Usage Status].
D The [Usage Status] window appears.
■ Resetting the Usage Counter
After part replacement, the usage counter can be reset to return the part status to normal.
1. Select [Monitoring & Management] J [Status Details] J [Usage Status].
D The [Usage Status] window appears.
2. Press the [Clear] button for the part replaced.
D The counter reset confirmation window appears.
3. Press the [OK] button.
D The counter value is reset to "0", and the [Status] field turns green again.
171
4.14 Viewing the Scanner Details
4.14.3 Viewing the Status of Installed Options
Central Admin
Console
1. Select [Monitoring & Management] J [Status Details] J [Installed
Options].
D The [Installed Options] window appears.
172
4.14.4 Managing the User Log
The most recent 1,000 user log entries are saved by the scanner.
z User logs may contain private information such as e-mail addresses or fax
numbers, so care should be taken when managing such data.
z If a log file error is detected during scanner operation, the log file will be cleared and
the log entry "Error 81001004 Corrupted user log file was deleted." is recorded.
■ Viewing the User Log Details
The user log summary is shown in date/time order. Even if the [Region/Timezone] or
[Date/Time] settings are changed, the order of the log entries will not be changed.
1. Select [Monitoring & Management] J [Status Details] J [User Log].
D The [User Log] window appears.
2. Select the user log you wish to view.
D The details of the selected log are displayed.
Pressing the [OK] button returns to the [User Log] window.
The [Date] format specified on the [Date/Time] window is used. For details, refer to
"4.5.4 Setting the Date/Time" (page 98).
173
4.14 Viewing the Scanner Details
■ Downloading the User Logs in CSV Format
User logs can be downloaded to a computer in CSV format.
The file is saved in the following format:
"Date","Time","User","Result","Code","Operation","Pages","Description"
The default file name is "OperationLog.csv".
1. Select [Monitoring & Management] J [Status Details] J [User Log].
D The [User Log] window appears.
2. Press the [Download] button.
D The [File Download] dialog box appears.
3. Press the [Save] button.
Make sure there is enough free space on the disk where it is to be saved and
press the [Save] button. If there is not enough free disk space, an incomplete
file may be saved.
D The [Save As] dialog box appears.
4. Enter a file name, and specify a folder for saving the file.
The file will contain CSV format data.
5. Press the [Save] button.
D A file containing CSV format data is saved.
■ Clearing the User Logs
1. Select [Monitoring & Management] J [Status Details] J [User Log].
D The [User Log] window appears.
2. Press the [Clear All] button.
D The confirmation window appears.
3. Press the [Yes] button.
D All the user operation logs are cleared.
174
4.14.5 Managing the System Log
Up to 1,000 system information logs (such as for startup, shutdown, and system errors)
are saved in the scanner.
z System logs may contain private information such as e-mail addresses or fax
numbers, so care should be taken when managing such data.
z If a log file error is detected during scanner operation, the log file will be cleared and
the log entry "Error 81001003 Corrupted system log file was deleted." is recorded.
■ Viewing the System Log Details
The system log summary is shown in date/time order. Even if the [Region/Timezone] or
[Date/Time] settings are changed, the order of the log entries will not be changed.
1. Select [Monitoring & Management] J [Status Details] J [System Log].
D The [System Log] window appears.
2. Select the log you wish to view.
D The details of the selected log are displayed.
Pressing the [OK] button returns to the [System Log] window.
z The [Date] format specified on the [Date/Time] window is used. For details, refer to
"4.5.4 Setting the Date/Time" (page 98).
z The information of "Error" and "Warning" in [Type] will be sent to the e-mail address
set in "4.16.6 Setting the Destination for Alert Notifications" (page 194).
175
4.14 Viewing the Scanner Details
■ Downloading the System Log in CSV Format
When downloaded to a computer, the file will contain CSV format data.
The file is saved in the following form:
"Date","Time","Type","Message"
The default file name is "SystemLog.csv".
1. Select [Monitoring & Management] J [Status Details] J [System Log].
D The [System Log] window appears.
2. Press the [Download] button.
D The [File Download] dialog box appears.
3. Press the [Save] button.
Make sure there is enough free space on the disk where it is to be saved
before pressing the [Save] button. If there is not enough free disk space, an
incomplete file may be saved.
D The [Save As] dialog box appears.
4. Enter a file name, and specify a folder for saving the file.
The file will contain CSV format data.
5. Press the [Save] button.
D A file containing CSV format data is saved.
■ Clearing the System Log
1. Select [Monitoring & Management] J [Status Details] J [System Log].
D The [System Log] window appears.
2. Press the [Clear All] button.
D The confirmation window appears.
3. Press the [Yes] button.
D The system log is cleared.
176
4.15 Managing the User Data Store and System
Settings
4.15.1 Maintaining the User Data Store
The scanner's user data store can be backed-up, restored, and deleted.
The user data store contains the following information:
z "My List" e-Mail Address Books
z Scan Settings
z User Logs
z Fax Number List
z Name of the last network printer used
z Name of the last network folder used
z Name of the last SharePoint folder used
z Local Accounts
Scanner login user names are authenticated with the LDAP server, and when a new
name is encountered, the scanner automatically adds an entry for that user to the user
data store.
The user data store may contain up to 1,000 users.
z Once 1,000 user names have been used to login, new user logins are no longer
possible until the entire user data store is cleared.
It is recommended that the user data store be backed up before it is cleared. Refer
to "Backing up the User Data Store" (page 178) and "Clearing the User Data
Store" (page 180) for details.
z When restoring from a user data store backup, if a backed up user name
corresponds to that of an existing user in the current user data store, the backup
user data will overwrite the current user data. Addition of new users cannot cause
the 1,000 user limit to be exceeded, or the user data store restoration will fail. If this
happens, delete all user data once and then restore from a user data store backup.
z When the user data store is restored from a backup, the Fax Number List and local
accounts are also reverted to their old state.
The following example illustrates how the number of users could exceed 1,000:
1. 100 users (A001 to A100) login.
2. The user data store is backed up (with 100 users: A001 to A100).
3. The user data store (containing users A001 to A100) is cleared.
4. 960 "new" users (A001 to A050 and B001 to B910) login.
177
4.15 Managing the User Data Store and System Settings
5. The user data store (containing users A001 to A100) backed up in Step 2 is
restored.
D Users A001 to A100 are to be restored, of whom 50 are already in the current
user data store (users A001 to A050) and so will be overwrite targets. Users
A051 to A100 are considered "new" users and thus need to be added to the user
data store. However 960 existing users + 50 new users = 1010 users. As the
number of users would exceed the 1,000 user limit, the Step 2 user data store
(containing users A001 to A100) is not restored.
The user data store contents are organized as follows:
Common Data (one per scanner)
Fax Number List
Local Accounts
Individual Data (one set per user)
User A
e-Mail Address Book
Scan Settings
User Log
User B
e-Mail Address Book
Scan Settings
User Log
User data may contain private information such as e-mail addresses or fax numbers,
so care should be taken when managing such data.
■ Backing up the User Data Store
As a precaution, the user data store should be backed up regularly.
The default file name is "restored_data".
User logs cannot be backed up.
1. Select [Monitoring & Management] J [Data Management] J [User Data
Store].
D The [User Data Store] window appears.
178
2. Press the [Backup] button.
D The [File Download] dialog box appears.
3. Press the [Save] button.
Make sure there is enough free space on the disk where it is to be saved and
press the [Save] button. If there is not enough free disk space, an incomplete
file may be saved.
D The [Save As] dialog box appears.
4. Enter a file name, and specify a folder for saving the file.
Use of a name that includes the scanner name and backup date is recommended.
5. Press the [Save] button.
D A backup copy of the user data store is saved.
Do not change the contents of data store backup files. If changed, the file may
be corrupted. Restoring from a corrupted file may cause the scanner to
function abnormally.
179
4.15 Managing the User Data Store and System Settings
■ Restoring the User Data Store
The scanner's user data store can be restored from a backed-up user data store file.
z Restoring user data overwrites all user information stored at the time of restoration,
and returns all e-mail address books, fax number list, and scan settings to the time
the backup was taken.
z During user data restoration, do not press and hold down the power button for
longer than 4 seconds, as it may cause the scanner to function abnormally.
User logs cannot be backed up, therefore cannot be restored.
1. Select [Monitoring & Management] J [Data Management] J [User Data
Store].
D The [User Data Store] window appears.
2. Select a user data store backup file.
Press the [Browse] button to select a file.
3. Press the [Restore] button.
D An "OK to overwrite?" confirmation message appears.
4. Press the [Yes] button.
D After the user data store is restored, a restore completion message appears.
5. Press the [OK] button.
■ Clearing the User Data Store
z Clearing the user data store cannot be undone.
z Even if the user data store is cleared, the local accounts are not removed. To
remove the local accounts, use the User Editor. For details about how to edit the
local accounts, refer to "E.8 Editing Local Accounts" (page 516).
1. Select [Monitoring & Management] J [Data Management] J [User Data
Store].
D The [User Data Store] window appears.
2. Press the [Clear] button.
D The delete confirmation window appears.
3. Press the [Yes] button.
D The user data store is cleared.
180
4.15.2 Maintaining the System Settings
The scanner's system settings set by the administrator can be saved in CSV format,
backed up, restored, or returned to their factory default values.
■ Downloading the System Settings in CSV Format
System settings downloaded in CSV format may be viewed by using spreadsheet
software.
CSV system settings files are of the following format:
"Function_name", "Option_name", "Value"
The default file name is "Configuration_download.csv".
1. Select [Monitoring & Management] J [Data Management] J [System
Settings File].
D The [System Settings File] window appears.
2. Press the [Get CSV] button.
D The [File Download] dialog box appears.
3. Press the [Save] button.
Make sure there is enough free space on the disk where it is to be saved and
press the [Save] button. If there is not enough free disk space, an incomplete
file may be saved.
D The [Save As] dialog box appears.
4. Name the file and specify where it should be saved.
The file will contain CSV format data.
5. Press the [Save] button.
D The system settings for the scanner are downloaded.
181
4.15 Managing the User Data Store and System Settings
■ Backing up System Settings
The administrator can back up the scanner system settings.
Backup files can later be used to restore system settings. Make backups periodically just
in case.
The default file name is "SystemSettingsFile".
1. Select [Monitoring & Management] J [Data Management] J [System
Settings File].
D The [System Settings File] window appears.
2. Press the [Backup] button.
D The [File Download] dialog box appears.
3. Press the [Save] button.
Make sure there is enough free space on the disk where it is to be saved and
press the [Save] button. If there is not enough free disk space, an incomplete
file may be saved.
D The [Save As] dialog box appears.
4. Name the file and specify where it should be saved.
The date of backup or scanner name should be used as an easy-to-understand file
name.
5. Press the [Save] button.
D The system settings are backed up.
Do not change the contents of system settings backup files. If changed, the
file may no longer be used as a backup. Trying to restore from a changed user
data store backup file may render the scanner inoperable.
182
■ Restoring the System Settings
Restore the system settings.
The system settings can be restored in the following ways.
z Return the system settings backup file to the same scanner
z Import the system settings backed up from another scanner to the current scanner
1. Select [Monitoring & Management] J [Data Management] J [System
Settings File].
D The [System Settings File] window appears.
2. Select the backup file of the system settings to be restored.
Press the [Browse] button to select a file.
3. Perform either of the following steps.
z To return the system settings backup file to the same scanner, select [Restore
in the same scanner].
z To import the system settings backed up from another scanner to the current
scanner, select [Import from another scanner].
4. Press the [Restore] button.
D A confirmation message appears.
5. Press the [Yes] button.
D The system settings are restored. After the system settings are restored, the
scanner is restarted.
During system settings restoration, do not press and hold down the power
button for longer than 4 seconds.
It may cause the scanner to function abnormally.
The network interface connection will be lost when the scanner is restarted to
complete the restoration of the system settings. To continue with other
settings, wait a short time for the scanner to restart, then login to the network
interface again.
As the network interface connection to the scanner requires the IP address or
scanner name, if this is changed by the restoration of the system settings (i.e.
if the backed up IP address or scanner name is different to the pre-restoration
IP address or scanner name), the new IP address or scanner name will be
needed. If not known, the current state of these settings can always be
checked by physically logging in to the scanner via the LCD touch panel
interface.
183
4.15 Managing the User Data Store and System Settings
■ Resetting Factory Defaults
The system settings or entire system can be reset to factory defaults.
1. Select [Monitoring & Management] J [Data Management] J [System
Settings File].
D The [System Settings File] window appears.
2. Perform either of the following steps.
z To reset system settings to factory defaults, press the [Reset] button for [Reset
system settings to factory defaults and clear logs.].
z To reset system settings to factory defaults, clear the user data store and logs,
and initialize the free space, press the [Secure initialize] button for [Reset
system settings to factory defaults, clear the user data store and logs, and
initialize the free space.].
D A confirmation message appears.
3. Press the [Yes] button.
D The system settings, user data store and logs are reset to factory defaults.
D After factory default settings have been restored, the scanner is restarted.
During factory defaults reset, do not press and hold down the power button for
longer than 4 seconds.
It may cause the scanner to function abnormally.
After the factory default settings are restored, the scanner name, IP address,
and other settings will need to be set again, as described in "Configuring the
System" (page 94).
184
4.16 Maintaining the System
4.16.1 Updating the Scanner's System Software
The scanner system, security system, and installed options can be updated as follows.
1. Select [Monitoring & Management] J [Maintenance] J [System Update].
D The [System Update] window appears.
2. Select a system update file.
Press the [Browse] button to select a file.
185
4.16 Maintaining the System
3. Press the [Upload] button.
D The [Current System Version] and [Was Updated On] values are displayed.
When installed options or the system including installed options are updated,
the following window appears.
4. Press the [OK] button.
D The system update process is started.
After the system has updated, the scanner is restarted.
z Wait for the system to restart.
z During system update, do not press and hold down the power button for
longer than 4 seconds, as this may cause the scanner to function abnormally.
The network interface connection will be lost when the scanner is restarted to
complete the system update. To continue with other settings, wait a short time
for the scanner to restart, then login to the network interface again.
186
4.16.2 Checking for New Updates
You can check whether new updates are available from the published server for the
scanner system, security system, and installed options.
You can also set whether to receive an e-mail notification if a new update is released.
To use the proxy server to check for released updates, set the HTTP proxy server as
necessary. For details about settings, refer to "4.8.5 Setting the Proxy Server" (page
118).
■ Checking for New Updates Manually
1. Select [Monitoring & Management] J [Maintenance] J [System Update].
D The [System Update] window appears.
2. Press the [Check for Updates] button.
D Checking for new updates is performed.
When a necessary update is available, a message is displayed.
Apply the update as necessary.
187
4.16 Maintaining the System
■ Checking for Updates at Scanner Startup
You can set the function for automatically checking for updates each time the scanner is
started.
1. Select [Monitoring & Management] J [Maintenance] J [System Update].
D The [System Update] window appears.
2. Select the [Check for updates at scanner startup.] check box.
■ Requesting e-Mail Notification When a New Update is
Available
The administrator can set to receive an e-mail notification if a new update is released.
1. Select [Monitoring & Management] J [Maintenance] J [System Update].
D The [System Update] window appears.
2. Select the [Check for updates at scanner startup.] check box.
3. Select the [Request e-mail notification when a new update is released]
check box.
D When a new update is released, an e-mail entitled "Event notification from
ScanSnap N1800 Scanner_Name" is sent to the e-mail address that is set in the
[Alert Notification] window. For details about the e-mail address settings for alert
notification, refer to "4.16.6 Setting the Destination for Alert Notifications" (page
194).
188
4.16.3 Maintaining Add-in Modules
An "Add-in" is an application created by using the ScanSnap N1800 SDK (development
kit).
This section describes how to check the Add-in status, how to install/uninstall an Add-in
module, how to upload an Add-in settings file, and how to set the on-screen keyboard to
be displayed when running an Add-in.
■ Installing an Add-in Module
Up to six Add-in modules can be installed.
1. Select [Monitoring & Management] J [Maintenance] J [Add-in Software].
D The [Add-in Software] window appears.
2. Press the [Browse] button to specify an Add-in installation file.
3. Press the [Install] button.
D The Add-in module is installed, and the Add-in name is displayed in the list.
189
4.16 Maintaining the System
■ Uninstalling an Add-in Module
1. Select [Monitoring & Management] J [Maintenance] J [Add-in Software].
D The [Add-in Software] window appears.
2. Perform either of following operations:
z To uninstall one Add-in module, select the Add-in module from the list and
press the [Uninstall] button.
z To uninstall all Add-in modules listed, press the [Uninstall All] button.
D A confirmation message appears.
3. Press the [Yes] button.
D The Add-in module is uninstalled, and the Add-in name is removed from the list.
■ Viewing the Add-in Status
When an Add-in module is installed, the Add-in status can be viewed.
1. Select [Monitoring & Management] J [Maintenance] J [Add-in Software].
D The [Add-in Software] window appears.
190
■ Uploading an Add-in Settings File
1. Select [Monitoring & Management] J [Maintenance] J [Add-in Software].
D The [Add-in Software] window appears.
2. When multiple Add-ins are installed, select the target Add-in from the
list.
3. Press the [Browse] button and specify the Add-in settings file to be
uploaded.
4. Press the [Upload] button.
D The specified Add-in settings file is stored in the folder for managing Add-ins
(program installation folder in C drive).
■ Setting the On-Screen Keyboard When Running an Add-in
1. Select [Monitoring & Management] J [Maintenance] J [Add-in Software].
D The [Add-in Software] window appears.
2. When multiple Add-ins are installed, select the target Add-in from the
list.
3. In the [Show On-Screen Keyboard] field, select whether or not to show
the on-screen keyboard when running an Add-in.
4. Press the [Set] button.
D This setting is reflected in the Add-in list.
191
4.16 Maintaining the System
4.16.4 Setting the Information Output Level
1. Select [Monitoring & Management] J [Maintenance] J [Technical
Support].
D The [Technical Support] window appears.
2. Enter the desired information output level.
Set the level requested by your FUJITSU scanner dealer or an authorized FUJITSU
scanner service provider.
3. Press the [OK] button.
D The information output level is set.
If the [Information Output Level] is set to "5", the output data may contain
private user information such as e-mail addresses, so care should be taken
when managing such data.
192
4.16.5 Obtaining Technical Support
If any problems occur when setting up or using the scanner, technical support information
can be collected to help determine the cause of the problem.
The information obtained should be sent to your FUJITSU scanner dealer along with the
scanner when given for repair.
1. Select [Monitoring & Management] J [Maintenance] J [Technical
Support].
D The [Technical Support] window appears.
2. Press the [Download] button.
D The [File Download] dialog box appears.
3. Press the [Save] button.
Make sure there is enough free space on the disk where it is to be saved and
press the [Save] button. If there is not enough free disk space, an incomplete
file may be saved.
D The [Save As] dialog box appears.
4. Name the file and specify where it should be saved.
5. Press the [Save] button.
D The technical information is downloaded.
193
4.16 Maintaining the System
4.16.6 Setting the Destination for Alert Notifications
Central Admin
Console
An alert notification can be sent by e-mail whenever a scanner alert situation occurs. This
section describes how to specify an e-mail address as the destination for alert notification.
When the destination for alert notification is set, an alert notification message is sent to
the registered e-mail address entitled "Network Scanner (XXXX) Error" if an error occurs
on the scanner.
If an SMTP server has not been setup, alert notifications cannot be sent. For details about
how to set an SMTP server, refer to "4.10.1 Setting the e-Mail Server" (page 137).
The e-mail address set in this section is also used as the destination for the new update
release notification when update check is performed. For details about update check,
refer to "4.16.2 Checking for New Updates" (page 187).
1. Select [Monitoring & Management] J [Maintenance] J [Alert
Notification].
D The [Alert Notification] window appears.
2. Enter recipient and sender e-mail addresses.
Multiple recipient e-mail addresses can be specified.
For details about e-mail address settings values, refer to "B.1 e-Mail Address
Setting Values" (page 483).
3. To confirm that the entered e-mail address is valid, press the [Test]
button.
Check that the test mail successfully arrives at the expected e-mail address.
194
4. To perform SMTP authentication, for [SMTP Server Authentication],
specify the user authentication information to be used for sending email.
To perform the SMTP authentication, enable SMTP authentication and
configure the required settings for the authentication in the [SMTP Server]
window. For details, refer to "4.10.1 Setting the e-Mail Server" (page 137).
5. Press the [OK] button.
D The destination for alert notifications is set.
4.16.7 Getting a Screenshot on the LCD Touch Panel
The image of the window displayed on the LCD touch panel can be received via the
network and saved in BMP or JPEG format.
1. Specify the name of a scanner as a URL using a Web browser to access
the scanner and display the download window.
For details about how to display the download window, refer to Step 1 to Step 3 of
"Installing the Admin Tool" (page 82).
2. Press the [Next] button for [Screenshot] on the download window.
D A window is displayed for getting a screenshot of the current screen on the LCD
touch panel.
195
4.16 Maintaining the System
3. Press the [Get Screenshot] button.
D A screenshot of the current window on the LCD touch panel is acquired and
displayed.
4. Select a file format (BMP or JPEG) of the image of the screenshot to be
saved.
5. When you refer to a date/time, the scanner as the connection
destination, or a comment to define a file name for the file to be saved,
enter a proper string for the file name in the relevant input field.
Alphanumeric characters, and symbols with the exception of
" \ / : ; * ? " < > | # & % " can be used.
To use characters of a different language for a file name, enter them into the [Save
As] dialog box.
If you enter [Date / Time], [Connect to], and [Comment], file names are created
in the following order.
z Comment
z Connect to
z Date / Time
6. Press the [Save] button.
D The [File Download] dialog box appears.
7. Press the [Save] button.
D The [Save As] dialog box appears.
8. Enter a file name, and specify a folder for saving the file.
9. Press the [Save] button.
D The screenshot is saved in a specified file format.
Press the [Power Off] button to turn the scanner off.
Press the [Restart] button to restart the scanner.
The scanner cannot be turned off or restarted when a regular user or administrator is
logged into the connected scanner.
196
4.17 Setting a Job Sequence
After the job sequence, job menu, and job group settings are performed on the Job Menu,
a regular user can use each assigned job menu at login, and process a job.
1. setting a job sequence
A job sequence is a single operation that pulls together several user operations (eMail/Fax/Print/Save) according to the settings on the [Scan Settings] window.
For example, the operation of sending scanned data by e-mail and then saving it in
a folder can be set as a single job sequence.
Set the job items (e-Mail/Fax/Print/Save)
Job
Job items
2. Job Menu Settings
A job menu is a menu arrangement of the job sequences set by the user.
For example, you can assign a job sequence that sends scanned data by e-mail
and then saves it in a folder as a button, and set it on a [Job Menu].
Job menu
Job
197
4.17 Setting a Job Sequence
3. Job Group Settings
A job group is a group of users assigned with the same job menu, by the
administrator.
Users associated with a group can use its job menu. All users who are not included
in any job group belong to a default group.
For example, job menu A is assigned to group A, and job menu D is assigned to the
default group. User C is included in group A, therefore can use job menu A. Users
not included in a job group are able to use job menu D.
When User C logs in
Job menu A
Group A
User A, User B, User C
Job menu A is assigned to group A
When a user not included
in a group logs in
Job menu D
Default group
All users not included in a group
Job menu D is assigned
to the default group
198
4.17.1 Job Setting Quick User Guide
The procedure for an administrator to set up job is shown below.
Setting a job sequence
For details, refer to
"4.17.2 Setting a Job
Sequence" (page
201).
Jobs List
View, add to, or edit the Jobs List.
Job Details
Set the scan options, message screen, and
operations after scanning for a selected job.
Setting a job menu
For details, refer to
"4.17.3 Setting a Job
Menu" (page 210).
Job Menus List
View, add to, or edit the Job Menus List.
Job Menu Layout
Set the job button for the selected job menu.
Setting a job group
For details, refer to
"4.17.4 Setting a Job
Group" (page 216).
Job Groups List
View, add to, or edit the Job Groups List.
Settings For Selected Group(s)
Set the assigned job menus, initial postlogin menu, and job group members for the
selected job group.
199
4.17 Setting a Job Sequence
Processing a job
Process the job.
When a user logs in, the assigned job menu
is displayed, and a job can be selected and
processed.
Before processing a job set on the job mode
edit window of the Central Admin Console,
the job mode settings set on the [Job Mode
Settings] window must be released.
200
For details, refer to
"6.14 Processing a
Job" (page 405).
Central Admin
Console
4.17.2 Setting a Job Sequence
Set the scan options and job item (e-Mail/Fax/Print/Save) to be processed together as a
job sequence.
Up to 1,000 job sequences can be set.
■ Adding a Job Sequence
This section describes how to add a job sequence.
1. Press the [Job Sequences] button.
D The [Jobs List] window appears.
2. Press the [New] button.
D The [Job Details] window appears.
3. Set the [Job Name] and [Comment].
201
4.17 Setting a Job Sequence
4. Press [ ] to the left of [Common Settings], and set the operations for
when a job is processed.
The layout of the message displayed in the message screen settings, and the
actual [Message Screen] layout in the scanner may differ. Check the layout in
the scanner and then enter the title and message in the [Message Screen].
Press the [Name Format] button to specify a [Common File Name] on the [File
Names (Common)] window.
[Sub-folder Name Format] is enabled only when scanned data is saved to a
folder. For details about setting values, refer to "Setting a File Name Format
for When Saving Scanned Data" (page 156).
202
5. Press [
] to the left of [Scan Settings].
Set the desired scan options, such as Carrier Sheet, Color Mode, and Paper Size.
For details about setting values, refer to "6.9 Setting the Scan Options" (page 356).
6. Set a job item.
For [Job Items], select one of following items:
z e-Mail
z Fax
z Print
z Save
Up to ten items can be set.
203
4.17 Setting a Job Sequence
7. If [e-Mail] is selected for the job item in Step 6, perform settings related
to sending e-mail.
For details about setting values, refer to "6.4 Sending the Scanned Data by e-Mail"
(page 309).
z Press the [Browse] button to set a different e-mail address from the [LDAP
List] window.
To filter the LDAP List, refer to "Filtering the LDAP List" (page 209) for more
details.
z Press the [Name Format] button to specify a file name on the [File Names (eMail)] window. For details about setting values, refer to "4.10.3 Setting a File
Name Format for When Attaching Scanned Data to e-Mail" (page 140).
204
8. If [Fax] is selected for the job item in Step 6, perform settings related to
sending a fax.
For details about setting values, refer to "6.5 Sending the Scanned Data by Fax"
(page 324).
Press the [Browse] button to set a different e-mail address from the [LDAP
List] window.
To filter the LDAP List, refer to "Filtering the LDAP List" (page 209) for more
details.
9. If [Print] is selected for the job item in Step 6, perform settings related to
printing.
For details about setting values, refer to "6.6 Printing the Scanned Data" (page
333).
Press the [Browse] button to set the network printer from the [Printer List]
window.
205
4.17 Setting a Job Sequence
10. If [Save] is selected for the job item in Step 6, perform settings related to
saving.
For details about setting values other than those for a [Save process results file],
refer to "6.7 Saving the Scanned Data to a Network Folder" (page 344).
Process results files are formatted as follows:
z Process results files are in an XML format.
z Process results files use the UTF-8 character set.
z Process results files contain the following output:
Item
Value
ResultFileVersion
V1.0
ScannerName
Scanner name
User
User
Date
Save completion date
Time
Save completion time
Result
Save process results
ResultCode
Result code
ResultDescription
Result details
Pages
Number of saved pages
SheetCount_Job
Number of sheets to be scanned, set by the job
SheetCount_User
Number of sheets to be scanned, set by the user
SheetCount_Scan
Actual number of scanned sheets
FileName
Saved file name(s) (Multiple files)
Path
Saved file path name
z Press the [Browse] button to set the network folder from the [Folder List]
window.
z Press the [Name Format] button to specify a file name from the [File Names
(Save)] window.
For details about setting values, refer to "Setting a File Name Format for
When Saving Scanned Data" (page 156).
206
11. Press the [OK] button.
D A job sequence is added to the [Jobs List] window.
■ Cloning a Job Sequence
This section describes how to clone a job sequence.
1. Press the [Job Sequences] button.
D The [Jobs List] window appears.
2. Select the job sequence to be cloned.
3. Press the [Clone] button.
D The [Job Details] window appears.
4. Clone the detailed job sequence settings.
5. Press the [OK] button.
D A job sequence is added to the [Jobs List] window.
■ Editing a Job Sequence
This section describes how to edit a job sequence.
1. Press the [Job Sequences] button.
D The [Jobs List] window appears.
2. Select the job sequence to be edited.
3. Press the [Edit] button.
D The [Job Details] window appears.
4. Edit the detailed job sequence settings.
5. Press the [OK] button.
D The settings of the job sequence are changed.
207
4.17 Setting a Job Sequence
■ Deleting a Job Sequence
This section describes how to delete a job sequence.
1. Press the [Job Sequences] button.
D The [Jobs List] window appears.
2. Select the job sequence to be deleted.
3. Press the [Delete] button.
D The confirmation window appears.
4. Press the [OK] button.
D The job sequence is deleted.
■ Filtering Job Sequences
This section describes how to filter job sequences.
1. Press the [Job Sequences] button.
D The [Jobs List] window appears.
2. Enter [Job Name] and [Comment].
Enter either a part of or full [Job Name] and [Comment] for the job sequence(s) to
be filtered.
3. Press the [Find] button.
D The filtered results appear.
To clear filtered results, delete the entered [Job Name] and [Comment], and
press the [Find] button.
208
■ Filtering the LDAP List
This section describes how to filter the LDAP List on the [LDAP List] window.
1. For [User Name], select the display format for the user names shown on
the user name/e-mail address list.
2. Enter the LDAP server and character string to be used for LDAP
searches in the [Search Base] field.
The LDAP entries under the character string entered here will become the search
target.
3. For [Search Position], select the filtering method.
4. Enter the filter character strings in [User Name] and [e-Mail Address].
If both a user name and e-mail address are entered, data containing both are
searched for as an "AND Search".
5. Select the filter target.
If multiple items are selected, a search operation tries to find entries containing any
of the search items.
6. Select the [Find] button.
D The filtered results appear.
z If the [Find] button is selected, an authentication window appears.
Enter a [User Name] and [Password], and then press the [OK] button.
User names may be up to 129 characters long.
Passwords may be up to 256 characters long. [User Name] and [Password]
are case sensitive.
z To clear filtered results, delete all filter strings and then press the [Find]
button.
209
4.17 Setting a Job Sequence
4.17.3 Setting a Job Menu
Central Admin
Console
Assign the job sequence set in "4.17.2 Setting a Job Sequence" (page 201) to a job
button, and job buttons on a job menu.
Up to 100 job menus can be set.
■ Adding a Job Menu
This section describes how to add a job menu.
1. Press the [Job Menus] button.
D The [Job Menus List] window appears.
210
2. Press the [New] button.
D The [Job Menu Layout] area becomes active.
3. Enter the job menu name.
4. Select the job button position, and press the [Edit] button.
D The [Job Button Settings] window appears.
5. Enter the job button name.
6. For [Select Button Pixmap], select a job button pixmap.
The selected job button pixmap is shown as a mockup image on the right.
211
4.17 Setting a Job Sequence
7. To start the Add-in module when the job button is pressed, select the
Add-in module to be started from [Add-in].
If an Add-in module is not installed in a scanner, you cannot select it.
8. Select a job sequence from the list to set as the job button.
To filter jobs, enter part of a [Job Name] and [Comment], or select all, and
press the [Find] button.
9. Press the [OK] button.
D A job button is set on the [Job Menu Layout] area.
10. Repeat Step 4 through Step 9 as required for the number of job buttons.
z Up to six job buttons can be set.
z To delete a job button, select the job button that you want to delete and press
the [Delete] button.
212
11. Change the position of the job buttons as necessary.
Select the job button to move, and then select either the [S] button or the [T] button
to move it.
The relationship between the order of job buttons on the [Job Menu Layout] area
and the arrangement of buttons on the [Job Menu] is shown below.
12. For [Message Screen], set whether to show [Message Screen] on the
[Job Menu] window.
13. For [Scan Viewer], set whether to show [Scan Viewer] on the [Job Menu]
window.
14. Press the [OK] button.
D A job menu is added to the [Job Menus List] window.
213
4.17 Setting a Job Sequence
■ Cloning a Job Menu
This section describes how to clone a job menu.
1. Press the [Job Menus] button.
D The [Job Menus List] window appears.
2. Select the job menu to view.
3. Press the [Clone] button.
D The [Job Menu Layout] area becomes active.
4. Clone the detailed job menu settings.
5. Press the [OK] button.
D A job menu is added to the [Job Menus List] window.
■ Editing a Job Menu
This section describes how to edit a job menu.
1. Press the [Job Menus] button.
D The [Job Menus List] window appears.
2. Select the job menu to be edited.
3. Press the [Edit] button.
D The [Job Menu Layout] area becomes active.
4. Edit the detailed job menu settings.
5. Press the [OK] button.
D The details of the job menu are changed.
214
■ Deleting a Job Menu
This section describes how to delete a job menu.
1. Press the [Job Menus] button.
D The [Job Menus List] window appears.
2. Select the job menu to be deleted.
3. Press the [Delete] button.
D The confirmation window appears.
4. Press the [OK] button.
D The job menu is deleted.
■ Viewing the Detailed Settings for a Job Menu
This section describes how to view the detailed settings for a job menu.
1. Press the [Job Menus] button.
D The [Job Menus List] window appears.
2. Select the job menu to view.
D The details for the selected job menu appear in view mode in the [Job Menu
Layout] area.
The information for the selected job menu shown in view mode in the [Job
Menu Layout] area cannot be edited. To edit this information, press the [Edit]
button.
215
4.17 Setting a Job Sequence
4.17.4 Setting a Job Group
Central Admin
Console
Assign the job menu set in "4.17.3 Setting a Job Menu" (page 210) to a job group. Users
included in a job group can use the job menus assigned to the group. Users included in
multiple job groups can use the multiple job menus assigned to those groups.
Up to 100 job groups can be set.
■ Adding a Job Group
This section describes how to add a job group.
1. Press the [Job Groups] button.
D The [Job Groups List] window appears.
216
2. Press the [New] button.
D The [Settings For Selected Group(s)] area become active.
3. Enter the job group name for [Job Group Name].
4. Press the [Select] button.
D The [Select Job Menu] window appears.
5. Select a job menu.
6. Press the [OK] button.
D A job menu is set on the [Settings For Selected Group(s)] area.
217
4.17 Setting a Job Sequence
7. Set whether or not to display the Multi-Function Menu.
If the same user is included in multiple job groups, the [Modes Available To
User] settings of the group that appears first in the list on the [Job Groups List]
window are used. For example, if a user belongs to the 3rd and 5th groups in
the list, the settings for the 3rd group will be used.
Therefore, specify the same [Modes Available To User] settings for all groups.
8. Press the [Edit] button.
D The [Group Member Settings] window appears.
9. For [Member Name Format], select the member name format.
The [Member Name] of the [Group Membership List] or [Member Search] is
shown, according to the selected format.
10. Enter the LDAP server and character string to be used for LDAP
searches in the [Search Base] field.
11. In the [Member Name] list of [Member Search], select the check box of a
user name, Active Directory group, or local account to be added to a job
group.
z To view detailed information about a user, Active Directory group, or local
account, select the [Member Name] or [Details] link. The detailed information
can be viewed on the [Member Details] window.
z To filter the LDAP List, refer to "Filtering the LDAP List" (page 223) for more
details.
218
12. Press the [<<<] button.
D The user, Active Directory group, or local account is added to the [Group
Membership List].
z Up to 1,000 members can be added as job group members.
z To delete a member added to the [Group Membership List], select the check
box in the [Member Name] list, and then press the [>>>] button.
z To filter job group members, enter the [Member Name] and [Details] in part or
in full, and then press the [Find] button.
To clear filtered results, delete the entered [Member Name] and [Details], and
press the [Find] button.
z If the login LDAP server type is changed, all job group members of the old
server type are automatically deleted the next time the group members are
edited.
13. Press the [OK] button.
D The number of members registered as job group members is shown in [Number
of Members] on the [Settings For Selected Group(s)] window.
14. To include the guest account as a job group member, select the [Include
guest account as a member] check box.
15. To include local accounts other than the guest account as job group
members, select the [Include all local accounts as members] check box.
16. To include all LDAP users as job group members, select the [Include all
LDAP users as members] check box.
17. Press the [OK] button.
D A job group is added to the [Job Groups List] window.
219
4.17 Setting a Job Sequence
■ Editing a Job Group
This section describes how to edit a job group.
1. Press the [Job Groups] button.
D The [Job Groups List] window appears.
2. Select the check box for the job group to be edited.
3. Press the [Edit] button.
D The [Settings For Selected Group(s)] area becomes active.
4. Change the detailed job group settings.
5. Press the [OK] button.
D The details of the job group are changed.
■ Deleting a Job Group
This section describes how to delete a job group.
1. Press the [Job Groups] button.
D The [Job Groups List] window appears.
2. Select the job group to be deleted.
3. Press the [Delete] button.
D The confirmation window appears.
4. Press the [OK] button.
D The job group is deleted
220
■ Viewing the Detailed Settings for a Job Group
This section describes how to view the detailed settings for a job group.
1. Press the [Job Groups] button.
D The [Job Groups List] window appears.
2. Select the job group to view.
D The details for the selected job group appear in view mode in the [Settings For
Selected Group(s)] area.
The information for the selected job group shown in view mode in the [Settings
For Selected Group(s)] area cannot be edited. To edit this information, select
a job group and press the [Edit] button.
■ Assigning Job Menus to Users Not Included in a Job Group
Users who are not included in any job group automatically belong to a Default Group.
This section describes how to assign job menus to those users.
1. Select the [Job Groups] tab.
D The [Job Groups List] window appears.
2. Select the default job group.
221
4.17 Setting a Job Sequence
3. Press the [Edit] button.
D The [Settings For Selected Group(s)] area becomes active.
4. Press the [Select] button.
D The [Select Job Menu] window appears.
5. Select a job menu.
6. Press the [OK] button.
D A job menu is set on the [Settings For Selected Group(s)] area.
7. For [Modes Available To User], set whether or not to display the MultiFunction Menu.
8. Press the [OK] button.
D A job menu is assigned to users who are not included in a job group.
222
■ Filtering the LDAP List
This section describes how to filter the LDAP List on the [Job Group Member Settings]
window.
1. For [Filter Conditions] of the LDAP List, select the filtering method.
2. Enter the filter character string.
3. Select the filter target.
If multiple items are selected, a search operation tries to find entries containing any
of the search items.
4. Press the [Find] button.
D The filtered results appear.
z If the login LDAP server type is [Active Directory] or [Active Directory Global
Catalog], when the [Find] button is pressed, a confirmation window appears.
Enter a [User Name] and [Password], and then press the [OK] button.
User names may be up to 129 characters long.
Passwords may be up to 256 characters long. [User Name] and [Password]
are case sensitive.
z To clear filtered results, delete all filter strings and then press the [Find]
button.
z When there are a large number of filtered results on the [LDAP List] window,
or a large number of registered job group members (1000 at maximum), it
may take several seconds until the [Group Member Settings] window
appears. This can be resolved by performing the following.
z Add a filter condition(s)
z Reduce the [Maximum Results] specified on the [e-Mail LDAP Server]
window
z Divide job groups
z Specify an Active Directory group
223
4.18 Messages
4.18 Messages
The following shows an example of the window that appears to display a message for the
administrator.
The following lists the meanings of icons shown on message windows.
Icon
Details
Indicates a warning message. This icon is displayed also for improper
input values.
Read the message and press the [OK] button.
Indicates an error message.
Read the message and press the [OK] button.
Indicates an information message.
Read the message and press the [OK] button. No action required.
Indicates an inquiry message.
Confirm the message details, and press a relevant button.
224
4.18.1 Administrator Window Messages
For details about messages and system logs, other than those shown in the table below,
refer to Help.
Window
Admin Tool
Message
Action
Connection error
For details about the action to
be taken, refer to "8.2.3 Failure
to Access the Scanner using a
Web Browser, Admin Tool, or
Central Admin Server" (page
456).
Cannot connect to this system
version.
Install the Admin Tool from the
scanner, and try again.
225
Chapter 5
Administrator Operations
(Central Admin Console)
This chapter explains scanner setting and management of the scanner performed using
the Central Admin Console.
5.1 Function List........................................................................................................ 227
5.2 Central Admin Console Window........................................................................ 230
5.3 Central Admin Console Quick Guide ................................................................ 231
5.4 Pre-settings for Using Central Admin Console................................................ 233
5.5 Central Admin Server Login: via the Central Admin Console ........................ 242
5.6 Setting the Central Admin Server...................................................................... 245
5.7 Setting Scanner Configuration .......................................................................... 251
5.8 Monitoring and Maintaining the Scanner Network .......................................... 260
5.9 Updating the System .......................................................................................... 261
5.10 Installing an Add-in........................................................................................... 263
5.11 Updating the Scanner Settings........................................................................ 266
5.12 Setting the Job Mode........................................................................................ 269
5.13 Viewing the Update Status Lists...................................................................... 272
5.14 Viewing the Scanners Operating Status ......................................................... 274
5.15 Viewing Event Log ............................................................................................ 275
5.16 Collecting and Exporting Audit Logs.............................................................. 277
5.17 Maintaining Central Admin Server Settings ................................................... 281
5.18 Messages ........................................................................................................... 287
226
5.1
Function List
The functions that can be used in the Central Admin Console are as follows.
Function
Used to...
See...
Scanner
Configuration
Management
View information for each scanner in
the Central Admin Console. Also you
can export the information in CSV
format by using the export function.
z Edit Scanner Configuration
Settings for the configuration of
scanners can be added, edited and
deleted in the Central Admin
Console. Files can also be
imported or exported in CSV
format.
z Network Scanner Admin Tool
[Start]
An Admin Tool of a specified
scanner can be started up from the
Central Admin Console.
"5.7 Setting Scanner
Configuration" (page
251)
Software Update
Update modules for scanner system/
security/installed options. Add-ins can
be pre-defined in the Central Admin
Server, and applied to multiple
scanners.
z Update Call
Pre-defined system update
modules and Add-ins can be
applied to multiple scanners at
once.
z Scanner Notification Schedule
A time zone for an update can be
specified.
"5.6 Setting the
Central Admin
Server" (page 245)
"5.7 Setting Scanner
Configuration" (page
251)
"5.8 Monitoring and
Maintaining the
Scanner Network"
(page 260)
"5.9 Updating the
System" (page 261)
"5.10 Installing an
Add-in" (page 263)
"5.13 Viewing the
Update Status Lists"
(page 272)
227
5.1 Function List
Function
Scanner Settings
Update
Automatic Update
Status Monitoring
Used to...
See...
Create scanner settings in the Central
Admin Server, and upload/release
them to multiple scanners. The
contents of the scanner settings can
be changed per settings group.
z Update Call
Scanner settings can be applied to
multiple scanners at once.
"5.8 Monitoring and
Maintaining the
Scanner Network"
(page 260)
Automatically update scanner
systems, security, installed options,
scanner settings, and Add-ins, on the
date specified on the scanner side.
Updates can be performed on a
specified date as the scanner is
automatically resumed for updates
from standby mode when update calls
or Wake-On-LAN cannot be used.
"4.8.9 Setting a
Central Admin
Server" (page 125)
Monitor the error status, operating
status, and consumable part status
for each scanner.
z Normalcy Monitoring
Monitoring of scanner errors can
be performed in the Central Admin
Server. Errors can be notified to
the Central Admin Console, or to
the administrator by e-mail.
z Operating Status Monitoring
The power status and login status
of each scanner can be displayed
in the Central Admin Console.
z Consumables Monitoring
When a consumable part needs to
be replaced in the near future, a
notification can be displayed in the
Central Admin Console.
"5.6 Setting the
Central Admin
Server" (page 245)
228
"5.11 Updating the
Scanner Settings"
(page 266)
"5.13 Viewing the
Update Status Lists"
(page 272)
"5.11 Updating the
Scanner Settings"
(page 266)
"5.7 Setting Scanner
Configuration" (page
251)
"5.14 Viewing the
Scanners Operating
Status" (page 274)
Function
Used to...
See...
Job Mode Settings
Share jobs between multiple
scanners. Job mode settings can be
created and edited in the Central
Admin Console.
"5.12 Setting the Job
Mode" (page 269)
User Data Roaming
Share user information such as the email address book and scan settings
between scanners.
"4.8.9 Setting a
Central Admin
Server" (page 125)
"5.6 Setting the
Central Admin
Server" (page 245)
Audit Log Collection
Collect the scanner system and user
logs in the Central Admin Server, so
that each operation performed by a
scanner can be audited.
Collected logs can be exported using
the audit log export command, and
output to an arbitrary folder.
229
"5.6 Setting the
Central Admin
Server" (page 245)
"5.16 Collecting and
Exporting Audit Logs"
(page 277)
5.2 Central Admin Console Window
5.2
Central Admin Console Window
The windows of the Central Admin Console are as follows.
When a button in the menu is pressed, the corresponding window is shown.
z [Scanner Admin Operations] window
z [Scanner Operation Monitor] window
z [Scanner Config List] window
z [Event Log] window
You can set the [Scanner Admin Operations] window or [Scanner Operation Monitor]
window as the Main window to be displayed after a Central Admin Console login.
Menu
Tool Menu
For details about operations of each menu, refer to the following:
z [Scanner Admin Operations] window
"5.8 Monitoring and Maintaining the Scanner Network" (page 260)
z [Scanner Operation Monitor] window
"5.14 Viewing the Scanners Operating Status" (page 274)
z [Scanner Config List] window
"5.7 Setting Scanner Configuration" (page 251)
z [Event Log] window
"5.15 Viewing Event Log" (page 275)
230
5.3
Central Admin Console Quick Guide
Administrator operations for management using the Central Admin Console are as
follows.
Pre-settings
1. Installing the Central Admin Server
Software
2. Installing the Central Admin Console
3. Setting up a Firewall for the Central
Admin Server
4. Configuring the Scanner Settings for
Central Admin Management
Login to Central Admin
Console
For details, refer to "5.4 Pre-settings for
Using Central Admin Console" (page
233).
For details, refer to "5.5 Central Admin
Server Login: via the Central Admin
Console" (page 242).
Set the Central Admin
Server
For details, refer to "5.6 Setting the
Central Admin Server" (page 245).
Register the scanners
to be managed
For details, refer to "5.7 Setting Scanner
Configuration" (page 251).
231
5.3 Central Admin Console Quick Guide
Scanner settings /
management
For details, refer to the following.
z "5.8 Monitoring and Maintaining the
Scanner Network" (page 260)
z "5.9 Updating the System" (page 261)
z "5.10 Installing an Add-in" (page 263)
z "5.11 Updating the Scanner Settings"
(page 266)
z "5.12 Setting the Job Mode" (page
269)
z "5.13 Viewing the Update Status
Lists" (page 272)
z Monitoring and Maintaining the
Scanner Network
z Updating the System
z Installing an Add-in
z Updating the Scanner Settings
z Setting the Job Mode
z Viewing the Update Status Lists
Monitoring
For details, refer to the following.
z Viewing the Scanners Operating
Status
z Viewing Event Log
z Collecting and Exporting Audit Logs
Maintaining
z "5.14 Viewing the Scanners Operating
Status" (page 274)
z "5.15 Viewing Event Log" (page 275)
z "5.16 Collecting and Exporting Audit
Logs" (page 277)
For details, refer to "5.17 Maintaining
Central Admin Server Settings" (page
281).
232
5.4
Pre-settings for Using Central Admin Console
This section explains the required pre-settings for using the Central Admin Console.
5.4.1 Installing the Central Admin Server Software
Install the Central Admin Server software in a computer.
1. Perform Step 1 to Step 3 of "Installing the Admin Tool" (page 82).
D The download window appears.
2. Press the [Next] button for [Central Admin Server].
D The Central Admin Server download window appears.
233
5.4 Pre-settings for Using Central Admin Console
3. Press the [Download] button.
z Downloading is not possible while a scanner operation is in process.
z Do not close the Web browser or logout until installation is complete.
z Installation requires 700 MB of free disk space, which includes 200 MB
required to install SQL Server 2005 Express Edition.
D Follow the instructions displayed on the window.
The following settings will be required. Determine the port number and protocol
to be used in advance.
z Port number for scanner communication
z Port number for Central Admin Console communication
After installation, the port number and protocol settings can be changed on the
Central Admin Console [Scanner Central Admin Server Settings] window.
D After installation is complete, restart the computer.
z If the Central Admin Server is already installed, skip to "5.4.2 Installing the Central
Admin Console" (page 238).
z When installing the Central Admin Server over an older version of the software, all
of the old Central Admin system settings should be automatically reused. However,
as a precaution, it is still recommended that the old settings be backed up before
proceeding with the upgrade installation. To back up the Central Admin settings,
refer to "5.17.1 Backing Up Central Admin Server Settings" (page 281).
z Make sure that the Central Admin Server date and time values are set correctly. If
the date/time difference between the values set in the server and actual values is
large, normal operation may not be possible.
z After the Central Admin Server software is installed, a Windows user account
(Account name: iSCentralAdmin) is added. This user is required for Central Admin
Server, therefore, do not change or delete the account.
234
z For details about the operating environment required for installing the Central
Admin Server software, refer to "1.4.3 Requirements for Central Admin Server"
(page 48).
z When installing the Central Admin Server software, the same necessary presettings before logging in with the Admin Tool are required. For details, refer to
"4.2.2 Setting up for Administrator Access via the Admin Tool" (page 80).
z To install the Central Admin Server software on Windows Server 2008, login as an
administrator. Do not install with Administrators group rights.
z If the following error message appears, installation was not successful.
An installation package for the product Microsoft SQL Server Native Client
cannot be found. Try the installation agent using a valid copy of the installation
package 'sqlncli.msi'.
In this case, uninstall "SQL Server Native Client". Then, try installing the Central
Admin Server software again.
z If the installation process fails and the following error message appears, stop the IIS
service and re-start manually. Then, re-install the Central Admin Server software.
The installation process was canceled because the system was busy. Try
restarting the Installation Wizard again later.
z If the following error message appears in Windows Server 2008, check that IIS
Management Console is installed. If IIS Management Console is not installed,
select and install IIS Management Console in [Role Services].
Installation requires that the IIS Management Console be installed.
Refer to the manual for details.
To select the role services for IIS, point to [Administrative Tools] - [Server Manager],
select Web Server (IIS) in [Roles Summary].
z In order to use HTTPS for communication to a scanner, or computer installed with
Central Admin Console software, a self-signed certificate is automatically imported
on the Central Admin Server. However, it is recommended that a formal certificate
be installed manually. For details, refer to "Importing the Certificate" (page 237).
235
5.4 Pre-settings for Using Central Admin Console
z If an interruption or error occurs during the installation or uninstallation process, the
following software components may be installed.
z AMMANAGER instance of Microsoft SQL Server 2005
z Microsoft SQL Server Native Client
z Microsoft SQL Server Setup Support Files
z Microsoft SQL Server VSS Writer
z MSXML 6.0 Parser
In this case, uninstall the software components described above.
For details about uninstalling software components, the following is a description of
the process using Windows Server 2003 as an example.
To uninstall a software component, select [Control Panel] - [Add or Remove
Programs].
Use the following procedure to uninstall "Microsoft SQL Server 2005 AMMANAGER
instance".
1. Point to [Add or Remove Programs], select "Microsoft SQL Server 2005" and
press the [Remove] button.
2. Select the [Remove SQL Server 2005 instance components] check box.
3. Select "AMMANAGER: Database Engine" under [Select all instance].
4. Press the [Next] button.
5. Follow the instructions displayed on the window.
For programs other than "Microsoft SQL Server 2005 AMMANAGER instance",
deletion is not necessary as they are used by other applications.
z If the following changes are to be made after the Central Admin Server software has
been installed, uninstall the Central Admin Server software, and re-install after
making the changes.
z If the Central Admin Server is to be used as the Active Directory domain
controller
z If the domain controller role assignment is to be deleted
236
■ Importing the Certificate
This section uses Windows Server 2003 as an example.
1. To startup IIS Manager, on the [Start] menu, point to [Administrative
Tools], and select [Internet Information Services (IIS) Manager].
2. Show the Web sites for importing the certificate.
Certificates are imported to the following Web sites:
z AmConsole
z AmService
3. Right-click the Web site and select [Properties].
4. On the [Directory Security] tab, select [Server Certificate] in the [Secure
communications] frame.
D The [Welcome to the Web Server Certificate Wizard] appears.
D Follow the instructions displayed on the window.
For Windows Server 2008, set the fingerprint for the imported certificate in the
CertHash.xml file.
z The CertHash.xml installation path is as follows.
Central_Admin_Server_installation_folder\AmManager\Sys\CertHash.xml
z An example for setting the fingerprint for the certificate "cc ce a0 66 e3 9c 9b 2a 65
45 03 a3 c4 f4 e5 e6 ad ec df 9f" is as follows.
<?xml version="1.0" encoding="utf-8" ?>
<IISPolicy>
<CertHash>cc ce a0 66 e3 9c 9b 2a 65 45 03 a3 c4 f4 e5 e6 ad ec df 9f</CertHash>
</IISPolicy>
237
5.4 Pre-settings for Using Central Admin Console
5.4.2 Installing the Central Admin Console
Install the Central Admin Console in a computer.
1. Perform Step 1 to Step 3 of "Installing the Admin Tool" (page 82).
D The download window appears.
2. Press the [Next] button for [Central Admin Console].
D The Central Admin Console download window appears.
3. Press the [Download] button.
z Downloading is not possible while a scanner operation is in process.
z Do not close the Web browser or logout until installation is complete.
238
D Follow the instructions displayed on the window.
When "Installation complete" is displayed, the installation is complete. Press the
[Close] button.
D After installation is completed, log out from the scanner on the Web browser and
close the Web browser.
D After installation, the Central Admin Console can be started by selecting the
[Start] menu - [All Programs] - [Scanner Central Admin Server] - [Scanner
Central Admin Console].
z If an older version of Central Admin Console is installed, uninstall it before installing
the latest version of Central Admin Console.
z From the Web browser [Tools] menu, select [Internet Options], and note the
following points about the settings shown on the [Internet Options] dialog box.
z In the [Accessibility] dialog box shown when pressing the [Accessibility] button
on the [General] tab, do not change the formatting and user style sheet
settings. If these settings are changed, the displayed style of the Central Admin
Console may be corrupted.
z In the [Language Preference] dialog box shown when pressing the
[Languages] button on the [General] tab, move the same language as that of
the Central Admin Server's operating system to the top. If a different language
is specified, a problem may occur with the input or displays for the Central
Admin Console.
z On the [Security] tab, if [Security level for this zone] is set to [High], part of the
Central Admin Console window may not be correctly displayed.
In this case, on the [Security] tab, add the scanner or Central Admin Server to
the trusted site zone and press the [Default Level] button. Or press the [Custom
Level] button and set [Binary and script behaviors] to [Enable].
z On the [Advanced] tab, select the [Play animations in webpages] check box
under [Multimedia].
In Windows Server 2003 or Windows Server 2008, this check box is not
selected by default.
z When the font size is large, part of the dialog box may not be shown correctly. In this
case, use a smaller font size.
z For details about the operating environment required for installing the Central
Admin Server software, refer to "1.4.2 Requirements for Central Admin Console"
(page 47).
z When installing the Central Admin Console, the same necessary pre-settings
before logging in with the Admin Tool are required. For details, refer to "4.2.2 Setting
up for Administrator Access via the Admin Tool" (page 80).
239
5.4 Pre-settings for Using Central Admin Console
5.4.3 Setting up a Firewall for the Central Admin Server
This section describes the firewall settings for the Central Admin Server.
Set the following port number for communication in the Central Admin Server, to enable
management by the Central Admin Console.
From/To
Protocol
Port Number
ScannerDCentral Admin Server
HTTP/
HTTPS
(TCP)
Port number set for scanner
communication
Central Admin ConsoleDCentral
Admin Server
HTTP/
HTTPS
(TCP)
Port number set for Central
Admin communication
For details about setting a firewall, refer to the manual for the relevant firewall.
5.4.4 Configuring the Scanner Settings for Central Admin Management
This section describes the scanner settings.
The following settings for connecting a scanner to the Central Admin Server are required
to enable management by the Central Admin Console.
z [Admin Connection] window
For details, refer to "4.8.8 Setting the Admin Connection" (page 123).
z [Scanner Central Admin Server] window
For details, refer to "4.8.9 Setting a Central Admin Server" (page 125).
240
5.4.5 Uninstalling the Central Admin Server Software/Central Admin
Console
This section describes how to uninstall the Central Admin Server Software/Central Admin
Console. Refer to this section if uninstallation is required.
■ Uninstalling the Central Admin Server Software
This section uses Windows Server 2008 as an example.
Uninstall the Central Admin Server from [Control Panel] - [Programs] - [Programs and
Features] in the computer in which it is installed.
z Before starting uninstallation, disconnect the Central Admin Server from the
network.
If the uninstallation process is completed while the Central Admin Server is
connected to the network, normal operation cannot be guaranteed.
z All files in the installation folder are deleted when the Central Admin Server software
is uninstalled. Back up the information related to Central Admin Server as required.
For details, refer to "5.17.1 Backing Up Central Admin Server Settings" (page 281).
z If the following message appears while uninstalling the Central Admin Server
software, press the [Retry] button. Even if the same message appears again, restart the Central Admin Server, and uninstall it again.
Another application has exclusive access to the file ASPNETDB.MDF. Please
shut down all other applications, then click Retry.
■ Uninstalling the Central Admin Console
This section uses Windows Vista as an example.
Uninstall the Central Admin Console from [Control Panel] - [Programs] - [Programs and
Features] in the computer in which it is installed.
z Before starting uninstallation, close the Central Admin Console.
If the uninstallation process is completed while the Central Admin Console is in
operation, normal operation cannot be guaranteed.
z Even if uninstalled, data will remain. Delete this data if it is not required.
For Windows XP, data is saved in the following way.
C:\Documents and Settings\User_name \Local Settings\Application Data
\PFU_LIMITED\CentralAdminConsole.exe_xxx
z The italic text represents variable character strings.
z User_name can be the name of any Central Admin Console user.
241
5.5 Central Admin Server Login: via the Central Admin Console
5.5
Central Admin Server Login: via the Central Admin
Console
Using the Central Admin Console allows an administrator to set multiple scanners via the
network interface.
This section describes how to login from the Central Admin Console.
If the normal screen display does not appear (for example: an "X" mark appears),
wait for a few minutes and try again. If the problem still occurs, contact your
FUJITSU scanner dealer or an authorized FUJITSU scanner service provider.
z The default user name and password for the administrator are set as follows:
User name: admin
Password: password
z Session timeout time is 20 minutes (fixed). Selecting links and buttons extends the
session timeout time by 20 minutes. However, the session timeout time is extended
automatically when the [Scanner Admin Operations] window or [Scanner Operation
Monitor] window of the Central Admin Console is shown, so as not to result in a
session timeout.
1. Select the [Start] menu J [All Programs] J [Scanner Central Admin
Server] J [Scanner Central Admin Console].
D The Central Admin Console starts.
2. Set the [Connect to] field.
242
z If the port number was changed in "5.6 Setting the Central Admin Server"
(page 245), enter the port number changed for [Port Number].
z To use SSL, select the [Use HTTPS] check box.
z If Central Admin Console is started while there is insufficient free memory, a
script error may occur. Try again after ensuring that there is enough free
memory.
z For Windows Server 2003 and Windows Server 2008, when first connecting
to the Central Admin Server, a confirmation window for whether or not to add
the specified URL to the trusted site zone may appear. In this case, after
adding the Central Admin Server URL as a trusted site, close the Central
Admin Console once, and re-open.
3. Press the [Connect] button.
D The Central Admin Console login window appears.
4. Enter the user name and password of the administrator.
243
5.5 Central Admin Server Login: via the Central Admin Console
5. Press the [Login] button.
D If the user is authenticated, the Central Admin Console main window appears.
The main window shown after login can be changed.
For details, refer to "5.6 Setting the Central Admin Server" (page 245).
244
5.6
Setting the Central Admin Server
Operating environment for the Central Admin Server is set up by changing the
administrator password and setting network and LDAP server.
■ Setting the Operating Environment
1. Click the [Scanner Central Admin Server Settings] link on the Central
Admin Console main window.
D The [Scanner Central Admin Server Settings] window appears.
245
5.6 Setting the Central Admin Server
2. Select the [Automatically add new scanners to the Central Admin
configuration when they are discovered.] check box to add a new
scanner automatically.
3. In [Network Connection], set up the network to communicate with
scanners and the Central Admin Console.
4. In [Screen Settings], configure the Central Admin Console main window.
5. In [LDAP Server], configure the LDAP server.
Configure the LDAP server used for job mode settings or user authentication when
LDAP is used for administrator login to Central Admin Server.
If [Other LDAP Server] is selected for [LDAP Server Type], press the [Adjust] button
to set the search items for LDAP searches and the LDAP server schema. Press the
[Use Defaults] button to reset the input values to default settings.
When a server type other than [Other LDAP Server] is selected for the [LDAP
Server Type], the search item schema cannot be adjusted (the [Adjust] button is
disabled).
Search Item
Description
First Name
Enter the schema name that is to be associated with
the [First Name] search item.
The default value is "givenName".
Last Name
Enter the schema name that is to be associated with
the [Last Name] search item.
The default value is "sn".
Common Name
Enter the schema name that is to be associated with
the [Common Name] search item.
The default value is "cn".
Display Name
Enter the schema name that is to be associated with
the [Display Name] search item.
The default value is "displayName".
246
Search Item
Description
Initials
Enter the schema name that is to be associated with
the [Initials] search item.
The default value is "initials".
Comment
Enter the schema name that is to be associated with
the [Comment] search item.
The default value is "description".
Workplace
Enter the schema name that is to be associated with
the [Workplace] search item.
The default value is "physicalDeliveryOfficeName".
Phone Number
Enter the schema name that is to be associated with
the [Phone Number] search item.
The default value is "telephoneNumber".
e-Mail Address
Enter the schema name that is to be associated with
the [E-mail Address] search item.
The default value is "mail". This search item cannot be
skipped.
Homepage
Enter the schema name that is to be associated with
the [Homepage] search item.
The default value is "wWWHomePage".
6. When a SharePoint folder is to be used in the scanner settings, perform
the setting for connecting with SharePoint server in [SharePoint Server
Connection Settings].
When no SharePoint folders are used, the Scanner Shared Folder Service
can be stopped.
247
5.6 Setting the Central Admin Server
7. In [Software Update Time-Period Restrictions], set whether to
automatically update the scanner system, security, installed options,
and Add-ins using the Central Admin Server.
z When an update is available for both systems (security and installed options
included) and Add-ins, if the update of systems is completed outside the
specified time-period, update is not run for Add-ins.
z The length of time required for a software update is estimated as follows:
Update module size × No. of target scanners × 1.5
Network throughput
Example: the following update case should be estimated as:
15 × 40 ×1.5 = 900 seconds (15 minutes)
1
z Update module size: 15 MB
z Number of target scanners: 40
z Network throughput: 8 Mbps = 1 MB/s
8. In [Operation Monitor], set whether to check the operating status of
scanners.
9. In [Error Notification Settings], set whether to send a notification e-mail
to the administrator if an error occurs.
A notification e-mail is sent when the "Error" event log occurs.
If an error with the same code occurs more than once a minute, a notification e-mail
is sent for only the first occurrence of the error.
10. In [Data Import/Export], select the character set of CSV files to be used
for scanner configuration import/export or event download.
11. In [Log Retention], set the number of days to keep the event log.
12. In [Audit Log Settings], set whether to automatically collect scanner
system logs and user logs, and save them in the Central Admin Server.
The system and user logs collected in the Central Admin Server are collectively
referred to as "audit log(s)".
13. Press the [OK] button.
D The specified settings are saved.
■ Changing the Admin Password
1. Click the [Scanner Central Admin Server Settings] link on the Central
Admin Console main window.
D The [Scanner Central Admin Server Settings] window appears.
2. Press the [Change Administrator Password] button.
D The [Change Administrator Password] window appears.
248
3. Enter a new administrator password and press the [Change Password]
button.
D The [Scanner Central Admin Server Settings] window is shown again.
249
5.6 Setting the Central Admin Server
■ Clearing the User Roaming Data
1. Click the [Scanner Central Admin Server Settings] link on the Central
Admin Console main window.
D The [Scanner Central Admin Server Settings] window appears.
2. Press the [User Roaming Data (Select & Clear)] button.
D The [User Roaming Data (Select & Clear)] window appears.
3. Select the check box for the user(s) whose user roaming data is to be
deleted and press the [Clear] button.
D The [Scanner Central Admin Server Settings] window is shown again.
250
5.7
Setting Scanner Configuration
Scanner configuration is set by adding, editing and deleting scanner configuration.
Scanner configuration is information used to identify scanners on the Central Admin
Server, when registering configuration information from a scanner to the Central Admin
Server.
The registered scanners can be reviewed, and modified by the Central Admin Server
functions.
Initially, scanner configuration for each scanner in the scanner group is automatically
added. To prevent scanner configuration from automatically being added, clear the
[Automatically add new scanners to the Central Admin configuration when they are
discovered] check box in the [Central Admin Server Settings] window in advance.
Scanner configuration can be registered on the Central Admin Server in the following
ways.
z Import from the [Scanner Config List] window
Import a defined scanner configuration file, and register scanner configuration for
several scanners at once.
z Add directly from the [Scanner Config List] window
Add scanner configuration directly from the [Scanner Config List] window for one
scanner at a time.
The following table shows which config items are added/imported to the Central Admin
Server from a config file or from a scanner.
Item
Comment
Configuration
from file
Configuration
from scanner
MAC Address
Scanner MAC address
Yes
Yes
IP address
Scanner IP address
Yes
Yes
Subnet Mask
Scanner subnet mask
Yes
Yes
Scanner name
Scanner name
Yes
Yes
Port Number
Scanner port number
Yes
Yes
Use HTTPS?
Whether or not HTTPS is used
to communicate with the
scanner
Yes
Yes
Model
Scanner model
Yes
Yes
Add-in Group
Group name used to identify
applied Add-in install modules
Yes
—
Settings Group
Group name used to identify
applied scanner settings
Yes
—
Comment
Note
Yes
—
251
5.7 Setting Scanner Configuration
Configuration
from file
Configuration
from scanner
Whether or not the system is to
be updated
Yes
—
Info Last
Modified
Last date and time scanner
configuration was modified
— (*1)
— (*1)
Registered
Whether or not information of a
target scanner is added to
Central Admin Server
— (*1)
— (*1)
Update Status
Indicates the most recent
update status (System Updates,
Add-in Installs, Scanner
Settings)
— (*1)
— (*1)
System Version
Scanner system version
—
Yes
Add-in Version
Scanner Add-in install module
version
—
Yes
Scanner
Settings
Identifies which set of Central
Admin Server supplied scanner
settings has been applied
—
Yes
Last Inventory
Taken
Date and time inventory was
last taken
— (*1)
— (*1)
Last System
Update
Date/time of the last known
successful system update
— (*1)
— (*1)
Last Add-in
Install
Date/time of the last known
successful add-in install
— (*1)
— (*1)
Last Scanner
Settings Update
Date/time of the last known
successful scanner settings
update
— (*1)
— (*1)
Current System
Update Status
The current system update
status
— (*1)
— (*1)
Current Add-in
Install Status
The current add-in installs
status
— (*1)
— (*1)
Current Scanner
Settings Status
The current scanner settings
status
— (*1)
— (*1)
Scanner
Version
Scanner firmware version
—
Yes
Item
Comment
System Updates
252
Item
Comment
Configuration
from file
Configuration
from scanner
PAD ASSY
(Sheets)
Number of times pad assy has
been used
—
Yes
PICK ROLLER
(Sheets)
Number of times pick roller has
been used
—
Yes
Total
Throughput
(Sheets)
Total number of scanned
sheets
—
Yes
Initial Use
Date on which scanner was
registered
—
Yes
Cumulative On
Time (Hours)
Total scanner "On" time, in
hours
—
Yes
Last Audit Log
Collected
Last date and time audit log
was collected
— (*1)
— (*1)
Security Update
Version
Security update version
—
Yes
Error Status
Whether or not an error
occurred in the scanner
—
—
Operating
Status
Scanner operating status
—
Yes
Installed
Options
A list of installed options
—
Yes
Serial Number
Scanner serial number
—
Yes
(*1):
Automatically set from the Central Admin Sever.
253
5.7 Setting Scanner Configuration
■ Importing Scanner Configuration
Scanner configuration can be registered for several scanners at once, by importing the
scanner configuration file. For details about the importable data (settings) allowed in a
scanner configuration file, refer to "B.2.1 Scanner Configuration File Format (for
Importing)" (page 484).
Also note that imported scanner configuration data can be updated at once for the
scanners.
Scanner information other than that contained in the scanner configuration cannot
be imported.
1. Press the [Config List] button in the Central Admin Console main
window.
D The [Scanner Config List] window appears.
2. Press the [Import Config] button.
D The [Import Scanner Config] window appears.
3. Specify the scanner configuration file to be imported.
Press the [Browse] button to select a file.
254
4. Press the [Import] button.
D The scanner configuration file is imported and the scanners are registered.
z Importing a scanner configuration file that contains zero scanner entries will
cause all of the existing scanner configuration information to be deleted.
z The imported scanner configuration file overwrites the current scanner
configuration.
z If the imported scanner configuration information contains the same MAC
address or scanner name as in the existing scanner configuration
information, the MAC address or the scanner name will be recognized as
already existing. This is determined in the order of MAC address, scanner
name. In this case, on the table shown in "5.7 Setting Scanner
Configuration" (page 251), items in the "Configuration from file" column
marked "Yes" are replaced, and those marked with "—" are left as they are.
z If the same MAC address or scanner name does not exist, the imported
scanner configuration information will be added.
■ Exporting Scanner Configuration
This section describes how to export scanner configuration to a file.
1. Press the [Config List] button in the Central Admin Console main
window.
D The [Scanner Config List] window appears.
2. Press the [Export Config] button.
D A window to confirm whether or not to export the scanner configuration appears.
3. Select scanner information to be exported, and press the [OK] button.
D The [File Download] dialog box appears.
4. Press the [Save] button.
D The [Save As] dialog box appears.
5. Specify the export destination.
D Scanner configuration is exported to the specified destination.
For details about the format of the scanner configuration file to be exported, refer
to "B.2.2 Scanner Configuration File Format (for Exporting)" (page 485).
255
5.7 Setting Scanner Configuration
■ Adding Scanner Configuration
This section describes how to add scanner configuration.
1. Press the [Config List] button in the Central Admin Console main
window.
D The [Scanner Config List] window appears.
2. Press the [New] button.
D The [Edit Scanner Details] window appears.
3.
4.
5.
6.
In [Scanner Name], enter the scanner name. This entry is required.
In [IP Address], enter the numeric IP address of the scanner.
In [MAC Address], enter the MAC address of the scanner.
In [Settings Group], enter the settings group of the scanner.
This group name is used to identify the settings contents of a group.
The settings group name entered here is displayed on the [Scanner Settings]
window, Settings Groups.
7. In [Add-in Group], enter the Add-in group of the scanner.
This group name is used to identify an Add-in module.
The Add-in name entered here is displayed on the [Add-in Installs] window, Add-in
Groups.
8. Select the [Should not be applied] check box to not update the system.
9. In [Comment], enter the comments on the scanner.
10. Press the [OK] button.
D The scanner configuration is registered.
256
■ Cloning a Scanners Configuration
This section describes how to clone a registered scanners configuration.
1. Press the [Config List] button in the Central Admin Console main
window.
D The [Scanner Config List] window appears.
2. Select the check box for the scanner to be cloned.
3. Press the [Clone] button.
D The [Edit Scanner Details] window appears.
4. Check and edit the scanner configuration.
5. Press the [OK] button.
D The scanner configuration is added.
■ Editing Scanner Configuration
This section describes how to edit scanner configuration.
1. Press the [Config List] button in the Central Admin Console main
window.
D The [Scanner Config List] window appears.
2. Select the check box for the scanner to be edited.
3. Press the [Edit] button.
D The [Edit Scanner Details] window appears.
4. Change the details of the scanner configuration.
5. Press the [OK] button.
D The changed scanner configuration is saved.
257
5.7 Setting Scanner Configuration
■ Deleting Scanner Configuration
This section describes how to exclude scanners from Central Admin management.
1. Press the [Config List] button in the Central Admin Console main
window.
D The [Scanner Config List] window appears.
2. Select the check box for the scanner to be deleted.
3. Press the [Delete] button.
D A confirmation window for whether or not to exclude the specified scanner(s)
from Central Admin management appears.
4. Press the [OK] button.
D The scanner(s) are excluded from Central Admin management.
z Deleting the scanner configuration does not exclude a scanner from Central Admin
management. Therefore, the Central Admin Server setting in the scanner will not be
"Unregistered". To exclude a scanner from Central Admin management, select the
Central Admin Server setting to [Off] in the scanner.
z To exclude multiple scanners from Central Admin management at once, apply a
new set of scanner settings with Central Admin set to [Off] for target scanners.
z To include the scanner in the Central Admin management again, re-register the
scanner on the Central Admin Server.
258
■ Viewing the Scanner List
This section describes how to view scanner configuration.
1. Press the [Config List] button in the Central Admin Console main
window.
D The [Scanner Config List] window appears.
2. Click the link of the scanner whose configuration you want to view.
The [Scanner Details] window appears.
3. View the scanner information details.
When the Admin Tool is started up by pressing the [Network Scanner Admin
Tool [Start]] button, scanners are identified by their IP addresses. If the
scanner information includes multiple scanners with the same IP address,
scanners which are not to be targeted may be connected.
When the [Network Scanner Admin Tool [Start]] button is pressed, if the
scanner is not started, starting the scanner by Wake-On-LAN and connecting
with the Admin Tool will take a few minutes.
If a "Connection error" occurs, and the window returns to the window for
specifying a connection, try re-connecting.
259
5.8 Monitoring and Maintaining the Scanner Network
5.8
Monitoring and Maintaining the Scanner Network
The registration status of scanners, the status of various scanner processes, and the
event log can be viewed.
1. Press the [Admin Operations] button in the Central Admin Console main
window.
D The [Scanner Admin Operations] window appears.
2. View the state of the scanner network.
For details on how to read the [Scanner-Side Update Status], refer to "5.13
Viewing the Update Status Lists" (page 272).
The [Update Type] link of [Scanner Updates] can be used to perform the following
operations:
z System Updates
For details, refer to "5.9 Updating the System" (page 261).
z Add-in Installs
For details, refer to "5.10 Installing an Add-in" (page 263).
z Scanner Settings
For details, refer to "5.11 Updating the Scanner Settings" (page 266).
z Job Mode Settings
For details, refer to "5.12 Setting the Job Mode" (page 269).
260
5.9
Updating the System
The system, security, and installed options can be updated by uploading a new system
update module and setting update calls.
The new system update module will be released, and applied to the scanners when one
of the following occurs:
z Scanner is started, or resumed from the standby mode
z Scanner is logged out
z Scanner is notified of any update modules
z Scanner has an automatic update scheduled
Updates can be applied to the scanners that are in power-off or standby mode using
Wake-On-LAN.
In the following cases, update modules cannot be uploaded.
z The module type is either a system or security option, and the same or upgraded
module version has already been registered
z For an installed option update module, the same update module is already
uploaded
Add-ins can be updated according to the time specified on the scanner side.
For details, refer to "4.8.9 Setting a Central Admin Server" (page 125).
1. Select the [System Updates] link in the [Scanner Admin Operations]
window of the Central Admin Console.
D The [System Updates] window appears.
To cancel release of the update module, press the [Cancel] button to delete
the module.
261
5.9 Updating the System
2. In [Model List], select [N1800].
D [Registered System Update] shows the details of the currently available update
modules.
3. Press the [Browse] button to specify the update module to be registered.
4. Press the [Upload] button to upload the update module.
5. Select the [Issue an Update Call] check box to issue an update call.
When the check box is selected, even if a scanner is not started or logged in to, the
update module is sent and applied to the scanner according to the Scanner
Notification Schedule.
However, if the update is released while the user is logged into a scanner, the
update will be applied after the user is logged out. If any other available updates are
pending, those are also applied at the same time.
6. In [Scanner Notification Schedule], set the schedule to notify update
modules.
When issuing a call, set a time that does not conflict with that set for [Software
Update Time-Period Restrictions] on the [Scanner Central Admin Server
Settings] window.
7. Press the [Register] button.
D This registers the uploaded update module.
When a new system update is available, it will be installed in a scanner if the
new version is higher than the current version. Targeted scanners are
restarted after the new system update has been installed.
Pending updates are performed in the following order:
1. System Updates
2. Add-in Installs
3. Scanner Settings
8. Press the [Back] button.
D The Central Admin Console main window appears again.
262
5.10 Installing an Add-in
An Add-in for scanner can be installed by uploading an Add-in module and setting update
calls. Up to six Add-in modules can be installed.
The new Add-in update module will be released, and applied to the scanners when one of
the following occurs:
z Scanner is started, or resumed from the standby mode
z Scanner is logged out
z Scanner is notified of any update modules
z Scanner has an automatic update scheduled
When update calls are set up, updates can be applied to the scanners that are in poweroff or standby mode using Wake-On-LAN.
If the Add-in module is already available, the module is replaced. However, if the date of
the last modified Add-in module version is the same as, or earlier than the currently
available one, the module cannot be uploaded.
Add-ins can be updated according to the time specified on the scanner side.
For details, refer to "4.8.9 Setting a Central Admin Server" (page 125).
1. Press the [Admin Operations] button in the Central Admin Console main
window.
D The [Scanner Admin Operations] window appears.
2. Select the [Add-in Installs] link.
D The [Add-in Installs] window appears.
263
5.10 Installing an Add-in
3. In [Add-in Groups], select a group to which the new Add-in module is to
be registered.
To cancel release of the Add-in module, press the [Cancel] button to delete the
module.
D [Registered Add-in Module] shows the details of the currently available Add-in
modules.
4. Press the [Add-in Upload] button.
D The [Add-in Upload] window appears.
5. Press the [Browse] button to specify the Add-in module file.
6. Press the [Upload] button to upload the Add-in module.
To install the uploaded Add-in module after uninstalling all Add-in modules
installed in a scanner, select the [Install after uninstalling all current Add-ins]
check box.
7. Press the [Back] button.
D The [Add-in Installs] window appears.
8. Select the [Issue an Update Call] check box to issue an update call.
When the check box is selected, even if a scanner is not started or logged in to, the
Add-in module is sent and applied to the scanner according to the Scanner
Notification Schedule. However, if the update is released while the user is logged in
to a scanner, the update will be applied after the user is logged out. If any other
available updates are pending, those are also applied at the same time.
264
9. In [Scanner Notification Schedule], set the schedule to notify Add-in
modules.
When issuing a call, set a time that does not conflict with that set for [Software
Update Time-Period Restrictions] on the [Scanner Central Admin Server
Settings] window.
10. Press the [Register] button.
D The uploaded Add-in module is registered to the selected Add-in group.
When a new Add-in module is available, it will only be not installed in a
scanner if both the name and version match that of the current Add-in.
Scanners are restarted twice when installing a new Add-in, once to uninstall
the old Add-in, and once again after the new Add-in has been installed.
Pending updates are performed in the following order:
1. System Updates
2. Add-in Installs
3. Scanner Settings
11. Press the [Back] button.
D The Central Admin Console main window appears again.
265
5.11 Updating the Scanner Settings
5.11 Updating the Scanner Settings
The scanner settings can be updated by uploading new sets of scanner settings and
setting update calls.
The new set of scanner settings will be released, and applied to the scanners when one of
the following occurs:
z Scanner is started, or resumed from the standby mode
z Scanner is logged out
z Scanner is notified of any update modules
z Scanner has an automatic update scheduled
When update calls are set up, updates can be applied to the scanners that are in poweroff or standby mode using Wake-On-LAN.
If the update is released while the user is logged into a scanner, the module will be
applied after you log out.
If scanner settings are already available, the scanner settings are replaced.
The scanner settings can be updated according to the time specified on the scanner
side.
For details, refer to "4.8.9 Setting a Central Admin Server" (page 125).
1. Press the [Admin Operations] button in the Central Admin Console main
window.
D The [Scanner Admin Operations] window appears.
2. Select the [Scanner Settings] link.
D The [System Settings] window appears.
266
3. In [Settings Groups], select a settings group to which the new set of
scanner settings is to be registered.
D [Registered Scanner Settings] shows the release date of the currently available
system settings.
To cancel release of the scanner settings, press the [Cancel] button to delete
the scanner settings.
If the scanner settings are canceled, checking or changing the settings
contents becomes difficult. Also, editing and viewing of the network printers/
folders setting contents on the job mode edit window may not be possible. For
details, refer to "Updating the Scanner Settings" (page 266).
4. In [Model], select [N1800].
5. Press the [Edit Scanner Settings] button.
D The scanner settings edit window appears.
6. Configure the scanner settings.
If scanner settings are available, the available scanner settings values are shown.
If no scanner settings have been released, the default settings are shown.
If you return to the [Main Menu] from the [Scanner Settings] window without
registering the scanner settings, the edited contents will be lost.
z [System Settings] tab
The setting items are the same as those set in the system settings menu in the
window for administrator operations. For details, refer to "4.5 Configuring the
System" (page 94).
However, the [Import Scanner Settings] button for the [System Settings] menu is
only displayed on the job mode edit window of the Central Admin Console.
267
5.11 Updating the Scanner Settings
The current configuration of the scanners saved by using the Admin Tool can be
sent to the Central Admin Server from the [Import Scanner Settings] window. The
current configuration of the scanners is the information saved in "Backing up
System Settings" (page 182).
The current configuration of the scanners can be imported in the following way.
1 Specify the scanner configuration file to be imported.
Press the [Browse] button to select a file.
2 Press the [Import] button.
DThe current configuration of the scanners is sent to the Central Admin Server.
The imported scanner settings are applied to the scanner according to the Scanner
Notification Schedule.
z [Network Settings] button
The setting items are the same as those set in the network settings menu in the
window for administrator operations. For details, refer to "4.8 Configuring the
Network Settings" (page 113).
z [Monitoring & Management] button
The setting items are the same as those set in the maintenance menu in the
window for administrator operations. For details, refer to "4.16 Maintaining the
System" (page 185).
z [Close] button
Registers the entered scanner settings and returns to the [Scanner Settings]
window.
7. Select the [Issue an Update Call] check box to issue an update call.
When the check box is selected, even if a scanner is not started or logged in to, the
update module is sent and applied to the scanner according to the Scanner
Notification Schedule. However, if the update is released while logged in to a
scanner, the update will be applied after logged out. If any other available updates
are pending, those are also applied at the same time.
8. In [Scanner Notification Schedule], set the schedule to notify scanner
settings.
9. Press the [Register] button.
D The entered scanner settings are registered to the selected settings group.
When a new set of scanner settings is available, first any existing network
printer and network folder settings are deleted, then the new scanner settings
are written over the old scanner settings.
Once the new scanner settings have been applied, any changes to the settings
of individual scanners are retained until the next time a new set of scanner
settings becomes available from the Central Admin Server.
Pending updates are performed in the following order:
1. System Updates
2. Add-in Installs
3. Scanner Settings
10. [Back] button
D The Central Admin Console main window appears again.
268
5.12 Setting the Job Mode
The job mode can be set by registering a new job mode and setting a release schedule.
After registering a new set of job mode settings, the job mode settings are replaced.
1. Press the [Admin Operations] button in the Central Admin Console main
window.
D The [Scanner Admin Operations] window appears.
2. Select the [Job Mode Settings] link.
D The [Job Mode Settings] window appears.
To cancel release of the job mode settings or to cancel the next scheduled
upload of the job mode settings, press the [Cancel] button to delete the job
mode settings.
Even if available job mode settings are canceled, job mode settings already
sent to a scanner will not become invalid. To not use job mode settings in a
scanner, on the [Network Settings], [Central Admin Server] window, set [Job
Mode] to [Off].
3. To create and release a new set of job mode settings, press the [Job
Mode Settings] button.
D The job mode edit window appears.
269
5.12 Setting the Job Mode
4. Configure job mode settings.
The contents of the last configured job mode settings are shown.
z [Job Sequences] button
The setting items are the same as those set in the [Job Sequences] tab in the job
mode settings menu in the window for administrator operations. For details, refer
to "4.17.2 Setting a Job Sequence" (page 201).
To set [Print] or [Save] for a job sequence, a network printer or network folder must
be previously added on the job mode edit window.
The job sequences and job mode edit window settings are related in the following
way.
z The network printers shown on the [Printer List] window when [Print] is selected
as a job item, are the network printers set on the job mode edit window.
z The network folders shown on the [Folder List] window when [Save] is selected
as a job item, are the network folders set on the job mode edit window.
z [Job Menus] tab
The setting items are the same as those set in the [Job Menus] tab in the job mode
settings menu in the window for administrator operations. For details, refer to
"4.17.3 Setting a Job Menu" (page 210).
z [Job Groups] tab
The setting items are the same as those set in the [Job Groups] tab in the job
mode settings menu, in the window for administrator operations. For details, refer
to "4.17.4 Setting a Job Group" (page 216).
z [Close] button
Registers the entered job mode settings and returns to the [Job Mode Settings]
window.
5. In [Settings Release Schedule], set the schedule to release job mode
settings.
6. Press the [Register] button.
D The entered job mode settings are registered.
270
7. Press the [Back] button.
D The Central Admin Console main window appears again.
271
5.13 Viewing the Update Status Lists
5.13 Viewing the Update Status Lists
Status details can be viewed for the following update types:
z System Updates
z Add-in Installs
z Scanner Settings
1. Press the [Admin Operations] button in the Central Admin Console main
window.
D The [Scanner Admin Operations] window appears.
2. Select the [Targeted] numeral link in [Scanner-Side Update Status].
D The [Update Status List] window corresponding to the update type appears.
Select the scanner name link to view the scanner details. For details, refer to
"5.7 Setting Scanner Configuration" (page 251).
3. To filter scanners shown in the list, specify filter conditions and press
the [Refresh List] button.
4. To issue a call for unapplied updates, select the check box of the
scanners to be notified, and press the [Call Now] button.
All update call targets are "Pending" for [Scanner-Side Update Status].
D A call is issued to the specified scanners.
D If a target scanner is in error status, the error is cleared before notification. The
scanner-side status is changed to "Pending", and becomes an update target.
5. To clear a scanner error, press the check box of the relevant scanner,
and press the [Clear Update Failures] button.
D The error is cleared. The scanner-side status is changed to "Pending", and
becomes an update target.
272
6. [Back] button
D The Central Admin Console main window appears again.
When issuing an update call or clearing an error, you can select or deselect all the
scanners by the following operations:
z Press the [Select All] button to select all scanners.
z Press the [Deselect All] button to clear the check boxes of all scanners.
273
5.14 Viewing the Scanners Operating Status
5.14 Viewing the Scanners Operating Status
The operating status of the scanners can be viewed.
1. Press the [Operation Monitor] button in the Central Admin Console main
window.
D The [Scanner Operation Monitor] window appears.
Press a scanner icon to show the [Scanner Details] window.
Immediately after the Central Admin Server starts up, the operating status of the
registered scanners is shown as "Unreported". In this case, the status of each
scanner will be updated when one of the following occurs:
z A scanner is logged in/out
z The scanner power is turned on, or it is resumed from standby mode
z The scanner power is turned off, or it is set to standby mode
2. To filter scanners shown in the list, specify filter conditions and press
the [Apply] button.
D The scanners satisfying the filter conditions appear.
3. To clear all error marks
shown on the [Scanner Operation Monitor]
window, press the [Clear All Errors] button.
D When the scanner operation monitor view consists of multiple pages, error marks
of all scanners are cleared.
274
5.15 Viewing Event Log
Event logs output from the scanners or the Central Admin Server can be viewed.
The latest 100 event log items can be viewed on the [Scanner Admin Operations] window.
z Log for all events that occur on the Central Admin Server
z Log for events that occur in the scanners, where "Type" is "Error" or "Warning"
To view all event logs, check the [Event Log] window.
■ Viewing Event Log
1. Press the [Event Log] button in the Central Admin Console main window.
D The [Event Log] window appears.
Select the [Date/Time] link to display the [Event Details] window, where you
can view the event details.
2. To filter scanners shown in the list, specify filter conditions and press
the [Refresh List] button.
D The events satisfying the filter conditions appear.
275
5.15 Viewing Event Log
■ Downloading Event Log
1. Press the [Event Log] button in the Central Admin Console main window.
D The [Event Log] window appears.
2. Press the [Export] button.
D A confirmation window for whether or not to download the event log appears.
3. Press the [OK] button.
D The [File Download] dialog box appears.
4. Press the [Save] button.
D The [Save As] dialog box appears.
5. Specify the download destination where the event log is to be saved.
D The events are output to the file.
When downloaded to a computer, the file will contain CSV format data. The file is
saved in the following form:
Date/Time,Origin,Type,Event_ID,"Message"
The types are, E: Error, W: Warning, I: Info.
■ Clearing All Events
1. Press the [Event Log] button in the Central Admin Console main window.
D The [Event Log] window appears.
2. Press the [Clear Log] button.
D A confirmation window for whether or not to clear the events appears.
3. Press the [OK] button.
D All the events are cleared.
276
5.16 Collecting and Exporting Audit Logs
Scanner system logs and user logs can be collected and saved in the Central Admin
Server.
System logs collected in the Central Admin Server are referred to as "audit logs (system)",
and user logs as "audit logs (user)". Both types of logs are referred to collectively as "audit
logs".
By automatically collecting system logs and user logs in the Central Admin Server, you
can record users' past operations.
To view audit logs, export those collected in the Central Admin Server to an arbitrary
folder by executing a command.
The status of audit logs collection can be checked in the [Scanner Details] window.
Central Admin
Server
Automatically
collect system
logs/user logs
Audit log export command
Export audit logs
Audit logs
Server in
which
audit logs
are saved
Audit logs
Computer
Scanner
Scanner
Scanner
Central Admin Console
Check the status of
log collection
5.16.1 Collecting Audit Logs
To automatically collect audit logs in the Central Admin Server, enable the audit log
collection in the [Scanner Central Admin Server Settings] window. For details, refer to "5.6
Setting the Central Admin Server" (page 245).
The audit logs are managed according to the date on which they are collected in the
Central Admin Server. Do not change the Central Admin Server date and time
setting to a date that has already passed.
If the audit log is collected, disk space for saving the audit log is required. Refer to
the following for estimates of the required disk space.
Under the following conditions, one log per day requires 25 KB.
Power on/off: once, Login/Logout: 20 times, Number of scan operations: 100 times
277
5.16 Collecting and Exporting Audit Logs
5.16.2 Exporting Audit Logs
To export audit logs collected in the Central Admin Server, execute "AmExportLog.exe" in
the command prompt on the computer installed with the Central Admin Server software.
z Command storage location
Under the [\AmManager\Bin] folder in the installation folder of the Central Admin
Server software
z Command executable format
AmExportLog -d OutputFolder [-v]
The italic text represents variable character strings.
To show the status of the process, specify -v.
An [AuditLogs] folder is created in the specified output folder. In this
[AuditLogs] folder, a folder is created for each date to save audit logs.
The date of a folder corresponds to that of when audit logs are collected in the
Central Admin Server. Therefore, the date may differ from that on the scanner
when the logs are created.
z File name format of an output audit log
z Audit log (system)
ScannerName_MACAddress_syslog.csv
z Audit log (user)
ScannerName_MACAddress_usrlog.csv
z Return value
z 0
Succeeded
z Other than 0
Failed
z
z
z
z
Do not execute this command twice at the same time.
If a file name already exists, the existing file will be overwritten.
When exported, audit logs are deleted from the Central Admin Server.
If an error occurs while exporting, the audit logs that have been exported are
deleted from the Central Admin Server.
278
5.16.3 File Format of Audit Logs
Audit log files are formatted as follows:
z Audit logs use the UTF-8 character set.
z Audit logs are in a CSV format.
z Audit logs contain the following output:
z Audit log (system)
This log contains the following output items:
"Sequence_number","Date","Time","Type","Code","Message"
These items are defined as follows:
Log Item
Description
Sequence
number
A file sequence number between "1" and
"4294967295".
This number increments from "1" as files are added,
and resets to "0" (indicating an overflow) after
"4294967295".
Date
Corresponds to the system log [Date].
Time
Corresponds to the system log [Time].
Type
Corresponds to the system log [Type].
Code
Corresponds to the system log [Code].
Message
Corresponds to the system log [Messages].
(*):
For details about accessing the system log, refer to "4.14.5 Managing
the System Log" (page 175).
279
5.16 Collecting and Exporting Audit Logs
z Audit log (user)
This log contains the following output items:
"Sequence_number","Date","Time","User","Code",
"Operation","Result","Pages","Description"
These items are defined as follows:
Log Item
Description
Sequence
number
A file sequence number between "1" and
"4294967295".
This number increments from "1" as files are added,
and resets to "0" (indicating an overflow) after
"4294967295".
Date
Corresponds to the user log [Date].
Time
Corresponds to the user log [Time].
User
Corresponds to the user log [User].
Code
Corresponds to the user log [Code].
Operation
Corresponds to the user log [Operation].
Result
Corresponds to the user log [Result].
Pages
Corresponds to the user log [Pages].
Description
Corresponds to the user log [Description].
(*):
For details about accessing the user log, refer to "4.14.4 Managing the
User Log" (page 173).
280
5.17 Maintaining Central Admin Server Settings
Central Admin Server settings set by the administrator can be backed up, restored, and
obtained.
Audit logs are not backed up or restored by the operations described below,
because they are not included in the Central Admin Server settings.
5.17.1 Backing Up Central Admin Server Settings
All data managed in the Central Admin Server (excluding audit logs) can be backed up.
Central Admin Server settings can be restored using the backup file. Make backups
periodically just in case.
To back up Central Admin Server settings, execute "AmBackup.exe" in the command
prompt on the computer installed with the Central Admin Server software.
When backing up, the Central Admin Server is in a temporarily suspended state, and
connection from the Central Admin Console or uploading/downloading of user roaming
data, and release of updates to scanners are not possible. On the [Scanner Operation
Monitor] window, the operating status of all scanners is indicated as "Unreported".
z Command storage location
Under the [\AmManager\Bin] folder in the installation folder of the Central Admin
Server software
z Command executable format
AmBackup.exe BackupFolderName
The italic text represents variable character strings.
z Return value
z 0
Succeeded
z Other than 0
Failed
281
5.17 Maintaining Central Admin Server Settings
z Specify a folder without files and sub-folders as the backup folder. If the specified
backup folder does not exist, it is created.
z Do not change the backup folder structure. If changed, restoration may not be
processed correctly.
z Do not change the content of the backup file of Central Admin Server settings. If the
backup file content is changed and restored, processes related to the Central
Admin Server may operate improperly.
z All files in the installation folder are deleted when the Central Admin Server software
is uninstalled. Therefore, save all backup files to a location other than in the
installation folder.
Before executing the AmBackup.exe command, confirm that the storage disk has
sufficient free space. If there is not enough free disk space, an incomplete file may
be saved.
The required free capacity is approximately twice the free capacity under the [Data]
folder in the installation folder.
282
5.17.2 Restoring Central Admin Server Settings
Central Admin Server settings that have been backed up can be restored to the Central
Admin Server.
To restore Central Admin Server settings, execute "AmRestore.exe" in the command
prompt on the computer installed with the Central Admin Server software.
z Command storage location
Under the [\AmManager\Bin] folder in the installation folder of the Central Admin
Server software
z Command executable format
AmRestore.exe BackupFolderName
The italic text represents variable character strings.
z Return value
z 0
Succeeded
z Other than 0
Failed
z Make sure to run the AmRestore.exe command after changing the current directory
to the [Bin] folder in the installation folder of the Central Admin Server software.
z The language for the backup and restore Central Admin Servers must be the same.
If languages are different, the Central Admin Server may not operate correctly when
restoring.
z The admin password is not backed up and restored by using the AmBackup.exe
and AmRestore.exe commands. Even if the AmRestore.exe command is executed,
the admin password is not changed.
z For Windows Server 2008, to use HTTPS for communication to a scanner, or
computer installed with the Central Admin Console, additional settings may be
required for the target Central Admin Server to be restored. For more details, refer
to "Importing the Certificate" (page 237).
283
5.17 Maintaining Central Admin Server Settings
5.17.3 Obtaining Technical Support on the Central Admin Server
If any problems occur when setting up or using the Central Admin Server, technical
support information on the Central Admin Server can be collected to help determine the
cause of the problem.
To obtain technical support information, execute "AmInvestigate.exe" in the command
prompt on the computer installed with the Central Admin Server software.
When obtaining technical support, the Central Admin Server is in a temporarily
suspended state. Do not try to obtain technical support unless requested by your
FUJITSU scanner dealer, or a problem occurs.
z Command storage location
Under the [\AmManager\Bin] folder in the installation folder of the Central Admin
Server software
z Command executable format
AmInvestigate.exe -d OutputFolder [-p EncryptedPassword] [-v]
The italic text represents variable character strings.
To show the status of the process, specify -v.
z Return value
z 0
Succeeded
z Other than 0
Failed
The information is output to the specified output folder for each type. If an encrypted
password is specified, the technical support information is encrypted.
284
5.17.4 Migrating Data to an Updated Version of the Central Admin
Server Software
When updating the Central Admin Server software version in order to use a different
server as the Central Admin Server, data from the previous version of the Central Admin
Server software must be transferred to the new version.
The data can be migrated by executing the "AmBackup.exe" and "AmRestore.exe"
commands in the computer in which the Central Admin Server software is installed.
If you back up data by executing "AmBackup.exe" in the [Bin] folder from the
installation folder of the previous version, you cannot restore the data in the new
version of the Central Admin Server.
z If updating the version of the current Central Admin Server software, you do not
need to migrate data.
z Make sure to export audit logs in advance, as they are not migrated by this
operation.
1. Copy the following folder in the new version of the Central Admin Server
software to an arbitrary folder of the previous version.
[\AmManager\Bin] folder in the installation folder of the new Central Admin Server
software
In the following cases, overwrite the "ServiceSetting.dll" file in the Bin folder that
was copied to an arbitrary location in Step 1, with the file of the same name from the
previous version of the Central Admin Server software.
z When migrating data from Windows Server 2003 to Windows Server 2008
z When migrating data from Windows Server 2008 to Windows Server 2003
The "ServiceSetting.dll" file is stored in the following location:
Under the [\AmManager\Bin] folder in the installation folder of the previous
Central Admin Server software
2. Execute "AmBackup.exe" in the [Bin] folder which was copied to an
arbitrary folder of the previous version of the Central Admin Server.
For details about "AmBackup.exe", refer to "5.17.1 Backing Up Central Admin
Server Settings" (page 281).
D The data of the previous version of the Central Admin Server is backed up.
285
5.17 Maintaining Central Admin Server Settings
3. Execute "AmRestore.exe" in the following folder of the new version of
the Central Admin Server.
For details about "AmRestore.exe", refer to "5.17.2 Restoring Central Admin Server
Settings" (page 283).
Under the [\AmManager\Bin] folder in the installation folder of the Central Admin
Server software
D The data backed up in Step 2 is restored in the new version of the Central Admin
Server.
This concludes migrating the data from a previous version of the Central Admin Server to
a new version.
286
5.18 Messages
The following lists the messages that may appear during central admin operations.
5.18.1 Central Admin Console Messages
Window
Connect
Message
Action
Check the port number setting.
Enter a port number.
Check the target server setting.
Enter a target server.
Connection error
Check the connection target
and port number, and try again.
Central
Admin
Console
Network Scanner Admin Tool
could not be started. Check that it
has been installed.
Check that the Admin Tool has
been installed correctly.
Central
Admin
Message
Failed to display window. Restart
Central Admin Console.
Restart Central Admin Console.
287
5.18 Messages
5.18.2 Event Log
■ System Event Log
The system event log shows a list of all system events.
z Log Type: Application
z Event source: Scanner Central Admin Server
Code
Message
Action
11001
Scanner Central Admin
Server started up.
11002
Scanner Central Admin
Server shut down.
12001
Default setting is being used
in place of invalid
value.Parameter: XXXX
Invalid value: XXXX Default
value: XXXX
12002
Tried to exceed the scanner
registration limit.
Delete unneeded scanner
configuration.
12003
Tried to exceed the user
roaming data registration
limit.
Delete any unneeded user roaming
data.
12902
Schedule notification failed.
Retrying. (XXXX)
No action required.
13001
Error has occurred.Type:
Error type Details: Error
details
Check the error details and other event
logs.
13002
Inhospitable execution
environment - process
cannot continue.Details:
Error details
Check the error details and other event
logs.
13003
Database could not be
accessed.Details: Error
details
Check the database operating status.
13004
Schedule could not be
set.Details: Error details
Restart the Scanner Central Admin
Server service.
288
No action required.
Code
Message
Action
13005
Settings used for
communication between the
Central Admin Server and
Central Admin Console
could not be
changed.Details: Error
details
Restart the Scanner Central Admin
Server service.
13901
Scheduler could not be
started. (XXXX)
Restart the Scanner Central Admin
Server service.
13902
Schedule notification failed.
(XXXX)
Check the operating status of the Web
site using IIS Manager.
If the operating system of the Central
Admin Server is either Windows Server
2003 or Windows Server 2008, check
the operating status of the Web site
"AmService" and the application pool
"AmService".
13903
Schedule (XXXX) expired
and was deleted. [XXXX]
events
The release schedules for seven or
more days ago were deleted. Check
the status of updates to the scanner,
and issue any necessary update calls
to scanners with "Pending" status.
13904
Error has occurred. (XXXX)
Restart the Scanner Central Admin
Server service.
11901
Service started successfully.
No action required.
11902
Service stopped
successfully.
289
5.18 Messages
5.18.3 Backup/Restore Command Messages
Backup/restore command messages which may appear during central admin operations
can be arranged into the following two categories:
z Information
z Error
Backup/restore command messages will be shown on the command prompt.
■ Information
Code
Message
0A040001
Starting backup.
0A040002
Finishing backup.
0A040003
Starting restore.
0A040004
Finishing restore.
Action
No action required.
■ Error
Code
Message
Action
7A040010
Scanner Central Admin
Server is not installed.
Central Admin Server software is not
installed.
Try again in a Central Admin Server
that has been correctly installed.
7A040011
Backup folder has not been
specified.
The backup file name is not specified
in the parameters of the backup
command and restore command.
Specify the backup file, and try again.
7A040012
Backup folder does not exist.
Specify the backup folder that was
specified with the backup command,
and try again.
Or, check the read privilege for the
specified backup folder.
7A040013
Backup folder contents are
invalid.
The backup folder specified in the
parameter for the restore command is
not a backup folder for Central Admin
Server. Specify the Central Admin
Server backup folder and try again.
290
Code
Message
Action
7A040014
Backup file already exists.
A file or folder exists in the backup
folder.
Specify an empty folder.
If a folder which does not exist is
specified, it will be created.
7A040015
Backup folder specification is
invalid.
This error message is output in the
following cases. After checking the
error, run the command again.
z The backup folder specified in the
parameter for the restore command
does not have write access.
z The specified backup folder name
already exists as a file.
z The backup file full path is longer
than 128 bytes.
7A040016
Server is busy. Try again
later.
291
This message appears if the backup/
restore command is executed during
an update call on the Central Admin
Server. Wait until the update call is
finished, and try again.
5.18 Messages
Code
7A040017
Message
Action
Backup failed.
If this message appears with auxiliary
code [7A041012], free disk space may
be insufficient. Ensure that there is
enough free disk space available, and
try again.
If this message appears with auxiliary
code [7A041015], it is possible that the
database file used in the Central Admin
Server is being used with software
other than the Central Admin Server
software. Stop using the database file
and try again.
If this message appears without
auxiliary code, the contents of the
problem are shown in the following
format.
...
Problem details
...
If this message appears frequently with
auxiliary code other than those
mentioned above, contact your
FUJITSU scanner dealer or an
authorized FUJITSU scanner service
provider.
292
Code
Message
Action
7A040018
Restore failed.
If this message appears with auxiliary
code [7A041013], free disk space may
be insufficient. Ensure that there is
enough free disk space available, and
try again.
If this message appears with auxiliary
code [7A041008], a file in the
restoration folder may be in use. Check
that the file is not in use, and try again.
If this message appears with auxiliary
code [7A041015], it is possible that the
database file used in the Central Admin
Server is being used with software
other than the Central Admin Server
software. Stop using the database file
and try again.
If this message appears without
auxiliary code, the contents of the
problem are shown in the following
format.
...
Problem details
...
If this message appears frequently with
auxiliary code other than those
mentioned above, contact your
FUJITSU scanner dealer or an
authorized FUJITSU scanner service
provider.
7A040019
Backup or restore is already
running.
Try again, after finishing the backup or
restoration.
7A040020
Port number (XXXX) is
already in use.
Port number (XXXX) is already in use
by another application.
Change the settings of the application
using XXXX, and try restoring again.
7A040021
Backup folder is not empty.
A file or folder exists in the backup
folder.
Specify an empty folder.
If a folder which does not exist is
specified, it will be created.
293
5.18 Messages
Code
7A040023
Message
Action
Restoration from this version
of backup file is not possible.
The backup file saved by executing the
AmBackup.exe command in the
Central Admin Server of the previous
version cannot be restored with the
AmRestore.exe command in the
Central Admin Server of new version.
Refer to "5.17.4 Migrating Data to an
Updated Version of the Central Admin
Server Software" (page 285), and try
backing up again.
294
5.18.4 Audit Log Export Command Messages
Code
Message
Action
7A050010
Scanner Central Admin
Server is not installed.
Detail error message:
XXXXXXXXXX
Check that the Central Admin Server
has been installed correctly.
Check whether the command is being
executed with administrative privileges
for the computer.
7A050012
Audit log export failed.
Detail error code:
XXXXXXXXXX
Detail error message:
XXXXXXXXXX
Check the error message, and try the
following:
7A050014
Command is already
running.
Try again after the command execution
is completed.
7A050015
Error has occurred.
Detail error message:
XXXXXXXXXX
An unexpected error occurred.
Contact your FUJITSU scanner dealer
or an authorized FUJITSU scanner
service provider.
7A050016
Length of specified folder
path exceeds the maximum
allowed.
The copy destination folder path length
specified in the command line exceeds
180 bytes. Specify a copy destination
folder path that is no longer than 180
bytes.
295
z Check that there is enough free disk
space in the destination (export-to)
folder.
z Check that the destination (exportto) folder is specified correctly.
z Check that the destination (exportto) folder, the destination (exportfrom) folder, and log file have write
access.
z Check that there is not a file of the
same file name without write access
in the destination (export-to) folder.
z Check that the audit log that failed to
be exported is not being used in
another application.
Chapter 6
Regular User Operations
This scanner is used to scan documents which then can be sent by e-mail or fax, printed
on a network printer, or saved to a folder.
To perform the operations described in this chapter, the scanner must first be set up by
the administrator.
For details about scanner setup, refer to "Chapter 4 Administrator Operations (LCD Touch
Panel and Admin Tool)" (page 74).
6.1 Loading Documents............................................................................................ 297
6.2 Using LCD Touch Panel Windows: Regular User ............................................ 303
6.3 Logging in: Regular User Mode......................................................................... 306
6.4 Sending the Scanned Data by e-Mail ................................................................ 309
6.5 Sending the Scanned Data by Fax .................................................................... 324
6.6 Printing the Scanned Data ................................................................................. 333
6.7 Saving the Scanned Data to a Network Folder................................................. 344
6.8 Saving the Scanned Data to a SharePoint Folder............................................ 348
6.9 Setting the Scan Options ................................................................................... 356
6.10 Enabling/Disabling the Scan Viewer ............................................................... 395
6.11 Editing the Scanned Data in the Scan Viewer ................................................ 398
6.12 Checking the User Log ..................................................................................... 402
6.13 Maintenance ...................................................................................................... 403
6.14 Processing a Job .............................................................................................. 405
6.15 Changing a User Password.............................................................................. 414
296
6.1
Loading Documents
This section describes how to load documents onto the scanner.
6.1.1 How to Load Documents
1. Check the number of document sheets.
For document sheet limits, refer to "A.3 Maximum Document Loading Capacity"
(page 476).
2. When loading multiple document sheets, fan the document stack.
1. Lightly grip the ends of the document stack in both hands, and fan two or three
times.
2. Rotate the documents 90 degrees, and fan again.
3. Align the edges of the document sheets.
3. Pull up the extension to hold the documents, and lift up the stacker.
Pull and lift up the stacker, as shown in the figure below.
Extension
Stacker
297
6.1 Loading Documents
The stacker holds the document sheets after they have been scanned. It can
be pulled out and adjusted to the size of the document being scanned.
4. Load the documents into the ADF paper chute.
Load the document front side down, with the top of the document entering the
scanner first (when multiple document sheets are loaded, the last page is on the
top).
If [Face-up] is selected on the [Paper Face Direction] window, load the
document front side up, with the bottom of the document entering the scanner
first.
For details about how to load the document, refer to "6.9.6 Document Feed
Direction" (page 368).
298
5. Adjust the side guides to the width of the documents.
Move the side guides so that they touch both sides of the documents.
If there is any space between the side guides and the edges of documents, the
scanned data may be skewed.
299
6.1 Loading Documents
6.1.2 Loading Documents Using a Carrier Sheet
With an optional carrier sheet, you can scan documents larger than A4 size, such as A3,
Double Letter, and B4. To do this, you fold the document in half and scan both sides
continuously in duplex mode, one side at a time. The scanned images will be merged and
saved as one image page.
When scanning a document larger than A4 size, change the settings as follows:
z When using a carrier sheet, set the size of the scanned document to be output. For
more details, refer to "6.9.1 Carrier Sheet" (page 362).
z When a carrier sheet is used for scanning, load and scan one page at a time.
Continuous scanning is not possible even when multiple document sheets are
loaded.
You can merge both front and back side images of a document smaller than A4 size
to output a single double-page image.
1. Fold the sheet to be scanned in half so that its front side faces outwards.
Fold the sheet tightly and smooth out the crease. Otherwise, the sheet may be
skewed during scanning.
300
2. Open the carrier sheet and insert the document.
Align the fold with the right edge of the Carrier Sheet so that the document fits into
the Carrier Sheet at the upper corner.
z When placing the carrier sheet with the printed black and white pattern to be at the
top, the front of the carrier sheet has the thick vertical line at the right side.
z If [Face-up] is selected on the [Document Feed Direction] window, align the fold
side with the right edge of the carrier sheet so that the document fits into the carrier
sheet at the lower corner.
3. With the front side of the carrier sheet face down, place the part of the
printed black and white pattern downward, and load it in the ADF paper
chute.
When loading the carrier sheet, move the side guides to lock the carrier sheet in
place.
301
6.1 Loading Documents
4. Start the scan.
D The front and back side images are merged into a double-page spread image.
z There may be a gap between the front and back side images, or a line may appear
on the output scan image.
If a thick document is scanned with the carrier sheet, scanned images on the both
right and left sides may be skewed to a trapezoidal shape.
These problems may be improved in the following ways.
z Fold the document neatly
z Align the edge of the document with the edge of the carrier sheet
z Scan the carrier sheet with the front side facing the paper chute or vice versa
z The folded part of the document may be mis-detected, causing the seam of the
facing pages be unintentionally trimmed on the scanned image. In this case, the
folded edge of the document should be placed 1 mm away from the edge of the
carrier sheet.
302
6.2
Using LCD Touch Panel Windows: Regular User
6.2.1 [Main Menu] Window
The type of buttons displayed on the menu differs according to the settings of the relevant
server.
The following describes display examples according to settings for e-Mail, Fax, Print,
Save and Scan to SharePoint.
303
6.2 Using LCD Touch Panel Windows: Regular User
6.2.2 [Job Menu] Window
The type of buttons displayed on the menu differs according to the job settings.
In the following example, six jobs are set up.
When a regular user belongs to multiple job groups, menus and buttons to switch the [Job
Menu] window appear as shown below.
304
6.2.3 Regular User Settings Overview
Regular users can configure the following setting items as long as these items have been
enabled by the administrator.
z Login Setting
Set the scanner to automatically login without displaying the [Login] window, when
the scanner power is switched on or restarted.
Also, set whether or not to enable login with the guest account.
To change these settings, contact the administrator.
z Initial Post-Login Menu
Set whether to display the [Main Menu] or [Job Menu] window.
Switch between the [Main Menu] and [Job Menu] windows, or display only the [Job
Menu] window.
z User Roaming Data
User settings can be shared between multiple scanners, by allowing user data to
be managed on the Central Admin Server.
A regular user can login on different scanners while retaining their user data.
The following user data can be used in roaming mode.
z "My List" e-Mail Address Books
z scan settings
z Name of the last network printer used (*)
z Name of the last network folder used (*)
z SharePoint folder (*)
(*): If the same network printer/folder, or SharePoint folder is not set for each
scanner, the name of the latest one used is not shown.
z Job Roaming Info
User job settings can be shared between multiple scanners, by allowing job
settings to be managed on the Central Admin Server.
A regular user can login on different scanners while retaining their preferred [Job
Menu] window.
When Roaming Mode or Job Mode is [On] in the [Scanner Central Admin Server]
window of [Network Settings], if communication with the Central Admin Server is not
possible at login, a confirmation message will appear.
If the [OK] button is pressed, the settings saved in the scanner are used. Pressing
the [Cancel] button returns to the login window.
305
6.3 Logging in: Regular User Mode
6.3
Logging in: Regular User Mode
CAUTION
Do not move or shake the scanner when it is turned on.
This may damage components in the scanner and cause data to be
lost.
Depending on the authentication mode and the specified user name, the following
authentication process is performed for login authentication.
z For users registered in the LDAP server
Specify a user name from the user information registered with the LDAP server.
z When the [Server Type] of the LDAP server is [Active Directory] or [Active
Directory Global Catalog]
User Name Format
Authentication Process
SAM Account Name
Does not contain @
Authenticate the user login name
(sAMAccountName).
Example: user
User Principal Name
Contains @
Authenticate the user login name
(userPrincipalName).
Example: [email protected]
z When the [Server Type] of the LDAP server is [Other LDAP Server]
User Name Format
Authentication Process
uid
Authenticate the user login name (uid).
Example: user
cn
Authenticate the user login name (cn).
Example: user
z For users registered in a local account
Specify a user name from the user information of the local account.
Authentication is performed with a specified user login name for a local account saved
in a scanner.
Note that the authenticated user info is also used when saving scans to a network folder.
When the scanner is turned on or restarted, automatic login without displaying the [Login]
window is possible.
Login is not possible if the Active Directory account option is "User must change
password at next logon". Contact an administrator to change a password, and then try
logging in.
306
z When using a scanner without using an LDAP server or registering a local account,
enter the following user name and password. For details about the LDAP server,
refer to "LDAP Server" (page 50).
User Name: guest
Password: guest
However, this cannot be used if login with the guest account is disabled.
z For details about automatic login or enabling login with the guest account, refer to
"4.7.1 Setting the Login Settings" (page 107).
z Only one administrator or user can login to the scanner at same time.
1. Push the power button.
D The [Login] window appears.
307
6.3 Logging in: Regular User Mode
2. Enter a user name and password.
If [Active Directory Global Catalog] is selected for the login LDAP server, the
[UPN Suffix] input field is displayed.
z User names including a UPN suffix may be up to 64 characters long. The
entered UPN suffix is remembered and used again at the next login.
z If a UPN suffix is entered, "@" and the UPN suffix will be appended to the
user name. For example, if the user name is "user" and the entered UPN
suffix is "example.com", it is authenticated as "[email protected]".
In this case, this is the "User Principal Name".
z Do not enter a UPN suffix when it is not required.
z A UPN suffix is not required when logging in with a guest account. Even if
entered, it is ignored.
3. Press the [Login] button.
D If the user name and password are valid, the [Main Menu] window appears.
308
6.4
Sending the Scanned Data by e-Mail
If an LDAP server is set, register the user e-mail address with the LDAP server. If a
local account is set, register the user e-mail address. If the user e-mail address is
not registered, e-mails cannot be sent.
1. On the [Main Menu] window, press the [e-Mail] button.
D The [Send e-Mail] window appears.
The scan information can be changed by pressing
of [Scan Settings]. For
details, refer to "6.9 Setting the Scan Options" (page 356).
2. Enter e-mail addresses, distribution list names, or groups in [To], [Cc],
and [Bcc] fields.
z Enter a distribution list name to send a single e-mail to multiple e-mail
addresses contained in the distribution list. For more details about distribution
list settings, refer to "6.4.2 Adding an e-Mail Target to the e-Mail Address Book"
(page 317).
z Enter a group to send an e-mail to all e-mail addresses contained in the group.
z e-Mail addresses can be selected from the e-mail address book by pressing
. For details, refer to "6.4.1 Selecting an e-Mail Target from the e-Mail
Address Book" (page 313).
If the e-mail address book cannot be used, contact the administrator.
z Groups can be edited using User Editor. Distribution lists can also be edited.
For details, refer to "Appendix E Editing Using User Editor" (page 496).
309
6.4 Sending the Scanned Data by e-Mail
3. Enter an e-mail address in the [From] field.
This field can be entered if logged in with the the guest account, that has no set email address.
For details about e-mail address settings values, refer to "B.1 e-Mail Address
Setting Values" (page 483).
[From] e-mail addresses can be selected from the e-mail address book by
pressing
.
For details, refer to "6.4.1 Selecting an e-Mail Target from the e-Mail Address
Book" (page 313).
If the e-mail address book cannot be used, contact the administrator.
4. For [File Name], enter a file name for the scanned data attached to the email.
z The following file names cannot be used:
z CON
z PRN
z AUX
z CLOCK$
z NUL
z COM0 to COM9
z LPT0 to LPT9
z The following symbols cannot be used.
\/:*?"<>|
5. Enter an e-mail title into the [Subject] field.
6. Enter the e-mail contents into the [Body] field.
7. When [Request Return Receipt] is available, you can press
button to
select whether or not to request a return receipt confirming that the email you are sending is opened.
To request a return receipt, contact the administrator.
8. When [Send a copy to my e-mail address] is available, you can press
button to select whether or not to specify your own e-mail address as a
Bcc recipient of a copy of the e-mail.
To send a copy to your e-mail address, contact the administrator.
310
9. Press the [Scan] button.
When [Scan Viewer] is [Off], this will be a [Scan&Send] button.
D The scanning starts.
The scanning status and scan settings are shown during the scan. The maximum
number of pages that can be scanned is 999.
When [Blank Page Skip] is enabled, the number of scanned pages excluding
skipped blank pages is shown.
Additional pages can be scanned in place of skipped blank pages, until the
maximum number of scanned pages is reached.
D When the scanning has completed, the [Scan Viewer] window appears.
For details about editing on the [Scan Viewer] window, refer to "6.11 Editing the
Scanned Data in the Scan Viewer" (page 398).
If the [Scan&Send] button is selected (when [Scan Viewer] is [Off]), the
scanned data is attached to an e-mail and sent immediately after the scanning
is completed, and the LCD touch panel screen returns to the [Main Menu].
For details, refer to "6.10 Enabling/Disabling the Scan Viewer" (page 395).
10. Check the scanned data.
For more details about the [Scan Viewer] window, refer to "6.11 Editing the
Scanned Data in the Scan Viewer" (page 398).
11. On the [Scan Viewer] window, press the [Send] button.
If the [SMTP Authentication] window appears, enter authentication information
needed to access the SMTP server, and press the [OK] button.
D The scanned data in the specified file format is sent as an e-mail attachment.
If [Split Mails] is set to [On], split e-mails will be sent.
If the number of e-mail recipients exceeds the specified maximum number, a
warning message appears.
311
6.4 Sending the Scanned Data by e-Mail
D The [Main Menu] window is shown again.
z The following items are set by the administrator in advance.
z The maximum number of e-mail addresses to be specified in the [To] field
z Whether to split an e-mail to be sent, and the maximum size of a split email
z The maximum size of an attached file
To change these settings, contact the administrator. For more details, refer to
"4.10.1 Setting the e-Mail Server" (page 137).
z For photos and images, a high compression rate can be used to create a
smaller file. For details, refer to "6.9.11 Compression" (page 380).
z If the file format is JPEG or TIFF, a file will be attached for each page in the
scan.
z If the number of pages is over ten and [Scan Viewer] is [On], a
confirmation message appears after the [Send] button on the [Send eMail] window is pressed.
z If the number of pages is over ten and [Scan Viewer] is [Off], a
confirmation message appears after the [Scan&Send] button on the
[Scan Viewer] window is pressed.
z If the e-mail fails to be sent, an error message e-mail with the following title is
sent from the scanner to the [From] address.
Network Scanner (XXXX) Error
312
6.4.1 Selecting an e-Mail Target from the e-Mail Address Book
The following explains how to use an e-mail address book to specify destinations when
sending an e-mail, instead of directly entering e-mail addresses with a keyboard.
The details to select e-mail addresses from an e-mail address book are described in Step
2 and Step 3 of "6.4 Sending the Scanned Data by e-Mail" (page 309).
z Type of the e-Mail Address Book
There are two types of e-mail address books, My List and LDAP List.
z My List
This is an e-mail address book that can be created by the user.
My List can also be edited using User Editor.
For details, refer to "Appendix E Editing Using User Editor" (page 496).
z LDAP List
This is an e-mail address book which uses all the data stored on the LDAP server.
The LDAP List cannot be edited.
The LDAP List cannot be used in the following cases, therefore the [LDAP List] tab
is not shown on the window.
z If an LDAP server is not used
z If logged in with the guest account
z If logged in with a local account
z e-Mail Targets that Can Be Selected from the e-Mail Address Book
When sending an e-mail, the following e-mail targets can be selected and entered from
the e-mail address book.
e-Mail Target
Icon Shown in the
e-Mail Address Book
My List
LDAP List
Group
A
— (*)
Distribution List
A
— (*)
e-Mail Address
A
A
A: Available
— : Not available
(*): Not shown in the LDAP List
The following explains how to select an e-mail address using the LDAP List.
313
6.4 Sending the Scanned Data by e-Mail
1. On the [Send e-Mail] window, press
in the e-mail address field.
D The [e-Mail Address Book] window appears.
2. Select the [LDAP List] tab.
D The [e-Mail Address Book] window for the LDAP List appears.
3. Press a search parameter button (either the left, middle, or [e-Mail
Address] button) to select a search item.
Left button
Middle button
The administrator can customize and specify the search parameters and
button names allocated to the left and middle buttons.
For details about customizing the search parameters and the button names,
refer to "4.9.3 Setting the LDAP Search Parameters" (page 135).
4. In the [Search Target] field, enter a part of or entire e-mail address to be
searched for.
For My List, the search string and the search results from the previous search
can be cleared by pressing
5. Press
button.
in [Search Position].
D The [Search Position] window appears.
314
6. Select a search position setting.
When the LDAP server contains thousands of entries, [Anywhere (...abc...)]
and [Tail (...abc)] searches can take a long time.
D The window returns to the [e-Mail Address Book] LDAP List. The selected
position is displayed in [Search Position].
7. Press
.
D The search results are displayed on the right side. Five results are displayed at a
time.
315
6.4 Sending the Scanned Data by e-Mail
z The number of search results to be displayed can be set by the administrator.
For details, refer to "4.9.2 Setting the e-Mail LDAP Server" (page 133).
z If items are missing for search results according to the display format of the
search results, "----" is shown instead.
For example, if the display format is "LastName FirstName", and the user
"LastName: Fujitsu, FirstName: None" is registered on the LDAP server, the
search result is displayed as "Fujitsu ----".
z Search methods differ for the My List and LDAP List. Therefore, search
results differ according to the list selected.
Search String
My List
LDAP List
Case
Insensitive
Insensitive
Diacritical/Accent marks
Sensitive
Insensitive
For My List search, the following also applies.
z All currently displayed levels and their subordinates are searched.
z For groups that are shown in a search result, even if a group is selected,
the
is disabled and the contacts of the group cannot be viewed.
8. Select the desired e-mail target from the search results and press
D The selected e-mail address is added to [Selected e-Mail Addresses].
To add multiple e-mail addresses, repeat this step.
Selecting an e-mail address and pressing
mail address to My List.
can be used to add the e-
9. Press the [OK] button.
D The e-mail address is added to the field in the [Send e-Mail] window.
316
.
6.4.2 Adding an e-Mail Target to the e-Mail Address Book
The following explains how to add an e-mail address or a distribution list to your My List in
the e-mail address book. e-Mail targets cannot be added to the LDAP List.
The maximum number of e-mail targets that can be stored in the e-mail address book is
as follows.
z Total of 5,000 e-mail targets which include groups, distribution lists and/or e-mail
addresses
z Total of 10,000 e-mail addresses
1. Open the [e-Mail Address Book] window in either of the following ways.
z On the [Send e-Mail] window, press
in the e-mail address field.
z On the [Main Menu] or [Job Menu] window, press the [Maintenance] button, then
on the [Maintenance] window, press the [Edit e-Mail Address] button.
2. Select the [My List] tab.
317
6.4 Sending the Scanned Data by e-Mail
3. Press the [Edit e-Mail Address Book] button.
D The [Edit e-Mail Address Book] window appears.
4. Press
.
To add an e-mail address or distribution list to a group, display the target group and
press the button.
D The [Add e-Mail Address] window appears.
318
5. Enter the information of the e-mail address to be added.
z For e-mail addresses
On the [e-Mail Address] tab, enter the e-mail address, first name, and last name to
be added.
For details about e-mail address settings values, refer to "B.1 e-Mail Address
Setting Values" (page 483).
319
6.4 Sending the Scanned Data by e-Mail
z For distribution lists
On the [Distribution List] tab, enter the list name and e-mail addresses to be added
to the distribution list.
For details about e-mail address settings values, refer to "B.1 e-Mail Address
Setting Values" (page 483).
e-Mail addresses can be selected from the e-mail address book, which can be
accessed by pressing
. For details, refer to "6.4.1 Selecting an e-Mail
Target from the e-Mail Address Book" (page 313).
If the e-mail address book cannot be used, contact the administrator.
6. Press the [OK] button.
D The e-mail addresses and distribution lists are added to your My List.
My List can also be edited using User Editor.
For details, refer to "Appendix E Editing Using User Editor" (page 496).
320
6.4.3 Editing an e-Mail Target in the e-Mail Address Book
The following explains how to edit My List in the e-mail address book. LDAP List cannot
be edited.
1. Open the [e-Mail Address Book] window in either of the following ways.
z On the [Send e-Mail] window, press
for the e-mail address input field.
z On the [Main Menu] or [Job Menu] window, press the [Maintenance] button, then
on the [Maintenance] window, press the [Edit e-Mail Address] button.
2. Select the [My List] tab.
3. Press the [Edit e-Mail Address Book] button.
D The [Edit e-Mail Address Book] window appears.
4. Select the e-mail address or distribution list to be edited.
5. Press
.
D The [Edit e-Mail Address] window appears.
6. Edit the information.
z For e-mail addresses
Enter the e-mail address, first name, and last name to be added.
For details about e-mail address settings values, refer to "B.1 e-Mail Address
Setting Values" (page 483).
321
6.4 Sending the Scanned Data by e-Mail
z For distribution lists
Enter the list name and e-mail addresses to be added to the distribution list.
For details about e-mail address settings values, refer to "B.1 e-Mail Address
Setting Values" (page 483).
e-Mail addresses can be selected from the e-mail address book, which can be
accessed by pressing
. For details, refer to "6.4.1 Selecting an e-Mail
Target from the e-Mail Address Book" (page 313).
If the e-mail address book cannot be used, contact the administrator.
7. Press the [OK] button.
D The edited e-mail address is saved in your My List address book.
My List can also be edited using User Editor.
For details, refer to "Appendix E Editing Using User Editor" (page 496).
322
6.4.4 Deleting an e-Mail Target from the e-Mail Address Book
The following explains how to delete an e-mail address or a distribution list from your My
List. e-Mail targets cannot be deleted from the LDAP List.
1. Open the [e-Mail Address Book] window in either of the following ways.
z On the [Send e-Mail] window, press
in the e-mail address field.
z On the [Main Menu] or [Job Menu] window, press the [Maintenance] button, then
on the [Maintenance] window, press the [Edit e-Mail Address] button.
2. Select the [My List] tab.
3. Press the [Edit e-Mail Address Book] button.
D The [Edit e-Mail Address Book] window appears.
4. Select the e-mail address or distribution list to be deleted.
5. Press
.
D The [Delete e-Mail Address] window appears.
The following is an example window which is shown when an e-mail address is
selected to be deleted.
6. Check that the correct e-mail target has been set for deletion and press
the [OK] button.
D The e-mail target is deleted from the e-mail address book.
My List can also be edited using User Editor.
For details, refer to "Appendix E Editing Using User Editor" (page 496).
323
6.5 Sending the Scanned Data by Fax
6.5
Sending the Scanned Data by Fax
1. On the [Main Menu] window, press the [Fax] button.
D The [Send Fax] window appears.
The scan information can be changed by pressing
of [Scan Settings]. For
details, refer to "6.9 Setting the Scan Options" (page 356).
2. Enter a fax number into the [Recipient Fax No.] field.
Fax numbers can be selected from the fax number list by pressing
.
For details, refer to "6.5.1 Selecting a Fax Number from the Fax Number List"
(page 327).
3. In the [Notification To (Sender's e-Mail Address)] field, enter an e-mail
address to which a notification of the results of the fax sending should
be sent.
For details about e-mail address settings values, refer to "B.1 e-Mail Address
Setting Values" (page 483).
324
4. Press the [Scan&Send] button.
When [Scan Viewer] is [On], this will be a [Scan] button.
D The scanning starts.
D The scanned data is sent by fax immediately after the scanning is completed,
and the LCD touch panel screen returns to the [Main Menu] window.
If the [SMTP Authentication] window appears, enter authentication information
needed to access the SMTP server and press the [OK] button.
325
6.5 Sending the Scanned Data by Fax
z If the [Scan] button is pressed (when [Scan Viewer] is [On]), the scanning
status and scan settings are shown during a scan.
The maximum number of pages that can be scanned is 999.
When [Blank Page Skip] is enabled, the number of scanned pages excluding
skipped blank pages is shown.
Additional pages can be scanned in place of skipped blank pages, until the
maximum number of scanned pages is reached.
When the scanning has completed, the [Scan Viewer] window appears.
For more details about editing on the [Scan Viewer] window, refer to "6.11
Editing the Scanned Data in the Scan Viewer" (page 398).
For more details about displaying the [Scan Viewer] window, refer to "6.10
Enabling/Disabling the Scan Viewer" (page 395).
z The results of the fax sending is notified to the e-mail address set in the
[Notification To (Sender's e-Mail Address)] field by the fax server.
z If data fails to be sent to the fax server, an error notification e-mail with the
following title is sent from the scanner to the e-mail address of the user who
logs in.
Network Scanner (XXXX) Error
326
6.5.1 Selecting a Fax Number from the Fax Number List
When sending a fax, instead of directly entering a fax number with keyboard, fax numbers
may be selected from a fax number list.
To enter a fax number using the fax number list, refer to Step 2 of "6.5 Sending the
Scanned Data by Fax" (page 324).
1. On the [Send Fax] window, press
.
D The [Fax Number List] window appears.
2. Press a search parameter button (either the [Recipient] or [Fax No.]
button) to select a search item.
3. In [Search Target], enter a search string.
4. Press
in [Search Position].
D The [Search Position] window appears.
327
6.5 Sending the Scanned Data by Fax
5. Select a search position setting.
D The window returns to the [Fax Number List]. The selected position is displayed
to the right of the [Search Position] button.
6. Press
.
D The search results are displayed on the right side. Five results are displayed at a
time.
7. Select a fax number.
8. Press the [OK] button.
D The fax number is added to the field in the [Send Fax] window.
Only one fax number can be entered at a time.
328
6.5.2 Adding a Contact to the Fax Number List
This section describes how to add a contact to the fax number list.
A maximum of 1,000 fax numbers can be stored in the fax number list. You cannot add
any more fax numbers if the list already contains 1000 fax numbers.
Fax contact numbers added to the list are accessible to all users.
1. Open the [Fax Number List] window in either of the following ways.
z On the [Send Fax] window, press
.
z On the [Main Menu] or [Job Menu] window, press the [Maintenance] button, then
on the [Maintenance] window, press the [Edit Fax Numbers] button.
2. Press
.
D The [Add Fax Number] window appears.
329
6.5 Sending the Scanned Data by Fax
3. Enter the fax contact details.
4. Press the [OK] button.
D The contact is added to the fax number list.
330
6.5.3 Editing a Contact in the Fax Number List
Edited fax contact numbers are accessible to all users.
1. Open the [Fax Number List] window in either of the following ways.
z On the [Send Fax] window, press
.
z On the [Main Menu] or [Job Menu] window, press the [Maintenance] button, then
on the [Maintenance] window, press the [Edit Fax Numbers] button.
2. Select a fax number to be edited.
3. Press
.
D The [Edit Fax Number] window appears.
4. Edit the information.
5. Press the [OK] button.
D The edited fax number list contact is saved.
331
6.5 Sending the Scanned Data by Fax
6.5.4 Deleting a Contact from the Fax Number List
Fax contact numbers deleted from the list are no longer accessible to any user.
1. Open the [Fax Number List] window in either of the following ways.
z On the [Send Fax] window, press
.
z On the [Main Menu] or [Job Menu] window, press the [Maintenance] button, then
on the [Maintenance] window, press the [Edit Fax Numbers] button.
2. Select the fax contact that is to be deleted.
3. Press
.
D The [Delete Fax Number] confirmation window appears.
4. Check that the correct fax contact has been set for deletion and press
the [OK] button.
D The contact is deleted from the fax number list.
332
6.6
Printing the Scanned Data
1. On the [Main Menu] window, press the [Print] button.
D The [Print] window appears.
The scan information can be changed by pressing
of [Scan Settings]. For
details, refer to "6.9 Setting the Scan Options" (page 356).
2. To change the printer, press
.
D The [Printer List] window appears.
333
6.6 Printing the Scanned Data
3. Select a target printer and press the [OK] button.
Only printers which were added in the list by the administrator can be
selected. To change the printers in the list, contact the administrator.
For more details about adding printers, refer to "4.13 Setting the Network
Printers" (page 159).
D This returns you to the [Print] window.
z If the [Print Server Authentication] window appears, enter authentication
information needed to access the network printer and press the [OK] button.
z Current user printing privileges for the specified printer are checked before
printing. When printing privileges are being checked, data may be spooled
temporarily.
334
4. Enter a number in [No. of Copies] field.
According to the printer being used, settings from the printers properties
window may be used instead.
5. Make any required print setting changes.
The scaling, positioning, and print mode settings can be changed.
For details, refer to the following.
"6.6.1 Scaling" (page 337)
"6.6.2 Positioning" (page 341)
"6.6.3 Print Side" (page 343)
To return the print settings to the factory settings, press the [Default] button.
According to the printer being used, settings from the printers properties
window may be used instead.
6. Press the [Scan] button.
When [Scan Viewer] is [Off], this will be a [Scan&Print] button.
D The scanning starts.
The scanning status and scan settings are shown during the scan.
The maximum number of pages that can be scanned is 100.
When [Blank Page Skip] is enabled, the number of scanned pages excluding
skipped blank pages is shown.
Additional pages can be scanned in place of skipped blank pages, until the
maximum number of scanned pages is reached.
D When the scanning has completed, the [Scan Viewer] window appears.
For details about editing on the [Scan Viewer] window, refer to "6.11 Editing the
Scanned Data in the Scan Viewer" (page 398).
z If the [Scan&Print] button is selected (when [Scan Viewer] is [Off]), the
scanned data is printed immediately after the scanning is completed, and the
LCD touch panel screen returns to the [Main Menu] window.
For details, refer to "6.10 Enabling/Disabling the Scan Viewer" (page 395).
z Current user printing privileges for the specified printer are checked before
printing. When printing privileges are being checked, data may be spooled
temporarily.
7. Check the scanned data.
For more details about the [Scan Viewer] window, refer to "6.11 Editing the
Scanned Data in the Scan Viewer" (page 398).
335
6.6 Printing the Scanned Data
8. On the [Scan Viewer] window, press the [Print] button.
D The scanned data is sent to the print server and printed.
The document name for the scanned data to be printed is the name of the
scanner.
The printing status is displayed in the user log until printing has finished. The
network printer printing result is not displayed. For more details about the user
log, refer to "6.12 Checking the User Log" (page 402).
If the printing fails, an error message e-mail with the following title is sent from
the scanner to the currently logged-in user's e-mail address registered in the
LDAP server.
Network Scanner (XXXX) Error
336
6.6.1 Scaling
Set the print size for the scanned data.
The setting selected here will be used every time the user prints a document.
1. On the [Print] window, press the [Scaling] button.
D The [Scaling] window appears.
2. Select the print scale of the scanned data.
Printing results will vary as shown below, depending on the positioning setting. For
more details on the positioning setting, refer to "6.6.2 Positioning" (page 341).
z Shrink to Fit
The image is reduced so that the entire image fits into the area available for
printing (area inside the dotted line). Further enlargement is not possible.
z If the positioning setting is [Center], the control point for printing is the center
point of the area available for printing.
z If the positioning setting is [Top Left], the control point for printing is the top left
corner of the area available for printing.
Center
Top Left
Control Point
Control Point
Available Area
for Printing
Available Area
for Printing
337
6.6 Printing the Scanned Data
Print Sheet
Small
Print Sheet
Scanned
Data
Large
positioning
Center
Scanned Data
Scanned Data
Top Left
Large
Print Sheet
Result
Small
Scanned Data
Center
Scanned Data
Scanned Data
B
B
Top Left
Scanned Data
B
Same
Print Sheet
Same
Center
Scanned Data
C
338
Scanned Data
Top Left
z 100%
The image is printed at full scale, regardless of the paper size.
z If the positioning setting is [Center], the control point for printing is the center
point of the print sheet.
z If the positioning setting is [Top Left], the control point for printing is the top left
corner of the print sheet.
Center
Top Left
Control Point
Control Point
Available Area
for Printing
Print Sheet
Small
Print Sheet
Available Area
for Printing
Scanned data
Large
positioning
Center
Result
Scanned D
Scanned Data
Top Left
Large
Print Sheet
Small
Center
Scanned Data
Scanned Data
B
B
Top Left
Scanned Data
B
Same
Print Sheet
Same
Center
Scanned Data
Scanned Data
C
339
Top Left
C
6.6 Printing the Scanned Data
D This returns you to the [Print] window. The selected scaling setting is displayed to
the right of the [Scaling] button.
z Nothing is printed in the margin set in the printer settings.
If edge cropping has been set, the width of the edge cropping setting may be
larger than the margin set in the printer settings. For more details, refer to
"6.9.20 Edge Cropping" (page 393).
z If [Shrink to Fit] is set, the edge cropping area is not included in the print data.
If [100%] is set, the edge cropping area is included in the print data.
z When [100%] is set, the printing result may differ from the original document
since the starting position or available area of printing depends on the printer
being used.
340
6.6.2 Positioning
Set the print position of the scanned data.
The setting selected here will be used every time the user prints a document.
1. On the [Print] window, press the [Positioning] button.
D The [Positioning] window appears.
2. Select the print positioning of the data.
Printing results will vary as shown below, depending on the scaling setting. For
more details on the scaling setting, refer to "6.6.1 Scaling" (page 337).
Button
Center
Scaling
Shrink to Fit
Control Point
Uses the center point of the area available for
printing as a control point.
Center
Control Point
Available Area
for Printing
341
6.6 Printing the Scanned Data
Button
Center
Scaling
100%
Control Point
Uses the center point of the sheet as a control
point.
Center
Control Point
Available Area
for Printing
Top Left
Shrink to Fit
Uses the top left corner of the area available for
printing as a control point.
Top Left
Control Point
Available Area
for Printing
100%
Uses the top left corner of the print sheet as a
control point.
Top Left
Control Point
Available Area
for Printing
D This returns you to the [Print] window. The selected positioning setting is
displayed to the right of the [Positioning] button.
342
6.6.3 Print Side
Set whether to print on one side (simplex mode) or both sides (duplex mode).
1. On the [Print] window, press the [Print Side] button.
D The [Print Side] window appears.
2. Select a print mode.
According to the printer, settings from the printers properties window may be
used instead.
D This returns to the [Print] window. The selected mode is displayed to the right of
the [Print Side] button.
343
6.7 Saving the Scanned Data to a Network Folder
6.7
Saving the Scanned Data to a Network Folder
Save the scanned data to a network folder or an FTP server folder.
1. On the [Main Menu] window, press the [Save] button.
D The [Save] window appears.
The scan information can be changed by pressing
of [Scan Settings]. For
details, refer to "6.9 Setting the Scan Options" (page 356).
2. Press
.
D The [Folder List] window appears.
344
3. Select a folder.
Only folders which are in the list may be selected. Only the administrator may
add folders to the list, or edit the details of folders already on the list. To
change the folders in the list, contact the administrator.
For more details about adding network folders, refer to "4.12.1 Setting the
Network Folders" (page 143).
For more details about adding FTP server folders, refer to "4.12.2 Setting the
FTP Server Folders" (page 149).
4. Press the [OK] button.
D This returns you to the [Save] window.
If the [File Server Authentication] window appears, enter authentication
information needed to access the file server and press the [OK] button.
345
6.7 Saving the Scanned Data to a Network Folder
5. In the [Save as] field, enter a file name for the scanned data to be saved.
z The following file names cannot be used:
z CON
z PRN
z AUX
z CLOCK$
z NUL
z COM0 to COM9
z LPT0 to LPT9
z \ and / are used as delimiters in a folder path.
z The following symbols cannot be used.
:*?"<>|
z When the file format is changed in [Scan Settings], the file name set on the
[File Names (Save)] window is reset in the [Save As] field.
6. Press
to select whether or not to overwrite an existing file with the
same name.
Whether or not the file was successfully saved can be checked in the user log.
For more details about accessing the user log, refer to "6.12 Checking the User
Log" (page 402).
7. Press the [Scan] button.
When [Scan Viewer] is [Off], this will be a [Scan&Save] button.
D The scanning starts.
The scanning status and scan settings are shown during the scan.
The maximum number of pages that can be scanned is 999.
When [Blank Page Skip] is enabled, the number of scanned pages excluding
skipped blank pages is shown.
Additional pages can be scanned in place of skipped blank pages, until the
maximum number of scanned pages is reached.
D When the scanning has completed, the [Scan Viewer] window appears.
For details about editing on the [Scan Viewer] window, refer to "6.11 Editing the
Scanned Data in the Scan Viewer" (page 398).
If the [Scan&Save] button is selected (when [Scan Viewer] is [Off]), the
scanned data is saved immediately after the scanning is completed, and the
LCD touch panel screen returns to the [Main Menu] window.
For details, refer to "6.10 Enabling/Disabling the Scan Viewer" (page 395).
8. Check the scanned data.
For more details about the [Scan Viewer] window, refer to "6.11 Editing the
Scanned Data in the Scan Viewer" (page 398).
346
9. On the [Scan Viewer] window, press the [Save] button.
D A file in the specified file format is saved in the selected folder.
D The [Main Menu] window is shown again.
If saving to the folder fails, an error message e-mail with the following title is
sent from the scanner to the currently logged-in user's e-mail address
registered in the LDAP server.
Network Scanner (XXXX) Error
347
6.8 Saving the Scanned Data to a SharePoint Folder
6.8
Saving the Scanned Data to a SharePoint Folder
1. On the [Main Menu] window, press the [Scan to SharePoint] button.
D The [Scan to SharePoint] window appears.
The scan information can be changed by pressing
of [Scan Settings]. For
details, refer to "6.9 Setting the Scan Options" (page 356).
2. Press
for the [Save in] field.
D The [Folder List] window appears.
348
3. Select a SharePoint folder and press the [OK] button.
Only SharePoint folders which are in the list may be selected. Only the
administrator may add folders to the list, or edit the details of folders already
on the list. To change the folders in the list, contact the administrator.
For more details about adding SharePoint folders, refer to "4.12.3 Setting the
SharePoint Folders" (page 153).
If the [Sign In] window appears, enter authentication information needed to
access the SharePoint server and press the [OK] button.
D The [Scan to SharePoint] window is shown again.
349
6.8 Saving the Scanned Data to a SharePoint Folder
4. In the [Save as] field, enter a file name for the scanned data to be saved.
z The following file names cannot be used:
z CON
z PRN
z AUX
z CLOCK$
z NUL
z COM0 to COM9
z LPT0 to LPT9
z \ and / are used as delimiters in a folder path.
z The following symbols cannot be used.
~"#%&*:<>?{|}
z When the file format is changed in [Scan Settings], the file name set on the
[File Names (Save)] window is reset in the [Save As] field.
5. Press
to select whether or not to overwrite an existing file with the
same name.
Whether or not the file was successfully saved can be checked in the user log.
For more details about accessing the user log, refer to "6.12 Checking the User
Log" (page 402).
6. Press
.
D The [Document Splitting] window appears.
Configure the settings to split a file of scanned data into multiple files when the
file size exceeds the maximum file limit.
350
7. In the [Max. File Size] field, enter the maximum file size at which a file is
to be split into multiple files, and press the [OK] button.
z When the file size of a single page exceeds the specified maximum file size,
the page is saved as one file.
z The file name format of split files is:
"original_file_name-file_number-total_number_of_split_files"
File numbers and the total number of split files are added in four digits.
File numbers are the numbers assigned to individual split files.
For example, if the original file name is "abc", the file number is "1", and the
total number of split files is "5", the file will be shown as "abc0105".
D The [Scan to SharePoint] window is shown again.
8. Press
of the [Content Type] field.
D The [Content Type] window appears.
351
6.8 Saving the Scanned Data to a SharePoint Folder
9. Select a content type used to manage the scanned data on the
SharePoint server, and press the [OK] button.
D The selected content type is set.
According to the selected content type, a list of properties defined on the
SharePoint server is shown in the [Scan to SharePoint] window.
352
10. Set properties in either of the following ways.
z Enter properties directly in the input fields that correspond to the properties to
be edited.
z Press
for a property to be edited, and set the property in the [Edit
Properties] window.
z The following properties cannot be set via the [Edit Properties] window:
z Description
z Categories
z Date Picture Taken
z If properties that cannot be set on the [Edit Properties] window are required
when saving to a SharePoint folder, the file will be saved in a checked out
state. The checked out state can be released once the mandatory fields have
been set. Checked out files cannot be overwritten.
The following properties can be set.
z Single line of text
z Multiple lines of text
z Choice
z Number
z Currency
z Date and Time
z Yes/No
z Person or Group
z Hyperlink or Picture
353
6.8 Saving the Scanned Data to a SharePoint Folder
11. Press the [Scan] button.
When [Scan Viewer] is [Off], this will be a [Scan&Save] button.
D The scanning starts.
The scanning status and scan settings are shown during the scan.
The maximum number of pages that can be scanned is 999.
When [Blank Page Skip] is enabled, the number of scanned pages excluding
skipped blank pages is shown.
Additional pages can be scanned in place of skipped blank pages, until the
maximum number of scanned pages is reached.
D When the scanning has completed, the [Scan Viewer] window appears.
For details about editing on the [Scan Viewer] window, refer to "6.11 Editing the
Scanned Data in the Scan Viewer" (page 398).
If the [Scan&Save] button is selected (when [Scan Viewer] is [Off]), the
scanned data is saved immediately after the scanning is completed, and the
LCD touch panel screen returns to the [Main Menu] window.
For details, refer to "6.10 Enabling/Disabling the Scan Viewer" (page 395).
12. Check the scanned data.
For more details about the [Scan Viewer] window, refer to "6.11 Editing the
Scanned Data in the Scan Viewer" (page 398).
13. On the [Scan Viewer] window, press the [Save] button.
z When a file is overwritten, the properties of the existing file are replaced by
those of the new file.
z When multiple files are saved in TIFF or JPEG format, identical properties
are set to all the files.
z If required items other than [Single line of text] or [Multiple lines of text] are
set for the properties of the specified folder content types, files saved in the
SharePoint folder will be checked out. To change the checkout status, enter
values for the required items via a Web browser, and then check in the files.
D A file in the specified file format is saved in the selected SharePoint folder.
354
D The [Main Menu] window is shown again.
355
6.9 Setting the Scan Options
6.9
Setting the Scan Options
On the following windows, press
of [Scan Settings] to access the [Scan Settings]
windows.
z [Send e-Mail] window
z [Send Fax] window
z [Print] window
z [Save] window
z [Scan to SharePoint] window
The following classes of scan settings are available.
z Default
These are the factory settings. To set the recommended values automatically,
press the [Default] button.
z Custom
The user can change the default settings and customize any scanning preferences
as needed.
Press each scan option button to set it as desired.
Function settings (for e-Mail, Fax, Print, Save, Scan to SharePoint) are saved for
each user, and will be used each time that user logs in.
For details, refer to the sections from "6.9.1 Carrier Sheet" (page 362) onward.
z The selected setting is displayed to the right of each button.
z The settings are saved for each login user. Settings changed after the previous
logout are shown by red characters.
z When the [Scan Settings] window is opened from the [Send Fax] or [Print] window,
the [Save] tab is not displayed.
356
Changing these scan options may influence other scan settings items.
z Setting an option may cause other option settings to become invalid.
z Other option settings may cause option settings to become invalid.
Scan option settings may be influenced in the following ways.
Tab
Basic
Settings which
become invalid
Item
z
z
z
z
z
Paper Size
Resolution, [600dpi]
Brightness
Contrast
Background
Removal
z Multifeed detection
—
Auto
z Paper Size, long
page mode
z JPEG as output file
format
z Dropout Color
—
Color
z Dropout Color
—
Grayscale
z High Compression
for Color PDF
z [Marker Index] of the
text recognition
settings
—
Black & White
z JPEG as output file
format
z Compression
z [Marker Index] of the
text recognition
settings
—
Carrier Sheet
Color
Mode
Conditions which
make settings
invalid
357
6.9 Setting the Scan Options
Tab
Basic
Paper Size
Conditions which
make settings
invalid
Auto
z Resolution, [600dpi]
z Carrier Sheet
Long page mode
z Resolution, [600dpi],
[300dpi], and [Auto]
z Text Recognition
z Blank Page Skip
z Page Orientation
z Multifeed detection
z Carrier Sheet
z Color Mode,
[Auto]
Other than Auto
and long page
mode
—
z Carrier Sheet
600dpi
z Text Recognition,
[All Pages] and
[Pages]
z High Compression
for Color PDF
z Page Orientation,
other than [Auto]
z Carrier Sheet
z Paper Size,
[Auto] and long
page mode
300dpi and Auto
—
z Paper Size, long
page mode
150dpi and
200dpi
—
—
Scan Mode
—
—
Document Feed Direction
—
—
File Format
PDF
—
—
JPEG
z Text Recognition
z PDF Password
z Compression, [High
Compression for
Color PDF]
z Color Mode,
[Auto] or [Black
& White]
Resolution
Save
(*1)
Settings which
become invalid
Item
TIFF
MTIFF
358
—
Tab
Save
(*1)
Settings which
become invalid
Item
Text
Recognition
(*2)
First Page
—
z Paper Size, long
page mode
z Other than PDF
file format
All Pages
Pages
—
z Paper Size, long
page mode
z Other than PDF
file format
z Resolution,
[600dpi]
First marked
section only
All marked
sections
z Brightness
z Contrast
z Background
Removal
z Color Mode,
[Grayscale] and
[Black & White]
z Other than PDF
file format
z Paper Size, long
page mode
—
z Other than PDF
file format
High
Compression for
Color PDF
—
z Color Mode,
[Grayscale] or
[Black & White]
z Resolution,
[600dpi]
z Other than PDF
file format
Other than High
Compression for
Color PDF
—
z Color Mode,
[Black & White]
PDF Password
Compression
Conditions which
make settings
invalid
359
6.9 Setting the Scan Options
Tab
Quality
Conditions which
make settings
invalid
Brightness
—
z Carrier Sheet
z [Marker Index]
of the text
recognition
settings
Contrast
—
z Carrier Sheet
z [Marker Index]
of the text
recognition
settings
Sharpness
—
—
None
—
z Color Mode,
[Auto] or [RGB
Color]
Other than None
—
z Carrier Sheet
z Color Mode,
[Auto] or [RGB
Color]
Background Removal
—
z Carrier Sheet
z [Marker Index]
of the text
recognition
settings
Blank Page Skip
—
z Carrier Sheet
z Paper Size, long
page mode
Page
Orientation
Auto
—
z Paper Size, long
page mode
Other than Auto
—
z Carrier Sheet
z Paper Size, long
page mode
z Resolution,
[600dpi]
Multifeed Detection
—
z Carrier Sheet
z Paper Size, long
page mode
Edge Cropping
—
—
Dropout
Color
Advanced
Settings which
become invalid
Item
360
(*1):
When the [Scan Settings] window is opened from the [Print] or [Send Fax] window,
the [Save] tab is not displayed.
(*2):
Text Recognition includes conversion to searchable PDF and output of marked
character strings as keywords.
361
6.9 Setting the Scan Options
6.9.1 Carrier Sheet
Set whether or not a carrier sheet is used.
When using a carrier sheet, set the size of the scanned document to be output.
1. On the [Scan Settings] window, select the [Basic] tab.
2. Press the [Carrier Sheet] button.
D The [Carrier Sheet] window appears.
3. If a carrier sheet is to be used, select the output size for the scanned
image.
D This returns you to the [Scan Settings] window. The selected setting is displayed
to the right of the [Carrier Sheet] button.
362
6.9.2 Color Mode
Set whether the document is scanned in "color" or "black and white".
1. On the [Scan Settings] window, select the [Basic] tab.
2. Press the [Color Mode] button.
D The [Color Mode] window appears.
3. Select the color mode.
D This returns you to the [Scan Settings] window. The selected mode is displayed
to the right of the [Color Mode] button.
z Usually, the color mode should be set as [Auto].
If this setting is specified, there is no need to change the color mode each time you
scan a document.
Note that black and white mode may be automatically selected for the following
kinds of documents:
z Off-white papers
z Documents with only a minor amount of color
z Documents printed in gray or other close-to-black colors
Sections of 16 mm from top, bottom, left, and right edges of a document are out of
the range for automatic mode selection (for the smaller sizes of business card,
postcard, A6 and B6, 4 mm from the edges), so that the shades of document edges
or punched holes can be avoided.
To ensure such documents are scanned in color mode, press the [RGB Color]
button on the [Color Mode] window.
z A black & white document containing a shaded table can be recognized as gray.
363
6.9 Setting the Scan Options
6.9.3 Paper Size
Set a paper size for the document to be scanned.
1. On the [Scan Settings] window, select the [Basic] tab.
2. Press the [Paper Size] button.
D The [Paper Size] window appears.
3. Select a paper size.
D This returns you to the [Scan Settings] window. The selected size is displayed to
the right of the [Paper Size] button.
When the [Auto] setting is used, the paper size is set to the same size (Maximum:
215.9 × 355.6 mm/8.5 × 14 in.) as the actual document being scanned.
However, if using any of the following types of documents, the automatic paper size
detection may not function correctly:
z Paper of weight less than 52 g/m2 (14 lb)
z Documents that are not rectangular
z Documents of a longer length than legal size
z If a paper size other than [Auto] is selected and only one side of the documents is
scanned, artwork on the reverse side of the paper may bleed through onto the front
side scan. If this happens, blank pages may not be recognized as such, and thus
may not be skipped by the [Skip Blank Page] function. For more details, refer to
"6.9.17 Blank Page Skip" (page 388).
z When the [Custom] button is selected, any paper size for the scanned data can be
specified on the [Custom] window.
If the paper height is 355.6 mm (14 in.) or longer, the paper size setting must be set
to allow long pages. For details, refer to "Long Page Mode" (page 365).
364
■ Long Page Mode
When scanning pages which are longer than standard documents, the [Allow long pages]
setting must be specified.
1. On the [Scan Settings] window, select the [Basic] tab.
2. Press the [Paper Size] button.
D The [Paper Size] window appears.
3. Press the [Custom] button.
D The [Custom Paper Size] window appears.
4. For [Unit], select a paper size unit.
5. For [Allow long pages?], select [Yes].
6. Enter a paper size.
7. Press the [OK] button.
D Pressing the [OK] button on the confirmation window returns you to the [Scan
Settings] window. "Custom" is displayed to the right of the [Paper Size] button.
365
6.9 Setting the Scan Options
6.9.4 Resolution
Changing the resolution level affects the scanned data in the following ways.
Item
High resolution
Low resolution
Scan speed
Slow
Fast
Scan quality
High
Low
File size
Large
Small
1. On the [Scan Settings] window, select the [Basic] tab.
2. Press the [Resolution] button.
D The [Resolution] window appears.
3. Select a resolution level.
D This returns you to the [Scan Settings] window. The selected level is displayed to
the right of the [Resolution] button.
366
6.9.5 Scan Mode
Set the scan mode for the documents.
1. On the [Scan Settings] window, select the [Basic] tab.
2. Press the [Scan Mode] button.
D The [Scan Mode] window appears.
3. Select [Simplex] if only the front sides of the documents are to be
scanned. Select [Duplex] if both front and reverse sides are to be
scanned.
D This returns you to the [Scan Settings] window. The selected mode is displayed
to the right of the [Scan Mode] button.
367
6.9 Setting the Scan Options
6.9.6 Document Feed Direction
Set the feed direction of the document when loading onto the scanner.
1. On the [Scan Settings] window, select the [Basic] tab.
2. Press the [Document Feed Direction] button.
D The [Document Feed Direction] window appears.
3. Select the document feed direction.
D This returns you to the [Scan Settings] window. The selected feed direction is
displayed to the right of the [Document Feed Direction] button.
368
6.9.7 File Format
Set the file format for the scanned data.
Some scan settings cannot be used for certain file formats.
Option
PDF
JPEG
TIFF
MTIFF
Text Recognition
A
—
—
—
PDF Password
A
—
—
—
A (*1)
A
A (*1)
A (*1)
Compression
A: Format can be used, —: Format cannot be used
(*1): Can only be used if the [Color Mode] is [Auto] , [Grayscale], or [RGB Color].
Compression also differs for certain file formats as follows:
File Format
Color Mode
Document
PDF
JPEG
TIFF/MTIFF
JPEG
High
Compression
for Color PDF
JPEG
JPEG
Grayscale
JPEG
JPEG
JPEG
Black &
White (*)
MMR
(NA)
MMR
JPEG
High
Compression
for Color PDF
JPEG
JPEG
RGB Color
Color
Grayscale
Black &
White
JPEG
JPEG
JPEG
Grayscale
Color
Grayscale
Black &
White
MMR
(NA)
MMR
Black & White
Color
Grayscale
Black &
White
Color
Auto
(NA): Not available
369
6.9 Setting the Scan Options
When PDF format is selected, select whether or not to use [High Compression for
Color PDF] mode. When [High Compression for Color PDF] is selected, characters
and backgrounds on the document are compressed separately. In order to do this,
the file size of the document that mostly consists of text characters becomes smaller
while keeping the quality of the characters as they are.
However, note the following:
z Photographs or pictures are recognized as background and compressed at a high
rate, causing degradation in the scanned image.
z Thus, this mode is not appropriate for scanning photographs or other graphical
materials.
z The contrast of the image may become higher.
1. On the [Scan Settings] window, select the [Save] tab.
2. Press the [File Format] button.
D The [File Format] window appears.
3. Select a file format.
If PDF format is selected, Adobe Reader 4.0 or later is required to view the
created PDF file.
D This returns you to the [Scan Settings] window. The selected format is displayed
to the right of the [File Format] button.
370
6.9.8 Searchable PDF
When the file format is PDF, the scanned data can be converted to a searchable PDF by
automatically recognizing character strings contained in the document.
z Conversion to searchable PDF may take extra time.
z In the following documents, highlighted character strings cannot be set as a
keyword. The scanner may fail to correctly recognize the following kinds of
documents (characters) as text. However, by changing the color mode and/or
improving the image quality for scanning, such documents may be successfully
recognized.
z Handwritten documents
z Documents including smaller characters and scanned in low quality
z Skewed documents
z Documents including texts written in italic characters
z Superscript/subscript letters and complex mathematical formulas
z Characters are written against an unevenly-colored or patterned background
Example: Shaded characters
z Documents containing a lot of characters to which effects are applied
Example: Characters to which effects such as Shadow and Outline are applied
z The recognition time may be long for documents of complex layout as well as
documents including unreadable characters (due to print-through, smudges, or
skewed sheets) and containing text of uneven thickness or small black spots.
1. On the [Scan Settings] window, select the [Save] tab.
2. Press the [Text Recognition] button.
D The [Text Recognition] window appears.
3. For [Searchable PDF], select [Yes].
371
6.9 Setting the Scan Options
4. For [Text Recognition Language], select a language used when text is to
be recognized in the document.
5. Under [Text Recognition for Pages], specify the pages to be output in
searchable PDF.
6. Press the [OK] button.
D This returns you to the [Scan Settings] window. The selected setting is displayed
to the right of the [Text Recognition] button.
372
6.9.9 Setting a Keyword for the PDF
A character string such as the title of a black-and-white document can be used as a
keyword for the created PDF file. The keyword is useful when searching the PDF file.
Mark a character string to be set as a keyword with a water-based highlight pen so that
the character string is completely covered. When you perform a scan, the marked
character strings are recognized and set as keywords for the PDF file.
Hereinafter, a line drawn with a water-based highlight pen is referred to as a "marked
section", and a water-based highlight pen as a "highlight pen".
Searchable PDF File
The text is set as a
keyword for the PDF file
Scan
Scan
Scan
Keyword
Scanned data
The highlighted character
string is recognized as
text
The file is searchable, since the
keyword has been set
Scan
Marked sections should be highlighted on a black-and-white document in the following
way.
z Any regular highlight pen can be used.
z The recommended colors and thickness of marked sections are as follows:
Pink
Yellow
Blue
Green
z Draw a straight line over a single line of characters.
z The supported size of a marked section is as follows:
Minimum size: Height 3 mm (0.1 in.), Width 10 mm (0.4 in.)
Maximum size: Height 20 mm (0.8 in.), Width 150 mm (5.9 in.)
z Sections marked by a pale color may not be recognized.
z Use only a single color within a page.
z Draw a marker line in a way that the desired character string is completely
covered.
373
6.9 Setting the Scan Options
The color of an entire marked section should be even in thickness.
Good Example
Bad Example 1
(The characters are not
completely covered)
Bad Example 2
(The color is not even)
z Up to 10 sections can be marked in a page.
z In the following documents, highlighted character strings cannot be set as a
keyword:
z Catalogs, pamphlets, and other color documents
z Documents including sections marked in two or more colors
z Documents containing colors other than for marking (pens other than highlight
pens are used or the document is stained)
z Documents containing a large number of marked sections in a page
z When any of the following conditions apply, the highlighted character strings may
not be able to be set as a keyword:
z The size of a marked section is out of the supported range
z Marking lines are not drawn in an ordinary way (such as when a line is slanted)
z Multiple marked sections are located close to each other
z The color of the highlight pen is too pale or the color has faded
z When applying markings on two or more character strings, the marked sections
must be separated from each other by at least 5 mm (0.2 in.). If marked sections are
too close to each other, multiple sections may be recognized as a single section.
z In the following case, other characters close to marked sections may be set as a
keyword:
z When a marking is drawn over another line (upper or lower)
z In the following cases, characters not highlighted by a marked section may be set
as a keyword:
z Catalogs, pamphlets, and other color documents
z Documents containing colored characters, figures, pictures, tables, lines, or
other elements
z Documents containing marked areas other than those containing character
strings to be set as keywords
z Tainted documents
z Documents containing sections framed by a highlight pen
z If setting a keyword is not successful, improving image scanning quality may help.
z Keywords for PDF files can be checked from the Adobe Acrobat document
properties menu.
374
To automatically set a keyword for a PDF file, change the settings as shown below.
z Conversion to searchable PDF may take extra time.
z In the following documents, highlighted character strings cannot be set as a
keyword. The scanner may fail to correctly recognize the following kinds of
documents (characters) as text. However, by changing the color mode and/or
improving the image quality for scanning, such documents may be successfully
recognized.
z Handwritten documents
z Documents including smaller characters and scanned in low quality
z Skewed documents
z Documents including texts written in italic characters
z Superscript/subscript letters and complex mathematical formulas
z Characters are written against an unevenly-colored or patterned background
Example: Shaded characters
z Documents containing a lot of characters to which effects are applied
Example: Characters to which effects such as Shadow and Outline are applied
z Documents with a complex layout and documents with image noise (uneven color,
paper overlap, smudges) may take longer for text recognition to process.
z If the same character string is marked at multiple locations of a document, the same
keyword is added to the PDF file multiple times.
z The total number of characters for keywords is limited up to 255 characters,
including delimiters between keywords.
z When keywords are viewed in Adobe Acrobat and Adobe Reader, the appended
quotation marks (") may be found at the beginning and end of keywords.
1. On the [Scan Settings] window, select the [Save] tab.
2. Press the [Text Recognition] button.
D The [Text Recognition] window appears.
375
6.9 Setting the Scan Options
3. For [Marker Index], select an option to specify the range of marked
sections for text recognition.
The range of marked sections for text recognition can be selected when the color
mode is [Auto] or [RGB Color].
Even if the color mode is [Auto], depending on the way sections are marked, the
document may be detected as black and white, and character strings in the
marked sections may not be recognized.
For details of automatic color mode selection, refer to "6.9.2 Color Mode" (page
363).
Use [First marked section only] as shown below.
z Use this option to, for example, set the title of a document as a keyword for the
PDF to be created.
Example: When only the title of the document is highlighted, it will be set as a
keyword for the PDF, allowing the title to be used to search for the PDF file.
z When multiple marked sections are located side by side, the one at the top will
be set as a keyword.
Example: In the figure below, the marked section B is set as a keyword, as marked
section B is at a higher position than A.
Marked section A
376
Marked section B
4. When [First marked section only] or [All marked sections] is selected in
Step 3, select whether or not to enable editing of character strings in
marked sections at [Edit Marked String].
z To make detected character strings in marked sections editable, set the [Scan
Viewer] window to appear after scanning. If the [Scan Viewer] window is not
set to appear, editing is not possible.
z When sending as an e-mail attachment, faxing, printing, or saving scanned
data, the [Scan Viewer] window appears, and then a window for editing the
character strings in marked sections appears, allowing the keyword strings to
be edited.
5. For [Text Recognition Language], select a language used when text is to
be recognized in the document.
6. For [Text Recognition for Pages], specify the target pages for text
recognition.
7. Press the [OK] button.
D This returns you to the [Scan Settings] window. The selected setting is displayed
to the right of the [Text Recognition] button.
377
6.9 Setting the Scan Options
6.9.10 PDF Password
PDF files can be locked with a user-specified password.
The password will need to be entered every time the password-protected PDF file is
opened. Do not forget or lose this password.
1. On the [Scan Settings] window, select the [Save] tab.
2. Press the [PDF Password] button.
D The [Require PDF Password] window appears.
3. Select whether or not to set a password.
D When [Yes] is selected, the [PDF Password] window appears.
378
4. Enter a password and confirm password.
5. Press the [OK] button.
D The PDF will be created with password protection.
379
6.9 Setting the Scan Options
6.9.11 Compression
When [Auto], [RGB Color], or [Grayscale] is selected as described in "6.9.2 Color Mode"
(page 363), it is also possible to set the compression rate of scanned data.
For photos and images, a high compression rate can be used to create a smaller file.
Changing the compression rate affects the scanned data in the following ways.
High compression
Low compression
Quality
Low
High
File size
Small
Large
1. On the [Scan Settings] window, select the [Save] tab.
2. Press the [Compression] button.
D The [Compression] window appears.
3. Select a compression rate.
The lower the selected compression rate is, the higher the quality of the resulting
scan will be, but at the expense of a larger file.
When PDF format is selected in "6.9.7 File Format" (page 369), [High Compression
for Color PDF] can be used.
D This returns you to the [Scan Settings] window. The selected rate is displayed to
the right of the [Compression] button.
380
z When the [High Compression for Color PDF] button is pressed, characters and
their backgrounds on a document are detected separately, and only the
backgrounds are compressed. For a text based document, the resulting file
size can be smaller while the characters remain clear.
However, note the following:
z Photographs or pictures are recognized as background and compressed
at a high rate, causing degradation in the scanned image.
z Thus, this mode is not appropriate for scanning photographs or other
graphical materials.
z The contrast of the image may become higher.
z If [High Compression for Color PDF] is selected, according to the type of
document, the file size may be larger than if a standard compression rate is
used.
z Documents with many photographs or figures and only a few characters
z Complex layout documents with multiple columns
z Documents which have a background pattern behind characters
z For documents with many characters scanned at 300 dpi resolution, a smaller
file size than that of High Compression for Color PDF is possible.
381
6.9 Setting the Scan Options
z When one color page is scanned, the file size criteria are shown as follows. These
numbers are for reference, other documents may vary in size.
Actual paper size: A4 size (general catalog)
File format: PDF
Scanner paper size setting: A4
z File size (KB) for color files
Compression
Resolution
Low
Medium
Low
Medium
Medium
High
High
High
Compression
for Color PDF
150 dpi
406
232
197
153
94
158
200 dpi
647
358
302
238
149
140
300 dpi
1319
693
580
448
272
115
600 dpi
3827
2034
1736
1377
854
—
z File size (KB) for grayscale files
Compression
Resolution
Low
Medium
Low
Medium
High
Medium
High Compression
High
for Color PDF
150 dpi
380
233
186
153
85
—
200 dpi
618
373
293
239
133
—
300 dpi
1422
825
606
494
245
—
600 dpi
3416
2147
1827
1338
720
—
z File size (KB) for black & white files
Resolution
Compression rate cannot be
selected
150 dpi
104
200 dpi
176
300 dpi
382
600 dpi
1430
382
6.9.12 Brightness
The brightness setting can be adjusted to improve the visual appearance of the scanned
data.
1. On the [Scan Settings] window, select the [Quality] tab.
2. Press the [Brightness] button.
D The [Brightness] window appears.
3. Select a brightness level.
D This returns you to the [Scan Settings] window. The selected level is displayed to
the right of the [Brightness] button.
383
6.9 Setting the Scan Options
6.9.13 Contrast
The color contrast setting can be adjusted to improve the visual appearance of the
scanned data.
1. On the [Scan Settings] window, select the [Quality] tab.
2. Press the [Contrast] button.
D The [Contrast] window appears.
3. Select a contrast level.
D This returns you to the [Scan Settings] window. The selected level is displayed to
the right of the [Contrast] button.
384
6.9.14 Sharpness
The sharpness setting adjusts the sharpness of characters on an image to improve the
visual appearance of the scanned data.
When using the sharpness setting, the sharpness level can be adjusted with this setting.
1. On the [Scan Settings] window, select the [Quality] tab.
2. Press the [Sharpness] button.
D The [Sharpness] window appears.
3. If the sharpness setting is to be used, select a sharpness level.
D This returns you to the [Scan Settings] window. The selected level is displayed to
the right of the [Sharpness] button.
385
6.9 Setting the Scan Options
6.9.15 Dropout Color
The colors red, green and blue (primary colors) can be deleted during scanning.
For example, if a document with black characters and a green border is scanned, only the
black characters will appear on the scanned image.
When using the dropout color setting, you can set whether to remove color details and
select color details to be removed.
This setting is effective only for pale colors. Deep colors may not be removed.
1. On the [Scan Settings] window, select the [Quality] tab.
2. Press the [Dropout Color] button.
D The [Dropout Color] window appears.
3. If color details are to be removed, select a color to be used as the
dropout color.
D This returns you to the [Scan Settings] window. The selected setting is displayed
to the right of the [Dropout Color] button.
386
6.9.16 Background Removal
The background of a scanned image can be removed to make image clearer. The level of
background removal can be adjusted.
1. On the [Scan Settings] window, select the [Quality] tab.
2. Press the [Background Removal] button.
D The [Background Removal] window appears.
3. Select a background removal level.
D This returns you to the [Scan Settings] window. The selected level is displayed to
the right of the [Background Removal] button.
When [Image Quality] is selected for [Operating Mode] on the [General Scanner
Settings] window, the background removal level cannot be adjusted. For details,
refer to "4.6.3 Setting General Scanner Settings" (page 106).
387
6.9 Setting the Scan Options
6.9.17 Blank Page Skip
The scan process can be set to skip any blank pages in the scanned data.
For example, when a stack of documents containing both two-sided and one-sided
documents is scanned in duplex scan mode, this feature removes only the reverse side
(i.e. blank page) of one-sided documents from the scanned data.
z If the Brightness setting (see "6.9.12 Brightness" (page 383)) is set to [Dark] or
[Medium Dark], blank pages may not be recognized as such by the scanner.
z No scanned data is produced if all of the sheets in the document stack are
recognized as blank pages.
z The following types of documents may be accidentally recognized as blank pages.
Before discarding the scanned documents, make sure to check for pages
accidentally removed from the scanned data.
z Almost blank pages containing only a few characters
z Pages of only one color, white or other (including black)
1. On the [Scan Settings] window, select the [Advanced] tab.
2. Press the [Blank Page Skip] button.
D The [Blank Page Skip] window appears.
3. Select whether or not blank pages are to be skipped.
D This returns you to the [Scan Settings] window. The selected setting is displayed
to the right of the [Blank Page Skip] button.
388
6.9.18 Page Orientation
Automatically rotates each scanned data page that contains text through 0°, 90°, 180°, or
270°, so the text is upright.
This function determines a document orientation based on Roman characters
printed on the document. Therefore, it may not work properly for the following kinds
of documents. When scanning such documents, do not set automatic page
orientation.
z Documents with many extremely large/small characters
z Documents on which the pitch of lines or characters is extremely narrow, or
characters overlap
z Documents with many characters that contact underlines or ruled lines
z Documents with many photographs or figures and only a few characters
z Documents which have a background pattern behind characters
z Documents with characters printed in various direction (e.g. plans)
z Documents written in languages other than English
z Documents with only capital letters
z Handwritten documents
z Unclear or smeared characters
1. On the [Scan Settings] window, select the [Advanced] tab.
2. Press the [Page Orientation] button.
D The [Page Orientation] window appears.
3. Select whether or not automatic page orientation is required.
389
6.9 Setting the Scan Options
In duplex mode, the bind direction can be selected when the page rotation angle is
set.
The following table shows the bind directions and the resulting scanned data.
Bind
Direction
Long Edge
Scanned Data
Select this setting when scanning a document with opposing left and
right pages (facing pages with long side as the middle crease).
The scanned data is output with the same orientation as the original
document.
Original document
Front side
Reverse side
ABC DEF
Scanned data
Front side
Reverse side
ABC DEF
Feed direction
Select this setting when scanning a document with opposing top and
bottom pages (facing pages with the short side as the middle
crease).
The front side of the document is output with the same orientation as
the original data, whereas the data on the reverse side is rotated 180
degrees.
Original document
Front side
Reverse side
Scanned data
Front side
Reverse side
ABC DEF
ABC
DEF
Short Edge
Feed direction
Rotated 180 degrees
390
4. Press the [OK] button.
D This returns you to the [Scan Settings] window. The selected setting is displayed
to the right of the [Page Orientation] button.
Irrespective of what page orientation is decided, pages may still be manually
rotated as desired in the [Scan Viewer] window.
For details, refer to "6.11 Editing the Scanned Data in the Scan Viewer" (page
398).
391
6.9 Setting the Scan Options
6.9.19 Multifeed Detection (Layer and Length)
"Multifeed" is an error that occurs when two or more sheets are fed simultaneously into
the ADF. The scanner can be set to detect multifeeds and stop the scan with an error
message.
Multifeeds are to be detected by layer and length. The following explains how to set
whether or not multifeeds are to be detected, and setup multifeed detection method.
For multifeed requirements, refer to "A.5 Multifeed Detection Conditions" (page 478).
1. On the [Scan Settings] window, select the [Advanced] tab.
2. Press the [Multifeed Setup] button.
D The [Multifeed Setup] window appears.
3. If multifeeds are to be detected, select which detection method is to be
used.
z An error will occur if the [Length] or [Both] multifeed setting is used with the
[Auto] paper size, and the document bundle being scanned contains different
size pages.
z When a multifeed is detected with [Ultrasonic], you can choose to ignore the
multifeed and continue scanning by pressing the [Retry] button on the error
message window.
D This returns you to the [Scan Settings] window. The selected setting is displayed
to the right of the [Multifeed Setup] button.
392
6.9.20 Edge Cropping
For scanned data, the width of the area for edge cropping can be adjusted, so that
unwanted sections are not scanned.
If using edge cropping, the width of the edges to be cropped can be adjusted with this
setting.
The following are the areas of documents to be scanned when edge cropping is used and
when not used.
Edge
Cropping
Off
Scannable area of documents
Original document
Scanned data
On
Document edge
Edge cropping width
Original document
Edge cropping width
Scanned data
393
6.9 Setting the Scan Options
1. On the [Scan Settings] window, select the [Advanced] tab.
2. Press the [Edge Cropping] button.
D The [Edge Cropping] window appears.
3. If edge cropping is to be used, enter the width of the edges to be
cropped.
4. Press the [OK] button.
D This returns you to the [Scan Settings] window. The selected setting is displayed
to the right of the [Edge Cropping] button.
z If the edge cropping width (top to bottom/left to right edge cropping width total) is
larger than the document, the edge cropping setting is not applied.
z If page orientation is set, edge cropping is performed after the page orientation is
corrected.
Example: In the following example, [Left-feed] is selected for page orientation.
Original document
Page Orientation
ABC
ABC
Edge Cropping
ABC
Scanned data is rotated 90 degrees left
Feed direction
394
6.10 Enabling/Disabling the Scan Viewer
The [Scan Viewer] can be set to appear before the scanned data is processed.
The scanned data can be checked and edited on the [Scan Viewer]. For details, refer to
"6.11 Editing the Scanned Data in the Scan Viewer" (page 398).
If desired, in the following windows, the [Scan Viewer] can be set to appear before the
scanned data is finally processed.
z [Send e-Mail] window
z [Send Fax] window
z [Print] window
z [Save] window
z [Scan to SharePoint] window
z [Job Menu] window
When [Scan Viewer] is disabled on the [Job Menu] window, it is not possible to
select whether or not to show the [Scan Viewer].
The following explains how to enable or disable the [Scan Viewer] using the [Send e-Mail]
window.
1. On the [Send e-Mail] window, press
of [Scan Viewer].
D Pressing the button toggles the setting between [On] and [Off].
395
6.10 Enabling/Disabling the Scan Viewer
Operations vary according to whether the [Scan Viewer] is set to [On] or [Off].
If sending an e-mail, scan operation proceeds as follows:
When the [Scan Viewer] button is [On]
and sending an e-mail
When the [Scan Viewer] button is [Off]
and sending an e-mail
On the [Send e-Mail] window, press the
[Scan] button.
On the [Send e-Mail] window, press the
[Scan&Send] button.
The scanning starts.
The scanned data is shown on the [Scan
Viewer] window and may be edited.
Check and edit the scanned data, and
then press the [Send] button.
The scanned data is sent as an e-mail attachment.
396
Even if [Scan Viewer] is set to [Off], the [Scan Viewer] window appears under the
following circumstances.
z Scan operation did not properly finish.
z Scan operation was canceled by pressing the [Cancel] button in the [Scanning]
window.
During the scan, the following window is shown.
The [Cancel] button is displayed when the scan starts. If the [Cancel] button is
pressed, a message to confirm the scan cancellation appears. If the [OK] button is
pressed, the ongoing scan is completed, and the following scans are canceled. The
scanned data is shown in the [Scan Viewer] window.
397
6.11 Editing the Scanned Data in the Scan Viewer
6.11 Editing the Scanned Data in the Scan Viewer
When the [Scan Viewer] is set to [On], the scanned data can be checked and edited in the
[Scan Viewer].
6.11.1 Viewing Scanned Data
The scanned data shown in the [Scan Viewer] window can be displayed in actual or
magnified size. The scanned data can be moved by dragging it across the window.
1. On the [Scan Viewer] window, use
pages of scanned data.
2. Use
to change the views.
398
to scroll through the
6.11.2 Rotating a Scanned Page
The scanned page showed on the [Scan Viewer] window can be rotated 90 degrees right
or left, or 180 degrees.
The rotated scanned page can be, in its rotated condition, sent as an e-mail attachment or
faxed, printed, or saved to a network folder.
1. On the [Scan Viewer] window, use
you want to rotate.
2. Use
to display the page
to rotate the page.
The actual scanned data is updated to include the rotated page as soon as the
button is pressed.
6.11.3 Sorting Pages
You can sort the scanned pages displayed in the [Scan Viewer] window in descending/
ascending order when two or more pages of the documents are scanned.
1. In the [Scan Viewer] window, press
order.
to sort the pages in ascending
2. Pressing
while the pages are displayed in ascending order results in
the pages to be displayed in previous order (descending order).
399
6.11 Editing the Scanned Data in the Scan Viewer
6.11.4 Scanning an Additional Page
On the [Scan Viewer] window, an additional page can be scanned.
1. Load the documents into the ADF paper chute.
2. On the [Scan Viewer] window, press the [Scan More] button.
D The scanning starts.
The scanning status and scan settings are shown during the scan. The page
numbers of additional pages will follow on from the last page of the current
scanned data.
For [Print], up to 100 pages can be scanned. For other than [Print], up to 999
pages can be scanned.
When [Blank Page Skip] is enabled, the number of scanned pages excluding
skipped blank pages is shown.
Additional pages can be scanned in place of skipped blank pages, until the
maximum number of scanned pages is reached.
D When the scan has completed, the [Scan Viewer] window opens and shows any
additionally scanned pages.
400
6.11.5 Deleting a Scanned Page
Specified pages can be deleted from the scanned data shown on the [Scan Viewer]
window.
If specified pages are deleted, the remaining scanned data is sent as an e-mail
attachment or faxed, printed, or saved to a network folder, without the deleted pages.
1. On the [Scan Viewer] window, use
you want to delete.
2. Press
to display the page
.
D A confirmation message appears.
3. Press the [OK] button.
D The page is deleted.
z If the scanned data consists of only one page, that page cannot be deleted. To
re-scan the document, press the [Cancel] button.
z The deleted page is removed from the scanned data. This operation cannot
be undone.
6.11.6 Editing Marked Characters to Be Set as Keywords
After character strings in marked sections are scanned, the recognized text can be edited
before it is finally set as a keyword for the PDF file.
For more details about setting whether or not to edit character strings in marked
sections, refer to "6.9.8 Searchable PDF" (page 371).
1. On the [Scan Viewer] window, press the button appropriate for your
desired operation, such as the [Send] and [Save] buttons.
D The window where you can edit character strings in marked sections appears.
2. Edit the characters shown on the window.
3. Press the [OK] button.
D The edited characters are set as a keyword for the PDF file.
401
6.12 Checking the User Log
6.12 Checking the User Log
The latest 100 user operation logs are shown for the current user.
The user log summary is shown in date/time order.
Even if the [Region/Timezone] or [Date/Time] settings are changed, the order of the log
entries will not be changed.
1. On the [Main Menu] or [Job Menu] window, press the [User Log] button.
D The [User Log] window appears.
2. Select the log you wish to view.
D The details of the selected log are displayed.
Pressing the [OK] button returns to the [User Log] window.
402
6.13 Maintenance
The following maintenance operations are possible:
z Editing the e-Mail Address Book
z Editing the fax number list
z Roller cleaning
z Scan test
z Administrator login (when [Auto Login] is set to [On])
z Changing password (when logged in with a local account)
1. On the [Main Menu] or [Job Menu] window, press the [Maintenance]
button.
D The [Maintenance] window appears.
2. Perform maintenance operation by pressing the following buttons:
z [Edit e-Mail Addresses] button
The [e-Mail Address Book] window appears. e-Mail addresses can be added,
edited, or deleted.
For details, refer to the following.
"6.4.2 Adding an e-Mail Target to the e-Mail Address Book" (page 317)
"6.4.3 Editing an e-Mail Target in the e-Mail Address Book" (page 321)
"6.4.4 Deleting an e-Mail Target from the e-Mail Address Book" (page 323)
z [Roller Cleaning] button
The [Roller Cleaning] window appears. You can check the way the feed rollers and
eject rollers should be rotated.
For details, refer to "Feed rollers (× 2) and eject rollers (× 2)" (page 422).
403
6.13 Maintenance
z [Edit Fax Numbers] button
The [Fax Number List] window appears. Fax numbers can be added, edited, or
deleted.
For details, refer to the following.
"6.5.2 Adding a Contact to the Fax Number List" (page 329)
"6.5.3 Editing a Contact in the Fax Number List" (page 331)
"6.5.4 Deleting a Contact from the Fax Number List" (page 332)
z [Scan Test] button
A scan test is performed. Scanned data can be checked on the [Scan Viewer]
window.
Perform a scan test to check that the scanner scans normally.
For details, refer to "7.6 Performing a Scan Test" (page 436).
z [Administrator Login] button
Shown when automatic login is enabled in the administrator settings.
Shows the [Administrator Login] window, on which administrator login can be
performed.
For details, refer to "4.2.1 Administrator Login: via the LCD Touch Panel" (page
78).
z [Change Password] button
Shown when logged in as a local account user.
Shows the [Change Password] window, on which the password of the currently
logged in user can be changed.
For details, refer to "6.15 Changing a User Password" (page 414).
404
6.14 Processing a Job
This section uses an example where buttons from [Job1] to [Job6] have been set.
1. On the [Job Menu] window, press the [Job] button.
When you are included in multiple job groups, the [Job Menu] windows can be
switched by using the job menu switch buttons on the [Job Menu List] window,
which appears when a list button is pressed.
D The Message Screen appears.
z If either the title or message is not set in [Message Screen] on the [Job
Details] window, even when [Message Screen] is set to [On], the [Message
Screen] will not be shown. For details, refer to Step 4 of "4.17.2 Setting a Job
Sequence" (page 201).
z If [Off] is selected for [Message Screen], scanning is started without showing
the [Message Screen], and the job is processed.
For details, refer to "6.14.1 Enabling/Disabling the Message Screen" (page
408).
z When [Message Screen] is disabled, whether or not the [Message Screen] is
shown depends on the settings configured by the administrator.
405
6.14 Processing a Job
2. Press the [Scan] button on the [Message Screen].
D The scanning starts.
Each page is briefly shown on the window as it is scanned.
When the scan has completed, the [Scan Viewer] opens.
For details about editing on the [Scan Viewer] window, refer to "6.11 Editing the
Scanned Data in the Scan Viewer" (page 398).
z When [Off] is set, the [Scan Viewer] is not shown.
z When a file name can be changed, the [File Name] window is shown before a
scan. For more details, refer to "6.14.2 Changing a File Name (for Save/eMail Attachment)" (page 410).
z When the setting of the [Scan Count] can be changed, the [Scan Count]
window is shown before a scan. For more details, refer to "6.14.3 Checking
the Number of Sheets to Be Scanned" (page 411).
3. Check the scanned data.
For more details about the [Scan Viewer] window, refer to "6.11 Editing the
Scanned Data in the Scan Viewer" (page 398).
4. Press the [OK] button on the [Scan Viewer].
D The data is processed according to the specified job.
While the job is being processed, the process is shown in real time on the [Job
Progress] window.
406
z To view the job report, press the [Job Report] button on the [Job Progress]
window. This will show the job report.
z To view detailed information for the job report, select a function name on the
[Job Report] window and press
. This will show the job report details.
appears if the status is shown as "Error". Press the button to send
detailed information of the job report to an administrator by e-mail. (The email address is the e-mail address set on the administrator [Alert
Notification] window.)
D If the job sequence is processed successfully, the LCD touch panel screen
returns to the [Job Menu].
If an error occurs during the job process, the [OK] button appears on the [Job
Progress] or [Job Report] window. Pressing the [OK] button returns to the [Job
Menu].
407
6.14 Processing a Job
6.14.1 Enabling/Disabling the Message Screen
You can select whether to show the [Message Screen] for checking the contents of a job.
When [Message Screen] is disabled, it is not possible to select whether or not to
show the [Message Screen].
This section uses an example where buttons from [Job1] to [Job6] have been set.
1. On the [Job Menu] window, press
for [Message Screen].
D Pressing the button toggles the setting between [On] and [Off].
408
Operations vary according to whether the [Message Screen] is set to [On] or
[Off].
z If a job sequence is processed when [Message Screen] is set to [On], the
[Message Screen] will be shown.
After checking the message, press the [Scan] button to start the scan. If
any further job setup steps are required, press the [OK] button that
appears instead.
z If a job sequence is processed when [Message Screen] is set to [Off], the
job will be processed without showing the [Message Screen].
409
6.14 Processing a Job
6.14.2 Changing a File Name (for Save/e-Mail Attachment)
When a job is processed, file names to be used when saving or attaching scanned data to
an e-mail can be changed.
It is not possible to change a file name when the [File Name] window is set not to be
shown.
1. On the [Job Menu] window, press the [Job] button.
2. On the [File Name] window, enter the file name for the scanned data to
be saved or sent by e-mail.
z When sequence numbers are set to be appended to file names, a sequence
number is appended to the end of the default file name. The guidance
message "A sequence number will be appended to the file name." is shown
on the window.
z A sequence number will not be appended to a file name that has been edited.
z After entering the file name, press the [Scan] button to start the scan. If any
further job setup steps are required, press the [OK] button that appears
instead.
410
6.14.3 Checking the Number of Sheets to Be Scanned
When a job is processed, the expected number of sheets to be scanned can be specified,
so that the actual number of scanned sheets can be checked after a scan.
For either of the following settings, the [Scan Count] window is not shown.
z The [Scan Count] is not to be checked
z The [Scan Count] is to be checked, but the [Scan Count] window is set not to
appear (The [Allow per-Job adjustment] check box in the [Check the Scan Count]
on the [Job Details] window is disabled)
1. On the [Job Menu] window, press the [Job] button.
2. On the [Scan Count] window, enter the number of sheets that are to be
scanned, between 1 and 999.
z When [Print] is included in the job sequence, the number of sheets to be
scanned can be set within the range of 1 to 100, but not 1 to 999.
z For [Print], up to 100 pages can be scanned. For other than [Print], up to 999
pages can be scanned. Therefore, for duplex scanning, make sure to set the
number of pages so as not to exceed these respective maximums.
411
6.14 Processing a Job
3. Press the [Scan] button.
D The scanning starts.
When the [Scan Viewer] is shown after a scan, you can check whether the
number of scanned sheets is the same as that set in the [Scan Count] window
at the area shown below.
Even if pages are deleted on the [Scan Viewer], the number of scanned
sheets is not changed.
412
After scanning has completed, the following confirmation window is shown if the
number of scanned sheets is set to be checked. Contact the administrator to
change the setting of whether or not to check the scan count. For details, refer to
"4.17.2 Setting a Job Sequence" (page 201).
When the [Scan More] button is shown, press the button to add further pages.
To continue, press the [OK] button.
To cancel the process and delete the scanned data, press the [Cancel] button.
413
6.15 Changing a User Password
6.15 Changing a User Password
A user password can be changed when logged in as a user registered in a local account.
1. On the [Maintenance] window, press the [Change Password] button.
D The window for changing a user password appears.
2. Enter the new password in [New Password] and [Confirm New
Password].
D The user password is changed.
3. Press the [OK] button.
414
415
Chapter 7
Scanner Care
This chapter describes how to clean the scanner and replace parts in order to maintain
the scanner in optimum scanning condition.
WARNING
CAUTION
Do not use any aerosol sprays or alcohol based sprays to clean the
scanner. Dust blown up by strong air from the spray may enter the
inside of the scanner. This may cause the scanner to fail or
malfunction.
Sparks, caused by static electricity, generated when blowing off dust
and dirt from the outside of the scanner may cause a fire.
The glass inside the ADF can become hot when the scanner is used.
Before cleaning inside the scanner or replacing any parts, turn off the
power, unplug the AC adapter from the AC outlet, and wait for at least
15 minutes.
Clean the feed rollers and eject rollers when the power is on.
Before replacing any parts, turn off the power, unplug the AC adapter
from the AC outlet, and wait for at least 15 minutes.
7.1 Cleaning Supplies and Part to Clean ................................................................ 417
7.2 Cleaning the Exterior of the Scanner ................................................................ 419
7.3 Cleaning Inside the Scanner .............................................................................. 420
7.4 Cleaning the Carrier Sheet ................................................................................. 425
7.5 Replacing Parts ................................................................................................... 426
7.6 Performing a Scan Test ...................................................................................... 436
7.7 Calibrating the LCD Touch Panel ...................................................................... 439
416
7.1
Cleaning Supplies and Part to Clean
■ Cleaning Supplies
Cleaning Supplies
Part No.
Remarks
Cleaner F1
PA03950-0352
1 bottle (100 ml)
Used to lightly moisten the cloths
before wiping parts clean.
When a large amount of the cleaner is
used, it may take some time until it is
dry. Use an appropriate amount to
moisten the cloths. Also, wipe off
Cleaner F1 well from the target part by
dry cloth.
Cleaning Paper
CA99501-0012
1 pack (10 sheets)
For use with Cleaner F1.
Cleaning Wipe
PA03950-0419
1 pack (24 sheets)
Pre-moistened with Cleaner F1,
Cleaning Wipes are used instead of
moistened cloths.
PFU LIMITED
Soft, dry cloth
Any commercially available lint-free product
Contact your FUJITSU scanner dealer or an authorized FUJITSU scanner service
provider to obtain these products.
417
7.1 Cleaning Supplies and Part to Clean
■ Which Parts and When
Part to Clean
Pad assy
Cleaning Frequency
Clean after every 2,000 sheets scanned.
Feed roller
Eject roller
Pick roller
Idler roller
Glass
Ultrasonic sensor
Cleaning frequency may be increased depending on the condition of documents.
When the following types of documents are used, scanner parts must be cleaned
more frequently than indicated above.
z Coated paper
z Documents with large areas of printing
z Specially treated paper such as carbonless paper
z Paper containing large amounts of calcium carbonate filler
z Documents written in pencil
z Documents with insufficiently fused toner
418
7.2
Cleaning the Exterior of the Scanner
■ Cleaning Parts Other Than the LCD Touch Panel
Parts other than the LCD touch panel, such as the exterior, the ADF paper chute and the
stacker, must be cleaned using a dry cloth or a cloth slightly moistened with Cleaner F1 or
a mild detergent. Cleaning Wipes can also be used.
z Never use paint thinner or other organic solvents.
z Make sure that water does not get inside the scanner when cleaning.
z When a large amount of Cleaner F1 is used, it may take some time until it is dry.
Use an appropriate amount to moisten the cloths. Also, wipe off any extra cleaner
from the part by using a dry cloth.
Cloth
Mild detergent or
Cleaner F1
Paint thinner
■ Cleaning the LCD Touch Panel
To prevent the LCD touch panel screen from becoming dirty, it should be regularly
cleaned with a soft, dry cloth.
Take care when cleaning the LCD touch panel. It can be easily damaged, and should
never be scratched or banged with hard objects.
Always use a dry (not damp) cloth to clean the screen.
If dust is allowed to collect and compact around the frame of the screen, it can cause
the LCD touch panel to malfunction.
419
7.3 Cleaning Inside the Scanner
7.3
Cleaning Inside the Scanner
Clean the interior of the scanner with a cloth slightly moistened with Cleaner F1 or the
Cleaning Wipe.
As scanning is repeated, paper powder and dust may accumulate inside the scanner,
possibly causing scanning to malfunction.
The interior of the scanner should be cleaned after approximately every 1,000 scanned
sheets. However, this criteria varies according to the type of documents scanned. For
example, it may be necessary to clean the scanner more frequently when documents with
insufficiently fused toner are scanned.
CAUTION
z The glass scanner windows inside the ADF can become hot when the
scanner is used.
Before cleaning inside the scanner or replacing any parts, turn off the
power, unplug the AC adapter from the AC outlet, and wait for at least
15 minutes.
z When you perform cleaning, make sure that the inside of the scanner
is free of any foreign object, and be careful not to get your hand or the
cloth caught on the pick spring (metal part) as a deformed pick spring
(metal part) may cause injury.
z Do not use water or a mild detergent when cleaning the interior of the scanner.
z When a large amount of Cleaner F1 is used, it may take some time until it is dry.
Use an appropriate amount to moisten the cloths. Also, wipe off any extra cleaner
from the part by using a dry cloth.
1. Turn off the scanner power and wait for at least 15 minutes.
For details about turning off the power, refer to "2.1 Turning the Power On/Off"
(page 57).
2. Pull the top cover release catch toward you and open the top cover.
Top cover release catch
420
CAUTION
Be careful that the top cover does not shut on your fingers.
3. Clean the following parts with a soft cloth slightly moistened with
Cleaner F1 or with the Cleaning Wipe.
Ultrasonic sensor
(Also on the ADF paper chute)
Idler rollers (× 4)
Eject rollers (× 2)
Pad assy (PAD ASSY)
Pick spring (metal part)
*Gray part
Feed rollers
(× 2)
Pick roller
Glass (× 2)
(Also on the top cover)
z Pad assy (× 1)
Wipe the pad assy downwards. When cleaning the pad assy, be careful not to get
your hand or the cloth caught on the pick spring (metal part).
z Ultrasonic sensors (× 2)
Clean lightly with a soft cloth to wipe their surfaces clean.
z Idler rollers (× 4)
Gently rotate the idler rollers by hand as you wipe them clean.
Take care not to damage the soft rubber. The idle rollers should be cleaned
carefully and thoroughly, as dirty idle rollers can adversely affect the paper pickup
performance.
421
7.3 Cleaning Inside the Scanner
z Glass (× 2)
Clean lightly with a soft cloth to wipe their surfaces clean.
A vertical black line on the scanned data may indicate that the glass is dirty.
z Pick roller (× 1)
Gently rotate the pick roller from top down, to lightly wipe off the dirt and dust. Take
care not to damage the soft rubber. The pick roller should be cleaned carefully and
thoroughly, as a dirty pick roller can adversely affect the paper pickup
performance.
z Feed rollers (× 2) and eject rollers (× 2)
When cleaning, turn on the power and let the feed rollers and eject rollers rotate.
1 On the [Main Menu] or [Job Menu] window, press the [Maintenance] button.
D The [Maintenance] window appears.
2 Press the [Roller Cleaning] button.
D The [Roller Cleaning] window appears.
422
3 Open the top cover.
4 Lightly press a soft cloth slightly moistened with Cleaner F1 or the Cleaning
Wipe against the surface of the feed rollers.
5 Press the [Cleaning] button on the [Roller Cleaning] window.
When the button is pressed, the feed rollers and eject rollers rotate slightly.
Pressing the button continuously rotates the feed rollers and eject rollers
for a fixed amount every few seconds.
Gently clean the rollers as you rotate them.
Stop pressing the button to stop the rollers rotating.
The feed rollers and eject rollers should be cleaned carefully and
thoroughly, as dirty feed rollers can adversely affect the paper pickup
performance.
z Pressing the [Cleaning] button seven times rotates the feed rollers and
eject rollers approximately one complete revolution.
z When Help is shown, close it before pressing the [Cleaning] button.
6 When you have finished cleaning the rollers, press the [OK] button, and
close the [Roller Cleaning] window.
When cleaning the feed rollers or eject rollers, be careful not to touch
the rollers with your fingers while they are rotating.
423
7.3 Cleaning Inside the Scanner
4. Close the top cover.
D You should hear a click.
z Be careful that the top cover does not shut on your fingers.
z Confirm that the top cover is completely closed. If not completely closed,
document jams and feeding errors may occur.
z When closing the top cover, do not slam it shut by pushing the LCD touch
panel as this may damage it.
424
7.4
Cleaning the Carrier Sheet
Use a soft dry cloth, a cloth slightly moistened with Cleaner F1 or a mild detergent, or the
Cleaning Wipe to clean the carrier sheet.
Lightly wipe off the dirt and dust from the surface and interior of the carrier sheet.
As the carrier sheet is repeatedly used, dirt and dust may collect on the surface of or
inside the carrier sheet.
To prevent scanning malfunction, the carrier sheet should be regularly cleaned.
z Never use paint thinner or other organic solvents.
z Do not rub too hard, as the carrier sheet may become scratched or deformed.
z After cleaning the interior of the carrier sheet, wait until it has completely dried
before closing it.
z As a guideline, it is recommended to replace the carrier sheet every 500 scans.
For details about purchasing a carrier sheet, refer to "7.5.5 Purchasing the Carrier
Sheet" (page 435).
425
7.5 Replacing Parts
7.5
Replacing Parts
7.5.1 Part Numbers and Replacement Cycle
The following table specifies the replacement part numbers and the standard replacement
cycles.
Part name
Part No.
Replacement cycle
PAD ASSY
PA03586-0002
After every 50,000 sheets
scanned or once a year
PICK ROLLER
PA03586-0001
After every 100,000 sheets
scanned or once a year
These replacement cycles are rough guidelines for when using 80 g/m2 (20 lb) A4/Letter
woodfree or wood containing paper. They may vary according to the type of documents
scanned, scanner usage, and cleaning frequency.
z When the consumable alert status is orange or red, contact your scanner
administrator to replace the necessary part.
z Use only the PFU LIMITED parts specified. Do not use consumable parts made by
other manufacturers.
For more details about how to check the consumable alert status, refer to "7.5.2 Checking
the Consumable Alert Status" (page 427).
To obtain these parts, contact your FUJITSU dealer or an authorized FUJITSU scanner
service provider.
426
7.5.2 Checking the Consumable Alert Status
1. On the [Main Menu] or [Job Menu] window, press the [Consumable Alert]
button.
D The [Consumable Alert] window appears.
2. Check which part needs to be replaced and press the [OK] button.
Parts whose [Usage Counter] value is bigger than the [Replace at] value should be
replaced.
The value of the [Usage Counter] is in units of 500 sheets scanned.
For details on how to check the status of consumable parts on the administrator
window, refer to "4.14.2 Viewing the Usage Status" (page 171).
3. Replace the part.
Refer to the following:
z Replacing the pad assy
"7.5.3 Replacing the Pad Assy" (page 428)
z Replacing the pick roller
"7.5.4 Replacing the Pick Roller" (page 430)
427
7.5 Replacing Parts
7.5.3 Replacing the Pad Assy
1. Remove any documents from the ADF paper chute.
2. Pull the top cover release catch toward you, place your hands at both
sides of the top cover, and open the top cover.
CAUTION
Be careful that the top cover does not shut on your fingers.
3. Remove the pad assy.
Squeeze the edges of the pad assy and remove it in the direction indicated by the
arrow.
Pad assy
428
4. Insert the new pad assy.
Holding the new pad assy by its sides, insert into the pad assy socket.
Take care not to snag the pick springs.
Pad assy
Make sure that the pad assy is firmly and fully inserted. If it is not correctly
attached, document jams and other feeding errors may occur.
5. Close the top cover.
D You should hear a click.
CAUTION
Be careful that the top cover does not shut on your fingers.
6. Reset the pad assy usage counter.
The usage counter must be reset by an administrator. For details, refer to
"Resetting the Usage Counter" (page 171).
429
7.5 Replacing Parts
7.5.4 Replacing the Pick Roller
1. Remove any documents from the ADF paper chute.
2. Remove the ADF paper chute.
Hold the ADF paper chute by both ends, and lift it while leaning it towards the front.
3. Pull the top cover release catch toward you, place your hands at both
sides of the top cover, and open the top cover.
CAUTION
Be careful that the top cover does not shut on your fingers.
4. Remove the sheet guide.
Squeeze the pickup tabs at both ends of the sheet guide with your fingers, and lift
the sheet guide up and away.
Pickup tab
430
5. Rotate the left bushing.
Bushing
Shaft
Pick roller
6. Remove the shaft.
Slightly lift the left side of the shaft (by approximately 5 mm), slide the shaft to the
left, and lift it up and away.
Pick roller
Shaft
The pick roller bushing may be hard to rotate. Do not try to turn it with your
fingernail. Use a paper clip to turn the roller bushing if you can not rotate it
with your fingertip.
431
7.5 Replacing Parts
7. Remove the pick roller from the shaft.
Lift up the lock tab of the pick roller and pull out the shaft.
Retaining clip
Shaft
Pick roller
Take care if lifting the pick roller lock tab with your fingernail as it may get
chipped or broken. If worried, try lifting the retaining clip using a paper clip as
shown in the following diagram.
8. Attach the new pick roller onto the shaft.
Insert the shaft into the new pick roller, aligning the protrusion on the shaft with the
matching notch in the pick roller.
Pick roller
Protrusion
Shaft
Make sure that the pick roller shaft is fully inserted. If it is not correctly
attached, document jams and other feeding errors may occur.
432
9. Insert the shaft back in the scanner.
Insert the top end of the shaft from above into the roller bushing located on the right
side as seen from the front, then set down the shaft until it is fixed in the scanner.
Then, adjust it slowly by setting it down.
Shaft
Bushing
Pick roller
10. Fix the bushing (located on the left side from the anterior view).
Rotate the left side bushing in the direction indicated by the arrow.
Bushing
Shaft
Pick roller
433
7.5 Replacing Parts
11. Attach the sheet guide.
Squeeze the pickup tabs at both ends of the sheet guide with your fingers, and fit it
back onto its original location.
Pickup tab
D The tab snaps open.
Make sure that the sheet guide is firmly and fully inserted. If it is not correctly
attached, document jams and other feeding errors may occur.
12. Close the top cover.
D You should hear a click.
CAUTION
Be careful that the top cover does not shut on your fingers.
13. Attach the ADF paper chute.
Push the ADF paper chute until it locks into place, inserting the tab of the ADF
paper chute into the hole on the back of the scanner.
Install the ADF paper chute so that the side guide faces upward.
14. Reset the pick roller usage counter.
The usage counter must be reset by an administrator. For details, refer to
"Resetting the Usage Counter" (page 171).
434
7.5.5 Purchasing the Carrier Sheet
If the carrier sheet provided with the scanner can no longer be used for scanning due to
damage or wear-and-tear, you can purchase a new carrier sheet separately.
As a guideline, it is recommended to replace the carrier sheet every 500 scans.
However, replace the carrier sheet when it becomes scratched or dirty.
The part name and the part number of the separately sold carrier sheet are as follows:
Part name
Part No.
ScanSnap Carrier Sheet
PA03360-0013
No. of items
5
To obtain a carrier sheet, contact your FUJITSU dealer or an authorized FUJITSU
scanner service provider.
435
7.6 Performing a Scan Test
7.6
Performing a Scan Test
After scanner cleaning or replacement of consumable parts, perform a scan test.
■ Regular User
1. On the [Main Menu] or [Job Menu] window, press the [Maintenance]
button.
D The [Maintenance] window appears.
2. Press the [Scan Test] button.
D The [Scan Test] window appears.
3. Load the document into the ADF paper chute for the scan test.
436
4. Press the [Scan] button.
D The scan test starts.
D When the scan test has completed, the [Scan Viewer] window appears.
If the scanner fails to scan correctly, an error message is displayed. Deal with
errors as required.
5. Check the scanned data.
For more details about [Scan Viewer], refer to the following:
"6.11 Editing the Scanned Data in the Scan Viewer" (page 398)
6. Press the [OK] button.
D The [Maintenance] window is shown again.
437
7.6 Performing a Scan Test
■ Administrator
1. Select [Admin Menu] J [Device Test] J [Scan Test].
D The [Scan Test] window appears.
2. Load the document into the ADF paper chute for the scan test.
3. Press the [Scan] button.
D The scan test starts.
D When the scan test has completed, the [Scan Viewer] window appears.
If the scanner fails to scan correctly, an error message is displayed. Deal with
errors as required.
4. Check the scanned data.
For more details about [Scan Viewer], refer to the following:
"6.11 Editing the Scanned Data in the Scan Viewer" (page 398)
5. Press the [OK] button.
D This returns you to the [Admin Menu] window.
438
7.7
Calibrating the LCD Touch Panel
This should be done when the LCD touch panel responses seem out of alignment with the
positions of objects on the LCD screen.
1. On the [Admin Menu] window, select [Device Test] J [Screen
Calibration].
D The [Screen Calibration] window appears, with a red "+" (adjustment mark)
shown on it.
2. Touch the "+" with your fingertip.
After being touched, the "+" will move to the next calibration position.
Each time it stops, touch it again.
Repeat until the test window appears, with the following [Calibration] dialog box:
3. Trace a line on the screen with your fingertip.
D A line corresponding to how you move your fingertip appears on-screen.
If the screen becomes cluttered, press the [Calib screen] button to remove all the
lines and repeat the process from Step 2.
439
7.7 Calibrating the LCD Touch Panel
4. When you are satisfied with the LCD touch panel response, press the
[Update] button.
D This saves the current calibration data, completing the calibration process, and
returns you to the [Screen Calibration] window.
If the red "+" (adjustment mark) is not touched accurately, a "Parameter Error.
Please input, again" message may appear.
In this case, perform the calibration from Step 2 again, being careful to touch
each calibration point accurately.
440
441
Chapter 8
Troubleshooting
This chapter provides information on dealing with scanner operation problems such as
paper jams, points to check before contacting your FUJITSU scanner dealer, and help on
how to check scanner labels.
8.1 Removing Jammed Documents......................................................................... 443
8.2 Network Connection Troubleshooting.............................................................. 446
8.3 Other Troubleshooting ....................................................................................... 459
8.4 Points to Check before Contacting Your FUJITSU Scanner Dealer............... 467
8.5 Checking the Scanner Labels ............................................................................ 470
8.6 Pre-Maintenance Preparations .......................................................................... 471
442
8.1
Removing Jammed Documents
If a document jam occurs, follow the procedure below to remove the jammed documents.
WARNING
z Do not forcibly pull out jammed documents. Make sure to open the top
cover before removing the documents.
z Take care not to snag sharp-edged parts when removing jammed
documents. Such parts may cause injury.
z When removing jammed documents, take care with dangling objects
such as neckties, necklaces and hair, as they may easily become
entangled in the scanner.
z The surfaces of the glass can become hot when the scanner is used.
Take care not burn your hands.
1. Remove all documents from the ADF paper chute.
2. Pull the top cover release catch toward you, place your hands at both
sides of the top cover, and open the top cover.
Top cover release catch
CAUTION
Be careful that the top cover does not shut on your fingers.
3. Remove the jammed document.
z Staples, paper clips, etc. can cause document jams.
z Take care not to damage the glass or the sheet guide when removing stapled
or paper-clipped documents.
443
8.1 Removing Jammed Documents
4. Holding both sides of the top cover, close the top cover.
z Be careful that the top cover does not shut on your fingers.
z Confirm that the top cover is completely closed. If not completely closed,
document jams and feeding errors may occur.
z When closing the top cover, do not slam it shut by pushing the LCD touch
panel as this may damage it.
D You should hear a click.
z Although no error message is displayed, document pages may remain in the
ADF even after scanning is completed or canceled. Follow the procedure
from Step 1 to Step 4 above to remove any such pages from the ADF.
z If document pages become blocked while scanning, check the scanned data.
Document pages which could not be scanned correctly may be shown in the
[Scan Viewer] window. In this case, delete all pages not correctly scanned
using
. For more details about the [Scan Viewer] window, refer to "6.11.5
Deleting a Scanned Page" (page 401).
If document jams or multifeed errors occur frequently, try the following procedures.
1. Align the edges of the document sheets.
2. Fan the documents.
1. Lightly grip the ends of the document stack in both hands, and fan two or three
times.
2. Rotate the documents 90 degrees, and fan again.
444
3. Align the edges of the document sheets to be loaded, and slightly skew the
leading edge of the document.
B
a
c
k
Slightly skew
Feed direction
Scanning the document sheets whose edges are not aligned might
cause paper jams or damage to the document.
3. Load the documents into the ADF paper chute, as shown in the following
diagram.
Cross section
Documents
Pick roller
445
8.2 Network Connection Troubleshooting
8.2
Network Connection Troubleshooting
If a network connection is not possible, first check the scanner status and system settings.
The following section provides information about general troubles that may occur when
connecting to a network.
If the cause of the problem is unknown or the problem persists, check the items in "8.4
Points to Check before Contacting Your FUJITSU Scanner Dealer" (page 467) and
contact your FUJITSU scanner dealer or an authorized FUJITSU scanner service
provider.
8.2.1 Basic Network Operation Tests
The following network operation tests are available on the administrator window, and
should be performed after the network has been setup.
z Checking basic network operation with a Ping test
z Checking the network operating status
z Checking the NTP server settings by synchronizing the system time (if using an
NTP server)
z Checking the mail server by sending a test mail (if scanned data is to be sent as an
e-mail, by fax, or when requesting alert notifications by e-mail)
■ Checking Basic Network Operation with a Ping Test
Check the network connection status of the following computers and servers associated
with the network.
For details about the checking procedure, refer to "4.8.6 Checking the Network
Connection with a Ping Test" (page 119).
z Computer with Admin Tool installed
z Computer with Central Admin Console installed
z Computer with Central Admin Server software installed
z Computer with User Editor installed
z DNS server
z WINS server
z NTP server
z LDAP server
z SMTP server
z File server
z FTP server
z Print server
z SharePoint server
z Domain controller
z Proxy server
Depending on the server setting, there may be no response from a Ping test.
446
When checking the network connection status by a Ping test, the following results are
possible.
Follow each action described below.
"Ping statistics" shows "Lost=0 (0% loss)".
■ Details
Network connection is working properly.
"Ping statistics" shows "Lost=4 (100% loss)".
■ Details
There is no response from the Ping target.
■ Action
z The specified Ping target might not be correct. Check that the Ping target IP address, host
name or FQDN is correct.
z The network transmission mode may differ from the connection target. In "4.8.7 Checking the
Network Operating Status" (page 121), change [Link Speed/Duplex Mode] from "AutoNegotiation" to a fixed mode.
z If the Ping target is correct and the network transmission method is appropriate, refer to
"Failure to Connect to a Server Using Its IP Address" (page 451) for further solutions.
"Ping statistics" shows "Lost=N (1 to 99% loss)".
■ Details
Communication with the Ping target is not stable.
■ Action
z There may be a quality problem with the LAN cable. Replace the LAN cable and try again.
z The network transmission mode may differ from the connection target. In "4.8.7 Checking the
Network Operating Status" (page 121), change the [Link Speed/Duplex Mode] from "AutoNegotiation" to a fixed mode.
Hardware error.
■ Details
A hardware problem might have caused a communication channel error. For example, the LAN
cable may have become disconnected during the Ping test.
■ Action
Check the status of the LAN cable and try again.
447
8.2 Network Connection Troubleshooting
"Ping request could not find host xxxxxxxxx. Please check the name
and try again."
■ Details
The name-resolution or address-resolution for the device specified as the Ping target may have
failed.
■ Action
z Check that the Ping target host name or FQDN is correct.
z Check that the DNS server or WINS server settings are correct.
z If the Ping target host name or FQDN is correct, refer to "Failure to Connect to a Server Using
Its Host Name or FQDN" (page 453) for further solutions.
■ Checking the Network Operating Status
Check the network status on the [Network Status] window.
For details about the checking procedure, refer to "4.8.7 Checking the Network Operating
Status" (page 121).
Follow each action described below.
The information shown is all valid.
■ Action
None
Network connection is working properly.
■ Action
z If DHCP is not used:
Check that the [IP Address] setting is correct.
z If DHCP is used:
z Check that physical network connection to the DHCP server is functioning correctly.
z The server may not be operating normally, or the DHCP settings (restricted number of
leases or MAC address validation) may be causing invalid IP addresses to be assigned.
Check the DHCP server.
The information shown is valid, but pinging indicates that the network
connection is not functioning normally.
■ Action
In "4.8.7 Checking the Network Operating Status" (page 121), change [Link Speed/Duplex Mode]
from "Auto-Negotiation" to a fixed mode.
If the problem persists, refer to "Failure to Connect to a Server Using Its IP Address" (page 451)
for further solutions.
448
■ Checking the NTP Server Settings by Synchronizing the
System Time
On the [NTP Server] window, press the [Sync Time] button to check if the system time can
be synchronized.
After pressing the [Sync Time] button, follow each action described below according to
the message that is shown.
The messages and their corresponding actions are as follows.
System time has been successfully synchronized.
■ Action
None
System time synchronization failed.
■ Action
Try the following:
z Check the specified NTP server IP address, host name, or FQDN for mistakes, and correct
them.
z Check the network path between to the NTP server for problems.
z The NTP server may be busy. Wait a short time before trying again to synchronize the system
time. If that does not work, the specified server may not be an NTP server, so try a different
NTP server. The specified NTP server cannot provide a trusted date and time.
z It attempted to acquire the date and time from a higher level NTP server, but failed. Try a
different NTP server or have the network administrator investigate.
z Check that the time is correct.
If the time is incorrect, adjust the date/time, and try again.
z Refer to "4.5.4 Setting the Date/Time" (page 98), adjust the date/time, and try again.
449
8.2 Network Connection Troubleshooting
■ Checking the Mail Server by Sending a Test Mail
On the [Scanner Central Admin Server Settings] window or [Alert Notification] window,
press the [Test] button to check if an e-mail can be sent to the specified destination.
After pressing the [Test] button, follow each action described below according to the
message that is shown.
The messages and their corresponding actions are as follows.
Sending...
■ Action
If no error message appears and the [Sending] indicator disappears, the test mail was sent
successfully to the mail server.
Check that the alert notification e-mail has arrived at the specified destination. If the alert
notification e-mail has not arrived at the expected destination, check that the part of the e-mail
address before the "@" has been entered correctly.
Test e-mail could not be sent.
■ Action
z
z
z
z
Check that the computer connected to the SMTP server is running properly.
Check if an e-mail can be sent to the address from other computers in the network.
Ping the SMTP server to check that it and its network connection are working properly.
If the SMTP server does not respond to the ping test, check that the system network is
functioning normally by pinging the SMTP server from another computer in the network.
z If it is only the scanner's network connection that does not work, refer to "Failure to Connect
to a Server Using Its IP Address" (page 451) for further solutions.
z If the problem seems to be with the SMTP server's network connection, request the network
administrator to check that the SMTP server and its network connection are functioning
normally.
z Check that the same port number has been correctly set for the scanner to SMTP server
connection in "4.10.1 Setting the e-Mail Server" (page 137) and "5.6 Setting the Central
Admin Server" (page 245).
450
8.2.2 Other Network Connection Troubleshooting
There are many reasons why a network connection may not be possible.
The following section provides information about general troubles that may occur when
connecting to a network.
If the cause of the problem is unknown or the problem persists, check the items in "8.4
Points to Check before Contacting Your FUJITSU Scanner Dealer" (page 467) and
contact your FUJITSU scanner dealer or an authorized FUJITSU scanner service
provider.
■ Failure to Connect to a Server Using Its IP Address
If a server cannot be connected to by using its IP address, and does not respond to a ping
test, try the following steps:
Connection error between a server and the scanner, or problem with the
LAN cable.
■ Action
Check that the LAN cable has been attached to both the scanner and server correctly.
If the server is connected using a LAN cable (straight type), in case Auto MDI/MDI-X (automatic
selection) is not supported, a LAN cable (crossover type), switch, or router is required between
the scanner and server.
If this is not the case, the LAN cable may be faulty. Find a LAN cable that functions normally and
try again.
IP address or subnet mask is invalid.
■ Action
On the [IP Address] window, check that the IP address or subnet mask settings are correct.
For more details about the [IP Address] window, refer to "4.8.1 Giving the Scanner an IP
Address" (page 113).
When using DHCP, the DHCP server does not operate normally, or there
is a problem with the DHCP server settings.
■ Action
If using DHCP, on the [Network Status] window, check that IP address, subnet mask, and default
gateway settings are all correct.
If these settings are not correct, the DHCP server may not operate normally, or the DHCP server
may not assign valid IP addresses because of restricted number of leases or MAC address
validation.
Check the DHCP server connection status and the details of the server settings.
For more details about the [Network Status] window, refer to "4.8.7 Checking the Network
Operating Status" (page 121).
451
8.2 Network Connection Troubleshooting
Another host or communication device is connected using the same IP
address as the scanner.
■ Action
If the same IP address has already been used by another host or communication device, then
even if the other device has been given a different IP address, the server may not recognize the
scanner's "duplicate" IP address until it is rebooted. Restart the server.
If a duplicate IP address connection from another host or communication device exists on a LAN,
it will be unusable.
If a duplicate IP address connection from another host or communication device exists, pull out
its LAN cable and restart the server.
Access is denied due to the establishment of a firewall between the
server and the scanner.
■ Action
If a firewall has been established between the server and the scanner, check that it has not been
set to deny access to the network.
The network Link Speed/Duplex Mode for the scanner and server are
different, or "Auto-Negotiation" is not supported by the server.
■ Action
z For this scanner, the default [Link Speed/Duplex Mode] value is [Auto-Negotiation].
z On the [Network Status] window, match the scanner and server's network Link Speed/Duplex
Mode settings. If the problem persists in spite of having set both the scanner and server's
network Link Speed/Duplex Mode settings to [Auto-Negotiation], select something other than
[Auto-Negotiation] and check again.
z For more details about the [Network Status] window, refer to "4.8.7 Checking the Network
Operating Status" (page 121).
452
■ Failure to Connect to a Server Using Its Host Name or FQDN
If a server cannot be connected to by using its host name or FQDN, and does not respond
to a ping test, try the following steps:
Same as in "Failure to Connect to a Server Using Its IP Address" (page
451).
■ Action
Check if a network connection is possible by trying the same solution for "Failure to Connect to a
Server Using Its IP Address" (page 451).
The scanner's DNS server or WINS server settings are invalid.
■ Action
Check that the DNS and WINS server settings are correct.
The DNS server or WINS server is not functioning normally, or there is
an error with the DNS or WINS server network connection.
■ Action
Ping the DNS and WINS servers to check they are functioning normally.
If the DNS or WINS server is not functioning, request the network administrator to check its
status.
453
8.2 Network Connection Troubleshooting
■ Failure to Add a Network Printer
If adding a network printer to/from the scanner is not possible, try the following steps.
Also, refer to how to set printer settings, how to add a network printer, and the printer
manual beforehand.
The Windows XP printer driver has not been installed on the print
server.
■ Action
Install the Windows XP printer driver on the print server.
Check that the Windows XP printer driver has been correctly installed on the print server. For
more details, refer to "4.13 Setting the Network Printers" (page 159).
Network printer shared name has been changed.
■ Action
Check the shared name on the print server.
The specified network printer path is invalid.
■ Action
Check that the specified network printer path is correct.
454
■ Failure to Print on a Network Printer
If printing on a network printer which has been set in the scanner is not possible, try the
following steps. Also, refer to how to set printer settings, how to add a network printer, and
the printer manual beforehand.
Same as in "Failure to Connect to a Server Using Its IP Address" (page
451).
■ Action
Check if a network connection is possible by trying the same solution for "Failure to Connect to a
Server Using Its IP Address" (page 451).
Printer is not usable, due to an out of paper error, paper jam, or similar
problem.
■ Action
Check whether or not the printer is ready for printing, deal with the cause of the error, and try
again.
Not authorized to print on network printer.
■ Action
Contact the administrator to check if printing is allowed on the network printer.
Printing is impossible due to a printer or spooler error.
■ Action
Try the following:
z Check that printing is possible from the print server application.
z Check that the print server spooling is operating normally.
455
8.2 Network Connection Troubleshooting
8.2.3 Failure to Access the Scanner using a Web Browser, Admin Tool,
or Central Admin Server
If access is not possible when attempting to connect to the scanner using a Web browser
or the Admin Tool, or when attempting to connect to the Central Admin Server from the
Central Admin Console, try the following steps:
Same as in "Failure to Connect to a Server Using Its IP Address" (page
451).
■ Action
Check if a network connection is possible by trying the same solution for "Failure to Connect to a
Server Using Its IP Address" (page 451).
The DNS server or WINS server is not functioning normally, or the
scanner name has not been registered in the DNS or WINS server.
■ Action
Check the connectivity of the specified IP address.
If it is possible to connect the scanner using the Admin Tool with a specified IP address, specify
the scanner's IP address in the DNS or WINS server.
Check the DNS or WINS server settings using the Admin Tool or Web browser.
A misconfigured firewall between the computer installed with the Admin
Tool or Web browser and the scanner is denying access.
■ Action
If there is a firewall between the computer installed with the Admin Tool or Web browser and the
scanner, check that its settings are not preventing access.
The URL of the target scanner is not registered as a trusted site.
■ Action
Set the scanner URL as a trusted site for Internet Explorer.
1. In Internet Explorer, set the following settings in the [Tools] menu, [Internet Options].
2. On the [Security] tab, select [Trusted sites] and press the [Sites] button.
3. Enter the URL of the scanner in the [Add this website to the zone] field, and press the [Add] button.
456
In Internet Explorer, the security level for the target zone is set to [High]
on the [Security] tab in the [Tools] menu -[Internet Options].
In the case of a custom level, [Prompt] or [Disable] is set for [Active
scripting] under [Scripting] in the [Settings] area.
■ Action
When connecting using the scanner name, the connection will be an intranet connection. When
connecting using an IP address, it will be an internet connection. If the URL includes a scanner
name, the scanner will be connected using an Intranet Zone. If the URL includes an IP address,
the scanner will be connected using the Internet Zone.
Try the following settings for the corresponding zone.
1. In Internet Explorer, set the following settings in the [Tools] menu, [Internet Options].
2. Enable active scripting in either of the following ways.
z On the [Security] tab, click the [Default level] button to set [Security level for this zone] to
[Medium].
z On the [Security] tab, click the [Custom level] button to set to [Enable] for [Active scripting]
under [Scripting] in the [Settings] area.
3. If connecting via the Internet zone, on the [Privacy] tab, set the level to below [Medium High].
4. Delete temporary internet files in either of the following ways:
z For Internet Explorer 6.0
On the [General] tab, press the [Delete Files] button on the [Temporary Internet Files].
z For Internet Explorer 7.0
On the [General] tab, press the [Delete] button on the [Browsing history], and press [Delete
Files] button on [Temporary Internet Files].
z For Internet Explorer 8.0
On the [General] tab, press the [Delete] button on the [Browsing history], then select the
[Temporary Internet Files] check box and press [Delete] button.
The scanner is in standby mode.
■ Action
Press the power button to start the scanner.
A proxy server is being used.
■ Action
Set the proxy server to not be used.
1. In Internet Explorer, set the following settings in the [Tools] menu, [Internet Options].
2. Press the [LAN settings] button on the [Connections] tab.
3. Clear the [Use a proxy server for your LAN (These settings will not apply to dial-up or VPN
connection).] check box.
There is an error with the connection protocol setting.
■ Action
Check if SSL is enabled on the [Admin Connection] window.
For details, refer to "4.8.8 Setting the Admin Connection" (page 123).
There is an error with the port number setting.
457
8.2 Network Connection Troubleshooting
■ Action
Check the specified port number on the [Admin Connection] window.
For details, refer to "4.8.8 Setting the Admin Connection" (page 123).
In Internet Explorer, [Tools] menu - [Internet Options] - [Advanced] tab,
the [Use SSL 3.0] check box under [Security] in the [Settings] area is not
selected.
■ Action
1. In Internet Explorer, set the following settings in the [Tools] menu, [Internet Options].
2. On the [Advanced] tab, select the [Use SSL 3.0] check box under [Security] in the [Settings] area.
458
8.3
Other Troubleshooting
This section describes problems that may occur during scanning and gives information on
how to deal with them. Before requesting repair, check the following list of common
problems.
If the problem still cannot be solved after consulting the troubleshooting suggestions,
check the points in "8.4 Points to Check before Contacting Your FUJITSU Scanner
Dealer" (page 467) and then contact your FUJITSU scanner dealer or an authorized
FUJITSU scanner service provider.
The possible problems are as follows:
Problem List
■ Scanner cannot be turned on
z " Scanner cannot be turned on." (page 460)
■ Scanner does not start up
z " The "The last attempt to restart ..." message is shown on the window and the scanner
does not start up." (page 460)
z " Scanner does not resume from standby mode." (page 460)
■ Data cannot be scanned properly
z
z
z
z
" Scanning does not start." (page 461)
" Even after pressing the top cover Scan button, scanning does not start." (page 461)
" Multifeed errors occur frequently." (page 462)
" Paper is not fed into the scanner. (Pick errors are frequent or document feed stops
midway)" (page 462)
■ Scanned data is inappropriate
z
z
z
z
z
z
z
" Scanned data is elongated." (page 463)
" Shadow on the leading edge of the scanned data." (page 463)
" Vertical line on the scanned data." (page 463)
" Scanned data appears skewed or distorted." (page 463)
" Quality of scanned data is poor." (page 464)
" Scanned data is partially cut off." (page 464)
" Scanned data is skewed." (page 464)
■ Cannot login
z " Cannot login with administrator password." (page 464)
z " The [Login] window is not displayed when connecting via the network." (page 465)
■ Operation does not work
z " Input field entry entered via the on-screen keyboard does not appear on the window."
(page 465)
z " Saving is not possible after pressing [Save] on the [File Download] dialog box." (page
465)
z " Status window stops at "Printing scan data on ..."." (page 465)
z " An error occurs when installing an Admin Tool." (page 466)
459
8.3 Other Troubleshooting
■ Scanner Cannot Be Turned On
Scanner cannot be turned on.
■ Check item
Has the power button been pressed?
■ Action
Press the power button.
■ Check item
Are the AC cable and AC adapter properly connected to the scanner?
■ Action
z Connect the AC cable and the AC adapter.
z Disconnect AC cable from the scanner to turn off the scanner, and connect the cable again.
After turning the power off, wait for at least 10 seconds before turning the power back on
again.
If the problem persists even after taking the above mentioned actions, contact your FUJITSU
scanner dealer or an authorized FUJITSU scanner service provider.
■ Scanner Does Not Start Up
The "The last attempt to restart ..." message is shown on the window
and the scanner does not start up.
■ Check item
After turning the scanner on, was the power turned off immediately?
■ Action
z Press the power button.
z Disconnect AC cable from the scanner to turn off the scanner, and connect the cable again.
After turning the power off, wait for at least 10 seconds before turning the power back on
again.
If the problem persists even after taking the above mentioned actions, contact your FUJITSU
scanner dealer or an authorized FUJITSU scanner service provider.
Scanner does not resume from standby mode.
■ Check item
After turning the scanner off, was the power turned back on again
immediately?
■ Action
Press the power button.
460
■ Data Cannot Be Scanned Properly
Scanning does not start.
■ Check item
Has the document been loaded correctly into the ADF paper chute?
■ Action
Reload the documents into the ADF paper chute.
■ Check item
Is the top cover completely closed?
■ Action
Close the top cover completely.
■ Check item
Does the same problem occur after turning the scanner power off and back
on again, and re-logging in?
■ Action
Disconnect AC cable from the scanner to turn off the scanner, and connect the cable again. After
turning the power off, wait for at least 10 seconds before turning the power back on again.
If the problem persists even after taking the above mentioned actions, contact your FUJITSU
scanner dealer or an authorized FUJITSU scanner service provider.
Even after pressing the top cover Scan button, scanning does not start.
■ Check item
Is the
button displayed on the LCD touch panel?
■ Action
The top cover Scan button can only be used on the following windows.
z [Send e-Mail] window
z [Send Fax] window
z [Print] window
z [Save] window
z [Scan Viewer] window
z [Scan Test] window
z [Message Screen]
z [Scan Count] window
z Confirmation window showing the number of scanned sheets
z [File Name] window
461
8.3 Other Troubleshooting
Multifeed errors occur frequently.
■ Check item
Do the documents satisfy the conditions given in "A.2 Paper Quality" (page
474)?
■ Action
Use documents which satisfy the conditions described in "A.2 Paper Quality" (page 474).
■ Check item
Has the document been loaded correctly into the ADF paper chute?
■ Action
Riffle and realign the document stack, then load it back into the ADF paper chute.
■ Check item
Is the document stack more than 5 mm thick?
■ Action
Remove sheets from the stack to reduce it to a thickness of 5 mm or less.
■ Check item
Is the pad assy dirty?
■ Action
Clean the pad assy.
For more details, refer to "7.3 Cleaning Inside the Scanner" (page 420).
■ Check item
Is the pad assy worn out?
■ Action
Replace the pad assy.
For more details, refer to "7.5 Replacing Parts" (page 426).
Paper is not fed into the scanner. (Pick errors are frequent or document
feed stops midway)
■ Check item
Do the documents satisfy the conditions given in "A.2 Paper Quality" (page
474)?
■ Action
Use documents which satisfy the conditions described in "A.2 Paper Quality" (page 474).
■ Check item
Is the pick roller dirty?
■ Action
Clean the pick roller.
For more details, refer to "7.3 Cleaning Inside the Scanner" (page 420).
462
■ Check item
Is the pick roller worn out?
■ Action
Replace the pick roller.
For more details, refer to "7.5 Replacing Parts" (page 426).
■ Check item
Is there any foreign matter in the document feed path?
■ Action
Clean the document feed path.
■ Scanned Data Is Inappropriate
Scanned data is elongated.
■ Check item
Are the feed rollers dirty?
■ Action
Clean the feed rollers.
For more details, refer to "7.3 Cleaning Inside the Scanner" (page 420).
Shadow on the leading edge of the scanned data.
■ Check item
Are the feed rollers dirty?
■ Action
Clean the feed rollers.
For more details, refer to "7.3 Cleaning Inside the Scanner" (page 420).
Vertical line on the scanned data.
■ Check item
Is the glass dirty?
■ Action
For more details on cleaning the glass, refer to "Chapter 7 Scanner Care" (page 416).
Scanned data appears skewed or distorted.
■ Check item
Has the document been loaded correctly?
■ Action
Load the document correctly.
463
8.3 Other Troubleshooting
Quality of scanned data is poor.
■ Check item
Is the glass dirty?
■ Action
Clean the glass.
Scanned data is partially cut off.
■ Check item
Depending on the paper color of the document, scanned data may be
partially cut off because the paper boundary is not recognized correctly.
■ Action
Before scanning, set the paper size to a standard one.
■ Check item
Is the document loaded correctly?
■ Action
Load the document correctly.
Scanned data is skewed.
■ Check item
Are the side guides aligned with the document width?
■ Action
Align the side guides with the paper size.
Pick roller may also cause this problem. Refer to "Check item" and "Action" for " Paper is not fed
into the scanner. (Pick errors are frequent or document feed stops midway)" (page 462).
■ Cannot Login
Cannot login with administrator password.
■ Check item
Was the Caps Lock on when the password was entered?
■ Action
Turn off the Caps Lock and try logging in again.
If the password has been lost or forgotten, contact your FUJITSU scanner dealer or an
authorized FUJITSU scanner service provider.
464
The [Login] window is not displayed when connecting via the network.
■ Check item
Are the SSL settings correct?
■ Action
Close the window, correct the settings, and try connecting again.
■ Check item
Was the [Yes] button selected on the [Security Warning] dialog box when
connecting with HTTPS?
■ Action
Close the window and try connecting again. Select the [Yes] button on the [Security Warning]
dialog box when connecting.
■ Operation Does Not Work
Input field entry entered via the on-screen keyboard does not appear on
the window.
■ Check item
Has the input field been selected?
■ Action
z Select the input field and try again.
z Press the [Cancel] button and try again.
z To use the LCD touch panel, touch the input field directly and try again.
Saving is not possible after pressing [Save] on the [File Download]
dialog box.
■ Check item
Does the length of the [Save As] folder path (folder path plus file name)
exceed 259 characters?
■ Action
Select a [Save As] folder that respects the limit.
Status window stops at "Printing scan data on ...".
■ Check item
Is there enough free space in the drive on which the spool folder for the print
server exists?
■ Action
Make sure that there is enough space in the drive.
465
8.3 Other Troubleshooting
An error occurs when installing an Admin Tool.
■ Check item
Is the language of the Admin Tool already installed different from that of the
operating system?
■ Action
Uninstall the existing Admin Tool. Then, install the Admin Tool of the same language as that of
the operating system.
466
8.4
Points to Check before Contacting Your FUJITSU
Scanner Dealer
Before contacting your FUJITSU scanner dealer or an authorized FUJITSU scanner
service provider, check the following points.
8.4.1 General Details
Info
Model
Findings
ScanSnap N1800
Serial No.
Example: 000001
For the serial number, refer to "8.5 Checking the Scanner
Labels" (page 470).
Production date
Year
Month
Example: 2010-12 (December, 2010)
For details, refer to "8.5 Checking the Scanner Labels"
(page 470).
Date of purchase
Year
System version
Symptoms
Frequency of trouble
Total throughput
467
Month
Day
8.4 Points to Check before Contacting Your FUJITSU Scanner Dealer
8.4.2 Error Status
■ Problem When Connecting to the Scanner via Computer
Info
Findings
OS (Windows)
Admin Tool
version
Displayed error
message
■ Document Feed Trouble
Info
Findings
Paper type
Main purpose of use
Last cleaned on
Year
Month
Day
Consumables last
replaced on
Year
Month
Day
Error message details
468
■ Problem with Central Admin Server Software
Info
Findings
Type of OS (Windows)
for Central Admin
Server software
Type of OS (Windows)
for Central Admin
Console
Central Admin Server
version
Central Admin
Console version
Displayed error
message
■ Sending an Original Document and Scanned Data
Info
Findings
Can both the original document and scanned
data be sent by fax or e-mail?
469
Circle one:
Available
Unavailable
8.5 Checking the Scanner Labels
8.5
Checking the Scanner Labels
The following diagrams show where the labels are located on the scanner.
The labels are on the back of the scanner.
Label A
Label B
The following are the label examples.
z Label A
Example: Contains various scanner information.
z Label B
Example: Indicates the various standards that the scanner conforms to.
470
8.6
Pre-Maintenance Preparations
Before sending the scanner for maintenance, the user data store and system settings
should be backed up.
z "Backing up the User Data Store" (page 178) from "4.15.1 Maintaining the User
Data Store" (page 177)
z "4.15.2 Maintaining the System Settings" (page 181)
After backing up the user data store and system settings, the original data may be
deleted. Refer to the following sections for details.
If the hard disk is replaced, all settings will revert to their factory default values.
z "Clearing the User Data Store" (page 180) from "4.15.1 Maintaining the User Data
Store" (page 177)
z "To reset system settings to factory defaults, press the [Reset] button for [Reset
system settings to factory defaults and clear logs.]." (page 184) from "4.15.2
Maintaining the System Settings" (page 181)
The user data store may contain private information such as e-mail addresses or fax
numbers, so care should be taken when managing such data.
471
Appendix A
Paper Specifications
This appendix describes the paper size and quality requirements for ensuring that the
ADF operates correctly when scanning documents.
472
A.1 Paper Size
The following paper sizes can be scanned with this scanner:
Width: 52 to 216 mm (2.1 to 8.5 in.)
Length: 74 to 355.6 mm (2.9 to 14.0 in.) (*)
(*): When [Custom] paper size setting is used, a page length of up to 3,048 mm (120
in.) is allowed for document scanning.
473
A.2 Paper Quality
Paper Type
The following paper types are recommended for use with the ADF:
z Woodfree paper
z Wood containing paper
When documents of a paper type other than those listed above are scanned, perform the
test-scan with a same paper type first to check if the document can be scanned without
problem.
Paper Weight
The following paper weights can be used with the ADF:
z 52 to 127 g/m2 (14 to 34 lb)
z For A8 and business card size, 127 g/m2 only
Precautions
The following documents may not scan successfully:
z Documents of non-uniform thickness (e.g. envelopes and documents with
attachments)
z Wrinkled or curled documents (See the following hint)
z Folded or torn documents
z Documents with appended photographs, notes, etc.
z Tracing paper
z Coated paper
z Carbon paper
z Carbonless paper
z Photosensitive paper
z Perforated or punched documents
z Documents that are not square or rectangular
z Exceptionally thin documents (less than 52 g/m2)
Do not attempt to scan the following types of documents:
z Paper-clipped or stapled documents
z Documents on which the ink is still wet
z Documents smaller than A8 Portrait
z Documents wider than 216 mm (8.5 in.)
z Non-paper documents (such as fabric, foil, transparent paper, and plastic card)
z Valuable documents that must not be damaged or dirty, such as certificate and
cash voucher
474
z Carbonless paper contains chemical substances that may damage the pad assy or
the pick and other rollers when documents are fed. Pay attention to the following:
z cleaning
If pick errors occur frequently, clean the pad assy and pick roller.
For details about cleaning the pad assy and pick roller, refer to "Chapter 7
Scanner Care" (page 416).
z Replacing parts
The service life of the pad assy and pick roller may be shortened when
compared to scanning only wood containing paper documents.
z When wood containing paper manuscripts are scanned, the life of the pad assy and
pick roller may be shortened compared with the case where woodfree paper
manuscripts are scanned.
z When scanning photographs, the face of the photograph may become damaged.
z When scanning semi-transparent documents, set the scan [Brightness] to [Light] to
avoid image bleed through.
z To prevent the rollers from becoming dirty, avoid scanning documents containing
large areas written or filled in with pencil. If scanning of such documents is
unavoidable, clean the rollers frequently.
For details about cleaning the pad assy and pick roller, refer to "Chapter 7 Scanner
Care" (page 416).
z To operate correctly, the leading edges of all document sheets must be evenly
aligned. The curling of the leading edge must be within the following tolerances:
More than
30 mm
Feed direction
Less than 3 mm
Leading edge
of document
More than
30 mm
Side being
scanned
Feed direction
Less than 5 mm
Leading edge
of document
475
Side being
scanned
A.3 Maximum Document Loading Capacity
The maximum number of sheets that can be loaded into the ADF paper chute is
determined by the length and weight of the document paper.
The following graph shows the maximum document loading capacity of ADF according to
paper size and weight.
A4/Letter or smaller
Legal
60
Capacity (sheets)
60
50
50
50
41
40
35
29
30
29
24
20
0
52
64
80
104
127
2
Paper weight (g/m )
Unit
Standard paper weights
g/m2
52
64
75
80
90
104
127
lb
14
17
20
21
24
28
34
kg
45
55
64.5
69
77.5
90
110
476
A.4 Area not to be Perforated
ADF feed problems can occur while scanning if the document has any holes (punched,
etc) in the shaded area shown in the following figure.
25 mm 25 mm
Control point for scan
Page top
Front side
Feed
direction
Page bottom
Center of paper
477
A.5 Multifeed Detection Conditions
There are three multifeed detection modes: document layer, document length, and both
document layer and length.
To detect multifeeds with document layer, document length, or both document layer and
length, specify [Ultrasonic], [Length], or [Both], in "6.9.19 Multifeed Detection (Layer and
Length)" (page 392).
The following conditions must be satisfied in each of these detection modes.
Detection by Layer
z Set sheets of the same thickness in the ADF paper chute for a series of scans.
z Paper weight: 52 to 127 g/m2 (14 to 34 lb) (45 to 110 kg/ream) (0.06 to 0.15 mm)
z Punched holes are not allowed within 25 mm (0.98 in.) either side of the center of
paper.(*)
z Do not glue on any other paper within 25 mm (0.98 in.) either side of the center of
paper.(*)
(*): Refer to Figure 1.
Detection by Length
z Set sheets of the same length in the ADF paper chute for a series of scans.
z Document length deviation: 1% or less
z Punched holes are not allowed within 25 mm (0.98 in.) either side of the center of
paper.(*)
(*): Refer to Figure 1.
Detection by both Layer and Length
z Set sheets of the same thickness and length in the ADF paper chute for a series of
scans.
z Document thickness: 52 to 127 g/m2 (45 to 110 kg for 1,000 sheets) (0.065 to 0.15
mm)
z Document length deviation: 1% or less
z Punched holes are not allowed within 25 mm (0.98 in.) either side of the center of
paper.(*)
z Do not glue on any other paper within 25 mm (0.98 in.) either side of the center of
paper.(*)
(*): Refer to Figure 1.
478
Figure 1
25 mm 25 mm
Control point for scan
Page top
Front side
Feed
direction
Page bottom
Center of paper
z Multifeed detection by layer will often mis-detect very thick paper.
When scanning such documents, select [None] on the [Multifeed Setup] window.
z Multifeed detection rate may decrease depending on the document condition.
z Multifeed may not be detected for the top and bottom 30 mm of a document.
479
A.6 Conditions for Using the Carrier Sheet
A.6.1 Paper Size
The paper sizes that can be scanned are as follows:
z A3 (297 × 420 mm) (*)
z B4 (257 × 364 mm) (*)
z 11 × 17 in. (279.4 × 431.8 mm) (*)
(*) The above paper sizes must be folded in half to be scanned.
A.6.2 Paper Quality
Paper type
Recommended paper type for scanning is as follows:
Standard office paper
Paper weight
The following paper weights can be used:
z Up to 127 g/m2 (Up to 34 lb)
z Up to 63.5 g/m2 (Up to 17 lb) (when scanning half fold paper)
Precautions
Take note of the following:
z You cannot mix the carrier sheet and regular documents in the same batch for
scanning.
z Up to three carrier sheets can be loaded at once.
z Do not write on, color, stain, or cut the end with a black & white pattern because
the carrier sheet will not be recognized properly.
z Do not place the carrier sheet upside down. Otherwise, a paper jam may occur and
damage the carrier sheet and the document inside.
z Do not leave your document inside the carrier sheet for a long time. Otherwise, the
ink on the document may be transferred onto the carrier sheet.
z To avoid deformation, do not use or leave the carrier sheet in high temperature
places such as under direct sunlight or near a heating apparatus for a long time.
z Do not fold or pull the carrier sheet by force.
z Do not use a damaged carrier sheet because it may damage or cause the scanner
to malfunction.
z To avoid deformation, keep the carrier sheet on a flat surface without any weight
on it.
z Be careful not to cut your finger on the edge of the carrier sheet.
z If paper jams occur frequently, feed about 50 sheets of PPC paper (recycled
paper) before scanning with the carrier sheet.
The PPC paper (recycled paper) can either be blank or printed.
480
481
Appendix B
Management Settings and Files
This appendix describes the scanner operating environment and management settings
and files.
482
B.1 e-Mail Address Setting Values
e-Mail addresses may be up to 256 characters long.
One of the following e-mail address formats must be used:
z XXXXXXX@IP_address
z XXXXXXX@Host_name
z XXXXXXX@Domain_name
XXXXXXX
Comprised of alphanumerics and the following symbols.
!#$%&'*+-/=?^_`{|}~.
However, periods (.) cannot be used in the following cases.
z Using periods (.) as a initial character
z Using periods (.) as a last element
z Using periods (.) consecutively
IP_address
Comprised of numbers separated by periods (.).
IP addresses within the following ranges may be used:
1.0.0.1 - 126.255.255.254
128.0.0.1 - 191.255.255.254
192.0.0.1 - 223.255.255.254
Host_name
Comprised of alphanumerics and hyphens (-) only. The initial
character may not be a hyphen.
Domain_name
Comprised of alphanumerics and hyphens (-) only, and
separated by periods (.).
Each name element may be up to 63 characters long, and only
alphabetic characters may be used for the last element.
483
B.2 Scanner Configuration File Format
The scanner configuration file format requirements differ for the following two cases.
z For importing
z For exporting
B.2.1 Scanner Configuration File Format (for Importing)
This section describes the scanner configuration file format requirements for importing.
z The file character set should be the same as the value on the Central Admin
Console, [Central Admin Server Settings] window. The default value is UNICODE
(UTF-8).
z The file is in CSV format. The values for each item are as follows.
Item
Value and Format
Remarks
MAC Address
XX:XX:XX:XX:XX (X is an alphanumeric
character)
Optional
IP Address
xxx.xxx.xxx.xxx (xxx is a value from 0 to
255)
Optional
Subnet Mask
xxx.xxx.xxx.xxx (xxx is a value from 0 to
255)
Optional
Scanner Name
Up to 15 alphanumeric characters long
(hyphens may also be used)
Required
Port Number
Numerical value from 1 to 65535
Optional
Use HTTPS?
0: Do not use HTTPS (default)
1: Use HTTPS
Optional
Model
Up to 64 characters long
Optional
Add-in Group
Up to 32 characters long (*1)
Optional
Settings Group
Up to 32 characters long (*1)
Optional
Comment
Up to 256 characters long
Optional
System Updates
0: Enable (default)
1: Disable
Optional
(*1):
The following character strings cannot be used:
(Default) (All) __default__ __all__
"__" is two underbars entered one after another.
484
B.2.2 Scanner Configuration File Format (for Exporting)
This section describes the scanner configuration file format requirements for exporting.
z The default value for the file name is "scannerinfo.csv".
z The file character set should be the same as the value on the Central Admin
Console, [Central Admin Server Settings] window. The default value is UNICODE
(UTF-8).
z A title line can be added as the first line in a file when the file is exported.
z The file is in CSV format. The values for each item are as follows.
Item
Value and Format
MAC Address
XX:XX:XX:XX:XX (X is an alphanumeric
character)
IP Address
xxx.xxx.xxx.xxx (xxx is a value from 0 to
255)
Subnet Mask
xxx.xxx.xxx.xxx (xxx is a value from 0 to
255)
Scanner Name
-
Port Number
Numerical value from 1 to 65535
Use HTTPS?
0: Do not use HTTPS (default)
1: Use HTTPS
Model
-
Add-in Group
Arbitrary character string
Settings Group
Arbitrary character string
Comment
Arbitrary character string
System Updates
0: Enable (default)
1: Disable
Info Last Modified
YYYYMMDD hh:mm:ss
Registered
0: # Unregistered
1: # Registered
Update Status
0: NotTarget
1: Finished
2: Pending
3: Error
4: Unregistered
System Version
-
Add-in Version
-
Scanner Settings
-
485
Remarks
None
When the
[Include
detailed
scanner
information.]
check box is
selected
Item
Value and Format
Last Inventory
Taken
YYYYMMDD hh:mm:ss
Last System
Update
YYYYMMDD hh:mm:ss
Last Add-in Install
YYYYMMDD hh:mm:ss
Last Scanner
Settings Update
YYYYMMDD hh:mm:ss
Current System
Update Status
0: NotTarget
1: Finished
2: Pending
3: Error
4: Unregistered
Current Add-in
Install Status
0: NotTarget
1: Finished
2: Pending
3: Error
4: Unregistered
Current Scanner
Settings Status
0: NotTarget
1: Finished
2: Pending
3: Error
4: Unregistered
Scanner Version
-
PAD ASSY
Numerical value
PICK ROLLER
Numerical value
Total Throughput
Numerical value
Initial Use
YYYYMMDD hh:mm:ss
Cumulative On
Time
Numerical value
Last Audit Log
Collected
YYYYMMDD hh:mm:ss
Security Update
Version
Syy-nn
486
Remarks
When the
[Include
detailed
scanner
information.]
check box is
selected
Item
Value and Format
Error Status
0: No
1: Yes
Operating Status
0: Unreported/Unregistered
1: Offline
3: Free
4: In use
Installed Options
-
Serial Number
-
487
Remarks
When the
[Include
detailed
scanner
information.]
check box is
selected
Appendix C
Root Certification Authority
This appendix provides an explanation of root certification authority.
488
C.1 Root Certification Authority List
SSL (Secure Socket Layer) encrypted communication may be used by the scanner for
user authentication and save operations to the FTP server or a SharePoint folder.
With SSL, trust certificates are exchanged to authenticate the communication opponents.
The following root certificate authorities are pre-registered in the scanner, but further root
certificates may be imported.
For details about importing certificates, refer to "4.5.6 Managing Certificates" (page 100).
Issuer
Valid until...
(YYYY/MM/
DD)
CA 1
2019/3/11
Certiposte Classe A Personne
2018/6/24
Certiposte Serveur
2018/6/24
Certisign - Autoridade Certificadora - AC2
2018/6/27
Certisign - Autoridade Certificadora - AC4
2018/6/27
Certisign Autoridade Certificadora AC1S
2018/6/27
Certisign Autoridade Certificadora AC3S
2018/7/10
Class 1 Primary CA
2020/7/7
Class 2 Primary CA
2019/7/7
Class 3 Primary CA
2019/7/7
Class 3 Public Primary Certification Authority
2028/8/2
Class 3P Primary CA
2019/7/7
Class 3TS Primary CA
2019/7/7
Deutsche Telekom Root CA 1
2019/7/10
Deutsche Telekom Root CA 2
2019/7/10
DST (ANX Network) CA
2018/12/10
DSTCA E1
2018/12/11
DSTCA E2
2018/12/10
DST-Entrust GTI CA
2018/12/9
Entrust.net Secure Server Certification Authority
2019/5/26
Equifax Secure Certificate Authority
2018/8/23
Equifax Secure eBusiness CA-1
2020/6/21
Equifax Secure eBusiness CA-2
2019/6/23
489
Issuer
Valid until...
(YYYY/MM/
DD)
Equifax Secure Global eBusiness CA-1
2020/6/21
EUnet International Root CA
2018/10/3
FESTE, Public Notary Certs
2020/1/2
FESTE, Verified Certs
2020/1/2
First Data Digital Certificates Inc. Certification Authority
2019/7/4
FNMT Clase 2 CA
2019/3/19
GlobalSign Root CA
2014/1/28
GTE CyberTrust Global Root
2018/8/14
http://www.valicert.com/
2019/6/26
Microsoft Root Authority
2020/12/31
Microsoft Root Certificate Authority
2021/5/10
NetLock Expressz (Class C) Tanusitvanykiado
2019/2/20
NetLock Kozjegyzoi (Class A) Tanusitvanykiado
2019/2/20
NetLock Uzleti (Class B) Tanusitvanykiado
2019/2/20
PTT Post Root CA
2019/6/26
Saunalahden Serveri CA
2019/6/26
SecureSign RootCA1
2020/9/15
SecureSign RootCA2
2020/9/15
SecureSign RootCA3
2020/9/15
SIA Secure Client CA
2019/7/9
SIA Secure Server CA
2019/7/9
Swisskey Root CA
2016/1/1
TC TrustCenter Class 1 CA
2011/1/1
TC TrustCenter Class 2 CA
2011/1/1
TC TrustCenter Class 3 CA
2011/1/1
TC TrustCenter Class 4 CA
2011/1/1
Thawte Premium Server CA
2021/1/1
Thawte Server CA
2021/1/1
UTN - DATACorp SGC
2019/6/25
UTN-USERFirst-Hardware
2019/7/10
490
Issuer
Valid until...
(YYYY/MM/
DD)
UTN-USERFirst-Network Applications
2019/7/10
VeriSign Trust Network
2028/8/2
If the root certificate authority validation period expires, SSL connection is not
possible.
491
Appendix D
Scanner Specifications
This appendix gives specifications for the scanner.
492
D.1 Installation Specifications
Item
Specification
Dimensions (W × D × H)
300 × 226 × 172 mm (11.81 × 8.90 × 6.77 in.)
Weight
6.0 kg (13.23 lb)
LCD touch panel
8.4-inch XGA TFT LCD monitor
Analog resistive touch panel
Keyboard
On-screen keyboard
Network interface
LAN (10Base-T/100Base-TX)
Input power
Voltage
100-240V ±10%
Frequency
50/60 Hz
Power consumption (AC)
50 W or less
This scanner is installed with a Wake-On-LAN card. If the last time the scanner
power was turned off was due to an error of power failure, the Wake-On-LAN
function will not work.
493
D.2 Basic Scanner Specifications
Item
Specification
Remarks
Scanner type
ADF
(Automatic Document Feeder)
Image sensor
Color CCD × 2
Light source
White cold cathode fluorescent
discharge lamp × 2
(One for front side, and
the other for reverse
side)
Maximum
Legal (8.5 × 14 in.)
Minimum
A8 (portrait) (52 × 74 mm)
or 2 × 3 in.
When [Custom] paper
size setting is used, a
page length of up to
3,048 mm (120 in.) is
allowed for document
scanning.
Scannable area
Paper weight
0.06 to 0.15 mm
(52 to 127 g/m2, 14 to 34 lb,
45 to 110 kg/ream)
Scan speed
(A4/Letter,
Portrait) (*1)
Black & White
Grayscale
Simplex: 20 sheets/min.
Duplex: 40 pages/min.
200 dpi
Color
ADF paper chute capacity
50 sheets
(Letter/A4, 80 g/m2 (20 lb))
Optical resolution
600 dpi
Output resolution
150 dpi, 200 dpi, 300 dpi,
600 dpi
(*1):
The maximum hardware limitation. Actual scanning time includes software processing
time such as data transfer time.
494
D.3 Changing the Functions on the On-Screen
Keyboard
The scanner supports the on-screen keyboard that enables entering characters on the
LCD touch panel.
For details on how to show/hide the on-screen keyboard, refer to "2.4 Using the OnScreen Keyboard" (page 63).
D.3.1 Switching the Keyboard Layout
There are two types of keyboard layouts on the on-screen keyboard: alphabetic layout
and numeric and symbols layout.
The keyboard layout can be switched in the following ways.
Keyboard Layout
Operation
Numeric and symbols layout
Press
.
Press
.
Alphabetic layout
Switching the upper/lower case
Press the [Caps] or [Shift] button.
z Pressing the [Caps] button enables you to enter
multiple characters continuously under the
switched state. After entering a character, the
switched state is still retained.
z Pressing the [Shift] button enables you to enter
only one character under the switched state.
After entering a character, the switched state
returns to the previous state.
495
Appendix E
Editing Using User Editor
This appendix describes how to edit mail address books and local accounts using User
Editor.
A regular user can contact the administrator for details about settings of the User Editor.
E.1 What is User Editor? .......................................................................................... 497
E.2 System Requirements ........................................................................................ 498
E.3 Pre-settings ......................................................................................................... 499
E.4 Windows of User Editor ..................................................................................... 503
E.5 Starting/Exiting User Editor............................................................................... 505
E.6 Viewing the Mail Address Book/Local Accounts............................................. 506
E.7 Editing an e-Mail Target in the Mail Address Book ......................................... 510
E.8 Editing Local Accounts...................................................................................... 516
E.9 Discarding the Edited Mail Address Book or Local Accounts ....................... 518
E.10 Saving the Mail Address Book/Local Account .............................................. 519
E.11 User Editor Information Shown in User Log .................................................. 521
496
E.1 What is User Editor?
User Editor is an application that is used for editing a scanner mail address book (My List)
or local accounts.
A scanner mail address book or local accounts can be edited from a computer by
connecting the computer installed with User Editor to a scanner via the network interface.
User Editor facilitates operations such as outputting a mail address book or local accounts
in a file (CSV format), and importing and saving a number of e-mail addresses in a file to
a scanner.
User Editor
- Mail address book
- Local accounts
Load and edit
Edit
- Mail address book
- Local accounts
Computer
Save
Load and edit
Scanner
Save
CSV format
- Mail address book
- Local accounts
z Editing a mail address book
A regular user can edit an e-mail address book (My List) and create a group in the
mail address book by using User Editor, so that the e-mail addresses can be
grouped by purpose and managed in a group.
z Editing local accounts
An administrator can create local accounts and save them in the scanner by using
User Editor. Local accounts can be used for authenticating to the scanner.
For the system requirements for User Editor, refer to "E.2.1 Requirements for User Editor"
(page 498).
497
E.2 System Requirements
E.2.1 Requirements for User Editor
For use of the User Editor, the following requirements apply:
Software (English Versions)
z Operating system
z Windows XP SP3 or later
z Windows Vista SP1 or later
z Windows 7
z Windows Server 2003 SP2 or later
z Windows Server 2008
z .NET Framework 2.0 SP2 or later, .NET Framework 3.0 SP2 or later, or .NET
Framework 3.5 SP1 or later
z Internet Explorer 6 SP2 or later
(*):
If .NET Framework is not installed, it will be notified. Download .NET
Framework from the Microsoft website and install it into the computer.
When installing .NET Framework, check that there is enough free disk
space. For .NET Framework 2.0, at least 280 MB of additional free disk
space is required.
Hardware
z Any computer which runs the supported software
32 MB or more of free memory space
64 MB or more of free disk space
z XGA monitor or better
z LAN cable
z Pointing device (e.g. mouse)
E.2.2 Port Number List
Function
User Editor
(*):
From/To
User Editor D Scanner
Port Number
Protocol
Number
80 (HTTP) (*)
6 (TCP)
443 (HTTPS) (*)
6 (TCP)
Changing the Port Number is possible
498
E.3 Pre-settings
E.3.1 Installing User Editor
To edit a mail address book or a local account of a scanner via the network interface,
install User Editor in a computer.
1. To access a scanner, specify the scanner name as a URL using a Web
browser.
According to the settings described in "4.8.8 Setting the Admin Connection" (page
123), specify the URL in one of the following ways.
z SSL is [Off], no port number change
http://scanner_name or IP_address/
z SSL is [Off], port number change
http://scanner_name or IP_address:port_number/
For port_number, enter the changed port number.
z SSL is [On], no port number change
https:// scanner_name or IP_address/
z SSL is [On], port number change
https://scanner_name or IP_address:port_number/
For port_number, enter the changed port number.
For SSL, the [Security Alert] window is displayed when connecting. Press the [Yes]
button on the [Security Alert] window.
D The [Login] window appears.
2. Enter a [User Name] and [Password].
3. Press the [Login] button.
D The download window appears.
499
4. Press the [Next] button for the [Network Scanner User Editor].
D The [Download Network Scanner User Editor.] window appears.
5. Press the [Download] button.
Downloading is not possible while a scanner operation is in process.
D The [File Download] dialog box appears.
500
6. Press the [Run] button.
D The Network Scanner User Editor setup wizard appears.
If .NET Framework is not installed, a confirmation window for .NET
Framework installation appears.
Press the [Yes] button to install .NET Framework, and then try again from
Step 1.
7. Press the [Next] button.
D The [Select Installation Folder] window appears.
501
8. Select the target folder(s) and user(s), and press the [Next] button.
To select a different folder, press the [Browse] button.
To check the free space available for the currently selected folder, press the [Disk
Cost] button.
Installation fails if the length of any installation path (folder path plus
installation file name) exceeds 259 characters. Select an installation folder
that respects this limit.
D From here on after, follow the instructions displayed on the window.
When "Installation complete" is displayed, the installation is complete. Press the
[Close] button.
D After installation, the User Editor can be started by selecting the [Start] menu J
[All Programs] J [Network Scanner] J [Network Scanner User Editor].
E.3.2 Uninstalling User Editor
This section uses Windows Vista as an example.
Uninstall User Editor from [Control Panel] - [Programs] - [Programs and Features] in the
computer in which it is installed.
Close the User Editor before uninstalling.
If the User Editor is uninstalled while still open, normal operation of the open User
Editor is not guaranteed.
502
E.4 Windows of User Editor
The User Editor window contains the [Address Book] tab and [Local Account] tab.
The following shows the details of each tab.
z [Address Book] tab
This tab page is used for editing the e-mail targets in the mail address book.
Toolbar
Menu bar
Status bar
Group/e-mail address list
Group list
503
z [Local Account] tab
This tab page is used for editing the local accounts saved in the scanner.
Menu bar
Toolbar
Local account list
Status bar
504
E.5 Starting/Exiting User Editor
■ Starting User Editor
1. Select [Start] menu J [All Programs] J [Network Scanner] J
[Network Scanner User Editor].
D The [Network Scanner User Editor] window appears.
■ Exiting User Editor
1. Select the [File] menu, and then select [Exit].
D The exit confirmation window appears.
2. Press the [OK] button.
D The User Editor exits.
505
E.6 Viewing the Mail Address Book/Local Accounts
Load and view mail address books or local accounts.
■ Loading from a Scanner
Load mail address books or local accounts from a scanner in the following ways.
1. Select [Address Book] tab to load mail address books.
Select [Local Account] tab to load local accounts.
2. Perform either of the following.
z Select the [File] menu, and then select [Load from Scanner].
z Press the [Load from Scanner] button on the toolbar.
D The [Load from Scanner] dialog box appears.
3. Enter the information to connect to the scanner.
z Enter the scanner IP address, host name, or FQDN for [Connect to].
z To enter an IP address, use the "xxx.xxx.xxx.xxx" format, where xxx is a value
from 0 to 255.
z For a host name or FQDN, up to 255 characters can be entered.
z For [Port Number], enter the number of the port to be used for communication with
the scanner, within the range of 1 to 65535. The default value is "80".
Select the [Use HTTPS] check box to use HTTPS for communication from the
scanner.
z For [User Name], enter the name of the user to login to the scanner.
z For [Password], enter the password for the user to login to the scanner.
Connect as a user that can login to the scanner.
z To edit a mail address book, login as a regular user.
z To edit local accounts, login as an administrator (admin) or an administrator
of a local account created with User Editor. For a new local account, login as
an administrator (admin).
4. Select the [Open] button.
D Mail address books or local accounts appear.
506
■ Loading from a File
Load mail address books or local accounts from a file in the following ways.
1. Select [Address Book] tab to load mail address books.
Select [Local Account] tab to load local accounts.
2. Perform either of the following.
z Select the [File] menu, and then select [Load from File].
z Press the [Load from File] button on the toolbar.
D The dialog box for opening a file appears.
3. Select the file and press the [Load] button.
D Mail address books or local accounts appear.
507
■ File Format of Mail Address Book Loaded from a File
This section describes the file format available for an e-mail address book that can be
loaded from a file.
With User Editor, a mail address book in CSV format can be edited.
z UNICODE (UTF-8) is used for the file character set.
z Describe in CSV format as follows:
"User Name","Group Name","Distribution List Name","First Name","Last
Name","E-mail Address"
The values for each item are as follows.
Item
Value and Format
User Name
Specify the name of the user.
Group
Name
Specify the name of the group.(*)
Prepend "\" at the beginning of the group name. (Example:
\group01)
To set the levels of the groups, delimit them with "\". (Example:
\group01\group02)
";" and "@" are replaced with "_".
Distribution
List Name
Specify the name of the distribution list.(*)
Multiple e-mail addresses must be separated using semi-colons
(";").
";" and "@" are replaced with "_".
First Name
Specify the first name.(*)
Last Name
Specify the last name.(*)
E-mail
Address
For details about e-mail address settings values, refer to "B.1 eMail Address Setting Values" (page 483).
A distribution list can contain up to 100 e-mail addresses.
(*):
Up to 64 characters can be specified.
Spaces at the start and end of a name are omitted if specified.
508
■ File Format of Local Accounts Loaded from a File
This section describes the file format available for local accounts that can be loaded from
a file.
With User Editor, local accounts in CSV format can be edited.
z UNICODE (UTF-8) is used for the file character set.
z Describe in CSV format as follows:
"User Name","Password","E-mail Address","Comment","Enabled/
Disabled","Account Type"
The values for each item are as follows.
Item
Value and Format
User Name
Specify the name of the user.
Password
Specify the password.
Comment
Specify the comment on the account.
E-mail
Address
For details about e-mail address settings values, refer to "B.1 eMail Address Setting Values" (page 483)
Enabled/
Disabled
Specify whether the local account is enabled or disabled.
"0": Indicates that the local account is disabled.
"1": Indicates that the local account is enabled.
Account
Type
Specify whether or not the local account has administrator right.
"0": Indicates a regular user who do not have administrator right.
"1": Indicates a user who has administrator right.
509
E.7 Editing an e-Mail Target in the Mail Address Book
This section describes how to edit e-mail targets in the mail address book.
An mail address book can contain up to 5000 groups, distribution lists, and e-mail
addresses.
E.7.1 Setting a Group
Set groups in the mail address book.
A group can contain multiple distribution lists and e-mail addresses, which allows e-mail
destinations to be sorted according to the respective purposes. Sub-groups can be
created under a group.
By specifying a group as an e-mail destination, an e-mail can be sent to all distribution
lists and e-mail addresses registered in the group at the same time.
Up to five levels can be set for groups.
■ Adding a Group
1. Select the [Address Book] tab.
2. In the group list, select a group to which the new group is to be added.
3. Open the [Add Group] dialog box in either of the following ways.
z Select the [Address Book] menu, and then select [Add Group].
z Press the [Add Group] button.
4. Enter a [Group Name].
This can be up to 64 characters long. The following symbols cannot be used.
\;@
5. Press the [OK] button.
D The new group is added.
510
■ Changing the Group Name
1. Select the [Address Book] tab.
2. In the group list, select the group name to be changed.
3. Open the [Edit Group] dialog box in either of the following ways.
z Select the [Address Book] menu, and then select [Properties].
z Press the [Properties] button on the toolbar.
4. Enter a [Group Name].
5. Press the [OK] button.
D The group name is changed.
■ Deleting a Group
Note that deleting a group also deletes the sub-groups and e-mail addresses
belonging to the group.
1. Select the [Address Book] tab.
2. In the group list, select a group to be deleted.
3. Perform either of the following.
z Select the [Address Book] menu, and then select [Delete].
z Press the [Delete] button on the toolbar.
D The delete confirmation window appears.
4. Press the [OK] button.
D The group is deleted.
511
E.7.2 Setting a Distribution List
Set distribution lists in the e-mail address book.
Multiple e-mail addresses can be registered in a distribution list.
By specifying a distribution list as an e-mail destination, an e-mail can be sent to all the email addresses registered in the list at the same time.
■ Adding a Distribution List
1. Select the [Address Book] tab.
2. Select a group to which the new distribution list is to be added.
3. Open the [Add Distribution List] dialog box in either of the following
ways.
z Select the [Address Book] menu, and then select [Add Distribution List].
z Press the [Add Distribution List] button on the toolbar.
4. Enter the information of the distribution list to be added.
Enter the [Distribution List Name] and [Mail Addresses] to be contained in the
distribution list.
Up to 64 characters can be specified for [Distribution List Name]. The following
symbols cannot be used.
;@
For details about e-mail address settings values, refer to "B.1 e-Mail Address
Setting Values" (page 483).
A distribution list can contain up to 100 e-mail addresses. Multiple e-mail addresses
must be separated using semi-colons (";").
5. Press the [OK] button.
D The distribution list is added.
512
■ Editing a Distribution List
1. Select the [Address Book] tab.
2. Select the distribution list to be edited.
3. Open the [Edit Address] dialog box in either of the following ways.
z Select the [Address Book] menu, and then select [Properties].
z Press the [Properties] button on the toolbar.
4. Edit the information.
5. Press the [OK] button.
D The details of the distribution list are changed.
■ Deleting a Distribution List
1. Select the [Address Book] tab.
2. Select the distribution list to be deleted.
3. Perform either of the following.
z Select the [Address Book] menu, and then select [Delete].
z Press the [Delete] button on the toolbar.
D The delete confirmation window appears.
4. Press the [OK] button.
D The distribution list is deleted.
513
E.7.3 Setting an e-Mail Address
Set an e-mail address in the mail address book.
■ Adding an e-Mail Address
1. Select the [Address Book] tab.
2. Select a group to which the new distribution list is to be added.
3. Open the [Add Address] dialog box in either of the following ways.
z Select the [Address Book] menu, and then select [Add Address].
z Press the [Add Address] button on the toolbar.
4. Enter the information of the e-mail address to be added.
[First Name] and [Last Name] may be up to 64 characters long. [First Name] and
[Last Name] can be skipped.
For details about e-mail address settings values, refer to "B.1 e-Mail Address
Setting Values" (page 483).
5. Press the [OK] button.
D The e-mail address is added.
514
■ Editing an e-Mail Address
1. Select the [Address Book] tab.
2. Select the e-mail address to be edited.
3. Open the [Edit Address] dialog box in either of the following ways.
z Select the [Address Book] menu, and then select [Properties].
z Press the [Properties] button on the toolbar.
4. Edit the information.
5. Press the [OK] button.
D The information of the e-mail address is changed.
■ Deleting an e-Mail Address
1. Select the [Address Book] tab.
2. Select the e-mail address to be deleted.
3. Perform either of the following.
z Select the [Address Book] menu, and then select [Delete].
z Press the [Delete] button on the toolbar.
D The delete confirmation window appears.
4. Press the [OK] button.
D The e-mail target is deleted from the mail address book.
515
E.8 Editing Local Accounts
This section describes how to edit the local accounts saved in the scanner.
Up to 100 local accounts can be added.
E.8.1 Adding a Local Account
1. Select the [Local Account] tab.
2. Open the [Add Account] dialog box in either of the following ways.
z Select the [Local Account] menu, and then select [Add Account].
z Press the [Add Account] button on the toolbar.
3. Enter the information of the local account to be added.
z [User Name], [Password], and [Confirm Password] may be up to 64 characters
long. Passwords are case sensitive.
z For details about e-mail address settings values, refer to "B.1 e-Mail Address
Setting Values" (page 483).
z For [Comment], enter a comment on the account. Up to 256 characters long
may be entered. [Comment] is case sensitive.
z For [Enabled/Disabled], select whether or not to enable the account. When
[Disabled] is selected, the user cannot login.
z For [Account Type], select [Regular User] for a regular user or select
[Administrator] for the administrator.
z "guest", "admin", and "fi-maintenance" cannot be specified as a user name.
z Spaces at the start and end of a user name are omitted if specified.
z White space characters can be used in a password and comment.
4. Press the [OK] button.
D The local account is added.
516
E.8.2 Editing a Local Account
1. Select the [Local Account] tab.
2. Select a local account to be edited.
3. Open the [Edit Account] dialog box in either of the following ways.
z Select the [Local Account] menu, and then select [Properties].
z Press the [Properties] button on the toolbar.
4. Edit the information.
5. Press the [OK] button.
D The information of the local account is changed.
E.8.3 Deleting a Local Account
1. Select the [Local Account] tab.
2. Select a local account to be deleted.
3. Perform either of the following.
z Select the [Local Account] menu, and then select [Delete].
z Press the [Delete] button on the toolbar.
D The delete confirmation window appears.
4. Press the [OK] button.
D The local account is deleted.
517
E.9 Discarding the Edited Mail Address Book or Local
Accounts
Discard the edited information of the mail address book or local accounts and restore it to
its original state.
1. Select the [Address Book] tab to discard the edited information of the
mail address book.
Select the [Local Account] tab to discard the edited information of the
local account.
2. Select the [File] menu, and then select [Discard].
D A discard confirmation dialog box appears.
3. Press the [OK] button.
D The edited information is discarded and the mail address book or local account is
restored to its original state.
518
E.10 Saving the Mail Address Book/Local Account
Save the edited mail address book or local account to the scanner.
■ Saving the Edited Information to the Scanner
Save the edited mail address book or local account to the scanner.
By saving the mail address book to the scanner, My List is updated with the changes.
1. Select [Address Book] tab to save mail address books.
Select [Local Account] tab to save local accounts.
2. Perform either of the following.
z Select the [File] menu, and then select [Save to Scanner].
z Press the [Save to Scanner] button on the toolbar.
D The [Save to Scanner] dialog box appears.
3. Enter the information to connect to the scanner.
z Enter the scanner IP address, host name, or FQDN for [Connect to].
z To enter an IP address, use the "xxx.xxx.xxx.xxx" format, where xxx is a value
from 0 to 255.
z For a host name or FQDN, up to 255 characters can be entered.
z For [Port Number], enter the number of the port to be used for communication with
the scanner, within the range of 1 to 65535. The default value is "80".
Select the [Use HTTPS] check box to use HTTPS for communication from the
scanner.
z For [User Name], enter the name of the user to login to the scanner.
z For [Password], enter the password for the user to login to the scanner.
Connect as a user that can login to the scanner.
z To edit a mail address book, login as a regular user.
z To edit local accounts, login as an administrator.
4. Press the [Save] button.
D Mail address books or local accounts are saved in the scanner.
519
■ Saving the Edited Information to a File
Save the edited mail address book or local accounts to a file in CSV format.
1. Select [Address Book] tab to save mail address books.
Select [Local Account] tab to save local accounts.
2. Perform either of the following.
z Select the [File] menu, and then select [Save to File].
z Press the [Save to File] button on the toolbar.
D The dialog box for saving a file appears.
3. Specify the directory and name of the file, and press the [Save] button.
D Mail address books or local accounts are saved in CSV format.
520
E.11 User Editor Information Shown in User Log
In the administrator or regular user [User Log] window, user logs of User Editor can be
viewed.
The user log items for User Editor are shown as follows:
Log Item
Info options
Description
Operation
Remote
The User Editor loaded a mail address
book. Or, the User Editor updated a mail
address book.
Pages
0
This item is always shown as 0.
For checking other items and detailed information on user logs, refer to the following:
z When the administrator checks the information on the [User Log] window
"Viewing the User Log Details" (page 173)
z When a regular user checks the information on the [User Log] window
"6.12 Checking the User Log" (page 402)
521
Appendix F
Compatibility with Different
Versions
This appendix explains the compatibility with different versions of scanner systems and
the Central Admin Server software.
F.1 Updating System Settings from the Central Admin Server ............................ 523
F.2 Functional Compatibility Between the Scanner and Central Admin Server . 524
F.3 Backing Up/Restoring Data Between Different Versions of the Central Admin
Server Software......................................................................................................... 525
F.4 Event Source Name Output by Central Admin Server .................................... 526
522
F.1 Updating System Settings from the Central Admin
Server
The following shows the compatibility of system setting updates between different
versions of the Central Admin Server and the scanner system version.
The version of the Central Admin Server software can be checked on the Central Admin
Console login window.
z ScanSnap N1800
Central Admin Server
Version
3.0.x
Scanner System Version
ss001 01.01.xx.xxxx
2.x.x. or earlier
Compatibility
Yes
No
z fi-6010N
Central Admin Server
Version
3.0.x
(*):
Scanner System Version
is001 01.04.xx.xxxx or later
Compatibility
Yes (*)
Can be used in the range of functions supported by the scanner.
523
F.2 Functional Compatibility Between the Scanner and
Central Admin Server
The following shows the functional compatibility between different versions of the scanner
system and the Central Admin Server.
The version of the Central Admin Server software can be checked on the Central Admin
Console login window.
z ScanSnap N1800
Central Admin Server
Version
Scanner System Version
3.0.x
ss001 01.01.xx.xxxx
2.x.x. or earlier
Compatibility
Yes
No
z fi-6010N
Central Admin Server
Version
3.0.x
(*):
Scanner System Version
is001 01.04.xx.xxxx or
later
Compatibility
Yes (*)
Can be used in the range of functions supported by the scanner.
524
F.3 Backing Up/Restoring Data Between Different
Versions of the Central Admin Server Software
The following shows the compatibility between different versions of the Central Admin
Server software for backing up or restoring data.
The version of the Central Admin Server software can be checked on the Central Admin
Console login window.
Central Admin Server
Software Version for
Data Backup
3.0.x
2.0.x or earlier
Central Admin Server
Software Version for
Data Restoration
Compatibility
3.0.x
Yes
3.0.x or earlier
No
3.0.x
Yes (*1) (*2) (*3)
(*1):
When Central Admin Server settings are restored from a previous version
of the Central Admin Server, default values are set for items newly added
in that of later version.
(*2):
To back up data, use the "AmBackup.exe" command from version 3.0.x of
the Central Admin Server. For details, refer to "5.17.4 Migrating Data to an
Updated Version of the Central Admin Server Software" (page 285).
(*3):
If the event log of the previous version is shown on the [Event Details]
window of the new version, the IP address information is not shown.
525
F.4 Event Source Name Output by Central
Admin Server
The event source name of the event log output by the Central Admin Server is as follows.
Central Admin Server Version
Event Source Name
3.0.x
Scanner Central Admin Server
2.0.x or earlier
iScanner Central Admin
526
527
Appendix G
Glossary
528
A4 size
A standard international paper size. (210 × 297 mm / approximately 8.27 × 11.7 in.)
A5 size
A standard international paper size. (148 × 210 mm / approximately 5.83 × 8.27 in.)
A6 size
A standard international paper size. (105 × 148 mm / approximately 4.13 × 5.83 in.)
ADF (Automatic Document Feeder)
A unit that allows the user to scan a number of pages consecutively.
Documents are transported from the ADF paper chute past the scanning area to the
output tray. Actual scanning is performed by the CCD sensors inside of this unit.
B5 size
A standard international paper size. (182 × 257 mm / approximately 7.17 × 10.12
in.)
B6 size
A standard international paper size. (128 × 182 mm / approximately 5.04 × 7.17 in.)
Brightness
Refers to the brightness level of the scanned data.
Business card size
A standard paper size. (51 × 89 mm)
Portrait orientation is used for this scanner.
Carrier Sheet
A carrier sheet is a plastic sheet specifically used for loading non-standard
documents onto the scanner.
529
Default settings
The settings installed at time of factory shipping.
dpi (dots per inch)
Dots per inch. Number of dots lined along one inch. The measurement of resolution
normally used for scanners and printers. Higher dpi means better resolution.
Duplex scan mode
A scan mode where both sides of each document sheet are scanned. See also
"Simplex scan mode".
Eject roller
Rollers that feed documents in the ADF to the stacker.
Executive size
A standard international paper size. (184.2 × 266.7 mm / approximately 7.25 × 10.5
in.)
Feed roller
Rollers that feed documents through the ADF.
Idler roller
Rollers that feed documents through the ADF.
Interface
The connection that allows communication from the computer to the scanner.
Landscape orientation
A document with its long side horizontal and its short side vertical. See also "Portrait
orientation".
LDAP (Lightweight Directory Access Protocol)
A protocol for accessing a directory database over a TCP/IP network.
530
Legal size
A standard international paper size. (215.9 × 355.6 mm / 8.5 × 14 in.)
Letter size
A standard North American paper size. (215.9 × 279.4 mm / 8.5 ×11 in.)
MMR
ITU-T (CCITT) T.6 compression.
A compression method used when the color mode is black and white.
Multifeed detection
A scanner function which detects accidental feeding of multiple sheets into the ADF.
Noise
Isolated white (black) dots appearing on black (white) areas of an image.
Pad assy (PAD ASSY)
A collection of rubber pads and metal leaf springs that is used to help separate a
single document sheet from a batch in the ADF paper chute for feeding into the
ADF.
Paper jam
A warning that appears when a document sheet is jammed in the document feed
path, or document feeding is interrupted by a slipping sheet.
Pick roller
Rollers that feed documents through the ADF.
Portrait orientation
A document with its long side vertical and its short side horizontal.
See also "Landscape orientation".
Postcard size
A standard paper size. (100 × 148 mm / approximately 3.94 × 5.83 in.)
Portrait orientation is used for this scanner.
531
Resolution
A measure of the fineness of details or grain of images. The customary metric of
resolution is dpi (dots per inch). For any given image, the higher the resolution, the
more dots or pixels that can be used, and the greater the resulting fineness of detail
that can be expressed.
Simplex scan mode
A scan mode where only one side of each document sheet is scanned. See also
"Duplex scan mode".
Ultrasonic sensor
A type of sensor that uses ultrasonic sound waves, in this case to detect document
multifeeds by recognizing differences in how the sound penetrates single versus
multiple sheets.
532
533
About Maintenance
Contact your FUJITSU scanner dealer or an authorized FUJITSU scanner service provider for
repairs to this product.
Do not perform repairs on this scanner.
534
535
Index
A
automatic logout setting
........................ 110
Add-in .................................................... 189
Add-in group
B
......................................... 256
background removal .............................. 387
adding
e-mail address ................................. 317
backing up Central Admin Server
fax number
...................................... 329
settings .................................................. 281
job group
......................................... 216
backing up the user data store .............. 178
job menu
......................................... 210
backing up/restoring data between different
job sequence ................................... 201
versions of the Central Admin Server
scanned data ................................... 400
software ................................................. 525
ADF paper chute ............................... 34, 36
basic mode .............................................. 67
admin connection .................................. 123
blank page skip
admin password .................................... 112
brightness .............................................. 383
..................................... 388
Admin Tool ........................................ 67, 82
administrator
C
............................. 37, 74, 226
administrator login
carbonless paper ................................... 475
via the Admin Tool
............................ 80, 87
care
administrator right
................................... 37
carrier sheet
administrator windows
....................................................... 416
.................................. 300, 362
carrier sheet setting ............................... 362
Admin Tool ........................................ 76
Central Admin Console
LCD touch panel
Central Admin Console window
advanced mode
............................... 75
...................................... 67
AmRestore.exe
changing
........................................ 278
AmInvestigate.exe
FTP server folder settings
................................ 284
password
..................................... 283
area not to be perforated
.... 227, 230
certificate management ......................... 100
AmBackup.exe ...................................... 281
AmExportLog
........... 67, 226, 238
............... 151
......................................... 112
checking
...................... 477
consumable alert status ................... 427
assigning job menus to users
network status
not included in a job group .................... 221
new updates
automatic logout .................................... 110
number of sheets to be scanned
536
................................. 121
.................................... 187
..... 411
user log
........................................... 402
DHCP
cleaning ................................................. 417
carrier sheet
DHCP server
.................................... 425
exterior of the scanner
.................................................... 113
........................................... 51
discarding edited mail address book ..... 518
.................... 419
DNS server .............................................. 51
inside of the scanner ....................... 420
document feed direction ........................ 368
LCD touch panel
document loading capacity .................... 476
............................. 419
cleaning frequency ................................ 418
cleaning supplies
downloading
.................................. 417
system log
clearing
....................................... 176
system settings in CSV format
system log ....................................... 176
user data store
........ 181
user logs .......................................... 174
................................ 180
dropout color
......................................... 386
user logs .......................................... 174
E
cloning
job menu
......................................... 214
edge cropping ........................................ 394
job sequence ................................... 207
editing
color mode setting ................................. 363
e-mail address book
compatibility with different versions
fax number list
...... 522
........................ 321
................................. 331
compression .................................. 369, 380
job group .......................................... 220
compression setting .............................. 380
job menu .......................................... 214
configuration from file ............................ 251
job sequence
configuring settings for sending e-mail
................................... 207
. 139
eject roller .............................................. 422
consumable ........................................... 427
e-mail ..................................................... 309
contrast
e-mail address book ...... 313, 317, 321, 323
................................................. 384
CSV format
custom
........................................... 174
e-mail address setting values ................ 483
.................................................. 356
exporting audit logs
............................... 277
extension ................................................. 34
D
F
default settings ...................................... 356
deleting
fax number list ....................... 327, 329, 332
e-mail address ................................. 323
fax server ................................................. 51
fax number
features
...................................... 332
................................................... 31
job group
......................................... 220
feed roller
job menu
......................................... 215
file format ............................................... 370
.............................................. 422
job sequence ................................... 208
file format of audit logs
scanned data ................................... 401
file format setting ................................... 369
537
.......................... 279
file name (for save/e-mail attachment) .. 410
intelligent multifeed detection ................ 102
file server
IP address
................................................ 50
............................................. 113
filtering
J
job sequences ................................. 208
the LDAP List
.................................. 209
filtering the LDAP List
job menu ................................................ 304
........................... 223
job mode settings
firewall settings for
............................ 77, 269
job setting quick user guide ................... 199
the Central Admin Server ...................... 240
folder alias ............................................. 145
K
folder list ........................................ 344, 348
keyword ................................................. 373
FTP server
.............................................. 51
FTP server folder details ....................... 152
L
FTPS server ............................................ 51
LAN connector ......................................... 35
functional compatibility between the
LCD touch panel .......................... 34, 62, 67
scanner and Central Admin Server ....... 524
LDAP server .................................... 50, 307
LDAPS server .......................................... 50
G
login ............................................... 242, 306
general scanner settings ....................... 106
login settings
getting a screenshot
login via the LCD touch panel
on the LCD touch panel
................. 78
........................ 195
glass ...................................................... 422
M
glossary ................................................. 528
magnification
......................................... 105
main menu ............................................. 303
I
idler roller
......................................... 107
maintaining
.............................................. 421
Central Admin Server settings ......... 281
importing scanner settings .................... 267
system settings ................................ 181
information output level ......................... 192
management
installation wizard .................................... 90
management file .................................... 482
installing
management settings ............................ 482
Add-in .............................................. 263
......................................... 226
managing
Add-in module ................................. 189
system log
Admin Tool ........................................ 82
user log ............................................ 173
Central Admin Console
................... 238
....................................... 175
marked section ...................................... 373
Central Admin Server ...................... 233
maximum number of e-mail targets that can
User Editor
be stored in the e-mail address book
...................................... 499
538
.... 317
maximum number of fax contact
part name
numbers ................................................ 329
part to clean ........................................... 418
menu ................................................. 75, 76
PDF password ............................... 369, 378
message screen .................................... 408
PDF password lock setting .................... 378
migrating data to an updated version of
pick roller ................................. 36, 422, 426
the Central Admin Server software ....... 285
ping ........................................................ 119
monitoring and maintaining the scanner
port number list ................................ 53, 498
network
positioning
................................................. 260
................................................ 34
............................................. 341
multifeed detection ........................ 102, 392
power button .............................. 34, 59, 307
My List ................................................... 313
power connector ...................................... 35
pre-settings
N
Central Admin Console .................... 233
network folder alias ............................... 146
User Editor ....................................... 499
network folder details ............................ 148
print
network printer alias ...................... 166, 167
print mode setting .................................. 343
network requirements
print server
............................. 52
....................................................... 333
.............................................. 51
network settings .................................... 113
printer details ......................................... 169
NTP server .............................................. 51
printer list ............................................... 333
processing a job
.................................... 405
purchasing a carrier sheet ..................... 435
O
obtaining
R
technical support ............................. 193
registering a network folder
technical support on the
offset
Central Admin Server .......... 284
network path .................................... 146
..................................................... 105
network tree ..................................... 144
operations
registering a network printer
............................... 37, 226, 296
network path .................................... 167
original document .................................. 297
network tree ..................................... 164
registering an FTP server folder ............ 149
P
pad assy .................................. 36, 421, 426
regular user
page orientation
regular user right
paper size
.................................... 389
............................. 37, 296, 303
..................................... 37
regular user settings overview ............... 305
............................. 364, 365, 473
removing
paper size setting .................................. 364
paper type ............................................. 474
FTP server folder ............................. 151
paper weight
network folder .................................. 147
......................................... 474
539
network printer
................................ 169
scan settings
renaming
......................................... 356
scan to SharePoint ................................ 348
network folder .................................. 147
scan viewer
network printer
scanner configuration file format
................................ 168
........................................... 398
replacement cycle ................................. 426
file format for exporting .................... 485
replacing
file format for importing .................... 484
pad assy .......................................... 428
scanner requirements for central admin .. 52
parts
scanner settings
.............. 74, 226, 240, 266
screen calibration
.................................. 439
................................................ 426
pick roller ......................................... 430
required scanner function settings .......... 69
searchable PDF ..................................... 371
requirements for User Editor ................. 498
security cable slot .................................... 35
resetting
selecting
entire system to factory defaults
..... 184
e-mail address ................................. 313
factory defaults ................................ 184
fax number ....................................... 327
system settings to factory defaults .. 184
semi-transparent documents ................. 475
usage counter
sending
resolution
................................. 171
.............................................. 366
e-mail ............................................... 309
resolution setting ................................... 366
fax .................................................... 324
restoring
setting
Central Admin Server settings
........ 283
Central Admin Server
.............. 125, 245
system settings
............................... 183
date/time ............................................ 98
user data store
................................ 180
distribution list .................................. 512
root certification authority ...................... 488
DNS server ...................................... 115
root certification authority list
e-mail address ................................. 514
rotating scanned data
................ 489
........................... 399
e-mail LDAP server
......................... 133
e-mail server .................................... 137
S
fax server ......................................... 142
file name format for when attaching
SAM account name ............................... 132
save
scanned data to e-mail
...................................................... 344
........ 140
file name format for
saving
when saving scanned data
mail address book ........................... 519
to a folder
group
........................................ 344
.. 156
............................................... 510
scaling ................................................... 337
job group .......................................... 216
Scan button ....................................... 34, 61
job menu .......................................... 210
scan mode
job sequence
............................................ 367
540
........................... 197, 201
T
LDAP search parameters ................ 135
link speed/duplex mode
login LDAP server
.................. 122
text recognition .............................. 369, 371
........................... 127
top cover .................................................. 35
NTP server ...................................... 117
top cover release catch
on-screen keyboard
turning the power on/off ........................... 57
proxy server
.......................... 99
........................... 34
.................................... 118
region/timezone ................................. 97
U
scanner configuration ...................... 251
scanner name
uninstalling
................................... 94
Add-in module
................................. 190
setting mode ...................................... 92
Admin Tool
SharePoint folders ........................... 153
Central Admin Console .................... 241
Wake-On-LAN ................................. 122
Central Admin Server
WINS server .................................... 116
User Editor ....................................... 502
setting mode
........................................... 67
........................................ 86
...................... 241
update check ......................................... 187
setting up for administrator access
updating system settings
via the Admin Tool
from the Central Admin Server .............. 523
settings group
.................................. 80
....................................... 256
SharePoint server
uploading an Add-in settings file
................................... 50
sharpness
............................................. 385
sheet guide
............................................. 36
URL
........... 191
......................................... 82, 195, 499
user data
User Editor
............................................... 177
............................................ 497
side guide ................................................ 34
user log .................................................. 402
simplex / duplex
.................................... 343
user log summary .................................. 173
SMTP server ........................................... 50
user principal name ............................... 132
specifications
using the on-screen keyboard ................. 63
stacker
........................................ 492
.................................................... 35
standby mode
................................. 59, 110
V
standby mode setting ............................ 110
ventilation ports
switching the keyboard layout ............... 495
viewing
system requirements
Add-in status .................................... 190
Admin Tool ........................................ 46
Central Admin Console
detailed settings for a job group
..................... 47
...... 221
detailed settings for a job menu ....... 215
Central Admin Server ........................ 48
system settings
....................................... 35
event log .......................................... 275
....................................... 94
mail address book
system update ....................................... 261
........................... 506
scanned data ................................... 398
scanners operating status
541
............... 274
status of consumable parts
............. 171
status of installed options ................ 172
system log details ............................ 175
system status
.................................. 170
update status lists
........................... 272
user log details ................................ 173
W
windows of User Editor
......................... 503
WINS server ............................................ 51
wizard ...................................................... 90
wood containing paper .......................... 475
542
ScanSnap N1800
Operator's Guide
P3PC-3182-01ENZ0
Issue date November 2010
Issued by PFU LIMITED
zThe contents of this manual are subject to change without notice.
zPFU LIMITED assumes no liability for incidental or consequential
damages arising from the use of this Product, and any claims by a
third party.
zCopying of the contents of this manual, in whole or in part, as well
as the scanner applications is prohibited under the copyright law.