1
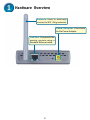
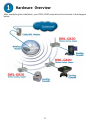
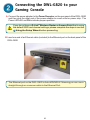
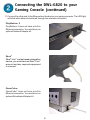
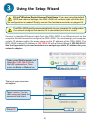
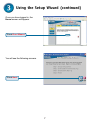
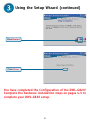
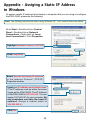
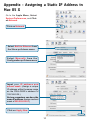
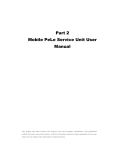
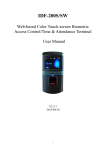
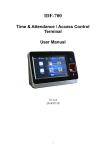
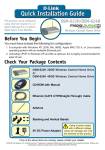
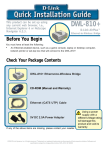
This product can be set up using
an
en
eb br
owser
.,
anyy curr
curren
entt W
Web
browser
owser,, i.e
i.e.,
Internet Explorer 6 or Netscape
Navigator 6.2.3.
DWL-G820
D-Link AirPlus Xtreme G™
Wireless Gaming Adapter
Before You Begin
You must have at least the following:
• An Ethernet-Enabled Game Console
•
•
•
•
A Wireless Access Point or Router
A Broadband Internet Connection
A Computer with an Ethernet Adapter
Xbox® Live™ users must have the necessary Xbox® Live™ equipment and an account
Check Your Package Contents
Your DWL-G820 purchase includes the following items:
DWL-G820 Wireless Gaming Adapter
CD-ROM (Manual and Warranty)
Ethernet (CAT5 UTP) Cable
5V DC, 2A Power Adapter
Using a power
supply with a
different voltage rating
will damage this product
and void its warranty.
If any of the above items are missing, please contact your reseller.
©2004 D-Link Systems, Inc. All rights reserved. Trademarks or registered trademarks are the property of their
respective holders. Software and specifications subject to change without notice. DWL-G820.06282004
Hardware Overview
Antenna: Used to wirelessly
connect to 802.11b/g networks.
Power Receptor: Connection
for the Power Adapter.
LAN Port: Connects to the
gaming console using a
standard Ethernet cable.
2
Hardware Overview
After completing the installation, your DWL-G820 setup should look similar to the diagram
below:
3
Connecting the DWL-G820 to your
Gaming Console
A. Connect the power adapter to the Power Receptor on the rear panel of the DWL-G820
and then plug the other end of the power adapter to a wall outlet or power strip. The
Power LED will turn ON to indicate proper operation.
If you do not have a D-Link® Wireless Router or Access Point that is using
the default SSID and channel settings, please complete the steps in section
Using the Setup Wizard before proceeding.
B. Insert one end of an Ethernet cable (included) to the Ethernet port on the back panel of the
DWL-G820.
The Ethernet port on the DWL-G820 is Auto MDI/MDI-X. Meaning you can use a
straight-through or crossover cable to the Ethernet Port.
4
Connecting the DWL-G820 to your
Gaming Console (continued)
C. Connect the other end to the Ethernet port located on your gaming console. The LED light
will blink when data is transferred through the wireless connection.
PlayStation® 2
PlayStation® 2 does not have a built-in
Ethernet connection. You must have an
optional Network Adapter kit.
Xbox®
Xbox® Live™ is a fee based subscription
service, you must have an Xbox® Live™
account and any required equipment
to connect.
GameCube™
GameCube™ does not have a built-in
Ethernet connection. You must have an
optional Broadband Adapter kit.
5
Using the Setup Wizard
D-Link® Wireless Router/Access Point Users: If you are using the default
SSID and channel settings, the DWL-G820 will connect right out of the box.
No configuration is needed! Simply connect the hardware as shown on pages 4-5.
The DWL-G820 must be connected directly to your computer for configuration.
You cannot configure this device if it is connected to a hub or router.
Connect a standard Ethernet cable from the DWL-G820 to an Ethernet port on the
computer that will be used to configure the DWL-G820. You must assign your computer
a static IP address within the same range as the IP address of the DWL-G820. The
DWL-G820’s default IP address is 192.168.0.35 with a Subnet Mask of 255.255.255.0.
See the Appendix if you need assistance in assigning a static IP address for your
network adapter.
Open your Web browser and
type http://192.168.0.35 into
the URL address box. Then
press the Enter or Return key.
The log-in pop-up screen
will appear.
Type “admin” for the
user name and leave the
password field blank.
Click OK
6
Using the Setup Wizard (continued)
Once you have logged in, the
Home screen will appear.
Click Run Wizard
You will see the following screens.
Click Next
7
Using the Setup Wizard (continued)
Step 1 - Set up your new password.
You have the option to establish a
password.
Click Next
Step 2 - Setup your Wireless LAN
Connection
The default wireless settings are:
SSID = default
Channel = 6
Click Next
Step 3 - Setup your Encryption
The DWL-G820 is capable of three
levels of wireless encryption 64-bit,
128-bit, and 152-bit. By default the
Encryption is disabled. You can
change the Encryption settings for
more secure wireless communication.
Click Next
8
Using the Setup Wizard (continued)
Click Restart
Click Close
You have completed the Configuration of the DWL-G820!
Complete the hardware installation steps on pages 4-5 to
complete your DWL-G820 setup.
9
Appendix - Assiging a Static IP Address
in Windows
To assign a static IP address to the laptop or computer that you are using to configure
the DWL-G820, please do the following:
Note: The following screens are taken using Windows XP. Your screens may look similar.
Go to Start > Double-click on Control
Panel > Double-click on Network
Connections > Right-click on Local
Area Connections > Click Properties
Highlight Internet Protocol (TCP/IP)
Click Properties
Select Use the following IP address
in the Internet Protocol (TCP/IP)
Properties window
Input your IP address and subnet mask.
(The IP address must be within the same
range as the DWL-G820. The IP Address
of the DWL-G820 is 192.168.0.35. You can
assign 192.168.0.51 for your computer. No
two computers can have the same IP
address. Assign a subnet mask of
255.255.255.0.)
Click OK
10
Appendix - Assigning a Static IP Address in
Mac OS X
Go to the Apple Menu, Select
System Preferences, and Click
on Network.
Click on Network
Select Built-in Ethernet from
the Show pull-down menu
Select Manually from the
Configuration pull-down menu
Input your IP address and
subnet mask. (Assign a unique
IP address within the same range
as the DWL-G820’s address of
192.168.0.35.)
No two computers can have the
same IP address. Assign a subnet
mask of 255.255.255.0.)
Click on Apply Now
11
Techni
cal Support
echnical
You can find software updates and user documentation on the D-Link website.
D-Link provides free technical support for customers within the United States and
within Canada for the duration of the warranty period on this product.
U.S. and Canadian customers can contact D-Link technical support through our
website, or by phone.
Tech Support for customers within the United States:
D-Link Technical Support over the Telephone:
(877) 453-5465
24 hours a day, seven days a week.
D-Link Technical Support over the Internet:
http://support.dlink.com
email:[email protected]
Tech Support for customers within Canada:
D-Link Technical Support over the Telephone:
(800) 361-5265
Monday to Friday 7:30am to 12:00am EST
D-Link Technical Support over the Internet:
http://support.dlink.ca
email:[email protected]