1
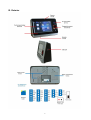
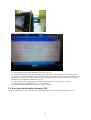
IDF-700 Time & Attendance / Access Control Terminal User Manual V1.0.4 2014/07/18 1 Contents I. Features ................................................................................................................................................................ 3 II. Specifications ...................................................................................................................................................... 4 III. Exterior ................................................................................................................................................................ 5 IV. Basic Settings .................................................................................................................................................... 6 Clock ..................................................................................................................................................... 6 Users .................................................................................................................................................... 6 ■ ■ ■ ■ ■ ■ ■ ■ ■ ■ ■ ■ ■ ■ ■ System ................................................................................................................................................. 6 Network ....................................................................................................................................................... 6 Record Option.............................................................................................................................................. 6 Tamper Switch ............................................................................................................................................. 6 Calibration ................................................................................................................................................... 6 Beep Hints ................................................................................................................................................... 6 Menu Password............................................................................................................................................ 7 Security Level .............................................................................................................................................. 7 Volume ......................................................................................................................................................... 7 HTTP & TCP Port........................................................................................................................................ 7 FTP User Set(to be performed by professionals of your supplier only) ...................................................... 7 System Maintenance .................................................................................................................................... 7 Database Backup ......................................................................................................................................... 7 Language ..................................................................................................................................................... 7 WiFi Setting ................................................................................................................................................. 7 Camera ......................................................................................................................................................... 7 Door .................................................................................................................................................... 8 IO Port(DI/DO) .................................................................................................................................... 8 Fingerprint ........................................................................................................................................... 9 V. User Interface...................................................................................................................................................... 9 VI. Self-contained Time & Attendance / Access Control Software................................................................... 9 Set login password ........................................................................................................................................... 10 Database Backup(External database backup) .................................................................................................. 10 System Setting ................................................................................................................................................. 10 Clone Database(Internal database backup) ...................................................................................................... 11 Attendance Report (Detailed) – for fixed shifts users ..................................................................................... 11 Attendance Report (Total) – for fixed shifts users ........................................................................................... 11 Attendance Report (Multi Work Shift) – for multiple flexible shifts users...................................................... 12 Transactions ..................................................................................................................................................... 12 Transactions Delete.......................................................................................................................................... 13 Job Code Setting .............................................................................................................................................. 13 Set Bell Schedule ............................................................................................................................................. 13 Slave Host Setting............................................................................................................................................ 14 PC Server Info ................................................................................................................................................. 14 Leave Setting(this function to be formally announced soon) .......................................................................... 14 Insert Leaves(this function to be formally announced soon) ........................................................................... 15 2 Work Shift Setting ........................................................................................................................................... 15 Holiday Setting ................................................................................................................................................ 16 Department ...................................................................................................................................................... 16 User.................................................................................................................................................................. 16 User Weekly Shift ............................................................................................................................................ 17 VII. KATES(Super Master) Central Management Software ................................................................................... 17 Introduction ..................................................................................................................................................... 17 How to append access/time terminals ...................................................................................................................... 18 Login KATES web system....................................................................................................................................... 18 Administration ......................................................................................................................................................... 20 User Management ............................................................................................................................................ 20 User List .......................................................................................................................................................... 22 Work Shift Management .................................................................................................................................. 24 User Weekly Shift ............................................................................................................................................ 24 Import Shift Program in .XLS ......................................................................................................................... 24 Attendance ............................................................................................................................................................... 25 Transaction(access/attendance logs) ................................................................................................................ 25 Transactions Add ............................................................................................................................................. 26 Transactions Modify ........................................................................................................................................ 26 Attendance Report (Weekly Rotation) ............................................................................................................. 27 Flexible Shift work hour calculation ............................................................................................................... 27 Access Control......................................................................................................................................................... 28 Access Control Setting .................................................................................................................................... 28 Access Control (advanced) Under development! ............................................................................................ 29 System ..................................................................................................................................................................... 33 Change Password ............................................................................................................................................. 33 Supervisor Management .................................................................................................................................. 33 Supervisor Password Reset .............................................................................................................................. 33 User Password Reset........................................................................................................................................ 34 Server Setting .......................................................................................................................................................... 34 Database Backup and Restore.......................................................................................................................... 34 What to do if any of your Slave terminals gets malfunction? .......................................................................... 35 Data Transfer from Terminal to KATES .......................................................................................................... 35 VIII. System Upgrade .............................................................................................................................................. 35 IX. Data download & upload through USB ............................................................................................................. 36 I. Features ■ ■ ■ ■ ■ ■ ■ ■ ■ ■ ■ ■ ■ ■ ARM 800MHz CPU; communication speed 100MB. Windows CE 6.0 operating system, built-in web server, FTP server and SQL CE 3.5 database. 7-inch color touchscreen LCD. Each terminal has a built-in web-based software. We also provides a free central management software (ASP.NET + SQL Express) for larger-scaled application. Can use either a terminal or a PC as the server for synchronizing all the connected slave terminals. TCP/IP interfaced. LAN / WAN(WiFi supported). 1.3MP camera records each punching to avoid faking. Every user can check its own attendance logs & work hrs between each IN & OUT record directly on the Touchscreen. Auto reconciliation of user & fingerprint accounts among multiple terminals in network. 256MB DRAM + 512MB Flash + 2GB Micro SD. Optical fingerprint reader + 125KHz + Mifare 13.56MHz card reader. Color touchscreen wallpaper is replaceable for displaying custom graphic design & company logo. Can store 9,500 fingerprints(2 fingerprints each user), 30,000 cards and 250,000 events. 50 programmable bell ring times (through web browser). Music ring file(.wav) is changeable via FTP. 3 II. Specifications CPU: Memory: Display: Fingerprint sensor: Card reader: Camera: Communications: Power input: Input: Output: Sound output: LED indicator: Operating temp.: Operating hum.: Measurements: Weight: ARM 800MHz 256MB DRAM + 512MB Flash + 2GB Micro SD 7 inch 800x480 touchscreen LCD Scratch-proof Optical EM & Mifare 1.3MP*1 RJ45*1, WiFi*1, USB2.0*1 DC12V 1.25~2A Sensor*2(Push Button, Door Sensor) Relay*2(Door Lock, Alarm or Bell) & Wiegand*1 Piezo Buzzer & 3020 speaker Comm. & card/finger reading 0 ~ 50°C / 32 ~ 122°F 20 ~ 95%(non-condensing) 226*150*72 mm 1200 g 4 III. Exterior 5 IV. Basic Settings Click [System Maintenance] to enter the setting menu(necessary settings are marked in Blue): Clock Manual time: Select Time Zone(UTC) > Click Apply > Set Date & Time. Auto time: Tick the Auto Time check box > fill out IP address of a preferred time server > click Apply. Users Add/Delete/Modify user information including User ID, Card numbers(Card numbers are used for identifying users and their enrolled fingerprints. It can be the number of an actual RF card, or you may make up a number for an user who is requested to use fingerprint only.), User Names, Access PIN(default: 888888), User Group(if set as VIP the user will be allowed to on the bottom of IDF-700’s main screen to pop up the keyboard and enter its click the keyboard icon card number to open the door without reading its card or fingerprint), & User Validity. A much faster and more convenient way for User management is through your IDF-700’s Self-contained or PC-end web-interfaced software (for details please refer to p.8 & 15). System ■ Network For setting IP address, Sub-net Mask, Gateway & DHCP on/off while using Ethernet cable. Once completed click [Apply] to save settings. ■ Record Option For selecting required records & relevant rules: In Record — In / Clock In records of registered users. Out Record — Out / Clock Out records of registered users. Event Record — including all records other than the above two, such as records of unregistered users, alarm, open-button, door open from software, etc. Record Cycle — if enabled, new records will overwrite old records when IDF-700 memory is full. Unduplicate — once enabled IDF-700 will stop recording the same card or fingerprint reading in the set interval(inMinute). 5 Digit — this is a special feature designed for those who require the card reader to decode only 5 digits of a card number. Ignore this if you are not sure about what this is! ■ Tamper Switch If enabled, IDF-700 will alarm in case of vicious destruction. ■ Calibration Used for re-calibrating touch screen if touch point found imprecise. Steps to do: 1. Click [Re-calibrate]. 2. A positioning cross will appear sequentially 5 times. Press on the centers of these crosses using your finger tip or a stylus precisely until you finish all the 5 crosses. Double-click on the blank screen to complete the procedure. ■ Beep Hints 6 For enable/disable sound for the following: 1. Key 2. Music Ring 3. Hints ■ Menu Password For setting a password for entering [System Maintenance]. Steps to do: 1. Old PIN: input old password(leave it blank if there is not). 2. New PIN: enter a new password(max. 6 digits). 3. New PIN Again: enter the new password again. 4. Click [Apply] to save setting. ■ Security Level For adjusting strictness of fingerprint verification. There are totally 5 levels. The higher the figure is the stricter the verification will be(level 1 is recommended). ■ Volume For adjusting the speaker volume(totally 6 scales & the Mute option). ■ HTTP & TCP Port For assigning IDF-700 HTTP & TCP port. ■ FTP User Set(to be performed by professionals of your supplier only) Each on-line(LAN or WAN) IDF-700 can be logged in via FTP for updating or maintaining its: 1. Residence Application(firmware). 2. Datebase(SQL CE3.5). 3. Self-contained Time & Attendance / Access Control software. 4. Sound files(.wav). 5. All graphics used as User Interfaces, such as the touch screen wallpaper. ■ System Maintenance 1. Initialize System: Delete “everything”, including all user information, users’ enrolled fingerprints, attendance records & reset to factory defaults. 2. Delete Users & Finger: Delete all users & their enrolled fingerprints but keep all other settings. 3. Delete All Fingerprints: Delete all enrolled fingerprints but keep all users and other settings. 4. Delete Transactions: Delete all attendance & event records. 5. Reboot Device: for rebooting IDF-700. ■ Database Backup For setting a fixed time everyday for database auto backup to IDF-700’s built-in Micro SD card. The function can be enabled or disabled. ■ Language For selecting interface language of IDF-700’s touch display. Currently supports English & Chinese. More languages will be included soon. ■ WiFi Setting For those who use wireless LAN for data communication. 1. Select Encryption mode. 2. Select Authentication mode. 3. Provide you Wireless LAN connection password/key. ■ Camera Provides following settings to the built-in camera: 7 1. Enable/Disable camera function. 2. Face detection enabled: once this function is enabled the camera will not take a snap until it successfully detects a human face 3. Photo storage path: for changing photo storage directory in IDF-700’s memory(if changed you will not be able to browse photos linked to each attendance/access log in Transaction Report of IDF-700 self-contained Time Attendance/Access Control software). Door ■Contr Mode — this function currently does not apply to model IDF-700. ■ Entry Type(authentication) — provides 6 different combinations of user identification: 1. Card only. 2. PIN only(default PIN: 888888. Changeable at [Users]). 3. Card & PIN. 4. FP only(fingerprint only). 5. FP & Card. 6. FP or Card(either of two will be accepted). ■ Sensor Type: Type of sensors connected to IDF-700(Normally Open/Normally Close). ■ Button Type: Door-open button type(Normally Open/Normally Close). ■ First Card Open: This is a special feature that once activated, in the access-allowed periods of st selected [User Group], the door will be kept unlocked since the 1 reading of a registered card/fingerprint until the period ends(door auto lock up then). This function currently does not apply to IDF-700. ■ Open Time: Door unlock duration after each reading of a registered card/fingerprint(default: 5 seconds). ■ Close Time: the interval from the door being unlocked until the door sensor starting detecting whether the door is closed properly(default: 30 seconds). IDF-700 will alert if the door detected not closed. ■ Access PIN: for setting a common(applies to all registered users) door-open password(referring to [Entry Type] described in p.6). IO Port(DI/DO) ■ Relay 1: for assigning for connecting a Lock, Bell, Alarm, Illegal or Null. ■ Relay 2: for assigning for connecting a Lock, Bell, Alarm, Illegal or Null. ■ WG In: if a Wiegand-interfaced card reader is applied as an external reader you may define it as for In or Out here. ■ Card(main): for assigning IDF-700’s built-in card readers(both125KHz & 13.56MHz) as for In or Out. This setting will be necessary only when a Wiegand-interfaced external card reader is applied to IDF-700 for reading cards on different card readers at either side of a door. ■ FP(main): for assigning IDF-700’s built-in fingerprint reader as for In or Out. ■ WG Out: for connecting IDF-700 to other host controller(IDF-700 simply works as a data collection unit). 8 Fingerprint For enrolling fingerprints of registered users. Each registered user is allowed to enroll 2 different fingerprints. Steps to do: 1. Input the user’s Card Number. 2. Click[Enroll Fingerprint] or [Delete Fingerprint]. 3. When [Enroll Fingerprint] is clicked, red backlight of the fingerprint sensor on > put your finger on > red backlight off > take your finger off scanner > red backlight on again > put finger on again > red backlight st nd off again > 1 fingerprint enrollment completed > repeat the same procedure for enrolling the 2 fingerprint if necessary. V. User Interface Click this icon & read a card or fingerprint for a Clock-In. Click this icon & read a card or fingerprint for a Clock-Out. For entering a Job Code(0~255) before reading a card or fingerprint. The entered Job Code will be part of the attendance record and used for distinguishing/classifying attendances of different types of works. Enter a Job Code, click and then read a card or fingerprint. Click this icon to enter the [Check Attendance] page. After reading your card or fingerprint you will get your own attendance hours between each Clock-In & Clock-Out. You may choose to browse data of Today, A Week, A Month, Select a Date or All. Click the [Exit] button to return to the main screen after a query. Click this icon to enter the [Attendance Logs] page. After reading your card or fingerprint you will be able to browse your own Clock-In & Clock-Out records. You may choose to browse data of Today, A Week, A Month, Select a Date or All. Click the [Exit] button to return to the main screen after a query. VI. Self-contained Time & Attendance / Access Control Software IDF-700’s unique Built-in Web-based software is designed for fulfilling easy Time & Attendance management of small businesses(especially for stand-alone usage and employee numbers is under 30). It allows a system manager to manipulate it simply through a Web Browser such as Microsoft Internet Explorer! Please setup the system accordingly following below steps: Log onto an IDF-700’s built-in web application. Method 1: 9 Connect your IDF-700 clock to Ethernet and the device will get an IP address for itself. Enter Menu on the color touch-screen > System > NetWork and write down the device IP address you see. Go to any computer which is in the same network with your IDF-700 terminal, open web browser(ex. Microsoft Internet Explorer) and enter IP address following http:// and followed by “/login.asp”(ie. http://192.168.123.105/login.asp) and press [Enter] key to enter the system log-on page. Enter the default user “ADMIN”, leave the password blank, and click [Login] to enter the main page. Method 2(for setting a designate IP address): Enter Menu on the color touch-screen > System > and complete IP address, Subnet Mask, Gateway settings accordingly and disable DHCP. Connect your IDF-700 clock to Ethernet(LAN), go to any computer which is in the same network with your IDF-700 terminal, open web browser(ex. Microsoft Internet Explorer) and enter IP address following “http:// “and followed by “/login.asp”(ie. http://192.168.123.105/login.asp) and press [Enter] key to enter the system log-on page. Enter the default password “admin” and click [Login] to enter the main page. Remark: For WiFi version the settings are at Menu > System > WIFI SET and Menu > System > WIFI IP Login page Main page Set login password For changing the default web login password. 1. Click on [Admin Password] in the left menu to enter the setting page. 2. Enter the new password and click [Save] to confirm the change. Database Backup(External database backup) For copying your IDF-700 database to your computer. 1. Click on [Database Backup] in the left menu. 2. IDF-700 database consists of two files, KATS.SDF & DISTR.SDF. Simply click on each file to download it to a favorite directory in your computer so that they can be applied in case of a hardware issue with your IDF-700/SW. System Setting Click on [System Setting] in the left menu and you will find 3 settings: 1. Select the Date format that you want to apply to all attendance reports. 2. Enable or disable the Leave Setting function(this function is not ready yet. It’s to be formally announced soon). 3. Set the storage roof of Default Database(currently used by system) to maintain high system efficiency. Soft Limit: system will emit a reminder when records accumulate to the soft limit. Hard Limit: system will force user to run [Transactions Delete] when records accumulate to the hard limit. 10 Clone Database(Internal database backup) Backup database in IDF-700’s own memory(Micro SD card). [Clone Database] can be taken any time you feel necessary or every time before you run [Transactions Delete]. You may also switch to use an older Clone Database for browsing earlier data or generating earlier attendance reports any time. Attendance Report (Detailed) – for fixed shifts users For generating detailed employee attendance reports. 1. Click on [Attendance Report Detailed] in the left menu. 2. Select a searching criterion(by User, Department or All employee). 3. Set the query timeframe(yyyy/mm/dd ~ yyyy/mm/dd). Leave the timeframe blank for searching all time. 4. Click the [Query] button to generate the report. You may also click [Print] to print the report or export the report in .csv, .txt and .xls. Attendance Report (Total) – for fixed shifts users For generating attendance summary(accumulated worked hours). 1. Click [Attendance Report Total] in the left menu. 2. Select searching criterion(by User, Department or All employee). 11 3. Set the query timeframe(yyyy/mm/dd ~ yyyy/mm/dd). Leave the timeframe blank for searching all time. 4. Click the [Query] button to generate the report. You may also click [Print] to print the report or export the report in .csv, .txt and .xls. . Attendance Report (Multi Work Shift) – for multiple flexible shifts users This function is for calculating work hour sum of employees who are requested to attend more than one flexible shifts a day. Work hour sum can be calculated and displayed by each single shift, each day or selected date range. To apply this function the clock(IDF-700 series) needs to be switch from Access Control to Time & Attendance mode and employees are requested to press 1 for a clock-in and 2 for a clock-out before they scan their fingerprints or read their proximity badges. 1. Click [Attendance Report (Multi Work Shift)] in the left menu. 2. Select users(by User, Department or All employee). 3. Set the query date range(yyyy/mm/dd ~ yyyy/mm/dd). Leave the columns blank for searching all time. 4. Select report type(by work shift, daily sum or sum of selected date range). 5. Click the [Query] button to generate the report. Transactions For browsing or exporting attendance records. 1. Click [Transactions] in the left menu. 2. Click [Add New] directly to generate a new record manually→select a Card ID(Employee)→enter date & time for that record(format: yyyy/mm/dd hh:mm:ss)→click [Save] to confirm or [Cancel] to abort. 3. Set searching criteria and click [Search] to browse current records stored in the clock database. 4. Click the [Query] button to generate the report. You may also click [Print] to print the report or export the report in .csv, .txt and .xls. 12 Transactions Delete For deleting Transactions(access/attendance records) to reduce database size. You have following choices: 1. Delete all records but keep those of latest 2~6 months. 2. Delete all records in the selected date range. 3. Delete all records . 4. Enable/disable internal database auto backup every time you perform data deletion. Job Code Setting For defining reasons of punches(only valid in Time Attendance mode under which each user may enter a code from 1~9 before scanning a card or fingerprint). 1. Click [Job Code Setting] in the left menu. 2. Click ADD NEW to enter the setting page. 3. Enter a Job Code and its status definition and click Save. Set Bell Schedule For programming 50 sets of bell activation schedule. 1. Click on [Bell Schedule] in the left menu to enter the bell schedule list. 2. Click on the [Bell Schedule No.] to enter the setting page. 3. Tick the [Enabled] check box, fill out the [Ring Time] and [Duration], and set the [Weekly Schedule]. 4. Click [Save] to confirm change or [Cancel] to abort. 13 Slave Host Setting If you have multiple IDF-700 terminals in a network, you are allowed to designate one of them as a Master terminal. All the users and fingerprints registered to the Master terminal will be reconciled to all the Slave terminals and all the clock-In & Clock-Out records on the Slaves will be collected to the Master in real time. 1. Click on [Slave Host Setting] in the left menu to enter the Slave terminal list. 2. Click on a Slave terminal ID(1~30) to enter the detailed setting form. 3. Enable the Slave terminal, enter the IP address it applies and give the terminal a name. 4. Click [Save] to confirm or [Cancel] to discard. Notice: This setting is only required on the unit that you want to make as Master/Server. PC Server Info For editing server information if you choose to install Kizone’s KATES central management software on a PC to manage all the IDF-700 in the network (this function is to be set up by professional from your product supplier). 1. Enter the IP of the server PC. 2. Keep the server port 9008 unchanged. 3. Tick to enable this setting. 4. Give this IDF-700 an ID. 5. Click [SAVE]. Leave Setting(this function to be formally announced soon) For appending different types of leaves. 1. Click[ADD NEW]. 2. Enter Leave No/ID and Leave Name and click [SAVE]. 14 Insert Leaves(this function to be formally announced soon) For inserting leaves for users/employees. You are allowed to insert 3 leaves a day at most. 1. Click [ADD NEW]. 2. Select user/employee, date, leave, enter hours and note and click [SAVE]. Work Shift Setting For generating employee work shifts. 1. Click on [Work Shift Setting] in the left menu to enter the work shift list. 2. Click on an existing shift code to modify the details or click [Add New] to append a new work shift. 3. Enter Shift Code, Shift Name, Start Time, End Time and Auto Deduct Break time. Tick the Default Work Shift check box if necessary. 4. Click [save] to confirm, [Cancel] to abort or [Delete] to delete an existing work shift. Notice: A Cross-day shift spanning two days is allowed only when it’s followed by another Cross-day shift or a Holiday. 15 Holiday Setting For appending holidays in the year. 1. Click [ADD NEW]. 2. Select Date and enter description(holiday name) and click [SAVE]. Department For browsing, modifying and generating departments. 1. Click [Department] in the left menu to browse the current departments list. 2. Click the Department ID directly to get the detail→enter a new Department ID→click [save] to confirm or [Cancel] to abort. 3. Click [Add New]→enter Department ID→enter Department Name→click [save] to confirm or [Cancel] to abort. User For browsing/modifying/deleting/adding users(employees). 1. Click [User] in the left menu to browse current users. 2. Click on User ID directly for modifying details of or deleting the user. 3. Click [Add New] to enroll a new user. Enter User ID→enter User Name→assign a department for the user→enter the Card No. if a proximity card will be used(for those users who are using Fingerprints only please also enter virtual Card No. ie. 0001, 0002, 0003, etc.)→click [save] to confirm or [Cancel] to abort. Notice: All enrolled users will have door access right if IDF-700 is applied for door control. 16 User Weekly Shift For programming weekly shift schedules for each user. 1. Click [User Weekly Shift] in the left menu. 2. Select an user→select an work shift for each week day and weekend→click [Save] to confirm. Notice: 1. The work shift choices contains a built-in shift named “Holiday”. 2. An overnight shift(cross-day shift) can only be followed by another overnight shift or Holiday(Holi) in the next day! VII. KATES(Super Master) Central Management Software Introduction Recommended to use when you are running multiple time/access terminals in the same network and having more than 30 employees or can generate more than 200 records per day! The KATES Central Management system is a web-based application software for managing multiple time/access terminals such as model AD-350W, AD-350WFP , IDF-200S & IDF-700 in a network. The software is for installing on a PC which runs Windows operating systems such as XP, Vista & 7(both Home & Professional editions). Super Master main functions include: 1. Maintaining employee accounts (including fingerprints), work shifts, shifts rotation program, slave terminal accounts & attendance reports. 2. Automatically synchronizing all the slave terminals employees & fingerprints from its own database. 3. Collecting enrolled fingerprints & attendance/access logs from all the slave terminals. 4. Calculating attendance & exporting reports (in .txt or .xls). 5. Automatically exporting attendance/access log in custom format to designated directory for being further applied to enterprises’ existing payroll or ERP systems(this feature is under development currently). 6. Assigning different door access rights to different users(employees). KATES consists of: 1. Web pages system. 17 2. DataSync service(Performing synchronization between computer and terminals). 3. KATES Database How to append access/time terminals 1. Complete the KATES installation on a computer. 2. Complete the installations of all access/time terminals and ensure every terminal has been given an IP address correctly. 3. Log into KATES web. Method: Open web browser such as Internet Explorer. Enter http://IP (IP = IP address of the computer on which KATES was installed. Ex. http://59.125.121.14). 4. Enter [Slave Terminal Setting] / [Slave Host Setting] to add all the installed terminals. If KATES is installed on a PC which is given with a virtual IP address, all the terminals have to use public static IP addresses. In reverse, If public IP address is available for the KATES/PC only and all the terminals in the network have to use virtual IP addresses, you may set these terminals as “Push Sync Client” so that they can “find” the KATES/server and exchange data with it). These appended terminals will then be defined as Slaves which since then will be under the control of the KATES computer(super master) whose tasks include: 4-1. Synchronizing all the Slaves with all users/employees added/deleted on/from itself automatically. 4-2. Collecting fingerprints enrolled from all the Slaves and synchronizing them with all the other Slaves automatically. This makes all users and fingerprints being consistent on each Slave and the KATES computer itself. 4-3. Keeping collecting access/attendance logs from all the Slaves. System manager only needs to log in KATES web to perform all the necessary works involved in data processing. Login KATES web system This requires the IP address of the computer which KATES web pages are installed. Please contact your system administrator or products supplier for detailed information. MORE INFO Private IP & Public IP It’s almost assigned the private IP to the client computer in most company. The private IP is present with following three IP address range: 10.x.x.x 172.16.x.x 192.168.x.x The private IP address can only be accessed in the local network in your organization. It cannot be accessed directly from external. The mechanism of private IP protects your local network against attacks from outsice. But it still can set the translation to redirect between outside and local network. Once KATES server is successfully installed, you will be able to open the KATES web system through a web browser on any web-enabled computer. 18 The login page of KATES web system User ID. The default account is “ADMIN” which also owns the highest control authority of the system. Default password is blank and to be set by system administrator. When a valid User ID and Password is entered, the KATES web system will be redirected to the home page as follow: FIGURE The home page of KATES web system 19 Administration User Management The term User in KATES refers to “everyone” who uses and is managed under this time attendance and door access management system. Each User needs a Card ID, for identification purpose, and can register/enroll 2 Fingerprints maximum. Appending Departments for classifying Users if necessary. FIGURE The feature of Department Management FIGURE The feature of User Management Click ADD NEW to append a new user 20 FIGURE User ID For identifying Users in KATES. Duplicate User ID is not allowed. The maximum length of User ID is 12 characters Card ID This is the most important element that plays a key role in data exchange between terminals. Allowed Card ID range is from 0000000001 to 4294967295. Modifying User FIGURE Edit a User Inactive The term Inactive in KATES means disabling the selected User. 21 User List FIGURE The feature of User List Export to TXT Export all users from KATES to a TXT file. FIGURE The example of exported file in TXT format. 22 Export to XLS Export all Users from KATES to a XLS file(HTML format). FIGURE The example of exported file in XLS (HTML) format. FIGURE The example of Save As from EXCEL 23 Work Shift Management First at all, KATES need to know the definition of work shift time, it includes Start Time and End Time of a Work Shift. Shift Code For identifying a work shift in KATES system. Break Time For setting time interval(in minute) of lunch break or tea break which KATES web system will deduct from attendance hours when calculating Normal Time in Attendance Reports. Default For designating one of the appended work shifts as the default KATES web system. System will automatically assign the default work shift to all appended new Users. FIGURE The example of ADD NEW of Work Shift Management User Weekly Shift FIGURE The example of User Weekly Shift Import Shift Program in .XLS If your enterprise requires each person to attend different shifts in different dates, you may go to [Administration] / [User Monthly Shift(multi-user)] to download a Monthly Shift Schedule form in XLS or HTML(Max. 6 months) and assign shifts(entering correspondent Shift Codes) for every person. Once completed, import the file back to 24 KATES database (both types of downloaded file are in Web format, and need to be save as real XLS before you import it back to KATES system!). Whenever you need to modify shift for a particular person in a particular date, you may enter [Administration] / [User Monthly Shift(single user)] to complete the job. Once you finish the settings, you may enter [Attendance] / [Attendance Report(Annual Rotation)] to generate required reports for the selected period. Remark: You may also want to use different grid back-ground colors to highlight different shifts and attendance status in [User Monthly Shift(multi-user)] and the [Absence Report]. This can be fulfilled in [Attendance status Setting]. Attendance Transaction(access/attendance logs) FIGURE The example of Transaction Report 25 Transactions Add FIGURE Example of Add Transaction Transactions Modify TranType TranType is used for marking the type of an attendance record. KATES is able to calculate attendance reports sorted by TranTypes. Inactive The term Inactive here refers to disabling selected records. FIGURE The example of Transaction Modify 26 Attendance Report (Weekly Rotation) Total Once selected system will sum up the attendance hours of selected period of each user. Detail Once selected system will provide detailed attendance status by day. FIGURE The report option of Attendance Report (Weekly Rotation) In The first Clock-in of the day. Out The last Clock-out of the day. Total The time interval from the first Clock-in to the last Clock-out. Late Time of being late to work. Early leave The time of leaving early. Normal Total working hours in the assigned work shift. Flexible Shift work hour calculation 1. 2. Attendance Report(Auto Match): system programs will judge automatically which is an IN record and which is an OUT record and calculate work hours of all attending periods. This report suits those who attends one or more flexible shifts a day. Attendance Report(In/Out): system programs will calculate work hours of all attending periods according to records which are flagged(1 for IN and 2 for OUT). To fulfill this application your Kizone time clocks will need to be switched to Time Attendance Mode under which you may define each punching , as an IN or an OUT, through either the JOB button displayed on the Touch LCD permanently or the IN & OUT buttons which will only pop up after each punching. This report also suits those who attends one or more flexible shifts a day. 27 Access Control Access Control Setting If your access/time terminals are used for controlling doors other than time clocks, this function let you assign different access-allowed periods on different doors for different persons easily and quickly. All the settings will be synchronized to all the Slaves automatically. Steps are as follow: Select Users (who) Select Door (where) Allowed Time (when) FIGURE Step 1 (Select Users) on Access Control Setting MORE INFO The column of Door Count Door Count : Quantities of doors involved in the setting. FIGURE Step 2 (Select Door) on Access Control Setting 28 FIGURE Step 3 (Allowed Time) on Access Control Setting Access Control (advanced) Under development! Holiday Setting Access Control (advanced) supports setting and defining Holidays in the year. FIGURE Holiday Setting Access Control Setting First you have to add as many TimeSet as required. System provides two default TimeSets as below: NO passing 00:00 ~ 00:00 29 24 Hour Passing 00:00 ~ 23:59 Step 1 (Time Set) on Access Control Setting (advanced) FIGURE MORE INFO Example: Day Sun Mon Tue Wed Thu Fri Sat Assign a TimeSet to each TimeFrame TimeFrame1 TimeFrame2 TimeFrame3 TimeFrame4 00:00 ~ 00:00 08:00 ~ 12:00 13:00 ~ 15:00 08:00 ~ 12:00 13:00 ~ 15:00 16:00 ~ 19:00 08:00 ~ 12:00 13:00 ~ 15:00 16:00 ~ 19:00 21:00 ~ 23:59 08:00 ~ 12:00 00:00 ~ 23:59 00:00 ~ 00:00 Assiging TimeSet for each day of the week could be time-consuming. You may want system to load the default for the first time use. And you always can make changes on the system afterwards. 30 FIGURE FIGURE Step 2 (Select User) on Access Control Setting (advanced) Step 3 (Select Door) on Access Control Setting (advanced) Once you completed the setting of a week you may save it as a template(UserGroup) and add a description for identification purpose. 31 FIGURE Step 4 (TimeFrame and UserGroup) on Access Control Setting (advanced) 32 System Change Password For changing login password of the system administrator. FIGURE The example of Change Password Supervisor Management When the account ADMIN has the highest authority in KATES, you are allowed to set several SUPERVISORS who own all the rights that the Administrator has but those in the Server Setting. FIGURE The example of Change Password Supervisor Password Reset The ADMIN has the password reset right to all SUPERVISORS and USER of KATES. 33 FIGURE The example of Supervisor Password Reset User Password Reset Both ADMIN and SUPERVISOR have the password reset right to all USER. FIGURE The example of User Password Reset Server Setting Database Backup and Restore We strongly recommend regular backup KATES database. The feature of Database Maintenance provides a simple way to backup KATES database manually. FIGURE The feature of Database Maintenance 34 MORE INFO Backup database automatically If you want to schedule a database backup, it can accomplish by following utility: Windows Backup The Backup and Restore is a popular utility in Windows Vista, Windows 7 and Windows Server 2008. Please note that the utility of Backup and Restore will require the backup storage such as 2nd internal HDD, external HDD or USB storage. It will reject the backup setting if there is only have 1 HDD in your computer. (Backup and Restore on Windows 7) Maintenance Plan on SQL Server It’s including the feature of Maintenance Plan in the SQL Server Standard edition or above (not included in SQL Server Express edition). This is a best way to schedule the database backup. (Setting up a Maintenance Plan to Backup Databases) What to do if any of your Slave terminals gets malfunction? In case of any of the existing Slaves getting faulty or damaged, replace it with a new terminal of same IP address. And then go back to KATES system, enter [Slave Host Setting], select the Slave that you just replaced, click “Edit”, tick “Reset to default”, click “Update”. This action can clear the selected Slave and download all users and fingerprints kept in the KATES database. Data Transfer from Terminal to KATES If you are now using terminal built-in software only and you would like to change to use KATES as the central management system for higher efficiency and stability, please follow below steps to complete it: 1. Install KATES on the selected computer(PC). Once completed, turn off DataSync.exe first. 2. Enter your time/access terminal’s built-in web and export UserList.xls from [User] to the computer and save(change) it again choosing Microsoft Office Excel format. 3. Enter KATES web/ [User List] and import the UserList.xls that you completed in step 2. After that, check both [User] & [User List] and make sure all users have been properly imported. 4. Enter KATES web/[Slave Host Setting] to add this access/time terminal in as a Slave terminal. 5. Activate DataSync.exe located at C:\Program Files\Data Synchro\. Once activated, software will start reading all Transaction records & the already enrolled fingerprints files into KATES database. You may monitor the reading progress on the DataSync.exe screen. 6. Once the reading in step 5 finishes, go back to KATES web/[User] to make sure fingerprints of each user have been successfully imported(with Delete FP1 or Delete FP2 highlighted). 7. Access into the previous Master terminal’s built-in web/[Slave Host Setting] to disable all the Master-Slave relations. 8. Go back to KATES web/[Slave Host Setting] to append all the other Slaves(Slave 2, 3, 4, 5…..). And finally run [Edit]→Tick [Is enabled] & [Reset to default]→Update to all the Slaves. This action will make the KATES PC re-synchronize all the connected Slaves with Users & Fingerprints again to ensure everything working correctly after. 9. Completed! VIII. System Upgrade Notice: Consult to your product supplier before undertaking below operations! This chapter describes how to upgrade your IDF-700 through its USB port. Upgradable contents: application(firmware),self-contained database, self-contained Time Attendance & Access Control software, etc. How to start: 1. Contact your product supplier for the latest upgrade files, copy them to a thumb drive and plug it onto IDF-700 USB port(as below photo shows). 35 2. Below System Kits screen pops up on IDF-700 display. 3. 2-1. Click [Update Firmware] for upgrading system firmware only. 2-2. Click [Install Database] for replacing database files with the latest version. This action will delete all the registered users and their attendance/access records but WILL NOT delete the enrolled fingerprint templates. You will also have to execute Delete All Fingerprints after you upgrade database. For how to Delete All Fingerprints please refer to page 6 ■System Maintenance point 3). 2-3. Click [Install ASP] for upgrading self-contained Time Attendance & Access Control software. 2-4. Click [Install System] upgrading above 3 tasks in one time. Unplug the thumb drive from IDF-700 once the upgrade completes. IX. Data download & upload through USB Plug your USB thumb drive onto your IDF-700, close the System Kits screen, and you will get below screen: 36 1. Register Users: for importing user data in .TXT into IDF-700. If you have ever generated users of IDF-700 through its built-in web application, you may run [Download Users] to download existing user data .TXT to the thumb drive(file name: AD700_User_Dl.txt) and re-edit it. Once completed, change the file name to AD700_User_Reg.txt for registering the updated data back to IDF-700. 2. Download Users: for downloading/exporting existing registered users to a thumb drive in .TXT(file name: AD700_User_Dl.txt). 3. Download Attendance Records: for downloading/exporting users attendance records in .TXT to a thumb drive. (file name: TA_Logs.txt). This will erase the already-collected data from IDF-700. 4. Download Photos: for downloading snaps of users attendance to a thumb drive(in folders named after dates). This will erase the already-collected data from IDF-700. 37