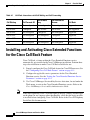
1
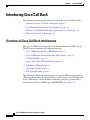
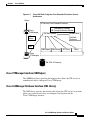
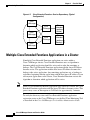
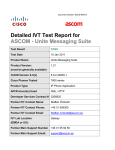
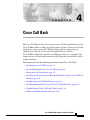
C H A P T E R
4
Cisco Call Back
The Cisco Call Back feature allows you to receive call back notification on your
Cisco IP Phone when a called party line becomes available. To receive call back
notification, a user presses the CallBack softkey while receiving a busy or
ringback tone. You can activate call back notification on a line on a
Cisco IP Phone within the same Cisco CallManager cluster as your phone. You
cannot activate call back notification if the called party has forwarded all calls to
another extension.
This chapter provides the following information about Cisco Call Back:
•
Introducing Cisco Call Back, page 4-2
•
System Requirements for Cisco Call Back, page 4-8
•
Interactions and Restrictions, page 4-9
•
Installing and Activating Cisco Extended Functions for the Cisco Call Back
Feature, page 4-10
•
Configuring Cisco Call Back Feature, page 4-11
•
Providing Information to Users for Cisco Call Back Feature, page 4-16
•
Troubleshooting Cisco Call Back Feature, page 4-16
•
Where to Find More Information, page 4-16
Cisco CallManager Features and Services Guide
OL-4660-01
4-1
Chapter 4
Cisco Call Back
Introducing Cisco Call Back
Introducing Cisco Call Back
The following sections provide information about the Cisco Call Back feature:
•
Overview of Cisco Call Back Architecture, page 4-2
•
Cisco Extended Functions Service Dependency, page 4-5
•
Multiple Cisco Extended Functions Applications in a Cluster, page 4-6
•
How to Use Cisco Call Back, page 4-7
Overview of Cisco Call Back Architecture
The Cisco Call Back feature uses the Cisco Extended Functions (CEF) service.
The CEF service comprises the following interfaces:
•
Cisco CTIManager Interface (QBEHelper), page 4-3
•
Cisco CallManager Database Interface (DBL Library), page 4-3
•
Call Back Handler, page 4-4
•
Screen Saver and Call Back Dictionary, page 4-4
•
Redundancy Manager, page 4-4
•
DB Change Notifier, page 4-4
•
SDI Trace and Alarm, page 4-5
The CEF service interfaces with the phone by using the XML services interface
(XSI) over skinny protocol (a protocol that is used between a Cisco IP Phone and
Cisco CallManager) and the Quick Byte Encoding protocol (a protocol that is
used between the Cisco CTIManager and TSP/JTAPI). See Figure 4-1.
Cisco CallManager Features and Services Guide
4-2
OL-4660-01
Chapter 4
Cisco Call Back
Introducing Cisco Call Back
Figure 4-1
Cisco Call Back Using the Cisco Extended Functions Service
Architecture
Skinny
NT Service Cisco Extended Functions
M
Redundancy manager
DB Change Notification handler
Cisco
CallManager
Call Back Handler
XSI over
skinny
Screen Saver
Call Back
Dictionary
QBE
DBL Library
SDI Trace
Alarm
85001
QBEHelper
Cisco
CTIManager
DB (SQL & Directory)
Cisco CTIManager Interface (QBEHelper)
The QBEHelper library provides the interface that allows the CEF service to
communicate with a configured Cisco CTIManager.
Cisco CallManager Database Interface (DBL Library)
The DBL library provides the interface that allows the CEF service to perform
queries on various devices that are configured and registered in the
Cisco CallManager database.
Cisco CallManager Features and Services Guide
OL-4660-01
4-3
Chapter 4
Cisco Call Back
Introducing Cisco Call Back
Call Back Handler
The Call Back Handler resides in the CEF service and receives the called
extension and calling extension information when the CallBack softkey is
pressed. Cisco CallManager passes this information to the CEF service through
the Cisco CTIManager interface.
The Cisco Extended Functions service determines the destination device by using
the Cisco CallManager Database Interface. The CEF service opens the line and
device by using Cisco CTIManager. When the called line becomes available, the
CEF service sends an audio alert (a twinkle sound) and visual notification on the
Cisco IP Phone through the Cisco CTIManager and XSI interfaces. Only one Call
Back can be active on a Cisco IP Phone. The Call Back Handler keeps this
information in memory. Phones and lines get opened through Cisco CTIManager
only for a Call Back-activated phone and called phone line. When the Call Back
notification goes to the Call Back-activated phone, the phone and lines that were
opened by Cisco CTIManager close.
Screen Saver and Call Back Dictionary
The screen saver of the Cisco Extended Functions service reads the XML
dictionary files and creates Document Object Model (DOM) objects for all
installed locales when the CEF service starts. The system uses these DOM objects
for constructing XSI screens that are needed by the Cisco IP Phone.
Redundancy Manager
When multiple Cisco Extended Functions are active within a Cisco CallManager
cluster, the redundancy manager uses an algorithm to determine which CEF is
active and which is the backup CEF. The Redundancy Manager uses the lowest IP
address of the server that is running the CEF service as the active service. The
remaining CEF services serve as backup services.
DB Change Notifier
The DB Change Notifier handles all the database change notifications, such as
service parameter changes, trace parameter changes, and alarm configuration
changes, and reports the changes to the CEF service.
Cisco CallManager Features and Services Guide
4-4
OL-4660-01
Chapter 4
Cisco Call Back
Introducing Cisco Call Back
SDI Trace and Alarm
The Cisco Extended Functions service uses the SDI Trace and Alarm libraries.
The libraries generate trace and alarms to the Event Viewer. The alarm library
publishes information to the Cisco RIS Data Collector service about the CEF
service. For more information about trace and alarms, refer to the
Cisco CallManager Serviceability Administration Guide.
Cisco Extended Functions Service Dependency
Cisco Call Back uses the Cisco Extended Functions service, which depends on the
following services (see Figure 4-2):
Tip
•
Cisco CallManager—Ensure a minimum of one Cisco CallManager service
is running in the cluster, but the service need not be on the same server as
CEF.
•
Cisco CTIManager—Ensure a minimum of one Cisco CTIManager service is
running in the cluster, but the service need not be on the same server as CEF.
•
Cisco Database Layer Monitor—Ensure one Cisco Database Layer Monitor
service is running on the same server as CEF.
•
Cisco RIS Data Collector—Ensure one Cisco RIS Data Collector service is
running on the same server as CEF.
Install all the services on one server for one-server Cisco CallManager systems.
Cisco CallManager Features and Services Guide
OL-4660-01
4-5
Chapter 4
Cisco Call Back
Introducing Cisco Call Back
Figure 4-2
Cisco Extended Functions Service Dependency (Typical
Configuration)
Cisco
CallManager
Cisco
CallManager
Cisco
CTIManager
Cisco
CallManager
Cisco
Extended
Functions
(Active)
Cisco
Extended
Functions
(Backup)
85002
Cisco
CTIManager
Multiple Cisco Extended Functions Applications in a Cluster
If multiple Cisco Extended Functions applications are active within a
Cisco CallManager cluster, Cisco Extended Functions uses an algorithm to
determine which application should be active and to order the remaining as
backups. The Cisco Extended Functions application with the lowest IP address
becomes active. The application with the next lowest IP address becomes the
backup to the active application. Any remaining applications act as backups to
each other, beginning with the application with the next lowest IP address. If you
add any new applications to the cluster, Cisco Extended Functions restarts the
algorithm to determine which application will be active.
Note
When a Cisco Extended Functions application gets started in a cluster, the Cisco
Extended Functions application with the lowest IP address becomes active. This
process may cause an interruption to Call Back for approximately 2 minutes.
To verify the directory status and Cisco Extended Functions application
registration status to the Cisco CTIManager, use the Real-Time Monitoring Tool
as described in the Cisco CallManager Serviceability Administration Guide.
Cisco CallManager Features and Services Guide
4-6
OL-4660-01
Chapter 4
Cisco Call Back
Introducing Cisco Call Back
How to Use Cisco Call Back
After proper installation and configuration, Cisco IP Phone Models 7960 and
7940 include the Cisco Call Back feature. The following sections describe how to
use the Call Back feature and what happens during normal and abnormal
operations.
For more information about how to use the Call Back feature, refer to the
Cisco IP Phone Models 7960 and 7940 User Guide.
Cisco Call Back—Normal Operation
Use Cisco Call Back for notification when a busy phone becomes available. See
the following examples.
Phone A and Phone C call Phone B, and both phones activate Call Back. When
Phone B becomes available, both Phone A and Phone C receive notification. The
phone that initiates the Call Back first connects to Phone B.
Phone A calls Phone B in the same Cisco CallManager cluster. Because Phone B
is busy or does not reply, Phone A activates the Call Back feature by using the
CallBack softkey. When Phone B becomes available, Phone A receives an audio
alert and visual notification.
When Phone A activates Call Back, the following message displays:
Call Back is activated on xxxx (a directory number). Press Cancel
to deactivate. Press Exit to quit this screen.
When Phone B becomes available (on hook), Phone A receives audio notification
and the following message displays:
xxxx has become available Time <hh:mm mm/dd/yy>. Press Dial to
Call. Press Exit to quit this screen.
Cisco Call Back—Abnormal Operation
From time to time, Call Back may not work for various reasons. See the following
examples.
Phone A calls Phone B in the same Cisco CallManager cluster. Because Phone B
is busy or does not reply, Phone A activates the Call Back feature by using the
CallBack softkey. When Phone B becomes available, Phone A receives an audio
alert and visual notification.
Cisco CallManager Features and Services Guide
OL-4660-01
4-7
Chapter 4
Cisco Call Back
System Requirements for Cisco Call Back
When Phone A unsuccessfully tries to activate Call Back, the following message
displays:
Call Back cannot be invoked for extension xxxx. Press Exit to
quit this screen.
If Phone A tries to press the CallBack softkey during the idle state, the following
message displays on Phone A:
Call Back is not active. Press Exit to quit this screen.
When Phone A tries to activate Call Back and it is already active, the following
message displays:
CallBack is already active on xxxx. Press OK to activate on yyyy.
Press Exit to quit this screen.
When Phone A tries to activate Call Back and the extension is not found in the
database, the following message displays:
CallBack cannot be activated for xxxx.
When Phone A tries to activate Call Back and the Cisco CTIManager and Cisco
Extended Functions services are not registered, the following message displays:
Service not available.
When Phone A tries to activate Call Back and the Cisco Extended Functions
service is not working, the following message displays:
Call Back Service Failure.
System Requirements for Cisco Call Back
Cisco Call Back requires the following software components to operate:
•
Cisco CallManager 3.3 or later
•
Microsoft Windows 2000
•
Microsoft Internet Explorer or Netscape Navigator
Cisco CallManager Features and Services Guide
4-8
OL-4660-01
Chapter 4
Cisco Call Back
Interactions and Restrictions
The following phones support Cisco Call Back with the CallBack softkey (can be
calling and called phone):
•
Cisco IP Phone Models 7960, 7940, 7912, and 7905
You can call the following phones and can have Call Back activated on them (must
be in same Cisco CallManager cluster as calling phone):
•
Cisco IP Phone 30 SP+
•
Cisco IP Phone 12 SP+
•
Cisco IP Phone 12 SP
•
Cisco IP Phone 12 S
•
Cisco IP Phone 30 VIP
•
Cisco IP Phone Model 7902
•
Cisco IP Phone Model 7910
•
Cisco IP Phone Model 7935
•
Cisco IP Phone Model 7936
•
Cisco VGC Phone (uses the Cisco VG248 Gateway)
•
Cisco Skinny Client Control Protocol (SCCP) Phone
•
Cisco Analog Telephone Adapter (ATA) 186 and 188
•
CTI route point forwarding calls to above phones
Interactions and Restrictions
Table 4-1 describes how Cisco Call Back interacts with call waiting and call
forward features.
Note
The calling phone can have only one active Call Back request. The called phone
can have multiple Call Back requests applied to it.
Cisco CallManager Features and Services Guide
OL-4660-01
4-9
Chapter 4
Cisco Call Back
Installing and Activating Cisco Extended Functions for the Cisco Call Back Feature
Table 4-1
Call Back Interactions with Call Waiting and Call Forwarding
Call Waiting
Call Forward All
Call Forward
Busy
Call Forward No
Answer
Call Back
ON
Not configured
Not configured
Not configured
Supported
ON or OFF
Configured
OFF or OFF
ON or OFF
Not supported
ON or OFF
Not configured
Configured
Not configured
Supported
ON or OFF
Not configured
Not configured
Configured
Supported
ON or OFF
Not configured
Configured
Configured
Supported
OFF
Not configured
Not configured
Not configured
Supported
Installing and Activating Cisco Extended Functions
for the Cisco Call Back Feature
Cisco Call Back, a feature within the Cisco Extended Functions service,
automatically gets installed with Cisco CallManager installation. Perform three
steps after installation to make Cisco Call Back available for use:
Note
1.
Properly configure the Cisco Call Back feature for Cisco IP Phone users. See
the “Configuring Cisco Call Back Feature” section on page 4-11.
2.
Configure the applicable service parameters for the Cisco Extended
Functions service. See the “Setting the Cisco Extended Functions Service
Parameters” section on page 4-14.
3.
Use Cisco CallManager Serviceability Service Activation, located under the
Tools menu, to activate the Cisco Extended Functions service. Refer to the
Cisco CallManager Serviceability Administration Guide.
If the users require the Cisco Call Back feature to display (softkeys and messages
on the phone) in any language other than English, verify that the locale installer
is installed before configuring Cisco Call Back. Refer to the Cisco IP Telephony
Locale Installer documentation.
Cisco CallManager Features and Services Guide
4-10
OL-4660-01
Chapter 4
Cisco Call Back
Configuring Cisco Call Back Feature
Configuring Cisco Call Back Feature
For successful configuration of the Cisco Call Back feature, review the steps in
the configuration checklist, perform the configuration requirements, and activate
the Cisco Extended Functions service. The following sections provide
configuration information:
•
Configuration Checklist for Cisco Call Back, page 4-11
•
Creating a Softkey Template with the CallBack Softkey, page 4-12
•
Configuring CallBack Softkey Template in Device Pool, page 4-13
•
Adding CallBack Softkey Template in Phone Configuration, page 4-14
•
Setting the Cisco Extended Functions Service Parameters, page 4-14
Configuration Checklist for Cisco Call Back
Table 4-2 shows the logical steps for configuring the Cisco Call Back feature in
Cisco CallManager.
Table 4-2
Cisco Call Back Configuration Checklist
Configuration Steps
Related Procedures and Topics
Step 1
Creating a Softkey Template with the
CallBack Softkey, page 4-12
Create a copy of the Standard User softkey
template and add the CallBack softkey:
•
On Hook call state
•
Ring Out call state
Step 2
Add the new softkey template to the device Configuring CallBack Softkey Template in
pool.
Device Pool, page 4-13
Step 3
Add the new softkey template to the user
phones by using the Phone Configuration
window.
Step 4
Use defaults for Cisco Extended Functions Setting the Cisco Extended Functions
service parameters.
Service Parameters, page 4-14
Adding CallBack Softkey Template in
Phone Configuration, page 4-14
Cisco CallManager Features and Services Guide
OL-4660-01
4-11
Chapter 4
Cisco Call Back
Configuring Cisco Call Back Feature
Table 4-2
Cisco Call Back Configuration Checklist (continued)
Configuration Steps
Related Procedures and Topics
Step 5
User Configuration Settings,
Cisco CallManager Administration Guide
Choose user locales for Cisco IP Phones.
Cisco IP Telephony Locale Installer
documentation.
Step 6
Using the Cisco CallManager
Cisco CallManager Serviceability
Serviceability tool, Service Activation,
Administration Guide
activate Cisco Extended Functions service.
Creating a Softkey Template with the CallBack Softkey
Perform the following procedure to create a new softkey template with the
CallBack softkey.
Procedure
Step 1
From Cisco CallManager Administration, choose Device > Device Settings >
Softkey Template.
The Softkey Template Configuration window displays.
Step 2
From the Softkey Template list, or from the drop-down list box in the Create a
softkey template based on field, choose the Standard User softkey template. (If
you choose the first option, the Softkey Template Configuration window
automatically displays with new information. Go to Step 3.)
Step 3
Click the Copy button.
The Softkey Template Configuration window displays with new information.
Step 4
In the Softkey Template Name field, enter a new name for the template; for
example, Standard User for Call Back.
Step 5
Click the Insert button.
The Softkey Template Configuration redisplays with new information.
Cisco CallManager Features and Services Guide
4-12
OL-4660-01
Chapter 4
Cisco Call Back
Configuring Cisco Call Back Feature
Step 6
To add the CallBack softkey to the template, click the Configure Softkey Layout
link.
The Softkey Layout Configuration window displays. You must add the CallBack
softkey to the On Hook and Ring Out call states.
Step 7
To add the CallBack softkey to the On Hook call state, click the On Hook link in
the Call States field.
The Softkey Layout Configuration window redisplays with the Unselected
Softkeys and Selected Softkeys lists.
Step 8
From the Unselected Softkeys list, choose the CallBack softkey and click the right
arrow to move the softkey to the Selected Softkeys list.
Step 9
To save and continue, click the Update button.
Step 10
To add the CallBack softkey to the Ring Out call state, click the Ring Out link in
the Call States field.
The Softkey Layout Configuration window redisplays with the Unselected
Softkeys and Selected Softkeys lists.
Step 11
From the Unselected Softkeys list, choose the CallBack softkey and click the right
arrow to move the softkey to the Selected Softkeys list.
Step 12
Click the Update button.
Configuring CallBack Softkey Template in Device Pool
Perform the following procedure to add the Call Back softkey template to the
device pool. You can add the template to the default device pool if you want all
users to have access to the CallBack softkey, or you can create a customized
device pool for Call Back feature users.
Procedure
Step 1
From Cisco CallManager Administration, choose System > Device Pool.
The Device Pool Configuration window displays.
Step 2
Choose the Default device pool or any previously created device pool that is listed
in the Device Pools.
Cisco CallManager Features and Services Guide
OL-4660-01
4-13
Chapter 4
Cisco Call Back
Configuring Cisco Call Back Feature
Step 3
In the Softkey Template field, choose the softkey template that contains the
CallBack softkey from the drop-down list box. (If you have not created this
template, see the “Creating a Softkey Template with the CallBack Softkey”
section on page 4-12.)
Step 4
Click the Update button.
Adding CallBack Softkey Template in Phone Configuration
Perform the following procedure to add the Call Back softkey template to each
user phone.
Procedure
Step 1
From Cisco CallManager Administration, choose Device > Phone.
The Find and List Phones window displays.
Step 2
Find the phone to which you want to add the softkey template. See Finding a
Phone in the Cisco CallManager Administration Guide.
Step 3
In the Softkey Template field, choose the softkey template that contains the
CallBack softkey from the drop-down list box. (If you have not created this
template, see the “Creating a Softkey Template with the CallBack Softkey”
section on page 4-12.)
Step 4
Click the Update button.
Setting the Cisco Extended Functions Service Parameters
Set the Cisco Extended Functions service parameters by using Cisco CallManager
Administration to access the service parameters (Service > Service Parameters).
Choose the server where the Cisco Call Back application resides and then choose
the Cisco Extended Functions service.
Cisco CallManager Features and Services Guide
4-14
OL-4660-01
Chapter 4
Cisco Call Back
Configuring Cisco Call Back Feature
Cisco recommends that you use the default service parameters settings unless
otherwise instructed by the Cisco Technical Assistance Center. Cisco Extended
Functions includes the following parameters for Cisco Call Back:
•
CTI Connecting Port—Default specifies port 2748. If this port number
changes, restart the Cisco Extended Functions service.
•
Provider Open Call Time Out—Default specifies 30000. This parameter
specifies the wait time of the Cisco Extended Functions service after provider
open requests are issued to Cisco CTIManager. If this wait time changes,
restart the Cisco Extended Functions service.
•
HeartBeat Interval Time Out—Default specifies 30. Cisco Extended
Functions and Cisco CTIManager exchange heartbeats to maintain the
connection. If this interval time out changes, restart the Cisco Extended
Functions service.
•
Connection Retry Time Out—Default specifies 60000. Cisco Extended
Functions retries to reconnect to Cisco CTIManager if a connection drops. If
this retry timeout changes, restart the Cisco Extended Functions service.
•
Synchronous Request Time Out—Default specifies 20000. This parameter
specifies the wait time of the Cisco Extended Functions service after a
synchronous request is issued. If this requested timeout changes, restart the
Cisco Extended Functions service.
•
Audio File Name—Default specifies CallBack.raw. The Call Back.raw file,
located in the directory C:\Program Files\Cisco\TFTPPath gets uploaded to
the Cisco IP Phone by Cisco TFTP during the restart cycle. This file contains
the twinkle sound that the Cisco IP Phone plays during Call Back
notification. The Audio format specifies 64 kbps audio mu-law. If this file
name changes, restart the Cisco Extended Functions service.
•
CBB Change Notification TCP Port—Default specifies 2552. This parameter
specifies the port number of the Cisco Extended Functions database change
notification receiving TCP port. The Cisco Database Layer Monitor sends
database change notifications. If this port number changes, restart the Cisco
Extended Functions service.
Cisco CallManager Features and Services Guide
OL-4660-01
4-15
Chapter 4
Cisco Call Back
Providing Information to Users for Cisco Call Back Feature
Providing Information to Users for Cisco Call Back
Feature
The Cisco IP Phone Models 7960 and 7940 User Guide provides procedures for
how to use the Call Back feature on the Cisco IP Phone.
Troubleshooting Cisco Call Back Feature
Use the Cisco CallManager Serviceability Trace Configuration and Real-Time
Monitoring Tool to help troubleshoot Call Back problems. Refer to the
Cisco CallManager Serviceability Administration Guide.
For troubleshooting information, refer to the Troubleshooting Guide for
Cisco CallManager.
Where to Find More Information
Related Topics
•
Softkey Template Configuration, Cisco CallManager Administration Guide
•
Device Defaults Configuration, Cisco CallManager Administration Guide
•
Service Parameters Configuration, Cisco CallManager Administration Guide
•
Cisco IP Phone Configuration, Cisco CallManager Administration Guide
Additional Cisco Documentation
•
Cisco CallManager Administration Guide
•
Cisco CallManager System Guide
•
Cisco CallManager Serviceability Administration Guide
•
Cisco CallManager Serviceability System Guide
•
Troubleshooting Guide for Cisco CallManager
•
Cisco IP Phones Model 7960 and 7940 User Guide
Cisco CallManager Features and Services Guide
4-16
OL-4660-01
Chapter 4
Cisco Call Back
Where to Find More Information
•
Cisco IP Phone Administration Guide for Cisco CallManager
•
Cisco IP Telephony Locale Installer
Cisco CallManager Features and Services Guide
OL-4660-01
4-17
Chapter 4
Cisco Call Back
Where to Find More Information
Cisco CallManager Features and Services Guide
4-18
OL-4660-01