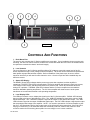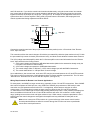
1
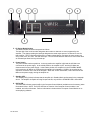
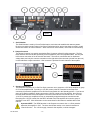
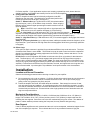
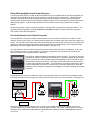
CV Series User Manual This User Manual is made available in Adobe Acrobat format. In order to view the manual and utilize it’s enhancements we recommend that you download Adobe Acrobat Reader® 4.0 or greater. If you do not currently have this viewer installed on your computer, or you have an older version the reader is available as a free download at http://www.adobe.com. By going to the table of contents you can directly access any topic outlined there, by simply clicking on the topic. iON Media is a registered trademark of Carver Professional, A Phoenix Gold International Company AMX, PANJA and Crestron are the registered trademarks of their respective owners. © Phoenix Gold International, Inc. February 2001 Rev 04.08.021 -1– SAFETY INFORMATION The lightning flash with arrowhead symbol within an equilateral triangle is intended to alert the user to the presence of uninsulated “dangerous voltage” within the product’s enclosure that may be of sufficient magnitude to constitute a risk of electric shock to persons. CAUTION RISK OF ELECTRIC SHOCK DO NOT OPEN CAUTION: TO REDUCE THE RISK OF ELECTRIC SHOCK DO NOT REMOVE COVER. NO USER SERVICABLE PARTS INSIDE. REFER SERVICING TO QUALIFIED PERSONNEL! The exclamation point within an equilateral triangle is intended to alert the user of the presence of important operating and maintenance (servicing) instructions in the literature accompanying the appliance. Please read this entire manual, especially the Safety Warnings, before operating your amplifier. TABLE OF CONTENTS Introduction Unpacking and Paperwork Features and Specifications CV1501 CV2501 CV1502 CV2502 CV4002 Controls and Functions Rack Mounts Level Controls LED Status Display LED Level Display Power Switch Standby LED Data LED Output Connector Sequence Connector Remote Level Control Standard Input Module AC Line Cord Configuration DIP Switch Rev 04.08.021 3 3 Effects Loop Installation and Operation Location and General Precaution Mechanical Considerations Rear Support Thermal Considerations AC Power Considerations Magnetic Leakage Input Wiring Input Sensitivity Loudspeaker Polarity Mono Operation Bridged Mono Connections Power Sequencing Remote Level Control Effects Loop CV Series Block Diagram Warranty Information In Case Of Difficulty Appendix A Appendix B 4-5 4-5 6-7 6-7 8-9 10-14 10 10 10 10 11 11 11 12 12-13 13 13 13 14 -2– 14 14 14 14 15 15 15 15-16 16 16 16-17 17 18-20 20-22 22 22 23 24-25 26 27 INTRODUCTION Congratulations on your purchase of a new Carver Professional CV Series Power Amplifier. The CV Series amplifiers are designed expressly for commercial and institutional audio applications. The CV Series amplifiers are designed and manufactured by Carver Professional, a division of Phoenix Gold International, Inc. They combine Carver Professional’s experience in pro audio along with the needs of the system integrator to provide an uncompromising product for the commercial sound industry. The sonic heritage of Carver Professional combined with the performance, manufacturing quality and attention to detail that has defined Phoenix Gold International assures you of the value and integrity you seek in an amplifier product. Thank you for placing your confidence in Carver Professional and Phoenix Gold. We know your amplifier will provide many years of dependable service and reliable sound reproduction. Please read this entire manual, especially the Safety Warnings, before operating your amplifier. UNPACKING AND PAPERWORK Carefully unpack the amplifier and keep the original carton and packing materials for future moving, shipment or long-term storage. After opening the box, please check for visible signs of damage that were not apparent from the outside of the box. If you encounter what appears to be concealed damage, please contact your Carver Professional Dealer before installing unit. Important Paperwork Make sure to save your sales receipt. Your receipt is extremely important to establish the duration of your Limited Warranty and for insurance purposes. Next, make a note of the serial number, which is located on the back of the amplifier. Record it in the space provided below for convenient reference. Model: _______________ Serial Number: __________________________ Purchased at: __________________________ Date: _________________ Finally, take a moment to fill out the Warranty Registration Card packed with the amplifier and return it to Carver Professional. This will allow us to keep you informed about new products, as they become available . Rev 04.08.021 -3– CV1501 CV2501 Power Output Power Output • 150W mono into 4 ohm and 8 ohm loads, autoformer coupled, 40Hz to 20kHz ±3db with < 0.5% THD at full power • 250W mono into 4 ohm and 8 ohm loads, autoformer coupled 40Hz to 20kHz ±3dB with < 0.5% THD at full power • 150W mono transformer coupled @ 25V, 35V, 50V, 70V and 100V 40Hz to 18kHz ±3dB with < 0.5% THD at full power • 250W mono transformer coupled @ 25V, 35V, 50V, 70V and 100V, 40Hz to 18kHz ±3dB with < 0.5% THD at full power Common Features • Convection Cooling • 5 segment LED level display per channel including signal present and clip indicators • 3 LED display per channel of Power, Protect and Thermal Overload • Standby LED indicates the amplifier is in Standby Mode • Data LED (used with Computer Control & Monitoring module) • Level control can be covered with a snap in cap (supplied) to prevent tampering • Remote Control of output level via Euro Style connector • Unbalanced Effects Loop (send/receive) via Euro Style Connector • Standard Mono Input Module with line level input via Euro Style connector and XLR jack, connected in parallel • Switched Clip Limiter Rev 04.08.021 -4– • 26Hz High Pass Filter • Switched 80Hz and 120Hz (12db/Octave cut) High Pass Filters • Terminals for Sequencing Power ON/OFF • Speaker Output via large gauge Euro Style connectors • Power Switch, 3 positions On, Off, Standby • AC Line Cord (Detachable IEC Type) • Optional Accessories: − Four Input Mixer Module with zone assignment − Paging Modules with variable ducking − Expanded Mic/Line Level Input Module − Computer Control & Monitoring via iON Media Control Module − DSP control of 28 Band Graphic EQ, 5 Band Parametric EQ, HP Filter, LP Filter, Crossover, Adjustable Limiting and Adjustable Delay via iON Media DSP Tools Module SPECIFICATIONS with Basic input module PERFORMANCE: • THD: <0.5% @ rated power, 0.2% 1/8 rated power at1 kHz • IMD DIM30 Method: <0.2% • Dynamic Headroom: 1.5dB • Power Bandwidth: 40 Hz to 20 kHz, 4 and 8 ohm loads • Frequency Response: 30 Hz to 20 kHz +0.5, -3dB(4 and 8 ohm loads) • Signal-to-Noise: 94dB (typical), A-weighted, referred to rated power • CMRR: 75dB at 1kHz • Slew Rate: 7V/µSec • Sensitivity for rated power (includes EFX Inputs): 0dBu or 0.775 Vrms • Input Impedance (includes EFX Inputs): 50kΩ balanced • Input Overload (includes EFX Inputs): 20 dBu • Protection: Thermal, Short Circuit, Over-current & Over Voltage, self-resetting • Stability: Unconditionally stable into reactive loads • Duty Cycle: Continuous operation with dynamic signal at 1/3rd power POWER REQUIREMENTS: • Mains Voltage (output power rated at nominal voltage): 100VAC, 50-60Hz ±20% 120VAC, 60Hz ±20% 230VAC, 50Hz ±20% • Power Consumption (See Appendix A) REGULATORY COMPLIANCE: nd • Proposed ETL/C Mark to: • CE Certification to: UL6500, 2 Edition EN55103-1 & EN55103-2 PHYSICAL: • Cooling Method: • Operating Environment: • Storage Environment: • Dimensions: Convection o o -10 C to 55 C, up to 85% RH o o -45 C to 70 C, up to 93% RH 3.5” H (2U) x 19.0” W x 16” D 89mm x 483mm x 438mm CV1501 – 27.4lbs / 12.4kg CV2501 – 32.7lbs / 14.9kg CV1501 – 32.9lbs. / 15.0kg CV2501 – 38.2lbs. / 17.4kg • Net Weight: • Shipping Weight: Rev 04.08.021 -5– CV1502 CV2502 Power Output Power Output • 150W per channel into 4 ohm and 8 ohm loads, autoformer coupled, 40Hz to 20kHz ±3dB with < 0.5% THD at full power • 250W per channel into 4 ohm and 8 ohm loads, autoformer coupled, 40Hz to 20kHz ±3dB with < 0.5% THD at full power • 150W per channel, transformer coupled @ 25V, 35V, 50V, 70V and 100V, 40Hz to 18kHz ± 3dB with < 0.5% THD at full power • 250W per channel, transformer coupled @ 25V, 35V, 50V, 70V and 100V, 40Hz to 18kHz ± 3dB • 300W parallel mono at 4 Ohms, 300W parallel and bridged mono at 8 and 16 Ohms, 50V, 70V, 100V, 140V and 200V with no more than 0.5% THD • 500W parallel mono at 4 Ohms, 500W parallel and bridged mono at 8 and 16 Ohms, 50V, 70V, 100V, 140V and 200V with no more than 0.5% THD Common Features • Convection Cooling • 5-segment LED level display, per channel, including signal present and clip indicators • 3 LED display, per channel, of Power, Protect and Thermal Overload • Standby LED indicates the amplifier is in Standby Mode • Data LED (used with Computer Control module) • Level controls can be covered with a cap (supplied) to prevent tampering • Remote control of output level via Euro Style connector • Unbalanced Effects Loop (send/receive) via Euro Style Connector • Standard Dual Input Module with line level inputs via Euro Style connectors and XLR jacks, connected in parallel • Switched Clip Limiters Rev 04.08.021 -6– • 26Hz High Pass Filters • Switched 80Hz and 120Hz (12db/Octave cut) High Pass Filters • Terminals for Sequencing Power ON/OFF • Speaker Outputs via large gauge Euro Style connectors • Power Switch, 3 positions On, Off, Standby • AC Line Cord (Detachable IEC Type) • Optional Accessories: − Four Input Mixer Module with zone assignment − Paging Modules with variable ducking − Expanded Mic/Line Level Input Module − Computer Control & Monitoring via iON Media Control Module − DSP control of 28 Band Graphic EQ, 5 Band Parametric EQ, HP Filter, LP Filter, Crossover, Adjustable Limiting and Adjustable Delay via iON Media DSP Tools Module SPECIFICATIONS with Basic input module PERFORMANCE: • • • • • • • • • • • • • • • THD: 0.5% at rated power, 0.2% at 1/8 rated power at 1kHz IMD DIM30 Method: <0.2% Dynamic Headroom: 1.5dB Power Bandwidth: 40 Hz to @20 kHz +0.5, -3 dB Frequency Response: 26 Hz to 20 kHz, 4 and 8 ohm loads Signal-to-Noise 94dB (typical), A-Weighted, referred to rated power Crosstalk: -60dB, full bandwidth CMRR: 75dB at 1kHz Slew Rate: 7V/µSec Sensitivity for rated power (includes EFX Inputs): 0dB or 0.775Vrms Input Impedance (includes EFX Inputs): 50kΩ balanced Input Overload (includes EFX Inputs): 20dBu Protection: Thermal, Short Circuit, and Over-current & Over Voltage Stability: Unconditionally stable into reactive loads Duty Cycle: Continuous operation at 1/3 rated power POWER REQUIREMENTS: • Mains Voltage (output power rated at nominal voltage): 100VAC, 50-60Hz ±20% 120VAC, 60Hz ±20% 230VAC, 50Hz ±20% • Power Consumption (See Appendix A) REGULATORY COMPLIANCE: nd • Proposed ETL/C Mark to: • CE Certification to: UL6500, 2 Edition EN55103-1 & EN55103-2 PHYSICAL: • • • • Cooling Method: Operating Environment: Storage Environment: Dimensions: Convection o o -10 C to 55 C, up to 85% RH o o -45 C to 70 C, up to 93% RH 3.5” H (2U) x 19.0” W x 17.25” D 89mm x 483mm x 438mm CV1502 – 35.1lbs / 15.9kg CV2502 – 42.5lbs / 19.3kg CV1502 – 41.0lbs. / 18.0kg CV2502 – 48.0lbs. / 22.0kg • Net Weight: • Shipping Weight: Rev 04.08.021 -7– CV4002 Power Output • 400W per channel into 4 ohm and 8 ohm loads, autoformer coupled, 40Hz to 20kHz ±3dBwith < 0.5% THD at full power • 400W per channel, transformer coupled @ 25V, 35V, 50V, 70V and 100V, 40Hz to 18kHz ±3dB with < 0.5% THD at full power • 800W in parallel mono at 4 Ohms, 800W parallel and bridged mono at 8 and 16 Ohms, 50V, 70V, 100V, 140V and 200V, with no more than 0.5% THD Common Features • Convection Cooling • 5-segment LED level display, per channel, including signal present and clip indicators • 3 LED display, per channel, of Power, Protect and Thermal Overload • Standby LED indicates the amplifier is in Standby Mode • Data LED (used with Computer Control Module) • Level controls can be covered with a cap (supplied) to prevent tampering • Remote control of output level via Euro Style connector • Unbalanced Effects Loop (send/receive) via Euro Style Connector • Standard Dual Input Module with line level inputs via Euro Style connectors and XLR jacks, connected in parallel • Switched Clip Limiters Rev 04.08.021 -8– • 26Hz High Pass Filters • Switched 80Hz and 120Hz (12db/Octave cut) High Pass Filters • Terminals for Sequencing Power ON/OFF • Speaker Outputs via large gauge Euro Style connectors • Power Switch, 3 positions On, Off, Standby • AC Line Cord (Detachable IEC Type) • Optional Accessories: − Four Input Mixer Module with zone assignment − Paging Modules with variable ducking − Expanded Mic/Line Level Input Module − Computer Control & Monitoring via ION Media Control Module − DSP control of 28 Band Graphic EQ, 5 Band Parametric EQ, HP Filter, LP Filter, Crossover, Adjustable Limiting and Adjustable Delay via iON Media DSP Tools Module SPECIFICATIONS with Basic input module PERFORMANCE: • • • • • • • • • • • • • • • THD: 0.5% at rated power, 0.2% at 1/8 rated power at 1kHz IMD DIM30 Method: <0.2% Dynamic Headroom: 1.5dB Power Bandwidth: 40 Hz to 20 kHz 4 and 8 ohm loads Frequency Response: 26 Hz to 20 kHz +0.5, -3 dB 4 and 8 ohm loads Signal-to-Noise 94dB (typical), A-Weighted, referred to rated power Crosstalk: -60dB, full bandwidth CMRR: 75dB @ 1kHz Slew Rate: 7V/µSec Sensitivity for rated power (includes EFX Inputs): 0dB or 0.775Vrms Input Impedance (includes EFX Inputs): 50kΩ balanced Input Overload (includes EFX Inputs): 20dBu Protection: Thermal, Short Circuit, and Over-current & Over Voltage Stability: Unconditionally stable into reactive loads Duty Cycle: Continuous operation at 1/3 rated power POWER REQUIREMENTS: • Mains Voltage (output power rated at nominal voltage): 100VAC, 50-60Hz ±20% 120VAC, 60Hz ±20% 230VAC, 50Hz ±20% • Power Consumption (See Appendix A) REGULATORY COMPLIANCE: nd • Proposed ETL/C Mark to: • CE Certification to: UL6500, 2 Edition EN55103-1 & EN55103-2 PHYSICAL: • • • • Cooling Method: Operating Environment: Storage Environment: Dimensions: Convection o o -10 C to 55 C, up to 85% RH o o -45 C to 70 C, up to 93% RH 5.25” H (2U) x 19.0” W x 17.25” D 133mm x 483mm x 438mm CV4002 – 54.0lbs. / 24.5kg CV4002 – 60.0lbs. / 27.3kg • Net Weight: • Shipping Weight: Rev 04.08.021 -9– Figure 1 CONTROLS AND FUNCTIONS 1. Rack Mount Ears The ears for rack mounting the CV Series amplifiers are removable. If your installation does not require rack mounting, the rack ears can be removed, however the screws that fasten the rack ears to the chassis should be replaced to maintain the chassis’ structural integrity. 2. Level Controls The Level Controls on the CV Series amplifiers utilize a DC voltage to control the output level of the CV Series amplifiers through a VCA (voltage controlled amplifier). The knobs can be removed and replaced with black plastic caps provided with the amplifier. Before installation of the plastic caps, be sure to set the maximum level that you will need for each channel or zone. Once the caps have been installed they are difficult to remove. 3. Status LED Display The READY (Green LED) indicates that the power-up process has completed, and the amplifier is operational. PROTECT (Red LED) indicates that the CV Series amplifier has detected a fault (over-current, over-voltage or short circuit, and has placed itself into a protect mode. Check all connections and level settings for a problem. THERMAL (Red LED) indicates that the CV Series amplifier has exceeded the maximum allowable operating temperature. The CV Series amplifier will restart as soon as the power transformer or heat sink has reached a safe operating temperature. 4. Level Display LEDs Five LEDs per channel or zone, display the signal level of the CV Series amplifier. SIGNAL LED indicates there is signal at the input of that channel or zone. The -20dB LED indicates a signal at the output of 20dB below rated output. The –12dB LED indicates a signal at the output of 12db below rated output. The –6dB LED indicates a signal at the output of 6dB below rated output. The CLIP LED indicates a signal at the output that exceeds the rated output of the amplifier. NOTE: It is normal to operate the CV Series amplifier so that the CLIP LED illuminates (Red) at the loudest peaks of the information being reproduced. If the Clip LED is staying on continuously, or for extended rather than momentary intervals, levels in that channel or zone should be reduced to avoid driving the amplifier into over-voltage or over-current conditions. Rev 04.08.021 - 10 – Figure 2 5. CV Series Model Number The Model number should be interpreted as follows: The last digit of the model number designates the number or channels or zones supported by the amplifier. The digits preceding the last digit designate the rated output power of a channel or zone for that amplifier. The CV Series amplifiers are a constant voltage design, and have the same output at 4 ohm, 8 ohm, 25V, 35V, 50V, 70V and 100V taps. Thus a CV1502 has two channels or zones each rated at 150 watts per channel at any selected tap. 6. Power Switch The power switch has three positions. In the top position the amplifier is ON and the AC Mains are connected to the power supply. In the middle position, the amplifier is OFF and the AC Mains are disconnected from the power supply. In the bottom position, the amplifier is in the STANDBY MODE. In this mode the AC Mains are connected to the standby circuit awaiting 12VDC to be supplied to the sequence connector on the rear of the amplifier. When this 12VDC is detected; a triac connects the AC Mains to the power supply, turning the amplifier on. 7. Standby LED The Standby LED (Yellow) indicates that the amplifier is in Standby Mode as discussed in the paragraph above. The amplifier is capable of being Sequenced ON, only when the STANDBY LED is illuminated. 8. DATA LED The Data LED indicates network traffic in the Computer Control Module (available as an Accessory) when illuminated Yellow. NOTE: The DATA LED has no function if the Computer Control module is not installed, and will not illuminate. Refer to information includes with the Computer Control Module or its accompanying software. Rev 04.08.021 - 11 – Figure 3 1. Serial Number The Serial Number is used by Carver Professional to track units and establish their warranty status. Be sure to record the serial number of all Carver Professional units, and to keep those records in a safe and secure location for future reference. Never remove the serial number, as this will void the warranty. 2. Output Connector The Output Connector is a special non-shorting Euro Connector utilized for safety purposes. The first three terminals from the left are specifically for low impedance (4 & 8 ohm) speaker loads. Use only the left Common connection is for the 4 and 8 ohm loads. The next six connections are for distributed voltage loads, and only the common connection on the right side of the connector (viewed from the rear) is used with these output connections. One connector is provided for each channel of the amplifier. Figure 4a Figure 4b 3. Sequence Connector The Sequence Connector is a 3-Pin Euro Style connector use to sequence a CV Series amplifier or group of CV series amplifiers ON. Providing a +12V DC current to the RCV terminal on the Sequence connector will cause the amplifier to turn ON if the Power Switch is in the Standby position. If you have a group of CV Series amplifiers, simply connect the +12V DC current to the first amplifier, then connect from the SEND terminal of the first amplifier to the RECV terminal of the second and so on. Once the +12V DC is present, the amplifiers will turn on sequentially at approximately two-second intervals. Removing the +12V DC current from the RECV terminal of the first amplifier will cause the group of amplifiers to turn OFF. More information on the connections for this feature is available later in this manual. Important NOTE: The SEND terminal on the Sequence connector has a +15Vdc potential whenever the amplifier is “ON”. The User should take caution not to short this terminal to "Chassis Ground”. The +15Vdc supply, internal to the amplifier, could be damaged. Rev 04.08.021 - 12 – 4. Remote Level The Remote Level Connector is used to connect a Remote Level Control to the CV Series amplifier. The connector is a Euro Style connector with the following connection points, from left to right. (See Figure 5) RTN – Return, CV2 – Control Voltage for Channel 2 on Dual Channel models, CV1 – Control Voltage for Channel 1, and +5V volt send from the VCA package. More information on how to connect this feature is available later in this manual Figure 5 5. Standard Input Module A Standard Input Module is included with each CV Series amplifier. The Standard Input Module allows the use of a balanced or unbalanced line level input via a panel mounted female XLR connector or a three pin Euro Style connector. The sensitivity of the input is adjustable with a jumper selection on the input card PCB at either a .775VRMS or 1.5VRMS input level. An additional jumper selection is available to select Bridged Mono mode, Normal Dual Channel input mode or Parallel Mono input mode. (See Appendix B) In the Bridged and Parallel input mode, a single input will drive both channels on a dual channel amplifier. Both a Single channel (MSSI) and Dual channel (MSDI) input cards are available and are provide with the appropriate CV Series amplifier. Caution! Before removing the input module for any reason, make certain that the amplifier’s AC mains are first switched OFF or disconnected. Figure 6 6. XLR Connector Female XLR connectors are provided on Standard Input Modules to receive Balanced or Unbalanced line level input signals. Pin 2 is (+) hot, Pin 3 is (-) negative and Pin 1 is chassis ground. To use the XLR for an unbalanced input signal, connect the (+) signal to Pin 2, and the shield to Pin 1 with a jumper from Pin 1 to Pin 3. 7. Euro Connector A three-pin Euro Style connector is provided on the Standard Input Module to receive a Balanced or Unbalanced line level input signal. Counting from left to right, Pin 1 is (+), Pin 2 is (-) and Pin 3 is chassis ground. For an unbalanced input signal connect pin 1 to (+), Pin 2 to the Shield and connect a jumper from Pin 3 to Pin 2. 8. AC Line Cord Receptacle An IEC type AC line cord receptacle is provided to receive the line cord included with the CV Series amplifier. An appropriate line cord termination is provided based on the country of destination with each Rev 04.08.021 - 13 – CV Series amplifier. If your application requires rack mounting, optional line cords, shorter than the standard 2 meter, are available as accessory item for the CV Series amplifiers. 9. Configuration DIP Switches Each CV Amplifier channel can be individually configured via the DIP Switches on the rear panel. The switches for each channel perform the following functions from left to right: (See figure 7) Switch 1 - Effects In/Out (up is IN and down is OUT) this switch enables the receive pins (+ and -) on the Effects Loop connector. When using the Effects Loop for outboard signal processing this switch must be in the UP (EFX IN) position. Note: If the EFX Loop is switched (IN) with no signal present at the Figure 7 EFX receive inputs, the amplifier will appear to not be working Switch 2 – Clip Limiter (up is ON and down is OFF) The Clip Limiter prevents the amplifier from being accidentally driven into hard clipping under normal operation. (Note: The Clip Limiter will not protect the amplifier from clipped signals that are introduced at the amplifier input.) Switch 3 – High Pass Filter (up is ON and down is OFF) This switch engages or disengages the internal High Pass filter. Switch 4 – Frequency Selection (up is 120Hz and down is 80Hz) this switch selects the frequency of the High Pass filter. (Note: whenever the High Pass filter is disengaged a 26Hz factory preset high pass filter is engaged) 10. Effects Loop A four pin Euro Style connector is provided for an unbalanced Effects Loop send and receive. The Input Overload of this feature is set at 20dBu. This Effects Loop can be used to send and receive unbalanced signals from outboard signal processing equipment such as EQ’s, Delays, Limiters and others. For the Effects Loop receive signal, the EFX IN Switch on the configuration DIP Switch must be set to the (IN or up) position for that channel or zone. The Send pins (+ and -) are always engaged and can be used to loop signal from one amp to another via the receiving amplifiers input module. (Note: The signal at the Send Pins of the Effects Loop are post any signal processing performed by a optional input module that may be in use in the CV Series amplifier). Connections to the Effects Loop are intended to be local, and signals sent over long wire runs are not recommended. Input through the “Input Module” would perform better in this circumstance. Installation Location and General Precaution Observe the following precautions when choosing a location for your amplifier. A. Do not expose the unit to rain or moisture. If a fluid or foreign object should enter the unit, disconnect the power plug and contact the Carver Professional Service Center. Do not pull out the plug by pulling on the cord; grasp the plug firmly and pull. B. Protect the amplifier from heat, and allow adequate ventilation. Place away from sources of heat, such as heating vents and radiators. All components produce some heat during operation, so make sure that the ventilation area above and below the heatsink are not covered and that air is allowed to circulate freely around the unit. Excessive heat is the single greatest source of both short-term and long-term component failure. Mechanical Considerations When being rack mounted, the CV1501, CV2501, CV1502 and the CV2502 are 2U or 3.5” (89mm) in height, The CV4002 is 3U or 5.25” (133mm) and they are all 17.25” (438mm) in depth inside the rack including the rear supports. Secure the unit to the rack mechanically using four screws. The addition of plastic or rubber washers prevents marring the front panel, but may interfere with grounding. Rear Support If the CV Series amplifiers are rack mounted and the rack is to be transported, mechanical support for the rear of the amplifier(s) is required. This could take the form of any mechanical means of tying the Rev 04.08.021 - 14 – amplifier’s chassis structure to the rear of the rack during transportation. This practice is recommended for all electronic components. Thermal Considerations When the CV Series amplifiers are used free standing, no thermal considerations are necessary other than using the four rubber feet supplied with the amplifier. This raises the amplifier above the surface it is sitting on enough to allow free movement of air through the heatsink located along the left side of the amplifier. Note! When several of the CV Series amplifiers are mounted together in a rack, it may be necessary to provide openings at both the top and bottom of the rack to allow convection to exchange the heated air at the top of the rack with cool air from the bottom. A minimum space of 1U should be left between CV Series amplifiers at no more than a 12U interval. This should allow sufficient cooling of the amplifiers. If the CV Series amplifiers are mixed with other devices, caution should be taken to locate the CV Series amplifiers together, facilitating the chimney effect of their heatsink design. Space should be left above and below the CV Series product, grouped together in the rack, for proper airflow. Additionally, if the CV Series amplifiers are used with other amplifiers, caution must be taken to ensure the heat forced into the rack from other amplifiers does not interfere with the ventilation of the CV Series amplifiers. AC Power Considerations Ensure that the CV Series amplifier is plugged into an outlet capable of supplying the correct voltage specified for the model and enough current to allow full-power operation of all the amplifiers utilizing that circuit. The current demand of a power amplifier varies depending on several factors, including the impedance of the load, the output level of the amplifier, and the crest factor and duty cycle of the program material. Under typical conditions reproducing contemporary music, with all channels driven into a fourohm load to the point where the peaks are just at the clipping point, the amplifiers require the following average currents: Psuedo Pink Noise @ 1/3 rated power into 4 ohm autoformer winding. (See Table 1 below) For full power consumption specifications (See Appendix A) Model 100VAC (50/60 Hz) 120VAC (60Hz) 230VAC (50Hz) CV1501 CV2501 CV1502 CV2502 CV4002 101 Watts / 1.35 Amps 148 Watts / 2.06 Amps 172 Watts / 2.35 Amps 285 Watts / 3.7 Amps 101 Watts / 1.13 Amps 153 Watts / 1.75 Amps 180 Watts / 1.89 Amps 308 Watts / 3.3 Amps 448 Watts / 4.92 Amps 101 Watts / 588 mA 153 Watts / 1.09 Amps 179 Watts /1.28 Amps 289 Watts / 1.69 Amps Table 1 Magnetic Leakage Consideration The CV Series amplifiers may be mounted without concern for magnetic flux leakage, within the confines of common sense. For example, it is not good practice to mount any power amplifier near a microphone input transformer or magnetic storage media. Input Wiring The CV Series amplifiers are furnished with a Standard Input Module that allows a line level input, either balanced or unbalanced. The input connectors on the Standard Input Module are a female XLR and a 3-pin Euro Style connector. These connectors are paired for each channel of the amplifier and are wired together in parallel. XLR Connector – Pin 2 is + (hot), Pin 3 is – (negative), and Pin 1 is Chassis Ground. To use this connector with an unbalanced input Pin 2 is + (hot), Pin 1 is Ground, and Pin 3 should be jumpered to Pin 1. Euro Style Connector- From Left to Right Pin 1 is + (hot), Pin 2 is – (negative), and Pin 3 is Chassis Ground. To use this connector with an unbalanced input; Pin 1 is + (hot), Pin 3 is Ground, and Pin 2 should be jumpered to Pin 3. Rev 04.08.021 - 15 – Another input to the CV Series amplifiers is provided via the EFX Loop’s RCV (receive) input. This input is only available when the FX Loop is enabled on the DIP switch located on the rear of the amplifier. This input is designed for unbalanced line level input only, and should only be used with equipment that is local to the CV amplifier or rack containing the CV amplifier, such as, an outboard signal processing device or the SND output from the FX Loop on the same or another (local) CV amplifier. This input offers low Common Mode Rejection and should not be used for signals from units more than a few feet away, in order to maintain low noise levels. Input Sensitivity The input sensitivity of the CV Series amplifiers is factory preset at 0dBu or 0.775Vrms needed to drive the amplifier to full rated output. Individual modules for the CV Series amplifiers may allow the user to select other settings based on the input source. (See Appendix B) Loudspeaker Polarity Loudspeakers or the distributed lines containing the step-down transformers must be connected with consistent polarity for correct phasing between them. Incorrect phasing will do no physical harm, but frequency response will be adversely affected. The key is to make sure that both speakers, or all transformers are connected to the output terminals in the same manner. Connect the (+) positive to the appropriate output connection such as 4, 8, 25V, 35V, 50V, 70V or 100V. Next be certain that the (-) negative is connected to the correct (Com) or common terminal. (Note! The low impedance 4 and 8 ohm outputs have a separate common terminal from the distributed voltage outputs. Facing the rear of the amplifier, the (Com) Common for the low impedance outputs is on the extreme left of each output connector. The (Com) Common for the distributed voltages is located on the extreme right of each output connector.) Mono Operation Mono operation of the CV Series Dual Channel amplifiers can be accomplished in two ways: Parallel Mono and Bridged Mono. Parallel Mono is achieved by driving both channels with a single input. In the parallel mono mode, the power of both channels can be considered as the total power, however the power is divided into two zones. In the bridged mono mode the two channels are combined to form one mono channel of greater power. One channel of input is fed to both channels via a circuit that inverts the input to one of the channels so that one channel reproduces the positive half of the input waveform and the other channel reproduces the negative half of the input waveform. In the bridged mode each channel sees one half of the total impedance. It is, therefore, not recommended to use a bridged load below 8 ohms. Parallel Mono – Use the Channel 2 input. In the parallel mono mode the channel 1 input is disabled. On the input module PCB find the Bridged/Normal/Parallel mode jumpers and change it from its factory preset “Normal” setting to the “Parallel” mono setting. (See Appendix B) By doing this you have instructed the input module to send the channel 2 input to both channels to be used as a mono input. Both output channels of the amplifier use a single input, and the total power of the amplifier is equal to twice the maximum output of a single channel. However, the total power is equally divided between the two channels or zones. Bridged Mono - Use the Channel 2 input. In the bridged mono mode the channel 1 input is disabled. On the input module PCB find the Bridged/Normal/Parallel mode jumper and change it from its factory preset “Normal” setting to the “Bridged” mono setting. (See Appendix B) By doing this you have instructed the input module to invert channel one so that it now represents the negative half of the audio waveform. Channel 2 is now the non-inverted channel and represents the positive half of the audio waveform. In this mode of operation each channel of the amplifier see one half of the total impedance, so that, an 8 ohm load now looks like a 4 ohm load to each channel. To connect the load to the amplifier you would connect the positive (+) of the load to the terminal of channel 2 and the negative (-) of the load to the terminal of channel 1. Example: You wish to bridge the Rev 04.08.021 - 16 – output of the CV2502 to create a Mono 70V output at 500 Watts. Connect the positive (+) lead from the distributed load to the 35V connector on Channel 2, and connect the negative (-) lead from the distributed load to the 35V connector of Channel 1. Be sure that the sum of the output to each of the speakers on the distributed load is less than 500 watts. (See Figure 8) It is also necessary to connect the commons together when bridging a distributed load. Caution: A 4 ohm mono load should not be connected to the CV Series amplifier in the bridged mode, but you can use the parallel mono configuration with a 4 ohm load. The table below lists the recommended “Bridged Mono” connections for a CV Series Dual Channel amplifier using Class 2 Wiring. The user should note that it is possible to bridge the 70 V and 100V terminals, however Class 1 Wiring should be observed. All outputs will be 500 watts on the example amplifier CV2502. (See Table 2 below) Bridged Mono Connections (-) CH 1 4 ohm 8 ohm 25V 35V 50V 70v 100V (+) CH 2 4 ohm 8 ohm 25V 35V 50V 70V 100V Connect to ------------------------------------------------------------------------------------------------------------------------------- Bridged Load 8 ohm load 16 ohm load 50V load 70V load 100V load 140V load 200V load Table 2 (+) 8 Ohm Mono Load (-) (+) 70V Mono Load (-) Figure 8 Rev 04.08.021 - 17 – Note! Class 2 wiring Approved Note! Class 1 Wiring Required Important Note: When bridging the CV Series amplifier at one of the distributed voltage outputs, it is necessary to connect the Common connections for the distributed voltages together. The commons on the secondary side of the output transformers are floating. This is not true for the low-impedance outputs. Their respective commons are connected internally. Power Sequencing A three pin Euro style terminal and mating connector are supplied with each amplifier to allow the amplifier power to be sequenced ON or OFF remotely. These terminals are located on the rear panel of the amplifier. The three terminals are from left to right, the “Ground, Send and Receive. (See Figure 9) Figure 9 When used with more than one amplifier the “SEQUENCE” feature will turn ON or OFF the amplifiers sequentially at about 0.5 second intervals, preventing a large turn on surge though the AC mains supply that could possibly cause disruption of the flow of current through the AC mains. Note: Use a remote supply of 12 to 15 VDC. Maximum current required is 20mA at turn-on, drops to ~1mA after amp turns on. Important NOTE: The SEND terminal on the Sequence connector has a +15Vdc potential whenever the amplifier is “ON”. The User should take caution not to short this terminal to ‘Chassis Ground”. The +15Vdc supply, internal to the amplifier, could be damaged. Turning A Single Amplifier ON / OFF First, place the CV amplifier’s power switch in the Standby (fully down) position. Connect the positive side of a 5to15VDC >20mA supply to the “RCV” terminal of the SEQUENCE connector. Connect the negative side of the supply to the “GROUND” terminal of the sequence connector. As long as the DC voltage is present the amplifier will remain on. Opening the circuit at the “SEQUENCE” connectors interrupts the DC voltage, and the amplifier will turn off. If a switch is used to control the “SEQUENCE” circuit, it should be a SPST (single pole single throw) switch, not a momentary contact closure. A control device such as a contact closure contained within a system such as Creston®, AMX® or Panja®, as examples, can be used to remotely control the Power ON/OFF function of the amplifier. The contact closure must be a latching type and not a momentary contact closure. Figure 10 Sequencing Multiple Amplifiers ON / OFF When using multiple amplifiers that utilize the “SEQUENCE” feature of the CV Series amplifiers, connect the amplifiers in the following manner. Starting with the first amplifier in the sequence to be turned on, connect the positive side of a 5 to15 VDC >20mA supply to the “RCV” terminal. Next connect a wire from the “SND” terminal of the first amplifier to the “RCV” terminal of the next amplifier to be turned on. Continue in this manner until all Rev 04.08.021 - 18 – amplifiers in the sequence are connected. Connect the negative side of the DC supply to the chassis ground terminal. If the amplifiers are mounted together in a rack where a common AC Ground connects the chassis grounds together through common connection via the metal rack rail, no other connections should be required. (See Figure 10) If this is not the case, simply connect all of the “Chassis Ground” terminals together. (See Figure 11) Place the CV amplifiers’ power switches in the Standby (fully down) position. To remotely begin the sequencing function, close the circuit, and supply the DC voltage to the “RCV” receive pin on the first amplifier and the subsequent amplifiers should turn on at 0.5 second intervals. Please note that the front panel “Power Switch” should be in the “Standby” position on all of the amplifiers in this group. When the DC voltage is interrupted, the amplifiers will then turn OFF. If there are signal processing and input source devices in the system, they should be turned ON before the amplifiers are “sequenced” ON, and these same devices should be powered down after the amplifiers are “sequenced” OFF. This will avoid large transient thumps being passed to the loudspeakers attached to the system. 12VDC Supply When using multiple amplifiers that utilize the “SEQUENCE” feature of the CV Series amplifiers, and you would like to power them ON, but remote operation is not required, you do not need the DC Voltage to activate the “Sequence” function. Simply connect the “SND” send terminal of the first amplifier to the “RCV” receive terminal of the next amplifier and so on. (See Figure 12) The front panel Power Switch of the first amplifier will activate the “SEQUENCE” function when switched to the ON position. All other front panel “Power Switches” should be in the “Standby” position for the “SEQUENCE” function to operate properly. Again, if the amplifiers are mounted together in a rack where a common AC Ground connects the chassis grounds together through common connection via the metal rack rails, no other connections should be required. Figure 11 Ground Test Procedure When mounting the amplifiers in a common rack, you should verify if the amplifiers’ chassis are sharing a common ground via the rack rails. To do this use a DMM (Digital Multi-Meter) to measure the DC resistance between the rack rail and the chassis ground of each unit. Set the DMM to measure DC resistance. Connect one probe to the rack rail and the other to the Chassis Ground terminal on the SEQUENCE terminal of the CV Series amplifier. If the DC resistance is greater than 0.2 ohms we recommend that you connect the chassis ground terminals of the sequence connector together in a daisy chain as in Figure 12. Repeat this for each CV Series amplifier in the rack. If there is less than a 0.2 ohm resistance from the rail to the chassis ground of each unit you do not have to daisy chain the chassis grounds together. Let the rack rail be your chassis ground path. Rev 04.08.021 - 19 – Figure 12 Using Other Amplifiers in the Power Sequence The Carver pm700, pm950, pm1400, pt1800 and pt 2400 can be use together with the CV Series amplifiers in a “Sequenced” configuration. However, as the Sequence Terminal on the pm Series has no Chassis Ground connector, whenever this manual references the chassis ground connector you should replace it with some reliable ground connection point on the PM series amplifier chassis such as a screw that is used in fastening the chassis parts together. A good example would be the screws that retain the input modules to the amplifier chassis. All other connections would be exactly as described in this discussion of sequencing hook-up procedures. For operational details regarding the Carver pm Series and pt Series amplifiers, please consult their respective user guides provide with the amplifiers. Use of the Remote Level Control Connector A four position Euro connector furnishes contact points for the use of several “Remote Level” options. When using the “Remote Level” option, you should keep in mind that the front panel level controls act as a master level control. The “Remote Level” control will perform as an attenuator from the preset level set by the front panel level adjustment. Once the master level has been set the front panel level control knob(s) may be replaced with the plastic snap-in buttons supplied with the CV Series amplifier. (See figure 13) You may choose to use one of the accessory remote level controls offered by Carver Professional, or you may elect to fashion your own in a custom panel of your design. Regardless of your decision the way that these devices connect to the CV Series amplifier is the same. Use a 5kΩ to 10kΩ potentiometer, preferably a reverse log taper. The nature of the taper will define the manner in which the control responds. A reverse log taper will give you the type of action that you would normally expect when adjusting the level of a radio or other conventional electronic audio device. In contrast, a linear taper will seem to have little or no effect in the first half of its rotation. This is because it is varying at a linear rate, and at or near full attenuation the effect is not notice until you achieve a level that is within the sensitivity of the loudspeaker connected to the amplifier, or at least exceeding the existing noise floor. Figure 13 Identify the terminal of the pot to which the wiper is connected when the pot is set to the fully clockwise position. Connect this terminal to the RTN (ground return) terminal of the “Remote Level” input connector. (See figure 14) 0.5Ω Ω Figure 14 Figure 15 Connect the center terminal of the pot to CV1 or CV2 (control voltage terminal) of the “Remote Level” input connector, depending on which channel you intend to adjust remotely. In the case of a dual channel CV Series amplifier, the two channels are independently controlled by their respective control voltages applied to the CV1 Rev 04.08.021 - 20 – and CV2 terminals. If you wish to control both channels simultaneously, using the remote control as a master level control and the front panel level controls as balance adjustments, both control inputs may be connected together and driven off the wiper of a single pot. (See figure 15) An example of this application would be in a system where the CV Series amplifier is being used to reproduce stereo information, and keeping two level controls synchronized during adjustment would be difficult. "CH1 Level" R1 5kC "CH2 Level" R2 5kC R3 330 D1 RED "Amp On" RTN C2 C1 + 5V Figure 16 Connect the remaining terminal of the pot (full counter-clockwise position) to the +5V terminal of the “Remote Level” input connector. This connection will set the control voltage to 0V with the pot rotated fully clockwise (sets maximum level), 5V with the pot rotated fully counter-clockwise (sets minimum level), and allow smooth variation between these extremes. The VCA (voltage controlled amplifier) within the CV Series amplifier uses control information from the “Remote Level” input terminals in the flowing manner: 1) A 0V control voltage corresponds to 0dB added attenuation (added to the attenuation already set by the front panel Level control for that channel). 2) A 5V control voltage corresponds to 100dB added attenuation. 3) The control voltage effect is “dB linear”; a 2.5V control voltage input will add 50dB of attenuation. 4) The control characteristic is –1dB per 50mV of control voltage. As an added bonus, low current loads, such as an LED, may be connected between the +5V and RTN terminals. This may be useful if one desires a visual indication that the CV Series amplifier is powered ON. The +5V at the “Remote Level” terminals turns on and off with the amplifier. (See figure 16) Wiring Requirements for Remote Level Control Applications For best results, use 24AWG or larger control wiring, especially for the +5V and RTN connections. Since 24AWG wire has DC resistance of 25mΩ per foot, using 1000 feet of 24AWG (loop resistance of 50Ω total) to make connection to a 5kΩ potentiometer will result in a 1% voltage drop, which causes a reduction in control voltage range. This voltage drop increases as more current is carried by the +5V and RTN conductors, i.e. when the 5V line is used to light a remote LED indicating that the amp is ON. In the (extreme) example given above, an additional 10mA load on the +5V and RTN conductors will cause 10% reduction in control voltage range, yielding lower maximum level and higher minimum level. Within reason, conductor capacitance is not a problem since the control voltages are averaged in the amplifier and any additional RC delay will not be noticeable. Note: do not connect the RTN conductor to a ground reference at the remote control location. Ground potential differences will drive currents through the RTN line and cause unpredictable remote level control performance. Rev 04.08.021 - 21 – Using Third Party Control Systems Other manufacturers such as Crestron®, AMX® and PANJA® supply systems frequently used to provide a centralized control platform for A/V Systems. A voltage ramp provided by one of these manufacturers, and controlled by their system can be used to adjust level on the CV Series amplifiers. Apply a control voltage from the external source of the desired control system to the “Remote Level” input terminal. This voltage may be applied to either or both of the CV1 and CV2 input terminals. Connect the control voltage reference or common to the RTN contact on the “Remote Level” input terminals. The –1dB per 50mV control characteristic mentioned above applies in this application, as well. Externally supplied control voltages should not exceed 15VDC with respect to the RTN terminal. Voltages in excess of 15VDC could possibly damage the “Remote Level” input circuitry. Note: Voltages in excess of 5V applied to CV1 or CV2 will not result in attenuation greater than 100dB. Note: You should keep in mind that the front panel level adjustments act as master level controls when using the remote level. Effects Loop When using the Effect Loop “EFX” to daisy chain signals to another amplifier, we recommend that you connect the unbalanced “SND” Terminals of the effects loop to the next amplifier’s input module, do not use the “RCV” terminal of the “EFX” loop. If daisy chaining to multiple amplifiers this should prevent the loss and degradation of the signal as the number of the daisy chained amplifiers grows. (See Figure 16) By connecting the amplifier in this manner, you can also take advantage of the effects loop as a signal processing loop. Note that the signal from the original input to the first amplifier is delivered to the “SND” terminal of the “EFX” loop as an unbalanced output. From there it can be split to go to the input module of another amplifier as well as back into the “EFX” loop. The next amp receives a clean signal except for any processing that may have occurred in the previous amplifier. The “RCV” terminal of the “EFX” loop should only be use when the effects loop is being used to accommodate outboard signal processing. This signal should be local to the amplifier. The quality of the “differential” amp in this feature is such that if long signal paths are used loss of signal quality should be expected. If signals are being sent to the amplifier over a long distance, we recommend that you use the amplifier’s input module, which offers greater common mode noise rejection. Figure 17 INPUT MO DUL E SIG NAL INPUT CV Series Block Diagram 17Hz HPF electron ic sw itch VCA Sectio n 120Hz HPF electron ic sw itch electron ic sw itch Sig n al to Amp O u tp u t Stag e EF F ECT S SEND AL W AYS HO T ! Master L evel, Remo te L evel Co n tro l Vo ltag e In p u t CV AMPL IF IER SIG NAL PRO CESSING BL O CK DIAG RAM Heil 11.21.00 O NE CHANNEL SHO W N co n figu ratio n DIP sw itch OUT OFF OFF 80Hz EF F ECT S RECEIVE EFX IN ON CLIP ON HP 120Hz 80Hz HPF Rev 04.08.021 - 22 – WARRANTY INFORMATION CV Series Power Amplifiers: 5 Years CV Series Modules and Accessories: 1 Year NOTE: The following warranty is exclusive to the United States and its possessions and territories. Please see your Carver Professional dealer or distributor for the correct warranty information in your area or locale. WHAT IS COVERED: THIS WARRANTY COVERS DEFECTS IN MATERIAL AND WORKMANSHIP ONLY. This limited Warranty DOES NOT extend to: 1) damage caused by shipment, 2) damage caused by accident, misuse, abuse, failure to perform owner maintenance, or operation contrary to the instructions in the Carver Professional owner’s manual, 3) units on which the serial number has been defaced, modified or removed and 4) damage resulting from modification or attempted repair by any other person than authorized by Carver Professional. WHAT WE WILL PAY FOR: Carver Professional will pay all labor and material expenses for items covered under this Limited Warranty. See the next section concerning shipping charges. WHAT YOU MUST DO TO OBTAIN WARRANTY SERVICE: In the event your Carver Professional product requires service, contact your Carver Professional Authorized Dealer / Contractor or contact Carver Professional (ATTN: Customer Service Dept.) 9300 North Decatur, Portland, OR 97203, or call Customer Service Department directly at (503) 978-3343. You will be directed to an Authorized Carver Professional Service Station or receive instructions to ship the unit to the factory. Please save the original carton and packing materials in case shipping is required. Please do not ship parcel post. Include a complete description of the problem, the associated components and connections, and a copy of the purchase receipt. Carver Professional does not pay initial shipping costs. Return shipping costs will be pre-paid if repairs were covered by the scope of this warranty. YOU MUST RETAIN AND PROVIDE YOUR SALES RECEIPT TO OBTAIN COVERAGE UNDER THIS LIMITED WARRANTY. The warranty period begins from the date of the first consumer purchase from an Authorized Carver Professional Dealer. Any implied warranties for merchantability and fitness for a particular purpose required by any state law are limited in duration to the warranty period of your product. The warranty set forth above is exclusive and no other, written or oral is expressed or implied. Carver Professional specifically disclaims the implied warranties and merchantability and fitness for a particular purpose. EXCLUSION OF CERTAIN DAMAGES: In no event shall Carver Professional be liable for property damage, or any other incidental or consequential damages, which may result from failure of this product. If your Carver Professional product proves defective in material or workmanship, the liability of Carver Professional shall be limited to the repair or replacement, at the option of Carver Professional, of any defective part. STATE LAWS MAY DIFFER: Some states do not allow limitations on how long an implied warranty lasts and/or do not allow the exclusion or limitation of incidental or consequential damages, so the above limitations may not apply to you. This warranty gives you specific legal rights, and you may have other rights, which vary, from state to state. OTHER IMPORTANT PROVISIONS: Carver Professional reserves the right to make changes in design and improvements to its products without the responsibility of installing such changes or improvements on products previously sold by Carver Professional. We suggest that you attach your purchase receipt to this Warranty and keep both documents in a safe place. Thank you for your choice of a Carver Professional Amplifier. Rev 04.08.021 - 23 – CARE AND SERVICE ASSISTANCE Care: Wipe off the CV Series Amplifier’s front panel and chassis from time to time, with a soft, dry cloth. If you have something stubborn to remove, use a mild dish soap or detergent sparingly applied to a soft cloth. Don’t use alcohol, ammonia or other strong solvents. Service Assistance: We suggest that you read the Limited Warranty completely to fully understand your warranty/service coverage. Please promptly complete and return the Warranty registration card. Also, be sure to save the sales receipt in a safe place. It will be necessary for warranty service. If your Carver Professional product should require service, you may contact the Carver Professional Technical Service Department by calling (503) 978-3343 or by writing to us at the Factory address found on page 25. We will then direct you to the nearest in our national network of Authorized Warranty Service Centers, or give you detailed instructions on how to return the product to us for prompt action. If you should have questions or comments, please write to the Factory address shown on page 25, or contact us via email at [email protected] or at our web site: http://www.carverpro.com. Please include the model and serial number of your Carver Professional product, your complete address and daytime phone number. IN CASE OF DIFFICULTY If you are having trouble, or suspect a problem with your CV Series amplifier, try some simple troubleshooting before contacting an Authorized Carver Professional Dealer, Authorized Carver Professional Service Center or Carver Professional Technical Service. Below are listed some general problems and items that should be checked in an attempt to resolve the difficulty. No Sound, No Power This is usually an indication of a power supply problem in either the power line itself or the amplifier’s power supply. Check the following: 1) CV Series amplifier’s power is switched off. 2) Line cord is disconnected. 3) Poor fit between the plug and AC receptacle. 4) Power off at AC receptacle (check with tester or lamp). 5) The amplifier is plugged into a switched outlet. Verify that the outlet is live. 6) CV Series amplifier’s fuse has blown. This amplifier contains no user serviceable fuses. 7) The thermal breaker in the power transformer has opened. Allow amplifier to cool and the breaker will reset itself. Power On, Low Output or No Output Low or no output problems are usually signal-source, bad cable or partial output short circuit related. 1) The input level controls are set too low. 2) Move the input connection to another amplifier that you know is working to verify that it is not a source problem. 3) Check speaker connections. Be sure that there are no small strands of wire touching similar strands coming from the other wire in the cable. 4) Make sure the speakers are functioning correctly. 5) If you are using bridged-mono mode, ensure that the Output Configuration Jumpers are set correctly. 6) Use a voltmeter to determine if the power line voltage is dropping excessively when the amplifier is driven hard. Playback Is Mixed with Hum 1) Check or replace the connecting cables, between source and amplifier’s input. 2) Make sure that each screw terminal connection is tight. 3) Signal cables may have been routed too closely to the AC cables, power transformers, motors or EMI inducing device. 4) Try connecting another source to the power amplifier inputs. If the hum stops, the problem lies with the original source component. Rev 04.08.021 - 24 – Distortion Distortion is usually caused by excessive loss in the input controls (the mixer/equalizer/crossover cannot produce enough output), overdriving resulting in output clipping, or current limiting caused by excessively low load impedance. 1) Check the setting of the input level controls. If set too low, the preceding piece of equipment may not have sufficient output to overcome the loss. 2) Check the speaker connections and verify that all screw connections are tight and that there are no stray strands of wire to cause short circuits. 3) Verify that the total load impedance presented to the amplifier is within the limits described in this manual for mode of operation selected. Carver Professional Service Department 9300 North Decatur Portland, Oregon 97203 Phone 503.978.3343 • Fax 503.978.3302 Email: [email protected] Web: http://www.carverpro.com OR Carver Professional Customer Support 9300 North Decatur Portland, Oregon 97203 Phone 503.978.3344 • Fax 503.978.3302 Email: [email protected] Web Page: http://www.carverpro.com Carver Professional reserves the right to improve its products at any time. Therefore, specifications are subject to change without notice. Rev 04.08.021 - 25 – Appendix “A” Power Consumption for CV Series Amplifiers CV Series AC Power Considerations Model CV1501 CV2501 CV1502 CV2502 CV4002 Model CV1501 CV2501 CV1502 CV2502 CV4002 Model CV1501 25v tap CV2501 25v tap CV1502 25v tap CV2502 25v tap CV4002 35v tap Model CV1501 25v tap CV2501 25v tap CV1502 25v tap CV2502 25v tap CV4002 35v tap Rev 04.08.021 1kHz Sine Wave @ Full Rated Power into 4 Ohm Autoformer Winding 100vAC (50Hz) 100vAC (60Hz) 120vAC (60Hz) 230vAC (50Hz) 250 Watts / 3 Amps 249 Watts / 2.98 Amps 249 Watts / 2.5 Amps 244 Watts / 1.28 Amps 380 Watts / 4.78 Amps 378 Watts / 4.73 Amps 395 Watts / 4.09 Amps 368 Watts / 2.14 Amps 463 Watts / 5.6 Amps 463 Watts / 5.6 Amps 467 Watts / 4.7 Amps 442 Watts / 2.5 Amps 794 Watts / 9.4 Amps 773 Watts / 9.2 Amps 800 watts / 7.9 Amps 775 Watts / 4.09 Amps 1230 Watts / 14.9 Amps 1230 Watts / 14.9 Amps 1216 Watts / 12.4 Amps 1207 Watts / 6.58 Amps 60 Hz Psuedo Pink Noise @ 1/3 Rated Power into 4 Ohm Autoformer Winding 100vAC (50Hz) 100vAC (60Hz) 120vAC (60Hz) 230vAC (50Hz) 101 Watts / 1.35 Amps 98.5 Watts / 1.3 Amps 101 Watts / 1.13 Amps 101 Watts / 588mA 150 Watts / 2.1 Amps 148 Watts / 2.06 Amps 153 Watts / 1.75 Amps 153 Watts / 1.09 Amps 172 Watts / 2.35 Amps 170 Watts / 2.3 Amps 180 Watts / 1.89 Amps 179 Watts / 1.28 Amps 296 Watts / 3.9 A 285 Watts / 3.7 Amps 308 Watts / 3.3 Amps 289 Watts / 1.69 Amps 488 Watts / 6.45 Amps 488 Watts / 6.45 Amps 448 Watts / 4.92 Amps 470 Watts / 2.7 Amps 60 Hz 1kHz Sine Wave @ Full Rated Power, Isolated Output Winding 100vAC (50Hz) 100vAC (60Hz) 120vAC (60Hz) 295 Watts / 3.4 Amps 293 Watts / 3.4 Amps 393 Watts / 4.85 Amps 552 Watts / 6.6 Amps 230vAC (50Hz) 289 Watts / 2.88 Amps 290 Watts / 1.49 Amps 389 Watts / 4.78 Amps 501 Watts / 5.05 Amps 372 Watts / 2.14 Amps 549 Watts / 6.5 Amps 566 Watts / 5.62 Amps 530 Watts / 2.9 Amps 908 Watts / 4.7 Amps 919 Watts / 10.5 Amps 919 Watts / 10.5 Amps 905 Watts / 8.97 Amps 1500 Watts / 18.1 Amps 1500 Watts / 18.1 Amps 1450 Watts / 14.5 Amps Psuedo Pink Noise @ 1/3 Power, Isolated Output Winding 100vAC (50Hz) 100vAC (60Hz) 120vAC (60Hz) 230vAC (50Hz) 119 Watts / 1.55 Amps 119 Watts / 1.55 Amps 116 Watts / 1.29 Amps 117 Watts / 0.666 Amps 155 Watts / 2.15 Amps 155 Watts / 2.15 Amps 163 Watts / 1.84 Amps 154 Watts / 1.05 Amps 211 Watts / 2.79 Amps 208 Watts / 2.7 Amps 225 Watts / 2.4 Amps 210 Watts / 1.41 Amps 339 Watts / 4.25 Amps 339 Watts / 4.25 Amps 342 Watts / 3.7 Amps 330 Watts / 1.9 Amps 575 Watts / 7.5 Amps 575 Watts / 7.5 Amps 765 Watts / 8.1 Amps - 26 – Appendix “B” Input Sensitivity Jumpers 101 and 102 on the standard input module’s PCB are used to set the Input Sensitivity of the amplifier for each channel or zone. The output level of the input source determines the setting. Since, each channel or zone may have a different input source, it is acceptable to have these jumpers set differently according to the potential output level of the input source. The figure below show the correct jumper setting for an input sensitivity of 0.775VRMS or 1.5VRMS. Caution! Before removing the module to change input sensitivity or to set Bridged Mono, Parallel Mono or Normal operating modes, make certain that the amplifier’s AC mains are first switched OFF. Bridged, Parallel, Normal Settings Jumper 100 on the standard input module’s PCB is used to configure the Standard Input Module and the amplifier in which it resides to operate in Normal, Bridged Mono or Parallel Mono modes. It is imperative that the module be configured to the operational mode desired before making the loudspeaker connections. Configuration of the jumpers should only be done with the amplifier’s power OFF. The figure below shows the correct jumper placement for each of the three modes of operation. Bridged Mono Parallel Mono Normal JP100 CONFIGURATION Caution! Before removing the module to change input sensitivity or to set Bridged Mono, Parallel Mono or Normal operating modes, make certain that the amplifier’s AC mains are first switched OFF. Rev 04.08.021 - 27 –