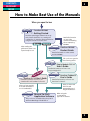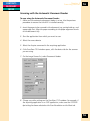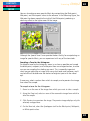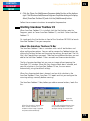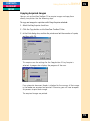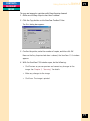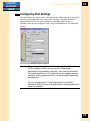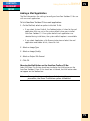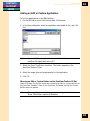
1
f o r
Windows
ScanGear CS-S 4.3
for CanoScan FB1200S Color Image Scanner
User'sGuide
CONTENTS
GLOSSARY
INDEX
2
How to Make Best Use of the Manuals
When you open the box
Printed Manual
CanoScan FB1200S
Getting Started
Describes operating procedure from set up
and software installation to scanning and
confirmation of operation. Please read before
using the scanner for the first time.
Windows
Detailed information
on care of the
scanner and handling
the accompanying
CD-ROM.
Macintosh
After reading this
guide and scanner is set
up and ready for use.
Electronic Manual CanoScan FB1200S
Product Guide
Detailed information on the scanner
and the CD-ROM.
Tells you how to get the
best scanning results.
Electronic Manual
Plug-in Module CS-S 3.6
User's Guide
e
uid
Electronic Manual
G
his
T
Detailed information on how to use
Plug-in Module CS-S.
Electronic Manual
Detailed information on how to use
ScanGear CS-S and ScanGear Toolbox CS.
Detailed information on how to use
CanoScan Toolbox CS.
After you have read
this book and
mastered the use of
Plug-in Module CS-S.
After you have read this
book and mastered the
use of ScanGearCS-S.
Electronic Manuals
CanoScan Toolbox CS
User's Guide
ScanGear CS-S 4.3 User's Guide
Manual for Each
Application Software
When using the
accompanying
application software.
Tells you how to use Adobe Photoshop 5.0 LE
and Caere OmniPage Limited Edition.
2
CONTENTS
GLOSSARY
INDEX
3
Copyright Notice
This manual is copyrighted with all rights reserved. Under the copyright laws,
this manual may not be copied, in whole or in part, without written consent
of Canon, Inc. Under the law, copying includes translating info another
language or format.
CanoScan, and Bubblejet are trademarks of Canon, Inc. Adobe, Adobe
Acrobat and Adobe Photoshop are trademarks of Adobe Systems
Incorporated. Microsoft is a registered trademark of, and Windows is a
trademark of Microsoft Corporation. All other names are trademarks of their
respective companies.
©1999 Canon, Inc.
3
4
GLOSSARY
INDEX
Contents
Chapter 1 Introduction to ScanGear CS-S 4.3 ..................... 7
Welcome to ScanGear CS-S ................................................................ 7
System Requirements ......................................................................... 7
About ScanGear CS-S ......................................................................... 8
About this User’s Guide ...................................................................... 9
Obtaining Customer Support .............................................................. 9
Chapter 2 Installing ScanGear CS-S 4.3 ............................. 12
Before You Install ............................................................
Installing ScanGear CS-S ..................................................
Selecting ScanGear CS-S ..................................................
Removing ScanGear CS-S.................................................
Where to Go From Here ..................................................
12
12
14
14
15
Next Steps ........................................................................................15
Getting Help in ScanGear CS-S .........................................................15
Chapter 3 Scanning ............................................................. 16
About Scanning ............................................................... 16
Features of the ScanGear CS-S Window ......................... 17
Quickstart to Scanning .................................................... 19
Preparing the Scanner ...................................................................... 19
Previewing an Image ........................................................................ 19
Where is the Scanned Image? ..........................................................23
Scanning in “Windowless” (UI-less) Mode ..................... 23
Working with Preview Images ........................................ 24
Changing the Preview Image Shape and Size .................................... 24
Cropping Part of an Image ................................................................ 25
Moving an Image ............................................................................. 25
Zooming In and Out ......................................................................... 25
Creating a Negative Image ................................................................ 25
Reversing an Image .......................................................................... 26
Rotating an Image Left or Right ........................................................26
Displaying or Hiding the Rulers .........................................................26
Selecting Automatic Tone Correction ................................................26
Viewing ScanGear CS-S Help Topics ..................................................26
Specifying How the Image is Previewed ............................................27
Setting Scan Mode, Resolution, and Dimensions .......... 28
4
5
GLOSSARY
INDEX
Setting Scanning Mode .................................................................... 28
Selecting Scan Resolution ................................................................. 30
Selecting Output Dimensions ............................................................32
Setting Image Tones ........................................................ 35
Setting General Preferences ........................................... 47
Using Text Enhanced for Scans ......................................................... 47
Using Canon ColorGearTM Color Matching ........................................ 48
Chapter 4 Scanning Devices ............................................... 51
Configuring Scanning Devices ........................................ 51
Configuring a Device with ScanGear CS-S ........................................ 51
Testing the Scanner .......................................................................... 53
Scanning Multi-Page Documents.................................... 55
Using the Automatic Document Feeder (ADF) ................................... 55
Connecting the Automatic Document Feeder ................................... 55
Scanning with the Automatic Document Feeder ............................... 56
Chapter 5 Scanning Techniques ......................................... 59
About Scanning Techniques ............................................ 59
Planning for the End Result ..............................................................59
Preparing the Material to Scan ......................................................... 59
Matching Scan Resolution to Purpose ............................................... 60
Optical and Enhanced Resolutions .................................................... 61
Estimating Image Sizes .................................................... 61
Resolution and Color ........................................................................ 61
File Size Estimates ............................................................................. 62
Cropping the Image Shape ............................................................... 63
Custom Tone Adjustments .............................................. 64
What Do Those Curves Mean? .........................................................64
Contrast and Brightness Adjustments ............................................... 64
Gamma Adjustments ........................................................................ 65
Histogram Techniques ....................................................................... 65
Enhancing Color Images.................................................. 69
About Image Color and Color Channels ............................................ 69
Chapter 6 Using ScanGear Toolbox CS .............................. 71
About ScanGear Toolbox CS ........................................... 71
Installing ScanGear Toolbox CS ......................................................... 71
Uninstalling ScanGear Toolbox CS ..................................................... 71
Starting ScanGear Toolbox CS ......................................... 72
About the ScanGear Toolbox CS Bar ................................................. 72
5
6
GLOSSARY
INDEX
Setting Up ScanGear Toolbox CS .................................... 73
Adding a Button to the ScanGear Toolbox CS Bar ............................. 73
Removing a Button from the ScanGear Toolbox CS Bar .................... 73
Enabling or Disabling Easy Acquire ...................................................74
Configuring Copy Settings .............................................. 75
Copying Acquired Images ................................................................. 76
Configuring Mail Settings ............................................... 78
Linking a Mail Application ................................................................ 79
Mailing Acquired Images .................................................................. 80
Configuring Fax Settings ................................................. 81
Linking a Fax Application .................................................................. 81
Faxing Acquired Images .................................................................... 82
Configuring Edit or Custom Settings.............................. 83
Linking an Edit or Custom Application .............................................. 84
Acquiring Images for Editing or Customized Applications ................. 85
Changing ScanGear Toolbox CS Preferences ................. 86
Selecting a ScanGear Toolbox CS Source .......................................... 86
Specifying ScanGear Toolbox CS Appearance ................................... 87
Cleaning Up Temporary Files ............................................................. 87
Using ScanGear Toolbox CS Shortcut Menus .................................... 88
Canon Scanner Monitor .................................................. 89
Canon Monitor Utility Display ........................................................... 89
Right-Clicking the Canon Scanner Monitor Icon ................................ 89
ScanGear Toolbox CS Settings Summary ........................ 90
Copy Image ......................................................................................90
Mail Image .......................................................................................90
Fax Image ......................................................................................... 91
Edit or Custom Image ....................................................................... 91
Chapter 7 Frequently Asked Questions............................. 92
Pre-Scan Checklist ............................................................ 92
“Top Ten” List .................................................................. 93
Troubleshooting Q & A ................................................... 94
Glossary
Index
............................................................................ 98
.......................................................................... 109
6
Chapter 1
Introduction to ScanGear CS-S 4.3
CONTENTS
GLOSSARY
INDEX
7
Chapter 1
Introduction to ScanGear CS-S 4.3
Welcome to ScanGear CS-S
Welcome to Canon ScanGear CS-S 4.3 for Windows 95, Windows 98 and
Windows NT 4.0! Working with your imaging application, the ScanGear CS-S
provides flexible capabilities for scanning with your Canon scanner and
interfacing with a wide variety of applications and devices. ScanGear CS-S
also gives you prescan image enhancement features and lets you produce
professional-quality images from your scanner.
System Requirements
Before you run install ScanGear CS-S, make sure your hardware and software
meet the system requirements listed below.
Hardware
• CPU:
• RAM:
i486 or greater (Windows 95/98)
Pentium or greater (Windows NT 4.0)
32 MB or greater; 64 MB recommended (Windows 95)
32 MB or greater; 64 MB recommended (Windows 98)
32 MB or greater; 64 MB recommended (Windows NT 4.0)
• Data files: 50 MB or greater free space
The size of scanned images varies depending on the image type selected.
Black and white scans have the smallest file size; high-resolution color
scans have the largest file size. As an example, a 4 inches x 6 inches color
photograph scanned in high-resolution color at 600 dpi needs about 25
MB of hard disk space. For more information about scanned image file
sizes, see Chapter 5, “Scanning Techniques.”
• Program files: 3 MB required
• Monitor: Super VGA, 256 or more colors, 800 X 600 or higher
resolution.
For previewing the best color scans, it is recommended that you make sure
your monitor’s color palette is set to Full Color (24 bit).
• ASPI-compatible SCSI card
A compatible SCSI card is bundled with your scanner.
7
Chapter 1
Introduction to ScanGear CS-S 4.3
CONTENTS
GLOSSARY
INDEX
8
Software
Windows® 95, Windows® 98 or Windows NT® 4.0 is required to run the
ScanGear CS-S. It is also recommended that you install the latest available
Windows 95/98 or Windows NT 4.0 Service Pack.
About ScanGear CS-S
ScanGear CS-S has a number of powerful features that help you get the most
out of your scanner’s capabilities. Using ScanGear CS-S, you can preview an
image and make changes before the image is scanned and acquired by the
application you are using.
Feature List
The following list describes some of ScanGear CS-S’s features:
• Flexible, fully automatic image acquisition, and pre-scan image
manipulation prior to passing data to the image application
• Sophisticated, Windows-compliant user interface
• Full support of TWAIN 1.6 specifications
• Support for Automatic Document Feeder (ADF) option
• Text Enhanced mode for OCR(optical character recognition)
applications
• Canon ColorGearTM Color Matching software technology
About ScanGear CS-S “Windowless” Mode
The ScanGear CS-S data source runs with or without its window (user
interface, or UI) displayed, depending on the acquiring application. When an
application requests a scan and the ScanGear CS-S window does not appear
before the scan occurs, you can not use the ScanGear CS-S settings described
in this manual. The host application provides the settings, and you can change
the image after it is acquired. This is called “windowless” or “UI-less”
scanning mode.
8
Chapter 1
Introduction to ScanGear CS-S 4.3
CONTENTS
GLOSSARY
INDEX
9
About this User’s Guide
This user’s guide has been designed to provide you essential information
about ScanGear CS-S. In addition, the context-sensitive online help provides
basic information on using ScanGear CS-S.
Assumptions
This guide assumes that you are familiar with the Microsoft Windows 95/98
or Windows NT 4.0 graphical user interface.
If you have Windows 95 for example, run the Windows tutorial by doing the
following:
1. Click the Start button, then click Help.
2. On the Contents tab, click Tour: Ten Minutes to Using Windows to run the
Windows 95 tutorial.
Obtaining Customer Support
If you are having problems setting up or running ScanGear CS-S, first read
Chapter 7, “Frequently-Asked Questions,” in this manual, or check the online
help troubleshooting section. These sources list the most common problems
and suggest solutions.
If the solution is not found in the Troubleshooting list, contact your nearest
Canon Help Desk.
CANON (UK) LTD.
Canon House, Manor Road, Wallington, Surrey SM6 0AJ, United Kingdom
For technical support, please contact Canon Helpdesk.
Helpdesk:
P.O. Box 431, Wallington, Surrey SM6 0XU
TEL: (0990) 143 723
(Calls may be recorded)
FAX: (0990) 143-340
BBS: (0990) 143-350
For sales inquiries: (0121) 666-6262
CANON FRANCE S.A.
17, quai du Président Paul-Doumer
92414 Courbevoie Cedex, France
Tél.01 4199 7777
Fax.01 4199 7951
Hotline:
Tél.01 4199 7070
9
Chapter 1
Introduction to ScanGear CS-S 4.3
CONTENTS
GLOSSARY
INDEX
10
CANON DEUTSCHLAND GmbH
Postfach 528, 47705 Krefeld, Germany
CANON- Hotline-Service
Customer Support: (0 21 51)349-555
Info-Desk: (0 21 51)349-566
Mailbox: (0 21 51)349-577
Telefax: (0 21 51)349-588
CANON ITALIA S.p.A
Palazzo L, Strada 6,
20089 Milano Fiori-Rozzano (MI), Italy
TEL: 02/8248. 1
FAX: 02/8248. 4604
Pronto Canon 02/8249. 2000
http://www.canon.it
CANON OY AB
Kornetintie, 3, 00380 Helsinki, Finland
Puhelin: 010 544 20
Help Desk: 0600-0-22606 (maksu 14,80 mk/min)
Fax: 010 544 4571
CANON SVENSKA AB
Stensätravägen 13, S-127 88, Skärholmen, Sweden
CANON DANMARK
Vasekær 12, DK-2730 Herlev, Denmark
Hotline: 44 88 26 66
http://www.canon.dk
CANON NORGE AS
Hallagerbakken 110, Boks 33, Holmlia 1210 Oslo 12, Norway
Tlf: 2262 9321
FAX. 2262 0615
CANON BENELUX NEDERLAND N.V.
Neptunusstraat 1, 2132 JA Hoofddorp
The Netherlands
Tel: 023-5 670 123
Fax: 023-5 670 124
Helpdesk: 023-5 681 681
CANON BENELUX BELGIUM N.V./S.A.
Bessenveldstraat 7, 1831 Diegem, Belgium
Tel: 02 7220411
Fax: 02 7213274
Helpdesk: 02 7220404
CANON GmbH
Zetschegasse 11, 1232 Wien, Austria
10
Chapter 1
Introduction to ScanGear CS-S 4.3
CONTENTS
GLOSSARY
INDEX
11
CANON (SCHWEIZ) A.G.
Industriestrasse 12, CH-8305 Dietlikon
Switzerland
Tel: (01)835 61 61
Fax: (01)835 68 60
Hotline: 157 30 20
CANON ESPAÑA S.A.
C/Joaquin Costa No 41, 28002
Madrid, Spain
HelpDesk: 906-301255
Tel.: 91-5384500
Fax.: 91-4117780
CANON AUSTRALIA PTY. LTD.
1 Thomas Holt Drive, North Ryde, Sydney N.S.W. 2113, Australia
Info-Line: (02)9805 2864
CANON NEW ZEALAND LTD.
Fred Thomas Drive, Takapuna
P.O. Box 33-336 Auckland, New Zealand
Info-Line: 0900-522666
CANON HONG KONG CO., LTD.
10/F, Lippo Sun Plaza, 28 Canton Road
Tsimshatsui, Kowloon, Hong Kong
CANON SINGAPORE PTE. LTD.
79 Anson Road #09-01/06
Singapore 079906
CANON LATIN AMERICA, INC.
6505 Blue Lagoon Drive Suite 325
Miami, Florida 33126, U.S.A.
CANON EUROPA N.V.
P.O. Box 2262
1180 EG Amstelveen, The Netherlands
CANON INC.
30-2 Shimomaruko 3-chome, Ohta-ku
Tokyo 146-8501, Japan
11
Chapter 2
Installing ScanGear CS-S 4.3
CONTENTS
GLOSSARY
INDEX
12
Chapter 2
Installing ScanGear CS-S 4.3
Before You Install
Before you install ScanGear CS-S, make sure the following items:
• Is a SCSI card mounted properly to your computer ? (Refer to the
Getting Started Guide on details.)
• Is a SCSI interface cable connected properly ? (Refer to the Getting
Started Guide on details.)
• Is an AC adapter connected to the CanoScan FB1200S scanner ? The
CanoScan FB1200S has to be powered on before the computer is
turned on. (Refer to the Getting Started Guide on details.)
Installing ScanGear CS-S
Note:
If ScanGear CS-S has already been installed according to the
instructions in the Getting Started Guide, there is no need to
perform the following procedures.
The following procedure describes how to install ScanGear CS-S in Windows
95, Windows 98 and Windows NT 4.0.
Use the following steps to install ScanGear CS-S.
Note:
You must be logged on as an administrator in Windows NT
4.0.
To install ScanGear CS-S software:
1. Place the CanoScan Setup Utility CD-ROM in the computer drive.
12
Chapter 2
Installing ScanGear CS-S 4.3
CONTENTS
GLOSSARY
INDEX
13
2. In the start-up menu, click [Install/Uninstall Software].
3. [Install] window is displayed. Be sure that [Install] in the top-left of the
window is selected and the check box for [ScanGear CS-S] is checked.
4. Click [Start Installation] in the bottom-right of the window.
5. Follow the instructions displayed in the message boxes.
6. ScanGear CS-S is installed.
13
Chapter 2
Installing ScanGear CS-S 4.3
CONTENTS
GLOSSARY
INDEX
14
Selecting ScanGear CS-S
ScanGear CS-S can be called from any TWAIN-compliant application, such as
an imaging or OCR application.
Because the TWAIN-compliant application may install older TWAIN files than
ScanGear CS-S’s, it is recommended that the application be installed first,
before ScanGear CS-S.
If you have installed other TWAIN drivers on your computer, you may select it
as your default TWAIN source by using the application’s ‘File/Acquire/Select
TWAIN_32 Source’ menu option or its equivalent. Once you have selected
ScanGear CS-S as your source, choosing the command to scan, such as ‘File/
Acquire’, or ‘File/Scan’ will automatically start ScanGear CS-S in the
application.
Removing ScanGear CS-S
If you need to remove ScanGear CS-S from your system, use the following
steps to make sure all files are removed from all locations.
To remove ScanGear CS-S from your computer:
1. Place the CanoScan Setup CD-ROM in the computer drive.
2. In the start-up menu, click [Install/Uninstall Software].
3. [Install] window is displayed. Check the check box for [ScanGear CS-S] and
click [Uninstall] in the top-left of the window.
4. Click [Open the Add/Delete Programs dialog] in the bottom-right of the
window.
5. In the [Add/Remove Programs Properties] dialog box, make sure the
[Install/Uninstall] tab is in front, then select Canon ScanGear CS-S 4.3 and
click [Add/Remove].
6. Click [Yes] to confirm that you want to delete ScanGear CS-S.
Windows removes ScanGearCS-S and all its associated unused files.
Note:
You may be asked a question about removing shared files
that are no longer in use. It is OK to click ‘Yes’ to these
questions.
14
Chapter 2
Installing ScanGear CS-S 4.3
CONTENTS
GLOSSARY
INDEX
15
Where to Go From Here
Now that your ScanGear CS-S is installed and your scanner is ready to run,
you can start scanning or read more about scanning techniques. ScanGear
CS-S is easy to use, but more help is available if you need it.
Next Steps
• To start scanning, see Chapter 3, “Scanning.”
• For detailed information on scanning and manipulating images, see
Chapter 5, “Scanning Techniques.”
• For information about using ScanGear Toolbox CS, see Chapter 6,
“Using ScanGear Toolbox CS.”
Getting Help in ScanGear CS-S
For information on using ScanGear CS-S, you can use the online help available
by clicking the Help button on the toolbar or on the dialog boxes. In Windows
Explorer/Windows NT Explorer, you can double-click the Csui.hlp file in the
ScanGear CS-S directory.
For general questions about scanning, check the Index to see if the topic you
are looking for is covered elsewhere in this User’s Guide.
If you need further assistance, check the list of Canon Service Centers in
Chapter 1, “Introduction to ScanGear CS-S 4.3,” in this User’s Guide.
15
Chapter 3
Scanning
CONTENTS
GLOSSARY
INDEX
16
Chapter 3
Scanning
About Scanning
Scanning is the process of converting an image into computer-usable
information that is, digitizing the image. Scanners and digital cameras are the
main examples of devices that have the technology to transfer an external
image to digital information that can be saved as a file, printed, faxed, or
otherwise manipulated on your computer.
Until the introduction of digital cameras, scanners were the usual means of
turning a photograph or other printed graphic into computer compatible
information. Digital cameras use a similar process. Instead of exposing the
image in its lens to photoreactive film, the shape, color and shading
information is translated to a computer file. ScanGear CS-S lets you
manipulate the digital information before the image is saved or sent to its
final destination.
Using ScanGear CS-S with an Application
ScanGear CS-S is an interface between the scanner hardware and an imaging
application on your computer. With ScanGear CS-S, you can scan images
directly into an application without any interaction, or you can preview the
image and make changes to the way the scan is performed that affect the
resulting image.
You can also scan printed text and, when the Text Enhanced feature is
enabled, help your optical character recognition (OCR) software to recognize
text more effectively.
The TWAIN Interface
ScanGear CS-S is TWAIN-compliant. TWAIN refers to the set of standards that
define how information should be passed from image acquisition devices such
as scanners to software imaging applications that have the ability to import
TWAIN-compliant scanned images.
A graphics application is a typical example of a program that supports TWAIN
drivers. When you have a TWAIN-compliant application, scanner, and scanner
driver, you can scan an image directly into that application.
16
Chapter 3
Scanning
CONTENTS
GLOSSARY
INDEX
17
You can choose to scan the image without changing the default scan settings,
or you can use ScanGear CS-S’s settings to preview and adjust a variety of
settings prior to scanning. ScanGear CS-S’s settings are also dependent on
your scanner’s capabilities and the capabilities of the imaging application you
are using.
Acquiring an Image
When an application receives a scanned image directly from a scan, it is
acquiring the image. Throughout this manual, you will see references to
“acquiring an image.” This means that an application is using ScanGear CS-S
to import the image from the scanner; so it is acquiring the image from the
scanner via ScanGear CS-S.
Features of the ScanGear CS-S Window
The main ScanGear CS-S window is used to preview, adjust, and scan images
when the acquiring software lets you preview the image before scanning. For
details on applications that do not open the ScanGear CS-S window, see
“Scanning in “Windowless” (UI-less) Mode.”
Toolbar
Settings
tabs
Preview area
Message
area
Status area
The Preview Area
The preview area lets you “prescan” an image before it is scanned and
acquired by the application. The preview shows how the scanned image will
look after you scan.
When an image is previewed, you can use the tools on the toolbar to select a
portion of the image to scan, rotate or resize the image, or view the image’s
appearance after you make changes to the scanning mode, tone, or other
settings. The horizontal and vertical rulers, selectable on the toolbar, let you
see the dimensions of the image.
17
CONTENTS
GLOSSARY
INDEX
Chapter 3
Scanning
18
Clear, Preview and Scan Buttons
The Clear, Preview and Scan buttons control the scanner. When you click
Clear, the image displayed in the preview area is cleared. When you click
Preview, the image on the scanner is scanned into the preview area but not
yet saved in the acquiring application. When you click Scan, the image
displayed in the preview area is scanned and sent to the acquiring application.
For details, see “Previewing an Image,” later in this chapter.
Toolbar
The toolbar has a set of tools that let you change the previewed image’s
shape and size. You can rotate the image, select a part of the image, zoom in
and out, create a negative image, flip an image, and turn rulers on and off.
For full details on these tools and their functions, see “Changing the Preview
Image Shape and Size,” later in this chapter.
Status and Message Areas
The status area at the bottom of the ScanGear CS-S window summarizes the
color mode, resolution, width and height, and the estimated file size of the
currently previewed image when it is acquired by the application. For more
information on estimating file sizes, see Chapter 5, “Scanning Techniques.”
The message area on the lower left of the window displays messages related
to the preview area and toolbar.
Settings Tabs
Each tab (Main, Tone, Preferences, and the device tab) contains settings that
let you modify the acquired image.
For information about the settings on the Main tab, see “Setting Scan Mode,
Resolution, and Dimensions.” For information about the settings on the Tone
tab, see “Setting Image Tones.” For information about the Preferences tab
settings, see “Setting General Preferences.” For information about the
FB1200S tab, see Chapter 4, “Scanning Devices.”
18
Chapter 3
Scanning
CONTENTS
GLOSSARY
INDEX
19
Quick Start to Scanning
Use these steps to get going with ScanGear CS-S quickly, with the installed
settings.
Note:
ScanGear CS-S does not launch unless a scanner is powered on
and recognized by Windows.
Preparing the Scanner
Before you start scanning, be sure the scanner is connected and powered on.
It is recommended that you power on your scanner before you turn on your
PC. If you want to ensure that the scanner is functioning correctly, run the
Test Scanner from FB1200S tab. See “Testing the Scanner” in Chapter 4,
“Scanning Devices.”
Place the item to be scanned image side down, and position it squarely on the
platen.
Previewing an Image
The advantage of using ScanGear CS-S is that you can preview the image and
make changes before actually scanning. That way, you can make sure you are
getting the most out of your scanner’s capabilities and of your time spent
scanning and working with the image.
Some applications, (for example OCR applications) do not require the
ScanGear CS-S window to open before the scan starts. However, ScanGear
CS-S has settings such as Text Enhanced that automatically give you the best
available scan without previewing the image.
To preview an image:
1. Place the item to be scanned on the scanner.
2. You must select a source if you have not already done so. On the menu of
your imaging application, use the command that selects the data source.
On many imaging applications, the menu item looks similar to the
following picture:
In the Imaging application that is included in the Windows 95/98
Accessories, the command is “Select Scanner” on the File menu.
19
Chapter 3
Scanning
CONTENTS
GLOSSARY
INDEX
20
A Select Source or Select Scanner dialog box appears that looks similar to
the following picture:
3. Select the source of the scan, and click Select (or OK).
Now you are ready to acquire the image.
4. On the menu of your imaging application, select the command that begins
the scanning process. On some applications, this is “Acquire/Image;” in the
Windows 95/98 Imaging application, it is “Scan New.”
Unless you are using ScanGear CS-S in “windowless” mode, the ScanGear
CS-S window appears.
Previewing starts automatically (Auto Preview is switched on at default
settings).
The ScanGear CS-S main window opens, scanning begins automatically,
and preview begins. When preview is finished, the preview image is
displayed in the Preview Area.
When Auto Preview is switched off in the basic settings, click the Preview
button to start image preview.
20
Chapter 3
Scanning
CONTENTS
GLOSSARY
INDEX
21
5. To change a default setting before you preview, click the appropriate
ScanGear CS-S settings tab and select the settings you need. For full
information on each setting, see “Specifying How the Image is Previewed,”
later in this chapter.
6. On the Main tab, make sure you set the scan mode and resolution. If you
want to change the mode after you preview - for example, to change from
Color to Grayscale - the preview image clears, the preview area reverts to
its default size, and you must preview the image again.
Note:
If necessary, you can cancel a preview or scan. During a
preview, the Preview button becomes a Cancel button. During
a scan, you can click Cancel on the progress dialog box.
Calibration will automatically be performed before scanning.
7. To adjust the image in the preview area, do one or more of the following:
• The Crop tool is selected automatically when you launch ScanGear CSS. If there is white space around your preview image, crop the image to
eliminate the white space and any other unwanted part of the image. If
you do not crop the image, the white space is included in the final
scan. For details, see “Cropping Part of an Image” later in this chapter.
• To view the image dimensions in the preview area, click the Rulers
button to display the horizontal and vertical rulers.
• Use the Zoom tool to zoom in before you crop. See “Zooming In and
Out,” later in this chapter. You can also use the Width and Height text
boxes on the Main tab in conjunction with the Crop tool to make your
selection more precise. If you want the acquired image to be larger or
smaller than the current preview size, use the Scale setting to set a
different percentage. For more information about zooming and scan
resolution, see Chapter 5, “Scanning Techniques.”
• Adjust the Contrast/Brightness, Gamma, or other tone settings to
adjust the image tone. When you adjust tone settings, you see the
results immediately in the preview image. For more information, see
the section “Setting Image Tone” later in this chapter.
21
Chapter 3
Scanning
CONTENTS
GLOSSARY
INDEX
22
In the following picture, the preview image has been cropped and the
tone has been adjusted to lighten the darker background on the image.
8. Continue manipulating the image and re-previewing, until the preview
image looks the way you want. You may continue previewing as many
times as you want.
Now you are ready to scan.
9. Click Scan. The item is scanned, and is acquired by the application you are
using. A progress bar informs you of the scan progress.
When the scan is complete, window closes automatically if the option
“Automatically close ScanGear after scanning” checkbox is checked on,
the acquiring application may close the ScanGear CS-S window, or you
may have to close it manually.
10.To close ScanGear CS-S, click the close box on the upper right of the
window.
You have now completed scanning your first image!
22
Chapter 3
Scanning
CONTENTS
GLOSSARY
INDEX
23
Where is the Scanned Image?
Once scanned, an image becomes one of the acquiring application’s open
files. If you launched ScanGear CS-S from a TWAIN-compliant program,
clicking the Scan button also saved the image in the format determined by
the application from which ScanGear CS-S was launched.
Scanning in “Windowless” (UI-less) Mode
Some applications use ScanGear CS-S without opening the ScanGear CS-S
window (the user interface, or UI). These applications include Pagis, Microsoft
MS Picture It!, and most OCR (Optical Character Recognition) software. If you
are using software that does not open the ScanGear CS-S window, you are
unable to use any of the features on the ScanGear CS-S window. However,
with some applications, you may be able to perform a “custom” scan that will
open the ScanGear CS-S window.
For applications that do not show the ScanGear CS-S window, ScanGear CS-S
automatically uses the settings determined by the application that will
perform the scan with optimal results. Follow the instructions in your
application to scan the images.
23
Chapter 3
Scanning
CONTENTS
GLOSSARY
INDEX
24
Working with Preview Images
The preview area displays how an image will look when it is scanned and
acquired by the application you are using. When an image is previewed, you
can decide if it needs any adjustments, and make them before you scan. Any
special effects or adjustments you make to the image are displayed in the
preview area.
Changing the Preview Image Shape and Size
You can use the tools on the Toolbar to change the shape, position, and other
attributes of the preview image.
Using the Toolbar
Use ScanGear CS-S tools, located along the top left edge of the main
window, to select the scan area from the preview area and to manipulate the
view of the preview image.
Move
Image
Crop
Zoom
Negative/
Positive
Mirror
Rotate
Left/Right
Ruler
Auto
Tone
Help
24
Chapter 3
Scanning
CONTENTS
GLOSSARY
INDEX
25
Cropping Part of an Image
Click Crop and drag diagonally across an area of the image in the Preview
window to select that area. The area you select is outlined with a broken line.
You can adjust the crop lines once you have selected an area. If you hold the
cursor over the selection handle in the middle of a crop line, a two-headed
arrow appears. You can drag the line in or out to adjust the width and height
of the image.
Click outside the broken line to crop a different area.
• If you crop too small an area, the size resets.
• If you type new values in the Width and Height text boxes, the selected
preview area changes. If the Keep Proportions button is turned on
when you select a new area (you see a chain between the Width and
Height boxes), the proportions match the last locked proportion.
• The minimum scan width and height varies depending upon the scan
resolution selected. For example, at 75 dpi, the minimum width and
height is 9 pixels (approximately 0.12 inches or 0.30 cm) for a preview
scan. At 300 dpi, the minimum width and height is 35 pixels
(approximately 0.12 inches or 0.30 cm) for a preview scan.
Note:
If your mouse has left-handed settings, the right and left
mouse settings for ScanGear CS-S tools are reversed.
Moving an Image
The Move Image tool lets you move a zoomed image in the preview area.
Click Move Image and drag the zoomed image around to display hidden parts
of the zoomed image.
Zooming In and Out
Click Zoom to enlarge the image in the preview area. Click once to enlarge
the zoomed image 2x. The maximum enlargement is 16x. Right-click the
image once to zoom out and reduce the enlarged image 2x per mouse click.
Creating a Negative Image
Use the Negative/Positive tool to create a negative image of the original. A
negative image is created by converting the colors in the image to their
complementary colors - the opposite color on the color wheel. Clicking a
second time makes a negative image of the negative image, thus returning
the image to the original positive image.
25
Chapter 3
Scanning
CONTENTS
GLOSSARY
INDEX
26
To create a negative image:
1. Click Negative/Positive. The image changes to the opposite color or tone.
2. Use the settings on the Tone tab to adjust the negative image color and
tone.
Reversing an Image
The Mirror tool reverses the image horizontally along the scan lines.
When you click Mirror, the image in the preview area flips left or right,
depending on the available space in the preview area.
Rotating an Image Left or Right
Click Rotate Left or Rotate Right to rotate the preview image 90 degrees left
(counterclockwise) or right (clockwise). The entire preview area, including the
rulers, rotates.
Rotate Left
The Rotate Left tool rotates the preview display 90 degrees counterclockwise.
If the preview area is in portrait orientation, it becomes landscape and vice
versa.
Rotate Right
The Rotate Right tool rotates the preview display 90 degrees clockwise. If the
preview area is in portrait orientation, it becomes landscape and vice versa.
Displaying or Hiding the Rulers
The Rulers button controls the display of the ruler on the top and left edges of
the preview area. It displays in inches, centimeters, or pixels, depending on
what you have set for units of measure on the Main tab.
Selecting Automatic Tone Correction
The Auto Tone tool performs an automatic tone correction on the image. This
button also reflects the state of the Auto Tone button on the Tone tab.
Viewing ScanGear CS-S Help Topics
ScanGear CS-S Help includes information on how to use all the features of
ScanGear CS-S. Click the Help button to view ScanGear CS-S help topics.
26
Chapter 3
Scanning
CONTENTS
GLOSSARY
INDEX
27
Specifying How the Image is Previewed
Before you scan or preview, you can change the mode and specify how the
image appears in the acquiring application.
To specify how the image is previewed:
1. Choose the Scan Mode that best matches how you want the scan of the
object to be output.
Note:
If you have already scanned an image and then change the
scan mode, the image is cleared from the preview area, and
you lose your preview image and all the settings you have
made.
2. Specify the Scan Resolution that best matches how you will be using the
scanned image.
3. Specify Width and Height of the platen area to be scanned if you want an
area other than the full platen scanned. Specify Units if other than the
default.
To keep the width to height ratio (proportion), click the Keep Proportions
button before changing the width or height values.
4. Change the Scale from 100 percent to either enlarge or reduce the
scanned image. The new Output size (width and height times the scale
factor) is displayed to the right of the Scale text box. To set the scale,
either click the up or down arrows or click in the field and type a
percentage.
27
Chapter 3
Scanning
CONTENTS
GLOSSARY
INDEX
28
Setting Scan Mode, Resolution, and Dimensions
When ScanGear CS-S is installed, the settings are in place and you can scan
without changing them. However, there are a wide variety of options available
for you to change the look of the preview and scanned image. You can
change the settings at any time and preview the results. Repeat this process
until you are ready to complete the scan. Some changes (Tone tab settings
and output size) take effect immediately and can be seen on the preview
image; some changes (changing the scan mode) require that you click the
Preview button again.
The primary settings for image acquisition, including scanning mode,
resolution and scanning area, are on the Main tab.
Setting Scanning Mode
The scanning mode-Black and White-affects the settings on all the other tabs.
The icon to the left of the list box reflects the current selection.
Indicates current
mode:
Color (36 - bit),
Color (24 - bit),
Grayscale (12 - bit),
Grayscale (8 - bit),
Black and White,
or Text Enhanced
Note:
If an image is in the preview area when you change the scan
mode, the image disappears and the preview area resets to
the default size.
28
Chapter 3
Scanning
CONTENTS
GLOSSARY
INDEX
29
To set scanning mode:
1. Click the Main tab.
2. Select an option from the Scan Mode list. You have the following choices:
• Color (36-bit): 36-bit color images contain 12 bits per pixel for each
primary color (red, green, blue). Use this option to attain a scanned
color image of the highest quality. However, the file will be
approximately twice the size of a Color (24-bit) file.
• Color (24-bit): 24-bit color images contain 8 bits per pixel for each
primary color. Use this option to attain a scanned color image of
average quality.
• Grayscale (12-bit): 12-bit grayscale images contain 12 bits per pixel.
Use this option to attain a scanned grayscale image of the highest
quality. However, the file will be approximately twice the size of a
Grayscale (8-bit) file.
• Grayscale (8-bit): 8-bit grayscale images contain 8 bits per pixel. Use
this option to attain a grayscale image of average quality.
• Black and White: Images are expressed in two colors only; black or
white. A pixel is set to black or white depending on its brightness value
in relation to a particular threshold value. The threshold value can be
freely set. Select this option to print photographs on monochrome
printers.
• Text Enhanced: Text Enhanced images are Grayscale images (8 bits per
pixel) converted to Black and White (1 bit per pixel) using Canon
ImageTrust technology. You can select Text Enhanced in the Scan
Mode list. If the application operates in windowless (UI-less) mode, you
can select “Text Enhanced” in the Preferences tab, and request the
application to perform a Black and White scan. In this case, the
conversion to Black and White takes place automatically.
The acquiring application may determine your Scan Mode choice. For
example, if a fax application is acquiring the image, you may not be able to
choose a color mode; you may have to choose Black and White or Grayscale.
The 24-bit and 36-bit options express colors with conversions of each primary
RGB color (Red, Green, Blue). The 24-bit options can express each color with
up to 256 gradations, and 36-bit color with up to 4,096 gradations. If you
need extremely high-quality color gradation in the scanned image, use 36-bit
color. Otherwise, use 24-bit for normal color scanning jobs.
29
Chapter 3
Scanning
CONTENTS
GLOSSARY
INDEX
30
The Grayscale options express varying shades of gray between white and
black. The Grayscale (8-bit) option can express shades within a range of 256
gradations and the Grayscale (12-bit) option within a range of 4,096
gradations.
If you attempt to use the Color (36-bit) or Grayscale (12-bit) options to scan
an image with a software application that does not support these options, the
system may hang up. Before you use either 36-bit or 12-bit grayscale, check
the specifications of the parent software application to confirm whether these
options can be used. You can use Color (36-bit) and Grayscale (12-bit) with
Photoshop Ver. 4.0 or later and with Photoshop LE enclosed with this
package.
If you scan an image with a version of Photoshop compatible with 36-bit color
and 12-bit grayscale, the image is scanned as a 16-bit Channel Mode image.
Selecting Scan Resolution
Using the Scan Resolution list, you can select the resolution of a scanned
image based on the selected output device. This resolution becomes the base
on which changes to image size and scale are calculated.
The resolution you choose depends on the limits of the printer or other
output device. However, you can also select a custom resolution and make
more specific resolution choices.
Note:
The maximum resolution of the scanner is set at 600 dpi when
the optional automatic document feeder (ADF) is installed.
Selecting a Preset Resolution
The list of preset resolutions should cover most of your scanning needs.
Available resolution settings depend on the capabilities of the acquiring
application.
To select a preset scan resolution:
Select an option from the Scan Resolution list.
Depending on your selected device, you have different resolution choices. For
example, if the acquiring application is configured to print the image, your
choices may be limited to the printer’s maximum resolution.
30
Chapter 3
Scanning
CONTENTS
GLOSSARY
INDEX
31
Selecting a Custom Resolution
ScanGear CS-S has a range of preset resolutions based on your chosen output
device. Using Custom Resolutions, you can also create a new customized
resolution, change an existing resolution, or delete a previously defined
custom resolution.
To set a custom scan resolution:
1. Select Custom from the Scan Resolution list. The Custom Resolutions
dialog box appears.
2. Enter the name for the resolution.
3. In the Resolution box, select a resolution or type a new one.
4. Click Add.
5. Click OK. The new resolution name is added to the Resolution list.
Deleting a Custom Resolution
When you no longer need to use a custom resolution, you can delete it from
the list.
To delete a custom resolution:
1. On the Main tab, select Custom from the Scan Resolution list.
2. In the Custom Resolution dialog box, select a name.
3. Click Remove.
Note:
You cannot remove or replace the preset resolution settings.
If you select a preset resolution, the Remove and Replace
buttons are unavailable.
31
Chapter 3
Scanning
CONTENTS
GLOSSARY
INDEX
32
Changing a Custom Resolution
Once you have set a custom resolution, you can change it. Use the following
steps.
To change a custom resolution:
1. On the Main tab, select Custom from the Scan Resolution list.
2. In the Custom Resolutions dialog box, select an existing custom resolution.
Its settings appear in the Resolution box.
3. Enter a new resolution in the Resolution box.
4. Click Replace. The updated custom resolution replaces the existing one.
5. Click OK.
Selecting Output Dimensions
Use the Selection options to set the scan image output dimensions. You can
select an area to scan using the Crop tool, then set the exact output
dimensions in the Width and Height boxes in inches, centimeters, or pixels.
You can select part of the image and maintain the width and height portions
with the Keep Proportions button. With the Ruler, you can view
measurements in inches, centimeters, or pixels. After selecting the image
dimensions, you can scale the image to be larger or smaller than the preview
image.
Width and height
settings
Units of
Measurement
Keep Proportions
button
Scale
Note:
Final dimensions of the output scan may differ due to
rounding effects. Black and White images are most affected
by this.
32
Chapter 3
Scanning
CONTENTS
GLOSSARY
INDEX
33
Setting Units of Measurement
In the Units list, you specify the unit of measure for width and height of the
scanned image. The preset unit of measurement is based on the
Measurement System setting of the Regional Settings in your Windows
Control Panel.
To set units of measurement, select Inches, Centimeters, or Pixels in the Units
list. The Width and Height values display in the units you choose.
There is no change to the size of the selection rectangle in the preview area
when units of measurement are changed, but the horizontal and vertical
rulers reflect the currently selected measurement units. For example if you
select Centimeters, the default Width value of 8.49 inches changes to 21.57
centimeters.
Setting Image Width and Height
The Width and Height text boxes contain the width and height of the current
selection or, if there is no selection, the maximum output size, measured from
the upper left of the image in the preview area and based on the currently
selected paper size.
The width and height values change when you select part of the image in the
preview area. Correspondingly, when you change the amounts in the Width
and Height boxes, the selection borders in the preview area change to match.
To change size without constraint, do one of the following:
• Click the Crop button on the toolbar and select a section of the image
in the preview area. The measurements in the Width and Height text
boxes display the new sizes.
• Type the desired measurements in the Width and Height text boxes.
The image selection borders change to match the width and height you
enter.
Maintaining Image Proportion
The Keep Proportions button
affects the selection, Width and Height
values, and the scale.
Keep Proportions inactive
33
Chapter 3
Scanning
CONTENTS
GLOSSARY
INDEX
34
When you click the Keep Proportions button, the image size is maintained in
the same proportion whenever you change either the width or the height.
Keep Proportions active
For example, if you set the width to 4 inches and the height to 6 inches, and
then you change the width to 5 inches, the height stays at 6 inches if the
constraint is turned off, so the proportion of the image width and height
changes. If you click the Keep Proportions button and then change the width,
the height automatically changes to 7.50 inches.
When the Keep Proportions button is selected, the image maintains the same
ratio indicated in the Width and Height text boxes.
To change size proportionally:
1. Click the Keep Proportions button.
A chain appears between the Width and Height text boxes.
2. Click the Crop button on the toolbar and select part of the image in the
preview area.
When you enlarge or reduce the selection, notice that the image width
and height stay in the same proportion.
Setting Scale
The Scale setting lets you specify an output size for the selected image as a
percentage of the original width and height. The scale amount is preset to
100 percent.
If you reduce the scale of an image that has a width of 7 inches and a height
of 9 inches by 50 percent, the selection in the preview area and the values in
the Width and Height text boxes remain the same, but the Output size
changes to indicate the size of the image when it is acquired by the
application. For example, if your preview image is 7 inches wide by 9 inches
high, and you select a scale of 50 percent, the output image will be 3.5 inches
wide by 4.5 inches high.
34
Chapter 3
Scanning
CONTENTS
GLOSSARY
INDEX
35
To set an image scale, do one of the following:
• In the Scale box, type a new percentage.
• Click the up arrow to increase the percentage or click the down arrow
to reduce the percentage.
The new output size is displayed in the Output size area.
Setting Image Tones
The Tone tab contains settings that govern the image tone. “Tone” refers to
the shading and combination of colors in the image.
Adjusting colors and grayscale tones can enhance the richness of a color
image or the contrast of a grayscale image. You can produce a wide range of
visual effects for your preview image by adjusting the different settings on the
Tone tab.
Note:
If you selected Black and White or Text Enhanced as the Scan
Mode on the Main tab, the Tone tab is not visible.
About the Tone Tab Settings
The Tone tab settings include five sub-settings that you select by clicking the
buttons on the Tone tab toolbar. These settings affect different aspects of
image tone, and give you great flexibility in manipulating your image tone
before scanning the image.
Histogram
Auto Tone
Contrast/Brightness
Special Tone Curves
Gamma
When you select one of the buttons on the Tone tab toolbar, the options
change.
35
Chapter 3
Scanning
CONTENTS
GLOSSARY
INDEX
36
About the Tone Curve Window
The Tone Curve windows display more details about each tone setting. The
shape of the tone curve changes to reflect the current settings in the selected
channel. If Scan Mode is Color or Grayscale, and the Tone tab is selected,
Contrast/Brightness is the Tone feature selected and displayed, by default. The
curve is not directly editable unless the Special Tone Curves tool is active.
Selecting a Color Channel
If you are scanning a color image, you can change the contrast and brightness
of the individual red, green, and blue tones in your image.
The Channel list has the following options:
Master
Red
Green
Blue
A combination of red, green, and blue.
Lets you adjust only the red tones in the image.
Lets you adjust only the green tones in the image.
Lets you adjust only the blue tones in the image.
If the menu is set to either red, green or blue, you see all three curves in the
curve box. The Channel list is disabled if the mode is not Color and the Tone
tab is not visible if you selected Black and White or Text Enhanced as your
scan mode.
For more information about how to use the color channels to adjust the
preview image, see the section, “Enhancing Color Images” in Chapter 5,
“Scanning Techniques.”
36
CONTENTS
GLOSSARY
INDEX
Chapter 3
Scanning
37
Using the Auto Tone Setting
To have ScanGear CS-S automatically adjust the tone of the scanned image,
click the Auto Tone button on either the Toolbar or Tone tab.
When you click Auto Tone, the color curves reflect the Auto Tone adjustment,
and the image in the preview area changes to reflect the tone correction.
37
Chapter 3
Scanning
CONTENTS
GLOSSARY
INDEX
38
Adjusting Contrast and Brightness
When you click the Contrast / Brightness button, two sliders appear, one for
Contrast and one for Brightness. Use these sliders to change the contrast and
brightness of your image.
To adjust the contrast or brightness of an image:
1. Click the Tone tab, then click the Contrast / Brightness button.
2. To adjust the contrast or brightness for a particular color (red, green, or
blue), select the color in the Channel list. Otherwise, leave the Channel set
to Master.
3. Move the Contrast slider to the left for less contrast, and to the right for
more contrast, until the desired contrast is achieved.
4. Move the Brightness slider to the left for less brightness, and to the right
for more brightness, until the desired brightness is achieved.
The image in the preview area reflects your changes.
38
Chapter 3
Scanning
CONTENTS
GLOSSARY
INDEX
39
Changing Gamma Curve Values
The Gamma curve lets you change the midtones of colors to increase the
contrast between colors, and enhance the overall image. When you increase
the gamma value, light colors are made lighter, and dark colors are made
darker.
For example, if you are scanning a photograph that has many dark tones,
simply adjusting the contrast and brightness settings may not improve the
image as effectively as adjusting the gamma setting.
Use the Gamma slider to change the gamma settings for your image.
To adjust the gamma value of an image:
1. Click the Tone tab, then click the Gamma button.
2. To adjust the gamma value for a particular color (red, green, or blue),
select the color from the Channel list. Otherwise, leave the channel set to
Master.
3. Move the Gamma slider to the left to decrease the midtone intensity, and
to the right to increase the midtone intensity, until the desired effect is
achieved. You can also type a value in the text box. The value must be
between 0.01 and 10.00, inclusive.
For more information about using gamma values to enhance images, see
“Custom Tone Adjustments” in Chapter 5, “Scanning Techniques.”
39
Chapter 3
Scanning
CONTENTS
GLOSSARY
INDEX
40
Change Tone Using the Histogram Tool
The Histogram settings let you adjust the tone shadows for the preview
image.
Using the eyedroppers, you can sample the Black-point, Mid-point, and
White-point tones in the preview image and base the image tone settings on
the sampling. Using the corresponding text boxes, you can type a value in the
Black-point, Mid-point, and White-point text boxes.
The default values are:
• Black-point: 0
• Mid-point: 128
• White-point: 255
Under the histogram chart, you can slide the black, gray, and white arrows to
adjust the tones. You cannot edit the histogram directly.
When you find a combination of tone settings you like, you can save the
settings in a file and use it in future scanning sessions.
40
Chapter 3
Scanning
CONTENTS
GLOSSARY
INDEX
41
To adjust the tones using the Histogram tool:
1. Click the Tone tab, then click the Histogram tool button. The Histogram
graph appears.
2. To adjust the tone of a particular color (red, green, or blue), select the
color from the Channel list. Otherwise, leave the Channel set to Master.
3. Do one of the following to change the black point:
• Click the Black-point Eyedropper button, then click the Eyedropper on
the darkest portion of the image in the preview area. Try zooming in on
the darkest part of the image so you can be sure you are selecting the
shade you want. When you click on the image, all tones darker than
the selected sample tone are adjusted to black.
• Click in the Black-point text box and type a value for the black point.
• Drag the Black arrow at the bottom of the histogram to the point you
want.
In the preview image, all tones darker than this tone are adjusted to black.
4. Do one of the following to change the white point:
• Click the White-point Eyedropper tool, then click on the lightest
portion of the image in the preview area. Try zooming in on the lightest
part of the image so you can be sure to select the shade you want.
• Click in the White-point text box and type a value for the white point.
• Drag the white arrow at the bottom of the histogram to the point you
want.
In the preview image, all tones lighter than this tone are adjusted to white.
5. Do one of the following to adjust the Mid-point. The Mid-point value
should always be between the Black-point and White-point values.
• Click the Mid-point Eyedropper tool, then click the portion of the
image that is in the middle of the range. Try zooming in on that part of
the image so you can be sure to select the shade you want.
• Click in the Mid-point text box and type a value for the midpoint.
• Drag the gray arrow at the bottom of the histogram to the point you
want.
41
Chapter 3
Scanning
CONTENTS
GLOSSARY
INDEX
42
In the preview image, all tones between the black point and the white
point are adjusted in relation to the midpoint setting.
6. Do one of the following:
• Click Save to save these settings to use on similar images. The file is
saved by default in the ScanGear CS-S device-specific directory,
although you may choose another location.
• Click Reset to reset to the default values.
• Click Load to load values you have saved.
Using Preset or Custom Curves
You can either select a predefined custom curve, or manipulate the curve in
the Custom Tone Curve to create your own custom tone curve. If you select a
preset custom curve, ScanGear CS-S provides automatic correction. If you find
a combination of custom tone curve settings you like, you can save the
settings in a file and use it in future scanning sessions.
42
Chapter 3
Scanning
CONTENTS
GLOSSARY
INDEX
43
Using Predefined Tone Curves
The Preset adjustments let you select an image correction by selecting the
problem with the image and letting ScanGear CS-S correct it with settings
that are designed to solve the most common problems with images:
overexposure, underexposure, or too high or too low a contrast.
To correct an image problem using predefined tone curves:
1. Click the Tone tab, then click the Custom Curve button.
2. To adjust the tone of a particular color (red, green, or blue), select the
color from the Channel list. Otherwise, leave the channel set to Master.
3. To have ScanGear CS-S automatically compensate for common problems
in an image, choose one of the following from the list:
• No correction
• Fix an image that is underexposed
• Fix an image that is overexposed
• Fix an image that is low contrast
• Fix an image automatically
• Edit custom curve
The preview image reflects the correction.
About the Curve Box
The Auto-curve button sets the curves to the automatic settings that best
display the current preview image. You can use the automatic curves as a
starting point, before editing a curve. You can then choose a channel to edit.
Using Custom Tone Curves
If you want to experiment with tones, try using the Custom Tone Curves.
In the graph window, the x-axis represents the input image, and the
y-axis represents the output.
43
Chapter 3
Scanning
CONTENTS
GLOSSARY
INDEX
44
To create Custom Tone Curves:
1. In the Select Special Curve list, select Edit custom curve.
2. Click on or near the curve. A handle appears wherever you click.
44
Chapter 3
Scanning
CONTENTS
GLOSSARY
INDEX
45
3. Position your cursor over the handle. The cursor becomes a crosshair,
indicating that you can drag the curve handle. Drag the handle and
release. The curve remains where you moved it, and the image in the
preview area reflects the change in tone. You can specify up to 15 anchor
points, including the end points.
4. Because the curve reflects mathematical calculations related to the image
tones, it does not move exactly where you want. You can move the curve
in the following ways:
• Drag a curve handle up or down.
• Click on another part of the curve to set a new handle. You can have
as many handles as you want. However, it is best to experiment and set
your handles at points in the curve where you want to bend it.
• To remove a handle, drag it off the curve, or right-click the handle.
5. Click Reset to undo a change to the curve.
6. Click Save to save your custom curve.
7. Specify a file name and click OK.
The curve is saved in the location you specify.
45
Chapter 3
Scanning
CONTENTS
GLOSSARY
INDEX
46
Opening a Saved Custom Tone Curve
Use the following steps to open a custom tone curve setting that you saved
previously. Custom Tone Curve files are saved by default in the ScanGear CS-S
device-specific directory, although you may choose another location.
To apply a previously saved curve:
1. Click Load.
2. Select the file name you want to load and apply.
3. Double-click the file, or click Open.
Hints for Editing Custom Tone Curves
You can choose a channel and begin to edit the custom curve with the
automatic curves as a starting point. Keep the following in mind when editing
a custom curve:
• The curve box handles are drawn on a white background to signify
that they are editable.
• The curve end points can be selected and dragged to any point in
the curve.
• You may add points to the curve by clicking anywhere in the curve
box.
• If a point is dragged outside of the curve box, it is deleted from the
curve and a new curve is fit to the remaining points.
• The x and y axes on the curve chart represent the input image color
and output image color. When you add a handle to the curve and
drag that handle toward the white areas, the preview image tones
are adjusted to reflect the change.
• You cannot position two handles on a vertical line, because you
cannot have two of the same x values due to the mathematical
formulas involved in drawing the curves. However, you can have
two or more of the same y values, so you can have several handles
on a horizontal line.
• The least and greatest x values for end points, whether original or
added, cannot be deleted.
46
Chapter 3
Scanning
CONTENTS
GLOSSARY
INDEX
47
Setting General Preferences
The Preferences tab contains settings that govern the general operation of
ScanGear CS-S. Settings include High Definition Color Text Enhanced and
Canon ColorGear Color Matching.
When Canon
ColorGearTM Color
Matching is selected, it
is used for the preview
and final scans, and you
can select a Monitor
Profile.
When the Text
Enhanced checkbox is
selected and the
acquiring application
requests a Black and
White scan in
“Windowless” mode,
ScanGear CS-S uses the
Text Enhanced setting.
Button for Changing the
Monitor Profile
Preview Options at
Startup
Check Box for
Automatically Closing
ScanGear After Scanning
Using Text Enhanced for Scans
Text Enhanced is designed for use with OCR (Optical Character Recognition)
software. This setting increases the contrast in black and white scanning to
assist in the accurate recognition of characters in OCR software. Resolution
should be at least 300 dpi for OCR scans.
For applications that operate in “windowless” (UI-less) mode (including most
OCR applications), ScanGear CS-S automatically uses the Text Enhanced
setting when the check box is selected and the application requests a Black
and White scan.
Selecting Text Enhanced
For applications that request a Black and White scan and use no ScanGear CSS window, you can select Text Enhanced.
47
Chapter 3
Scanning
CONTENTS
GLOSSARY
INDEX
48
To use the Text Enhanced setting:
1. On the Main tab of the ScanGear CS-S window, choose Black and White
from the Scan Mode list.
2. Click the Preferences tab.
3. Select the setting, “Use Text Enhanced instead of Black and White for OCR
software”.
Using Canon ColorGearTM Color Matching
Canon ColorGear Color Matching sets the TWAIN Acquire to automatically
use Canon ColorGear Color Matching for the preview and final scans.
When Canon ColorGear Color Matching is selected, you can select a monitor
profile.
If Canon ColorGear Color Matching is cleared, no matching is done.
Note:
Canon ColorGear Color Matching can be selected only when
using Color (24-bit) Scan Mode.
About Canon ColorGear Color Matching
Canon ColorGear Color Matching is the universal color-matching system for
Canon printers, copiers, and scanners that makes predictable color available
for all levels of users, from home user to professional publisher.
Canon ColorGear Color Matching provides RGB to CYMK conversions that
are optimized for Canon scanners, printers, and copiers. Canon ColorGear
Color Matching also enhances and optimizes the monitors of most other
manufacturers.
With some printers, there is a discrepancy between the color image displayed
on a computer monitor and the same image printed on a color printer. The
color printout is disappointing because the colors are duller, or the color does
not match the color on the screen. Canon ColorGear Color Matching ensures
that this does not happen.
Canon ColorGear Color Matching is compliant with ICC (International Color
Consortium) guidelines. ICC is a group of hardware and software companies
which developed cross-platform, industry-standard guidelines for color
devices. Canon ColorGear Color Matching is also compatible with the ICM
(Image Color Matching) component of Windows 95/98/NT.
48
Chapter 3
Scanning
CONTENTS
GLOSSARY
INDEX
49
Selecting a Monitor Profile
When Canon ColorGear Color Matching is selected, you can select a monitor
profile that most closely matches your monitor’s settings. This ensures that the
color of the preview image closely matches the original image being scanned.
To select a Monitor Profile:
1. Click the Preferences tab of the ScanGear CS-S window.
2. Select the setting, “Canon ColorGear Color Matching”.
3. Click Change Monitor Profile.
The Monitor Profile dialog box appears.
4. Select a profile from the Monitor Profile list and click OK.
Your selection appears on the Preferences tab as the Current Monitor
Profile.
Note:
The default setting is [sRGB v1.10(Canon)]. If this does not
match the image processing software, monitor or printer you
are using, select another monitor profile and rescan.
49
Chapter 3
Scanning
CONTENTS
GLOSSARY
INDEX
50
Setting Up the Preview Options
These options set up how ScanGear CS-S operates when it starts up and shuts
down.
Auto Preview
Every time ScanGear CS-S is started, the original on the platen is previewed in
the Preview Area.
Preview Cache
The current image in the Preview Area is saved when ScanGear CS-S is shut
down and displayed again the next time ScanGear CS-S is started.
No Setup for Preview
Neither Auto Preview nor Preview Cache is executed when ScanGear CS-S is
started and shut down.
The initial setting just after the installation is Auto Preview.
Setting ScanGear CS-S to Close After Scanning
Auto Close
This setting determines whether ScanGear CS-S is shut down automatically
when scanning is completed. This setting is automatically set to off (not
checked) when ScanGear CS-S is installed.
When the ADF (Automatic Document Feeder) is in use, this option is
automatically set for off and cannot be changed.
50
Chapter 4
Scanning Devices
CONTENTS
GLOSSARY
INDEX
51
Chapter 4
Scanning Devices
Configuring Scanning Devices
ScanGear CS-S has another tab which supports device(scanner) depending
functions. The following picture shows the FB1200S tab.
Image Source
Paper Size
Threshold
Descreen
Test Scanner
Shut off lamp time
Configuring a Device with ScanGear CS-S
• You can change settings for FB1200S characteristic configuration in
this tab.
Selecting an Image Source
This option allows you to select the ADF (Automatic Document Feeder) as the
scanning device when this device is connected. If ADF is not connected, then
Platen is the only choice available.
Selecting a Paper Size
Paper Size is a list that lets you select the default preview scanning size. You
can choose from any of the defined preview default sizes in the list.
51
Chapter 4
Scanning Devices
CONTENTS
GLOSSARY
INDEX
Note:
52
When changing the Paper Size setting, the preview area will
be cleared and all setting values are reset. When setting the
preview area size larger than the Paper Size, the preview area
size will be adjusted to the Paper Size.
Adjusting Threshold Setting
The Threshold slider can be used to adjust the threshold value (the
demarcation between black and white) of black and white images. Images are
collection of data assigned varying brightness values. Grayscale and Color
images express the brightness with 8 or 12 bit values whereas Black and
White images express the brightness with only two values, black (0) and white
(255). Accordingly, a point has to be determined either black or white. This
point is called the threshold value. By changing the threshold value, you can
alter the appearance of image. The default setting is 128.
To adjust threshold value, drag the slider or input the value directly into the
box (click the box and type the number from 0 to 255) in FB1200S tab.
Selecting the Descreen
Moiré patterns occasionally appear when items printed at high resolutions are
scanned. To reduce this phenomenon, scan photographs and other highresolution prints with the descreen activated. Shut it off to scan lower
resolution items, such as newspapers, books and magazine text. The default
setting is "Off."
• The Descreen is unavailable when the scanning resolution is set for 601
dpi or more.
• Descreen returns to the previous setting when a scanning job is started
with a parent software application that cannot display the ScanGear
CS-S operation panel.
52
Chapter 4
Scanning Devices
CONTENTS
GLOSSARY
INDEX
53
Testing the Scanner
The Test Scanner button performs any diagnostic tests the scanner can
perform. Before you begin, make sure the scanner is turned on and in a ready
position. For a flatbed scanner, make sure the document cover, or optional
document feeder is closed, flat on the document glass.
To test the scanner:
1. On the Device page, click Test Scanner. The Scanner Diagnostics dialog box
appears.
2. On the Scanner Diagnostics dialog box, click Start. After a short pause, you
should hear the scanner start to run its diagnostics.
When the test is complete, a message in the Scanner Diagnostics dialog
box informs you of the results.
53
Chapter 4
Scanning Devices
CONTENTS
GLOSSARY
INDEX
54
3. Click Close.
4. If there are any errors reported during the test, use your scanner’s
documentation to troubleshoot the problem.
Setting the Lamp Save Feature
The “Shut off lamp time” option turns off the lamp of the FB1200S to save
power if it remains idle for a specified length of time. Click the up or down
arrows in the spinbox to increase or decrease the time limit in units of
minutes. You can select a time within the range of 10 to 59 minutes. This
setting is automatically set to 10 minutes when ScanGear CS-S is installed.
54
Chapter 4
Scanning Devices
CONTENTS
GLOSSARY
INDEX
55
Scanning Multi-Page Documents
If you use a flatbed scanner, you can scan and acquire many pages of
documents at a time. ScanGear CS-S has settings to support the use of the
automatic document feeder (ADF). When you have an automatic document
feeder attached, ScanGear CS-S controls the feeder during the scan.
Using the Automatic Document Feeder (ADF)
Use the following steps to have ScanGear CS-S scan multiple documents
using a document feeder. For details on loading the document feeder, see its
documentation.
Connecting the Automatic Document Feeder
The Automatic Document Feeder replaces the document cover on a flatbed
scanner. You must remove the document cover and replace it with the ADF,
and attach a connector plug.
To connect the Automatic Document Feeder:
1. Remove the document cover from the scanner and set aside in a safe place
where the inside document cover will not be scratched.
2. Disconnect the power cord.
3. Insert the hinges of the ADF in the scanner and make sure the ADF is
securely seated.
4. Plug the adapter cord in the Options port on the back of the scanner.
5. Reconnect the power cord.
6. Turn on the scanner. You should hear the ADF initializing.
7. Turn on your PC.
Now you are ready to scan.
55
Chapter 4
Scanning Devices
CONTENTS
GLOSSARY
INDEX
56
Scanning with the Automatic Document Feeder
To scan using the Automatic Document Feeder:
1. Make sure the automatic document feeder is set up. Use the previous
procedure to ensure that the ADF is installed correctly.
2. Insert the paper to be scanned in the document tray, printed side up, and
upper edge first. Align the paper according to the paper alignment marks
on the document tray.
3. Start the application from which you want to scan.
4. Select the source device.
5. Select the Acquire command in the acquiring application.
6. If the ScanGear CS-S window opens, click the device tab for the scanner
you are using.
7. On the Image Source list, select Document Feeder.
8. Change any other settings on the ScanGear CS-S window. For example, if
the acquiring application is an OCR application, make sure the OCR 300
dpi setting has been selected as the Scan Resolution on the Main tab.
56
Chapter 4
Scanning Devices
CONTENTS
GLOSSARY
INDEX
57
9. Do one of the following:
• Click Preview to preview a page before scanning the remainder. You
will have to re-load this page in the feeder to scan it.
• Click Scan to scan all the pages in the feeder tray with no further
intervention. In a graphics imaging application, each page is acquired
as a separate file. In some OCR applications, each page is acquired as a
separate file, while in other OCR applications, each page is appended
into one file.
Tips for Using the Automatic Document Feeder
Here are some tips for using the Automatic Document Feeder
• Make sure Document Feeder is selected in the Image Source setting on
the scanner’s settings tab.
• If there is a paper jam message, make sure the paper in the document
tray is not stuck together. Open the ADF cover (do not lift up the entire
ADF unit), remove the paper, close the lid, and reload the paper. Only a
few documents should be loaded in the document tray at a time.
• Make sure no other document has been left on the document glass
under the Document Feeder.
• If you see a message on the screen that says something like this:
“Device failed/cannot find TWAIN...” make sure you have turned on
your scanner first, before your PC. If necessary, turn the scanner off and
back on again.
• If the Document Feeder tries to feed but cannot, and you hear a
bumping noise in the scanner, check that the scanner’s scanning head
is not locked. If you have just unpacked your scanner, this lock may be
in place to protect the scanning head. See your scanner documentation
for details.
• Documents are scanned from top to bottom order.
• Select the proper Paper Size from the device tab.
57
Chapter 4
Scanning Devices
CONTENTS
GLOSSARY
INDEX
58
Clearing Paper Jams in the Automatic Document Feeder
When using the ADF, follow the guidelines below to clear paper jams.
When originals remain in the document tray:
1. Lift the ADF cover.
2. Remove the jammed paper by pulling it forward.
When jams occur during document ejection:
1. Lift the ADF cover.
2. Raise the document tray.
3. Remove the jammed paper by pulling it forward.
When jams occur on the interior:
1. Lift the ADF cover.
2. Raise the ADF unit on its hinges.
3. Open the delivery guide sheet cover.
4. Remove the delivery guide sheet.
5. Remove the jammed paper by pulling it forward.
58
Chapter 5
Scanning Techniques
CONTENTS
GLOSSARY
INDEX
59
Chapter 5
Scanning Techniques
About Scanning Techniques
This chapter provides additional information about scanning theory and
practice. It has basic information to help get the most out of ScanGear CS-S’s
tools, and to help you make the right choices before scanning your images.
Using the information in this chapter in conjunction with the information in
Chapter 3, “Scanning,” should let you produce effective results from your
scans.
Planning for the End Result
The settings you use to scan depend on the purpose of the scan. Will the
result be printed on a color printer, be included in an Internet web site, or be
used for professional color magazine printing? Is an OCR application acquiring
the scanned image for conversion to text? All these target destinations have
different requirements for color mode, resolution, and tone.
Preparing the Material to Scan
A general rule of image reproduction is that the output image can be only as
good as the original. Anything you can do to lessen the manipulation
between the original and the end result will give you a better quality product.
If the original image needs correction - for example, it is overexposed,
underexposed, or blurry - more time will be needed to make the correction,
and the results may still be limited by the flaws of the original image.
ScanGear CS-S lets you correct many undesirable features in scanned images,
but you will save time and effort by starting with the best possible original
image.
• Although ScanGear CS-S’s Tone tab lets you adjust for over- and
underexposed images and other tone problems, it cannot bring a
blurry image into focus, and “sharpen” options in the imaging
software can only do so much with a blurry original. If you are
scanning a photograph or other reproduced image, make sure the
original is in the sharpest possible focus or delineation.
• If you are scanning text, make sure the print is clearly defined.
59
Chapter 5
Scanning Techniques
CONTENTS
GLOSSARY
INDEX
60
• Although it may seem obvious, it is important to line up the original
as straight as possible so you do not have to make adjustments in
the scan.
• If you plan to rotate the image in the ScanGear CS-S preview
window or in the acquiring software, try positioning the image so it
is already rotated before the scan.
Matching Scan Resolution to Purpose
ScanGear CS-S provides many choices for resolution. What resolution you
choose depends on your output device, how you want to use the image, the
type of image, and your scanner.
In general, it is recommended that you scan the image at a higher resolution
than you need. That way, you retain the amount of information in the image,
and if necessary you can reduce the resolution in the imaging application,
after the image has been scanned and acquired.
Different types of images need different types of scan settings. However, after
a certain point, increases in scan resolution will not improve the output image
quality. For example, a text image can be scanned at 600 dpi for output to a
600 dpi laser printer, but a color image should be scanned at 180 dpi to be
output to a color BJ-printer. When the image is output to a Bubble jet printer
in the color or gray mode, for example, the basic resolution of the printer is
halved. For example, for a 360 dpi printer the basic resolution is set for 180
dpi.
• If your image is black and white with no shades of gray, such as line
art, scan in Black and White mode.
• If you are scanning a text image for conversion to a text file, scan in
Text Enhanced mode.
• If you are scanning continuous-tone black and white photographs,
charcoal drawings, or any original with shades of gray, scan in
Grayscale mode.
• For full-color images, such as photographs or illustrations, scan in
Color mode.
• For example, with OCR applications using Black and White scan
mode, more than 300 dpi is the recommended scan resolution.
60
Chapter 5
Scanning Techniques
CONTENTS
GLOSSARY
INDEX
61
Optical and Enhanced Resolutions
Optical resolution refers to the amount of information a scanner can sample
per inch. Different varieties of scanner feature different optical resolutions.
The maximum optical resolution of the CanoScan FB1200S is 1200 dpi for
both the primary scan (horizontal dimension of the document) and secondary
scan (vertical dimension).
The 1200 dpi resolution of the primary scan is achieved with a proprietary
Canon technology, the VAriable Refraction Optical System (VAROS). VAROS is
a two-pass scanning technique that combines the results of the scanning
unit's first pass with a second pass that is optically shifted by a half pixel. This
technique is used for scans at resolutions of 601 dpi or greater.
Estimating Image Sizes
When scanning many files, you have to consider the available space on your
hard disk and weigh it against how you plan to use the images.
High - resolution, color image files take longer to scan. If you have less than
32 MB of RAM, working with large color image will be very time consuming.
Consult your imaging application’s documentation for guidelines.
The output file size depends on the image resolution, scan mode (Color,
Grayscale, or Black and White), and output dimensions. Lower resolutions
contain a fewer number of dots per inch, and therefore less digital information
to store on disk. So, when estimating the size of an image, you have to include
the output file size, the resolution, and the number of colors.
Resolution and Color
The greatest amount of disk space is required for a 36-bit Color image of one
horizontal inch, centimeter, or pixel. Each pixel contains 24 bits of color
information: 8 bits each of red, green, and blue, and 36 bits of color
information are required for a 36-bit Color image. Resolution refers to the
number of pixels per inch, or in printing terms, dots per inch (dpi).
Check the ScanGear CS-S status area for the estimated file size of the acquired
image. Generally, file sizes can range from 15 KB for a 6 inches x 4 inches image
scanned in Black and White mode at 75 dpi to 202,500KB(198 MB) for the same 6
inches x 4 inches image scanned in 36-bit Color mode at 1200 dpi.
61
Chapter 5
Scanning Techniques
CONTENTS
GLOSSARY
INDEX
62
File Size Estimates
ScanGear CS-S displays an estimated file size for your scan in the status area
on the lower left of the ScanGear CS-S window. The following table provides
some estimates for the same 6 inches x 4 inches color photograph scanned at
typical modes, resolutions, and output sizes.
Scan Mode
Color (24-bit)
Scan Resolution (dpi)
Screen/Web 75 dpi
Fax 200 x 200
BJ-Printer 360
Laser 600
File 1200
Output Size
6" x 4"
6" x 4"
6" x 4"
6" x 4"
6" x 4"
File Size
396 KB
2.75 MB
8.90 MB
24.7 MB
98.9 MB
Color (36-bit)
Screen/Web 75 dpi
Fax 200 x 200
BJ-Printer 360
Laser 600
File 1200
6" x 4"
6" x 4"
6" x 4"
6" x 4"
6" x 4"
791 KB
5.49 MB
17.8 MB
49.4 MB
198 MB
Grayscale (8-bit)
Screen/Web 75 dpi
Fax 200 x 200
BJ-Printer 360
OCR 300
Laser 600
File 1200
6" x 4"
6" x 4"
6" x 4"
6" x 4"
6" x 4"
6" x 4"
132 KB
938 KB
2.97 MB
2.96 MB
8.24 MB
33.0 MB
Grayscale (12-bit)
Screen/Web 75 dpi
Fax 200 x 200
BJ-Printer 360
OCR 300
Laser 600
File 1200
6" x 4"
6" x 4"
6" x 4"
6" x 4"
6" x 4"
6" x 4"
264 KB
1.83 MB
5.93 MB
4.12 MB
16.5 MB
65.9 MB
Screen/Web 75 dpi
Fax 200 x 200
BJ-Printer 360
OCR 300
Laser 600
File 1200
6" x 4"
6" x 4"
6" x 4"
6" x 4"
6" x 4"
6" x 4"
16.5 KB
117 KB
380 KB
264 KB
1.05 MB
4.12 MB
Black and White/
Text Enhanced
The color mode, resolution, and size also affect the length of time it takes to
scan an image. If you are scanning at a high resolution in Color mode, the
scan may take a lot longer than if you are scanning at lower resolutions, or in
Black and White or Grayscale.
62
Chapter 5
Scanning Techniques
CONTENTS
GLOSSARY
INDEX
63
The file size scanned with 36 bit Color/12 bit Grayscale mode is two times of
that scanned with 24 bit Color/8 bit Grayscale. It will not be one and a half
times.
Cropping the Image Shape
In most cases, you will want to crop the preview image before your final scan,
to eliminate white space or other unwanted images from the final product. By
combining the use of the Crop and Zoom tools, you can easily select a precise
section of the image, and then make other changes.
The Crop tool lets you select a rectangle shape of the preview image. You can
switch between the Crop tool and the Zoom tool to select exactly the part of
the image you want acquired.
If you select pixels as the unit of measure, you can see the exact size of your
selection on the rulers in the preview area.
Use the selection handle to
move a side or corner of the
selection rectangle more
precisely
To zoom and crop the preview image:
1. Preview the image as described in Chapter 3, “Scanning.”
2. With the Crop tool, select part of the image. The selection is outlined with
a broken line. Handles appear at the corners and midpoints of the
selection rectangle, and the cursor changes to a selection
crosshair.
You can move the entire selection rectangle around, or you can adjust any
edge or corner of the rectangle by moving one of its handles. When you
place the cursor over a handle, it turns to a double-headed arrow, and you
can drag that side in, out, up, or down to increase or decrease the
selection rectangle more precisely.
63
Chapter 5
Scanning Techniques
CONTENTS
GLOSSARY
INDEX
64
3. Click the Zoom tool and zoom in on the image. When you select the Zoom
tool, the cursor changes to a magnifying glass.
The plus and minus signs on the mouse indicate that you can
enlarge the image (zoom in) by clicking the left mouse button,
and zoom out by clicking the right mouse button.
By zooming in on the image even more, you can select a more precise part
of the image to scan or work with.
4. Continue alternating between the selection and other tools on the
ScanGear CS-S toolbar as long as you do not click off the selection with
the Crop tool.
Custom Tone Adjustments
The settings on the Tone tab let you make individual adjustments to a variety
of tone settings.
What Do Those Curves Mean?
The curve displayed on the Tone tab represents the values of the preview
image according to the tone tool you are using. You may see multiple curves
of red, blue, and green, depending on the settings on the Tone tab, the color
mode, and the image.
The shape of the curve changes to reflect the current settings of the
Automatic, Contrast/Brightness, Gamma, and Histogram tone tools. You
cannot edit the curve except with the Special Tone Curves tool.
Contrast and Brightness Adjustments
The Contrast/Brightness tools control use the image’s brightest and darkest
tones for its reference in adjusting the overall image in a uniform way.
If you increase an image’s brightness by 10 percent, even the bright parts are
increased by 10 percent. So, if you are scanning an overly dark image with a
wide range of tones, increasing the brightness makes the dark tones more
visible, but the brighter parts may appear faded and washed out.
The contrast control bases its calculations on the image’s dark and light tones
to calculate an overall adjustment. Because the adjustment affects the lightest
and darkest tones, increasing the contrast increases the proportion of bright
and dark tones in the entire image. Decreasing the contrast lessens the
proportion of bright and dark tones in the entire image. This can give the
image a dull, washed-out look.
64
Chapter 5
Scanning Techniques
CONTENTS
GLOSSARY
INDEX
65
If you have a high-contrast image, or a black and white continuous tone
photograph that needs minor adjustment, the brightness and contrast
settings can improve the image.
If you have an image with multiple tones, such as most color images, the
brightness and contrast settings may not provide the desired results. The
Gamma, Histogram, and Special Tone Curves, which let you adjust the
midtone range and contrast as well as individual color ranges, may give you
more satisfying results.
Gamma Adjustments
The Gamma curve tool adjusts the midtones in an image in relation to
themselves. Adjusting the gamma setting can improve the visibility of color
and grayscale images, particularly ones with many midtones. Gamma values
above 1.00 lighten the midtones of an image, and values below 1.00 darken
the midtones. The gamma settings can range from 0.10 and 10.00, but for
most color photographs, the range is between 1.00 and 2.00. The
photographs scanned for the illustrations in this manual had many dark
midtones in the background, so a lower setting was used to enhance the
background.
Histogram Techniques
The histogram displays a graph of all the pixels in the image, sorted by tone.
The darkest pixels are grouped to the left, the midtone pixels in the middle,
and lightest tone pixels to the right. The triangular sliders at the bottom of the
histogram reflect the default settings of Black-Point 0, Mid-point 128, and
White-point 255.
The histogram tools let you change the distribution of dark-tone, midtone,
and white-tone pixels in your image, to correct the image. Any changes you
make are immediately displayed in the preview image.
65
CONTENTS
GLOSSARY
INDEX
Chapter 5
Scanning Techniques
66
The following preview image has too dark a background, probably because
the photograph was exposed to set off the white flowers more effectively.
The histogram for this image shows that most of the pixels are between the
black and gray points, so there are too many dark pixels in the image. The
diagonal line indicates the color channel, in this case, the Master channel.
The following figure shows just the histogram of the same image, but with
the blue channel, the predominant color in the image, selected. Notice that
the blue pixels are more evenly spread around the midtones, but there is still a
large distribution of pixels in the dark-tone area.
66
CONTENTS
GLOSSARY
INDEX
Chapter 5
Scanning Techniques
67
The following figure displays the histogram when the flower is cropped.
Notice the pixels are spread more evenly, although still leaning to the darker
side of the midtones.
You can adjust the histogram so the pixels are spread move evenly throughout
the range of tones in the image. The procedures for adjusting the histogram
are in “Change Tone Using the Histogram Tool” in Chapter 3, “Scanning.”
The easiest way to affect the redistribution of pixels is to adjust the triangles
at the bottom of the histogram. When you move the Mid-point slider to the
left, a larger number of pixels fall into the midpoint range, and more midtone
shades become visible.
Move the triangles to
adjust the pixel
distribution in the
preview image.
67
CONTENTS
GLOSSARY
INDEX
Chapter 5
Scanning Techniques
68
You can also achieve some special effects by manipulating the Black-point,
Mid-point, and White-point values to the extreme. In the following figure, the
Mid-point has been moved to the right of the White-point, producing a
solarizing effect to the lighter areas of the image.
Although the Special Tone Curves provide the best facility for manipulating an
image for special effects, you can experiment with any of the tone tools.
Sampling a Tone for the Histogram
To sample a tone for the histogram, zoom in as close as possible and sample
the black point, midpoint, and white point from an enlarged section, to make
sure you are sampling the shading you want. This is especially important
when you are adjusting an image with many dark tones and midtones, and it
may be difficult to determine the darkest or brightest spot with the naked
eye.
If necessary, select a section from which to sample, and re-preview the image,
then select the sample.
To sample a tone for the Histogram:
1. Zoom in on the area of the image from which you want to take a sample.
2. Using the Crop tool, select an area of the zoomed-in image from which to
take the sample.
3. Click Preview to re-preview the image. The preview image displays only the
selected, enlarged area.
4. On the Tone tab, select the Eyedropper tool for the Black-point, Mid-point,
or White-point values.
68
Chapter 5
Scanning Techniques
CONTENTS
GLOSSARY
INDEX
69
5. Click the Eyedropper tool on the point of the image you want to sample.
That value is entered in the corresponding text box, and the image adjusts
according to that value.
6. If the area of the image surrounding the sampled area changes tone as
you expected, make a note of the settings. If the selected image area does
not change tone as you expected, repeat this process until you get the
results you want.
Enhancing Color Images
This is a brief discussion about color basics. There are many good books about
working with graphic images. If you are using color imaging software such as
Adobe Photoshop LE, your software documentation can provide you with
more information to help you adjust your images when they have been
scanned and acquired by the imaging software.
About Image Color and Color Channels
All printable colors can be created using a combination of the colors cyan,
magenta, and yellow (CMY). (Black is often used in printing, so you may hear
that colors are printed using the “colors” CMYK, the K stands for “Key
color.”)
All colors displayed on monitors can be created using a combination of the
colors red, green, and blue (RGB). Red, green, and blue can be thought of as
complementary colors to cyan, magenta, and yellow-that is, the colors cancel
each other out when combined in equal amounts. Similarly, adding a small
amount of one color reduces its complement by that amount.
This complementary relationship between the colors cyan, magenta, and
yellow and the colors red, green, and blue can be represented using a color
wheel that indicates the possible colors and their opposites.
Green
Yellow
Cyan
Red
Blue
Magenta
69
Chapter 5
Scanning Techniques
CONTENTS
GLOSSARY
INDEX
70
Using this color wheel model, you can use the Tone tab adjustments to modify
specific colors and correct the preview image before scanning. You can select
the Red, Green, or Blue channels and adjust the Gamma, Custom Curve, and
Histogram settings for the image, to provide the results you want.
For example, if your original picture has too much yellow, you can adjust the
color by increasing its complement (more blue). If the image has too much
green, you can increase the combination of colors to decrease the magenta.
Note:
If you are working with images that are meant for
professional color printing, all your equipment should be
calibrated so the color values on your scanner, monitor, and
output devices are using the same frame of reference. This
means you should make sure you have a video monitor that
can display Full Color (24-bit), up to 16.7 million colors.
70
Chapter 6
Using ScanGear Toolbox CS-S
CONTENTS
GLOSSARY
INDEX
71
Chapter 6
Using ScanGear Toolbox CS
About ScanGear Toolbox CS
ScanGear Toolbox CS lets you streamline the process of transferring acquired
images to the function or application you want. You can scan an image and
immediately send it to a printer or to a fax or mail application. You can also
customize ScanGear Toolbox CS to send the image to an image application,
OCR application, or another application of your choice.
You can preview the image in the ScanGear CS-S window, and change the
scan settings, or you can select the Easy Acquire feature, and let ScanGear
Toolbox CS handle the acquisition completely. Once you have customized your
settings, you can let ScanGear Toolbox CS do the rest.
Installing ScanGear Toolbox CS
To install ScanGear Toolbox CS:
1. Place the [CanoScan Setup Utility CD-ROM] in your CD-ROM drive.
2. In the start-up menu, click [Install/Uninstall Software].
3. [Install] window is displayed. Be sure that [Install] in the top-left of the
window is selected and the check box for [ScanGear Toolbox CS] is
checked.
4. Click [Start Installation] in the bottom-right of the window.
5. Follow the Setup program instructions.
When the installation has been completed, a program group is added to the
Start menu.
Uninstalling ScanGear Toolbox CS
1. Place the CanoScan Setup Utility CD-ROM in the drive.
2. Click the [Install/Uninstall Software] button in the CD-ROM’s menu
window.
3. The Install window will display. Click the [Uninstall] button near the upper
left. The Uninstall window will display.
71
Chapter 6
Using ScanGear Toolbox CS-S
CONTENTS
GLOSSARY
INDEX
72
4. Click the [Open the Add/Remove Programs dialog] button at the bottom
right. The Windows Add/Remove Programs Properties dialog will display.
Select [ScanGear Toolbox CS] and click the [Add/Remove] button.
Follow the on-screen instructions to complete the procedure.
Starting ScanGear Toolbox CS
When ScanGear Toolbox CS is installed, click the Start button; point to
Programs, point to Canon ScanGear Toolbox CS, and click Canon ScanGear
Toolbox CS.
Or, simply push the Start button in front of the CanoScan FB1200S to launch
ScanGear Toolbox CS on your computer.
About the ScanGear Toolbox CS Bar
The ScanGear Toolbox CS bar is a window with a set of tool buttons and
other configuration options. You can add or remove the Toolbox buttons by
clicking the Settings button and changing the settings for each tool. The Fax,
Mail, and Copy buttons are preset. There are four additional buttons you can
add to the ScanGear Toolbox CS bar: one edit and three custom buttons.
The Easy Acquire check box lets you scan an image without opening the
ScanGear CS-S window. When the Easy Acquire check box is selected, and
you click a button in the ScanGear Toolbox CS bar, the scan occurs
automatically, using the default settings.
When Easy Acquire check box is cleared, and you click a button in the
ScanGear Toolbox CS bar, ScanGear CS-S opens and lets you configure the
scanning settings manually before scanning.
The ScanGear Toolbox CS bar, before you add or remove buttons, looks like
this:
Open the
online help.
When Easy Acquire is selected, you
don’t see the ScanGear CS-S
window and the image is acquired
and processed automatically.
Click to add and delete buttons from
the ScanGear Toolbox CS bar, and
configure settings for each button.
72
Chapter 6
Using ScanGear Toolbox CS-S
CONTENTS
GLOSSARY
INDEX
73
Setting Up ScanGear Toolbox CS
You can add or remove buttons from the ScanGear Toolbox CS bar, change
the buttons’ settings, or enable Easy Acquire. When you install ScanGear
Toolbox CS, the Fax, Mail, and Copy buttons appear on the ScanGear Toolbox
CS bar automatically.
Adding a Button to the ScanGear Toolbox CS Bar
You can add a button from the ScanGear Toolbox CS bar at any time. The
following steps provide an overview of the procedure for adding a button.
For details on configuring each button’s settings, see the individual button’s
sections later in this chapter.
To add a button:
1. Click Settings.
2. In the ScanGear Toolbox CS settings dialog box, click the tab for the
button you want to add. For example, to change settings for the Mail
button, click the Mail tab.
3. Under button Links, select System Default, Application, Driver from the
Link to list, or click Browse to link an application’s .exe file to the button.
4. Select the Show This Button check box.
5. Click OK.
Note:
Some buttons have additional button settings.
Removing a Button from the ScanGear Toolbox CS Bar
When you remove a button from the ScanGear Toolbox CS bar, the settings
for that button remain the same, so you can re-display the button without
having to reconfigure its settings again.
To remove a button from the ScanGear Toolbox CS bar:
1. Click Settings.
2. Click the tab for the button you want to remove.
3. Clear the Show This Button check box.
4. Click OK. The button does not appear on the Toolbox bar.
73
Chapter 6
Using ScanGear Toolbox CS-S
CONTENTS
GLOSSARY
INDEX
74
When you display the button again, the settings remain the same as when
you removed it. You can also change a ScanGear Toolbox CS button’s settings
without displaying it on the ScanGear Toolbox CS bar.
Enabling or Disabling Easy Acquire
When the Easy Acquire check box is selected and you click a button on the
ScanGear Toolbox CS bar, ScanGear Toolbox CS acquires an image and directs
it to the linked application or driver. When Easy Acquire is cleared and you
click a button on the ScanGear Toolbox CS bar, ScanGear Toolbox CS opens
the ScanGear CS-S window and lets you configure the image scan settings
manually.
To enable Easy Acquire
• Select the Easy Acquire check box.
To disable Easy Acquire
• Clear the Easy Acquire check box
74
Chapter 6
Using ScanGear Toolbox CS-S
CONTENTS
GLOSSARY
INDEX
75
Configuring Copy Settings
The Copy button lets you print a scanned image directly to a printer, without
having to acquire the image in a graphics application and then print it. You
are, in effect, copying the image, using your scanner and printer.
To set up ScanGear Toolbox CS to print an acquired image:
1. Click the Copy tab.
2. Select an option in the Image Type list.
3. Select an option in the Image Quality (Resolution) list.
4. Click OK.
Showing the Copy Button on the ScanGear Toolbox CS Bar
When the Show This Button check box is selected, the Copy button appears
on the ScanGear Toolbox CS bar.
75
Chapter 6
Using ScanGear Toolbox CS-S
CONTENTS
GLOSSARY
INDEX
76
Copying Acquired Images
You can set up ScanGear Toolbox CS to acquire images and copy them
directly to a printer. Use the following steps.
To copy an image to a printer with Easy Acquire selected:
1. Select the Easy Acquire check box.
2. Click the Copy button on the ScanGear Toolbox CS bar.
3. In the Print dialog box, confirm the printer and set the number of copies,
and then click OK.
This acquire uses the settings for the Copy button if Easy Acquire is
selected. A progress bar displays the progress of the scan.
If an automatic document feeder is attached to the scanner, all the images
in the feeder are acquired and printed. Otherwise, you will have to repeat
this process to print each image.
The acquired images are printed.
76
Chapter 6
Using ScanGear Toolbox CS-S
CONTENTS
GLOSSARY
INDEX
77
To copy an image to a printer with Easy Acquire cleared:
1. Make sure the Easy Acquire check box is cleared.
2. Click the Copy button on the ScanGear Toolbox CS bar.
The Print dialog box appears.
3. Confirm the printer, enter the number of copies, and then click OK.
Because the Easy Acquire check box is cleared, the ScanGear CS-S window
appears.
4. With the ScanGear CS-S window open, do the following:
• Click Preview so you can preview and correct any changes to the
image. See Chapter 3, “Scanning” for details.
• Make any changes to the image.
• Click Scan. The image is printed.
77
Chapter 6
Using ScanGear Toolbox CS-S
CONTENTS
GLOSSARY
INDEX
78
Configuring Mail Settings
The Mail button lets you e-mail a scanned image without having to attach the
scanned image separately to a new e-mail message. ScanGear Toolbox CS
automatically links to the system default e-mail application set up in
Windows, but you can change this link using the procedure in the following
section.
Note:
The mail application linked to ScanGear Toolbox CS must be
MAPI-compliant. MAPI, an acronym for ‘Messaging
Application Programming Interface’, is an industry standard
for e-mail applications. It is a defined set of message services
available to all programs that run in the Windows operating
environment.
You can configure your e-mail application to be MAPIcompliant. Refer to your mail application’s documentation for
more information.
78
Chapter 6
Using ScanGear Toolbox CS-S
CONTENTS
GLOSSARY
INDEX
79
Linking a Mail Application
The Mail tab contains the settings to configure ScanGear Toolbox CS for use
with an e-mail application.
To link ScanGear Toolbox CS to a mail application:
1. On the Mail tab, select an option in the Link To list.
• If you select System Default, the Toolbox button is linked to the mail
application that was set as the system default when you installed
ScanGear Toolbox CS. If no system default mail application was
selected during installation, the system default option is unavailable.
• If you select Application, click Browse to locate and select the mail
application executable to link, then click Link.
2. Select an Image Type.
3. Select an Image Quality.
4. Select an Output File Format.
5. Click OK.
Showing the Mail Button on the ScanGear Toolbox CS Bar
Select the Show This Button check box to display the Mail button on the
ScanGear Toolbox CS bar. If this check box is cleared, the Mail button does
not appear on the Toolbox bar.
Note:
If no application .exe has been linked using the previous
procedure, the Show This Button option is disabled.
79
Chapter 6
Using ScanGear Toolbox CS-S
CONTENTS
GLOSSARY
INDEX
80
Mailing Acquired Images
You can send mail images directly to your mail application.
To mail an acquired image with Easy Acquire selected:
1. Select the Easy Acquire check box.
2. Click the Mail button on the ScanGear Toolbox CS bar.
This acquire uses the settings for the Mail button if Easy Acquire is
selected. A progress bar displays the progress of the scan.
If an automatic document feeder is attached to the scanner, all the images
in the feeder are acquired and sent to the mail application.
When the image acquire is complete, the acquired images appear attached
in the mail application in a new message window. They are ready to be
addressed and sent.
To mail an acquired image with Easy Acquire cleared:
1. Clear the Easy Acquire check box.
2. Click the Mail button on the ScanGear Toolbox CS bar. The ScanGear CS-S
window appears.
3. Click Preview to preview the image and make any desired changes.
Note:
For details on using the ScanGear CS-S window, see Chapter 3,
“Scanning.”
4. Click Scan.
When the image acquire is complete, the acquired images appear attached
in the mail application in a new message window. They are ready to be
addressed and sent.
80
Chapter 6
Using ScanGear Toolbox CS-S
CONTENTS
GLOSSARY
INDEX
81
Configuring Fax Settings
You can change the application or driver linked to the Fax button on the
ScanGear Toolbox CS bar. By default, the system default fax application or
driver is linked to the button.
Note:
If you do not have any fax application or driver in the system,
select System Default to send the image.
Linking a Fax Application
To link a fax application or driver:
1. On the Fax tab, select an option in the Link To list.
• If you select System Default, the Toolbox button is linked to the MAPIcompliant fax application. If no system default fax application existed
when ScanGear Toolbox CS was installed, the system default option is
unavailable.
• If you select Driver, click the Set button and select the fax driver to link.
The list of names is collected from available drivers on your system.
• If you select Application, click Browse to locate and select the fax
application executable that you want to link.
2. Select Show This Button.
3. Select an Image Type.
81
Chapter 6
Using ScanGear Toolbox CS-S
CONTENTS
GLOSSARY
INDEX
82
4. Select an Image Quality.
5. Click OK.
Showing the Fax Button on the ScanGear Toolbox CS Bar
Select Show This Button to display the Fax button on the Toolbox bar. If this
check box is cleared, the button does not display.
Note:
If no application .exe has been linked using the previous
procedure, the Show This Button option is disabled.
Faxing Acquired Images
You can send an acquired image directly to a fax.
To scan and fax an image with Easy Acquire selected:
1. Select the Easy Acquire check box.
2. Click the Fax button on the ScanGear Toolbox CS bar.
ScanGear Toolbox acquires all the images and displays a progress bar.
The acquired images are sent to the current Fax driver or Fax application.
Note:
If an automatic document feeder is attached to the scanner,
all the images in the feeder are acquired and sent to the fax
application.
To scan and fax an image with Easy Acquire cleared:
1. Clear the Easy Acquire check box.
2. Click the Fax button on the ScanGear Toolbox CS bar. The ScanGear CS-S
window appears.
3. Optionally, click Preview to preview the images and make any changes
before scanning.
4. Click Scan. The image is sent to the Fax application, ready to send.
82
CONTENTS
GLOSSARY
INDEX
Chapter 6
Using ScanGear Toolbox CS-S
83
Configuring Edit or Custom Settings
You can use ScanGear Toolbox CS in conjunction with Canon’s scanner driver,
ScanGear CS-S, to acquire images for an image application, OCR application,
or other customized application.
For each Edit or Custom button you add, you can select the application,
image type, and image quality. These are operative when you select Easy
Acquire on the ScanGear Toolbox CS bar. When Easy Acquire is cleared, you
cannot use those settings.
83
Chapter 6
Using ScanGear Toolbox CS-S
CONTENTS
GLOSSARY
INDEX
84
Linking an Edit or Custom Application
To link an application to the Edit button:
1. On the Edit tab or one of the Custom tabs, click Browse.
2. In the Open dialog box, select an application executable to link, and click
Link.
Note:
You must link an application’s executable file (.exe) and not
another file type (such as a .dll.)
3. Select the Show This Button check box. The button appears on the
ScanGear Toolbox CS bar.
4. Select the image type and image quality for the application.
5. Click OK.
Showing an Edit or Custom Button on the ScanGear Toolbox CS Bar
Select the Show This Button check box to display an Edit or Custom button on
the ScanGear Toolbox CS bar. If this check box is cleared, the Edit or Custom
button does not appear.
Note:
If no application .exe file appears in the Application list, the
Show This Button option is disabled.
84
Chapter 6
Using ScanGear Toolbox CS-S
CONTENTS
GLOSSARY
INDEX
85
Acquiring Images for Editing or Customized Applications
You can use ScanGear Toolbox CS to acquire images for an imaging, OCR or
other customized application. The Edit and Custom settings are identical.
To acquire an image for Edit or Custom Application button with Easy
Acquire cleared:
1. Click the Edit button on the ScanGear Toolbox CS bar. The ScanGear CS-S
window appears.
2. Optionally, click Preview and make any adjustments to the image.
3. Click Scan. The image is acquired by the application you specified for the
Edit or Custom button.
If an automatic document feeder is attached to the scanner, all the images
in the feeder are acquired.
To acquire an image for Edit or Custom Application button with Easy
Acquire selected:
1. Click the Edit button on the ScanGear Toolbox CS bar.
A progress bar shows the progress of the scan.
The images appear in your application.
If an automatic document feeder is attached to the scanner, all the images in
the feeder are acquired.
When the image acquire is complete, the Edit/Custom application appears.
85
Chapter 6
Using ScanGear Toolbox CS-S
CONTENTS
GLOSSARY
INDEX
86
Changing ScanGear Toolbox CS Preferences
As well as configuring individual button settings, you can configure the
ScanGear Toolbox CS Image (scanner) source, and the way ScanGear Toolbox
CS appears on your taskbar when it is minimized. You can also specify how
you want ScanGear Toolbox CS to dispose of temporary files created during
the scanning process.
Selecting a ScanGear Toolbox CS Source
ScanGear Toolbox CS automatically searches your hard disk and networked
servers for available scanning devices, which you can select from the Image
Source list. You cannot browse and select a source separately.
To select a ScanGear Toolbox CS Image Source:
1. Click the Preferences tab.
2. Select a scanner from the Image Source list.
3. Click OK.
86
Chapter 6
Using ScanGear Toolbox CS-S
CONTENTS
GLOSSARY
INDEX
87
Specifying ScanGear Toolbox CS Appearance
You can specify if you want ScanGear Toolbox CS to appear in the Taskbar
when it is minimized.
To specify ScanGear Toolbox CS icon location:
1. Click the Preferences tab.
2. Select On Minimize Appear in Task Bar.
• If this option is selected, the ScanGear Toolbox CS will remain available
for reactivation if you press Alt-Tab.
• If this option is cleared, the ScanGear Toolbox CS icon appears in the
status indicator, and you must click it or right-click it to open the
ScanGear Toolbox CS bar.
3. Click OK.
Cleaning Up Temporary Files
You can specify how you want ScanGear Toolbox CS to dispose of the
temporary files created during the scanning session. You can also delete
temporary files immediately.
To specify how to clean up temporary files:
1. Click the Preferences tab.
2. Under File clean-up, select one or more of the following options:
• If you select On Close Delete ScanGear Temp Files, ScanGear CS-S
deletes the temporary files when you close ScanGear Toolbox CS.
• If you select Warn Before Deleting, ScanGear Toolbox CS asks before
deleting files.
3. Optionally, click Delete now to delete temporary files immediately.
4. Click OK.
87
CONTENTS
GLOSSARY
INDEX
Chapter 6
Using ScanGear Toolbox CS-S
88
Using ScanGear Toolbox CS Shortcut Menus
ScanGear Toolbox CS lets you use shortcut menus to acquire images and
select different settings. When you right-click any button on the ScanGear
Toolbox CS bar, the shortcut menu displays the currently-selected settings
from that button, and lets you make Image Setting changes.
You can also right-click the minimized ScanGear Toolbox CS icon in the status
indicator to start the image acquire without opening the ScanGear CS-S
preview window.
To use a shortcut menu on the minimized icon:
1. In the Task Bar status indicator, right-click the minimized ScanGear Toolbox
CS icon.
2. On the shortcut menu, click the item you want to use. The menu lists all
buttons currently activated in ScanGear Toolbox CS.
Clicking the shortcut command is the same as clicking the button on the
ScanGear Toolbox CS bar.
88
Chapter 6
Using ScanGear Toolbox CS-S
CONTENTS
GLOSSARY
INDEX
89
Canon Scanner Monitor
The Canon Scanner Monitor, a utility program that allows you to monitor the
scanner status, can be used when both ScanGear CS-S and ScanGear Toolbox
CS are installed on the same computer. The Canon Scanner Monitor icon will
display beside the time icon on the Windows taskbar at the lower right of
the screen when the utility can be used.
Canon Monitor Utility Display
Green Icon
Indicates that the scanner is correctly connected and ready for use.
Red Icon
Indicates that the scanner is not correctly connected and cannot be used.
Right-Clicking the Canon Scanner Monitor Icon
Right-clicking the Canon Scanner Monitor displays the following pop-up
menu. Any option can be selected.
Scanner information...
Displays the product ID, ROM version and SCSI ID of the connected scanner.
It also displays error messages when the icon is green.
About...
Displays the Canon Scanner Monitor version data.
Close
Closes Canon Scanner Monitor.
89
Chapter 6
Using ScanGear Toolbox CS-S
CONTENTS
GLOSSARY
INDEX
90
ScanGear Toolbox CS Settings Summary
The following sections provide the scan settings that are available when you
use ScanGear Toolbox CS.
Copy Image
Setting Copy Image Quality
Available selections for printing image quality (resolution) are different for
color printers and black and white printers.
True Color
• Draft 75 dpi
• Good 180 dpi
• High 360 dpi
Black and White
• Draft 150 dpi
• Good 300 dpi
• High 600 dpi
Setting Copy Image Type
Available selections for copy image type are:
• True Color - 24 bit
• Grayscale - 8 bit
• Black and White, (Text Enhanced Off) - 1 bit 50 % Threshold
Mail Image
Setting a Mail Image Type
Available selections for Mail image type are:
• True Color - 24 bit
• Grayscale - 8 bit
• Black and White, (Text Enhanced Off) - 1 bit 50 % Threshold
Setting Mail Image Quality (Resolution)
Available selections for Mail image quality (resolution) are:
• Screen
75 dpi
• Web
75 dpi
• BJ Print
180 dpi
• BJ Print
360 dpi
• Laser Print
300 dpi
• Laser Print
600 dpi
90
Chapter 6
Using ScanGear Toolbox CS-S
CONTENTS
GLOSSARY
INDEX
91
Setting Mail Output File Formats
Available mail file formats are:
• Windows Bitmap (*.bmp)
• Tagged Image File (*.tif)
• JPEG
(*.jpg)
Fax Image
Setting Fax Image Type
Available selections for Fax image type are:
• Black and White, (Text Enhanced Off) - 1 bit 50% Threshold
Setting Fax Image Quality
Available selections for Fax image quality (resolution) are:
• Standard
• Fine
• Super Fine
Edit or Custom Image
Setting Edit or Custom Image Quality
Available selections for edit or custom image quality (resolution) are:
• Screen - 75 dpi
• Web - 75 dpi
• BJ Print - 180 dpi
• BJ Print - 360 dpi
• Laser Print - 300 dpi
• Laser Print - 600 dpi
Setting Edit or Custom Image Type
Note:
If you use an OCR application, only Black and White or Text
Enhanced are supported.
Available selections for edit or custom image type are:
• True Color - 24 bit
• Grayscale - 8 bit
• Black and White, (Text Enhanced Off) - 1 bit 50% Halftone Diffusion
91
Chapter 7
Frequently Asked Questions
CONTENTS
GLOSSARY
INDEX
92
Chapter 7
Frequently Asked Questions
Pre-Scan Checklist
Before you begin troubleshooting specific problems, verify that you have
reviewed this checklist.
• Viewing that your system meets all the memory, hard disk and
operating system requirements listed “System Requirements” in
Chapter 1.
• Make sure that the ScanGear CS-S software was installed
successfully.
• Check that the cables between your computer and scanner are
connected securely.
• If you see a message on the screen that says something like this:
“Device failed/cannot find TWAIN...” make sure you have turned on
your scanner first, before your PC. If necessary, turn the scanner off
and back on again.
• Turn on your scanner before you turn on the computer.
• Before scanning or previewing, check that the data source has been
selected. If your scanner does not appear as an option when you
select a source to scan from your imaging software, you may have
to install ScanGear CS-S again.
92
Chapter 7
Frequently Asked Questions
CONTENTS
GLOSSARY
INDEX
93
“Top Ten” List
Here is a list of the “Top Ten” pieces of advice for scanning.
1. Start with the best possible original image to scan.
2. Select only the part of the image you want to scan. Preview the image and
select it. Not only does a more precise selection save file space, but your
image quality will be much higher.
3. Check the output file size before beginning the scan. Make sure you have
enough room if you are scanning files that take up a lot of disk space.
4. Match your Scan Mode to the output purpose. If you are scanning text,
use the Text Enhanced mode. If you are scanning line art, use the Black
and White setting, and so on.
5. Match your scan resolution to the type of file you need. If you are
scanning images for use as .GIF or .JPG files on the Web, you do not have
to scan at 600 dpi. Although it is recommended that you scan at a higher
resolution than you need for high-quality color images, you should balance
that factor against your planned use for the image.
6. Take advantage of the Gamma tone curve and other tone tools to correct
your images.
7. Try to use Full Color mode on your monitor so you can view your preview
image as accurately as possible.
8. If you are using OCR software, scan in Text Enhanced at 300 dpi or higher.
9. If creating halftones, scan at twice the halftone resolution.
10.Take advantage of the preview feature and preview as much as you want
before scanning.
93
Chapter 7
Frequently Asked Questions
CONTENTS
GLOSSARY
INDEX
94
Troubleshooting Q & A
The scanner diagnostics test displays a “test failed” message.
Problem:
When I run the scanner diagnostics test, I get an error
saying the diagnostics failed.
Cause:
The scan head may not be in its home position.
Solution:
Close the ScanGear CS-S window if it is open. Try turning
the scanner off and back on again, and restart.
The previewed image appears different from original being scanned.
Problem:
The colors in the previewed image appear different from
the colors in the original image.
Cause:
The scanned colors need to be adjusted.
Solution:
Check that the Auto Tone button is selected. If further
adjustments are necessary, use the Tone tab tools.
The printed image colors appear different from image you see in the
preview area.
Problem:
The colors in the printed image appear different from the
colors in the image you see on the screen.
Cause:
Printer toner may be low. ColorGear Color Matching may
have not been selected when it was necessary.
Solution:
Check the toner in the printer to be sure it is not low or
empty. Check that ColorGear Color Matching is selected
on the Preferences tab.
94
Chapter 7
Frequently Asked Questions
CONTENTS
GLOSSARY
INDEX
95
Your graphics application cannot find the scanner.
Problem:
When trying to scan, an error message says the scanner
cannot be found.
Cause:
Windows may not recognize your scanner.
Solution:
Check to see if your scanner is properly connected to
your computer and that the scanner was turned on
before you started Windows. If not, connect the scanner
and turn it on. Then restart your computer.
If this does not correct the problem, consult the scanner
user manual for additional information about how to
properly set up your scanner.
Some functions are grayed-out.
Problem:
Some functions are grayed-out.
Cause:
Some functions are not available until an image has been
previewed.
Solution:
Change Functions. (for example, Black and White to
Color (24-bit))
ScanGear CS-S does not launch.
Problem:
ScanGear CS-S does not launch; the screen freezes or
another application is displayed.
Cause:
The scanner may not be connected correctly. You may
have chosen the wrong scanner source in your graphics
application. The scanner configuration file may have
been changed.
Solution:
Check to see if your scanner is properly connected to
your computer and that the scanner was turned on
before you started Windows. If not, connect the scanner
and turn it on. Then restart your computer.
Make sure you selected the correct scanner in your
graphics application. (See your graphics application
documentation for instructions.)
If neither of those steps solve the problem, uninstall
ScanGear CS-S using the Windows Control Panel “Add/
Remove Programs” function, then reinstall ScanGear CS-S.
95
Chapter 7
Frequently Asked Questions
CONTENTS
GLOSSARY
INDEX
96
Printing or scanning is too slow.
Problem:
The printer or scanner is taking an unusually long time to
print or scan.
Cause:
The selected output resolution of the image may be too
high for the resolution of your printer, or your computer
may be low on memory.
Solution:
Before printing the image, make sure you have set the
scan resolution (on the Main tab) to not exceed the
resolution of your printer. Also check to see if there is
enough memory available in your computer. Before
printing, quit other applications that are not in use.
Parts of images are missing or misaligned.
Problem:
Some characters are missing from the image in the
preview area, or the image is misaligned in the preview
area.
Cause:
The page has been placed on the scanner improperly or
has fed through the optional Automatic Document
Feeder (ADF) incorrectly.
Solution:
Check the scanner and adjust the image, or try sending
the paper through the optional ADF again.
Image does not have the expected colors; it is too light or too dark.
Problem:
Scanned or printed image is too light or too dark.
Cause:
Image type or image and color adjustments may not have
been set properly.
Solution:
The best solution is to scan the image using all default
settings again. Then make imaging and color adjust
ments as necessary.
96
Chapter 7
Frequently Asked Questions
CONTENTS
GLOSSARY
INDEX
97
The automatic document feeder is jammed.
Problem:
The automatic document feeder (ADF) is jammed, but no
paper is found under the ADF paper feeder cover.
Cause:
You may be checking under the platen cover, not under
the cover to the ADF paper feeder.
Solution:
Check your hardware user manual for the location of the
ADF paper feeder cover and verify that the paper path is
free.
The preview image is too small on my monitor
Problem:
The image in the preview area is very small, and I cannot
view it effectively to make adjustments.
Cause:
If you have a high-resolution setting on your monitor, the
ScanGear CS-S window is smaller than if you had a
lower-resolution setting.
Solution:
Click the Size button on the ScanGear CS-S window to
enlarge the entire window or lower your monitor’s resolu
tion.
97
CONTENTS
Glossary
98
INDEX
Glossary
Acquired Images
Images sent from your scanner software to the host graphics application.
ADF
Automatic Document Feeder, an optional attachment that lets your scanner
perform continuous scanning of documents.
Automatic Tone Adjustment
Automatic analysis and adjustment of the image using Contrast/Brightness
and Gamma settings.
Bits and Bit Depth
A bit (BInary digiT) is the smallest possible unit of information on a computer;
it represents yes or no; on or off; 1 or 0. Bit Depth is used to describe the
complexity of a graphic image.
One-bit, or bilevel, images are black and white. This is the Black and White
setting in ScanGear CS-S.
Grayscale (8-bit)
Expresses a dot in 256 shades of gray between white and black.
Grayscale (12-bit)
Expresses a dot in 4,096 shades of gray between white and black.
Color (24-bit)
Expresses a dot with 8 bits for each primary color for a total of 24 bits (8 bits x
3 colors=24 bits). A dot can be expressed in up to 16.8 million distinct
shades(2563=16.8 million)
High Quality Color (36-bit)
Expresses a dot with 12 bits for each primary color, red, green, and blue
(RGB), for a total of 36 bits (12 bits x 3 colors =36 bits). A dot can be expressed in up to 68.7 billion distinct shades (4,0963=68.7 billion)
Black-point
The darkest portion of an image scanned as Color or Grayscale. When you
click on the image with the Black-point eyedropper, all tones darker than the
selected sample tone are adjusted to black. See also Mid-point Eyedropper,
White-point Eyedropper.
98
CONTENTS
Glossary
99
INDEX
Black-point Eyedropper
The Histogram tool that lets you select the darkest portion of the image in the
preview area.
Brightness
The overall amount of lightness or darkness in an image. An image with
maximum brightness tends toward white; an image with minimum brightness
tends toward black. While contrast refers to the range and number of tones
in an image, brightness refers to the intensity of tones.
Canon ColorGear Color Matching
Canon’s process of matching the color profile of the input device (scanner)
with the color profile of the output device (monitor), to yield the most accurate color image.
Channel
See Color Channels.
Clear Preview button
The button that removes the current image from the preview area.
CMY
An acronym for cyan, magenta, and yellow, the color complements to red,
green, and blue.
CMYK
An acronym for cyan, magenta, yellow, and black, the four-color process used
in most commercial printing. (The black “K” stands for “Key color.”)
Color Channels
The red, green, or blue components of a color image. Color images contain 8
bits/12 bits per pixel each for red, green, and blue channels, therefore each
pixel has 24 bits/36 bits. If you are scanning a color image, you can change
the brightness and contrast of the individual red, green, and blue tones in
your image. The Master channel is a combination of the three.
Color Matching
The range of colors your scanner can see may not match the range of colors
your video monitor can produce. Color matching lets your system display
colors so that the color on your monitor and printer matches the colors
scanned. See also Canon ColorGearTM Color Matching.
99
CONTENTS
Glossary
100
INDEX
Color wheel
A representation of colors and their complements.
Complementary colors
Red, green, and blue can be thought of as complementary colors to cyan,
magenta, and yellow. These colors cancel each other out when combined in
equal amounts. Similarly, adding a small amount of one color reduces its
complement by that amount.
Contrast
Contrast refers to the difference between the lightest light and the darkest
dark in the image. A low contrast value indicates that the difference between
dark shades and light shades is not very great. A high value indicates a great
difference between dark and light shades. While brightness refers to the
intensity of tones in an image, contrast refers to the range and number of
tones in an image.
Crop
The action of selecting part of an image. The Crop tool on the main ScanGear
CS-S window lets you select part of a preview image and re-preview or scan
only that selected part.
Curve chart
The graph displayed in the Tone tab settings for the Auto Tone, Contrast/
Brightness, Gamma, Histogram, and Special Tone Curves features. This graph
describes the relationship between the color characteristics of the previewed
image and the available feature settings.
Curve file
A file containing Special Tone Curve settings. (Tone tab - Special Tone Curves)
Custom curves
A user-defined Special Tone Curve that may be saved in a file. (Tone tab Special Tone Curves)
Custom Resolutions
The Custom Resolutions dialog box lets you create a scan resolution not
found in the preset list, but supported by the input device.
Default
The preset factory settings on hardware or software.
100
CONTENTS
Glossary
101
INDEX
Digitizing
The process of converting an image into computer-usable (digital) information
that can be saved as a file, printed, faxed, or otherwise manipulated on your
computer.
dpi
The abbreviation for dots per inch. The resolution of a monitor or printer is
measured in how many dots per horizontal inch it can display or print. See
also, Optical resolution, Pixel, Resolution.
Driver
The software that lets you run a peripheral device such as a printer, scanner,
video monitor, and so on. ScanGear CS-S is a scanner driver.
Easy Acquire
A method to allow quick scanning without manipulating scanner settings.
When the Easy Acquire check box is selected, and you click a button in the
ScanGear Toolbox window, the scan occurs automatically, using the default
settings.
End points
The points at each end of a preset or custom tone curve. The curve end points
cannot be deleted. If they are dragged to or past an edge, they remain on the
edge. Add points to the curve by clicking anywhere in the curve box. (Tone
tab - Special Tone Curves)
Eyedropper
A Histogram tool used to sample the Black-point, Mid-point, and White-point
areas in the previewed image. (Tone tab - Histogram)
Full Platen
The maximum scannable area on the scanner’s document glass, 8.50 x 11.64
inches (width of U.S. Letter and length of A4 paper sizes).
Gamma Curve
The Gamma curve tool lets you change the midtones of colors to increase the
contrast between colors, and enhance the overall image. When you increase
the Gamma value, light colors are made lighter, and dark colors are made
darker. The graphed curve represents the relationship between input and
output values for the midtones of the preview image.
101
CONTENTS
Glossary
102
INDEX
Gamma correction
The process of adjusting the midtones to improve an image.
Grainy
An image with rough, uneven texture or tone.
Grayscale
Grayscale refers to a single-channel image made up of 256 (8-bit)/4096 (12-bit)
shades of gray, ranging from white to black, that represent all tones in an
image.
Height
The Height text box contains the height of the current selection, or, if there is
no selection, the maximum vertical output size, based on the currently
selected Paper Size.
Histogram Tool
The Histogram displays the distribution of bright and dark pixels for each color
channel in the previewed image. The Eyedropper tool on the histogram graph
lets you redefine the tonal profile. You can save the settings for Black-point,
Mid-point, and White-point settings in a histogram file with the extension
*.HST.
Interpolation
The process of adding digital information to an image to increase resolution.
Image Tone
See Tone.
Image Type
The type of image, such as color or grayscale.
JPEG file format
An image file format developed by the Joint Photographic Experts Group, as a
standard for storing color images in less space, with the file format .jpg.
Keep Proportions button
The Keep Proportions button affects the selection and the Width and Height
text boxes. When you click the Keep Proportions button, the image size is
maintained in the same proportion whenever you change either the width or
the height.
102
CONTENTS
Glossary
103
INDEX
Low contrast
An image that has low contrast does not have many distinct differences
between tones.
Mid-point Eyedropper
The Histogram tools that lets you select the midtone portion of the image in
the preview area. When you click on the image with the Mid-point
eyedropper, all tones between the black-point and the white-point are
adjusted in relation to the mid-point setting.
Mid-tone
Mid-tones are the middle range of tones in an image, between highlights and
shadows. Midtones can be adjusted for color and grayscale images with the
Gamma tool.
Mode
The type of scan used to scan an image, differentiated by the number of bits
per pixel. ScanGear CS-S has the following scan modes:
• Color (24-bit)/Color (36bit): Color images contain 8 bits/12 bits per
pixel each for red, green, and blue channels. Each pixel has 24 bits/36
bits.
• Grayscale (8-bit)/Grayscale (12-bit): Grayscale images contain 8 bits /12
bits per pixel in one channel.
• Text Enhanced: Text Enhanced images are grayscale images (8 bits per
pixel) converted to 1 bit per pixel using Canon ImageTrust. The default
preferences setting is to automatically use Text Enhanced when the
client TWAIN application (in UI- or Windowless mode) requests that a
black and white scan be made.
• Black and White: Black and white images are defined to be 1 bit per
pixel.
OCR (Optical Character Recognition)
OCR (Optical Character Recognition) software converts text images into actual
text characters readable by a word-processing program or similar application.
The Text Enhanced scan setting sharpens black and white contrast to assist in
the accurate recognition of characters in OCR software.
Optical resolution
A scanner’s resolution capability. See also dpi, Resolution.
103
CONTENTS
Glossary
104
INDEX
Output Dimensions
The final dimensions of the scanned image, based on paper size, cropping,
and scaling.
Output file formats
The format in which a file is saved to disk. In ScanGear Toolbox CS, available
mail file formats are: Windows Bitmap (*.bmp), Tagged Image File (*.tif),
JPEG (*.jpg).
Output size
The size of the acquired image, calculated by multiplying the width and
height by the scale percentage.
Overexposed
An image that was exposed to too much light while it was being
photographed.
Paper Size
An option on the FB1200S tab that determines the initial scannable area. For
flatbed scanners, standard paper sizes from B5, A4, Letter and Full Platen are
available. For the Document Feeder, standard paper sizes from B5, A4, Letter
and U.S. Legal are available.
Pixel
An acronym for “picture element,” a pixel is the smallest element used to
create a screen image.
Platen
The scanner’s document glass, where originals are placed for scanning.
Preset Curves
A set of curves designed to fix common photographic image problems such as
underexposure, overexposure, or low contrast.
Preview area
The area located to the left of the main ScanGear CS-S window where the
image is displayed before the scan occurs. When you click the Preview button,
the image on the scanner is scanned into the preview area, but not acquired
by the application.
Proportion
The ratio of width to height. When you click the Keep Proportions button, the
image size is maintained in the same proportion whenever you change either
the width or the height.
104
CONTENTS
Glossary
105
INDEX
Resolution
The degree of detail, translated into the number of pixels or dpi, which a
device such as a scanner, video monitor, printer, or other image-displaying
device, can display or reproduce. See also dpi, Pixel, Scan Resolution.
RGB
RGB is an acronym for red, green, and blue, the onscreen color complements
to print colors cyan, magenta, and yellow.
Rotate Left/Right
The Rotate Left/Right tool rotates the preview display 90 degrees
counterclockwise/clockwise. If the preview area is in portrait orientation, it
becomes landscape and vice versa.
Sampling
In scanning, sampling is the process of measuring and recording the tonal or
color value in an image and converting it to digital information.
Scale
The Scale setting lets you specify an output size for the selected image as a
percent of the original width and height.
Scan Mode
The desired bit depth for the scanned image. Choices are: Color, Black and
White, Grayscale, and Text Enhanced.
Scanner
An input device that scans a physical image with a light source, and converts
the image tones to digital information for computer applications. The digital
information can be saved as a file, or converted to a text file using OCR
software.
Scan Resolution
A list of preset levels of detail, expressed in dots per inch (dpi), for the
scanned image, available from the Scan Resolution list on the Main tab.
See also dpi, Pixel, Resolution.
ScanGear Toolbox CS
ScanGear Toolbox CS is an application that streamlines the process of
transferring acquired images to the function or application you want. You can
scan an image and immediately send it to a fax machine, printer, or mail
application. You can also customize ScanGear Toolbox to send the image to
an image application, OCR application, or another application of your choice.
105
CONTENTS
Glossary
106
INDEX
SCSI
An acronym for small computer system interface. This is an interface used to
connect scanners to computers.
Selection tool
See Crop.
Shortcut menus
ScanGear Toolbox CS lets you use shortcut menus to acquire images and
select different settings. When you right-click any button on the ScanGear
Toolbox CS bar, the shortcut menu displays the currently-selected settings
from that button.
Sliders
On some of the controls in ScanGear CS-S, for example, the Contrast/
Brightness tool, you have the choice of either typing values directly into text
boxes or using sliders. You click the slider and move it to the left or to the
right to change the values.
Start button
The Start button, when clicked, causes the image to be sent from ScanGear
CS-S to the host application.
Status area
The information area at the lower border of the ScanGear CS-S main user
interface, which includes information about the current image and settings.
System Default
In ScanGear Toolbox CS, if you select System Default in the Link To list, the
Toolbox button is linked to the application that was set as the system default
when you installed ScanGear Toolbox CS. If no system default application was
selected during installation, the system default option is unavailable.
Temporary files
In ScanGear Toolbox CS, you can specify how you want to dispose of
temporary files created during the scanning process.
Test Scanner button
The Test Scanner button on an installed FB1200S tab performs diagnostic tests
and reports if there are any problems with the scanner.
106
CONTENTS
Glossary
107
INDEX
Text Enhanced
A feature used by ScanGear CS-S to increase the accuracy of text scans. When
Text Enhanced is the scan mode, images are scanned as Grayscale (8 bits per
pixel) and converted to Black and White (1 bit per pixel) using Canon
ImageTrust processing software.
Threshold
In a bilevel image, the point at which a gray pixel is determined to become
either black or white. This image option is available in the FB1200S tab in
ScanGear CS-S.
Tone
The shading and combination of colors in the image.
Tone Curve
The curve displayed with the Tone tab tools to indicate the Black-, Mid-, and
White-point tones in a color or grayscale preview image. You cannot edit the
curve except with the Special Tone Curves tool.
Tone tab
The Tone tab contains tools that let you adjust and correct the image tone.
The Tone tab tools are:
• Automatic
• Contrast/Brightness
• Gamma
• Histogram
• Special Tone Curves
Toolbar
A set of ScanGear CS-S tool buttons, located above the preview area, for
image selection, orientation, and other basic adjustments.
TWAIN
TWAIN refers to an industry standard for transferring information from
devices (such as a scanner or digital camera) to your computer. One
interpretation of the acronym is “Technology Without An Interested Name.”
Underexposed
An image that was exposed to too little light when it was photographed.
107
CONTENTS
Glossary
108
INDEX
Units of measurement
In the Units text boxes, the expression of width and height, in inches,
centimeters, or pixels, of the scanned image. The preset unit of measurement
is based on the Measurement System setting of the Regional Settings in your
Windows Control Panel.
White-point Eyedropper
The Histogram tool that lets you select the lightest portion of the image in the
preview area. When you click on the image with the White-point eyedropper,
all tones lighter than the selected sample tone are adjusted to white.
Width
The Width text box contains the width of the current selection or, if there is
no selection, the maximum horizontal output size, based on the currently
selected paper size.
Width-Height ratio
Proportion of the image. To keep the width-height ratio intact, click the Keep
Proportions button before changing the width or height values.
X and Y Axes
The X and Y axes on the Tone tab curve chart represent, respectively, the input
image color and output image color.
Zooming
Enlarging an image or a selected part of the image in the preview window or
in a graphics application.
108
CONTENTS
GLOSSARY
Index
109
Index
A
Acquired Images 17
Copying 76
Faxing 82
Mailing 80
Printing 76
Processing With The Edit Or Custom
Buttons 85
ADF
Connecting 55
Scanning With 55-58, 76, 80, 82, 85
Tips 57
Adjustments
Contrast And Brightness 38
Curve Box 36, 43, 46
Custom Curves 42, 44
Gamma Curve 39
Histogram 40
Predefined Tone Curves 43
Tone Tab Settings 35
Auto Tone Tool 26, 37
Automatic Document Feeder
Connecting 55
Scanning With 55-58, 76, 80, 82, 85
Tips 57
B
Black And White 29, 98
File Size 61-62
Line Art 93
Scan Mode 28
Text Enhanced 29, 47-48
Black And White Mode 29
Adjusting Image Tones 35
Output Dimensions 32
Setting 29
Threshold Setting 52
Black-Point 40-41, 65, 98
Histogram Tool 40-41, 102
Manipulating 68
Black-Point Eyedropper 41, 99
Brightness Settings 99
Adjustment 38, 64
Threshold Settings 52
C
Canon ColorGear Color Matching 48,
99
Preferences 47
Monitor Profiles 49
Troubleshooting 94
Canon Service Centers 9-11
Changing The Monitor Profile 47, 49
Clearing Temporary Files 86-87, 106
Clear Preview Button 18, 99
CMY 99
CMYK 69, 99
Color 69
Auto Tone 37
Curve Chart 100
Gamma Curve 39, 101
Histogram 40, 102
Matching 48, 99
Midtones 39
Color Channels 69, 99
Selecting 36
Color Image 103
Color Channels 69, 99
Enhancing 35, 69
Negative Image 25
True Color 90, 91
Color Printers 90
Settings 90
Color Wheel 69-70, 100
Color Mode
Adjusting In 36
Color (24-Bit) 28-29, 98, 103
Color (36-Bit) 28-29, 98, 103
Photoshop Support 30
Setting 29
109
CONTENTS
GLOSSARY
Status 18
Unsupported Applications 30
Complementary Colors 69-70, 100
Contrast 21, 100, 103
Adjusting 38, 64-65, 98, 99
Contrast/Brightness Button 35
Copy
Acquired Images 76-77
Button 72-73, 75
Configuring Copy Settings 75
Image Quality 75
Image Type 75
Settings 90
Crop Tool 21, 24, 63, 100
Cropping
Cropping An Image 25, 32-34, 63-64
Precision Cropping 64
Selecting A Scan Area 100
Curve Chart 100
Curve File 100
Curves
Adjusting 64-68
Chart 100
Creating Custom Tone Curves 44
Curve Box 43, 46
Custom Tone Curves 43, 100
Definition 36, 64
Editing 46
End Points 101
Gamma Curve 39, 101
Opening a Saved Custom Tone Curve
46
Meaning 64
Preset Or Custom Curves 42-43, 104
Special Tone Curve 35
To Apply A Previously Saved Curve 46
Tone Curve 107
Tone Curve Window 36
Custom
Application 84-85
Button 84
Resolution 100
Tone Curves 43, 100
Custom Tone
Index
110
Adjustments 64
Editing Curves 46
Opening A Saved Curve 46
Customer Support 9-11
Canon Service Centers 9-11
Frequently Asked Questions 92
Glossary 98-108
Troubleshooting 94-97
D
Devices
Configuring for ScanGear CS-S 51
E
Easy Acquire
Check Box 72
Copying Images With 76
Custom Applications 85
Edit Button 85
Enabling/Disabling 74
Faxing With 82
Mailing With 80
Edit/Custom Buttons
Configuring Settings 83
Image Quality 84
Image Type 84
Linking To An Application 84
Eyedropper 101
Black-point 41, 98-99, 101
Histogram 40
Mid-point 41, 103
Tool 68-69
White-point 41, 108
F
Fax
Acquired Images 82
Button 81-82
Configuring Settings 81
Driver 81
Image Quality 81
Image Type 81
110
CONTENTS
GLOSSARY
Index
Linking A Fax Application 81
Settings 91
Tab 81
Features 17
File Size Estimates 61-62
Full Color Mode 93
G
Gamma Curve 101
Adjustments 39, 65
Correction 102
Custom Curve 70
Gamma Tool 35
Grayscale
Definition 98, 102
Image 102
Grayscale Mode
8-bit 28-29, 98, 103
12-bit 28-29, 98, 103
H
Help 9
Canon Service Centers 9-11
Frequently Asked Questions 92
Glossary 98-108
Online Help 9
Troubleshooting 94-97
High Quality Color (36-Bit) 98
Histogram
Adjusting 41, 65-68
Curve Charts 40, 100
Eyedropper Tools 99, 101, 103, 108
Sampling Tones 68
Techniques 65-68
Tool 35, 40, 102, 107
I
ICM (Image Color Matching) 48
Image
Acquiring 56-57, 59, 75, 80, 82, 85
Copying 76
111
Creating A Negative Image 24-26
Cropping 21, 24-25, 32-34, 63-64,
100
Estimating File Sizes 61-62
Fixing Automatically 26, 35-37, 42
Low Contrast 42, 100, 103
Manipulating 59-70
Moving 25
Overexposed 43, 59, 104
Previewing 24-27
Proportions 25, 27, 32-34, 102, 108
Reversing An Image 26
Rotate 24, 26, 60, 105
Underexposed 43, 59, 107
Zooming 21, 24-25, 41, 63-64, 68,
108
Image Source 51, 56-57, 86
Installing
ScanGear CS-S 12-14
ScanGear Toolbox CS 71
K
Keep Proportions Button 25, 27, 32-34,
102, 104, 108
M
Mail
Button 78
Image Quality 79
Image Type 79
Mailing Acquired Images 80
Output File Formats 79
Settings 78
MAPI Settings 78, 81
Monitor Profile 47-49
Moving An Image 25
Multi-Page Documents
Scanning 55-58
N
Negative Image 24-26
111
CONTENTS
GLOSSARY
Index
O
OCR
Applications 19, 23, 47-48, 56, 59, 83
Resolution 60
Text Enhanced Mode 16, 47
Optical Character Recognition
See OCR
Output Dimensions 104
Selecting 32, 61
112
Negatives 25
Reversing 26
Rotating 26
Rulers 26
Specifying How An Image Is Previewed
27
Working With Preview Images 24
Zooming 25
Previewing 19
Q
P
Paper Jams
Clearing 57-58
Troubleshooting 97
Paper Size 104
Maximum 101
Selecting 33, 51-52, 57
Percentage
Setting The Scale 27, 34-35, 104
Platen
Full Platen 101
Paper Size 104
Platen Option 51
Preview Settings 27
Positioning Documents 19
Preferences
Default Settings 20-21, 33, 36, 103
Tab 18, 29, 47
ScanGear Toolbox CS Preferences 8688
Setting General Preferences 47
Pre-Scan Checklist 92
Preset Resolution 30, 100, 105
Preview Area 33, 50, 52, 63, 94, 99, 104
Clearing 18, 21, 27, 52, 99
Preview Button 20-21, 28
Preview Images
Automatic Tone Correction 26
Changing Shape And Size 24
Clearing 18, 21, 27, 52, 99
Cropping 25
Moving 25
Quick Start 19
Preparing The Scanner 19
R
Removing
ScanGear CS-S 14
ScanGear Toolbox CS 71
Resolution
Changing Custom Resolutions 32
Deleting Custom Resolutions 31
File Sizes 61
Matching To Purpose 60
Monitor 7
Optical and Enhanced 61
Preset 30
Scan Resolution 30
Selecting 28, 30
Setting Custom Resolutions 31
Reversing An Image 26
RGB 29, 48, 69, 98, 105
Rotate 26
Ruler
Displaying Or Hiding 26
S
Scale
Keep Proportions 33
Setting 21, 27, 30, 32, 34-35
Scan Button 18, 23
Scan Mode 105
112
CONTENTS
GLOSSARY
Black And White 29, 35, 52
Color 28-29, 98, 103
Grayscale 36,52, 60-62, 98, 102-103
Setting 28-29
Text Enhanced 28, 35, 47, 60, 103
Windowless 8, 20, 23, 47, 103
Scan Resolution 105
Selecting 30
Matching to Purpose 60
Previewing 27
ScanGear CS-S
Buttons 18, 24
Features 17
Help 26
Installing 12-14
Removing 14
Preview Area 17
Settings Tabs 18
Status And Message Areas 18
Toolbar 18
User’s Guide 9
Window 17
ScanGear Toolbox CS
Adding Buttons 72-73
Changing Preferences 86-88
Copy Button 75-77
Edit/Custom Buttons 83-85
Fax Button 81-82
Installing 71
Mail Button 78-80
Removing Buttons 73
Selecting A Source 86
Setting Up 73-88
Settings Summary 90
Shortcut Menus 6-20
Specifying Minimized Appearance 88
Starting 72
Scanner
Preparing 19
Recognizing In Windows 19, 95
Status 17-18, 61-62, 87-88, 106
Testing 51, 53
Scanning
About Scanning Techniques 59
Index
113
Multi-Page Documents 55-58
Preparing Material To Scan 59
Pre-Scan Checklist 92
Quick Start 19
Using Windowless Mode 23
Settings
Custom 42, 43, 83-84
Edit 43-44, 46, 83-84
Fax 81-82
Mail 78-80
Settings In ScanGear CS-S
Auto Tone 26, 35, 37
Cropping 25
Dimensions 28
Negative Image 25
Resolution 28
Rotate 26
Rulers 26
Scale 21, 27, 30, 32, 34-35
Scan Mode 28
Zoom 25
Settings In ScanGear Toolbox CS
Copy 75
Edit/Custom 83-85
Fax 81-82
Summary 90-91
Shortcut Menus 88, 106
Status And Message Area 18
Status Area 17-18, 61, 106
System Requirements 7
T
Temporary Files
Deleting In ScanGear Toolbox CS 8687, 106
Test Scanner Button 19, 51, 53-54, 106
Text Enhanced 28, 35, 47, 60, 103
Tone Curve Window 36
Custom Tone Curves 43-44, 46
Predefined Tone Curves 42-43, 104
Tone Tab Settings 35
Toolbar 17-18, 24-26, 35, 107
Troubleshooting
113
CONTENTS
GLOSSARY
Index
114
ADF Is Jammed 97
Graphics Application Cannot Find
Scanner 95
Grayed-Out Functions 95
Image Is Too Light/Dark 96
Misaligned/Missing Images 96
Preview Image Small On Monitor 97
Previewed Image Problems 94
Printing/Scanning Too Slow 96
ScanGear CS-S Will Not Launch 95
Scanner Diagnostics Test 94
TWAIN Interface 14, 16, 107
U
Units Of Measurement 26, 32-33, 108
Uninstalling
ScanGear CS-S 14
ScanGear Toolbox CS 71
User’s Guide
About 9
Assumptions 9
W
Width And Height 21, 25, 27, 32-34
Windowless Mode 8, 20, 23, 47, 103
Z
Zoom Tool 21, 24-25, 41, 63-64, 68
114
I-OE-022AA
0399 CDS
©Canon Inc. 1999
Adobe Acrobat PDF created in Japan