1
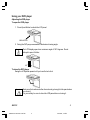
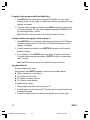
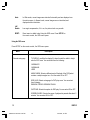
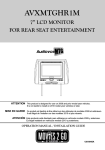
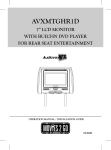
MMD92 9.2" OVERHEAD LCD VIDEO MONITOR WITH DVD PLAYER Owner’s Manual 1287962 user manual 6-12-07.P65 1 6/15/2007, 1:27 PM Important Notice An LCD panel and/or video monitor may be installed in a motor vehicle and visible to the driver if the LCD panel or video monitor is used for vehicle information, system control, rear or side observation or navigation. If the LCD panel or video monitor is used for television reception, video or DVD play, the LCD panel or video monitor must be installed so that these features will only function when the vehicle is in “park” or when the vehicle’s parking brake is applied. An LCD panel or video monitor used for television reception, video or DVD play that operates when the vehicle is in gear or when the parking brake is not applied must be installed to the rear of the driver’s seat where it will not be visible, directly or indirectly, to the operator of the motor vehicle. Warnings Do not use any solvents or cleaning materials when cleaning the video monitor. Do not use any abrasive cleaners, they may scratch the screen. Use only a lightly dampened lint free cloth to wipe the screen if it is dirty. Lock the LCD screen in the fully closed position when not in use. Before putting on headphones always adjust the volume setting to the lowest position. Remember to leave the dome light switch in the off or auto positions when the vehicle is unattended, as the dome lights, if left on, can drain the vehicle’s battery. Do not put pressure on the screen. Caution children to avoid touching or scratching the screen, as it may become dirty or damaged. 2 1287962 user manual 6-12-07.P65 MMD92 2 6/15/2007, 1:27 PM Congratulations on your purchase of the Movies 2 Go MMD92 drop-down Video Monitor with DVD Player. The MMD92 has been designed to give you and your family many years of video entertainment in the mobile environment. Please read the directions that follow to familiarize yourself with the product and to ensure that you obtain the best results from your equipment. NOTE: Installation options vary, see the individual installation/owner’s manuals for each component in your system to obtain a full understanding of each component’s operation. FEATURES • • • • • • • • • • • 9.2.” TFT (Thin Film Transistor) Active Matrix LCD (Liquid Crystal Display) Monitor,16:9 Aspect Ratio OSD (On Screen Display) for Control of Picture Quality and Functions Infrared Transmitter for Optional IR Wireless Headphones Three Audio/ Video Source Inputs (including the Built-in DVD player) Audio/Video Outputs Dome Lights with Built-in Three Way Switch Video Display ON/OFF Control (when LCD Panel is Opened and Closed) Last Position Memory for DVD Screen Mode Select (16:9, 4:3) Full Function Remote Control Backlit Controls for Low Light Operation MMD92 1287962 user manual 6-12-07.P65 3 3 6/15/2007, 1:27 PM CONTROLS AND 1 INDICATORS 2 3 4 56 DIAGRAM 7 8 9 10 1112 13 1 14 15 17 16 4 1287962 user manual 6-12-07.P65 MMD92 4 6/15/2007, 1:27 PM MAIN FUNCTION DESCRIPTIONS 1. Dome Lights – Provide additional interior illumination. 2. Power ON/OFF Button ( 3. Menu Button – Source select DVD, AV1 and AV2. 4. A/V Source Button – Source select DVD, AV1 and AV2. 5. (-) Button – Used to move down for Menu navigation. 6. (+) Button – Used to move upwn for Menu navigation. ) – Turn the MMD92 ON and OFF. 7. Dome Light Switch – Move to the ON/OFF position, then press to turn the dome light on or off. 8. Screen Release – Press to lower the LCD screen. 9. Rewind Button ( ) – This button is used to skip the previous chapter on DVD or track on CD. Press and hold it to fast reverse playback at 2x, 4x, 8x, 16x and 32x speeds. ) – This button is used to skip the next chapter on DVD or track on CD. 10. Fast Forward Button ( Press and hold it to fast forward layback at 2x, 4x, 8x, 16x and 32x speeds. 11. Stop Button ( ) – Press once to stop playback and resume playback at the last position. Press the button twice to fully stop playback and resume playback at the beginning of DVD. 12. Play or Pause Button ( II ) – This button is used to begin or pause playback. 13. Eject Button – This button is used to eject the disc. 14. Infrared Transmitter and Sensor – Used to transmit audio to wireless headphones. Also allows the remote control to operate the MMD92 and to control other accessories in the system. 15. DVD disc insertion slot 16. LCD Screen Shut Off Switch – Turns off the LCD screen when the screen is in the closed position. 17. AV 1 Input MMD92 1287962 user manual 6-12-07.P65 5 5 6/15/2007, 1:27 PM Remote Control Operation 6. Remove the battery if the remote is not going to be used for a long time or during storage. The remote control will only operate the MMD92. It is not a universal remote control and will not control equipment from other manufacturers. Initial Use* *When purchased the remote control has a battery installed with a plastic insert to prevent battery discharge. Remove the plastic insert before attempting to use the remote. Battery Replacement 1. Remove the battery holder. Refer to the drawing. 2. Insert the battery into the battery holder and insert the battery holder into the remote. Be sure to observe the correct polarity 3. For best results, aim the remote directly at the remote receiver window within 10 feet, and angles not exceeding 60 degrees. 4. The path between the remote control and remote sensor should be free of obstructions. 5. Under normal use the battery will last for approximately one year. 6 1287962 user manual 6-12-07.P65 MMD92 6 6/15/2007, 1:27 PM Operation with Remote Control 1. POWER - Press this button to turn the MMD92 “ON” or “OFF” . 2. SETUP - Press to access the setup menu to modify the DVD player settings. 3. MUTE - Press to turn sound on or off. 4. Eject ( 5. 0-9 - Press to enter numbers directly such as settings or track numbers. 6. Previous Button ( track on CD. 7. Play or Pause Button ( 8. Audio - DVD: press to change the audio language during DVD playback. CD: press to change the audio channel (Left, Right and Stereo) during CD playback. 9. Arrow and ENTER Buttons - Press to navigate in a menu and change setting values. ) Button - This button is used to eject the disc. ) - This button is used to go to the previous chapter on DVD or 10. Fast Reverse ( FR 32X speeds. ) II ) - This button is used to begin or pause playback. Button - Press to fast reverse playback at 2X, 4X, 8X, 16X and 11. Random - Press to play chapters or tracks in random order. 12. A-B - Press to repeat playback from point A to point B. 13. A/V - Press to select the video input mode among DVD-IN, AV IN 1 and AV IN 2. 14. Return - Press to return to main menu; press again to return to last playback position. 15. ANGLE - Press to select a different filming angle. This feature only works if the DVD is recorded with multiple angles. MMD92 1287962 user manual 6-12-07.P65 7 7 6/15/2007, 1:27 PM Operation with Remote Control (Cont) 16. Zoom - Press to set the zoom for movie viewing. 17. Repeat - Press to repeat the track or the entire disc. 18. Title - Press to view the DVD disc’s title menu. 19. Fast Forward ( 32x speeds. FF ) Button - Press to fast forward playback at 2x, 4x, 8x, 16x and 20. Subtitle - Press to select and turn on subtitles during playback. 21. Menu - Press to view the DVD disc’s main minu; Press and hokd it to display the system menu. 22. NEXT ( ) Button - Press to go to the next chapter on DVD or track on CD. ) - Press to stop playback, press [PLAY] or [ENTER] button to start playing at the last 23. STOP ( position. Press [STOP] button twice to fully stop playback. Press [PLAY] or [ENTER] button to start playing at the beginning of DVD. 24. Display - Press to display the playvack information (such as title, chapter, track and time). 25. GoTo - Press to start playback at a sselected chapter, track or time. 8 1287962 user manual 6-12-07.P65 MMD92 8 6/15/2007, 1:27 PM Using your DVD player Adjusting the DVD player To open the DVD player 1. Press Open Button to unlock the LCD panel. OPEN BUTTON 2. Swing the DVD player downward to the desired viewing angle. Caution The LCD display opens to a maximum angle of 150° degrees. Do not attempt to open it further. 150° To close the DVD player Swing the LCD panel upward until you hear the lock click. Caution Make sure that cords and other items do not get caught in the panel when you close it. For your safety, be sure to close the LCD panel when not using it. MMD92 1287962 user manual 6-12-07.P65 9 9 6/15/2007, 1:27 PM Basic operation Turning on the player ] button on the remote control or on the front panel. The player turns on and the input Press the [ source and format are displayed on the screen: DVD-IN NTSC Notes: Input source name The system of the input source detected automatically 1. The default is DVD-IN. 2. If the message "NO DISC" is displayed on the screen, insert Disc Media or press A/V button to change input source. Selecting the input source 1. After Power ON, press A/V button to switch from one mode to another. 2. The operating modes changes in the following order: DVD-IN > AV 1> AV2> DVD-IN Note: DVD Disc cannot be inserted if unit is not in DVD mode. Turning off the player Press the[ ] button again; the player will be turned off. 1. If there is a disc in the player, it will continue playback from last position the next time you turn the player on. 2. DVD Disc cannot be ejected if player is switched off or not in DVD mode. 10 1287962 user manual 6-12-07.P65 MMD92 10 6/15/2007, 1:27 PM Playing a disc 1. If the input source isn't already set to DVD-IN, press A/V button to change the input source to DVD-IN 2. Insert a disc to DVD into the disc slot on the right of the player. After several seconds, the screen displays the message "loading". 3. When the DVD menu appears, press Play/Pause button or ENTER button. To stop playback, press STOP button. To play the previous track or chapter, press Previous button. To play the next track or chapter, press Next button. To pause or resume playback, press Play/Pause button. 4. Press Eject button to eject the disc from the player. 5. Press Power button to turn off the player. Note: 1. If the DVD Playback is interrupted by switching the product OFF, when it is switched ON again the DVD commences playback from the start of the disc. 2. If during DVD playback, the STOP button is pressed and then the PLAY button is pressed the DVD will recommence playback from the beginning of the last chapter played, not the last exact location played. Muting the sound 1. Press MUTE button to mute the sound during disc playback. 2. Press MUTE button again to enable sound. Playing DVDs Accessing the DVD root menu Press MENU button during the playback to display the menu. A DVD is divided into sections called titles and chapters. When you play a DVD, a root menu of the disc appears on the screen of your Monitor. The contents of the menu vary from disc to disc. Press MENU during playback to display the menu again. Some DVDs only allow you to select disc playback options using the DVD root menu. Displaying playback information During the playback, press DISPLAY button repeatedly to show the following: MMD92 1287962 user manual 6-12-07.P65 11 11 6/15/2007, 1:27 PM Changing the audio language during Playback (Multi Audio) 1. Press AUDIO button to change audio track during DVD playback. The current audio language number, the total number of available audio channels (languages) and current language are displayed. 2. If there are multiple languages are available, press AUDIO button again to cycle through the available languages. The audio display disappears automatically if AUDIO button is not pressed again within 3 seconds. Note: Some DVDs only allow access to this function through the DVD menu. Turning the subtitles and changing the subtitle Language on : 1. Press SUBTITLE button to change the subtitle language you want during DVD Playback. The current language number, the total number of the subtitle languages and current language are displayed. 2. If multiple languages are available, press SUBTITLE button again to cycle through the available languages. 3. To turn subtitles off, Press SUBTITLE button until "subtitle off" appears on the screen. The subtitle display disappears automatically if SUBTITLE button is not pressed again within 3 seconds. Note: Some DVDs only allow access to this function through the DVD menu. Using Repeat Playback To repeat a chapter, a title, or both: During playback, press REPEAT repeatedly to cycle through the available settings: Chapter---Repeats the current chapter. Title---Repeats the current title. All---Repeats all chapters and titles. Off---Resumes normal playback To repeat a custom segment: 1. During playback, press A-B to set the starting point "A". 2. Press A-B again to set the ending point "B". The player plays the segment between point A and point B repeatedly. 3. To cancel the repeat playback and resume normal playback, press A-B agai again. 12 1287962 user manual 6-12-07.P65 MMD92 12 6/15/2007, 1:27 PM Changing Viewing Angle during Playback (Multi-Angle) To change viewing angle: 1. Press ANGLE button to cycle through available viewing Angles during DVD playback. The current angle number and the total number of angles available appear on the screen. 2. Press ANGLE button again to select a different angle, then press it again to exit and return to the normal viewing angle. The Angle display disappears automatically if ANGLE button is not pressed again within 3 seconds. Note: Viewing angles are available for a DVD if the back of the DVD jacket contains a multiple angles icon. Using zoom To zoom the image: During disc playback, press ZOOM to switch through the available zoom settings.(2x,3x,4x,1/2x,1/3x,1/4x and normal) or FR to switch the zoom While viewing JPG/JPEG images on a disc, press ZOOM, then press FF settings. Playing audio CDs To display playing time and the current track: During CD playback, press DISPLAY button to display, the disc type, current time, current track number and total number of the tracks are displayed on the screen. To repeat a track or the entire CD: During playback, press REPEAT repeatedly to cycle through the available settings: Track---Repeats the current track. All---Repeats the entire CD. Off--- Resume normal playback. To repeat a custom segment: 1. During playback, press A-B to set the starting point "A". 2. Press A-B again to set the ending point "B". The player plays the segment between point A and point B repeatedly. 3. To cancel the repeat playback and resume normal playback, press A-B again. MMD92 1287962 user manual 6-12-07.P65 13 13 6/15/2007, 1:27 PM Playing MP3 CDs MP3 is a format for storing digital audio. An audio track is compressed into the MP3 format with little loss of audio quality, while taking up much less disc space. This player can play CD-R/RW discs that contain music MP3 files. When a MP3 disc is inserted into the player, the menu screen appears automatically. You can use the menu screen to select the folders and tracks you want, or the player plays the tracks in the order they were burned onto the disc. To select the folders and tracks you want: 1. Press DISPLAY on the remote control. The list of files and folders opens. 2. Press the up or down button on the remote control to select a folder from the list, then press ENTER. The screen displays the files in the folder you selected. 3. Press the up or down button on the remote control to select a file, then press ENTER to play the file. 14 1287962 user manual 6-12-07.P65 MMD92 14 6/15/2007, 1:27 PM 4. Press the button to move to the next file or press the button to move to the previous file. 5. Press the < button to go to the previous folder or to page up, or press the > button to page down. To repeat a file or folder of an MP3 disc: During MP3 playback, press the REPEAT button to cycle through the available settings: Repeat single---Repeats the current file. Repeat all---Repeats the contents of current folder. Repeat off---Turns off repeat and resumes normal playback. Note: This icon in front of an item indicates it's a folder. This icon in front of an item indicates it's an MP3 file. System setup Changing the picture quality Accessing the menu To adjust the picture, use the menu button to select the features you would like to adjust. Adjustment selections are as follows. 1. Press and hold MENU on the remote control for more than one second. The Operation Menu opens. 2. Press MENU repeatedly to select one of the following settings, then press the < and > button to change the value: The features are: Contrast: Brightness: Color: Tint: Wide Screen: Adjust the contrast of the picture Adjust the brightness of the picture Adjust the color of the picture Adjust the tint of the picture (it is only available in NTSC system) Selects display Mode: Wide (16:9)/ Normal (4:3) MMD92 1287962 user manual 6-12-07.P65 15 15 6/15/2007, 1:27 PM Note: LAC Enable: RESET: In Wide mode, normal images are stretched horizontally and are displayed over the entire screen. In Normal mode, normal images are not stretched, and displayed without distortion. Low angle compensation, if it is on, the picture looks very smooth Reset menu to default value Using the OSD menu. Press SETUP on the remote control, the OSD menu opens. Using the OSD menu Press SETUP on the remote control; the OSD menu opens. Menu General setup page Description TV DISPLAY: modifies the display if it doesn't match the width to height ratio the DVD uses. You can select from the following: ·NORMAL/PS ·NORMAL/LB ·WIDE ANGLE MARK: Selects a different angle if the back of the DVD jacket contains a multiple angles icon. You can select ON or OFF. OSD LANG: Selects a language for DVD play menu. You can select from following: ENGLISH ·FRENCH ·SPANISH·ITALIAN CAPTIONS: Selects the caption for DVD play. You can select ON or OFF. SCREEN SAVER: Protects the screen if playback is paused after about 5 minutes. You can select ON or OFF. 16 1287962 user manual 6-12-07.P65 MMD92 16 6/15/2007, 1:27 PM Menu Description Speaker setup page DOWNMIX: Applies to Dolby digital sound. You can select from following: ·LT/RT ·STEREO DUAL MONO: Selects the different channels of sound. You can select from following: ·STEREO ·L-MONO ·R-MONO ·MIX-MONO DYNAMIC: Selects the different rating level of dB. You can select from following: ·Off ·2/8 ·4/8 ·6/8 ·FULL Preference page TV TYPE: Selects the TV system .You can select from following: ·AUTO ·PAL (Europe and Asia) ·NTSC (United States) AUDIO: Selects the audio track language. You can select from following: ·ENGLISH·FRENCH·SPANISH·GERMAN·CHINESE·RUSSIAN·THAI SUBTITLE: Selects the language of the subtitles displayed on the screen. You can select from the following: ENGLISH· FRENCH·GERMAN ·CHINESE RUSSIAN·THAI ·OFF DISC MENU: Selects the language of the current disc. You can select from following: ·ENGLISH·FRENCH·SPANISH·GERMAN·CHINESE ·RUSSIAN·THAI PARENTAL: Restricts the viewing of movies to children of appropriate age levels only. You can select 1 to 8. 1=KID SAF (safe for children) 2=G (general audience) 3=PG (parental guidance suggested) 4=PG 13 (some material unsuitable for children under 13) 5=PGR (some material unsuitable for children under 17) 6=R (some material unsuitable for children under 17) 7=NC 17 (not recommended viewing for children under 17) 8=ADULT (default setting. Only for adults due to graphic content. ) After you select the parental setting, press ENTER, then enter the 4-digit password (default is 3308). Press ENTER again to confirm. PASSWORD: Lets you change the 4-digit password using the number keys on the remote control. The default password is 3308, but no longer works after you change the password. DEFAULT: Resets all settings to the factory defaults. MMD92 1287962 user manual 6-12-07.P65 17 17 6/15/2007, 1:27 PM Customizing DVD settings To set the general setup page: 1. Press SETUP button on the remote control. The DVD setup menu opens. 2. Press < or > to select General setup page, then the list opens. 3. Press the ∧ or ∨ to select the desired setting item. The items include TV DISPLAY, ANGLE MARK, OSD LANG, CAPTIONS and SCREEN SAVER. 4. Press ENTER to open the list, then press ∧ or ∨ to choose the setting values. 5. Press ENTER to confirm. 6. Press SETUP to exit the setup menu. To set the speaker setup page: 1. Press SETUP button on the remote control. The DVD setup menu opens. 2. Press < or > to select speaker setup page, then the list opens. 3. Press ∧ or ∨ to select the desired setting item, The items include: DOWNMIX, DUAL MONO and DYNAMIC. 4. Press ENTER to open the list, then press ∧ or ∨ to choose the setting values. 5. Press ENTER to confirm. 6. Press SETUP to exit the setup menu. To set the preference page: 1. This setting is only available in stop mode or when no disc in the player. 2. Press SETUP button on the remote control. The DVD setup menu opens. 3. Press < or > to select preference page, then the list opens. 4. Press ∧ or ∨ to select the desired setting item. The items include TV TYPE, AUDIO, SUBTITLE, DISC MENU, PARENTAL, PASSWORD and DEFAULT. 5. Press ENTER to open the list, then press ∧ or ∨ to choose the setting values. 6. Press ENTER to confirm. 7. Press SETUP to exit the setup menu. Troubleshooting If operation freezes, the screen goes black or the unit should otherwise not function properly, try turning the unit on and off. If the unit does not respond, press the reset switch on the monitor cavity. 18 1287962 user manual 6-12-07.P65 MMD92 18 6/15/2007, 1:27 PM Problem Player does not play disc Cause Solution Disc inserted incorrectly Reinsert the disc with the label side up (facing the ceiling). Disc format is not supported Check the disc format. Disc is dirty or scratched Clean or replace the disc. Wrong region code Must be region 1 disc The player suddenly stopped working or the screen went black Player error Try turning the player off and on. If the player still doesn't respond, press the reset button. Player doesn't turn on The car ignition (or ACC/ (Accessory) is off Insert the key into the ignition and turn it to ACC/ssory. Condensation in the player Wait for about one hour or until condensation evaporates. Disc is dirty or scratched Clean or replace the disc. . Picture Skips Occasionally MMD92 1287962 user manual 6-12-07.P65 19 19 6/15/2007, 1:27 PM Problem The picture on the screen is dark. No sound can be heard from the IR wireless headphones. Cause Solution 1. The equipment is located at a low temperature area. 1.This is the characteristics of LCD display in low temperature; it will restore to normal brightness after playing for few minutes. 2. Brightness is set too low. 2. Adjust the brightness setting. 1. Headphones are not turned on. 1.Turn on the headphones. 2. The battery in the headphone is low. 2.Replace or recharge the batteries. 20 1287962 user manual 6-12-07.P65 MMD92 20 6/15/2007, 1:27 PM Specification Design and specifications are subject to change without notice. Power Source Operating Voltage Display Angle Pixel Viewing angle (up/down/left/right) Dome Light Operation Temperature Storage Temperature Vehicle battery (DC +10V ~ +16V) DC +14V Vertical Adjustable: Up/Down>150° 1280 x 3 (RGB) x 800 35/15/45/45 2W 23ºF to 122ºF (-5ºC to +50ºC) -4ºF to 140ºF (-20ºC to +60ºC) Maintaining Handling discs To keep a disc clean, do not touch the play side (non-label side) of the disc. Do not attach paper or tape to the disc. Keep the disc away from direct sunlight or heat source. Store the disc in a disc case after playback. Cleaning discs Before playback, wipe the disc outwards from the center with clean cloth. LCD Panel Maintenance Wipe off any dust gently with a soft, dry cloth. The surface is easily scratched; do not rub it with hard objects. Do not use any chemical solvent, cleaning agent or corrosive detergent to clean away dirt on the surface of the screen. MMD92 1287962 user manual 6-12-07.P65 21 21 6/15/2007, 1:27 PM 12 MONTH LIMITED WARRANTY Applies to Movies To Go Mobile Video Products AUDIOVOX ELECTRONICS CORP. (the Company) warrants to the original retail purchaser of this product that should this product or any part thereof, under normal use and conditions, be proven defective in material or workmanship within 12 months from the date of original purchase, such defect(s) will be repaired or replaced with reconditioned product (at the Company's option) without charge for parts and repair labor. A game controller, if supplied, is similarly warranted for ninety (90) days. To obtain repair or replacement within the terms of this Warranty, the product is to be delivered with proof of warranty coverage (e.g. dated bill of sale), specification of defect(s), transportation prepaid, to the Company at the address shown below. This Warranty does not extend to the elimination of externally generated static or noise, to correction of antenna problems, to costs incurred for installation, removal or reinstallation of the product, or to damage to digital memory/media devices, gaming devices, discs, speakers, accessories, or vehicle electrical systems. This Warranty does not apply to any product or part thereof which, in the opinion of the Company, has suffered or been damaged through alteration, improper installation, mishandling, misuse, neglect, accident, or by removal or defacement of the factory serial number/ bar code label(s). THE EXTENT OF THE COMPANY'S LIABILITY UNDER THIS WARRANTY IS LIMITED TO THE REPAIR OR REPLACEMENT PROVIDED ABOVE AND, IN NO EVENT, SHALL THE COMPANY'S LIABILITY EXCEED THE PURCHASE PRICE PAID BY PURCHASER FOR THE PRODUCT. This Warranty is in lieu of all other express warranties or liabilities. ANY IMPLIED WARRANTIES, INCLUDING ANY IMPLIED WARRANTY OF MERCHANTABILITY, SHALL BE LIMITED TO THE DURATION OF THIS WRITTEN WARRANTY. ANY ACTION FOR BREACH OF ANY WARRANTY HEREUNDER INCLUDING ANY IMPLIED WARRANTY OF MERCHANTABILITY MUST BE BROUGHT WITHIN A PERIOD OF 24 MONTHS FROM DATE OF ORIGINAL PURCHASE. IN NO CASE SHALL THE COMPANY BE LIABLE FOR ANY CONSEQUENTIAL OR INCIDENTAL DAMAGES FOR BREACH OF THIS OR ANY OTHER WARRANTY. No person or representative is authorized to assume for the Company any liability other than expressed herein in connection with the sale of this product. Some states do not allow limitations on how long an implied warranty lasts or the exclusion or limitation of incidental or consequential damage so the above limitations or exclusions may not apply to you. This Warranty gives you specific legal rights and you may also have other rights which vary from state to state. Audiovox Electronics Corporation, 150 Marcus Blvd., Hauppauge, New York 11788 z 1-800-645-4994 128-6429F 22 1287962 user manual 6-12-07.P65 MMD92 22 6/15/2007, 1:27 PM THIS PAGE LEFT BLANK INTENTIONALLY MMD92 1287962 user manual 6-12-07.P65 23 23 6/15/2007, 1:27 PM © Copyright 2007 AEC 150 Marcus Blvd. Hauppauge, NY 11788 128-7962 1287962 user manual 6-12-07.P65 24 6/15/2007, 1:27 PM