1
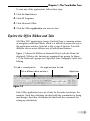
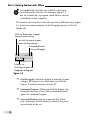
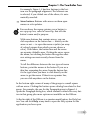
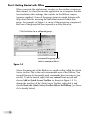
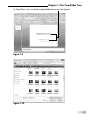
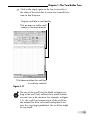
➟
The Two-Dollar
Tour
Chapter
AL
S
tep right up for a tour of Microsoft Office,
the most popular suite of applications in
the world!
RI
Get ready to . . .
Write letters, reports, and newsletters.
➟
Track bank account balances and
investments.
TE
D
➟
➟ Start an Office Application .... 8
➟ Explore the Office Ribbon
TE
MA
Here are some of the things you can do with
Office:
1
Create presentations to support speeches
and meetings.
➟
Send and receive e-mail.
RI
GH
➟
CO
PY
The Office suite consists of several very powerful applications (programs), each with its own
features and interface, but the applications also
have a lot in common with one another.
Learning about one application gives you a
head start in learning the others.
In this chapter (and Chapter 2), I take you on
a quick tour of some of the features that multiple Office applications have in common,
including the tabbed Ribbon area. In this chapter, I show you how to insert text and graphics
in the various applications, and how to move
around and zoom in and out.
and Tabs ............................. 9
➟ Understand the Office Button
and Office Menu ................ 13
➟ Create a Document ............. 15
➟ Type Text ........................... 15
➟ Insert a Picture .................... 16
➟ Move Around in a
Document........................... 18
➟ Select Content .................... 20
➟ Zoom In and Out ................ 21
➟ Change the View ................ 22
Part I: Getting Started with Office
This book shows Microsoft Office in the Windows
Vista operating system, not Windows XP. Office
works the same way in both versions of Windows
except for minor differences in the dialog boxes
where files are saved and opened. Those differences
are covered in Chapter 3.
Start an Office Application
All the Office applications are available from the Start menu in
Windows, as shown in Figure 1-1.
Office applications are in
the Microsoft Office folder
➟
8
Figure 1-1
Chapter 1: The Two-Dollar Tour
To start any of the applications, follow these steps:
1. Click the Start button.
2. Click All Programs.
3. Click Microsoft Office.
4. Click the Office application you want to start.
Explore the Office Ribbon and Tabs
All Office 2007 applications (except Outlook) have a common system
of navigation called the Ribbon, which is a tabbed bar across the top of
the application window. Each tab is like a page of buttons. You click
different tabs to access different sets of buttons and features.
Figure 1-2 shows the Ribbon in Microsoft Word, with the Home tab
displayed. Within a tab, buttons are organized into groups. In Figure
1-2, the Home tab’s groups are Clipboard, Font, Paragraph, Styles, and
Editing.
This tab is currently active
You might not have this tab
Click a different tab to activate it
Help button
Figure 1-2
Each Office application has a set of tabs for the tasks it performs. For
example, Word has a Mailings tab that holds the commands for doing
mail merges. Excel has a Formulas tab that holds the commands for
setting up calculations.
➟
9
Part I: Getting Started with Office
You might find tabs that were added by third-party
(non-Microsoft) software. For example, Figure 1-2
has an Acrobat tab. A program called Adobe Acrobat
is installed on this computer.
The buttons and controls on the tabs operate in different ways. Figure
1-3 points out some examples on the Paragraph group on Word’s
Home tab.
Click the button face to apply
the most recent setting...
...or click the arrow to open
a menu of other settings
A command button
An on/off toggle
A button set
Click here to open the
Paragraph dialog box
Figure 1-3
➟
10
➟
On/off toggles: When the button is selected (it turns
orange), the feature is on. Each time you click the
button, it switches between on and off.
➟
Command buttons: When you click the button, the
command executes. If you click a command button
again, the command repeats.
➟
Connected button sets: In connected sets of buttons, selecting a button deselects (cancels) the previous selection in the set.
Chapter 1: The Two-Dollar Tour
For example, Figure 1-3 has four buttons in the bottom row for paragraph alignment. The leftmost one
is selected; if you clicked one of the others, it’s automatically canceled.
➟
Menu buttons: Buttons with arrows on them open
menus or color palettes.
You can hover the mouse pointer over a button to
see a pop-up box, called a ScreenTip, that tells the
button’s name and/or purpose.
With some buttons that contain arrows, you can
click anywhere on the button face — directly on the
arrow or not — to open the menu or palette (an array
of colored squares from which you can choose a
color). With others, the button face and the arrow
are separate clickable areas. Clicking the arrow opens
the menu, but clicking the button face applies whatever setting was most recently chosen from the
menu.
To tell the difference between the two types of menu
buttons, point the mouse at the button. If you see a
thin line separating the arrow from the button face,
it’s the type where you have to click directly on the
arrow to get the menu. If there’s no separator line,
you can click anywhere on the button.
In the bottom-right corner of many of the groups is a small square
with an arrow. Clicking this button opens a dialog box related to that
group. For example, the one for the Paragraph group in Figure 1-3
opens the Paragraph dialog box, which contains controls for every button in that group plus more options not available on the Ribbon.
At the far right of the Ribbon is a question mark button, the Help button. You can click Help at any time to open the Help system for the
application you have open.
➟
11
Part I: Getting Started with Office
When you resize the application’s window so the window is narrower
than normal, or when you run the application on a computer that has
low-resolution video settings, the controls on the Ribbon compress
(squeeze together). Some of the groups turn into single buttons with
drop-down lists for accessing the individual controls within that
group. For example, in Figure 1-4, most of the groups are compressed,
and one of the groups has been opened as a drop-down list.
Click the button for a collapsed group...
...to expand the group and
select a command from it
Figure 1-4
Above the main part of the Ribbon is a small toolbar called the Quick
Access toolbar. This is the only customizable area of the Ribbon. You
can add buttons for frequently used commands here (as many as you
can fit). To add a button, right-click any control from any tab and
choose Add to Quick Access Toolbar, as shown in Figure 1-5. To
change the position of the Quick Access Toolbar, right-click it and
choose Show the Quick Access Toolbar Below the Ribbon (or Above,
if it’s already below).
➟
12
Chapter 1: The Two-Dollar Tour
Quick Access Toolbar
Right-click any control on any
tab to add it to the toolbar
Figure 1-5
Understand the Office Button and Office Menu
The Office menu provides access to commands that have to do with
the data file you are working with—things like saving, opening, printing, mailing, and checking its properties. Open the Office menu by
clicking the big round button (the Office button) at the upper left.
The Office menu is similar to the File menu in older
Office applications.
The Office menu is organized in two columns, as shown in Figure 1-6:
➟
Left column: Commands you can select.
➟
Right column: Shortcuts to recently used files. Click
any of these shortcuts to reopen that data file.
➟
13
Part I: Getting Started with Office
Office button
Recently used documents
Commands with arrows open submenus
Figure 1-6
Some commands on the Office menu have arrows to their right. These
open submenus with more options on them. For example, when you
point to the Send command, a submenu of commands related to
sending documents appears.
Some of the commands that have arrows next to them, such as Print
and Save As, are dual function:
➟
14
➟
Point to its arrow to open its submenu of more choices.
➟
Click directly on the command to choose the most
common option for it.
At the bottom right of the menu is an Exit button, which you click to
quit the application. Next to that is an Options button, which opens a
dialog box from which you can control the settings for the application.
Each of these is named for the application; in Figure 1-6, they’re Exit
Word and Word Options.
Chapter 1: The Two-Dollar Tour
Create a Document
In Word, Excel, and PowerPoint, a new document (or workbook, or
presentation) opens automatically when you start the program. You
can just start typing or inserting content into it.
You can also create additional new documents. An easy shortcut to do so
is to press Ctrl+N. You can also choose Office➪New. That latter method
has the advantage of opening up a dialog box where you can choose a
template, if you don’t want a totally blank document to start with.
Type Text
Putting text on the page (or onscreen) is a little different in each of the
three major Office applications: Word, Excel, and PowerPoint.
➟
Word: The main work area of the program is a blank
slate on which you can type directly. Just click in the
work area and start typing! Chapter 2 explains more
about typing and editing text. See Figure 1-7.
In Word, there is a single work area
Figure 1-7
➟
Excel: The work area is divided into a grid of cells.
Click any cell to make it active, and type to place text
➟
15
Part I: Getting Started with Office
into it, as in Figure 1-8. Chapter 7 shows how to
work with text in Excel cells.
In Excel, text is entered into individual cells
Figure 1-8
➟
PowerPoint: The work area is divided into three
panes. The largest one, in the center, is where you
insert content on a slide.
• If a slide has a text placeholder on it, you can click
in the placeholder and type, as in Figure 1-9.
• If there isn’t a placeholder on the slide, or if the
placeholder doesn’t meet your needs, you can
place a text box on the slide manually. (That’s covered in Chapter 11.)
Insert a Picture
All Office applications accept various types of pictures. Here’s how to
insert a photo (or other graphic file) into Word, Excel, or PowerPoint:
1. Click the Insert tab.
2. Click the Picture button. The Insert Picture dialog box
➟
16
opens. See Figure 1-10. The default location that opens is
the Pictures folder for the user currently logged into
Windows.
Chapter 1: The Two-Dollar Tour
In PowerPoint, text is entered in placeholder boxes on slide layouts
Figure 1-9
Figure 1-10
➟
17
Part I: Getting Started with Office
3. Select the picture you want to insert. (You might need to
change to a different location. That’s covered in Chapter 3.)
4. Click the Insert button.
The preceding steps apply to picture files, such as images from a digital
camera or that you downloaded from the Internet. There are lots of
other graphic types, such as clip art, WordArt (stylized text), and
drawn lines and shapes. Each of these has its own procedure for insertion. Later chapters discuss these in more detail.
You can drag and drop pictures directly into any document in an Office application.
Move Around in a Document
As you add content in one of the applications, there might be so much
content that you can’t see it all onscreen at once. You might need to
scroll through the document to view different parts of it.
The simplest way to move around is by using the scroll bars with your
mouse:
➟
In Excel, a vertical (up and down) and a horizontal
(left to right) scroll bar are always available.
➟
In Word and PowerPoint, the vertical scroll bar is
always available. The horizontal scroll bar disappears
if there is no undisplayed text from side-to-side.
Figure 1-11 shows several ways to use a scroll bar:
➟
18
➟
Click the arrow at the end of a scroll bar to scroll the
display slowly in the direction of the arrow (a small
amount each time you click).
➟
Drag the box in the scroll bar to scroll quickly.
Chapter 1: The Two-Dollar Tour
➟
Click in the empty space on the bar to one side or
the other of the scroll box to move one screenful at a
time in that direction.
Drag the scroll box to scroll quickly
Click an arrow to scroll a small
amount in the arrow direction
Click above or below the scroll box
to scroll one screenful
Figure 1-11
The size of the scroll box (the blank rectangle you
drag in the scroll bar) indicates how much content
you can’t see at the moment. For example, in Figure
1-11, the scroll bar occupies most of the scroll bar;
this means that there isn’t much undisplayed content. In a very large spreadsheet, the scroll bar might
be very small.
➟
19
Part I: Getting Started with Office
You can also move around by using keyboard shortcuts. As you gain experience with the applications,
you might find using keyboard shortcuts more convenient than using than the scroll bar. Chapter 4 lists
shortcuts for Word, Chapter 7 lists shortcuts for
Excel, and Chapter 14 lists shortcuts for PowerPoint.
Select Content
Selecting content is an essential skill for any Office application. Many
commands in Office applications apply to whatever text or graphics
you select. For example, to make some text bold, select it first, and
then click the Bold button. Figure 1-12 shows some selected text.
Selected text
Figure 1-12
To select text in Word or PowerPoint, you can either
➟
Drag the mouse pointer across it (holding down the
left mouse button).
➟
Click where you want to start and then hold down Shift
as you press the arrow keys to extend the selection.
When text is selected, its background changes color. The color depends
on the color scheme in use; with the default color scheme, it’s light
blue.
➟
20
In Excel, you usually want to select entire cells rather than individual
bits of text; when the cell is selected, any formatting or other commands that you issue applies to everything in that cell. To select a cell,
Chapter 1: The Two-Dollar Tour
click it. You can extend the selection to multiple cells by dragging
across them or by holding down Shift and pressing the arrow keys.
You can also select text by using keyboard shortcuts.
Chapter 4 lists shortcuts for Word, Chapter 7 lists
shortcuts for Excel, and Chapter 14 lists shortcuts for
PowerPoint.
To select a graphic, click it with the mouse. Selection handles appear
around the outside of it. Depending on the graphic type, these handles are
blue circles or black squares. Figure 1-13 shows a selected graphic in Word.
Selection handles
Figure 1-13
When a graphic is selected, you can do any of the following to it:
➟
Move it. Position the mouse pointer on the graphic
(not on the border) and drag.
➟
Copy it. Hold down the Ctrl key while you move it.
➟
Resize it. Position the mouse pointer on one of the
selection handles and drag.
➟
Delete it. Press the Delete key.
Zoom In and Out
While you’re working in an Office application, you might want to
zoom in to see a close-up view of part of your work, or zoom out to
➟
21
Part I: Getting Started with Office
see a bird’s-eye view of the whole project. The lower the zoom percentage, the smaller everything looks — and the more you can see onscreen
at once, without scrolling.
Word, Excel, and PowerPoint all have the same Zoom controls,
located in the bottom right of the window. (There are also zoom controls on the View tab in each application.) Figure 1-14 shows the
Zoom controls on the status bar.
➟
Drag the slider to adjust the zoom (to the left to
zoom out, and to the right to zoom in).
➟
Click the minus or plus button (at opposite ends of
the slider) to slightly zoom out (minus) or in (plus).
➟
Clicking the number of the current zoom percentage
opens a Zoom dialog box, which shows more zooming options.
Zooming doesn’t affect the size of printouts. It is
only an onscreen adjustment.
View buttons (different in each application)
Drag Zoom slider
Click here for Zoom dialog box
Figure 1-14
Change the View
➟
22
Each Office application has a variety of viewing options available.
Each view is suited for a certain type of activity in that application. For
example, in Word, you can choose Draft view, which is speedy to work
with and presents the text in a simple one-column layout. Or, you can
choose a Print Layout view, where you can see any special layout formatting you applied, such as multiple columns.
Chapter 1: The Two-Dollar Tour
Each application has shortcut buttons to the most common views. You
can find these buttons to the left of the Zoom slider, as pointed out in
Figure 1-14. Hover your mouse over a button to find out which view
it selects. These views are available:
➟
Excel
• Normal: Displays a regular row-and-column grid
• Page Layout: Displays the content as it will appear
on a printed page
➟
Word
• Print Layout: Shows the document approximately
as it will be printed, including any layout features,
such as multiple columns
• Full-screen Reading: Displays the document in a format that’s easy to read onscreen
• Web Layout: Displays the document as it will
appear if saved as a Web page and published on a
Web site
• Outline: Displays the document as an outline, with
headings as outline levels
• Draft: Displays the document in simple text form,
in a single column
➟
PowerPoint
• Normal: This default view provides multiple panes
for working with the content.
• Slide Sorter: All of the slides appear as thumbnail
images, which is useful for rearranging the order of
slides.
➟
23
Part I: Getting Started with Office
• Slide Show: The presentation is shown to the audience, one slide at a time.
• Notes Page: Each slide appears as a graphic on a
page where notes are displayed.
Notes Page view is available only from the View
tab, not from the buttons.
Enjoying the tour so far? There’s lots more ahead in Chapter 2, where I
continue walking you through the important features that the Office
apps have in common.
➟
24