1
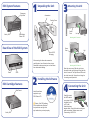
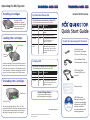
Operating the RDX System
Handling Cartridges
Eject Button/Power LED
Although the RDX
cartridges are ruggedly
built they must be handled
with care to ensure data
integrity and long life.
Loading the Cartridges
Write Protect
The Eject Button is illuminated by a Power LED
The table describes the operation of this LED:
LED Status
Meaning
Description
Off
No Power
Unit does not have power
On Green
Ready
Power is On and the unit is working
properly
Blinking Green
Ejecting
Unit is rejecting the cartridge
On Amber
Fault
Unit has detected a fault condition.
For more information, run a
diagnostic application
Blinking
Amber
Prevent
Host computer is accessing the
media and the user has pressed
the Eject Button. The unit will eject
the cartridge after the Host access
completes
Keyed
Corner
Insert the cartridge in the unit with the keyed corner
facing the upper left corner of the unit and the write
protect tab on the back right. The cartridge only fits
in one orientation. Push the cartridge gently into the
unit until it is locked in place with a clicking sound.
Unloading the Cartridges
Internal SATA version
Quick Start Guide
Check Your Accessory Kit Contents
Mounting Screws:
Secure unit in standard
3.5 inch or 5.25 inch bay
Power Adapter Cable:
Provides power to the unit
Activity LED
The Activity LED displays current cartridge status
The table describes the operation of this LED:
LED Status
Meaning
Description
On Green
Ready
Cartridge is ready
Blinking Green
Activity
Reading, writing, seeking
On Amber
Fault
Unit has detected a cartridge fault
condition. For more information, run
a diagnostic application
SATA Data Cable:
Connects RDX unit to
the host
Warranty Card
Eject Button
Product Registration
Register this product today at
http://tandbergdata.com/register
Activity LED
Wait until the cartridge Activity LED is off. Then
push the Eject Button. When the cartridge has been
ejected, grasp the exposed sides of the cartridge
and pull the cartridge out. Store in its container.
www.tandbergdata.com
©2008. RDX is a registered trademark of ProStor Systems, Inc.
Part no. 433649-03
RDX Utilities and
Backup Software CD:
Contains more detailed
information on the RDX
system, as well as
the utility software and
backup application
RDX System Features
Emergency
Eject Hole
1
Unpacking the Unit
Accessories
3
Mounting the Unit
Packing Foam
Activity LED
Server
Front
Eject Button/
Power LED
Unit
Mounting the 3.5 inch unit
Rear View of the RDX System
Server
Front
Unit
Drive in ESD
Packaging
After removing the drive and accessories,
carefully place it on a flat work surface, top up.
Remember to always protect your unit and server
from electrostatic damage.
Power
SATA
RDX Cartridge Features
Write Protect
Activity LED
2
Installing the Software
Install the software
supplied on your
RDX Product CD.
Caution: If the RDX software
is not installed under Windows®
the eject button and right-click
eject method may not work properly.
Mounting the 5.25 inch unit
Open the server cover. Slide the unit into an
unused drive bay until the bezel is flush with the
front of the server. The Eject/Power LED should
be on the lower right. Secure the unit using the
4 mounting screws provided.
4
Connecting the Unit
Carefully connect
the SATA cable to
your system’s SATA
controller (built-in
or PCI card).
Attach the power
adapter cable. Check all the cable routing and
cable connections. Replace server cover.
Power ratings: 5vDC/1.8A