1
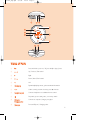
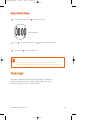
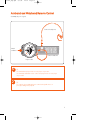
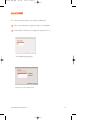
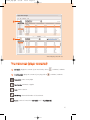
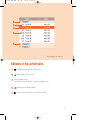
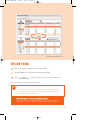
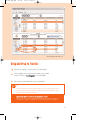
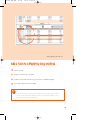
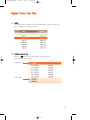
psa220&250 cover
2/6/04
14:31
Page 1
psa220_eng.qxd
2/6/04
14:54
Page 1
Preparations
1
Install
Insert the supplied CD into your computer’s CD-ROM drive.
Follow screen instructions to complete installation.
ATTENTION!
WINDOWS 98 USERS:
To avoid installation problems, DO NOT CONNECT your player to your
computer until AFTER installation completes.
2
✔
3
✔
4
5
Charge
Open the USB cover. Connect the supplied charger to the USB port
and the main power supply. For extended battery power, please
charge for at least 4 hours for first time use.
1 HR =
4 HRS =
TIP
This indicator
shows your battery information during charging.
Connect player to computer
Open the USB cover. Connect your player to your computer using
the supplied USB cable.
TIP
Please refer to your computer’s manual for the exact position of
your USB port. Look for the USB symbol on the processing unit of
your computer.
Organize and transfer music via DMM
Launch DMM on your PC from Windows desktop or Start menu.
Use DMM to organize your music.
Transfer music files from your computer to your player.
Unplug safely
To avoid loss of data, disconnect your player safely.
Exit DMM. Click
on the task tray.
Remove the USB cable.
6
Power on and enjoy!
Press and hold 2 ; for 2 seconds to power on if the player does not power
on automatically. Enjoy your new music experience!
1
psa220_eng.qxd
2/6/04
14:54
Page 2
Name of Parts
1
2;
Press and hold to power on / off; press briefly to play / pause
2
3,5
Up / Previous / Fast rewind
3
2
Right
4
4,6
Down / Next / Fast forward
5
1
Left
6
LCD display
Dynamically displays menu, options and track information
7
−/+
Volume control, press − to decrease; press + to increase
8
Headphones jack
Connects headphones or waistband remote control
9
Stop watch, press to start, pause, or reset stop watch
0
USB port /
Charging socket
Connects to computer / charges your player
!
USB cover
Protects USB port / Charging socket
2
psa220_eng.qxd
2/6/04
14:54
Page 3
Menu Navigation
1
Press and hold 2 ; to power on.
Press and hold 1 for the root menu.
2
See specific chapters for details of each setting.
Playlists
e.g. Playlist001
Up
...
Music
PlaylistXXX
Left
e.g. A
...
Artists
4
Z
3
4
2
Right
Down
e.g. A
...
Albums
1
4
Z
e.g. A
...
Genres
4
Z
e.g. A
...
All Tracks
4
Z
Presets
Preset 1
...
Radio
4
Preset 10
Autostore
Settings
Strobe light
Shuffle & Repeat
DBB
Equalizer
Backlight
Contrast
Language
Factory settings
3
psa220_eng.qxd
2/6/04
14:54
Page 4
Music Mode: Basic Operation
1
Press and hold 2 ; to power on.
From the root menu, press 2 to enter the music mode.
Any radio playback will stop as you enter the music mode.
2
Press 3 to scroll up or 4 to scroll down for your option.
Press 2 for next or 1 for previous levels of library.
Press 2 ; to play.
Library options
3
Artists list
Press 2 ; to pause during playback.
Playscreen
4
Press 3 , 3 for the previous or 4 for the next track.
Press and hold 4 to fast forward or 3 to rewind in a track during playback.
5
Press and hold 2 ; to power off. Your player will save your current
music playback status and resume next time you power on.
✔
TIP
Your music playback status will be erased when you connect your player to your
computer.
*Actual display varies with use
4
psa220_eng.qxd
2/6/04
14:54
Page 5
Music Mode: Library Options and Fast Scrolling
1
Press 3 to scroll up or 4 to scroll down for your library option.
Press 2 on Artist to display the artist library
2
Press 2 for the next or 1 for the previous level of library.
Artists list in alphabetical order
3
Press and hold 4 for 3 seconds to scroll down quickly.
Press and hold 3 for 3 seconds to scroll up quickly.
Release button to stop scrolling.
Browsing tracks quickly.
✔
TIP
To display library options during playback, press and hold 1 for the root menu.
The playscreen (see page 4) will appear again when you have stopped browsing.
*Actual display varies with use
5
psa220_eng.qxd
2/6/04
14:54
Page 6
Radio Mode: Automatic Tuning
1
From the root menu, press 4, 2 to enter the radio mode.
Any music playback will stop as you enter the radio mode.
2
Press 4 to scroll down to AUTO SEARCH. Press 2 ; to automatically select
the 10 strongest radio stations. Press 1 to abort AUTO SEARCH.
Radio mode, no station stored
3
Automatic tuning
Stations tuned
Press 3 to scroll up or 4 to scroll down for your preset.
Press 2 ; to play the selected station.
✔
TIP
No stations are tuned if you are using your player for the first time.
*Actual display varies with use
6
psa220_eng.qxd
2/6/04
14:54
Page 7
Radio Mode: Manual Tuning
1
Press 3 to scroll up or 4 to scroll down for your preset.
Radio preset menu
2
Press 2 ; to play the selected station.
Press 4 or 3 to fine tune (tune step by step).
Press and hold 4 to search for the next available station.
Press and hold 3 for the previous available station.
Press 1 to abort searching.
Manual tuning
3
Press 2 ; to save your setting.
Station stored
✔
TIP
If you want to discard the newly searched station, press 1 to exit the radio menu.
*Actual display varies with use
7
psa220_eng.qxd
2/6/04
14:54
Page 8
Settings Mode
1
From the root menu, press 4, 4, 2 to enter the settings mode.
Settings mode
2
Press 3 to scroll up or 4 to scroll down for your setting.
Press 2 for next or 1 for previous levels of options.
Repeat / Shuffle
3
✔
Strobe light
Equalizer
Press 2 to confirm your selection.
TIP
To display player information, select and highlight Factory settings;
press and hold 2 for 2 seconds. The information screen will tell you
the model number and free space available on your player.
*Actual display varies with use
8
psa220_eng.qxd
2/6/04
14:54
Page 9
Advanced Settings and Actions
You can adjust the following settings from the settings mode.
Press 3 to scroll up or 4 to scroll down for your setting.
Press 2 for next or 1 for previous levels of options.
Press 2 to confirm your selection.
Settings
Strobe light
on
Up
off
Shuffle &
Repeat
Repeat All
Shuffle
Shuffle & Repeat
off
DBB
Left
1
3
4
2
Right
Down
on
off
Equalizer
Rock
Default setting in bold.
Funk
Techno
HipHop
off
Backlight
5 sec
10 sec
30 sec
Off
Contrast
Levels 1 to 10
Level 7
Language
English
Français
Italiano
Deutsch
Español
Portugués
Factory settings
Restore
Cancel
9
psa220_eng.qxd
2/6/04
14:54
Page 10
Stop Watch Mode
1
From any player mode, press
to start the stop watch.
Stop watch mode
2
Press
3
Press and hold
✔
to pause the stop watch. Press
again to resume the stop watch.
to exit stop watch mode.
TIP
Music or radio playback is not affected when you start your stop watch.
Stop watch count will be displayed at the bottom of your music or radio screen.
Strobe Light
Strobe light is an illumination technology setting that allows the backlit LCD
display to gradually radiate bursts of light, enhancing visibility of the runner
in low light conditions. (see p.9 for more information)
*Actual display varies with use
10
psa220_eng.qxd
2/6/04
14:54
Page 11
Armband and Waistband Remote Control
(availability subject to regions)
Connect headphones
Attach
armband
Attach waistband
Player holder
✔
✔
TIP
Use armband and player holder to wear player on your arm.
Use armband, waistband remote control and player holder to wear player
on your waist.
TIP
The controls of your waistband remote control works just like those on
your player during music playback.
11
psa220_eng.qxd
2/6/04
14:54
Page 12
About Digital Media Manager (DMM)
Digital Media Manager contains all the necessary software components you need to work
properly with your player. These include:
- playlist creation
- MP3 / WMA transfer for playback on player
- paths and supporting link for DMM software and player firmware upgrades.
*Actual display varies with use
12
psa220_eng.qxd
2/6/04
14:54
Page 13
Install DMM
1
Insert the supplied CD into your computer’s CD-ROM drive.
2
Follow screen instructions to begin and complete DMM installation.
3
Launch DMM to customize your settings when prompted to do so.
Select DMM’s display language*
Specify one or more music folder*
*Actual display varies with use
13
psa220_eng.qxd
2/6/04
14:54
Page 14
Launch DMM (player connected)
1
✔
Open the USB cover.
Connect your player to your computer using the supplied USB cable.
The USB connection screen will automatically appear.
TIP
Please refer to your computer’s manual for the exact position of your USB port.
Look for the USB symbol on the processing unit of your computer.
2
Launch DMM. (see page 15 for first time launch settings)
3
Organize your music and playlists in DMM.
4
Transfer your music from DMM to your player.
*Actual display varies with use
14
psa220_eng.qxd
2/6/04
14:54
Page 15
1
2
*Actual display varies with use
The mainscreen (player connected)
1
MY MUSIC: displays the contents of your music folders; click on
2
PLAYER MUSIC: displays the contents of your player; click on
to minimize / maximize.
to minimize / maximize.
New playlist: creates a new playlist.
Import music: adds music or playlist.
Trash: deletes selection.
Edit ID3 tag: edits track information of selected track.
Search: searches for music from MY MUSIC and / or PLAYER MUSI C.
15
psa220_eng.qxd
2/6/04
4
14:54
Page 16
5
6
7
8
9
1
2
3
*Actual display varies with use
Selector panel and content panel
1
Selector panel: arranges the display order of the content panel.
2
Content panel: displays the contents of MY MUSIC, highlight to drag from MY MUSIC
and drop to PLAYER MUSIC.
3
Scroll bar
4
Pull down menus
5
Text area: type your search criteria here.
6
: transfers highlighted tracks and / or playlists.
7
Header separator: resizes column width.
8
Player memory indicator: shows available memory on your player.
9
Resizing buttons: minimizes, maximizes DMM view / exit DMM.
16
psa220_eng.qxd
2/6/04
14:54
Page 17
1
2
3
4
5
*Actual display varies with use
Indicators on the content panel
1
: expanded view, displays item contents in full.
2
: track / playlist not on the player.
3
4
5
Click to highlight an item.
Press <Delete> on your keyboard to delete the highlighted item.
: indicates track is playing by DMM.
: collapsed view: item contains more contents to display.
17
psa220_eng.qxd
2/6/04
14:54
Page 18
*Actual display varies with use
Click and Transfer
1
Make sure your player is connected when you launch DMM.
2
Click and highlight an item (e.g. track, artist, album, genre, playlist).
3
Click on
4
Your selection is now transferred to your player.
✔
to copy your selection from your computer to your player.
TIP
Press and hold <Ctrl> on your keyboard and click to select more than one item.
To select consecutive items, click the first item, press and hold <Shift> on your
keyboard, and then click the last item.
IMPORTANT: KEEP A COPY OF YOUR ORIGINAL FILES!
Please keep a copy of the original files transferred to your player. Philips is not
responsible for any loss of content if the player is damaged or not readable.
18
psa220_eng.qxd
2/6/04
14:54
Page 19
*Actual display varies with use
Drag and Drop to Transfer
1
Make sure your player is connected when you launch DMM.
2
Click to highlight an item (e.g. track, artist, album, genre, playlist).
Drag the selection to PLAYER MUSIC or a specific playlist.
3
Your selection is now transferred to your drop destination.
✔
TIP
Press and hold <Ctrl> on your keyboard and click to select more than one item.
To select consecutive items, click the first item, press and hold <Shift> on your
keyboard, and then click the last item.
IMPORTANT: KEEP A COPY OF YOUR ORIGINAL FILES!
Please keep a copy of the original files transferred to your player. Philips is not
responsible for any loss of content if the player is damaged or not readable.
19
psa220_eng.qxd
2/6/04
14:54
Page 20
*Actual display varies with use
Add a Track to a Playlist by Drag and Drop
1
Click on a track.
2
Drag the selected track to a playlist.
3
Hold the mouse button and move your selection to a destination playlist.
4
Your selected track is now in the playlist.
✔
TIP
Press and hold <Ctrl> on your keyboard and click to select more than one item.
To select consecutive items, click the first item, press and hold <Shift> on your
keyboard, and then click the last item.
20
psa220_eng.qxd
2/6/04
14:54
Page 21
*Actual display varies with use
Create Playlists
1
Click on
to create a new playlist.
2
Fill in the information in the pop up window.
3
Follow screen instructions to save your new playlist.
You can now drag more tracks to the new playlist.
Import Playlists
1
Click on
2
Fill in the information in the pop up window.
3
Follow screen instructions to import your new playlist.
You can now drag more tracks to the imported playlist.
to import a playlist.
21
psa220_eng.qxd
2/6/04
14:54
Page 22
*Actual display varies with use
Delete Tracks and Playlists
1
Click to highlight an item.
2
Drag your selection to
3
Alternatively, press <Delete> on your keyboard to delete your selection.
✔
to delete.
TIP
Press and hold <Ctrl> on your keyboard and click to select more than one item.
To select consecutive items, click the first item, press and hold <Shift> on your
keyboard, and then click the last item.
22
psa220_eng.qxd
2/6/04
14:54
Page 23
*Actual display varies with use
Edit Track Information
1
Click on a track to edit its information.
2
Click on
3
Click on the text boxes of Track name, Track number, Artist, Album, Genre, Year,
Comments to edit relevant information.
4
Click on OK to save the information. Click Cancel to discard changes made.
to call up the ID3 Tag Editor.
23
psa220_eng.qxd
2/6/04
14:54
Page 24
*Actual display varies with use
Search for Tracks or Playlists
1
Type a search string in the Search field.
2
Click on
3
You will see tracks and / or playlists that contain the search string.
4
You can transfer, delete or drag and drop these tracks as described in previous sections.
5
Click on the Selector panel to exit the search view.
✔
to start searching.
TIP
Deleting items from the searched results will delete them from your library!
24
psa220_eng.qxd
2/6/04
14:54
Page 25
DMM Menus and Actions
Use menus to customize DMM:
File
Refresh contents
For updating the latest status of the selected window
Start player link/
For disconnecting your player from DMM
Stop player link
Quit
For exiting DMM
Edit
Track information
For editing track information (see page 27 for more information)
User and player name
For changing the names of the user and your player
Preferences
Language
For selecting a language for DMM
Music folders
For adding, deleting or re-arranging your Music folders
Transfer options
For selecting transfer options
Player firmware
For checking, upgrading and restoring player firmware
Upgrade DMM
For checking and upgrading DMM
Help
DMM Help
For additional help and tips
Support
For instant access to support site
About DMM
For software version information
About Player
For player information
✔
TIP
The menus will call up various messages or windows where you need to input
some information. Follow screen instructions to complete your settings.
25
psa220_eng.qxd
2/6/04
14:54
Page 26
Make Use of the Different Views
DMM provides different view options. This is to minimize content refreshing time.
There are a few ways to customize DMM views.
1
Section icons
You can click on
or
to expand or minimize respective content panels.
2
Border area
Drag the border area between MY MUSIC and PLAYER MUSIC. When the content
panel is reduced to a certain size, the content panel will only show the section icon.
3
Drop Zone
When PLAYER MUSIC is minimized, you will see a Drop Zone. You can drag
selected items and drop them here. Note that the Drop Zone icon turns grey when
player memory is full.
26
psa220_eng.qxd
2/6/04
14:54
Page 27
Display Tracks Your Way
1
2
Sorting
You can click on the contents header (Track, Artist, Album, Genre) to arrange music
tracks according to the order you selected.
Detailed / summary view
Click on the
next to the contents header to turn on / turn off
detailed display of item contents.
detailed view
summary view
27
psa220_eng.qxd
2/6/04
14:54
Page 28
Upgrades
We know you will enjoy your product for a long time. For best performance, we recommend that
you regularly check in to www.nike-philips.com for free upgrades of the latest software
and firmware for your product.
Firmware Upgrade
Your player is controlled by an internal program called firmware. You can download and install
the latest firmware to keep your player updated.
1
Click Preferences ➔ Player Firmware ➔ Upgrade Firmware . This will give you further
information on how to download and upgrade your player firmware.
2
Follow screen instructions to complete firmware upgrade.
✔
TIP
Because you are updating the program of your player, please make sure
your player is connected to your computer before you launch DMM.
Keep it connected during the firmware upgrade process.
DMM Upgrade
DMM is the software that enables best interactions between your player and your computer
Keep it updated by doing upgrades.
1
Click Preferences ➔ Upgrade DMM. This will give you further information on how to
download and upgrade your DMM.
2
Follow screen instructions to complete DMM upgrade.
28
psa220_eng.qxd
2/6/04
14:54
Page 29
Uninstall DMM
1
Close all applications, including DMM.
2
From the Start menu, go to Control Panel. Select Add / Remove Programs.
Select DMM from your currently installed programs to uninstall.
3
For further information on uninstalling programs, please refer to Windows’
user manual.
29
psa220_eng.qxd
2/6/04
14:54
Page 30
Troubleshooting (1)
If a fault occurs, first check the points listed. For further help and other troubleshooting tips,
please also check out FAQ for your player at www.nike-philips.com.
If you are unable to find a solution from these hints, consult your dealer or service center.
WARNING:
Under no circumstances should you try to repair the set yourself, as this will invalidate
the warranty.
Problem
Cause
Solution
Cannot power on player
Battery drained
Charge the battery
(See page 1, step 2)
Loose key press
Press and hold 2 ; for 2 seconds
USB connected
Disconnect player from
computer (See page 1, step 5)
Firmware error
Connect player to computer and
restart DMM
Database error
Connect player to computer
and restart DMM
Loose connection
Check connection
USB driver not installed
Windows 98SE user only: install the
USB driver provided in by-packed CD
Player busy
Press and hold [VOLUME +] and 3 to
reset. Press and hold 2 ; for 2 seconds
to power on again if the power on
screen does not appear automatically
Automatic power off
Your player automatically powers
if there is no operation and no
music played within 20 seconds.
Press and hold 2 ; to power on.
USB doesn’t work
Player does not respond
30
psa220_eng.qxd
2/6/04
14:54
Page 31
Troubleshooting (2)
Problem
Cause
Solution
Cannot play track
Track format not
supported
Your player is not able to play
AAC encrypted or WMA songs
bought from the internet.
Since it is possible for you to upgrade
your product, we recommend that you
register your product on
www.nike-philips.com/register so we can
inform you as soon as new free
upgrades becom available.
Tracks were copied
Your player will play tracks only if they
from your computer
are transferred using the by-packed
to your player using
music management software
drag and drop in Windows
Explorer or Finder
Tracks not shown in
by-packed music
management software
Track format not
supported
Ensure that all your music on your
computer is in formats supported by
your player.
31
psa220_eng.qxd
2/6/04
14:54
Page 32
Safety and Maintenance
Take care when using headphones
Hearing safety:
Listen at a moderate volume. Using headphones at high volume can impair your hearing.
Traffic safety:
Do not use headphones while driving or cycling as you may cause an accident.
Take care when using strobe light
Do not look directly into the strobe light for prolonged period as this may cause
damage to your eyes.
General maintenance
To avoid damage or malfunction:
– Do not expose to excessive heat caused by heating equipment or direct sunlight.
– Do not drop your player or allow objects to fall on your player.
– Do not allow your player to be submersed in water. Do not expose earphone socket or
battery compartment to water as water entering the set may cause major damage.
– Do not use any cleaning agents containing alcohol, ammonia, benzene, or abrasives as
these may harm the set.
– Active mobile phones in the vicinity may cause interference.
Using DMM
Avoid the risk of corrupting and losing data with the following precautions when using DMM:
– Never disconnect the USB cable while file transfer is in progress.
– Never close DMM while file transfer is in progress.
– Operate using one file management system only. When transferring files, do not attempt to
transfer files via Windows Explorer / Finder whilst waiting for transfer to complete on DMM.
– Do not delete any track via Windows Explorer / Finder when file transfer is active in DMM.
If you wish to delete a file, please only do so from either DMM or from Windows Explorer / Finder
after file transfer completes.
Using the power adapter / charger
– Use only the power adapter that came with your player. Adapters for other electronic
devices may look similar, but they may damage your player.
– The only way to shut off power completely to your power adapter/charger is to disconnect
it from the power source.
– Always leave space around your power adapter. Do not use this equipment in a location
where airflow around the power adapter is confined, such as a bookcase.
– When connecting or disconnecting your power adapter, always hold the power adapter by
its sides. Keep fingers away from the metal part of the plug.
– The power adapter for your player is a high-voltage component and should not be opened
for any reason, even when your player is off.
Environmental information
We have reduced the packaging to its minimum and made it easy to separate into
materials: cardboard, PS, PE, PET.
Your set consists of material which can be recycled if disassembled by a specialized company
Please observe the local regulations to dispose of packaging, exhausted
batteries and old equipment.
32
psa220_eng.qxd
2/6/04
14:54
Page 33
Notice for the USA
Nike-Philips
PSA220, PSA250
Note:
This equipment has been tested and found to comply with the limits for a Class B
digital device, pursuant to part 15 of the FCC Rules. These limits are designed to provide
reasonable protection against harmful interference in a residential installation. This
equipment generates, uses, and can radiate radio frequency energy and, if not installed
and used in accordance with the instruction manual, may cause harmful interference to
radio communications.
However, there is no guarantee that interference will not occur in a particular installation.
If this equipment does cause harmful interference to radio or television reception, which
can be determined by turning the equipment off and on, the user is encouraged to try to
correct the interference by one or more of the following measures:
0
Relocate the receiving antenna.
0
Increase the separation between the equipment and receiver.
0
Connect the equipment into an outlet on a circuit different from that to which
the receiver is connected.
0
Consult the dealer or an experienced radio/ TV technician for help.
This Class B digital apparaatus complies with Canadian ICES-003.
This product complies with the radio interference requirements of the European Community.
Modifications
Modifications not authorized by the manufacturer may void user authority to operate this device.
Copyright information
All other brand and product names are trademarks of their respective companies
or organizations.
Unauthorized duplication of any recordings downloaded from the internet or made from audio
CDs is a violation of copyright laws and international treaties.
33
psa220_eng.qxd
2/6/04
14:54
Page 34
Technical Data
General
Dimension
Weight
27 (D) x 27 (H) x 71 mm
70g
Power supply
Built-in 600mAh Li-ion rechargeable battery
Multi-voltage AC power adapter / charger
Battery playtime
12 hours using built-in rechargeable battery (4 hours fully charged, 1 hour fast charge)
*Battery life may vary according to use.
Display
White Backlight LCD
Indications
Album name, artist name, battery status, DBB, frequency, pre-set station, time, track
Sound
Bass enhancement
Equalizer settings
Frequency Response
Output power (RMS)
Signal to noice ratio
Volume control
Audio Playback
MP3 (8 - 320 kbps and VBR)
WMA (32 - 192 kbps)
ID3-tag support
Album title, genre title, track title and artist name
Storage Media
Mass storage class, 256MB* NAND Flash (psa 220), 512MB* NAND Flash (psa 250)
Music memory capacity:
psa 220: up to 60 MP3 tracks (128kbps) or 120 WMA tracks (64kbps)
psa 250: up to 125 MP3 tracks (128kbps) or 250 WMA tracks (64kbps)
Dynamic Bass Boost
Funk, Hip hop, Rock, Techno
20 - 20 000 Hz
2 x 5 mW (16 Ω)
>80
Digital
* Actual formatted capacity will be less.
Tuner
Frequency range
Station presets
Tuner bands
Connectivity
5V DC, headphones (3.5mm line-out), remote control, USB 1.1
Music transfer
via DMM for music playback
File transfer
via Windows Explorer (PC) of data in general
87.5 - 108 MHz
10
FM stereo
Accessories (availability subject to regions)
AY4102
AY4208
AY4207
SBC HJ030/77
AY3192
AY4002
AC/ DC adapter
Armband
Carrier
Headphones
USB cable
Waistband remote control
The type plate is at the back of the set.
Philips, Nike, Inc. reserves the right to make design and specification changes for product
improvement without prior notice.
All rights reserved.
34
psa220&250 cover
2/6/04
14:31
Page 2
Meet Philips & Nike on the Internet
http://www.nike-philips.com
type number - psa220 / 250
© 2004 Phillips, Nike, Inc. All rights reserved.
www.nike-philips.com