1
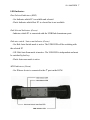
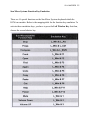
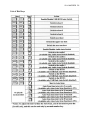
SY-KVM31036 1
USB 3.0
KVM Switch
Model: SY-KVM31036
User Manual
Ver. 2.0
SY-KVM31036 2
Product Introduction
The USB 3.0 KVM Switch is a high quality and durable system which allows
control over multiple computers/servers from one console. (mouse, keyboard,
monitor, microphone, and speaker)
Features
- Controls 3 computers from a single console (keyboard/mouse) over a USB
connection using standard USB cables.
- Supports 1 MHL (Mobile High-Definition Link) smart phone projected display
via the specific Micro USB to HDMI with power charged synchronization.
- Supports USB keyboard/mouse.
- Compliant with USB specification Revision 3.0 and USB Device Class
Definition for HID Revision 1.11.
- Three computers can share two USB 3.0 downstream ports.
- Supports two types of switching:
a. Push button on front panel
b. Hot keys on USB keyboard
- LED display for easy status monitoring.
- Supply Microsoft Intellimouse 3~5 Key Mouse & Microsoft Natural Keyboard
Pro series.
- Supports HDMI resolutions up to 1920x1200 @60Hz, full HD 1080p.
- Provides USB 3.0 HUB switching in independent method or combination with
the host switching. (USB HUB Auto-Switch mode)
SY-KVM31036 3
- Provides audio switching in independent method or combination with the host
switching (enable/disable by hotkey).
- Auto-scan function (time interval can be adjusted between 5-20 seconds when the
auto-scan function is enabled.
- Plug and Play
Package Contents
- 1 x 4-port USB 3.0 HDMI KVM with USB 3.0 Hub and Audio and MHL
- 2 x HDMI Cable
- 2 x USB 3.0 Cable
- 2 x 3.5mm audio/microphone cable
- 1 x External power adapter DC 5V 2A
- 1 x Micro USB to HDMI cable (for MHL function)
- 1 x User Manual
System Requirements
- Supports Windows® 2000/XP/Vista/7/8/2003, Linux, Mac OS9/OSX, SUN
Micro Solaris 8 or later.
- Computer with 1 USB port and 1 HDMI port (if you wish to share speakers
and/or a microphone, the computer must also have available audio ports)
- HDMI male-to-male cable per computer
- USB 3.0 cable with Type-A end and Type-B end
- 3.5mm speaker and microphone audio cable
SY-KVM31036 4
- One monitor which supports HDMI
- One keyboard/mouse
Note: Wireless keyboard/mouse may not work properly with tis KVM switch.
- One speaker and microphone with relative cable if necessary
- One USB device to USB downstream port is necessary.
SY-KVM31036 5
Hardware Installation
1. Connect USB keyboard/mouse to the console front ports of the KVM.
2. Connect all audio cables to each computer, KVM, speaker, and microphone is
necessary.
3. Connect any other USB device to the USB 3.0 Hub downstream ports if
necessary.
4. Connect the monitor HDMI cable to the monitor output port of the KVM.
5. Connect the DC 5V power adaptor to the KVM.
6. Connect the HDMI cable between the HDMI port on the computer display card
and the HDMI input port on the KVM.
7. Ensure all USB ports on your system are up-to-date with the latest drivers
available.
8. Connect the USB 3.0 cable Type-A end to the computer and the cable Typ-eB
end to the KVM switch.
9. Turn on the computers.
USB Enumeration
This KVM support USB plug & play. All components can be added and removed
at any time without the need to shutdown the unit. However, it will take serveral
seconds to enumerate USB devices. Time consumed depends on the number of
USB devices and the speed of the computer.
SY-KVM31036 6
Notice for Sun Micro System user
Some Sun Micro Systems do not support the USB 3.0 HUB feature during the
booting period. If you are using such Sun Micro Systems it is possible that you will
see a system prompt message that the keyboard failed to be detected. At this point
the screen will go blank for a few minutes then the login screen will display.
SY-KVM31036 7
LED Indicators
Host Selected Indicators (RED)
- On: Indicates which PC is available and selected.
- Flash: Indicates which Host PC is selected but is not available.
Hub Selected Indicators (Green)
- Indicates which PC is connected with the UDB Hub downstream ports.
Hub auto-switch / Auto-scan Indicator (Green)
- On: Hub Auto-Switch mode is active. The UDB HUB will be switching with
the selected PC
- Off: Hub Auto-Scan mode is inactive. The USB HUB is independent and must
be switched by hot key.
- Flash: Auto-scan mode is active
MHL Indicators (Green)
- On: When a device is connected to the 4th port on the KVM.
SY-KVM31036 8
Operations
Push Button Operation
You can switch to any desired USB host connection with audio together by
pushing the button on the front panel of the KVM switch. You can also disable the
Audio Auto-Switch function hotkey.
Host Selection (Hotkey Support)
The hotket function is working on the USB keyboard which is plugged in at the
port marked with the keyboard logo of the KVM. There is no hot key support for
the USB keyboard plugged into the UDB Hub downstream ports which are located
on the lower part of the KVM.
Host Selection (Specific Channel Selection)
You can select the computer you want to control by using the following hotkeys.
[Scroll Lock] + [Scroll Lock] + [1]: Switch control to host 1
[Scroll Lock] + [Scroll Lock] + [2]: Switch control to host 2
[Scroll Lock] + [Scroll Lock] + [3]: Switch control to host 3
[Scroll Lock] + [Scroll Lock] + [4]: Switch control to host 4
Note: It will take time when switching control to host 4 since the KVM must detect
if host 4 is connecting with a smart phone or device built in MHL.
Host Selection (Channel Shift Function)
Switch control to previous host:
[Scroll Lock] + [Scroll Lock] + [Up Arrow]
Switch control to next host:
[Scroll Lock] + [Scroll Lock] + [Down Arrow]
[Scroll Lock] + [Scroll Lock] + [Enter]
SY-KVM31036 9
Host Selection (Host Selected Indicator)
The host selected LED (Red) on the KVM front panel indicates the host port
status:
- On: Indicates the host port is available and selected.
- Off: Indicates the host port is not selected.
- Flash: Indicates the host port is selected but is not available.
Hub Selection
Hub Selection (USB Hub Switch by Push Button)
You must enable the Hub Auto-switch function before you can use the push button
switch. There are two ways to toggle the Hub Auto-Switch alternatively:
- Press any button on the KVM front panel for 3 seconds.
- By using hotkey: [Scroll Lock] + [Scroll Lock] + [H]
After the Hub Auto-Switch function is enabled, the hub auto-switch / auto-scan
indicator on the front panel will turn ON statically and, the USB hub can be
switched along with the selected host port by using the push button on the front
panel. The USB hub switching time is one second later after the port switch, the
reason the switch is delayed is to decrease the USB enumeration loading if the user
changes active ports quickly.
SY-KVM31036 10
Hub Selection (Hot key Switch for USB Hub Selection)
If the Hub Auto-Switch function is disabled, the USB hub switch is independent
from the host port. You can use the following hotkeys to switch the USB hub to a
specific port:
[Scroll Lock] + [Scroll Lock] + [Q]: Switch USB hub to port 1
[Scroll Lock] + [Scroll Lock] + [W]: Switch USB hub to port 2
[Scroll Lock] + [Scroll Lock] + [E]: Switch USB hub to port 3
After the HUB Auto-Switch function is enabled the USB hub will be switched
along with the host port selection by hotkey.
In this mode, the kotkey: [Scroll Lock] + [Scroll Lock] + [Q/W/E] for HUB
switching is disabled.
[Scroll Lock] + [Scroll Lock] + [1]: Switch both host and hub to port 1
[Scroll Lock] + [Scroll Lock] + [2]: Switch both host and hub to port 2
[Scroll Lock] + [Scroll Lock] + [3]: Switch both host and hub to port 3
Hub Selection (Hub Selected indicator)
The Hub Selected LED (Green LED) on the KVM front panel indicates the USB
hub selection status:
On: Indicates the USB hub is active at this port.
Off: Indicates the USB hub is not active at this port.
SY-KVM31036 11
Audio Selection
Audio Selection (Audio Auto-Switch Function)
Press [Scroll Lock] + [Scroll Lock] + [A], then the Audio-Switch function will be
disabled/enabled alternately. The Audio-Switch function is on by default.
Audio Selection (Hotkey Switch for Audio Selection)
You can use the following hotkeys to switch audio to the indicated port. There is
no indicator for the audio selection.
[Scroll Lock] + [Scroll Lock] + [Z]: Switch audio to port 1
[Scroll Lock] + [Scroll Lock] + [X]: Switch audio to port 2
[Scroll Lock] + [Scroll Lock] + [C]: Switch audio to port 3
[Scroll Lock] + [Scroll Lock] + [V]: Switch audio to port 4
Auto-Scan Function
Auto-Scan Function (Activate Auto-Scan)
Press [Scroll Lock] + [Scroll Lock] + [S], then the Auto-Scan function will activate
and, the KVM will switch the display through all the ports sequentially.
Auto-Scan Function (Auto-Scan Time Interval)
The default time interval of Auto-Scan is 5 seconds. You can press the numeric
key [1], [2], [3], and [4] to adjust the time interval during auto-scan. The mapping
table is:
N
Scan Interval
[1]
5 sec
[2]
10 sec
[3]
15 sec
[4]
20 sec
SY-KVM31036 12
Auto-Scan Function (Stop Auto-Scan)
Press the Space key: Will stop the auto-scan and will stay in the current scanning
port.
Press any other key on the keyboard: Pressing any keys, excluding the number key
[1], [2], [3], and [4], will turn off the auto-scan function. The monitor screen will
then jump back to the original host port before the auto-scan.
SY-KVM31036 13
Sun Micro Systems Function Key Emulation
There are 16 special functions on the Sun Micro Systems keyboard which the
KVM can emulate. Below is the mapping table for the function key emulation. To
activate these emulation keys, you have to press the Left Window Key first then,
choose the second relative key.
SY-KVM31036 14
List of Hot Keys
SY-KVM31036 15
FAQ
Question: I installed the device and connected my systems but there is no display
to my monitor?
Answer: Please remember to connect the power cable to the kvm switch and,
ensure all cables are connected to the proper in/out ports.
Question: The device is not working with my system. Are there drivers I can
download to fix this?
Answer: No, there are no drivers/firmware for this device.
Question: The device installed properly but only one system will display on my
monitor?
Answer: Try using a different port on the kvm to determine if the problem is with
the port or the system. Also check that the port drivers on your system are up-todate and, that any system updates have been applied.
Question: The kvm won’t recognize my keyboard/mouse?
Answer: Try connecting the keyboard/mouse to each system before connecting
them to the switch. Please note that certain wireless keyboards will not work with
this kvm switch. It’s recommended that a wired keyboard/mouse combo be used
with this device.
Question: My keyboard/mouse will disconnect randomly but reconnect after a
reboot?
Answer: The keyboard/mouse may not have a sufficient supply of power. Try
changing the power management for the keyboard/mouse in the device settings.
SY-KVM31036 16
Version Information
Version: 2.0
Date Updated: 3/20/2014
Changes/Fixes:
- Compiled manual information into .pdf format.
- Cleaned up wording and text throughout the previous 1.0 manual.
- Added hotkey functionality sheet
- Added FAQ of general information.