1
Chapter 1 Package Contents ......................................................... 2
Chapter 2 The Unit Parts ............................................................... 4
2.1
2.2
2.3
2.4
Touch Button Control Panel ................................................................. 4
Infrared Sensor .................................................................................... 4
LED Indicator ....................................................................................... 5
Connection Ports ................................................................................. 6
2.4.1
Front View…………………………………………………………………….6
2.4.2
Rear View……………………………………………………………………..6
Chapter 3 Installation & First Time Setup..................................... 7
3.1
3.2
3.2.1
3.2.2
3.3
3.4
3.5
Hardware Installation ........................................................................... 7
Storage Device Installation ................................................................ 11
USB Storage Device Insertion…………………………………………….11
HDD Installation and Removal……………………………………………11
Setup Wizard ..................................................................................... 16
Supported Resolutions ...................................................................... 19
Video Output Settings for Game Consoles ........................................ 19
3.5.1
Video Output Settings for PS3……………………………………………19
3.5.2
Video Output Settings for Xbox 360……………………………………...22
Chapter 4 The Remote Control.................................................... 23
Chapter 5 Gameplay Capture ...................................................... 25
5.1
5.2
5.3
Standard Mode & Real-time Mode ..................................................... 25
Gameplay Capture under Standard Mode ......................................... 26
Gameplay Capture under Real-time Mode ........................................ 28
Chapter 6 The OSD Menu Display............................................... 29
6.1
6.2
6.3
Recordings and Snapshots ................................................................ 30
File Management ............................................................................... 33
Settings.............................................................................................. 38
English-1
English
Table of Content
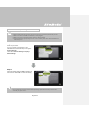
Thank you for purchasing Game Capture HD. Please read this user manual carefully to ensure proper
use of this product. We recommend you to keep it for future reference.
Introduction
Game Capture HD, a stand-alone video capture box specially designed for TV gamers, allows you to
capture HD content up to 1080i from various video game consoles, such as PlayStation®3 and Xbox
360.
Game Capture HD records HD gameplays directly to your hard disk drive (HDD) or USB flash drive for
later viewing and further editing, eschewing the hassle of setting up a PC nearby your TV set.
Most attractively, the one-press capture feature allows you to instantly grab high score screen and
record your exciting gameplay footage with nearly no effort.
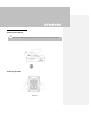
Chapter 1
Package Contents
Please confirm that the package contains the following items. If any of the package contents are missing
or damaged, please contact the distributor immediately.
Game Capture HD
Power Adapter
Power Adapter Outlet Module
Component Video Cable
English-2
RCA Audio Cable
User Manual
Quick Guide
Remote Control (Batteries Included)
Universal Component Cable for
Game Consoles
The accessories that come with the package may slightly vary depending on different sales regions.
AVerMedia regularly releases the latest version of firmware for Game Capture HD. Having the latest
firmware enhances the functionality of Game Capture HD. To download the latest firmware file, please go to
http://www.avermedia.com and then enter the model name in Product Search field. Firmware file is available
on the product information page. (See p.41 for details)
English-3
Chapter 2
The Unit Parts
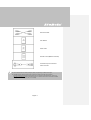
2.1 Touch Button Control Panel
The touch button panel found on the front of the unit provides quick access to commonly used
functions
# Buttons
Descriptions
Record
1
Press to start / stop recording.
Power
2
Press to turn the unit on / into stand-by mode.
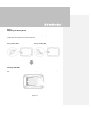
2.2 Infrared Sensor
When using the remote control, aim it at the infrared (IR) sensor located at the front panel of the unit.
The remote control must be held at an angle within 30 degrees perpendicular to the IR sensor to
function correctly. The distance between the remote control and the sensor should not exceed 6 meters
(20 feet).
English-4
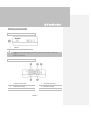
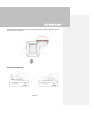
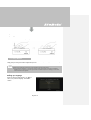
2.3 LED Indicator
The LED indicators on the front of the unit show the device’s status.
1
2
Red LED indicator
Green / Blue LED indicator
While the device is…
The Green/Blue LED indicator…
On (Standard Mode)
Glows solid green
On (Real-time Mode)
Glows solid blue
Off / in standby mode
Lights off
Starting up / Powering off / Upgrading its
firmware
Flashes green continuously
Having problems
Alternates between green and blue
Receiving a remote control signal
(Standard Mode)
Flashes green once
Receiving a remote control signal
Flashes blue once
(Real-time Mode)
While the device is…
The Red LED indicator…
Under recording mode
Flashes red continuously
Accepting a snapshot command
Flashes red once
For the description on Standard Mode and Real-time Mode, refer to p.25.
English-5
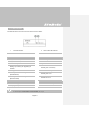
2.4 Connection Ports
2.4.1 Front View
1
USB slot
USB slot is for external USB storage device connection as well as for firmware upgrade via USB storage
device.
USB hub is not supported.
2.4.2 Rear View
1
Component video output
4
Component video input
2
RCA Audio L/R output
5
RCA Audio L/R input
3
DC-IN
English-6
Chapter 3
Installation & First Time Setup
3.1 Hardware Installation
Please follow the steps below to properly connect Game Capture HD and your TV / video game
consoles.
Game Capture HD supports one game console connection at a time only.
If you would like to install internal hard drive, install it before making the connections.
Make sure that the color of each cable matches the corresponding jack color while making the connections.
Make sure to power off your game console before making the connections.
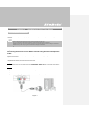
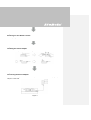
Step 1
Connecting the Device to Your Game Console Using Universal Component
Cable
Universal Component Cable, an optional accessory, is used to hook up your game console to Game
Capture HD at a time.
This cable is composed of component video cable with RCA audio cable at one end and three cables
compatible with PS2/3, Xbox and Wii at the other end.
Step 1-1:
Plug the green, blue, red connectors into the COMPONENT VIDEO IN port on the rear of the device.
Step 1-2:
Plug the white and red connectors into the AUDIO IN port on the rear of the device.
Step 1-3:
Plug the other end to your game console (choose a console-specific cable).
English-7
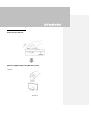
Step 2
Connecting the Device to Your TV Using Component Video Cable
Connect one end of the component video cable to the COMPONENT VIDEO OUT port on the rear of
the device and the other end to the COMPONENT VIDEO IN (colored green, blue, and red) port on
your TV.
Step 3
Connecting the Device to Your TV Using Composite Audio Cable
Connect one end of the composite audio cable to the AUDIO OUT port on the rear of the device and
the other end to the AUDIO IN (colored white and red) port on your TV.
English-8
Step 4
Powering on Your Game Console
Power on your game console.
Step 5
Installing the Power Adapter
Slide the Power Adapter Outlet Module into the groove on the Power Adapter.
Step 6
Connecting the Power Adapter
Connect the Power Adapter connector to the DC-IN port on the rear of the device. Then plug the power
adapter to a wall outlet.
English-9
Step 7
Powering on Game Capture HD
Press the power button on the front panel of the device.
Or
Aim the remote control at the infrared sensor located on the front panel of the device. Then press
Power on the remote.
The LED indicator then lights up green, indicating that the device is on.
Step 8
Check Video on TV screen
Make sure that there is video displayed on TV screen.
If your TV is not displaying video properly, please check the followings:
Make sure that your TV is set on the correct input source (Component IN). Switch video input by pressing the
input selection button ("Input"/"Source"/"TV/AV") on the TV remote control.
Supported resolutions vary depending on the TV in use. For details, please refer to the documentation that
comes with your TV.
Check video output settings of your game console. If you were using HDMI connection for your game
console, reset the video output for your game console (See p.19 for details).
Power off Game Capture HD and then make sure that the device is connected properly and with the proper
cables.
If there is still no video signal on TV, refer to FAQs at http://www.avermedia.com for further troubleshooting.
English-10
3.2 Storage Device Installation
Game Capture HD supports 2.5 inch internal hard drive (with both 9.5mm and 12.5mm height) and
external USB storage device. You can save the recorded files and snapshots either to the internal HDD
or your external USB drive.
3.2.1 USB Storage Device Insertion
Connect your portable USB hard drive or flash drive to the USB port on the front of Game Capture HD.
To allow long-time recording, it is recommended to use a hard drive instead of a flash drive.
To avoid data loss, please safely remove your external storage device before unplug it from Game Capture HD
(See p.32 for details).
If problems encountered while using USB flash drive to store recordings, refer to FAQs at
http://www.avermedia.com for further troubleshooting.
3.2.2 HDD Installation and Removal
It is highly recommended to use a new unformatted hard drive or a hard drive formatted as NTFS or FAT32
file system. The maximum supported storage capacity of the hard drive is 2TB.
Before installing or removing the internal HDD, please disconnect the power supply from Game Capture HD to avoid
data loss.
Removing internal HDD immediately after powering-off may cause personal injury due to heat. Please wait until
the HDD cools down completely (it takes approximately 10 minutes) before any attempt to remove it.
English-11
To install the internal HDD:
Step 1
Removing the HDD Lid
Use your fingertip to flip open the HDD lid, located on the bottom of Game Capture HD.
Lift off the lid and set it aside.
Step 2
Measuring HDD Height Using Measuring Card
Use the measuring card placed on the HDD slot to measure the height of your HDD (9.5mm or
12.5mm).
English-12
Step 3
Adjusting the Rotary Knob
Adjust the rotary knob attached to the inner side of the lid to fit the height of your HDD.
The default position of the rotary knob fits HDD with 9.5mm height. If you use HDD with 12.5mm
height, rotate the rotary knob to the other direction.
Using a 9.5mm HDD:
Using a 12.5mm HDD:
Step 4
Inserting the HDD
Place the HDD on the slot with the sticker-side facing up and the HDD connector end facing to the
left.
English-13
Align and insert the HDD connectors all the way into the SATA connectors attached to the slot.
Push in firmly to secure them.
Step 5
Replacing the HDD Lid
Place the HDD lid back and snap it into place.
English-14
To remove the internal HDD:
Step 1
Removing the HDD Lid
Removing internal HDD immediately after powering-off may cause personal injury due to heat. Please wait until the
HDD cools down completely (it takes approximately 10 minutes) before any attempt to remove it.
Use your fingertip to flip open the HDD lid, located on the bottom of Game Capture HD.
Lift off the lid and set it aside.
Step 2
Removing the HDD
Pull the HDD out in the direction of the arrow. Then lift the HDD out of the slot.
English-15
Step 3
Replacing the HDD Lid
Place the HDD lid back and snap it into place.
3.3 Setup Wizard
When the first time you power on the Game Capture HD unit, the setup wizard appears. The following
steps guide you through the initial configuration process.
Make sure to install internal hard drive or external USB storage device beforehand.
For the first-time initialization, a short duration of black screen (approximately 20 seconds) is followed by
AVerMedia logo. The blinking green status light indicates that Game Capture HD is starting up. Please wait
until the welcome screen appears.
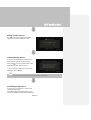
Step 1
Setting up Language
When the welcome page appears, use ▲/▼ to
select your preferred language. Press OK to
confirm.
English-16
Step 2
Setting up Date and Time
Use ◄/► to move among options and ▲/▼ to
adjust date and time. Press OK to confirm.
Step 3 (Optional)
Installing Storage Device
If you have not yet installed any storage device,
install it before continuing the setup process.
Then press
to go to the previous screen and
press OK to run disk checking process.
If you have already installed your storage device
beforehand, jump to Step 5.
Unplug Game Capture HD from the power supply before installing an internal HDD.
Step 4 (Optional)
Formatting Storage Device
If you are using a new hard drive, a disk format
request will be prompted.
Press OK to start the disk format process. Once
finished, press OK to start using Game Capture HD.
English-17
Disk formatting will remove all the data stored on the disk. Please properly backup your data before formatting the
disk.
NEVER power off the device or unplug the power supply during the disk format process.
Step 5
Setting up Storage Destination
Use ▲/▼ to select desired default storage disk for
both recorded files and snapshots. Press OK to
select a disk.
Then use ▲/▼ to select a folder and press OK to
enter.
Press F1 to save setting.
Step 6
Finishing Setup Wizard
Press OK to exit the wizard and start using Game
Capture HD. The game screen then appears.
English-18
3.4 Supported Resolutions
Game Capture HD supports YPbPr input resolution:
YPbPr
480i/576i
480p/576p
720p (50 & 60Hz)
1080i (50 & 60Hz)
3.5 Video Output Settings for Game Consoles
Game Capture HD supports YPbPr input resolution up to 1080i. If you were using HDMI connection for
your game console, you need to set the console’s video output to 1080i or below.
3.5.1 Video Output Settings for PS3
Before resetting video output for PS3, make sure to properly connect Game Capture HD with your PS3.
Leave both the HDMI cable and Universal Component Cable for Game Consoles (or your console specific
component cable) plugged in.
Make sure to power off both Game Capture HD and your PS3 beforehand.
Supported resolutions vary depending on the TV in use. For details, please refer to the documentation that
comes with your TV.
Step 1
Power on your PS3.
On your console, go to Settings > Display
Settings > Video Output Settings.
English-19
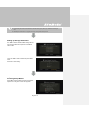
Step 2
Select Component/D-terminal and confirm the
selection. Then your TV screen goes blank
immediately.
Now use your TV remote to switch the TV input
source to Component (YPbPr). The screen then
comes back on again.
Step 3
Check ALL the resolutions except for 1080p.
Step 4
Confirm the setting.
English-20
Step 5
Select Set Audio Output Settings.
Step 6
Select Audio Input Connector/SCART/AV MULTI
as audio output.
Step 7
Confirm the setting.
English-21
3.5.2 Video Output Settings for Xbox 360
Before resetting video output for Xbox, make sure to properly connect Game Capture HD with your Xbox.
Make sure to remove the HDMI cable beforehand, if it was plugged in.
Make sure to power off both Game Capture HD and your Xbox beforehand.
Supported resolutions vary depending on the TV in use. For details, please refer to the documentation that
comes with your TV.
Step 1
Power on your Xbox.
On your console, go to My Xbox on the
dashboard and scroll all the way to the right to
System Settings.
Then select Console Settings > Display >
HDTV Settings.
Step 2
Adjust the output setting to 1080i or below from
the menu list. Select Yes to confirm the setting.
For more information concerning console’s video output settings, please refer to the setup instruction that
comes with your game console.
English-22
Chapter 4
The Remote Control
The descriptions below show the deployment of the keys on the remote control.
Under Real-time mode, the remote keys are invalid, except for
(stop recording),
(snapshot), and
(power).
English-23
(mode),
(start/stop recording),
#
1
2
3
4
5
Buttons
Descriptions
Press to turn the unit on / into stand-by mode.
* Stand-by mode: power-saving sleep mode.
Press to access the main menu. Press again to exit.
Press the navigation keys to move among options.
Press OK to confirm a selection.
Press to play the last recorded file or view the last captured image.
Press to start / stop recording.
6
Press to start playing the selected file.
Press to play the file at normal (1x) speed when slow motion, rewind, or
fast-forward is active.
7
Press to stop the playback.
Press to stop the recording.
8
9
10
11
12
13
14
15
16
Press to rewind (2x, 4x, 8x, 16x, 32x).
Press to return to the previous page.
Press to display the video/image quality adjustment screen. Press again to exit.
(Follow the on-screen instruction)
(Follow the on-screen instruction)
(Follow the on-screen instruction)
Press to switch between Real-time Mode and Standard Mode during
gameplay (See p.25 for details).
Press to display the on-screen information.
Press to exit the current page and return to the previous page.
English-24
17
18
19
20
21
22
23
Press to take a snapshot during gameplay or video playback.
Press and hold to take multiple snapshots at a speed of two images per second.
Press to pause the playback. Press OK or
to resume playback.
Press to play the video in slow motion (1/2x). Press again to enter
frame-by-frame mode (See p.27 for details).
Press to fast-forward (2x, 4x, 8x, 16x, 32x).
Press to go to the next page.
Press to delete the selected files.
Press to display the disk information. Press again to hide it.
Chapter 5
Gameplay Capture
This chapter guides you to record gameplay, capture images, and instantly play files.
5.1 Standard Mode & Real-time Mode
Every time you power on Game Capture HD, Standard Mode is set as default. If you would like to
switch to Real-time Mode, press
. To switch back to Standard Mode, press
again.
Under Standard Mode, the OSD (on-screen-display) information and full functions are available.
Under Real-time Mode, the OSD (on-screen-display) information is disabled to let you concentrate on
your gameplay. Under this mode, only recording and snapshot functions are available.
Recording and snapshot functions are only available if the storage device is properly installed.
The default storage destination for recordings and snapshots is the root directory of your storage device.
To change the storage destination, please go to Settings > Disk Management > Storage Destination (See
p.40 for details).
English-25
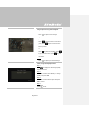
5.2 Gameplay Capture under Standard Mode
OSD Menu
Descriptions
Instant Recording During Gameplay
- Press
to activate instant recording.
- Press
again or
to stop recording.
Quick Snapshot During Gameplay
- Press
to capture current image.
- Press and hold
to take multiple
snapshots.
Instant Playback
- Press
to play the last recorded file or
view the last captured image.
- Press
English-26
to stop the playback.
Image Capture During Video Playback
Way 1:
- Press
to capture current image.
Way 2:
Step 1:
- Press
to play the video in slow motion
(1/2x). Press
again to view the video
frame by frame.
or
- Press
to pause the playback. Press
to go to previous frame; press
to go to
next frame.
Step 2:
- Press
to capture your desired image.
Video / Image Quality Adjustment
Step 1:
Press
to display the video/image quality
adjustment screen.
Step 2:
Use ▲/▼ to select “Video Quality” or “Image
Quality” and press OK.
Step 3:
Use ▲/▼ to select desired option and press
OK to confirm.
Step 4:
Press
English-27
to exit.
Disk Information
- Press
to display the disk information.
Press again to hide it.
Main menu
- Press
to call up the main menu.
- Press
or
to return to the game
screen.
5.3 Gameplay Capture under Real-time Mode
OSD Menu
Descriptions
Instant Recording During Gameplay
- Press
to activate instant recording
- Press
again or
English-28
to stop recording.
Quick Snapshot During Gameplay
- Press
to capture current image.
- Press and hold
to take multiple
snapshots.
Chapter 6
The OSD Menu Display
Under the menu, you can check and manage both your recorded files and snapshots, and customize
your preferences.
Under Real-time mode, the OSD menu display is not available. To call up the menu, press
back to Standard Mode and then press
OSD Menu
to switch
.
Descriptions
Basic Operation
- Press
to bring up the menu.
- Press
or
to return to the game
screen.
- Use ▲/▼ to make selection on the menu
and OK to enter a submenu.
- In the submenu, use ▲/▼ to make selection
and OK to confirm. Press
the previous page.
English-29
to return to
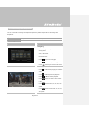
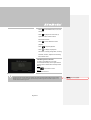
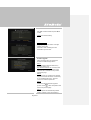
6.1 Recordings and Snapshots
You can check both recordings and snapshots captured by Game Capture HD in “Recordings and
Snapshots”.
Capture Format:
Video
AVI (Codec: H.264 format with MP3 audio)
Image
JPEG
OSD Menu
Descriptions
Navigating
- Use the navigation keys ◄/►/▲/▼ to select
among items.
- Press F1 to sort the files by file name, file
size, or file format.
- Press F2 to switch between list mode and
thumbnail mode.
- Press
to go to the next page.
- Press
return to the previous page.
- Press
to directly access the main menu.
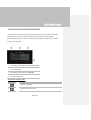
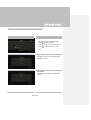
Video Playback
- Press
or OK to start playing the selected
video.
- Press
Press
or OK to pause the playback.
or OK to resume playback.
- Press
to play the video in slow motion
(1/2x).
- Press
to rewind at 2x, 4x, 8x, 16x, 32x
speed.
- Press
32x speed.
English-30
to fast forward at 2x, 4x, 8x, 16x,
- Press
to play the file at normal (1x)
speed when slow motion, rewind, or
fast-forward is active.
- Press
to stop the playback.
- Press
to display the playback
information, including storage disk, recording
resolution, duration, elapsed and remaining
time, and file name.
Image Capture During Video Playback
Way 1:
- Press
to capture current image.
Way 2:
Step 1:
- Press
to play the video in slow motion
(1/2x). Press
again to view the video
frame by frame.
or
- Press
to pause the playback. Press
to go to previous frame; press
to go to
next frame.
Step 2:
- Press
English-31
to capture your desired image.
Snapshots Viewing
- Press
Press
- Press
or OK to view the selected image.
return.
to display the image information,
including storage disk and file name.
USB Storage Device Removal
In order to avoid data loss, it is highly
recommended to safely remove your external
storage device. Please follow the steps below:
Step 1:
Press
on the remote control.
Step 2:
Select the partition.
Step 3:
Press F2 to remove it.
English-32
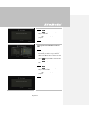
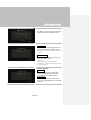
6.2 File Management
“File Management” allows you to manage videos and images captured by Game Capture HD. You can
copy files between internal hard drive and external USB storage device, and delete unwanted files.
Please note that only video and image files captured by Game Capture HD are supported.
Before entering this submenu, insert your storage device first (USB 2.0 storage device / 2.5” HDD
in NTFS or FAT 32 format).
File Management User interface:
1
A list displaying files located on the internal hard disk
2
A set of editing tools
3
A list displaying files located on the USB disk
4 Information display area
Descriptions on Editing Tools:
# Buttons
1
2
Descriptions
Copy files to USB disk
Copy files to internal hard disk
English-33
3
4
5
Select all
Deselect all
Delete
OSD Menu
Descriptions
Navigating
- Use ▲/▼ to select and OK to enter the
folder in which you save the recordings and
snapshots.
- Use ▲/▼ to select “Back” and press OK to
go one level up.
- Press F1 to sort the files by file name, file
size, or file type.
- Press
to go to the next page.
- Press
return to the previous page.
- Press
to directly access the main
menu.
Copying Files from Internal HDD to USB
Disk
Step 1:
- On the left-side list, use ▲/▼ to highlight the
file that you want to copy to USB disk. Press
OK to select / unselect an item.
- Select
and press OK to select all files.
- Select
and press OK to deselect all
files.
English-34
Step 2:
- Select
and press OK to copy selected
file(s) to USB disk.
- Press
to cancel copying the files in a
progress.
Step 3:
- Press OK.
Copying Files from USB Disk to Internal
HDD
Step 1:
- On the right-side list, use ▲/▼ to highlight
the file that you want to copy to internal
HDD. Press OK to select / unselect an item.
- Select
and press OK to select all files.
- Select
and press OK to deselect all
files.
Step 2:
- Select
and press OK to copy selected
file(s) to internal HDD.
- Press
to cancel copying the files in a
progress.
Step 3:
- Press OK.
English-35
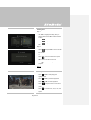
Deleting Files
Step 1:
- Use ▲/▼ to highlight the file(s) that you
want to delete. Press OK to select/unselect
an item.
- Select
and press OK to select all files.
- Select
and press OK to deselect all
files.
Step 2:
- Select
and press OK to remove the file
from the list.
or
Press
on the remote and then press
OK to remove the file from the list.
- Press
to cancel deleting the files in a
progress.
Step 3:
- Press OK.
File Playback
- Press
or OK to start playing the
highlighted file.
- Press
Press
- Press
or OK to pause the playback.
or OK to resume playback.
to play the video in slow motion
(1/2x).
- Press
speed.
English-36
to rewind at 2x, 4x, 8x, 16x, 32x
- Press
to fast forward at 2x, 4x, 8x, 16x,
32x speed.
- Press
to play the file at normal (1x)
speed when slow motion / rewind /
fast-forward is active.
- Press
once to restart the current
playback.
- Press
to stop the playback.
- Press
to display the playback
information, including storage disk, recording
resolution, duration, elapsed and remaining
time, and file name.
USB Storage Device Removal
In order to avoid data loss, it is highly
recommended to safely remove your external
storage device. Please follow the steps below:
Step 1:
Press
on the remote control.
Step 2:
Press F2 to remove it.
A single file size that exceeds 4GB is not allowed to be copied from NTFS-formatted HDD to FAT32-formatted
USB storage device. To solve this problem, please format your USB storage device to NTFS file system or use
a NTFS formatted USB storage device.
English-37
格式化:
式化: 項目符號及編號
6.3 Settings
You can customize your preferences in “Settings”.
OSD Menu
Descriptions
Basic Operation
- Use ▲/▼ to select a preferred category.
Press OK to make a selection.
- Press
to return to the previous page.
- Press
to directly access the main
menu.
Language
Use ▲/▼ to select your preferred language.
Press OK to confirm.
Date Format
Use ▲/▼ to select date format. Press OK to
confirm.
English-38
Date and Time
Use ◄/► to move among options and ▲/▼ to
adjust date and time. Press OK to confirm.
Power Management
Boot-up Mode
Use ▲/▼ to switch between different boot-up
modes (Normal/Fast). Press OK to confirm.
*Fast Mode speeds up the boot time, though more electricity is
consumed.
Auto Power On/Off
Use ▲/▼ to set the device to auto-power on
or off. Press OK to confirm.
* Auto-power off:
the device auto powers off when the signal input is
unavailable for 10 minutes. The device auto powers on when
the signal input is back on.
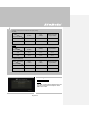
Video/Image Quality
Video Quality:
Use ▲/▼ to toggle among various video
quality options (Optimal /Good / Maximum
recording length). Press OK to confirm.
Image Quality:
Use ▲/▼ to toggle among various image
quality options (Best /Better / Good). Press OK
to confirm.
English-39
Estimated recording duration for different video quality settings:
HD (1080i)
Video Quality
Optimal
(15 Mbps)
Good
(12 Mbps)
Maximum Recording
Length (10 Mbps)
1TB
125 hrs
150 hrs
200 hrs
2TB
250 hrs
300 hrs
400 hrs
Optimal
(12 Mbps)
Good
(10 Mbps)
Maximum Recording
Length (8 Mbps)
1TB
150 hrs
200 hrs
250 hrs
2TB
300 hrs
400 hrs
500 hrs
Optimal
(7.5 Mbps)
Good
(5 Mbps)
Maximum Recording
Length (3 Mbps)
1TB
250 hrs
400 hrs
650 hrs
2TB
500 hrs
800 hrs
1300 hrs
Storage Capacity
HD (720p)
Video Quality
Storage Capacity
SD 480i(576i)/480P(576P)
Video Quality
Storage Capacity
*Recordings with higher video quality take up more disk space.
Disk Management
Storage Destination
Step 1:
Use ▲/▼ to select desired default storage disk
for both recorded files and snapshots. Press
OK to select a disk.
English-40
Step 2:
Use ▲/▼ to select a folder and press OK to
confirm.
Step 3:
Press F1 to save the setting.
Disk Information
This page displays the status of storage
capacity of the disk.
Press F1 to start formatting the disk.
Press F2 to eject the disk.
Firmware Upgrade
Follow the steps below to upgrade the
firmware via USB storage device:
Step 1:
To download the latest firmware binary
package, please go to
http://www.avermedia.com, and then enter
the model name in Product Search field.
Firmware file is available on the product
information page.
Step 2:
Extract the files by unzipping the package.
Copy the firmware files to the root directory
of your USB storage device, and then
connect it to Game Capture HD.
Step 3:
Press F1 to start the firmware upgrade
process. Press
to abort the operation and
return to the previous page.
Step 4:
Game Capture HD automatically detects
whether a newer version of firmware is
English-41
available for upgrade. Once the firmware
upgrade process has completed, press OK to
restart Game Capture HD.
The firmware upgrade process takes up approximately 3-5 minutes.
Firmware upgrade requires at least 256MB free space of the storage device (USB/HDD).
If problems encountered during firmware upgrade, please use a USB storage device with no data on it and
repeat the process above.
NEVER power off the device or unplug the power supply during the firmware upgrade process. If the
firmware upgrade is interrupted for any reason, the device may crash.
Restore to Factory Settings
Press F1 to restore to original factory
settings. Press
to abort the operation and
return to the previous page.
Product Information
This page provides information about this
product, such as the product name and
firmware version, etc.
English-42