1
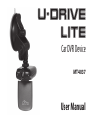
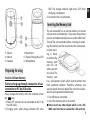
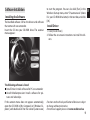
U-DRIVE
LITE
Car DVR Device
MT4037
User Manual
EN Index
Parts of the car camcorder
Index ................................................................................................2
Parts of the car camcorder .......................................................2
Preparing for using .....................................................................3
Inserting the Memory Card .....................................................3
Using this car camcorder ..........................................................4
Using the menu in record mode ............................................5
Playback ..........................................................................................7
Making connections...................................................................8
Software Installation ..................................................................9
1. Mode button
2. Down/Zoom out button
3. Up/Zoom in button
4. Shutter/Ok button
9. Lens
2
5. AV-out port
6. USB port
7. Menu button
8. Power button
10. SD Card slot
RED. The charge indicator light turns OFF when
charging is completed.
3. Disconnect the car camcorder.
Inserting the Memory Card
11. Mount
12. Mount
13. Speaker
14. Reset hole
15. Power/Charge/Busy LED
16. Microphone
Preparing for using
Bulit-in Lithium Battery
Battery-charging through connection of car
camcorder to PC by USB-cable.
Please charge the battery when the indicator shows
the
icon.
1. Power OFF; connect the car camcorder to the PC by
the USB-cable.
2. Charging starts when charge indicator LED turns
This car camcorder has an internal memory, it can take
a few pictures and video clips . If you want to take more
pictures and video record, please use a SD or MMC card.
Turn off the car camcorder before inserting or removing the memory card. Be sure to orient the card correctly when inserting it. Never
try to force the
memory card
into the slot
when you feel
resistance. The
memory card
has a write protect switch, which used to protect data
from accidental deletion. Therefore, whenever you
want to record, format or delete files in the SD card, disable the write protection beforehand.
1. Turn off the car camcorder.
2. Insert the memory card as illustrated.
¯ Never insert any other object which is not a SD/
MMC card into the car camcorder’s SD card slot.
3
EN
EN
Doing so will cerate the risk of damaging to the
car camcorder and the card.
¯ Never remove the SD card from the car camcorder while the car camcorder is powered on. Doing
so can cause failure to the picture recording operation, and even damage the memory card.
Format the memory card
All data will be deleted including protected files. Be
sure to download important files to your computer before formatting.
1. Press the POWER button to turn the car camcorder
on, and press the MENU button to display the menu,
and then press it again to enter the Setup Menu.
[For2. Press the UP or DOWN button to select
mat] and then press the OK button to launch the
submenu.
3. Press the UP or DOWN button to select the item
[Yes] and then press the OK button to erase all data.
Using this car camcorder
Turning the Car camcorder On and Off
1. To turn on the car camcorder, hold and press the
POWER button to turn on the car camcorder.
2. Press the POWER button again to turn the car camcorder off.
4
Note: To save battery power, You can change the
power off by setting the function [Auto Off ] in the
Setup menu.
Change the record mode
There are three record modes in this car camcorder.
1. Press the POWER button to turn on the car camcorder, and the car camcorder get into the default video
mode.
2. Press the MODE button to change the mode. Each
time the MODE button is pressed the mode icon is
changed.
Display
Title
Description
Capture mode
For taking still photos.
Video mode
For recording movie clips.
Playback mode
For preview files.
Recording video clip
1. Turn the car camcorder on and enter to default video
record mode.
2. Press the SHUTTER button to start recording.
3. Press the UP/ZOOM IN or DOWN/OUT button to increase and decrease the size of your subject.
4. Press the SHUTTER again to end the recording. If the
memory is full the car camcorder will stop recording
automatically.
Taking still images
1. Turn the car camcorder on and set it to capture
mode.
2. Press the UP/ZOOM IN or DOWN/OUT to increase
and decrease the size of your subject.
3. Hold the car camcorder steady and then press the
SHUTTER button completely down to take a picture.
Note:
¯ Make sure that your fingers do not cover the lens.
¯ Do not take the memory card out when the car
camcorder is saving the image, otherwise the image will not be saved completely.
Using the Zoom Function
This car camcorder has a digital zoom function that
allows you to zoom in or zoom out on subjects. The
digital zoom enlarges or shrinks the image using a software process.
1. Turn the car camcorder on and set it to capture
mode or video record mode.
2. Press the UP or DOWN button to compose the image.
Down: zoom out for a wide-angle shot.
Up: zoom in for a telephoto shot.
When the zoom button is pressed, the value of magnification level appears on the LCD monitor.
Using the menu in record mode
When a menu is displayed, the UP/DOWN/OK button
is used to make the desired setting.
Menu in video mode
1. In video record mode press the MENU button to display the menu.
2. Use the UP or DOWN button to select an item.
3. Press the OK button to enter the submenu.
4. Use the UP or DOWN button to select the desired
item.
5. Press the OK button to confirm the setting.
6. Press the MENU button twice to close the menu.
Menu item
Function
Movie Size
Select small movie size to record longer
time. There are two items for option:
VGA: 640x480 / QVGA: 320X240.
Exposure
Sets the exposure value manually to compensate for
unusual lighting conditions such as indirect indoor lighting,dark backgrounds,
and strong backlighting.
The exposure value range is –2.0 to 2.0.
5
EN
EN
Capture menu list
Menu item
Function
White Balance
Adjust the white balance to suit different
light sources.
There five items for option: [Auto] / [Daylight] / [Cloudy] / [Fluorescent] / [Tungsten].
Menu item
Function
Resolution
There are five options for choice:
5M: [2592X1944] / 3M: [2048X1536] /
2M: [1600X1200] / 1.3M: [1280X960] /
VGA: [640X480]
Move Detection
This function can be used to detect the car
camcorder for moving. There two items
for option: [On] / [Off ].
Quality
Select a lower image quality to decrease
the image size in order to capture more
images. There are three options for
choice:[Super Fine] / [Fine] / [Normal].
Recording Time
Sets the time of video recording. The next
video will be started when a video is finished. There three items for option: [2] /
[5] / [15].
Exposure
Set the exposure value manually to compensate for unusual lighting conditions
such as indirect indoor lighting, dark backgrounds, and strong backlighting. The exposure value range is –2.0 to 2.0.
White Balance
Adjust the white balance to suit different
light sources.
There five items for option: [Auto]/[Daylight]/[Cloudy]/[Fluorescent]/[Tungsten].
Cont. mode
This function can be used to shoot serial
photos:
[Off ]: Single frame shoot.
[On]: 3 frames shoot .
Menu in capture mode
1. Turn on the car camcorder and set it to capture
mode.
2. Press the MENU button to display the menu.
3. Use the UP or DOWN button to select an item.
4. Press the OK button to enter the submenu.
5. Use the UP or DOWN button to select the desired
item.
6. Press the OK button to confirm the setting.
7. Press the MENU button twice to close the menu.
6
Setup menu
You can set the system items in setup menu.
1. Turn the power on and press the MENU button to
display the menu.
2.
3.
4.
5.
Press the MENU button again to select
[Setup].
Use the UP or DOWN button to select an item.
Press the OK button to enter the submenu.
Use the UP or DOWN button to select the desired
item.
6. Press the OK button to confirm the setting.
7. Press the MENU button to close the menu.
Menu item
Function
Format
All data will be deleted including protected files.
Auto Off
To save power, the car camcorder is turned
off automatically after a period of time.
There are two options: [On] / [Off ].
Reset All
To reset the entire menu and button operation settings to initial default. [Yes]/ [ No].
Power
frequency
Light Frequency should be set to either
60Hz or 50Hz depending on your region.
[50HZ] / [60HZ].
TV Out
TV Out should be set to either NTSC or PAL
depending on your region. [NTSC] / [PAL].
Menu item
Function
USB Mode
You can use this car camcorder as a PC
camera or removable disk.
[PCCAM]: Use as a PC camera;
[MSDC]: Use as a removable disk.
Playback
Playback still image
1. Turn the car camcorder on, and then press the
MODE button to set the car camcorder to playback
mode. The latest recorded file appears on the LCD
screen. If there are no images stored, a message [No
Image] appears.
2. Press the UP/DOWN button to preview the previous
or next image.
Playing back movie clips
1. Press the UP/DOWN button to select the movie clips
you want to playback.
2. Press the OK button to start playing. Press the UP/
DOWN button to end playing. Press the OK button
to pause it and press it again to continue.
Menu in playback mode
1. In playback mode press the MENU button to display
the menu.
7
EN
EN
2. Press the UP or DOWN button to select an item.
3. Press the OK button to enter the submenu.
4. Press the UP or DOWN button to select the desired
item.
5. Press the OK button to confirm the setting.
6. Press the MENU button twice to close the menu.
Menu item
Function
Delete
Use this function to delete a single file or
all files.
[One]: Delete current singe file.
[All]: Delete all files except locked files.
Sound
Adjust the volume level of video clip in
playback mode.
[1]/ [2]/ [3]/ [4]/ [5]/ [6]/ [7]/ [8]
Making connections
Connecting the Car camcorder to a PC
There are two ways to download files from the car camcorder’s internal memory or memory card to a computer:
¯ By inserting the memory card into a card reader
¯ By connecting the car camcorder to a computer using the supplied USB cable.
8
Using a Card Reader
1. Eject the memory card
from the car camcorder
and then insert it into a
card reader that is connected to a computer.
2. Open [My Computer] or
[Windows Explorer] and double-click the removable
disk icon that represents the memory card.
3. Copy images from the card into a directory of your
choice on the computer’s hard disk.
Connecting the Car camcorder to a PC
with the USB Cable
1. Set the USB mode to [MSDC] mode in the Setup
Menu.
2. Connect the supplied USB cable to the computer’s
USB port.
3. Open [My Computer] or [Windows Explorer]. A “Removable Disk” appears in the drive list. Double-click
the “Removable Disk” icon to view its contents. Files
stored on the car camcorder are located in the folder
named “DCIM”.
4. Copy the photos or files to your computer.
Note: If the car camcorder is turned to PCCAM
Mode, Please set the USB mode to [PCCAM] mode
in the Setup Menu.
Software Installation
Installing the Software
The bundled software CD has the drivers and software
that come with car camcorder.
Insert the CD into your CD-ROM drive. The autorun
menu appears:
to start the program. You can also click [Run] in the
Windows Startup menu, enter “D:\autorun.exe” (where
D is your CD-ROM drive letter) in the text box, and click
[OK].
Install Driver
1. Click [Install Driver].
2. Follow the on-screen instructions to install the drivers.
The following software is listed:
¯ Install Driver: Installs software for PC car camcorder
¯ Arcsoft Mediaimpression: Installs software for pictures and video clips.
If the autorun menu does not appear automatically,
open the CD-ROM in [My Computer] or [Windows Explorer] and double-click the file named [autorun.exe]
Functions and technical specification of device are subject
to change without prior notice.
For technical support please visit www.media-tech.eu
9
EN


![[VC120-2] [MENARDS] User Guide [FINAL] 20100618](http://vs1.manualzilla.com/store/data/005701495_1-e41e7e0d778d2f045f29de9890ac0ae7-150x150.png)