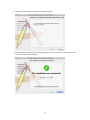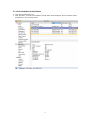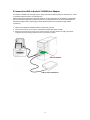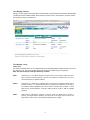
1
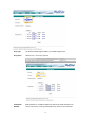
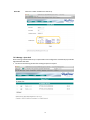
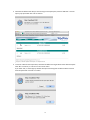
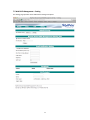
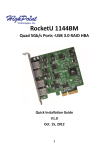
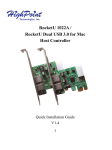
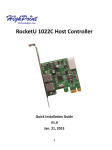
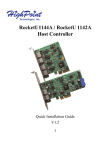
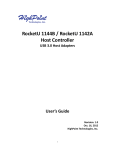
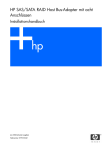
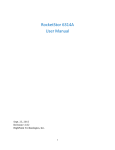
RocketU 1144CM Host Controller 4-Port USB 3.0 PCI-Express 2.0 x4 RAID HBA for Mac User’s Guide Revision: 1.0 Dec. 13, 2012 HighPoint Technologies, Inc. 1 Copyright Copyright © 2013 HighPoint Technologies, Inc. This document contains materials protected by International Copyright Laws. All rights reserved. No part of this manual may be reproduced, transmitted or transcribed in any form and for any purpose without the express written permission of HighPoint Technologies, Inc. Trademarks Companies and products mentioned in this manual are for identification purpose only. Product names or brand names appearing in this manual may or may not be registered trademarks or copyrights of their respective owners. Backup your important data before using HighPoint's products and use at your own risk. In no event shall HighPoint be liable for any loss of profits, or for direct, indirect, special, incidental or consequential damages arising from any defect or error in HighPoint's products or manuals. Information in this manual is subject to change without notice and does not represent a commitment on the part of HighPoint. Notice Reasonable effort has been made to ensure that the information in this manual is accurate. HighPoint assumes no liability for technical inaccuracies, typographical, or other errors contained herein. 2 Table of Contents 1 Features and Specifications ................................................................................................................... 4 2 Physical Specifications ........................................................................................................................... 5 3 Kit Contents .......................................................................................................................................... 6 4 Hardware Description and Installation .................................................................................................. 7 4.1 RocketU 1144CM Host Adapter Board Layout ................................................................................ 7 4.2 Installing the RocketU 1144CM Host Adapter................................................................................. 7 5 RocketU 1144CM Host Adapter Driver Installation ................................................................................ 8 5.1 Driver Installation........................................................................................................................... 8 5.2 Verify Installation of the Software ................................................................................................ 11 6 Connect Hard Disk to RocketU 1144CM Host Adapter ......................................................................... 12 7 Web RAID Management Interface ....................................................................................................... 13 7.1 Running the Web RAID Management Software ........................................................................... 13 7.2 Web RAID Management – Manage............................................................................................... 14 7.2.1 Manage - Devices ............................................................................................................... 15 7.2.2 Manage - Array ................................................................................................................... 15 7.2.3 Manage – Spare Pool .......................................................................................................... 18 7.3 Web RAID Management – Event................................................................................................... 20 7.4 Web RAID Management – Task..................................................................................................... 21 7.5 Web RAID Management – Setting ................................................................................................ 22 7.6 Maintaining and Rebuilding a RAID Array ..................................................................................... 24 7.6.1 Maintenance and Verify ..................................................................................................... 24 7.6.2 Maintenance and Rebuilding a Critical RAID Array ............................................................. 25 7.6.3 Add Disk ............................................................................................................................. 25 7.6.4 Rebuild RAID Array ............................................................................................................. 26 7.7 Web GUI Icon Definition List......................................................................................................... 26 8 Thank You ........................................................................................................................................... 28 9 Customer Support ............................................................................................................................... 29 3 HighPoint RocketU 1144CM Quad 5Gb/s Ports USB 3.0 - SuperSpeed RAID HBA HighPoint's RocketU 1144CM: 3rd Generation PCI-E 2.0 x4 USB 3.0 HBA designed for Apple Mac Pro's and Mac OS X. RocketU 1144CM HBAs benefit from a 2 ounce (oz) copper PCB layer for robust transfer performance and improved energy efficiency. The four Dedicated 5Gb/s USB Ports deliver 20Gb/s of transfer bandwidth. The RocketU 1144CM is optimized for today's fastest USB 3.0 HDD and SSD's, storage docks, and enclosures. Built-in RAID technology and an intuitive Web-based Management interface support a variety of storage configurations including RAID 0, 1, and JBOD. 1 Features and Specifications Host Adapter Architecture PCI Express 2.0 x4 Quad-Port: Four USB 3.0 ports with type A connectors for easy data access SuperSpeed USB 3.0: 5Gb/s per USB port 20Gb/s transfer bandwidth Support RAID 0, 1 and JBOD Optimized for external USB drives and drive enclosures Backwards compatible with USB 2.0 & 1.1 Hot-Swap and Hot-Plug Compliant with xHCI (Extensible Host Controller Interface) Specification Support SMTP Email notification Mac OS X 10.6 and newer 4 2 Physical Specifications Host Adapter Dimensions: Size: 96mm x 95.0mm x 19mm EMI: EMI: FCC Part 15 Class B and CE Thermal and Atmospheric Characteristics: Work Temperature Range: +5 °C ~+ 55 °C Relative Humidity Range: 5% ~ 60% non-condensing Storage Temperature: -20 °C ~ +80 °C MTBF: 920,585 Hours Electrical Characteristics: PCI-E 3.3V 12V Power 4W max 1W max 5 3 Kit Contents RocketU 1144CM USB 3.0 HBA CD (Driver Software) Quick Installation Guide 6 4 Hardware Description and Installation 4.1 RocketU 1144CM Host Adapter Board Layout RocketU 1144CM 4.2 Installing the RocketU 1144CM Host Adapter Note: Make sure the system is powered-off before installing the RocketU host adapter. 1. 2. 3. 4. 5. Open the system chassis. Locate an unused PCI-Express ×16 slot. Remove the PCI-Express slot cover. Gently insert the RU series into the PCI-Express slot, and secure the bracket to the system chassis. After installing the adapter, attach the hard disks or disk enclosure to the RU series card using the USB cables. 6. Close and secure the system chassis. RocketU 1144CM 7 5 RocketU 1144CM Host Adapter Driver Installation 5.1 Driver Installation Once you have installed the RocketU 1144CM Card and booted your Mac, follow these instructions to install the drivers and the HighPoint Web Management Software: 1. Click “System Information” icon. 2. Click “PCI Cards”. Four PCI entries labeled “pci1103,1042” will be displayed. “Driver Installed” should be reported as “No” for these entries. 8 3. Insert the RocketU Series Software CD into your Mac Pro's DVD drive and navigate to the Mac Software package folder: /RocketU/RU1144CM Double-click on the “*.dmg” file to mount the disc image containing the Mac OS X software and drivers. 4. Double-click on the installer package labeled to start the installation process. 9 5. Follow the on-screen steps to complete the installation process. 6. After the install has completed, you will be prompted to restart your computer. You will need to restart in order to use the RocketU 1144CM. 10 5.2 Verify Installation of the Software 1. Click “System Information” icon. 2. Click “PCI Cards”. Four PCI entries labeled “pci1103,1042” will be displayed. “Driver Installed” should be reported as “Yes” for these entries. 11 6 Connect Hard Disk to RocketU 1144CM Host Adapter The RocketU 1144CM’s standard Type-A ports accept stand-alone USB 3.0 hard drive and SSD’s kits, as well as standard USB 3.0 enclosures and docking bays. HighPoint RocketStor 5122B USB 3.0 Storage docks are an ideal companion for the RocketU 1144CM HBA. The innovative dual-5Gb/s bay architecture provides an unprecedented level of transfer bandwidth for a USB-based storage solution, delivering the fastest SATA 6G performance possible through USB 3.0 connectivity. 1. Make sure the RocketU 1144CM has been installed into your Mac. 2. Connect the enclosure or hard disk to the RocketU 1144CM with USB 3.0 cables. 3. Allow the drives/enclosure to spin up for a few moments. Once the devices are ready, they will be recognized by the operating system and can be accessed as needed RocketU 1144CM USB 3.0 external Hard Drive 12 7 Web RAID Management Interface HighPoint’s web-based RAID Management Software (also known simply as the “Web GUI”), is used to monitor and configure hard disks and RAID arrays attached to HighPoint Rocket host adapters. The software package must be installed on a system with supported HighPoint Rocket controllers installed, and the device driver must be loaded to run the service. A web browser with XML support is required on the client side, e.g. Safari, Mozilla or Google’s Chrome. 7.1 Running the Web RAID Management Software To run the Web GUI, start your browser and enter the following URL address or click on the shortcut icon on the desktop: http://localhost:7402 The RAID Management Interface will display information about any hard disks and SSD’s attached to the RocketU 1144CM HBA. 13 7.2 Web RAID Management – Manage Three options are provided by the Manage Tab: Device, Array and Spare Pool. Device: Displays all hard drives and SSD’s attached to the RocketU 1144CM HBA. Array: Create and Delete RAID arrays. Spare Pool: When creating RAID 1 arrays, a Spare HDD can be configured to automatically help rebuild the array in the case of disk failure. 14 7.2.1 Manage - Devices Manage – Device displays information about each hard disk and SSD hosted by the RocketU 1144CM HBA, including the device’s Model Number, Serial Number, Firmware version, Total Capacity, and port number (which port the device is attached to). 7.2.2 Manage - Array Create Array The RocketU 1144CM allows you to configure RAID arrays using SATA HDD and SSD’s attached to any of its four USB 3.0 ports. Three types of RAID configurations (known as RAID levels) are supported: Note: The requirements for creating a RAID array are below. JBOD: Also known as “Just a Bunch Of Disks”. Requires one or more devices. Select this array type if maximum storage capacity is priority. The capacity of a JBOD array is the sum total of each devices’ available capacity. RAID 0: Also known as a “Stripe array”. Requires one or more devices. Configure a RAID 0 array if speed is priority – it is the fastest RAID level. The capacity of a RAID 0 array is equal to the smallest device multiplied by the total number of devices (for example: a 2 disk RAID 0 array created between a 3TB and 4TB hard drive results in 6TB of available capacity). RAID 1: Also known as “Mirroring”. Requires 2 devices. Select this RAID level if security is priority. The target device’s capacity must be equal to or larger than the source. All data written to the source is automatically duplicated to the target. 15 Array Type: The RocketU 1144CM supports RAID 0, 1, and JBOD configurations. Array Name: Name the array – this step is optional. Initialization Method: RAID initialization is available for RAID level 1 RAID arrays. RAID initialization will zero out each device, ensuring a healthy RAID array. There are two initialization 16 methods to choose from: Foreground and Quick Init. Quick Init: Will skip the initialization process and allow the user to immediately format and use the RAID array. This method is recommended only if you plan on “Verifying” the RAID array at a later time. A RAID array that is not fully initialized may have problems rebuilding when a RAID array becomes critical. Note: A. This option will delete all content on the disks. B. This option will not perform disk array initialization. When new HDD’s are used this option can be ignored since there is no data on the hard disks. Foreground: Will zero out the RAID array. The RAID array will not be accessible during the initialization process and it will only be available after initialization is complete. Initialization times are dependent the capacity of the RAID array. (A larger array will take longer to initialize than a smaller array). Note: A. This option will delete all content on the disks. B. The initialization time will be shorter time compared to the "Background" option. The logical disks will not be reported to the OS until the initialization is complete. 17 Select All: Select the number of HDD for the RAID array. 7.2.3 Manage – Spare Pool When creating redundant RAID arrays 1 a Spare HDD can be configured to automatically help rebuild a degraded redundant RAID. 1. You will see the following window after clicking the Spare Pool option. 18 2. Check the box before each disk you want to assign to the Spare pool, and click “Add Disk”. This will open a pop-up window. Click “OK” to confirm. 3. To remove a disk from the Spare Pool, check the box before the target disk and click “Remove Spare”. Click “OK” to continue, or “Cancel” to return to the menu. If you select “OK”, a second pop-up window will open announcing that the disk has been removed from the Spare Pool. Click “OK” to confirm. 19 7.3 Web RAID Management – Event The Event tab will open the Event View interface. Event View logs all RAID related activity including administrative actions, warnings and hardware failures. Clear: Click “Clear” to remove all current entries from the Event View log. 20 7.4 Web RAID Management – Task The Task page allows you to schedule maintenance sessions for RAID 1arrays. Regular maintenance is highly recommended for any redundant RAID array, and is essential for maintaining healthy, reliable storage configurations. The interface allows you to name each task, and specify the frequency, date, hour minute and second for each session. 21 7.5 Web RAID Management – Setting The Settings page provides various HBA-related settings and options. 22 Rebuild Priority: When a RAID 1 array becomes critical and needs to be rebuilt, the Rebuild Priority setting allows you to adjust how system resources are allocated to the rebuild procedure. Lowest: Lowest Priority when rebuilding arrays. System resources will be assigned to all other tasks first. Low: Most of the system’s tasks have priority over the rebuild procedure. Medium: Medium Priority is the default option – system resources are equally distributed between the rebuild procedure and other system tasks. High: The majority of available system resources will be directed towards the rebuild procedure. Highest: The HBA will utilize all available system resources to rebuild the array. Browser Based The default listening port is 7402, no other application utilities will use 7402 as RAID Management listening port. Restricting to localhost access port number means that remote Listening Port: network access of the RAID management utility with the systems IP address will not work. Email Notification Setting: The RocketRAID HBA can be configured to send Event Log entries to one or more E-Mail addresses. 23 7.6 Maintaining and Rebuilding a RAID Array 7.6.1 Maintenance and Verify From the Manage page, click the “Maintenance” link displayed near the arrays Status to see additional options and features for the selected array. The following pop-up window will be displayed: Delete: Will delete the existing RAID array or single disk JBOD. The HDD’s will become legacy HDD’s after rebooting. Unplug: Power down and power off all members of the RAID array. For any hosted device not configured as an array, this option is displayed beneath the Device name (see below): Verify: Use this option to manually verify the selected RAID 1 array. This will scan the RAID disks for bad sectors, and will ensure that parity is consistent. Rename: You are free to rename any RAID array at any time. Note: the name is limited to 8 characters or less. 24 7.6.2 Maintenance and Rebuilding a Critical RAID Array A redundant array (RAID 1) may become Critical if one of the disks fails or drops offline. The RAID status will change to Critical. Click “Maintenance” for more information. The missing /failed disk will be reported as an “Offline Disk”. 7.6.3 Add Disk If a spare disk is not available, you can physically install a new disk and use it to rebuild the critical array. To rebuild the array, click on “Maintenance”. Next, click “Add Disk”. The following menu will be displayed: Check the empty circle before the new disk and click “Submit”. 25 7.6.4 Rebuild RAID Array Once a disk has been added, the Web GUI will automatically start the rebuild process. Once complete, the status will change to “Normal”. 7.7 Web GUI Icon Definition List The definitions of each ICON used by the RAID Management interface are listed below. Icon Description The array status is "Normal". The array status is "Critical" - a disk is missing from the RAID array. The array status is "Verifying". This indicates that the array is running a data integrity check. The array status is "Rebuilding". This occurs when the data verification fails or when adding a new disk into the "Critical" array. The array status is "Critical". This indicates that current array needs "rebuild". The status of the "Array" or "Device" is "Disabled". The array is "Initializing". This icon means the RAID array is "Uninitialized". This icon is displayed if the Quick Init option is used when first creating an array, or if the initialization process was interrupted 26 or cancelled. The array has stopped "Initializing". Current status is "Uninitialized". The device status "Legacy". An existing file system has been created on the HDD. The device is a "Spare". It is used to replace the failed RAID disk member to rebuild automatically Information. Warning. Error. 27 8 Thank You Thank you for purchasing the RocketU 1144CM Host adapter. We appreciate your support, and welcome any questions, comments or product suggestions you may have. 28 9 Customer Support If you encounter any problem while utilizing RocketU series Host Adapters, or have any questions about this or any other HighPoint Technologies, Inc. product, feel free to contact our Customer Support Department. HighPoint Technologies, Inc. websites: http://www.highpoint-tech.com/ Web Support: http://www.highpoint-tech.com/websupport/ http://www.highpoint-tech.com 29