1
Always there to help you
Register your product and get support at
www.philips.com/welcome
Question?
Contact
Philips
User manual
BDP2180
Before you connect this Blu-ray disc/ DVD player, read and understand all accompanying instructions.
2
Register your product and get support at
www.philips.com/welcome
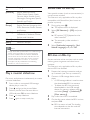
1
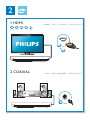
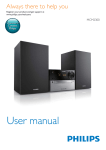
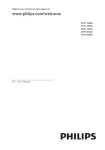
HDMI
(
)
COAXIAL
A
3
2
1 HDMI
HDMI {VIDEO {COAXIAL {AUDIO LINE OUT
HDMI
2 COAXIAL
{HDMI {VIDEO COAXIAL {AUDIO LINE OUT
COAXIA
COAXIAL
A AL
4
3
4
5
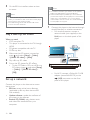
1
2
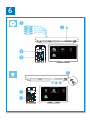
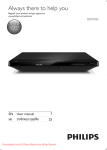
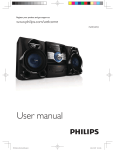
SOURCE
TV
5
6
2
BD/BD 3D
DVD/VCD/CD
DivX Plus HD/MKV
MP3 / JPEG
1
3
4
1
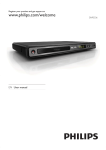
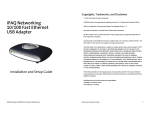
USB
2
3
6
Contents
1 Hookup and play
2 Use your Blu-ray disc/ DVD player
Basic play control
Video, audio and picture options
DivX videos
Play a musical slideshow
BonusView on Blu-ray
BD-Live on Blu-ray
Play a Blu-ray 3D video
Set up a network
Smartphone control
Browse PC through DLNA
Use Philips EasyLink
3 Change settings
Picture
Sound
Network
(installation, status...)
Preference
(languages, parental control...)
Advanced options
(clear memory...)
4 Update software
Update software via the Internet
Update software via USB
2-6
8
8
9
10
11
11
11
12
12
13
14
14
15
15
15
16
16
16
17
17
17
6SHFLÀFDWLRQV
6 Troubleshooting
19
7 Safety and important notice
21
EN
7
2 Use your Bluray disc/ DVD
player
Congratulations on your purchase, and
ZHOFRPHWR3KLOLSV7RIXOO\EHQHÀWIURP
the support that Philips offers (e.g. product
software upgrade), register your product at
www.philips.com/welcome.
8
EN
Basic play control
During play, press the following buttons to
control.
Button
/
/
/
AUDIO
SUBTITLE
DISC MENU
/ POP-UP
MENU
TOP MENU
Color
buttons
OK
Alphanumeric
buttons
Action
Turn on the player, or switch
to standby.
Access the home menu.
Stop play.
Press and hold (more than 4
seconds) to open or close the
disc compartment.
Pause play.
Press repeatedly to slow
forward frame by frame.
Start or resume play.
Skip to the previous or next
WUDFNFKDSWHURUÀOH
Fast backward or forward.
Press repeatedly to change the
search speed.
Press once, and then press
to slow forward.
Select an audio language or
channel.
Select a subtitle language.
Access or exit the disc menu.
Access the main menu of a
video disc.
Select tasks or options for
Blu-ray discs.
Navigate the menus.
Press
to rotate a picture
clockwise or counter-clockwise
during slideshow.
&RQÀUPDVHOHFWLRQRUHQWU\
Return to a previous display
menu.
Access more options during
play.
Select an item to play.
Enter values.
Enter letters via SMS style
entry.
Video, audio and picture
options
More options are available for video or picture
play from a disc or USB storage device.
Video options
2
3
1
Access more options during video play.
[Audio language]: Select an audio language.
[Subtitle Language]: Select a subtitle
language.
[Subtitle shift]: Change the subtitle
position on the screen. Press
to
change the subtitle position.
[Info]: Display play information.
[Character set]: Select a character set that
supports the DivX video subtitle (only for
DivX videos).
[Time search]6NLSWRDVSHFLÀFWLPH
via the numeric buttons on the remote
control.
[2nd audio language]: Select the second
audio language (only for Blu-ray discs that
support BonusView).
[2nd Subtitle Language]: Select the second
subtitle language (only for Blu-ray discs that
support BonusView).
[Titles]: Select a title.
[Chapters]: Select a chapter.
[Angle list]: Select a camera angle.
[Menus]: Display a disc menu.
[PIP selection]: Display a picture-in-picture
window (only for Blu-ray discs that support
BonusView).
EN
9
[Zoom]: Zoom into a video picture. Press
to select a zoom factor.
[Repeat]: Repeat a chapter or title.
[Repeat A-B]: Mark two points within a
chapter for repeat play, or turn off repeat
mode.
[Picture settings]6HOHFWDSUHGHÀQHG
color setting.
Note
Available video options depend on the video source.
Picture options
2
3
1
Access more options during slideshow.
[Rotate +90]: Rotate a picture 90 degrees
clockwise.
[Rotate -90]: Rotate a picture 90 degrees
counter-clockwise.
[Zoom]: Zoom into a picture. Press
to
select a zoom factor.
[Info]: Display picture information.
[Duration per slide]: Set a display interval
for a slideshow.
[Slide Animation]: Select a transition effect
for a slideshow.
[Picture Settings]6HOHFWDSUHGHÀQHG
color setting.
[Repeat]: Repeat a selected folder.
10
EN
Audio options
Press
repeatedly to cycle through the
following options.
Repeat the current track.
Repeat all the tracks on the disc or folder.
Play audio tracks in a random loop.
Turn off a repeat mode.
DivX videos
You can play DivX videos from a disc or a USB
storage device.
VOD code for DivX
Before you purchase DivX videos and play
them on this player, register this player on
www.divx.com using the DivX VOD code.
Display the DivX VOD code: press , and
select [Setup] > [Advanced] > [DivX®
VOD Code].
DivX subtitles
Press SUBTITLE to select a language.
If the subtitle is not displayed correctly,
change the character set that supports the
DivX subtitle. Select a character set: press
, and select [Character Set].
Character
set
[Standard]
[Central
Europe]
[Cyrillic]
[Greek]
[Baltic]
Languages
English, Albanian, Danish,
Dutch, Finnish, French, Gaelic,
German, Italian, Kurdish (Latin),
Norwegian, Portuguese, Spanish,
Swedish, and Turkish
Albanian, Croat, Czech, Dutch,
English, German, Hungarian, Irish,
Polish, Romanian, Slovak, Slovene,
and Serbian
Bulgarian, Belorussian, English,
Macedonian, Moldavian, Russian,
Serbian, and Ukrainian
Greek
Northern Europe
BonusView on Blu-ray
View special content (such as commentaries) in
a small screen window.
This feature is only applicable to Blu-ray discs
compatible with BonusView (also known as
picture in picture).
1
2
During play, press .
» The options menu is displayed.
Select [PIP Selection] > [PIP], and press
OK.
» PIP options [1]/[2] depend on the
video contents.
» The secondary video window is
displayed.
3
Note
Select [2nd Audio Language] or [2nd
Subtitle Language], and press OK.
7RSOD\'LY;'50SURWHFWHGÀOHVIURPD86%VWRUDJH
device, connect this player to a TV through HDMI.
7RXVHWKHVXEWLWOHVPDNHVXUHWKDWWKHVXEWLWOHÀOH
KDVWKHVDPHQDPHDVWKH'LY;YLGHRÀOHQDPH)RU
H[DPSOHLIWKH'LY;YLGHRÀOHLVQDPHG´PRYLHDYL
VDYHWKHVXEWLWOHÀOHDV´PRYLHVUWµRU´PRYLHVXEµ
7KLVSOD\HUFDQSOD\VXEWLWOHÀOHVLQWKHIROORZLQJ
formats: .srt, .sub, .txt, .ssa, and .smi.
Play a musical slideshow
Play music and pictures simultaneously to create
a musical slideshow.
1
2
3
4
5
BD-Live on Blu-ray
Access exclusive online services, such as movie
trailers, games, ringtones and other bonus
contents.
This feature is only applicable to Blu-ray discs
that are BD-Live enabled.
1
2
From a disc or connected USB storage
GHYLFHSOD\DPXVLFÀOH
Press , and go to the picture folder.
Select a picture from the same disc or
USB, and press OK to start slideshow.
Press
to stop slideshow.
Press
again to stop music play.
3
4
Prepare the Internet connection and set
XSDQHWZRUNVHH6HWXSDQHWZRUN
Connect a USB storage device to this
player.
A USB storage device is used to store
the downloaded BD-Live content.
To delete the BD-Live previously
downloaded on the USB storage
device for memory release, press
and select [Setup] > [Advanced] >
[Clear memory].
Play a disc that is BD-Live enabled.
On the disc menu, select the BD-Live icon,
and press OK.
» BD-Live starts to load. The loading
time depends on the disc and the
Internet connection.
EN
11
5
On the BD-Live interface, select an item
to access.
Note
For wireless connection, you need to use an optional
Note
Philips Wi-Fi USB adapter (named WUB1110).
Te Wi-Fi USB Adapter (WUB1110) is not included. To
purchase this adapter, visit shop.philips.com. If the Philips
online shop is not available in your country, please
contact Philips customer service. For contact details, go
to www.philips.com/support.
BD-Live services vary from discs and countries.
When you use BD-Live, data on the disc and this player
are accessed by the content provider
Use a USB storage device with at least 1GB of free
space to store the download.
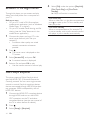
Play a Blu-ray 3D video
What you need
A 3D compliant TV
This player is connected to the TV through
HDMI
3D glasses compatible with the TV
3D Blu-ray disc
1
2
3
Connect this player to the Internet through
wired (Ethernet) or wireless connection.
For wired connection, connect a
network cable (not supplied) to the
LAN port on the back panel of this
player.
PC (DLNA)
Make sure that 3D output is turned on:
press , and select [Setup] > [Video]
>[Watch 3D video] > [Auto].
Play a Blu-ray 3D video.
Put on the 3D glasses for 3D effects.
To play 3D video in 2D, turn off Blu-ray
3D output (press , and select [Setup]
> [Video] > [Watch 3D video] >
[Off]).
Set up a network
Connect this player to the Internet to access
the services:
BD-Live: access online bonus features
(applicable to Blu-ray discs that are BDLive enabled)
Update software: update the software of
this player via the Internet.
Browse PC (DLNA): play photos, music,
DQGYLGHRÀOHVVWUHDPHGIURP\RXU
computer.
12
1
EN
For Wi-Fi, connect a Philips Wi-Fi USB
adapter (named WUB1110) to the
(USB) connector on the front
panel of this player.
PC (DLNA)
For iPhone, search for the application
in App Store
For Android based device, search for
the application in Android Market
Before you start
Connect this player to a home network
VHH6HWXSDQHWZRUN
Connect your smartphone to the same
home network (see the user manual of the
smartphone for details).
Turn on this player
Control your player
2
Perform the network installation.
1) Press .
2) Select [Setup], and press OK.
3) Select [Network] > [Network
installation], and press OK.
4) Follow the instructions on the TV screen to
complete the installation. If necessary, use the
alphanumeric buttons on the remote control
to enter a password.
Caution
Before you connect to a network, familiarize yourself
Use a smartphone to browse, control and play
PHGLDÀOHVIURPWKLVSOD\HU
1
2
3
4
with the network router, and networking principles. If
necessary, read documentation accompanying network
components. Philips is not responsible for lost, damaged
or corrupt data.
5
Smartphone control
Use a smartphone to browse, control and play
PHGLDÀOHVIURPWKLVSOD\HU
What you need
An iPhone (iOS 3.1.3 and above) or
Android based device (Android 2.1 and
above)
On your smartphone, download Philips
MyRemote application
6
Insert a data disc or USB storage device
into this player.
On your smartphone, tap the MyRemote
icon from the home screen.
» The name of this player is displayed on
the smartphone.
Select this player from the smartphone
screen.
» The smartphone used as a virtual
remote control is enabled.
On the smartphone, tap the Media
(Media) tab, and then select the disc or
USB source.
» The folders in the data disc or USB
storage device are displayed.
2SHQDIROGHUDQGVHOHFWDÀOHWRSOD\
To access the remote control, return
to the previous smartphone screen,
and then tap the Remote (Remote)
tab. Only the relevant control buttons
are enabled.
Tap the control buttons on the
smartphone to control play.
To access more control buttons, swipe
the screen to the left or right.
To exit the application, press the home
button on the smartphone.
EN
13
Browse PC through DLNA
Through this player, you can stream and play
video, music and photo from a computer on
your TV.
Before you start
On your PC, install a DLNA-compliant
media server application (such as Windows
Media Player 11 or higher)
2Q\RXU3&HQDEOHPHGLDVKDULQJDQGÀOH
VKDULQJVHHWKH+HOSGRFXPHQWLQWKH
media server application)
1
2
3
4
Connect this player and your PC in the
VDPHKRPHQHWZRUNVHH6HWXSD
QHWZRUN
For better video quality, use wired
network connection whenever
possible.
Press .
» The home menu is displayed on the
TV screen.
Select [browse PC], and press OK.
» A content browser is displayed.
6HOHFWDÀOHDQGSUHVVOK to play.
Use the remote control to control play.
Use Philips EasyLink
This player supports Philips EasyLink which
uses the HDMI CEC (Consumer Electronics
Control) protocol. You can use a single remote
control to control EasyLink compliant devices
that are connected through HDMI. Philips does
not guarantee 100% interoperability with all
HDMI CEC devices.
1
2
3
14
Connect the HDMI CEC compliant devices
through HDMI, and turn on the HDMI
CEC operations on the TV and other
connected devices (see the user manual of
the TV or other devices for details).
Press
.
Select [Setup]> [EasyLink].
EN
4
Select [On] under the options: [EasyLink],
[One Touch Play] and [One Touch
Standby].
» EasyLink function is turned on.
One Touch Play
When a video disc is in the disc compartment,
press to wake up the TV from standby, and
then play a disc.
One Touch Standby
When a connected device (for example TV)
is put to standby with its own remote control,
this player is put to standby automatically.
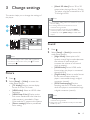
3 Change settings
[Watch 3D video]: Set to 3D or 2D
output when playing a Blu-ray 3D disc.
The player must be connected to a 3D
TV through HDMI.
This section helps you to change the settings of
this player.
Note
If you change a setting, make sure that the TV supports
the new setting.
1
For settings related to HDMI, the TV must be
connected through HDMI.
For the composite connection (via the VIDEO
2
connector), select a video resolution of 480i/576i
or 480p/576p under [HDMI video] to enable video
output.
3
Watch 3D video
Sound
1
2
Note
You cannot change a menu option that is grayed out.
To return to the previous menu, press . To exit the
menu, press
.
Picture
1
2
Press
.
Select [Setup] > [Video] to access the
video setup options.
[TV display]: Select a picture display
IRUPDWWRÀWWKH79VFUHHQ
[HDMI video]: Select an HDMI video
resolution.
[HDMI Deep Color]: Display colors
with more shades and hues when the
video content is recorded in Deep
Color and the TV supports this feature.
[Picture settings]6HOHFWDSUHGHÀQHG
color setting.
Press
.
Select [Setup] > [Audio] to access the
audio setup options.
[Night Mode]: Select quiet or full
dynamic sound. Night mode decreases
the volume of loud sound and
increases the volume of soft sound
(such as speech).
[HDMI Audio]: Set an HDMI audio
format when this player is connected
through HDMI.
[Digital Audio]: Select an audio format
for the sound output when this
player is connected through a digital
connector (coaxial).
[PCM Downsampling]: Set the
sampling rate for PCM audio output
when this player is connected through
a digital connector (coaxial).
Note
For settings related to HDMI, the TV must be
connected through HDMI.
Night mode is only available for Dolby encoded DVD
and Blu-ray discs.
EN
15
SRVLWLRQLVFKDQJHGDXWRPDWLFDOO\WRÀW
the TV screen (this feature works with
some Philips TVs only).
[Change Password]: Set or change
a password to play a restricted disc.
,QSXWLI\RXGRQRWKDYHD
password or if you have forgotten your
password.
[Auto Standby]: Enable or disable
auto standby. If enabled, the player
switches to standby after 30 minutes
of inactivity (for example, in pause or
stop mode).
[VCD PBC]: Display or skip the
content menu for VCD and SVCD.
Network
(installation, status...)
1
2
Press
.
Select [Setup] > [Network] to access the
network setup options.
[Network installation]: Start a wired
or wireless installation to make the
network work.
[View network settings]: Display the
current network status.
[View wireless settings]: Display the
current Wi-Fi status.
[Name your Product:]: Re-name this
SOD\HUIRULGHQWLÀFDWLRQLQDKRPH
network.
Note
If your preferred language is not available for disc
Preference
(languages, parental control...)
1
2
16
Press
.
Select [Setup] > [Preference] to access
the preference setup options.
[Menu language]: Select an onscreen
display menu language.
[Audio]: Select an audio language for
video.
[Subtitle]: Select a subtitle language for
video.
[Disc Menu]: Select a menu language
for a video disc.
[Parental Control]: Restrict access to
discs that are encoded with ratings.
,QSXWWRDFFHVVWKHUHVWULFWLRQ
options. To play all discs irrespective of
WKHUDWLQJVHOHFWOHYHO
[Screen Saver]: Enable or disable
screen saver mode. If enabled, the
screen enters idle mode after 10
minutes of inactivity (for example, in
pause or stop mode).
[Auto Subtitle Shift]: Enable or disable
subtitle shift. If enabled, the subtitle
EN
language, audio or subtitle, you can select [Other]
from the menu options and input 4-digit language code
which can be found at the back of this user manual.
If you select a language which is not available on a disc,
this player uses the default language of the disc.
Advanced options
(clear memory...)
1
2
Press
.
Select [Setup] > [Advanced] to access the
advanced setup options.
[BD-Live security]: Restrict or allow
access to BD-Live (only for noncommercial, user-created BD-Live
discs).
[Downmix mode]: Control 2-channel
stereo audio output.
[Software update]: Select to update
software from a network or from USB
storage device.
[Clear memory]: Delete the previous
BD-Live download on the USB
VWRUDJHGHYLFH$%8'$IROGHULV
automatically created to store the BDLive download.
[DivX® VOD Code]: Display the
DivX® registration code or the
deregistration code for this player.
[Version information]: Display the
software version of this player.
[Restore default settings]: Reset this
player to the default settings made at
the factory, except for password and
parental control level.
Note
4 Update software
Before you update the software of this player,
check the current software version:
Press , and then select [Setup] >
[Advanced] > [Version Info.], and press
OK.
Blu-ray discs.
Update software via the
Internet
player, register this player on www.divx.com with the
DivX VOD code.
1
You cannot restrict Internet access on commercial
Before you purchase DivX videos and play them on this
2
3
4
Connect the player to the Internet
VHH6HWXSDQHWZRUN
Press
, and select [Setup].
Select [Advanced] > [Software Update]>
[Network].
» If an upgrade media is detected, you
are prompted to start the update.
Follow the instructions on the TV screen
to update the software.
» When the update is complete, this
player automatically turns off and on
again.
Update software via USB
1
2
Check the latest software version on
www.philips.com/support.
Search for your model and click on
6RIWZDUHDQGGULYHUV
Download the software into a USB storage
device.
a Unzip the download, and make sure
that the unzipped folder is named
"UPG_ALL".
b Put the "UPG_ALL" folder in the root
directory.
EN
17
3
4
5
6
Connect the USB storage device to the
(USB) connector on this player.
Press
, and select [Setup].
Select [Advanced] > [Software Update]>
[USB].
» If an upgrade media is detected, you
are prompted to start the update.
Follow the instructions on the TV screen
to update the software.
» When the update is complete, this
player automatically turns off and on
again.
Caution
Do not turn off the power or remove the USB storage
device when the software update is in progress because
you might damage this player.
18
EN
5 Specifications
Note
6SHFLÀFDWLRQVDUHVXEMHFWWRFKDQJHZLWKRXWQRWLFH
Region code
This player can play discs with the following
region codes.
DVD
Blu-ray
B
Countries
Europe, United
Kingdom
Playable media
BD-Video, BD 3D
DVD-Video, DVD+R/+RW, DVD-R/-RW,
DVD+R/-R DL (Dual Layer)
VCD/SVCD
Audio CD, CD-R/CD-RW, MP3 media,
:0$PHGLD-3(*ÀOHV
DivX (Ultra)/DivX Plus HD media, MKV
media
USB storage device
File format
Video: .avi, .divx, .mp4, .mkv
Audio: .mp3, .wma, .wav
3LFWXUHMSJJLISQJ
Video
Signal system: PAL / NTSC
HDMI output: 480i/576i, 480p/576p, 720p,
1080i, 1080p, 1080p/24Hz
Audio
Digital output: 0.5 Vp-p (75 ohm)
Coaxial
HDMI output
Sampling frequency:
MP3: 32 kHz, 44.1 kHz, 48 kHz
WMA: 44.1 kHz, 48 kHz
Constant bit rate:
MP3: 112 kbps - 320 kpbs
WMA: 48 kpbs - 192 kpbs
USB
Compatibility: Hi-Speed USB (2.0)
Class support: USB Mass Storage Class
File system: FAT16, FAT32
USB port: 5V , 500mA
Support HDD (a portable hard disc drive):
an external power source may be needed.
Main unit
Power supply rating: 220-240V~, 50Hz 60Hz
Power consumption: 10 W
Power consumption in standby mode:
< 0.5 W
Dimensions (w x h x d): 310 x 39.5 x
217.7 (mm)
Net Weight: 1.12 kg
Accessories supplied
Remote control and batteries
User manual
Optional accessory
A wireless Philips USB adapter(named
WUB1110, sold separately)
Multimedia connections: Wi-Fi
802.11b/g/n
Connectivity: Rear connection (USB)
Ambient temperature: 5 deg C to 40
deg C.
Dongle dimensions (W x H x D): 28.4
x 82 x 13.4 mm
/DVHU6SHFLÀFDWLRQ
Laser Type (Diode): AlGaInN (BD), AlGaInP
(DVD/CD)
Wave length: 398nm to 413nm
(BD),645nm to 664nm (DVD), 770nm to
800nm(CD)
Output power: 1.7mW (BD),
0.19mW(DVD), 0.25mW (CD)
6 Troubleshooting
Note
)RULGHQWLÀFDWLRQDQGVXSSO\UDWLQJVVHHWKHW\SHSODWH
at the back or bottom of the product.
Before you make or change any connections, make sure
that all devices are disconnected from the power outlet.
Warning
Risk of electric shock. Never remove the casing of the
player.
To keep the warranty valid, never try to repair
the player yourself.
If you have problems using this player, check the
following points before you request service. If
you still have a problem, register your player and
get support at www.philips.com/support.
If you contact Philips, you will be asked for the
model and serial number of this player. The
model number and serial number are on the
back of this player. Write the numbers here:
Model No. __________________________
Serial No. ___________________________
Main unit
The buttons on this player do not work.
Disconnect this player from the power
supply for a few minutes, and then
reconnect.
Picture
No picture.
Make sure that the TV is switched to the
correct source input for this player.
For the composite connection (via the
VIDEO connector) to the TV, on this player
select a video resolution of 480i/576i or
480p/576p under [HDMI Video] to enable
video output.
EN
19
No picture on HDMI connection.
Make sure that the HDMI cable is not
faulty. If it is faulty, replace with a new
HDMI cable.
On the remote control, press and then
SUHVV´µQXPHULFEXWWRQVWRUHFRYHU
picture display. Or wait for 10 seconds for
auto recovery.
If this player is connected to an
unauthorized display device with an HDMI
cable, the audio and video signals may not
be output.
7KHGLVFGRHVQRWSOD\KLJKGHÀQLWLRQYLGHR
Make sure that the disc contains highGHÀQLWLRQYLGHR
Make sure that the TV supports highGHÀQLWLRQYLGHR
Sound
No audio output from the TV.
Make sure that the audio cables are
connected to the audio input of the TV.
Make sure that the TV is switched to the
correct source input for this player.
No audio output from the loudspeakers of
the external audio device (home theater or
DPSOLÀHU
Make sure that the audio cables are
connected to the audio input of the audio
device.
Switch the external audio device to the
correct audio source input.
No sound on HDMI connection.
You may not hear any sound from the
HDMI output if the connected device
is non-HDCP compliant or only DVIcompatible.
No secondary audio output for picture-inpicture feature.
When [Bitstream] under the [HDMI
Audio] or [Digital Audio] menu is selected,
interactive sound like secondary sound
for picture-in-picture feature is muted.
Deselect [Bitstream].
20
EN
Play
Cannot play a disc.
Clean the disc.
Make sure that the disc is correctly loaded.
Make sure that this player supports the
GLVF6HH6SHFLÀFDWLRQV
Make sure that this player supports the
region code of the DVD or BD.
For DVD±RW or DVD±R, make sure that
WKHGLVFLVÀQDOL]HG
&DQQRWSOD\'LY;YLGHRÀOHV
0DNHVXUHWKDWWKH'LY;YLGHRÀOHLV
complete.
0DNHVXUHWKDWWKHYLGHRÀOHQDPH
extension is correct.
7RSOD\'LY;'50SURWHFWHGÀOHVIURPD
USB storage device, connect this player to
a TV through HDMI.
DivX subtitles do not display correctly.
0DNHVXUHWKDWWKHVXEWLWOHÀOHKDVWKH
VDPHQDPHDVWKH'LY;YLGHRÀOH
0DNHVXUHWKDWWKHVXEWLWOHÀOHKDVDQ
extension name supported by this player
(.srt, .sub, .txt, .ssa, or .smi).
Cannot read the contents of a connected USB
storage.
Make sure that the format of the USB
storage device is compatible with this
player.
0DNHVXUHWKDWWKHÀOHV\VWHPRQWKH86%
storage device is supported by this player.
For a USB HDD (a portable hard disc
drive), an external power source may be
needed.
'No entry' or 'x' sign is displayed on the TV.
The operation is not possible.
EasyLink feature does not work.
Make sure that this player is connected
to the Philips brand EasyLink TV, and the
(DV\/LQNRSWLRQLVWXUQHGRQVHH8VH
\RXU%OXUD\GLVF'9'SOD\HU!8VH
3KLOLSV(DV\/LQN
Cannot access BD-Live features.
Make sure that this player is connected to
WKHQHWZRUNVHH8VH\RXU%OXUD\GLVF
'9'SOD\HU!6HWXSDQHWZRUN
Make sure that the network installation is
PDGHVHH8VH\RXU%OXUD\GLVF'9'
SOD\HU!6HWXSDQHWZRUN
Make sure that the Blu-ray disc supports
BD-Live features.
&OHDUPHPRU\VWRUDJHVHH&KDQJH
VHWWLQJV!$GYDQFHGRSWLRQV%'/LYH
VHFXULW\FOHDUPHPRU\
7 Safety and
important
notice
Read and understand all instructions before you
use this Blu-ray disc/ DVD player. If damage is
caused by failure to follow the instructions, the
warranty does not apply.
Network
Wireless network is not found or distorted.
Make sure that the network is correctly
FRQQHFWHGVHH8VH\RXU%OXUD\GLVF
'9'SOD\HU!6HWXSDQHWZRUN
Make sure that the network installation is
PDGHVHH8VH\RXU%OXUD\GLVF'9'
SOD\HU!6HWXSDQHWZRUN
Make sure that the wireless network is
not disturbed by microwave ovens, DECT
phones, or other neighboring Wi-Fi devices.
If the wireless network does not work
properly, try a wired network installation
VHH8VH\RXU%OXUD\GLVF'9'SOD\HU!
6HWXSDQHWZRUN
Browse PC works slowly.
Look in your wireless router’s user manual
for information on indoor range, transfer
rate, and other factors of signal quality.
You need a high speed Internet connection
for your router.
3D videos
Cannot see 3D effects
Make sure that 3D output is turned on(see
8VH\RXU%OXUD\GLVF'9'SOD\HU!
3OD\D%OXUD\'YLGHR
Make sure that the disc title being played is
Blu-ray 3D compliant.
Make sure that the TV is 3D and HDMI
compliant, and the TV is set to 3D mode
(refer to the TV's user manual).
Make sure that the 3D glasses are activated
(refer to the TV’s user manual).
Important notes for users in
the U.K.
Mains fuse
This information applies only to products with a
UK mains plug.
7KLVSURGXFWLVÀWWHGZLWKDQDSSURYHGPROGHG
plug. If you replace the fuse, use one with:
the ratings shown on the plug,
a BS 1362 approval, and
the ASTA approval mark.
Contact your dealer if you are not sure about
what type of fuse to use.
Caution: To conform with the EMC directive
(2004/108/EC), do not detach the plug from
the power cord.
How to connect a plug
The wires in the power cord are colored as
follows: blue = neutral (N), brown = live (L).
If the colors do not correspond with the colors
on your plug, identify the terminals in your plug
as follows:
1
2
3
Connect the blue wire to the terminal
marked N or colored black.
Connect the brown wire to the terminal
marked L or colored red.
Do not connect either wire to the earth
terminal in the plug, marked E (or e) or
colored green (or green and yellow).
Before you replace the plug cover, make sure
that the cord grip is clamped over the sheath
EN
21
RIWKHFDEOHDQGQRWMXVWRYHUWKHWZRZLUHVLQ
the cable.
Copyright in the U.K.
Recording and playback of material may require
consent. see Copyright Act 1956 and The
performer's Protection Acts 1958 to 1972.
Safety
3D health warning
If you or your family has a history of
epilepsy or photosensitive seizures, consult
a medical professional before exposing
\RXUVHOIWRÁDVKLQJOLJKWVRXUFHVUDSLG
image sequences or 3D viewing.
To avoid discomfort such as dizziness,
headache or disorientation, we
recommend not watching 3D for extended
periods of time. If you experience any
discomfort, stop watching 3D and do
not immediately engage in any potentially
hazardous activity (for example driving a
car) until your symptoms have disappeared.
If symptoms persist, do not resume
watching 3D without consulting a medical
SURIHVVLRQDOÀUVW
Parents should monitor their children
during 3D viewing and ensure they do not
experience any discomfort as mentioned
above. Watching 3D is not recommended
for children under 6 years of age as their
visual system is not fully developed yet.
5LVNRIHOHFWULFVKRFNRUÀUH
Never expose the product and accessories
to rain or water. Never place liquid
containers, such as vases, near the product.
If liquids are spilt on or into the product,
disconnect it from the power outlet
immediately. Contact Philips Consumer
Care to have the product checked before
use.
Never place the product and accessories
QHDUQDNHGÁDPHVRURWKHUKHDWVRXUFHV
including direct sunlight.
22
EN
1HYHULQVHUWREMHFWVLQWRWKHYHQWLODWLRQ
slots or other openings on the product.
Where the mains plug or an appliance
coupler is used as the disconnect device,
the disconnect device shall remain readily
operable.
Batteries (battery pack or batteries
installed) shall not be exposed to excessive
KHDWVXFKDVVXQVKLQHÀUHRUWKHOLNH
Disconnect the product from the power
outlet before lightning storms.
When you disconnect the power cord,
always pull the plug, never the cable.
5LVNRIVKRUWFLUFXLWRUÀUH
Before you connect the product to the
power outlet, ensure that the power
voltage matches the value printed on the
back or bottom of the product. Never
connect the product to the power outlet if
the voltage is different.
5LVNRILQMXU\RUGDPDJHWRWKHSURGXFW
Visible and invisible laser radiation when
open. Avoid exposure to beam.
Do not touch the disc optical lens inside
the disc compartment.
1HYHUSODFHWKHSURGXFWRUDQ\REMHFWV
on power cords or on other electrical
equipment.
If the product is transported in
temperatures below 5°C, unpack the
product and wait until its temperature
matches room temperature before
connecting it to the power outlet.
5LVNRIRYHUKHDWLQJ
1HYHULQVWDOOWKLVSURGXFWLQDFRQÀQHG
space. Always leave a space of at least four
inches around the product for ventilation.
0DNHVXUHWKDWFXUWDLQVRURWKHUREMHFWV
never cover the ventilation slots on the
product.
5LVNRIFRQWDPLQDWLRQ
Do not mix batteries (old and new or
carbon and alkaline, etc.).
Remove batteries if they are exhausted or
if the remote control is not to be used for
a long time.
Batteries contain chemical substances, they
should be disposed of properly.
5LVNRIVZDOORZLQJEDWWHULHV
The product/remote control may contain a
coin type battery, which can be swallowed.
Keep the battery out of reach of children
at all times!
Class II equipment symbol:
This symbol indicates that this product has a
double insulation system.
When this crossed-out wheeled bin symbol is
attached to a product it means that the product
is covered by the European Directive 2002/96/
EC. Please inform yourself about the local
separate collection system for electrical and
electronic products.
Please act according to your local rules and
do not dispose of your old products with your
normal household waste. Correct disposal of
your old product helps to prevent potential
negative consequences for the environment and
human health.
CLASS 1
LASER PRODUCT
Care for your product
'RQRWLQVHUWDQ\REMHFWVRWKHUWKDQGLVFV
into the disc compartment.
Do not insert warped or cracked discs into
the disc compartment.
Remove discs from the disc compartment
if you are not using the product for an
extended period of time.
2QO\XVHPLFURÀEHUFORWKWRFOHDQWKH
product.
Your product contains batteries covered by the
European Directive 2006/66/EC, which cannot
be disposed with normal household waste.
Please inform yourself about the local rules
on separate collection of batteries because
correct disposal helps to prevent negative
consequences for the environmental and
human health.
This product complies with the radio
interference requirements of the European
Community.
Copyright
Care of the environment
Your product is designed and manufactured
with high quality materials and components,
which can be recycled and reused.
This item incorporates copy protection
technology that is protected by U.S. patents
and other intellectual property rights of
Rovi Corporation. Reverse engineering and
disassembly are prohibited.
EN
23
Open source software
Philips Electronics Singapore Pte Ltd hereby
offers to deliver, upon request, a copy of the
complete corresponding source code for the
copyrighted open source software packages
used in this product for which such offer is
requested by the respective licenses.
This offer is valid up to three years after
product purchase to anyone in receipt of this
information. To obtain source code, please
contact [email protected]. If you prefer
not to use email or if you do not receive
FRQÀUPDWLRQUHFHLSWZLWKLQDZHHNDIWHUPDLOLQJ
WRWKLVHPDLODGGUHVVSOHDVHZULWHWR2SHQ
Source Team, Philips Intellectual Property &
Standards, P.O. Box 220, 5600 AE Eindhoven,
7KH1HWKHUODQGV,I\RXGRQRWUHFHLYHWLPHO\
FRQÀUPDWLRQRI\RXUOHWWHUSOHDVHHPDLOWRWKH
email address above.
This product incorporates proprietary
technology under license from Verance
Corporation and is protected by U.S. Patent
7,369,677 and other U.S. and worldwide
patents issued and pending as well as copyright
and trade secret protection for certain aspects
of such technology. Cinavia is a trademark of
Verance Corporation. Copyright 2004-2010
Verance Corporation. All rights reserved by
Verance. Reverse engineering or disassembly is
prohibited.
Cinavia notice
This product uses Cinavia technology to
limit the use of unauthorized copies of some
FRPPHUFLDOO\SURGXFHGÀOPDQGYLGHRVDQG
their soundtracks. When a prohibited use of an
unauthorized copy is detected, a message will
be displayed and playback or copying will be
interrupted.
More information about Cinavia technology
is provided at the Cinavia Online Consumer
Information Center at http://www.cinavia.com.
To request additional information about Cinavia
by mail, send a postcard with your mailing
address to: Cinavia Consumer Information
Center, P.O. Box 86851, San Diego, CA, 92138,
USA.
24
EN
Trademarks
‘Blu-ray ’, ‘Blu-ray Disc ’, ‘Blu-ray Disc ’
logo, ‘Blu-ray 3D ’ and ‘Blu-ray 3D ’ logo are
the trademarks of Blu-ray Disc Association.
+'0,DQG+'0,ORJRDQG+LJK'HÀQLWLRQ
Multimedia Interface are trademarks or
registered trademarks of HDMI licensing LLC in
the United States and other countries.
Manufactured under license from Dolby
Laboratories. Dolby and the double-D symbol
are trademarks of Dolby Laboratories.
Manufactured under license under U.S. Patent
#’s: 5,451,942;5,956,674; 5,974,380; 5,978,762;
6,487,535 & other U.S. and worldwide patents
issued & pending. DTS and the Symbol are
registered trademarks, & DTS 2.0+ Digital Out
and the DTS logos are trademark of DTS, Inc.
Product includes software. © DTS, Inc. All Rights
Reserved.
ABOUT DIVX VIDEO: DivX® is a digital video
format created by DivX, LLC, a subsidiary
RI5RYL&RUSRUDWLRQ7KLVLVDQRIÀFLDO'LY;
&HUWLÀHG® device that plays DivX video. Visit
divx.com for more information and software
WRROVWRFRQYHUW\RXUÀOHVLQWR'LY;YLGHRV
ABOUT DIVX VIDEO-ON-DEMAND: This
'LY;&HUWLÀHG® device must be registered
in order to play purchased DivX Video-onDemand (VOD) movies. To obtain your
registration code, locate the DivX VOD section
in your device setup menu. Go to vod.divx.com
for more information on how to complete your
registration.
'LY;&HUWLÀHG® to play DivX® and DivX Plus®
HD (H.264/MKV) video up to 1080p HD
including premium content.
DivX®'LY;&HUWLÀHG®, DivX Plus® HD
and associated logos are trademarks of Rovi
Corporation or its subsidiaries and are used
under license.
BONUSVIEW™
'BD LIVE ' and 'BONUSVIEW ' are
trademarks of Blu-ray Disc Association.
'DVD Video' is a trademark of DVD Format/
Logo Licensing Corporation.
Java and all other Java trademarks and logos are
trademarks or registered trademarks of Sun
Microsystems, Inc. in the United States and/or
other countries.
EN
25
Specifications are subject to change without notice
© 2013 Koninklijke Philips Electronics N.V.
All rights reserved.
BDP2180_05_UM_V1.0