1
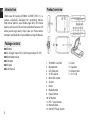
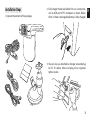
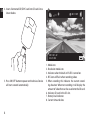
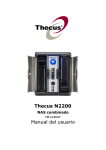
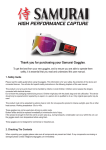
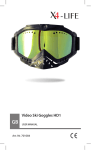
U-DRIVE DVR
Car DVR Device
MT4036
User Manual
EN Introduction
Product overview
Thank you for buying MT4036 U-DRIVE DVR. It is a
camera especially designed for recording movies
from driver point o view. Wide angle lens, HD movie
quality with sound, SD card slot and other features will
allow you to enjoy every trip in your car. Please take a
moment and read this manual before using the device.
Package contents
¯ MT4036
¯ Car charger (input DC12/24V input, output DC 5V)
¯ Windshield mount
¯ USB cable
¯ AV cable
¯ User Manual
2
1.
2.
3.
4.
5.
6.
7.
8.
9.
10.
11.
12.
13.
SD/MMC Card Slot
Microphone
LED indicator
5V DC socket
Mini USB socket
AV out
Reset
Mode Button
Down Button
UP Button
REC / Snap Button
Menu Button
ON/OFF Power Switch
14.
15.
16.
17.
Lens
Speaker
Mount hole
2.5” LCD
Installation Steps
1. Unpack the content of the package.
2. Fully charge the device before first use. Connect device to USB port of PC computer as shown below.
After 3-4 hours rechargeable battery is fully charged.
3. You can also use attached car charger, one end plug
to DC 5V socket, other end plug to car cigarette
lighter socket.
3
EN
EN
1
4. Insert a formatted SD/SDHC card into SD card slot as
shown below:
REC
2 HD
4
5 00:11:09
SD
6
3
8
5. Press ON/OFF button to power on the device. Device
will start o record automatically.
4
1.
2.
3.
4.
5.
2011-01-22
22:28:08
7
Mode icon.
Resolution mode icon.
Indicates when the built-in IR LED is turned on.
REC icon will flash when recording video.
When recording this indicates the current recording duration. When not recording it will display the
amount of video that can be saved onto the SD card.
6. Indicates SD card in the SD slot.
7. Battery level indicator.
8. Current time and date.
Two ways to start the car recorder:
When used with built-in battery
Press “ON/OFF” button once to power on the device,
press again to power off.
Charging: connect DVR recorder to PC computer using
USB cable. Green and red LED indicator will be on, when
fully charged red LED is off.
When connected to car charger
Device will automatically detect power from car lighter
socket and device will turn on. Start engine, device will
start record automatically. Stop engine, device will save
file and turn off after few seconds automatically.
Charging: when connected to car charger red LED indicator will be on, when fully charged red LED is off. During recording red LED will be on and green LED will be blinking.
Recording
DVR will enter into default recording mode when
turned on, green LED will be blinking during record.
The recorded file is saved onto SD/SDHC card. Stop recording by pressing “REC/SNAP” button or simply stop
engine when device is connected via car charger, green
LED will go off.
Note! When option “Motion detection” is enabled
files are recorded in cycle. If there is no free space
on SD card device is deleting previous files in order
to record new file.
Video mode settings
Power on the device, press “MENU” button to enter settings mode. Press “UP” or “DOWN” button to navigate,
then press “REC/SNAP” to enter submenu.
¯ Image Size: [HD 1280x720/640x390]
¯ Time Stamp: [On/Off ]
¯ Motion detect: [On/Off ]
Note! When motion detection is set enabled, record
will automatically start whenever movement is detected within defined “record time”.
¯ Audio record: [On/Off ]
¯ Record time (adjust max file length): [2 min/5 min
/15 min] (longer records will be split into volumes)
¯ Night mode: [disable/auto]
¯ Setup
- Format: select OK to format SD card
- Language: select menu language
- Default settings: select OK to set default settings
- Frequency: select 50Hz or 60Hz
- Date: enter current date/time.
5
EN
EN DSC mode
Power on the device and press “MODE” button to enter DSC mode. To take photo press “REC/SNAP” button.
Press “MENU” button to enter DSC settings. Press “UP”
or “DOWN” button to navigate, then press “REC/SNAP”
to enter submenu.
1. Image Size: [5M 2560x1920/3M 2048x1536/2M
1600x1200/1M 1280x1024]
2. Time Stamp: [On/Off ]
3. Night mode: [disable/auto]
Playback mode
Power on the device and press “MODE” button twice to
enter playback mode. Press “UP” or “DOWN” button to
select item, press “REC/SNAP” button to preview. Press
“MENU” button to enter playback mode options. Now
press “UP” or “DOWN” button to navigate, then press
“REC/SNAP” to enter submenu.
1. Delete [This image/All/Cancel]
2. Show thumbnails [OK/Cancel]
3. Volume adjust [1/2/3/4/5/6]
USB mode
Use USB cable and connect DVR recorder to USB port
6
of PC computer. System will recognize new USB mass
storage and install it automatically. Now you can access
files stored on SD card.
Playback on TV
Connect DVR recorder to TV set using AV cable. Power
on the device and enter playback mode automatically.
Follow operations described earlier in “Playback mode”.
Specification:
¯ 1 MPix CMOS sensor,
¯ Wide angle lens,
¯ Video mode: HD 1280x720@30fps or 640x390@30fps,
¯ Video format: AVI,
¯ Snapshot up to 2560x1920pix,
¯ Microphone built-in,
¯ AV output,
¯ Standard ¼” tripod mount,
¯ Li-Ion rechargeable battery.
¯ 2.5” TFT LCD display,
¯ For car use, automatic start up engine record function,
¯ SD/SDHC card support: up to 64GB.
* Specification and appearance of device are subject to
change without prior notice.