1
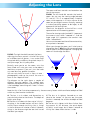
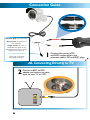
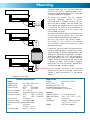
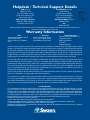
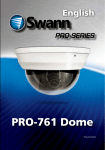
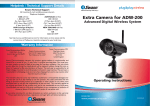
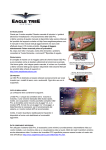
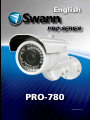
English
PRO-780
M780CAM190312E
1
About the Camera
Congratulations on your purchase of this PRO-780 from Swann! You’ve chosen well: we think this is
one of the finest vari-focal CCTV video cameras available. The adjustable lens and on-screen menu
system make the PRO-780 ideal for monitoring any kind of space in almost any lighting conditions...
even no light at all, as it can see up to 40m/130ft in complete darkness!
Our two cents: you’ve spent the money on a great camera. It’s worth spending a bit of time making
sure it’s set up right. This manual will take you through what you need to do to get the camera
delivering high quality images, and will let you know a little about how you can tweak it further.
The Process: An Overview
1.
Choose a spot for your camera. This will be influenced by what you need to monitor, the places
nearby which could support a camera, the lighting conditions of the environment and so on.
2.
Connect the camera to a monitor. We suggest connecting it directly to a monitor during setup,
and to your DVR (or other recording device) afterwards. Having a monitor on hand in the same
location as the camera is a real time saver during setup.
3.
Set the zoom. This will set the viewing angle of the lens, which determines how much the
camera can see (page 3).
4.
Set the focus. This will allow you to choose which parts of what the camera can see is in focus.
In actuality, you’ll probably go back and forth between steps 3 and 4 until you’re happy with the
image (page 3).
5.
Connect the camera to your DVR (or other recording/monitoring device) - see page 4.
Choosing a Location
The PRO-780 is very flexible, and can be installed practically anywhere. Some of the things you’ll have
to consider when choosing a location are:
•
What you want to monitor, and where you’ll get the best view of it.
•
How you’re going to connect the camera to your monitoring system.
•
How to keep the camera out of harm’s way. Up high in protected corners is a good option.
Rules is Rules
Regardless of all the tweaking of the lens and image processing you do, there are a few immutable
things that are true for all cameras, CCTV or otherwise.
•
The closer the camera is to what you want to see, the more detail you’re going to get.
You can make some alteration by tweaking the zoom, but there’s no substitute for proximity.
•
Areas with varied lighting conditions are hard to view completely, with any camera. If
the bright bits are exposed correctly, then the shadows will “black out”. If the shadowy areas are
exposed correctly, then the bright bits will overexpose and “white out”. Aiming the camera at an
evenly lit area will always give the best results.
•
That “image enhancement” stuff that they do on CSI or 24 is all lies. You can’t zoom in
indefinitely on a video image. Licence plates are only readable from a few meters (a dozen or so
feet) away. If someone’s head is represented by three pixels, that’s it. Sorry. This is technology, not
magic. This is a great CCTV camera, but it’s still just a video camera - it can’t see that much better
than you can! Still, it does make for good television.
Adjusting Focus and Zoom
•
To access the zoom and focus, remove the two protective caps from the rear of the camera by
unscrewing counter-clockwise.
•
Use a flat-blade screwdriver to turn the exposed control rod. The zoom is located on the top left,
and focus on the lower right.
•
Be sure to securely replace the protective caps after adjusting the zoom and focus, otherwise the
camera will no longer be weather-proof.
2
Adjusting the Lens
The zoom and focus controls are located on the
rear of the camera.
23°
81°
ZOOM: The left hand dial controls the level of
zoom. You can vary the viewing angle between
23° and 81°. This is an approximately 3x optical
zoom, which operates in a similar manner to the
zoom on your digital camera. Basically, zooming
in makes everything appear to be larger, at the
expense of the viewing area.
Check out the diagram to the left for a visual
representation of the zooming process.
The smaller viewing angle (marked 23°) represents
the camera’s view when “zoomed in”, and the
larger angle (81°) represents the camera’s view
when “zoomed out”.
You can set the zoom to either of these extremities,
or anywhere in between.
When you change the zoom, you’ll also have to
change the focus. Why? Lenses are complicated,
and all the bits are joined together. Changing the
zoom will also change the focus.
FOCUS: The right hand dial controls the focus.
Adjusting the focus control is kind of like trying
on a different pair of glasses - it can make sharp
things look blurry and blurry things look sharp. It’s
not quite magic, but it’s pretty close.
Basically, once you’ve set the zoom, twist the
focus knob until what you want to see doesn’t
look blurry anymore. If you can’t turn the knob
any more one way, go back the other.
A
C
B
D
You can only have so much in focus at once photographers refer to the size of the area in
focus as the “depth of field”.
The diagram to the right shows a couple of
different focusing options. The shaded areas
represent the depth of field. As you can see, there
is no hard edge, some things are “more” in focus
than others.
Note that this is for illustrative purposes only - there are many factors which contribute to depth of field
which vary from location to location.
A: The lens is at its widest, and focused on an
area relatively close to the camera. The depth of
field is quite large.
B: The lens at its widest with focus set to “infinity”.
Anything in the shaded section will be in focus,
and this focus extends to infinity (that is, things
in the far distance will also be in focus). However,
things in the distance might be too small to see
the detail you require.
C: The lens at its tightest, focused on an area
close to the camera. As you can see, the more
the lens is zoomed, the smaller the depth of field
becomes.
D: The lens at its tightest with focus further from
the camera. At this distance, the actual depth
of field is much larger, but it doesn’t extend to
infinity like it does when the lens is wide.
3
Connection Guide
The green plug: what does it do?
Short answer: To connect the
OSD controller.
Longer answer: To access a
comprehensive guide for the
advanced features of this camera,
log onto our website at:
1
www.swann.com/osdpro
There’s also a little more
information on page 6.
Connect the camera’s DC
and BNC socket cable to the
extension cable’s DC and BNC plugs
2A. Connecting Directly to TV
2
Connect a BNC to RCA
adapter and connect to video
input on your TV or VCR
INPUT
4
3
Connect the extension cables
DC socket to the DC plug on
the power adapter
4
Plug in the camera
power adapter into
a wall socket
2B. Connecting to Your Existing DVR
2
Connect the BNC extension
cable to an open channel on
the back of the DVR
5
The OSD & Troubleshooting
The On-Screen Display
We’re constantly on the lookout for ways to incorporate more features and more advanced technologies
into our products. So here’s one we’re excited about: the PRO-780 features an On-Screen Display (OSD)
that you can control with the included control unit.
As this is a new, powerful feature, we couldn’t possibly fit the full explanation of everything it can do
into this booklet. So, we’ve created an online guide you can access at:
www.swann.com/osdpro
Of course, you don’t have to use this feature at all. The PRO-780 will work perfectly well if you never
even connect the controller – it’ll adjust all of its settings automatically.
Troubleshooting
Problem: At night, all I see is white.
Solution: The camera is most likely looking through a window. At night, the infrared light the camera
uses to see in the dark can ‘bounce back’ off a reflective surface (such as glass, water, spider webs,
some ceramics and so on) and effectively blind the camera. If you want to see outside, mount the
camera outside - we made it weatherproof for a reason!
Problem: I see only a blank screen where my image should be.
Solution: Check the wiring to the camera, and ensure the camera is being supplied power from
the included power adapter. Try using a different video lead, or connecting the camera to a different
television or monitor. Be sure there are no devices interrupting your signal, such as a DVR or VCR that
isn’t outputting the signal correctly.
Problem: I can’t see anything at night.
Solution: The maximum range of the night vision is just that, the maximum range. If there’s nothing
in this range, you won’t see anything. Also, some dark objects (like the proverbial black cat) may not
reflect enough light to be seen except as a silhouette if the background is brighter. Some objects which
can easily be seen in visible light don’t reflect much infrared light.
Problem: My image just doesn’t seem as “nice” as it should.
Solution: That’s one of the ironic things about so many configurable options on a high-end camera.
You’ll probably need to tweak a couple of things before you’ll get a really “good” image. We’ll deal
with the most common issues one at a time.
Everything looks blurry/soft.
You probably need to adjust the focus (the knob on the right). This is simply a matter of removing the
right protective cap on the rear of the camera, and turning the control knob one way until you find the
best focus point or it won’t turn any more. Then, turn it back the other way. If there is no “sweet spot”
then this indicates one of two things.
1.
Your lens might be dirty. Clean the front of it with a dedicated lens cleaning cloth (available at any
camera store). Avoid using solvents or cleaning chemicals, as these can leave a residue.
2.
You might be trying to focus on something outside the “depth of field” - objects need to be at
least a certain distance from the camera for you to be able to focus on them. Typically, this will be
only a few feet (about 1m) but this distance can increase dramatically if the lens is zoomed in, or
in low light conditions.
3.
Be sure to replace the protective cap once you’ve set the focus!
6
Mounting
There are three ways that you can mount the
PRO-780: to a wall (1, recommended) or to a
horizontal surface, either above (2) or suspended
(3, requires additional hardware).
Option 1
To mount the camera, use the supplied
mounting hardware (screws). If you’re
mounting onto a wooden surface, you can
drive the screws directly into the wood. You
may need to drill guide holes first, particularly
if mounting the camera onto hardwood. If
mounting on masonry or similar surface, use
the included wall plugs.
We recommend mounting the camera onto a
wall or other vertical surface - this is what the
stand has been designed for. See diagram 1.
Option 2
Option 3
You can also mount the camera above a
flat surface (2). This is useful if, for example,
you wanted to mount the camera on a roof
overlooking a yard.
If necessary, you can mount the camera onto a
ceiling or other horizontal surface (3) by using a
mounting block or bracket (represented on the
diagram to the left by the grey box). We don’t
recommend doing this as it’s the most difficult
mounting option and will require additional
hardware and skill to execute. Be sure to use
a bracket or block with sufficient strength.
Mounting in this way will make it more difficult
to access the zoom and focus controls.
You can change the angle of the stand by
loosening the screw on the hinge, shown here.
Tighten it once the camera is in the desired
position.
Diagrams Not to Scale
Technical Specifications
Video
Image Sensor
1/3” Sony ‘Effio’ CCD
Video Quality
700 TV Lines
Effective Pixels
NTSC: 976 x 494
PAL: 976 x 582
Min. Illumination 0 Lux (IR on)
White Balance
Automatic / Manual / Custom
Electronic Shutter NTSC: 1/60 ~ 1/100 000
PAL:
1/50 ~ 1/100 000
Gain Control
Automatic
Backlight Comp.
Yes (Adjustable)
Wide Dynamic RangeYes (Adjustable)
Lens
Vari-focal
2.8mm ~ 12mm
Viewing Angle
Max: 81, Min: 23
Night Vision
Range
Up to 40m (130ft)
IR Cut Filter
No
Number of IR LEDs 36
Infrared Wavelength850nm
IR LED Life (Average)10, 000 hours
General
Operating Power
Operating Temp.
Casing
Dimensions
Weight
DC 12V @ 400mA
-20°C ~ 45°C (-4°F ~ 113°F)
Aluminium
260mm x 160mm x 83mm (10.25” x 6.3” x 3.25”)
865 / 32oz (approx)
7
Helpdesk / Technical Support Details
AUSTRALIA toll free
USA toll free
Swann Technical Support
1300 138 324
1-800-627-2799
All Countries E-mail: [email protected]
(Su, 2pm-10pm US PT)
Telephone Helpdesk (M 9am-5pm AUS ET)
(M-Th, 6am-10pm US PT)
(Tu-F 1am-5pm AUS ET)
(Sa 1am-9am AUS ET)
(F 6am-2pm US PT)
NEW ZEALAND toll free
USA Exchange & Repairs
1-800-627-2799 (Option 1)
0800 479 266
(M-F, 9am-5pm US PT)
UK
0203 027 0979
See http://www.worldtimeserver.com for information on time zones and the current time in Melbourne,
Australia compared to your local time.
Warranty Information
USA
Swann Communications USA Inc.
12636 Clark Street
Santa Fe Springs CA 90670
USA
Australia
Swann Communications
Unit 13, 331 Ingles Street,
Port Melbourne Vic 3207
United Kingdom
Swann Communications LTD.
Stag Gates House
63/64 The Avenue
SO171XS
United Kingdom
Swann Communications warrants this product against defects in workmanship and material for a period
of one (1) year from its original purchase date. You must present your receipt as proof of date of purchase
for warranty validation. Any unit which proves defective during the stated period will be repaired without
charge for parts or labor or replaced at the sole discretion of Swann. The end user is responsible for all
freight charges incurred to send the product to Swann’s repair centers. The end user is responsible for all
shipping costs incurred when shipping from and to any country other than the country of origin.
The warranty does not cover any incidental, accidental or consequential damages arising from the use of
or the inability to use this product. Any costs associated with the fitting or removal of this product by a
tradesman or other person or any other costs associated with its use are the responsibility of the end user.
This warranty applies to the original purchaser of the product only and is not transferable to any third
party. Unauthorized end user or third party modifications to any component or evidence of misuse or
abuse of the device will render all warranties void.
By law some countries do not allow limitations on certain exclusions in this warranty. Where applicable by
local laws, regulations and legal rights will take precedence.
For Australia: Our goods come with guarantees which cannot be excluded under Australian Consumer
Law. You are entitled to a replacement or refund for a major failure and for compensation for any other
reasonably foreseeable loss or damage. You are also entitled to have the goods repaired or replaced if the
goods fail to be of acceptable quality and the failure does not amount to major failure.
FCC Verification
This equipment has been tested and found to comply with the limits for Class B digital device, pursuant
to part 15 of the FCC Rules. These limits are designed to provide reasonable protection against harmful
interference in a residential installation. This equipment generates, uses and can radiate radio frequency
energy and, if not installed and used in accordance with the instructions, may cause harmful interference
to radio or television reception, which can be determined by turning the equipment off and on, the user is
encouraged to try to correct the interference by one or more of the following measures:
Reorient or relocate the receiving antenna
Increase the separation between the equipment and the receiver
Connect the equipment into an outlet on a circuit different from that to which the receiver is connected
Consult the dealer or an experienced radio/TV technician for help
WARNING: Modifications not approved by the party responsible for compliance could void user’s authority
to operate the equipment.
8
© Swann Communications 2012