1
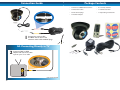
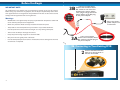
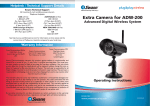
Helpdesk / Technical
Support Details
Swann Technical Support
All Countries E-mail: [email protected]
AUSTRALIA toll free
USA toll free
Telephone Helpdesk 1300 138 324
1-800-627-2799
(M 9am-5pm AUS ET)
(Su, 2pm-10pm US PT)
(Tu-F 1am-5pm AUS ET)
(M-Th, 6am-10pm US PT)
(Sa 1am-9am AUS ET)
(F 6am-2pm US PT)
NEW ZEALAND toll free
USA Exchange & Repairs
0800 479 266
1-800-627-2799 (Option 1)
UK
(M-F, 9am-5pm US PT)
0203 027 0979
See http://www.worldtimeserver.com for information on time zones and the current time in Melbourne,
Australia compared to your local time.
Warranty Information
Swann Communications USA Inc.
12636 Clark Street
Santa Fe Springs CA 90670
USA
Swann Communications
Unit 13, 331 Ingles Street,
Port Melbourne Vic 3207
Swann Communications LTD.
Stag Gates House
63/64 The Avenue
SO171XS
United Kingdom
Swann Communications warrants this product against defects in workmanship and material for a period
of one (1) year from it’s original purchase date. You must present your receipt as proof of date of purchase
for warranty validation. Any unit which proves defective during the stated period will be repaired without
charge for parts or labour or replaced at the sole discretion of Swann. The end user is responsible for all
freight charges incurred to send the product to Swann’s repair centres. The end user is responsible for all
shipping costs incurred when shipping from and to any country other than the country of origin.
The warranty does not cover any incidental, accidental or consequential damages arising from the use of
or the inability to use this product. Any costs associated with the fitting or removal of this product by a
tradesman or other person or any other costs associated with its use are the responsibility of the end user.
This warranty applies to the original purchaser of the product only and is not transferable to any third
party. Unauthorized end user or third party modifications to any component or evidence of misuse or
abuse of the device will render all warranties void.
By law some countries do not allow limitations on certain exclusions in this warranty. Where applicable by
local laws, regulations and legal rights will take precedence.
FCC Verification
This equipment has been tested and found to comply with the limits for Class B digital device, pursuant
nt
to part 15 of the FCC Rules. These limits are designed to provide reasonable protection against harmfull
interference in a residential installation. This equipment generates, uses and can radiate radio frequency
energy and, if not installed and used in accordance with the instructions, may cause harmful interference
to radio or television reception, which can be determined by turning the equipment off and on, the user is
encouraged to try to correct the interference by one or more of the following measures:
Reorient or relocate the receiving antenna
Increase the separation between the equipment and the receiver
Connect the equipment into an outlet on a circuit different from that to which the receiver is connected
Consult the dealer or an experienced radio/TV technician for help
WARNING: Modifications not approved by the party responsible for compliance could void user’s authority
to operate the equipment.
ADS-191
Flashing Dome Camera
M581CAM250711E
© Swann Communications 2011
Before You Begin
IMPORTANT NOTE:
All jurisdictions have specific laws and regulations relating to the use of cameras.
Before using any camera for any purpose, it is the buyer’s responsibility to be aware
of all applicable laws and regulations that prohibit or limit the use of cameras and to
comply with the applicable laws and regulations.
3B
FOR MULTI CAMERA PACKS
Connect the extension cable’s
DC socket to one of the four
sockets on the power splitter.
Then, plug the single end of the
power splitter to the DC plug
on the power adaptor.
Warnings:
•
Modifications not approved by the party responsible for compliance could void
user’s authority to operate the equipment.
•
Make sure product is fixed correctly and stable if fastened in place
•
The product is not waterproof. It may not work in very humid conditions.
•
Do not expose the camera to direct sunlight as it may damage the optics.
•
Take care to not drop or damage the camera.
•
Keep away from strong magnetic or electrical fields
•
Only clean the lens gently with a soft cloth
•
Do not attempt to operate the camera if it becomes wet or damaged or the wires
or terminals are exposed.
4
3A
Plug in the camera
power adapter into
a wall socket
FOR A SINGLE CAMERA
Connect the extension cable’s
DC socket to the DC plug on
the power adapter
2B. Connecting to Your Existing DVR
2
2
Connect the BNC extension
cable to an open channel on
the back of the DVR
11
Connection Guide
1
Package Contents
•
1 x ADS-191 CMOS Dome Camera
•
4 x Security Stickers
•
1 x Extension cable
•
1 x Remote Control
•
Screws & wall plugs
•
1 x Operating Instructions
•
1 x Power Adapter
Connect the camera’s DC
and BNC socket cable to the
extension cable’s DC and BNC plugs
2A. Connecting Directly to TV
2
Connect a BNC to RCA
adapter*and connect to video
input on your TV or VCR
INPUT
*may not be included
10
3
Introduction
Technical Specifications
Thank you for purchasing the Swann ADS-191, a versatile dome camera with infrared night vision and motion sensing technology making it easy to pick up movement
during the day or night. It can even be set to trigger flashing LEDs and a voice-alarm
when it detects movement to warn intruders that they are being monitored.
Increase Brightness
Alarm Speaker OFF
Mounting Holes
Video
The light plastic body makes it easy to mount and blend into most modern decors
and the included remote control makes it easy to control from a distance once
mounted.
480 TV Lines
Number of Effective Pixels
648 x 488
Minimum Illumination
0 Lux (IR on)
Day/Night mode
Color during day/in lit areas
Black & White at night/in darkness
White Balance
Automatic
Signal/Noise Ratio
>50db
Electronic Shutter
1/60 - 1/15,000 NTSC
1/50 - 1/15,000 PAL
Gain Control
Automatic
Backlight Compensation
Yes
Decrease Brightness
Wide Dynamic Range
No
Lens
3.6mm
Viewing Angle
53 degrees
Zoom
No
Microphone
N/A
Audio Range
N/A
Night Vision Distance
Up to 50’ / 15m
IR Cut Filter
Yes
Infra-Red LEDs
30
Motion Alarm OFF
Camera Lens
Using the remote control, you can control many of the functions of the camera.
Motion Detection
This function turns ON or OFF the motion detection of the camera. When Motion
detection is off, the camera acts as a surveillance camera only and will not give a
visual or audible alert when motion is detected.
Night Vision
Battery Compartment
Audio
IR LEDs
Press the MOTION ALARM OFF button (Unlock button) to turn Motion Alarm OFF.
The red LEDs only will blink 5 times to confirm your choice.
This function turns ON or OFF the audible alarm that will sound when motion is
detected. The alarm has a voice-recorded warning which says “Warning, you have
triggered the alarm system. Your movements are being recorded’ when movement
is detected.
•
Press the ALARM SPEAKER ON button (3) to turn the audible alarm ON.
•
Press the ALARM SPEAKER OFF button (1) to turn the audible alarm OFF.
General
Press the MOTION ALARM ON button (Lock button) to turn Motion Alarm ON. The
blue and red LEDs will blink 5 times together to confirm your choice.
Audible Alarm
4
Video Quality
Alarm Lights ON
Motion Alarm ON
•
1/4” CMOS
Alarm Speaker ON
Alarm Lights OFF
•
Image Sensor
Infra-Red Wavelength
850nm
Infra-Red LED life
10,000 hours + hours
Indoor/Outdoor
Both
Operating Power
DC 12V
Operating Temperature
-14°F ~ 122°F
-10°C ~ 50°C
Body Construction
Heavy Duty Plastic
Weight
6.7oz / 190g
Dimensions - Camera
3.9” x 3.9” x 3.3”
100mm x 100mm x 85mm
9
Troubleshooting
Alarm LED Light Function
Problem: I can’t see the camera on my TV.
This function turns ON or OFF the LEDs that will flash when motion is detected.
Solution: Ensure the camera is plugged in and the TV or VCR is tuned to the correct
input channel.
•
Press the ALARM LIGHT ON button (9) to turn the alarm LEDs ON. The blue LEDs
will blink 3 times to confirm your choice.
Problem: When I view my camera at night I only see a bright spot and no image.
•
Press the ALARM LIGHT OFF button (7) to turn the alarm LEDs OFF. The red LEDs
will blink 3 times to confirm your choice.
Solution: Night Vision will reflect when shining through a window. Move the camera
to the other side of the window or another location.
Problem: The BNC Extension Cable will not connect to my TV.
Solution: Connect a BNC to RCA adapter to the end of the Extension Cable and plug
into the TV.
Problem: On my Swann DVR, “Video Loss” appears where my camera should be.
Solution: Check the Extension cable is securely connected to the camera and check
the connection is secure on the back of the DVR. Also ensure the camera has power
by trying a second power outlet.
Camera Brightness Control
This controls the brightness of the picture. A green bar appears on the monitor
screen as to indicate the value of the brightness.
•
Press the UP button (2) to increase the brightness of the picture.
•
Press the DOWN button (8) to decrease the brightness of the picture.
Password Protect Function
The camera can be locked with a four digit numeric password to protect it from any
unauthorized changes to the functions or settings. In this mode, the remote control
cannot change any of the previous functions (Motion Detection, Audible Alarm,
Alarm LED or Camera Brightness control) without the correct password.
The default password is “0000”
To LOCK the camera:
•
Press the # button once. The red and blue LEDs will flash together once to confirm
your choice.
•
Using the numbers 0-9, input the four digit password and then press the # button
again. The red and blue LEDs will blink three times together if the password is
correct and is accepted.
•
The red LEDs will blink ten times if the password is incorrect and rejected. You
should try again, ensuring you follow the above procedure.
To UNLOCK the camera:
•
8
Press * XXXX* (asterisk X X X X asterisk) where ‘XXXX’ is your current password.
5
Mounting the Camera
Setting a password
The ADS-191 is lightweight allowing mounting in almost any location or surface.
To set up a new password, press *XXXX#NNNN*NNNN# (‘XXXX’ is your old password
and ‘NNNN’ is your new password). In this case you are entering the old password
once and the new password twice to confirm it. Remember that the default password
if you have not set one yet is ‘0000’.
Some things to consider when choosing the location of your camera:
To set a new password:
•
•
What you want to monitor and where you will get the best view of it
•
How you’re going to connect the camera to your monitoring system
•
How to keep the camera out of harms way. Up high in protected corners makes it
harder for intruders to access.
Press the asterisk button (*) once. The red and blue LEDs will blink together 2
times to confirm your choice.
To mount the camera:
•
Using the 0-9 buttons, input the the old four digit password
•
The camera mounts using three screws through the base.
•
Press the pound/hash button(#). The blue LEDs will blink 2 times together if the
password is OK. The red LEDs will blink 10 times if the password is incorrect.
•
•
If you have entered the old password correctly, enter a new 4 digit password.
Line up the base onto the ceiling or wall where you want to secure the camera
and mark in pencil where the three screws will pass through the base, as well
as any necessary hole to feed through the power and video cable. Using these
markers, drill the necessary holes.
•
Press the asterisk button (*). The red and blue LEDs will blink 2 times to confirm
your choice.
•
•
Re-enter the password again
If you are going to feed the cables from the camera behind the camera rather
than up through the cable guide, make sure you connect them to the extension
cables first.
•
Press the pound/hash button (#) to save your settings
•
•
The blue LEDs will blink 2 times if the password has been saved correctly. The red
LEDs will blink 10 times if there was error. If you get an error, you should repeat
these steps.
Secure the base to a ceiling or wall using three screws. The camera allows a limited
degree of adjustment to its tilt so ensure it is mounted where it can see the area
you wish to monitor without requiring large adjustments.
Special Functions
The camera also has several other settings which are controlled by codes entered via
the remote control. To perform the action, make sure you enter the key sequence as
shown while the remote is pointed at the camera.
Name
Description
Key Sequence
Reset
Reboots Camera
**79#**72#
TV_PAL
Change to the PAL TV system
**79#**74#
TV_NTSC
Change to the NTSC TV system
**79#**75#
IR_ON
Turn the IR LEDs ON
**79#**76#
IR_OFF
Turn the IR LEDs OFF
**79#**77#
IR_AUTO
IR LEDs will be controlled automatically
**79#**78#
6
7
Troubleshooting
Alarm LED Light Function
Problem: I can’t see the camera on my TV.
This function turns ON or OFF the LEDs that will flash when motion is detected.
Solution: Ensure the camera is plugged in and the TV or VCR is tuned to the correct
input channel.
•
Press the ALARM LIGHT ON button (9) to turn the alarm LEDs ON. The blue LEDs
will blink 3 times to confirm your choice.
Problem: When I view my camera at night I only see a bright spot and no image.
•
Press the ALARM LIGHT OFF button (7) to turn the alarm LEDs OFF. The red LEDs
will blink 3 times to confirm your choice.
Solution: Night Vision will reflect when shining through a window. Move the camera
to the other side of the window or another location.
Problem: The BNC Extension Cable will not connect to my TV.
Solution: Connect a BNC to RCA adapter to the end of the Extension Cable and plug
into the TV.
Problem: On my Swann DVR, “Video Loss” appears where my camera should be.
Solution: Check the Extension cable is securely connected to the camera and check
the connection is secure on the back of the DVR. Also ensure the camera has power
by trying a second power outlet.
Camera Brightness Control
This controls the brightness of the picture. A green bar appears on the monitor
screen as to indicate the value of the brightness.
•
Press the UP button (2) to increase the brightness of the picture.
•
Press the DOWN button (8) to decrease the brightness of the picture.
Password Protect Function
The camera can be locked with a four digit numeric password to protect it from any
unauthorized changes to the functions or settings. In this mode, the remote control
cannot change any of the previous functions (Motion Detection, Audible Alarm,
Alarm LED or Camera Brightness control) without the correct password.
The default password is “0000”
To LOCK the camera:
•
Press the # button once. The red and blue LEDs will flash together once to confirm
your choice.
•
Using the numbers 0-9, input the four digit password and then press the # button
again. The red and blue LEDs will blink three times together if the password is
correct and is accepted.
•
The red LEDs will blink ten times if the password is incorrect and rejected. You
should try again, ensuring you follow the above procedure.
To UNLOCK the camera:
•
8
Press * XXXX* (asterisk X X X X asterisk) where ‘XXXX’ is your current password.
5
Introduction
Technical Specifications
Thank you for purchasing the Swann ADS-191, a versatile dome camera with infrared night vision and motion sensing technology making it easy to pick up movement
during the day or night. It can even be set to trigger flashing LEDs and a voice-alarm
when it detects movement to warn intruders that they are being monitored.
Increase Brightness
Alarm Speaker OFF
Mounting Holes
Video
The light plastic body makes it easy to mount and blend into most modern decors
and the included remote control makes it easy to control from a distance once
mounted.
480 TV Lines
Number of Effective Pixels
648 x 488
Minimum Illumination
0 Lux (IR on)
Day/Night mode
Color during day/in lit areas
Black & White at night/in darkness
White Balance
Automatic
Signal/Noise Ratio
>50db
Electronic Shutter
1/60 - 1/15,000 NTSC
1/50 - 1/15,000 PAL
Gain Control
Automatic
Backlight Compensation
Yes
Decrease Brightness
Wide Dynamic Range
No
Lens
3.6mm
Viewing Angle
53 degrees
Zoom
No
Microphone
N/A
Audio Range
N/A
Night Vision Distance
Up to 50’ / 15m
IR Cut Filter
Yes
Infra-Red LEDs
30
Motion Alarm OFF
Camera Lens
Using the remote control, you can control many of the functions of the camera.
Motion Detection
This function turns ON or OFF the motion detection of the camera. When Motion
detection is off, the camera acts as a surveillance camera only and will not give a
visual or audible alert when motion is detected.
Night Vision
Battery Compartment
Audio
IR LEDs
Press the MOTION ALARM OFF button (Unlock button) to turn Motion Alarm OFF.
The red LEDs only will blink 5 times to confirm your choice.
This function turns ON or OFF the audible alarm that will sound when motion is
detected. The alarm has a voice-recorded warning which says “Warning, you have
triggered the alarm system. Your movements are being recorded’ when movement
is detected.
•
Press the ALARM SPEAKER ON button (3) to turn the audible alarm ON.
•
Press the ALARM SPEAKER OFF button (1) to turn the audible alarm OFF.
General
Press the MOTION ALARM ON button (Lock button) to turn Motion Alarm ON. The
blue and red LEDs will blink 5 times together to confirm your choice.
Audible Alarm
4
Video Quality
Alarm Lights ON
Motion Alarm ON
•
1/4” CMOS
Alarm Speaker ON
Alarm Lights OFF
•
Image Sensor
Infra-Red Wavelength
850nm
Infra-Red LED life
10,000 hours + hours
Indoor/Outdoor
Both
Operating Power
DC 12V
Operating Temperature
-14°F ~ 122°F
-10°C ~ 50°C
Body Construction
Heavy Duty Plastic
Weight
6.7oz / 190g
Dimensions - Camera
3.9” x 3.9” x 3.3”
100mm x 100mm x 85mm
9
Connection Guide
1
Package Contents
•
1 x ADS-191 CMOS Dome Camera
•
4 x Security Stickers
•
1 x Extension cable
•
1 x Remote Control
•
Screws & wall plugs
•
1 x Operating Instructions
•
1 x Power Adapter
Connect the camera’s DC
and BNC socket cable to the
extension cable’s DC and BNC plugs
2A. Connecting Directly to TV
2
Connect a BNC to RCA
adapter*and connect to video
input on your TV or VCR
INPUT
*may not be included
10
3
Before You Begin
IMPORTANT NOTE:
All jurisdictions have specific laws and regulations relating to the use of cameras.
Before using any camera for any purpose, it is the buyer’s responsibility to be aware
of all applicable laws and regulations that prohibit or limit the use of cameras and to
comply with the applicable laws and regulations.
3B
FOR MULTI CAMERA PACKS
Connect the extension cable’s
DC socket to one of the four
sockets on the power splitter.
Then, plug the single end of the
power splitter to the DC plug
on the power adaptor.
Warnings:
•
Modifications not approved by the party responsible for compliance could void
user’s authority to operate the equipment.
•
Make sure product is fixed correctly and stable if fastened in place
•
The product is not waterproof. It may not work in very humid conditions.
•
Do not expose the camera to direct sunlight as it may damage the optics.
•
Take care to not drop or damage the camera.
•
Keep away from strong magnetic or electrical fields
•
Only clean the lens gently with a soft cloth
•
Do not attempt to operate the camera if it becomes wet or damaged or the wires
or terminals are exposed.
4
3A
Plug in the camera
power adapter into
a wall socket
FOR A SINGLE CAMERA
Connect the extension cable’s
DC socket to the DC plug on
the power adapter
2B. Connecting to Your Existing DVR
2
2
Connect the BNC extension
cable to an open channel on
the back of the DVR
11
Helpdesk / Technical
Support Details
Swann Technical Support
All Countries E-mail: [email protected]
AUSTRALIA toll free
USA toll free
Telephone Helpdesk 1300 138 324
1-800-627-2799
(M 9am-5pm AUS ET)
(Su, 2pm-10pm US PT)
(Tu-F 1am-5pm AUS ET)
(M-Th, 6am-10pm US PT)
(Sa 1am-9am AUS ET)
(F 6am-2pm US PT)
NEW ZEALAND toll free
USA Exchange & Repairs
0800 479 266
1-800-627-2799 (Option 1)
UK
(M-F, 9am-5pm US PT)
0203 027 0979
See http://www.worldtimeserver.com for information on time zones and the current time in Melbourne,
Australia compared to your local time.
Warranty Information
Swann Communications USA Inc.
12636 Clark Street
Santa Fe Springs CA 90670
USA
Swann Communications
Unit 13, 331 Ingles Street,
Port Melbourne Vic 3207
Swann Communications LTD.
Stag Gates House
63/64 The Avenue
SO171XS
United Kingdom
Swann Communications warrants this product against defects in workmanship and material for a period
of one (1) year from it’s original purchase date. You must present your receipt as proof of date of purchase
for warranty validation. Any unit which proves defective during the stated period will be repaired without
charge for parts or labour or replaced at the sole discretion of Swann. The end user is responsible for all
freight charges incurred to send the product to Swann’s repair centres. The end user is responsible for all
shipping costs incurred when shipping from and to any country other than the country of origin.
The warranty does not cover any incidental, accidental or consequential damages arising from the use of
or the inability to use this product. Any costs associated with the fitting or removal of this product by a
tradesman or other person or any other costs associated with its use are the responsibility of the end user.
This warranty applies to the original purchaser of the product only and is not transferable to any third
party. Unauthorized end user or third party modifications to any component or evidence of misuse or
abuse of the device will render all warranties void.
By law some countries do not allow limitations on certain exclusions in this warranty. Where applicable by
local laws, regulations and legal rights will take precedence.
FCC Verification
This equipment has been tested and found to comply with the limits for Class B digital device, pursuant
nt
to part 15 of the FCC Rules. These limits are designed to provide reasonable protection against harmfull
interference in a residential installation. This equipment generates, uses and can radiate radio frequency
energy and, if not installed and used in accordance with the instructions, may cause harmful interference
to radio or television reception, which can be determined by turning the equipment off and on, the user is
encouraged to try to correct the interference by one or more of the following measures:
Reorient or relocate the receiving antenna
Increase the separation between the equipment and the receiver
Connect the equipment into an outlet on a circuit different from that to which the receiver is connected
Consult the dealer or an experienced radio/TV technician for help
WARNING: Modifications not approved by the party responsible for compliance could void user’s authority
to operate the equipment.
ADS-191
Flashing Dome Camera
M581CAM250711E
© Swann Communications 2011