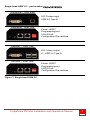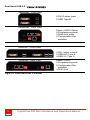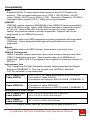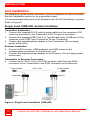
1
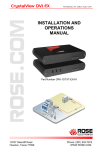
CrystalView DVI Mini DVI, USB 2.0 CATx Extender Installation and Operations Manual 10707 Stancliff Road Houston, Texas 77099 Phone: (281) 933-7673 WWW.ROSE.COM LIMITED WARRANTY Rose Electronics warrants the CrystalView DVI Mini to be in good working order for one year from the date of purchase from Rose Electronics or an authorized dealer. Should this product fail to be in good working order at any time during this one-year warranty period, Rose Electronics will, at its option, repair or replace the Unit as set forth below. Repair parts and replacement units will be either reconditioned or new. All replaced parts become the property of Rose Electronics. This limited warranty does not include service to repair damage to the Unit resulting from accident, disaster, abuse, or unauthorized modification of the Unit, including static discharge and power surges. Limited Warranty service may be obtained by delivering this unit during the one-year warranty period to Rose Electronics or an authorized repair center providing a proof of purchase date. If this Unit is delivered by mail, you agree to insure the Unit or assume the risk of loss or damage in transit, to prepay shipping charges to the warranty service location, and to use the original shipping container or its equivalent. You must call for a return authorization number first. Under no circumstances will a unit be accepted without a return authorization number. Contact an authorized repair center or Rose Electronics for further information. ALL EXPRESS AND IMPLIED WARRANTIES FOR THIS PRODUCT INCLUDING THE WARRANTIES OF MERCHANTABILITY AND FITNESS FOR A PARTICULAR PURPOSE, ARE LIMITED IN DURATION TO A PERIOD OF ONE YEAR FROM THE DATE OF PURCHASE, AND NO WARRANTIES, WHETHER EXPRESS OR IMPLIED, WILL APPLY AFTER THIS PERIOD. SOME STATES DO NOT ALLOW LIMITATIONS ON HOW LONG AN IMPLIED WARRANTY LASTS, SO THE ABOVE LIMITATION MAY NOT APPLY TO YOU. IF THIS PRODUCT IS NOT IN GOOD WORKING ORDER AS WARRANTED ABOVE, YOUR SOLE REMEDY SHALL BE REPLACEMENT OR REPAIR AS PROVIDED ABOVE. IN NO EVENT WILL ROSE ELECTRONICS BE LIABLE TO YOU FOR ANY DAMAGES INCLUDING ANY LOST PROFITS, LOST SAVINGS OR OTHER INCIDENTAL OR CONSEQUENTIAL DAMAGES ARISING OUT OF THE USE OF OR THE INABILITY TO USE SUCH PRODUCT, EVEN IF ROSE ELECTRONICS OR AN AUTHORIZED DEALER HAS BEEN ADVISED OF THE POSSIBILITY OF SUCH DAMAGES, OR FOR ANY CLAIM BY ANY OTHER PARTY. SOME STATES DO NOT ALLOW THE EXCLUSION OR LIMITATION OF INCIDENTAL OR CONSEQUENTIAL DAMAGES FOR CONSUMER PRODUCTS, SO THE ABOVE MAY NOT APPLY TO YOU. THIS WARRANTY GIVES YOU SPECIFIC LEGAL RIGHTS AND YOU MAY ALSO HAVE OTHER RIGHTS WHICH MAY VARY FROM STATE TO STATE. NOTE: This equipment has been tested and found to comply with the limits for a Class A digital device, pursuant to Part 15 of the FCC Rules. These limits are designed to provide reasonable protection against harmful interference when the equipment is operated in a commercial environment. This equipment generates, uses, and can radiate radio frequency energy and, if not installed and used in accordance with the instruction manual, may cause harmful interference to radio communications. Operation of this equipment in a residential area is likely to cause harmful interference in which case the user will be required to correct the interference at his own expense. IBM, AT, and PS/2 are trademarks of International Business Machines Corp. Microsoft and Microsoft Windows are registered trademarks of Microsoft Corp. Any other trademarks mentioned in this manual are acknowledged to be the property of the trademark owner. Copyright Rose Electronics 2010. All rights reserved. No part of this manual may be reproduced, stored in a retrieval system, or transcribed in any form or any means, electronic or mechanical, including photocopying and recording, without the prior written permission of Rose Electronics. Rose Electronics Part # MAN-CRVDVIMINI Printed In the United States of America – Revision 1.1 CE Declaration Of Conformity The products listed below in the form as delivered comply with the provisions of the following European Directives: 2004/108/EG Council Directive on the approximation of the laws of the Member States relating to electromagnetic compatibility CE Marking 2009 Product list: CRK-M1DTXUD1D / CRK-M1DTXUD2D CRK-M1DTXTD1D / CRK-M1DTXTD2D The products comply with the following harmonized standards for Information Technology Equipment: • EN 55022:2006 + A1:2007 (Class A) • EN 55024:1998 + A1:2001 + A2:2003 • This declaration certifies the conformity to the specified directives but contains no assurance of properties. The safety instructions and installation guidelines noted in this manual shall be considered in detail. Compliance with the specifications for cable lengths and types is mandatory. Use in a Domestic Environment This is a Class A product. In a domestic environment, this product may cause radio interference in which case the user may be required to take adequate measures. RoHS compliance All CrystalView DVI Mini models comply with the EC Directive 2002/95/EG on the Restriction of the use of certain Hazardous Substances in electrical and electronic equipment. TABLE of CONTENTS CONTENTS PAGE # System Introduction ............................................................................................. 2 Disclaimer ............................................................................................................ 2 About This Manual .............................................................................................. 3 Product Registration ............................................................................................ 3 Rose Electronics Web Site .................................................................................. 3 Features ........................................................................................................... 4 Package Contents ........................................................................................... 4 CrystalView DVI Mini Models .............................................................................. 5 Compatibility .................................................................................................... 9 Unit Installation .................................................................................................. 10 Single head (USB-HID model) Installation .................................................... 10 Dual head (USB-HID model) Installation ....................................................... 11 Single head (USB-2.0 model) Installation ...................................................... 12 Dual head (USB-2.0 model) Installation ........................................................ 13 Dip Switch Settings ........................................................................................ 14 Command Mode ................................................................................................ 16 DDC Information ............................................................................................ 17 Compatibility Information ............................................................................... 18 System Operation .............................................................................................. 18 Troubleshooting ................................................................................................. 19 Product Safety ................................................................................................... 21 Figures PAGE # Figure 1. Single Head USB HID Model ............................................................... 5 Figure 2. Dual head USB HID Model .................................................................. 6 Figure 3. Single head USB 2.0 ............................................................................ 7 Figure 4. Dual head USB 2.0 Model.................................................................... 8 Figure 5. Single head Installation (USB-HID).................................................... 10 Figure 6. Dual head Installation (USB-HID) ...................................................... 11 Figure 7. Single head Installation (USB-2.0) ..................................................... 12 Figure 8. Dual head Installation (USB-2.0) ....................................................... 13 Figure 9. Transmitter Dip switch settings .......................................................... 14 Appendices PAGE # Appendix A - Specifications ............................................................................... 23 Appendix B – Parts and Cables ........................................................................ 24 Appendix C - Diagnostics .................................................................................. 25 CrystalView DVI Mini Installation and Operations Manual 1 INTRODUCTION System Introduction Thank you for choosing the Rose Electronics CrystalView DVI Mini KVM station extender. The CrystalView DVI Mini is the result of Rose Electronics commitment to providing state-of-the-art solutions for today’s demanding workplace. The CrystalView DVI Mini has proven to be a valuable investment for any business, big or small, that has a need to access their computer from a remote location. Using the CrystalView DVI Mini, you can locate the remote user station up to 165ft. (50m) away and have full control of the computer. The CrystalView DVI Mini is available in four models; single and dual head, HID USB and single and dual head USB 2.0 transparent. The dual head model allows a second video input to be connected to the transmitter unit. The CrystalView DVI Mini system consists of two Units, a transmitter and a receiver unit. The transmitter connects to your computer’s DVI-D SingleLink graphic card and a USB Type A port. The receiver unit connects to a USB keyboard, DVI video monitor and a USB mouse. The transmitter and receiver units are connected together with industry standard CATx S/UTP cable terminated with RJ45 connectors. All models can extend the distance from the CPU up to 165 feet. CAT-x cable can be ordered from Rose Electronics in 251,000 foot lengths. Using the CrystalView DVI Mini to remotely access your computer has several applications that make it convenient for the users. You can locate your computer in a secure area and access them from other unsecured areas. Computers used in hazardous industrial environments can be accessed remotely, keeping the users safe and unexposed to any hazards. Disclaimer While every precaution has been taken in the preparation of this manual, the manufacturer assumes no responsibility for errors or omissions. Neither does the manufacturer assume any liability for damages resulting from the use of the information contained herein. The manufacturer reserves the right to change the specifications, functions, or circuitry of the product without notice. The manufacturer cannot accept liability for damages due to misuse of the product or other circumstances outside the manufacturer’s control. The manufacturer will not be responsible for any loss, damage, or injury arising directly or indirectly from the use of this product. 2 CrystalView DVI Mini Installation and Operations Manual INTRODUCTION About This Manual This manual covers the installation, configuration, and the operation of the CrystalView DVI Mini extender system. The system consists of a transmitter and receiver units, a computer to remotely access, and a remote KVM user station for remote access to the computer. The “Model” section describes the front and rear panel of the transmitter and receiver units. The “Installation” section describes how all components are interconnected and configured. Product Registration Register your product for future updates at: www.rose.com/htm/online-registrationform.htm Rose Electronics Web Site Visit our web site at www.rose.com for additional information on the CrystalView DVI Mini and other products designed for data center applications, classroom environments, and many other applications. CrystalView DVI Mini Installation and Operations Manual 3 Features Single-Link - single or dual head models available Single head supports: 1 DVI-D graphic card and 2 USB HID devices or 1 DVI-D graphic card and USB 2.0 devices Dual head supports: 2 DVI-D graphic cards and 2 USB HID devices or 2 DVI-D graphic cards, 2 HID devices, and USB 2.0 devices Supports all operating systems and computers with a DVI-D graphic interface (uncompressed) Video resolutions up to: (Solid core AWG24 CATx cable) 1920 x 1200 @ 130 feet (40 meters) 1920 x 1080 @ 130 feet (40 meters) 1600 x 1200 @ 130 feet (40 meters) 1280 x 1024 @ 165 feet (50 meters) NOTE: Using AWG 26/8 patch cable will reduce the distance by approximately 50%. No video quality degradation at all resolutions Use the internal EDID configuration or DDC information from the remote monitor Supports USB keyboards, mice and other HID devices like touch screens and graphic tablets The USB 2.0 models supports scanners, web cams, memory devices, and other USB 2.0 devices Selectable CATx cable length settings provides for the best, clearest image Automatic or manual resolution configuration Firmware upgradeable Rackmount kits available Package Contents CrystalView DVI Mini Transmitter and Receiver as ordered 2 – 5VDC international power adapter units 2 – Power cords 1 – DVI-D mm video cable (2 cables included with the dual head model) 1 – USB cable (Type A to Type B) (2 cables included with the dual head model) Installation Guide 4 CrystalView DVI Mini Installation and Operations Manual MODELS CrystalView DVI Mini Models The CrystalView DVI Mini is available in the following models: Single head USB HID – part number CRK-M1DTXUD1D Transmitter - Front View DVI-D video input USB Type B Transmitter - Rear View Power +5VDC Programming port Configuration Dip switches RJ45 Receiver – Front View DVI-I video output 2 – USB HID Type A Receiver – Rear View Power +5VDC Programming port Configuration Dip switches RJ45 Figure 1. Single Head USB HID Model CrystalView DVI Mini Installation and Operations Manual 5 Dual head USB HID – part number CRK-M1DTXUD2D Transmitter - Front View 2-DVI-D video input 2-USB Type B Transmitter - Rear View Power +5VDC Option 2-Programming ports 2- Configuration Dip switches 2-RJ45 connectors Receiver – Front View 2-DVI-I video outputs 4-USB HID Type A Receiver – Rear View Power +5VDC 2-Programming ports 2-Configuration Dip switches 2-RJ45 Link Figure 2. Dual head USB HID Model NOTE: Single and Dual head USB-HID models support two and only two USB-HID devices. 6 CrystalView DVI Mini Installation and Operations Manual Single head USB 2.0 – part number CRK-M1DTXTD1D Transmitter - Front View DVI-D video input USB 2.0 Type B Transmitter - Rear View Power +5VDC Programming port 2-RJ45 Link Configuration Dip switches Receiver – Front View DVI-I video output 4 – USB 2.0 Type A Receiver – Rear View Power +5VDC Programming port 2-RJ45 Link Configuration Dip switches Figure 3. Single head USB 2.0 CrystalView DVI Mini Installation and Operations Manual 7 Dual Head USB 2.0 - CRK-M1DTXTD2D Transmitter - Front View 2-DVI-D video input 2-USB Type B Transmitter - Rear View Power +5VDC Option 2-Programming ports 3-RJ45 Link ports 2-Configuration Dip switches Receiver – Front View 2-DVI-I video outputs 2-USB HID Type A 4-USB 2.0 Type A Receiver – Rear View Power +5VDC 2-Programming ports 2-Configuration Dip switches 3-RJ45 Link Figure 4. Dual head USB 2.0 Model 8 CrystalView DVI Mini Installation and Operations Manual Compatibility Video Supports all DVI-D video signals that comply to the DVI-D Single Link protocol. This includes resolutions up to 1920 x 1200 @ 60Hz, full HD video (1080p), 2K HD (up to 2048 x 1152). Data rate is limited to 165 MP/s. Interlaced video signals (1920 x 1080i) are not guaranteed. USB HID USB-HID models support a MAXIMUM of two USB-HID devices compliant with USB-HID protocol. Each USB-HID port provides a maximum current of 100 mA. Other USB-HID devices such as touch screens, graphic tablets, and barcode readers are also supported. Support can not be guaranteed for all USB-HID devices. Keyboard Compatible with most USB keyboards including keyboards with integrated USB Hubs. Some keyboards with special keys/functions may not be supported. Mouse Compatible with most USB 2-button, three-button, and scroll mice. USB 2.0 Transparent USB 2.0 models support scanners, web cams, memory devices and other USB 2.0 transparent devices. Data transfer rates up to 480Mbit/s is supported. Each USB 2.0 transparent port supplies a maximum current of 500 mA. Interconnect link The CrystalView DVI Mini Extenders require cabling specified for Gigabit Ethernet (1000BASE-T). The use of solid-core (AWG24), shielded, CAT 5e (or better) is recommended. CAT x Solid-Core Cable AWG24 S/UTP (CAT 5e) cable according to EIA/TIA-568-B. Four pairs of wires AWG24. Connection according to EIA/TIA-568-B (1000BASE-T). CAT x Patch Cable AWG26/8 S/UTP (CAT 5e) cable according to EIA/TIA-568-B. Four pairs of wires AWG26/8. Connection according to EIA/TIA-568-B (1000BASE-T). Maximum CATx Cable Length 40 m (120 ft) at 1920x1200 and 1600x1200 CAT x Solid-Core 50 m (150 ft) at 1280x1024 and less Cable AWG24 20 m (60 ft) at 1920x1200 and 1600x1200 CAT x Patch 30 m (90 ft) at 1280x1024 and less Cable AWG26/8 NOTE: CATx patch cables reduces the distances by approximately 50% CrystalView DVI Mini Installation and Operations Manual 9 INSTALLATION Unit Installation The installation guide section describes a typical installation for all four models. See the installation section for your particular model. It is recommended that power to all equipment be off until all cabling is in place. Refer to Figure 5 Single head (USB-HID model) Installation Transmitter Installation 1. Connect the supplied DVI-D male-to-male cable from the computer’s DVI video out connector to the Transmitter’s DVI-D video in connector. 2. Connect the supplied USB Type A to Type B cable from a USB port on the computer to the USB Type A connector on the Transmitter. 3. Connect the supplied power adapter to the Transmitter. (Do not apply power at this time) Receiver Installation 4. Connect a DVI monitor, USB keyboard, and USB mouse to the corresponding connectors on the Receiver unit. 5. Connect the supplied power adapter to the Receiver. (Do not apply power at this time) Transmitter to Receiver Connection 6. Connect up to 150 ft. (50 m) of CAT5e or better cable from the RJ45 connector on the Transmitter to the RJ45 connector on the Receiver. Power adapter CATx cable Transmitter Power adapter Receiver Figure 5. Single head Installation (USB-HID) 10 CrystalView DVI Mini Installation and Operations Manual Dual head (USB-HID model) Installation Transmitter Installation 1. Connect the two supplied DVI-D male-to-male cables from the computer’s DVI video out connectors to the two Transmitter’s DVI-D video in connectors. 2. Connect the two supplied USB Type A to Type B cables from a USB port on the computer to the two USB Type A connectors on the Transmitter. 3. Connect the supplied power adapter to the Transmitter. (Do not apply power at this time) Receiver Installation 4. Connect a DVI monitor, USB keyboard, and USB mouse to the corresponding connectors on the Receiver unit. 5. Connect a second DVI monitor to the second DVI-D video out connector. 6. Connect the supplied power adapter to the Receiver. (Do not apply power at this time) Transmitter to Receiver Connection (See diagram below) 7. Connect up to 150 ft. (50 m) of CAT5e or better cable from the RJ45 connectors on the Transmitter to the RJ45 connectors on the Receiver. NOTE: USB-HID models support a maximum of two USB-HID devices. Figure 6. Dual head Installation (USB-HID) CATx cabling is connected as shown to the left. Up to 150 ft. max. CrystalView DVI Mini Installation and Operations Manual 11 Single head (USB-2.0 model) Installation Transmitter Installation 1. Connect the supplied DVI-D male-to-male cable from the computer’s DVI video out connector to the Transmitter’s DVI-D video in connector. 2. Connect the supplied USB Type A to Type B cable from a USB port on the computer to the USB Type A connector on the Transmitter. 3. Connect the supplied power adapter to the Transmitter. (Do not apply power at this time) Receiver Installation 4. Connect a DVI monitor, USB keyboard, and USB mouse to the corresponding connectors on the Receiver unit. 5. Connect the USB 2.0 transparent devices to the USB ports 6. Connect the supplied power adapter to the Receiver. Transmitter to Receiver Connection 7. Connect two CAT5e or better cable from the RJ45 connectors on the Transmitter to the RJ45 connectors on the Receiver. Figure 7. Single head Installation (USB-2.0) CATx cabling is connected as shown to the left. Up to 150 ft. max. 12 CrystalView DVI Mini Installation and Operations Manual Dual head (USB-2.0 model) Installation Transmitter Installation 1. Connect the two supplied DVI-D male-to-male cables from the computer’s DVI video out connectors to the two Transmitter’s DVI-D video in connectors. 2. Connect the two supplied USB Type A to Type B cables from a USB port on the computer to the two USB Type A connectors on the Transmitter. 3. Connect the supplied power adapter to the Transmitter. (Do not apply power at this time) Receiver Installation 4. Connect a DVI monitor, USB keyboard, and USB mouse to the corresponding connectors on the Receiver unit. 5. Connect a second DVI monitor to the second DVI-D video out connector. 6. Connect the USB 2.0 transparent devices to the USB ports 7. Connect the supplied power adapter to the Receiver. (Do not apply power at this time) Transmitter to Receiver Connection 8. Connect up to 150 ft. (50 m) of CAT5e or better cables (3) from the RJ45 connectors on the Transmitter to the RJ45 connectors on the Receiver. Figure 8. Dual head Installation (USB-2.0) CATx cabling is connected as shown to the left. Up to 150 ft. max. CrystalView DVI Mini Installation and Operations Manual 13 When all cabling is in place, power up the system in the following recommended sequence: 1. Monitor(s) 2. Receiver unit 3. Transmitter unit 4. Computer Dip Switch Settings The configuration Dip-Switches are located on the front panel of the transmitter and the receiver units. The Dip-Switches on the transmitter are used to set the monitor resolution. The default switch setting (Automatic control - #1 and #2 Off) will automatically adapt to the remote monitor resolution. The default setting should only be modified if the cable length goes to or beyond the specified limits or the image quality is not satisfactory. Switch #4 selects the operating mode; standard or firmware update. Switch #4 must be OFF (down) for standard operation. Transmitter Dip-switch settings DIP Function Switch = Switch down = Switch up = Switch not used Position Monitor Resolution: Automatic adjustment (Default) Monitor Resolution: up to 1280 x 1024 Monitor Resolution: larger than 1280 x 1024 Configuration for Maximum Distance transmission, Independent of Monitor Resolution Send stored DDC information to CPU (Default setting) Allow reading of the DDC information from the monitor Reset and send only the factory default DDC information Standard Operation mode: Standard operation (Default) Dip-Switch 4 must be in the “OFF” (down) position during normal operation Test operation mode: Firmware update Set only during Firmware Update, if required Figure 9. Transmitter Dip switch settings 14 CrystalView DVI Mini Installation and Operations Manual Receiver Dip-switch settings The receiver Dip-switches are used to adjust the CATx cable length. The installation cable should be Type AWG24. Patch cables or flexible CATx cables (AWG26/7) may be used but this reduces the cable distance by approximately 50%. Keep this in mind when adding flexible cabling. The default switch setting is preset for automatic adjustment. This setting is acceptable for most configurations. The default setting should only be changed if the CATx cable length is short or the image quality is not satisfactory. DIP Switch Position Function = Switch down = Switch up = Switch not used Automatic cable length adjustment (Default setting) Cable length greater than 33 ft. (10 m) Cable length greater than 66 ft. (20 m) Max. cable length: use this setting if exceeding the max recommended cable length or if the video quality is not acceptable using the automatic adjustment setting. Inhibits reading of the DDC information from the attached monitor Allows reading of the DDC information from the attached monitor Standard Operation mode: Standard operation (Default) Dip-Switch 4 must be in the “OFF” (down) position during normal operation Test operation mode: Firmware update Set only during Firmware Update, if required Figure 10. Receiver Dip switch settings CATx cables should have ferrites on both ends of the cable close to the transmitter and receiver’s RJ45 connector. A point to point connection is required. Patch panels in the line are allowed CrystalView DVI Mini Installation and Operations Manual 15 Command Mode The command mode is not available on the USB-2.0 single head model. It is used to initiate an automatic readjustment of the transmission parameters and read the DDC information from the attached monitor. The command mode is invoked by pressing the Left Shift key twice, then the hot key. <Left shift> + <left Shift> is the default key sequence to invoke the command mode. This can be changed to 1 of 7 key sequences. While in the command mode, the Shift and Scroll LEDs will flash. To exit the command mode, press the Esc key. Function Keyboard Command Enter Command Mode (default) <Left Shift> , <Left Shift> Exit Command Mode <Esc> Change ‘Hot key’ sequence (see below table) <Left Ctrl>+<Left Shift>+<c>, <Hot key code>,<Enter> ‘Hot Key’ Code New ‘Hot Key’ Sequence <key> + <key> <Key> , <key> 1 <Left Ctrl>+<Left Shift> 2 <Scroll>,<Scroll> 3 <Left Shift>,<Left Shift> 4 <Left Ctrl>,<Left Ctrl> 5 <Left Alt>,<Left Alt> 6 <Right Shift>,<Right Shift> 7 <Right Ctrl>,<Right Ctrl> 8 <Right Alt>,<Right Alt> Press the keys simultaneously Press the keys successively Example: To change the ‘Hot Key’ from the default to <Right Shift> , <Right Shift> Press the Left Ctrl, Left Shift, c key, the 6 key, and press enter. The key sequence to enter the command mode is now changed. To perform an auto-adjust (USB-HID models only) enter the command mode <Left Shift> , <Left Shift> then press the <a> key. The screen will blank for a short time, then the unit will exit the command mode and the transmission parameters will be re-adjusted for optimum video quality. 16 CrystalView DVI Mini Installation and Operations Manual DDC Information The CrystalView DVI Mini has preset DDC information that is sent to the source computer. If this factory preset DDC information is not appropriate, you can read the attached monitor’s DDC information and the CrystalView DVI mini will use these values. There are two ways to read the DDC information from the attached monitor. 1. Using keyboard commands during operation 2. Disconnecting and re-connecting the monitor at the receiver unit The Dip switches must be set correctly to properly read the DDC information. Using Keyboard commands Perform the following command sequence to read the DDC information from the attached monitor (except for the single-head, USB 2.0 model). 1. Enter the command mode <Left Shift> , <Left Shift> (press left shift twice) NOTE: If the hot key has been changed, use the new hot key sequence. Shift and Scroll LEDs will flash 2. Press the <2> key, then <Enter> to read the DDC information. The monitor will blank for a short time, then will exit the command mode The CPU can now read the monitor DDC information and allow the video resolution to be selected. 3. Enter the command mode again <Left Shift> , <Left Shift> 4. Press the <1> key, then <Enter> The CrystalView DVI Mini will exit the command mode. The DDC information from the attached monitor has now been updated. Disconnecting and re-connecting the monitor Verify that the monitor is on (both monitors on the dual-head model) 1. Set the Dip switch #3 on the receiver unit to the “ON” (up) position. 2. Disconnect and re-connect the monitor cable from the receiver unit (Both monitor cables on the dual-head model) Upon re-connecting the monitor cable(s), the DDC information will be read from the monitor and transmitted to the CPU. The “Video OK” LED will flash for about one second on both the transmitter and receiver units to indicate that programming was successful 3. Set the Dip switch #3 on the receiver unit back to the “OFF” (down) position. CrystalView DVI Mini Installation and Operations Manual 17 Compatibility Information The CrystalView DVI Mini is compatible with the following: Video DVI-D SingleLink TMDS Signal Levels Mouse USB 2-button USB 3-button USB wheel Keyboard Standard keyboards Keyboards with built-in USB Hubs Keyboards with enhanced features may be supported but support for all HID devices can not guaranteed USB-HID models Supports HID devices only ie. Keyboards, mice, Touch Screens, Graphic tablets, barcode readers, etc. Does not support devices like scanners, web cams, memory devices, etc. Each USB-HID port provides a maximum current of 100mA. Only two USB-HID devices are supported concurrently. USB 2.0 models Supports all types of USB 2.0 devices like scanners, web cams, memory devices at USB high speed ( max. 480 Mbits/s) Note: CrystalView DVI Mini, USB-HID models support two and only two USB HID devices – keyboard and mouse, keyboard and touch screen, but not keyboard, mouse, and touchscreen. Hubs are allowed but only two USB devices supported. System Operation Operating the CrystalView DVI Mini is no different than operating your computer normally. All computer functions and applications can be performed normally. The only difference is your keyboard, monitor, and mouse can be up to 165 feet away from the computer. With the USB 2.0 transparent models you can extend your USB peripherals as well as your keyboard, monitor, and mouse. Diagnostics (See Appendix C) 18 CrystalView DVI Mini Installation and Operations Manual TROUBLESHOOTING Troubleshooting Video Diagnosis Possible Reason Possible Solution Power LED off Power supply Check power supply units and the connection to the mains. Link Status LED off Connection between Transmitter and Receiver unit Check the CATx cable and connections Video OK LED off (Transmitter) No video signal detected From the source Check DVI-D cable to CPU. Download DDC information from monitor Reboot CPU if necessary Video OK LED off No monitor detected Check connection, length and quality of the DVI-D cable to monitor, tighten cable thumbscrews No video signal detected from CPU Unit Check connection, length and quality of interconnect cable between the units. Download DDC information from monitors. Reboot CPU if necessary Suboptimal transmission parameters Execute Auto-Adjust manually adjust monitor resolution USB Status LED off (Transmitter) No USB connection to the computer Check connection of USB cable to CPU, select another USB port if necessary. Remove USB and power cable and restart CPU. Connect power cable first. USB Status LED off (Receiver) Check USB connection Check connection of USB cable to USB-HID device. Remove DVI and power cable and restart CON Unit. Connect power cable first. USB device does not function USB-HID device is not supported Contact tech support if necessary. (Receiver) USB-HID CrystalView DVI Mini Installation and Operations Manual 19 USB-2.0 Link Status USB LED off Connection between Transmitter and receiver Check CATx cable and connections. USB controller (Receiver Unit) Check USB Status LED at the Receiver Unit. Source (computer, CPU) Check status (standby, sleep mode) USB controller (Receiver Unit) Check USB Status LED on Receiver Unit USB Status LED off on Transmitter No USB connection to CPU Check connection of USB cable to CPU, select another USB port if necessary. Remove USB and power cable and restart CPU Unit. Connect power cable first. USB Status LED off on Receiver Problem with USB connection Check connection of USB cable to USB-HID device. Remove DVI and power cables and restart the Receiver Unit. Connect power cable first. USB device without function Device not detected by CPU Check installation including required drivers. Reconnect USB device. Contact Tech support if necessary. Link Status USB LED is flashing 20 CrystalView DVI Mini Installation and Operations Manual SAFETY Product Safety Please note the following safety guidelines to ensure product reliability and a safe, long-term operation: Except where explained in this manual, do not attempt to service this Unit yourself. Do not use this Unit near water. CrystalView DVI Mini is for indoor use only, do not link between buildings Do not connect the CATx cable to any other equipment, especially network or telecommunication equipment Assure that the placement of this Unit is on a stable surface. Provide proper ventilation and air circulation. Keep connection cables clear of obstructions that might cause damage to them. Use only power cords, power adapter and connection cables designed for this Unit. Connect the power adapters to a grounded outlet. Ensure that the ground connection is maintained from the outlet to the power adapter Keep objects that might damage this Unit and liquids that may spill, clear from this Unit. Liquids and foreign objects might come in contact with voltage points that could create a risk of fire or electrical shock. Do not use liquid or aerosol cleaners to clean this Unit. Always unplug this Unit from its electrical outlet before cleaning. Unplug this Unit refer servicing to a qualified service center if any of the following conditions occur: The connection cables are damaged or frayed. The Unit has been exposed to any liquids. The Unit does not operate normally when all operating instructions have been followed. The Unit has been dropped or the case has been damaged. The Unit exhibits a distinct change in performance, indicating a need for service. CrystalView DVI Mini Installation and Operations Manual 21 SERVICE and MAINTENANCE Service Information Maintenance and Repair This Unit does not contain any internal user-serviceable parts. In the event a Unit needs repair or maintenance, you must first obtain a Return Authorization (RA) number from Rose Electronics or an authorized repair center. This Return Authorization number must appear on the outside of the shipping container. See Limited Warranty for more information. When returning a Unit, it should be double-packed in the original container or equivalent, insured and shipped to: Rose Electronics Attn: RA__________ 10707 Stancliff Road Houston, Texas 77099 USA Technical Support If you are experiencing problems, or need assistance in setting up, configuring or operating your CrystalView DVI Mini, consult the appropriate sections of this manual. If, however, you require additional information or assistance, please contact the Rose Electronics Technical Support Department at: Phone: (281) 933-7673 E-Mail: [email protected] Web: www.rose.com Technical Support hours are from: 8:00 am to 6:00 pm CST (USA), Monday through Friday. Please report any malfunctions in the operation of this Unit or any discrepancies in this manual to the Rose Electronics Technical Support Department. 22 CrystalView DVI Mini Installation and Operations Manual APPENDICES Appendix A - Specifications Maximum resolution Up to 1920 x 1200 @ 60Hz Max. cable length (AWG24) 150 ft (50m) @ 1280 x 1024 or less 120 ft (40m) @ 1920 x 1200 and 1600 x 1200 Patch cable (AWG26/8) will reduce the length by approximately 50% Video compatibility DVI-D Single Link Keyboard USB Mouse USB 2-button, 3-button, wheel Single Head – Transmitter – 5VDC / 800 mA USB-HID Receiver – 5VDC / 800 mA Power Single Head – Transmitter – 5VDC / 800 mA USB-2.0 Receiver – 5VDC / 2500 mA Dual Head – Transmitter – 5VDC / 1600 mA USB-HID Receiver – 5VDC / 1600 mA Dual Head – Transmitter – 5VDC / 1600 mA USB-2.0 Receiver – 5VDC / 3300 mA Connectors Video to PC/ KVM – DVI-I USB – Transmitter Type B / Receiver Type A Interconnect: RJ45 Power Operating Temp. 41ο F-113ο F / 5ο C-45ο C Storage Temp. -13ο F-140ο F / -25ο C-60ο C Rel. Humidity Max 80% non-condensing Weight Transmitter/Receiver (Single-Head) – 0.4 lbs (0.2kg) Transmitter/Receiver (Dual-Head) – 0.7 lbs (0.3kg) Dimensions Single-Head Transmitter / Receiver H: 1.1 in / 29 mm W: 3.1in / 80 mm D: 4.3 in / 110 mm Dual-Head Transmitter H: 1.7 in / 42 mm W: 3.1in / 80 mm D: 4.3 in / 110 mm Dual-Head Receiver H: 1.1 in / 29 mm W: 6.3in / 161 mm D: 4.3 in / 110 mm CrystalView DVI Mini Installation and Operations Manual 23 Appendix B – Parts and Cables Part Number Description CRK-M1DTXUD1D USB-HID transmitter and receiver Single head CRK-M1DTXUD2D USB-HID transmitter and receiver Dual head CRK-M1DTXTD1D USB-2.0 transmitter and receiver Single head CRK-M1DTXTD2D USB-2.0 transmitter and receiver Dual head CAB-DVImm DVI-D male-to-male CAB-USBABnnn USB Type A to Type B CAB-08C5UTPnnn CAT5 cable 24 CrystalView DVI Mini Installation and Operations Manual Appendix C - Diagnostics The CrystalView DVI Mini has the following LEDs for status indication at Transmitter and Receiver Units: USB-HID Models (Transmitter and Receiver Unit) Diagnostic LEDs 1 1 2 3 4 2 3 4 LED Status Diagnostics Power (red) off Device not ready on Device ready Link Status (green) off No connection via interconnect cable on Connection available Video OK (green) off Transmitter: No DVI signal from video source (computer, CPU) detected. Receiver: No DVI signal from CPU Unit or no monitor detected on DVI signal from video source available flashing DDC information is being transmitted from monitor off No USB connection on USB connection available USB Status (green) CrystalView DVI Mini Installation and Operations Manual 25 USB-2.0 Models (Transmitter and Receiver Unit) Diagnostic LEDs 1 1 2 3 4 5 26 2 3 4 5 LED Status Diagnostics Power (red) off Device not ready on Device ready Link Status USB (green) off No connection via interconnect cable on Connection available flashing No USB host found Link Status Video (green) off No connection via interconnect cable on Connection available Video OK (green) off Transmitter: No DVI signal from video source (computer, CPU) detected. Receiver: No DVI signal from CPU Unit or no monitor detected on DVI signal from video source available flashing DDC information is being transmitted from monitor off No USB connection on USB connection available USB Status (green) CrystalView DVI Mini Installation and Operations Manual 10707 Stancliff Road Houston, Texas 77099 Phone: (281) 933-7673 Internet: WWW.ROSE.COM