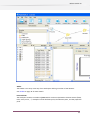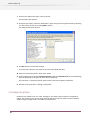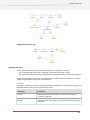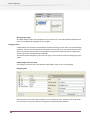
1
Switch 2-in-1 Enfocus Switch 10 Contents 1. Copyrights.........................................................................11 2. Introduction......................................................................12 2.1 Welcome to Switch............................................................................12 2.2 Using Switch Help.............................................................................12 Displaying help............................................................................12 Applicability................................................................................12 Getting more help........................................................................13 2.3 Switch product flavors.......................................................................15 Product family.............................................................................15 Product flavors............................................................................15 3. Installing and running Switch ..............................................16 3.1 Getting ready to run Switch ................................................................16 System requirements....................................................................16 Installing Switch .........................................................................16 Using language packs....................................................................17 Running Switch as limited user.......................................................18 3.2 Running Switch for the first time.........................................................19 Preparing to run Switch ................................................................19 3.3 Licensing........................................................................................19 Creating an activation account........................................................20 Starting a trial.............................................................................20 Activating licenses........................................................................21 Moving licenses between computers................................................22 3.4 Third-party applications....................................................................23 Installing third-party applications...................................................23 Detecting third-party applications...................................................25 Licensing third-party applications...................................................27 Information on third-party application............................................29 3.5 Upgrading from a previous version......................................................29 Stop the Switch server before upgrading...........................................29 One version at a time...................................................................29 Version change detection..............................................................30 Downgrading to a previous version..................................................30 4. Finding your way around Switch ...........................................31 4.1 Switch application components...........................................................31 4.2 Switch designer...............................................................................32 Workspace overview.....................................................................32 Toolbar.....................................................................................36 2 Contents Canvas.......................................................................................37 Flow Elements pane.....................................................................37 Files pane..................................................................................39 Flows pane.................................................................................41 Folders pane..............................................................................44 Messages pane............................................................................44 Progress pane.............................................................................45 Properties pane..........................................................................46 Activity monitor...........................................................................47 Users pane.................................................................................48 Filtering....................................................................................48 4.3 SwitchScripter.................................................................................49 4.4 SwitchClient...................................................................................50 5. Creating and executing a flow...............................................51 5.1 Performing the tutorial......................................................................51 5.2 Creating a flow................................................................................51 5.3 Adding the input folder....................................................................52 5.4 Sorting between PDF and non-PDF files................................................52 5.5 Creating a drop folder.......................................................................54 5.6 Retrieving files from an FTP server.......................................................55 5.7 Testing the partial tutorial flow...........................................................57 Monitoring the active flow.............................................................57 Files and unique name prefixes......................................................57 5.8 Delivering the PDF files through FTP.....................................................58 5.9 Sending the non-PDF files via email....................................................59 6. Managing flows.................................................................61 6.1 Creating a new flow..........................................................................61 Creating a new flow......................................................................61 Choosing the type of flow to create..................................................61 Downloading files from FTP Servers..................................................62 Receiving files through email.........................................................63 Sorting files into folders................................................................64 Sending notifications...................................................................66 Finishing up...............................................................................67 6.2 Working with flows.........................................................................68 Organizing flows.........................................................................68 Changing flow properties...............................................................70 Adding and removing flows...........................................................70 Locking and unlocking flows...........................................................72 Activating and deactivating flows....................................................73 Importing and exporting flows.......................................................74 7. Designing flows.................................................................76 7.1 Basic concepts..................................................................................76 3 Enfocus Switch 10 Working with the canvas...............................................................76 Working with flow elements..........................................................78 Working with properties...............................................................85 7.2 Advanced topics..............................................................................86 Preferences................................................................................86 Working with folders....................................................................87 Leaving originals in place..............................................................90 Configurators..............................................................................91 Using hierarchy info.....................................................................91 Using Email info..........................................................................93 Acknowledged job hand-off..........................................................96 Specifying file filters.....................................................................97 Process these folders....................................................................99 8. Running flows.................................................................103 8.1 Monitoring flow execution................................................................103 Viewing an active flow.................................................................103 Putting connections on hold.........................................................104 Viewing log messages..................................................................107 Viewing processes........................................................................111 Viewing flow problems.................................................................111 Activity monitor and workload management.....................................114 8.2 Handling execution problems............................................................114 Handling problem jobs.................................................................114 Handling problem processes..........................................................116 9. Metadata........................................................................118 9.1 Metadata overview..........................................................................118 9.2 Defining text with variables..............................................................119 Entering text.............................................................................120 Inserting a variable.....................................................................120 Updating a variable.....................................................................121 9.3 Defining a condition with variables....................................................122 Defining a condition....................................................................122 Comparison operators..................................................................124 9.4 Sample jobs..................................................................................125 Working with sample jobs............................................................125 Selecting a sample job.................................................................126 9.5 Building a location path...................................................................127 10. Scripting concepts............................................................130 10.1 Scripting overview..........................................................................130 10.2 Putting a script in a flow.................................................................132 Script expressions.......................................................................132 Script package...........................................................................136 Script declaration........................................................................137 4 Contents Scripted plug-in.........................................................................138 10.3 Scripting languages........................................................................138 JavaScript.................................................................................138 AppleScript...............................................................................139 VBScript....................................................................................141 11. Working with SwitchClient..................................................143 11.1 Preparing for SwitchClient.................................................................143 Setting up communication............................................................143 Designing a flow........................................................................145 Managing users.........................................................................148 Configuring access rights..............................................................150 11.2 Installing SwitchClient.....................................................................152 Licensing issues..........................................................................152 SwitchClient System requirements..................................................152 Installing SwitchClient from a DVD..................................................152 Installing SwitchClient from the internet..........................................153 Preparing to run SwitchClient........................................................153 11.3 Using SwitchClient..........................................................................153 Finding your way around SwitchClient.............................................153 User preferences.........................................................................155 Connecting to Switch...................................................................156 Submitting jobs..........................................................................157 Working with Checkpoints............................................................159 Replacing a job..........................................................................163 Viewing log messages..................................................................164 Working with jobs......................................................................165 12. General application reference.............................................166 12.1 Licensing......................................................................................166 Starting a trial off-line................................................................166 Off-line activation......................................................................168 Deactivating licenses...................................................................170 Repairing licenses.......................................................................173 Tips and troubleshooting for Licensing.............................................175 12.2 Feature matrix...............................................................................177 12.3 Flow element matrix.......................................................................178 12.4 Running Switch Watchdog as a service................................................181 Switch server and Switch Watchdog................................................181 Setting up Switch Watchdog as a Windows service.............................182 Operating Switch as a Windows service............................................182 Mapped drives...........................................................................182 12.5 Version requirements for third-party applications.................................183 13. Advanced topics for Designing flows.....................................184 13.1 Flow properties.............................................................................184 5 Enfocus Switch 10 13.2 Preferences..................................................................................184 User interface preferences............................................................184 Mail send preferences.................................................................185 FTP proxy preferences..................................................................186 Mac file types preferences............................................................186 Processing.................................................................................187 Error handling...........................................................................188 Problem alerts...........................................................................188 Application data........................................................................189 Logging....................................................................................190 Internal communication...............................................................191 Remount Volumes.......................................................................192 13.3 Unique name prefixes.....................................................................193 13.4 Mac file types...............................................................................194 13.5 Regular Expressions.......................................................................196 13.6 JavaScript for applications...............................................................201 13.7 AppleScript for applications.............................................................205 Writing an AppleScript for applications...........................................206 Examples of AppleScripts for applications........................................207 14. Advanced topics for running flows.......................................210 14.1 Scheduling jobs.............................................................................210 Objectives for scheduling jobs.......................................................210 Internal job ticket.......................................................................210 Execution slots...........................................................................210 Scheduling tasks.........................................................................211 14.2 Job priorities.................................................................................211 14.3 Arrival stamps...............................................................................212 15. Flow element reference.....................................................213 15.1 Basic elements...............................................................................213 Connection................................................................................213 Folder......................................................................................216 Problem jobs.............................................................................219 Submit hierarchy........................................................................220 Archive hierarchy........................................................................224 Set hierarchy path......................................................................225 Job dismantler..........................................................................226 Ungroup job..............................................................................227 Split Multi-job...........................................................................229 Assemble job.............................................................................229 Generic application.....................................................................233 Execute command......................................................................234 15.2 Tools...........................................................................................237 Compress..................................................................................237 6 Contents Uncompress...............................................................................237 Merge PDF Pages........................................................................239 Split PDF in pages.......................................................................241 Hold job...................................................................................243 Inject job.................................................................................246 Rename job..............................................................................248 File type...................................................................................251 Sort job....................................................................................252 Sort files in job..........................................................................253 Sort by Preflight State..................................................................255 Script element...........................................................................256 Recycle bin...............................................................................257 15.3 Communication elements...............................................................258 FTP receive................................................................................258 FTP send...................................................................................261 Mail receive..............................................................................263 Mail send.................................................................................267 Submit point............................................................................269 Checkpoint................................................................................270 Checkpoint via mail.....................................................................273 Pack job...................................................................................276 Unpack job................................................................................277 Monitor confirmation..................................................................279 15.4 Processing elements......................................................................280 15.5 Metadata Flow Element Reference....................................................280 XML pickup...............................................................................280 JDF pickup................................................................................281 XMP pickup...............................................................................282 Opaque pickup..........................................................................284 Apago PDFspy............................................................................285 Export metadata........................................................................287 XSLT transform...........................................................................288 Log job info..............................................................................288 16. Metadata reference.........................................................290 16.1 Variables.....................................................................................290 Using variables..........................................................................290 Basic syntax..............................................................................292 Data types................................................................................292 Formatting...............................................................................293 Comparing................................................................................295 Indexed variables......................................................................296 String manipulations...................................................................297 Known variables........................................................................298 7 Enfocus Switch 10 Doc group................................................................................299 Email group..............................................................................300 Image group..............................................................................301 IPTC group................................................................................302 Job group.................................................................................303 Metadata group.........................................................................305 Photo group.............................................................................306 Stats group...............................................................................308 Switch group.............................................................................310 16.2 Metadata......................................................................................311 Embedded metadata...................................................................311 External metadata......................................................................314 Pickup mechanisms.....................................................................317 Email message schema................................................................319 Processing results schema............................................................320 Defining metadata fields..............................................................322 Client fields schema....................................................................326 Introduction to XPath 1.0..............................................................327 Introduction to Adobe XMP location paths.......................................330 17. Developing scripts............................................................333 17.1 Using SwitchScripter........................................................................333 Finding your way around SwitchScripter..........................................333 SwitchScripter Toolbar.................................................................334 SwitchScripter Declaration pane.....................................................335 SwitchScripter Fixture pane..........................................................336 SwitchScripter Program pane........................................................339 SwitchScripter Properties pane......................................................339 SwitchScripter Message pane........................................................340 17.2 Writing and testing a script..............................................................340 Writing a script..........................................................................340 Testing a script..........................................................................342 17.3 Developing a scripted plug-in..........................................................344 Obtaining permission..................................................................344 Creating a scripted plug-in...........................................................345 Configurator guidelines................................................................347 17.4 Script declaration...........................................................................353 Main script properties.................................................................353 Execution mode.........................................................................355 Property definition properties.......................................................358 Property editors.........................................................................359 Validating property values............................................................361 External property editor..............................................................365 18. Scripting reference..........................................................367 8 Contents 18.1 Scripting API - Introduction..............................................................367 18.2 JavaScript Reference......................................................................368 Language concepts.....................................................................368 Built-in types and objects............................................................371 Built-in functions......................................................................388 Built-in operators......................................................................390 Declarations.............................................................................398 Control statements.....................................................................400 18.3 Utility module..............................................................................408 Text encoding...........................................................................408 ByteArray class...........................................................................410 File class...................................................................................412 Dir class....................................................................................417 Process class..............................................................................422 18.4 XML module.................................................................................426 Node class................................................................................426 Document class..........................................................................427 Element class............................................................................429 Text class.................................................................................430 Comment class...........................................................................431 Attr class...................................................................................431 List classes: NodeList, AttrList.........................................................431 18.5 Network module...........................................................................432 SOAP class.................................................................................432 18.6 Database module.........................................................................438 Text encoding...........................................................................438 DataSource class........................................................................440 Statement class..........................................................................441 18.7 Flow element module....................................................................444 Entry points..............................................................................444 Environment class......................................................................449 Switch class..............................................................................458 Connection class........................................................................462 Job class..................................................................................463 Occurrence class.........................................................................474 List classes: ConnectionList, JobList.................................................476 18.8 Metadata module.........................................................................476 Map class.................................................................................476 Dataset class..............................................................................477 XML data model.........................................................................478 JDF data model..........................................................................479 XMP data model.........................................................................481 Opaque data model...................................................................486 9 Enfocus Switch 10 FileStatistics class......................................................................486 CP2 data model.........................................................................493 Existing functions......................................................................500 Classes.....................................................................................501 19. Data Collecting Wizard......................................................513 19.1 Task description.............................................................................513 19.2 Challenges...................................................................................513 19.3 GUI.............................................................................................514 19.4 Resulting zip package.....................................................................517 10 Enfocus Switch 10 1. Copyrights © 2011 Enfocus BVBA all rights reserved. Enfocus is an EskoArtwork company. Certified PDF is a registered trademark of Enfocus BVBA; patent pending. Enfocus PitStop Connect, Enfocus PitStop Pro, Enfocus PitStop Server, Enfocus PitStop Workgroup Manager, Enfocus Instant PDF, Enfocus StatusCheck, Enfocus CertifiedPDF.net, Enfocus Instant Barcode, Enfocus PitStop Extreme, Enfocus PDF Workflow Suite, Enfocus LightSwitch, Enfocus FullSwitch, Enfocus PowerSwitch, Enfocus SwitchClient and Enfocus SwitchScripter are product names of Enfocus BVBA. Acrobat, Distiller, InDesign, Illustrator, Photoshop, FrameMaker, PDFWriter, PageMaker, the Adobe logo, the Acrobat logo and PostScript are trademarks of Adobe Systems Incorporated. Macintosh, Mac, Mac OS and ColorSync are trademarks of Apple Computer, Inc., registered in the U.S. and other countries. Windows, Windows 2000, Windows XP and Windows Vista are registered trademarks of Microsoft Corporation. PANTONE® Colors displayed here may not match PANTONE-identified standards. Consult current PANTONE Color Publications for accurate color. PANTONE® and other Pantone, Inc. trademarks are the property of Pantone, Inc. ©Pantone, Inc., 2006. OPI is a trademark of Aldus Corporation. Quark, QuarkXPress, QuarkXTensions, XTensions and the XTensions logo among others, are trademarks of Quark, Inc. and all applicable affiliated companies, Reg. U.S. Pat. & Tm. Off. and in many other countries. This product and use of this product is under license from Markzware under U.S.Patent No. 5,963,641. Other brand and product names may be trademarks or registered trademarks of their respective holders. All specifications, terms and descriptions of products and services are subject to change without notice or recourse. 11 Enfocus Switch 10 2. Introduction 2.1 Welcome to Switch Thank you for your interest in Enfocus Switch. Switch was born because so many people like you were looking for a simple yet powerful publishing automation solution. Over the years numerous features have been added to make it easier for you to automate your life. We strive to make our products user-friendly and easy to learn. If you think we could do more with the product, the documentation, our web site or anything else to make your life easier, we would love to hear about it. 2.2 Using Switch Help Displaying help Switch uses your default web-browser to display its help content. You can reach Switch help in one of the following ways: • Select the Help > Switch help menu item. • Press the F1 key. Applicability Switch help describes the capabilities of the complete Switch product family. Some topics may not apply to your version of the Switch product (see Switch product flavors on page 15 for a description of the Switch product family members). The applicability for some topics is indicated with an icon: Icon 12 LightSwitch FullSwitch PowerSwitch Enfocus Switch 10 Icon LightSwitch FullSwitch PowerSwitch Getting more help How to get more help If you run into a problem while installing or using Switch, there are a number of ways to get help: • • Consult this guide. Consult the support section on the Enfocus web site; you'll find an extensive information database, including: a) A set of example flows and scripts (flow library, application library, script library). b) A knowledge base with answers to frequently asked questions. • • • Discuss the issue with other Switch users on the Enfocus user group. Contact your reseller; a list of authorized resellers is available on the Enfocus web site: Open http://www.enfocus.com/FindReseller.php and choose your country in the dropdown menu. Complete and submit the "report a problem" form on the web at http://www.enfocus.com/reportaproblem.php. Note: Some of the resources, such as Flow library and Script library, can be accessed directly from the Help menu. Flow library The flow library offers an extensive set of documented example flows. You can download an example and use it "as is", as a starting point for your own customized flow design, or just to get a feeling for the capabilities of Switch. To access the flow library, go to: http://www.crossroads-world.com/en/Get%20Flows.aspx. Application library The application library lists third-party applications that can be automated through Switch and for which such automation has been tested by Enfocus. The list includes third-party applications for which Switch offers a configurator, and other third-party applications that are treated as a generic application. The description for each application includes links to example flows and scripts to get you on your way quickly. To access the application library, go to https://www.crossroads-world.com/en/Get%20Applications.aspx. 13 Enfocus Switch 10 Script library While Switch offers many features "out of the box", some situations require additional customization through scripting. The script library offers a number of example scripts for use with Switch. You can download an example and use it "as is", as a starting point for your own customized script, or just to get a feeling for the capabilities of Switch scripting. To access the script library, go to: http://www.enfocus.com/flows.php. Knowledge base The knowledge base contains articles with answers to frequently asked questions, work-arounds, tips and tricks. The knowledge base should be your first stop when you run into a problem with Switch. To access the knowledge base, go to: http://www.enfocus.com/kboverview.php?id=4707. User group The Switch user group is an email-based user community where you can ask questions and exchange ideas with other Switch users. Joining the user group is very simple. Sign up today! To join the user group, go to: http://www.enfocus.com/usergroup.php. Support If you cannot find the answer to your question in Switch help or on the web, help is available from the Enfocus support team. Before asking your question please: • Consult the product documentation (Switch help) and the online resources available on the web (knowledge base, flow library, application library, script library). • Consider to gain advice from your peers on the user group. • Register your product - this will help us to know who you are and what products you are using. To contact Enfocus Support: complete and submit the "report a problem" form on the web at http://www.enfocus.com/reportaproblem.php. Contact us We highly value interaction with our customers. Web site http://www.enfocus.com Email For sales questions, email: [email protected] For support questions: email: [email protected] or contact the support team All other questions, email: [email protected] 14 Enfocus Switch 10 2.3 Switch product flavors Product family Switch offers an impressive array of features, including: • • • • • Visual flow design tools making automated flows easy to setup and deploy. Automatically receiving and sending jobs through FTP or email. Configuring and driving a range of third-party applications used for publishing tasks. Importing, exporting and working with metadata in various formats. Sorting and processing jobs based on their origin or based on the contents of metadata accompanying the job. Powerful scripting capabilities to automate a yet wider range of third-party applications and to integrate with databases, digital-asset management systems, MIS-systems or Web services. Interacting with users on the network to support job submission and monitoring from their own desktop. • • Product flavors The Switch product family has the following three members, also called “flavors”, in the order of increasing capabilities: LightSwitch FullSwitch PowerSwitch File transfer through FTP and email, and sorting files into folders Automating third-party applications through configurators More sophisticated automation through scripting and advanced metadata features Users on the local network or Users on the local network or over the Internet can submit over the Internet can submit jobs and monitor their progress jobs and monitor their progress 15 Enfocus Switch 10 3. Installing and running Switch 3.1 Getting ready to run Switch System requirements Resources By itself Switch doesn’t require a lot of resources. You can find the system requirements on the Enfocus website http://www.enfocus.com/contentpage.php?id=5507 by navigating to [your Switch Flavor] > System Requirements However Switch usually drives a number of processes that require substantial additional resources: • Disk space for (potentially large) jobs as they are being moved along a flow or after they have been archived. • Network bandwidth for email and FTP communication. • Processor time, disk I/O capacity, memory and disk space for third-party applications. The resource requirements for these processes must be estimated separately. Multi-processor systems Switch is heavily multi-threaded and takes full advantage of multi-processor systems, both for its internal operation and when driving external processes. Configurators While most configurators are provided for all supported operating systems, this is not always possible because the corresponding third-party application may not be available (or may not support an automation interface) on all systems. The configurators come in packs so that a user can manage (install/ delete/ update) them at any time in a user friendly way and without running a Switch installer. See Version requirements for third-party applications on page 183 for details. Installing Switch Locating the installer from a trial or product DVD 1. Insert the DVD in the DVD drive of your system 2. On Windows: the DVD wizard appears and shows you the content of the DVD. Follow the steps in the wizard to find the installer 3. On Mac OS: locate the installer application. The name of the installer depends on the flavor of Switch being installed: 16 Enfocus Switch 10 • For LightSwitch, locate "LightSwitch Installer" • For FullSwitch, locate "FullSwitch Installer" • For PowerSwitch, locate "PowerSwitch Installer" Download the installer from internet To download the latest version of the installer: 1. Visit the Enfocus web site and go to the download section. 2. Download the appropriate installer for your operating system. 3. Locate the installer where you saved it on your computer. Installing Switch • • Double-click the Switch installer to launch it, and follow the steps presented to you by the installer. If you had a previous version of Switch installed, see Upgrading from a previous version on page 29 Note: You need administrator rights to install and license Switch . In other words, you cannot successfully complete these tasks when logged in with a limited user account. Using language packs The Switch user interface and help system can be displayed in a language other than English by installing the appropriate language pack and selecting the desired language in the user preferences. Installing languages and documentation is also done via PackManager. The PackManager is launched automatically by the Switch installer and user can select the desired language packs which should be installed during the installation. Locating language pack installers For each language there are two language pack installers: LightSwitch FullSwitch PowerSwitch SwitchClient A server-side language pack that includes the localization information needed by the server, designer and scripter The same language pack is applicable for any of the product flavors A client-side language pack that includes the localization information needed by the client (including the translation for messages received from the server) 17 Enfocus Switch 10 Installing language packs Selecting the desired language After installing the language pack, perform the following steps for each Switch application (designer & server; scripter; client): 1. Quit the Switch application (if you have not already done so). 2. Launch the Switch application. 3. Open the Preferences on Mac Choose Preferences from the application menu on Windows For Switch (designer & server) and SwitchScripter, Choose Edit > Preferences . For SwitchClient, click the window title bar icon or right-click the title bar, and choose Preferences from the window’s system menu 4. In the application's Preferences dialog, set the Language property to the desired language. 5. Quit the Switch application. 6. Launch the Switch application. Running Switch as limited user Installing and licensing You need administrator rights to install and license Switch . In other words, you cannot successfully complete these tasks when logged in with a limited user account. Application data All of the application data managed by Switch (including flow definitions, auto-managed backing folders, internal job tickets and so on) is stored in a nested folder hierarchy under a single root folder, which is called the application data root. By default, this folder is not accessible for writing by limited users (i.e. a user without administrator rights). If you need a limited user to operate Switch , you need to provide that user with full read-write access to the Switch application data. Preparing for operation by limited user To prepare Switch for operation by a limited user, perform the following steps: 1. Log in as administrator. 2. Ensure that Switch is successfully installed and activated (or the trial period has not yet expired). 3. Launch Switch . 4. Deactivate all flows (preferably). 5. Open the Preferences dialog and select the application data group. 18 Enfocus Switch 10 6. Select a new location for the application data root that offers full access rights to the intended limited user(s). 7. Switch guides you through the procedure of relocating the application data root. 8. Quit Switch . 3.2 Running Switch for the first time Preparing to run Switch Depending on what you intend to use Switch for, you will need different pieces of information to get Switch completely up and running. You may need to obtain some of this information from your system administrator. • • • • If you have purchased Switch , you'll need your license key to license the application (see Licensing on page 19). If you want Switch to send email messages, you'll need the name and related information of your outgoing SMTP email server (see Mail send preferences on page 185). If you want Switch to receive files through email, you'll need the log-in information for your POP3 email accounts (see Mail receive on page 263). If you want Switch to send or receive files through FTP, you'll need URL and log-in information for the FTP servers (see FTP send on page 261 and FTP receive on page 258). 3.3 Licensing From the About Enfocus Switch window, you can: • start a 30-day trial (see Starting a trial on page 20), • activate your license (see Activating licenses on page 21), • deactivate your license, • repair your license. For easiest configuration, the machine running your copy of Switch should be online with full Internet access while performing licensing tasks. However, if the machine you are using does not have full Internet access, you can perform licensing tasks off-line if you: • have access to Internet e-mail and use of a Web browser on another machine, • can copy a file received in an Internet e-mail message to the machine you are using (using a USB flash memory drive, a diskette, an internal network...). 19 Enfocus Switch 10 Before you can activate or deactivate licenses, you should set up an activation account using the Enfocus website (http://www.enfocus.com/CreateAccount). Creating an activation account 1. Go to http://www.enfocus.com/CreateAccount. 2. Enter the appropriate information in the fields. 3. If you would like to receive news from Enfocus or be contacted by an Enfocus Certified Partner, leave the two bottom checkboxes selected; otherwise, clear them. 4. Click Create my Account. 5. After a few minutes, check your e-mail program for a new message from Enfocus regarding activating your new account. Note: If you do not receive this e-mail message, you might have to check any spam folders in your e-mail program as well. 6. Once it arrives, open the message and click the link to confirm your e-mail address. You should receive a message that your account was confirmed successfully in your default web browser. Starting a trial Once you have created and confirmed your activation account (see Creating an activation account on page 20), you can start a 30-day trial for your copy of Switch. • If the computer running your copy of Switch is connected to the Internet, you can start a 30-day trial from that machine. See Starting a trial on-line on page 20. • Otherwise, you must create a trial request file and use a computer that is connected to the Internet to upload it to an activation server. Starting a trial on-line You can start a 30-day trial on-line if the computer where your copy of Switch is installed is connected to the internet. To start a 30-day trial on-line, do the following: 1. Go to the Trial tab of the About Enfocus Switch window and click Start Trial. This opens the Activate License Wizard (on PC) or the Activate License Assistant (on Mac). 2. Click Next (on PC) or Continue (on Mac) in the first screen of the Activate License Wizard/ Assistant dialog box. 3. Select On-line activation and click Next / Continue. 20 Enfocus Switch 10 4. Enter the name and password of your activation account and click Next / Continue. Note: You should have created this activation account in Creating an activation account on page 20. If you haven’t created an activation account yet, click the Create a new Enfocus Account link in the Wizard/ Assistant and see Creating an activation account on page 20 for instructions. After you click Next / Continue, a status bar appears while the system communicates with the activation server. Do not cancel or close the Wizard/ Assistant. A message will appear saying that the trial was completed successfully and that you can now use the product(s) on your computer. 5. Click Finish / Done. You will see the number of trial days remaining in the Trial tab of the About Enfocus Switch window. Activating licenses Once you have created and confirmed your activation account (see Creating an activation account on page 20), you can start activating the licenses using your software’s product keys. Product keys come from online stores, from product key files you receive from Enfocus, or you can find them inside product boxes. Note: Product key files are HTML files. You can double-click them to see what product keys they contain. • If the computer running your copy of Switch is connected to the Internet, you can get licenses for the product keys and activate them from that machine. See On-line activation on page 21. • Otherwise, you must create an activation request file and use a computer that is connected to the Internet to upload it to an activation server. On-line activation You can activate your product key(s) on-line if the computer where you will use your software is connected to the internet. To activate a product key on-line, do the following: 1. Open the Activate License Wizard (on PC) or the Activate License Assistant (on Mac) by either: • going to the Trial tab of the About Enfocus Switch window and clicking Activate, • going to Help > Licensing > Activate . 2. Click Next (on PC) or Continue (on Mac) in the first screen of the Activate License Wizard/ Assistant dialog box. 21 Enfocus Switch 10 3. Select On-line activation and click Next / Continue. 4. Enter the product key and click Next / Continue. 5. Enter the name and password of your activation account and click Next / Continue. Note: You should have created this activation account in Creating an activation account on page 20. If you haven’t created an activation account yet, click the Create a new Enfocus Account link in the Wizard/Assistant and see Creating an activation account on page 20 for instructions. After you click Next / Continue, a status bar appears while the system communicates with the activation server. Do not cancel or close the Wizard/ Assistant. A message will appear saying that the activation was completed successfully and that you can now use the product(s) on your computer. 6. Click Finish / Done. The product and its license will appear in the License tab of the About Enfocus Switch window (previously called Trial tab). Activating extra client license SwitchClient is a free application, it can be installed on multiple computers and requires no activation. However, switch server counts the number of Client connections and accepts or refuses them. PowerSwitch comes with 5 licenses, which means that 5 SwitchClients can connect simultaneously to it. The FullSwitch accepts only 1 SwitchClient connection. Follow the same procedure which is used in licensing a new FullSwitch or PowerSwitch and enter a new activation key in FullSwitch or PowerSwitch to increase the number of licenses (i.e. simultaneous connections). Moving licenses between computers To move licenses between computers, do the following: 1. Deactivate the licenses on the computer that will not use them anymore. 2. Copy the product keys file to the computer that will use the licenses. 3. On the computer acquiring the licenses, activate the licenses using the product keys file. See Activating licenses on page 21. 22 Enfocus Switch 10 3.4 Third-party applications Installing third-party applications Switch interacts with a number of frequently-used third-party applications through built-in configurators. For a Switch configurator to work with the corresponding third-party application, follow these guidelines: • • • Obtain a version of the third-party application that is supported by Switch; see Third-party applications on page 23. Install the third-party application on the same computer as Switch (it will also be launched on that computer). Use the installer program or installer guidelines supplied with the third-party application. Note: User must legally obtain a valid license and installation kit from the application's vendor (or its representatives) for any third-party application used in conjunction with Switch. Enfocus does not sell, distribute or support third-party applications. In most cases you need to license a third-party application through its own user interface. Some configurators however support licensing the corresponding third-party application from within Switch. See Licensing third-party applications on page 27. PackManager Import and update mechanism Configurators from some Crossroads partners are shipped with the Switch installer and can be loaded during a post installation procedure (packs). However, for some other partners the plug-in can only be downloaded from the Crossroads website. Update installations include all configurator packs. PackManager is used to assist the user in managing configurators. Users can also manually download the configurators from the Crossroads website and eventually install via PackManager. In FullSwitch and PowerSwitch, click Manage configurators... option present below Manage languages... in the Help menu of the Menu bar. This option provides access to new configurators and an install/ update/ remove mechanism for configurators that are already installed. 23 Enfocus Switch 10 Installed tab This tab provides users with the following options: 1. A search field 2. An Actions button 3. A list of all installed configurators 4. Search for updates button 5. Uninstall button 6. Install button For the listed configurators, information such as Name, Icon, Description, Link to Crossroads application page, Compatibility (Switch version), Compatibility (3rd party version and flavor), Status (installed, installed and up-to-date, not installed) are displayed. Before updating, Switch checks if Switch version and configurator are compatible. Web tab This tab provides users with the following options: 1. A search field 2. An Actions button 3. A list of all installed configurators 4. Uninstall button 5. Install button For the listed configurators, information such as Name, Icon, Description, Link to Crossroads application page, Compatibility (Switch version), Compatibility (3rd party version and flavor), Status (installed, installed and up-to-date, not installed) are displayed. Before installing a configurator from this tab, Switch checks if Switch version and configurator are compatible. Local tab This tab provides users with the following options: 1. A search field 24 Enfocus Switch 10 2. An Actions button 3. A list of locally stored packs (example: packs that were downloaded but not yet installed, installed packs appear in the Installed tab) 4. Browse for folder button 5. Uninstall button 6. Install button For the listed configurators, information such as Name, Icon, Description, Link to Crossroads application page, Compatibility (Switch version), Compatibility (3rd party version and flavor), Status (installed, installed and up-to-date, not installed) are displayed. Before installing a configurator from this tab, Switch checks if Switch version and configurator are compatible. Detecting third-party applications Each Switch configurator implements one or more mechanisms to detect the presence of the corresponding third-party application. Often the application is automatically detected when Switch is launched, however in some cases manual intervention is required. Detection feedback As long as its third-party application is not successfully detected, a configurator's icon is grayed-out (as shown below) in the elements pane and in the canvas. A grayed-out configurator can be used in a flow design as usual, but the flow cannot be activated. Missing elements The export – import mechanism at the end of an installation procedure can result in broken flows with missing elements. Also starting from Switch 10, configurators can be deleted easily which might also result in missing elements. Therefore, to avoid this, missing elements and the connection to and from it are not removed. Instead a question mark (?) appears on their icon at the upper right corner. When hovering over such element, the tool tip displays the meessage WARNING: the flow element cannot be found by Switch. It is possible to start the flow again by adding back element to Switch. Automatic detection at startup When the Switch server starts, it attempts to detect the third-party application using fast mechanisms (such as querying the operating system registry or checking the default application path). To limit startup time, Switch does not perform a full file search during startup. 25 Enfocus Switch 10 Searching from the Flow Elements pane If during startup Switch does not detect a third-party application that has been successfully installed, you can trigger a search for the application through the context menu offered by the Flow Elements pane (as shown above). You can also use this function if you did not quit and restart Switch after installing a third-party application. To search for the third-party application corresponding to a configurator: 1. Bring up the context menu for the configurator's icon in the Flow Elements pane. 2. Choose the Search for application menu item in the context menu. This function first attempts to detect the third-party application using fast mechanisms and if that fails, it performs a full file search in the system's program files folder. Note: Some configurators do not offer this function or may not offer the full file search capability. Manually locating the executable If the search function described in the previous section fails to detect a third-party application that has been successfully installed, you can manually locate the application through the context menu offered by the Flow Elements pane (as shown in the previous section). Be careful with this procedure; selecting an unsupported application will have unpredictable results. To manually locate a third-party application corresponding to a configurator: 1. Bring up the context menu for the configurator's icon in the Flow Elements pane. 2. Choose the Set path to application menu item in the context menu. 3. In the Choose application dialog, browse to the application's executable (or application bundle). 26 Enfocus Switch 10 4. Click Open Note: Some configurators do not offer this function. Licensing third-party applications You must legally obtain a valid license and installation kit from the application's vendor (or its representatives) for any third-party application used in conjunction with Switch. Enfocus does not sell, distribute or support third-party applications. The third-party licensing mechanism facilitates implementing a robust commercial licensing and copy-protection scheme for plug-ins to the products offered by third-party vendors. Copy-protection is achieved by binding the plug-in license to the host application’s serial number. A single license can control multiple related plug-ins. Time-limited licenses support trial periods and rental-based business models. License generation and version/ upgrade management is fully under control of the third-party vendor. Enfocus provides a Host License Key to the end-user, who uses it to activate the Host (the Enfocus application that loads the third-party plug-in(s) under consideration, Switch in this instance). This involves communication with the Enfocus license server, usually over the Web. The Host License Key is bound to the Host Product Code (that is, it will only work for the appropriate type of product) and it provides an unambiguous, non-zero Host Serial Number. As long as the Host is in trial mode, its Serial Number is zero. The end-user transmits the following information to the Plug-in Vendor to request a plug-in license: • • • • Type of Plug-in Type of Host Host Serial Number (found on the Host’s user interface) Desired license period (unlimited, time-limited, trial, …) In most cases you need to license a third-party application through its own user interface. Trial Versions Most configurators work with a trial version of the corresponding third-party application. This allows you to test the combined solution before actually purchasing the products. Licensing from within Switch 27 Enfocus Switch 10 Some configurators support licensing the corresponding third-party application from within Switch through the context menu offered by the Flow Elements pane. In the Switch application, navigate to Help > License > License third-party plug-ins to view the License third-party plug-ins dialog box. Use this dialog box to enter license key received from the third-party vendor and click License button to activate it. License Key Generator The Enfocus Plug-in License Key Generator is a command-line application developed by Enfocus and provided to the Plug-in Vendor under strict non-disclosure terms. Three modes of operation are provided for this application: 1. Invoked from terminal window, manually entering the arguments. 2. Invoked from a shell, script or simple application offering a user interface customized for and built by the Plug-in Vendor. 3. Installed a website as part of an interactive request/ response procedure. This application is available only in English on both Windows and Mac OS. Entering the license key To license the third-party application corresponding to a configurator: 1. Navigate to Help > License menu. 2. Choose the License third-party plug-ins menu item. 3. In the License third-party plug-ins dialog, enter the license key for the third-party application in Third-party plug-in license key textbox. 4. Press License button. After successfully validating the license key, a message box appears displaying the message The third-party plug-in “name” has been successfully licensed until "expiration date". 28 Enfocus Switch 10 When validation of a license key is unsuccessful, a message box appears displaying the message This license key is invalid, does not correspond to the serial number of this copy of Switch or does not apply to any installed third-party plug-in. Verifying the licensing status To verify the licensing status for the third-party application corresponding to a configurator: 1. Bring up the context menu for the configurator's icon in the elements pane. 2. Choose the Show licensing status menu item in the context menu. 3. Review the message in the Application licensing status dialog. Note: only some configurators offer this function. Information on third-party application All configurators in the Flow Elements pane offer a context menu item Info on third-party application. By clicking this user can open a web page in the default web browser, showing a page on the Crossroads website, which contains information on the selected third-party application, such as: • An overview of the application’s features and benefits • Links to example flows, application notes, the vendor web site, ... • A direct link to the place where a trial version of the application can be downloaded etc. 3.5 Upgrading from a previous version Stop the Switch server before upgrading Before installing a new version of Switch , make sure that Switch is not running, including the Switch server. If you're not sure whether the Switch server is running or not, launch the Switch designer in the regular way and quit it again. If there are any active flows, Switch will present a dialog with the option to stop the server. If you were running the previous version of Switch as a Windows service, you may have to repeat the setup procedure after installing the upgrade. One version at a time Installing a new version of Switch automatically removes the previous version of the same Switch product flavor. Running two versions of the same Switch product flavor at the same time on the same computer is not supported. This is because the two versions would share the same preferences and application data. 29 Enfocus Switch 10 It is possible though to install and run multiple Switch product flavors in parallel, since each flavor has its own preferences and application data. For example, you could run FullSwitch 07 and PowerSwitch 08 at the same time on the same computer. Version change detection After installing a new version of Switch, when it is launched for the first time, Switch detects the version change and presents a warning dialog. As explained in the dialog message if user click Proceed button, Switch makes a backup of existing flows and then re-imports them. While re-importing the flows, Switch adjusts all flow elements and properties so that they conform with the current version of Switch. Any problems are reported to the user. See also importing and exporting flows. If user clicks Cancel button Switch quits without making any changes to the flows. Backup location The automatically exported flows are stored in a folder named for the current date/time inside the Switch designer's application data, which is system dependent. For example, on a typical Windows system the location might be: C:\Documents and Settings\All Users\Application Data\Enfocus\PowerSwitch Designer\backup\2007-08-18--16-45-01 And on a typical Mac OS X system the location might be: /Library/Application Support/Enfocus/PowerSwitch Designer/backup/2007-08-18--16-45-01 Deprecated flow elements Deprecated flow elements are automatically converted while re-importing existing flows as described above. See upgrading deprecated flow elements. Downgrading to a previous version Follow these steps to roll back to a previous version of Switch: 1. Export all existing flows to a safe place as a backup; see Importing and exporting flows on page 74. 2. Delete all existing flows in Switch (not the backup!); see Adding and removing flows on page 70. 3. Uninstall the newer version of Switch. 4. Install the previous version of Switch. 5. Launch Switch. 6. Import the flows from the backup made (when you first launched it); see backup location above. 30 Enfocus Switch 10 4. Finding your way around Switch 4.1 Switch application components Switch offers its functionality through a number of separate applications, each with a distinct function. Switch server The Switch server runs in the background, managed and monitored by the Switch Watchdog, to execute flows. It is automatically started and terminated as needed by the Switch designer. If so requested, the Watchdog can continue running after the user quits the designer. Since it has no user interface there is little to say about the Switch server and Switch Watchdog. Although in fact a reference to Switch often really refers to Switch server (especially in the context of executing flows). Switch designer The Switch designer offers a comprehensive user interface to design, activate, and monitor flows. It communicates with and manages the Switch server. The designer and the server must run on the same computer to establish a one-on-one communication. See Workspace overview on page 32 for an introduction to the designer. SwitchScripter SwitchScripter offers a scripting development environment, that is, it allows creating and testing script packages for use with Switch. The PowerSwitch installer automatically installs SwitchScripter as well. Although there is no technical requirement, SwitchScripter usually runs on the same computer as the designer. For more information see SwitchScripter on page 49, Scripting concepts on page 130 and Scripting reference on page 367. 31 Enfocus Switch 10 SwitchClient SwitchClient is a light-weight desktop application that allows a user on a different computer to submit and monitor jobs. Since it usually runs on a different computer, SwitchClient has its own installer. For more information see Working with SwitchClient on page 143 4.2 Switch designer Workspace overview When Switch designer is launched, it displays the main window called the workspace, shown here in its default configuration (design view): 32 Enfocus Switch 10 Toolbar The toolbar is the strip at the top of the workspace offering a number of tool buttons. See Toolbar on page 36 for more details. Panes and views The workspace contains a number of panes which can be manipulated as distinct entities (show, hide, resize, move, ...). Examples include the flows pane, the elements pane, and the properties pane. 33 Enfocus Switch 10 The central area that displays a flow design is called the canvas; it is a special pane because it has no title bar and it can't be moved from its central position. One or more panes (optionally including the canvas) combine to make up a workspace configuration called a view. The currently displayed view is selected by pressing one of the buttons in the leftmost section of the toolbar. Configuring the workspace The workspace offers a number of panes that are displayed in a number of pre-configured views. Each of the views can be configured at will to display an arbitrary combination of panes. The contents of a pane persists across views (i.e. the different views display the same instance of the pane rather than different copies). Panes can be shown or hidden by choosing the corresponding item in the View > Show panes menu. Panes can be resized by dragging the separators between them, they can be rearranged next to one another or overlaid as tabs by dragging their title bar, and they can be undocked as a floating pane. All configuration settings are persistent across sessions. The currently displayed view can be returned to its pre-configured settings by selecting View > Show panes > Reset view . Views The Workspace offers the following views. The intended function is only a recommendation, since the user can re-configure the views at will. Tool button 34 View name Intended function Design Design a flow Test Test-run a flow Run Run a flow in production Messages View and export historical messages Statistics View historical statistics Users Manage SwitchClient users and their access rights Enfocus Switch 10 Panes The workspace offers the following panes, which can be combined at will in the different views Pane Description Canvas Displays and allows interaction with a flow design Dashboard Displays status information on problem jobs or processes, as reported by the Switch server Elements Lists the icons representing flow elements that can be dragged onto the canvas Files Serves to view and explore the contents of flow element backing folders (i.e. mostly jobs) Can also be used to view the contents of an arbitrary folder in the file system, but this is not a primary function Flows Lists all flows known to Switch at the present time Folders Serves to browse folders (not files) in the local file system and allows dragging backing folders to the canvas Messages Displays log messages produced by the Switch server during flow execution Messages 2, 3 Extra messages panes that may be configured with different settings for filtering or sorting messages Progress Displays progress information for tasks currently being executed by the Switch server Properties Displays the properties of the currently selected flow or flow element Statistics Displays statistics about job execution by the Switch server Statistics 2, 3 Extra statistics panes that may be configured to display a different set of statistics. 35 Enfocus Switch 10 Pane Description Users Allows managing SwitchClient user names, passwords and access rights Toolbar The toolbar is the strip located at the top of the workspace window; it contains a number of tool buttons to accomplish common tasks. For example, this is the toolbar in the default workspace configuration (design view): Some icons cannot be found on the toolbar any longer. However their functionality can still be found in the Menu Bar, the contextual menu of the Flows pane and the shortcuts. Tool sets The tool buttons are grouped in tool sets, which are shown or hidden depending on which panes are currently shown or hidden. The following table provides an overview of the tool sets and their function. Tool set Shown with Function Always Select a view (Workspace, Messages, Statistics, Users). See Configuring the workspace in Workspace overview on page 32 Flows pane New Flow, Duplicate Flow, Delete Flow See Flows pane on page 41 Canvas, Flows pane Activate, Deactivate See Flows pane on page 41 Canvas/ Dashboard pane Retry a problem job or process See Viewing flow problems on page 111 Messages (,2,3) 36 Export messages, clear messages Enfocus Switch 10 Tool set Shown with Function See Messages pane in Workspace overview on page 32 Users Allows managing SwitchClient user names, passwords and access rights. Allows export and import of user's information See Users pane in Canvas The canvas is the central workspace area that allows viewing and editing flows. Here's an example of a simple flow displayed in the canvas: To display a flow in the canvas, select it in the flows pane. To make changes to a flow, ensure that it is inactive and unlocked. You can drag new flow elements from the elements pane onto the canvas, create connections between flow elements, configure flow elements using the properties pane, and drag flow elements around to adjust the layout of the design. When a flow element is selected in the flow pane, selection with focus (that is, user has selected a flow element and is also hovering the mouse pointer on it) is highlighted in blue and selection without focus is highlighted in gray. Flow Elements pane The Flow Elements pane lists the icons representing flow elements (such as folders, connections, tools and configurators) that can be dragged onto the canvas and become part of a flow design. 37 Enfocus Switch 10 To toggle between large and small icons, choose the appropriate context menu item shown for the Flow Elements pane. Filtering You can use the Search field on top to filter the Flow Elements. See Filtering on page 48 Favorites The Favorites section can contain shortcuts to elements in other sections. It looks and functions like other section headers, but its content is managed by the user. You can • Select Add to favorites from the context menu of an Element to add a shortcut to the Favorites section • Drag an Element into the Favorites section to add a shortcut to the Favorites section • Select Move up or Move down from the context menu of a shortcut in the Favorites section, to change the order • Drag and drop shortcuts in the favorites section to change the order. • Select Remove from favorites from the context menu of a shortcut in the Favorites section, to remove it from the Favorites section Sections The Flow Elements pane groups the flow elements in sections. Click on a section header to open or close the sections, showing or hiding the flow elements in the section. 38 Section Description Basics Basic flow elements that form the fabric of a flow design, including folder and connection Tools Built-in tools such as compress and rename, mostly for file handling Communication Built-in tools for communication including email and FTP Enfocus Switch 10 Section Description Configurators Configurators for third-party applications for processing jobs Metadata Built-in tools for working with metadata, including XML Custom Custom applications Flow elements The list of flow elements displayed in the elements pane depends on the Switch product flavor you have installed. See the Flow element matrix on page 178 for an overview. Files pane The Files pane serves to view and explore the contents of flow element backing folders (that is, mostly jobs). Although it can also be used to view the contents of an arbitrary folder in the file system, this is not its primary function. Use the Files pane to: • View the contents of the backing folder for one of more flow elements by selecting the flow elements in the canvas. • View the contents of any folder on the locally reachable file system by choosing the show in files pane context menu item for a folder in the folders pane). • Drop files and folders in a flow using copy and paste or drag and drop. • Delete files and folders by pressing the delete key or by choosing the Delete context menu item; deleted items are moved to the system's recycle bin. Row types Each row in the Files pane represents a file or folder as described in the following table. Folder rows offer a triangle button to show/hide the rows representing the contents of the folder. Icon Row represents Information displayed The backing folder of a flow element Flow element name and backing folder path A job folder (*) Folder info; Job info 39 Enfocus Switch 10 Icon Row represents Information displayed A job file (*) File info; Job info A regular folder Folder info A regular file File info File pane columns The rows in the files pane have multiple columns as listed in the following table. Individual columns can be shown or hidden through the "Show columns" context menu item. By default, only a subset of the columns is shown. The visible columns can be resized and reordered by dragging. Clicking on a column header selects that column as the key for sorting the rows in the files pane, and toggles between ascending and descending order. Rows that have the same parent (and thus are on the same hierarchical level in the tree) are sorted according to this specification. Root rows are always sorted on the name column (ascending or descending depending on the last setting). Column Description Name Name of the file or folder represented by the row For a job file or folder the unique name prefix is removed Size The file size in bytes for files; blank for folders Type The file type as retrieved from the operating system Modified The date/time the folder or file was last modified Job Prefix The unique name prefix for job files and job folders; blank otherwise This field is shown in red color if there is no corresponding valid internal job ticket (i.e. the job ticket doesn’t exist or its file path doesn’t point to this job) The following columns are not shown by default 40 Waiting since The date/time the job arrived in this backing folder (more precisely, when it was detected by the server) State The name of the state currently attached to the job, or blank if there is none (a state can be attached to a job through the “Attach job state” property of the folder flow element; also see preparing for state statistics) Enfocus Switch 10 Column Description Entered state The date/time the job entered the state currently attached to it, or blank if there is none (a state can be attached to a job through the “Attach job state” property of the folder flow element; also see preparing for state statistics) Submit point The name of the Submit point through which the job was submitted, or blank if it wasn’t submitted through a Submit point Submitted The date/time the job was submitted through a Submit point, or blank if it wasn’t submitted through a Submit point User name The name of the user associated with the job, or blank if there is none (a user is automatically associated with the job when it is submitted through a Submit point) Custom 1 A user-configurable value calculated through variables or a script expression ... Both the column header and the column value can be configured through the context menu items "Set column header" and "Set column value (first make the column visible with the "Show columns" context menu item) Custom 5 Initially the values for these columns are blank Example of custom columns In the following example, two custom columns were configured to display the date when the picture was taken and the camera model (see defining text with variables). A third custom column was configured to display whether the flash fired when taking the picture (see defining a condition with variables). Flows pane The Flows pane lists all flows known to Switch at the present time. It allows organizing these flows in a hierarchy of groups and subgroups, and provides a context menu for managing flows in various ways. 41 Enfocus Switch 10 Filtering You can use the Search field on top to filter the Flows. See Filtering on page 48 Actions The Actions drop-down list contains all the items that are available in the Flow menu on the menu bar. Flows and groups Each row in the flows pane represents a flow or a group. A group can contain flows and other groups, up to any nesting level. When you select a group, all the flows in the group (and in any subgroups) are automatically selected as well. You can open/close a group by clicking the arrow at the left. You can reorganize the order and nesting structure in the flows pane by dragging the rows. When you select a flow in the flows pane, it is displayed in the canvas and you can see its properties in the properties pane. When you select two or more flows in the flows pane, a scaled-down representation of all the selected flows is shown in the canvas. You can perform many operations (such as activate/deactive) on multiple flows at the same time; however you can't make changes to the flow design while two or more flows are selected. State An icon is displayed at the left of each row to indicate its flow state, as described in the following table. The flow state for a group row is equal to the "highest" flow state for any of the flows in the group (the table lists the flow states from high to low). 42 Enfocus Switch 10 Flow Group Description The flow can’t be activated because it contains a design error The flow is being activated The flow is active, i.e. it is being executed by Switch The flow is being deactivated The flow is inactive and it is locked for editing Name and description You can rename a row by clicking on the name field and entering the new name. You can also change the value of the "Name" property in the properties pane. You can add a longer (possibly multi-line) description of the flow or group in the "Description" property. Marker The rightmost column in the flows pane can display a marker icon selected from a predefined list of icons (including colored flags, priorities, and level of completeness indicators). You can set these markers at your discretion to help organize your flows (for example, indicate work in progress). The markers have no meaning to Switch . If you do not want to use markers, you can hide the marker column with the "Marker column" context menu item. 43 Enfocus Switch 10 Folders pane The Folders pane serves to browse folders (not files) in the local file system and allows dragging backing folders to the canvas. You can use the Folders pane to: • View folders in the file system that is reachable from the computer on which Switch is running. • Add a folder to a flow by dragging it from the folders pane onto the canvas. • Change the backing folder for an existing flow element by dragging a folder from the folders pane onto the flow element. • Open a folder in the files pane by selecting it in the folders pane and choosing the "Show in files pane" context menu item. The Folders pane automatically updates to reflect changes in the folder structure on disk after a certain delay. Choose the "Refresh" context menu item to update the Folders pane at any time. Messages pane The Messages pane shows the log messages issued by Switch and by the various processes controlled by Switch . 44 Enfocus Switch 10 New messages are continuously added to the list while Switch is operating. Warning and error messages are shown in color. Type search strings in the filter fields at the top of the Messages pane to select the subset of messages to be displayed. Messages can be sorted in different ways by clicking on the column headers. Columns can be reordered and resized by dragging. For more information see Viewing log messages on page 107. Multiple Messages panes You can display up to three Messages panes at the same time (called "Messages", "Messages 2" and "Messages 3"). Each pane remembers its own settings for filtering and sorting messages. For example, you could setup three Message panes respectively displaying: • All messages • All messages related to FTP • All error messages. Progress pane The Progress pane displays a list of currently executing processes with their progress information. Examples of processes include internal processes such as downloading a file from an FTP site, and external processes controlled by Switch such as distilling a PostScript file. Processes are dynamically added to and removed from the list as they occur. 45 Enfocus Switch 10 For more information, see Viewing processes on page 111. Properties pane The Properties pane shows all properties for the selected flow in the Flows pane or for the selected flow element in the canvas. If multiple flow elements are selected, the common properties are shown, and if the flow is inactive, these common properties can be changed. The name of each property is displayed on the left, its value on the right. Some properties can be edited directly in the properties area by clicking in the displayed text field: Or by clicking on the drop-down menu: For some properties multiple editors are available; these can be selected by clicking on the little arrow that appears on the right of the property value when you click the property. 46 Enfocus Switch 10 For more information, see Working with properties on page 85. Activity monitor Switch offers five panes to monitor activity/ manage workload. These are: 1. General load indicator pane 2. Dashboard pane 3. Progress pane 4. Network activity pane and 5. Jobs information pane Using the above panes users can, • • • • • • • • • • • • Monitor Switch activity Inspect OS and Switch workload View processing statistics View state of Switch internal data Size of jobs queue The load for a specific element Number of script entry points currently running (grouped by types) Number of external processes currently launched with their CPU usage For each element: number of job waiting Sizes of log database, global data, temp folder Number of job tickets, datasets Number of currently connected Clients 47 Enfocus Switch 10 For more information see Activity monitor and workload management on page 114. Users pane The Users pane allows managing the access rights of users accessing the Switch server from SwitchClient copies installed on other computers in the network. Specifically, it allows configuring: • The list of users recognized by the Switch server. • The list of groups of users (each user is part of exactly one group) • The access rights for each group of users. • Export and import user information. When users click the Export user info icon, Export user dialog box appears using which the information can be saved as "*.xml" and/or "*.txt" formats. For more information, see Managing users on page 148 and Configuring access rights on page 150. Filtering Filtering restricts the set of items shown in the list by comparing search terms (entered in the search field) with one or more search targets associated with the items. Filtering is available for Elements, Flows and for Messages. Using the search field The search field is located above the list of items being managed. If the search field is empty, all items are shown in the list. 48 Enfocus Switch 10 The set of items shown in the list adjusts with each keystroke in the search field, showing only items that satisfy the search term(s). If the search field is not empty, a clear button appears at the right of the field, to clear the search field and show all elements. Using the search menu You can open the search menu by clicking the Search button on the left side of the search field. The search menu contains: • the last 7 strings entered in the field. Selecting one will reapply this filtering. • Search options. This controls the search targets included in the search. Each menu item has a checkbox which can be turned on or off by choosing the menu item. For Elements, the name of the elements is always included in the search. You can also search for keywords, which are associated with the elements. For example searching for "PDF" will include Adobe Acrobat Distiller, although "PDF" is not a part of the Element name. For an overview of all elements and their keywords, see the Flow element reference on page 213. For Flows, you can search in the flow names, the flow descriptions, the elements used in the flows, or even the properties or values in the flow’s elements. This allows for example to search for Flows containing the "Adobe Acrobat Distiller" element. • Sort options, allowing to sort the search result alphabetically, or in the order they were found. 4.3 SwitchScripter SwitchScripter is a script development environment included with the PowerSwitch product. It is installed as a separate application and has the following major functions: • Create and edit Switch Script packages and its components • Emulate the Switch scripting API for testing purposes • Setup specific input/output conditions for testing purposes For more information ... About the SwitchScripter application itself, see SwitchScripter on page 49. About scripting in Switch in general, see Scripting concepts on page 130 and Scripting reference on page 367. 49 Enfocus Switch 10 Distribution and licensing SwitchScripter is part of the PowerSwitch product and is automatically installed as a separate application by the PowerSwitch installer. SwitchScripter does not require a license key; any registered PowerSwitch user is entitled to use SwitchScripter. 4.4 SwitchClient SwitchClient is a light-weight desktop application in the Switch product family that allows a user on a different computer to submit and monitor jobs processed by PowerSwitch and FullSwitch on a central server. Since it usually runs on a different computer, SwitchClient has its own installer and has to be downloaded separately. SwitchClient supports the following tasks: • Connect with one or more PowerSwitch / Full Switch servers on the local network • Submit jobs (files or job folders) to a Submit point in a flow • Review and act on jobs being held in a Checkpoint in a flow • View progress information and status for submitted jobs. • View log messages issued by processes on the server. For more information about the SwitchClient application, see Working with SwitchClient on page 143. Benefits Benefits offered by SwitchClient include: • Submit and review jobs without the need for shared network folders. 50 • Easily support a mixed-platform network (Mac and Windows). • Remotely view job progress (even for jobs that weren't submitted through SwitchClient). • Ensure job submission to the appropriate points in a flow. • Validate manual job ticket data during job submission. • Manage jobs that are being held for human inspection based on an automated decision. • Consult concise job overviews and activity logs on any desktop in the local network. Enfocus Switch 10 5. Creating and executing a flow 5.1 Performing the tutorial In this tutorial we will build a simple flow in order to demonstrate designing and executing a flow. Functions of the tutorial flow The tutorial flow shows how a small publisher automates reception of PDF files. The flow will: 1. Get files from an FTP server. 2. Get files from a network folder (for files delivered on a CD or other removable medium). 3. Sort all files into PDF and non-PDF files. 4. Deliver the PDF files to their printer through FTP. 5. Notify the customer relations representative when non-PDF files come in. Performing the tutorial To perform the tutorial, follow the instructions provided in the topics of this book. Proceed to the first topic: Creating the flow. 5.2 Creating a flow 1. Launch Switch so that it displays the workspace window 2. Click the tool button to ensure that the design view is displayed (see Configuring the workspace in Workspace overview on page 32). 3. Create a new blank flow by clicking the tool button and following the instructions offered by the flow wizard (see Creating a new flow on page 61). 4. Rename the flow to "Tutorial flow" by clicking on the flow name in the Flows pane (see Changing flow properties on page 70). 5. Proceed to the next topic: Adding the input folder. 51 Enfocus Switch 10 5.3 Adding the input folder 1. Make sure the tutorial flow is selected in the Flows pane. 2. In the Elements pane, make sure the "Basics" group is displayed (click on the title of the group if it is currently hidden). 3. In that group click on the icon called "Folder" and drag it onto the canvas. Drop the folder somewhere on the left-hand side of the canvas. The name of the folder automatically becomes "Folder 1" after you have dropped it onto the canvas. 4. Click on "Folder 1" to select it. 5. Click on the name field itself and type a new name for the folder: "Input Folder". 6. With the input folder still selected, in the Properties pane, set the value for the Path property to auto-managed. This means that the folder is created and maintained by Switch. This is what we want for the input folder, where we will gather all input files. You will see later how to explicitly set the location of a folder when it is important to have it on a certain fixed location. 7. Proceed to the next topic: Sorting between PDF and non-PDF files. 5.4 Sorting between PDF and non-PDF files The first thing we will make our flow do is to distinguish between PDF files and other files. 1. Create two more folders to the right of the input folder. 2. Name those folders as "PDF Files" and "Other Files". 52 Enfocus Switch 10 Your flow should now look like this: 3. We now need to connect our folders. To connect the "Input Folder" and the "PDF Files" folder do one of the following: • In the Elements pane, click on the "Connection" element and drag it out onto the canvas. Drop the connection icon on top of the "Input Folder" icon on your canvas; or • Double-click on the "Input Folder" icon. This starts a connection; as you move the mouse you'll see that a connection line is drawn between the folder and your mouse pointer. Move your mouse pointer over the "PDF Files" folder icon and click on it. A connection is now made between the two folders. 4. Now connect the "Input Folder" and the "Other Files" folder as well. 5. Select the connection to the "PDF Files" folder by clicking on it; You can see the connection is selected because it is drawn in a distinctive color. 6. In the properties pane click on the "Include these files" property, then click on the little arrow that appears on the right hand side of the property. A pop-up menu with multiple filtering options appears: 53 Enfocus Switch 10 7. Click on the "Define File Types" item in the list. The file type editor appears. 8. In the file type editor, move the "Adobe PDF (*.pdf)" file type to the right hand list by selecting it in the list on the left and clicking Add > button. The editor should look like this: 9. Click Ok button to accept the changes. You have now created a connection that moves only Adobe PDF files. 10. Select the connection to the "Other files" folder. 11. In the properties pane set the Include these files property to All other files (one of the filtering options appearing in the pop-up menu for the property). You now have a connection which moves all files with the exception of PDF files. 12. Proceed to the next topic: Creating a drop folder. 5.5 Creating a drop folder All folders we created so far are "auto-managed"; this means their location is managed by Switch. This makes it very hard to allow users to drop files into such folders as their location might change or might not be accessible to network users. 54 Enfocus Switch 10 The solution to this is to create a "user-managed" folder for our drop folder. This will be a folder on the network (or local computer) in a location that we can publish to our other users in the network so that they can drop files in the flow. 1. Begin by dragging one more folder on the canvas, to the left of your flow. 2. Rename the folder "Drop Folder" and connect it to the "Input Folder". 3. Make sure the "Drop Folder" is selected in the canvas 4. Click on the Path property in the properties pane 5. Click on the arrow that appears on the right hand side of the property. 6. Select the Choose folder option A Browse for folder dialog box appears where you can select a folder on your computer or somewhere on the local network (as long as it is accessible from your computer). 7. Select the folder you want to use as drop folder 8. Click OK button to set the property value. Note: You can use this alternative way to create the drop folder: In the Folders pane, browse to the folder you want to use as "Drop Folder". Click on that folder in the Folders pane and drag it onto the canvas. When you drop the folder on the canvas, Switch automatically creates a user-managed folder for you. 5.6 Retrieving files from an FTP server The next thing we want our flow to do is download files from an FTP server. In this step we will add an "FTP receive" tool to our flow and configure it to download all files from the root directory of the FTP server. Note: 55 Enfocus Switch 10 If you do not have access to an FTP server you can safely skip this step and go on with the next step in the tutorial. 1. In the Elements pane scroll down until you see the "Communication" section. 2. In that section click on the "FTP receive" tool and drag it onto the canvas to the left of the "Input Folder". 3. Now connect the "FTP receive" tool to the "Input Folder" in the same way as you would connect two folders. The "FTP receive" icon on the canvas displays an alert icon to indicate a problem with its configuration. This is to be expected since we have not yet entered any of its property values. 4. To configure the FTP receive tool, setup the values of its properties as follows: Name Change to an easily recognizable name for the FTP server you are checking (optional). FTP Server address Change to an easily recognizable name for the FTP server you are checking (optional). Port In most cases you can leave this on the default value (21). If the FTP server uses a different communication port you will have to adjust this. User name and Password Set to the user name and password of an account on the FTP server Check every (minutes) By default this is set to 10 so that the FTP server is checked every 10 minutes. For this tutorial purposes you're better off setting it to a smaller value (so that you can see something happening). Set this property to "1" All other values can remain set to their default value for the purpose of this tutorial. 5. Proceed to the next topic: Testing the partial tutorial flow 56 Enfocus Switch 10 5.7 Testing the partial tutorial flow Now that we are this far, it is time to test our partial tutorial flow. 1. Drop two files on the FTP server, one PDF file and one other file. Alternatively you can drop the files in the drop folder, bypassing the FTP server. 2. Activate the flow by clicking the tool button. If the flow is successfully activated, the canvas shows a darker background to indicate that the flow can no longer be edited. See Activating and deactivating flows on page 73. If all goes well, Switch should automatically download both files from the FTP server. The PDF file should eventually end up in the "PDF Files" folder, the other file in the "Other Files" folder. Monitoring the active flow While the flow is active, the canvas displays the number of files residing in each folder (in the "flag" drawn over the upper-left corner of each folder icon). Furthermore, when you select a folder in the canvas, its contents are displayed in the Files pane. This way you can monitor the progress of the files as they move along the flow. At the end of the test, deactivate the flow by clicking the deactivating flows on page 73 tool button. See Activating and Files and unique name prefixes Once both files have arrived in the correct folders, have a look at their file names. You will notice that both files have received a prefix to their original file name. For example, the file "test.pdf" may have become "_00045_test.pdf" (or so). This unique name prefix is used to track the file as it moves through the flow and to ensure that two files with the same name don't clash as they are moving around. 57 Enfocus Switch 10 To remove this unique name prefix at the end of a flow, set the strip unique name property for the final folder to yes. Proceed to the next topic: Delivering the PDF files through FTP. 5.8 Delivering the PDF files through FTP In a real world workflow, your PDF files would probably have to be processed in a particular way; for this tutorial however we will assume we can just forward them to our printer (the next step in the chain). 1. Make sure that the flow is inactive. 2. From the "Communication" section in the Elements pane, add an "FTP send" tool to the flow. 3. Connect it to the "PDF Files" folder. Your flow should now look something like this: 4. Configure the various properties of the FTP send tool as follows: Name Change to an easily recognizable name for the FTP server you are uploading to (optional). FTP Server address Set to the IP address or server name of your FTP server. You do not have to add "ftp://" in front of the name. Port In most cases you can leave this on the default value (21). If the FTP server uses a different communication port you will have to adjust this. User name and Password Set to the user name and password of an account on the FTP server FTP directory Set to the directory on the FTP server you want to upload the files to. All other values can remain set to their default value for the purpose of this tutorial. 58 Enfocus Switch 10 5. Proceed to the next topic: Sending files via email. 5.9 Sending the non-PDF files via email To finish the tutorial flow, you are going to use two additional tools to compress and email the non-PDF files to an internal customer relationship staff member. 1. From the "Tools" section in the elements pane, drag the "Compress" tool on the canvas. 2. Connect the "Other Files" folder to the new "Compress" flow element. 3. From the "Communication" section in the Elements pane, drag the "Mail send" tool on the canvas. 4. Connect the "Compress" tool with the "Mail send" tool in the canvas (just as you would connect two folders). You will notice that Switch makes this connection by adding another folder between the two tools. This is a general concept in Switch: tools cannot be connected directly to each other, there must be a folder in between. To solve the problem, Switch automatically add another folder on to the canvas in between the "Compress" and "Mail send" tools. Rename this folder as "Compressed". Your flow now looks like this: 5. Configure the different properties of the "Mail send" tool as follows: Subject Fill in the subject of the email you are sending out. To addresses Enter one or more email addresses of people you want to send the email Body text Add additional text for the body of the email you will send out Attach files Set to "yes" so that the file we just compressed is attached to the email message. 59 Enfocus Switch 10 All other values can remain set to their default value for the purpose of this tutorial You have now just created a flow which sends out email messages. Before you can activate this flow, you need to make sure that your email preferences are set up correctly. 6. Select Edit > Preferences... (Windows) or PowerSwitch > Preferences (Mac) to open the User Preferences dialog box. 7. In the Mail send category of the dialog box, fill in all the details of the SMTP server you want to use to send out your emails. 8. You may now test the flow again by activating it and dropping files in to the incoming FTP site (or in the drop folder) That concludes the tutorial flow - you are now ready to move on to create more complex flows using Switch! 60 Enfocus Switch 10 6. Managing flows 6.1 Creating a new flow Creating a new flow To create a new flow, follow one of these steps: • Click the Create new flow... tool • Select the Flow > Create new... menu item; or • Select the New flow... menu item in the context menu of the flows pane. button; or The Create new flow wizard(a special dialog) appears to guide you through the rest of the process. The different pages of the flow wizard are described by the remaining topics in this chapter. Choosing the type of flow to create The "Welcome" screen of the Create new flow wizard allows you to select the type of flow to create 1. Select the desired type of flow to create: Blank flow creates a blank flow; you can provide a flow name and a description but the actual flow design will start with an empty canvas. 61 Enfocus Switch 10 Receive and sort files creates a flow which will allow you to receive files through FTP and/or email, sort all incoming files in folders based on file type and file names and send notification emails if and when needed. Install sample flows imports one or more sample flows that were installed with the Switch application. 2. Click Next button. Setting flow properties This flow wizard screen allows you to set properties for the created flow. 1. Enter a concise name for your flow in the Flow name field The flow name will be used to identify your flow in the Flows pane, so use a meaningful name. 2. You can enter a longer description in the Flow description field. This description will be shown in the Properties pane when you select the flow in the Flows pane. 3. Click Next button. Downloading files from FTP Servers This flow wizard screen allows you to setup one or more FTP Servers to download files from. 62 Enfocus Switch 10 Note: The above dialog box appears only if you had selected "Receive and sort files" for type of flow. Configuring an FTP server Use this dialog box to set the properties for an FTP Server from where you want to download files. See FTP receive on page 258 for more information on the various properties in this dialog box. Receiving files through email This flow wizard screen allows you to specify one or more email accounts from which files need to be downloaded. 63 Enfocus Switch 10 Configuring an email server Use this dialog box to configure an email account from which you want to receive files. See Mail receive on page 263 for more information on these various properties. Sorting files into folders This flow wizard screen allows you to set up one or more sorting rules to sort all incoming files into folders. 64 Enfocus Switch 10 Note: The above dialog box appears only if you had selected "Receive and sort files" for type of flow. Configuring a sorting rule Use this dialog box to set up a sorting rule to sort files into folders. Depending on whether you specified sorting on file type or file name in the flow wizard, this dialog window will look different. Sorting on file type See Specifying file filters on page 97 for more information on filtering and file types. Sorting on file name pattern 65 Enfocus Switch 10 See Specifying file filters on page 97 for more information on filtering and filename patterns. Sending notifications This flow wizard screen allows you to specify if and how email notifications should be sent out when files are received. Note: The above dialog box appears only if you had selected "Receive and sort files" for type of flow. Configuring a notification Use this dialog box to specify an email notification to be sent out when a file hits one of the output folders for your flow. 66 Enfocus Switch 10 Finishing up This flow wizard screen displays the summary of all the settings configured so far. Review the settings and click Finish buttton to create the flow. Created flow When you click the Finish button, Switch automatically creates a new flow with the information provided. For example, the following flow is created for the information shown above: 67 Enfocus Switch 10 All flow elements are configured with appropriate property values. Modify and further expand the flow at will using any of the flow design tools offered by Switch. 6.2 Working with flows Organizing flows The Flows pane lists all flows currently known to Switch. It allows organizing these flows in a hierarchy of groups and subgroups, and provides a context menu for managing flows in various ways. Selecting flows • • • 68 You can select any number of flows in the Flows pane at the same time; the selected rows need not be consecutive. When you select a group, its descendents (all flows and groups in the group) are automatically selected as well. This happens regardless of whether the group is displayed open or closed. Use the modifier keys (such as shift) in the usual fashion to expand an existing selection. Enfocus Switch 10 Adding a group You can use groups to organize flows into a structure resembling a tree, much like files in a folder tree. A group can contain flows and other groups, up to any nesting level. To add a new group in the Flows pane, perform the following steps: 1. In the Flows pane, select the row after which the new group should be inserted. 2. Choose the New group menu item in the context menu of the Flows pane. 3. Click the Name field in the newly inserted row and type an appropriate name for the group. The new group is empty; use the techniques described in the following section to add items to the group. Reorganizing rows You can reorganize the order and nesting structure in the Flows pane by dragging the rows around. To move one or more flows to a different location in the Flows pane, perform the following steps 1. Select the rows you want to move. 2. Drag the selected rows to the target location. • Drop them in between two rows to move them between those rows or • Drop them on top of a group row to place them inside that group (this works even if the group's children are not displayed). Ordering rows The Flows pane supports three row ordering modes: • Manual ordering: the rows are ordered by manually dragging them in to appropriate position. • Sorted by name: at each level in the tree, rows are sorted on the name column (case insensitive, and regardless of whether they are group or flow rows). • Sorted by marker: at each level in the tree, rows are sorted on the marker column (see Setting flow markers on page 69), and then on the name column (so that the order is predictable when rows have the same marker). Clicking on a column header toggles between the following three states: • Sorted on this column, in ascending order. • Sorted on this column, in descending order. • Manual ordering Setting flow markers The rightmost column in the Flows pane can display a marker icon selected from a predefined list of icons (including colored flags, priorities, and level of completeness indicators). The markers have no meaning to Switch. Set a marker for a flow To set the marker for one or more flows, perform the following steps: 69 Enfocus Switch 10 1. Select the flows you want to mark. 2. Choose the Set marker menu item in the context menu of the Flows pane, and select one of the markers in the submenu. Clear a marker for a flow To clear the marker for one or more flows, perform the following steps: 1. Select the flows for which you want to clear the marker. 2. Choose the Set marker menu item in the context menu of the Flows pane, and select "No marker" the submenu. Marker for a group Marker cannot be set for a group. It is determined automatically from the markers for its children, as follows: • If none of the children have a marker, the parent has no marker. • If all of the children that have a marker have the same marker then the parent displays that marker. • Otherwise (i.e. if the children have a mix of markers) then the parent has no marker. Changing flow properties To view the properties of a flow, select the flow in the Flows pane and make sure that none of the flow elements in the canvas are selected. This ensures that the Properties pane displays the flow's properties (rather than the flow element's properties) You can now change the flow's properties by editing the values in the Properties pane; see Working with properties on page 85. Renaming a flow You can also change a flow's name by clicking on the name field in the Flows pane after the flow was already selected, and then typing the new name. Choosing images You can also change the background and header image by choosing the corresponding menu item in the contextual menu of canvas. Allowing advanced performance tuning (PowerSwitch only) You can unlock two addiitonal performance properties on flow elements that support processing jobs concurrently. When set to Yes, you will be able to change the default number of slots and the idle time-out for those elements. See "Default number of slots for concurrent processing" in Processing on page 187 Adding and removing flows The Flows pane lists all flows known to Switch at the present time. 70 Enfocus Switch 10 Adding flows • See Creating a new flow on page 61 • See Importing flows on page 74 Duplicating flows To make a copy of one or more existing flows, select the flows in the Flows pane, and perform one of these steps: • Press the Duplicate flows tool button, or • Choose the Flow > Duplicate menu item, or • • Choose Duplicate menu item in the context menu of the flows pane, or Drag the selected flows to a different location and hold the appropriate modifier key while dropping the flows. The suffix “[Copy]” is added to the names of the duplicated flows. Note: You can duplicate a flow even while it is active; the new copy will be inactive. Deleting flows To delete one or more flows, select the flow(s) in the Flows pane and make sure they are all inactive (it is not possible to delete an active flow). Then perform one of these steps: • Press the Delete flows tool button, or • Press the Delete key, or • Choose the Flow > Delete menu item, or • Choose the Delete menu item in the contextual menu of the Flows pane. Deleting a flow is permanent and cannot be undone. Therefore a confirmation dialog window is shown: 71 Enfocus Switch 10 Click Yes button to delete the flow, or No to retain the flow. Locking and unlocking flows A flow in the Flows pane can be locked for editing. When a flow is locked, the Flows pane shows the state icon even when the flow is inactive, and no changes can be made to the flow design or to the flow’s properties. The flow can still be activated as usual. Locking status is preserved when the flow is exported and re-imported. Locking flows without password When a flow is locked without a password it can be unlocked without providing a password (i.e. no password is requested). This is useful to guard against accidental editing without protection against interference by another user. To lock one or more flows without password, select the flows in the Flows pane, and perform one of these steps: • Choose the Flow > Lock menu item, or • Choose the Lock menu item in the context menu of the Flows pane Switch displays a dialog requesting a lock password. Leave the password blank (i.e. press the dialog's OK button without entering any text) to lock the flow without a password. Locking flows with a password When a flow is locked with a password, the password must be provided to unlock it.The password is stored in the flow definition in an encrypted form. Note: There is no way to recover the password when forgotten. To lock one or more flows with a password , select the flows in the Flows pane, and perform one of these steps: • Choose the Flow > Lock menu item, or • Choose the Lock menu item in the contextual menu of the Flows pane Switch displays a dialog box requesting a lock password. Enter the same password twice and click OK button to lock the flow with that password. The flow can be unlocked only by providing the same password again (and there is no way to recover the password when it is forgotten). Note: Certain Enfocus employees have access to a mechanism that bypasses the password protection (because Switch defines the password encryption). While Enfocus does not intend to open password-protected flows, and does not intend to publish the bypass mechanism, the company does not legally guarantee that this will never happen. It is important for flow designers to understand the limitations of the protection. 72 Enfocus Switch 10 Unlocking flows To unlock one or more flows, select the flow(s) in the Flows pane, and perform one of these steps: • Choose the Flow > Unlock menu item, or • Choose the Unlock menu item in the context menu of the Flows pane If the selected flows were locked without password, Switch unlocks them without further ado. If one or more selected flows were locked with a password, Switch displays a dialog requesting a password (and unlocks only flows that match the provided password). Activating and deactivating flows A flow can be in different states: • An inactive flow is in "design mode": the flow can be changed at will and flow element properties can be updated. An inactive flow can not process jobs. • An active flow is currently being executed by Switch server, that is, it is processing jobs. An active flow cannot be edited. This state is indicated by the icon next to the flow name in the Flows pane, and by the darkened background in the canvas. See flow states for more information. Activating flows To activate a single inactive flow, double-click the flow in the Flows pane. To activate one or more flows (press Ctrl or Shift key to select multiple flows), select the flows in the Flows pane, and perform one of these steps: • Press the Activate flows tool button, or • Choose the Flow > Activate menu item, or • Choose the Activate menu item in the context menu of the Flows pane Deactivating flows To deactivate a single active flow, double-click the flow in the Flows pane. To deactivate one or more active flows (press Ctrl or Shift key to select multiple flows), select the flows in the Flows pane, and perform one of these steps: • Press the Deactivate flows tool button, or • Choose the Flow > Deactivate menu item, or 73 Enfocus Switch 10 • Choose the Deactivate menu item in the contextual menu of the Flows pane. Importing and exporting flows Flows can be exported to make a backup or to share them with someone else. Likewise if you have an exported flow you can import that flow into your copy of Switch and have the flow appear in the Flows pane. Exported flows have the "sflow" filename extension. Exporting a flow To export one or more flows to an external file, select the flow(s) in the Flows pane, and perform one of these steps: • Choose the Flow > Export menu item, or • Choose the Export menu in the context menu of the Flows pane. If you selected a single flow, the Export flow dialog appears to let you choose a location and name for the exported flow. If you had selected more than one flow, the Browse for folder dialog box appears to let you choose a destination folder. All selected flows are exported and saved into the destination folder, one file per flow, using the flow names for the file names. Backup: exporting all flows To export all flows in the Flows pane, choose the Flow > Export all menu item. This behaves as described before for multiple flows, and guarantees that all flows are exported. This function is very useful to create a quick backup of your flows. The grouping structure of your flows in the Flows pane is not exported (there is no way to do this). Importing flows To import one or more flows from an external ".sflow" file: • Choose the Flow > Import menu item, or • Choose the Import menu item in the contextual menu of the Flows pane The Import flow dialog box appears which lets you browse to the external file that contains the flow. Select the file and click OK button to import the flow. You can import multiple flows at the same time by selecting multiple flow files in the Import flow dialog box. Alternatively you can locate the external ".sflow" file using the Windows Explorer (on Microsoft Windows) or Finder (on Mac) and: 74 Enfocus Switch 10 • Double-click the file; this will launch Switch if it is not yet running and import the flow. • Drag and drop the file on to the Flows pane in Switch; this will import the flow. Compatibility considerations When exporting a flow, Switch stores a maximum amount of information in the exported flow file: • The list of flow elements and connections as they are shown in the canvas, including the geometry. • The values of all properties, including references to backing folders and configuration files • A copy of any referenced configuration files. Sometimes a property value refers by name to configuration data stored internally by a third-party application. In those cases it is not possible to include the configuration data itself (the reference by name is still included). When importing a flow, Switch ensures that all encountered flow elements and properties are supported by this version of Switch. If not, any issues are reported to the user and the unsupported items are omitted from the imported flow. Switch also copies configuration files from the flow file being imported into a special location under its application data root, and changes the corresponding references to point to these new copies. Further validation of property values is performed when the flow is activated (for example, ensuring that all backing folders have a valid path). Auto-managed backing folders are automatically created where necessary. For user-managed backing folders the original paths are preserved without change. In most cases this means that you must create and assign new backing folders (i.e. unless the backing folders already exist because you are importing a flow that was previously created on your own system). 75 Enfocus Switch 10 7. Designing flows 7.1 Basic concepts Working with the canvas The canvas is the central workspace area that allows viewing and editing flows. The canvas always displays the flows selected in the Flows pane. Single flow at full size When a single flow is selected, the canvas displays it at full size and scroll bars appear if the flow design is larger than the visible area. In this mode the flow is editable (assuming that it is inactive and unlocked); see Editing a flow on page 78. Multiple flows as tiles 76 Enfocus Switch 10 When two or more flows are selected, the canvas displays a tile for each flow. A tile is a scaled-down version of the flow design similar to a thumbnail. Tiles can't be edited. However you can select a particular tile and edit its flow properties in the Properties pane. In tile mode the canvas never shows horizontal scroll bars. Instead the size of the tiles is adjusted so that a predefined number of tiles fit on a row. The maximum number of tiles shown can be set as well. • • • To adjust the number of tiles in a row, choose the "Tiles in a row" menu item in the canvas context menu and select one of the choices 1 through 9 in its submenu (this context menu item is present only while the canvas displays tiles). To return one of the displayed flows to full size • Double click the tile in the canvas; or • Select the tile in the canvas and choose the "Show at full size" menu item in the canvas context menu; or • Select the flow in the Flows pane (without selecting any other flows). To change the maximum tiles shown, select the "Maximum tiles" menu item in the context menu and select the desired value. If more flows are selected than this maximum number, the canvas will show a message instead of the tiles. Single flow scaled to fit • To display a large flow design (that doesn’t fit the current Canvas pane) as a tile that fits the visible area of the canvas • • Select the flow and choose the "Scale to fit" menu item in the canvas context menu (this context menu item is present only if the canvas shows a scroll bar). To return the scaled-down flow to full size, perform one of these steps: • Double click the tile in the canvas; or • Select the tile in the canvas and choose the "Show at full size" menu item in the canvas context menu. 77 Enfocus Switch 10 Editing a flow Before making changes to a flow: • Ensure that the flow is inactive and unlocked; an active or locked flow is displayed with a darkened background and cannot be edited. • Select the flow in the Flows pane without selecting any other flows; when multiple flows are selected the canvas shows tiles which cannot be edited. Working with flow elements A flow design (as displayed in the canvas) consists of a number of interconnected flow elements. Switch offers a range of flow elements, including: • Connection: a special flow element used to connect other flow elements; connections determine how jobs can travel along a flow. • Folder: a central flow element used to (temporarily) store jobs in between processes. • Various flow elements types to produce, process and consume jobs. Adding new flow elements To add a new flow element to the canvas, do one of the following: • Drag the icon for the desired flow element type from the elements pane onto the canvas in the desired location. • Choose Add in the context menu on a blank area of the canvas, and select the desired flow element type from its submenus. Connecting flow elements To connect two flow elements that are already present on the canvas, do one of the following: • • • Drag the connection icon from the elements pane and drop it onto the first flow element; then click on the second flow element. Double-click the first flow element and drop the connection line on the second flow element. Select "Start connection" in the context menu of the first flow element and drop the connection line on the second flow element. Inserting a folder on new connections In Switch, you cannot make a connection between two non-folder flow elements, without having a folder in between. For this reason, when dragging a connection between two non-folder flow elements, Switch automatically adds a folder in between, and creates a double connection (from the original flow element to the folder, and from the folder to the second flow element). You can see that a folder is added upon creating the connection as the drag line includes the outline of a folder between source and destination, and the cursor changes to "allowed". This insertion of a folder does not take place if, 78 • there is not enough room in between the two flow elements to insert a folder • inserting a folder does not result in valid connections Enfocus Switch 10 Inserting a flow element on an existing connection You can insert a flow element on an existing connection, putting the new flow element in between the others. The flow element that you insert can be dragged from the Elements pane, or you can drag and drop an existing flow element from the canvas, if it does not have any connections yet. The connection from the original "source" flow element will go to the newly inserted flow element, and a new connection from the inserted element to the original target element will be established. If necessary, a folder will be added in between, just as when connecting two flow elements. See Inserting a folder on new connections on page 78 You can see the flow element will be added on the existing connection as the the outline of the element is shown between source and destination. This insertion on a connection will not take place if, • there is not enough room in between the two flow elements to insert the flow element (and a folder if necessary) • inserting the element doesn’t result in a valid connection Manually changing connections You can manually change connections by clicking and dragging the start or end of a connection from one flow element onto another one. • • • • Select the connection you want to change. Hover the cursor over the source or target end of the connection you want to change. A grab handle appears, similar to the grab handle for the corner point. Click and drag the connection on another flow element, for which the new configuration is allowed: • For the target of the connection, this is similar to creating a new connection. • For the source, the new source flow element must accept outgoing connection of the same type and with the same injected properties. Press the Ctrl key (for Windows) or Alt key (for Mac OS) to copy the connection instead of moving it. Validation of connections After adding a new flow element to the canvas, the flow element often displays an alert icon indicating a problem with the flow design. This is because many flow elements require incoming and/or outgoing connections. For example, after adding a "Submit hierarchy" and a "Folder" the flow design looks like this: The tooltip for the "Submit hierarchy" states "the flow element requires at least one outgoing connection". After adding a connection the flow design looks like this: 79 Enfocus Switch 10 Selecting flow elements To select a flow element, click it in the canvas. There is visual feedback to indicate the selected item. In the first example shown above, the "Folder 2" flow element is selected (it is surrounded by a gray rectangle). In the second example, the connection is selected (it is drawn in color). Multiple selection You can select as many flow elements as you like at the same time, except that a connection and other flow elements cannot be selected at the same time. To select multiple flow elements at the same time, do one of the following: • • Drag a selection rectangle around the flow elements in the canvas. Click on a first flow element, and then expand the selection by clicking on other flow elements while holding the Ctrl key (on Windows) or Command key (on Mac OS). Configuring flow elements Each flow element (including connection) offers one or more properties that help determine the flow element's behavior. You should set an appropriate value for each property (or use the default value) to fully configure a flow. Refer to the flow element reference (Connection, Folder, ..., Compress, ... ) for a description of the properties offered by each flow element. Name All flow elements (including connections) offer at least one property: the name of the flow element as displayed in the canvas. When you add a new flow element Switch provides it with a default name inspired by the flow element type. By default a connection does not contain a name. You can edit the Name property in the Properties pane, just like other properties. However you can also edit the flow element name directly on the canvas as shown here: To edit the name of a flow element directly on the canvas, perform the following steps: 80 Enfocus Switch 10 1. Select the flow element on the canvas (ensure only one flow element is selected) 2. Click the flow element name on the canvas 3. Enter the new name or adjust the existing name. Other properties When a single flow element is selected on the canvas, the Properties pane shows its properties. See Working with properties on page 85. When multiple flow elements are selected, the Properties pane shows all mutual properties, i.e. the properties that can be set for every selected flow element. This allows to change the (same) property for multiple flow elements at once. When no flow elements are selected, the Properties pane shows the flow properties instead (see Changing flow properties on page 70). Reset property values You can reset the property values to the factory defaults, as when creating a new flow element on the canvas. 1. Select the flow element. 2. Right-click the flow element, and from the contextual menu, select Reset property values. Copying property values For all flow elements, including connections, you can copy and paste the property values. 1. Select a single flow element, from which you want to copy the property values. 2. Right-click the target flow element, and in the contextual menu, choose Copy property values. 3. Select the flow element(s) you want to paste the property values on. 4. Right-click the flow element(s), and in the contextual menu, choose Paste property values. Property values can be pasted to selected flow element(s) of similar type. Validation of properties Switch validates property values to ensure that meaningful values are provided (to the extent such validation is feasible). Invalid property values are indicated by adding an alert icon to the flow element's icon, and by coloring the property background in the Properties pane. For example, after adding and connecting an FTP receive flow element, the canvas and the Properties pane look like this: 81 Enfocus Switch 10 The FTP server address and corresponding login information fields are empty, causing the alert icon to appear. (Switch provides meaningful default values for most properties, but that seems impossible in this case). Adjusting the layout of the design To adjust the layout of the flows design, select one or more flow elements (other than connection) and drag the selection around, or use the arrow keys to "nudge" the selection to the indicated direction in small steps. Connections automatically adjust to the new layout. Aligning flow elements • • To align one or more flow elements in the horizontal direction, select the flow elements and • Choose the Edit > Align Horizontally menu item, or • Choose the Align Horizontally menu item in the canvas context menu To align one or more flow elements in the vertical direction, select the flow elements and • Choose the Edit > Align Vertically menu item, or • Choose the Align Vertically menu item in the canvas context menu Adjusting the layout of a connection 82 Enfocus Switch 10 After adding a new connection, it is drawn as a straight line between the two flow elements, as indicated in the upper left corner in the above example. • • To draw the connection along the sides of a rectangle (with a rounded corner), as shown in the upper right and lower left corners in the above example, select the connection and: • Choose the "Vertical, then horizontal" or "Horizontal, then vertical" menu item from the connection's context menu, or • Set the connection's "corner angle" property to one of the values -90 or +90. To draw the connection along a route somewhere in between these extremes, as shown in the lower right corner in the above example, select the connection and: • Move the cursor over the connections's corner until a drag handle appears, and drag the handle between the two extremes, or • Set the connection's "corner angle" property to a values in between -90 and +90. Copying and deleting flow elements You can copy and paste flow elements within the same flow or to another flow. The copy includes all selected flow elements plus any connections between them. Connections to flow elements outside of the selection are not included. It is not possible to copy a connection on its own. 83 Enfocus Switch 10 When pasting flow elements into a flow, Switch renames the new flow elements if needed to avoid name clashes between backing folders. • • • To copy one or more flow elements to the pasteboard, select the flow elements and • Click the Copy tool button, or • Choose the Edit > Copy menu item, or • Choose the Copy menu item in the canvas context menu To paste previously copied flow elements from the pasteboard into a flow, select the target flow and • Click the Paste tool button, or • Choose the Edit > Paste menu item, or • Choose the Paste menu item in the canvas context menu To delete one or more flow elements from a flow, select the flow elements and • Click the Delete tool button, or • Choose the Edit > Delete menu item, or • Choose the Delete menu item in the canvas context menu • Press the Delete key Undoing flow editing operations Switch remembers flow editing operations (including changes to flow element properties) since it was last started, and allows undoing these operations in reverse order. There is a separate undo stack for each flow. • • To undo the most recent edit operation for a flow, select the flow and perform one of these steps: • Click the Undo tool button, or • Choose the Edit > Undo menu item. To redo the most recently undone edit operation for a flow, select the flow and perform one of these steps: • 84 Click the Redo tool button, or Enfocus Switch 10 • Choose the Edit > Redo menu item. Working with properties Properties pane The Properties pane shows all properties for the selected flow in the Flows pane or for the selected flow element in the canvas. The name of each property is displayed on the left, its value on the right. Inline property editors Some properties can be edited directly in the Properties area by clicking and typing in the displayed text field: Or by clicking the drop-down menu: Property editor dialogs Other properties can be edited through a property editor dialog. When you select the property, a button appears at the right-hand side of the property value. 85 Enfocus Switch 10 Pressing the button displays the property editor dialog for the property. For example: Update the fields offered by the dialog box and click Ok button to change the property value, or Cancel button to leave the value unchanged. Multiple property editors Many properties offer multiple property editors. In that case, when you select the property, a button appears at the right-hand side of the property value. Clicking the button displays a pop-up list of property editor names; choose one of the names in the list to select the desired property editor. This could be an inline editor or a dialog box. 7.2 Advanced topics Preferences The User preferences dialog box provides access to a number of global configuration settings and user preferences. To open the this dialog box: 86 • On Mac, choose the Preferences menu item in the application menu (named for the Switch flavor you're using). • On Windows, choose the Preferences menu item in the Edit menu. Enfocus Switch 10 Select one of the group names in the leftmost list to access the preferences in that group. Individual properties are displayed and can be edited in a manner similar to those in the Properties pane; see Working with properties on page 85. For more information on Preferences, see Preferences on page 184 Working with folders Working with individual files in Switch is quite straightforward. When files are grouped into folders (and sometimes in nested folder structures), you need to take the following information into consideration. Switch distinguishes between two important concepts related to (and implemented by) folders: • Subfolder hierarchies provide structure to file submissions and to final processing results by placing files in appropriately named subfolders (for example, a subfolder for each customer). • Job folders represent file sets that move along the flow as a single entity, for example a page layout with its accompanying images and fonts, or the individual pages in a book. Since both concepts are implemented with regular file system folders, Switch needs a way to know what it is looking at when it sees a folder. This is accomplished as follows: • Subfolders in a regular folder are always treated as a job folder; i.e. the subfolder and its contents are moved along as a single entity. • Certain flow elements (such as Submit Hierarchy and Archive Hierarchy) have special provisions to support a mixture of subfolder hierarchies and job folders; these provisions are configured through the flow element's properties. Thus the complexity of dealing with both concepts at the same time is limited to those special flow elements. Working with subfolders Submit hierarchy The "Submit hierarchy" tool (and its sibling FTP receive) can be used to fetch files that are delivered in a hierarchy of subfolders. The tool looks for files in the nested subfolder structure up to a 87 Enfocus Switch 10 certain level (specified in a property), and injects those files into the flow along its output connection(s). The injected files are placed in the output folder(s) at the highest level, in effect flattening the subfolder hierarchy. However, if so requested, the original location in the hierarchy is stored with the file (in its internal job ticket) so that it can be retrieved later to recreate the hierarchy. See Using hierarchy info on page 91 for more details. If a subfolder occurs in the hierarchy on a deeper nesting level than what is specified in the "Subfolder levels" property, it is treated as a job folder (i.e. it is moved along as a single entity). Thus, in effect, the "Subfolder levels" property determines which subfolders in the hierarchy should be treated as "hierarchy folders" and which should be treated as job folders. In the example below you can see the input folder and the corresponding output folder, using Subfolder levels set at 2. If you do not want to support job folders, set the "subfolder levels" property to a very high value (for example, 999). This will cause all files to be processed separately, regardless of their nesting level in the hierarchy. Archive hierarchy When archiving files (or job folders), you might want to recreate the subfolder hierarchy that was used to deliver them, or you may want to create a different subfolder hierarchy based on which route files took in a flow. Even though the files have been retrieved from different locations and have been moved along the flow through various processing steps, the internal job ticket for each file can remember the information needed to place the file in its appropriate location in the hierarchy. The archive hierarchy tool extracts this information and creates the corresponding hierarchy (you can still limit the number of subfolder levels to be recreated regardless of the information stored in the internal job ticket). See Using hierarchy info on page 91 for more details. Working with job folders Any folder (and its contents) that should be processed as one entity is considered to be a job folder. A job folder usually contains files and/or subfolders (which can contain other files and folders, recursively). Examples include a page layout with its accompanying images and fonts, and the individual pages in a book. 88 Enfocus Switch 10 To inject a job folder in a flow, you need an active flow. Otherwise it will take the folder path of this folder as its new input folder and will treat all files as single jobs. The job folder will be moved along the flow and processed as a single entity. It is also possible to submit job folders through a "Submit hierarchy". In that case you need to make sure that the "Subfolder levels" property is set correctly, as explained in working with subfolders above. For example, if you have a subfolder for each of your customers and these subfolders contain the jobs, the "Subfolder levels" property should be set to 1. If you would set this property to 2, the job folder would be treated as yet another subfolder level and the files in the job will be processed as separate files. Job dismantler In some situations you need to dismantle a job folder and continue with the job's files as separate entities. Often this is because the files arrived inside a folder, but in reality they are not part of a single logical entity. Sometimes you just want to deal with (some of) the components of a job. For example: • Customers submit a "job folder" that contains a number of related PDF files, but you really want to preflight each of them separately. • You use the uncompress tool to unzip a zip archive, resulting in a job folder that contains all of the files from the ZIP archive. • You want to review each of the images inside a page layout job (outside of the job's context). In these situations you can use the job dismantler to retrieve the individual files from the job folder. When you dismantle a job, you need to set the “Subfolder levels” property correctly. This property behaves in the same way as what is explained above for Submit hierarchies i.e. it determines how many levels Switch will search for individual files from the job. Job assembler Vice versa, sometimes you need to gather a number of files and keep them together through the rest of the flow. For example: • You need to group individual PDF files that will have to be merged into a single document. • You want to send out an email for every 10 files that arrived in some input folder. • You would like to insert a file (for example, a preflight report) into an existing job folder. The job assembler supports various ways of determining which files go together in a job: • Merge by file name: the file names must contain a numbering scheme (e.g. "page X of Y") • Complete job every N files: a job is created when N files are collected. • Complete job every N minutes: a job is created every N minutes. By default all newly created job folders are named “Job” followed by a running count. 89 Enfocus Switch 10 To create a job with (nested) subfolders, you can use the same mechanisms as described above for archive hierarchies. See Using hierarchy info on page 91 for more details. Leaving originals in place Default mode of operation In its default mode of operation, Switch moves incoming jobs out of the input folder when injecting them into a flow. In this mode, Switch needs full access rights to rename, create and remove files and folders in the input folder. Read-only mode of operation Several key flow elements (Folder, Submit hierarchy, FTP receive and Mail receive) also support a read-only mode of operation. This mode is activated by setting the "Leave originals in place" property for the flow element to yes. In read-only mode, Switch leaves all incoming jobs in place rather than removing them from the original location. Since Switch never writes to the input folder, read-only access rights suffice. Ignore updates The "Ignore Updates" option can be used for flow elements in read-only mode, if the "Leave Originals in Place" option is set to yes. If "Ignore Updates" is set to yes, Switch processes a job only once, ignoring any changes to the job’s file size or modification date after it was initially processed. This can be used in workflows where Switch replaces the input job by a processing result, without triggering an endless loop. If set to no, Switch will reprocess a job when its file size or modification date changes. This can be useful when submitting a job with the same name of a previously submitted job. In this case, Switch will use the list of already processed jobs (see below) Remembering jobs already processed For each flow element operating in read-only mode, Switch maintains a list of all files/ folders in the input folder that were already processed (i.e. actually injected in the flow or skipped due to filters). Switch automatically updates the list at regular intervals as follows: • Items that are updated or replaced in the input folder are reprocessed if "Ignore Updates" is set to no; changes are detected by looking at the byte count and at the most recent of creation date and modification date. • Items that disappear from the input folder are removed from the list (to keep its size down). Reprocessing originals The user can manually clear the list of jobs already processed as follows: • Choose the "Reprocess originals" context menu for the relevant flow element. This causes all remaining original items to be reprocessed when the flow is next activated. 90 Enfocus Switch 10 • Certain flow design changes (turn off “leave originals”; change backing folder) automatically clear the list when the flow is next activated. Configurators A configurator is a Switch flow element that drives a third-party application as part of the execution of a Switch flow. The application must be installed on the same computer as Switch (and it will also be launched on that computer). For a list of supported third-party applications, see version requirements or the Crossroads website. For more information on installing third-party applications for use with Switch, see Third-party applications on page 23 Benefits of a configurator Depending on the application's characteristics, a Switch configurator provides a range of substantial benefits, including: • The application's settings are configured from within Switch through the configurator's properties, providing a single point of setup for all steps in a flow. • Interactive applications offering no or limited automation capabilities are turned into fully automated solutions. • Multiple configurations for the same application can be used in parallel without the need for complex hot folder structures. • Switch automatically launches the application when it is needed. • Switch controls all file movement to and from the application, fully integrating its operation with all Switch features including job tracking and logging, processing statistics, and so forth. • The application's function is documented in context of the complete flow. Interacting with other applications Switch includes configurators for a number of frequently-used applications. While Enfocus intends to add more configurators in future versions of Switch, it is not feasible to include every relevant application on the market. Switch offers some important options to automate or interact with third-party applications for which there is no configurator: • The Generic Application tool controls any third-party application that supports hot folders. • Command-line applications can be configured through the regular Switch user interface (rather than console commands and options). • The scripting capabilities of PowerSwitch allow interaction with the host operating system and with any application that allows scripting. Using hierarchy info A key feature of Switch is its ability to • Remember a job's origin and routing information, and • Use this information when placing the job in a folder hierarchy (Example: for archiving). This information is called hierarchy info. It is stored in the job's internal job ticket under the form of a hierarchy location path, as described below. 91 Enfocus Switch 10 See also Working with folders on page 87. Hierarchy location path The hierarchy location path (stored in a job's internal job ticket) consists of zero or more segments, and each segment represents the name of a (sub)folder in a nested folder structure. The first segment represents the top-level folder. For example, the hierarchy location path consisting of the segments "CustomerA", "Input" and "PDF", in that order, represents the following folder structure: Remembering hierarchy info Most producers allow remembering hierarchy info depending on a job’s origin, and provide properties to configure what’s remembered. For example, a "Submit hierarchy" element allows remembering its own name and/or the relative path to the subfolder where the job was submitted. A folder allows adding the folder name to the location path (at the top or at the bottom). This can be used to create additional hierarchy levels. For example, separating input and output jobs for each customer. Using hierarchy info Some elements, and most notably the archive hierarchy, use the hierarchy information remembered for each job to place the job in an appropriate nested folder structure. Switch automatically creates any folders needed for the (nested) hierarchy. Example For example, consider this flow: And the following configuration details: • Submit is configured to remember one level of subfolders, and those subfolders are named for different customers. • 92 Downsample is configured to produce a JPEG thumbnail of the incoming image file. Enfocus Switch 10 • Proof and Original are configured to add their own folder name at the bottom of the hierarchy location path. • Archive is configured to accept two subfolder levels. Then the following Submit hierarchy: Will result in this Archive hierarchy: Specifically, submitting a file named "File.tif" in folder "Submit/CustomerA" will result in two archived files (in addition to the proof being mailed out): • The original "File.tif" will be placed in "Archive/CustomerA/Original". • The downsampled copy "File.jpg" will be placed in "Archive/CustomerA/Proof". And naturally submitting a file in folder "Submit/CustomerB" will result in two archived files under the "Archive/CustomerB/..." structure. Using Email info A key feature of Switch is its ability to: • Remember a job's origin and the corresponding sender's email address; • Associate additional email information with a job depending on its origin; • Use this information for sending external email messages related to the job (for example, sending a receipt to the job's sender) • Use this information for sending internal email messages related to the job (for example, sending a notification to the appropriate in-house customer service representative). This information is called "Email info". It is stored in the job's internal job ticket and it includes body text in addition to a list of email addresses. Editing Email info Various flow elements allow associating email information with a job as it moves along a flow. Usually this email information must be specified as the value of a property called "Email info" or "Email info map". This section discusses the corresponding property editors (i.e. the dialogs shown for these properties). Here is the property editor for "Email info": 93 Enfocus Switch 10 This editor allows entering a single set of email info consisting of a list of email addresses and a segment of body text. It is used, for example, for editing the "attach email info" property of a folder. If the email info is non-empty, it is associated with every job that passes through the folder. And here is the property editor for "Email info map": This editor allows entering a mapping table with multiple entries: each entry maps a specified "key" to a complete set of email information (and the order of the table entries is insignificant). It is used by flow elements that may receive jobs from several sources, such as mail receive and FTP receive. The intention is to allow specifying a different set of email information depending on the origin of the job. For example, let's say that we've setup an FTP site where our customers submit jobs. We have provided a separate subfolder for each of our customers (with the appropriate access rights). Using a single FTP receive instance in Switch, we can associate the appropriate customer's email address with each submitted job by mapping the customer's subfolder name (the "key") to the email address for the customer (the email information contained in the table entry for that key). FTP receive always uses subfolder names as the key; other tools (such as mail receive) allow selecting the basis for the key. This is described in more detail in the following section. In tools it is possible to have multiple key matches for the same job. For example, if a job is submitted in a nested subfolder some levels deep, FTP receive uses each of the subfolder names in the nested subfolder path as a key in the mapping table. The email information for all matches is combined and associated with the job. 94 Enfocus Switch 10 If the mapping table contains an entry for the special key <all> with non-empty email information, this is added for all jobs regardless of their key. Attaching Email info When associating email information with a job, Switch combines the new email information with any email information already present. Email addresses are added to the list, and body text is appended to what's there (inserting a line break if needed). In other words, the effect is cumulative and existing email info is never removed. Mail receive The mail receive tool adds email information depending in the email message's origin. Specifically: • If the "Attach email info" property is set to yes, the sender's address of the incoming email message is automatically added to the job's email information. Body text from the incoming email message is never copied into the job's email information. • If the "Attach extra email info" property is set to yes, and the incoming email message matches one of the keys in the mapping table (see below), the email information specified for that table entry is added to the job's email information. The "base map key on" property defines which attribute of the incoming message is used for matching the mapping table key: • Sender’s email address: the sender's address of the incoming email message. • Email account name: the account name used to retrieve the incoming email message. • Message subject: the subject line of the incoming message. In each case, the email information specified for any matching table entries is added to the job's email information. Example You are receiving jobs from different customers. In your company each customer service representative (CSR) is responsible for a well-defined set of customers. You want to setup Switch so that the appropriate CSR is copied on emails sent back to customers. In the "base map key on" property, select "senders email address". In the "Email info map" dialog press the "add" button; in the "map key" field enter the customer name (as it is used in their email address) and in the following field enter the email address of the CSR associated with this customer. Make sure that the map key you've entered matches one of the following: • The part of the customer's email address in front of the '@' sign. • The part of the customer's email address following the '@' sign. • The complete email address. All jobs sent in by this customer will now have the CSR email address added to their job ticket, which can be used when sending notifications. Other receivers Switch tools that receive jobs from external sources allow adding email information based on the job's origin. For example, FTP receive and submit hierarchy add email information depending on the original job's location in the subfolder hierarchy from which it is retrieved. Specifically, each of the 95 Enfocus Switch 10 subfolder names in the job's nested subfolder path is used as a key in the mapping table. The email information for all matches is combined and associated with the job. Folder A folder provides just a single set of email information. If it is non-empty, the email info is attached to each job passing through the folder. Here are a few examples of how this can be used: • Accumulate an audit trail of status messages in the email body text as a job moves along a flow, and email the audit trail to a supervisor at the end of the flow. • Associate a different email address with a job depending on its status in the flow (e.g. passed preflight test or not). • Sort jobs based on filename (or any other criteria) and then associate a different email address with a job depending in how it was sorted. Using Email info in Mail send The mail send tool can use the email information associated with the job, in addition to email information specified directly in the mail send tool itself. Specifically: • Use the "Email info" property to explicitly specify email addresses and body text for each and every email being sent by this instance of the mail send tool. You may leave this empty if you only wish to use email info associated with the job (see next bullet item). • Set the "Include attached email info" property to "yes" to also include the email info associated with the job (i.e. the email information that has been accumulated as described in the previous section). The email addresses specified in the email information are always used in the "To" field of the outgoing email messages. The mail send tool offers a separate "CC addresses" property which allows specifying email addresses to be used in the "CC" field of the outgoing email messages. It is not possible to associate "CC" addresses with a job (other than in the mail send tool) since email information contains only "To" addresses. Acknowledged job hand-off The Pack job, Unpack job, and Monitor confirmation tools can be used to implement acknowledged hand-off of jobs between instances of Switch running on separate computers, regardless of the communication channel used to transfer the data. The involved instances of Switch may reside on the same local network, or they may be in remote locations connected through the Internet (or any other communications channel). Furthermore, Pack job and Unpack job can carry over any Switch metadata associated with the job, including internal job ticket information (such as email and hierarchy information), external metadata and (of course) embedded metadata. This feature can be used with or without acknowledged hand-off. Example flow on sender’s side 96 Enfocus Switch 10 Example flow on receiver’s side Specifying file filters Several Switch tools offer file or folder filter properties, including for example: • the "Include/exclude these files" properties on connections leaving a folder. • the "Include/exclude these folders" properties on connections leaving an FTP receive instance. Each of these properties can be set to a particular file or folder filter that "matches" a certain category of jobs based on the filter's characteristics. File filters A file filter is applied to a job (file or job folder) being submitted to or moving along a flow. The following table lists the various supported filter types. Filter type Description All files Matches all files and job folders; is used as the default for "Include" properties No files Matches no files or job folders; is used as the default for "Exclude" properties 97 Enfocus Switch 10 Filter type Description All other files Matches all files and job folders not moved by any other connection (see All other files for more details) File types A predefined list of cross-platform file types. A file matches the filter if its Mac file and creator types and/or its filename extension match any of the specified types A job folder matches the filter if any of the files at the topmost level inside the folder match any of the specified types (or if the list of types contains the special “Folder” type) File patterns A list of filename pattern strings entered in a dialog; a pattern includes one or more of the following wildcard characters (in addition to regular characters that must match exactly): • * (asterisk): matches zero or more arbitrary consecutive characters • ? (question mark): matches exactly one arbitrary character A file matches the filter if its filename matches any of the patterns in the list A job folder matches the filter if its folder name matches any of the patterns in the list Regular expression A regular expression (i.e. a more complex pattern; see the separate topic for more details) A file matches the filter if its filename completely matches the regular expression A job folder matches the filter if its folder name completely matches the regular expression Condition with variables A condition expressed through variables; see Defining a condition with variables on page 122 Script expression A script expression that returns a Boolean result (true or false) All other files A common problem while creating connections from a flow element is how to capture those files or job folders not matched by any other connection. The "All other files" filter addresses this problem; all files or job folders that do not match one of the connections with another filter (example: file type, file pattern, regular expression) are matched by this filter. For example: imagine a flow element with one connection that matches all PDF files and a second connection that matches all PostScript files. Adding a third connection where the "Include these files" property is set to "All other files" causes all files that are not PDF or PostScript to be matched (i.e. moved through this third connection). 98 Enfocus Switch 10 A flow element can have more than one outgoing connection that uses the "All other files" filter. In that case all of these connections match the same set of files and job folders: those not matched by other connections using e.g. file type, file pattern or regular expression filters. Folder filters A folder filter is applied to a subfolder of the folder hierarchy from which files are being retrieved. Filter type Description All folders Matches all folders; is used as the default for "Include" properties No folders Matches no folders; is used as the default for "Exclude" properties All other folders Matches all folders not matched by any other connection; the semantics are similar to the “All other files” file filter (see All other files for more details) Folder patterns A list of folder name pattern strings entered in a dialog; a pattern includes one or more of the following wildcard characters (in addition to regular characters that must match exactly): • * (asterisk): matches zero or more arbitrary consecutive characters • ? (question mark): matches exactly one arbitrary character A folder matches the filter if its folder name matches any of the patterns in the list Regular expression A regular expression (i.e. a more complex pattern; see the separate topic for more details) A folder matches the filter if its folder name completely matches the regular expression Script expression A script expression that returns a Boolean result (true or false) Process these folders The objective is to offer more flexibility for defining the subset of the folder hierarchy to be processed. This is accomplished by offering a variable list of powerful rules. Properties The tool offers the following new properties: Property name Process these folders Description Editors Defines the ‘initial’ set of Dropdown list folders that should be processed by the submit hierarchy tool; this set can be adjusted by defining one or more rules in subsequent properties Default All folders 99 Enfocus Switch 10 Property name Description Possible values are: • • Adjusted by (rule 1) Editors Default All folders No folders Defines a rule for adjusting Dropdown list the set of folders that should be processed by including or excluding folders None Possible values are: • Including folders named • Including folders not named • Excluding folders named • Excluding folders not named .. Folder name .. On levels .. Restriction A pattern for the folder name to be included or excluded The level or range of levels to which this rule applies, in the same format as the old “Subfolder range” property Defines an optional restriction on the parent or ancestors for the folder in this rule Folder patterns Empty Regular expression Script expression Single-line text Empty Dropdown list None Possile values are: • None • With immediate parent named • With no immediate parent named • With any ancestor named • With no ancestor named .... Parent name or .... Ancestor name .. Nesting A pattern for the folder name of the parent or ancestor Defines whether this rule operates on all nested subfolders of the target folder, or just on the target folder itself Possible values for “including” rule are: • Include nested subfolders as well 100 Folder patterns Empty Regular expression Script expression Dropdown list “Don’t include…” or “Exclude…” Enfocus Switch 10 Property name Description • Don’t include nested subfolders Editors Default Possible values for “excluding” rule are: • Exclude nested subfolders as well • Dont exclude nested subfolders Adjusted by (rule 2) .... Same as rule 1 with an identical set of dependent properties Adjusted by (rule 5) Applying rules The rules are applied in the same order as they are specified. It is perfectly possible for a rule to exclude folders that were included by a previous rule, or vice versa. For example, consider a hierarchy with two levels (in addition to the root folder) and where each level has three folders called A, B, C. Now, consider the following rules: • Start with no folders • Include folders named C on level 2 (with or without nesting) • Exclude folders named C on level 1 (with nesting) These rules will process all jobs in folders A/C and A/B, but not in folder C/C (because it was excluded in the second rule), and not in any of the other folders (because they were never included to begin with). Reversing the order of the rules would change the result (files in folder C/C will be processed as well), because excluding something from an empty set has no effect. Upgrading When upgrading from a previous version of Switch, the new properties are initialized as follows: • The new “Process these folders” property is set to “All folders” • If the old “Process only these folders” property is not set to “All folders”, a rule is created as indicated in the following table • If the old “Skip these folders” property is not set to “No folders”, a rule is created as indicated in the following table If both old properties are present, the rules are listed in the order presented above (although the order is not important). Property name Adjusted by .. Folder name .. On levels .. Restriction Value for “Process only these Value for “Skip these folders” folders” “Excluding folders not named” “Excluding folders named” The value of the “Process only The value of the “Skip these these folders” property folders” property The value of the corresponding The value of the corresponding dependent property dependent property "None" "None" 101 Enfocus Switch 10 Property name .. Nesting Value for “Process only these Value for “Skip these folders” folders” “Exclude nested subfolders as “Exclude nested subfolders as well” well” These values should produce the same behavior as in the previous Switch version. 102 Enfocus Switch 10 8. Running flows 8.1 Monitoring flow execution Viewing an active flow An active flow is currently being executed by Switch server, i.e. it is processing jobs. The active state is indicated by the icon next to the flow name in the Flows pane, and by the darkened background in the canvas. See Activating and deactivating flows on page 73 and Flows pane on page 41. While executing a flow the canvas provides visual feedback about the number of jobs residing in each backing folder, and about problem jobs and problem processes, as described in this topic below. More extensive feedback about flow execution is provided elsewhere; for more information see: • Viewing log messages on page 107 • Viewing processes on page 111 • Viewing flow problems on page 111 • Activity monitor and workload management on page 114 Number of jobs When a flow is active, the canvas attaches a small rectangle to each flow element that has a backing folder, as shown above. The number in the rectangle reflects the number of jobs residing in the flow element's backing folder. For performance reasons Switch stops counting at 100 jobs. When a backing folder contains 100 or more jobs, the rectangle displays the symbol for infinity. 103 Enfocus Switch 10 Scanning folders and checking Mail / FTP Switch automatically scans the contents of backing folders and checks Mail and FTP in an active flow at regular intervals. The interval between scans is governed by global user preferences; see Preferences on page 184. When testing a flow it is sometimes impractical to wait for the next interval scan. Therefore: • The "scan now" context menu for Folder and Submit hierarchy elements causes Switch to immediately scan the corresponding backing folder. • The "Check now" context menu for Mail Receive and FTP receive causes Switch to immediately check for jobs arrived by mail or FTP . • The "scan folders now" context menu for the canvas causes Switch to immediately scan all backing folders in the currently displayed flow. • The "Check FTP now" context menu for the canvas causes Switch to immediately check for arrived jobs with all FTP receive flow elements in this flow. • The "Check Mail now" context menu for the canvas causes Switch to immediately check for arrived jobs with all Mail receive flow elements in this flow. Problem jobs When the problem jobs flow element contains at least one problem job, it displays a red error mark as shown above. This feedback is provided for both active and inactive flows. See also Handling problem jobs on page 114. Problem processes When a flow is active, flow elements that correspond to a problem process display a red error mark (as shown above for FTP send). This feedback is provided only for active flows since, by definition, an inactive flow can't have problem processes. See also Handling problem processes on page 116. Putting connections on hold Most connections offer a "Hold files" property. While this property is set to yes, jobs are not allowed to move through the connection. This is mostly used to temporarily hold jobs (perhaps because there is a problem with a process downstream). The canvas displays connections on hold as a dashed line (see examples below). 104 Enfocus Switch 10 Although editing in the Properties pane is disabled while a flow is active (see activating and deactivating flows), the status of the "Hold files" property can be modified at any time through the context menu of the connection. Putting a connection on hold To put a connection on hold, select it in the canvas and perform one of these steps: • • Choose the "Hold" menu item in the connection context menu (this works for active and inactive flows); or If the flow is inactive, set the value of the "Hold files" property in the Properties pane to "Yes". Note: If a job is being processed over the connection when the transition occurs, that job/process will be allowed to complete normally. In that case a job will arrive in the connection's destination after the connection has been put on hold. Releasing a connection To release a connection, select it in the canvas and perform one of these steps: • • Choose the "Release" menu item in the connection context menu (this works for active and inactive flows); or If the flow is inactive, set the value of the "Hold files" property in the Properties pane to "No". Examples of connections on hold Hold job example In this example the Hold job is used to distribute jobs evenly across three printers. The connections for printers A and B have been put on hold because the printers are temporarily off line. This causes the Hold job to send all jobs to printer C. Folders example 105 Enfocus Switch 10 In this example the connections are setup to duplicate the incoming job (one copy in each output folder). When the first connection is put on hold, the copies for that connection are held in the input folder until the connection is released. The copies for the other connection proceed without interruption. FTP receive example In this example, file filters have been setup for the connections leading from the FTP receive tool. PDF files are sent to Folder 1 and all other jobs are sent to Folder 2. When the "PDF files" connection is put on hold, the other connection is automatically put on hold as well, effectively disabling the FTP receive tool. The connections are linked in this respect because implementing a "partial hold" on the remote connection would be tricky at best. Once the connections are on hold, maintenance can happen on the FTP server without affecting the rest of the flow. Traffic-light example 106 Enfocus Switch 10 Traffic light connections carry data or log information for the same job, so it does not make sense to put a single connection on hold independently. When one of the connections is put on hold, all other connections are automatically put on hold as well, effectively disabling the originating tool. Generic application example In this example, the generic application tool is used to integrate an external hotfolder application in the flow. The connections can't be put on hold because the jobs are moved under the external application’s control. Viewing log messages The Messages pane shows the log messages issued by Switch and by the various processes controlled by Switch. 107 Enfocus Switch 10 New messages are continuously added to the list while Switch is operating. Warning and error messages are shown in color. Wrap text To display long messages on multiple lines (i.e. "wrapped" rather than chopped off): Choose the "Wrap text" menu item in the context menu of the Messages pane. Columns The following table describes the columns in the Messages pane. You can resize and reorder the columns by dragging the column headers. Column Description Time stamp The moment in time when this message was issued Type The message type, such as Info or Error (see below) Module The Switch module (such as Control) or type of flow element that issued this message Flow The name of the flow issuing this message Flow element The name of the flow element issuing this message Job Prefix The unique name prefix of the job referred in the message, or blank if there is no unique name prefix Job The name of the job for which this message was issued Message The message itself Message types Type Description Info An informational message that has no other purpose than to inform the user of a certain occurrence Warning A warning message that informs the user of a recoverable problem or non-fatal error Error An error message that informs the user of a fatal error Debug (*) An informational message solely intended for debugging purposes Assert (*) A message solely intended for debugging purposes that is issued only when a coding error is discovered Note: (*) Messages of these types are stored in the log database only when the "Log debug messages" user preference is turned on (see Logging preferences). 108 Enfocus Switch 10 Filtering and sorting log messages Filter fields Each column in the Messages pane has a filter field which is placed just above the column header. A filter field allows text entry and remembers the most recently entered values in its drop-down list. The contents of the filter field serves to filter messages for display in the Messages pane based on the value of the corresponding column. Message filtering is performed “live” while a filter value is being entered or updated. Each Message pane has its own distinct copy of current filter values; the filter values are persistent across sessions. To set all filter fields to their default values (i.e. blank except for the time stamp filter), choose the "Reset all filters" menu item in the context menu for the Messages pane. Search terms A blank filter means that all values are allowed in the corresponding column (i.e. no messages are hidden due to a blank filter). A filter may contain a number of “search terms” separated by a white space. There is support for quotes so a search term can contain whitespace. There are no explicit Boolean operators. All comparisons are case insensitive. Multiple search terms in the same filter are logically ORed (i.e. the filter allows any of the values in the corresponding column). The effects of multiple filters are ANDed (i.e. only messages that pass both filters are shown). Search term semantics differ slightly depending on the data type of the corresponding column, as described in the following table. Column Search term Matches messages Time Stamp Text string With a time stamp that contains the specified string Type Text string With a type that starts with the specified string Module Text string With a module name that starts with the specified string Flow Text string With a flow name that contains the specified string Flow element Text string With a flow element name that contains the specified string Job Text string With a job name that contains the specified string Message Text string With a message body that contains the specified string Sorting Messages can be sorted in different ways by clicking on the column headers. 109 Enfocus Switch 10 Exporting log messages The messages currently displayed in the Messages pane (after filtering) can be exported to an XML file for processing by third-party tools. To export log messages, perform the following steps: 1. Setup filters (as explained above) so that the Messages pane displays just the messages you want to export; the sorting order doesn't matter. 2. Do one of the following: • Choose the "Export Log messages" menu item in the context menu of the Messages pane; or • Ensure that the keyboard focus is in the Messages pane and press the "Export log messages from Messages" tool button. 3. Select a location and file name for the exported XML file. Automated daily export Switch can automatically export all log messages on a daily basis. This is configured through the "Export messages to XML" and "Destination folder" user preferences (see Logging on page 190. If you set the destination folder to an input folder for a Switch flow, you can automatically process the exported log files using Switch. XML schema The exported XML file uses a simple schema to store messages. All XML element and attribute names are in the default Namespace, there are no Namespace prefixes and no Namespaces are defined. The root element name is “message-list”. It contains a “message” element for each message being exported. The “message” elements occur in the order the messages were issued regardless of the sorting order in the Messages pane. Each “message” element has a number of XML attributes corresponding to the message fields in the exact format as stored in the database; empty values are omitted. The text content of each “message” element contains the formatted message as it is displayed in the Messages pane. Clearing log messages Log messages are stored in a database on disk and thus remain available after quitting and restarting Switch (the application data preferences determine for how long messages are retained). To permanently clear all log messages, perform one of these steps: • 110 Press the "Clear log messages" tool button; or Enfocus Switch 10 • Choose the "Clear log messages" menu item in the context menu of the Messages pane. A confirmation dialog appears. If you press the "Yes" button, all messages will be removed from the log database; there is no undo for this action. Viewing processes The Progress pane displays a list of currently executing processes (for all active flows) with their progress information. Examples of processes include internal processes such as downloading a file from an FTP site, and external processes controlled by Switch such as distilling a PostScript file. Processes are dynamically added to and removed from the list as they occur. Concurrent processes Depending on the value of the processing preferences, there may be more or less concurrent processes. Stopping and starting processing • To cause the Switch server to stop processing: Choose the File > Stop processing menu item. • To resume processing: Choose the File > Start processing menu item. When you stop processing, operation of all active flows is halted and flows are de-activated temporarily. When you subsequently start processing, all active flows are simply resumed. To stop processing is sometimes useful while designing and testing a flow that interacts with a third-party application. Stopping processing suspends Switch's interaction with the external application (and with the file system), so that you can, for example, change a setting in the external application without the need for deactivating the flow. When in doubt, deactivate and reactivate the flow rather than stopping and restarting processing. Viewing flow problems The Dashboard pane displays an overview of current flow execution problems at any given time. This is in contrast with the Messages pane, which provides an audit trail of what happened in the past. Furthermore, the Dashboard allows relevant actions to be taken for certain problem types, such as retrying a problem job. 111 Enfocus Switch 10 Wrap text To display long messages on multiple lines (i.e. "wrapped" rather than chopped off): Choose the "Wrap text" menu item in the context menu of the Dashboard pane. Problem categories Switch distinguishes between problem jobs (which cannot be processed because of an issue with the job itself) and problem processes (where jobs cannot be processed because of a general issue with the process). Processes are further divided in file transfers and external processes. Category Description Switch action Problem job A process failed to handle this job because of an issue that does not affect other jobs; human intervention is required for this specific job but processing can continue for other jobs Move the problem job to the problem jobs folder A Mail, FTP or local network operation cannot transfer any jobs because there is a communication problem; human intervention may be required, or communication may be restored "by itself" Make all jobs in front of the process wait “inline” in the flow until the problem is resolved File transfer See Handling problem jobs on page 114 See Handling problem processes on page 116 External process A built-in tool (such as compress), a script or a third-party application under the control of a configurator cannot continue processing jobs due to a problem with the process; human intervention is most likely required Information in the Dashboard pane The information in the Dashboard pane is updated dynamically. A problem item appears as soon as it is detected and disappears as soon as the problem is solved or handled. Rows The Dashboard pane shows a header row for each problem category indicating the number of items in the category. The triangle in front of the header row serves to expand or collapse the category. The items in each category may be grouped per flow; grouping can be turned on and off for all categories at the same time through the "Grouping on" menu item in the Dashboard context menu. 112 Enfocus Switch 10 Group nodes, if present, are sorted on flow name. The order in which items are sorted within each group (or within the category if there are no groups) can be configured by clicking the column headers in the table. Columns The following table describes the columns in the Dashboard pane. You can resize and reorder the columns by dragging the column headers. Column Description Time stamp The moment in time when the problem was detected Module The Switch module (such as Control) or type of flow element from which the problem originated Flow The name of the flow in which the problem originated (this column is absent when grouping is turned on) Flow element The name of the flow element from which the problem originated Job Prefix The unique name prefix of the job referred to in the message, or is left blank if there is no unique name prefix. Job The name of the problem job, or the name of the job for which the process problem was detected, or blank if there is no job context Message A message that describes the problem Researching problems The Dashboard pane offers assistance with researching a problem through the following context menu items: Context menu item Description Show flow element Causes the canvas to select the flow and the flow element listed in the selected problem item Show job Causes the canvas to select the flow and the flow element in which the job listed in the selected problem item currently resides (i.e. a problem jobs folder for the “jobs” category and a regular folder for the other categories) Causes the files pane to show the backing folder of the previously mentioned flow element, and to select the job under consideration Retrying problems The Dashboard pane offers assistance with retrying a problem through the context menu items described in the following table. See Handling problem jobs on page 114 and Handling problem processes on page 116 for more information on retrying problems. 113 Enfocus Switch 10 Context menu item Description Retry item Retries the job or process associated with the selected row Retry group For a group row, retries all items in the associated group For an item row, retries all items in the group that contains the selected row Retry category For a category row, retries all items in the associated category For a group or item row, retries all items in the category that contains the selected row Activity monitor and workload management Health Indicator pane The Health Indicator pane is used in the Design, Test and Run view to indicate the general condition of the Server and for general monitoring purposes. When the indication becomes orange or red, the administrator can use other monitoring panes available in Switch. Network activity pane The Network activity pane shows the network activity of Switch Server. The table displays SwitchClients which are currently connected and activities which are currently running. The table displays only the last connection initiated by an IP or username, for the SwitchClient. When an activity is completed, the corresponding row is removed from the table. This pane requires presence of responsive Server process as it is updated every ten seconds when visible. Jobs information pane The Jobs information pane displays current job distribution in the flows, that is, the number of jobs waiting to be processed by each flow element. Here elements are grouped by flows. This pane requires presence of responsive Server process as it is updated constantly when visible. 8.2 Handling execution problems Handling problem jobs While executing a flow Switch executes processes and moves jobs between processes according to the specifications in the flow definition. However there are situations where a process fails to handle a job properly and it no longer makes sense for the job to move along the flow in its usual fashion. In those cases, Switch moves the job to the problem jobs folder, a central location for jobs that require human intervention. Important examples of why a job may be moved to the problem jobs folder include: 114 Enfocus Switch 10 • The job has an invalid file format causing a third-party application to issue a fatal error message. • The job matches none of the file filters set on the outgoing connections of a particular folder. Switch offers a number of facilities for handling problem jobs, from detecting their presence to re-injecting them in the flow after the problem has been resolved. Detecting problem jobs There are various ways to detect the existence of problem jobs in Switch: • • • The Problem alerts user preferences allow specifying that a notification email should be sent to the system administrator when a job is moved to the problems folder. The Problem jobs flow element can be placed on the canvas right inside a flow design; its icon displays a red error mark when there are problem jobs present (see Viewing an active flow on page 103). The Dashboard pane displays an overview of the current problem jobs at any given time. See Viewing flow problems on page 111. Researching problem jobs Switch assists with locating and researching problem jobs in various ways: • • • When you select the Problem jobs flow element in the canvas; the Files pane displays a list of the problem jobs (for this flow or for all flows depending on how the Problem jobs flow element is configured). The context menu for the Dashboard pane provides options to locate the flow element causing the problem in the canvas, and to show the problem job in the Files pane. See Viewing flow problems on page 111. The Messages pane shows all messages issued by Switch and the processes under its control; use the pane's filtering capabilities to pinpoint the messages issued for the problem job or by the process(es) involved in the problem; this may provide some context in case the problem was really caused by an occurrence further upstream. See Viewing log messages on page 107. Retrying problem jobs When Switch moves a job to the Problem jobs folder, it remembers the original location of the job in its internal job ticket. This makes it possible to move the job back to the location where it left the flow for another attempt at successful processing, without loosing any of the job's history (which is also stored in the internal job ticket). The process of moving the job back in the flow is called retrying the job. It is meaningful to retry a job only after you have fixed the problem (or at least believe you did) by reconfiguring a process, adjusting the flow design, or tweaking the job itself. Note: Leave the job in the Problem jobs folder and leave its file name intact (including unique name prefix and file name extension); if you change the location or the file name Switch may loose the connection with the job's internal job ticket and it can no longer retry the job. 115 Enfocus Switch 10 Switch offers various ways to retry a job: • • • • When you select the Problem jobs flow element in the canvas (and it contains problem jobs), the Retry tool button is enabled. Pressing the Retry tool button retries all jobs in the selected Problem jobs flow element. The context menu for the Problem jobs flow element also offers a "Retry all jobs" menu item. When the Files pane displays a list of problem jobs (because the Problem jobs flow element is selected), its context menu offers a "Retry" menu item that retries only the selected job(s). The context menu for the Dashboard pane provides options to retry one or more of the listed jobs. See Viewing flow problems on page 111. Handling problem processes While executing a flow Switch causes processes to be performed and jobs to be moved between processes according to the specifications in the flow definition. However there are situations where a process is no longer able to continue processing jobs due to some problem with the process itself. In those cases, Switch makes all jobs in front of the process wait “inline” in the flow until the problem is resolved (it makes no sense to move these jobs to the problem jobs folder since there is nothing wrong with the jobs). Important examples of why a process may fail include: • There is a network communication problem so jobs can no longer be transferred. • A property for the process is set to an improper value (Switch attempts to detect invalid properties when a flow is activated but this can never be foolproof in all cases). Switch offers a number of facilities for handling problem processes, from detecting their presence to re-enabling them once the problem has been resolved. Detecting problem processes There are various ways to detect the existence of problem processes in Switch: • • • The Problem Alerts user preferences allow specifying that a notification email should be sent to the system administrator when communication (Email, FTP, local network) is down for more than a specified time, or when an external process fails. The flow element corresponding to a problem process is shown in the canvas with a red error mark, providing obvious feedback on its problem state (see Viewing an active flow on page 103). The Dashboard pane displays an overview of the current problem processes at any given time. See Viewing flow problems on page 111. Researching problem processes Switch assists with locating and researching problem processes in various ways: • • 116 The context menu for the Dashboard pane provides options to locate the flow element causing the problem in the canvas. See Viewing flow problems on page 111. The Messages pane shows all messages issued by Switch and the processes under its control; use the pane's filtering capabilities to pinpoint the messages issued for the process(es) involved in the problem; this may provide some context in case the problem is caused by interrelated processes. See Viewing log messages on page 107. Enfocus Switch 10 Retrying problem processes The process of re-enabling a process (or at least attempting to do so) is called retrying the process. It is meaningful to retry a process only after you have fixed the problem (or at least believe you did) by reconfiguring the process, adjusting the flow design, or resolving any relevant issues outside of Switch. Automatic retry The Error Handling user preferences allow automatically retrying a problem process after a specified time interval. Separate values can be specified for different categories of processes. Automatic retry is especially meaningful for communication processes since a network problem is often resolved by external influences. Manual retry Switch offers various ways to manually retry a problem process: • • • • • When you select the flow element in the canvas that corresponds to a problem process, the Retry tool button is enabled. Pressing the Retry tool button retries the process. The context menu for the flow element in the canvas that corresponds to a problem process also offers a "Retry" menu item. The context menu for the Dashboard pane provides options to retry one or more of the listed processes. See Viewing flow problems on page 111. When you deactivate and reactivate a flow, all of its problem processes are implicitly retried. When you quit and restart Switch, all problem processes are implicitly retried. 117 Enfocus Switch 10 9. Metadata 9.1 Metadata overview What is metadata In the Switch context, metadata is descriptive information about a job (file or job folder) in a structured electronic form. Metadata is often used to store administrative information associated with a job, and to exchange such information between systems. Metadata can be distinguished from the job contents proper, even if it happens to be embedded in the job. Historically, metadata has been stored in various proprietary or standard formats. TIFF, EXIF and IPTC tags (often found in image files) are classic examples. More recently, the industry has moved to store metadata as XML, building on the strengths of this ubiquitous format. JDF and Adobe XMP, two XML-based formats, are often used in the publishing industry in addition to generic XML. Metadata categories Switch recognizes three categories of metadata depending on the storage mechanism used to convey the information, as described in the following table. Category Description Internal Switch-specific information stored in the internal job ticket for each job; for example hierarchy info and email info Embedded Metadata that is embedded inside the job (as part of the file); for example EXIF or IPTC tags, or an embedded Adobe XMP packet; see Embedded metadata on page 311. External Metadata that travels with the job but is stored as a distinct entity; for example an XML or JDF file, or a standalone Adobe XMP packet (possibly extracted from the job file); see External metadata on page 314. Support for metadata Switch supports working with metadata in various ways - depending on the product flavor - as defined in the following table. 118 Feature Benefits Internal job ticket Maintaining hierarchy info, email info and other internal metadata used by the Switch tools Enfocus Switch 10 Feature Benefits Variables Read-only access to embedded metadata (EXIF, IPTC, XMP) and file information Pick-up and export Picking up external metadata (XML, JDF, XMP) from foreign sources, and exporting it for external use Scripting Read-write access to embedded metadata and external metadata 9.2 Defining text with variables Text properties that support variables can be edited with the "Define text with variables" property editor. The text field at the bottom contains the text being edited. Variables are simply mixed-in with static text and enclosed in square brackets [ ] (see Variables on page 290). The list boxes and text fields in the top portion of the property editor offer guidance for dealing with variables, as explained below. Arguments The rightmost column shows any arguments relevant for the selected variable; for example: 119 Enfocus Switch 10 See Data types on page 292, Formatting on page 293, Indexed variables on page 296, and String manipulations on page 297. Entering text You can type constant text in the text field at the bottom at any time. You can also leave the field empty and just insert one or more variables using the procedures explained in the following sections. If you understand variable syntax, you can enter or modify variables directly in the text field. However, it makes more sense to let the Property editor assist you with inserting and updating variables, as explained below. Inserting a variable 120 Enfocus Switch 10 To insert a new variable in the text, proceed as follows: 1. In the text field at the bottom, place the text cursor in the location where you'd like to insert a variable; make sure it is not inside a pair of square brackets [ ] that mark a variable; if the text field is empty, just leave the cursor at the start of the field. 2. Select a variable group in the leftmost list ("Switch" in the example above); the list to the right adjusts to list all the variables in this group. 3. Select a variable in the second list ("Date" in the example above); the text area to the right adjusts to provide a brief description of the variable, the title bar indicates the variable's data type, and the rightmost column shows any arguments relevant for this variable (see Characteristics of variables on page 291). 4. If the rightmost column contains any text fields, enter the appropriate values for the variable's arguments (see Metadata on page 311); leave a field blank to use its default value. 5. Once you are satisfied with the selected variable and argument values, press the "Insert variable" button. Updating a variable To update a variable that was previously inserted, proceed as follows: 1. In the text field at the bottom, place the text cursor inside the variable you would like to update, that is, inside the pair of square brackets [ ] that mark the variable; the fields in the top portion of the property editor automatically synchronize with the contents of the variable. 2. Adjust the argument values for the variable in the text fields at the right, or select a new variable (possibly in another group) as desired. 121 Enfocus Switch 10 3. Once you are satisfied with the changes, press the "Update variable" button. 9.3 Defining a condition with variables Conditional properties that support variables can be edited with the "Define condition with variables" property editor. A conditional property has a Boolean result (true or false). For example, the file filtering properties on connections are conditional properties. The property editor discussed here offers a user interface to create comparison expressions with support for locating a variable and entering its arguments. Its more advantageous to compare variables from a job with other variables (for example: from an external source like database or dataset). Therefore, Switch allows users to select multiple variables when setting up a condition. Select one of the following three property editors in the drop-down menu (highlighted in the screen given below): • Inline Value • Text with Variable... • Script Expression... The example condition is true if the job being tested contains a single file smaller than 5MB, or if one of the associated email addresses has the 'gradual.com' domain. Defining a condition The property editor has two distinct parts: 122 • The main dialog box which allows defining one or more comparisons between a variable and a constant value, forming the condition. • The pop-up dialog box which serves to locate a variable and enter its arguments, similar to defining text with variables. Enfocus Switch 10 The group and variable listboxes in the pop-up are synchronized with the corresponding dropdown menus for the currently selected comparison in the main dialog box. Defining a single comparison When the property editor for a certain property is displayed for the first time, a single comparison row is shown. To define this comparison, proceed as follows: 1. Click this button beside the first textbox. The Define text with variables pop-up dialog box appears. 2. Select a variable group in the first listbox. The second listbox adjusts to list all the variables in this group. Select a variable in the second listbox. • The text area to the right adjusts to provide a brief description of the variable, the title bar indicates the variable's data type, and the rightmost column shows any arguments relevant for this variable (see characteristics of variables). 3. Click Insert variable button. • • Define text with variables pop-up dialog box closes. The selected variable group and variable are inserted in the first textbox of the main dialog box. 4. The dropdown menu next to the textbox adjusts to list the appropriate comparison operators for the variable's data type. Select the desired comparison operator. 5. In the last dropdown menu, select the appropriate property editor. Enter or select the appropriate values. 6. Once you are satisfied with the configuration, click the OK button. Defining multiple comparisons The property editor allows defining a condition that combines multiple comparisons. Each comparison is represented as a separate row in the lower portion of the property editor. The radio button in front of each row indicate which of the comparisons is currently synchronized with the upper portion of the property editor; it is called the currently selected comparison. The dropdown menu to the left of each row (starting with the second row) indicates the logical operator (OR or AND) used to combine the consecutive comparisons. It is also used to add and remove comparison rows. • To add a new comparison: a) Locate the dropdown menu at the bottom left (in front of an empty row) displaying "----". b) In that dropdown menu, select the desired logical operator "AND" or "OR" instead; a new comparison row is added. • To remove a previously added comparison: a) Locate the dropdown menu at the start of the comparison row displaying the logical operator "AND" or "OR". b) In that dropdown menu, select "----" instead; the comparison row is removed. 123 Enfocus Switch 10 You cannot remove the first condition since it does not have a logical operator dropdown menu. • To change the logical operator combining two comparisons: a) Locate the dropdown menu at the start of the second comparison row displaying the logical operator "AND" or "OR". b) In that dropdown menu, select the other logical operator instead; be careful NOT to select "----" because that would cause the comparison row to be removed. Operator precedence If three or more comparison rows are combined with different logical operators (that is, both "AND" and "OR" are used), the meaning of the condition depends on the order in which the logical operations are performed. Thus in that case the property editor displays an extra section at the very bottom, allowing to select operator precedence: • OR then AND: the logical OR operations are performed first, then the logical AND operations. • AND then OR: the logical AND operations are performed first, then the logical OR operations. The following table provides some examples of conditions with their meaning for each choice of operator precedence. Condition OR then AND means AND then OR means A OR B AND C (A OR B) AND C A OR (B AND C) A OR B AND C OR D (A OR B) AND (C OR D) A OR (B AND C) OR D A AND B OR C AND D A AND (B OR C) AND D (A AND B) OR (C AND D) A AND B OR C OR D A AND (B OR C OR D) (A AND B) OR C OR D Comparison operators Variable data type Comparison operators Comparison value Text Equal to Any text string Not equal to Contains Does not contain Starts with Does not start with Matches A regular expression Does not match Boolean True False 124 None Enfocus Switch 10 Variable data type Comparison operators Comparison value Integer Rational Equal to A decimal integer or floating point number, example, "-12" or "0.56" Not equal to Less than or equal A constant expression using + - * / operators; example: • 5 * 1024 * 1024 Greater than • 2/3 Greater than or equal • 6.77 + 8.55 Equal to An ISO 8601 formatted date/time (equivalent to format string "yyyy-MM-ddThh:mm:ss.zzz") or any portion thereof Less than Date Not equal to Earlier than Earlier than or same Later than Later than or same Enter a format string in the Format argument of the variable to specify which portion of the date and/or time should take part in the comparison For example, you may enter "yyyy-MM" for the format string and "2007-08" as the comparison value to compare year and month 9.4 Sample jobs The variable-related property editors (Defining text with variables and Defining a condition with variables) offer a mechanism to select a sample job and to display actual metadata values derived from that job while you are configuring (portions of) the property value in the editor. Limitations A job can be a sample job only if it has a unique name prefix and a valid internal job ticket. Switch further requires that a sample job resides in the flow being edited (but not necessarily just in front of the tool or connection being edited). This simplifies the user interface and avoids problems with jobs residing in active flows (since the flow being edited is always inactive). Working with sample jobs To benefit from this feature, you should design a prototype of the desired flow and process one or more sample jobs through the flow to the point where the jobs have accumulated the relevant metadata. In other words, you should follow these steps: 1. Create a valid prototype of the desired flow (see Designing flows: Working with the canvas on page 76, Working with flow elements on page 78, Working with properties on page 85). 2. Activate the flow (see Activating and deactivating flows on page 73). 125 Enfocus Switch 10 3. Put connections on hold where appropriate to keep jobs from moving too far ahead (see Activating and deactivating flows on page 73). 4. Place sample jobs in the flow and let them process to the desired stage (see Viewing an active flow on page 103). 5. Deactivate the flow (see Activating and deactivating flows on page 73). 6. Bring up the desired property editor that supports variables (see Working with properties on page 85,Defining text with variables on page 119, Defining a condition with variables on page 122 ). 7. Select a sample job in the property editor (see below). Selecting a sample job As soon as a flow contains valid sample jobs (see procedure), the variable-related property editors display a list of available sample jobs in a simple table as shown above. The columns can be resized/reordered and rows can be sorted as usual. Selecting one of the rows in the table determines the sample job used for displaying actual metadata values in other areas of the property editor as follows: • • 126 The actual value of each variable below the variable’s description. The actual value of the text string or the condition being edited at the bottom of the dialog. Enfocus Switch 10 9.5 Building a location path The “Build location path” dialog offers assistance with building location paths for the variables in the Metadata group using picked up metadata by a sample job. The dialog supports the various data models known in Switch. See also XMP location path syntax on page 331. Showing the dialog The property editors Defining text with variables and Defining a condition with variables show a button called “Build location path” when a variable in the Metadata group is selected and at least one valid sample job is available (See Working with sample jobs on page 125). When you click this button, the Build location path dialog is displayed. When you click the OK button on the Build location path dialog after performing some edits, the selected Metadata variable is updated accordingly. 127 Enfocus Switch 10 Metadata dataset This section lists the various datasets associated with the job. You can select the embedded dataset (which is always available, even if it is empty) or one of the external datasets associated with the job (if any). Location path syntax The data model for the selected dataset determines the available options for the location path syntax. Unavailable options are automatically disabled in the user interface. The selected location path syntax determines the layout and behavior of the dialog’s bottom portion, as described in the following sections. Result data type The result of the location path configured in the dialog’s bottom portion (evaluated in the context of the sample document) determines which Result data type options are available. Unavailable options are automatically disabled in the user interface. The selected Result data type determines which of the variables in the Metadata group is used to produce the result. 128 Enfocus Switch 10 Location path For the choices “XMP/XML/JDF location path” the bottom part of the dialog displays the following two items: • An editable text field labeled “xxx location path”. • A tree view representing the metadata in the sample document, labeled “xxx data tree”. You can expand and collapse the nodes in the tree view, but the tree is not otherwise editable. When you select a node in the tree view, the dialog displays the corresponding location path in the editable text field (discarding anything that was already there). Vice versa, when you modify the contents of the editable text field, and the contents represents a valid location path pointing to an existing node, the dialog selects that node in the tree (and expands and scrolls the view to make it visible if needed). The OK button is enabled only if the location path is valid and the selected node is compatible with the selected result data type; otherwise an appropriate alert message is shown at the bottom of the dialog. XPath expression For the choice “XPath expression” the bottom part of the dialog displays the following items: • An editable text field labeled “XPath expression”. • A read-only text field that displays the result type and value of the expression as it is evaluated against the metadata, for example: “Integer: 5”, “Boolean: false” or “Node set: 3 element nodes” • A control bar with buttons and checkboxes (see below). • A read-only multi-line text field that displays the XML for the sample metadata and highlights the nodes in the result node set, if any. When you modify the contents of the editable text field, and the contents represents a valid XPath expression, the text fields are automatically updated to reflect the expression’s result. The control bar offers buttons to navigate between the nodes in a result node set, and two checkboxes that affect the XML display: • Auto-indent: when turned on, the XML is “pretty-printed” with nested indentation. • Color-code: when turned on, each XML node type is displayed in a different color. The OK button is enabled only if the XPath expression is valid and its data type is compatible with the selected result data type; otherwise an appropriate alert message is shown at the bottom of the dialog. 129 Enfocus Switch 10 10. Scripting concepts 10.1 Scripting overview PowerSwitch offers a comprehensive scripting environment. With limited scripting experience, a user can substantially extend Switch's capabilities and provide for interaction with third-party systems in new and powerful ways. The various topics in this chapter describe the Switch scripting environment, including its capabilities for working with metadata. Note: In addition to Switch's own scripting environment, certain Switch configurators support executing JavaScript scripts inside the Adobe Creative Suite applications. These types of scripts are not discussed in this chapter; instead refer to JavaScript for applications on page 201. Switch supports two types of scripting languages: • Operating system scripting languages: use the script execution mechanism provided by the operating system to support a platform-specific scripting language. • Internal scripting language: a cross-platform JavaScript subset implemented and executed inside Switch. Operating system scripting languages Operating system scripting is intended primarily for communicating with other applications or with operating systems services from within Switch. The supported scripting languages are: • AppleScript on Mac OS X. • VBScript on Microsoft Windows. In each environment, a script object representing the Switch application provides access to key variables and functions, including the metadata context of the job being processed. By definition, operating system scripts are platform-specific (i.e. not portable). Internal scripting language The Switch-internal scripting language JavaScript is intended primarily for working with variables and functions provided by Switch (rather than the operating system). A primary goal of the internal scripting language is to work with the contents of metadata fields associated with the jobs being processed. Switch supports a substantial JavaScript subset (more precisely, it supports a subset of the ECMAScript 4.0 language), with extensions for: • Accessing key Switch variables and functions, including the metadata context of the job being processed. • 130 Reading and writing plain text files. Enfocus Switch 10 • Reading and writing XML files and performing XSLT transforms. • Executing a command line application. • Database access. • Webservices interaction. JavaScript scripts have limited "external access". For example, there is no way to communicate with interactive applications, and there is no access to operating system services. JavaScript scripts are cross-platform, i.e. they work without change on both Mac OS X and Microsoft Windows. Script element and script expression A script element is a flow element that encapsulates a script written in any of the supported scripting languages. The script implements an “entry point” function called by Switch for each job being processed through the flow element. A script expression is a text string associated with a flow element property. To determine the value of the property, Switch evaluates the contents of the string as a JavaScript expression in the context of the job being processed. Only JavaScript is supported in script expressions. The Switch scripting API (application programming interface) provides script elements and script expressions with access to information about the job being processed, including job ticket and metadata contents. Script expressions are limited to read-only access, while script elements can update the information. Script package A script that is to be associated with a script element consists of the following components: • Script declaration: an XML file that specifies information about the script, such as the name and data type of any properties (arguments) used by the script. • Script program: a plain text file that contains the script program itself, written in one of the supported scripting languages. • Script icon: optionally, an icon that is used to display the script element in the Switch flow designer. These components are collected in a single file called a “script package” which is presented to the script element as a single entity. This also allows creating “fat” packages containing an implementation of the same functionality on multiple platforms. Scripted plug-in A scripted plug-in is a script package that, when saved with the appropriate password and placed in the appropriate folder, behaves just like a tool or configurator built into Switch. Scripted plug-ins are of no concern to regular Switch users. Enfocus may license selected third-party vendors to develop scripted plug-ins. Script development PowerSwitch includes a script development environment called SwitchScripter, installed as a separate application with the following major functions: • Create and edit Switch script packages and its components. • Emulate the Switch scripting API for testing purposes. • Setup specific input/output conditions for testing purposes. 131 Enfocus Switch 10 10.2 Putting a script in a flow Script expressions A script expression is a JavaScript program that gets evaluated in the context of a job (file or job folder) to determine the value of a particular property of a flow element or connection. This allows the property value to depend on the job or its associated metadata. Associating a script expression with a property Many flow element and connection properties in PowerSwitch offer an extra property editor that allows entering a script expression. String value example For example, the "Subject" property of the Mail send flow element allows a script expression in addition to a regular explicit value: Select "Inline value" (the default) to enter an explicit string value in the text field next to the "Subject" label. Select "Define Script Expression" to enter a script expression in the property editor, which looks as follows: In this case, when it is evaluated in the context of the job being processed, the script expression should return a string value (or a value that can be meaningfully converted to a string under the JavaScript rules). The resulting value is used as the subject line of the email sent out for the job. 132 Enfocus Switch 10 Boolean value example As a second example, the "Include these files" property of a connection leaving a folder allows a script expression in addition to other filter types: Select "Define Script Expression" to enter a filter script expression in the property editor, which looks as follows: In this case, when it is evaluated in the context of the job being considered as a possible match for the filter, the script expression should return a Boolean value, i.e. true or false (or a value that can be meaningfully converted to a Boolean under the JavaScript rules). If the resulting value is true, the job will be considered to match the filter, otherwise it won't. Writing a script expression A script expression is written in JavaScript; other scripting languages are not supported. The value of a script expression's property is set to the result of evaluating the main body of the script as an expression. The main body may invoke functions defined in the script expression itself or provided as part of the Switch scripting API. Also, the script expression can use the predefined variables "job" and "s" which represent the job and the flow element context at the moment of script evaluation (see predefined variables below). You have two options for developing and testing a script expression: • Enter the script expression directly in the appropriate property editor dialog, as demonstrated in the previous sections, and test it by activating the flow and processing some sample jobs. 133 Enfocus Switch 10 • Use SwitchScripter to develop and test the script expression, and then load it into the appropriate property editor dialog box. SwitchScripter offers several advantages for working with complex script expressions. Most importantly, you can setup test fixtures to verify the script expression's results without having to activate a flow and process jobs, and you can save the script expression in a script package for future use (like when using a script expression) or for sharing it with other users. Access to scripting API A script expression has access to a subset of the Switch scripting API (application programming interface). In general, a script expression should not have any persistent side-effects; for example it cannot modify the current job or write data to disk. There are two notable exceptions to this rule however: a script expression can log messages and it can update global user data. The following subsections describe in more detail which portions of the scripting API can be accessed from a script expression. Note: Do not attempt to violate these limitations (even if Switch inadvertently allows you to do it); the result is undefined and most likely disastrous. Predefined variables A script expression can use the following predefined global variables: • job: an instance of the Job class which represents the job being processed or considered at the moment of script evaluation. • 134 s: an instance of the Switch class which represents the flow element in which the script expression is defined (and its environment). Enfocus Switch 10 Flow element module Entry points are not supported (instead the main body of a script expression is evaluated to obtain a value). The Environment class is included except for the following functions: copy, getApplicationPath, getApplicationLicense, findRegisteredApplication, findApplicationOnDisk, getSecondsLeft, sleep. The Switch class is included except for the following functions: getScriptName, getIn/OutConnections, getJobsForConnection, createNewJob, failProcess, set/getTimerInterval. The Connection class is excluded. The Job class is included, but only its functions named “log”, “get…” or “is…” are included. This includes functions for logging, getting job file/folder information, getting job ticket info, getting read-only metadata datasets, and evaluating variables. All other functions are excluded. Metadata module This module is fully included except for the functions for updating properties. Specifically, the Map class, the Dataset class and all its subclasses for the supported data models are included, except for the functions for updating properties in the XMP data model. The CP2 (Certified PDF2) data model is now a part of the Metadata module. It includes the Session class, Certificate class, User class, DataMap class and AltText class. Utility module The File class is included but its access mode is limited to read-only. All functions named “remove…” and “write…” are excluded. The Dir class is included but it is limited to read-only functions. Specifically, all functions named “mkdir…”, “rmdir…” and “setCurrent” are excluded. The Process class is excluded. XML module The Document class is included but it is limited to read-only functions. Specifically, the functions named “save” and “transform” are excluded. All other classes in this module (such as the Element class) are fully included. Network module This module allows communication with external applications. It is exposed only to the JavaScript language (not to AppleScript and VBScript). The classes and functions in the Network module support a subset of the SOAP 1.1 communication protocol over HTTP. Switch SOAP class supports two types of attachments: • DIME • MIME Database module This module allows access to external databases via ODBC and SQL. This module is exposed only to the JavaScript language (not to AppleScript and VBScript). 135 Enfocus Switch 10 The classes and functions in the Database module offer access to a small but functional subset of the ODBC API. The DataSource class and Statement class are included. Script package A script package contains all of the information needed to execute a particular script program in the context of a script element. See scripting overview for more background information. Use the SwitchScripter development environment to create and edit script packages. Format A script package includes the following components: • Script declaration: an XML file that specifies information about the script, such as the name and data type of any properties (arguments) used by the script. • Script program: a plain text file that contains the script program itself, written in one of the supported scripting languages. • Script icon: optionally, an icon that is used to display the script element in the Switch flow designer. A script package can contain multiple script programs, each program providing an implementation of the same functionality in a different scripting language. Since there is only one script declaration, from a semantic viewpoint a script package contains a single script even if it contains multiple implementations of the same functionality in different scripting languages. All components of a script package are collected in a single file (stored as a ZIP archive) with the ".sscript" filename extension. Consequently a script package can be exchanged between users as a single entity. Script declaration The script declaration is an XML file that specifies information about the script, such as the name and data type of any properties (arguments) used by the script. Script program A script program is a plain text file that contains the script program itself, written in one of the supported scripting languages. The syntax and semantics must conform to those of the chosen scripting language. The script program also relies on the Switch scripting API. A script package may contain multiple script programs, each written in a different scripting language . In that case the Switch execution engine selects a language version in the following order: • The language version that is native to the operating system on which it is being executed (Visual Basic Scripting for Microsoft Windows, AppleScript for Apple Mac OS X). • The JavaScript version. If neither is present the script package cannot be executed on that operating system. Although it is possible to have a script program for all three languages in a single script package, the JavaScript program would never be executed in that case (at least as long as Windows and Mac OS are the only supported platforms). Icon The optional script icon is a PNG image file (not interlaced) with a size of exactly 32x32 pixels in the RGB color space and with support for transparency. When a script package is associated with 136 Enfocus Switch 10 a script element, and the package contains an icon, the flow designer uses the icon to display the script element in the canvas. Otherwise the flow designer uses the default script element icon. Password protection A script package can be saved with a password. This means the script package can no longer be opened in SwitchScripter (for viewing or editing) without providing the same password. However the script package can still be executed by PowerSwitch. There is no way to block a script package from being executed. The password protection allows a script author to distribute script packages without providing other parties with access to the script’s source code (with an important exception – see the note below). Note: Important note: Certain Enfocus employees have access to the mechanism that bypasses the password protection (because even password-protected scripts can be executed and thus opened by Switch). While Enfocus does not intend to open password-protected scripts for viewing, and does not intend to publish the bypass mechanism, the company does not legally guarantee that this will never happen. It is important for script authors to understand the limitations of the protection. Script declaration A script declaration is an XML file that specifies information about a script program, such as the name and data type of any properties (arguments) used by the script. The contents of a script declaration can be edited with SwitchScripter as part of a script package. See scripting overview for more background information. Purpose When a script package is associated with a script element, the script declaration in the script package is used to: • Produce the appropriate behavior in the Switch flow designer for the associated script element with regards to supported connections and properties. • Provide the appropriate information to the runtime environment and the scripting API, for example, to access flow element properties and to allow moving jobs in accordance with the semantics for various outgoing connection types. Main script properties A script declaration contains the following information: • The name of the script. • The number and type of supported incoming and outgoing connections. • The script's execution mode (as in concurrent or serialized). • A list of definitions for properties injected into the script element. • A list of definitions for properties injected into the outgoing connections leaving the script element. See main script properties for reference information. 137 Enfocus Switch 10 Property definition properties Each property definition in the script declaration includes: • A tag used to uniquely identify the property to the script and its human-readable name. • The type of property editors used to enter a value for the property. • Specifications for validating the property value. See property definition properties and property editors for reference information. Scripted plug-in A scripted plug-in is a script package which when saved with the appropriate password and placed in the appropriate folder, behaves just like a tool or configurator built into Switch. This allows Enfocus and its licensed partners to create built-in tools and configurators using scripting. Scripted plug-ins are of no concern to regular Switch users. Enfocus may license selected third-party vendors to develop scripted plug-ins. If you are interested in developing a scripted plug-in then refer to the following topics: • Obtaining permission • Creating a scripted plug-in • Configurator guidelines 10.3 Scripting languages JavaScript The Switch-internal scripting language JavaScript is intended primarily for working with variables and functions provided by Switch (rather than the operating system). A primary goal of the internal scripting language is to work with the contents of metadata fields associated with the jobs being processed. Switch supports a substantial JavaScript subset (more precisely, it supports a subset of the ECMAScript 4.0 language), with extensions for: • Accessing key Switch variables and functions, including the metadata context of the job being processed. • Reading and writing plain text files. • Reading and writing XML files and performing XSLT transforms. • Executing a command line application. • Database access • Web services access JavaScript scripts have limited "external access". For example, there is no way to communicate with interactive applications and there is no access to operating system services. JavaScript scripts are cross-platform, that is they work without change on both Mac OS X and Microsoft Windows. 138 Enfocus Switch 10 Language reference Refer to the Switch JavaScript language reference included with Switch help. Extensions reference Refer to the Scripting reference on page 367. AppleScript AppleScript scripting in Switch is intended primarily for communicating with other applications or with operating systems services from within Switch. A script object representing the Switch application provides access to key variables and functions, including the metadata context of the job being processed. AppleScript scripting is available on Mac OS X only. Refer to the scripting overview for more background information. Language reference Comprehensive reference and introductory information about AppleScript can be found on the Apple web site (AppleScript) and in widely available literature. AppleScript extensions reference Switch provides a number of Switch-specific classes and functions to support accessing key Switch variables and functions, including the metadata context of the job being processed. Refer to the Switch scripting API for reference documentation about these extensions. API differences The Switch scripting API reference documentation uses the JavaScript syntax and semantics to describe its various classes and functions. Unfortunately the AppleScript syntax and semantics differ substantially from JavaScript (and most other scripting languages). Thus, while the AppleScript API provides the same concepts and functionality, it has been adapted to the AppleScript way. Refer to the AppleScript dictionary included with the Switch server application for a brief description of the AppleScript classes and methods it offers, and refer to the corresponding sections in the scripting API reference for more extensive background information. API restrictions Not all of the classes and functions described in the scripting API are available when using AppleScript. Specifically, the classes and functions in the "Utility", "XML", "Database" and "Network" modules are not available. If you need the functionality in these modules, you have to use AppleScript extensions included with the operating system or offered by third-parties. Compiled binaries Background Before executing an AppleScript script, its source code must be compiled to a binary form. This requires the presence of all of the script’s target applications because the compiler needs the application-specific dictionaries. Sometimes accessing an application’s AppleScript dictionary requires launching the application (as is the case for QuarkXPress, for example). 139 Enfocus Switch 10 Script packages Starting with Switch 08, SwitchScripter stores the compiled binary form of the AppleScript in the Switch script package (in addition to the source code) to avoid recompilation at execution time. This has several advantages: • It is possible to execute portions of the script that do not need the target application (such as perhaps a property validation entry point) without launching the application. • The name of a target application can be determined at run-time by the script (as long as the dictionaries for the alternative applications are compatible). • There is a small performance gain because the compilation process is skipped. Editing AppleScript on Windows When you edit AppleScript source code on Windows, SwitchScripter is unable to generate the compiled binary form, so any compiled binary already present in the script package is removed (to avoid inconsistencies). However, as long as you do not change the AppleScript source code the corresponding compiled binary remains untouched - also on Windows. In summary, you can safely edit a multi-platform script package on Windows as long as you do not touch the AppleScript source code (or in case you do not mind omitting the compiled binary). Target applications in tell statements Referring to Switch In AppleScript, programs executed by PowerSwitch or SwitchScripter can be referred to the Switch host application through the string "Current_Switch_Server" (or "Current_SWITCH_Server"). The string is automatically replaced by the appropriate application name before the AppleScript is compiled. For example: tell application "Current_Switch_Server" set theJobPath to path of j set theJobProper to proper name of j set theJobName to name of j end tell Referring to Switch from a scripted plug-in AppleScript programs that may be executed in LightSwitch or FullSwitch as a scripted plug-in must use a run-time mechanism to select the appropriate host application (because it's no longer possible to replace strings in the compiled binary contained in the script package). So in this case, you must refer to the global variable ‘Current_Switch_Server’ provided by Switch as follows: set Current_Switch_Server to system attribute "Current_Switch_Server" tell application Current_Switch_Server using terms from application "Current_Switch_Server" … end using terms from 140 Enfocus Switch 10 end tell Referring to third-party application If the name of the target application is constant, and if it does not matter that the target application gets referenced (or sometimes even launched) when the script is first executed, the script can use the regular compile-time mechanism: tell application "QuarkXPress" … end tell Otherwise the script must use the following run-time mechanism: if … then set quarkName to "QuarkXPress" else set quarkName to "QuarkXPress Passport" end if using terms from application "QuarkXPress" tell application quarkName … end tell end using terms from In the "using terms from application" statement, specify the application name that is currently installed in the script writer's system. For the above example, "QuarkXPress" application should be installed, not "QuarkXPress Passport". If the script writer has "QuarkXPress Passport" installed, write "using terms from application "QuarkXPress Passport"". Afterwards the script may be executed with "QuarkXPress" as well as with "QuarkXPress Passport". VBScript VBScript scripting in Switch is intended primarily for communicating with other applications or with operating systems services from within Switch. A script object representing the Switch application provides access to key variables and functions, including the metadata context of the job being processed. VBScript is available on Microsoft Windows only. Refer to the Scripting overview on page 130 for more background information. Note: Switch does not support the JScript language (a scripting language also available on Microsoft Windows). 141 Enfocus Switch 10 Language reference Comprehensive reference and introductory information about VBScript can be found on the Microsoft web site and in widely available literature. Use the search term "VBScript" when looking for information on the web. Don't confuse VBScript with the Visual Basic programming language (a full-featured programming language and development environment offered by Microsoft) which is quite distinct from VBScript. A good starting page regarding VBScript on the Microsoft web site is the page on Windows Script in the Microsoft MSDN section. This page links to a full VBScript language reference and to a script repository that contains numerous practical example scripts. Extensions reference Switch provides a number of Switch-specific classes and functions to support accessing key Switch variables and functions, including the metadata context of the job being processed. Refer to the Switch scripting API for reference documentation about these extensions. The Switch scripting API reference documentation uses the JavaScript syntax and semantics to describe its various classes and functions. In almost all cases, there is a straightforward correspondence with VBScript syntax and semantics. The following sections highlight some issues to keep in mind while reading the scripting API documentation. API restrictions Not all of the classes and functions described in the scripting API are available when using VBScript. Specifically, the classes and functions in the "Utility", "XML", "Database" and "Network" modules are not available. If you need the functionality in these modules, you have to use the native VBScript capabilities. For example, the "Utility" module provides "File" and "Dir" classes to work with files and folders. In VBScript this functionality is available through the "FileSystemObject". Functions versus procedures In JavaScript there is no difference between calling a function (something that returns a value) and calling a procedure (something that does not return a value). In VBScript there is a difference and this is one of the most common pitfalls when translating JavaScript code into VBScript. For example, here's how to call two of the Job class functions (defined in the Switch scripting API) in JavaScript: job.addEmailAddress("[email protected]");theResult = job.getPrivateData("key"); In VBScript procedure calls do not use parenthesis to enclose the arguments, so the above translates to: job.addEmailAddress "[email protected]"theResult = job.getPrivateData("key") 142 Enfocus Switch 10 11. Working with SwitchClient 11.1 Preparing for SwitchClient Setting up communication To enable PowerSwitch/ FullSwitch to handle connections with SwitchClient copies (running on the same computer or on another computer in the network), the system administrator should properly configure the PowerSwitch/ FullSwitch preferences and settings discussed in this topic. Note: Both FullSwitch and PowerSwitch support SwitchClient connections. FullSwitch can support only one SwitchClient connection while PowerSwitch can support up to five SwitchClient connections. The number of licenses (i.e. simultaneous connections) can be raised by entering a new activation key in FullSwitch or PowerSwitch which is the same procedure as licensing a new FullSwitch or PowerSwitch. In SwitchClient users can submit jobs and metadata describing this job. Only PowerSwitch supports usage of this metadata information to make automated routing decisions or providing variable input to various tools and configurators. Also, PowerSwitch offers tools to pick-up metadata from sources other than SwitchClient and tools to export metadata and create reports. Compatibility between Switch and SwitchClient Now, additional information is transmitted between Switch and SwitchClient which results in the following compatibility issues. Switch 09 and SwitchClient 10: This combination is not supported. A newer SwitchClient should always to talk to a Switch of at least the same version. Attempting to connect to an older Switch returns an error during connection. Switch 10 and SwitchClient 09: This combination is supported. The communication protocol is adjusted in such a way that an older client still gets the information it expects. This is helpful when users have upgraded PowerSwitch and cannot ensure to upgrade all SwitchClient installations at the exact same time. Metadata handling The following new concepts are available for metadata handling: • • Bidirectional communication. More user friendly way of handling metadata. Improved metadata handling affects the metadata properties on the Submit point and Checkpoint tools, described inSubmit point on page 269 and Checkpoint. Also the job card, which is used to display and enter metadata, is affected. Those changes are described in a subsequent chapter. 143 Enfocus Switch 10 Default values for bidirectional communication: Bidirectional communication (that is, Client – Server – Client communication during file submission) requires that default values can be used for returning personalized information to SwitchClient or PitStop Connect. For example: Default value(s) could be a list of order ID’s coming from an external database and visualized in a dropdown list. In this case the customers can choose one of their jobs for which they have submitted the file. This example requires that Switch receives the user ID from the customer, uses this ID to get information from the database and returns that information (the order ID list) to SwitchClient or the Connector. To accomplish this, a new group “Connection group” of variables has been added at the sever side. The variables are: [Connection.Role] [Connection.Email] [Connection.UserName] [Connection.FullUserName] [Connection.Group] [Connection.IP] Easily update metadata from Submit point: Update metadata from a Submit point in a Checkpoint. Submit and Check metadata is written into separate datasets and Switch 09 is not able to update external metadata. Also Switch will not be able to edit/ update such datasets. However, Switch makes it easier to re-use metadata fields from a Submit point in a Checkpoint. The value entered on file submission automatically becomes the default value for the Checkpoint metadata field. Configure communication preferences In the PowerSwitch/ FullSwitch Edit > Preferences dialog box click Internal communication option: 1. Set the Server name preference to an appropriate name for this instance of PowerSwitch/ FullSwitch. This name is shown to SwitchClient users to differentiate between multiple PowerSwitch/ FullSwitch instances. Note that this name is distinct from the host name of the computer that runs PowerSwitch/ FullSwitch. SwitchClient expects the host name to be entered on the Connect panel, but displays the application's server name in its various data tables. 2. Set the Port for PowerSwitch/ FullSwitch client preference to an appropriate value. SwitchClient expects the port to be entered on the Connect panel when connecting to a new server. Leave this setting at its default value (51008) unless users understands why they need to change it. 3. Set the Secure SwitchClient communication preference to "Yes" if you want communication with SwitchClient to use the secure https protocol (introducing a performance overhead of approximately 20%); otherwise leave it at the default value "No". SwitchClient automatically adjusts to this preference setting. 144 Enfocus Switch 10 Other configuration and setup Design flows In PowerSwitch/ FullSwitch, users can design the flows they want to use with SwitchClient. The next topic discusses information specific to designing a flow for use with SwitchClient. For more information, see Performing the tutorial on page 51, Workspace overview on page 32 and Working with the canvas on page 76. Configure users In the PowerSwitch/ FullSwitch Users pane, add the appropriate SwitchClient users and configure their user name, password, email address, and access rights. See Managing users on page 148 and Configuring access rights on page 150. Provide sufficient client licenses A regular PowerSwitch license includes a license for up to five SwitchClient connections. If this is insufficient, user can purchase additional client licenses. A FullSwitch includes a license for one SwitchClient connection. The number of licenses (that is, simultaneous connections) can be raised by entering a new activation key in FullSwitch or PowerSwitch. This is the same procedure as licensing a new FullSwitch or PowerSwitch. Activate flows In PowerSwitch/ FullSwitch, activate the flows you want to be operational for use with SwitchClient. Note: A SwitchClient user with the appropriate access rights can access Submit points, Checkpoints and jobs in inactive flows but the jobs will not move along the flow. Leave the server running SwitchClient interacts only with the PowerSwitch/ FullSwitch server, not with the PowerSwitch/ FullSwitch designer. User can safely quit the designer without disturbing SwitchClient operation by leaving the server running (the designer will ask what to do when user quits). Designing a flow SwitchClient interacts with certain elements of one or more flows that have been designed with PowerSwitch/ FullSwitch. To design a flow, the PowerSwitch/ FullSwitch user drags flow elements (such as Submit points, processors and folders) on the canvas and connects them according to the desired job flow. After configuring appropriate property values for each flow element (and in some cases, the connections), the PowerSwitch/ FullSwitch user can activate the flow for execution. From then on, PowerSwitch/ FullSwitch automatically moves and processes jobs along the flow. For more information, see performing the tutorial, workspace overview and working with the canvas. Example flow Here's a simple flow example as it is shown in the PowerSwitch/ FullSwitch canvas: 145 Enfocus Switch 10 Since this example focuses on SwitchClient features, there is a lot of interaction with human operators and little automated processing (other than moving jobs around). Real-life flows would probably include processing steps such as preflight or color conversion. The Submit point to the left (Creatives) allows submitting jobs to the flow in a controlled fashion using SwitchClient. The user's name is automatically remembered; multiple users can use the same Submit point since each user is identified to PowerSwitch/ FullSwitch through his/her user name and password. The "Set User Name" script serves to add a user name for jobs submitted through a regular hot folder (Henry). The first Checkpoint (Visual Proof) holds the incoming jobs for inspection by a SwitchClient user. The names of the output connections (Approve and Decline) are displayed in SwitchClient as buttons. Pressing one of these buttons moves a job along the corresponding connection. The second Checkpoint (Output Jobs) allows a SwitchClient user to decide how the jobs will be stored or processed. This Checkpoint is configured to allow multiple outputs at the same time; for example both "Store in DAM" and "Create Proof". Setting up a Submit point A Submit point (Creatives in the example flow) offers properties to configure its behavior. For example, a Submit point may require that the SwitchClient user enters one or more data fields before submitting a job. This screen grab shows how the SwitchClient user must enter a valid Job ID: 146 Enfocus Switch 10 Setting up a Checkpoint Similarly, a Checkpoint (Visual Proof and Output Jobs in the example flow) offers properties to configure its behavior. It can cause SwitchClient to display additional information about the job, and it may require that the SwitchClient user enters additional data fields before acknowledging a job. Furthermore, the output connections of the Checkpoint determine the look of the buttons shown to the SwitchClient user for acknowledging a job. For example, the Visual Proof Checkpoint in the example flow is configured so that SwitchClient shows two buttons; pressing one of the buttons causes the job to move along the corresponding connection: On the other hand, the Output Jobs Checkpoint in the example flow is configured so that SwitchClient shows a list of options; the user can select more than one option, causing a duplicate of the job to be sent out over each of those connections: 147 Enfocus Switch 10 Setting up access rights To enable Submit points and Checkpoints for a particular user, the PowerSwitch/ FullSwitch user must also configure the appropriate access rights. Managing users A SwitchClient user connects to PowerSwitch/ FullSwitch through a user name and corresponding password. The user name identifies the SwitchClient user to the server and defines his/her access rights. The system administrator must configure the appropriate SwitchClient user information via the Users pane in PowerSwitch/ FullSwitch. This topic describes configuring users and user groups. The next topic discusses configuring access rights. Making changes in the Users pane All changes in the Users pane are effective immediately. There is no undo capability. Configuring users The top portion of the Users pane provides a list of individual users. Sort the users in the table on user name or on group name by clicking the corresponding table headers. 148 Enfocus Switch 10 To add a new user, click the + button and enter the user's information in the fields to the right. Providing an email address enables Switch to send notification email messages about a job to the appropriate user (email messages are sent only when this is explicitly designed into a flow). To delete a user, click the - button. Press Ctrl key to select multiple users and click the - button. A confirmation dialog box appears displaying the message This will remove multiple users. Are you sure?. click OK button to continue with deletion. Each user is assigned a role by selecting the appropriate item in the "Role" popup list. Options available in this list are: "Administrator", "Job Manager" and "Operator". Users' access to different jobs and SwithClient functionalities are based on the role assigned to them. Do not forget to set an appropriate password. Each user is part of exactly one group (but a group can include multiple users). Assign a user to a group by selecting the appropriate item in the "Group" popup list. Since this list contains only already existing groups, a group must be created (as explained below) before a user can be assigned to it. Note: it is allowed to modify or remove the pre-configured user "Administrator". In fact, at the very least set an appropriate password for that user. Configuring groups The lower portion of the users view provides a list of groups of users. Access rights are managed at the group level; not at the level of each individual user (that is, a user has the access rights of the group to which the user is assigned). To add a new group, click the button which has a plus sign(+) on it and enter the group's name in the field to the right. Then configure the access rights for the group (or rather, for users in the group) as explained below. Note: It is allowed to modify or remove the pre-configured group "Admin". 149 Enfocus Switch 10 User roles Operator Operators can view their own jobs and additionally can have access rights for certain (or all) Submit points and Checkpoints. In Checkpoints routing decisions can be taken for all jobs waiting in the Checkpoint (regardless of how they got there or who submitted them). If the user is an operator (on all Switch servers the user is connected to), the user interface elements are no longer solely focused on dealing with jobs (like in Switch 09) but the new SwitchClient also offers a message view to operators. The toolbar now contains a number of view buttons on the left, to switch between the jobs view and message view. The messages in the log only concern information and error messages for the jobs that the operator has access to. Customer The customer is a new concept in Switch and is introduced to improve collaboration with PitStop Connect and web clients (using Client SDK). Being a customer changes SwitchClient user interface to a job view only where users can see the active jobs they submitted or the jobs derived form the parent job they submitted (example: customer submits an InDesign file and wishes to approve the resulting PDF). There is no message view. Job manager Being a job manager does not change the user interface as described for the operator. However the Content pane shows the jobs and the message view shows the information and error messages of the jobs for all users in the group to which the job manager belongs. Administrator The administrator has full access rights and can not only see all jobs but also the full administrative interface in SwitchClient. Configuring access rights The system administrator can configure SwitchClient user access rights in PowerSwitch/ FullSwitch to help ensure that jobs are submitted and reviewed by the appropriate users. User access rights can be configured in the PowerSwitch/ FullSwitch Users pane. Access rights Distinct access rights are assigned to a group of users (see configuring user groups). Each user is part of exactly one group (see configuring users), which indirectly determines the access rights assigned to the user. There are distinct access rights for: • Accessing a Submit point. • Accessing a Checkpoint. See also designing a flow for use with SwitchClient. Configuring access rights for Submit points 150 Enfocus Switch 10 SwitchClient displays a list of Submit points through which the user can submit jobs to a flow. The settings in this section determine which Submit points can be accessed by users in the group being configured. The listbox lists all Submit points in all flows in the Flows pane. Check the ones you want to be accessible for the selected group of users. To allow users in this group access to any and all Submit points, check the All Submit points checkbox a the top. This way new Submit points are automatically included. Configuring access rights for Checkpoints SwitchClient displays a list of Checkpoints to be watched by the user for jobs that are being held for human intervention. The settings in this section determine which Checkpoints can be accessed by users in the group being configured. The listbox lists all Checkpoints in all flows in the Flows pane. Check the ones you want to be accessible. To allow users in this group access to any and all Checkpoints, check the All Checkpoints checkbox a the top. This way new Checkpoints are automatically included. Important note: jobs being held in a Checkpoint are visible to a user with access rights to that Checkpoint, regardless of the user information attached to the job (or even the absence of user information). 151 Enfocus Switch 10 11.2 Installing SwitchClient Licensing issues Distribution SwitchClient is part of the PowerSwitch/ FullSwitch product but it has its own separate installer so that it can be easily deployed on several computers in the network. Licensing mechanism There are no license keys for SwitchClient itself; what's licensed is the number of simultaneous connections to the PowerSwitch server. More precisely, the PowerSwitch server keeps track of the number of distinct SwitchClient instances that logged on at least once during the last 30 minutes (not counting the SwitchClient instance on the same computer) and compares that number to the licensed number of connections. FullSwitch Server can accept only one SwitchClient connection. Standard and additional licenses A regular PowerSwitch license includes a license for up to five SwitchClient connections. Licenses for additional connections can be purchased separately (see purchasing Switch and contact us). The license keys for additional client connections must be entered using the PowerSwitch client licensing dialog (not in SwitchClient). SwitchClient System requirements The system requirements for SwitchClient can be found on the Enfocus website http://www.enfocus.com Installing SwitchClient from a DVD SwitchClient is part of the PowerSwitch/ FullSwitch product but it has its own separate installer so that it can be easily deployed on several computers in the network. To install SwitchClient from a trial or product DVD: 1. Insert the DVD in the DVD drive of your system. 2. Locate the installer: 152 • On Windows: the DVD wizard appears and displays the content of the DVD. Follow the steps in the wizard to find the installer. • On Mac: locate the installer application named "SwitchClient Installer". Enfocus Switch 10 3. Double-click the SwitchClient installer to launch it and follow the steps presented by the installer. Installing SwitchClient from the internet SwitchClient is part of the PowerSwitch/ FullSwitch product but it has its own separate installer so that it can be easily deployed on several computers in the network. To install SwitchClient from the internet: 1. Visit the Enfocus web site and go to the download section. 2. Download the appropriate installer for your system (Windows or Mac). 3. Locate the installer application where you saved it on your computer. 4. Double-click the SwitchClient installer to launch it and follow the steps presented by the installer. Preparing to run SwitchClient System administrator Before you can connect to a PowerSwitch/ FullSwitch instance with SwitchClient, the system administrator needs to prepare PowerSwitch/ FullSwitch for use with SwitchClient. This includes: • Designing and activating one or more flows that will process the jobs submitted by and monitored from SwitchClient. • Configuring user access rights and communication settings. For more information about these tasks, system administrators should refer to setting up communication, designing a flow, managing users and configuring access rights SwitchClient user User needs to obtain the following information from the system administrator: • The host name (or IP address) of the computer on which PowerSwitch/ FullSwitch is installed. • The network port on which PowerSwitch/ FullSwitch expects client connections (usually the default value of 51008). • Username and password. Enter this information in SwitchClient when connecting to the Switch server for the first time. 11.3 Using SwitchClient Finding your way around SwitchClient 153 Enfocus Switch 10 Main window To keep things concise, SwitchClient has a single window that supports all its tasks. The SwitchClient window is displayed when the application is launched (by double-clicking the application icon, for example). The SwitchClient window is divided in three sections: • The topmost section displays a list of buttons; this is the tool bar. In the tool bar, there is also a filtering field which allows to filter the list of jobs shown based on a part of their name. • The left section shows a list of filters for the jobs shown in the right section, based on the job (All jobs, My jobs, Alert jobs or Archive jobs) or based on the Switch Server. • The rightmost section shows the job cards based on the filtering selected at the left side. Tool bar The topmost section of the SwitchClient window displays the tool bar as shown above. The tool bar offers the following tasks, in the order listed: • View Jobs or Messages (only Administrator users) • Refresh: refreshes the list of jobs shown • Toggle display: toggle between the two different job card sizes or table view • Submit file and Submit folder Each of these tasks is discussed in a separate topic in this section. Generic user interface elements Several of the user interface elements in SwitchClient appear in different views (job view, message view…) and behave in a standard way across those views. The following sections describe those user interface elements in a generic way. Menu bar The menu bar appears above SwitchClient main window. There are no icons in the menu bar. The following are the menu items: 1. File: Submit File, Submit Folder, View Job, Edit Job, Save Copy As..., Revert Job, Lock Job, Unlock Job, Process Job, Replace Job, View Report, Save Report and Quit SwitchClient 2. Edit: Preferences... and Connections... 3. View: Small Card View, Large Card View, Table View, Jobs (09 onwards), Messages (09 onwards), New Custom Filter, Remove Custom Filter and Refresh 4. Help: About SwitchClient, Enfocus home page, Check for updates, Manage languages..., Manage configurators..., Switch help (html), Read me (PDF), License agreement (PDF), Online documentation, Knowledge base and Get support 154 Enfocus Switch 10 The Search box saves the last searches and displays as a hint when typing in the search box. Filters pane The Filters pane appears at the left of the SwitchClient main window. Custom filters: SwitchClient offers Custom filters that can be added to the Jobs section. Using the Menu bar > View > New Custom Filter users can add filters and using Menu bar > View > Remove Custom Filter they can remove filters. If the Filters pane is used in the Table view, the layout (that is, column ordering and the columns that are hidden or visible) are remembered together with the filter. The contextual menu for the Jobs section in Filters pane contains "New Custom Filter" and "Remove Custom Filter". Content pane The Content pane displays a list that shows jobs and appears to the right of the SwitchClient main window. The list can be a Table View, Small Card View or Large Card View. The contextual menu for Content pane contains: View Job, Edit Job, Save Copy As..., Revert Job, Lock Job, Unlock Job, Process Job, View Report and Save Report. User preferences Setting user preferences The User preferences dialog provides access to a number of global configuration settings and user preferences. When you select Edit > Preferences , SwitchClient opens the User Preferences panel: User interface 1. Select the preferred language used for the user interface in Language pull down menu. The possible choices are determined at run-time depending on the installed language packs (English is always available). Changes take effect only after re-launching Switch. 155 Enfocus Switch 10 2. Selecting Yes in the Launch at system startup pull down menu enables SwitchClient application to automatically start when the system is started. 3. Select Yes in the Display thumbnail images pull down menu to visualize thumbnail images of job cards in job list. Switch server 1. Specify the time interval (in minutes) for refreshing the information displayed in SwitchClient in Refresh interval. 2. Specify the time (in hours) when a processed job card should be removed from the job list in Information period. Notifications 1. Select Yes in Show alert balloon pull down menu to display a balloon in the system tray or dock icon, when an alert job is first detected. 2. In Play sound pull down menu configure the sound to be played when an alert job is first displayed. Select None to ignore it. 3. Enter the time (in minutes) in Repeat the alert every minute to configure the frequency with which alert is repeated when a job remains unprocessed. Connecting to Switch Before connecting to a particular instance of PowerSwitch/ FullSwitch, refer to Preparing to run SwitchClient. Connections When you select Edit > Connections , SwitchClient opens the Connections panel: 156 Enfocus Switch 10 Adding a connection To establish a new connection to a copy of PowerSwitch/ FullSwitch on your local network: 1. Press the + button at the bottom; a new line appears in the list with status “Unknown Server". 2. Complete the fields in the rightmost section; see table below; also see Preparing to run SwitchClient. Field Contents Host name / IP address The host name or IP address of the computer on which PowerSwitch/ FullSwitch is installed To connect to a copy of PowerSwitch/ FullSwitch on the computer, enter "localhost" for this field Port The network port on which PowerSwitch/ FullSwitch expects client connections (usually the default value of 51008) User name User name as recognized by PowerSwitch/ FullSwitch (see Preparing to run SwitchClient) Password Password as recognized by PowerSwitch/ FullSwitch (see Preparing to run SwitchClient) 3. When all information is entered correctly, the status underneath changes to Connected 4. If SwitchClient fails to connect, refer to Preparing to run SwitchClient and setting up communication. After rectifying the problem, check or update the Connections panel again. Disabling or removing a connection • To temporarily disable a connection, select it in the list and double-click the connection icon in front of its name. The connection can no longer be used until it is re-enabled. Its icon will be greyed out and its status will be Disabled • To permanently remove a connection, select it in the list and click the - button. Discover The Discover button searches for PowerSwitch/ FullSwitch Servers on the network and will add all those servers that are not yet present in the list. Submitting jobs Refer to designing a flow for some background information on Submit points. GUI elements The GUI has three main parts: 1. Submit point (selected from a table dialog box) 2. Metadata entry in a form 157 Enfocus Switch 10 3. Options to copy or move a file and options to assemble jobs when multiple jobs are submitted Listing Submit points Submit point’s icon and display name is shown on the dialog box. If no display name is available then the element name – server name – flow name is used. The Submit point can be selected from a new table dialog box by clicking the Select button. This table dialog box has five columns: Icon - Server name- Flow - Element name - Display name. The table behaves like the SwitchClient Table View (without filtering, because the Switch Table View does not have filters anymore as the filters are now in a separate Filter pane). So there is a search field, the column and field ordering can be changed (except for the icon) and there is a contextual window with “Reset Ordering” and “Show Columns >” items. This allows a user to customize the way Submit points are visualized. Example: only visualize display names and order them alphabetically. Metadata The metadata is shown in a form. If no metadata is requested, the form is not visualized. Keep originals in place The user can choose to keep the original files/ folders or delete them after they have been submitted. Submit and assemble multiple jobs User can indicate how multiple files or folder are to be handled by using a dropdown menu. Multiple individual files: Submitting multiple files results in a GUI offering the dropdown menu so that the user can decide whether to: 1. Create one job folder including all the files and one dataset for that folder. In this case user has to provide a name for the collection. 2. Create a job and dataset for every individual file (every dataset contains the same metadata). Single folder: Submitting a single folder results in one job folder and one dataset for this folder. The dropdown menu is not displayed. Multiple folders: Submitting multiple folders results in a GUI offering the dropdown menu so that the user can decide whether to: 1. Create one job folder including all the submitted folders as subfolders in one folder and one dataset for that parent folder. 2. Create a job folder and dataset for every individual folder (every dataset contains the same metadata). Note: When user clicks the Submit all button, Switch displays a warning dialog box with the message Same metadata and routing decision will be applied to all jobs. 158 Enfocus Switch 10 When user click OK button in this dialog box, jobs are processed. If users click Cancel button in this dialog box, they are reverted to the Submit job pane. Submitting a job To submit a job to a particular Submit point: 1. Click the Submit folder or Submit file button 2. Browse for a job with the appropriate file system dialog box 3. Select a Submit point from the dropdown menu. 4. If the Submit point defines any data fields, complete the values for these fields in the Metadata properties section. 5. Click the OK button. Working with Checkpoints Refer to designing a flow for some background information on Checkpoints. Viewing jobs Jobs button When user selects the Jobs icon in the task bar, the SwitchClient window adjusts to show a list of jobs issued by the PowerSwitch/ FullSwitch server and by the various processes it controls. Using the Toggle Display button, choose between list view or Job Card view: The table view in SwitchClient offers filters and sort features. Now, it also offers creating a "customized content pane" tailored to the need of every SwitchClient user. Jobs can now be grouped in a multi level tree based on these items/ columns: Job name, Status, Refreshed, Server, Type, Size, Files, Pages, Dimensions, Modified, Flow, On hold since, User, Submit point, Initiated, Checkpoint, On alert since, Transferred, State, In state since, Metadata, Locked state and Family starter. Groups are created via a contextual window – Group. This is similar to "show columns" where the user can check or uncheck a column to group on. It is possible to create multiple levels/ 159 Enfocus Switch 10 groups by checking multiple columns. The order in which the columns are checked is the order of the grouping. When un-checking a column in a multiple level grouping, the grouping is rearranged according to the order of the grouping. When users double click on a job or choose to process a job, the Individual job card is displayed. A job card consists of three sections: • Job information • Metadata information • Routing information The Individual job card is also available for jobs which have completed processing, however, the Process button is disabled for such job cards. Updating server information If SwitchClient does not show the expected jobs, ensure that: • The appropriate PowerSwitch/ FullSwitch connection has been established; see connecting to Switch. • The server information has been recently updated; see updating server information. Filtering and sorting jobs Type search strings in the filter fields at the top of the job pane to select the subset of jobs to be displayed. To sort the table rows on the values in a particular column, click on that column's header. To rearrange the table columns, drag the column headers around. Customizing table appearance The Contextual menu helps in adding/ removing columns and resetting the default. Right click on a column header to view the Contextual menu. 1. The columns shown by default are Job name, Status, Submitted to, User, Initiated, Checkpoint and Metadata (yes or no) 2. To remove a column, drag the column header upwards or downwards. 3. To move or sort the columns, drag them sideways. Toggle display Each click toggles a job view and users can select among the following three types: • small card view • large card view • table view Search box Users can search for a job by entering the job name or job card details in the search box. Using the search box, it is possible to find a job even if the searched value in not displayed. For example: searching for a specific flow name returns all the jobs for that flow, even if the flow column is not displayed. Reviewing jobs being held in a Checkpoint To review jobs being held in a Checkpoint: 160 Enfocus Switch 10 1. In the section on the left, select Alert Jobs to determine the number of jobs waiting in a Checkpoint. 2. In the list on the right, select a job for review. 3. In the rightmost section of the window, you can now: • View information fields about the job published by this particular Checkpoint. In the File menu or the contextual menu: • Click View job button to retrieve a copy of the job to the local hard drive (in a temporary location) and open it in the application that is associated with the job's file type. When a job is being viewed, it cannot be modified or saved. The job is not locked automatically. • Click the Edit job button to edit a job file. Switch first locks the file at the Server side so that no other users can edit the job. Then the file is downloaded to the client in a temporary location to allow the user to edit the file. The Edit job button is grayed out if “Allow replacing job” property on the Checkpoint is set to No. After editing the job (that is, close and save the temporary file), users always see the edited version of the job when they view or edit the job again. • Click the Revert job to unlock the job and revert the job to its original state by downloading the file again from the server. • Click the Process job to process the job file. If the job was not edited, the original job is routed further on. If the job was edited, the resulting job (from the temporary location) is processed and the job is again unlocked. • Click the Save Copy As... button to retrieve a copy of the job to the local hard drive in a location selected by browsing to it. If the job was not edited, the original job is saved to the specified location. If the job was edited, the resulting job (from the temporary location) is saved to the specified location. 4. In SwitchClient, users can now lock the jobs so that the job (and the report) cannot be processed, edited, reverted or replaced by any other user. Viewing, saving a local copy of the job and opening the individual job card are still possible for locked jobs. User can manually lock and unlock the jobs they have locked. Locked jobs are still visible in the job list. When other users open such a job, they get a message stating that the job is in use by the user, before the job card is displayed. Lock/ Unlock is enabled for all Checkpoints. Viewing the report associated with a job If the Checkpoint associates a report with a job, the task bar offers two extra buttons (the buttons are disabled if no report is available for the selected job): • Click the View report button to retrieve a copy of the report to your local hard drive (in a temporary location) and open it in the application that is associated with the report's file type. • Click the Save report as button to retrieve a copy of the report to your local hard drive in a location you can select by browsing to it. When a job is locked by a user, the report associated with the job cannot be processed, edited, reverted or replaced by other users. • 161 Enfocus Switch 10 Handling jobs being held in a Checkpoint To handle a job (that is, move it along the flow) after reviewing it: • Click the button for the appropriate connection at the bottom of the job card • Select the job and click the Process button to open the Processing jobs panel • View information associated with the job in the left panel named Job Info • If the Checkpoint defines any editable data fields, complete their values in the "Metadata" section on the right named Job ticket. • Select the appropriate checkboxes or select the appropriate options in the drop down menu at the bottom section named Route to. Single routing decisions have a drop down menu from which users can select a connection. When multiple routing decisions are supported, checkboxes are present for every connection. The buttons shown in this section of the window depend on the configuration settings of the Checkpoint (see designing a flow). Here is another example of a Checkpoint that allows to send out multiple copies of the job: Click the Process button to proceed with job processing. Note: When multiple jobs are selected (and SwitchClient is able to handle them simultaneously), the user can insert metadata and take routing decisions for all the jobs at once. For a multi-select it is not possible to set metadata or take routing decisions for individual jobs. Jobs can be 162 Enfocus Switch 10 processed by clicking the Process all button. If only a single job is selected, the regular Process button replaces the Process all button. Note: The list of metadata fields is more dynamic. A dependent field is displayed only if a set of predefined conditions are met (similar to dependent properties in Designer). If the predefined conditions are not met, the dependent field is not displayed. Replacing a job A Checkpoint can be configured to allow replacing a job with a new version (presumably edited on the client user's computer) before moving it out of the Checkpoint. The original job (as it resided in the Checkpoint to begin with) is lost, but its metadata is preserved. Initiating replacement When you right click a job in a Checkpoint that allows replacement, the contextual menu offers Replace Job option. When user clicks this option SwitchClient displays the Choose File for Replace dialog box using which you can replace file for a job. Performing replacement If the Checkpoint in Switch server supports job replacement (uploading a new job instead of the one currently in the flow), a Replace Job option in the contextual menu is enabled. 1. Select the Job to be replaced. This job must be in "Alert" state 2. Open the Processing Panel either by double-clicking the Alert job or by clicking the Process button. 3. Browse for a file or folder. This is similar to the submit functionality on the regular SwitchClient window. The Choose File for Replace dialog box does not allow changing the job name; the output job always retains the same name as the input job, regardless of the name of the replacement job. 163 Enfocus Switch 10 As an important exception, the filename extension of the output job reflects the extension of the replacement job (so that it is possible to provide a different file type). 4. Enter metadata and handle job: Adjust metadata values as desired and then press the appropriate button to handle the replaced job. This is similar to the Checkpoint handling functionality. 5. Wait while job is being transferred. When the transfer is complete the dialog box closes automatically. Locking Switch implements a mechanism for detecting and handling situations where two or more SwitchClient users would replace a job at the same time. This is important because it would be impossible to decide which replacement job is the “winner”. When a user clicks the Replace job button and Switch detects that another user is in the process of replacing the same job, SwitchClient displays an alert dialog with the message “User xxx is currently replacing this job; if you press the overrule button, the replacement job provided by user xxx will be lost”. • Click Cancel to withdraw the replacement request and allow the other user to complete the replacement process. • Click Overrule to abort the other user's replacement process and start your own. This is meaningful in case the other user has left the computer in the middle of a replacement request and cannot be reached (or in case Switch has become confused due to a system crash, for example). Viewing log messages Messages button When the messages icon in the task bar is selected, the SwitchClient window adjusts to show a list of log messages issued by the PowerSwitch/ FullSwitch server and by the various processes it controls. Using the Toggle Display button choose between List view or Message Card view: Updating server information If SwitchClient does not show the expected log messages, ensure that: 164 Enfocus Switch 10 • The appropriate PowerSwitch/ FullSwitch connection has been established; see connecting to Switch. • The server information has been recently updated; see updating server information. • The messages issued by all enabled connections are merged in a single list. Note: SwitchClient can no longer show log messages that have been deleted by PowerSwitch/ FullSwitch, so showing logs is also limited by the "cleanup" Application Data preferences in PowerSwitch/ FullSwitch. Filtering and sorting messages Type search strings in the filter fields at the top of the message pane to select the subset of messages to be displayed. To sort the table rows on the values in a particular column, click on that column's header. To rearrange the table columns, drag the column headers around. For more information see Viewing log messages in PowerSwitch/ FullSwitch. Working with jobs Job folders In Switch a job can be an individual file or a job folder. An individual file is treated as expected. A job folder represents a set of files that moves along the flow as a single entity. For example, a page layout with its accompanying images and fonts or the individual pages in a book. A job folder may contain nested subfolders (which can contain other files and folders, recursively). To submit a job folder to a flow, simply click the Submit Folder button - which is similar to clicking the Submit File with a regular file. The job folder is submitted to and moved along the flow as a single entity. PowerSwitch/ FullSwitch can disassemble jobs into separate files if required, but not every flow uses this capability. Thus it is important to know, for each Submit point, whether its flow supports job folders or not. See also Working with folders. Relationship between jobs Sometimes a particular job spawns another related job. For example, a preflight application might generate a preflight report about the job. This report is a separate job (most likely a single file) since the original file is still there as well. Most often the report is named for the original job (with a different suffix), but in the current version of Switch there is no other way to show the relationship between the two jobs. 165 Enfocus Switch 10 12. General application reference 12.1 Licensing Starting a trial off-line If the computer where you will use your software is NOT connected to the internet, you need to start your trial off-line. To start a trial off-line, do the following: 1. Create the trial request file using the Activate License Wizard / Assistant, and copy it to a machine with Internet access. See Creating a trial request on page 166. 2. Upload the trial request file, download the response file and copy this file to the machine where Enfocus Switch is installed. See Uploading the trial request and downloading the response file on page 167. 3. On this machine, use the Activate License Wizard / Assistant to start your trial. See Loading the trial response file on page 167. Creating a trial request To create a trial request file, do the following: 1. Go to the Trial tab of the About Enfocus Switch window and click Start Trial. This opens the Activate License Wizard (on PC) or the Activate License Assistant (on Mac). 2. Click Next (on PC) or Continue (on Mac) in the first screen of the Activate License Wizard/Assistant dialog box. 3. Select Off-line activation and click Next / Continue. 4. Leave Step 1: Create an activation request selected and click Next / Continue. 5. Enter the name of your activation account and click Next / Continue. Note: You should have created this activation account in Creating an activation account on page 20. If you have not created an activation account yet, go to http://www.enfocus.com/CreateAccount on a computer connected to the internet, and see Creating an activation account on page 20 for instructions. 166 Enfocus Switch 10 6. Save the trial request file. a) Click Save As (PC) or Select... (Mac). b) In the pop-up that opens, browse to the desired location and click Save. Note: By default, the trial request file is called requesttrial.xml. 7. A message appears saying that Step 1 of the off-line trial has been completed successfully. Click Finish / Done. 8. Copy the trial request file to a computer with Internet access. Uploading the trial request and downloading the response file Once you have copied the trial request file to a machine with full Internet access, do the following: 1. Start a web browser on that machine and go to http://www.enfocus.com/Activation. 2. On the web page, select Offline Product Activation and click Continue. 3. Click the Choose File button, browse for the trial request file you copied to this machine and click Continue. 4. Enter your activation account password in the Password: field (your Account Name should be populated automatically) and click Continue. 5. Verify that the product information contained in the trial request file is correct and click Continue. 6. The website generates a response file (response.xml). Depending on the level of security of your Web browser, the response file will download automatically, or be blocked. If it is blocked, click the direct link to download it. Important: Do NOT click on the warning message at the top of your browser window then go back to the previous page and try to download the file again. If you do this the file you download will be corrupt. 7. Copy the response file back to the machine running Enfocus Switch and go to that machine. Loading the trial response file Once you are back at the machine running Enfocus Switch, do the following to load the trial response file: 1. Open the Activate License Wizard (on PC) or the Activate License Assistant (on Mac) by either: • going to the Trial tab of the About Enfocus Switch window and clicking Activate, or • going to Help > License > Activate . 167 Enfocus Switch 10 2. Click Next / Continue in the first screen of the Activate License Wizard/Assistant dialog box. 3. Select Off-line activation again and click Next / Continue. 4. Select Step 2: Load an activation response and click Next / Continue. 5. Browse to the response file you copied from the machine with full Internet access and click Next / Continue. Attention: Select the response file you downloaded from the website (response.xml) and NOT the trial request file you uploaded. A status bar appears while the system processes the response file, and then a message appears that the trial completed successfully and that you can now use the product(s) on your computer. 6. Click Finish / Done. In the Trial tab of the About Enfocus Switch window, the number of trial days remaining is displayed. Off-line activation If the computer where you will use your software is NOT connected to the internet, you need to activate your product key(s) off-line. To activate a product key off-line, do the following: 1. Create the activation request file using the Activate License Wizard / Assistant, and copy it to a machine with full Internet access. See Creating an activation request on page 168. 2. Upload the activation request file, download the response file and copy this file to the machine with Enfocus Switch installed. See Uploading the activation request and downloading the response file on page 169. 3. On this machine, use the Activate License Wizard / Assistant to activate your software. See Loading the activation response file on page 170. Creating an activation request To create an activation request file, do the following: 1. Open the Activate License Wizard (on PC) or the Activate License Assistant (on Mac) by either: • going to the Trial tab of the About Enfocus Switch window and clicking Activate, or • going to Help > License > Activate . 2. Click Next (on PC) or Continue (on Mac) in the first screen of the Activate License Wizard/Assistant dialog box. 3. Select Off-line activation and click Next / Continue. 168 Enfocus Switch 10 4. Leave Step 1: Create an activation request selected and click Next / Continue. Note: You should have created this activation account in Creating an activation account on page 20. If you have not created an activation account yet, go to http://www.enfocus.com/CreateAccount on a computer connected to the internet, and see Creating an activation account on page 20 for instructions. 5. Save the activation request file. a) Click Save As (PC) or Select... (Mac). b) In the pop-up that opens, browse to the desired location and click Save. Note: By default, the activation request file is called requestactivate.xml. 6. A message appears saying that Step 1 of the off-line activation has been completed successfully. Click Finish / Done. 7. Copy the activation request file to a computer with Internet access using whatever method you have available - USB thumb drive, diskette, network... Uploading the activation request and downloading the response file Once you have copied the activation request file to a machine with full Internet access, do the following: 1. Start a web browser on that machine and go to http://www.enfocus.com/Activation. 2. On the web page, select Offline Product Activation and click Continue. 3. Browse for the activation request file you copied to this machine and click Continue. 4. Enter your activation account password in the Password: field (your Account Name should be filled in automatically) and click Continue. 5. Verify that the product information contained in the activation request file is correct and click Continue. 6. The website generates a response file (response.xml). Depending on the level of security of your Web browser, the response file will download automatically, or it may be blocked. If it is blocked, click the direct link to download it. Important: Do NOT click on the warning message at the top of your browser window then go back to the previous page and try to download the file again. If you do this the file you download will be corrupt. 169 Enfocus Switch 10 7. Copy the response file back to the machine running Enfocus Switch and go to that machine. Loading the activation response file Once you are back at the machine running Enfocus Switch, do the following to load the activation response file: 1. Open the Activate License Wizard (on PC) or the Activate License Assistant (on Mac) by either: • going to the Trial tab of the About Enfocus Switch window and clicking Activate, or • going to Help > License > Activate . 2. Click Next / Continue in the first screen of the Activate License Wizard/Assistant dialog box. 3. Select Off-line activation again and click Next / Continue. 4. Select Step 2: Load an activation response and click Next / Continue. 5. Browse to the response file you copied from the machine with full Internet access and click Next / Continue. Attention: Select the response file you downloaded from the website (response.xml) and NOT the activation request file you uploaded. A status bar will appear while the system processes the response file, and then a message will appear that the activation completed successfully and that you can now use the product(s) on your computer. 6. Click Finish / Done. The product and its license will appear in the License tab of the About Enfocus Switch window (previously called Trial tab). Deactivating licenses Just as with activating licenses, deactivating licenses can be done both on-line and off-line. You must deactivate a license before moving it to another computer. On-line deactivation To deactivate a license on-line, do the following: 1. Open the Deactivate License Wizard (on PC) or the Deactivate License Assistant (on Mac) by either: • going to the License tab of the About Enfocus Switch window and clicking Deactivate, or • going to Help > License > Deactivate . 2. Click Next / Continue in the first screen of the Deactivate License Wizard/Assistant dialog box. 3. Select On-line deactivation and click Next / Continue. A progress bar will appear while the computer communicates with the activation server. 170 Enfocus Switch 10 4. A product key file (HTML) is created. You will need this file to activate the license for this product key on another computer. a) Click Save As / Select... to save the file. b) In the Save As dialog box, navigate to the desired location, enter a name for the file, and click Save. Make sure to note the location and name for future reference. 5. In the Save the Product Key dialog box, click Next / Continue. 6. A message appears saying the deactivation was completed successfully. Click Finish / Done. The license will no longer appear in the About Enfocus Switch window. Off-line deactivation If the computer where you use your software is NOT connected to the internet, you need to deactivate your product key(s) off-line. To deactivate a product key off-line, do the following: 1. Create an off-line deactivation request and copy it to a machine with internet access. See Creating a deactivation request on page 171. 2. Upload that request to the activation server, download the response file and copy this file to the machine with Enfocus Switch installed. See Uploading the deactivation request file and downloading the response file on page 172. 3. On this machine, use the Deactivate License Wizard / Assistant to deactivate your software. See Loading the deactivation response on page 172. Creating a deactivation request To create a deactivation request file, do the following: 1. Open the Deactivate License Wizard (on PC) or the Deactivate License Assistant (on Mac) by either: • going to the License tab of the About Enfocus Switch window and clicking Deactivate, or • going to Help > License > Deactivate . 2. Click Next / Continue in the first screen of the Deactivate License Wizard/Assistant dialog box. 3. Select Off-line deactivation and click Next / Continue. 4. Leave Step 1: Create a deactivation request selected and click Next / Continue. 5. Save the deactivation request file. a) Click Save As (PC) / Select... (Mac). b) In the pop-up that opens, browse to the desired location and click Save. 171 Enfocus Switch 10 Note: By default, the activation request file is called requestdeactivate.xml. 6. A message will appear saying that Step 1 of the off-line deactivation has been completed successfully. Click Finish / Done. At this point, you will not be able to run this copy of Enfocus Switch anymore. The License tab of the About Enfocus Switch window will show “Not Allowed to run (Partial deactivated License)”. You will still be able to open Switch designer and export the flows, but you will not be able to process any jobs. 7. Copy the deactivation request file to a computer with Internet access using whatever method you have available - USB thumb drive, diskette, network... Uploading the deactivation request file and downloading the response file Once you have copied the deactivation request file to a machine with full Internet access, do the following: 1. Start a web browser on that machine and go to http://www.enfocus.com/Activation. 2. On the web page, select Offline Product Deactivation and click Continue. 3. Browse for the deactivation request file you copied to this machine and click Continue. 4. Verify that the product information contained in the deactivation request file is correct and click Continue. 5. The website generates a response file (response.xml). Depending on the level of security of your Web browser, the response file will download automatically, or it may be blocked. If it is blocked, click the direct link to download it. Important: Do NOT click on the warning message at the top of your browser window then go back to the previous page and try to download the file again. If you do this the file you download will be corrupt. 6. Copy the response file back to the machine running Enfocus Switch and go to that machine. Loading the deactivation response Once you are back at the machine running Enfocus Switch, do the following to load the deactivation response file: 1. Open the Deactivate License Wizard (on PC) or the Deactivate License Assistant (on Mac) by either: 172 • going to the License tab of the About Enfocus Switch window and clicking Deactivate, or • going to Help > License > Deactivate . Enfocus Switch 10 2. Click Next / Continue in the first screen of the Deactivate License Wizard/Assistant dialog box. 3. Select Off-line deactivation and click Next / Continue. 4. Select Step 2: Load a deactivation response and click Next / Continue. 5. Browse to the response file you copied from the machine with full Internet access and click Next / Continue. Attention: Select the response file you downloaded from the website (response.xml) and not the deactivation request file you uploaded. A status bar will appear while the system processes the response file. 6. A product key (HTML) file is created. You will need this file to activate the license for this product key on another computer. a) Click Save As / Select... to save the file. b) In the Save As dialog box, navigate to the desired location, enter a name for the file, and click Save. Make sure to note the location and name for future reference. 7. Click Next / Continue. A message will appear that the deactivation was completed successfully. 8. Click Finish / Done. The license will no longer appear in the About Enfocus Switch window. Repairing licenses Licenses are tied to identifying characteristics of the hardware inside your computer. Licenses may break if you change the hardware significantly (for example if you add memory AND the hard drive crashes AND your network card breaks...). If more than three hardware elements of the computer change simultaneously, the licenses are invalidated and declared broken. As with activating and deactivating licenses, the repair procedure may be done on-line or off-line. On-line repairing To repair your broken license(s) online, do the following: 1. Open the About Enfocus Switch window. When your license needs repair, the window shows “Needs repair” in red, and a Repair button. 2. Click the Repair button to open the Repair License Wizard (on PC) or the Repair License Assistant (on Mac). 3. Click Next / Continue in the first screen of the Repair License Wizard/Assistant dialog box. 173 Enfocus Switch 10 4. Leave On-line Repair selected and click Next / Continue. A status bar appears while the system communicates with the activation server. After that, a message appears that the repair completed successfully and that you can now use the product(s) on your computer. 5. Click Finish / Done. Off-line repairing To repair broken licenses on a machine without Internet access, follow the same general procedure as when performing an off-line activation or deactivation. Creating a repair request To create the repair request, do the following: 1. Open the About Enfocus Switch window. When your license needs repair, the window shows “Needs repair” in red, and a Repair button. 2. Click the Repair button to open the Repair License Wizard (on PC) or the Repair License Assistant (on Mac). 3. Click Next / Continue in the first screen of the Repair License Wizard/Assistant dialog box. 4. Select Off-line repair and click Next / Continue. 5. Leave Step 1: Create a repair request selected and click Next / Continue. 6. Save the repair request file. a) Click Save As (PC) / Select... (Mac). b) In the pop-up that opens, browse to the desired location and click Save. Note: By default, the activation request file is called requestrepair.xml. 7. A message appears stating that Step 1 of the off-line repair has been completed successfully. Click Finish / Done. 8. Copy that file to a computer with Internet access using whatever method you have available - USB thumb drive, diskette, network... Uploading the repair request file and downloading the response file Once you have copied the repair request file to a machine with full Internet access, do the following: 1. Start a web browser on that machine and go to http://www.enfocus.com/Activation. 2. On the web page, select Offline Repair and click Continue. 3. Browse for the repair request file you copied to this machine and click Continue. 174 Enfocus Switch 10 4. Verify that the product information contained in the repair request file is correct and click Continue. 5. Depending on the level of security of your Web browser, the response file (response.xml) will download automatically, or it may be blocked. If it is blocked, click the direct link to download the response file. Important: Do NOT click on the warning message at the top of your browser window then go back to the previous page and try to download the file again. If you do this the file you download will be corrupt. 6. Copy the response file back to the machine running Enfocus Switch and go to that machine. Loading the repair response Once you are back at the machine running Enfocus Switch, do the following to load the deactivation response file: 1. Open the About Enfocus Switch window. 2. Click the Repair button to open the Repair License Wizard (on PC) or the Repair License Assistant (on Mac). 3. Click Next / Continue in the first screen of the Repair License Wizard/Assistant dialog box. 4. Select Off-line repair and click Next / Continue. 5. Select Step 2: Load a repair response and click Next / Continue. 6. Browse to the folder containing the response file you copied from the machine with full Internet access, double-click it, and click Next / Continue. Attention: Select the response file you downloaded from the website (response.xml) and not the repair request file you uploaded. A status bar appears while the system processes the response file. After that, a message appears that the repair completed successfully. 7. Click Finish. Tips and troubleshooting for Licensing In this section are tips and troubleshooting information designed to help you use the software if there are unexpected results. Error messages - is the problem local or on the Web server? On the rare occasion that you get an error message when you are manipulating licenses, if there is an incident ID, the error is on the Web server. If there is no incident ID, the problem is local. For example, "An error occurred while processing an activation/deactivation/repair response. Incident ID: 1443" indicates that there is a problem on the Web server. 175 Enfocus Switch 10 Error during activation / deactivation / repair If you get the error message: “An error occurred during activation/deactivation/repair”, check the version of your FNP Licensing Service. The Licensing Wizard/Assistant works with the FNP Licensing Service on both Mac and PC. The versions of your FNP Licensing Service and of the Licensing Wizard/Assistant must match. If deactivation fails If deactivation of your licenses fails, resulting in disabled licenses, you should be able to clean them up by deactivating them again. Error when processing the response file When your off-line activation, deactivation or repair fails after loading the response file you downloaded from the activation website, it may be because you downloaded the file twice. This happens when your browser blocks automatic downloads, and you click the security message at the top of your browser window then go back to the previous page to try downloading the file again. This generates a second, corrupt response file, that causes the activation / deactivation / repair to fail. If this happened to you, complete and submit the "report a problem" form on the web at http://www.enfocus.com/reportaproblem.php. To avoid this next time you download a response file, you need to either change your browser’s security settings, or click the direct link on the download page. See also: • Uploading the activation request and downloading the response file on page 169 • Uploading the deactivation request file and downloading the response file on page 172 • Uploading the repair request file and downloading the response file on page 174 On-line activation issues When performing an on-line activation, if the Activate License Wizard / Assistant cannot access the Internet, it prompts for proxy server information. • If you have a proxy server, enter the required information and try again. • If you do not have a proxy server, the anomalies should be looked for somewhere else within your connection. If the program hangs If your software hangs when you launch it, it could be because another application using licenses may have crashed and locked the connection to the licensing server. In this case, quitting the process of the crashed application in Window’s Task Manager, or rebooting the machine (Mac or Windows) should solve the problem. Careful use of filesystem monitoring utilities The licensing server software stores its critical configuration information in a special area of the filesystem called trusted storage. This area of the computer can appear empty when in reality it is not. 176 Enfocus Switch 10 If you are using a filesystem monitoring utility such as Radmind on the Macintosh, it can delete the configuration in the trusted storage area thinking it is empty. Make sure in the monitoring utility to exclude those directories from monitoring/cleanup/replacing. Operating System Trusted Storage location OS X on a Macintosh /Library/Preferences/FLEXnet Publisher/FLEXnet Windows XP on a PC \Documents and Settings\All Users\Application Data\FLEXnet Windows Vista on a PC \ProgramData\FLEXnet 12.2 Feature matrix The following table provides an overview of the features offered by each product flavor: Feature LightSwitch FullSwitch PowerSwitch Switch server and designer (on the same computer) Flow design (flow wizard, canvas, flows pane, elements pane, properties pane, ...) Flow execution (feedback on canvas , messages pane, dashboard pane, statistics pane) Built-in tools (see flow element matrix for details) Configurators for third-party applications (see Version requirements for third-party applications on page 183) Hierarchy info and email info (internal metadata) Variables and read-only embedded metadata (EXIF, IPTC, XMP) Variables that use a location path to access any data field in embedded or externalmetadata 177 Enfocus Switch 10 Feature LightSwitch FullSwitch PowerSwitch 1 license included 5 licenses included External metadata (XML, XMP, JDF) and writable embedded metadata Script expressions and script elements Script development environment (SwitchScripter) Scripted plug-ins (if licensed by Enfocus) Setup for SwitchClient (users pane, Submit point, Checkpoint) Connections to SwitchClient 12.3 Flow element matrix The following table provides an overview of the flow elements offered by each product flavor. Flow element Basics Connection Folder Problem jobs Submit hierarchy Archive hierarchy 178 LightSwitch FullSwitch PowerSwitch Enfocus Switch 10 Flow element LightSwitch FullSwitch PowerSwitch Set hierarchy path Job dismantler Ungroup job Split Multi- job Assemble job Generic application Execute command Tools Sort by preflight state Compress Uncompress Merge PDF Pages Split PDF in Pages Hold job Inject job Rename job 179 Enfocus Switch 10 Flow element File type Sort job Sort files in job Script element Recycle bin Communication FTP receive FTP send Mail receive Mail send Submit point Checkpoint Checkpoint via mail Pack job Unpack job Monitor confirmation 180 LightSwitch FullSwitch PowerSwitch Enfocus Switch 10 Flow element LightSwitch FullSwitch PowerSwitch Processing Various configurators Metadata XML pickup JDF pickup XMP pickup Opaque pickup Apago PDFspy configurator Export metadata XSLT transform Log job info 12.4 Running Switch Watchdog as a service Note: Only for Microsoft Windows Switch server and Switch Watchdog Switch offers its functionality through a number of separate applications. See Switch application components on page 31. 181 Enfocus Switch 10 The Switch server runs in the background (without user interface) to execute flows, monitored and managed by the Switch Watchdog. In normal circumstances it is automatically started and terminated as needed by the Switch designer. Setting up Switch Watchdog as a Windows service On Microsoft Windows, the Switch Watchdog can be operated as a Windows service. This allows Switch to continue processing after you have logged off from the computer. In addition, you can specify that Switch should be restarted automatically after a system failure. Running the Switch Watchdog will also restart Switch when it unexpectedly quit. To setup Switch Watchdog as a Windows service, follow the steps given below: 1. In the Windows operating system navigate to Start > Control Panel > Administrative Tools > Services . If necessary, switch to "Classic View". 2. In the list of services, locate Enfocus xxxxSwitch Watchdog (where xxxx is replaced by Light, Full, or Power). 3. Right click this service and choose Properties in the context menu. 4. On the General tab, choose the Startup type you prefer: automatic will make sure the service is started when booting your computer; manual means you will have to start the service explicitly from this dialog box. 5. On the Log On tab, enter the information for the user account that should be used to run the service. This can be important to access information (such as Photoshop actions) saved in a specific user's preferences. 6. Back on the General tab, click the Start button to launch the Switch Watchdog as a service. Operating Switch as a Windows service Now the Watchdog is installed as a service in the installer. The Server need not to be installed as a service anymore. At startup, the designer checks if the watchdog is running. If the watchdog is not running, the designer starts the watchdog as a background application. The Watchdog starts the Server almost immediately and the designer connects to the Server. Be careful though: • When users quit the Switch designer, they are asked whether they want the server to keep running. If they say "no", the server will terminate. • The Switch designer next sends a message to Watchdog to quit. Mapped drives Microsoft Windows allows assigning a drive letter to a network computer or folder, creating a mapped drive. A mapped drive letter (such as Z) can be used in a file or folder path just like a local drive letter (such as C). But there is a catch: the drive mappings are established when a user logs in to the system - and a service is not logged in (even if it is associated with a user account). 182 Enfocus Switch 10 Thus while Switch server is running without any user logged in, it cannot access mapped drives. You must ensure that all folders and file paths in the flow definitions are local drive paths or UNC paths (of the form \\server\volume\directory\file) rather than mapped drive paths. This holds for all paths including user-managed folders and references to files in configurator properties. 12.5 Version requirements for third-party applications Detailed information on Configurators can be found on the Crossroads website. To access the online information directly from the Switch application, choose Info on third-party application ... from the contextual menu of a configurator in the Flow Elements pane. This documentation is an html file which is based on the content of the configurator pack. Switch returns an empty html documentation file only when this version of the configurator does not include documentation. In such a case, user should try to update the configurator or contact the application vendor. 183 Enfocus Switch 10 13. Advanced topics for Designing flows 13.1 Flow properties Property Description Name The name of the flow as it is shown in the Flows pane Description A description of or comments about the flow; the text in this field may have multiple lines Background image A PNG or JPG image to be shown in the background of the flow design; the background image is placed at its effective resolution, and repeated (as tiles) to fill the canvas; when the flow is not editable (because it is locked or active), the background image is darkened The background image is a kind of wallpaper on which the flow design is drawn; light colors or sober patterns work best Header image A PNG or JPG image to be shown in the upper-left corner of the flow design, on top of the background image; the header image is not repeated and it is not darkened when the flow is not editable The header image is intended to mark a flow with a company or brand logo; small images work best (avoiding overlap with the actual flow design) Allow advanced performance tuning If set to Yes, two additional performance properties for flow elements that support concurrent processing are unlocked. Hence users can change the default number of slots and the idle time-out for those elements. For more information on the number of slots see the separate topic on Processing on page 187. 13.2 Preferences User interface preferences These preferences configure some aspects of the Switch user interface. Property Description Language The language used for the user interface; the possible choices are determined at run-time depending on the installed language packs (English is always available) Changes take effect only after re-launching Switch 184 Enfocus Switch 10 Property Description Language environment Indicates the overall language environment in which Switch is installed; choices are Western and Japanese This setting affects the text encoding defaults for email and ZIP compression to match the legacy standards used in the selected language environment (that is, for interacting with software that does not use Unicode) Hide unavailable configurators If set to yes, configurators for unavailable applications are not shown in the Elements pane; otherwise they are shown in a grayed state (and can still be used to design flows) Large icons in elements pane If set to yes, the Elements pane displays large icons; otherwise it displays small icons When exiting the flow designer This preference determines what happens to Switch server when the user quits the flow designer. There are three possible choices: • Ensure processing is started: Switch server remains running in the background and continues processing flows • Ensure processing is stopped: Switch server is terminated • Ask the user: Switch Designer displays a dialog box so the user can select the appropriate option Mail send preferences These preferences provide Enfocus Switch with details for an SMTP email relay server appropriate for your system environment. The Mail send tool will fail as long as these preferences have not been set. SMTP server address The URL or IP address of the SMTP email relay server SMTP port The port used by the SMTP server SMTP server requires authentication Defines whether the SMTP server requires authentication user name The login name for the SMTP server, or empty if none is required password The password for the SMTP server, or empty if none is required Use secure password verification Defines whether to use secure password verification Server requires secure Defines whether the mail server requires secure connection (SSL) connection (SLL) User name in emails The sender’s name for outgoing email messages 185 Enfocus Switch 10 Reply email address The sender’s reply address for outgoing email messages FTP proxy preferences In case your system environment requires FTP connections to pass through a proxy server, these preferences provide Switch with the configuration details for the proxy server. In case of a proxy server, the FTP receive and FTP send tools will fail as long as these preferences have not been set. FTP proxy protocol To use the FTP proxy protocol rather than HTTP or SOCKS, select "no proxy" for the "type of proxy" preference described below, and follow these guidelines for entering the appropriate proxy information in the FTP receive and FTP send properties: • In the "FTP server address" property, enter the name or IP address of the proxy server (instead of the FTP site being targeted). • In the "user name" property, append an @ sign and the target FTP site address (domain or IP address) to the regular user name (that is, "ftpserverusername@ftpserveraddress"). • The other properties, including password, remain unchanged. Property Description Name or IP address of host Name or IP address of the proxy server on your local network Type of proxy The type of proxy; one of these choices: • No proxy: no proxy is required for FTP connections • Tunneling proxy: uses the HTTP protocol • SOCKS4 proxy: uses the SOCKS4 protocol • SOCKS5 proxy: uses the SOCKS5 protocol Proxy user name The user name for logging in to the proxy server Proxy password The password for logging in to the proxy server Proxy port The port number for communicating with the proxy server Mac file types preferences These preferences configure some issues related to compatibility with Mac and Windows file types. 186 Enfocus Switch 10 Property Description Add filename extension If set to yes, Switch ensures that all files receive a filename extension corresponding to the Mac file type and file creator codes (if these are present); for more information see the separate topic on Mac file types on page 194. Processing These preferences configure some aspects of how Switch processes jobs. Property Description Concurrent file transfers The number of FTP and email file transfers (counting both send and receive) allowed to occur in parallel Concurrent transfers to The number of file transfers to the same FTP site allowed to occur in the same site parallel (counting both send and receive) Automatic means that there is no limit other than the overall maximum number of concurrent file transfers as determined by the previous preference Concurrent external processes The number of third-party applications and compress/uncompress processes allowed to run in parallel Default number of slots The number of slots available for scripts and tools working in concurrent for concurrent mode. By default, this property is set to "1", this will cause a serialized elements execution mode. Change the number of slots to more than 1 to execute in concurrent mode. Setting this property to "0" means all available slots will be used. In PowerSwitch, this default value from the preferences can be overruled by 1. Setting the flow property Allow advanced performance tuning to yes 2. Changing the element property "number of slots" from default to any other value. Performance tuning properties and preferences need to be set cautiously because however they are made to speed up processing, unwary use may slow down performance. Scan input folders every (seconds) The frequency with which input folders (i.e. the folders without incoming connections) and submit hierarchies are scanned for newly arrived jobs Scan intermediate The frequency with which intermediate folders (i.e. the folders with folders every (seconds) incoming connections) are scanned for newly arrived jobs Note that jobs placed in an intermediate folder by Switch are detected and processed immediately and without waiting for the next scan 187 Enfocus Switch 10 Property Description Process file only after (seconds) The time for which newly arrived jobs must be stable before they are processed; to avoid picking up an input job before it has been completely written to disk, Switch ensures that the size of the file (or the total size of a job folder) has not changed for at least this amount of time before processing the job Reactivate flows upon When starting up, if this property is set to yes, Switch automatically startup reactivates flows that were active when Switch was last closed; otherwise all flows are inactive after startup Stop processing if free If the amount of free disk space for application data is lower than the disk space for entered amount, processing will stop, avoiding "Disk Full" processing application data is less errors. than (Mb) Error handling These preferences configure error handling and retry behavior for problem processes. Property Description Abort file transfers after If an FTP or email file transfer takes longer than this time, it is (minutes) considered crashed or locked-up and it is aborted (0 means never abort) Abort processes after (minutes) If a process other than a file transfer takes longer than this time, it is considered crashed or locked-up and it is aborted (0 means never abort) Retry mail transfers after (minutes) Time interval in minutes between retrying a failed email transfer (0 means “do not retry” which is not recommended) Retry FTP transfers after Time interval in minutes between retrying a failed FTP transfer (0 means (minutes) “do not retry” which is not recommended) Retry unreachable folder after (minutes) Time interval in minutes between retrying an unreachable folder (0 means “do not retry” which is not recommended) Retry failed external processes after (minutes) Time interval in minutes between retrying a failed external process (0 means “do not retry” which in this case is the recommended value) Problem alerts These preferences configure notification of a system administrator in case of execution problems. Property Description Send problem alerts to A list of destination email addresses and body text for each alert message; information about the error is appended to the body text 188 Enfocus Switch 10 Property Description Problem job arrives If set to yes, send an alert when Switch moves a job into a problem jobs folder Processing takes more than (minutes) Send an alert if a job takes more than the defined time for processing. When set to 0, this option is disabled. Mail server is down for Send an alert when an email server cannot be accessed for the more than (hours) indicated time (0 means do not send alert) FTP site is down for more than (hours) Send an alert when an FTP site cannot be accessed for the indicated time (0 means do not send alert) Folder is unreachable Send an alert when a backing folder is unreachable for more than for more than (minutes) “minutes” External process fails Send an alert when a process other than folder fails (that is, its process is put in the “problem process” state) Execution log was not finalized Send an alert when Switch detects upon startup that the execution log was not properly finalized, indicating that Switch server did not orderly terminate (due to a software or hardware failure) Alert if free disk space for application data is less than, Mb Send an alert when the amount of free disk space for application data is less than the defined amount. Application data These preferences determine the location and configure the cleanup mechanism for Switch's application data. Switch stores quite a bit of application-specific data, including for example: • flow definitions (defined or imported with the flow designer) • auto-managed backing folders (and their contents, i.e. jobs being processed through flows) • internal job tickets pointing to jobs being processed • log messages All of this data is stored in a nested folder hierarchy under a single root folder, which is called the application data root. Location The default location of the application data root is system dependent. For example, on a typical Windows system the default location might be: C:\Documents and Settings\All Users\Application Data\Enfocus\PowerSwitch Server or C:\ProgramData\Enfocus\PowerSwitch Server (Vista, Windows 7) And on a typical Mac OS X system the default location might be: /Library/Application Support/Enfocus/PowerSwitch Server 189 Enfocus Switch 10 You can move the application data to another location by changing the value of the first preference in this group. Cleanup Some temporary application data cannot be removed automatically during regular operation. To ensure that the amount of data does not grow indefinitely, Switch performs a cleanup process at regular intervals. Property Description Application data root The root folder for the hierarchy in which Switch's application data is stored; the default is the "system data" location, but you can browse to an arbitrary location on the file system Changing the location of the application data root is a substantial operation and requires that Switch stops processing flows; a dialog will be displayed with progress information Keep internal job tickets The time period after which internal job tickets may be deleted for for (hours) jobs that left the flow; Switch will not delete internal job tickets for jobs that are still active Keep log messages for (hours) The time period after which log messages may be deleted Run cleanup starting at (hh:mm) The time offset from midnight at which to run the cleanup process for application data Run cleanup every (hours) The period or frequency with which to run the cleanup process for application data Logging Property Description Saving log messages Determines the mechanism for saving log messages into Switch's logging database: • Fast: uses delayed writing to increase speed but risks loosing messages in case of an operating system crash or power failure • Export messages to XML Safe: writes each message to disk before proceeding; this guarantees that no messages are lost but it can be quite slow when Switch logs many messages per second (in practice the "fast" option is almost always preferred) When set to “yes” the messages stored in the execution log are automatically exported to daily XML files, starting with the day on which the feature was turned on The export happens 5 minutes after midnight; if days were skipped because Switch was not active, the missing days are exported 5 minutes after the next startup 190 Enfocus Switch 10 Property Description The name of the exported files include the Switch server name (see internal communication preferences) and the date in the format: “<server-name> logs YYYY-MM-DD.xml” See Exporting log messages on page 110 for information on the XML schema of the exported files Destination folder The folder where the exported XML files are placed To process the exported XML files with Switch, set the destination folder to the input folder of an active flow Log debug messages When set to “yes” any debug messages are written to the regular log database (normally they are ignored) Turn on this preference only when so requested by Enfocus Support, or when you are debugging a script that issues debug messages Log to text file When set to “yes” all execution log messages (including debug messages) are written to a comma-separated text file in addition to the regular log database Turn on this preference only when so requested by Enfocus Support Internal communication These preferences configure advanced settings related to the communication between Switch application components. Do not change these settings unless you understand why you need to change them. Property Description Server name The name of this instance of the Switch server as it is displayed to users of SwitchClient. Port for Switch Designer The port used for communication between Switch server and Switch Designer, in the range of 1 to 65535. Note: The port in the range 0 to 1023 are often managed by the IANA and are available for use only to privileged users. Port for SwitchClient The port used for communication between Switch server and SwitchClient instances, in the range of 1 to 65535. Note: The port in the range 0 to 1023 are often managed by the IANA and are available for use only to privileged users. Port for Switch Watchdog The port used for communication between Switch server and Switch - Server communication Watchdog, in the range of 1 to 65535. Note: The port in the range 0 to 1023 are often managed by the IANA and are available for use only to privileged users. 191 Enfocus Switch 10 Property Description Port for Switch Watchdog The port used for communication between Switch Designer and SwitchClient Watchdog, in the range of 1 to 65535. Note: The port in the range 0 to 1023 are often managed by the IANA and are available for use only to privileged users. Secure SwitchClient communication If set to yes, communication with SwitchClient instances uses the secure https protocol; using the secure protocol introduces a performance overhead of approximately 20% If set to no (the default), regular http is used instead Compress client jobs If set to yes (the default), jobs transferred from and to SwitchClient instances are compressed (higher processing time and lower bandwidth consumption) If set to no, jobs are not compressed (lower processing time and higher bandwidth consumption); this is meaningful for high-speed local networks Remount Volumes Remount Volumes is only available when Switch is running on Mac OS X. It contains one single preference: "Volume remount information" which contains a list of volume paths with corresponding user name and password. If the network connection is interrupted while the flow is running, these volumes will be automatically (re)mounted. The specified user name and password is used to mount the volumes. The list of volumes to be remounted, shows the Volume path, the User name and Password. When closing the list editor, only volumes with a defined user name will be kept. Property editor This preference uses a new property editor which offers the following three columns: Column header Description Volume path The complete network path identifying a volume that may have to be remounted by Switch User name The user name to be used for remounting the volume (required field) Password The password to be used for remounting the volume Leaving the user name empty is equivalent to not listing the volume at all. When user closes the property editor all items with empty user names are automatically removed. This is relevant to the suggestion feature described in the next section. 192 Enfocus Switch 10 Show volume paths used by active flows When editing the Volume list, the Show volume paths used by active flows can be used to list all volume paths currently in use by active flows at the end of the list. By default this checkbox is turned on. Its state is remembered between uses of the property editor and across Switch sessions. If the volume path contains a user name, this will be entered in the User name field. The password is NOT added automatically. When turning the option off, all volume paths with an empty user name will be removed from the list. 13.3 Unique name prefixes Internal job tickets A key feature of Switch is its ability to remember information about a job (file or job folder) while it is being processed through a flow. This information is stored in an internal job ticket managed by Switch. The internal job ticket for each job contains housekeeping information (such as where the job was last located) in addition to information about the job's origin and routing. For example, a job's hierarchy info and email info (attached by specific tools) are stored in its internal job ticket. Switch needs a way to associate a particular internal job ticket with its corresponding job, and vice versa. To maximize flexibility and transparency for the user, Switch uses the filename as the basis for this mechanism rather than hiding jobs in some database. However Switch may be handed two or more jobs with the same name (in different input folders, or even in the same input folder after the first job was moved along). Thus Switch employs a "trick" to keep similarly named jobs apart: unique name prefixes. Unique name prefixes A job is associated with its internal job ticket by prefixing the file or folder name with a unique identifier that consists of five letters or digits preceded and followed by an underscore. For example: “myjob.txt” may become “_0G63D_myjob.txt”. Note that the files inside a job folder are not renamed; only the job folder name receives the unique name prefix. When a job folder is disassembled into separate files, each of the files of course receives its own unique name prefix. For the technically-minded: each of the five characters in the unique name prefix can be a digit (0-9) or an uppercase letter (A-Z). This allows 36**5 or about 60 million combinations. A different unique name prefix can be generated every second for about 23 months. Switch generates a new unique name prefix (and a corresponding internal job ticket) when: • It detects a job in a folder or in a submit hierarchy. • It makes a copy of a job. • A producer (such as email receive) injects a new job in the flow. • A processor produces a secondary output job that is injected in the flow. 193 Enfocus Switch 10 The primary output of a processor (i.e. the incoming job with any changes applied by the processor) retains the same unique name prefix as the incoming job. When a job looses its unique name prefix (for example because the “strip unique name” property is set for an archive or a final folder), it also looses the association with its internal job ticket. Handing over jobs between flows Switch can pass along a job from one flow to another without loosing the job's association with its internal job ticket (assuming both flows are being executed by the same instance of Switch; hand-over between different instances of Switch does not preserve the internal job ticket information at this time). This feature enables splitting up a complex flow in smaller segments without loosing any information. To hand over jobs from flow A to flow B: • In flow A, create a user-managed folder with no outgoing connections and make sure its “strip unique name” property is set to No. • In flow B, create a user-managed folder with the same backing folder (the folder in flow B may or may not have incoming connections). 13.4 Mac file types Background information Microsoft Windows uses the filename extension (which is required) to determine a file’s type. Apple's Mac OS X uses the filename extension (if present) and in addition uses the file type and creator codes (if present) stored in the catalog entry for the file. This allows Mac OS X to be compatible with the external world (i.e. Windows and Unix, which use filename extensions) and with Mac Classic (which exclusively used Mac file types). Successfully exchanging files in a mixed platform environment requires performing a mapping between Mac file types and filename extensions. And since the catalog entries for file type and creator codes are supported only by Mac-specific file systems (such as HFS), they must be emulated on foreign file systems (such as FAT). Mac OS X (and Mac Classic) also allows files to have a resource fork (a second stream of information in addition to the main data). In its most extreme form, a file may store all of its information in the resource fork and have zero data bytes (as is the case for certain types of Classic font files). Modern applications tend to rely less on the contents of the resource fork than Classic applications, but in general the resource fork cannot be ignored. Again resource forks are directly supported only by Mac-specific file systems, and thus must be emulated on foreign file systems. Emulation with dot-underscore file (AppleDouble) When a Mac OS X user copies a file from a Mac-specific volume to a foreign volume, the system splits out any information that is not located in the data fork of the file and writes it to a hidden file on the destination volume. The name of this file is the same as the original file except that it has a dot-underscore prefix. For example, if the user copies an file named MyMug.jpg to a foreign volume, there will be a file named ._MyMug.jpg in addition to the MyMug.jpg file in the same location. 194 Enfocus Switch 10 When a Mac OS X user copies a file from a foreign volume to a Mac-specific volume, the system looks for a matching “dot-underscore” file. If one exists, the system uses the information in the dot-underscore file to recreate the resource fork and file type attributes. If the hidden file does not exist, these attributes are not recreated. Emulation using NTFS alternate data streams Although this feature is not widely known, the NTFS file system (used by most modern Microsoft Windows systems) supports alternate data streams in a file. In a way this feature is a generalization of the Mac resource fork concept. Each individual stream can be opened for input or output, but otherwise the file (with all its associated streams) is managed as a single unit. The Windows user interface provides no interface to alternate data streams, and regular Windows applications never use alternate data streams. Several AppleTalk file sharing protocol (AFP) implementations for Windows servers, including Microsoft's own implementation, emulate Mac file types and resource forks on the Windows NTFS file system using alternate data streams. Note that these AFP implementations do not support the FAT file system since it doesn't offer alternate data streams. This mechanism has the benefit of storing the emulated information in one single file with the regular data. However the presence of this extra data is extremely hard to detect for a Windows user (i.e. only through specialized shareware utilities). Furthermore, while the Windows file system correctly copies any alternate data streams with a file, the extra information is lost when the file is attached to an email message or when it is stored in an archive such as a ZIP. Automatically adding filename extensions On Windows a file must have a filename extension for it to be correctly recognized by the applications operating on it; so there is almost never a reason for not including the extension that is appropriate for the file's type. Even on Mac OS X, while it is not a requirement, there seem to be several factors in favor of including filename extensions when working with automated processes: • It makes an implicit attribute explicit for the human operator, avoiding confusion (i.e. the operator and the system might interpret the file type differently if it was not made explicit). • It allows files to be more easily interchanged with foreign systems (which may happen even if it is not currently planned). Therefore Switch offers a function to automatically add an appropriate filename extension to arriving files, based on Mac file type information associated with the file. This feature is turned on by default (recommended), and it can be turned off in the preferences dialog. Specifically, when Switch detects that a new file has arrived (and the "add filename extension" feature is enabled), Switch looks for Mac file type information in the following way: • On Mac OS X, it looks in the file system catalog (this is the easy part). • On Windows, it looks for an appropriate alternate data stream attached to the file, and it looks for a dot-underscore file with the same name as the file (in other words, Switch supports both emulations discussed above). If Switch finds meaningful Mac file type information, and if it can locate the corresponding filename extension in its built-in table, and if the file doesn't already have the appropriate filename extension, Switch will add the filename extension to the file's name. Otherwise the filename is left unchanged. 195 Enfocus Switch 10 Copying files When Switch copies or moves a file under its own control (for example, between two folders), it ensures that all available Mac file type information and resource fork data is copied along with the file. (On Mac OS X this means using the native file operations; on Windows this involves supporting the emulations discussed above). This preserves Mac file type information (which may be superfluous if a filename extension is also present), but more importantly it also preserves any resource fork data - which allows, for example, to process Classic Mac fonts through Switch on a Windows system. Note however that other processes and third-party applications may not carry along Mac file types and resource forks. On Windows this is almost never the case, and even on Mac some modern applications no longer support these Classic features. Changing the file type The file type tool allows setting a file’s filename extension and/or Mac file and creator types to a specified value. This is handy if you know the correct type of a file (for example, because it was created by an application under your control) but you suspect that it may not have the appropriate filename extension or Mac file type information. Filtering on file type Several Switch tools offer the possibility to sort files based on file type; see Specifying file filters on page 97. 13.5 Regular Expressions Note: The contents of this topic is adapted from documentation provided by Trolltech. Introduction Regular expressions, or "regexps", provide a way to find patterns within text. This is useful in many contexts, for example a regexp can be used to check whether a piece of text meets some criteria. In Switch a regular expression can be used to sort files based on some naming scheme: only files with a name that matches the regular expression are allowed to pass through a certain connection. While this is almost surely of no concern for the use of regexps in Switch, it is good to know that not all regexp implementations are created equal. Most implementations provide identical results for basic expressions, but the results for more advanced expressions and matches may differ in subtle ways. The Switch regexp language is modeled on Perl's regexp language, A good reference on regexps is Mastering Regular Expressions: Powerful Techniques for Perl and Other Tools by Jeffrey E. Friedl, ISBN 1565922573. Several web sites offer tools for working with regexps or provide libraries with examples for matching all sorts of patterns. One simple tool to start playing with regexps can be found at http://www.roblocher.com/technotes/regexp.aspx. 196 Enfocus Switch 10 Brief tutorial Regexps are built up from expressions, quantifiers, and assertions. The simplest form of expression is simply a character, example, x or 5. An expression can also be a set of characters. For example, [ABCD] will match an A or a B or a C or a D. As a shorthand we could write this as [A-D]. If we want to match any of the capital letters in the English alphabet we can write [A-Z]. A quantifier tells the regexp engine how many occurrences of the expression we want, e.g. x{1,1} means match an x which occurs at least once and at most once. We will look at assertions and more complex expressions later. We will start by writing a regexp to match integers in the range 0 to 99. We will require at least one digit so we will start with [0-9]{1,1} which means match a digit exactly once. This regexp alone will match integers in the range 0 to 9. To match one or two digits we can increase the maximum number of occurrences so the regexp becomes [0-9]{1,2} meaning match a digit at least once and at most twice. However, this regexp as it stands will not match correctly. This regexp will match one or two digits within a string. To ensure that we match against the whole string we must use the anchor assertions. We need ^ (caret) which when it is the first character in the regexp means that the regexp must match from the beginning of the string. And we also need $ (dollar) which when it is the last character in the regexp means that the regexp must match until the end of the string. So now our regexp is ^[0-9]{1,2}$. Note that assertions, such as ^ and $, do not match any characters. If you have seen regexps elsewhere, they may have looked different from the ones above. This is because some sets of characters and some quantifiers are so common that they have special symbols to represent them. [0-9] can be replaced with the symbol \d. The quantifier to match exactly one occurrence, {1,1}, can be replaced with the expression itself. This means that x{1,1} is exactly the same as x alone. So our 0 to 99 matcher could be written ^\d{1,2}$. Another way of writing it would be ^\d\d{0,1}$, i.e. from the start of the string match a digit followed by zero or one digits. In practice most people would write it ^\d\d?$. The ? is a shorthand for the quantifier {0,1}, i.e. a minimum of no occurrences and a maximum of one occurrence. This is used to make an expression optional. The regexp ^\d\d?$ means "from the beginning of the string match one digit followed by zero or one digits and then the end of the string". Our second example is matching the words 'mail', 'letter' or 'correspondence' but without matching 'email', 'mailman', 'mailer', 'letterbox' etc. We will start by just matching 'mail'. In full the regexp is m{1,1}a{1,1}i{1,1}l{1,1}, but since each expression itself is automatically quantified by {1,1} we can simply write this as mail; an m followed by an a followed by an i followed by an l. The symbol | (bar) is used for alternation, so our regexp now becomes mail|letter|correspondence which means match 'mail' or 'letter' or 'correspondence'. Whilst this regexp will find the words we want it will also find words we do not want such as 'email'. We will start by putting our regexp in parentheses, (mail|letter|correspondence). Parentheses have two effects, firstly they group expressions together and secondly they identify parts of the regexp that we wish to capture for reuse later on. Our regexp still matches any of the three words but now they are grouped together as a unit. This is useful for building up more complex regexps. It is also useful because it allows us to examine which of the words actually matched. We need to use another assertion, this time \b "word boundary": \b(mail|letter|correspondence)\b. This regexp means "match a word boundary followed by the expression in parentheses followed by another word boundary". The \b assertion matches at a position in the regexp not a character 197 Enfocus Switch 10 in the regexp. A word boundary is any non-word character such as a space, a newline or the beginning or end of the string. Characters and abbreviations for sets of characters Element Meaning c Any character represents itself unless it has a special regexp meaning. Thus c matches the character c. \c A character that follows a backslash matches the character itself except where mentioned below. For example if you wished to match a literal caret at the beginning of a stringyou would write \^. \a This matches the ASCII bell character (BEL, 0x07). \f This matches the ASCII form feed character (FF, 0x0C). \n This matches the ASCII line feed character (LF, 0x0A, Unix newline). \r This matches the ASCII carriage return character (CR, 0x0D). \t This matches the ASCII horizontal tab character (HT, 0x09). \v This matches the ASCII vertical tab character (VT, 0x0B). \xhhhh This matches the Unicode character corresponding to the hexadecimal number hhhh (between 0x0000 and 0xFFFF). \0ooo (i.e. zero ooo) This matches the ASCII/Latin1 character corresponding to the octal number ooo (between 0 and 0377). . (i.e. period) This matches any character (including newline). \d This matches a digit. \D This matches a non-digit. \s This matches a whitespace. \S This matches a non-whitespace. \w This matches a word character (letter or number or underscore). \W This matches a non-word character. \n This matches the n-th backreference, e.g. \1, \2, etc. Sets of characters Square brackets are used to match any character in the set of characters contained within the square brackets. All the character set abbreviations described above can be used within square brackets. Apart from the character set abbreviations and the following two exceptions no characters have special meanings in square brackets. 198 Enfocus Switch 10 Character Meaning ^ The caret negates the character set if it occurs as the first character, that is immediately after the opening square bracket. For example, [abc] matches 'a' or 'b' or 'c', but [^abc] matches anything except 'a' or 'b' or 'c'. - The dash is used to indicate a range of characters, for example, [W-Z] matches 'W' or 'X' or 'Y' or 'Z'. Using the predefined character set abbreviations is more portable than using character ranges across platforms and languages. For example, [0-9] matches a digit in Western alphabets but \d matches a digit in any alphabet. Note that in most regexp literature sets of characters are called "character classes". Quantifiers By default an expression is automatically quantified by {1,1}, i.e. it should occur exactly once. In the following list E stands for any expression. An expression is a character or an abbreviation for a set of characters or a set of characters in square brackets or any parenthesized expression. Quantifier Meaning E? Matches zero or one occurrence of E. This quantifier means "the previous expression is optional" since it will match whether or not the expression occurs in the string. It is the same as E{0,1}. For example dents? will match 'dent' and 'dents'. E+ Matches one or more occurrences of E. This is the same as E{1,}. For example, 0+ will match '0', '00', '000', etc. E* Matches zero or more occurrences of E. This is the same as E{0,}. The * quantifier is often used by mistake. Since it matches zero or more occurrences it will match no occurrences at all. For example if we want to match strings that end in whitespace and use the regexp \s*$ we would get a match on every string. This is because we have said find zero or more whitespace followed by the end of string, so even strings that don't end in whitespace will match. The regexp we want in this case is \s+$ to match strings that have at least one whitespace at the end. E{n} Matches exactly n occurrences of E. This is the same as repeating the expression n times. For example, x{5} is the same as xxxxx. It is also the same as E{n,n}, e.g. x{5,5}. E{n,} Matches at least n occurrences of E. E{,m} Matches at most m occurrences of E. This is the same as E{0,m}. E{n,m} Matches at least n occurrences of E and at most m occurrences of E. 199 Enfocus Switch 10 If we wish to apply a quantifier to more than just the preceding character we can use parentheses to group characters together in an expression. For example, tag+ matches a 't' followed by an 'a' followed by at least one 'g', whereas (tag)+ matches at least one occurrence of 'tag'. Note that quantifiers are "greedy". They will match as much text as they can. For example, 0+ will match as many zeros as it can from the first zero it finds, e.g. '2.0005'. Capturing text Parentheses allow us to group elements together so that we can quantify and capture them. For example if we have the expression mail|letter|correspondence that matches a string we know that one of the words matched but not which one. Using parentheses allows us to "capture" whatever is matched within their bounds, so if we used (mail|letter|correspondence) and matched this regexp against the string "I sent you some email" we would capture 'mail'. We can use captured text within the regexp itself. To refer to the captured text we use backreferences which are indexed from 1. For example we could search for duplicate words in a string using \b(\w+)\W+\1\b which means match a word boundary followed by one or more word characters followed by one or more non-word characters followed by the same text as the first parenthesized expression followed by a word boundary. If we want to use parentheses purely for grouping and not for capturing we can use the non-capturing syntax, e.g. (?:green|blue). Non-capturing parentheses begin '(?:' and end ')'. In this example we match either 'green' or 'blue' but we do not capture the match so we only know whether or not we matched but not which color we actually found. Using non-capturing parentheses is more efficient than using capturing parentheses since the regexp engine has to do less book-keeping. Both capturing and non-capturing parentheses may be nested. Anchors Anchors match the beginning or end of the string but they do not match any characters. Regular expressions entered in the Switch user interface always match the complete string. In other words the regexp is automatically anchored at the beginning and at the end of the string, and you shouldn't specify explicit anchors. (Regular expressions specified in a Switch JavaScript program should include explicit anchors as needed). Anchor Meaning ^ The caret signifies the beginning of the string. If you wish to match a literal ^ you must escape it by writing \^. For example, ^#include will only match strings which begin with the characters '#include'. (When the caret is the first character of a character set it has a special meaning, see Sets of Characters.) $ The dollar signifies the end of the string. For example \d\s*$ will match strings which end with a digit optionally followed by whitespace. If you wish to match a literal $ you must escape it by writing \$. Assertions Assertions make some statement about the text at the point where they occur in the regexp but they do not match any characters. In the following list E stands for any expression. 200 Enfocus Switch 10 Assertion Meaning \b A word boundary. For example, the regexp \bOK\b means match immediately after a word boundary (example: start of string or whitespace) the letter 'O' then the letter 'K' immediately before another word boundary (example: end of string or whitespace). But note that the assertion does not actually match any whitespace so if we write (\bOK\b) and we have a match it will only contain 'OK' even if the string is "It's OK now". \B A non-word boundary. This assertion is true wherever \b is false. For example, if we searched for \Bon\B in "Left on" the match would fail (space and end of string are not non-word boundaries), but it would match in "tonne". (?=E) Positive lookahead. This assertion is true if the expression matches at this point in the regexp. For example, const(?=\s+char) matches 'const' whenever it is followed by 'char', as in 'static const char *'. (Compare with const\s+char, which matches 'static const char *'.) (?!E) Negative lookahead. This assertion is true if the expression does not match at this point in the regexp. For example, const(?!\s+char) matches 'const' except when it is followed by 'char'. Case insensitive matching You can make the complete regexp case insensitive by surrounding it by the /.../i constuct. More precisely, if the regexp starts with a forward slash and ends with a forward slash followed by the letter i, then matching for the complete regexp is case insensitive. For example: Regexp Matches these strings ABC ABC abc abc /ABC/i ABC, abc, Abc /ABC/ /ABC/ 13.6 JavaScript for applications Introduction The Adobe Creative Suite applications (Acrobat, Photoshop, Illustrator and InDesign) can be extensively scripted through JavaScript (a scripting language interpreted and executed by the application). All four applications offer a similar overall interface for working with JavaScript, although each application offers a different set of JavaScript functions to actually control the application’s functionality 201 Enfocus Switch 10 The JavaScript programming interface for each application is documented in the application's software development toolkit which can be found on the Adobe web site. The Adobe Creative Suite bundle includes the "ExtendScript Toolkit" application which is extremely useful for developing and debugging JavaScript scripts for Adobe Creative Suite applications. The Switch configurators for the four applications mentioned above allow posting a JavaScript script to the application for execution. Combined with Switch's built-in capabilities this provides powerful control of the Adobe Creative Suite applications. Note: In the remainder of this topic “application” means one of the four Adobe Creative Suite applications mentioned above, and “configurator” means the Switch configurator that controls the application under consideration. Stages A configurator defines the action to be executed by its corresponding application in the form of three consecutive stages: • Open the file and make it the currently active document. • Perform a command on the currently active document. • Save the currently active document and close it. The desired action for each stage is defined independently, and can be selected from: • One of the built-in actions listed by name. • A user-provided script (which is specified by browsing to a JavaScript text file). Depending on the selected action a number of subordinate properties are shown to further configure the action. In other words, each choice has its own set of properties. The properties for the “Use script” choice are described below; those for built-in choices are described for each configurator separately. Properties for specifying a user script The following set of properties is shown for an action stage if the “Use script” option is selected for the stage. Property Description Script file The text file that contains the JavaScript script to be executed by the application for this stage Argument 1 The first argument to be passed to the script (or empty) Argument 2 The second argument to be passed to the script (or empty) Argument 3 The third argument to be passed to the script (or empty) Argument 4 The fourth argument to be passed to the script (or empty) Argument 5 The fifth argument to be passed to the script (or empty) There are always five arguments because there is no mechanism to determine how many arguments are actually needed by the script. 202 Enfocus Switch 10 Writing a user script To write a user script, simply provide the JavaScript statements that should be executed in the main body of the script file. If your script encounters an error, it should set the $error variable to the appropriate error message; otherwise it should leave the $error variable alone. See below for a typical coding pattern. The following special global variables are defined before your script executes, and thus their value can be used in your script; in some cases (noted in the variable's description) your script should also set or update the contents of the variable. Variable Description $arg1 The first argument passed to the script (or the empty string if there is none) $arg2 The second argument passed to the script (or the empty string if there is none) $arg3 The third argument passed to the script (or the empty string if there is none) $arg4 The fourth argument passed to the script (or the empty string if there is none) $arg5 The fifth argument passed to the script (or the empty string if there is none) $infile The absolute path of the input file, including name and extension; this is used mostly in a script attached to an "open" action $doc The currently active document, that is, the document that was opened by the "open" action; $doc is null for a script attached to an "open" action (or when the "open" action failed) Important note: use $doc instead of "this" to refer to the currently active document $outfolder The absolute path of the folder in which to place the output; this is used mostly in a script attached to a "save" action $filename The filename (without extension) of the input (and output) file $extension The filename extension of the input file, or if it does not have one, the filename extension corresponding to the Mac file types of the input file $outfiles The incoming value of this variable is irrelevant If your script is attached to a "save" action, it should set the contents of this array variable to the absolute paths of the output files generated by the script $jobfolder The incoming value of this variable is irrelevant If your script is attached to a "save" action, it should set the contents of this variable as follows: 203 Enfocus Switch 10 Variable $error Description • The empty string: each output file is moved along the outgoing connection as a separate job • The desired name of the job folder: all output files are placed inside a single job folder with the specified name If an error occurred during the execution of an earlier stage, or while preparing for the execution of this stage, this variable contains an appropriate error message: otherwise its value is null (NOT the empty string; an empty string signifies that an error indeed occurred but no meaningful error message was generated -- this is considered bad practice but it may happen) If your script encounters an error, it should set the $error variable to the appropriate error message (that is, a non-empty string); otherwise it should leave the $error variable alone. Error handling Here's a typical coding pattern to correctly handle errors in a user script attached to the command action: if ($error == null) { try { // statements to be executed by this script // $doc.ApplicationDependentFunction(); } catch( e ) { $error = e.description; $doc.closeDoc( Application Specific Parameters ); // close any other resources used in the try block } if } Here's a typical coding pattern to correctly handle errors for Adobe Acrobat application: // Acrobat is used to make a summary of the annotations resulting in a file that shows you the page // content and the annotations per page. // No arguments are required. if($error == null) { try { var title = $doc.documentFileName + " summary" $outfile = $outfolder + '/' + $filename + "_summary.pdf"; $doc.ANsummarize($doc, title, ANSB_Page, null, $outfile, null, false, true, false, false, false, false) $outfiles.push($outfile); } catch(theError) { $error = theError; $doc.closeDoc( {bNoSave : true} ); } } 204 Enfocus Switch 10 $error 13.7 AppleScript for applications Introduction QuarkXPress can be scripted through AppleScript (a scripting language offered by Mac OS X). The Switch configurator for QuarkXPress allows executing a user-provided AppleScript script to perform custom steps. Combined with Switch's built-in capabilities this provides powerful control of QuarkXPress. Stages The QuarkXPress configurator defines the action to be executed by its corresponding application in the form of three consecutive stages: • Open the file and make it the currently active document. • Perform a command on the currently active document. • Save the currently active document and close it. The desired action for each stage is defined independently, and can be selected from: • One of the built-in actions listed by name. • A user-provided script (which is specified by browsing to an AppleScript file). Depending on the selected action a number of subordinate properties are shown to further configure the action. In other words, each choice has its own set of properties. The properties for the “Use script” choice are described below; those for built-in choices are described with the QuarkXPress configurator. Properties for specifying a user script The following set of properties is shown for an action stage if the “Use script” option is selected for the stage. Property Description Script file The AppleScript to be executed for this stage; this can be a text file or a compiled script (see below) Argument 1 The first argument to be passed to the script (or empty) Argument 2 The second argument to be passed to the script (or empty) Argument 3 The third argument to be passed to the script (or empty) Argument 4 The fourth argument to be passed to the script (or empty) Argument 5 The fifth argument to be passed to the script (or empty) 205 Enfocus Switch 10 There are always five arguments because there is no mechanism to determine how many arguments are actually needed by the script. Writing an AppleScript for applications Handler The custom AppleScript must contain a run handler that takes a single argument, as follows: on run {args} ... end run Arguments When the configurator invokes the run handler, it passes a record to the single argument with useful information. The following table describes the fields in the record. Field Description server The name of the Switch server hosting the configurator that executes this script(see referring to Switch below) jobobject An instance of the Job class (part of the Switch scripting API) representing the incoming job (see referring to Switch below) infile The absolute path (including name and extension) of the incoming QuarkXPress file (that is, the job itself of the main file inside the job folder), or the empty string if there is none This field is provided only to scripts attached to the "open" action arg1 The first argument passed to the script (or the empty string if there is none) arg2 The second argument passed to the script (or the empty string if there is none) arg3 The third argument passed to the script (or the empty string if there is none) arg4 The fourth argument passed to the script (or the empty string if there is none) arg5 The fifth argument passed to the script (or the empty string if there is none) Return value The script's run handler must return a string value as described in the following table. 206 Action Return value in case of success Return value in case of error Open The string "/OK/" Error message starting with "/ERROR/:" Enfocus Switch 10 Action Return value in case of success Return value in case of error Command The string "/OK/" Error message starting with "/ERROR/:" Save as Absolute path of output file or job folder (*) Error message starting with "/ERROR/:" (*) use the methods offered by the Job class (part of the Switch scripting API) to obtain a temporary output location. Referring to Switch If your custom script does not use any of the methods in the Switch scripting API then you may save it as a plain text file or as a compiled script (the latter is slightly more efficient). However if your custom script does use any of the methods in the Switch scripting API then you need a special construct to ensure that AppleScript can access the Switch dictionary at compile-time, and that the commands are sent to the appropriate Switch server at run-time: • Use the following code for referring to the Switch server from a tell statement: using terms from application "PowerSwitch_Service" tell application (server of args) ... end tellend using terms from • Replace "PowerSwitch_Service" by "FullSwitch_Service" if you do not have PowerSwitch installed. • Save your script as a compiled script. Examples of AppleScripts for applications Open script: use document preferences To open a document using document preferences, specify the following as a custom "open" script and enter "yes" for the first argument. on run {args} set theJobPath to infile of args set theDocPrefs to arg1 of args set scriptResult to "/OK/" tell application "QuarkXPress" try if (theDocPrefs is equal to "yes") then open alias theJobPath use doc prefs yes remap fonts no do auto picture import no else open alias theJobPath use doc prefs no remap fonts no do auto picture import no end if on error errmsg number errnum set scriptResult to ("/ERROR/:" & errmsg) end try end tell 207 Enfocus Switch 10 return scriptResult end run Command script: reverse page order in a document To reverse the page order in a document, specify the following as a custom "command" script. The script doesn't use any arguments. on run {args} set scriptResult to "/OK/" tell application "QuarkXPress" try if not (exists document 1) then error "No open document" tell document 1 set pageCnt to count of page if pageCnt is not equal to 1 then repeat with i from 1 to pageCnt move page pageCnt to before page i end repeat end if end tell on error errmsg number errnum set scriptResult to ("/ERROR/:" & errmsg) end try end tell return scriptResult end run Save as script: save as multi-file DCS To save a document as multi-file DCS, specify the following as a custom "save as" script (using a compiled script). The script uses the first argument to specify the color setup ("Grayscale", "Composite RGB", "Composite CMYK", "Composite CMYK andSpot", "As Is"). on run {args} set theOutputSetup to arg1 of args set theResultJobPath to "/ERROR/:Unknown error" using terms from application "PowerSwitch_Service" tell application (server of args) try set theJob to jobobject of args set theJobProper to proper name of theJob set theResultJobPath to create path theJob name theJobProper with creating folder on error errmsg number errnum set theResultJobPath to ("/ERROR/:" & errmsg) return theResultJobPath end try end tell end using terms from tell application "QuarkXPress" try if not (exists document 1) then error "No open document" tell document 1 set pageCnt to count of pages repeat with i from 1 to count of pages -- Create the sequential number for the file set fileNum to i repeat until (length of (fileNum as text)) = (length of (pageCnt as text)) set fileNum to "0" & fileNum end repeat set FileName to theJobProper & "_" & fileNum & ".eps" set theResultPath to theResultJobPath & ":" & FileName save page i in theResultPath EPS format Multiple File DCS EPS data binary EPS scale 100 Output Setup theOutputSetup with transparent page end repeat 208 Enfocus Switch 10 end tell close document 1 without saving on error errmsg number errnum set theResultJobPath to ("/ERROR/:" & errmsg) end try end tell return theResultJobPath end run 209 Enfocus Switch 10 14. Advanced topics for running flows 14.1 Scheduling jobs Objectives for scheduling jobs The Switch job scheduler has the following (sometimes conflicting) objectives, in order of importance: • Maximize overall throughput, that is, process as many jobs as possible in a given amount of time. • Allow users to specify individual job priorities: a task for a job with a higher priority should be executed first. This can be used to “rush” a particular job through a flow, or to define a high-priority flow (by assigning a priority to all jobs in the flow). • Process jobs in order of arrival, that is, jobs should arrive at the end of a flow in the order they were placed in the flow to begin with (FIFO = first-in/first-out). These objectives are not absolute: enforcing some particular order of execution to the letter would sacrifice throughput and/or overly complicate the implementation. Internal job ticket To support these objectives, the internal job ticket for each job stores the following fields: • Job priority: a signed integer number that determines the priority of the job; a higher number indicates a higher priority; the default priority is zero. • Arrival stamp: a signed integer number that indicates the order in which this job first arrived in a flow, as compared to other jobs. Execution slots The scheduler manages a number of slots in which tasks can be executed in parallel. The maximum number of concurrent slots is determined for each category of tasks as described in the following table: 210 Task category Task types in this category Maximum concurrent slots for this category Disk Copying & moving jobs, basic tools in Sunrise framework 3 Light Light scripts (see below) 3 + “Concurrent external processes” preference Processor (Un)Compress, configurators in Sunrise “Concurrent external processes” framework, heavy scripts (see below) preference Enfocus Switch 10 Task category Task types in this category Maximum concurrent slots for this category Network FTP, Mail “Concurrent file transfers” preference Within each category concurrency is further limited by the serialization needs of each task type. Thus even when a slot is available for a particular category, a task in that category may not match the slot because, for example, another task of the same type is already executing and the task type has the serialized execution mode. Light and heavy scripts Scripts include many of the tools built-in to Switch, and all third-party script packages. Initially a script is heavy. If its entry points consistently complete quickly (in less than 1 second for 5 consecutive times) the script becomes light, until it violates this “trust” by not completing within 1 second once – it then becomes heavy again. Scheduling tasks The scheduler removes tasks from the task queue and schedules them for execution in one of the available slots. The scheduler attempts to schedule a task: • Each time a new task is queued (because a slot may be available that does not match the previously queued tasks). • Each time an execution slot becomes available because a tasks has completed (because there may be a queued task that matches this slot). The scheduler selects a task for execution by narrowing down the set of queued tasks using the following steps: 1. Start with the set of all tasks on the queue that match any available execution slot. 2. Narrow down to tasks for jobs that have the highest job priority in the task set. 3. Narrow down to the task that was placed on the queue first. The selection process ends as soon as the result set contains a single task (in which case the task is scheduled for execution) or is empty (in which case no action can be taken). The last step selects a single task so the selection process always ends. 14.2 Job priorities The internal job ticket for each job contains a field that determines the priority of the job. Tasks for jobs with a higher priority are executed first (unless the higher-priority task has no matching execution slot; see scheduling jobs). This can be used to “rush” a particular job through a flow, or to define a high-priority flow (by assigning a higher priority to all jobs in the flow). 211 Enfocus Switch 10 A job priority is a signed integer number (in the range that can be represented with 32 bits). A higher number indicates a higher priority. The default priority is zero; relative to the default a priority can be higher (positive numbers) or lower (negative numbers). A job's priority can be set through one of the properties of the folder flow element and through the scripting API. 14.3 Arrival stamps The internal job ticket for each job contains a field that records the job's arrival stamp. Unless job priorities dictate otherwise, Switch processes jobs in order of arrival (if there is a matching execution slot). Switch uses the arrival stamp to determine which job arrived first. See scheduling jobs. An arrival stamp is a signed integer number (in the range that can be represented with 32 bits). It indicates the order in which a job first arrived in a flow, as compared to other jobs. Switch maintains a persistent and global arrival count that gets incremented each time a new arrival stamp is handed out. Thus a higher number indicates a more recent arrival. Several jobs may have the same arrival stamp. This happens when multiple jobs are generated from the same original job, or when for some reason no arrival stamp was assigned to a job. Stamping jobs Switch assigns a new arrival stamp to a job when it first detects the job in a folder or submit hierarchy, or when a producer (such as FTP receive or Mail receive) first injects the job into a flow. A job's arrival stamp is not affected while the job is moving along a flow. Results generated for a job (such as a preflight report, or a duplicate of the job) retain the original job's arrival stamp. In certain situations a job’s arrival stamp needs to be refreshed (that is, assigned a fresh stamp) so that the job is not unduly processed before other jobs. For example, a Checkpoint refreshes the arrival stamp when moving a job along one of its outgoing connections. 212 Enfocus Switch 10 15. Flow element reference 15.1 Basic elements Connection Connection is a special flow element that serves to interconnect other flow elements. The network of connections in a flow determines how jobs can travel between the flow's elements. To connect two flow elements that are already present on the canvas, do one of the following: • Drag the connection icon from the Elements pane and drop it onto the first flow element; then click on the second flow element or • Double-click the first flow element to start a connection and drop it on the second flow element to connect it with the first flow element or • Select "Start connection" in the context menu of the first flow element and drop the extension on the second flow element. Keywords Keywords can be used with the search function above the Elements pane. The keywords for the Connection element are: • move • filter • traffic-light Flow element types In terms of connectivity, there are four types of flow elements (other than connection itself): Flow element type Description Folder Represents a folder on disk that can hold jobs before, after or in between processing steps; folder has a central role in Switch (see below) Processor Processes jobs and thus accepts incoming and outgoing connections Producer Injects jobs into a flow from an outside source (such as an email inbox); a producer does not accept incoming connections 213 Enfocus Switch 10 Flow element type Description Consumer Consumes jobs from a flow and possibly transports them to an outside target (such as an FTP site); a consumer does not allow outgoing connections The central role of folder At least one of the two flow elements being connected must be a folder. In other words, a flow element other than a folder can be connected only to a folder. A simple rule of thumb is "there must always be a folder in between". Connection types There are several types of connections, each with a slightly different set of properties. The type of a connection is determined by the flow element from which the connection originates. All connections originating at a particular flow element have the same type. Some flow elements also restrict the number of outgoing connections. Connection type Description No-op Jobs are moved under the control of a third-party application; this connection type is used only in conjunction with generic application; it offers only the most basic set of properties Move Simply moves jobs along (under the control of Switch); a flow element with outgoing move connections often produces only a single output along one of the outgoing connections (for example, file balancer), or it may allow just one outgoing connection Filter Offers properties for file filtering in addition to the move properties; a flow element with multiple outgoing filter connections (for example, folder) usually sends identical copies of its output along these connections (assuming a connection's filter allow the output to pass) Traffic-light Offers data and log subtypes and allows to set success-, warning- and errorfilters; this connection type is used by flow elements that produce a report for human consumption and/or validate jobs against some specified rules (for example, preflight); multiple connections of the same subtype carry identical copies of the output Properties The following table lists the properties for all connection types (i.e. no single connection offers all of these properties). Some flow elements “inject” extra properties in their outgoing connections. These properties are described with the flow element that injects them. 214 Property Description Name The name of the connection displayed in the canvas; most connections have a blank name (the default) but the user can add a name if so desired; some flow elements use the name of their connections for special purposes (these rare cases are described for each flow element where applicable) Enfocus Switch 10 Property Description Corner angle Determines the layout of a connection as it is drawn on the canvas Consider the rectangle formed by drawing horizontal and vertical line segments through the center of the two flow elements being connected; the breakpoint in the connection line can be positioned anywhere on the diagonal of this rectangle The corner angle is an integer number in the range [-90, 90] inclusive; the value is a measure for how much the corner formed at the breakpoint differs from a straight line; thus a zero value means a straight line (the default) and a value of ±90 means a rectangular corner (the breakpoint is positioned at one of its extremes) Hold files While set to yes, jobs are not allowed to move through the connection; this is mostly used to temporarily hold jobs (perhaps because there is a problem with a process downstream) The value of this property can be modified while the flow is active (through a canvas context menu item); see putting connections on hold Include these files Jobs that match the specified filter are moved through this connection, unless they are explicitly excluded (see next property); refer to Specifying file filters on page 97 for more details Exclude these files Jobs that match the specified filter are never moved through this connection; refer to Specifying file filters on page 97 for more details Include these folders Subfolders that match the specified filter are included for this connection; injected by producers that retrieve jobs from an outside folder hierarchy, such as FTP receive; refer to Specifying file filters on page 97 for more details Exclude these folders Subfolders that match the specified filter are ignored for this connection; injected by producers that retrieve jobs from an outside folder hierarchy, such as FTP receive; refer to Specifying file filters on page 97 for more details Carry this type of Determines the type of files carried by this connection: files • Data: data file (regular output) • Log: log file (reports) • Data with log: (PowerSwitch and FullSwitch) data file with the corresponding log file associated to it as an opaque metadata dataset; this is equivalent to picking up the log file with the opaque pickup tool Dataset name If the previous property is set to “Data with log”, this property defines the name of the metadata dataset containing the log file attached to the data file; see Picking up metadata on page 315 Success out If set to yes, a file will move along the connection if the originating process did not log any warnings or errors Warning out If set to yes, a file will move along the connection if the originating process logged at least one warning and no errors 215 Enfocus Switch 10 Property Description Error out If set to yes, a file will move along the connection if the originating process logged at least one error Folder Folder is a central flow element that serves as an intermediary for moving jobs between other flow elements. Each folder flow element instance represents a backing folder on disk that can hold jobs before, after or in between processing steps. The contents of the backing folder can also be accessed by external processes or by users. For example, a folder may be used to submit jobs into a flow or to retrieve the results of a flow. Keywords Keywords can be used with the search function above the Elements pane. The keywords for the Folder element are: • backing • input • output • hot • watched Processing jobs Any subfolders placed into a folder are treated as a job folder; that is, the subfolder and its contents are moved along as a single entity. If a folder has no outgoing connections (that is, it is a "dead-end" folder), a job placed in the folder will stay there until it is removed by some external process that is not under the control of Switch. If a folder has at least one outgoing connection, a job placed in the folder is removed after it was processed by all outgoing connections. If none of the filters on the outgoing connection(s) match, the job is moved to the problem jobs folder. Refer to Handling problem jobs on page 114 and error handling preferences for more details. Properties Note that certain properties are present only for folders that have at least one outgoing connection, and certain other properties are present only for folders that have no outgoing connections ("dead-end" folders) 216 Property Description Name The name of the folder displayed in the canvas; a newly created folder receives a default name of "Folder nn"; it is recommended that you provide a meaningful name instead; if you setup a user-managed backing folder Enfocus Switch 10 Property Description while a "Folder nn" name is still in place, the flow element automatically adopts the name of the backing folder Path The path of the folder's backing folder on disk, or "auto-managed" Leave originals in place If set to yes, incoming jobs are left untouched in the folder; Switch never writes to the folder so read-only access rights suffice; see Leaving originals in place on page 90 for more details If set to no (the default), incoming jobs are moved out of the folder; Switch needs full access rights to rename, create and remove files and folders in the folder Ignore Updates The Ignore Updates option is only available if Leave Originals is set to yes. If set to yes, a job will only be processed once, regardless of any changes to the file size or modification date. This can be used for workflows where the input job is replaced by the processing result, to avoid triggering endless loops If set to no, the job will be reprocessed when its file size or modification date is different. This allows processing jobs which have the same file name as previously submitted jobs Minimum file size (KB) Used to set the minimum file size (in KB) limit before Switch picks up the files or folders. To set no limits, leave it empty Scan every (seconds) The frequency with which this folder is scanned for newly arrived jobs; if set to “Default” or zero the global user preference is used instead; see Processing on page 187 Time-of-day window If set to yes, the folder detects (and moves) newly arrived jobs only during a certain time of the day (specified in the subordinate properties) Allow from (hh:mm) Allow to (hh:mm) The time-of-day window during which to detect jobs; the values are structured as "hh:mm" (hours, minutes) indicating a time of day on a 24 hour clock; an empty value means midnight; two identical values mean the folder always detects jobs Day-of-week window If set to yes, the folder detects (and moves) newly arrived jobs only during certain days of the week (specified in the subordinate properties) Allow from Allow to The days of the week (Monday, Tuesday, Wednesday, Thursday, Friday, Saturday, Sunday) during which to detect jobs; two identical values mean the folder only detects jobs on that specific day Day-of-month window If set to yes, the folder detects (and moves) newly arrived jobs only during a certain day of the month (specified in the subordinate properties) Day The day in the month during which to detect jobs, as a number in the range [1 . .31]; the default value of one means the first or the last day of the month (depending on the following property) 217 Enfocus Switch 10 Property Description Relative to Determines whether the day of the month is relative to “Start of month’” or “End of the month” Attach hierarchy info If set to yes, the folder’s name is added to each job’s hierarchy location path as the job passes through the folder; see Using hierarchy info on page 91 for more details Add name at the top If set to yes, the folder name is added at the top of the hierarchy location path; otherwise it is added at the bottom Attach email addresses The specified email addresses are added to each job's email info as the job passes through the folder; see Using Email info on page 93 for more details Attach email body The specified email body text is added to each job's email info as the job text passes through the folder; see Using Email info on page 93 for more details Attach job state If the specified string is non-empty, the job state of each job is set to the string as soon as the job arrives in the folder; the statistics view can display the average time spent for each job state Set job priority If set to None (the default), nothing happens If set to any other value (including zero), the job priority of each job is set to this new value as soon as the job arrives in the folder The specified value is converted to a number and rounded to the nearest integer; text strings that do not represent a number are converted to zero To specify a negative value, use the “Single-line text with variables” property editor or provide a script expression Strip unique name If set to yes, the unique name prefix added to the filename by Switch is removed before placing the job in the folder; the default is to strip the prefixes from jobs deposited in a dead-end folder - leaving the prefixes in place avoids overwriting a previously deposited job with the same name Duplicates Show in statistics 218 Determines what happens when "Strip unique name" is set to yes and a job arrives with the same name as a job already residing in the folder: • Overwrite: replace the existing job with the new one – this is the default behavior • Keep unique name: preserve the new job’s unique name prefix, leaving the existing job untouched (without unique name prefix) • Add version number: add an incrementing version number at the end of the filename body for the new job (“2”, “3”, … “9”, “10”, “11”), leaving the existing job untouched • Fail: move the new job to the problem jobs folder, leaving the existing job untouched If set to yes, statistics for this folder are gathered and displayed in the statistics view Enfocus Switch 10 Property Description Ignore these subfolders All subfolders that match the specified folder filter are ignored for the purpose of counting the number of jobs residing in this folder This property appears only when the folder’s outgoing connection leads to a generic application; if that application stores information in subfolders inside its input folder, this property allows Switch to ignore these folders and their contents Backing folders The backing folder (on disk) for a folder can be auto-managed (the default) or user-managed. Auto-managed backing folders are placed in a special area managed by Switch (refer to application data preferences for more details). External processes (not under control of Switch) and users should not refer to auto-managed folders since they can change name and/or location under the control of Switch. • • • To create an auto-managed folder, drag the folder icon from the Elements pane onto the canvas. To create a user-managed folder, drag a folder from the Folders pane onto the canvas. To convert a folder from auto-managed to user-managed, do one of the following: a) Choose a folder path for the folder’s Path property b) Drag a folder from the Folders pane onto the folder in the canvas. • To convert a folder from user-managed to auto-managed: a) Choose auto-managed for the folder’s Path property Problem jobs Problem jobs is a special flow element that represents the Switch problem jobs folder. When a Switch process fails to handle a particular job, the "problem job" is moved to the problem jobs folder; see Handling problem jobs on page 114 for more information. Keywords Keywords can be used with the search function above the Elements pane. The keywords for the Problem jobs element are: • error • failure Connection The problem jobs tool can be placed in a flow on its own, without any connections. In that case it serves simply as an easy way to access the problem jobs from the designer user interface (for example, when you select the problem jobs tool, the Files pane shows its contents). See Handling problem jobs on page 114 for more information. If the problem jobs tool has an outgoing connection, it acts as a producer picking up any problem jobs that arrive and injecting them into the flow (again). This allows providing automated error handling. You can add a filter to the outgoing connection to select the jobs you want to handle, 219 Enfocus Switch 10 leaving the others in the problem jobs folder. In any case be careful to avoid endless loops of jobs that fail over and over again. The problem jobs tool supports only one outgoing connection. To overcome this limitation, connect it to a regular folder from which you can originate as many connections as you like. Properties Property Description Name The name of the flow element displayed in the canvas Handle problems for Determines the “scope” of this problem jobs tool; choices are: • This flow only: acts on problem jobs generated just by the flow containing this flow element • All flows: acts on all problem jobs generated in this copy of Switch Multiple problem jobs tools A flow can have at most one problem jobs element; including more than one will keep the flow from activating. In addition, at any one time, the active flows in Switch can have at most one problem jobs element with a scope set to “All flows”. Submit hierarchy Submit hierarchy is a producer that supports one or more levels of subfolders. Since it is a producer, a submit hierarchy can be used only to submit jobs into a flow. The backing folder (on disk) for a submit hierarchy should typically be user-managed. Each subfolder up to the nesting level specified by the “subfolder levels” property is treated as if it were an individual hot folder. A file placed inside a subfolder at the specified nesting level, or at any level closer to the main folder, moves along the flow as a file. A job folder placed inside a subfolder at the specified nesting level moves along the flow with its contents as a single entity (that is, as a job folder). A job folder placed on the same level as the allowed subfolders is treated as a subfolder by mistake, and its contents are moved along as separate files. Keywords Keywords can be used with the search function above the Elements pane. The keywords for the Submit hierarchy element are: • backing • folder • subfolder • structure 220 Enfocus Switch 10 • • • input hot watched Connections Submit hierarchy does not allow incoming connections. Submit hierarchy injects folder filter properties into its outgoing connections so that it is possible to include/exclude certain subfolders in the hierarchy for particular connections. Also see the "skip folders" property described below. Note: The number of eligible jobs for processing is shown in a small rectangle to Submit hierarchy element. Properties Property Description Name The name of the flow element displayed in the canvas Path The path of the submit hierarchy's backing folder on disk, or "auto-managed" Leave originals in place If set to yes, incoming jobs are left untouched in the hierarchy; Switch never writes to the hierarchy so read-only access rights suffice If set to no (the default), incoming jobs are moved out of the hierarchy; Switch needs full access rights to rename, create and remove files and folders in the hierarchy Ignore Updates The Ignore Updates option is only available if Leave Originals is set to yes. If set to yes, a job will only be processed once, regardless of any changes to the file size or modification date. This can be used for workflows where the input job is replaced by the processing result, to avoid triggering endless loops. If set to no, the job will be reprocessed when its file size or modification date is different. This allows processing jobs which have the same file name as previously submitted jobs. Minimum file size (KB) Used to set the minimum file size (in KB) limit before Switch picks up the files or folders. To set no limits, leave it empty. Scan every (seconds) The frequency with which this submit hierarchy is scanned for newly arrived jobs; if “Default” or zero the global user preference is used instead; see Processing on page 187 Time-of-day window If set to yes, the submit hierarchy detects (and moves) newly arrived jobs only during a certain time of the day (specified in the subordinate properties) 221 Enfocus Switch 10 Property Description Allow from (hh:mm) The time-of-day window during which to detect jobs; the values are structured as "hh:mm" (hours, minutes) indicating a time of day on a 24 hour clock; an empty value means midnight; two identical values mean the submit hierarchy always detects jobs Allow to (hh:mm) Day-of-week window If set to yes, the submit hierarchy detects (and moves) newly arrived jobs only during certain days of the week (specified in the subordinate properties) Allow from The days of the week (Monday, Tuesday, Wednesday, Thursday, Friday, Saturday, Sunday) during which to detect jobs; two identical values mean the submit hierarchy only detects jobs on that specific day. Allow to Day-of-month window If set to yes, the submit hierarchy detects (and moves) newly arrived jobs only during a certain day of the month (specified in the subordinate properties) Day The day in the month during which to detect jobs, as a number in the range [1 . .31]; the default value of one means the first or the last day of the month (depending on the following property) Relative to Determines whether the day of the month is relative to “Start of month’” or “End of the month” Subfolder levels The number of nested subfolder levels considered to be hot folders (as opposed to job folders); see also the description on subfolders earlier. Process these folders Defines the initial set of folders that should be processed by the Submit hierarchy tool. This set can be adjusted by defining one or more rules in the subsequent properties. Options available in this menu are: All folders (default) and No folders. Adjusted by (rule 1) This property defines a rule for adjusting the set of folders to be processed, by including or excluding folders matching or not matching a folder name. Different rules can be applied, and will be processed in the order as they are specified. Options available in this menu are: • None (default) Folder name On levels 222 • Including folders named • Including folders not named • Excluding folders named • Excluding folders not named A pattern for the folder name to be included or excluded The level or range of levels to which this rule applies. Enfocus Switch 10 Property Restriction Description Defines an optional restriction on the parent or ancestors for the folder in this rule. Options available are: • None (default) • With immediate parent named • With no immediate parent named • With any ancestor named • With no ancestor named Parent name or Ancestor name A pattern for the folder name of the parent or ancestor Nesting Only available if Attach hierarchy info is enabled. If set to yes, the name of the flow element is included at the top of the remembered location path Adjusting by (rule 2) ... Same as Adjusting by (rule 1) with an identical set of dependent properties Adjusting by (rule 5) Attach hierarchy info If set to yes, (part of) a job’s submit location, depending on the hierarchy info configuration, is added to its hierarchy location path as it is submitted in the flow; see Using hierarchy info on page 91 for more details Include hierarchy name Only available if Attach hierarchy info is enabled. If set to yes, the name of the flow element is included at the top of the remembered location path Include subfolder levels Identifies the number of hierarchy segments in the hierarchy information. Save top subfolders If set to yes, the top-most subfolders are remembered in the location path, otherwise the bottom-most subfolders are remembered Attach email info Email addresses and body text specified with the editor for this property are added to each job's email info as the job is submitted in the flow; the information added can vary depending on the subfolder in which the job was submitted; see Using Email info on page 93 for more details Allow subfolder cleanup If set to yes, subfolders created in the submit hierarchy (by an external process or a user) are automatically removed when they become empty 223 Enfocus Switch 10 Property Description Starting from this level The number of upper levels for which not to cleanup subfolders Archive hierarchy Archive hierarchy is a consumer that creates a nested hierarchy with one or more levels of subfolders. It is used to archive jobs into a structured hierarchy at the end of a flow. The resulting jobs are to be consumed (and removed) by an external process. The backing folder (on disk) for an archive hierarchy should typically be user-managed. It is not allowed for an external process or a user to place files into an archive hierarchy. An archive hierarchy uses the hierarchy location path stored in a job’s internal job ticket to determine where the job should be stored, up to the nesting level specified for the archive hierarchy. Any superfluous segments in a location path are ignored. Subfolders are created automatically. See Using hierarchy info on page 91 for more details. Keywords Keywords can be used with the search function above the Elements pane. The keywords for the Archive hierarchy element are: • backing • folder • subfolder • structure • output Connections Archive hierarchy does not allow outgoing connections Properties 224 Property Description Name The name of the flow element displayed in the canvas Path The path of the archive hierarchy's backing folder on disk, or "auto-managed" Subfolder levels The number of nested subfolder levels in the archived structure; see also the description on subfolders earlier. Strip unique name If set to yes, the unique name prefix added to the filename by Switch is removed before placing the job in the archive hierarchy; the default is to strip the prefixes from jobs deposited in an archive hierarchy - Enfocus Switch 10 Property Description leaving the prefixes in place avoids overwriting a previously deposited job with the same name Duplicates Determines what happens when "Strip unique name" is set to yes and a job arrives with the same name and location as a job already residing in the hierarchy: • Overwrite: replace the existing job with the new one – this is the default behavior • Keep unique name: preserve the new job’s unique name prefix, leaving the existing job untouched (without unique name prefix) • Add version number: add an incrementing version number at the end of the filename body for the new job (“2”, “3”, … “9”, “10”, “11”), leaving the existing job untouched • Fail: move the new job to the problem jobs folder, leaving the existing job untouched Set hierarchy path Set hierarchy path is a processor that replaces or augments the hierarchy path in the internal job ticket by constructing a fresh path from the segments specified as its properties. There are five segment properties and thus a maximum of five path segments can be specified (an empty value means “unused”). Since the segment properties support variables ( and script expressions), this tool is a great help when building custom archive hierarchies, for example organizing jobs in a folder hierarchy based on today’s year, month, and day. Keywords Keywords can be used with the search function above the elements pane. The keywords for the Set hierarchy path element are: • folder • subfolder • structure Connections Set hierarchy path allows only a single outgoing connection. Properties Property Description Name The name of the flow element displayed in the canvas 225 Enfocus Switch 10 Property Description Action Determines how to combine the new segments with the existing hierarchy location path: • Replace: replace any existing hierarchy location path by the path formed by the new segments Path segment 1 … Path segment 5 • Add at the top: add the new segments at the top of the existing hierarchy location path • Add at the bottom: add the new segments at the bottom of the existing hierarchy location path • Remove: remove one or more segments from the existing hierarchy location path • Reverse: put the top segments at the bottom and vice-versa The new path segments; an empty value means “unused”; a maximum of five path segments can be specified Start index The one-based index of the first segment to remove (topmost segment is index 1) End index The one-based end index of the last segment to remove; zero means until the end of the path Job dismantler Job dismantler is a processor that disassembles a job folder (which may have one or more levels of subfolders) into separate files. This tool is often used to dismantle job folders that really do not represent a single job. This happens for example when a user submits a folder into the flow that contains a set of otherwise unrelated files that need to be processed individually rather than as a single entity. Each incoming file or job folder is treated with the semantics of a submit hierarchy with regards nested subfolders and job folders. Keywords Keywords can be used with the search function above the Elements pane. The keywords for the Job dismantler element are: • hierarchy • folder • subfolder • ungroup • group • assemble • disassemble 226 Enfocus Switch 10 Connections Job dismantler injects folder filter properties into its outgoing connections so that it is possible to include/exclude certain subfolders in the incoming job folders for particular connections. Also see the "skip folders" property described below. Properties Property Description Name The name of the flow element displayed in the canvas Subfolder levels The number of nested subfolder levels considered to be hot folders (as opposed to job folders); see also the description in Submit hierarchy on page 220 Attach hierarchy info If set to yes, (part of) a job’s location in the job folder is added to its hierarchy location path as it is injected in the flow; see using hierarchy info for more details Include dismantler name If set to yes, the name of this flow element is included in the remembered location path Include job name If set to yes, the name of the incoming job folder is included in the remembered location path Include subfolder levels Identifies the number of hierarchy segments in the hierarchy information. Save top subfolders If set to yes, the top-most subfolders are remembered in the location path, otherwise the bottom-most subfolders are remembered Keep existing info If set to yes, the new information is added at the bottom of the existing location path; otherwise the existing location path is replaced Attach email info Email addresses and body text specified with the editor for this property are added to each job's email info as the job is injected in the flow; the information added can vary depending on the subfolder in which the job was located; see Using Email info on page 93 for more details Ungroup job Ungroup job is a processor that, in combination with assemble job, provides a way to keep track of files that belong together while they are being processed separately. Ungroup job injects all files from a job folder into the flow as separate jobs. After these files have been processed through the flow (and possibly were renamed), assemble job can reassemble them into a new job folder with a structure similar to the original one, with provisions for injecting additional files and for dealing with incomplete jobs or orphaned files. 227 Enfocus Switch 10 Keywords Keywords can be used with the search function above the Elements pane. The keywords for the Ungroup job element are: • hierarchy • folder • subfolder • ungroup • group • assemble • disassemble Usage examples • Split a multi-page PDF file in separate pages; process each page separately through one or more applications that can deal only with a single page at a time; recombine the pages in a job folder; merge the pages into a single PDF file. • Receive a job folder that contains a nested structure of related files; disassemble the folder into separate files; sort the files on file type and put them through some different process depending on the file type; re-assemble the files into a job folder with a structure that is identical to the incoming job folder. Connections Ungroup job allows only a single outgoing connection. Properties Property Description Name The name of the flow element displayed in the canvas Private data key The first portion of the private data key used to store the information for reassembling the job later on Varying this value here and in assemble job allows: • Ensuring that a job is reassembled by the intended assembler • Nesting ungroup/reassemble operations Private data Ungroup job stores the following information in the internal job ticket for each injected job file, for use by assemble job: 228 Private data key Stored value <key>.JobID The unique name prefix of the incoming parent job <key>.JobName The name of the incoming parent job (without prefix) <key>.NumFiles The total number of files injected in the flow for this parent job <key>.FileName The name of this file as injected in the flow Enfocus Switch 10 Private data key Stored value <key>.FilePath The relative path of this file within the parent job folder Split Multi-job Related Adobe InDesign or QuarkXPress jobs are often stored in a single job folder with multiple “main” files at the top level and shared resources (such as images and fonts) in subfolders. The Switch configurators for these applications however expect a single main file in each job folder, so these “multi-job folders” cannot be processed without change. The “Split multi-job” tool splits a multi-job folder in separate job folders, one for each main file. Each resulting job folder contains a single main file, and a full copy of all resources (in fact, everything from the original job folder except for the other main files). Keywords Keywords can be used with the search function above the Elements pane. The keywords for the Split multi-job element are: • Adobe InDesign • QuarkXPress • multiple • job • package • folder • assemble • disassemble Connections Split Multi-job allows only a single outgoing connection. Properties Property Description Name The name of the flow element displayed in the canvas Main file type The file type or file name extension of the main files. The tool will output a separate job folder for each main file in the incoming job folder. Main files are recognized only if they are located immediately inside the job folder, not in a subfolder Assemble job 229 Enfocus Switch 10 Assemble job is a processor that offers various schemes for assembling a job folder from individual job files. Keywords Keywords can be used with the search function above the Elements pane. The keywords for the Assemble job element are: • hierarchy • folder • subfolder • ungroup • group • assemble • disassemble • build Connections Assemble job supports outgoing traffic-light connections of the following types: • Data success: carries successfully assembled jobs. • Data error (optional): carries incoming jobs that cannot be assembled into a job after a certain timeout period. Properties 230 Property Description Name The name of the flow element displayed in the canvas Scheme Determines the scheme used to assemble jobs: • Arbitrary files: combines arbitrary files based on number and/or time • Numbers in filename: uses digit groups in the incoming filenames to combine files • Filename patterns: uses filename patterns to combine up to 5 related files in a job • Ungrouped job: uses the information stored by an instance of ungroup job to reassemble a job • Custom: allows specifying a custom formula for determining matching files Every N jobs Displayed when Shceme is Arbitrary files. A job is completed whenever it contains at least the indicated number of files; a value of 0 means this option is disabled Every N minutes Displayed when Shceme is Arbitrary files. A job is completed whenever more than the indicated time has expired since the Enfocus Switch 10 Property Description previous assembly was completed; a value of 0 means this option is disabled After N minutes Displayed when Shceme is Arbitrary files or Custom. A job is completed whenever more than the indicated time has expired since the first job in this assembly arrived; a value of 0 means this option is disabled Number index for total Displayed when Shceme is Numbers in filename. The one-based index of the digit group determining the total number of files; automatic means the digit group that represents the largest number Number index for serial Displayed when Shceme is Numbers in filename. The one-based index of the digit group determining the serial number for each file; automatic means the digit group that represents the smallest number Match filename Displayed when Shceme is Numbers in filename. The filename without the indexed numbers of the files to asemble in job must be the same. Filename pattern 1 Displayed when Shceme is Filename patterns. Up to five filename patterns (using the regular wildcards ? and *) that serve to detect matching files; empty patterns are ignored … Filename pattern 5 For filenames to match, they must conform to the specified patterns and the text portions matched by the wildcards must be identical Private data key Displayed when Shceme is Ungrouped job. The first portion of the private data key used to store the ungroup information; specify the same value as in ungroup job Number of files Displayed when Shceme is Ungrouped job or Custom. The total number of files expected to complete the output job: • Automatic: the same number of files as was present in the original folder before it was ungrouped Job identifier • Number: a constant integer • Single-line text: a constant integer or a short JavaScript expression in function of the variable “N” (example: “N+2” or “2*N”); this function has NO access to the scripting API • Script expression: a script expression (with full access to the scripting API) that has an integer result; the expression is re-evaluated for each newly arrived job in the context of that job A string value using variables ( or a script expression), evaluated in the context of each arriving job, that identifies the output job in which the arriving job belongs 231 Enfocus Switch 10 Property Description The string is used only for the purpose of determining which jobs belong together; it has no other meaning Complete condition A job (using Custom scheme) is completed if this condition is true, even if the required number of jobs hasn’t arrived. The condition is re-evaluated for each newly arrived job in the context of that job. A value of None means this option is disabled. Merge metadata If set to no, the metadata for the assembled job is copied from a single (arbitrary) incoming job, and metadata from all other jobs is lost. If set to yes, the metadata for the assembled job is derived from all incoming jobs: • All email addresses are used, and email bodies are merged. • User name and Job state will be arbitrarily selected from all jobs, or will be empty if this is empty for all jobs • The highest priority among all incoming jobs will be used. • Private data and External datasets will all be retained. If multiple jobs have private data or external datasets with the same tag, a dataset or value will be arbitrarily chosen. All other metadata will be arbitrarily selected from one of the incoming jobs Job folder name The filename of the created job folder, or Automatic to construct a default name depending on the scheme (e.g. the reassemble scheme uses the job name stored by the ungroup tool) Question marks in the filename pattern are replaced by a running count; e.g. Job??? will produce Job001, Job002, ... Variables ( and script expressions) are executed in the context of one of the incoming jobs, chosen arbitrarily Subfolder levels The number of nested subfolder levels in the job folder being assembled The tool uses the hierarchy location path or the ungrouped job private data to determine where the job should be stored, up to the specified nesting level (similar to archive hierarchy) Strip unique name If set to yes, the unique name prefix is removed before placing the job in the job folder being assembled Duplicates Determines what happens when “strip unique name” is set to yes and a job arrives with the same name and location as a job already residing in the job folder being assembled: • Overwrite: replace the existing job with the new one – this is the default behavior • 232 Keep unique name: preserve the new job’s unique name prefix, leaving the existing job untouched (without unique name prefix) Enfocus Switch 10 Property Orphan timeout (minutes) Description • Add version number: add an incrementing version number at the end of the filename body for the new job ( “2”, “3”, … “9”, “10”, “11”), leaving the existing job untouched • Fail: move the new job to the problem jobs folder, leaving the existing job untouched The time delay after which incoming jobs are considered orphaned because they are not part of a completed job Incoming jobs remain in their respective input folder until the last job arrives that completes an output job folder; whenever a new job arrives, the timeout counter is reset for already arrived jobs that are part of the same output job folder Orphaned jobs are moved along the outgoing data error connection, or if there is no such connection, they are moved to the problem jobs folder Generic application Generic application is a processor that functions as a stand-in for a third-party hot-folder application. The third-party application must be configured independently, and its input and output folders must refer to the backing folders of the corresponding flow elements preceding and following the generic application in the flow design. Files are moved along the incoming and outgoing connections of a generic application under the control of the third-party application (not under the control of Switch). Still, designing the generic application flow element and its connections into the flow at the appropriate place has several key advantages: • Switch ensures that the third-party application's output files receive the appropriate unique name prefix so that internal job ticket information (such as hierarchy info and email info) is preserved. • Switch automatically cleans up files left in the input folder by the third-party application. • If the third-party application runs on the same computer, Switch can launch the application when needed. • Switch is able to gather its regular processing statistics for the third-party application. • The third-party application's function is documented in context of the complete flow. Because the incoming connection is under the control of the 3rd party tool, the incoming folder, the connection and the generic application tool itself behave different than regular Switch flow elements: • the input folder has no properties to attach hierarchy info, e-mail addresses, e-mail body text or job state, set job priority or show in statistics. • the input folder does have a special property to ignore sub folders. 233 Enfocus Switch 10 • the input folder can only have one outgoing connection • the connection cannot be set on hold. • the generic application tool can only have one incoming connection. Keywords Keywords can be used with the search function above the Elements pane. The keywords for the Generic application element are: • hot • watched • folder • third-party Properties Property Description Name The name of the flow element displayed in the canvas Known application Set to yes if you can browse to the third-party application's executable on the same computer system; this allows Switch to launch and monitor the application Path The absolute file path of the third-party application’s executable Launch application If set to yes, Switch launches the third party application when it is needed and if it is not already running Abort application If set to yes, Switch aborts the third-party application if it exceeds the time limit specified by the user preference "Abort processes after" (see error-handling preferences) Perform cleanup If set to yes, Switch removes files left in the input folder left by the third-party application; it is strongly recommended to leave this option turned on unless you are sure that the third-party application removes its input files in all circumstances, including error conditions When detecting output files (N) Remove a file from the input folder after at least the specified number of output files have been detected for the file; a value of zero means this option is disabled; Switch uses the unique name prefix to match output files with input files, so if the third-party application's output files are not named similar to its input files, this option will not work After (min) Remove a file from the input folder if more than the specified time has passed; provide sufficient extra time for unforeseen circumstances; a value of zero means this option is disabled Execute command 234 Enfocus Switch 10 Execute command is a processor that executes a system command or a console application with the specified command-line arguments and output mechanisms. Keywords Keywords can be used with the search function above the Elements pane. The keywords for the Execute command element are: • command • console • third-party • CLI Connections Execute command allows only a single outgoing connection Properties Properties Description Name The name of the flow element displayed in the canvas Command or path The system command to be executed, or the absolute path to the console application to be invoked Arguments The remainder of the command line; the following substitutions are made in the specified text: • %1: the absolute path of the input file/job folder • %2: the absolute path of the output file/job folder (which does not yet exist) including filename and extension • %3: the absolute path of a folder (which does exist) in which output or temp files may be placed Note 1: all of these substitutions work even if “Output” is set to None or Original (in which case any generated output is discarded) Note 2: argument values that may contain spaces (such as file paths) should be enclosed in quotes Output Determines how the command generates its output (the tool automatically moves the output to the outgoing connection): • None: the command generates no output (or any generated output is discarded) and nothing is moved to the outgoing connection • Original: the command generates no output (or any generated output is discarded) and the incoming job is moved to the outgoing connection • Updated input job: the command updates or overwrites the incoming job in place 235 Enfocus Switch 10 Properties Copy input job Description • Result next to input job: the command places the output next to the input job (i.e. in the same folder) • File at path: the command places a single output file at the absolute path specified by %2 • Folder at path: the command places a single output job folder at the absolute path specified by %2 • Result in folder: the command places the output inside the existing folder at absolute path %3 If set to yes, the incoming job is copied to a temporary location before the command is triggered; this must be turned on in cases where the command modifies the input job or places files in the folder where the input job resides This property is not present for some choices of output because in those cases the incoming job must always be copied 236 Output job filter Determines which of the generated files or folders is the output file; Automatic works unambiguously if a single file is generated; otherwise a simple heuristic is used to make an “educated guess” Output extension The filename extension of the output job to be provided to the command line (i.e. the substitution of %2); Automatic means use the same extension as the input job Fail if exit code is Fails the job (that is, moves it to the problem jobs folder) if the command’s exit code is: • Nonzero • Negative • In range • Outside range • Disregard exit code Range A range specified as “n1..n2;n3..n4” where the n’s represent a positive or negative integer or are missing to indicate an open end; for example: “-7..-4; 0..” Fail if stdout contains Fails the job (that is, moves it to the problem jobs folder) if the regular console output contains the search string or pattern; empty means disregard the regular console output Fail if stderr contains Fails the job (that is, moves it to the problem jobs folder) if the console error output contains the search string or pattern; empty means disregard the console error output Enfocus Switch 10 15.2 Tools Compress Compress is a processor that places the incoming file or a job folder into a compressed ZIP archive. All files in a job folder are placed in a single archive. The archive is named as the incoming file or job folder with a “.zip” extension. Keywords Keywords can be used with the search function above the Elements pane. The keywords for the Compress element are: • ZIP • archive Connections Compress allows only a single outgoing connection. Properties Property Description Name The name of the flow element displayed in the canvas Compress If set to yes, the files in the ZIP archive are compressed (the default behavior) If set to no, the files are stored in the ZIP archive without compression, dramatically reducing processing time; this can be meaningful when speed is more important than size, or when the files will not compress well anyway (example: JPEG images) – but you still want a single archive containing all files Use password If set to yes, all created archives are password-protected Password The password used for protecting archives Uncompress Uncompress is a processor that extracts files from an archive in one of the following formats: 237 Enfocus Switch 10 • ZIP • RAR • MIME Any files that are not recognized as an archive are passed through the uncompress tool without change. Keywords Keywords can be used with the search function above the elements pane. The keywords for the Uncompress element are: • ZIP • RAR • MIME • archive • compress • decompress • unzip Filenames and folder structure The following table describes the resulting file or folder structure and the corresponding naming conventions. Multiple files from the same archive are always placed in a job folder. If the intention is to inject these files into the flow as separate jobs, a job dismantler should be placed directly after the uncompress flow element. Archive contents Uncompress result Single file The file (named as specified in the archive) Multiple files or folders with a common root folder A job folder (named as the nearest common root folder) containing all files and folders (named as specified in the archive) Multiple files or folders without A job folder (named as the archive after stripping the a common root folder extension) containing all files and folders (named as specified in the archive) Connections Uncompress allows only a single outgoing connection Properties 238 Property Description Name The name of the flow element displayed in the canvas Passwords A list of passwords for opening password-protected archives; each of the passwords in the list will be tried in turn. Enfocus Switch 10 Property Description The script expression can be used to determine a password dynamically, for example based on the sender of the packed data Remove redundant folders If set to yes, for archives where the files or job folders are contained in deeply nested subfolder structures, removes all but the deepest subfolder level while uncompressing Example: A PDF file that is compressed as "Folder 1\Folder 2\Folder 3\Test.pdf" is uncompressed as "\Folder3\Test.pdf" if this option is set to yes Merge PDF Pages Merge PDF Pages is a processor that produces a single PDF file containing all of the pages provided by the PDF files in the incoming job folder. The tool does not require Adobe Acrobat or any other external application to be installed. Keywords Keywords can be used with the search function above the Elements pane. The keywords for the Merge PDF pages element are: • PDF • split • merge • pages Connections Merge PDF Pages allows only a single outgoing connection Properties Property Description Name The name of the flow element displayed in the canvas PDF metadata File, Title, Author, Subject and Keywords will be merged if all input PDF files have the same value. So in case a flow uses a Split PDF and Merge PDF tool, this metadata can be restored. If the metadata has different values, the merged PDF will have empty metadata fields. 239 Enfocus Switch 10 Switch metadata The Merge PDF tool processes a job folder, so Switch metadata is derived from that folder and not from the individual PDF files. PDF version The merged PDF will have the highest PDF version number. Example: Merge two files, one PDF version 1.4 and the other PDF version 1.6, the result will be PDF version 1.6. Merge Order The tool will merge the files in increasing alphabetical order of file name. However, if • every file name contains at least one number and • every file has the same amount of numbers (consecutive digit groups) in their file name, the Merge Order processor will take the lowest number represented by any of the digit groups in the file name as "Rank". If no two files have the same rank, the processor will merge the files in order of increasing rank. Note: More advanced merge ordering can be achieved by using the Sort files in job tool in front of the Merge PDF pages tool. See Sort files in job on page 253. Examples The Merge PDF pages will correctly collate all of the examples provided for the Split PDF in Pages tool (see Split PDF in pages on page 241) 240 Incoming files Ordering • Booklet_01.pdf • Booklet_02.pdf • ... All file names have a single digit group representing a ranking number that is unique among the complete set of files: this ranking is used to order the files • Booklet_15.pdf • Booklet pages 01-02 of 15.pdf • Booklet pages 03-04 of 15.pdf • ... • Booklet pages 15-15 of 15.pdf • 01 Booklet i.pdf • 02 Booklet ii.pdf • 03 Booklet iii.pdf All file names have the same number of digit groups (3). The lowest number offers a correct ranking that is unique among the complete set of files: this ranking is used to order the files The file names have different amounts of digit groups (1 vs 3), so the files will be ordered alphabetically. Even if the file names would have the same number of digit groups, the ranking would be alphabetically, as their would be doubles in ranking (each chapter number occurs more than once. Enfocus Switch 10 Incoming files Ordering • 04 Booklet iv.pdf • 05 Booklet 1-1.pdf However, because the page index (including the leading zeroes) appears early in the file name, the alphabetical order will put the pages in the same order as before splitting • ... • 10 Booklet 1-6.pdf • 11 Booklet 2-1.pdf • ... • 15 Booklet 2-5.pdf Split PDF in pages Split PDF in Pages is a processor that produces a job folder containing a separate PDF file for each page or range of pages in the incoming PDF file. The tool does not require Adobe Acrobat or any other external application to be installed. Keywords Keywords can be used with the search function above the Elements pane. The keywords for the Split PDF in pages element are: • PDF • split • merge • pages Connections Split PDF in pages allows only a single outgoing connection Properties Property Description Name The name of the flow element displayed in the canvas Pages per file The number of pages in each output file Filename prefix The string pattern to be inserted before the filename Filename suffix The string pattern to be inserted after the filename (but before the file name extension 241 Enfocus Switch 10 File naming For each incoming PDF file, the tool creates a job folder that contains the PDF files resulting from splitting the incoming PDF file into sections of one or more pages. The files are named by adding a prefix and/or suffix to the incoming file’s name. In the values of the filename prefix and suffix properties described above, the following character sequences (regardless of case) are replaced by the appropriate number for the file as follows: sequence Replaced by [Index] The one-based index (in the original file) of the first page stored in this result file [LastIndex] The one-based index (in the original file) of the last page stored in this result file [Label] The PDF page label of the first page stored in this result file. If the page does not have a label, its one-based index is used [LastLabel] The PDF page label of the last page stored in this result file. If the page does not have a label, its one-based index is used. [LastSourceLabel] The PDF page label of the last page in the original file. If the page does not have a label, its one-based index is used. [Total] The total number of pages in the original file Note: For [Index] and [LastIndex], leading zeros are added so that the index has the same number of digits as the total number of pages in the original file Note: If the constructed filename contains characters that are not allowed in filenames on Windows (control characters, \, /, :, *, ?, <, > and |), these characters are replaced by a #, even if Enfocus Switch is running on Mac. Example This example is based on a PDF file named "Booklet.pdf". It contains 15 pages. The first 4 pages are labled in roman numbers, followed by 2 chapters with respectively 6 and 5 pages, labeled "1-2", "1-3", etc. 242 Property settings Resulting files Default settings: • Pages per file = 1 • Booklet_01.pdf • Booklet_02.pdf • Prefix = "" • ... • Suffix = "_[Index]" • Booklet_15.pdf • Pages per file = 2 • Booklet pages 01-02 of 15.pdf Enfocus Switch 10 Property settings Resulting files • Prefix = "" • Booklet pages 03-04 of 15.pdf • Suffix = " pages [index]-[LastIndex] of [Total]" • ... • Booklet pages 15-15 of 15.pdf • Pages per file = 1 • 01 Booklet i.pdf • Prefix = "[Index]" • 02 Booklet ii.pdf • Suffix = "[Label] • 03 Booklet iii.pdf • 04 Booklet iv.pdf • 05 Booklet 1-1.pdf • ... • 10 Booklet 1-6.pdf • 11 Booklet 2.1.pdf • ... • 15 Booklet 2-5.pdf Hold job Hold job is a processor that offers various time-based schemes for holding and releasing jobs and for distributing jobs across multiple outgoing connections. Keywords Keywords can be used with the search function above the Elements pane. The keywords for the Hold job element are: • delay • file • balancer • priority • queue • distribute Connections Hold job allows any number of outgoing move connections, and offers additional properties on each of those connections. 243 Enfocus Switch 10 Properties Properties Description Job priority The priority assigned to each incoming job; jobs with higher priority are released first; a greater number indicates a higher priority Default means: use the job priority defined in the job ticket The value of this property is converted to a floating point number; the Boolean value True and string values that commonly represent True convert to 1, the Boolean value False and any string values that don’t represent a number or True convert to 0 Delay jobs If set to yes, jobs are delayed for a certain period of time (specified in the subordinate properties), i.e. a job becomes eligible for release only after it has resided in the input folder for at least the specified period of time Unit Selects the unit for the subsequent property: Seconds, Minutes, Hours, Days Delay The job delay in the units indicated by the previous property Output order Determines the order in which outgoing connections receive jobs (relevant only if there is more than one): • Cyclic: always in the same cyclic order • Random: in pseudo-random order Outgoing connection properties The following properties are provided for each of the outgoing connections in addition to the basic connection properties. 244 Property Description Connection priority The priority of this connection; a greater number indicates a higher priority; at any given time only the eligible connections with the highest priority will receive jobs Folder constraint If set to yes, this connection is eligible to receive jobs only when certain constraints on the target folder (specified in the subordinate properties) are met Maximum job count This connection receives a job as long as its target folder contains no more than this number of jobs after adding the job; a zero value means this constraint is disabled Maximum file count This connection receives a job as long as its target folder contains no more than this number of files after adding the job; a zero value means this constraint is disabled Enfocus Switch 10 Property Description Maximum folder size (MB) This connection receives a job as long as its target folder’s size does not exceedthis limit after adding the job; a zero value means this constraint is disabled Target folder The absolute path of the folder that should be checked for job count and/or size; Default means the connection’s target folder Note: Whenever a job arrives in the Hold job tool, Switch checks the Target folder. Jobs that are in between the Hold job tool and the Target folder are not taken into account for the constraint. To make sure that there are no jobs in between the Hold job tool and the Target folder, space the jobs apart for a certain period of time. Time-of-day window If set to yes, this connection is eligible to receive jobs only during a certain time of the day (specified in the corresponding properties) Allow from (hh:mm) The time-of-day window during which to receive jobs; the values are structured as "hh:mm" (hours, minutes) indicating a time of day on a 24 hour clock; an empty value means midnight; two identical values mean the connection is always eligible Allow to (hh:mm) Day-of-week window If set to yes, this connection is eligible to receive jobs only during certain days of the week (specified in the subordinate properties) Allow from The days of the week (Monday, Tuesday, Wednesday, Thursday, Friday, Saturday, Sunday) during which to receive jobs; two identical values mean the connection is eligible for that 1 single day Allow to Day-of-month window If set to yes, this connection is eligible to receive jobs only during a certain day of the month (specified in the subordinate properties) Day The day in the month during which to receive jobs, as a number in the range [1 .. 31]; the default value of one means the first or the last day of the month (depending on the following property) Relative to Determines whether the day of the month is relative to “Start of month’” or “End of the month” Space jobs apart If set to yes, jobs moving over this connection are spaced apart by a minimum period of time (specified in the subordinate properties); example: after the connection receives a job it becomes eligible to receive another job only after the specified period of time has passed Unit Selects the unit for the subsequent property: Seconds, Minutes, Hours, Days Delay The spacing delay in the units indicated by the previous property Scheduling algorithm The scheduling algorithm is executed whenever a new job arrives, at regular intervals: 245 Enfocus Switch 10 1. Determine J, the set of eligible jobs, to include all incoming jobs that have fully arrived and that have waited for at least the delay specified for the job (if any). 2. If J is empty, there are no jobs to be moved – terminate. 3. Sort the jobs in J on priority (higher priority first) and within the same priority on arrival stamp (earliest arrival first). 4. For each job in J, in the sorted order, perform these steps: a. Consider A to be the set of outgoing connections. b. Determine B as the subset of A containing connections that can accept the job at this time (that is, the connection is not on hold and none of its constraints are violated). c. If B is empty, the job can not be moved at this time – skip to next job. d. Determine C as the subset of B containing all connections with the highest priority that occurs within B. By definition all connections in C have the same priority and C is non-empty. e. Select one of the connections in C according to the selected algorithm (cyclic or random). f. Move the job along this connection. Inject job Inject job is a a processor (acting as a producer) that injects a job into the flow when triggered by an incoming job or by various time-based events. The injected job can be selected dynamically from a repository of jobs, it can be a fixed job, or it can be the incoming job itself. The properties for each outgoing connection specify what needs to happen for that connection (independently of other connections). For example, to inject a job from a repository based on the metadata of some incoming job while keeping the original job around, setup one connection to receive the incoming job, and a second connection to receive the job from the repository. Keywords Keywords can be used with the search function above the Elements pane. The keywords for the Inject job element are: • trigger • timer Connections Inject job supports an optional incoming connection and allows any number of outgoing connections. It offers additional properties on each of its outgoing connections. 246 Enfocus Switch 10 Properties Property Description Name The name of the flow element displayed in the canvas Outgoing connection properties The following properties are provided for each of the outgoing connections in addition to the basic connection properties Property Description Trigger Specifies the type of event that triggers injection for this connection: • Incoming job: an injection is triggered for each incoming job • Time since previous job: an injection is triggered when the specified period of time passed since the last job arrived • Time of day: an injection is triggered at the specified time(s) during the day Unit Selects the unit for the subsequent property: Minutes, Hours, Days Delay The trigger delay in the units indicated by the previous property Repeat If set to yes, a new injection is triggered repeatedly at the specified interval as long as no jobs arrive; if set to no, an injection is triggered only once (until a new arrival resets the timer) Time (hh:mm) The time of day when an injection is triggered (every day) Repeat unit Selects the unit for the subsequent property: Minutes, Hours Repeat delay The repeat delay in the units indicated by the previous property; a value of zero means “do not repeat” Inject Specifies the scheme for determining the injected job for this connection: • Incoming job: inject the incoming job (or a copy, if more than one connection specify this scheme); if the injection is not triggered by an incoming job this behaves as if “Dummy job” was selected • Dummy job: inject an empty file called “dummy.txt” (generated by the tool) • Specific job: inject the job specified in a subordinate property through its absolute file or folder path • Job repository: inject the job specified in a subordinate property through an absolute folder path (the repository containing the jobs) and a job name (the name of the job residing in the repository) 247 Enfocus Switch 10 Property Description Job path The absolute file or folder path of the job to be injected (if a fixed file path is selected, the selected file is included in the exported flow) Job repository The absolute folder path of the repository containing the jobs Job name The file or folder name of the job residing in the repository (possibly including the filename extension, depending on the value of the subsequent property) Extension The filename extension for the job residing in the repository (without the period); an empty value means that the filename extension is included in the “Job name” property (or that there is no filename extension) Delete after injection Used in the Job Repository and Specific Job cases. If set to yes or if the condition is true, the original injection job is deleted after being injected in the outgoing connection. Otherwise, the original job is unaffected. Name job after Specifies how to determine the name of the jobs injected into this connection: • Incoming job: use the name of the incoming job; if the injection is not triggered by an incoming job this behaves as if “Injection job” was selected • Injection job: use the name of the job selected for injection (which may be the incoming job) Rename job Rename job is a processor that provides various mechanisms for renaming the incoming job and/or the files inside a job folder. Keywords Keywords can be used with the search function above the Elements pane. The keywords for the Rename job element are: • remove • add • replace • filename • name • extension • prefix 248 Enfocus Switch 10 • • • suffix regular expression regexp Connections Rename job allows only a single outgoing connection. Properties Property Description Name The name of the flow element displayed in the canvas Affect job name for Determines for which jobs the rename actions are applied to the name of the job (individual file or job folder): • All jobs • Individual files only • Job folders only • No jobs Remember original name If set to yes, the original filename of the incoming job is stored in private data in the internal job ticket for the job so that it can be restored with a subsequent rename flow element; see Restoring the original filename on page 251 Only the name of the job is remembered; not the name of any files inside a job folder Private data key The first portion of the private data key used to store the original filename; see Restoring the original filename on page 251 Files inside job folder Determines what to do with files inside a job folder: • Leave alone • Rename files • Rename files and folders • Flatten hierarchy (discarding folders) • Flatten hierarchy and rename files Nested folder levels Specifies the number of nested subfolder levels to act on (zero means “leave alone”; use a large number to act on all levels) Resolve collisions Determines how to resolve situations where two files on the same level end up with the same name (after all other actions specified in this tool have been performed): • Add suffix after filename proper Pattern • Add suffix after complete filename • Modify name without changing length A pattern for the suffix or replacement string used to resolve collisions; “count” is replaced by a number with an appropriate number of digits 249 Enfocus Switch 10 Property Description (that is, a single digit unless there are many files colliding to the same name) Action 1 Act on Determines the first rename action taken: • None • Add prefix • Add suffix • Remove segment • Keep segment • Replace • Search and replace • Reduce character set • Remove extension • Add extension • Replace extension Determines which portion of the filename is affected: • Filename proper • Prefix The prefix to add at the start of the filename Suffix The suffix to add at the end of the filename Start index The one-based start index of the filename segment to remove/keep End index The one-based end index of the filename segment to remove/keep; zero means until the end of the filename Search for The search string to be replaced, or a regular expression that matches the string to be replaced Replace by The replacement string, or a regular expression that can use the groups captured by the search regexp Repeat Determines the repeat behavior of the search/replace: • Once: only the first match is replaced Allowed character set 250 Complete filename (select this if the file has no extension) • Consecutive: repeated as many times as needed to reach the end of the filename (however the replaced portion is NOT searched again) • Recursive: consecutive is repeated until the filename no longer changes (with a max. of 99 iterations) Determines the allowed character set: • Local8bit: the current ANSI code page on Windows (Latin1 on Western systems); UTF-8 (i.e. anything) on Mac OS X Enfocus Switch 10 Property Description • Replacement character Portable ASCII: printable 7-bit ASCII less those characters that aren’t allowed in filenames on some systems Determines the replacement for disallowed characters: • Underscore • Space • Remove New extension The new filename extension Action 2 … Action 5 The subsequent rename actions taken; these properties have the same subordinate properties as the first action property Restoring the original filename If the "Remember original name" property is set to yes, the tool stores the original name of the incoming job in the internal job ticket for the job using private data keys as follows: Private data key Stored value <key> The original filename including extension <key>.Name <key>.NameProper The original filename without extension <key>.Extension The original filename extension For example, if the private data key property is left to its default value, the original filename without extension can be retrieved later on with the following variable: [Job.PrivateData:Key="Original.NameProper"] The “Remember original name” option works even if all rename actions are set to “none”; this can be useful to capture the job name before it gets changed by some other tool or application. File type File type is a processor that sets a filename extension for a file and if applicable its Mac file type and creator type to a specified type. Job folders are moved along without change. See also Mac file types on page 194 and Mac file types preferences on page 186. Keywords Keywords can be used with the search function above the Elements pane. 251 Enfocus Switch 10 The keywords for the File type element are: • replace • filename • name • extension Connections File type allows only a single outgoing connection. Properties Property Description Name The name of the flow element displayed in the canvas File type One of the file types presented by the file type property editor, except for Folder; see also Specifying file filters on page 97 Sort job Sort job is a processor that offers various schemes for sorting incoming jobs across its outgoing connections depending on metadata associated with the jobs. For each job the tool determines the value of the specified metadata field and compares this value with the names of the outgoing connections. If a match is found, the job is moved along that connection. Otherwise the job is moved along the outgoing data error connection, or if there is no such connection, it is moved to the problem jobs folder. Keywords Keywords can be used with the search function above the Elements pane. The keywords for the Sort job element are: • metadata • switch • route Connections Sort job supports outgoing traffic-light connections of the following types: • Data success: the name of each connection is matched with the value of the job's metadata field; if a match is found, the job is moved along that connection. • 252 Data error (optional): if no match is found the job is moved along this connection; if there is no such connection, the job is moved to the problem jobs folder. Enfocus Switch 10 Properties Property Description Name The name of the flow element displayed in the canvas Scheme Determines the scheme used to specify a metadata value: • Direct: use variables or a script expression to calculate a value • Location path • Key/value pair Value The value to be used for sorting the job Dataset The name of the metadata dataset to query; Default means the embedded dataset Data model The data model used for querying the dataset (one of XMP, JDF, XML); this must match the data model of the dataset except that XML can be specified to query JDF Location path The location path pointing at the value to be used for sorting the job (for XML this can be an arbitrary XPath expression) Array location path The location path pointing at the array containing the key/value pairs Key name The name of the key field Key contents The value of the key Value name The name of the value field Sort files in job Sort files in job is a processor that provides a mechanism for “sorting” the files inside a job folder, in other words to perform the following two steps: 1. Determine the desired sorting order of the files based on their current filename. 2. Rename the files so that they alphabetically collate in the desired sorting order. This is useful to prepare the job for tools that process files in alphabetical order, for example merging pages into a single document. Sort files in job ignores any nested subfolders and their contents (that is, it works only on the files immediately inside the job folder). Individual job files are passed along unchanged. Keywords Keywords can be used with the search function above the Elements pane. 253 Enfocus Switch 10 The keywords for the Sort files in job element are: • remove • add • replace • order • filename • name • extension Connections Sort files in job allows only a single outgoing connection. Properties Property Description Name The name of the flow element displayed in the canvas Sort key 1 Determines the first sort key: • None • Number: the Nth distinct group of consecutive digits • Segment: the segment specified by start index and length • Search: the segment matching a regular expression • Extension: the filename extension Number index The one-based index of the intended digit group; automatic means “use the smallest number” of all digit groups Start index The one-based start index of the intended filename segment Length The length of the intended filename segment; zero means until the end of the filename, excluding extension Search pattern A regular expression that matches the intended segment; if there is no match the sort key is empty Sort as numbers If set to no, the filename segments specified in the previous properties are sorted as regular text strings If set to yes, the segments are first padded with leading zeroes (to the maximum length in the set) so that they collate as one would expect for numbers (note that this procedure works for hexadecimal numbers in addition to regular decimal numbers) This property setting is irrelevant in case the filename segments all have the same length Sort key 2 Sort key 3 254 The second and third sort keys; these have the same subordinate properties as the first sort key If two or more filenames have identical sort key values, they are sorted alphabetically Enfocus Switch 10 Property Description Rename scheme Determines the rename action taken to make files collate: • Add prefix Prefix pattern • Add prefix and suppress digits: each digit group in the original filename is replaced by an underscore • Replace filename (leave extension) • Replace filename and extension A pattern for the prefix; “count” is replaced by a number with an appropriate number of digits (depending on the number files) Sort by Preflight State Sort by Preflight State is a processor that sorts incoming Enfocus Certified PDF files across its outgoing connections depending on their preflight state: Error, Success, Warning or Sign-off. Keywords Keywords can be used with the search function above the Elements pane. The keywords for the Sort by Preflight State element are: • Enfocus • Status check • PDF • preflight • error • success • warning • sign-off Properties Property Description Name The name of the configurator. Default is "Check PDF" Rejecting jobs This tool rejects the following incoming jobs (that is, these jobs are moved along the outgoing "reject" connection): • Jobs other than a single PDF file 255 Enfocus Switch 10 • PDF files that are not Certified PDF Script element Script is a flow element that executes a script program specified by the user to process, produce or consume jobs. A script flow element can be a processor, producer or consumer depending on the specifications in the attached script declaration. In addition, the script declaration may inject extra properties into the script element and into its outgoing connections. These extra properties serve as arguments to the script program. For more information on scripting in Switch, refer to the Scripting reference on page 367. Keywords Keywords can be used with the search function above the Elements pane. The keywords for the Script element are: • package • program • custom • plug-in • plugin • applescript • visual basic • javascript Script package A script package is an archive file (with filename extension "sscript") that contains all information about a script. It includes a script declaration, a script program, and possibly an icon to be displayed in the Switch flow designer instead of the standard script element icon. A script package can be exchanged between users as a single entity. To assign a new script package (created with SwitchScripter or received from a third party) to a script element, right-click on the script element in the canvas and select the "Choose script package" menu item, or edit the "Script package" property in the properties editor. To edit the script package selected in a script element, right-click on the script element in the canvas and select the "Edit script package" menu item. The script package will be opened in SwitchScripter for viewing or editing. Connections The type and maximum number of outgoing connections for a script element are determined by the script declaration attached to the script element. Furthermore, the script declaration may cause the script element to inject extra properties into its outgoing connections. 256 Enfocus Switch 10 Properties Property Description Name The name of the flow element displayed in the canvas Script package The Switch script package to be attached to this script element <Injected> The script declaration may define extra properties to be injected into the script element as arguments for the script program Recycle bin Recycle bin is a consumer that deletes incoming jobs either immediately or depending on the jobs size, age etc... Keywords Keywords can be used with the search function above the Elements pane. The keywords for the Recycle bin element are: • trash can • remove • delete Connections Recycle bin does not allow outgoing connections Properties Property Description Name The name of the flow element displayed in the canvas Path The path of the recycle bin's backing folder on disk, or "auto-managed" Keep N jobs If non-zero, the recycle bin delays deletion of jobs until the total number of jobs in the recycle bin exceeds the given limit; the oldest jobs are then deleted until the number of jobs in the recycle bin is once again under the limit The "Save..." properties of the recycle bin tool are independent; jobs are deleted as soon as they exceed the limit of any of the "Save..." properties Keep N MB jobs If non-zero, the recycle bin delays deletion of jobs until the total size of all jobs in the recycle bin exceeds the given limit; the oldest jobs 257 Enfocus Switch 10 Property Description are then deleted until the total size of the jobs in the recycle bin is once again under the limit The "Save..." properties of the recycle bin tool are independent; jobs are deleted as soon as they exceed the limit of any of the "Save..." properties Keep jobs for N (hours) If non-zero, specifies the number of hours that the deletion of jobs by the recycle bin should be delayed; any job that is older than the limit is permanently removed from the recycle bin The "Save..." properties of the recycle bin tool are independent; jobs are deleted as soon as they exceed the limit of any of the "Save..." properties Move to system recycle bin If set to yes, jobs deleted by the recycle bin tool are not permanently deleted but instead moved to the system recycle bin Strip unique name If set to yes, the unique name prefix added to the filename by Switch is removed before moving the job to the system recycle bin 15.3 Communication elements FTP receive FTP receive is a producer that downloads jobs from an FTP site and injects them into the flow. The semantics are similar to those of a submit hierarchy. In case your system environment requires FTP connections to pass through a proxy server, you need to setup the FTP proxy preferences to provide Switch with the configuration details for the proxy server. In this case, FTP receive will fail as long as these preferences have not been set. Keywords Keywords can be used with the search function above the Elements pane. The keywords for the FTP receive element are: • Internet • web • FTP • SFTP • network • communication • transfer • input 258 Enfocus Switch 10 • download Connections FTP receive does not allow incoming connections. FTP receive injects folder filter properties into its outgoing connections so that it is possible to include/exclude certain subfolders in the incoming job folders for particular connections. Also see the "skip folders" property described below. Properties Property Description Name The name of the flow element displayed in the canvas Server type FTP or SFTP FTP server address The URL or IP address of the FTP server from which jobs are to be retrieved Port The port used by the FTP server Passive mode If set to yes, FTP receive uses passive mode, otherwise it uses active mode Transfer as binary If set to yes, FTP receive transfers files as binary, otherwise it transfers them as ASCII User name The login name for the FTP server. For anonymous login, use "anonymous" as user name Password The password for the FTP server. For anonymous use, enter an email address as password. FTP directory The directory on the FTP site from which jobs are to be retrieved. If the path starts with a forward slash "/", it is relative to the users’s home directory. If the path starts with a double forward slash, it is relative to the FTP site’s system root. This is only useful if the user has access to the complete file system on the FTP site Leave originals on server If set to yes, incoming jobs are left untouched on the FTP site; Switch never writes to the site so read-only access rights suffice; see Leaving originals in place on page 90 for more details If set to no (the default), incoming jobs are removed from the FTP site; Switch needs full access rights to rename, create and remove files and folders on the FTP site Ignore Updates The Ignore Updates option is only available if Leave Originals is set to yes. If set to yes, a job will only be processed once, regardless of any changes to the file size or modification date. This can be used 259 Enfocus Switch 10 Property Description for workflows where the input job is replaced by the processing result, to avoid triggering endless loops. If set to no, the job will be reprocessed when its file size or modification date is different. This allows processing jobs which have the same file name as previously submitted jobs. Minimum file size (KB) Used to set the minimum file size (in KB) limit before Switch picks up the files or folders. To set no limits, leave it empty. Check every (minutes) The frequency of checking the FTP directory for new jobs Time-of-day window If set to yes, the tool checks for new arrivals only during a certain time of the day (specified in the subordinate properties) Allow from (hh:mm) The time-of-day window during which to check for new arrivals; the values are structured as "hh:mm" (hours, minutes) indicating a time of day on a 24 hour clock; an empty value means midnight; two identical values mean the tool always detects jobs Allow to (hh:mm) Day-of-week window If set to yes, the tool checks for new arrivals only during certain days of the week (specified in the subordinate properties) Allow from The days of the week (Monday, Tuesday, Wednesday, Thursday, Friday, Saturday, Sunday) during which to check for new arrivals; two identical values mean the tool only checks for new arrivals on that specific day. Allow to Day-of-month window If set to yes, the tool checks for new arrivals only during a certain day of the month (specified in the subordinate properties) Day The day in the month during which to check for new arrivals, as a number in the range [1 . . 31]; the default value of one means the first or the last day of the month (depending on the following property) Relative to Determines whether the day of the month is relative to “Start of month’” or “End of the month” Subfolder levels The number of nested subfolder levels considered to be hot folders (as opposed to job folders); see also the description on subfolders earlier. Process these folders Defines the initial set of folders that should be processed. This set can be adjusted by defining rules in the subsequent properties Adjusted by This property defines a rule for adjusting the set of folders to be processed, by including or excluding folders matching or not matching a folder name. Different rules can be applied and will be processed in the order as they are specified. Additional properties for this rule are: 260 Enfocus Switch 10 Property Description • The Folder name used for matching • The Levels, limiting the range of subfolder levels on which the rule applies • A Restriction, based on the folder name of the parent or ancestors for the folder. If folder Y contains subfolder X; Y is X's parent folder. If folder Z contains subfolder Y; Z is one of X's ancestors. The folder that contains folder Z is also one of X's ancestors, and so on. • Nesting, defining whether this rule operates on all nested subfolders of the target folder, or on the target folder itself. Attach hierarchy info If set to yes, (part of) a job’s submit location is added to its hierarchy location path as it is submitted in the flow; see Using hierarchy info on page 91 for more details Include FTP name Only available if Attach hierarchy info is enabled. If set to yes, the name of the flow element is included at the top of the remembered location path Include subfolder levels Identifies the number of hierarchy segments in the hierarchy information. Save top subfolders If set to yes, the top-most subfolders are remembered in the location path, otherwise the bottom-most subfolders are remembered Attach email info Email addresses and body text specified with the editor for this property are added to each job's email info as the job is injected in the flow; the information added can vary depending on the subfolder in which the job was located; see Using Email info on page 93 for more details Allow subfolder cleanup If set to yes, subfolders created in the FTP hierarchy are automatically removed when they become empty Starting at level The number of upper levels for which not to cleanup subfolders FTP send FTP send is a processor (although conceptually it is a consumer) that uploads any incoming jobs to an FTP site. In case your system environment requires FTP connections to pass through a proxy server, you need to setup the FTP proxy preferences to provide Switch with the configuration details for the proxy server. In this case, FTP send will fail as long as these preferences have not been set. 261 Enfocus Switch 10 Keywords Keywords can be used with the search function above the Elements pane. The keywords for the FTP send element are: • Internet • web • FTP • SFTP • network • communication • transfer • output • upload Connections FTP send supports optional outgoing connections to provide in-flow feedback about the operation and to keep the job around without extra copying. This allows multiple send operations to be chained in an intelligent manner; for example: • Successively upload the same job to multiple FTP sites. • Provide a fallback operation when an upload fails (for example, upload to a secondary site). • Send an email with the URL of a job that was successfully uploaded to an FTP site. FTP send supports traffic-light connections of the following types (other types are not allowed): • Data error: carries the incoming job if the operation fails at the first attempt; if there are no data error connections the tool keeps retrying the operation as specified in the user preferences. • Data success: carries the incoming job after the operation succeeds; if there are no data success connections the output is simply suppressed (without logging a warning or error). • Log success: carries a small log file in XML format after the operation succeeds; if there are no log success connections the output is simply suppressed. The log file contains relevant information about the operation such as destination, time sent, transfer time, list of files, etc. SeeProcessing results schema on page 320. • Data with log success: carries both the job and the log file (as metadata), allowing access to the results of the operation through variables or scripting. Properties 262 Property Description Name The name of the flow element displayed in the canvas Server type FTP or SFTP FTP server address The URL or IP address of the FTP server to which the jobs are to be delivered Port The port used by the FTP server Passive mode If set to yes, FTP send uses passive mode, otherwise it uses active mode Enfocus Switch 10 Property Description Transfer as binary If set to yes, FTP receive transfers files as binary, otherwise it transfers them as ASCII User name The login name for the FTP server. For anonymous login, use "anonymous" as user name Password The password for the FTP server. For anonymous use, enter an email address as password. FTP directory The directory on the FTP site to which jobs are to be delivered. If the path starts with a forward slash "/", it is relative to the users’s home directory. If the path starts with a double forward slash, it is relative to the FTP site’s system root. This is only useful if the user has access to the complete file system on the FTP site Subfolder levels The number of nested subfolder levels in the uploaded folder hierarchy (similar to the behavior of the archive hierarchy tool) When this property is set to zero (the default) all jobs are placed immediately inside the FTP directory specified in the previous property Strip unique name If set to yes, the unique name prefix added to the filename by Switch is removed before placing the job in the FTP hierarchy; the default is to strip the prefixes from jobs deposited in a FTP hierarchy - leaving the prefixes in place avoids overwriting a previously deposited job with the same name Duplicates Determines what happens when "Strip unique name" is set to yes and a job arrives with the same name and location as a job already residing on the FTP site: • Overwrite: replace the existing job with the new one – this is the default behavior • Keep unique name: preserve the new job’s unique name prefix, leaving the existing job untouched (without unique name prefix) • Add version number: add an incrementing version number at the end of the filename body for the new job (“2”, “3”, … “9”, “10”, “11”), leaving the existing job untouched • Fail: move the new job to the problem jobs folder, leaving the existing job untouched Mail receive 263 Enfocus Switch 10 Mail receive is a producer that retrieves email messages from a POP3 and IMAP email server (so that users can access email accounts like Gmail, Hotmail etc) and injects any file attachments into the flow. Please note that Switch only accepts MIME encoded attachments. Keywords Keywords can be used with the search function above the Elements pane. The keywords for the Mail receive element are: • Internet • web • email • e-mail • POP3 • IMAP • network • communication • transfer • input Connections Mail receive does not allow incoming connections. Mail receive allows only a single outgoing connection. Properties Property Description Name The name of the flow element displayed in the canvas Server type The type of server from which to retrieve mail. Choices are "POP3" and "IMAP4" Server address The URL or IP address of the server from which to retrieve mail Port Editors in this property are numbers and it is empty by default Accounts A list of accounts (names and corresponding passwords) from which to retrieve mail Use secure password verification Defines whether to log in to the mail server using secure password verification Server requires secure connection (SSL) Defines whether the mail server requires a secure connection using the SSL protocol Leave originals on server If set to "Yes", incoming messages are left untouched on the server If set to no (the default), incoming messages are removed from the server; see also Leaving originals in place on page 90 Check every (minutes) 264 The frequency of checking the email accounts for new messages Enfocus Switch 10 Property Description Time-of-day window If set to "Yes", the tool checks for new arrivals only during a certain time of the day (specified in the subordinate properties) Allow from (hh:mm) The time-of-day window during which to check for new arrivals; the values are structured as "hh:mm" (hours, minutes) indicating a time of day on a 24 hour clock; an empty value means midnight; two identical values mean the tool always checks for new arrivals. Allow to (hh:mm) Day-of-week window If set to "Yes", the tool checks for new arrivals only during certain days of the week (specified in the subordinate properties) Allow from The days of the week (Monday, Tuesday, Wednesday, Thursday, Friday, Saturday, Sunday) during which to check for new arrivals; two identical values mean the tool only checks for new arrivals on that specific day Allow to Day-of-month window If set to "Yes", the tool checks for new arrivals only during a certain day of the month (specified in the subordinate properties) Day The day in the month during which to check for new arrivals, as a number in the range [1 . . 31]; the default value of one means the first or the last day of the month (depending on the following property) Relative to Determines whether the day of the month is relative to “Start of month’” or “End of the month” Attach hierarchy info If set to "Yes", information about a file's origin (derived from the email message as specified by the next property, see below) is added to its internal job ticket as a location path; see Using hierarchy info on page 91 for more details Base info on Defines how to derive the attached location path from the email message; the path can be based on the contents of one of the following: “Sender’s email address”, “Email account name”, or “Message subject” Attach email info If set to "Yes", the sender's address of the incoming email message is added to the email info in the file's internal job ticket; body text from the incoming message is never copied into the email info; see Using Email info on page 93 for more details Attach extra email info If set to "Yes", additional email info is added to the internal job ticket as specified by the next two properties (see below); the information added can vary depending on properties of the incoming email message (see below); see Using Email info on page 93 for more details 265 Enfocus Switch 10 Property Base map key on Email info map Scan for nested attachments Collect attachments Assemble message and attachments Inject message as file Description Defines the "key" that is used to select the appropriate email info from the table provided in the next property; the key can be contents of: “Sender’s email address”, “Email account name”, or “Message subject” Email addresses and body text specified with the editor for this property are added to each file's email info as the file is injected in the flow; the value of the key specified in the previous property (for example, the sender's address of the incoming email message) determines which entry of the table is actually added When set to "Yes", user can scan all nested email until no emails but real assets are found. By default, "No" is selected in this menu Set to "Yes" to collect all attachments in a folder. Single file attachments will also be stored in a job folder. By default, "No" is selected in this menu This is a sub property of Collect attachments and is available only when the parent is set to yes. Set to "Yes" to assemble the injected message and the attachment(s) in the same job folder. If there is no message to inject, this property will not affect attachment handling. By default, "No" is selected in this menu Determines whether the email message itself (as opposed to its attachments) is injected into the flow as a separate file; choices are: • No: only attachments are injected in the flow • If no attachments: the mail message is injected as a separate file only if it has no attachments • Always: the mail message is always injected as a separate file The message body is converted to plain text and saved into a “.txt” file with UTF8 encoding and named for the subject line of the email message. However, if the email message does not have a subject line, it is saved into a file named "No subject.txt". Picking up email metadata The mail receive tool automatically picks up the contents of incoming email messages as metadata. This behavior cannot be configured or turned off (that is, there are no flow element properties related to this behavior). See Picking up metadata on page 315 for more background information. For each incoming message the mail receive tool creates a metadata dataset that contains the relevant components of the message, such as the sender, to, cc, and reply-to addresses and the complete email body text. This dataset is then associated with the job ticket for all files delivered by the message under the standard dataset name “Email”. 266 Enfocus Switch 10 Refer to Email message schema on page 319 for details on the format of the generated metadata. Mail send Mail send is a processor (although conceptually it is a consumer) that sends an email message to an SMTP email relay server for each incoming job. Some properties for this tool (such as the SMTP server details) are setup as a global user preference since these values are always the same for all outgoing email. Mail send will fail as long as these preferences have not been set with appropriate values for your environment. Keywords Keywords can be used with the search function above the elements pane. The keywords for the Mail send element are: • Internet • web • email • e-mail • SMTP • network • communication • transfer • output Connections Mail send supports optional outgoing connections to provide in-flow feedback about the operation and to keep the job around without extra copying. This allows multiple send operations to be chained in an intelligent manner; for example: • Successively mail and FTP the same job. • Provide a fallback operation when a mail operation fails. Mail send supports traffic-light connections of the following types (other types are not allowed): • Data error: carries the incoming job if the operation fails at the first attempt; if there are no data error connections the tool keeps retrying the operation as specified in the user preferences. • Data success: carries the incoming job after the operation succeeds; if there are no data success connections the output is simply suppressed (without logging a warning or error). • Log success: carries a small log file in XML format after the operation succeeds; if there are no log success connections the output is simply suppressed. The log file contains relevant information about the operation such as destination, time sent, transfer time, list of files, etc. See Processing results schema on page 320. • Data with log success: carries both the job and the log file (as metadata), allowing access to the results of the operation through variables or scripting. 267 Enfocus Switch 10 Properties Property Description Name The name of the flow element displayed in the canvas Subject The subject line for the message. To addresses The list of destination email addresses for the message. Email addresses are separated by a semicolon or by a newline. Include attached addresses If set to "Yes", the email addresses from the job’s internal job ticket are added to the To addresses. Cc addresses A comma/ semicolon/ newline separated list of carbon-copy email addresses for the message Bcc addresses A comma/ semicolon/ newline separated list of blind carbon-copy email addresses for the message Reply address The email address to which a receiver of the message should send a reply. If the value is empty or Default, the reply address specified in the User Preferences is used. Message format The format of the message body, either Plain text or HTML. When set to HTML, the email message has two bodies. The first is in HTML format and the second is a plain text version of the HTML message. Body template The location of the template of the email body. If set to Built-in, the text can be set in the Body text property. Using the Include attached body text option, you can insert the body text attached to the job as part of its email info, after the body text If set to Fixed file, a Template file can be set, referring to a plain text or HTML file containing the template for the message body. A plain text body template shall be a regular text file (preferred extension “.txt”) using Unicode (UTF-16 with proper BOM or UTF-8). Other text encodings are not allowed. An HTML body template shall be a valid HTML file (preferred extension “.html”) using Unicode UTF-8. The HTML file must contain a tag specifying that it uses UTF-8 encoding. Other text encodings (including UTF-16) are not allowed. An HTML body template shall not refer to any local resources (since these will not be transmitted with the mail message). Any references should point to public resources on the worldwide web. You can use Enfocus Switch variables in a plain text template or an HTML template. An example with variables you could use in your own template: <span>Job size: [Job.ByteCount]</span> <span>Flow name: [Switch.FlowName]</span> <span>Current date: [Switch.Date]</span> Also see Known variables on page 298 for more information on variables. If set to Associated with job, the name of the metadata dataset associated with the job containing a plain text or HTML template can be set. 268 Enfocus Switch 10 Property Description Attach files If set to "Yes", the incoming file or job folder is compressed (zipped) and attached to the email message being sent. Strip unique name If set to "Yes", the unique name prefix added to the filename by Switch is removed before emailing the job; the default is to strip the prefixes from jobs before emailing them This property affects both the actual attachments and the names of the jobs listed in the email body Submit point Submit point is a producer that serves to submit jobs into a flow through SwitchClient by a user with the appropriate access rights. See Submitting jobs on page 157 . The backing folder for a submit point is always auto-managed. Keywords Keywords can be used with the search function above the Elements pane. The keywords for the Submit point element are: • Internet • web • network • communication • transfer • input • client • user • upload • metadata • workstation Properties Property Description Name The name of the flow element displayed in the canvas. By default it is displayed as "Submit point" Display name The name to be displayed in SwitchClient. If set to Default, the default name is displayed Thumbnail The image to be used as thumbnail for this Submit point in SwitchClient. Allowed image types are PNG, BMP and JPEG 269 Enfocus Switch 10 Property Description Attach hierarchy info If set to "Yes", part of a job’s submit information (as configured with the next two properties) is added to its hierarchy location path as it is injected in the flow; see Using hierarchy info on page 91 for more details Include Submit point name If set to "Yes", the name of this flow element is included at the top of the remembered location path Include user name If set to "Yes", the name of the user submitting the job is included in the remembered location path Attach user as email info If set to "Yes", the submitting user's email address is added to each job's email info as the job is injected in the flow; see Using Email info on page 93 for more details Attach extra email info Email addresses and body text specified with the editor for this property are added to each job's email info as the job is injected in the flow; the information added can vary depending on the user submitting the job; see Using Email info on page 93 for more details Require metadata entry If set to "Yes", the SwitchClient user is asked to complete metadata fields before submitting a job; see Picking up metadata on page 315 and Defining metadata fields on page 322 for more information Metadata template Set the path to a custom metadata template (.ui file) or leave empty to use the default template for visualizing metadata (editor: Choose file) Metadata fields Definitions for the metadata fields to be entered; see Defining metadata fields on page 322 for more information Dataset name A name for the set of metadata entered here; see Picking up metadata on page 315 for more information Picking up client fields as metadata The Submit point tool picks up metadata fields entered by the SwitchClient user when submitting a job. Specifically, when a user submits a job and the list of field definitions in the Submit point's “Metadata fields” property is nonempty, the Submit point: • Creates a metadata dataset containing the contents of the metadata fields entered by the user. • Associates this dataset with the job ticket for the submitted job under the dataset name specified in the “Dataset name” property. Refer to Client fields schema on page 326 for details on the format of the generated metadata. Checkpoint 270 Enfocus Switch 10 Checkpoint is a processor that holds jobs for human intervention. A SwitchClient user with the appropriate access rights can review jobs in a Checkpoint and redirect them along any of the Checkpoint’s outgoing connections. See Working with Checkpoints . The name shown to the SwitchClient user for each outgoing connection is the name of the connection, or if it is empty, the name of the target folder. The backing folder for a Checkpoint is always auto-managed. Keywords Keywords can be used with the search function above the Elements pane. The keywords for the Checkpoint element are: • Internet • web • network • communication • transfer • interact • client • user • route • approve • metadata Connections Checkpoint allows any number of outgoing move connections. Properties Property Description Name The name of the flow element displayed in the canvas. Default value is "Checkpoint" Allow multiple outputs If set to yes, the SwitchClient user can send copies of a job along more than one outgoing connection; otherwise the job is sent along exactly one of the outgoing connections Enable report viewing If set to yes, SwitchClient offers extra buttons to view or save a report obtained by retrieving the metadata dataset named in the property described below This feature is most often used with datasets picked up through a traffic-light connection by setting "Carry this type of files" to "Data with log" Report dataset name The metadata dataset name for the report to be viewed by the client 271 Enfocus Switch 10 Property Description Allow replacing job If set to yes, SwitchClient displays an extra button that allows the user to edit and/or replace jobs with a new version (presumably edited on the client user's computer) before moving it out of the Checkpoint; the original job is lost, but its metadata is preserved See Replacing a job on page 163 for more information on the replacement process Require metadata entry If set to yes, the SwitchClient user is asked to complete metadata fields before moving along a job; see Picking up metadata on page 315 and Defining metadata fields on page 322 for more information Metadata fields Definitions for the metadata fields to be entered; see Defining metadata fields on page 322 for more information Metadata template Set the path to a custom metadata template (.ui file) or leave empty to use the default template for visualizing metadata (editor: Choose file) Dataset name A name for the set of metadata entered here; see Picking up metadata on page 315 for more information Attach user as email info If set to yes, the handling user's email address is added to each job's email info as the job is moved along the flow In addition, the Checkpoint updates the “user name” attribute in the internal job ticket as follows: • If this property is set to yes, the “user name” attribute is always set to the name of the Checkpoint client user moving the job along, regardless of its previous value • Fail jobs after timeout If this property is set to no, the “user name” attribute is set to the new name only if it was empty to begin with If set to yes, jobs are failed after residing in the Checkpoint for a certain period of time (specified in the subordinate properties) Failed jobs are moved to the outgoing connection specified in the subordinate properties or to the problem jobs folder Unit Selects the unit for the subsequent property: Minutes, Hours, Days Timeout delay The timeout delay in the units indicated by the previous property (0 means ‘no timeout’) Fail connection The name of the connection to which failed jobs must be moved If this property value is empty or if the specified name doesn’t match any of the outgoing connection names, failed jobs are moved to the problem jobs folder 272 Enfocus Switch 10 Picking up client fields as metadata The Checkpoint tool picks up metadata fields entered by the SwitchClient user when moving along a job. Specifically, when a user moves along a job residing in a Checkpoint and the list of editable field definitions in the Checkpoint's “Metadata fields” property is nonempty, the Checkpoint creates a metadata dataset and associates it with the job’s job ticket under the specified dataset name. Note that a Checkpoint always creates a completely new dataset, i.e. it does not update or modify an existing dataset (even if the job was previously moved through the same or another Checkpoint). If the job already has dataset association with the same name, the reference to the old dataset is removed and replaced by the new one. Refer to Client fields schema on page 326 for details on the format of the generated metadata. Checkpoint via mail Checkpoint via mail is a processor that allows implementing a simple Checkpoint via email, performing the following main functions: • For each arriving job, send out an email message that includes the unique name prefix of the job and a list of possible “Checkpoint actions” (the names of the outgoing connections) – in addition to instructions on how to operate the Checkpoint by return email. • Monitor email messages coming back from users and parse those messages for the original information about the job and for the Checkpoint action selected by the sender. • When a matching response comes in, move the corresponding job along the specified outgoing connection. Keywords Keywords can be used with the search function above the elements pane. The keywords for the Checkpoint via mail element are: • Internet • web • email • e-mail • network • communication • transfer • interaction • client • user Connections Checkpoint allows any number of outgoing move connections. The name of each connection defines a “Checkpoint action”. 273 Enfocus Switch 10 Properties Property Description Name The name of the flow element displayed in the canvas Subject The subject line for the message. To addresses The list of destination email addresses for the message. Email addresses are separated by a semicolon or by a newline. Include attached addresses If set to yes, the email addresses from the job’s internal job ticket are added to the To addresses. Reply address The email address to which a receiver of the message should send a reply. If the value is empty or Default, the reply address specified in the User Preferences is used. Message format The format of the message body, either Plain text or HTML Body template The location of the template of the email body. If set to Built-in, the text can be set in the Body text property. Using the Include attached body text option, you can insert the body text attached to the job as part of its email info, after the body text If set to Fixed file, a Template file can be set, referring to a plain text or HTML file containing the template for the message body. If set to Associated with job, the name of the metadata dataset associated with the job containing a plain text or HTML template can be set. 274 Attach job If set to yes, the incoming job is attached to the email message sent out Attach report If set to yes, the metadata dataset indicated with the subordinate property is attached to the email message sent out Dataset name The name of the dataset to be attached to the email message Report name suffix The name of the attached report is formed by adding this suffix to the name of the job, before the file name extension Report name extension The file name extension for the report. Select "Data Model" to automatically use xml, jdf or xmp depending on the data model of the exported data set. For the Opaque data model, the original backing file’s extension is used. Allow multiple outputs If set to yes, the user can send copies of a job along more than one outgoing connection; otherwise the job is sent along exactly one of the outgoing connections Server type The type of server from which to retrieve email. Choices are "POP3" and "IMAP" Enfocus Switch 10 Property Description Server address The URL or IP address of the server from which to retrieve email Accounts A list of accounts (names and corresponding passwords) from which to retrieve email Use secure password verification Defines whether to log in to the email server using secure password verification Server requires secure connection (SSL) Defines whether the email server requires a secure connection using the SSL protocol Check every (minutes) The frequency of checking the email accounts for new messages Reply syntax The user's reply message must specify the job ID and the selected Checkpoint action(s) in a simple format. Specifically, Switch searches for the following character sequences: • "Job identifier:" followed by the job ID (as specified in the original email sent to the user). • "Action:" followed by one of the Checkpoint action names, or a list of comma-separated action names (in case multiple actions are allowed). In both cases, the text is case insensitive. All other text in the message is ignored. Example Mail sent to user Job identifier: 0044P Message text: Body text........ ...........end. Possible Checkpoint actions (please choose any): Accept Reject Email was triggered by this file : Test.txt Attachments: Job file: Test.txt --- Important information --Reply message should contain the following lines: Job identifier: 0044P Action: action from the list above or comma separated actions list 275 Enfocus Switch 10 Reply from user Job identifier: 0044P Action: Accept ... Pack job Pack job is a processor that packs a job and its associated metadata for transmission. The result is always a single ZIP file that contains a globally unique identifier to identify it across multiple Switch instances. Pack job also stamps the internal job ticket of its output with the unique identifier so that confirmations can be matched with the packed data without opening the ZIP file. See Acknowledged job hand-off on page 96 for an example of how to use this tool. Keywords Keywords can be used with the search function above the Elements pane. The keywords for the Pack job element are: • ZIP • compress • archive • Internet • web • network • communication • transfer • acknowledged • hand-off Connections Pack job allows only a single outgoing connection. Properties 276 Property Description Name The name of the flow element displayed in the canvas Include internal metadata If set to "Yes", the output archive contains internal job ticket information for the job (including email info, hierarchy info, private data fields, etc.) Enfocus Switch 10 Property Description Include external metadata If set to "Yes", the output archive contains a copy of the external metadata (that is, all datasets) associated with the job Embedded metadata is always included since it is part of the job file itself Compress If set to yes, the data in the output archive are compressed (the default behavior) If set to no, the data are stored in the output archive without compression, dramatically reducing processing time; this can be meaningful when speed is more important than size, or when the data does not compress well (example: JPEG images) Password The password used for protecting the output archive, or empty if no password-protection should be used Unpack job Unpack job is a processor that unpacks a job that was packed for transmission with Pack job. Outgoing data success connections receive the unpacked job, with restored metadata (if it was included in the packed archive). Outgoing log success connections receive a checksum-protected XML file that can serve as a formal confirmation of successful receipt of the job, recognized by the Monitor confirmation element. Incoming jobs that do not have the appropriate format (or that were corrupted during transmission) are sent to the data error connection or if there is no such connection, these jobs are moved to the problem jobs folder. See Acknowledged job hand-off on page 96 for an example of how to use this tool. Keywords Keywords can be used with the search function above the Elements pane. The keywords for the Unpack job element are: • ZIP • uncompress • unzip • archive • Internet • web • network • communication • transfer • acknowledged • hand-off 277 Enfocus Switch 10 Connections Unpack job supports outgoing traffic-light connections of the following types: • Data success: carries successfully unpacked jobs, with restored metadata. • Log success (optional): carries confirmation file that should be returned to the sender of the packed job. • Data error (optional): carries incoming jobs that cannot be unpacked; if there is no such connection, these jobs are moved to the problem jobs folder. Properties Property Description Name The name of the flow element displayed in the canvas Passwords A list of passwords used for opening the packed data, if needed The script expression can be used to determine a password dynamically, for example based on the sender of the packed data Restore metadata If set to yes, internal job ticket information and external metadata associated with the job are restored from the packed data (overwriting any metadata already associated with the packed data) Embedded metadata is always included since it is part of the job file itself Email info Hierarchy info Fail duplicates Special options for email info in the internal metadata: • Restore and replace • Restore and merge • Don’t restore Special options for hierarchy info in the internal metadata: • Restore and replace • Restore and place at the top • Restore and place at the bottom • Don’t restore If set to yes, a packed data entity that comes in twice (based on the unique identifier stored inside) is sent to the error output; otherwise it is treated as usual In both cases the duplicate is logged to the execution log 278 Enfocus Switch 10 Property Description Keep info for (days) The list of identifiers already processed is kept for at least this many days Monitor confirmation Monitor confirmation is a processor that monitors incoming receipt confirmations (generated by Unpack job) and matches them against a copy of the packed data (generated by Pack job) waiting in its input folder. When no confirmation is received after a certain amount of time, tool can be setup to retry the communication (that is, send another copy of the packed data). See Acknowledged job hand-off on page 96 for an example of how to use this tool. Keywords Keywords can be used with the search function above the Elements pane. The keywords for the Monitor confirmation element are: • Internet • web • network • communication • transfer • acknowledged • hand-off Connections Monitor confirmation supports outgoing traffic-light connections of the following types to support its various actions: Action Connection type Comments Confirm Success data When a matching confirmation is received, the packed data is removed from the input folder and sent along this connection Success log When a matching confirmation is received, it is sent along this connection Retry Warning data For each retry attempt (as specified by the tool’s properties) a copy of the packed data is moved along this connection; the original packed data stays in the input folder Reject Error data After all retries have timed-out, the packed data is removed from the input folder and sent along this connection 279 Enfocus Switch 10 Action Connection type Comments Error log When a confirmation is received that does not match any of the waiting packed data files or that is corrupt, it is sent along this connection Properties Property Description Name The name of the flow element displayed in the canvas Retry count The number of retry attempts made when no confirmation is received Retry delay (minutes) The delay (in minutes) between each retry attempt and the timeout after the last one 15.4 Processing elements Documentation related to a configurator can be accessed by clicking the Documentation... option in the contextual menu of the configurator in the Flow Elements pane. 15.5 Metadata Flow Element Reference XML pickup XML pickup is a processor that allows associating an arbitrary XML file with a job as metadata. It supports the following pickup mechanisms: • Metadata alongside asset • Metadata in job folder asset • Metadata refers to asset • Metadata is asset For more info see Pickup mechanisms on page 317. Keywords Keywords can be used with the search function above the Elements pane. 280 Enfocus Switch 10 The keywords for the XML pickup element are: • metadata • dataset • asset Data model The metadata source must be a well-formed XML file with any schema. The dataset data model is XML. Connections XML pickup allows only a single outgoing connection. Properties Property Description Name The name of the flow element displayed in the canvas Dataset name A name for the set of metadata picked up by this tool; see picking up metadata Pickup mode The pickup mechanism; one of: • Metadata alongside asset • Metadata in job folder asset • Metadata refers to asset • Metadata is asset See also Pickup mechanisms on page 317 Additional properties are shown depending on the selected pickup mechanism; see the description of each mechanism for more information. JDF pickup JDF pickup is a processor that allows associating an JDF file (that is, a JDF job ticket) with a job as metadata. It supports the following pickup mechanisms: • Metadata alongside asset • Metadata in job folder asset • Metadata refers to asset • Metadata is asset Keywords Keywords can be used with the search function above the Elements pane. 281 Enfocus Switch 10 The keywords for the JDF pickup element are: • metadata • dataset • asset • ticket • adticket Data model The metadata source must be a JDF file conforming to the JDF 1.3 specification. The dataset data model is JDF. Connections JDF pickup allows only a single outgoing connection. Properties Property Description Name The name of the flow element displayed in the canvas Dataset name A name for the set of metadata picked up by this tool; see picking up metadata Pickup mode The pickup mechanism; one of: • Metadata alongside asset • Metadata in job folder asset • Metadata refers to asset • Metadata is asset Additional properties are shown depending on the selected pickup mechanism; see Pickup mechanisms on page 317 for more information. Adobe Acrobat JDF The JDF pickup tool supports JDF files generated by Adobe Acrobat 7 or higher. If the JDF file produced by Acrobat is delivered as a separate file it can be picked up with the “alongside asset” or “in job folder asset” mechanisms. If the JDF file and the corresponding assets are delivered as a single combined MIME file, the uncompress tool should be used in front of the JDF pickup tool to extract the individual files into a job folder. XMP pickup XMP pickup is a processor that allows associating an XMP packet with a job as metadata. It supports the following pickup mechanisms: • Metadata embedded in asset (the default location for an XMP packet) 282 Enfocus Switch 10 • Metadata alongside asset • Metadata in job folder asset • Metadata is asset Keywords Keywords can be used with the search function above the Elements pane. The keywords for the XMP pickup element are: • metadata • dataset • asset • ticket • adticket Data model The metadata source must be an Adobe XMP packet or a standalone XMP file conforming to the Adobe XMP specification dated June 2005. The dataset data model is XMP. Connections XMP pickup allows only a single outgoing connection. Properties Property Description Name The name of the flow element displayed in the canvas Dataset name A name for the set of metadata picked up by this tool; see picking up metadata Pickup mode The pickup mechanism; one of: • Metadata embedded in asset • Metadata alongside asset • Metadata in job folder asset • Metadata is asset Additional properties are shown depending on the selected pickup mechanism; see the description of each mechanism for more information. Locating XMP packets The mechanism for embedding XMP packets in a file is also described in detail in the Adobe XMP specification mentioned above. There are two distinct methods to locate XMP packets embedded in a file: • Scan the complete file for the magic markers at the head and tail of a packet: this works for any file format, but may possibly locate the wrong packet in case a composite document contains multiple packets. 283 Enfocus Switch 10 • Interpret the file format’s structure to track down the packet: this guarantees that the correct packet has been located and it is usually much faster, but it requires a specific algorithm for each distinct file format. The XMP pickup tool interprets the file format for a number of supported file formats, and scans the complete file for all other file formats. Synchronizing with EXIF and IPTC For certain supported file formats the values of binary EXIF and IPTC tags can be merged with the embedded XMP packet before it is picked up. See the "Synchronize EXIF/IPTC fields" property for the embedded pickup mechanism. Opaque pickup Opaque pickup is a processor that allows associating an arbitrary file with a job as metadata. It supports the following pickup mechanisms: • Metadata alongside asset • Metadata in job folder asset Keywords Keywords can be used with the search function above the elements pane. The keywords for the Opaque pickup element are: • metadata • dataset • asset Data model The metadata source can be any file (but not a folder). The dataset data model is Opaque. Connections Opaque pickup allows only a single outgoing connection. Properties Property Description Name The name of the flow element displayed in the canvas Dataset name A name for the set of metadata picked up by this tool; see picking up metadata Pickup mode The pickup mechanism; one of: • Metadata alongside asset • 284 Metadata in job folder asset Enfocus Switch 10 Additional properties are shown depending on the selected pickup mechanism; see the description of each mechanism for more information. Apago PDFspy This configurator drives Apago PDFspy 1.0. It is a processor that tells PDFspy to dump a number of statistics about a PDF file in an XML file, and then picks-up that XML file as metadata that gets associated with the PDF file's internal job ticket. The PDF file itself remains unchanged. See Picking up metadata on page 315 and Using metadata on page 315 for more information on handling metadata in Switch. Refer to the Apago web site for information on the third-party application required by this configurator, and refer to the PDFspy product documentation for details on the format of the XML file produced by this configurator. Keywords Keywords can be used with the search function above the Elements pane. The keywords for the Apaga PDFspy configurator are: • XML • metadata Detecting the application This configurator implements the following mechanisms to detect the presence of the corresponding third-party application. See Detecting third-party applications on page 25 for more information. Detection mechanism Comments Automatic detection at startup Uses information registered with the operating system when the application is installed Searching from the elements pane Same as above Manually locating the executable Select the executable for the command-line version of the application Connections This configurator allows only a single outgoing connection. Installing and licensing Apago PDFspy To install and license Apago PDFspy for use with Switch, follow these steps: • Unpack the Apago PDFspy package and put its contents in a permanent location on the system that also runs Switch (for example, in the folder that contains your other applications). 285 Enfocus Switch 10 • License Apago PDFspy as described in its documentation, using a valid license key obtained from Apago or from an authorized reseller (Enfocus does not sell or distribute third-party software). If you skip this step you can use Apago PDFspy in trial mode for a limited amount of time. • Start Switch; in the elements pane (NOT in the canvas) right-click on the Apago PDFspy icon; in the resulting context menu select the "set path to application..." menu item; browse to the Apago PDFspy command-line application. Properties To help limit the size of the metadata XML file, the configurator provides properties indicating which types of statistics should be included. If all properties are set to "exclude", the configurator (through PDFspy) still produces a minimal set of basic file statistics. The word in parenthesis at the end of each property's description is the PDFspy command line keyword corresponding to this property. 286 Property Description Name The name of the flow element displayed in the canvas Dataset name A name for the set of metadata picked up by this tool; see picking up metadata Pages In/exclude statistics on each individual page in the PDF file (pagedata) Fonts In/exclude statistics on typefaces used in the PDF file (fonts) Color spaces In/exclude statistics on color spaces used in the PDF file (color) Images In/exclude statistics on images contained in the PDF file (images) OPI comments In/exclude statistics on OPI comments contained in the PDF file (OPI) Bookmarks In/exclude statistics on bookmarks contained in the PDF file (outlines) Annotations In/exclude statistics on annotations contained in the PDF file (annots) Links In/exclude statistics on hyperlinks contained in the PDF file (links) Actions In/exclude statistics on PDF actions contained in the PDF file (actions) Names In/exclude statistics on PDF names contained in the PDF file (names) Forms In/exclude statistics on PDF forms contained in the PDF file (forms) Enfocus Switch 10 Property Description XMP packet In/exclude a complete copy of the XMP packet embedded in the PDF file, if any, with the statistics (XMP) Export metadata Export metadata is a processor that allows saving a metadata dataset associated with the incoming job to a standalone file. The tool merely copies the dataset’s backing file to the output location without any transformations. The XSLT transform on page 288 tool can be used to transform the exported metadata if needed. The outgoing log connections carry the exported metadata; the outgoing data connections carry the incoming job without change. If the incoming job has no dataset with the specified name, no log output is generated. Keywords Keywords can be used with the search function above the Elements pane. The keywords for the Export metadata element are: • XML • JDF • XMP • opaque • metadata • dataset Connections Export metadata supports any number of outgoing traffic-light connections. Properties Property Description Name The name of the flow element displayed in the canvas Dataset name The name of the set of metadata (associated with the job) to be exported; see Picking up metadata on page 315 for more information Filename body The filename for the generated metadata file (without filename extension) Filename extension The filename extension for the generated metadata file; select "Data Model" to automatically use "xml", "jdf" or "xmp" depending on the data model of the exported dataset (for the 287 Enfocus Switch 10 Property Description Opaque data model, the original backing file’s filename extension is used) XSLT transform XSLT transform is a processor that performs an XSLT 1.0 transformation on the incoming XML file and produces the resulting XML, HTML or text file. Refer to the XSLT 1.0 specification and to widely available literature about XSLT for more information. See also External metadata on page 314. Keywords Keywords can be used with the search function above the Elements pane. The keywords for the XSLT transform element are: • XML • JDF • XMP • HTML • CSV • metadata Connections XSLT transform allows only a single outgoing connection. Properties Log job info 288 Property Description Name The name of the flow element displayed in the canvas XSLT transform The XSLT transform to be applied to the incoming XML file; this must be a valid XML document representing an XSLT 1.0 style sheet Output file type The type of the transformed output file: XML, JDF, XMP, HTML, Text, Log, or CSV Enfocus Switch 10 Log job info is a processor that issues a message to the Switch execution log containing the value of the specified metadata field. It is intended mainly for use while testing a flow. Keywords Keywords can be used with the search function above the Elements pane. The keywords for the Log job info element are: • metadata • debug Connections Log job info allows only a single outgoing connection. Properties Property Description Name The name of the flow element displayed in the canvas Message text The message to be logged; %1 will be replaced by the argument value; if %1 is not present it is added at the end of the string Message level Determines the message level: Info, Warning or Debug Scheme Determines the scheme used to specify a metadata value: • Direct: use variables or a script expression to calculate a value • Location path • Key/value pair Value The value to be logged Dataset The name of the metadata dataset to query; Default means the embedded dataset Data model The data model used for querying the dataset (one of XMP, JDF, XML); this must match the data model of the dataset except that XML can be specified to query JDF Location path The location path pointing at the value to be logged (for XML this can be an arbitrary XPath expression) Array location path The location path pointing at the array containing the key/value pairs Key name The name of the key field Key contents The value of the key Value name The name of the value field 289 Enfocus Switch 10 16. Metadata reference 16.1 Variables Using variables Switch allows the use of variables in the values of many text properties and for defining file filters. A variable is a special, well-recognizable text string that gets replaced by a dynamic value when the flow is being executed. The dynamic value is recalculated each time in the context of the job being processed. Variables provide access to run-time information about the flow environment and about a job, including embedded metadata fields (and external metadata fields), without the need for scripting. This lowers the barrier for accessing dynamic information in a flow definition since most users will find it is much easier to use a variable than to create a script expression. Furthermore, variables are available in all Switch product flavors, while scripting is available only in PowerSwitch. Entering Variables Text properties Variables in text properties are simply mixed-in with static text. Users can insert a variable in two distinct ways: • Directly type the variable with the appropriate syntax when entering the text; this requires understanding variable syntax. • Use the define text with variables property editor for locating the variable and entering its arguments; the formatted variable is automatically inserted in the text. Most users will prefer the second method; however in both cases the final result is regular text (with variables). When the value of a text property that supports variables is needed while executing a flow, Switch scans the text for variables and replaces them by their dynamic value in the context of the current job. All text outside variables remains unchanged. Conditional properties A conditional property has a Boolean result (true or false). For example, the file filtering properties on connections are conditional properties. A variable-based conditional property is entered through a special property editor that offers a user interface to create basic comparison expressions with support for locating a variable and entering its arguments. See defining a condition with variables. When the value of a condition with variables is needed while executing a flow, Switch replaces the variables by their dynamic value in the context of the current job and evaluates the expression. 290 Enfocus Switch 10 Using sample jobs The variable-related property editors (Defining text with variables and Defining a condition with variables) offer a mechanism to select a sample job and to display actual metadata values derived from that job while you are configuring (portions of) the property value in the editor. The Build location path dialog offers assistance with building location paths for the variables in the Metadata group using actual metadata associated with a sample job. List of variables Switch offers a library of variables organized in groups, accessing Switch-specific flow and job information, various types of metadata embedded in or a associated with a job, and statistics derived from the file's contents. See Known variables on page 298 for a complete list. Characteristics of variables Name Each variable is identified by a name including the group name and the variable name proper. For example: "Switch.Counter" or "Photo.ExposureTime". See Basic syntax on page 292. Arguments Some variables can have arguments to help determine the dynamic value or the value's formatting. For example, the "Switch.Counter" variable supports two arguments called "Width" and "Id", and the "Switch.Date" variable supports an argument called "Format". See Basic syntax on page 292, Formatting on page 293, Indexed variables on page 296, String manipulations on page 297. Data type Each variable has a specific data type, which is indicated with the variable’s description. The data type is important for two reasons: • For some data types, the formatting of the variable’s text representation can be influenced by specifying an appropriate argument for the variable. • When using a variable in a condition, the data type determines the type of comparison performed. See Data types on page 292, Formatting on page 293, String manipulations on page 297. Indexed variables Some variables access a list of values rather than a single value. These variables are called indexed variables. For example, the "Job.EmailAddress" variable accesses a list of all email addresses associated with the job. Depending on the arguments specified with it, an indexed variable may evaluate to a concatenated list of all items (with a customizable separator) or to one particular item from the list. 291 Enfocus Switch 10 See Indexed variables on page 296. Basic syntax Variable name In its simplest form, a variable is specified as follows: [Group.Variable] The variable name is surrounded by square brackets. Whitespace is not allowed in the variable specification. Variable names contain two segments separated with a period. The first segment is the group name; the second segment is the variable name within the group. Arguments Some variables can contain arguments that help determine the variable’s dynamic value. Arguments are specified as follows: [Group.Variable:ArgumentName1="Value",ArgumentName2="Value"] In this example, two arguments are defined with names “ArgumentName1” and “ArgumentName2”. If a variable has arguments, the variable name is followed by a colon which is followed by the arguments. For each argument, the argument name is followed by an equal sign and the value of that argument between single or double quotes. The value can contain single quotes if it is double-quoted, or double quotes if it is single-quoted. A comma separates the arguments if there is more than one. A variable specification must not contain any whitespace except when required in a quoted argument value. Note: It is not possible to include one variable inside another, so an argument for a variable can NOT be a variable. If you want to use the result of one variable as an argument of another, you should use scripting. See also: • Data types on page 292 • Formatting on page 293 • Comparing on page 295 • Indexed variables on page 296 • String manipulations on page 297 Data types Each variable has a specific data type, which is indicated with the variable’s description. The data type is important for two reasons: • For some data types, the formatting of the variable’s text representation can be influenced by specifying an appropriate argument for the variable. • When using a variable in a condition, the data type determines the type of comparison performed with the dynamic value. The following table lists the supported data types for variables. 292 Enfocus Switch 10 Data type Description Text Text string Alt Text Possibly localized text string (that is, there may be multiple language versions) Switch always uses the default language; so this data type is equivalent to Text Text Indexed List of items of type Text (see indexed variables) Boolean Boolean value true or false Integer Integer number Rational Rational number formed by division of two integers Date A moment in time, including date and/or time information See also: • Basic syntax on page 292 • Formatting on page 293 • Comparing on page 295 • Indexed variables on page 296 • String manipulations on page 297 Formatting The following table describes the formatting options for each data type, including: • The default representation which is used when no formatting arguments are present. • The supported formatting arguments, if any, and the corresponding representation. Data type Description of data type /Formatting argument Representation as a text string Text Text string Text string Alt Text Possibly localized text string Text string (Switch always uses the default language) Text Indexed List of items of type Text See indexed variables Boolean Boolean value true or false "True" or "False" (or all-lower-case versions) Integer Integer number Decimal representation (including minus sign if needed; no plus sign; no leading zeroes) Rational Rational number formed by division of two integers Decimal representation of the form: numerator, forward slash, denominator; example: "2/3" or "-17/4" 293 Enfocus Switch 10 Data type Date Description of data type /Formatting argument Representation as a text string Precision="integer" Decimal floating point representation with the specified number of digits after the decimal point (minimum precision is 1, max is 15) A moment in time, including String representation in the subset of the ISO date and/or time information 8601 format allowed in XMP Date fields (see Adobe XMP specification, version dated September 2005, page 75) Equivalent to format string "yyyy-MM-ddThh:mm:ss.zzz" Format="format-string" String representation in the format specified by the format string, which must conform to the syntax described below Date format string The following format expressions are recognized and replaced in the date format string: 294 Expression Output d the day as number without a leading zero (1 to 31) dd the day as number with a leading zero (01 to 31) ddd the abbreviated day name (example: 'Mon' to 'Sun') dddd the long day name (example: 'Monday' to 'Sunday') M the month as number without a leading zero (1-12) MM the month as number with a leading zero (01-12) MMM the abbreviated month name (example: 'Jan' to 'Dec') MMMM the long month name (example: 'January' to 'December') yy the year as two digit number (00-99) yyyy the year as four digit number h the hour without a leading zero (0 to 23 or 1 to 12 if AM/PM display) hh the hour with a leading zero (00 to 23 or 01 to 12 if AM/PM display) m the minute without a leading zero (0 to 59) mm the minute with a leading zero (00 to 59) s the second without a leading zero (0 to 59) Enfocus Switch 10 Expression Output ss the second with a leading zero (00 to 59) z the milliseconds without leading zeroes (0 to 999) zzz the milliseconds with leading zeroes (000 to 999) AP use AM/PM display; AP will be replaced by either "AM" or "PM" ap use am/pm display; ap will be replaced by either "am" or "pm" '...' any sequence of characters enclosed in single quotes is treated as literal text See also: • Basic syntax on page 292 • Data types on page 292 • Comparing on page 295 • Indexed variables on page 296 • String manipulations on page 297 Comparing Type of comparison A variable's data type determines the type of comparison performed in a condition involving the variable. This is important because comparison semantics for numbers, strings and dates are very different. Variable data type Comparison semantics Text String Alt Text String Text Indexed String Boolean Boolean Integer Number Rational Number Date Date Value used for comparison When used in a condition, the variable's value is obtained in two steps: • First the text representation of the variable is formatted as usual (see formatting); this allows influencing the value in interesting ways, such as rounding a rational number or extracting a date from a date/time. 295 Enfocus Switch 10 • Then the value is converted to the data type appropriate for the comparison type (example: string, number, ...); as indicated in the table above. See also: • Basic syntax on page 292 • Data types on page 292 • Formatting on page 293 • Indexed variables on page 296 • String manipulations on page 297 Indexed variables Some variables access a list of values rather than a single value. These variables are called indexed variables. All indexed variables support the indexing arguments described in this section. In general, if an Index argument is provided for an indexed variable, the variable evaluates to a single value from the list. Otherwise, the variable evaluates to a sequence that contains all values in the list. The following table describes the indexing arguments and their effect in more detail. Indexing arguments provided(don’t combine!) Description of result None Concatenation of all values in the list separated by a semicolon, all on the same line If there are no values, the result is the empty string Index="integer" The list value indicated by the specified one-based index If the Index argument is provided, all other arguments are ignored Separator="separator-string" Concatenation of all values in the list separated by the specified string, all on the same line If there are no values, the result is the empty string If the Separator argument is provided, the Prefix and Suffix arguments are ignored Prefix="prefix-string" Suffix="suffix-string" Concatenation of all values in the list, each on a separate line of the form: <prefix-string><value><suffix-string> If there are no values, the result is the empty string Examples Text in a property value Evaluates to [Job.EmailAddress:Index="1"] [email protected] [Job.EmailAddress] 296 [email protected];[email protected] Enfocus Switch 10 Text in a property value Evaluates to [Job.EmailAddress:Separator=", [email protected], [email protected] "] The email addresses for this job are: The email addresses for this job are: - [email protected] [email protected] [Job.EmailAddress:Prefix=" - "] See also: • Basic syntax on page 292 • Data types on page 292 • Formatting on page 293 • Comparing on page 295 • String manipulations on page 297 String manipulations Variables of data type Text, Alt Text and Text Indexed support additional arguments to perform simple manipulations on the text value of the variable. For Indexed variables, the manipulation is performed on each item in the list (that is, before the items are sequenced). If multiple arguments are present, the manipulations are performed in the order as they are listed in the table (regardless of the order in which they occur in the variable). Argument Value Result Space One of “trim”, “norm” trim = leading and trailing white space removed norm = trimmed and consecutive white space compressed to a single space Case One of “upper”, “lower”, “first”, “word” The string converted to the specified case (first = first character is upper case, word = first character of every word is upper case) After Search string (non-empty) The substring after (and not including) the last occurrence of the search string Before Search string (non-empty) The substring before (and not including) the first occurrence of the search string Segment Start and end index (one-based) The substring between and including separated by a comma or a hyphen; the characters indicated by the if one of the indices is missing this indices indicates the start or end of the string 297 Enfocus Switch 10 Argument Value Result Search Regular expression (use anchors to match start or end of string) The first substring that matches the regular expression See also: • Basic syntax on page 292 • Data types on page 292 • Formatting on page 293 • Comparing on page 295 • Indexed variables on page 296 Known variables Switch offers a library of variables organized in groups, as listed in the table below. Follow the links in the first column in this table for a list of variables in each group, with corresponding technical reference information. A description for each variable is displayed in the property editors for defining text with variables and defining a condition with variables. This description is not repeated in the help topics. Group Type of information Source Doc group on page 299 Title, keywords, author(s), copyright terms Embedded metadata: XMP Email group on Components of the email message through page 300 which this job was originally delivered Mail receive flow element Image group on Resolution, orientation, color mode page 301 Embedded metadata: EXIF (TIFF tags) IPTC group on page 302 Contact, location, headline, instructions Embedded metadata: IPTC Job group on page 303 Filename, size, email info, hierarchy info, fail File system, internal job ticket info, origin Metadata group Arbitrary field in any dataset associated with External metadata or embedded on page 305 the job (PowerSwitch only) metadata Photo group on Exposure time, aperture, focus, flash page 306 Embedded metadata: EXIF (EXIF tags) Stats group on page 308 File format & contents File format, number of pages, page labels, colorants Switch group on Flow element name, date/time, counter page 310 298 Flow definition, system environment Enfocus Switch 10 Group Type of information Source Connection Client connection attributes like user name, IP, user role Switch settings, system environment Doc group These variables access embedded metadata fields in the Adobe XMP format. The third column indicates the XMP location path for the variable in the XMP data model. The metadata fields accessed by the variables in this table can be viewed and edited using the "File > File Info..." dialog in Adobe Creative Suite applications. The fourth column indicates the label of the field that corresponds to each variable. The "Alt Text" data type indicates a possibly localized text string (that is, there may be multiple language versions). Switch always uses the default language; so this data type is equivalent to Text. Variable name Data type XMP location path Acrobat Photoshop File Info DocumentProperties label label Doc.Application Text xmp:CreatorTool Doc.Author Text dc:creator/*[1] Doc.Authors Text Indexed dc:creator Doc.AuthorTitle Text photoshop: AuthorsPosition Description / Author Title Doc.Category Text photoshop:Category Categories / Category Doc.City Text photoshop:City Origin / City IPTC Image / City Doc.CopyrightNotice Alt Text dc:rights Description / Copyright Notice Doc.CopyrightStatus Boolean xapRights:Marked Description / Copyright Status Doc.CopyrightTerms Alt Text xapRights:UsageTerms IPTC Status / Rights Usage Terms Doc.CopyrightURL Text xapRights: WebStatement Description / Copyright Info URL Doc.Country Text photoshop:Country IPTC Image / Country Doc.Created Date xmp:CreateDate Description / Created Application Description / Application Description / Author Author Description / Author 299 Enfocus Switch 10 Variable name Data type XMP location path Acrobat Photoshop File Info DocumentProperties label label Doc.Credit Text photoshop:Credit Doc.DateCreated Date photoshop: DateCreated Created Origin / Date Created Doc.Description Alt Text dc:description Subject Description / Description Origin / Credit IPTC Status / Provider Doc.DescriptionWriter Text photoshop: CaptionWriter Description / Description Writer Doc.Format Text dc:format Description / Format Doc.Headline Text photoshop:Headline Origin / Headline IPTC Content / Headline Doc.Instructions Text photoshop:Instructions Origin / Instructions IPTC Status / Instructions Doc.Keywords Text Indexed dc:subject Keywords Description / Keywords Doc.Modified Date xmp:ModifyDate Modified Description / Modified Doc.Source Text photoshop:Source Origin / Source IPTC Status / Source Doc.State Text photoshop:State Origin / State-Province IPTC Image / State Doc.Supplemental Text Categories Indexed photoshop: Supplemental Categories Categories / Supplemental Categories Doc.Title Alt Text dc:title Doc.Transmission Reference Text photoshop: Transmission Reference Origin / Transmission Reference IPTC Status / Job Doc.Urgency Integer photoshop:Urgency Origin / Urgency Title Description / Document Title Email group These variables access the components of the email message through which this job was originally delivered. The values are empty if the job was not delivered via email or if the email message did not contain the requested component. 300 Enfocus Switch 10 The Mail receive flow element associates this information with the job as a metadata dataset. Refer to Email message schema on page 319 for details on the format of this metadata. The third column in the table lists the element name in this schema corresponding to each variable. (*) See email message schema. Variable name Data type Element name (*) Email.Body Text body Email.Cc Text cc Email.Date Text date Email.From Text from Email.MessageId Text message-id Email.ReplyTo Text reply-to Email.Sender Text sender Email.Subject Text subject Email.To Text to Image group These variables access embedded metadata fields in the EXIF format (synchronized with Adobe XMP). The third column indicates the hexadecimal TIFF tag corresponding to each variable. Variable name Data type XMP location path TIFF tag Image.Artist Text tiff:Artist & dc:creator/*[1] 0x013B Image.ColorMode Integer photoshop:ColorMode -- Image.Copyright Alt Text tiff:Copyright & dc:rights 0x8298 Image.DateTime Date tiff:DateTime & xmp:ModifyDate 0x0132 & 0x9290 Image.ICCProfile Text photoshop:ICCProfile -- Image.ImageDescription Alt Text tiff:ImageDescription & dc:description 0x010E Image.ImageLength Integer tiff:ImageLength 0x0101 Image.ImageWidth Integer tiff:ImageWidth 0x0100 Image.Make Text tiff:Make 0x010F Image.Model Text tiff:Model 0x0110 301 Enfocus Switch 10 Variable name Data type XMP location path TIFF tag Image.Orientation Integer tiff:Orientation 0x0112 Image.PhotometricInterpretation Integer tiff:Photometric Interpretation 0x0106 Image.ResolutionUnit Integer tiff:ResolutionUnit 0x0128 Image.SamplesPerPixel Integer tiff:SamplesPerPixel 0x0115 Image.Software Text tiff:Software & xmp:CreatorTool 0x0131 Image.XResolution Rational tiff:XResolution 0x011A Image.YResolution Rational tiff:YResolution 0x011B IPTC group These variables access embedded metadata fields in the IPTC format (synchronized with Adobe XMP). The third column indicates the XMP location path for the variable in the XMP data model. The Iptc4xmpCore prefix has been omitted in the location paths. The metadata fields accessed by the variables in this table can be viewed and edited using the File > File Info... dialog box in Adobe Creative Suite applications. The fourth column indicates the label of the field that corresponds to each variable. (*) The Iptc4xmpCore prefix has been omitted in the location paths. 302 Variable name Data type XMP location path (*) Photoshop File Info label Iptc.City Text photoshop:City IPTC Image / City Iptc.ContactAddress Text CreatorContactInfo/CiAdrExtadr IPTC Contact / Address Iptc.ContactCity Text CreatorContactInfo/CiAdrCity IPTC Contact / City Iptc.ContactCountry Text CreatorContactInfo/CiAdrCtry IPTC Contact / Country Iptc.ContactEmail Text CreatorContactInfo/CiEmailWork IPTC Contact / E-mail(s) Iptc.ContactPCode Text CreatorContactInfo/CiAdrPcode IPTC Contact / Postal Code Iptc.ContactPhone Text CreatorContactInfo/CiTelWork IPTC Contact / Phone(s) Iptc.ContactState Text CreatorContactInfo/CiAdrRegion IPTC Contact / State-Province Iptc.ContactWebsite Text CreatorContactInfo/CiUrlWork IPTC Contact / Website(s) Iptc.CopyrightNotice Alt Text dc:rights IPTC Status / Copyright Notice Iptc.Country Text photoshop:Country IPTC Image / Country Iptc.CountryCode Text CountryCode IPTC Image / ISO Country Code Enfocus Switch 10 Variable name Data type XMP location path (*) Photoshop File Info label Iptc.Creator Text dc:creator/*[1] IPTC Contact / Creator Iptc.CreatorJobTitle Text photoshop:AuthorsPosition IPTC Contact / Creator’s Job Title Iptc.DateCreated Date photoshop:DateCreated IPTC Image / Date Created Iptc.Description Alt Text dc:description IPTC Content / Description Iptc.DescriptionWriter Text photoshop:CaptionWriter IPTC Content / Description Writer Iptc.Headline Text photoshop:Headline IPTC Content / Headline Iptc.Instructions Text photoshop:Instructions IPTC Status / Instructions Iptc.IntellectualGenre Text IntellectualGenre IPTC Image / Intellectual Genre Iptc.JobID Text photoshop: TransmissionReference IPTC Status / Job Identifier Iptc.Keywords Text Indexed dc:subject IPTC Content / Keywords Iptc.Location Text Location IPTC Image / Location Iptc.Provider Text photoshop:Credit IPTC Status / Provider Iptc.RightsUsageTerms Alt Text xmpRights:UsageTerms IPTC Status / Rights Usage Terms Iptc.Scene Text Indexed Scene IPTC Image / IPTC Scene Iptc.Source Text photoshop:Source IPTC Status / Source Iptc.State Text photoshop:State IPTC Image / State-Province Iptc.SubjectCode Text Indexed SubjectCode IPTC Content / IPTC Subject Code Iptc.Title Alt Text dc:title IPTC Status / Title Job group These variables are Switch-specific. The third column indicates the scripting API function that returns the variable's dynamic value. Variable name Data type Scripting API equivalent Job.ByteCount Integer Job.getByteCount() Job.EmailAddress Text Indexed Job.getEmailAddresses() 303 Enfocus Switch 10 Variable name Data type Scripting API equivalent Job.Extension Text Job.getExtension() Job.FileCount Integer Job.getFileCount() Job.Hierarchy Text Indexed Job.getHierarchyPath() Job.IsFile Boolean Job.isFile() Job.IsFolder Boolean Job.isFolder() Job.JobState Text Job.getJobState() Job.Name Text Job.getName() Job.NameProper Text Job.getNameProper() Job.Path Text Job.getPath() Job.Priority Integer Job.getPriority() Job.PrivateData Text Job.getPrivateData() Job.Size Text -- Job.UniqueNamePrefix Text Job.getUniqueNamePrefix() Job.UserName Text Job.getUserName() Job.FileCreationDate Date The creation date/time of the job file or folder as taken from file system File(job.getPath()).created Job.EmailBody Text The email body text in the email info associated with the job Job.getEmailBody() Job.NestedName Indent=” “ Text Indexed A list of indented names (including extension) for all files and folders in the job; by default each level indents with 4 spaces; on a particular level names are sorted alphabetically; see example below The Indent argument specifies the string added for each indentation level (default value is 4 spaces) Script that recursively iterates over job contents Nested name example: 304 Enfocus Switch 10 The variale [Job.NestedName:Prefix="-> ",Indent=". "] might be replaced by the following lines: -> -> -> -> -> -> My job folder . First.pdf . Second.pdf . Subfolder . . Readme.txt . Third.pdf The following variables access a job's occurrence trail to provide information on the job's origin and on why the job was sent to the problem jobs folder. Each of the variables access the most recent occurrence of a particular type, as listed in the table. Variable name Data type Most recent occurrence of type Scripting API equivalent Job.FailElement Text Failed Occurrence.getElement() Job.FailFlow Text Failed Occurrence.getFlow() Job.FailMessage Text Failed Occurrence.getLocalizedMessage() Job.FailModule Text Failed Occurrence.getModule() Job.FailTime Date Failed Occurrence.getTimeStamp() Job.Origin Text Produced Occurrence.getOrigin() Metadata group These variables allow access to an arbitrary field in any dataset associated with the job (external metadata or embedded metadata). There is a variable for each data type supporting the appropriate formatting and/or indexing arguments. This enables the user to express the expected data type for the metadata value and control its formatting. Variable name Data type Metadata.Text Text Metadata.TextIndexed Text Indexed Metadata.Boolean Boolean Metadata.Integer Integer Metadata.Rational Rational Metadata.Date Date Selecting a data field The variables in the Metadata group support the following arguments for selecting a particular metadata field from a particular dataset. 305 Enfocus Switch 10 Argument Value Dataset The name of the external dataset to be accessed, or empty/missing to indicate the embedded dataset Model The data model used for querying the data set; when empty/missing the data model is derived from the dataset; allowed values are “XML”, “JDF” and “XMP” This argument can be omitted except when forcing a JDF data model to be queried using regular XML semantics (that is, using “evalToString” rather than “getString”) Path The location path or expression for selecting a field (or calculating a value) using syntax appropriate for the data model: • XML: XPath expression (which includes XPath location paths) • JDF: JDF location path (which is really the same as an XPath location path) • XMP: XMP location path • All prefixes used in the location path or expression must occur in the default namespace map for the data set; there is no way to specify explicit mappings Data type conversions Switch does not guarantee that the value of a variable in the Metadata category conforms to the string representation of its data type. The user is responsible for selecting the correct data type by using the appropriate variable in the Metadata category. The variable is always set to the string value of the query (for Text Indexed, each item in the list is converted separately). In other words: • For the JDF and XMP data models there is never a conversion, because the result of the query is always a string (the text content of the node specified by the location path). • For the XML data model, the result of the XPath expression is converted to a string using XPath semantics (unless it was a string to begin with). Photo group These variables access embedded metadata fields in the EXIF format (synchronized with Adobe XMP). The third column indicates the hexadecimal EXIF tag corresponding to each variable. Variable name Data type XMP location path EXIFF tag Photo.ApertureValue Rational exif:ApertureValue 0x9202 Photo.BrightnessValue Rational exif:BrightnessValue 0x9203 Photo.ColorSpace Integer exif:ColorSpace 0xA001 exif:CompressedBitsPerPixel 0x9102 Photo.CompressedBitsPerPixel Rational 306 Enfocus Switch 10 Variable name Data type XMP location path EXIFF tag Photo.Contrast Integer exif:Contrast 0xA408 Photo.CustomRendered Integer exif:CustomRendered 0xA401 Photo.DateTimeDigitized Date exif:DateTimeDigitized 0x9004 & 0x9292 Photo.DateTimeOriginal Date exif:DateTimeOriginal 0x9003 & 0x9291 Photo.DigitalZoomRatio Rational exif:DigitalZoomRatio 0xA404 Photo.ExposureBiasValue Rational exif:ExposureBiasValue 0x9204 Photo.ExposureIndex Rational exif:ExposureIndex 0xA215 Photo.ExposureMode Integer exif:ExposureMode 0xA402 Photo.ExposureProgram Integer exif:ExposureProgram 0x8822 Photo.ExposureTime Rational exif:ExposureTime 0x829A Photo.FlashEnergy Rational exif:FlashEnergy 0xA20B Photo.FlashFired Boolean exif:Flash/exif:Fired 0x9209 bits Photo.FlashFunction Boolean exif:Flash/exif:Function 0x9209 bits Photo.FlashMode Integer exif:Flash/exif:Mode 0x9209 bits Photo.FlashRedEyeMode Boolean exif:Flash/exif:RedEyeMode 0x9209 bits Photo.FlashReturn Integer exif:Flash/exif:Return 0x9209 bits Photo.FNumber Rational exif:FNumber 0x829D Photo.FocalLength Rational exif:FocalLength 0x920A Photo.FocalLengthIn35mmFilm Integer exif:FocalLengthIn35mmFilm 0xA405 Photo.FocalPlaneResolutionUnit Integer exif:FocalPlaneResolutionUnit 0xA210 Photo.FocalPlaneXResolution Rational exif:FocalPlaneXResolution 0xA20E Photo.FocalPlaneXResolution Rational exif:FocalPlaneYResolution 0xA20F Photo.GainControl Integer exif:GainControl 0xA407 Photo.ImageUniqueID Text exif:ImageUniqueID 0xA420 Photo.ISOLatitude Integer exif:ISOSpeedRatings/*[2] 0x8827 Photo.ISOSpeed Integer exif:ISOSpeedRatings/*[1] 0x8827 307 Enfocus Switch 10 Variable name Data type XMP location path EXIFF tag Photo.Lens Text aux:Lens -- Photo.LightSource Integer exif:LightSource 0x9208 Photo.MaxApertureValue Rational exif:MaxApertureValue 0x9205 Photo.MeteringMode Integer exif:MeteringMode 0x9207 Photo.PixelXDimension Integer exif:PixelXDimension 0xA002 Photo.PixelYDimension Integer exif:PixelYDimension 0xA003 Photo.Saturation Integer exif:Saturation 0xA409 Photo.SceneCaptureType Integer exif:SceneCaptureType 0xA406 Photo.SensingFunction Integer exif:SensingFunction 0xA217 Photo.Sharpness Integer exif:Sharpness 0xA40A Photo.ShutterSpeedValue Rational exif:ShutterSpeedValue 0x9201 Photo.SpectralSensitivity Text exif:SpectralSensitivity 0x8824 Photo.SubjectDistance Rational exif:SubjectDistance 0x9206 Photo.SubjectDistanceRange Integer exif:SubjectDistanceRange 0xA40C Photo.UserComment Alt Text exif:UserComment 0x9286 Photo.WhiteBalance Integer exif:WhiteBalance 0xA403 Stats group These variables access statistics derived from the actual file contents for a number of supported file formats. The values are empty for a job in an unsupported file format and for a job folder. File format Refer to the documentation of the FileStatistics class on page 486 for a list of supported file formats. Variable name Data type Scripting API equivalent Stats.FileFormat Text FileStatistics.getFileFormat() Content statistics The Stats group includes an additional variable for each additional statistic supported by the FileStatistics class (see Supported statistics). The variable has the same name and data type as the statistic (where string maps to Text and string list maps to Text Indexed). 308 Enfocus Switch 10 Variable name Data type Supported for Stats.NumberOfPages Integer All supported formats Stats.SamplesPerPixel Integer JPEG, TIFF, PNG Stats.PixelXDimension Integer JPEG, TIFF, PNG Stats.PixelYDimension Integer JPEG, TIFF, PNG Stats.ColorMode Integer JPEG, TIFF, PNG Stats.ColorSpace Integer JPEG, TIFF, PNG Stats.ICCProfile Text JPEG, TIFF, PNG Stats.Colorants Text Indexed TIFF Stats.CellWidth Integer TIFF Stats.CellLength Integer TIFF Stats.TileWidth Integer TIFF Stats.TileLength Integer TIFF Stats.ColorIntent Integer PNG Stats.Version Text PDF Stats.PageWidth Rational PDF Stats.PageHeight Rational PDF Stats.PageLabels Text Indexed PDF Stats.Colorants Text Indexed PDF Stats.Fonts Text Indexed PDF Stats.SecurityMethod Text PDF Stats.PageBoxesEqual Boolean PDF Stats.MediaBoxWidth Integer PDF Stats.MediaBoxHeight Integer PDF Stats.CropBoxWidth Integer PDF Stats.CropBoxHeight Integer PDF Stats.BleedBoxWidth Integer PDF Stats.BleedBoxHeight Integer PDF 309 Enfocus Switch 10 Variable name Data type Supported for Stats.TrimBoxWidth Integer PDF Stats.TrimBoxHeight Integer PDF Stats.ArtBoxWidth Integer PDF Stats.ArtBoxHeight Integer PDF Stats.PDFXVersionKey Text PDF Stats.ColorSpaceFamilies Text Indexed PDF Stats.TransparentColor Boolean PDF Stats.FontTypes Text Indexed PDF Switch group These variables are Switch-specific. The third column indicates the scripting API function that returns the variable's dynamic value. Variable name Data type Scripting API equivalent Switch.Counter Text -- (see below) Switch.Date Date -- (the current date/time) Switch.ElementName Text Switch.getElementName() Switch.FlowName Text Switch.getFlowName() Switch.Language Text Environment.getLanguage() Switch.LanguageEnvironment Text Environment.getLanguageEnvironment() Switch.ServerName Text Environment.getServerName() Switch.OutgoingName Text Indexed A list of names for the outgoing connections in alphabetical order; if a connection name is empty the target folder name is used as a fallback; if the folder name is empty as well, the connection is not listed Script that iterates over connections, determines the (fallback) name and sorts the list Counter operation The Switch.Counter variable evaluates to an automatically incrementing decimal integer with a fixed number of digits. For example, if the variable has never been used before, it will evaluate 310 Enfocus Switch 10 to “00001”. Next time, it will evaluate to “00002” and so forth. After the counter reaches “99999” it circles back to “00000”. The most recently used value of the counter is retained across multiple invocations of the Switch server. Counter: number of digits The Width argument specifies the number of decimal digits in the number; leading zeroes are inserted when needed. The default value for width is 5; the minimum value is 1 and the maximum value is 15. An invalid value is replaced by the nearest valid value. The internal counter is always 15 digits wide; the Width argument specifies how many of the right-most digits are actually shown. Identifying counters A counter variable refers to a particular physical counter through an identifier (ID). Switch uses the same physical counter for all counter variables with the same ID, even if these variables are used in properties of a different flow element or in a different flow (in the same Switch instance). A physical counter is incremented each time a counter variable with its ID is evaluated, regardless of where the variable occurred. A counter variable can explicitly specify an ID or it can rely on the default value. If the “ID” argument is present and has a non-empty value, this explicitly specifies the ID. Otherwise a default ID is generated that is unique to the flow element in which the counter is used. This makes the counter variable “local”. If a property uses the same counter variable more than once, each invocation of the variable is deemed a new invocation and will cause the counter to be incremented. For example, assuming no counters have been used yet in a flow element, the property value Demo [Switch.Counter] - [Switch.Counter] evaluates to Demo 00001 - 00002 16.2 Metadata Embedded metadata Switch offers direct access to metadata embedded in a job in the EXIF, IPTC and Adobe XMP formats, without the need for a separate “pick-up” action. All Switch product flavors provide read-only access to embedded metadata through variables; PowerSwitch offers read-write access to embedded metadata through scripting. Also see "Metadata overview". Embedded metadata formats Switch supports the following embedded metadata formats: 311 Enfocus Switch 10 Format Description Reference EXIF A binary format designed to store information about a photograph Exif Version 2.2 specification dated April 2002 (JEITA CP-3451) Generated by all digital cameras and used by many desktop applications and asset management systems IPTC A binary format designed to store IPTC – NAA Information news-related information in photographs Interchange Model Version 4 dated July 1999 Used by many applications including asset management systems IPTC Core Schema for XMP Version 1.0 Revision 8 dated March 2005 XMP An XML-based format defined by Adobe Embedded in images or compound documents; used by Adobe Creative Suite and many other applications Adobe XMP specification dated September 2005 Also see "Supported file formats" below. Read-only access through variables Switch allows the use of variables in the values of many text properties and for defining file filters. Variables provide access to run-time information about a job including embedded metadata fields. Examples of embedded metadata fields that can be accessed through variables include: Group Type of information Metadata format Doc Title, keywords, author(s), copyright terms XMP IPTC Contact, location, headline, instructions IPTC Image Resolution, orientation, color mode EXIF (TIFF tags) Photo Exposure time, aperture, focus, flash EXIF (EXIF tags) Read-write access through scripting PowerSwitch offers complete access to embedded metadata through the scripting API: • The Job.getEmbeddedDataset() function retrieves a dataset object representing the job's embedded metadata. • The XMP data model query functions allow reading fields in the embedded dataset. • The XMP data model update functions allow writing or updating fields in the embedded dataset for certain supported file formats. Rather than providing separate data models for each embedded metadata format, Switch synchronizes the binary EXIF and IPTC tags with the XMP properties – offering a unified view of all metadata using the XMP data model. See Supported file formats on page 313. 312 Enfocus Switch 10 Supported file formats The following table lists the embedded metadata capabilities for the supported file formats. File format Metadata access JPEG, TIFF XMP packet handling EXIF & IPTC synchr. Image data synchr. Read and write (*) Smart read and write (*) For reading and writing (*) For reading Photoshop Read and write (*) Smart read and write (*) For reading and writing (*) None PNG Read and write (*) Smart read and write (*) None For reading PDF Read and write (*) Smart read and write (*) None None InDesign, PostScript Read-only Smart read-only None None Other formats Read-only Generic read-only None None (*) Write access is available only through scripting in PowerSwitch XMP packet handling There are two distinct methods to locate XMP packets embedded in a file: • Scan the complete file for the magic markers at the head and tail of a packet: this works for any file format, but may possibly locate the wrong packet in case a composite document contains multiple packets. • Interpret the file format’s structure to track down the packet: this guarantees that the correct packet has been located and it is usually much faster, but it requires a specific algorithm for each distinct file format. As indicated in the table, Switch offers three levels of support for embedded XMP packets depending on the file format: • Smart read and write: interprets the file format to allow reading, updating and inserting an XMP packet. • Smart read-only: interprets the file format to locate the appropriate document-level XMP packet but does not allow changes. • Generic read-only: uses generic packet scanning to locate one of the XMP packets in the document; does not allow changes. EXIF and IPTC synchronization As indicated in the table, for some file formats Switch performs two-way synchronization between binary EXIF and IPTC tags on the one hand and XMP properties on the other hand, similar to the behavior of the Adobe Creative Suite applications. For supported file formats, when creating the embedded dataset for a job, Switch performs these steps: 313 Enfocus Switch 10 • Locate the primary embedded XMP packet and parse it into an XMP object model; if there is no XMP packet start with an empty XMP object model. • Read the appropriate binary EXIF and IPTC tags, if present and merge their values into the XMP object model as the equivalent XMP properties. • Offer access to the resulting unified XMP object model. For supported file formats, when saving changes for a writable embedded dataset, Switch performs these steps: • If any changes were made to the dataset as compared to the original XMP packet, save the complete unified XMP information in an updated or inserted XMP packet. • If changes were made to one or more synchronized properties that are "user-editable", update or insert the corresponding binary EXIF or IPTC tags. Properties that reflect characteristics of the image (and thus should never be edited by a user) are not updated in the binary tags. Image data synchronization As indicated in the table, for some file formats Switch retrieves basic information about the image from the image data itself and writes this information to the appropriate fields in the XMP packet. This ensures that the following fields are always present for these formats: Variable name XMP location path Image.ColorMode photoshop:ColorMode Image.ICCProfile photoshop:ICCProfile Image.SamplesPerPixel tiff:SamplesPerPixel Photo.ColorSpace exif:ColorSpace Photo.PixelXDimension exif:PixelXDimension Photo.PixelYDimension exif:PixelYDimension Locating the backing file The backing file for an embedded dataset is determined as follows: • If the job is an individual file, use it as the backing file. • Otherwise if the job folder immediately contains a single Adobe InDesign file (that is, at the uppermost level), use that InDesign file as the backing file. • Otherwise use the job folder path for the backing file and return an empty read-only dataset. External metadata Switch offers substantial support for importing, exporting, transforming and using metadata through a combination of: • Standard tools for picking up and exporting metadata associated with a job. • Complete access to metadata from the Switch scripting environment. For example, using simple script expressions you can route a job and set its processing parameters based on metadata provided with the job. Also see metadata overview. 314 Enfocus Switch 10 Picking up metadata Switch allows permanently associating metadata with a job moving through the flow (by storing a reference to it in the job's internal job ticket). Each distinct set of metadata fields (for example, a JDF job ticket or an XMP packet) are stored in a separate metadata dataset. Switch supports several types of datasets, each with a specific data model that determines the semantics for querying values from the dataset. See below for information on supported data models. Metadata can originate from a number of different sources including a job ticket provided with a job, an XMP packet embedded in a file, statistics derived from a file’s contents and manual data entry through SwitchClient. Certain flow elements, including several built-in metadata pickup tools, can associate a new metadata dataset with a job being processed through the tool. Each dataset is given a unique name. Therefore, multiple datasets of the same type can be associated with a job (for example: two JDF job tickets, each in its own dataset with a distinct name). To pickup metadata from a particular source, a flow designer must explicitly place the appropriate pickup tool or configurator in the flow, at a location before the metadata is actually queried. See below for a list of typical metadata sources and the corresponding Switch tools. Using metadata The Switch scripting API provides access to the contents of all metadata datasets already associated with a job and offers the appropriate functions for querying metadata values in each dataset, depending on its data model. Furthermore, the scripting API allows adding a new dataset or replacing an existing one. Using script expressions, a flow can route a job and set its processing parameters based on the contents of metadata fields associated with the job. Script elements offer complete freedom for importing, exporting, transforming and using metadata at will. Variables in the Metadata group provide access to any external metadata field associated with a job. Switch allows the use of variables in the values of many text properties and for defining file filters. Updating metadata The datasets picked up in the manner described above are called external datasets, as opposed to the embedded dataset which references information stored inside the file - see embedded metadata. Switch does not support updating the value of individual metadata fields within an external dataset. This limitation does not apply to an embedded dataset (see Read-write access through scripting on page 312) or to hierarchy info and email info (which is stored directly in the internal job ticket and not in a metadata dataset). Note that, despite this limitation, it is possible to replace an external dataset as a whole by a new version. Exporting and transforming metadata Any metadata dataset associated with a job can be exported as a separate file (in the same format) using the export metadata tool. The result can be further transformed to an appropriate XML, HTML or text file using the XSLT transform tool. Metadata data models Switch supports the following metadata data models and corresponding querying mechanisms: 315 Enfocus Switch 10 Data model Description Query mechanism Scripting API XML Any well-formed XML file (with or XPath 1.0 Dataset class, XML without XML namespaces); refer to the expression and/or data model XML 1.0 specification location path JDF A JDF file conforming to the JDF 1.3 specification XPath 1.0 location Dataset class, JDF path data model XMP An Adobe XMP packet or file conforming to the Adobe XMP specification dated September 2005 Adobe XMP location path (subset of XPath) Dataset class, XMP data model Opaque An arbitrary data file (allows associating information such as a human readable report with a job) None Dataset class, Opaque data model Metadata resources The following table lists various metadata sources and the corresponding metadata data models. The default dataset name can be overridden in most cases to allow associating more than one dataset of the same type with a job. 316 Source Pickup tool Data model Default dataset name Email message components Mail receive XML Email Manual entry in SwitchClient Fields defined in Submit point or Checkpoint XML Submit or Check Separate XML file XML pickup XML Xml Separate JDF file JDF pickup JDF Jdf Separate XMP file XMP pickup XMP Xmp Embedded XMP packet XMP pickup XMP Xmp Any data file Opaque pickup Opaque Opaque Adobe Acrobat JDF Uncompress MIME file; then JDF pickup JDF Jdf QuarkXPress Job Jacket JDF pickup JDF Jdf PDF contents statistics Apago PDFspy configurator XML Pdf Preflight results callas pdfInspektor or Enfocus PitStop Server or Markzware FlightCheck XML Xml Enfocus Switch 10 Source Pickup tool Data model Default dataset name Professional configurator (with XML report); then XML pickup Text log or PDF preflight report Any configurator with outgoing traffic Opaque light connections (set the "carry this type of files" property to "data with log") Log Pickup mechanisms The metadata pickup tools (XML pickup, JDF pickup, XMP pickup) allow associating metadata from various sources as a metadata dataset with a job’s internal job ticket. The tools support several distinct mechanisms to locate the metadata source and its corresponding asset, as described in the following subsections. Terminology • Metadata source: the file (or sometimes the portion of a file) that contains the metadata to be picked up. • Asset: the file or job folder that is being described by the metadata and that will be moved along in the flow after its internal job ticket has picked up the metadata. • Pickup mode: a particular mechanism/algorithm to locate the metadata source and its corresponding asset. Metadata alongside asset The metadata source (which is always a single file) and the corresponding asset (which may be a file or a job folder) are both placed in one of the pickup tool’s input folders (the same folder or a different one) at the top level (that is, immediately under the input folder). Both have the same name but a different filename extension. The supported filename extensions are defined through flow element properties for the pickup tool. The pickup tool waits until both the asset and the metadata source have arrived and then performs the following steps: • Create a new metadata dataset with a copy of the metadata source as its backing file. • Associate this dataset with the asset’s internal job ticket under the dataset name specified through a flow element property for the pickup tool (replacing any existing association with the same name). • Remove the metadata source. • Move the asset to the output folder. Property Description Metadata filename pattern One or more file types or filename extensions that are recognized as metadata files Orphan timeout (minutes) The time delay after which an incoming metadata source or an incoming asset is considered orphaned because it can’t be matched to a counterpart Orphaned jobs are moved to the problem jobs folder 317 Enfocus Switch 10 Metadata in job folder asset The asset (which is always a job folder) is placed in one of the pickup tool’s input folders and the metadata source (which is always a single file) resides inside the job folder. The pickup tool provides flow element properties for locating the metadata source within the job folder (nesting level and filename pattern). The pickup tool waits until the job folder has fully arrived and then performs the following steps: Locate the metadata source; if none is found the next two steps are skipped. • Create a new metadata dataset with a copy of the metadata source as its backing file. • Associate this dataset with the asset’s internal job ticket under the dataset name specified through a flow element property for the pickup tool (replacing any existing association with the same name). • Move the job folder asset to the output folder. Note that the metadata source is not removed in this case. Property Description Metadata file filters File filter that determines which of the files in the job folder represents the metadata; files are scanned starting at the topmost nesting level (at each level the scan order is arbitrary); the file filter is evaluated in the context of each file and the first file that matches is used as metadata source Search depth The number of nesting levels in which to look for the metadata; "1" means the topmost level only Metadata refers to asset The metadata source (which is always a single file) is placed in one of the pickup tool’s input folders and it contains a reference to the asset (which may be a file or a job folder) in some other location accessible through the file system. Thus the asset itself is never directly placed in a flow input folder. The pickup tool provides flow element properties for locating the asset reference inside the metadata source (a location path) and for determining whether the original copy of the asset should be removed or not. When the pickup tool detects an incoming file, it expects it to be a metadata source and it performs the following steps: • Locate the asset reference in the metadata source, locate the asset, and ensure that it is readable. If any of these steps fail, report an error and quit. 318 • Create a new metadata dataset with a copy of the metadata source as its backing file. • Associate this dataset with the asset’s internal job ticket (which in fact is the metadata source’s job ticket) under the dataset name specified through a flow element property for the pickup tool (replacing any existing association with the same name). • Copy or move (depending on the property settings) the asset from its original location to the output folder. • Remove the metadata source. Enfocus Switch 10 Property Description Asset path A script expression that evaluates to the file or folder path referring to the asset to be copied (*) Delete asset Determines whether the original copy of the asset is deleted after it has been copied into the flow; this can be an explicit value or a script expression (*) (*) Usually script expressions are evaluated in the context of an incoming job before the tool acts on the job. As an exception to this rule, here the script expressions are evaluated AFTER the incoming metadata has been picked up (but before the asset has been located) so that the script expression can access the metadata to calculate its return value. Metadata embedded in asset The asset (which is always a single file) is placed in one of the pickup tool’s input folders and the metadata source is embedded in the asset file according to some format (which depends on the pickup tool). When the pickup tool detects an incoming file, it expects is to be an asset and it performs the following steps: • Extract the metadata source from the asset and store it into a standalone file; if the asset does not contain embedded metadata of the appropriate type, the next two steps are skipped. • Create a new metadata dataset with this standalone file as its backing file. • Associate this dataset with the asset’s internal job ticket under the dataset name specified through a flow element property for the pickup tool (replacing any existing association with the same name). • Move the asset file to the output folder. Property Description Synchronize EXIF/IPTC If set to "Yes", for supported file formats the values of binary EXIF and fields IPTC tags are merged with the embedded XMP packet before it is picked up (the packet embedded in the asset remains unchanged) If set to "No", the embedded XMP packet is picked up without change if present Metadata is asset The pickup tool with a fourth pickup mode: "Metadata is asset" is used to implement for JDF, XML and XMP pickup. When a job (example: JDF) file is sent to a pickup tool using this feature, the resulting file is the JDF file with its own content as JDF metadataset. So tools have only three properties: Name, Dataset name and Pickupmode. There is no need for additional properties when this pickup mode is selected. Email message schema In PowerSwitch the mail receive tool automatically picks up the contents of incoming email messages as metadata. Specifically, for each incoming message the mail receive tool creates a metadata dataset that contains the relevant components of the message, such as the sender, 319 Enfocus Switch 10 to, cc, and reply-to addresses and the complete email body text. This dataset is then associated with the job ticket for all files delivered by the message under the standard dataset name “Email”. Data model and schema The email message dataset uses the XML data model with a simple schema without namespaces. The XML document element name is “email”. It contains an element for each message component as described in the table below; each element contains the text of the corresponding message component. If a message component is not present or it contains only white space, the corresponding element is missing. Leading and trailing white space is removed (except for the body text, where it may be significant). Otherwise, no parsing or reformatting is performed. For example, a list of email addresses (including its separators) is stored exactly as it was provided in the incoming message. Element name Message component message-id An identifier for the message (assigned by the host which generated the message) subject The subject line of the message date The date and time when the message was sent (formatted as it appeared in the message header) from The email addresses of the author or authors of the message sender The single email address of the sender of the message; if there is a single author the sender is identical to the author, otherwise the sender should be one of the authors reply-to The email addresses to which a response to this message should be sent to The email addresses of the primary recipients of this message cc The email addresses of the secondary recipients of this message body A plain-text rendition (without markup) of the body text of this message Processing results schema The FTP send and Mail send tools produce a log file with processing results. This log file is carried along the outgoing log connections. In PowerSwitch this log file can be associated with the job as a metadata dataset by using a "data with log" connection (see the "Carry this type of files" property of traffic-light connections). Data model and schema The processing results log file uses the XML data model with a simple schema without namespaces. The XML document element name is “ProcessingResults”. It contains a sequence of elements with a name and contents as described in the following table. If a data item is not applicable, the corresponding element may be missing. 320 Enfocus Switch 10 Element name Data type Description Destination Text For FTP, the complete target URL for the job For Mail, the list of destination email addresses FlowElementName Text The name of the flow element that produced this log file (as displayed in the canvas) FlowElementType Text The type of the flow element that produced this log file (e.g. “FTP send” or “Mail send”) FlowName Text The name of the flow (as displayed in the flows pane) containing the flow element that produced this log file JobArrivalStamp Integer The arrival stamp for the processed job as a signed integer number; a lower arrival stamp indicates a job that arrived in the flow earlier (and vice versa) Several jobs may have the same arrival stamp, for example when multiple jobs are generated from the same original job JobByteCount Integer The size in bytes of the processed job; if it is a job folder, all files in subfolders are included in the count, recursively JobExtension Text The processed job’s filename extension, or the empty string if there is none JobFileCount Integer The number of files in the processed job, including all files in subfolders, recursively (folders and subfolders themselves do not contribute to the count) JobFiles Sequence of “File” A sequence of one or more “File” elements elements representing the files in the processed job in arbitrary order; each File element has the Text data type and contains the relative path of a file within the job (using a forward slash as path separator) Folders are NOT represented in this list JobIsFile Boolean True if the processed job is a single file, false otherwise JobIsFolder Boolean True if the processed job is a folder, false otherwise JobName Text The file or folder name for the processed job, including filename extension if present, but excluding the unique filename prefix JobNameProper Text The file or folder name for the processed job excluding filename extension and excluding the unique filename prefix 321 Enfocus Switch 10 Element name Data type Description JobOrigin Text An indication of the origin of the processed job before it was injected in the flow; for example, a Submit point writes the absolute path of the original job (on the client machine) in this field JobPath Text The absolute file or folder path for the processed job as it resided in the input folder before being processed, including unique filename prefix JobPriority Integer The job priority assigned to the processed job as a signed integer number JobUniqueNamePrefix Text The unique filename prefix used for the processed job, without the underscores; for a job called “_0G63D_myjob.txt” this would be “0G63D” JobUserName Text The user name associated with the processed job, if any ProcessingEnded Date The date-time when the operation was completed (in the ISO 8601 format also used for Switch date variables) ProcessingStarted Date The date-time when the operation started (in the ISO 8601 format also used for Switch date variables) ServerAddress Text The name or IP address of the destination server ServerLoginName Text The user name used to login at the destination server ServerPort Integer The port of the destination server Defining metadata fields The Submit point and Checkpoint tools allow defining metadata fields which can be viewed and/or edited by the SwitchClient user when submitting or moving along a job. The values of display-only fields are determined by evaluating a script expression so that they can depend on metadata associated with the job. After a user submits a job or moves it along, the values of editable fields (as entered by the user) are associated with the job as metadata (with the client fields schema). Defining metadata fields 322 Enfocus Switch 10 The property editor for editable metadata fields allows creating an ordered list of field definitions (using the buttons under the listbox on the left-hand side). For each field definition, the property editor allows editing the properties described in the table below (using the edit fields and controls on the right-hand side). Property Description Label The label shown in front of the field. Description Description for this field shown as tool tip when user hovers over the label or the data field in SwitchClient. Show if parent equals... The value (string) of the parent field on which this child field depends. Dependency is set using the arrow keys in the field list. This property is grayed out if no dependency is set. Data type The field’s data type: Dropdown list (Single-line text, Password, Date, Number, Hours and minutes, No-yes list, Dropdown list). Data format Only available when "Data type" is set to text or number. Format the metadata field using a regular expression. Leave empty to not set any special formatting (Single-line text, Regular expression). Data values Only available when "Data type" is set to dropdown list. Define the drop down list (Multi line text, Multi line text with variables, Script expression, Values from dataset, Values from database). Default value The default value for the field (Single-line text, Single-line text with variable, Condition with variables, Date and Script expression). 323 Enfocus Switch 10 Property Description In case "Data type" is Dropdown list with dynamically generated content, this default value might not correspond with one of the list items. In this case the "Default value" is empty in SwitchClient. In case the "Data type" format and the default values format do not match, Switch tries to force the formatting of the data type property (example, Data type is hour and minute and the Default value is a text variable). If forcing is not possible, the Default value is empty in SwitchClient. Remember last value If set to "Yes", SwitchClient displays the value most-recently entered by the user in this field. In case "Data type" is Dropdown list with dynamically generated content, the previous value might become irrelevant. The previous value is however stored so we can also compare it with the content of the list. If the stored value matches one of the data values, then this value is shown. If the stored value no longer appears in the list, no value is shown. Value is required If set to "Yes", SwitchClient requires that the user enters a non-blank value (relevant only if Data type is string). Read only Display metadata field Set this to "Yes" to make this field read only. When set to "Yes" this field is displayed or hidden when set to "No". If set to yes, SwitchClient shows the user a list of values determined by evaluating script expressions in the context of the job (so that the values can be derived from metadata attached to the job); see Using metadata on page 315 and Defining metadata fields on page 322 for more information. Note: For Checkpoint tool, when users select "Values from dataset" in Data Values, Meatadata Variables pane appears using which XPath expressions can be created. The regular variables from a dataset only returns one single value where as the result of the Xpath can be a list of values. Note: For both Submit point and Checkpoint tools, when users select "values from database", Variables from database pane appears. The regular variables from database only returns one single record where as the result of the SQL statement can be a list of records. Update metadata Click the button present below the Metadata fields list to access a dialog box which displays a two level tree: first level table tree of all Submit points (level 1) and second level for their metadata fields (level 2). In the list, a Submit point can be checked (including all its fields) or an individual field can be selected. The fields that are checked are added to the Metadata fields list. Possible dependencies are preserved. The fields from a Submit point are clearly marked (using color or some other mark). Therefore, user can distinguish such fields from a newly added Checkpoint field. All properties from these 324 Enfocus Switch 10 fields are grayed-out, except the Show if parent equals ... property, the Read only property and the Display metadata field property. Behavior of updated fields in SwitchClient The metadata from the submit dataset is shown as the default value. SwitchClient users can read and change this data (if allowed). The new value is written to the check dataset. So technically, this is not a real update from the data but a copy from a field of one dataset (submit) to another (check). The Switch user can of course use the same name for the submit and check dataset. In this case the first dataset is overwritten. If metadata fields are changed or added on a Submit point, the user will probably wish to update those fields in the Checkpoint too. Switch however does not offer an automatic update mechanism, so the user has to delete the field and re-import it again. If users delete a field from a Submit point, they are also responsible for deleting that field from the Checkpoint metadata list as well. If a user does not remove the deleted field from the Checkpoint metadata list, then the field is still shown in SwitchClient but the default value will then be empty. Defining display-only fields The property editor for display-only metadata fields allows creating an ordered list of field definitions (using the buttons under the listbox on the left-hand side). For each field definition, the property editor allows editing the properties described in the table below (using the edit fields and controls on the right-hand side). 325 Enfocus Switch 10 Property Description Label The label shown in front of the field Description A hint displayed when the cursor hovers over the field Data type The field’s data type: Boolean or string Calculated value A script expression that evaluates to the value of the metadata field; it is evaluated in the context of the job being viewed by the user so that it can use metadata associated with the job Client fields schema The Submit point and Checkpoint tools pickup metadata fields entered by the SwitchClient user when submitting or moving along a job. Specifically, when a user submits a job and the list of field definitions in the Submit point's “Metadata fields” property is nonempty, the Submit point: • Creates a metadata dataset containing the contents of the metadata fields entered by the user. • Associates this dataset with the job ticket for the submitted job under the dataset name specified in the “Dataset name” property. Similarly, when a user moves along a job residing in a Checkpoint and the list of editable field definitions in the Checkpoint's “Metadata fields” property is nonempty, the Checkpoint creates a metadata dataset and associates it with the job’s job ticket under the specified dataset name. Note that a Checkpoint always creates a completely new dataset, i.e. it does not update or modify an existing dataset (even if the job was previously moved through the same or another Checkpoint). If the job already has dataset association with the same name, the reference to the old dataset is removed and replaced by the new one. Data model and schema The client fields dataset uses the XML data model with a simple schema without namespaces. The XML document element name is “field-list”. It contains a “field” element for each item in the list of editable metadata field definitions associated with the Submit point or Checkpoint under consideration. The “field” elements occur in the same order as in the list of field definitions, and a “field” element is present even if the corresponding field’s value is empty. Each “field” element in turn contains zero or one occurrence of each element listed in the table below. Within the contents of those child elements leading and trailing white space is removed. 326 Element name Description of element contents Element is present tag The field name; in the current implementation this Always is equal to the human-readable field label type The field’s data type; that is, "boolean", "string" or "choice" Always Enfocus Switch 10 Element name Description of element contents Element is present format A regular expression that matches the values allowed for the field (relevant only if data type is string) If type is string and if regexp is not blank required Equals "true" if the user is required to enter a If type is string non-blank value, "false" otherwise (relevant only if data type is string) value The value for the field: • For boolean data types: "true" or "false" • items Always For string data types: the value entered by the user after removing any leading and trailing white space (may be the empty string unless required is set to true) The field's possible choices if type is choice Introduction to XPath 1.0 XPath 1.0 is used in the Switch scripting API for querying the contents of XML documents in the XML and JDF data models and in the XML module. Note: The current version of Switch does not support XPath 2.0. Refer to the XPath 1.0 specification, the XML 1.0 specification, the XML namespaces specification, and widely available literature for full details on XPath 1.0. The remainder of this topic provides a brief introduction to a very small subset of XPath 1.0. Expressions and location paths XPath models an XML document as a tree of nodes. There are different types of nodes, including element nodes, attribute nodes and text nodes. XPath defines a way to address specific nodes in the node tree, to compute a string-value for each type of node and to perform more general calculations with these values. The primary construct in XPath is the expression. An expression is evaluated to yield an object, which has one of the following four basic types: • node-set (an unordered collection of nodes without duplicates). • boolean (true or false). • number (a floating-point number). • string (a sequence of Unicode characters). One important kind of expression is a location path. A location path selects a set of nodes. The result of evaluating an expression that is a location path is the node-set containing the nodes selected by the location path. Location paths can recursively contain expressions that are used to filter sets of nodes. 327 Enfocus Switch 10 Location paths A location path is a sequence of one or more location steps separated by a slash. Each location step in turn (from left to right) selects a set of nodes relative to the context node determined by the previous step. The initial context node is determined by the location path's context (for the data model queries in Switch this is always the document's root node; in the XML module it is the node being queried). A slash in front of a location path makes the location path absolute, that is, the "/" refers to the root node of the document. Here are some examples of location paths: para selects the para element children of the context node * selects all element children of the context node text() selects all text node children of the context node @name selects the name attribute of the context node @* selects all the attributes of the context node para[1] selects the first para child of the context node para[last()] selects the last para child of the context node */para selects all para grandchildren of the context node /doc/chapter[5]/section[2] selects the second section element in the fifth chapter element in the doc document element chapter//para selects the para element descendants of the chapter element children of the context node //para selects all the para descendants of the document root and thus selects all para elements in the same document as the context node //olist/item selects all the item elements in the same document as the context node that have an olist parent . selects the context node .//para selects the para element descendants of the context node .. 328 Enfocus Switch 10 selects the parent of the context node ../@lang selects the lang attribute of the parent of the context node para[@type="warning"] selects all para child elements of the context node that have a type attribute with value warning para[@type="warning"][5] selects the fifth para child element of the context node that has a type attribute with value warning para[5][@type="warning"] selects the fifth para child element of the context node if that child has a type attribute with value warning chapter[title="Introduction"] selects the chapter child elements of the context node that have one or more title child elements with string-value equal to Introduction //field[name="JobID"]/value selects all value elements in the document that have a parent field element and a sibling name element with string-value equal to JobID chapter[title] selects the chapter child elements of the context node that have one or more title child elements employee[@secretary and @assistant] selects all the employee child elements of the context node that have both a secretary attribute and an assistant attribute Expressions The location paths listed in the previous section contain a few examples of simple expressions used to filter nodes (such as @type="warning" to filter out elements with a particular attribute value). Expressions can also stand on their own, and can be used to express calculations based on the result of a location path. XPath provides a limited number of functions for use in expressions. Here are some examples of expressions: para evaluates to the text contents of the para element(s) @type evaluates to the text contents of the type attribute (2 + 3) * 4 evaluates to the number 20 number(@type) > 10 evaluates to true if the contents of the type attribute represents a number that is greater than 10; and to false otherwise count(//field) 329 Enfocus Switch 10 evaluates to the number of field elements in the document, regardless of their position in the node tree count(/doc/chapter[5]/section) evaluates to the number of section elements in the fifth chapter element in the doc document element string-length(normalize-space(para)) evaluates to the number of characters in the text contents of the para element, after removing leading and trailing white space and replacing sequences of white space characters by a single space Namespaces The examples above assume that the XML document being queried does not use namespaces. In practice however many XML documents do use namespaces to avoid conflicting element and attribute names when information of a different type or origin is mixed. A namespace is identified by a Unique Resource Identifier (URI) which resembles a web page address but in fact is just a unique string (most URIs do not point to an actual web page). Rather than repeating this URI each time, element and attribute names use a namespace prefix (a shorthand) to refer to a namespace. The mapping between namespace prefixes and namespace URIs is defined in namespace declarations in the XML file. For example: xml:lang is the name of a standard xml attribute for indicating a natural language jdf:node is the name of a node element in the JDF specification, assuming that the jdf prefix is mapped to the JDF namespace URI Namespaces and XPath If the XML file being queried uses namespaces, the XPath expressions and location paths must use namespace prefixes as well. The mapping between those prefixes and the corresponding namespace URIs must be passed to the query function separately, since this information can't be expressed in XPath. Note that namespace URIs must match between the XPath expression and the XML file; the namespace prefixes may differ. XPath does not have the concept of a default namespace. If the XML file being queried defines a default namespace, the XPath expression must specify a namespace prefix to refer to elements in that namespace. The default_switch_ns prefix can be used to specify elements using the default namespace. Introduction to Adobe XMP location paths The Adobe XMP specification dated September 2005 defines the XMP data model (the abstract node hierarchy represented by an XMP packet or file). Other Adobe publications define a mechanism to address a specific node in the XMP data model, using a syntax that is a (very small) subset of the XPath 1.0 location path syntax. In this documentation we refer to this mechanism as XMP location paths. 330 Enfocus Switch 10 XMP location path syntax An XMP location path points to a specific node in an XMP node hierarchy (whether the node exists or not). An XMP location path is a series of one or more XMP location steps separated by a slash. Each location step address the next child element, depending on the structure of the document. Each location step is one of the following: • A prefixed field name • An array index selector • A language selector A language selector may occur only as the very last location step. The first location step is always a prefixed field name. Field name A field name addresses a named element (also called a field). For example: xmp:SomeProperty Addresses a field named "SomeProperty" in the namespace to which the "xmp" namespace prefix is mapped. Index selector An index selector addresses an item in an array. Indices are one-based, that is, the first item in an array has index 1. The last item in an array can be addressed with the special index "last()". In all cases the index must be enclosed in square brackets and preceded by an asterisk. For example: *[1] *[4] *[last()] Address the first, the fourth and the last item of an array, respectively. Language selector A language selector addresses an item in a collection with language alternatives (a collection of strings with the same meaning but localized for different human languages). The language is indicated by a 2-letter language code (ISO 639), optionally followed by a 2-letter country code (ISO 3166). The special language code "x-default" indicates the default language. The language code must be embedded in special XPath syntax for addressing the xml:lang attribute. For example: *[@xml:lang='enUS'] *[@xml:lang='x-default'] Address U.S. English and the default language item, respectively. 331 Enfocus Switch 10 Examples The following examples address properties in the XMP Dublin Core schema, which is usually associated with the "dc" prefix. Thus these examples assume that the "dc" prefix is mapped to the Dublin Core namespace URI (http://purl.org/dc/elements/1.1/). Examples: dc:format Addresses the top-level data format property. dc:creator/*[1] Addresses the first item in the list of document creators, which by convention is the primary author of the document. dc:description/*[@xml:lang='x-default'] Addresses the default item in the list of language alternatives for the document's description. 332 Enfocus Switch 10 17. Developing scripts 17.1 Using SwitchScripter Finding your way around SwitchScripter To launch SwitchScripter: • • • Double-click the SwitchScripter application icon, or Double-click a Switch script package (a file with the ".sscript" filename extension), or Select a script element in the canvas and choose the "Edit script package" menu item in its context menu. SwitchScripter offers a workspace window to edit a single script package. SwitchScripter can display multiple instances of the workspace window at the same time. SwitchScripter Workspace window The SwitchScripter window offers a workspace with the following important areas (each of which is discussed in a separate topic): 333 Enfocus Switch 10 Workspace area Description Toolbar Contains tool buttons for the most frequently used functions Declaration pane Allows editing the script declaration, defining support for connections, injected properties and so on Fixture pane Allows setting up an emulated test environment so that you can test-run a script without attaching it to a flow Properties pane Serves to edit the properties of the item currently selected in the declaration or fixture pane Program pane Allows editing your script program in any of the supported scripting languages Message pane Displays log messages issued by your script or by the emulated run-time environment during testing The various panes can be shown or hidden by choosing the corresponding item in the View menu. Panes can be resized by dragging the separators between them, they can rearranged next to one another or overlaid as tabs by dragging their title bar and they can be undocked as a floating pane. All configuration settings are persistent across sessions. Also see Writing a script on page 340 and Testing a script on page 342. SwitchScripter Toolbar The toolbar offers a number of tool buttons for frequently used operations (all of which can be accessed via menu items as well). File Tool Description Create new Create a new empty script package Open Open an existing script package Save Save the script package being edited. View 334 Tool Description Declaration/Fixture pane Show the Declaration pane or the Fixture pane; toggle between these panes Properties pane Show or hide the Properties pane Enfocus Switch 10 Tool Description Messages pane Show or hide the Messages pane Edit Tool Description Undo Undo the most recent text editing operation in the Program pane (supports multipleundo) Redo Redo the most recently undone text editing operation in the Program pane Copy Copy the selected text in the Program pane to the clipboard Paste Paste the clipboard's text contents in the Program pane Delete Delete the selected text from the Program pane Test Tool Description Select entry point Select the entry point that will be invoked when the "Invoke entry point" button is pressed The drop-down menu offers a list of all entry points supported by the Switch scripting API; entry points that are not present in the currently visible script program (Program pane) are preceded by a red "unavailable" icon The menu item "script expression" is special in the sense that it indicates the main script body rather than a specific entry point; it is used for testing script expressions Invoke entry point Invoke the selected entry point in the currently visible script program (Program pane), in the context of the text fixture; progress is logged in the Messages pane This button is enabled only if the selected entry point is present in the currently visible script program, if the Fixture pane is visible, and (for evaluating script expressions and for entry points that take a job argument) if a job is selected in the Fixture pane Abort Abort script execution SwitchScripter Declaration pane 335 Enfocus Switch 10 The Declaration pane allows viewing and editing the information in the script declaration for the script package. When you select an item in the Declaration pane, the Properties pane displays the properties for that item. See Writing a script on page 340 for background information. Terminology In this topic the term "property" is used to mean two different things: • A property injected into the flow element to which this script package will be attached, or into its outgoing connections. • A property of the item selected in the SwitchScripter declaration pane (which may be the definition of an injected property!). This is confusing but hopefully the context of the term's use will resolve the ambiguities. Main script properties The properties displayed in the properties pane when you select the main script item in the Declaration pane (that is, "My Script" in the example above) are described in main script properties. Property definitions The "Flow element properties" and "Outgoing connections properties" sections of the script declaration define properties to be added to the property of flow element to which this script package will be attached or to the outgoing connections of that flow element. Each section can have any number of property definitions (including zero). Use the small tool buttons at the top of the Declaration pane to add, remove and reorder property definitions. In the above example, there are two flow element property definitions ("Argument 1" and "Argument 2") and a single outgoing connection property definition ("Injected"). The values of these injected properties are entered in the designer's Properties pane while designing a flow, and can be retrieved by the script at run time. The properties displayed in the Properties pane when you select one of the property definitions in the Declaration pane (that is, "Argument 1", "Argument 2" and "Injected" in the above example) are described in property definition properties. SwitchScripter Fixture pane 336 Enfocus Switch 10 The information setup through the Fixture pane defines a simulated run-time environment for script testing purposes, including: • The values of the properties for the flow element to which the script is considered to be attached. • The number of incoming and outgoing connections and the relevant property values for each. • A list of input jobs (files or job folders), and the corresponding job ticket and metadata information for each. • The target location for any output files of the test. The fixture information is stored in a fixture package alongside the script package (with the same filename but a different extension). The fixture is not part of the definition of a script and may be removed after the script has been tested. Basic fixture settings The following table describes the properties displayed in the Properties pane when you select the main item in the Fixture pane (that is, "My Script" in the example above). The values of these settings (except for the test folder path) can be accessed in the script at run-time through functions of the Switch class in the Switch scripting API. Property Description Test folder The absolute path of the folder in which to place files or folders provided to or generated by the script during testing Global data The set of global data presented to the script for all scopes Flow name The name of the flow to which the script is considered to be attached Element name The name of the flow element to which the script is considered to be attached Injected flow element properties Additional flow element properties as specified in the Declaration pane Incoming jobs The "incoming jobs" section of the fixture defines the jobs that are presented to the script as inputs during testing, including job ticket and metadata info, and the connection on which each job is to be presented. Use the small tool buttons at the top of the Fixture pane to add, remove and reorder job definitions. In the example above, there are two job definitions ("creaX-cmyk....pdf" and "creaX-spot....pdf"). The following table describes the properties displayed in the Properties pane when you select one of the job definitions in the Fixture pane. The values of these settings (except for the test file or folder path) can be accessed in the script at run-time through functions of the Job class in the Switch scripting API. 337 Enfocus Switch 10 Property Description File or folder The absolute path to the file or folder for this input job Enabled Defines whether this input job is indeed included in the simulated test environment (can be used to temporarily exclude a job) Connection name The name of the incoming connection on which this job is to be presented Hierarchy info The hierarchy path to be stored in the internal job ticket (each segment as a separate string, ordered from top to bottom) Email addresses A list of email addresses to be stored in the internal job ticket Email body text Email body text to be stored in the internal job ticket Job state The job state to be stored in the internal job ticket Private data A list of tag/value pairs of private script data to be stored in the internal job ticket Metadata datasets A list of metadata dataset references to be stored in the internal job ticket Outgoing connections The "outgoing connections" section of the fixture defines the outgoing connections, if any, that are presented to the script, including the values of relevant connection properties. Use the small tool buttons at the top of the Fixture pane to add, remove and reorder connection definitions. In the example above, there are two outgoing connection definitions ("Accepted" and "Rejected"). The following table describes the properties displayed in the Properties pane when you select one of the connection definitions in the Fixture pane. Property Description Connection name The name of the outgoing connection Enabled Defines whether this outgoing connection is indeed included in the simulated test environment (can be used to temporarily exclude a connection) Hold files If set to "Yes", the connection is on hold Include these files For filter connections, determines which files flow along this connection Exclude these files Include these folders Exclude these folders 338 For folder filter connections, determines which folders flow along this connection Enfocus Switch 10 Property Description Carry this type of files For traffic-light connections, determines whether this connection carries data files or log files Success out For traffic-light connections, determines whether a file moves along the connection depending on its success status Warning out Error out Injected connection properties Additional outgoing connection properties as specified in the Declaration pane SwitchScripter Program pane The Program pane offers a separate tab for each of the supported scripting languages (JavaScript, VBScript, AppleScript). Each tab contains a multi-line text editor for entering a script program in the corresponding language. The text editors use syntax coloring appropriate for the language being entered. The JavaScript editor also supports function name & argument completion as shown above. You can select the scripting languages being included in the script package (and thus enable/disable the corresponding tabs) by setting appropriate values for the "include xxxScript" properties in the Declaration pane. Also see Writing a script on page 340. SwitchScripter Properties pane 339 Enfocus Switch 10 The Properties pane allows viewing and editing the properties for the currently selected item in the Declaration pane or in the Fixture pane. The properties for each item are described in the Declaration pane and Fixture pane topics. This pane is very similar to the Properties pane in the Switch designer. SwitchScripter Message pane The Messages pane displays a list of log messages generated by test runs of the script (see testing a script). You can filter and sort the messages using the controls at the top of the pane. This pane is very similar to the Messages pane in the Switch designer. 17.2 Writing and testing a script Writing a script SwitchScripter's primary function is to create and edit script packages for use with PowerSwitch. A script package is an archive file (with the ".sscript" filename extension) that contains a script declaration, one or more alternate script programs and an optional icon for the script. Creating a new script To create a new script package for PowerSwitch from a blank sheet: 1. Launch SwitchScripter or, if it is already running, press the "Create new" tool button. 2. The newly created script package is setup for JavaScript; skip the next step if Javascript alone is required; otherwise select choice of scripting language(s) as explained in the next step. 3. In the Declaration pane, select the root element (representing the script as a whole) and set the "Include JavaScript/VBScript/AppleScript" properties according to your wishes (also see Selecting a scripting language). 4. Use the Declaration pane to further configure the script declaration, including supported connections and injected properties. 5. The Program pane has been initialized with a template (empty stubs) for the two most important entry points supported by the scripting API. Enter your custom program text inside the function body of the entry point(s) you need, remove the stubs for entry point(s) you do not need and add any other entry points you may need. 340 Enfocus Switch 10 6. Press the "Save" tool button to save your script package with an appropriate name in a location of your choice. 7. Verify the operation of your script as explained in "Testing a script", adjust the script and its declaration as desired and save the final result. Starting from an existing script In most cases it makes a lot of sense to start developing the script from an example obtained from the Enfocus web site or from another Switch user (see How to get more help on page 13 for pointers to these resources). To start developing your script package from an existing example: 1. Copy the example script package file under a new name (so that the original is preserved); do this in the system's file browser or by using the Save As menu item in SwitchScripter. 2. Double-click the copy to open it in SwitchScripter. 3. Adjust the configuration in the Declaration pane if needed (if the example is very similar to the script, change the script's name and perhaps its icon). 4. Adjust the program text in the Program pane as desired. 5. Press the "Save" tool button to save the script package. 6. Verify operation of the script as explained in Testing a script on page 342, adjust the script and its declaration as desired, and save the final result. Using a script in PowerSwitch To use a script package in PowerSwitch: 1. Create and save the script package in SwitchScripter. 2. Drag a script element onto the canvas in PowerSwitch. 3. Set the script element's "Script package" property to the file path of the script package. 4. Add the appropriate connections and configure any relevant properties for the script element and its connections. 5. Activate the flow that contains the script element. PowerSwitch retains just a reference to the script package (that is, it remembers the file's path rather than the file itself). Each time the flow containing the script element is deactivated and activated, the script package is reloaded afresh from the file. This means that the script package can be modified and try again in a very short cycle. Note: In contrast, when a flow is exported, the exported ".sflow" file contains a full copy of the script package file (that is, it is distributed with the flow). 341 Enfocus Switch 10 Script expressions A script expression is a brief JavaScript program used to calculate the value of a flow element property. Users can enter a script expression in a property editor dialog within PowerSwitch, that is they do not need SwitchScripter. However, SwitchScripter provides some functions to help test more complex script expressions; see Testing a script expression on page 343. Selecting a scripting language PowerSwitch supports three scripting languages (JavaScript, VBScript, AppleScript) as explained in the Scripting reference on page 367. In general, use JavaScript unless there is a good reason to select an operating system scripting language (like VBScript or AppleScript). JavaScript scripts are cross-platform, that is, they work without change on both Mac OS X and Microsoft Windows, and most of the PowerSwitch scripting examples available on the web or from other users will be in JavaScript. At the same time, JavaScript scripts have limited "external access". For example, there is no way to communicate with interactive applications and there is no access to operating system services. If these features are necessary, use AppleScript or VBScript. If required, build a cross-platform script package by including both an AppleScript and VBScript implementation. If a script package contains more than one script program, PowerSwitch selects one of the programs for execution by looking for them in this order: • The operating system scripting language for the platform on which Switch is running (that is, AppleScript or VBScript). • JavaScript. If neither of these are included, the script package cannot be executed. Testing a script SwitchScripter provides a simulated run-time environment for script testing purposes, avoiding the need for moving back and forth between the Switch designer and SwitchScripter while developing a script. The set of boundary conditions describing the test environment for a particular script is called a fixture. Fixture package A fixture package is an archive file (with the ".sfixture" filename extension) that contains the boundary conditions describing the environment for testing a script. Its contents can be configured using the Fixture pane in SwitchScripter. A fixture package is always stored alongside the script package (with the same filename but a different extension). The fixture is not part of the definition of a script and may be removed after the script has been tested. A fixture package often contains references to test files. It just remembers the file paths, and never includes the test files themselves. The test files are externally maintained by the script writer/tester. Testing a script To test a script in SwitchScripter: 1. Create an initial version of your script as described in Writing a script on page 340. 2. Save the script package with an appropriate name in an appropriate location. 342 Enfocus Switch 10 3. Click the "View declaration/fixture pane" tool button to reveal the Fixture pane. 4. In the Fixture pane, configure the basic fixture settings, the incoming jobs and the outgoing connections to reflect a relevant test scenario. If the script accesses information in the internal job ticket of incoming jobs, setup the corresponding test data as well. 5. To simulate the arrival of a job on one of the script's incoming connections, select the desired job in the Fixture pane (make sure it is enabled). Then select the "jobArrived" entry point using the selector in the toolbar and press the "invoke entry point" tool button. The selected job is passed to the script's "job" argument and all enabled jobs are returned when the script requests a complete list of incoming jobs (disabled jobs are hidden from the script). 6. To simulate a timer event, select the "timerFired" entry point using the selector in the toolbar, and click the "Invoke entry point with the test fixture" tool button. Again, all enabled jobs are returned when the script requests a complete list of incoming jobs. 7. In the Messages pane, review the messages issued by SwitchScripter and by the script to evaluate the script's operation. Also, use the Environment.log() and Job.log() functions to generate messages for debugging. 8. If desired, adjust the script program and/or the script declaration and start over. Other entry points Test any of the supported entry points with a similar procedure. If an entry point that requires an extra argument (such as a property tag, for example) is selected, SwitchScripter displays a dialog for entering the argument value when the "Invoke entry point with test fixture" button is clicked. Execution mode SwitchScripter ignores the script's execution mode property. Entry points are always invoked one at a time and data is not persistent between entry point invocations. While testing a script with persistent execution mode, insert explicit calls to the initializeProcessing and finalizeProcessing entry points from within the jobArrived and timerFired entry points. Do not forget to remove those calls before deploying the script in Switch. For a script, users can select three types of execution modes: • • • Serialized Concurrent and Persistent Testing a script expression A script expression is a brief JavaScript program used to calculate the value of a flow element property. Even though users can enter a script expression in a property editor dialog within PowerSwitch, they still need a SwitchScripter to test a complex script expression: 1. Create a new empty script package and save it with an appropriate name in an appropriate location. 2. Enter the script expression in the JavaScript tab of the Program pane (leave the default entry points in place but it is cleaner to remove them). 343 Enfocus Switch 10 3. In the Fixture pane, configure the basic fixture settings and at least one incoming job to reflect a relevant test scenario. If the script expression accesses information in the internal job ticket of its job, setup the corresponding test data as well. 4. Select the desired job in the Fixture pane (make sure it is enabled), select "script expression" in the entry point selector in the toolbar, and click the "Invoke entry point with the test fixture" tool button. The selected job is passed to the script expression's predefined "job" variable. 5. In the Messages pane, review the message issued by SwitchScripter containing the result of evaluating the script expression. Use the Environment.log() and Job.log() functions to generate messages for debugging. 6. If desired, adjust the script expression and start over. 7. Once the script expression works correctly, copy/paste it into the appropriate property editor dialog within PowerSwitch. 17.3 Developing a scripted plug-in Obtaining permission Enfocus may license selected third-party vendors to develop scripted plug-ins or configurators for Switch, based on commercial considerations. In most cases, a third-party vendor has to submit the (unprotected) script package to Enfocus for code review and quality assurance. Upon approval, Enfocus will save the scripted plug-in with the appropriate password. Certain third-party vendors may be handed a scripted plug-in password (after signing the required licensing agreement), so that they can create a scripted plug-in by themselves. If you are interested in developing a scripted plug-in or configurator for Switch, please contact Enfocus. Scripted plug-ins and product flavors Depending on the password used to save a scripted plug-in, it may be enabled for use with any of the Switch product flavors (including LightSwitch and FullSwitch). In contrast, regular script packages are supported only in PowerSwitch. When loading a scripted plug-in from the “scripted-plugin” or “third-party-plugin” folder, Switch verifies the password with which the plug-in was saved and acts according to the description in the following table: Table 1: Load action Password Not a scripted-plug password or not valid for the current Switch flavor 344 Plug-in type Not allowed Load action Does not load the Plug-in Enfocus Switch 10 Password Plug-in type Valid scripted plug-in password Third-party but not one of the built-in passwords Load action Loads the plug-in with the following changes: • • One of the built-in passwords Built-in Always puts it in the custom section If the plug-in requested a section other than custom or if its name clashes with a built-in tool or configurator, adds an underscore in front of its name Loads the plug-in in the requested section Creating a scripted plug-in Introduction A scripted plug-in is a regular script package that has been saved with a special password and is placed in the appropriate folder, so that it can be located and loaded by Switch. Once successfully loaded, the scripted plug-in's icon appears in the Elements pane and it can be used just like any other built-in tool or configurator. The scripting API offers several entry points, properties and functions to support optional features that are specific to scripted plug-ins (for example, centralized management of the path to a third-party application). Since none of these features are required, a regular script package can be turned into a scripted plug-in in a matter of seconds. Furthermore, all scripted plug-in features can be developed and tested using SwitchScripter. The only thing which cannot be done without an appropriate password is loading the scripted plug-in in the Switch Elements pane. Password Enfocus may license selected third-party vendors to develop scripted plug-ins; see Obtaining permission on page 344. In most cases, users have to submit their (unprotected) script package to Enfocus for code review and quality assurance. Upon approval, Enfocus saves the scripted plug-in with the appropriate password. If users have been handed a scripted plug-in password (and signed the required licensing agreement), they can create a scripted plug-in by entering the password in the main script properties in SwitchScripter Declaration pane. Location A scripted plug-in must be located in the special “scripted-plugins” folder located near the Switch Server executable. Each plug-in consists of a folder (inside the “scripted-plugins” folder) that contains a single script package (with the filename extension .sscript) and any additional resources used by the scripted plug-in. Scripted plugins created by anyone other than Enfocus must be located in a folder called "third-party-plugins" located next to the regular “scripted-plugins” folder. After a fresh install this folder is empty. 345 Enfocus Switch 10 The Switch installer places a number of built-in scripted plug-ins in the appropriate location. Accessing resources A scripted plug-in can obtain the absolute path to its plug-in folder through the getSpecialFolderPath("PluginResources") function offered by the Environment class. This allows a scripted plug-in to access resources contained in its plug-in folder (that is, next to the script package). Support for third-party application Switch offers special support for scripted plug-ins that control a third-party application. The reason is that information about the third-party application’s location and licensing should be managed centrally. Rather than offering a property for each instance of the script in a flow, the scripted plug-in’s icon in the Elements pane offers a context menu item to set the property value once and for all. Moreover some scripted plug-ins can automatically discover the third-party application’s location and this should happen only once since it may be a time-consuming process. Special properties If a script package is loaded as a scripted plug-in, Switch treats the property tags “ApplicationPath” and “ApplicationLicense” in a special way: • Properties with these tags are not shown in the script element’s occurrences in a flow. • The property values are retrieved from a central memory location managed by the context menu items in the scripted plug-in’s icon in the Elements pane. If the script package is not loaded as a scripted plug-in, these properties are not treated in any special way. Special entry points If a script package is loaded as a scripted plug-in, the optional findApplicationPath, licenseApplication, and getApplicationLicensing entry points help manage the special properties discussed above in conjunction with the context menu items. If the findApplicationPath entry point is present, this means that the scripted plug-in controls an external application. If the entry point returns a non-empty string, this value is used as the application path stored in the central “ApplicationPath” property. Otherwise the application path remains empty, the scripted plug-in’s icon in the Elements pane is grayed out and a context menu item is offered to set (or view) the application path manually. The findApplicationPath entry point can return "/:External resource:/" if there is no application path available, for example if it is on a network server. The findApplicationPath entry point can use the findRegisteredApplication() and findApplicationOnDisk() functions offered by the Environment class to help discover the third-party application. If the licenseApplication entry point is present, this means that the application can be licensed through Switch. In this case the scripted plug-in’s icon in the Elements pane offers a context menu item that displays a dialog requesting a license key. When the user enters a license key and closes the dialog box, the licenseApplication entry point is called and the license key is stored in the central “ApplicationLicense” property. This allows the script to perform licensing once (in the entry point, when the key is entered) or pass the license key with every execution (by retrieving the property value). 346 Enfocus Switch 10 The getApplicationLicensing entry point serves to provide feedback about the third-party application licensing state through a context menu on the scripted plug-in’s icon in the Elements pane. Testing special properties and entry points SwitchScripter does not emulate central management of these special properties and entry points. However it does allow testing the special entry points just like any other entry points, and it treats the properties as regular properties (so you can enter a value in the Fixture pane). Thus SwitchScripter fully supports developing and testing these special features; see Testing a script on page 342. Configurator guidelines This topic introduces the mechanisms used to develop a Switch configurator for a third-party application and it offers guidelines for adjusting third-party applications so that they can be optimally configured and controlled from within Switch. Limited to scripting Although many of the built-in Switch configurators have historically been developed in the C++ programming language, this topic discusses configurators solely in the context of scripting because: Third-party developers have access to the Switch scripting API and not to the C++ API. All new Switch configurators (including those developed by Enfocus) use scripting. Definition of a configurator Refer to configurators for a description of the configurator concept and its benefits. More formally, a configurator is a scripted plug-in that defines the findApplicationPath entry point and the special property “ApplicationPath”. A configurator may (but does not have to) also define the getApplicationLicensing entry point, the licenseApplication entry point, and/or the special property “ApplicationLicense”. See entry points for Application discovery on page 348 and Application licensing on page 348, Creating a scripted plug-in on page 345, and Obtaining permission on page 344. For the avoidance of doubt: • A script package assigned to a script element is not a configurator; its application discovery entry points are never invoked and its special properties behave as regular properties. • A flow element implementation that does not define the findApplicationPath entry point is not a configurator. • It is an error for a flow element implementation to define the findApplicationPath entry point while not defining the special property “ApplicationPath” (because the flow implementation would have no access to the application path it claims to require). • It is meaningless (but not an error) for a flow element implementation to define the getApplicationLicensing or licenseApplication entry points without defining the findApplicationPath entry point since in that case the entry points will never be invoked. • It is meaningless (but not an error) for a configurator to define the “ApplicationLicense” property without defining the licenseApplication entry point since in that case the property will never receive a value (there is no license context menu and the property is hidden). 347 Enfocus Switch 10 • Conversely a configurator may define the licenseApplication entry point without defining the “ApplicationLicense” property in case it does not need access to the license string outside of the licenseApplication entry point. Application discovery Ideally a third-party application can be configured and used from within Switch immediately after it is installed, without the need for separately launching the third-party application (for example, to license it). This is not always feasible and Switch provides several fall-back options, but the objective is to approach this optimal situation. Application discovery is implemented in the findApplicationPath entry point. Windows The installer for the third-party application should make an entry in the system registry specifying the full path of the executable (or a folder that contains it). This registry entry should be clearly documented so that Switch can retrieve the information using the Environment.findRegisteredApplication() function. Otherwise the third-party application should be installed somewhere inside the standard “Program Files” directory, so Switch can search the contents of the “Program Files” directory for the name of the application using the Environment.findApplicationOnDisk() function. Mac OS If the third-party application is in a regular “.app” bundle with an appropriate property list, Mac OS X will recognize the “.app” and add it to its central registry. Switch can then retrieve the information using the Environment.findRegisteredApplication() function. Otherwise the third-party application should be installed somewhere inside the standard “Applications” folder, so Switch can search the contents of the Applications folder for the name of the application using the Environment.findApplicationOnDisk() function. Manual On both platforms, if Switch does not find the third-party application, the user is offered a “fall-back” option in the form of a context menu item on the configurator’s icon in the Elements pane, which allows manually browsing the file system for the application. Application licensing Independent In this option the user licenses the third-party application independently from Switch through some user interface provided by or with the third-party application. For example, by entering a license key in a dialog box or on a command line. Although it violates the objective of allowing the application to be fully controlled from within Switch, this may be the most logical option for regular interactive applications that offer a rich user interface aside from the automation capabilities via Switch. In Switch Some third-party applications do not have a graphical user interface and are intended mostly for integration with products such as Switch. Since the user never directly interacts with the third-party application it is more logical to allow licensing from within Switch. 348 Enfocus Switch 10 In this option the user enters a license key in a Switch dialog box that is accessed through a context menu item on the configurator’s icon in the Elements pane. Switch can pass the license key on to the third-party application at the time the user enters the license key (the most frequently used option) and/or each time an action is executed. The third-party application should document the licensing process for the configurator. Application licensing is implemented in the licenseApplication entry point. Licensing state Assuming that it is possible to automatically detect the licensing state of a third-party application, Switch can display this information through a context menu item on the configurator’s icon in the Elements pane. This feedback is meaningful regardless whether the licensing operation itself can be performed from within Switch or not. Thus wherever feasible the third-party application should document a way for the configurator to detect licensing state. Detecting licensing state is implemented in the getApplicationLicensing entry point. Configuring properties Flow element properties Each configurator instance in a Switch flow offers properties to control the behavior of the third-party application for jobs passing through that instance. A property can have various simple data types such as string, number or enumeration, it can reference a named collection of properties (see property sets below), or it can be a value edited by a wide range of property editors. These properties are defined in the script declaration. Property values for each configurator instance are entered in the Switch designer's Properties pane and they are stored (and exported/imported) with the flow definition. Preferences and persistent settings The third-party application may offer preferences or other settings that are persistent between invocations and cannot be controlled from Switch. This is no problem as long as the user has a way to influence these settings independently from Switch, for example through a user interface that is part of or ships with the third-party application. Property sets A property set is a collection of controls, settings or options used to configure a third-party application. A property set usually combines a large number of options and it vastly simplifies the user interface required in Switch for configuring the application because it can be referred to as a single entity. Referring to a property set Depending on how a property set is stored by the third-party application, Switch keeps a different type of reference to the property set – as illustrated in the following table. Storage model Reference in Switch Stored in exported flow As a regular file anywhere in the file system Absolute file path Full copy of the file In an open repository (folder) controlled by the Absolute file path third-party application but directly accessible to Switch as a regular file Full copy of the file 349 Enfocus Switch 10 Storage model Reference in Switch In a private repository (database) controlled by Name the third-party application and only accessible by Switch by name and through the third-party application Stored in exported flow Name Some applications support multiple storage models for the same property (that is, the property can be specified as a named repository item or as a file path). Switch configurators can easily accommodate this by providing multiple property editors for the property. Selecting a property set Switch allows a choice between browsing for a file (the first storage model) or selecting from a list of names (the second and third storage models). Note that there is no way to show a tree structure; only a linear list of names. The following table describes the implementation mechanism and the cooperation required from the third-party application depending on the storage model. Storage model Action in Switch Implemented through Cooperation required from application As a regular file Allow the user to browse the "Choose file" property in the file system file system for a property set editor "Choose file" property editor In an open repository as a regular file List all of the appropriate files in the repository folder and show them in a dialog after stripping the filename extension "Select from library" Document the location property editor with of the repository getLibraryForProperty folder entry point that iterates over the repository folder In a private repository, by name Request the list of names from the third-party application and show them in a dialog box "Select from library" property editor with getLibraryForProperty entry point that interacts with the third-party application Provide a run-time mechanism to retrieve the list of names on request Communication requirements The Switch configurator needs a mechanism to communicate with the third-party application with the following basic requirements: • Pass on the values of the properties to configure the behavior of an action. 350 • Start an action on some input file(s). • Detect termination of an action. • Locate the output file(s). • Determine success/warning/error status. Enfocus Switch 10 Error handling The third-party application should clearly document how Switch can discriminate between: • Successful execution versus failure to execute an action. • Messages that should be passed on to the Switch execution log versus messages that are irrelevant to the Switch user (or output that can safely be ignored). • The “level” of messages passed on to the Switch execution log: info/warning/error. Serialized communication If required, Switch can serialize all communication with a third-party application, even if many instances of the same configurator are active simultaneously. See Execution modes on page 356 for more information. Switch can also automatically terminate a third-party application if an action does not complete within a certain amount of time (which is configurable as a user preference). Platform considerations If a third-party application is available on both Mac and Windows, it is acceptable (but not necessarily preferable) to use a different communication mechanism on each platform. For example, the Adobe Acrobat Distiller configurator uses COM on Windows and AppleScript on Mac. In other words, a Switch configurator can include platform-specific code, as long as the user’s view of the configurator’s properties and behavior is the same on both platforms. Platform-specific behavior is achieved by including an implementation in two different scripting languages (see script package and selecting a scripting language) or through the Environment.isMac() and Environment.isWindows() functions. Communication mechanisms Communication with the third-party application is implemented mostly (or solely) in the configurator's jobArrived entry point. Command line From an implementation standpoint this is often the easiest form of communication. The Switch configurator compiles command line options based on the configurator properties and if necessary Switch provides console input and/or parses console output. Alternative sources of information may be the application’s return code and log files written by the application. Inter-application communication Applications that offer a graphical user interface (and thus are often launched by the user independently of Switch) can be controlled using inter-application communication mechanisms (usually COM in VBScript on Windows and AppleScript on Mac). Hotfolder A hotfolder application could be driven from a Switch configurator on the condition that it is possible to configure the application’s behavior using a single watched folder and a control file. There can be several setups including: • The control file is placed in a watched folder and points to the path of the input file(s). • The input file and the control file are both placed in the same watched folder (and they are matched through some filename pattern). 351 Enfocus Switch 10 A Switch configurator can NOT control an application that requires a different folder watched for each configuration setup. Preferably the third-party application and Switch should be able to settle on a watched folder path without requiring user setup in the third-party application. The best way to achieve this is to provide a mechanism that allows Switch to set the watched folder path at its discretion. Failing that, the third-party application should document a mechanism for the configurator to retrieve or otherwise determine the watched folder path. Loadable library Third-party functionality that is offered as a loadable library (DLL on Windows, Sylib on Mac) can be accessed in a Switch configurator by providing an independent helper application. The helper application calls the library functions and provides a simple interface towards Switch (usually command line and/or console input/output). Text encoding issues On modern operating systems – including Windows XP and Mac OS X – file and folder names may contain any Unicode code point (except for a few platform-specific separator characters). This is true even if the default 8-bit code page is not able to represent these characters. For example, on a regular English Windows XP system it is perfectly possible to have Greek or Cyrillic characters in a filename, although these characters cannot be represented in the default Latin code page. Switch is fully Unicode enabled and for optimal operation it requires a configured third-party application to be Unicode enabled as well. In other words Switch requires that the third-party application: • Correctly works with filenames that may contain any Unicode code point. • Performs all text communication with Switch using an appropriate and well-defined character encoding (as explained in more detail below). Command line on Mac OS X Mac OS X uses UTF-8 as its default encoding for representing filenames/paths. In our experience, a command line application can simply take a file path from the command line as an 8-bit string and pass it through to a regular UNIX or Mac OS file system call even if the command line application itself is not Unicode aware. Since the functions of the Switch Process class use UTF-8 to invoke command line applications, things will automatically work correctly. Command line on Windows On Windows the functions of the Switch Process class use Windows-specific Unicode-enabled function calls to invoke command line applications. The command line application in turn MUST invoke the Windows-specific Unicode-enabled function calls for retrieving the command line AND for opening the files. For example, in C/C++ the command line application must use the Unicode ("wide") version of the Windows-specific “GetCommandLine” function rather than the argv[] argument in the main function (which only supports the current default code page). Other text input/output This includes the console input/output streams and any exchanged control files that may contain plain text (as opposed to XML which has built-in Unicode support). It is strongly recommended to use UTF-8 for all text input/output because this encoding can represent any Unicode code point and it is upwards compatible with 7-bit ASCII in various ways (for example, with regards to line breaks and null-terminators). 352 Enfocus Switch 10 If this is not feasible, at the very least the encoding used must be well-defined and documented, and it should follow these guidelines: • Text that may contain a filename/path must be able to represent any Unicode code point. In essence UTF-8 or UTF-16 are the only options. • Text that may contain code points outside 7-bit ASCII (for example, localized messages for human readers) must be in a well-defined encoding that is able to represent the characters in the languages used. Preferably this encoding is the same on all platforms; or at least it is well defined. Again UTF-8 is the best option. • Text that only contains 7-bit ASCII code points (for example, keywords that are not localized and are not intended for human consumption) is not encoding-sensitive. Still it does not hurt to use UTF-8 since it is compatible with 7-bit ASCII. 17.4 Script declaration Main script properties The following table describes the main script properties contained in the script declaration, which is part of a script package and is edited using the declaration pane in SwitchScripter. Property Description Name The name of this script for identification to a user For scripted plug-ins, a tilde should separate the company name from the tool name (for example, "Adobe~Acrobat Distiller"); Switch will derive appropriate long and short versions from this name. Keywords For scripted plug-ins, defines a list of zero or more keywords, separated by a space, a comma and/or a semicolon. When filtering elements in the Elements pane with the “Search keywords” menu item turned on, this element is displayed if the filter text matches the beginning of at least one of the keywords in this list. Tooltip For scripted plug-ins, determines the tooltip shown for the icon in the elements pane Icon The icon to be displayed for a flow element associated with this script package; this must be a PNG image file (not interlaced) with a size of exactly 32x32 pixels in the RGB color space (with support for transparency). Password protected If set to yes, the script package is protected by a password; the password is asked when the script package is opened for viewing and editing in SwitchScripter; a script package can always be opened for execution by PowerSwitch, even if it is password protected See also password protection Password Verify password Defines the password for the script package if it is password protected 353 Enfocus Switch 10 Property Description Include JavaScript If set to yes, the script package includes a JavaScript program and the corresponding tab in the program pane is enabled Include VBScript If set to yes, the script package includes a VBScript program and the corresponding tab in the program pane is enabled Include AppleScript If set to yes, the script package includes an AppleScript program and the corresponding tab in the program pane is enabled Incoming connections If set to yes, the script supports incoming connections Require at least one If set to yes, the script requires at least one incoming connection Outgoing connections Defines to what extent the script supports outgoing connections: "No", "One", or "Unlimited" Require at least one If set to yes, the script requires at least one outgoing connection (for traffic-light connections: at least one outgoing connection that carries data or data with logs) Connection type The type of outgoing connections supported by the script, if there are any; choices are: • Move • Filter • Traffic-light Include/exclude folder For outgoing filter connections, if set to yes, the standard include/exclude folder properties are automatically injected in the outgoing connections Data success For outgoing traffic-light connections, defines which of the standard success, warning and error properties is injected in the outgoing "data" and "data with log" connections Data warning Data error Log success Log warning For outgoing traffic-light connections, defines which of the standard success, warning and error properties is injected in the outgoing "log" connections Log error Execution mode 354 The execution mode for this script; one of these choices: • Serialized: entry points for all script instances in the same execution group are never invoked concurrently • Concurrent: different instances of the script may be executed concurrently • Persistent: entry points are invoked in the same “private” thread (and thus are inherently serialized), and some information can be preserved between invocations Enfocus Switch 10 Property Description Execution group The name of the execution group in which instances of this script reside; the precise interpretation depends on the selected execution mode: • Serialized: determines the scope of serialization • Concurrent: not used • Persistent: unambiguously identifies the script implementation Enable performance tuning If set to yes, additional performance tuning is enabled for the script package. When using the script in Switch, an extra property “Idle after job (secs)” will be available, which can be used to fine-tune the flow’s performance. If script execution mode is also set to "Concurrent", another property, "Number of slots", will become available. Idle after job (secs) When performance tuning is enabled, this property contains the default number of seconds the script should remain idle after processing a job. The user can override this value when designing a flow. Number of slots The number of slots that can be used concurrently by the specific flow element. Possible values are: "0" (unlimited), "Default" (value from Preferences is used) or any number larger than 0. Note that this property can be overridden by the value specified in Preferences > "Concurrent external processes". Position in element pane For scripted plug-ins, determines the position of the icon in the elements pane; the value of the property has the following format: • <section>:<sort-key> Where: • <section> is the name of the elements pane section in which the scripted package should appear: Basics, Tools, Communication, Processing, Metadata, or Custom. If it is not one of these, the section defaults to “Custom”. • <sort-key> is a text string that determines the order in which elements are listed within each section; they are sorted alphabetically on the sort key. Execution mode Switch execution is inherently multi-threaded, so in principle all tasks can run in parallel. To help reduce implementation complexities (both in the Switch framework and in a script), concurrency is limited in a number of ways as explained in this topic. Operating system scripting languages Switch severely limits the concurrency of AppleScript and VBScript scripts (on Mac and Windows, respectively): only a single AppleScript or VBScript entry point can be executing at any time. This is due to an implementation limit which may be lifted in a future version. Thus the remainder of this topic applies only to JavaScript scripts. 355 Enfocus Switch 10 Script expressions Script expressions may be evaluated in parallel with each other and with other scripts. Script expressions should not have side effects (other than issuing log messages) so this parallelism should not cause any problems. Terminology In the following discussion it is important to differentiate between a script package (that is, the definition of a script) and the script instances created by associating a script package with a flow element (through a script element or a scripted plug-in). There may be several script instances for a particular script package. Execution modes The script declaration defines the execution mode for all instances of the script package as one of these choices: • Serialized: entry points for all script instances in the same execution group are never invoked concurrently. • Concurrent: entry points for the same or different script instances of the script may be executed concurrently. • Persistent: entry points are invoked in the same “private” thread (and thus are inherently serialized), and some information can be preserved between invocations. Concurrent In concurrent execution mode, the entry points for the same or different script instances of the script may be called concurrently. In other words, two or more script instances of the same type may run in parallel and even two or more entry points for a particular script instance may run in parallel (for example, the jobArrived and timerFired entry points). For example, a flow containing a single flow element with a concurrent script (in addition to input/output folders) will pick up and process multiple input jobs at the same time – within the overall processing limits configured through user preferences. Script implementations with concurrent execution mode must take care to synchronize access to resources that are shared between script instances or between different entry points. For example, access to a text file that is updated from both the jobArrived and timerFired entry points should be synchronized using the Environment.lock/unlockGlobalData() functions. Serialized In serialized execution mode, entry points for script instances in the same execution group are never called concurrently. In other words, script instances in the same execution group are executed one after another. Still, the entry points in script instances outside of the execution group may be executing in parallel with those in the group. Script implementations that need to be serialized between each other (perhaps because they use a common external resource) should refer to the same execution group. Usually however a script implementation needs serialization only with itself. In that case, the execution group name should be unique to the script implementation. Persistent In persistent execution mode: • All entry points for all script instances in the same execution group are executed in the same thread (except for cleanupAfterAbort), and thus by definition execution is serialized (in 356 Enfocus Switch 10 serialized mode execution is serialized but consecutive invocations may happen in different threads). • The contents of the predefined global script variable “persistent” is preserved across all invocations of entry points, whether from the same script instance or not (this persistence is the reason why all invocations must happen in the same thread). • The entry points initializeProcessing, finalizeProcessing and cleanupAfterAbort are invoked at the appropriate times to help manage resources (such as an external application) that persist across invocations of jobArrived and timerFired entry points. • A new execution mode, called the multiple persistent allows the combination of concurrency and persistency. Execution group The script declaration defines the execution group for all instances of the script package. The execution group is a string that should be structured as a reverse domain name (similar to Java packages) to avoid collision with other developer’s group names; for example: “com.gradual.myProject.myExecutionGroup”. If the value of this property is empty, the execution group name defaults to the script’s name (the first property in the scripter’s declaration pane). This causes the script package to be in its own execution group unless another script package declares the same script name (that is, there is no strong protection against name collisions). The precise interpretation of the execution group depends on the selected execution mode. Concurrent With concurrent execution mode, the execution group is not used. Serialized With serialized execution mode, a name collision between execution groups is mostly harmless in the sense that nothing breaks, but there is a potential performance issue due to the fact that the inadvertently colliding script instances can’t run concurrently. Thus, it is strongly recommended that scripts intended for wide deployment provide a unique execution group name structured as described earlier. Persistent With persistent execution mode, the execution group name should be unique to the script implementation. A name collision between two script instances with a different implementation has undefined (and most likely unpleasant) results. Thus it is strongly recommended that persistent scripts provide a unique execution group name structured as described earlier. Selecting the appropriate execution mode The following table provides an overview of the execution modes and their typical uses. Execution mode Instances in same group are serialized Information can be Example usage preserved across invocations Concurrent No No Gather metadata from the internal job ticket of a job and produce an XML file (all done in scripting) 357 Enfocus Switch 10 Execution mode Instances in same group are serialized Information can be Example usage preserved across invocations Serialized Yes No Control a command-line application that is launched and terminated within each invocation of jobArrived Persistent Yes Yes Control a command-line application that needs to be kept alive between invocations of jobArrived Property definition properties The following table describes the properties for each property definition contained in the script declaration which is part of a script package and is edited using the declaration pane in SwitchScripter. A property definition may describe a property injected into the flow element to which the script package will be attached or a property injected into its outgoing connections. Property Description Tag The internal name of the property as it will be referred to from the script Name The name of the property as it will be displayed in the designer's Properties pane Tooltip A brief description of the property which will be shown in the designer's Properties pane as a tool tip Inline editor The inline property editor used to edit this property in the designer's Properties pane, if any; see inline property editors for a list of choices and further information Editor 2 Extra property editors shown for this property in the designer's Properties pane, if any; see other property editors for a list of choices and further information Editor 3 Editor 5 This allows for a maximum of five property editors (including the inline editor); there must be at least one editor (if all five editors are set to “None” a single-line text editor is automatically provided); it is meaningless to specify the same editor twice (the second occurrence is ignored) Default The default value for the property Depends on master If set to yes, this property is displayed only if its master property has a particular value; the master property is the nearest preceding property with “Depends on master” set to “No” Editor 4 Only a single level of dependency is supported (a dependent property can never be a master) Show if master equals 358 The string value or values of the master for which this property is displayed; multiple values must be separated by a semicolon Enfocus Switch 10 Property Description Validation The validation method for the value of this property, which is one of: • None: perform no validation for this property • Standard: perform standard validation for this property depending on the property editor used to enter the value • Custom: invoke the script’s isPropertyValid entry point to validate this property; do not perform standard validation • Standard and custom: first perform standard validation for this property, and if successful then also perform custom validation See validating property values for further information Property editors Property values Regardless of which property editor is used to edit an injected property, the property value is always accessed from the script as a string or a string list (using the getPropertyValue() and getPropertyValueList() functions, respectively). The tables below describe the values for each supported property editor. Inline property editors The “Inline editor” property of a property definition offers the choices listed in the following table. These property editors are contained inside the property value field in the designer's properties pane. See working with properties for information on using property editors. Property editor Resulting value Single-line text The text line entered in the inline editor, as a string Password The hidden value entered in the inline editor, as a string (this is the same as single-line text but the value is hidden) Number The decimal integer number entered in the inline editor, as a string (this is the same as single-line text but the user can enter only digits) Hours and minutes A string formatted as “hh:mm” (including the colon) where h and m stand for a decimal digit; hh and mm include a leading zero if needed (this is the same as single-line text but the user can enter only 4 digits) No-yes list One of the strings "No" or "Yes" Dropdown list The selected item (that is, one of the provided custom strings); see extra properties below 359 Enfocus Switch 10 Other property editors The “Editor 2/3/4/5” properties of a property definition offers the choices listed in the following table. Most of these property editors are modal dialogs. See working with properties for information on using property editors. 360 Property editor Resulting value Literal The fixed string value corresponding to the name of the property editor, which must be selected from a predefined list; see extra properties below Choose file The selected absolute file path, as a string Choose folder The selected absolute folder path, as a string Regular expression The regular expression entered in the dialog, as a string File type The file type selected from a dialog with standard file types, as a string with the corresponding Windows filename pattern(s) Select from library The string value selected from a list in a “library” dialog; the contents of the dialog is determined by calling the getLibraryForProperty entry point in the script Multi-line text The text entered in the dialog as a single string that may include newlines Script expression The result of the script expression evaluated in the context of the job, converted to a string under the JavaScript rules Single-line text with variables The text line entered in the dialog, as a string, after replacing any variables by their values in the context of the job Multi-line text with variables The text entered in the dialog box as a single string that may include newlines after replacing any variables by their values in the context of the job Condition with variables The result of the conditional expression after replacing any variables by their values in the context of the job, as one of the strings “true” or “false” File patterns The list of pattern strings as they have been entered in the dialog box Folder patterns The list of pattern strings as they have been entered in the dialog box File types The list of file types selected from a dialog with standard file types, each as a string with the corresponding Windows filename pattern(s) String list The string values entered in a generic string list dialog; each line is represented is a separate string Select many from library The string values selected from a list in a “library” dialog; each selected item is represented as a separate string; the contents of the dialog is determined by calling the getLibraryForProperty entry point in the script Enfocus Switch 10 Property editor Resulting value External editor The file path to a property set edited by a third-party application; see external property editor Extra properties for certain property editors The following extra properties are shown just after the “Editor” properties only when a particular property editor is chosen. Dropdown list Property Description Dropdown items The list of choices to be offered in the dropdown list Choose file Property Description Include file for export If set to yes, a copy of the file indicated by this property’s value (a file path) is included in the exported flow archive when a flow with this script is exported Literal Property Description Literal editor name The name of the literal property editor, that is, one of: Default, None, Automatic, No Files, All Files, All Other Files, No Folders, All Folders Select from library, Select many from library, String list Property Description Message A custom message displayed on the property editor dialog External editor See external property editor. Validating property values Introduction The “Validation” property of a property definition specifies the mechanism for validating the values of this property. In most cases, properties are validated while the flow is being designed or just before it is activated. If there are any invalid properties, Switch refuses to activate the flow. For performance reasons, Switch does assume that the result of design-time validation remains valid for the duration of flow activation. While this assumption is correct in most production environments, 361 Enfocus Switch 10 it is not strictly true for all data types; for example a file path becomes invalid when the target file is removed. Properties that contain a variable or a script expression are validated while the flow is running, since their value cannot be determined at design time. Just before each invocation of the jobArrived entry point, Switch performs run-time validation for all properties of the flow element that contain a variable or a script expression. If a property value is invalid, Switch fails the job with an appropriate error message. Note that there is NO run-time validation before calling the timerFired entry point (or any of the other entry points). Using non-static property values from those entry points is risky anyway since there is no job context (and referencing job context from a script expression or variable in those circumstances has undefined results). Validation at design time Validation of a particular property value is performed at design time if isPropertyValueStatic() returns true for that property. The following table describes the standard design-time validation for values entered by a particular property editor. Note that all property values are of data type string or string list. 362 Property editor Design-time validation requires that the value… Single-line text Is non-empty Password Is non-empty Number Is non-empty and contains only decimal digits Hours and minutes Is non-empty and has the format “hh:mm” (including the colon) where h and m stand for a decimal digit, hh and mm include leading zero if needed, hh is in range 00..23 and mm is in range 00..59 No-yes list Is one of the strings "No" or "Yes" (exact spelling and case) Dropdown list Is one of the custom strings provided for the dropdown list Literal Is the fixed string value selected from a predefined list Choose file Represents a valid absolute path and that a file exists at the path Choose folder Represents a valid absolute path and that a folder exists at the path Regular expression Is non-empty and has valid regular expression syntax File type Is non-empty and has valid filename pattern syntax Select from library Is one of the strings returned by the getLibraryForProperty entry point in the script Multi-line text Is non-empty Script expression N/A Enfocus Switch 10 Property editor Design-time validation requires that the value… Single-line text with variables N/A (if the value contains no variables: Is non-empty) Multi-line text with variables N/A (if the value contains no variables: Is non-empty) Condition with variables N/A File patterns Has at least one item and each item has valid filename pattern syntax Folder patterns Has at least one item and each item has valid filename pattern syntax File types Has at least one item and each item has valid filename pattern syntax String list Has at least one item and each item is non-empty Select many from library Has at least one item and each item is one of the strings returned by the getLibraryForProperty entry point in the script External editor Represents a valid absolute path and that a file exists at the path Validation at run time Validation of a particular property value is performed at run time if isPropertyValueStatic() returns false for that property. In this case the property editor used to enter the source value (example: the script expression or text with variables) is no indication for the appropriate validation scheme. Therefore, as a general principle, standard run-time validation allows the computed property value to conform to the validation scheme of ANY of the property’s property editors. Specifically, the validation algorithm works as follows: • Compile a list of validation schemes by adding the validation scheme from the following table for each of the property’s property editors (“--” means do not add a scheme for this editor). • The computed property value must be non-empty AND it must comply with at least one of the validation schemes in the list compiled above (unless the list is empty). Property editor Run-time validation scheme Single-line text -- Password -- Number Same as design-time scheme Hours and minutes Same as design-time scheme No-yes list Same as design-time scheme, or a Boolean value (*) Dropdown list Same as design-time scheme 363 Enfocus Switch 10 Property editor Run-time validation scheme Literal Same as design-time scheme Choose file Same as design-time scheme Choose folder Same as design-time scheme Regular expression Same as design-time scheme, or a Boolean value (*) File type Same as design-time scheme Select from library Same as design-time scheme Multi-line text -- Script expression -- Single-line text with variables -Multi-line text with variables -Condition with variables -- File patterns Same as design-time scheme (for one item), or a Boolean value (*) Folder patterns Same as design-time scheme (for one item), or a Boolean value (*) File types Same as design-time scheme (for one item), or a Boolean value (*) String list -- Select many from library Same as design-time scheme (for one item) External editor Same as design-time scheme (*) a Boolean value is represented by one of the strings “true” or “false” Validation example Consider a property that specifies a property set which can be provided as a file or it can be part of an external library. The property is set to standard validation and it has the following property editors: • Choose file 364 • Select from library • Script expression • Single-line text with variables Enfocus Switch 10 For the first two editors, validation is always performed at design time. For the last two editors, validation is performed at run time (except if the single-line text does not contain any variables). In all cases, the property value is guaranteed to contain one of the following: • A valid file path that points to an existing file. • One of the library items returned for the property by the getLibraryForProperty entry point. For most use cases it can be assumed that these values are mutually exclusive, and that the script code can tell the data types apart from looking at the value. If needed however, the script code can check which editor has been used to enter the value. External property editor Introduction Switch supports a property editor called “External editor” that offers integrated editing capabilities for third-party property sets (such as a preflight profile) without including third-party code in Switch. The property set must be stored in a file, and an external editing application must be supplied that behaves according to some specific guidelines. Designing a flow with an external property editor When a user invokes an external property editor while designing a flow, Switch launches the associated external application and passes it the file path to a copy of the property set to be edited. The external application brings up a dialog for editing the contents of the property set and saves any changes back into the file. When the application exits, Switch recognizes the updated property set. The value of a property edited with the “External editor” property editor is a file path. The actual file is stored in a temporary place allocated by Switch (similar to property sets created while importing a flow). The “External editor” property editor works well in conjunction with the “Choose file” property editor, since both operate on a file path. Furthermore, Switch always makes a copy of the property set before editing. This means that: • A property set that was selected with the “Choose file” property editor is never changed. • Edited property sets are never shared between multiple flow elements. Specifying an external property editor in SwitchScripter The “External editor” property editor supports the following extra properties (shown in SwitchScripter and stored in the script declaration): Property Description Application The path to the application (executable) used to edit a property set If a relative path is specified (that is, the path does not start with a drive letter or a forward slash), Switch looks for the external application relative to the folder portion of the path returned by the Environment.getApplicationPath( ) function Arguments for new The argument string passed to the application when there is no pre-existing property set, after substituting all occurrences of %1 and %2 as described below 365 Enfocus Switch 10 Property Description Arguments for edit The argument string passed to the application when there is a pre-existing property set to be edited, after substituting all occurrences of %1 and %2 as described below Substitutions in argument strings The following substitutions are performed in the specified argument strings: Placeholder Replaced by %1 The file path for the property set: • If it points to an existing file, the external application should load this file and replace it by the updated property set (the “edit” argument string is used) • %2 If the path does not point to a file, the external application should place the newly created property set at this path (the “new” argument string is used) The locale currently in use by Switch specified as a four-letter string consisting of the two-letter ISO 639 language code (lowercase), followed by the two-letter ISO 3166 country code (uppercase); example: “enUS” External application behavior The external application must open the property set specified on its command line (or create a new default property set) and display a main window and/or a dialog box. After the user saves or cancels the changes, the application must exit with an appropriate exit code as follows: 366 Exit code Meaning Switch action Zero Changes to the property set were successfully saved Use the newly created or updated property set Nonzero The user cancelled the operation or an Discard any changes error occurred Enfocus Switch 10 18. Scripting reference 18.1 Scripting API - Introduction The Switch scripting API (application programming interface) provides script elements and script expressions with access to information about the job (file or job folder) being processed, including job ticket and metadata contents. Script expressions are limited to read-only access, while script elements can update the information. The scripting API supports three scripting languages: JavaScript, AppleScript, and VBScript. The API documentation is provided in JavaScript syntax. Refer to AppleScript on page 139 and VBScript on page 141 for information on how to adjust this syntax for the other scripting languages. JavaScript language reference The JavaScript language reference is provided as part of the scripting API documentation. Scripting API Modules The scripting API consists of a number of distinct modules, each of which publishes a set of related classes and functions. Some modules are published only to the JavaScript scripting language since AppleScript and VBScript offer their own built-in functionality in these areas. Module Description Availability Utility module Reading and writing plain text files, enumerating files Only JavaScript in directories and executing command line applications Text encoding, ByteArray class, File class, Dir class, Process class XML module Reading and writing XML files, including DOM and XPath access to their contents and performing XSLT transforms Only JavaScript Node class, Document class, Element class, Text class, Comment class, Attr class, List classes Network module Communicating with external applications and web services through SOAP Only JavaScript SOAP class Database module Accessing external databases with SQL queries via ODBC Only JavaScript (Open Database Connectivity) DataSource class, Statement class 367 Enfocus Switch 10 Module Description Availability Flow element module Accessing script flow element properties, including incoming and outgoing connections All scripting languages Moving jobs from and to these connections Accessing job ticket information for the current job, including the list of associated metadata datasets Entry points, Environment class, Switch class, Connection class, Job class, Occurrence class, List classes Metadata module Retrieving the contents of metadata fields from a All scripting metadata dataset for the three supported data models languages (XML, JDF, XMP and Certified PDF 2) Map class, Dataset class, XML data model, JDF data model, XMP data model, CP2 data model, Opaque data model, FileStatistics class, Session class, Certificate class, User class, DataMap class, AltText class Script declaration Reference information for the script declaration is presented as part of the scripting API documentation in Main script properties, Execution mode, Property definition properties, Property editors, Validating property values and External property editor. 18.2 JavaScript Reference (The contents of this topic is adapted from documentation provided by Trolltech.) This language reference describes the language features provided by Switch's JavaScript, which implements a subset of the ECMAScript 4.0 language. It is divided into the following topics: • Language concepts • Built-in types and objects • Built-in functions • Built-in operators • Declarations • Control statements Readers are assumed to have a basic understanding of programming. Language concepts (The contents of this topic is adapted from documentation provided by Trolltech.) 368 Enfocus Switch 10 Identifiers, variables and constants JavaScript identifiers match the regexp pattern [_A-Za-z][_A-Za-z0-9]*. Identifiers are used for variables, constants, class names, function names and labels. JavaScript reserves some words which are valid identifiers for its own use. See declarations for the complete list. Variables are declared using the var keyword: var a; // undefinedvar c = "foliage"; // the string "foliage"x = 1; // global variable If a variable is assigned without being declared, it is automatically declared as a global variable. Using global variables can make your code difficult to debug and maintain and is not recommended. Constants are declared using the "const" keyword: const x = "Willow"; const y = 42; Constants must be defined at the point of declaration, because they cannot be changed later. If an attempt is made to assign to a constant, the JavaScript interpreter will issue an error message and stop. Constants are public globals if they are declared outside of any enclosing braces. When declared within the scope of some braces, (example: within an "if" statement) their scope is local to the enclosing block. Classes JavaScript is a fully object oriented language. Classes can be defined using the class keyword as shown in the example below. class { var var var Circle m_x; m_y; m_r; function Circle( posx, posy, radius ) { m_x = posx; m_y = posy; m_r = radius; } function setX( posx ) { m_x = posy; } function setY( posy ) { m_y = posy; } function setR( radius ) { m_r = radius; } function x() { return m_x; } 369 Enfocus Switch 10 function y() { return m_y; } function r() { return m_r; } } class ColorCircle extends Circle { var m_rgb; function ColorCircle( posx, posy, radius, rgbcolor) { Circle( posx, posy, radius ); m_rgb = rgbcolor; } function setRgb( rgbcolor ) { m_rgb = rgbcolor; } function rgb() { return m_rgb; } } A class's constructor is the function which has the same (case-sensitive) name as the class itself. The constructor should not contain an explicit return statement; it will return an object of its type automatically. JavaScript does not have a destructor function (a function that is called when the class is destroyed). The class's member variables are declared with var, and its member functions with function. The object instance itself is referred to using this operator. Inside a member function of a class, member variables and member functions can be accessed with an explicit "this" (example: this.x = posx;). This is not required, but can sometimes help to increase visibility. JavaScript supports single inheritance and if a class inherits from another class, the superclass's constructor can be called with super(). Qualified names When an object of a particular type is declared, the object itself becomes, in effect, a namespace. For example, in JavaScript there is a function called Math.sin(). If you wanted to have a sin() function in your own class that would not be a problem, because objects of your class would call the function using the object.function() syntax. The period is used to distinguish the namespace a particular identifier belongs to. In most cases JavaScript is intelligent enough to work out the fully qualified name on its own. The only time that you need to qualify your names is when an unqualified name is ambiguous. Class properties A property is an undeclared variable that can be written to and accessed if the class supports properties. var obj = new Objectobject.myProperty = 100; The class Object does not define the variable myProperty but since the class supports properties, we can define the variable with that name on the fly and use it later. Properties are associated 370 Enfocus Switch 10 with the object they are assigned to, so even though the object (obj in the above example) gets the property myProperty, it does not mean that other objects of type Object will have the property "myProperty", unless explicitly stated. Comments JavaScript supports the same commenting syntax as C++. One-line comments may appear on a line of their own or after the statements on a line. Multi-line comments may appear anywhere. // A one-line comment. /* A multi-line comment. */ Built-in types and objects (The contents of this topic is adapted from documentation provided by Trolltech.) JavaScript provides a variety of built-in types (or classes) and objects. • The built-in types include Array, Boolean, Date, Function, Number, Object, Point, Rect, RegExp, Size and String. • The only built-in object is Math. Array An Array is a datatype which contains a named list of items. The items can be any JavaScript object. Multi-dimensional arrays are achieved by setting array items to be arrays themselves. Arrays can be extended dynamically simply by creating items at non-existent index positions. Items can also be added using push(), unshift() and splice(). Arrays can be concatenated together using concat(). Items can be extracted using pop(), shift() and slice(). Items can be deleted using splice(). Arrays can be turned into strings using join() or toString(). Use reverse() to reverse the items in an array, and sort() to sort the items. The sort() function can be passed a comparison function for customized sort orders. In general, operations that copy array items perform a deep copy on items that are Number or String objects and a shallow copy on other objects. Array Construction Arrays can be constructed from array literals or using the new operator: var var var for mammals = [ "human", "dolphin", "elephant", "monkey" ]; plants = new Array( "flower", "tree", "shrub" ); things = []; ( i = 0; i < mammals.length; i++ ) { things[i] = new Array( 2 ); things[i][0] = mammals[i]; things[i][1] = plants[i]; } Arrays can be initialized with a size, but with all items undefined: var a = new Array( 10 ); // 10 items Array Access Array items are accessed via their names. Names can be either integers or strings. 371 Enfocus Switch 10 Example: var m2 = mammals[2]; mammals[2] = "gorilla"; var thing = things[2][1] The first statement retrieves the value of the third item of the mammals array and assigns it to m2, which now contains "monkey". The second statement replaces the third item of the mammals array with the value "gorilla". The third statement retrieves the second item of the third item's array from the things array and assigns it to thing, which now contains "shrub". As stated above, it is also possible to access the arrays using strings. These act as normal properties, and can be accessed either using the square bracked operator ([]) or by directly dereferencing the array object and specifying the property name (.name). These two accessor types can be mixed freely as seen below with the address and phoneNumber properties. var names = []; names["first"] = "John"; names["last"] = "Doe"; var firstName = names["first"]; var lastName = names["last"]; names["address"] = "Somewhere street 2"; names.phoneNumber = "+0123456789"; var address = names.address; var phoneNumber = names["phoneNumber"]; Array Properties length : Number Holds the number of items in the array. Items with string keys are excluded from the length property. Array Functions Concatenates the array with one or more other arrays in the order concat( a1 : Array, a2 : Array, ... aN : Array ) : Array given and returns a single array. var x = new Array( "a", "b", "c" ); var y = x.concat( [ "d", "e" ], [ 90, 100 ] ); // y == [ "a", "b", "c", "d", "e", 90, 100 ] join( optSeparator : String ) Joins all the items of an array together, separated by commas or by the specified optSeparator. : String var x = new Array( "a", "b", "c" ); var y = x.join(); // y == "a,b,c" var z = x.join( " * " ); // y == "a * b * c" pop( ) : Object Pops (that is, removes) the top-most (right-most) item off the array and returns it. var x = new Array( "a", "b", "c" ); var y = x.pop(); // y == "c" x == [ "a", "b" ] push( item1 : Object, optItem2 : Object, ... optItemN : Object ) Pushes (that is, inserts) the given items onto the top (right) end of the array. The function returns the new length of the array. var x = new Array( "a", "b", "c" ); x.push( 121 ); // x == [ "a", "b", "c", 121 ] 372 Enfocus Switch 10 reverse( ) Reverses the items in the array. var x = new Array( "a", "b", "c", "d" ); x.reverse(); // x == [ "d", "c", "b", "a" ] shift( ) : Object Shifts (that is, removes) the bottom-most (left-most) item off the array and returns it. var x = new Array( "a", "b", "c" ); var y = x.shift(); // y == "a" x == [ "b", "c" ] slice( startIndex : Number, Copies a slice of the array from the item with the given starting optEndIndex : Number ) : index, startIndex, to the item before the item with the given ending index, optEndIndex. If no ending index is given, all items Array from the starting index onward are sliced. var x = new Array( "a", "b", "c", "d" ); var y = x.slice( 1, 3 ); // y == [ "b", "c" ] var z = x.slice( 2 ); // z == [ "c", "d" ] sort( optComparisonFunction : function or Function ) Sorts the items in the array using string comparison. For customized sorting, pass the sort() function a comparison function, optComparisonFunction, that has the following signature and behavior: function comparisonFunction( a, b ) // signature The function must return an integer as follows: • -1 if a < b • 0 if a == b • 1 if a > b Example 1: var x = new Array( "d", "x", "a", "c" ); x.sort(); // x == [ "a", "c", "d", "x" ] Example 2: function numerically( a, b ) { return a < b ? -1 : a > b ? 1 : 0; } var x = new Array( 8, 90, 1, 4, 843, 221 ); x.sort( numerically ); // x == [ 1, 4, 8, 90, 221, 843 ] splice( startIndex : Number, replacementCount : Number, optItem1 : Object, ... optItemN : Object ) Splices items into the array and out of the array. The first argument, startIndex, is the start index. The second argument, replacementCount, is the number of items that are to be replaced. Make the second argument 0 if you are simply inserting items. The remaining arguments are the items to be inserted. If you are simply deleting items, the second argument must be > 0 (that is, 373 Enfocus Switch 10 the number of items to delete) and there must be no new items given. var x = new Array( "a", "b", "c", "d" ); // 2nd argument 0, plus new items ==> insertion x.splice( 1, 0, "X", "Y" ); // x == [ "a", "X", "Y", "b", "c", "d" ] // 2nd argument > 0, and no items ==> deletion x.splice( 2, 1 ); // x == [ "a", "X", "b", "c", "d" ] // 2nd argument > 0, plus new items ==> replacement x.splice( 3, 2, "Z" ); // x == [ "a", "X", "b", "Z" ] toString( ) : String Joins all the items of an array together, separated by commas. This function is used when the array is used in the context of a string concatenation or is used as a text value, example: for printing. Use join() if you want to use your own separator. var x = new Array( "a", "b", "c" ); var y = x.toString(); // y == "a,b,c" var z = x.join(); // y == "a,b,c" unshift( item1 : Object, optItem2 : Object, ... optItemN : Object ) Unshifts (that is, inserts) the given items at the bottom (left) end of the array. var x = new Array( "a", "b", "c" ); x.unshift( 121 ); // x == [ 121, "a", "b", "c" ] Boolean JavaScript provides a Boolean data type. In general, creating objects of this type is not recommended since the behavior will probably not be what you would expect. Instead, use the boolean constants true and false as required. Any expression can be evaluated in a boolean context, example: in an if statement. If the expression's value is 0, null, false, NaN, undefined (see built-in constants) or the empty string "", the expression is false; otherwise the expression is true. Date Instances of the Date class are used to store and manipulate dates and times. A variety of get functions are provided to obtain the date, time or relevant parts, for example, getDay(), getYear(), getHours(), getMilliseconds(), getMinutes(), getMonth(), getSeconds(), getTime(). A complementary set of functions are also provided, including setYear(), setHours(), setMilliseconds(), setMinutes(), setMonth(), setSeconds(), setTime(). The functions operate using local time. Conversion between Date objects to and from strings are provided by parse() and Date::toString(). Elapsed time (in milliseconds) can be obtained by creating two dates, casting them to Number and subtracting one value from the other. var date1 = new Date(); 374 Enfocus Switch 10 // time flies.. var date2 = new Date(); var timedifference = date2.getTime() - date1.getTime(); Static Date Function parse( dateString : String ) : Number This is a static function that parses a string, dateString, which represents a particular date and time. It returns the number of milliseconds since midnight on the 1st January 1970. The string must be in the ISO 8601 extended format: YYYY-MM-DD or with time YYYY-MM-DDTHH:MM:SS. var d = new Date( Date.parse( "1976-01-25T22:30:00" ) ); d = Date.parse( "1976-01-25T22:30:00" ); Date Construction Date( ) Date( milliseconds : Number ) Date( year : Number, month : Number, day : Number, optHour : Number, optMinutes : Number, optSeconds : Number, optMilliseconds : Number ) Dates can be constructed with no arguments, in which case the value is the date and time at the moment of construction using local time. A single integer argument is taken as the number of milliseconds since midnight on the 1st January 1970. var var var var 30 ); today = new Date(); d = new Date( 1234567 ); date = new Date( 1994, 4, 21 ); moment = new Date( 1968, 5, 11, 23, 55, Date Functions getDate( ) : Number Returns the day of the month using local time. The value is always in the range 1..31. var d = new Date( 1975, 12, 25 ); var x = d.getDate(); // x == 25 getDay( ) : Number Returns the day of the week using local time. The value is always in the range 1..7, with the week considered to begin on Monday. Example 1: var d = new Date( 1975, 12, 25, 22, 30, 15 ); var x = d.getDay(); // x == 4 Example 2: var IndexToDay = [ "Mon", "Tue", "Wed", "Thu", "Fri", "Sat", "Sun" ]; var d = new Date( 1975, 12, 28 ); var day = IndexToDay[ d.getDay() - 1 ]; // day == "Sun" 375 Enfocus Switch 10 getYear( ) : Number Returns the year using local time. var d = new Date( 1975, 12, 25 ); var x = d.getYear(); // x == 1975 getHours( ) : Number Returns the hours using local time. The value is always in the range 0..23 var d = new Date( 1975, 12, 25, 22 ); var x = d.getHours(); // x == 22 getMilliseconds( ) : Number Returns the milliseconds component of the date using local time. The value is always in the range 0..999. In the example, x is 0, because no milliseconds were specified, and the default for unspecified components of the time is 0. var d = new Date( 1975, 12, 25, 22 ); var x = d.getMilliseconds(); // x == 0 getMinutes( ) : Number Returns the minutes component of the date using local time. The value is always in the range 0..59. var d = new Date( 1975, 12, 25, 22, 30 ); var x = d.getMinutes(); // x == 30 getMonth( ) : Number Returns the month component of the date using local time. The value is always in the range 0..12. Example 1: var d = new Date( 1975, 12, 25, 22, 30 ); var x = d.getMonth(); // x == 12 Example 2: var IndexToMonth = [ "Jan", "Feb", "Mar", "Apr", "May", "Jun", "Jul", "Aug", "Sep", "Oct", "Nov", "Dec" ]; var d = new Date( 1975, 12, 25 ); var month = IndexToMonth[ d.getMonth() - 1]; // month == "Dec" getSeconds( ) : Number Returns the seconds component of the date using local time. The value is always in the range 0..59. In the example x is 0 because no seconds were specified, and the default for unspecified components of the time is 0. var d = new Date( 1975, 12, 25, 22, 30 ); var x = d.getSeconds(); // x == 0 376 Enfocus Switch 10 getTime( ) : Number Returns the number of milliseconds since midnight on the 1st January 1970 using local time. var d = new Date( 1975, 12, 25, 22, 30 ); var x = d.getTime(); // x == 1.91457e+11 setDate( dayOfTheMonth Sets the day of the month to the specified dayOfTheMonth in local : Number) time. var d = new Date( 1975, 12, 25, 22, 30 ); d.setDate( 30 ); // d == 1975-12-30T22:30:00 setYear( year : Number) Sets the year to the specified year in local time. If the month, optMonth is specified, it must be in the range 0..11. If the optDayOfTheMonth is specified it must be in the range 1..31. var d = new Date( 1975, 12, 25, 22, 30 ); d.setYear( 1980 ); // d == 1980-12-30T22:30:00 d.setYear( 1980, 11, 2 ); // d == 1980-12-02T22:30:00 setHours( hour : Number) Sets the hour to the specified hour, which must be in the range 0..23, in local time. The minutes, seconds and milliseconds past the hour (optMinutes, optSeconds and optMilliseconds) can also be specified. var d = new Date( 1975, 12, 25, 22, 30 ); d.setHours( 10 ); // d == 1980-12-30T10:30:00 setMilliseconds( milliseconds : Number) Sets the milliseconds component of the date to the specified value in local time. var d = new Date( 1975, 12, 25, 22, 30 ); d.setMilliseconds( 998 ); // d == 1980-12-30T10:30:00:998 setMinutes( minutes : Number) Sets the minutes to the specified minutes, which must be in the range 0..59, in local time. The seconds and milliseconds past the minute (optSeconds and optMilliseconds) can also be specified. var d = new Date( 1975, 12, 25, 22, 30 ); d.setMinutes( 15 ); // d == 1980-12-30T10:15:00 setMonth( month : Number) Sets the month to the specified month, which must be in the range 0..11, in local time. The day of the month (optDayOfTheMonth) may also be specified. var d = new Date( 1975, 12, 25, 22, 30 ); d.setMonth( 0, 11 ); // d == 1980-01-11T22:30:00 377 Enfocus Switch 10 setSeconds( seconds : Sets the seconds to the specified seconds, which must be in the Number, optMilliseconds range 0..59, in local time. The milliseconds past the seconds : Number ) (optMilliseconds) can also be specified. var d = new Date( 1975, 12, 25, 22, 30 ); d.setSeconds( 25 ); // d == 1980-12-30T22:30:25 setTime( milliseconds : Number ) Sets the date and time to the local date and time given in terms of milliseconds since midnight on the 1st January 1970. var d = new Date( 1975, 12, 25, 22, 30 ); var duplicate = new Date(); duplicate.setTime( d.getTime() ); toString( ) : String Converts the date into a string on the ISO 8601 extended format: YYYY-MM-DDTHH:MM:SS. var d = new Date( 1975, 12, 25, 22, 30 ); var s = d.toString(); // s == "1975-12-25T22:30:00" Function In some situations it is desirable to create functions at run time. var min = new Function( "x", "y", "return x < y ? x : y;" ); var m = min( 68, 9 ); // m == 9 The first arguments are the names of the parameters; the last argument is a string which contains the function's definition. It is also possible to supply the list of argument names as one comma separated string. var min = new Function( "x,y", "return x < y ? x : y;" ); Variable numbers of arguments are also supported using the arguments array (see built-in variables). For example: var max = new Function( "var max = 0;" + "for ( var i = 0; i < arguments.length; i++ ) {" + " if ( arguments[ i ] > max ) max = arguments[ i ];" + "}" + "return max;" ); var x = max( 50, 16, 24, 99, 1, 97 ); // x == 99 Number A Number is a datatype that represents a number. In most situations, programmers will use numeric literals like 3.142 directly in code. The Number datatype is useful for obtaining system limits, example: MIN_VALUE and MAX_VALUE, and for performing number to string conversions with toString() A numeric variable can hold a non-numeric value, in which case isNaN() returns true. The result of an arithmetic expression may exceed the maximum or minimum representable values in which case the value of the expression will be Infinity, and isFinite() will return false. See also built-in contants and built-in functions. 378 Enfocus Switch 10 Number Construction Numbers are not normally constructed, but instead created by simple assignment, example: var x = 3.142; Number Properties MAX_VALUE : Number The maximum value for floating point values. MIN_VALUE : Number The minimum value for floating point values. Number Functions toString( ) : String Returns the number as a string value. Object Object is the base type for all JavaScript objects. Object provides a toString() function which is usually overridden by subclasses. Point A Point object represents a two-dimensional point. Point Construction The Point class provides three different constructors. var point = new Point( 20, 30 ); var duplicate = new Point( point ); // 20, 30 var zero = new Point(); // 0, 0 Point Properties x : Number The x position of the point. y : Number The y position of the point. Rect A Rect object represents a rectangle. Rect Construction The rectangle class provides three constructors. var rect = new Rect( 10, 20, 30, 40 ); // x=10, y=20, width=30, height=40 var duplicate = new Rect( rect ); // x=10, y=20, width=30, height=40 var empty = new Rect(); // x=0, y=0, width=0, height=0 Rect Properties x : Number The left position of the rectangle. y : Number The right position of the rectangle. width : Number The width of the rectangle. 379 Enfocus Switch 10 height : Number The height of the rectangle. top : Number The position of the top of the rectangle. This is defined as top = y. bottom : Number The position of the bottom of the rectangle. This is defined as bottom = y + height + 1. left : Number The position of the rectangle's left side. This is defined as left = x right : Number The position of the rectangle's right side. This is defined as right = x + width + 1. center : Point The center of the rectangle. Rect Functions isNull() : Boolean Returns true if the rectangle has a width and height of 0. var empty = new Rect(); empty.isNull(); // true; var square = new Rect( 10, 10, 10, 10 ); square.isNull(); // false; isEmpty() : Boolean Returns true if the rectangle is empty, meaning that it has width and/or height that is negative. var rect = new Rect( 10, 10, -10, -10 ); rect.isEmpty(); // true var rect = new Rect( 10, 10, 10, 10 ); rect.isEmpty(); // false contains( otherRect : Rect ) : Boolean Returns true if the rectangle contains the other rectangle. new Rect( 0, 0, 100, 100 ).contains( new Rect( 10, 10, 10, 10 ) ); // true new rect( 10, 10, 10, 10 ).contains( new Rect( 0, 0, 100, 100 ) ); // false intersection( otherRect : Rect Returns the intersection between this rectangle and another ) : Rect rectangle. The intersection of two rectangles is the part of the rectangles that overlap. If they do not overlap, an empty rectangle is returned. union( otherRect : Rect ) : Rect 380 Returns the union of two rectangles. The union is a rectangle large enough to encompass both rectangles. intersects( otherRect : Rect ) : Boolean Returns true if this rectangle intersects the other rectangle. normalize( ) Normalizes this rectangle. This means changing the prefix of the width and/or height if they are negative. After being normalized, a rectangle will no longer be empty Enfocus Switch 10 moveLeft( pos : Number ) Moves the rectangle so that its left property is equal to pos. moveRight( pos : Number ) Moves the rectangle so that its right property is equal to pos. moveTop( pos : Number ) Moves the rectangle so that its top property is equal to pos. moveBottom( pos : Number ) Moves the rectangle so that its bottom property is equal to pos. moveBy( dx : Number, dy : Number Translates the rectangle by dx and dy. dx and dy will be ) added to x and y. Width and height will be left unchanged. RegExp A RegExp is a regular expression matcher for strings. Regular expressions can be created either by using the /expression/ syntax or by using the RegExp constructor as shown below. Note that when using the RegExp constructor, a string is passed, and all backslashes must be escaped using an extra backslash, that is, \\d. Below are two ways to create regular expressions that matches the pattern "QUANTITY=471 # Order quantity" and gets the number 471. var directRegex = /([A-Z]+)=(\d+)/; var str = "QUANTITY=471 # Order quantity"; str.match(directRegex); directRegex.capturedTexts[2]; // "471"; var indirectRegex = new RegExp( "([A-Z]+)=(\\d+)" ); RegExp Properties valid : Boolean True if the regular expression is syntactically valid; otherwise returns false. empty : Boolean True if the pattern is empty; otherwise returns false. matchedLength : Number The length of the last matched string or -1 if there was no match. capturedTexts : String[ ] An array of all the captured texts from the previous match. This can be empty. global : Boolean Specifies that the regexp should be matched globally. A global regexp will match every occurrence (that is, as many times as possible), whereas a non-global regexp will match at most once (at the first match it encounters). This is particularly relevant for replace where every occurance of a pattern will be replaced when global is true. 381 Enfocus Switch 10 A regular expression can be set to global either by setting the global property on a regexp object or by specifying a trailing g in the pattern. var re = /mypattern/g; var re = /mypattern/; re.global = true ignoreCase : Boolean // Global by method #1 // Global by method #2 Specifies that the regexp ignores case when matching. Case-insensitivity can is enabled by either specifying a trailing i after the pattern or by setting the ignoreCase property. var re = /mypattern/i; // Case-insensitive by method #1 var re = /mypattern/; re.ignoreCase = true; // Case-insensitive by method #2 RegExp Functions toString() : String Returns the regular expression pattern as a string. search( text : String) : Number Searches text for the pattern defined by the regular expression. The function returns the position in the text of the first match or -1 if no match is found. var re = /\d+ cm/; // matches one or more digits followed by space then 'cm' re.search( "A meter is 100 cm long" ); // returns 11 searchRev( text : String) : Same as search(), but searchRev searches from the end of the text. Number exactMatch( text : String) : Boolean Returns true if text exactly matches the pattern in this regular expression; otherwise returns false. cap( nth : Number ) : String Returns the nth capture of the pattern in the previously matched text. The first captured string (cap(0) ) is the part of the string that matches the pattern itself, if there is a match. The following captured strings are the parts of the pattern enclosed by parenthesis. In the above example, we try to capture ([a-zA-Z ]+), which captures a sequence of one or more letters and spaces after the name: part of the string. re = /name: ([a-zA-Z ]+)/; re.search( "name: John Doe, age: 42" ); re.cap(0); // returns "name: John Doe" re.cap(1); // returns "John Doe" re.cap(2); // returns undefined, no more captures. pos( nth : Number ) : Number Returns the position of the nth captured text in the search string. re = /name: ([a-zA-Z ]+)/; re.search( "name: John Doe, age: 42" ); re.pos(0); // returns 0, position of "name: John Doe" 382 Enfocus Switch 10 re.pos(1); // returns 6, position of "John Doe" re.pos(2); // returns -1, no more captures Size A Size object represents a two-dimensional size, using width and height. Size Construction The Size class provides three constructors: var size = new Size( 100, 200 ); // width = 100, height = 200 var duplicate = new Size( size ); // width = 100, height = 200 var empty = new Size(); // width = 0, height = 0 Size Properties width : Number The width of the size. height : Number The height of the size. Size Functions translate( ) Swaps the width and height of the size. String A String is a sequence of zero or more Unicode characters. String Construction Strings can be created and concatenated as follows. var text = "this is a"; var another = new String( "text" ); var concat = text + " " + another; // concat == "this is a text" String Properties length : Number The length property specifies the length of the string. Static String Functions fromCharCode ( code1 : Number, code2 : Number, ... ) Returns a string made up of the characters with code code1, code2, etc, according to their Unicode character codes. var s = String.fromCharCode( 65, 66, 67, 68 ); // s == "ABCD" 383 Enfocus Switch 10 String Functions charAt( pos : Number ) : String Returns the character in the string at position pos. If the position is out of bounds, undefined is returned. charCodeAt( pos : Number ) : Number Returns the character code of the character at position pos in the string. If the position is out of bounds, undefined is returned. indexOf( pattern : String or RegExp, Returns the index of pattern in the string, starting at pos : Number ) : Number position pos. If no position is specified, the function starts at the beginning of the string. If the pattern is not found in the string, -1 is returned. lastIndexOf( pattern : String or RegExp, pos : Number ) : Number Returns the last index of pattern in the string, starting at position pos and searching backwards from there. If no position is specified, the function starts at the end of the string. If the pattern is not found in the string, -1 is returned. match( pattern : RegExp ) : String or String[ ] Returns the matched pattern if this string matches the pattern defined by regexp. If the string doesn't match or regexp is not a valid regular expression, undefined is returned. If the regexp has global set and the string matches multiple patterns, an array of strings is returned. search( pattern : String or RegExp, Same as find. pos : Number ) : Number searchRev( pattern : String or RegExp, pos : Number ) : Number Same as findRev replace( pattern : RegExp, newValue Replaces the first occurrence of pattern in the string with : String ) : String newvalue if the pattern is found in the string. A modified copy of string is returned. The original string is not modified. If pattern is a regular expression with global set, all occurances of pattern in the string will be replaced. split( pattern : String or RegExp ) : Returns an array of strings containing this string split on String[ ] each occurrence of pattern. 384 substring( startIndex : Number, endIndex : Number ) : String Returns a copy of this string which is the substring starting at startIndex and ending at endIndex. toLowerCase() : String Returns a lowercase copy of this string. lower() : String Same as toLowerCase(). toUpperCase() : String Returns an uppercase copy of this string. upper() : String Same as toUpperCase(). Enfocus Switch 10 isEmpty() : Boolean Returns true if the string is empty, that is, has a length of 0; otherwise returns false. left( length : Number ) : String Returns a substring containing the length leftmost characters of this string. right( length : Number ) : String Returns a substring containing the length rightmost characters of this string. mid( start : Number, length : Number ) : String Returns a copy of this string which is the substring starting at "start" and is "length" characters long. If the optional length parameter is not specified, the new string will be from start until the end of the string. find( pattern : String or RegExp, pos Returns the first position of pattern after pos. If the : Number ) : Number pattern is not found, -1 is returned. If pos is not specified, position 0 is used. findRev( pattern : String or RegExp, Returns the first position of pattern before or at pos, pos : Number ) : String searching backward. If pattern is not found, -1 is returned. If pos is not specified, the search starts at the end of the string. startsWith( pattern : String or RegExp ) : Boolean Returns true if the string starts with pattern; otherwise returns false. endsWith( pattern : String or RegExp Returns true if the string ends with pattern; otherwise ) : Boolean returns false. arg( value : String or Number, fieldWidth : Number ) : String This function will return a string that replaces the lowest numbered occurrence of %1, %2, ..., %9 with value. The fieldWidth parameter specifies the minimum amount of space that value is padded to. A positive fieldWidth will produce right-aligned text, whereas a negative fieldWidth will produce left-aligned text. argInt( value : Number, fieldWidth This function behaves like arg above, but is specialized : Number, base : Number ) : String for the case where value is an integer. value is expressed in base base, which is 10 by default and must be between 2 and 36. argDec( value : Number, fieldWidth This function behaves like arg() above, but is specialized : Number, format : String, precision for the case where value is a decimal value. : Number): String Argument value is formatted according to the format specified, which is 'g' by default and can be any of the following: • e - format as [-]9.9e[+|-]999 • E - format as [-]9.9E[+|-]999 385 Enfocus Switch 10 • f - format as [-]9.9 • g - use e or f format, whichever is the most concise • G - use E or f format, whichever is the most concise With 'e', 'E', and 'f', precision is the number of digits after the decimal point. With 'g' and 'G', precision is the maximum number of significant digits (trailing zeroes are omitted). Math The Math object, which always exists in a JavaScript program, supports many common mathematical functions. with ( Math ) { var x = PI * 2; var angle = 1.3; var y = x * sin( angle ); } See also built-in contants and built-in functions. Math Properties All the Math properties are read-only constants. E : Number Eulers constant. The base for natural logarithms. LN2 : Number Natural logarithm of 2. LN10 : Number Natural logarithm of 10. LOG2E : Number Base 2 logarithm of E. LOG10E : Number Base 10 logarithm of E. PI : Number Pi. SQRT1_2 : Number Square root of 1/2. SQRT2 : Number Square root of 2. Math Functions abs( number : Number ) : Number Returns the absolute value of the given number. The equivalent of: x = x < 0 ? -x: x; var x = -99; var y = 99; with ( Math ) { x = abs( x ); y = abs( y ); } // x == y 386 Enfocus Switch 10 acos( number : Number ) : Number Returns the arccosine of the given number in radians between 0 and Math.PI. If the number is out of range, returns NaN. asin( number : Number ) : Number Returns the arcsine of the given number in radians between -Math.PI/2 and Math.PI/2. If the number is out of range, returns NaN. atan( number : Number ) : Number Returns the arctangent of the given number in radians between -Math.PI/2 and Math.PI/2. If the number is out of range, returns NaN. atan2( yCoord : Number, xCoord : Number ) : Number Returns the counter-clockwise angle in radians between the positive x-axis and the point at (xCoord, yCoord). The value returned is always between -Math.PI and Math.PI. function polar( x, y ) { return Math.atan2( y, x ); } ceil( number : Number ) : Number If the number is an integer, it returns the number. If the number is a floating point value, it returns the smallest integer greater than the number. var x = 913.41; x = Math.ceil( x ); // x == 914 var y = -33.97; y = Math.ceil( y ); // y == -33 cos( number : Number ) : Number Returns the cosine of the given number in radians. The value will be in the range -1..1. exp( number : Number ) : Number Returns Math.E raised to the power of the given number. floor( number : Number ) : Number If the number is an integer, it returns the number. If the number is a floating point value, it returns the greatest integer less than the number. log( number : Number ) : Number If the number is > 0, it returns the natural logarithm of the given number. If the number is 0, it returns Infinity. If the number is < 0, it returns NaN. max( number1 : Number, number2 Returns the largest of number1 and number2. : Number ) : Number min( number1 : Number, number2 Returns the smallest of number1 and number2. : Number ) : Number pow( number : Number, power : Number ) : Number Returns the value of the number raised to the power. 387 Enfocus Switch 10 random() : Number Returns a pseudo-random floating point number between 0 and 1. Pseudo random numbers are not truly random but may be adequate for some applications such as simple simulations. round( number : Number ) : Number Returns the number rounded to the nearest integer. If the fractional part of the number is >= 0.5, the number is rounded up; otherwise it is rounded down. sin( number : Number ) : Number Returns the sine of the given number in radians. The value will be in the range -1..1. sqrt( number : Number ) : Number If the number is >= 0, it returns the square root. If the number is < 0, it returns NaN. tan( number : Number ) : Number Returns the tangent of the given number in radians. Built-in functions JavaScript provides a number of convenient built-in constants, variables and functions. • The built-in constants include Infinity, NaN and undefined. • The built-in variables include arguments. • The built-in functions include eval(), isFinite(), isNaN(), parseFloat(), parseInt(). Built-in constants Infinity This is the value of any division by zero, that is, var i = 1/0; In JavaScript, division by zero does not raise an exception; instead it assigns the Infinity value as the result of the expression. Use isFinite() to test whether a value is finite or not. NaN Some functions that are supposed to return a numeric result may return NaN instead. Use isNaN() to check for this. undefined This is the value of a variable that does not have a defined value, that is, has not been assigned to. var i; // ... if ( i == undefined ) { i = 77; } In this example, if execution reaches the if statement and i has not been assigned a value, it will be assigned the value 77. 388 Enfocus Switch 10 Built-in variables arguments : Array This is an array of the arguments that were passed to the function. It only exists within the context of a function. function sum() { total = 0; for ( i = 0; i < arguments.length; i++ ) { total += arguments[ i ]; } return total; } Built-in functions eval( string : String ) This function parses and executes the contents of the string, taking the text to be valid JavaScript. var x = 57; var y = eval( "40 + x" ); // y == 97 isFinite( expression ) : Boolean Returns true if the expression's value is a number that is within range; otherwise returns false. isNaN( expression ) : Boolean Returns true if the expression's value is not a number; otherwise returns false. var var var var x = parseFloat( "3.142" ); y = parseFloat( "haystack" ); xx = isNaN( x ); // xx == false yy = isNaN( y ); // yy == true parseFloat( string : String Parses the string and returns the floating point number that the ) : Number string represents or NaN if the parse fails. Leading and trailing whitespace are ignored. If the string contains a number followed by non-numeric characters, the value of the number is returned and the trailing characters ignored. parseInt( string : String, optBase : Number ) : Number Parses the string and returns the integer that the string represents in the given base optBase or NaN if the parse fails. If the base is not specified, the base is determined as follows: • base 16 (hexadecimal) if the first non-whitespace characters are "0x" or "0X"; • base 8 (octal) if the first non-whitespace character is "0"; • base 10 otherwise. Leading and trailing whitespace are ignored. If the string contains a number followed by non-numeric characters, the value of the number is returned and the trailing characters ignored. var i = parseInt( "24" ); // i == 24 389 Enfocus Switch 10 var h = parseInt( "0xFF" ); // h == 255 var x = parseInt( " 459xyz " ); // x == 459 Built-in operators Javascript offers built-in operators in the following categories: • Assignment operators • Arithmetic operators • String operators • Logical operators • Comparison operators • Bit-wise operators • Special operators Assignment operators These operators are used to assign the value of expressions to variables. 390 Enfocus Switch 10 = operator var variable = expression; The assignment operator is used to assign the value of an expression to the variable. It is an error to attempt to assign to a constant. += operator variable += expression; This operator adds the value of the expression to the variable. It is the same as: variable = variable + expression; but is shorter to write and less error-prone. See also += string operator. -= operator variable -= expression; This operator subtracts the value of the expression from the variable. *= operator variable *= expression; This operator multiplies the value of the expression by the value of the variable. /= operator variable /= expression; This operator divides the value of the variable by the value of the expression. %= operator variable %= expression; This operator divides the variable by the expression and assigns the remainder of the division (which may be 0), to the variable. &= operator variable &= expression; This operator performs a bit-wise AND on the value of the expression and the value of the variable and assigns the result to the variable. ^= operator variable ^= expression; This operator performs a bit-wise OR on the value of the expression and the value of the variable and assigns the result to the variable. |= operator variable |= expression; This operator performs a bit-wise OR on the value of the expression 391 Enfocus Switch 10 and the value of the variable and assigns the result to the variable. <<= operator variable <<= expression; This operator performs a bit-wise left shift on the variable by an expression number of bits. Zeros are shifted in from the right. >>= operator variable >>= expression; This operator performs a bit-wise (sign-preserving) right shift on the variable by an expression number of bits. >>>= operator variable >>>= expression; This operator performs a bit-wise (zero-padding) right shift on the variable by an expression number of bits. Arithmetic operators These operators are used to perform arithmetic computations on their operands. 392 Enfocus Switch 10 + operator operand1 + operand2 This operator returns the result of adding the two operands (operand1 and operand2). See also + string operator. ++ operator ++operand; // pre-increment operand++; // post-increment The pre-increment version of this operator increments the operand and returns the value of the (now incremented) operand. The post-incremented version of this operator returns the value of the operand and then increments the operand. - operator var result = operand1 - operand2; // subtraction operand = -operand; // unary negation The subtraction version of this operator returns the result of subtracting its second operand (operand2) from its first operand (operand1). The unary negation version of this operator returns the result of negating (changing the sign) of its operand. -- operator --operand; // pre-decrement operand--; // post-decrement The pre-decrement version of this operator decrements the operand and returns the value of the (now decremented) operand. The post-decremented version of this operator returns the value of the operand and then decrements the operand. * operator operand1 * operand2 This operator returns the result of multiplying the two operands (operand1 and operand2). / operator operand1 / operand2 This operator returns the result of dividing the first operand (operand1) by the second operand (operand2). Note that division by zero is not an error. The result of division by zero is Infinity. % operator operand1 % operand2 This operator returns the integer remainder (which may be 0) from the division of operand1 by operand2. String operators 393 Enfocus Switch 10 These operators provide string functions using operators. Many other string functions are available, see String. + string operator str1 + str2 This operator returns a string that is the concatenation of its operands, (str1 and str2). See also + arithmetic operator. += string operator str1 += str2 This operator appends its second operand (str2) onto the end of the first operand (str1). See also += assignment operator. Logical operators These operators are used to evaluate whether their operands are true or false. The binary operators use short-circuit logic, that is, they do not evaluate their second operand if the logical value of the expression can be determined by evaluating the first operand alone. && operator operand1 && operand2 This operator returns an object whose value is true if both its operands are true; otherwise it returns an object whose value is false. Specifically, if the value of operand1 is false, the operator returns operand1 as its result. If operand1 is true, the operator returns operand2. || operator operand1 || operand2 This operator returns an object whose value is true if either of its operands are true; otherwise it returns an object whose value is false. Specifically, if the value of operand1 is true, the operator returns operand1 as its result. If operand1 is false, the operator returns operand2. ! operator ! operand If the operand's value is true, this operator returns false; otherwise it returns true. Comparison operators These operators are used to compare objects and their values. 394 Enfocus Switch 10 == operator operand1 == operand2 Returns true if the operands are equal; otherwise returns false. != operator operand1 != operand2 Returns true if the operands are not equal; otherwise returns false. === operator operand1 === operand2 Returns true if the operands are equal and of the same type; otherwise returns false. !== operator operand1 !== operand2 Returns true if the operands are not equal or if the operands are of different types;otherwise returns false. > operator operand1 > operand2 Returns true if operand1 is greater than operand2; otherwise returns false. >= operator operand1 >= operand2 Returns true if operand1 is greater than or equal to operand2; otherwise returns false. < operator operand1 < operand2 Returns true if operand1 is less than operand2; otherwise returns false. <= operator operand1 <= operand2 Returns true if operand1 is less than or equal to operand2; otherwise returns false. Bit-wise operators & operator operand1 & operand2 Returns the result of a bit-wise AND on the operands (operand1 and operand2). ^ operator operand1 ^ operand2 Returns the result of a bit-wise XOR on the operands (operand1 and 395 Enfocus Switch 10 operand2). | operator operand1 | operand2 Returns the result of a bit-wise OR on the operands (operand1 and operand2). ~ operator ~ operand Returns the bit-wise NOT of the operand. << operator operand1 << operand2 Returns the result of a bit-wise left shift of operand1 by the number of bits specified by operand2. Zeros are shifted in from the right. >> operator operand1 >> operand2 Returns the result of a bit-wise (sign propagating) right shift of operand1 by the number of bits specified by operand2. >>> operator operand1 >>> operand2 Returns the result of a bit-wise (zero filling) right shift of operand1 by the number of bits specified by operand2. Zeros are shifted in from the left. Special operators ?: operator expression ? resultIfTrue : resultIfFalse This operator evaluates its first operand, the expression. If the expression is true, the value of the second operand (resultIfTrue) is returned; otherwise the value of the third operand (resultIfFalse) is returned. , operator expression1, expression2 This operator evaluates its first and second operand (expression1 and expression2) and returns the value of the second operand (expression2). The comma operator can be subtle and is best reserved only for use in argument lists. function operator var variable = function( optArguments ) { Statements } This operator is used to create anonymous functions. Once assigned, the variable is used like any other function name, example variable (1, 2, 3). Specify the argument names (in optArguments) if named arguments are required. If no optArguments are specified, arguments may still be passed and will be available using the arguments list. 396 Enfocus Switch 10 The JavaScript function operator supports closures, for example: function make_counter( initialValue ) { var current = initialValue; return function( increment ) { current += increment; return current; } } // ... var counterA = make_counter( 3 ); // Start at 3. var counterB = make_counter( 12 ); // Start at 12. var x1 = counterA( 2 ); // Adds 2, so x1 == 5 var x2 = counterB( 2 ); // Adds 2, so x2 == 14 var x3 = counterA( 7 ); // Adds 7, so x3 == 12 var x4 = counterB( 30 ); // Adds 30, so x4 ==44 Note that for each call to make_counter(), the anonymous function that is returned has its own copy of current (initialized to the initialValue), which is incremented independently of any other anonymous function's current. It is this capturing of context that makes the function that is returned a closure. See also function declaration and Function type. in operator property in Object Returns true if the given Object has the given property; otherwise returns false. instanceof operator object instanceof type Returns true if the given object is an instance of the given type, (or of one of its base classes); otherwise returns false. new operator var instance = new Type( optArguments ); This function calls the constructor for the given Type, passing it the optional arguments (optArguments) if any and returns an instance of the given Type. The Type may be one of the built-in types, one of the library types, or a user-defined type. Example: var circle = new Circle( x, y ); var file = new File(); this operator this.property The "this" operator may only be used within a function that is defined within a class, that is a member function. Within the scope of the function this is a reference to the particular instance (object) of the class's type. Example: class MinMax { var _min; var _max; function MinMax( min, max ) { this._min = min; this._max = max; } function max() { return this._max; } 397 Enfocus Switch 10 function min() { return this._min; } function setMax( value ) { this._max = value; } function setMin( value ) { this._min = value; } } typeof operator typeof item This operator returns a type of the object as a string. Example: var f = new Function("arguments[0]*2"); // "object" var str = "text"; // "string" var pi = Math.PI; // "number" Functions and built-in objects have a "typeof" of "function". Declarations Classes, functions, variables and constants are declared with class, function, var and const respectively. Reserved words JavaScript reserves some words which are valid identifiers for its own use: • Currently used for declarations: class, function, var and const. • Reserved for future use: boolean, byte, char, debugger, double, enum, export, float, goto, implements, import, int, interface, long, native, short, synchronized, throws, transient and volatile. It is unadvisable to use any of these words as identifiers. class class ClassName { static var ClassVariable; var MemberVariable; static function ClassFunction { Statements; } function ClassName() { Statements; } // constructor function MemberFunction() { Statements; } } This keyword is used to define new classes. After the keyword class comes the ClassName, then optionally, the keyword extends followed by a class name from which this class derives, then an opening brace. Class variables are declared with static var (ClassVariable). Only one instance of these variables exists per class. Member variables (MemberVariable) are declared with var; each instance (object) of the class has its own copy of each member variable. Functions declared with the keywords static function are class functions (ClassFunction); these functions are called using the name of the class rather than from an object. In the standard library, the Math functions are all static, for example Math.sin(). Member functions are called by objects and are declared with function. The constructor is the member function with the same name as the class; constructors must not contain an explicit return statement or have an explicit return type, since JavaScript handles these automatically. A class that only contains static const, var and function definitions does not need a constructor. 398 Enfocus Switch 10 Example: class Area { static var count = 0; var _name; function Area( name ) { this._name = name; this.count++ } function destroy() { this.count--; } static function count() { return this.count; } function name() { return this._name; } function setName( name ) { this._name = name; } } In this example we define the "Area" class. When an instance of the class is constructed: var area = new Area( "Berkshire" ); the given name is assigned to the object's _name variable and the class's static count is incremented. The destroy() function is not called automatically; it must be called explicitly if there is any clean-up to do. JavaScript does not have destructors. All the class's variables and functions must be defined within the class definition. Classes are all derived from Object. It is possible to derive a class from another class using the extends keyword, for example: class City extends Area { var _population; function City( name, population ) { Area( name ); _population = population; } function population() { return _population; } function setPopulation( population ) { _population = population; } } See also function. const const identifier = Value; This keyword is used to define constant values. The identifier is created as a constant with the given Value. The constant is global unless defined within the scope of a class or function. Example: const PI2 = Math.PI * 2; const COPYRIGHT = "Copyright (c) 2006"; Attempts to assign to a constant cause the interpreter to issue an error message and stop. function function functionName( arguments ) { Statements; } Functions may also be declared within the scope of a class definition. In this situation, the functions become member functions of the class that contains them. See class. 399 Enfocus Switch 10 var var variableName; var anotherVariableName = InitialValue; This keyword is used to declare and optionally initialize variables. If just the variableName is given, the variable is created, but it has no value, that is, its value is undefined. If an InitialValue is given, the variable is created and assigned this InitialValue. Variables declared within functions are local to the function in which they are declared. Variables declared outside of functions and classes are global. Example: var i; var count = 22; var str = "string"; Control statements The flow-of-control in JavaScript programs is controlled by control statements, for example: if, switch, for and while. JavaScript also supports exceptions with try and catch. This topic discusses control statements in alphabetical order: break, case, catch, continue, default, do, else, for, if, finally, label, return, Switch, throw, try, try...catch, try...finally, while, with. break label: for ( var i = 0; i < limit; i++ ) { if ( condition ) { break label; } } switch ( expression ) { case 1: Statements1; break; default: DefaultStatements; break; } This keyword is used in, for loops, do loops, while loops and Switch statements. When a break statement is encountered in a loop, control is passed to the statement following the end of the inner-most loop that contains the break statement; unless the break statement is followed by the name of a label, in which case control passes to the statement governed by the label. A break statement is usually placed at the end of each case in a Switch statement to prevent the interpreter "falling through" to the next case. When the interpreter encounters a break statement, it passes control to the statement that follows the inner-most enclosing Switch statement. If every case has a corresponding break, then at most one case's statements will be executed. If the break statement is followed by a label name (see label) then when the break is encountered, control will pass to the statement marked with that label; this is useful, for example, for breaking out of deeply nested loops. Example: red: for ( x = 0; x < object.width; x++ ) { for ( y = 0; y < object.height; y++ ) { if ( color[x][y] == 0xFF0000 ) { 400 Enfocus Switch 10 break red; } } } case switch ( expression ) { case Value: Statements; break; default: DefaultStatements; break; } This keyword is used in Switch statements. For each possible value that a Switch statement's expression may evaluate to, one case may be written, (but see default.) If a case's literal value (Value) matches the value of the Switch statement's expression, then that case's statements (Statements) are executed. Normally a case's statements are terminated by a break statement which causes execution to pass to the end of the Switch statement. See Switch for an example. catch try { Statements; } catch( exception ) { ExceptionStatements; } This keyword is used in try statements. If an exception occurs, then the ExceptionStatements in a matching catch block are executed. Catch blocks come in two varieties, unqualified and qualified. An unqualified catch block has the form: catch ( e ) { /* statements */ } and a qualified catch block has the form: catch ( e if e instanceOf RangeError ) { /* statements */ } The possible exception types are: • EvalError -- the result of a failed eval() call. • RangeError -- a result that is out of range, example: an array index to an element that is not in the array. • TypeError -- an attempt to perform an operation on an object of an inappropriate type. • User defined exceptions -- exceptions that are objects of a user-defined type. See try for an example. Also, see throw. 401 Enfocus Switch 10 continue for ( var i = 0; i < limit; i++ ) { if ( condition ) { continue; } Statements; } This keyword is used within the context of a for, while or do loop. If a continue statement is encountered in a for loop, execution immediately passes to the third part of the for loop (normally where a counter is incremented or decremented), and then execution continues normally, that is, the middle part of the for loop (the conditional) is tested and if true, the body of the loop is executed. If a continue statement is encountered in a while or do loop, execution immediately passes to the conditional, which is retested; the body of the loop will be executed if the conditional is still true. See do for an example. default switch ( expression ) { case 1 : Statements1; break; default : DefaultStatements; break; } This keyword is used in Switch statements. It is used instead of case to match anything that the Switch statement's expression has evaluated to. If no default is used, and none of the cases match, then the Switch statement will not execute anything and control will pass on to the following statement. If default is used, it must be the last case in the Switch statement. This is because each case is evaluated in order and since default matches any value, it will always be executed if the interpreter reaches it and any following cases would always be ignored. When the default case is encountered its DefaultStatements are executed. It is customary to end a default statement with a break. See Switch for an example. do do { Statements; } while ( condition ); This keyword is used in conjunction with while to form a loop which is guaranteed to execute at least once. The Statements in the braces following the do are executed once. If the while condition evaluates to true, execution passes back to the do and the whole process repeats. If the while loop's conditional ever becomes false, execution continues from the statement following the while statement. Example: var x = 0; do { 402 Enfocus Switch 10 x += 5; if ( x == 50 ) continue; debug( x ); } while ( x < 100 ); The example outputs 5, 10, 15, ..., 45, 55, 60, 65, ..., 95. See also continue and break. else if ( condition ) { Statements; } else { ElseStatements; } The else keyword is used in conjunction with if. See if for details. for for ( i = 0; i < limit; i++ ) { Statements; } This keyword is used to create a loop that executes a fixed number of times. The for statement is broken into parts as follows: the keyword for, an opening parentheses, zero or more statements (the first part), a semi-colon, a conditional expression (the second part), a semi-colon, zero or more statements (the third part), a closing parentheses and finally a statement or block that is governed by the for loop. The first part of the for statement is typically used to initialize (and possibly declare) the variable used in the conditional in the second part of the for loop statement. This part is executed once before the loop begins. This part may be empty. The second part contains a conditional expression. The expression is evaluated before each iteration of the loop (including before the first iteration). If this expression evaluates to false, the statement or block governed by the for loop is not executed and control passes to the statement that follows. If the condition is never true, the statement or block governed by the for loop will never be executed. If the condition expression is true, the statement or block governed by the for loop is executed and then the third part of the for statement is executed, before control is passed back to the conditional expression with the whole process being repeated. This part should not be empty. The third part contains statements which must be executed at the end of every iteration of the loop. This part is typically used to increment a variable that was initialized in the first part and whose value is tested in the second part. This part may be empty. Example: var a = [ "a", "b", "c", "d", "e" ]; for( var i = 0; i < a.length; i++ ) { debug( a[ i ] ); } See also continue and break. 403 Enfocus Switch 10 if if ( expression1 ) { // statements1 } else { // elsestatements } if ( expression1 ) { // statements1 } else if ( expression2 ) { // statements2 } // else if ... } else { // elsestatementsN } An if statement provides a two-way branch. A multi-way branch is achieved using else ifs. (See also Switch.) If the first expression, expression1, is true, then the statements governed by that expression (statements1) will be executed, after which control will pass to the statement following the if block. If expression1 is false, control passes to the else statement. If the else has no following if, the else statements (elsestatements) are executed, after which control will pass to the statement following the if block. If the else has a following if, then step 1 or step 2 (this step) is repeated for that if statement depending on whether its expression is true or false. finally try { Statements; } finally { finalStatements; } A "finally" block is a block of code that is executed after the governing try block. If no exceptions occur within the try block, control will pass to the finally block after the last statement in the try block has been executed. If an exception occurs within the try block, control is passed immediately to the finally block. See try...finally for an example. label labelname: Statement; Statements may be labelled; the syntax is labelname followed by a colon, followed by the Statement. The labelname is any valid (unique) identifier. See break for an example. return return optExpression; A return statement may occur anywhere within a function, including member functions, but not within constructors. When a return statement is encountered, control leaves the function immediately and execution resumes at the statement following the call that invoked the function. 404 Enfocus Switch 10 If the return statement is followed by an expression (optExpression) the value of the expression is returned to the caller. Example: function inRange( v, min, max ) { if ( v >= min && v <= max ) { return true; } else { return false; } } switch switch( expression ) { case Value : Statements; break; default : DefaultStatements; break; } A switch statement provides a multi-way branch. The expression is evaluated once, then each case is checked in order to find one with a Value that matches the value of the expression. If a match is made, the statements of the matching case are executed, after which control passes to the statement following the switch block. If no matching case is found and there is a default case, the DefaultStatements are executed, after which control passes to the statement following the switch block. If there is no matching case and no default, no statements within the switch block are executed and control passes to the statement following the switch block. Note that if a default is used it must be come after all the cases; this is because once default is encountered it is treated as a matching case regardless of what follows. Every case and the default (if used) should have a break as their last statement. If break is not present, control will "drop through" to the following statements, which is not usually the desired behavior. The expression may be any arbitrary JavaScript expression that evaluates to an object that can be strictly compared. For example, an expression that evaluates to a Boolean, Date, Number or String value. Example: switch( expr ) { case 1: doActionOne(); break; case "two": doActionTwo(); break; case 3: doActionThree(); case 4: doActionFour(); break; default: doDefaultAction(); break; } In the example, if expr has the value 1, the doActionOne() function will be called. But if expr has the value 3, both doActionThree() and doActionFour() will be called because case 3 does not have 405 Enfocus Switch 10 a break statement and execution "falls through" to case 4. If expr is not 1, "two", 3 or 4 then the default case will be matched and doDefaultAction() will be executed. throw try { Statements; throw "an exception"; } catch ( e ) { if ( e == "an exception" ) { ExceptionStatements; } else { OtherExceptionStatements } } The throw keyword is used to raise user-defined exceptions. Example: function monthToName( i ) { var IndexToMonth = [ "Jan", "Feb", "Mar", "Apr", "May", "Jun", "Jul", "Aug", "Sep", "Oct", "Nov", "Dec" ]; if ( i < 0 || i > 11 ) { throw "month number out of range"; } else { return IndexToMonth[ i ]; } } It is also possible to define a user-defined exception class and throw an object of that type, example: throw new AUserDefinedException( "month number out of range" ); See also try. try try { Statements; } catch ( e ) { } try { Statements; } finally { } The try keyword is used to identify a statement block for which exceptions will be caught. There are two kinds of try block, try...catch and try...finally. try...catch If an exception occurs within a try...catch block, control is passed to the first catch block. If that catch block does not accept the exception, control is passed on to the next catch block (if any) and so on, until there are no more catch blocks, in which case the exception is passed up the call chain until an enclosing catch block is found to accept it or if none accept it, the program will terminate. 406 Enfocus Switch 10 Catch blocks come in two varieties, unqualified and qualified. An unqualified catch block has the form: catch ( e ) { /* statements */ } and a qualified catch block has the form: catch ( e if e instanceOf RangeError ) { /* statements */ } See catch for details of the qualifiers. try...finally If an exception occurs within a try...finally block, control is passed to the finally block. This is useful if you want to ensure that something happens at the end of the block, no matter what. Examples: try { file = new File; file.open( filename ); process( file ); } finally { file.close(); } In this example, the file is always closed, even if an exception occurred. try { var a = monthToName( 11 ); var b = monthToName( 2 ); } catch ( e ) { if ( e == "month number out of range" ) { debug( "Code error: " + e ); } else { throw e; } } In this example, the monthToName() function is called to set two variables. If the function fails, it throws an exception rather than returns an error value, so no explicit check for an error value is necessary. If one of the function calls failed debug() is called; otherwise the exception is re-thrown so that it can be handled at a higher level. (See throw for the definition of monthToName().) while while ( condition ) { Statements; } This keyword is used to repeat a block of code zero or more times. When the while statement is encountered the condition is evaluated. If the condition is true, the Statements in the while block are executed; otherwise control passes to the statement following the while block. If the condition is true, after the Statements have been executed, the condition is again evaluated and the whole process repeats. 407 Enfocus Switch 10 Example: var i = 10; while ( i > 0 ) { debug( i ); i--; } See also continue and break. with with ( QualifyingName ) { Statements; } This keyword is used to indicate that any unqualified names in the Statements should be qualified by QualifyingName. Example: // Without with debug( Math.abs( -4 ) ); debug( Math.pow( 2, 3 ) ); debug( Math.random() ); // With with with ( Math ) { debug( abs( -4 ) ); debug( pow( 2, 3 ) ); debug( random() ); } If multiple qualifying names are required, with statements can be nested. Forcing the interpreter to do the lookup may be slower than using the fully qualified names. 18.3 Utility module Text encoding JavaScript strings represent Unicode characters (internally encoded in UTF-16). Care must be taken when converting a Unicode string to or from a sequence of 8-bite bytes, such as a file on disk (File class) or a byte array in memory (ByteArray class). The Codecs supported by scripting API can be classified as follows: Codecs UTF-16, UTF-16BE, UTF-16LE UTF-8, latin1, Apple Roman, … Hex, Base64 408 Description Map Unicode code points to 16-bit (two byte) representation Map Unicode code points to 8-bit (single byte) representation Map an 8-bit byte stream into a 7-bit ASCII representation Data types String <- -> ByteArray / File String <- -> ByteArray / File String or ByteArray may be used on both sides Enfocus Switch 10 Codec A codec (short-hand for "code-decode") specifies the text encoding used to represent a Unicode string as a sequence of 8-bit bytes. Various codecs are in use throughout the industry. The utility module refers to supported codecs through predefined names. To specify a codec in a function argument, use one of the following strings: • Apple Roman • ISO 8859-1 to 10 • ISO 8859-13 to 16 • latin1 • UTF-8 • UTF-8BOM (see byte order marker below) • UTF-16 • UTF-16BE • UTF-16LE • Windows-1250 to 1258 In addition the utility module supports the following special codecs (See Hex and Base64 below for more information): • Hex (corresponds to xsd:hexBinary) • Base64 (corresponds to xsd:base64Binary and SOAP-ENC:base64) • toHex, toBase64 • fromHex, fromBase64 Note: If the codec argument is missing or null, the codec is set to UTF-8 on Mac and to the current ANSI code page on Windows. Conversion errors When converting from a byte sequence to a text string, byte sequences that do not match the requirements for the codec are replaced by the Unicode representation of a question mark (“?”). When converting from a text string to a byte sequence, Unicode code points that cannot be represented as a byte sequence using the codec are replaced by the ASCII representation of a question mark (“?”). Byte order marker (BOM): Input (from a byte sequence to a text string) Regardless of the specified codec, the utility module automatically recognizes a UTF-16 BOM and when found, the codec is automatically adjusted to the appropriate UTF-16 variant. For example, if the codec argument is set to “UTF-8”, the utility module will correctly read UTF-8, UTF-16BE and UTF-16LE. Byte order marker (BOM): Output (from a text string to a byte sequence) When the codec is set to one of the UTF-16 variants, the utility module always outputs an appropriate 2-byte UTF-16 BOM at the beginning of the data. 409 Enfocus Switch 10 When the codec is set to UTF-8, the utility module does not output a BOM. This is the standard behavior expected by most applications. When the codec is set to UTF-8BOM, the utility module outputs a 3-byte UTF-8 BOM at the beginning of the data (this is just a marker to indicate UTF-8 since there are no byte-order issues in this encoding). Be careful when using this codec, because many applications are not able to correctly interpret a UTF-8 BOM. Hex and Base64 Converting between a String and a ByteArray with any of the codecs (except Hex and Base64) is always unambiguous: the String contains the Unicode code points, the ByteArray contains the 16-bit or 8-bit representation. With a Hex or Base64 codec, the situation is problematic because: • Both decoded and encoded sides can be represented in 8 bits • Following the logic that “the encoded side is in the ByteArray” (as with the other codecs) contradicts the frequent use case where “the encoded side is in a String” (for example, part of an XML stream). To resolve this issue, the 10 release introduces the following directional codecs: Codec Description toHex toBase64 Map an 8-bit byte stream into the specified 7-bit ASCII representation, regardless of the source and target data types If the source is a String, only the 8 lowest bits of each Unicode code point are used (as if latin1 encoding was used) fromHex fromBase64 Map a 7-bit ASCII representation of the specified type into an 8-bit byte stream, regardless of the source and target data types If the source is a String, only the 8 lowest bits of each Unicode code point are set and higher bits are cleared (as if latin1 encoding was used) For compatibility reasons, the unidirectional codecs Hex and Base64 can still be used: • Hex/Base64 will operate as toHex/toBase64 when the target is a ByteArray • Hex/Base64 will operate as fromHex/fromBase64 when target is a String. ByteArray class An instance of the ByteArray class represents a sequence of 8-bit bytes (as opposed to Unicode characters). Constructors ByteArray ( length : Number ) : ByteArray Constructs a new byte array with the specified number of bytes and clears all bytes to zero. An exception is thrown if the specified length is negative or if it is not an integer. ByteArray ( part1 : ByteArray, part2 : ByteArray ) : ByteArray 410 Constructs a new byte array by concatenating the two specified parts. Enfocus Switch 10 ByteArray ( source : String, codec : String ) : ByteArray Constructs a new byte array by converting a source string with the specified codec; see text encoding. Properties length : Number The number of bytes in the byte array. This value is read-only. size : Number Member functions getAt( index : Number ) : Number Returns the value of the byte at the specified zero-based index in the byte array. The returned value is an integer in the range [0..255]. An exception is thrown if the index is out of range or if it is not an integer. putAt( index : Number, value Stores a new value for the byte at the specified zero-based : Number ) index in the byte array. The specified value must be an integer in the range [0..255]. An exception is thrown if the value or the index are out of range, or if they are not integers. getSubArray ( start : Number, Returns the specified portion of the byte array (zero-based start length : Number ) : ByteArray index). An exception is thrown if the requested portion is out of range, or if start and length are not integers. toString (codec : String ) : String Returns the string obtained by converting the byte array using the specified codec, text encoding. convertTo (codec : String ) : ByteArray Returns a new ByteArray which is the re-encoded version of the current one. Supported codecs are Hex and Base64. This function recodes the entire ByteArray even if the data includes null bytes. Example: ByteArray (‘abc’, ‘UTF-8’).convertTo(‘Hex’) returns a ByteArray of length 6 with bytes 54 49 54 50 54 51. Signatures The ByteArray class offers the following additional functions to generate and verify signatures using standard RSA algorithms (compatible with PKCS#1 v2.0). generateSignature( privateKeyPath : String ) : ByteArray Returns the digital signature for the data in the receiving ByteArray using the specified private key. This signature allows a receiver to verify that the data was indeed generated by a script that has access to the specified private key (assuming that the receiver has access to the public key corresponding to the private key). The privateKeyPath argument specifies the path to a private key file in the standard PKCS #8 format. Since this format is not encrypted or password protected, the user must provide other means to safeguard the private key from inappropriate access. 411 Enfocus Switch 10 If the privateKeyPath argument is missing or null, the private key built into Switch is used instead. The resulting signature allows a receiver to verify that the data was indeed generated by a script running in Switch (since the public key corresponding to the private key is part of the public Switch documentation). verifySignature( signature : ByteArray, publicKeyPath : String ) : Boolean Verifies whether the specified digital signature fits the data in the receiving ByteArray using the specified public key. If this function returns true, the data was indeed generated by a sender with access to the private key corresponding to the specified public key (with the certainty level offered by PKCS#1 v2.0). The publicKeyPath argument specifies the path to a public key file in the standard Base64 encoded X.509 format (also called PEM). If the publicKeyPath argument is missing or null, the public key corresponding to the private key built into Switch is used instead. This avoids including an explicit reference to the public key which is part of the public Switch documentation. Example: the following code would generate a signature for authenticating Switch with the Alwan CMYK Optimizer CLI: var var var var strData = "2008-10-12T14:16:22+01:00/var/tmp/foo.pdf/var/tmp/bar.pdf"; binData = new ByteArray(strData, "UTF-8"); binSignature = binData.generateSignature(); strSignature = binSignature.toString("toBase64"); Public Key in C++ syntax: -----BEGIN CERTIFICATE----MIIBgTCCASugAwIBAgIJAN+2brjXZa75MA0GCSqGSIb3DQEBBQUAMA0xCzAJBgNV BAYTAkJZMB4XDTA5MDUxMjA4MDAwMVoXDTA5MDYxMTA4MDAwMVowDTELMAkGA1UE BhMCQlkwXDANBgkqhkiG9w0BAQEFAANLADBIAkEAqm5CNFaMI/Jc7++ySmLdVb9W Y/C+l5Zt1qr8v4qObYZOgpuwucDh9QzC7wgWnCWUINs9xgcU9p6WwrSFcyAbqQID AQABo24wbDAdBgNVHQ4EFgQUTFkQhg1pkDGONt6MFc2zF+L2vRswPQYDVR0jBDYw NIAUTFkQhg1pkDGONt6MFc2zF+L2vRuhEaQPMA0xCzAJBgNVBAYTAkJZggkA37Zu uNdlrvkwDAYDVR0TBAUwAwEB/zANBgkqhkiG9w0BAQUFAANBAKjV5bqRnkgufLyS ddAIwhyvWa5nvVbobF26cEE+7jkC+fspsSvnJDLIW72zCKFEqtnBtEM4uCweYnDV ODWBKjg= -----END CERTIFICATE----- File class The File class provides functionality for reading and writing binary and text files. A File can be instantiated as an object, giving the script developer complete flexibility when reading and writing files. In addition, the File class provides a set of static convenience functions for reading and writing files in one go. Enum AccessMode The enum AccessMode is used in conjunction with File.open() to specify the mode in which the file is opened. The access mode is specified by OR-ing together values from the following list. 412 Access mode Description File.ReadOnly Opens the file in read-only mode Enfocus Switch 10 Access mode Description File.WriteOnly Opens the file in write-only mode; if this flag is used with Append, the file is not truncated; but if used on its own (or with Truncate), the file is truncated File.ReadWrite Opens the file in read/write mode; the file is not truncated File.Append Opens the file in append mode; you must actually use (WriteOnly | Append) to make the file writable and to go into append mode; this mode is very useful when you want to write something to a log file: the file index is set to the end of the file; note that the result is undefined if you position the file index manually using at() in append mode File.Truncate Truncates the file File.Translate Enables line break translation (carriage return and linefeed) for text files to platform-specific conventions Static functions exists( fileName : String ) : Boolean Returns true if fileName exists; otherwise returns false. remove( fileName : String ) Deletes the file fileName if possible; otherwise throws an exception. isFile( fileName : String ) : Boolean Returns true if fileName is a file; otherwise returns false. isDir( fileName : String ) : Boolean Returns true if fileName is a directory; otherwise returns false. isType( fileName : String, ext : String ) : Boolean Returns true if the job matches the specified file type, specified as a filename extension, and false otherwise. A file matches if its filename extension and/or its Mac file type (after conversion) match the specified filename extension. A folder matches if any of the files at the topmost level inside the folder match the specified type. These semantics are similar to those of matching cross-platform file types in filter connections. Checking for arrival This function checks if a file has "arrived": • If the file doesn't exist or can't be opened with exclusive read access, return false. • Note the file’s size, and wait for a specified period of time (“stability period”). • If the file’s size has changed during the period, return false. • If the file can't be opened with exclusive read access after the period, return false. • Otherwise return true. 413 Enfocus Switch 10 hasArrived( fileName : Returns true if it can be assumed that the file has arrived according String, stabilitySeconds to the heuristic describe above; otherwise returns false. The stability : Number ) : Boolean period is specified in seconds (as a floating point number). [static] The length of the required stability period depends on the nature and hasArrived( size of the file, on the process writing the file, and on the performance stabilitySeconds : and workload of the computer system(s) involved. In most cases a Number ) : Boolean stability period of 1 second is both sufficient and acceptable (in terms of delay). When the file is produced by a slow process or transferred toNativeSeparators( across a slow network, a much longer stability period may be required. fileName : String ) : String Returns fileName with the '/' separators converted to separators that fromNativeSeparators( are appropriate for the underlying operating system. fileName : String ) : Returns fileName using '/' as file separator. String Note: A hasArrived() function often returns only after a delay of at least the stability period. However if it can be determined right away that the file has not yet arrived, the function returns immediately. Thus it is never acceptable to invoke a hasArrived() function in a tight loop. The following table describes the two most important use cases for dealing with an external application through the hasArrived() functions. In fact, the guidance presented in the table does not depend on the employed arrival/ready detection mechanism. 414 Model Description Implementation Synchronous If the external process is synchronous, resource-intensive and hosted on the same computer as Switch, the jobArrived entry point should block until the process is finished (so that Switch can correctly manage the number of external processes running in parallel) jobArrived entry point contains a waiting loop that repeatedly calls hasArrived() followed by Environment.sleep() to introduce additional delay Asynchronous If the external process is asynchronous (i.e. you want to feed it the next job even if the previous job hasn't been processed), if it depends on user interaction, or if it potentially takes a long time without using a lot of resources on the local computer, the jobArrived entry point should return timerFired entry point simply calls hasArrived() once, since it is automatically executed repeatedly with a predefined interval Enfocus Switch 10 Model Description Implementation immediately and leave the follow-up to the timerFired entry point Static Text I/O functions read( fileName : String, codec : Reads and returns the contents of the file fileName if possible; String ) : String otherwise throws an exception. The optional argument codec specifies the text encoding used to read the file; see text encoding. write( fileName : String, content Writes the string content to the file fileName if possible : String, codec : String ) (completely replacing the original contents if the file already exists); otherwise throws an exception. The optional argument codec specifies the text encoding used to write the file contents; see text encoding. Static Binary I/O functions The functions presented in this section read and write sequences of bytes (rather than text streams). Hence there is no need to specify a codec (see text encoding). readByteArray( fileName : String ) : ByteArray Reads and returns the content of the file fileName if possible; otherwise throws an exception. writeByteArray( fileName : String, content : ByteArray ) Writes the content to the file fileName if possible (completely replacing the original contents if the file already exists); otherwise throws an exception. Constructor File( fileName : String, codec Creates a file object with the fileName. If fileName is missing or : String ) is not a String, an exception is thrown. The optional argument codec specifies the text encoding used to read or write the file contents; see text encoding. Properties The File object's properties are read-only. name : String The name of the file including the extension. path : String The path of the file. 415 Enfocus Switch 10 fullName : String The fullName of the file, including path, name, and extension. baseName : String The name of the file, excluding its path and extension. extension : String The file name's extension. symLink : String The expansion of the symlink if the file is a symlink; otherwise empty. exists : Boolean True if the file exists; otherwise false. readable : Boolean True if the file is readable; otherwise false. writable : Boolean True if the file is writable; otherwise false. executable : Boolean True if the file is executable; otherwise false. hidden : Boolean True if the file is hidden; otherwise false. eof : Boolean True if reading has reached the end of the file; otherwise false. created : Date The creation time of the file. lastModified : Date The last modification time of the file. lastRead : Date The last time the file was read. size : Number The size of the file, in bytes. codec: String The codec being used for reading and writing the file's contents; see text encoding. Member functions open( accessMode : Number ) Opens the file in the mode accessMode (see enum AccessMode) if possible; otherwise throws an exception. For example: profile.open(File.ReadOnly); Opens a file for reading only. jobfile.open(File.WriteOnly|File.Translate); Opens a file for writing and enables line break translation. close() 416 Closes the file. Enfocus Switch 10 remove() Deletes the file if possible; otherwise throws an exception. Member Text I/O functions readChar() : Number Reads one character from the file if possible; otherwise throws an exception. The character is represented as a 16-bit Unicode code point. read() : String Returns the entire content of the file as a string if it can be read; otherwise throws an exception. readLine() : String Reads one line from file if possible; otherwise throws an exception. Retains any trailing whitespace. readLines() : String[ ] Returns the contents of the file as an Array of strings, one for each line. Linebreaks are stripped from the strings. If the file could not be read, an exception is thrown. writeChar( char : Number ) Writes one character to the file if possible; otherwise throws an exception. The character is represented as a 16-bit Unicode code point. write( data : String, length : Number ) Writes length number of characters from data to the file if possible; otherwise throws an exception. writeLine( data : String ) Writes the line data to the file and adds a linebreak. If the file could not be written error is returned. Member Binary I/O functions The functions presented in this section ignore the file's codec (see text encoding). Never mix these binary I/O function with any of the text-oriented I/O functions on the same file. Violating this rule has unpredictable results. readByte() : Number Reads one byte from the file if possible; otherwise throws an exception. writeByte( byte : Number ) Writes one byte to the file if possible; otherwise throws an exception. Dir class The Dir class provides access to file system directory structures and their contents in a platform-independent way. It provides a means of listing directory content, creating filenames with proper path separators, etc. Enum FilterSpec This enum describes the filtering options available to Dir for entryList(). The filter value is specified by OR-ing together values from the following list. 417 Enfocus Switch 10 FilterSpec Description Dir.Dirs List directories only Dir.Files List files only Dir.Drives List disk drives only Dir.NoSymLinks Do not list symbolic links Dir.All List directories, files, drives and symlinks (this does not list broken symlinks unless you specify System) Dir.TypeMask A mask for the the Dirs, Files, Drives and NoSymLinks flags Dir.Readable List files for which the application has read access Dir.Writable List files for which the application has write access Dir.Executable List files for which the application has execute access; executables must be combined with Dirs or Files Dir.RWEMask A mask for the Readable, Writable and Executable flags Dir.Modified Only list files that have been modified Dir.Hidden List hidden files Dir.System List system files Dir.AccessMask A mask for the Readable, Writable, Executable Modified, Hidden and System flags Enum SortSpec This enum describes the sort options available to Dir for entryList(). The sort value is specified by OR-ing together values from the following list. 418 SortSpec Description Dir.Name Sort by name Dir.Time Sort by time (modification time) Dir.Size Sort by file size Dir.Unsorted Do not sort Dir.SortByMask A mask for Name, Time and Size Dir.DirsFirst Put the directories first, then the files Dir.Reversed Reverse the sort order Enfocus Switch 10 SortSpec Description Dir.IgnoreCase Sort case-insensitively Static properties current : String The current directory. home : String The home directory. root : String The root directory. drives : String[ ] An Array of strings containing the drive names (c:, d:, etc). Static functions The Utility module uses "/" as a directory separator throughout (although it understands the conventions of the platform it is used on). If you are working with paths, use "/" within your code, and use convertSeparators() when you want to display a path to the user. cleanDirPath( filePath : String ) : String Removes all multiple directory separators "/" and resolves any "."s or ".."s found in the path filePath. convertSeparators( pathName : String Returns pathName with the "/" separators converted to ) : String separators that are appropriate for the underlying operating system. Checking for arrival This function checks if a folder and all of its files have "arrived". A folder has arrived if the number of files and subfolders in the folder (recursively) has not changed during the stability period, and if all of these items have arrived individually. See also in the File class documentation. hasArrived( filePath : String, stabilitySeconds : Number ) : Boolean [static] Returns true if it can be assumed that the folder and its contents have arrived according to the heuristic describe above; otherwise returns false. The stability period is specified in seconds (as a hasArrived( stabilitySeconds : floating point number). Number ) : Boolean The length of the required stability period depends on the nature and size of the file, on the process writing the file and on the performance and workload of the computer system(s) involved. In most cases a stability period of 1 second is both sufficient and acceptable (in terms of delay). When the file is produced by a slow process or transferred across a slow network, a much longer stability period may be required. Note: 419 Enfocus Switch 10 A hasArrived() function often returns only after a delay of at least the stability period. However if it can be determined right away that the file has not yet arrived, the function returns immediately. Thus it is never acceptable to invoke a hasArrived() function in a tight loop. The following table describes the two most important use cases for dealing with an external application through the hasArrived() functions. In fact, the guidance presented in the table does not depend on the employed arrival/ready detection mechanism. Model Description Implementation Synchronous If the external process is synchronous, resource-intensive and hosted on the same computer as Switch, the jobArrived entry point should block until the process is finished (so that Switch can correctly manage the number of external processes running in parallel) jobArrived entry point contains a waiting loop that repeatedly calls hasArrived() followed by Environment.sleep() to introduce additional delay Asynchronous If the external process is asynchronous (i.e. you want to feed it the next job even if the previous job hasn't been processed), if it depends on user interaction or if it potentially takes a long time without using a lot of resources on the local computer, the jobArrived entry point should return immediately and leave the follow-up to the timerFired entry point timerFired entry point simply calls hasArrived() once, since it is automatically executed repeatedly with a predefined interval Constructor Dir( path : String ) Creates a directory object for path path. If path is empty, the current directory is used. Properties 420 name : String Contains the name of the directory; this is not the same as the path, e.g. a directory with the name "mail", might have the path "c:/spool/mail". path : String Contains the path, this may contain symbolic links, but never contains redundant ".", "..", or multiple separators. absPath : String Contains the absolute path (a path that starts with "/" or with a drive specification), which may contain symbolic links, but never contains redundant ".", "..", or multiple separators. Enfocus Switch 10 canonicalPath : String Contains the canonical path, i.e. a path without symbolic links or redundant "." or ".." elements. readable : Boolean True if the directory is readable; otherwise false. exists : Boolean True if the directory exists; otherwise false. Member functions filePath( fileName : String ) : String Returns the path name of the file fileName in the directory. absFilePath( fileName : String ) Returns the absolute path name of the file fileName in the : String directory. cd( dirName : String ) Changes the Dir's directory to dirName if possible; otherwise throws an exception. cdUp() Changes directory by moving one directory up from the Dir's current directory if possible; otherwise throws an exception. entryList( filter : String, Returns a list of the names of all the files and directories in filterSpec : Number, sortSpec : the directory, ordered in accordance with sortSpec (see enum Number ) : String[ ] SortSpec) and filtered in accordance with filterSpec (see enum FilterSpec). For example: var profiles = profilesDir.entryList("*.icc", Dir.Files, Dir.Name); Gets a list of ICC profiles in the specified directory, sorted by filename. var writableProfiles = profilesDir.entryList("*.icc", Dir.Files|Dir.Writable, Dir.Name); Same as above but the list is restricted to ICC profiles for which the application has write access. mkdir( dirName : String ) Creates the directory dirName if possible; otherwise throws an exception. mkdir() Creates this directory if possible; otherwise throws an exception. mkdirs( dirName : String ) Creates the directory tree dirName if possible; otherwise throws an exception. mkdirs() Creates this directory tree if possible; otherwise throws an exception. 421 Enfocus Switch 10 rmdir( dirName : String ) Deletes the directory dirName if possible; otherwise throws an exception. rmdir() Deletes this directory if possible; otherwise throws an exception. rmdirs( dirName : String ) Deletes the directory structure dirName if possible; otherwise throws an exception. rmdirs() Deletes this directory structure if possible; otherwise throws an exception. fileExists( fileName : String ) : Boolean Returns true if the file fileName exists; otherwise returns false. setCurrent() Sets the application's current working directory to this directory if possible; otherwise throws an exception. Process class The Process class is used to start external programs and to communicate with them. It can start programs in one of three modes, as described in the following table: Mode Function Comments Synchronous Process.execute() The calling script blocks until the external program has finished; stdout/stderr are collected in the corresponding properties Asynchronous new Process().start() The calling script continues in parallel with the external program and can communicate with its stdin and stdout/stderr through the corresponding write...() and read...() functions Detached Process.startDetached() The external program is started in a separate process; the calling script continues in parallel with the external program but it can NOT communicate with its stdin and stdout/stderr Static properties 422 stdout : String Contains the data sent to stdout during the last call to Process.execute(). This property is read-only. stderr : String Contains the data sent to stderr during the last call to Process.execute(). This property is read-only. Enfocus Switch 10 Static functions execute( command : String, stdin : String ) : int Executes command synchronously and passes stdin to its standard input if specified. When the program ends its output is accessible through Process.stdout and Process.stderr. command can contain both the program and command line arguments, separated by spaces. The function returns the executed command's return code on exit. execute( command : String[ ], Same as above, except that command is an Array of strings, stdin : String ) : int where the first item isthe name of the program and the following items are command line arguments. This version is useful if you have arguments that contain spaces or other characters that would need to be quoted if you just passed a single string command line, since it takes care of the quoting for you. bool startDetached ( command : String ) Starts command in a new process and detaches from it. command can contain both the program and command line arguments, separated by spaces. The function returns true on success; otherwise returns false. The detached process will continue to live even if the calling process exits. bool startDetached ( Same as above, except that its is possible to provide a list of command : String, arguments command line arguments. : String[ ] ) Constructors Process() Creates a Process object without specifying the program or any arguments. This does not start a process. Process( command : String ) Creates a Process object that will execute command. This does not start the process. Process( command : String[ ] ) Same as above, except that command is an Array of strings, where the first item is the name of the program and the following items are command line arguments. This version is useful if you have arguments that contain spaces or other characters that would need to be quoted if you just passed a single string command line, since it takes care of the quoting for you. Properties arguments : String[ ] Contains an Array of strings where the first item is the program to execute and the following items are the command line arguments. workingDirectory : String Contains the working directory for the process. running : Boolean True if the process is currently running; otherwise false. This property is read-only. 423 Enfocus Switch 10 exitStatus : Number Contains the exitStatus of the program when it has finished. This property is read-only. Member functions start( env : String[ ] ) Tries to run a process for the command and arguments that were specified with the argument property or that were specified in the constructor. The command is searched for in the path for executable programs; you can also use an absolute path in the command itself. If env is not specified, the process is started with the same environment as the starting process. If env is specified, then the values in the Array of strings are interpreted as environment settings of the form VARIABLE=VALUE and the process is started with these environment settings. If the program could not be started, an exception is thrown. launch( stdin : String, env Runs the process and writes the data stdin to the process's standard : String[ ] ) input. If all the data is written to standard input, standard input is closed. The command is searched for in the path for executable programs; you can also use an absolute path in the command itself. If env is unspecified, the process is started with the same environment as the starting process. If env is specified, then the values in the Array of strings are interpreted as environment settings of the form VARIABLE=VALUE and the process is started with these environment settings. If the program could not be started, an exception is thrown. waitForStarted ( seconds : Blocks until the process has started or until the specified time (in Number ) seconds) has passed. Returns true if the process was started successfully; returns false if the operation timed out or if an error occurred. waitForFinished ( seconds Blocks until the process has finished or until the specified time (in : Number ) seconds) has passed. Returns true if the process finished; returns false if the operation timed out or if an error occurred. 424 readStdout() : String Reads what is currently available on the process's standard output. readStderr() : String Reads what is currently available on the process's standard error. canReadLineStdout() : Boolean Returns true if a line can be read from the process's standard output. canReadLineStderr() : Boolean Returns true if a line can be read from the process's standard error. readLineStdout() : String Reads one line of text from the process's standard output if available; otherwise returns an empty string. readLineStderr() : String Reads one line of text from the standard error stream of this process if available; otherwise returns an empty string. Enfocus Switch 10 writeToStdin( buffer : String ) Writes the data buffer to the standard input stream of this process. The process may or may not read this data. closeStdin() Closes the standard input stream of the process. tryTerminate() Asks the process to terminate. Processes can ignore this if they wish. If you want to be certain that the process really terminates, you can use kill() instead. kill() Terminates the process. This is not a safe way to end a process since the process will not be able to do any cleanup. tryTerminate() is safer, but processes can ignore tryTerminate(). Text encoding JavaScript strings represent Unicode characters (internally encoded in UTF-16). Care must be taken to preserve Unicode compliance when communicating with external programs - wherever possible. Command line The Process class passes the command line to the operating system (and thus to the external program) in full Unicode compliance: • On Mac OS the command line is UTF-8 encoded, which is the default filename encoding and which turns out to be compatible with virtually all command-line tools. • On Windows the command line is passed using a "wide" (16-bit-character) system call; external programs should retrieve command line arguments using the "wide" (16-bit-character) version of the Windows-specific “GetCommandLine” function rather than the argv[] argument in the main C function (which supports only characters that can be encoded in the current ANSI code page). Console text streams The Process class uses the following scheme for communicating with the stdin and stderr/stdout text streams: • Text is written to stdin using UTF-8 encoding. • Text is read from stdout/stderr using UTF-8 encoding, unless the text doesn't conform to UTF-8 syntax, in which case it is interpreted using the current ANSI code page (on Windows) / MacRoman or Latin1 encoding (on Mac OS). While this behavior is not perfect in all cases, note that: • UTF-8 is upwards compatible with 7-bit ASCII. • If a byte stream conforms to UTF-8 syntax, there is a very high probability that it represents a text string in UTF-8 encoding (as opposed to a text string in one of the common 8-bit legacy encodings). 425 Enfocus Switch 10 18.4 XML module Node class Node is the abstract base class for the Document, Element, Text, and Comment classes. A Node object represents a node in the XML tree of one of those types. Accessing node properties getNodeType() : String Returns the node type (“Document”, “Element”, “Text”, “Comment” or “Attr”). getOwnerDocument() : Document Returns the document object in which this node resides. getParentNode() : Node Returns this node’s parent node or null if this node is a document or if this node is not currently part of a node hierarchy. Evaluating XPath expressions The functions presented here evaluate an XPath 1.0 expression in the context of the node being queried. Namespaces Namespace prefixes in the query expression are resolved into namespace URIs using the prefix map provided to the query functions as a second argument. If the map argument is omitted or null, the default prefix map is used for resolving prefixes. Result data types The value of an XPath 1.0 expression can have several data types (a node set with several elements, the text value of an attribute, a number returned by the count() function, the Boolean result of a comparison). The value is converted to the function's result data type using XPath 1.0 semantics – which may very well differ from the conversion semantics in the scripting language. For example the XPath 1.0 conversion from string to Boolean returns true for all non-empty strings (including the string “false”). Functions 426 evalToNodes( xpath : String, prefix-map : Map ) : NodeList Evaluates an XPath 1.0 expression in the node’s context. If the result is a non-empty node-set, returns a list of the nodes in the set. Otherwise returns an empty list. evalToNode( xpath : String, prefix-map : Map ) : Node Evaluates an XPath 1.0 expression in the node’s context. If the result is a non-empty node-set, returns the first node in the set. Otherwise returns null. evalToString( xpath : String, prefix-map : Map ) : String Evaluates an XPath 1.0 expression in the node’s context and converts the result to a string value with the XPath 1.0 string() function. Enfocus Switch 10 evalToNumber( xpath : String, prefix-map : Map ) : Number Evaluates an XPath 1.0 expression in the node’s context and converts the result to a numeric value with the XPath 1.0 number() function. evalToBoolean( xpath : String, prefix-map : Map ) : Boolean Evaluates an XPath 1.0 expression in the node’s context and converts the result to a Boolean value with the XPath 1.0 boolean() function. Document class A Document object represents the root node of a well-formed XML document (refer to the XML 1.0 specification). The root node is the "invisible" node that contains the document element and any top-level comments. Document inherits from the Node class, so all functions defined for Node can be used with Document. Document is the only class in the XML module with a constructor; all other classes are instantiated from within a document. Constructing, loading and saving Document( ) Constructs a new empty XML document (in memory). Document( path : String, discardBlankNodes: Boolean ) Constructs a new XML document (in memory) and parses the contents of the file at the specified absolute path into the document’s node tree. If the specified file is not well-formed XML, this function logs an error message and it constructs a partial or empty document. If discardBlankNodes is true, text nodes that contain only white space (such as line breaks) are discarded while parsing the input stream. If discardBlankNodes is false, null or missing, white-space text nodes are left in place. save( path : String ) Serializes the XML document into a file at the specified absolute path. Performing transformations Refer to the XSLT 1.0 specification and to widely available literature about XSLT for more information. createTransform( stylesheet : Document ) : Document Returns a newly created document that contains the transformation of this document according to the rules of the specified stylesheet. The stylesheet argument must be a valid XML document which is assumed to be an XSLT 1.0 stylesheet. transform( in-path : String, This is a static function. stylesheet-path : String, out-path Transforms the XML file at “in-path” using the XSLT 1.0 : String ) stylesheet at “stylesheet-path” and saves the result in a file at “out-path”. 427 Enfocus Switch 10 Child nodes A Document can directly contain any number of Comment nodes (including the XML declaration, which if present is always the first node of the document) and a single Element node (which is called the document element). A Document can not contain any Text nodes and it can not contain two or more Element nodes. The functions described in this section log an error if these restrictions are violated. hasChildNodes( ) : Boolean Returns true if this element has any child nodes and false if not. getChildNodes( ) : NodeList Returns the list of child nodes of this element, in document order, or an empty list if the element has no child nodes. getFirstChild( ) : Node Returns the first child node of this element, or null if there is none. getLastChild( ) : Node Returns the last child node of this element, or null if there is none. appendChild( new-child : Node ) Appends a new child node to the list of children for this element. insertBefore( new-child : Node, ref-child : Node ) Inserts a new child node before the specified reference node, which must be in the list of children of this element. removeChild( oldChild : Node ) : Node Removes the specified node from the list of children of this element and returns the removed node. replaceChild( newChild : Node, oldChild : Node ) : Node Replaces the specified child of this element with another node and returns the removed node. Directly accessing the document element getDocumentElement( ) : Returns the document element, i.e. the single element directly under Element the root node (which is represented by the Document object). setDocumentElement( Sets the document element, i.e. the single element directly under doc-element : Element ) the root node (which is represented by the Document object). Specifically, if before this function is called the document node contained: • No children at all, this function adds an XML declaration comment and the specified document element. 428 • One or more children but none of them is an element, this function appends the specified document element at the end. • A document element, this function replaces the document element by the specified document element. Enfocus Switch 10 Creating new objects createEmptyMap( ) : Map Returns a new empty prefix map object. createDefaultMap( ) : Map Returns a new prefix map object that already contains all mappings that occur in the document. createElement( qualified-name : String, prefix-map : Map ) : Element Returns a newly created element node with the specified name, owned by this document. If the element name is qualified its namespace prefix must occur in the map provided in the second argument. If the name is not qualified the second argument may be null. createText( value : String ) : Text Returns a newly created text node with the specified text content, owned by this document. createComment( value : String ) : Comment Returns a newly created comment node with the specified content (i.e. all the characters that appear between the '<!--' and '-->'), owned by this document. cloneNode( node : Node, deep : Boolean ) : Node Returns a clone of the specified node that is owned by this document. If deep is true, all descendant nodes are cloned as well. Element class An Element object represents an XML element node. An element may have other Element, Comment and Text nodes as children. Furthermore an element may have attributes (these are not considered to be children). Element inherits from the Node class, so all functions defined for Node can be used with Element. Name getQualifiedName( ) : String Returns the qualified element name, i.e. including the namespace prefix if there is one. getBaseName( ) : String Returns the element name without the namespace prefix. getPrefix( ) : String Returns the namespace prefix or the empty string if there is none. getNamespaceURI( ) : String Returns the namespace URI corresponding to namespace prefix or the default namespace URI for the document if there is no prefix or the empty string if there is no prefix and no default namespace. Child nodes hasChildNodes( ) : Boolean Returns true if this element has any child nodes, and false if not. 429 Enfocus Switch 10 getChildNodes( ) : NodeList Returns the list of child nodes of this element, in document order or an empty list if the element has no child nodes. getFirstChild( ) : Node Returns the first child node of this element or null if there is none. getLastChild( ) : Node Returns the last child node of this element or null if there is none. appendChild( new-child : Node ) Appends a new child node to the list of children for this element. insertBefore( new-child : Node, ref-child : Node ) Inserts a new child node before the specified reference node, which must be in the list of children of this element. removeChild( oldChild : Node ) : Node Removes the specified node from the list of children of this element, and returns the removed node. replaceChild( newChild : Node, oldChild : Node ) : Node Replaces the specified child of this element with another node, and returns the removed node. Attributes getAttributes( ) : AttrList Returns the list of attributes of this element, in arbitrary order. If there are no attributes, returns an empty list. addAttribute( attribute : Attr ) Adds the specified attribute to the element or replaces an existing attribute with the same name. getAttributeValue( qualified-name Returns the value for the element’s attribute with the : String, prefix-map : Map ) : specified qualified name or null if there is no such attribute. String If the qualified name includes a prefix it is resolved using the map in the second argument, otherwise the second argument may be null. addAttribute( qualified-name : Adds an attribute to the element with the specified qualified String, prefix-map : Map, value : name and value or replaces an existing attribute with the String ) same name. If the qualified name includes a prefix it is resolved using the map in the second argument, otherwise the second argument may be null. Text class A Text object represents an XML text node. Text inherits from the Node class, so all functions defined for Node can be used with Text. 430 Enfocus Switch 10 Text content getValue( ) : String Returns the text content of this node. Comment class A Comment object represents an XML comment node. Comment inherits from the Node class, so all functions defined for Node can be used with Comment. Comment content getValue( ) : String Returns the content of the comment represented by this node, that is, all the characters that appear between the '<!--' and '-->'. Attr class An Attr object represents an attribute of an XML element. Attr inherits from the Node class, so all functions defined for Node can be used with Attr. Name getQualifiedName( ) : String Returns the qualified attribute name, that is, including the namespace prefix if there is one. getBaseName( ) : String Returns the attribute name without the namespace prefix. getPrefix( ) : String Returns the namespace prefix or the empty string if there is none. getNamespaceURI( ) : String Returns the namespace URI corresponding to namespace prefix or the namespace URI for the element owning this attribute if there is no prefix or the empty string if there is no prefix and no element namespace. Value getValue( ) : String Returns the value of this attribute. List classes: NodeList, AttrList Due to implementation limitations Switch is unable to return an array of Node and Attr instances. Instead, it returns a helper object of the corresponding list class, that is, NodeList and AttrList, respectively. These helper classes offer the following functions to access the items in the list. getCount( ) : Number Returns the number of items in the list (may be zero). 431 Enfocus Switch 10 getItem( index : Number ) : Node or Returns the item in the list at the specified (zero-based) Attr index. If the index is out of range, the function returns null. length : Number This is a read-only property (rather than a function) that contains the value returned by getCount(). at( index : Number ) : Node or Attr Returns the same value as getItem(index). 18.5 Network module SOAP class Background The SOAP communication protocol and the Web Services framework provide a standard mechanism to communicate between applications and more precisely to request the execution of a particular service in a different application (a “remote procedure call”). The communicating applications may be running on the same computer, on computers in the same local network or on remote computers across the Internet. For more information see http://www.w3.org/TR/SOAP/. Overview The SOAP class supports a subset of the SOAP 1.1 communication protocol over HTTP. Specifically, it allows remote procedure calls to be made to a remote server. The SOAP protocol is used to marshall JavaScript parameters to a remote procedure call and to unmarshall the result as a JavaScript object. The current implementation has the following restrictions: • Supports only SOAP 1.1 (and not 1.2). • Supports only synchronous processing (and not asynchronous). • Supports DIME and MIME attachments in the SOAP message • Always uses SOAP encoding style (as defined in the specification section 5). Class instances The send and request methods - which were already available in older Switch versions – are static functions which allow sending of a simple SOAP message without headers. As they are static functions, there is no need to create instances of the SOAP class. For more direct control an instance of the SOAP class may be created. This represents an entire SOAP request and/or response message including body, headers and envelope. 432 Enfocus Switch 10 Static Functions request( url : String, Initiates a remote procedure call (RPC) or sends an XML request-object : request-object, message to a SOAP HTTP endpoint, waits for the endpoint to action : String ) : response-object reply (synchronous processing) and returns its response. An exception is thrown if the request object does not conform, when the SOAP endpoint returns a SOAPFault or when there is a failure from the underlying HTTP transport layer. send ( url : String, request-object Initiates a remote procedure call (RPC) or sends an XML : request-object, action : String message to a SOAP HTTP endpoint without waiting for a reply. ) An exception is thrown if the request object does not conform or when there is a failure from the underlying HTTP transport layer. Constructing SOAP ( ) Constructs a new empty SOAP request. SOAP ( request-object : request-object Constructs a new SOAP request and sets the SOAP body ) SOAP ( in-path : String ) Constructs a new SOAP request and reads the SOAP envelope from the specified XML file. Property accessing isResponse ( ) : Boolean Returns whether the SOAP message is a SOAP response. getBody ( ) response-object Returns the SOAP body from the SOAP message. setBody ( request-object : request-object ) Sets the SOAP body to the SOAP request. The body is replaced with the new body and the headers are preserved. getHeader ( ) : header-object Returns the SOAP header from the SOAP message. setHeader ( header-object : header-object ) Sets the SOAP header to the SOAP request. The body is associated with the new header and the body itself is preserved. Sending messages requestMessage ( url : String, action : String ) : SOAP Initiates a remote procedure call (RPC) or sends an XML message to a SOAP HTTP endpoint, waits for the endpoint to reply (synchronous processing) and returns its response. 433 Enfocus Switch 10 An exception is thrown if the request object does not conform, when the SOAP endpoint returns a SOAPFault or when there is a failure from the underlying HTTP transport layer. sendMessage ( url : String, action : String ) Initiates a remote procedure call (RPC) or sends an XML message to a SOAP HTTP endpoint without waiting for a reply. An exception is thrown if the request object does not conform or when there is a failure from the underlying HTTP transport layer. Logging and debugging writeToFile ( filename : String ) : Boolean Writes the SOAP message envelope (including body and headers) to an XML file Working with attachments Data exchange is widely used in Web Services word. SOAP message is convenient to exchange with text data, but not convenient when exchanging large amount of data or when data is in binary format. For such purposes SOAP protocol provides ability to attach additional data to SOAP message. Switch SOAP class supports two types of attachments: • DIME (Direct Internet Message Encapsulation) - in this case SOAP message contains DIME attachments, when sending the message is being sent packet in DIME format and SOAP message header contains type of "application/dime". See http://msdn.microsoft.com/en-us/magazine/cc188797.aspx • MIME (Multipurpose Internet Mail Extensions) - in this case SOAP message contains MIME attachments, when sending the message is being sent in MIME format and SOAP message header contains type of "multipart/related". See article http://www.w3.org/TR/SOAP-attachments addAttachment(file-path : String, id : String, type : String, chunk-size : Number) add attachment to message specifying the file name, attachment id and type values, chunk size is not used and reserved for future use, should be 0 getAttachmentsCount() : Number return number of attachments in the SOAP message getAttachment(index : Number) : ByteArray return contents of attachment specified by index "inIndex" of attachment identifier "inID" getAttachment(id : String) : ByteArray 434 getAttachmentID(index : Number) : String get attachment identifier, specifying attachment by index getAttachmentType(index : Number) : String return attachment type string getAttachmentIndex(id : String) : Number get index of attachment with the given identifier Enfocus Switch 10 saveAttachment(index : Number, file-path : String) : Boolean save attachment to the disk file saveAttachment(id : String, file-path : String) : Boolean setAttachmentSendType(attachment-type : Number) set/get attachment send type: 0 - DIME format; 1 - MIME format getAttachmentSendType() : Number Working with SOAP message body, retrieving information Since SOAP message body is a text in XML format, it is convenient to gather information from it as from XML. There are some functions to work with SOAP message as with XML document: parseBody(element-name : String) : String[ returns array of elements' values specified with ] name equivalent to Document's evalToNodesList, getNodeValue, except that elements specified by name, not by XPath saveBody(file-path : String, root-element-name : String) : Boolean saves extract from SOAP body specifying root element into file on disk changeElement(element-name : String, new-value : String) set SOAP body element value OASIS support addOasisSecurity ( username : String, This call modifies the SOAP header to include an OASIS password : String, passwordtype : security header. It adds a wsse:Security element with a String ) : Boolean wsse:UsernameToken of the specified password type. Any existing wsse:Security element is replaced by the new element. The following table describes the parameters and return value. Parameter Description url The URL for a SOAP HTTP endpoint, e.g. http://serverName:portNumber/URI request object An object that specifies the remote procedure name and parameters of the XML message to send; see separate section below action The SOAPAction, a URN written to an HTTP header used by firewalls and servers to filter SOAP requests; the SOAP service description will usually describe the SOAPAction header required, if any The default is for the action to be an empty string response object An object that describes the return value received by the remote procedure call; see separate section below username The username used for authentication password The password used for authentication 435 Enfocus Switch 10 Parameter Description passwordtype One of “PasswordText” or “PasswordDigest”. Qualified names In the request object, a qualified name is specified as a string in the <namespace>:<localname> notation, where <namespace> can be a custom namespace or one of the predefined prefixes “xsd” (http://www.w3.org/2001/XMLSchema) or “SOAP-ENC” (http://schemas.xmlsoap.org/soap/encoding/). For example: "http://soapinterop.org/:param1" "xsd:int" Request object The request object is an object literal that specifies the remote procedure name and the parameters to call. The object literal uses the qualified method name of the remote procedure as the key. The value of this key is an object literal in which each key is a parameter of the method and the value of each key is the value of the corresponding parameter of the method. For example: { "http://soapinterop.org/:echoString":{inputString: "Echo!"} } When passing parameters to a remote procedure, JavaScript types are bound to SOAP types automatically as listed in the following table. JavaScript type SOAP type Boolean xsd:boolean Number xsd:float String xsd:string Date xsd:dateTime Array SOAP-ENC:Array Comments Single-dimension arrays only All items must have the same data type, which must be Boolean, Number, String or Date ByteArray SOAP-ENC:base64 Uses the ByteArray “Base64” codec Other Not supported Causes an exception to be thrown Instead of providing one of these JavaScript data types, a parameter value can also be represented by a literal object with the following properties: 436 Enfocus Switch 10 Property Description soapType : String The SOAP type (as a qualified type name) that will be used for the value when generating the SOAP message; this is useful when a datatype is needed other than the automatic bindings described above soapValue : String The value that will be used when generating the SOAP message The value is passed unescaped (example: “<” is not converted to “<”) which means that it can be a raw XML fragment that will be passed on as is For example, integers are not supported in JavaScript but an integer parameter to a SOAP method can be constructed as follows: var iPar = { soapType: "xsd:int", soapValue: "1" }; { "http://soapinterop.org/:echoInteger": { inputInteger: iPar } } Header object The header-object is an object literal that specifies the soap header to be included. The object literal uses the qualified name of the header XML element(s) as the key. The value of this key is encoded like a request-object. For example: { "http://example.org/2001/06/tx:Transaction":5, "http://example.org/2001/06/tx:PaymentOption":10} will create the following header: <env:Header xmlns:env="http://www.w3.org/2003/05/soap-envelope" > <t:Transaction xmlns:t="http://example.org/2001/06/tx"> 5 </t:Transaction> <t: PaymentOption xmlns:t="http://example.org/2001/06/tx"> 10 </t: PaymentOption > </env:Header> Response object The function returns an object describing the SOAP Body of the returned message in a manner similar to the request object. The SOAP types in the result are mapped to JavaScript types as listed in the following table. SOAP type JavaScript type xsd:boolean Boolean xsd:integer Number xsd:float Number xsd:string String Comments 437 Enfocus Switch 10 SOAP type JavaScript type xsd:dateTime Date SOAP-ENC:Array Array Comments Single-dimension arrays only All items must have the same data type, which must be boolean, integer, float, string or dateTime xsd:hexBinary ByteArray Uses the ByteArray “Hex” codec xsd:base64Binary ByteArray Uses the ByteArray “Base64” codec SOAP-ENC:base64 ByteArray Uses the ByteArray “Base64” codec Other String Copies the XML string content without change Example var url = <get a URL for this service from http://www.whitemesa.com/interop.htm>; // Call the echoString SOAP method var testString = "This is my test string"; var response = SOAP.request( url, { "http://soapinterop.org/:echoString": { inputString: testString } }, "http://soapinterop.org/" ); var result = response["http://soapinterop.org/:echoStringResponse"]["return"]; // Call the echoInteger SOAP method var testInt = { soapType: "xsd:int", soapValue: "10" }; var response = SOAP.request( url, { "http://soapinterop.org/:echoInteger": { inputInteger: testInt } }, "http://soapinterop.org/" ); var result = response["http://soapinterop.org/:echoIntegerResponse"]["return"]; 18.6 Database module Text encoding JavaScript strings in Switch store Unicode text in UTF-16 encoding. A database implementation may use a different text encoding, in which case the appropriate conversion must be performed when exchanging text. The ODBC interface unfortunately does not offer a mechanism to discover the text encoding used by the database, so this information must be provided by the user. Most modern databases use Unicode-aware encodings such as UTF-16 or UTF-8. Older database implementations may use local 8-bit encodings that are not Unicode-aware. To complicate matters even more, some databases use a mixture of encodings (for example UTF-8 for storing text in data fields and UTF-16 for interpreting queries). Codec Arguments Selected functions in the Switch database module offer extra “codec” arguments to support databases that use text encodings other than UTF-16. The DataSource.connect() function allows specifying two codec arguments: • query-codec: affects queries sent to and column names retrieved from the database. 438 Enfocus Switch 10 • data-codec: affects STRING and BINARY data fields when retrieved as a string. The codecs established with the connect() function are used for all Statement instances derived from the DataSource during the connection. However the Statement.getString() function allows overriding the data-codec on an individual field basis. Text items exchanged with the database Function Text item Direction Encoding connect() user name and password To database query-codec execute() SQL statement To database query-codec tables() Table names From database query-codec columns() Table name To database query-codec Column names From database query-codec Column name From database query-codec getNumber() getDate() Column name getString() getBinary() From database query-codec getString() for STRING Data field and BINARY data types From database data-codec getColumnName() getColumnDataType() getColumnSize() Default behaviour The default query-codec and data-codec is UTF-16. If the data-codec for the connection is UTF-16, the default codec for converting BINARY column data is latin-1 (copy the low byte and clear the high byte of each code point). If the data-codec for the connection is an 8-bit encoding (i.e. not UTF-16), that encoding is also the default for converting BINARY column data. The default behavior is summarized in the following table. Item Algorithm to determine codec query-codec If DataSource.connect() explicitly specifies a query-codec, use that codec. Otherwise use UTF-16 data-codec for STRING If Statement.getString() explicitly specifies a data-codec, use that code. data in If DataSource.connect() explicitly specifies a data-codec, use that codec. Statement.getString() Otherwise use UTF-16 data-codec for BINARY If Statement.getString() explicitly specifies a data-codec, use that codec data in (even if the specified codec is UTF-16). If DataSource.connect() explicitly Statement.getString() 439 Enfocus Switch 10 Item Algorithm to determine codec specifies a data-codec other than UTF-16, use that codec. Otherwise use latin-1 DataSource class Background ODBC (Open Database Connectivity) provides a standard mechanism for using databases independent of programming languages, database systems, and operating systems. The ODBC specification offers a procedural API for using SQL queries to access data. Both Windows and Mac OS X offer a built-in ODBC implementation, and OBDC drivers exist for a large variety of database systems and data sources including spreadsheets, text and XML files. System requirements The system administrator of the computer hosting Switch must correctly install and configure the appropriate ODBC drivers and the system’s ODBC driver manager. Overview The DataSource class encapsulates a connection to a particular ODBC data source. A script can be connected to different data sources at the same time. Within the limited capabilities of the Database module, it is not meaningful to have multiple connections to the same data source. The Statement class allows executing a SQL statement on a data source, and allows retrieving the results. Constructing DataSource( ) : DataSource Constructs a new unconnected data source. Connecting connect(data-source-name : String, user : String, password : String, query-codec : String, data-codec : String) : Boolean Attempts to connect to the specified data source with the specified user and password. If the user and password are empty or null, no user authentication is performed. Returns true if the connection succeeds, false otherwise (in which case an error message is logged). The optional codec arguments specify the text encoding used by the connection to communicate with the database and retrieve data. If an argument is missing or null, UTF-16 is used as the default. For more information see separate section on text encoding issues. disconnect( ) 440 Disconnects the data source if it was connected; otherwise does nothing. Disconnecting a data source invalidates all associated Statement instances. Enfocus Switch 10 A disconnected data source can be reconnected by calling connect(). Switch automatically disconnects a data source when exiting the entry point in which it was constructed .Still, it is good programming style to explicitly disconnect all data sources. isConnected( ) : Boolean Returns true if the data source is currently connected, false otherwise. Statement class The Statement class provides a context to execute a series of SQL statements on a data source and retrieve the results. A statement is always associated with a particular data source. By constructing multiple statements on the same data source, you can access the results of multiple queries at the same time. Constructing Statement( data-source : DataSource Constructs a statement associated with the specified data ) : Statement source. The data source must be connected; if not the resulting Statement instance is invalid. Getting state information isOK( ) : Boolean Returns true if the previous operation returned “SQL_SUCCESS” or SQL_SUCCESS_WITH_INFO”; false otherwise. isSuccess( ) : Boolean Returns true if the previous operation returned “SQL_SUCCESS”; false otherwise. isSuccessWithInfo( ) : Boolean Returns true if the previous operation returned “SQL_SUCCESS_WITH_INFO”; false otherwise. getCode( ) : Number Returns the native (system- or driver-specific) ODBC error or information code generated by the previous operation, or zero if there was no such code. getMessage( ) : String Returns the human-readable ODBC error or information message generated by the previous operation, or the empty string if there was no such message. The message is formatted to already include the SQL state and the native code. isValid( ) : Boolean Returns true if the associated data source is connected, false otherwise. 441 Enfocus Switch 10 Executing SQL statements execute( sql : String ) : Boolean Executes the specified SQL statement on the associated data source, and stores the results. Returns the value of isOK() after performing the operation. tables ( table-type : String ) : String Returns a list of table names. The list includes all tables of the specified type in the data source. The table type must be specified in all upper-case, and multiple types must be comma-separated (for example: “TABLE, VIEW”). If the argument is missing, null or empty, information is retrieved about all tables in the data source. Some databases support the "SHOW TABLES" query to retrieve more details about tables as a regular result set. After passing this query to the database with the execute() function, the result set contains a column with the table names and further columns with addiitonal information on each table. columns ( table-name Returns a list of column names, including all columns in the specified : String ) : String table. Some databases support the "SHOW COLUMNS FROM <table-name>" query to retrieve more details about columns in a table as a regular result set. After passing this query to the database with the execute() function, the result set contains a column with the column names and further columns with addiitonal information on each column. Getting information about the result set getRowCount( ) : Number Returns the number of rows affected by an UPDATE, INSERT, or DELETE statement. For some data sources, this function returns the number of rows returned by a SELECT statement. However, many data sources cannot provide this information before fetching the rows. If the function is unable to provide the information, it returns -1. getNumColumns( ) : Number Returns the number of columns in the result set, or -1 if an error occurred (or if there is no result set) getColumnName ( column : Number ) : String Returns the name of the specified column (as a one-based index), or the empty string if the name can’t be determined. getColumnDataType ( column Returns the data type of the specified column (one-based index : Number or String ) : String or column name) as one of these strings: • INTEGER: integer numeric value or single-bit binary value (Boolean) 442 • REAL: floating point or fixed point numeric value • DATETIME: date or time or a combination thereof • STRING: character string in a known encoding (so that it can be converted to Unicode) Enfocus Switch 10 • BINARY: character string in unknown encoding, or binary data, or unsupported data type getColumnSize (column : Returns the size in bytes needed to store the data in the specified Number or String ) : Number column (one-based index or column name), or -1 if the size can’t be determined. Getting the actual data in the result set isRowAvailable( ) : Boolean Returns true if a row is available for fetching; false otherwise. This function is used to terminate the iteration over the rows in the result set. fetchRow( ) Fetches the next available row, making its data values available for the functions described below. Get functions The functions described below return the null object (as opposed to an empty string or a zero number) if: • The specified column can’t be found. • There is no currently fetched row. • The data type for the specified column can’t be converted to the requested data type (see table in the following section). • The value in the specified column for the currently fetched row does not conform to the format for the requested data type. getNumber( column : Number or Returns the value in the specified column for the currently String ) : Number fetched row as a number. getDate( column : Number or String ) : Date Returns the value in the specified column for the currently fetched row as a Date object (date-time value). getString( column : Number or String , data-codec : String) : String Returns the value in the specified column for the currently fetched row as a string. The optional codec argument specifies the text encoding used to convert STRING and BINARY data to a Unicode string. If the argument is missing or null, latin-1, UTF-16 or the encoding specified for the connection is used as the default. For more information see separate section on text encoding issues. The codec argument is ignored if the specified column has a data type other than “STRING” or “BINARY”. getBinary( column : Number or String ) : ByteArray Returns the value in the specified column for the currently fetched row as a sequence of bytes. 443 Enfocus Switch 10 Supported conversions Column data type Number INTEGER Date String Binary Straightforward (*) Not supported Decimal representation of the number Not supported REAL Straightforward (*) Not supported Decimal representation of the number Not supported DATETIME Not supported Straightforward ISO 8601 representation of the date-time Not supported STRING Decimal number representation (Unicode) Interpret as ISO date-time representation (Unicode) Straightforward (Unicode) Not supported BINARY Decimal number representation (ASCII) Interpret as ISO 8601 date-time representation (ASCII) Interpret as latin-1 Straightforward encoding (i.e. clear high bytes) (*) Values out of the range that can be represented in JavaScript are converted to negative or positive infinity. 18.7 Flow element module Entry points Entry points form the mechanism for passing control from Switch to a script in a structured manner. Specifically, an entry point is a function defined in a script (according to the rules specified below) and intended to be called from the Switch application. All other functions defined in the scripting API work the other way around: they expect to be called from a script. Switch invokes the entry points defined in a script at certain appropriate times, as explained below. Also see execution modes. The first argument for each entry point is an instance of the Switch class or of the Environment class. This object serves as the starting point for accessing the information offered by the flow element and metadata modules in the scripting API. Regular execution Switch expects one or both of the following two entry points to be present in each script: 444 Enfocus Switch 10 jobArrived( s : Switch, job This entry point is invoked each time a new job arrives in one of the : Job ) input folders for the script element. The newly arrived job is passed to the entry point as the second argument. timerFired( s : Switch ) This entry point is invoked for the first time immediately after the flow is activated and thereafter it is invoked at regular intervals regardless of whether a new job arrived or not. The default value for the interval is 300 seconds (5 minutes); it can be modified with Switch.setTimerInterval(). Property editing These optional entry points support editing and validating properties defined in the script declaration; see property definition properties, property editors and validating property values. getLibraryForProperty( s : Switch, Invoked when a user chooses the “Select from library” or tag : String ) : String[ ] “Select many from library” property editor in the designer for one of this script’s properties. The second argument specifies the tag of the property involved in the operation. Returns the list of strings to display in the property editor dialog. If this entry point is absent, it is considered to return an empty list. getLibraryForConnectionProperty( Invoked when a user chooses the “Select from library” or s : Switch, c : Connection, tag : “Select many from library” property editor in the designer String ) : String[ ] for a property injected on this script’s outgoing connections. The second and third arguments specify the connection and the tag of the property involved in the operation. Returns the list of strings to display in the property editor dialog. If this entry point is absent, the getLibraryForProperty entry point is invoked instead, omitting the connection argument. This is meaningful in case the result does not depend on the connection involved in the operation. isPropertyValid( s : Switch, tag : Invoked at appropriate times to validate the value of a String, value : String ) : Boolean property for the script with “custom” validation, example: when the user changes the property value in the designer, when the user attempts to activate the flow in which the script resides, or just before invoking the jobArrived entry point (while the flow is running). See validating property values. The second argument specifies the tag of the property that needs to be validated. The third argument specifies the current value of the property. It is provided for convenience only; it is identical to the return value of getPropertyValue(tag). 445 Enfocus Switch 10 Returns true if the value of the specified property is deemed valid, false otherwise. If this entry point is absent, it is considered to return false. isConnectionPropertyValid( s : Invoked at appropriate times to validate the value of a Switch, c : Connection, tag : property injected on this script’s outgoing connections with String, value : String ) : Boolean “custom” validation, example: when the user changes the property value in the designer, when the user attempts to activate the flow in which the script resides, or just before invoking the jobArrived entry point (while the flow is running). See validating property values. The second and third arguments specify the connection and the tag of the property involved in the operation. The last argument specifies the current value of the property. It is provided for convenience only; it is identical to the return value of getPropertyValue(tag). Returns true if the value of the specified property is deemed valid, false otherwise. If this entry point is absent, the isPropertyValid entry point is invoked instead, omitting the connection argument. This is meaningful in case the result doesn’t depend on the connection involved in the operation. No run-time context These entry points are often invoked while the flow is inactive, which means there is no valid flow run-time context and no valid job context. As a consequence, within these entry points calling the following Switch class functions has undefined (and possibly destructive) results: • Working with jobs and processes: getJobs, getJobsForConnections, createNewJob, failProcess • Accessing the timer interval: setTimerInterval, getTimerInterval It is safe to call the Switch class functions for accessing the flow definition and accessing injected properties and any of the Environment class functions inherited by the Switch class. Variables and script expressions Furthermore, when the flow is inactive, there is no way to determine the value of a property that contains a variable or a script expression. Thus in that case the getPropertyValue() and getPropertyValueList() functions return the source value of a property instead of its computed value (that is, the variable or script expression definition rather than its evaluation result). The isPropertyValid entry point is invoked only when an actual value is available for the property that needs to be validated (that is, a property that contains a variable or a script expression is never validated when the flow is inactive; see validating property values). So in most cases the validation process does not need to worry about this complexity. However sometimes properties are interrelated and the validation process requires referring to another property value. In that case, the validation code must verify that an actual value exists for the other property through the isPropertyValueActual() function. Application discovery and licensing The optional entry points described in this section provide support for scripted plug-ins that serve as a configurator for a third-party application. If the script is not loaded as a scripted 446 Enfocus Switch 10 plug-in these entry points are never invoked. See also creating a scripted plug-in, configurator guidelines and detecting third-party applications. findApplicationPath( e Is invoked for a scripted plug-in to discover the associated third-party : Environment, startup application – if any. : Boolean ) : String Returns the absolute file path for the third-party application’s executable (“.exe” on Windows, “.app” on Mac). If the entry point returns null or the empty string, this means that the script cannot discover the application and that the user will need to set the application path. The startup argument is true when this entry point is invoked during Switch startup, and false when invoked as a result of a user action (that is, not during startup). When startup is true, the entry point should not perform time-consuming operations. The Environment.findApplicationOnDisk() function is automatically disabled (it returns an empty string without searching) so it is safe to call this function without explicitly checking for startup. If this entry point is absent, Switch offers no user interface for setting an application path for this scripted plug-in; otherwise it does (even if the script can determine the application path). getApplicationLicensing( Is invoked for a scripted plug-in to discover the licensing state of the e : Environment ) : associated third-party application. Returns one of the following strings String to indicate the licensing state: “Licensed”, “Demo”, “Trial”, “Unlicensed”, “Unknown”. The Switch designer displays a localized version of these strings. If this entry point is absent, this means the licensing state is irrelevant or cannot be discovered even in principle. This not the same thing as returning “Unknown”, which means there is a mechanism for discovering the licensing state but it failed this time to produce a conclusive result. licenseApplication( e : Is invoked when the user enters or modifies the license key for the Environment, license : scripted plug-in in the designer. Attempts to license the associated String ) third-party application with the specified string. If this entry point is absent, Switch offers no user interface for entering a license key for this scripted plug-in. Persistent execution The optional entry points described in this section are invoked only for scripts with the persistent execution mode. They are invoked at the appropriate times to help the script with managing resources that persist across invocations of the regular execution entry points described above. initializeProcessing( If the script has the persistent execution mode, this optional entry point e : Environment ) : is invoked to allow the script to initialize any persistent resources it may Boolean need. The entry point is called “lazily”, that is, it’s invoked only when Switch receives the first processing request for a script instance of this type after startup or after the most recent finalize or abort. 447 Enfocus Switch 10 The entry point returns true if initialization was successful and false if it is not able to initialize appropriately. In the latter case Switch marks all script instances of this type as a problem process and it retries initialization at regular intervals. As long as initialization fails, Switch refrains from invoking jobArrived and timerFired for the script. If the entry point is absent, this means the script does not need initialization and the entry point is assumed to return true. If the script has an execution mode other than persistent this entry point is never invoked. finalizeProcessing( e If the script has the persistent execution mode, this optional entry point : Environment ) is invoked to allow the script to release any persistent resources it may have used. The entry point is called when Switch stops processing and whenever Switch determines that it is meaningful to do so – for example, after the script fails a job. If the entry point is absent, this means the script doesn’t need finalization. If the script has an execution mode other than persistent this entry point is never invoked. cleanupAfterAbort ( If the script has the persistent execution mode, this optional entry point e : Environment ) is invoked to allow the script to release any persistent resources after its execution was forcefully aborted due to a time-out. If the entry point is absent, this means the script does not need cleanup. If the script has an execution mode other than persistent this entry point is never invoked. Invocation sequence In persistent execution mode, the invocation sequence is as follows: ( initializeProcessing ( jobArrived | timerFired )+ finalizeProcessing )* In other words, initialize and finalize bracket one or more processing requests for any script instance of this execution group. All of these invocations happen in the same thread so that the contents of the global variable “persistent” is preserved. Thus, for example, the script can start an external application in the initialize entry point and leave it running until finalize, while maintaining a persistent reference to the application for use in intermediate invocations. Switch guarantees the appropriate invocation sequence, so the script does not need to worry about this. Abort after time-out There is one important exception to this guaranteed invocation sequence. If one of the involved entry points (initializeProcessing, jobArrived, timerFired and finalizeProcessing) does not return within the maximum allotted time ("abort processes after" in error handling preferences), Switch aborts the thread and releases all resources attached to it, including its private scripting environment. Finally, Switch invokes the cleanupAfterAbort entry point to allow the script to release any external resources. Unfortunately the cleanupAfterAbort function can no longer access the script’s private persistent data since it is being called in a new thread (the old one was just destroyed). Communication 448 Enfocus Switch 10 between the regular functions and the cleanup function is possible through the global data access functions of the Environment class, but this is restricted to plain strings (rather than arbitrary objects). After aborting a thread as described, Switch restarts the regular invocation sequence in a new thread whenever it receives a new processing request. Other entry points The entry points related to application discovery/licensing and property validation are invoked in the same thread (and thus can access the global variable “persistent”) but they are not automatically bracketed by initializeProcessing and finalizeProcessing. If required, these entry points must handle initialization and finalization themselves. Environment class The single instance of the Environment class is passed as an argument to the script entry points that operate out of the context of a particular flow element. By convention, the name for the Environment object is “e” (although the script developer can choose to use another name). Since the Switch class inherits from the Environment class, any of the functions described in this topic can be called for the Switch class as well. In other words, you can call the Environment class functions with “e.function()” or “s.function()” depending on the argument passed to the entry point. Logging log( type : Number, message : String, extra : String or Number ) Logs a message of the specified type (see below) outside of a job context. Where possible use the job.log() function instead, because it includes information about the job in the message. Log messages are displayed in the Messages pane and in the Progress pane; see also viewing log messages and viewing processes. Log Type The "type" argument must have one of the following numeric values: Numeric type Display type Description 1 Info An informational message that has no other purpose than to inform the user of a certain occurrence 2 Warning A warning message that informs the user of a recoverable problem or non-fatal error 3 Error An error message that informs the user of a fatal error 4 Start A formal message that marks the start of a task that should be displayed in the progress pane 5 Progress A formal message that marks the completion of a particular portion of a task for which a start message was previously issued 449 Enfocus Switch 10 Numeric type Display type Description 6 End A formal message that marks the completion of a task for which a start message was previously issued -1 Debug An informational message solely intended for debugging purposes -2 Assert A message solely intended for debugging purposes that is issued only when a coding error is discovered Log Message The message argument and the optional extra argument specify the message being issued, as a constant and variable part. For example: e.log(2, "Trial period will expire in %1 days", days); The message argument should be a constant string (that is, not constructed programmatically) because it is used as a key in the localization database. The “extra” argument, when present, replaces the placeholder “%1” in the localized version of the message. If the “extra” argument is missing or null, no replacement takes place. If the extra argument is a number, it is rounded to the nearest integer and then converted to the corresponding decimal string representation. This allows picking alternative messages from the localization database depending on the number (example: “1 day” versus “2 days”). If the extra argument is a string, all leading and trailing white space is removed, and any remaining line breaks (CR, LF, or CRLF) are replaced by a semicolon. This allows passing multi-line text (such as the complete contents of stderr or stdout) to the extra argument without inadvertently causing line breaks in log messages. Log: Multiple variable parts The message argument can use the special placeholders “%11”, “%12” through “%19” to access the corresponding segment (indexed 1 through 9) of the extra argument interpreted as a list of comma-separated values. If the specified segment does not exist the empty string is used. There is no support for quoted strings so individual values in the list can not contain commas. Log: Showing progress The messages of type "start", "progress" and "end" cause a task to be displayed in the Progress pane. The extra argument (which must be an integer) is used to indicate the total progress range and the current progress. For example, to indicate a taskconsisting of twelve more or less equal parts one might write: e.log(4, "Task started", 12); for (var i=0; i < 12; i++) { e.log(5, "Task in progress", i); ... } e.log(6, "Task ended"); Where possible use the job.log() function instead, because it includes information about the job in the Progress pane. 450 Enfocus Switch 10 Maintaining global data The data accessed by these functions is stored in a global repository that is part of the persistent state of the flow execution engine. Access to the repository is serialized (to avoid conflicts caused by access in multiple threads) and the contents of the repository persist across invocations of the flow engine. It is the script programmer’s responsibility to maintain distinct namespaces for different applications (including those written by other programmers), and to determine the extent to which the data is global. This can be accomplished by providing an appropriate value for the scope argument in the access functions. The following table lists some examples for the value of the scope argument. The table assumes that the variable myOrg contains a URI (unique resource identifier) that uniquely identifies the programmer’s organization, and that myApp contains a string that uniquely identifies the overall application under consideration (which may involve several cooperating scripts). Value of scope argument The data can be accessed by myOrg + myApp Any script that belongs to this application anywhere in the execution engine myOrg + myApp + Switch.getFlowName() Any script that belongs to this application and that resides in the same flow myOrg + Switch.getScriptName() All copies of this script (even if used in different script elements in the same flow or in different flows) Switch.getFlowName() + Switch.getElementName() The copy of this script for this script element (if the same script is used twice, there is a separate copy of the data for each script element) setGlobalData( scope : Sets the value of the global data with the specified scope and tag String, tag : String, value to the specified string. : String ) getGlobalData(scope : String, tag : String ) : String Returns the value of the global data with the specified scope and tag, or the empty string if no global data with that scope and tag was set. lockGlobalData( scope : String) Acquires a global data lock on the specified scope so that multiple related get/set operations can be performed in the scope without interference from other scripts running in concurrent threads. (It is not necessary to lock global data for a single set or get operation or for multiple unrelated set and get operations). This function blocks until the requested lock can be obtained. A script can acquire only a single lock at a time, that is, nested locks are not allowed. While a lock is in effect, the script is allowed to access global data only in the scope on which a lock was acquired. Acquiring a nested lock (even on the same scope) or accessing data outside of the locked scope has undefined (and almost certainly undesirable) results. 451 Enfocus Switch 10 unlockGlobalData( ) Releases the current global data lock, if any. Does nothing if there is no current lock. Switch automatically releases the current lock, if any, after a script returns from the entry point. This is only a safeguard: a script should explicitly release a lock as soon as it is no longer needed. Copying files copy( source-path : String, destination-path : String) Copies the file or folder (including its contents, recursively) specified by the source path to the destination path. Both paths are absolute and include a filename; that is, the destination path specifies the filename of the copied file or folder, not the parent folder in which it should be placed. Files are copied with full support for platform-specific information such as Mac file types and resource forks (including emulations on Windows), as if copied by a regular flow operation under the control of Switch. Note: This function should be used only to copy files to a temporary location; use the Job.sendTo() functions for moving files to outgoing connections. Getting special property values The following functions allow retrieving the value of the special properties “ApplicationPath” and “ApplicationLicense” without requiring access to a Switch class instance. This is necessary in a scripted plug-in to access these properties from with the getApplicationLicensing entry point. See creating a scripted plug-in for more information on these special properties. getApplicationPath( ) : String Returns the centrally managed absolute path to the third-party application associated with this scripted plug-in or null if no such path is available (yet). getApplicationLicense( ) : String Returns the centrally managed license key for the third-party application associated with this scripted plug-in or null if no such license key is available (yet). Getting global user preferences getServerName( ) : String Returns the name of the Switch server hosting this execution, as specified by the user in the communication preferences. getLicenseeName( ) : String Returns the name entered in the Switch licensing dialog, or the empty string if no name has been entered. If multiple licenses are activated, the license with the longest license time period is used. getLicenseeOrganization( ) : Returns the organization entered in the Switch licensing dialog, String or the empty string if no organization has been entered. If 452 Enfocus Switch 10 multiple licenses are activated, the license with the longest license time period is used. getLanguage( ) : String Returns the name of the currently active language preference, in English. For example, the currently implemented languages are “English” and “German”. getLanguageEnvironment( ) Returns the name of the currently active language environment : String preference, in English. For example, the currently implemented language environments are “Western” and “Japanese”. getLicenseSerial( ) : Number Returns the serial number (max. 9 digits) associated with the license entered in the Switch licensing dialog. If multiple licenses are activated, the license with the longest license time period is used. This is always a positive integer, or zero if Switch has not been properly licensed. isInTrialMode( ) : Boolean Returns true if Switch currently runs in trial mode; false otherwise. isLicenseFeatureEnabled( feature : String, version : Number ) : Boolean Returns true if Switch currently runs in trial mode or if the specified license feature with at least the specified version is currently enabled (because an appropriate license key has been successfully activated through the Switch licensing dialog); false otherwise. Note: This function is intended solely for internal use by Enfocus or a technology partner employing the Enfocus activation-based license server. Getting system information isWindows( ) : Boolean Returns true if the calling script is running on Microsoft Windows, false otherwise. isMac( ) : Boolean Returns true if the calling script is running on Apple Mac OS X, false otherwise. findRegisteredApplication( Queries the system for an application that has been registered with key1 : String, key2 : String one of the specified keys, and returns the absolute path of the ) : String application if found or null if not. The function verifies that the returned path is valid (that is, a file exists at the location); if not null is returned instead. There are two key arguments so that a single call can specify the keys required for two different operating systems. The function automatically figures out which key to use on each operating system. The second key argument can be omitted if it is not needed. On Windows, the function queries the system registry with the specified key, which must be an absolute registry path. Most professional application installers make a registry entry for this purpose but there is no guarantee. 453 Enfocus Switch 10 Mac OS X automatically adds an entry to its application database when an application bundle is installed or copied to the system. Thus on Mac OS X the function queries the system application database with the specified key, which must be the filename of the application bundle (that is, the same name one would use to address the application from AppleScript) or the application’s bundle identifier as provided in the property list located inside the application bundle (example: “com.adobe.distiller”). In the latter case, when multiple versions of the application are installed, Mac OS X will choose the most recent version. findApplicationOnDisk( name1 : String, name2 : String ) : String Searches the system folder in which applications are usually installed for an application with one of the specified file names and returns the absolute path of the application if found or null if not. There are two name arguments in case the application is named differently on different operating systems. The second name argument can be omitted if it is not needed. On Windows the function recursively searches the contents of the Program Files folder. If the specified name has no extension, “.exe” is added. On Mac OS X the function recursively searches the contents of the Applications folder. If the specified name has no extension, the function looks for the specified name AND for the name with “.app” added. The function does not search inside application bundles. This function may use substantial resources (and time) to complete since it recursively searches the contents of a potentially large folder. Therefore, when called from the findApplicationPath entry point during Switch startup, this function is automatically disabled and immediately returns an empty string without searching. getSpecialFolderPath( Returns the absolute path to the special folder indicated by the folderID : String ) : String folderID argument, which must be one of the strings listed in the table below. Returns null if folderID is unknown. folderID Returns an absolute path to ApplicationData The folder that serves as a common repository for application-specific data for the current user (that is, the user who launched Switch server) CommonApplicationData The folder that serves as a common repository for application-specific data that is used by all users PluginResources 454 The resource folder associated with the calling script; in the current implementation this is always the folder that contains the calling script package but implementations should not count in this fact Enfocus Switch 10 folderID Returns an absolute path to The resource folder is intended for use by scripted plug-ins (see creating a scripted plug-in) and should not be used from regular script packages except for testing; there is no reliable way to transport external resources with regular script packages SciptData The folder that serves as a common repository for custom “global” Switch script data; it is shared by all scripts (and all users) so callers must provide unique names for any files stored in this folder This is a subfolder of the Switch application data root, which has the advantage that its contents is relocated with all other information relevant to the operation of Switch, and can be easily located for diagnostics purposes getSystemInfo( infoID : String ) : String Returns the system information indicated by the infoID argument, which must be one of the strings listed in the table below. Returns null if infoID is unknown. infoID Returns UserName The login name of the current user (i.e. the user who launched Switch server) supports64bit( ) : Boolean Returns true if the calling script is running on a 64-bit capable operating system and processor, false otherwise. Switch always runs in 32-compatibility mode. This function is provided solely to inform a script about operating system capabilities. For example, the script may use the information to select the appropriate version of a third-party application. The Windows operating system comes in two distinct flavors (32-bit and 64-bit), so this function returns true only if it runs on a 64-bit Windows version. Mac OS X supports a mix of 32-bit and 64-bit applications when running on a 64-bit capable processor, so this function returns true when running on a 64-bit capable processor. Note that all Intel-based Macs are 64-bit capable. getServerVersion( ) : number Returns the version of the Switch server hosting this execution as a decimal number: “major version + update number / 100”. For example, Switch 08 update 6 returns the number 8.06. 455 Enfocus Switch 10 This function does not differentiate between prerelease and release builds. This function was introduced in Switch 08 update 6. If a script may be hosted by an older version of Switch, the script should check for the presence of this function before using it. For example: if ("getServerVersion" in s && s.getServerVersion() >= 8.07) ... Supporting time-out getSecondsLeft( ) : Returns the number of seconds left before the maximum allotted execution Number time ("abort processes after" in error handling preferences), is reached for this entry point. This allows a script to fail gracefully when it detects that it is getting close to being aborted, or to choose different algorithms based on the allotted time. Switch provides no guarantees about the actual CPU time that will be available to the script (since many other tasks may be executing in parallel). Sleeping sleep ( seconds : Number ) Blocks the calling script for approximately the specified amount of time (in seconds). Other Switch processes are allowed to continue execution in parallel. Compressing compress( source-path : String, destination-path : String, password : String, compress : Boolean ) : Boolean Places the source file or folder (including its nested contents) into a ZIP archive at the destination path, using the specified password. If the password is null or missing, the archive is not password-protected. By default (that is, if the compress argument is true, missing or null), the files in the ZIP archive are compressed. If the compress argument is false, the files are stored in the ZIP archive without compression, dramatically reducing processing time. This can be meaningful when speed is more important than size or when the files will not compress well (example: JPEG images). Returns true if successful, false if not (in which case an appropriate error message is logged). This function behaves exactly as the compress tool (except that it does not add a unique name prefix to the output archive’s name). uncompress( source-path : String, destination-path : String, remove-redundant-folders : Boolean, passwords : String[ ] ) : Boolean 456 Extracts all files from the archive at the source path and places them as a file or folder at the destination path. If the third argument is set to yes, all but the deepest subfolder levels are removed while uncompressing. The last (optional) argument Enfocus Switch 10 provides a list of passwords for opening password-protected archives. Returns true if successful, false if not (in which case an appropriate error message is logged). This function behaves exactly as the uncompress tool (except that it doesn’t add a unique name prefix to the output file or folder’s name). That is, it supports the same formats and the output file/folder is structured in the same way. extract( archive-path : String, file-path : String, destination-path : String, passwords : String[ ] ) : Boolean Extracts the single file specified by the file-path argument from the source ZIP archive and places it at the destination path in the file system. The last (optional) argument provides a list of passwords for opening password-protected archives. Returns true if successful, false if not (in which case an appropriate error message is logged). Note that this function supports only the ZIP archive format; it is intended to extract a manifest from the archive without having to uncompress the complete archive. Downloading download( source-url : Downloads the file specified by the source URL to the destination String, destination-path path. The source URL must specify the ‘http’ or ‘ftp’ protocol, : String ) : Boolean including login and password if applicable. The destination path must include a filename; that is, the it specifies the filename of the copied file, not the parent folder in which it should be placed. Returns true if the operation succeeded, false if not. Only one download attempt is made. Note: This function should be used only to place files in a temporary location; use the Job.sendTo() functions for moving files to outgoing connections. Temporary location createPathWithName( name : This function has the same semantics as the String, createFolder : Boolean ) Job.createPathWithName() function. It is provided as a : String member of the Environment class so that one can obtain a location for storing temporary files or folders without having access to a job (for example, in the timerFired entry point). 457 Enfocus Switch 10 Client connection getClientConnection( Returns the valid ClientConnection object if the script code is executed in ) : ClientConnection the context of a client connection, otherwise null is returned. Note: The ClientConnection object is available only in context of a client connection. If there is a client connection which triggered evaluation of a script, then this script returns a valid ClientConnection object after calling this method. In all other cases, the method getClientConnection returns null. This means that the ClientConnection currently can be used only in JavaScript script expressions specified in Metadata properties of Submit point and Checkpoint flow elements. Switch class The single instance of the Switch class is passed as an argument to the script entry points that operate in the context of a particular flow element. By convention, the name for the Switch object is “s” (although the script developer can choose to use another name). Since the Switch class inherits from the Environment class, any of the functions described for that class can be called for the Switch class as well. In other words, you can call the Environment class functions with “e.function()” or “s.function()” depending on the argument passed to the entry point. Accessing the flow definition See script element, script declaration and main script properties for background information. getFlowName( ) : String Returns the name of the flow, as displayed in the Flows pane, in which this script resides. getElementName( ) : String Returns the name of the flow element associated with this script as displayed in the canvas. getElementID ( ) : String Returns a string that uniquely identifies the flow element associated with this script (within the limits of the guarantees described below). Callers should not rely on the syntax of the returned string as this may change between Switch versions. The element ID for a particular flow element offers two fundamental guarantees: • It differs from the element ID for any other flow element in any currently active flow. • It remains unchanged as long as the flow in which it resides is not edited, even if the flow is deactivated and reactivated and across Switch sessions. Note that holding or releasing connections or renaming the flow does not count as editing in this context. However, exporting and re-importing (or upgrading) a flow, or renaming a flow element inside the flow, does count as editing. getScriptName( ) : String Returns the name of this script as defined in the script declaration. 458 Enfocus Switch 10 getInConnections( ) : ConnectionList Returns a list of Connection instances representing the incoming connections forthe flow element associated with this script. The list is in arbitrary order. If there are no incoming connections the list is empty. getOutConnections( ) : ConnectionList Returns a list of Connection instances representing the outgoing connections for the flow element associated with this script. The list is in arbitrary order. If there are no outgoing connections the list is empty. Accessing injected properties The functions in this section retrieve information about the properties injected into the script element as defined in the script declaration (see property definition properties). The property value is entered by the user in the Properties pane; the property tags are defined in the script declaration. Property values for which isPropertyValueStatic() returns false can be computed only in the context of a particular job. By default the functions getPropertyValue() and getPropertyValueList() use the current job (that is, the job for which the jobArrived entry point was invoked) to compute property values. Thus in most cases the job argument can be omitted. In situations however where there is no current job (for example: because this function is called from within the timerFired entry point), it is necessary to specify the job argument when getting non-static property values. getPropertyValue( tag Returns the value of the injected flow element property with the specified : String, job : Job ) : tag for the script element associated with this script. If the specified tag String is not defined in the script declaration, the function returns null. If the property has a string list value, this function returns the first string in the list. If this function is invoked while the flow is inactive, it returns the source value of a property that contains a variable or a script expression instead of its computed value (that is, the variable or script expression definition rather than its evaluation result). The optional job argument specifies the job for which the property value is computed. If the argument is null or missing, the current job is used instead. If the argument is null or missing, and there is no current job, and the property value is non-static, this function returns null. getPropertyValueList( Returns the string list value of the injected flow element property with tag : String, job : Job the specified tag for the script element associated with this script. If the ) : String[ ] specified tag is not defined in the script declaration, the function returns null. If the property has a single-string value, this function returns a list with a single string. If this function is invoked while the flow is inactive, it returns the source value of a property that contains a variable or a script expression instead of its computed value (i.e. the variable or script expression definition rather than its evaluation result). The optional job argument specifies the job for which the property value is computed. If the argument is null or missing, the current job is used 459 Enfocus Switch 10 instead. If the argument is null or missing, and there is no current job, and the property value is non-static, this function returns null. getPropertyEditor( Returns the name of the property editor that was used to enter the value tag : String ) : String for the specified property. In case a property offers multiple editors, this information may be required to correctly interpret the property value. If the specified tag is not defined in the script declaration, the function returns null. The function returns the property editor’s name exactly as it appears in the tables in inline property editors and other property editors. isPropertyValueStatic( Returns true if the value for the specified property is guaranteed not to tag : String ) : change between entry point invocations for this flow element as long Boolean as the containing flow remains active; false otherwise. If the specified tag is not defined in the script declaration, the function returns null. This function is useful to determine whether an invalid property value should result in calling Job.failProcess() (the value is static) or Job.fail() (the value is dynamic). Specifically, the function returns false if one of the following conditions holds: • The property value was entered with the property editor “Script expression” or “Condition with variables”. • The property value was entered with the property editor “Single-line text with variables” or “Multi-line text with variables” and the text does indeed contain a syntactically valid variable. • The property offers the property editor “Single-line text with variables” or “Multi-line text with variables”, and the property value was entered with the inline property editor “Single-line text” instead, and the text does indeed contain a syntactically valid variable. isPropertyValueActual( Returns true if the getPropertyValue() or getPropertyValueList() functions tag : String ) : return an actual value for the specified property, in other words if the Boolean property value is static or if the flow is active so that the property value can be computed. Returns false if the getPropertyValue() or getPropertyValueList() functions return the source value for the specified property, in other words if the property value is not static and the flow is inactive. If the specified tag is not defined in the script declaration, the function returns null. Working with jobs and processes getJobs( ) : JobList 460 Returns a list of Job instances representing all of the jobs currently waiting in the input folders for the flow element. The list is in arbitrary order and includes all jobs that have formally “arrived”, whether they were already passed to the jobArrived entry point or not, and including the job passed to the current invocation of the jobArrived entry point. If there are no such jobs, the list is empty. Enfocus Switch 10 getJobsForConnection( Returns a list of Job instances representing all of the jobs currently c : Connection ) : waiting in the input folders for the specified incoming connection. Same JobList semantics as for the getJobs function apply. createNewJob( origin Returns a Job instance representing a new job that does not correspond : String ) : Job to an incoming job. The job is given a fresh job ticket with default values. The file path associated with the job is the empty string. A new job is needed only in cases the script generates or imports new jobs into a flow. In all other cases the script should use (one of) the incoming job(s) related to the output so that job ticket information is preserved. The optional argument provides an indication of the origin of the job before it was injected in the flow, for example its absolute file path or location in a third-party data base. This value is written in the origin attribute of the ‘Produced’ occurrence in the newly created job ticket (see job occurrence trail). If the origin argument is missing or null, the empty string is used. failProcess( message Logs a fatal error with the specified message and puts the flow element : String, extra : String instance in the “problem process” state, without providing the context or Number ) of a particular job. This function should be used only when there is no appropriate job context, for example in the timerArrived entry point of a Producer. In all other cases, use the Job.failProcess() function instead so that the job causing the problem is properly retried when the process is retried. See the description of the Environment.log() function for more information on the message and extra arguments. See viewing problem status for more information on problem processes. Accessing the timer interval setTimerInterval( seconds : Number ) Sets the interval, in seconds, between subsequent invocations of the timerFired entry point (if it has been declared in the script). The implementation guarantees only that the time between invocations will not be less than the specified number of seconds. Depending on run-time circumstances the actual interval may be (much) longer. The default value for the timer interval is 300 seconds (5 minutes). getTimerInterval( ) : Number Returns the interval, in seconds between subsequent invocations of the timerFired entry point. isDeactivating ( ) : Boolean Returns true if the flow in which this script resides is attempting to deactivate at the time of invocation; false otherwise. When the user deactivates a flow (or quits the server) Switch waits until all executing entry points have run to completion. Therefore, an entry point that potentially executes for a long time, for example 461 Enfocus Switch 10 because it is waiting for an external event, can invoke this function at regular intervals to determine whether it should abort its operation. Connection class An instance of the Connection class represents an incoming or outgoing connection for the flow element associated with the script (see connection and script element for background information). Connection objects can be obtained through functions of the Switch class. Accessing the flow definition getName( ) : String Returns the name of the connection as displayed in the canvas; this may be an empty string. getElementID ( ) : String Returns a string that uniquely identifies the connection (within the limits of the guarantees described below). Callers should not rely on the syntax of the returned string as this may change between Switch versions. The element ID for a particular flow element offers the following fundamental guarantees: • It differs from the element ID for any other flow element in any currently active flow. • It remains unchanged as long as the flow in which it resides is not edited, even if the flow is deactivated and reactivated and across Switch sessions. • The element ID for a connection is never equal to the element ID for a non-connection flow element. Note that holding or releasing connections or renaming the flow does not count as editing in this context. However exporting and re-importing (or upgrading) a flow, or renaming a flow element inside the flow, does count as editing. getConnectionType( ) : String Returns the type of the connection as one of the following strings: “Move”, “Filter”, “Traffic-data”, Traffic-log”, “Traffic-datawithlog”. allowsSuccess ( ) : Boolean Returns true if this is a traffic-light connection and the Success property is set to yes; otherwise returns false. allowsWarning ( ) : Boolean Returns true if this is a traffic-light connection and the Warning property is set to yes; otherwise returns false. allowsError ( ) : Boolean Returns true if this is a traffic-light connection and the Error property is set to yes; otherwise returns false. isOnHold( ) : Boolean Returns true if the connection is currently on hold, false if it is not. getFolderName( ) : String Returns the name of the folder at the other end of this connection (the originating folder for an incoming connection, the target folder 462 Enfocus Switch 10 for an outgoing connection) as displayed in the canvas; this may be an empty string. Accessing injected properties The connection class offers the same functions for accessing injected properties as the Switch class; the function descriptions are not repeated here. Only outgoing connections have injected properties. Accessing files at the other end of the connection getFileCount( nested : Returns the number of files currently residing in the folder at the other Boolean ) : Number end of this connection (the originating folder for an incoming connection, the target folder for an outgoing connection). If nested is false, only items directly inside the folder are counted (i.e. each file and each subfolder is counted as one item). If nested is true, the number of files in subfolders are counted as well, recursively (and subfolders themselves do not contribute to the count). getByteCount( ) : Number Returns the size in bytes of the contents currently residing in the folder at the other end of this connection (the originating folder for an incoming connection, the target folder for an outgoing connection). Files in subfolders are included in the count, recursively. Note: The getFileCount() and getByteCount() functions tally any and all files that are reported by the file system to reside in the connection’s folder at the instant of the function’s invocation, including files that have not yet fully arrived, and (for outgoing connections) including files that have been placed in the target folder by other processes. As a consequence, the return value of these functions may vary between subsequent invocations as files are added/removed/updated under or outside of the script’s control. Job class An instance of the Job class represents a job (file or job folder) waiting to be processed in one of the input folders for the flow element associated with the script (see working with job folders and internal job tickets for background information). Job objects can be obtained through functions of the Switch class. The second argument passed to the jobArrived entry point is the newly arrived job that triggered the entry point’s invocation. This is commonly called the current job. By convention, the name for the object representing the current job is “job” (although the script developer can choose to use another name). Processing a job Processing a job in a script usually consists of the following steps: • Decide on how to process the job based on file type etc. • Get the path to the incoming job. • Get a temporary path for one or more output files or folders. 463 Enfocus Switch 10 • Create the output(s) in the temporary location. • Call one of the sendTo functions for each output. If the incoming job is passed along without change the Job.sendTo() functions can be called directly on the incoming job path, skipping all intermediate steps. Based on the above scenario, Switch automatically handles all complexities: • Moving and copying jobs to the appropriate output connections. • Providing outgoing jobs with a unique name prefix. • Creating and updating the related internal job tickets. • Removing the incoming job and any temporary files created along the way. • Logging the appropriate messages. A job remains in the input folder until one of the Job.sendTo() or Job.fail() functions has been called for the job. The jobArrived entry point will be invoked only once for each job, so if the entry point does not call a sendTo() or fail() function for the job, the script should do so at a later time (in a timerFired entry point or in a subsequent invocation of the jobArrived entry point for a different job). Note: After Switch server quits and restarts, the jobArrived entry point will be invoked for all jobs in the input folder once again. Getting job file/folder information 464 getPath( ) : String Returns the absolute file or folder path for the job as it resides in the input folder, including unique filename prefix. getUniqueNamePrefix( ) : String Returns the unique filename prefix used for the job, without the underscores. For example, for a job called “_0G63D_myjob.txt” this function would return “0G63D”. getName( ) : String Returns the file or folder name for the job, including filename extension if present, but excluding the unique filename prefix. getNameProper( ) : String Returns the file or folder name for the job excluding filename extension and excluding the unique filename prefix. getExtension( ) : String Returns the job’s filename extension, or the empty string if there is none. getMacType( ) : String Returns the job’s Mac file type code as a 4-character string if available, otherwise the empty string. getMacCreator( ) : String Returns the job’s Mac creator code as a 4-character string if available, otherwise the empty string. isType( ext : String ) : Boolean Returns true if the job matches the specified file type, specified as a filename extension, and false otherwise. Enfocus Switch 10 A file matches if its filename extension and/or its Mac file type (after conversion) match the specified filename extension. A folder matches if any of the files at the topmost level inside the folder match the specified type. These semantics are similar to those of matching cross-platform file types in filter connections. isFile( ) : Boolean Returns true if the job is a single file, false otherwise. isFolder( ) : Boolean Returns true if the job is a folder, false otherwise. getFileCount( ) : Number Returns the number of files in the job. If it is a single file, the function returns 1. If it is a job folder, the function returns the number of files in the job folder and any subfolders, recursively (folders and subfolders themselves do not contribute to the count). getByteCount( ) : Number Returns the size in bytes of the job. If it is a job folder, all files in subfolders are included in the count, recursively. Getting temporary output paths createPathWithName( Returns an absolute path to a writable temporary location in the file name : String, system with the specified filename (which should include the createFolder : Boolean ) filename extension if one is required). : String If the optional createFolder argument is true, the function creates a new folder at the location indicated by the returned path. The caller can use this folder as the root of an output job folder or just as a location to store temporary files, one of which may become an output file. If the optional createFolder argument is false or missing, the function does not create a file or folder at the location indicated by the returned path (but the parent folder is guaranteed to exist). The caller can use the path to create an output file or a temporary file. The returned path is guaranteed to differ between invocations of the function, even for the same job and with identical argument values. Also, after the entry point returns, Switch deletes any file or folder left at any of the paths created using this function. createPathWithExtension( Same as above but uses the filename of the job after substituting ext : String, createFolder the specified extension (rather than replacing the complete filename). : Boolean ) : String If the specified extension is the empty string, any trailing dot is removed from the filename; this helps creating a folder path without extension. Sending jobs to outgoing connections The semantics for sending files to outgoing connections depend on the connection type. However all outgoing connections of a flow element (and thus a script) have the same type, and this type is defined in the script declaration. 465 Enfocus Switch 10 To successfully complete processing of a job, the script must call exactly one sendTo() function for each generated output file/folder (i.e. there may be multiple sendTo() calls for the same job). If there is no output, the script must call the sendToNull() function. It is allowed to defer these calls to a subsequent entry point invocation (for example, when grouping multiple incoming jobs in a job folder). If a fatal error occurs, the script must call one of the fail() functions as appropriate. Calling a fail() function cancels any and all previous sendTo() function calls for the same job during the same entry point invocation. Once a fail() function has been called for a job, any further calls to fail() or sendTo() functions for the same job during the same entry point invocation are ignored (such calls just log a warning message rather than performing the requested operation). Guidance to generating output jobs Use Case Guidance on generating output jobs One to many To deliver multiple output jobs triggered by or associated with an incoming job, repeatedly call the sendTo() function on the input job rather than using the createNewJob() function; this ensures that all output jobs correctly inherit the job ticket of the originating job This guideline holds even if the output job is a totally different file; for example, a preflight report for a PDF file or a file selected from a database depending on the contents of an incoming xml file Many to one Leave jobs in the input folder (by not calling any sendTo() functions) until you have everything to generate a complete output job; then call sendTo() on the “primary” input job and sendToNull() on all other input jobs related to this output job – all in a single entry point invocation The output job inherits only the job ticket of the primary input job; if this is unacceptable you’ll have to merge metadata from the other input jobs in a meaningful way (similar to the built-in job assembler) Many to many In most situations this is simply a combination of the previous two use cases None to any You need the createNewJob() function only when there really is no originating job, for example when you eject a new output file based on a timer or an external event that is not associated with a job already in the flow Any to none Whenever you’re ready with an input job, call sendToNull() on it However if it is not possible to generate all output jobs during the same entry point invocation, you need to call setAutoComplete(false) on the input job so that it is not automatically removed from the input folder at the end of the entry point invocation; this is an extremely rare situation so in most cases you don’t need to worry about preventing auto-completion SendTo functions In their “path” argument the sendTo() functions expect to be passed the absolute path of the file or folder that should be sent along. This could be any path: • The path of the incoming job file/folder as returned by Job.getPath(). 466 Enfocus Switch 10 • One of the temporary paths returned by Job.createPathWithName/Extension(). • A file inside a folder located at one of the temporary paths, which is useful in case the script can control the location but not the name of the output file to be sent along (because some other process determines it). • Any other path, which is useful in case the script can’t control the location of the output file to be sent along (because some other process determines it). In their optional “name” argument the sendTo() functions expect to be passed the filename for the output file or job folder (including filename extension; a path portion and/or a unique name prefix are ignored). If the “name” argument is null or missing, the filename in the “path” argument is used instead. The sendTo() functions automatically insert or replace the unique name prefix as appropriate, and they move or copy files as needed. After the entry point returns, Switch removes all jobs for which one or more sendTo() functions were called from the input folder, and it deletes any file or folder left at any of the paths passed to any of the sendTo() functions. Thus a script should never call sendTo() on files that must be preserved. For example, a script that injects a file from an asset management system into a flow should copy the file to a temporary location and then call sendTo() on the copy. sendToNull( path : String ) Marks the job as completed without generating any output. The path is ignored other than for marking the indicated file/folder for deletion. sendToSingle( path : String, Sends a file/folder to the single outgoing move connection. If the name : String ) flow element has outgoing connection(s) of another type or if it has more than one move connection this function logs an error and does nothing. If the flow element has no outgoing connections, fail() is invoked instead with an appropriate error message. sendToData( level: Number, Sends a file/folder to any and all outgoing traffic-light data path : String, name : String connections that have the specified level property enabled (success ) = 1, warning = 2, error = 3). If the flow element has outgoing connection(s) of another type this function logs an error and does nothing. If the flow element has no outgoing data connections of the specified level, fail() is invoked instead with an appropriate error message. sendToLog( level: Number, Sends a file/folder to any and all outgoing traffic-light log path : String, name : String, connections that havethe specified level property enabled (success model : String ) = 1, warning = 2, error = 3). If the flow element has outgoing connection(s) of another type this function logs an error and does nothing. If the flow element has no outgoing log connections of the specified level, nothing happens (i.e. the log file is discarded). The model argument is used only in case the log file is sent over a “Data and log” connection as a metadata dataset attached to the job. In that case the value of model determines the data model of the dataset ("XML", "JDF", "XMP" or "Opaque"). If the argument is nil or missing or if it has an unsupported value, the data model is set to "Opaque". 467 Enfocus Switch 10 sendToFilter( path : String, Sends a file/folder to all outgoing connections with a file filter name : String ) that matches the file/folder being sent. If there is no such connection, fail() is invoked instead with an appropriate error message. The flow element must have outgoing filter connections without folder filter properties, otherwise this function logs an error and does nothing. sendToFolderFilter( Similar to sendToFilter() but also honors the folder filter properties foldernames : String[ ], path on the outgoing connections, using the list of folder names passed : String, name : String ) in the first argument. The flow element must have outgoing filter connections with folder filter properties, otherwise this function logs an error and does nothing. sendTo( c : Connection, path Sends a file/folder to the specified outgoing connection, regardless : String, name : String ) of connection type. Fail functions See the description of the Environment.log() function for more information on the message and extra arguments. A script should invoke failProcess() rather than fail() or failRetry() when it encounters an error condition that does not depend on the job being processed but rather on the process itself (for example, a network resource is not available). In such a case all subsequent jobs would fail as well (because the process is broken) and moving them all to the problem jobs folder makes no sense. It is much more meaningful to hold the jobs in front of the broken process and retry the process from time to time. See viewing problem status for more information on problem jobs and processes. fail( message : String, extra Logs a fatal error for the job with the specified message and : String or Number ) moves the job to the problem jobs folder. failAndRetry( message : String, extra : String or Number ) Similar to fail() but requests that Switch retries processing the job if this was the first attempt at processing it. This is useful if an external application or resource produced an error that may go away when retrying the job a second time. Switch keeps track of the retry count, so the script doesn’t need to worry about it. If the job fails a second time it will be moved to the problem jobs folder. If the script has the persistent execution mode, Switch will invoke the finalizeProcessing and initializeProcessing entry points before trying again, so that the external resource is re-initialized. failProcess( message : String, Logs a fatal error for the job with the specified message and puts extra : String or Number ) the flow element instance in the “problem process” state. The job is not affected (i.e. it stays in the input folder) and a new jobArrived event will be generated for the job when the process is retried. 468 Enfocus Switch 10 Logging Switch automatically issues the appropriate log messages when a script invokes the one of the Job.sendTo() or Job.fail() functions. A script can call the function described below to log additional job-related messages. log( type : Number, message : String, extra : String or Number ) Logs a message of the specified type for this job, automatically including the appropriate job information. See the description of the Environment.log() function for more information on the arguments. Getting job ticket info See using hierarchy info, using email info, viewing job state statistics, and configuring users for background information. getHierarchyPath( ) : String[ ] Returns an Array with the location path segments in the hierarchy info associated with the job, or an empty array if there is no hierarchy info. The topmost path segment is stored at index 0. getEmailAddresses( ) : String[ ] Returns an Array with the email addresses in the email info associated with the job, or an empty array if there are none. getEmailBody( ) : String Returns the email body text in the email info associated with the job, or the empty string if there is none. getJobState( ) : String Returns the job state currently set for the job, or the empty string if the job state was never set. getUserName() : String Returns the short user name for the job, or the empty string if no user information has been associated with this job. getPrivateData ( tag : String ) : String Returns the value of the private data with the specified tag, or the empty string if no private data with that tag was set for the job. getPrivateDataTags( ) : String[ ] Returns a list of all tags for which non-empty private data was set for the job. getPriority( ) : Number Returns the job priority for this job as a signed integer number; see job priorities. getArrivalStamp( ) : Number Returns the arrival stamp for this job as a signed integer number; see arrival stamps. Updating job ticket info See using hierarchy info, using email info, viewing job state statistics, and configuring users for background information. 469 Enfocus Switch 10 The update functions do not affect jobs that have already been sent (by calling one of the Job.sendTo() functions). They do affect any jobs that will be sent after calling the update function. setHierarchyPath( segments : String[ ] ) Replaces the location path in the hierarchy info associated with the job to the list of segments in the specified Array. The topmost path segment is stored at index 0. addBottomHierarchySegment( segment : String ) Adds the specified segment to the location path in the hierarchy info associated with the job, at the end of the list (i.e. at the bottom). addTopHierarchySegment( segment : String ) Adds the specified segment to the location path in the hierarchy info associated with the job, at the beginning of the list (i.e. at the top). setEmailAddresses( addresses : Replaces the email addresses in the email info associated with String[ ] ) the job by the list of email addresses in the specified Array. addEmailAddress( address : String ) Adds the specified email address to the email info associated with the job. setEmailBody( body : String ) Replaces the email body text in the email info associated with the job by the specified string. appendEmailBody( body : String Appends the specified string to the email body text in the ) email info associated with the job, inserting a line break after the existing body if any. setJobState( state : String ) Sets the job state for the job to the specified string. setUserName( username: String Sets the short user name associated with the job. If the ) specified string does not match the name of an existing user in the user database a warning is logged (but the set operation does succeed). setPrivateData( tag : String, value : String ) Sets the value of the private data with the specified tag to the specified string. This supports light-weight persistent job information. setPriority( priority : Number ) Sets the job priority for this job to the specified number, rounded to an integer; see job priorities. Generally speaking, jobs with a higher priority are processed before jobs with a lower priority. refreshArrivalStamp( ) Refreshes the job’s arrival stamp so that it seems that the job just arrived in the flow; see arrival stamps. Switch uses the arrival stamp to determine the processing order for jobs with equal priority (generally speaking, jobs that arrived in the flow first are handled first). Refreshing the arrival stamp can be meaningful when releasing a job that 470 Enfocus Switch 10 has been held in some location for a long time, to avoid that the job would be unduly processed before other jobs. Managing external metadata datasets The functions described here allow associating external metadata with a job's internal job ticket. The Dataset classes in the metadata module implement each of the supported metadata data models: XML data model, JDF data model, XMP data model, and Opaque data model. The createDataset() and setDataset() functions must not be used after any of the Job.sendTo() or Job.fail()functions was called for a job. createDataset ( model : String ) : Dataset Creates and returns a new external metadata dataset object with the specified data model ("XML", "JDF", "XMP" or "Opaque") and with a backing file path and name appropriate for this job, without creating the actual backing file. Returns null if an unknown data model is requested, or if any of the Job.sendTo() or Job.fail() functions was already called for the job. The caller is responsible for creating a backing file that conforms to the specified data model before attempting to read any data from the dataset. The backing file path can be retrieved from the returned Dataset object. It is not possible to create a writable or an embedded dataset with this function. setDataset ( tag : String, value : Dataset ) Associates a metadata dataset object with the specified tag, for this job. It is allowed to associate a dataset with a job that has been created for another job. getDataset ( tag : String ) : Returns the metadata dataset object associated with the specified Dataset tag for this job, or null if there is none. getDatasetTags( ) : String[ Returns a list of all tags for which a metadata dataset object is ] associated with the job. Managing embedded metadata datasets getEmbeddedDataset ( Returns an embedded metadata dataset object with the XMP data writable : Boolean ) : model for the metadata embedded in the job. If there is no supported Dataset embedded metadata, the function returns a valid but empty dataset. The backing file path for the dataset may point to the job itself (if it is an individual file) or to one of the files in the job folder (in some cases). Metadata may be embedded in the file as an XMP packet and/or as binary EXIF or IPTC tags. Metadata fields from multiple sources are synchronized into a unified XMP data model. See supported file formats for more information. When the getEmbeddedDataset() function is invoked on a job for the first time in a certain entry point, it returns: • A writable dataset if the “writable” argument is set to true and Switch supports updating metadata for the file format of the backing file (see supported file formats). 471 Enfocus Switch 10 • A read-only dataset if the “writable” argument is set to false or if Switch does not support updating metadata for the file format of the backing file. If the function is called again on the same job in the same entry point, it returns the embedded dataset object that was created in the first call, ignoring the “writable” argument in the repeat calls. Note: A writable dataset keeps its backing file (the job!) open for update. Thus it is necessary to invoke the finishWriting() function on the dataset (which closes the backing file) before attempting to move or process the job in any way. Managing job families The job family of a job is the set of jobs that have been directly or indirectly generated from the same original job. See Job families. isSameFamily( job : Job Returns true if the receiving job and the specified job belong to the ) : Boolean same job family; otherwise returns false. startNewFamily( ) Disconnects the receiving job from its current family and makes it start a fresh family. In other words, the job becomes the equivalent of an original job. joinFamily( job : Job ) Disconnects the receiving job from its current family and makes it join the family of the specified job. getJobsInFamily( job : Job ) : JobList Returns a list of Job instances representing the jobs in the job family of the specified job. The returned Job objects are “read-only” and they support only a limited subset of the functions offered by the Job class. Specifically, these objects support the functions described in the sections Getting job file/folder information and Getting job ticket info, plus the functions isSameFamily() and getJobsInFamily(). Invoking any other function on these objects is not allowed and causes an error. Furthermore, the information returned by the read-only Job objects is cached in memory at the time the objects are created (i.e. before they are returned). There is no guarantee that the information is still valid, since other processes may be concurrently operating on these jobs. Accessing the occurrence trail Information about things that happen to a job (occurrences) is written to the internal job ticket as a job moves along the flow; see job occurrence trail. The following functions allow retrieving occurrences for each job. The Occurrence class allows retrieving the attributes for each occurrence. getOccurrences( type : String ) Returns a list of all Occurrence instances of the specified type : OccurrenceList associated with the job, in chronological order (the most recent occurrence is listed last). If the type argument is missing or null, all occurrences associated with the job are returned. 472 Enfocus Switch 10 getMostRecentOccurrence( type Returns the most recent Occurrence instance of the specified : String ) : Occurrence type associated with the job, or null if there is no such instance. If the type argument is missing or null, the most recent occurrence is returned regardless of its type. Evaluating variables These functions obtain the value of a single variable in the context of the job (and if needed, in the context of a flow element). The variable must be specified with the usual syntax including the square brackets. Thus by definition the first argument must start with a “[“ and end with a “]” and include no white space. The second argument provides the appropriate Switch class instance for variables that need the flow element context. It can be missing or null for variables that don’t need such context. All of these functions return null if the argument has invalid syntax, if the specified variable is unknown, if an unsupported argument is specified, if the variable needs the flow element context and the Switch argument is null or missing, if an indexed variable is specified without its Index argument, if the variable's text value does not conform to the format for the requested data type, or if the text value is empty. getVariableAsString( variable : Returns the text representation of the variable, formatted String, s : Switch ) : String appropriately for the variable’s data type and taking into account any formatting and indexing options. getVariableAsNumber( variable Same as getVariableAsString() but interprets the string as a : String, s : Switch ) : Number decimal number (with or without a decimal point) or as a rational number (two decimal integer numbers separated by a forward slash). For example, “1.25” and “5/4” represent the same number. The function converts the strings “-INF”, “-Infinity”, “INF”, and “Infinity” to negative and positive infinity, respectively. Numbers outside the range of the scripting language are clipped to negative of positive infinity. getVariableAsBoolean( variable Same as getVariableAsString() but interprets the string as a : String, s : Switch ) : Boolean Boolean value. The preferred strings are “True” and “False”. If these do not match, a case insensitive comparison is tried, then simply “t” or “f”, and finally non-zero and zero integer representations. getVariableAsDate( variable : String, s : Switch ) : Date Same as getVariableAsString() but interprets the string as a date-time in the ISO 8601 format. The class of the returned Date object is specific to the scripting environment in use. Activating fonts activateFonts( targetPath : String ) Activates the fonts residing in this job folder by copying them to the specified target location. This function does nothing if the receiving job is an individual file or if the job folder doesn’t contain any fonts. The target path specifies the folder in which the fonts will be copied, for example an application specific font folder. If this argument is 473 Enfocus Switch 10 missing, null or the empty string, the user’s default system font location is used instead. deactivateFonts( ) Undoes the effect of any prior invocations of activateFonts() in this entry point. If necessary this function is called automatically when exiting the entry point, however it is good programming style to call it explicitly. Automatic Job Completion The following function is provided to allow generating output jobs for the same input job during multiple subsequent entry point invocations. Normally an input job is removed when exiting the first entry point in which an output job is generated. setAutoComplete( Sets the auto-completion flag for the job to the specified value. auto-complete : If the auto-completion flag has a value of “false” when exiting the entry Boolean ) point, the job will stay in the input folder, even if any number of sendTo() functions have been called for the job during the entry point invocation. If the auto-completion flag has a value of “true” when exiting the entry point, and one or more sendTo() functions have been called for the job during the entry point invocation, the job will be removed from the input folder. This is the default behavior. At the start of each entry point invocation, the auto-completion flag is initialized to its default value of “true” for all jobs. Consequently the effect of the setAutoComplete() function is restricted to the current entry point invocation. Furthermore, since the auto-completion flag is checked only when exiting the entry point, the order in which the setAutoComplete() and sendTo() functions are called is of no importance. The auto-completion flag does not affect the behavior of the fail() functions. After calling a fail function for a job, the job will be removed from the input folder regardless of the value of the auto-completion flag. Occurrence class An instance of the Occurrence class represents a single item in a job’s occurrence trail, and allows retrieving the occurrence’s attributes. See job occurrence trail. Getting occurrence attributes getTimeStamp( ) : Date Returns the moment in time when this occurrence happened. The class of the returned Date object is specific to the scripting environment in use. 474 getType( ) : String Returns the occurrence type as a string (one of “Detected”, “Produced”, “Moved”, “Duplicated”, “Processed” or “Failed”). getModule( ) : String Returns the module or type of flow element causing this occurrence (same as the module attribute in a log message). getFlow( ) : String Returns the name of the flow causing this occurrence. Enfocus Switch 10 getElement( ) : String Returns the name of the flow element (as displayed in the canvas) causing this occurrence. getOrigin( ) : String Returns an indication of the origin of the job before it was injected in the flow by this occurrence. For example, a Submit point writes the absolute path of the original job (on the client machine) in this attribute. This attribute is meaningful only for ‘Produced’ occurrence types. This function returns the empty string for other occurrence types. getOutFolder( ) : String Returns the name of the folder (as displayed in the canvas) that received the job as a result of this occurrence. This attribute is meaningful only for ‘Produced’, ‘Moved’, and ‘Processed’ occurrence types. This function returns the empty string for other occurrence types. Note: This function returns the outelement attribute. getConnectionType( ) : Returns the type of the connection that carried the job as a result of String this occurrence, as one of the following strings: “Noop”, “Move”, “Filter”, “Traffic-data”, Traffic-log”, “Traffic-datawithlog”. This attribute is meaningful only for ‘Produced’, ‘Moved’, and ‘Processed’ occurrence types. This function returns the empty string for other occurrence types. getSuccessLevel( ) : Number Returns the success level of the job when carried over a traffic-light connection, as an integer (success = 1, warning = 2, error = 3). This attribute is meaningful only if the job was actually carried over a traffic-light connection. If the getConnectionType() does not return a string that starts with “Traffic”, getSuccessLevel() returns zero. getBasicMessage( ) : String Returns the basic message associated with this occurrence, without argument replacement or localization. The basic message is not intended for human consumption, but can be used in a script to discriminate between various causes of an error, for example (similar to an error code). This attribute is meaningful only for ‘Failed’ occurrence types. This function returns the empty string for other occurrence types. Note: Note: this function returns the operation attribute without further processing. getLocalizedMessage( Returns the message associated with this occurrence after argument ) : String replacement and localization. The localized message is intended for human consumption. This attribute is meaningful only for ‘Failed’ occurrence types. This function returns the empty string for other occurrence types. 475 Enfocus Switch 10 Note: This function returns the localized message derived from the operation attribute and the relevant message arguments using the algorithm used for log messages. List classes: ConnectionList, JobList Due to implementation limitations Switch is unable to return an array of Connection, Job or Occurrence instances. Instead, it returns a helper object of the corresponding list class, that is, ConnectionList, JobList or OccurrenceList respectively. These helper classes offer the following functions to access the items in the list. getCount( ) : Number Returns the number of items in the list (may be zero). getItem( index : Number) : Connection Returns the item in the list at the specified or Job or Occurrence (zero-based) index. If the index is out of range, the function returns null. length : Number This is a read-only property (rather than a function) that contains the value returned by getCount(). at( index : Number) : Connection or Job Returns the same value as getItem(index). or Occurrence 18.8 Metadata module Map class A Map object (that is, an instance of the Map class) holds a set of mappings from an XML namespace prefix to a full namespace URI. These mappings are used for resolving namespace prefixes in XML element and attribute names. See also XPath expressions, XMP location paths and the Node class in the XML module. Constructing Map objects There is no direct constructor for Map objects. Instead the Dataset class (in the Metadata module) and the Document class (in the XML module) offer functions to obtain a new Map object. Each class offers two distinct functions: • createEmptyMap( ) returns a new empty prefix map object. • createDefaultMap( ) returns a new prefix map object that already contains all mappings that occur in the XML document associated with the receiving object In case the script developer can easily determine the set of prefix mappings used by a script, the preferred mechanism is to add that list of prefix mappings to a newly obtained empty prefix map. In reality however this is not always practical. For example, a query expression (with prefixes) might be provided by a user at run-time and the script developer may wish to avoid exposing the complexity involving namespaces to the user. 476 Enfocus Switch 10 With the default prefix map the query expression can use any of the prefixes that occur in the backing file. While this is certainly not according to the book, the conventions for the use of prefixes are often stable enough to allow this sort of convenience trick. Adding/accessing mappings in a Map object put( prefix: String, namespaceURI: String ) Adds the specified prefix to URI mapping to the map, replacing the previous mapping for this prefix if any. get( prefix: String ) : String Returns the URI mapped to the specified prefix or null if there is no mapping for the prefix. Dataset class The Dataset class is a base class that offers a number of functions common to all types of metadata datasets. There is a separate inheriting class for each metadata data model supported by the scripting API: XML data model, JDF data model, XMP data model, and Opaque data model. Instances of the Dataset class (or rather of its inheriting classes) can be obtained with the Job.createDataset(), Job.getDataset() and Job.getEmbeddedDataset() functions in the flow element module. See also external metadata and embedded metadata. Getting dataset attributes getPath( ) : String For an external dataset, returns the absolute file path (including filename and extension) for the backing file for this dataset. This is used predominantly for placing the backing file in the correct location while creating a new dataset. However it might conceivably be used to bypass the data model access mechanisms and provide direct access to the backing file. For an embedded dataset, returns the absolute path to the file that embeds the metadata (rather than the metadata packet as a separate entity). hasValidData( ) : Boolean Returns true if the backing file exists, can be read, and conforms to the syntax and semantics of the dataset’s underlying data model. Otherwise returns false. getModel( ) : String Returns the name of the data model for the dataset ("XML", "JDF", "XMP" or "Opaque"). In effect this determines the actual class of this instance. Returns true if this data set corresponds to embedded metadata, i.e. if it has been returned by the Job.getEmbeddedDataset() function. Otherwise returns false. isWritable( ) : Boolean Returns true if this data set supports updating its corresponding embedded metadata (only embedded metadata can be updated). Otherwise returns false. 477 Enfocus Switch 10 Creating prefix maps createEmptyMap( Returns a new empty prefix map object. ) : Map createDefaultMap( Returns a new prefix map object that already contains all mappings that ) : Map occur in the backing file. For an Opaque dataset this function returns an empty prefix map object. For XML and JDF datasets, the default namespace (if any) is included in the default map with one or more special prefixes. This allows XPath queries to refer to the default namespace using these special prefixes. (XPath does not support the default namespace concept, so you always have to explicitly provide a namespace prefix). The following table summarizes the contents of the default map for each data model. Data model Default namespace defined in backing file Namespace prefixes defined in the backing file XML Included in default map Included in default map using with special prefixes the prefix specified in “default_switch_ns” and xmlns:<prefix> attribute “dn” unless these prefixes are otherwise defined in the file JDF Included in default map with special prefix “jdf” unless this prefix is otherwise defined in the file XMP Not applicable Opaque Not applicable Not applicable XML data model The XML data model describes a class that inherits all functions described in the Dataset class. Query language The XML data model expects a well-formed XML backing file ( refer to the XML 1.0 specification), which is parsed with support for namespaces into an XML document object model (DOM). The object model is then queried with an XPath 1.0 expression using the root node as the context node. Namespaces Namespace prefixes in the query expression are resolved into namespace URIs using the prefix map provided to the query functions as a second argument. If the map argument is omitted or null, the default prefix map is used for resolving prefixes. 478 Enfocus Switch 10 Result data types The value of an XPath expression can have several data types (a node set with several elements, the text value of an attribute, a number returned by the count() function, the Boolean result of a comparison). The value is converted to one of the data types string, number, or Boolean using XPath 1.0 semantics – which may very well differ from the conversion semantics in the scripting language. For example the XPath 1.0 conversion from string to Boolean returns true for all non-empty strings (including the string “false”). Query functions evalToString( xpath : String, prefix-map : Map ) : String Evaluates the XPath 1.0 expression against the backing file and returns the result after converting it to a string value with the XPath 1.0 string() function. evalToNumber( xpath : String, prefix-map: Map ) : Number Evaluates the XPath 1.0 expression against the backing file and returns the result after converting it to a numeric value with the XPath 1.0 number() function. evalToBoolean( xpath : String, prefix-map: Map ) : Boolean Evaluates the XPath 1.0 expression against the backing file and returns the result after converting it to a Boolean value with the XPath 1.0 boolean() function. JDF data model The JDF data model describes a class that inherits all functions described in the Dataset class. Query language The JDF data model expects an XML backing file that conforms to the JDF 1.3 specification. A JDF instance describes a nested structure of JDF nodes and their resources. The result is a nicely structured XML file which can be validated by an XML schema. The JDF specification uses XPath 1.0 notation to refer to items in a JDF instance. Thus it is appropriate to use this notation to locate items in a query. The current implementation of the JDF data model in fact considers the underlying XML file with some limited JDF-specific functionality layered on top. Namespaces Namespace prefixes in the query expression are resolved into namespace URIs using the prefix map provided to the query functions as a second argument. If the map argument is omitted or null, the default prefix map is used for resolving prefixes. A JDF instance is required to set its default namespace to the JDF namespace, and all XML elements and attributes described in the JDF specification reside in this namespace. XPath 1.0 however does not have the concept of a default namespace. Therefore the default prefix map for the JDF data model includes a definition of the “jdf” prefix (in addition to any other prefixes defined in the backing file), and JDF query expressions should explicitly use this prefix. A JDF instance may contain elements or attributes in other namespaces, allowing third-party extensions to the specification. The query functions allow providing a prefix map to enable accessing these extensions. 479 Enfocus Switch 10 Generic XPath querying The JDF data model implementation offers two types of query mechanisms. The first mechanism allows evaluating an arbitrary XPath 1.0 expression with the same semantics as those in the XML data model, i.e. the expression's value is converted to one of the data types string, number or Boolean using XPath 1.0 semantics. This generic mechanism supports complex queries that may involve multiple elements or attributes (for example, counting the number of elements in a particular node set). evalToString( xpath : String, prefix-map : Map ) : String Evaluates the XPath 1.0 expression against the backing file, and returns the result after converting it to a string value with the XPath 1.0 string() function. evalToNumber( xpath : String, prefix-map: Map ) : Number Evaluates the XPath 1.0 expression against the backing file, and returns the result after converting it to a numeric value with the XPath 1.0 number() function. evalToBoolean( xpath : String, prefix-map: Map ) : Boolean Evaluates the XPath 1.0 expression against the backing file, and returns the result after converting it to a Boolean value with the XPath 1.0 boolean() function. JDF data type querying The second query mechanism uses an XPath 1.0 location path (not an arbitrary expression) to indicate a single XML attribute or a single XML element, and thus to indicate a single text value. This text value is then interpreted and converted to a script object according to the JDF data type semantics described in the JDF specification. The current implementation supports a limited subset of the JDF data types, as described in the following table. Query function Supported JDF data types getString() string, NMTOKEN, telem, text any other data type (since everything is stored as text) getNumber() double, integer, LongInteger getBoolean() boolean getDate() date, dateTime, gYearMonth The query functions described below return the null object (as opposed to an empty string or a zero number) if: • The location path does not evaluate to a single attribute or to a single element; for example it evaluates to an empty node set, to a node set with two elements, to a comments node or to a number. • The text value of the indicated attribute or element does not conform to the format for the requested data type. getString( xpath : String, prefix-map : Map ) : String 480 Returns the text value of the item at the specified XPath 1.0 location path. The text content of an element is concatenated Enfocus Switch 10 into a single string. Leading and trailing whitespace is removed. Whitespace including linebreaks may occur in the body of the string. getNumber( xpath : String, prefix-map: Map ) : Number Same as getString but interprets the string as a decimal number with support for negative and positive infinity (-INF and INF) as per the JDF specification. Numbers outside the range of the scripting language are clipped to negative of positive infinity. getBoolean( xpath : String, prefix-map: Map ) : Boolean Same as getString but interprets the string as a boolean (“true” or “false”) as per the JDF specification. getDate( xpath : String, prefix-map : Map ) : Date Same as getString but interprets the string as a date and/or a time according to the JDF specification (based on the ISO 8601 format). The class of the returned Date object is specific to the scripting environment in use. XMP data model The XMP data model describes a class that inherits all functions described in the Dataset class. Query language The XMP data model expects a backing file that conforms to the Adobe XMP specification dated June 2005. The XMP backing file is parsed into an XMP-specific document object model. This XMP object model is then queried with an XMP location path (which is a small subset of XPath 1.0). The standard built-in aliases for XMP property names are automatically resolved. Note: An XMP packet or file is a subset of RDF serialized to XML. Because a particular RDF construct (and thus an XMP property) can be serialized to XML in various ways, it is virtually impossible to correctly query an XMP file using generic XPath 1.0 expressions. Namespaces Namespace prefixes in the XMP location path are resolved into namespace URIs using the prefix map provided to the query functions as a second argument. If the map argument is omitted or null, the default prefix map is used for resolving prefixes. The query functions do not provide a separate argument to specify the top-level namespace (also called the “schema namespace” in XMP). This means that all property names in the XMP location path (including the top-level property name) must have a namespace prefix. The default prefix map for a dataset with this model includes all mappings for the standard XMP namespaces, augmented with any extra mappings that occur in the backing file. Querying existence hasLeaf( xmp-path : String, prefix-map : Map ) : Boolean Returns true if there is a leaf property at the XMP location path. 481 Enfocus Switch 10 hasStruct( xmp-path : String, prefix-map : Returns true if there is a structure property at the Map ) : Boolean XMP location path. hasArray( xmp-path : String, prefix-map : Map ) : Boolean Returns true if there is an array property at the XMP location path. hasAltTextArray( xmp-path : String, prefix-map : Map ) : Boolean Returns true if there is an Alt-Text array property at the XMP location path (that is, an array property of type “Alt” with leaf properties as children). getArrayItemCount( xmp-path : String, prefix-map : Map ) : Number Returns the number of items in the array at the XMP location path or 0 if there is no such property or if it is not an array. Querying values The query functions described below return the null object (as opposed to an empty string or a zero number) if: • The location path does not point to a leaf property (i.e. the property is not present or it is present but it is an array or a struct rather than a leaf). • The string value does not conform to the format for the requested data type. getString( xmp-path : String, prefix-map : Map ) : String Returns the value of the leaf property at the specified XMP location path. getNumber( xmp-path : String, prefix-map: Map ) : Number Same as getString but interprets the string as a decimal number (with or without a decimal point) or as a rational number (two decimal integer numbers separated by a forward slash). For example, “1.25” and “5/4” represent the same number. getBoolean( xmp-path : String, prefix-map: Map ) : Boolean Same as getString but interprets the string as a Boolean value. The preferred strings are “True” and “False”. If these do not match, a case insensitive comparison is tried, then simply “t” or “f”, and finally non-zero and zero integer representations. getDate( xmp-path : String, prefix-map : Map ) : Date Same as getString but interprets the string as a date-time in the ISO 8601 format. The class of the returned Date object is specific to the scripting environment in use. Querying localized text Localized text properties are stored in alt-text arrays. They allow multiple concurrent localizations of a property value, for example a document title or copyright in several languages. The most important aspect of these functions is that they select an appropriate array item based on one or two RFC 3066 language tags. One of these languages, the "specific" language, is preferred and selected if there is an exact match. For many languages it is also possible to define 482 Enfocus Switch 10 a "generic" language that may be used if there is no specific language match. The generic language must be a valid RFC 3066 primary subtag or the empty string. For example, a specific language of "en-US" should be used in the US, and a specific language of "en-UK" should be used in England. It is also appropriate to use "en" as the generic language in each case. If a US document goes to England, the "en-US" title is selected by using the "en" generic language and the "en-UK" specific language. It is considered poor practice, but allowed, to pass a specific language that is just an RFC 3066 primary tag. For example "en" is not a good specific language, it should only be used as a generic language. Passing "i" or "x" as the generic language is also considered poor practice but allowed. RFC 3066 language tags must be treated in a case insensitive manner. The XMP specification defines an artificial language, "x-default", that is used to explicitly denote a default item in an alt-text array. The localized text functions have several special features related to the x-default item. The selection of the array item is performed as follows: • Look for an exact match with the specific language. • If a generic language is given, look for a partial match. • Look for an x-default item. • Choose the first item. A partial match with the generic language is where the start of the item's language matches the generic string and the next character is '-'. An exact match is also recognized as a degenerate case. It is fine to pass x-default as the specific language. In this case, selection of an x-default item is an exact match by the first rule, not a selection by the 3rd rule. The last 2 rules are fallbacks used when the specific and generic languages fail to produce a match. getLocalizedText( xmp-path : String, prefix-map : Map, genericLang : String, specificLang: String ) : String Returns the localized string in the specified alt-text array selected according to the rules described above or null if there is no such string (even no default). Updating properties The functions described in this section are available only for writable datasets, that is, datasets for which the isWritable() function returns true. Invoking any of these functions on a non-writable dataset is a programming error and has unpredictable results. Finishing finishWriting( ) Flushes any unsaved metadata changes to the backing file, closes the backing file, and turns the dataset into a read-only dataset. From now on, the isWritable() function returns false and further updates are impossible. A writable dataset keeps its backing file open for updating after the dataset is created. Since the backing file is the current job (or a file in the job folder), it is necessary to close it before attempting to move or process job in any way. In practice it is seldom necessary to explicitly call the finishWriting() function because Switch automatically invokes it on the embedded dataset for a job at the following times: • When one of the Job.sendTo() or Job.fail() functions is invoked on the job. 483 Enfocus Switch 10 • When the entry point in which the dataset was created returns. Setting leaf values The set functions described below set the value of a leaf property. They succeed if: • The specified property exists and it is a leaf property: the property value is updated. • The specified property does not exist, but its immediate parent does exist and it is a struct: the property is created with the specified name and its value is set. • The specified property does not exist, but its immediate parent does exist and it is an array: the property is created with the specified index and its value is set; any missing array items (that is, siblings of the property with a lower index) are created as well and set to an empty string value. setString( xmp-path : String, prefix-map Sets the value of the leaf property at the specified : Map, value : String ) : Boolean XMP location path to the specified string. Returns true if successful, false otherwise. setNumber( xmp-path : String, prefix-map : Map, value : Number, precision : Number ) : Boolean Same as setString but produces a decimal representation of the number; “precision” indicates the number of digits after the decimal point; if precision is zero the representation has no decimal point (that is, this is suitable for an integer number). setBoolean( xmp-path : String, prefix-map : Map, value : Boolean ) : Boolean Same as setString but produces the string “True” or “False” depending the Boolean value. setDate( xmp-path : String, prefix-map Same as setString but produces a date-time : Map, value : Date ) : Boolean representation in the ISO 8601 format. The class of the Date object is specific to the scripting environment in use. Note: To set the value of a child property, first verify that its parent exists, and if not, create the parent with the set functions described in the following section. It may be necessary to apply this process recursively to create the parent’s parent. Note: To set the value of an item in an alt-text array, use the setLocalizedText() function described later. The above set functions do no allow a language selector in the specified XMP location path. Setting localized text setLocalizedText( xmp-path : String, prefix-map : Map, value : String, genericLang : String, specificLang: String ) : Boolean 484 Modifies the value of a selected item in an alt-text array. Creates an appropriate array item if necessary, and handles special cases for the x-default item. If the selected item is from a match with the specific language, the value of that item is modified. If the existing value of that item matches the existing value of the x-default item, the x-default item is also Enfocus Switch 10 modified. If the array only has 1 existing item (which is not x-default), an x-default item is added with the given value. If the selected item is from a match with the generic language and there are no other generic matches, the value of that item is modified. If the existing value of that item matches the existing value of the x-default item, the x-default item is also modified. If the array only has 1 existing item (which is not x-default), an x-default item is added with the given value. If the selected item is from a partial match with the generic language and there are other partial matches, a new item is created for the specific language. The x-default item is not modified. If the selected item is from the last 2 rules then a new item is created for the specific language. If the array only had an x-default item, the x-default item is also modified. If the array was empty, items are created for the specific language and x-default. Returns true if successful, false if the specified property does not exist or is not an Alt-Text array. Adding structs and arrays The set functions described below create struct or array properties. They succeed if: • The specified property exists and it is has the appropriate type: nothing happens. • The specified property does not exist, but its immediate parent does exist and it is a struct: the property is created with the appropriate type. • The specified property does not exist, but its immediate parent does exist and it is an array: the property is created with the specified index and the appropriate type; any missing array items (that is, siblings of the property with a lower index) are created as well with the same type. setStruct( xmp-path : String, prefix-map Creates a struct property at the specified XMP : Map ) : Boolean location path. Returns true if successful, false otherwise. setUnorderedArray( xmp-path : String, prefix-map : Map ) : Boolean Creates an unordered array property (“Bag”) at the specified XMP location path. Returns true if successful, false otherwise. setOrderedArray( xmp-path : String, prefix-map : Map ) : Boolean Creates an ordered array property (“Seq”) at the specified XMP location path. Returns true if successful, false otherwise. setAlternateArray( xmp-path : String, prefix-map : Map ) : Boolean Creates an alternate array property (“Alt”) at the specified XMP location path. Returns true if successful, false otherwise. Note: To change the type of a property between leaf, array and struct, first remove the property and then create it again with the appropriate set function. 485 Enfocus Switch 10 Removing properties removeProperty( xmp-path : String, Removes the property at the specified XMP location path prefix-map : Map ) and the complete sub-tree rooted at the property. If the property does not exist the function does nothing. Opaque data model The Opaque data model describes a class that inherits all functions described in the Dataset class; it does not add any functions to those of the Dataset class. The Opaque data model does not provide access to its contents other than the backing file as a whole. This data model can be used to associate a chunk of arbitrary, non-interpreted data with a job. FileStatistics class The FileStatistics class allows retrieving certain statistics about file contents for a number of supported file formats. The class does not allow modifying file contents. Each FileStatistics instance references a particular file, which may be any file on the local file system (whether it is a job or not). The FileStatistics class does not support folders. Constructing FileStatistics( file-path : String Constructs a FileStatistics instance associated with a file ) : FileStatistics specified through its absolute file path. If the specified path references a folder rather than file, the constructed instance behaves as if the referenced file doesn’t exist. Getting file system attributes The functions in this section work independently of the file’s file format. 486 getPath( ) : String Returns the absolute file path. getName( ) : String Returns the filename including filename extension if present. getNameProper( ) : String Returns the filename excluding filename extension. getExtension( ) : String Returns the filename extension, or the empty string if there is none. getMacType( ) : String Returns the Mac file type code as a 4-character string if available, otherwise the empty string. getMacCreator( ) : String Returns the Mac creator code as a 4-character string if available, otherwise the empty string. isType( ext : String ) : Boolean Returns true if the file matches the specified file type, specified as a filename extension, and false otherwise. A file Enfocus Switch 10 matches if its filename extension and/or its Mac file type (after conversion) match the specified filename extension. This function does not examine the file contents. isFile( ) : Boolean Returns true if the file exists, false otherwise. getByteCount( ) : Number Returns the size in bytes of the file, or zero if the file doesn’t exist. getCreated( ) : Date Returns the creation time of the file, or null if the file doesn’t exist. getModified( ) : Date Returns the last modification time of the file, or null if the file doesn’t exist. Accessing embedded metadata getEmbeddedDataset( Returns a read-only embedded metadata dataset object with the XMP ) : Dataset data model for the metadata embedded in the file, or null if the file doesn’t exist. If the file exists but it has no supported embedded metadata, the function returns a valid but empty dataset. The backing file path for the dataset points to the file. Metadata may be embedded in the file as an XMP packet and/or as binary EXIF or IPTC tags. Metadata fields from multiple sources are synchronized into a unified XMP data model. See supported file formats for more information. This function behaves similarly to the Job.getEmbeddedDataset() function; it supports the same file and metadata formats and performs the same synchronizations. The advantage is that it can be used with any file (for example, to iterate over all files inside a job folder). It does not however allow metadata updates (it always returns a read-only dataset) and it does not support folders (i.e. it doesn’t look for an appropriate backing file inside a folder). Recognizing file format The functions in this section recognize file format by looking at the file contents. The current implementation supports the following formats: Filename extension Description AI Adobe Illustrator (internal format is PDF) AVI Video clip EPS Encapsulated PostScript INDD Adobe InDesign JPEG JPEG image 487 Enfocus Switch 10 Filename extension Description MOV QuickTime movie MP3 MP3 sound PDF Adobe PDF (Portable Document Format) PNG PNG image PS Adobe PostScript PSD Adobe Photoshop TIFF TIFF image WAV Wave sound getFileFormat( ) : String Returns the format of the file contents (as one of the strings in the first column of the table above), or the empty string if the format is not recognized or if the file doesn’t exist. This function checks for all supported file formats, so it may be a bit slow. isFileFormat( format : String ) : Boolean Returns true if the file exists and its contents has the specified format (as one of the strings in the first column of the table above); otherwise it returns false. This function is faster than getFileFormat() since it has to check for only a single file format. Getting contents statistics The functions in this section interpret the file contents to obtain certain file-format-specific statistics. The requested statistic is specified through its name (as defined for each format in subsequent sections). Each statistic has a well-defined data type (listed with its description). It is recommended to use the “get” function with the appropriate data type, but reasonable conversions between data types are supported. The functions return the null object (as opposed to an empty string or a zero number) if: • The file doesn’t exist. 488 • The requested statistic is unknown or unsupported for the file format. • The requested statistic is not present in the file or is not applicable to the file. • The result can’t be converted to the requested data type. getString( query : String ) : String Returns the requested statistic as a string. getStringList( query : String ) : String[ ] Returns the requested statistic as a list of strings. getNumber( query : String ) : Number Returns the requested statistic as a number. getBoolean( query : String ) : Boolean Returns the requested statistic as a Boolean. Enfocus Switch 10 getDate( query : String ) : Date Returns the requested statistic as a date-time. Data type conversions Statistic data String type Number Boolean String Straightforward Decimal number Interpret as representation in the XMP data model Integer Decimal representation of the Straightforward number False if zero; Not supported true if nonzero Rational Decimal floating point Straightforward representation of the number False if zero; Not supported true if nonzero Boolean “true” or “false” Straightforward Not supported Date ISO 8601 representation of the Not supported date-time 1 or 0 Not supported Date Interpret ISO 8601 date-time representation Straightforward A string list is converted to another data type by converting the first string in the list (if the list is empty, the conversion is not supported). Any other data type is converted to a string list by converting it to a string and forming a list of one item. Supported statistics Statistic name Data type Supported for Description NumberOfPages Integer All formats The number of pages in the document (or a value of one if the format doesn’t support multiple pages) SamplesPerPixel Integer JPEG, TIFF, PNG Number of components per pixel PixelXDimension Integer JPEG, TIFF, PNG Valid image width, in pixels PixelYDimension Integer JPEG, TIFF, PNG Valid image height, in pixels ColorMode Integer JPEG, TIFF, PNG The color mode used: 0 = Bitmap; 1 = Gray; 2 = Indexed color; 3 = RGB; 4 = CMYK; 7 = Multichannel; 8 = Duotone; 9 = Lab color ColorSpace Integer JPEG, TIFF, PNG Color space information: 1 = sRGB; 65535 = uncalibrated 489 Enfocus Switch 10 Statistic name Data type Supported for Description ICCProfile String JPEG, TIFF, PNG The name of ICC color profile used, if any Colorants String list TIFF A list of the names of all colorants for Duotone or Multichannel images; the list is empty for all other color models CellWidth Integer TIFF The width of the dithering or halftoning matrix used to create a dithered or halftoned bilevel file CellLength Integer TIFF The length of the dithering or halftoning matrix used to create a dithered or halftoned bilevel file TileWidth Integer TIFF The width (number of columns) of each tile TileLength Integer TIFF The length (number of rows) of each tile ColorIntent Integer PNG The sRGB rendering intent: 0 = Perceptual, 1 = RelativeColorimetric, 2 = Saturation, 3 = AbsoluteColorimetric 4 = invalid value 490 Version String PDF The version of the file format (for example “1.6”) PageWidth Rational PDF The width of the first page in the document, in points (derived from the media box) PageHeight Rational PDF The height of the first page in the document, in points (derived from the media box) PageLabels String list PDF A list of the page labels for all pages in the document, or null if none of the pages has a page label Colorants String list PDF A list of the names of all colorants as they appear in Separation and DeviceN color spaces and in page separation info dictionaries in the document Fonts String list PDF A list of the names of all fonts (without subsetting prefix) as they appear in font dictionaries in the document Enfocus Switch 10 Statistic name Data type Supported for Description SecurityMethod String PDF The method used to protect the document; possible values: "None", "Password", "Certificate", "LiveCycle" PDF media boxes The FileStatistics class offers the following additional statistics for the PDF file format: Statistic name Data type Description PageBoxesEqual Boolean True if all pages have identical page boxes; false otherwise (verifies media, crop, bleed, trim and art box) MediaBoxWidth Rational The width of the media box for the first page in the document, in points This is a synonym for the ‘PageWidth’ statistic MediaBoxHeight Rational The height of the media box for the first page in the document, in points This is a synonym for the ‘Pageheight’ statistic CropBoxWidth Rational The width of the crop box for the first page in the document, in points CropBoxHeight Rational The height of the crop box for the first page in the document, in points BleedBoxWidth Rational The width of the bleed box for the first page in the document, in points BleedBoxHeight Rational The height of the bleed box for the first page in the document, in points TrimBoxWidth Rational The width of the trim box for the first page in the document, in points TrimBoxHeight Rational The height of the trim box for the first page in the document, in points ArtBoxWidth Rational The width of the art box for the first page in the document, in points ArtBoxHeight Rational The height of the art box for the first page in the document, in points PDF/X version key The FileStatistics class offers the following additional statistics for the PDF file format: 491 Enfocus Switch 10 Statistic name Data type Description PDFXVersionKey String The contents of the PDF/X version key in the document, or the empty string if there is no such key; one of the following values may be returned: • PDF/X-1a:2001 • PDF/X-3:2002 • PDF/X-1a:2003 • PDF/X-3:2003 • PDF/X-4 • PDF/X-4p The PDF/X version key indicates a claim that the document conforms to the PDF/X specification, but it does not offer any guarantees PDF page content The FileStatistics class offers the following additional statistics for the PDF file format. Obtainging the information for these statistics requires parsing the complete page contents, so it might be time consuming. Statistic name Data type ColorSpaceFamilies String list Description A list of the names of all color space families actually used in the document’s page contents; the following names may be returned: DeviceGray, DeviceRGB, DeviceCMYK, CalGray, CalRGB, Lab, ICCBasedGray, ICCBasedRGB, ICCBasedCMYK, Indexed, Pattern, Separation, DeviceN. For Indexed or Pattern, the underlying color space families are also listed 492 TransparentColor Boolean True if the document’s page contents uses transparency for defining colors; false otherwise FontTypes String list A list of the names of all font types actually used in the document’s page contents; the following names may be returned: • TrueType • Type1 • Type3 • MultipleMaster Enfocus Switch 10 Statistic name Data type Description • Composite CP2 data model The CP2 data model (part of the metadata module) describes a class that inherits all functions of the XMP data model and all functions of the Dataset class. The following subsections describe the functions specific to the CP2 data model. Overview Since most Certified PDF 2 information is stored as XMP, the “CP2” data model inherits from the “XMP” data model. Thus any XMP data model function can be invoked on a CP2 dataset as well. A CP2 dataset is always embedded. It is not possible to create an external dataset with this data model. A CP2 dataset can either be read-only or writable. When a writable CP2 dataset is finalized, an appropriate Certified PDF 2 signature is written to the backing file - in addition to updating the XMP and CP2 data structures. A CP2 dataset can be obtained for any PDF file, whether it is a valid Certified PDF 2 file or not. This allows converting a regular PDF file into a Certified PDF 2 file. A writable CP2 dataset can be “cleared”, removing all Certified PDF 2 related information. This allows converting a Certified PDF 2 file into a regular PDF file. File formats other than PDF are not supported, since Certified PDF 2 is tied to PDF. Effects on the scripting API Supporting the new CP2 data model requires: • Adding semantics to a limited number of existing functions. • Offering a range of new classes (and corresponding functions). Compatibility GWG Proof of Preflight Since a PDF file with a valid GWG Proof of Preflight ticket is – by definition – also a valid Certified PDF 2 file, the scripting API presented in this document fully supports the GWG Proof of Preflight specification. The scripting API does not support Certified PDF 1 files. In other words, Certified PDF 1 files are treated as regular PDF files, and any Certified PDF 1 data structures are ignored. Certified PDF 1 Accessing XMP metadata Certified PDF 2 metadata After obtaining a CP2 dataset, the Certified PDF 2 metadata stored in the XMP packet must be accessed exclusively through the functions specific for the CP2 data model. Accessing any XMP metadata fields in the CP2 namespace using the regular XMP access functions has undefined results. Note: This allows the CP2 data model implementation to cache Certified PDF 2 information without immediate write-through to the XMP fields. 493 Enfocus Switch 10 Other XMP Metadata It is perfectly valid however to access any other XMP metadata (i.e. unrelated to Certified PDF 2) using the regular XMP access functions on the CP2 dataset, even intermixed with the use of functions specific for the CP2 data model. Note: This requires the CP2 data model implementation to update the Certified PDF 2 information independent of the rest of the XMP packet or – if this is not possible – to detect any regular XMP updates and synchronize when needed. File level operations Validity The CP2 data model offers functions to determine whether the underlying file has a valid Certified PDF 2 signature, and whether it contains a valid Certified PDF 2 data structure even if the signature is invalid. Creating a Certified Converting a regular PDF file to a Certified PDF 2 file requires no extra functions; it can be accomplished as follows: PDF 2 file • Obtain a writable CP2 dataset for the PDF file. • Add any relevant Certified PDF 2 metadata information to the dataset using the CP2 data model functions described later. • Explicitly finish writing on the dataset or exit the entry point. Removing Certified Converting a Certified PDF 2 file to a regular PDF file can be accomplished PDF 2 information as follows: • • • Changing the PDF file Obtain a writable CP2 dataset for the Certified PDF 2 file. Call the removeCertifiedPDF() function on the CP2 dataset. Explicitly finish writing on the dataset or exit the entry point. The scripting API does not offer any functions to update portions of a PDF file other than the changes directly related to the Certified PDF 2 data structures (including the XMP packet and the Certified PDF 2 signature). Also, in an entry point that obtains a writable CP2 dataset on the incoming PDF file, it is not allowed to invoke an external application that changes that PDF file (or keeps it open for update without actually modifying it). This is because: • • A writable CP2 dataset keeps the underlying PDF file open for update. The process of writing the changes back to a temporary copy of the file is not under the script programmer’s control. Thus cannot be coordinated with the external application. hasValidSignature( ) : Boolean [R] Returns true if the backing file for which this dataset was created has a valid Certified PDF 2 signature; returns false if the file has no conforming signature or if the signature is no longer valid because the file was modified. hasPreviousSessions( ) : Boolean [R] Returns true if the backing file for which this dataset was created contains a valid Certified PDF 2 data structure with at least one session File level validity 494 Enfocus Switch 10 (not counting any sessions automatically added while obtaining the dataset); returns false otherwise. If hasValidSignature() returns true, hasPreviousSessions() should return true as well (unless some application has created a corrupt Certified PDF 2 file). However if hasValidSignature() returns false, hasPreviousSessions() may still return true. Removing Certified PDF 2 removeCertifiedPDF2( Removes all metadata related to Certified PDF 2 from the dataset and fullSave : Boolean ) causes the dataset to subsequently behave as a regular XMP dataset. When finishWriting() is called (or the entry point exits), any data structures [w] related to Certified PDF 2 are removed from the underlying file. If fullSave is false or missing, these changes are affected through incremental save, which means the file will contain the original information and overhead. If fullSave is true, a full save is performed, eliminating any information that is no longer referenced and thus reducing overhead. After this function was invoked on a dataset, invoking any of the CP2-specific functions on the dataset is a programming error and has unpredictable results. Sessions A session represents the work done to a Certified PDF 2 file between saves. Active session When obtaining a CP2 dataset, a new session object is automatically created and stored in the dataset. This session is called the "Active" session and it contains any changes made to the CP2 dataset during this entry point. The session is automatically completed when the dataset is finished for writing (explicitly or by exiting the entry point). Delaing with uncertified files If a previously valid Certified PDF 2 file has been updated by a nonconforming application, its XMP metadata do not contain session objects for each performed save. When obtaining a writable CP2 dataset for such a file, session objects are automatically created for each uncertified save, before creating the active session. Note: For implementation, use a subset of the PitStop algorithms to determine the missing sessions, without considering any Certified PDF 1 information; create minimal sessions (containing required properties only) with editing zone “All”. Updating sessions Once a session has been finished it can no longer be modified. The active session is the only editable session object. Any session can be removed from the dataset. However when a session is removed, all previous sessions are automatically removed as well. In addition any certificates added during the removed sessions are automatically removed as well. As an alternative to removing a session completely (and as an exception to the rule of not modifying previous sessions), it is possible to strip a session. Stripping a session removes all optional session properties while leaving any certificates intact. 495 Enfocus Switch 10 Note: After implementation, the scripting API should remove any PDF objects associated as private data with removed or stripped sessions or with removed certificates. getAllSessions( ) : Returns a list of all sessions in the dataset, including the active session, in order of occurrence (that is, the active session is the last session in the list). SessionList [R] getPreviousSessions( ) : SessionList [R] Returns a list of the sessions that were already in the backing file before the dataset was created, that is, excluding the active session and any other automatically added sessions. The list is in order of occurrence (that is, the most recent session is listed last). The list may be empty. getActiveSession( ) : Session Returns the active session; this is the only editable session. [R] touchZones( zones : String Notifies the dataset that the specified editing zone(s) have been touched in the PDF file during the active session. This function | String[] ) : Boolean [W] performs three actions: • Add the specified zone(s) to the editing zones of the active session. • Set the state of any certificate with overlapping zones and residing in the active session to “Unknown”. • Cause any certificate with overlapping zones and residing in previous sessions to become dirty (there is no actual change in the data structure, just in the internal caches for the dataset). The function returns true if any certificate was affected, false otherwise. removeSessionsIncluding( index : Number ) [W] Removes the session at the specified zero-based index (in the list returned by getAllSessions) and all previous sessions. All certificates associated with these sessions and any orphaned users are removed as well. stripSessionAt( index : Number ) [W] Removes all optional information from the session at the specified zero-based index (in the list returned by getAllSessions). If the associated user becomes orphaned, it is removed as well. Certificates A CP2 dataset can contain zero or more certificates. Each certificate references the session during which it was created. Adding certificates Certificate class 496 New certificates can be added to a writable dataset. A new certificate is automatically associated with the active session. The class ID of a new certificate must be specified when the certificate object is constructed which cannot be changed any time later. The scripting API does not support access to class properties in certificates. Enfocus Switch 10 Updating certificates Certificates other than those associated with the active session cannot be updated. It is possible however to completely remove any certificate. Note: After implementation, the scripting API should remove any PDF objects associated as private data with removed certificates. The scripting API does not support influencing the order of certificates. Proof of Preflight certificate When obtaining a CP2 dataset for a PDF file that contains a GWG Proof of Preflight ticket without a corresponding preflight certificate, a new preflight certificate is automatically created and stored in the dataset. Depending on implementation issues, such auto-generated preflight certificate may be associated with the active session or with a previous session. getAllCertificates( ) Returns a list of all certificates in the dataset, including any certificates in : CertificateList [R] the active session, in order of appearance in the dataset. The list may be empty. addNewCertificate( Creates a new certificate of the specified vendor-neutral class, associates classID : String ) : it with the current session, adds it to the dataset and returns a reference to the new certificate. Certificate [W] A certificate class associates additional semantics with a particular type of certificate. Even if the scripting API does not support access to the class properties that may be defined for certain certificate classes, it is important to specify the appropriate class. For example, a preflight certificate may cause a GWG Proof of Preflight ticket to be written in the PDF file, while other certificates do not show this correspondence. The Certified PDF 2 specification describes two “built-in” classes, as described in the following table: classID (CP2:class_id) "" (the empty string) "Preflight" Description A generic certificate, without additional semantics A preflight certificate, which may correspond to a GWG Proof of Preflight ticket in the PDF file In many cases these built-in classes provide sufficient functionality. Third-party vendors may agree on other values for classID; it is recommended to register such other values with Enfocus to avoid name collisions. After adding a new certificate with this function, and before finishing the dataset (or exiting the entry point), the script must set the certificate’s required properties (see "Required and Automatic Properties" section below) to a non-empty value. Alternatively the script may remove the certificate. Failing to do either of these is a programming error and has unpredictable results. Note: The built-in classID values are easily mapped to one of the built-in C++ certificate classes. However supporting other classID values requires a C++ certificate class with dynamic classID (but without support for accessing 497 Enfocus Switch 10 class properties). Such a class may need to be implemented within the toolkit (so that special hacks can be applied). removeCertificateAt( Removes the certificate at the specified zero-based index (in the list index : Number ) returned by getAllCertificates). [W] After completion of this function, the indexes for the remaining certificates may have shifted and references to the removed certificate may have become invalid. Using such invalid references is a programming error and has unpredictable results. Users A CP2 dataset can contain zero or more user objects. Each session can reference a user; multiple sessions can share the same user. Active user There is a function to create a user object for the active session. If the specified user turns out to have the same properties as one of the users already present in the CP2 dataset, the active session is updated to reference that existing user. Otherwise a new user object is automatically added to the dataset. Updating users Only active users can be updated. When a user is no longer referenced by any session (because the referencing sessions have been stripped or removed), the “orphaned” user object is automatically removed from the dataset. Note: The C++ toolkit deals with users in a slightly different way; the scripting API implementation will have to cache the user object and associate either the new object or an existing user object with the active session when the session is finalized. getAllUsers( ) : UserList [R] Returns a list of all users in the dataset, including the active user if any, in arbitrary order. The list may be empty. addActiveUser( ) : User [W] If the active session has an associated user, this function returns it. If the active session has no associated user, this function creates a new user object, associates it with the active session and returns a reference to it. removeActiveUser( ) : User [W] Removes the active user from the dataset and dissociates the active session from any user. Required and automatic properties Session, user and certificate objects have optional and required properties, as stated in the Certified PDF 2 file format specification. Automatic properties 498 The scripting API automatically generates appropriate values for most (but not all) required properties and for some optional properties. Some of these automatic properties are not even exposed to the script programmer. Others are available for reading but can’t be changed under the script programmer’s control. The following table lists the automatic properties and corresponding details. Enfocus Switch 10 Object Session Property CP2:session_id Exposure Not exposed Session CP2:start_byte CP2:user_id_ref CP2:start_time Read-only CP2:end_time Session CP2:tool_id Read-only CP2:tool_version CP2:tool_desc CP2:appl_id User Certificate Certificate Other required properties CP2:appl_version CP2:appl_desc CP2:user_id CP2:session_id_ref CP2:time Not exposed Not exposed Read-only For sessions and users all required properties are automatic. For certificates however the required properties listed in the following table must be supplied by the script programmer; most even don’t have a default value. Object Certificate Property CP2:type_id Default value None CP2:type_version Value to be supplied by script CP2:type_desc CP2:impl_id Certificate CP2:impl_version CP2:statement_desc CP2:state “Unknown” Value can be overridden by script Certificate CP2:zones “All” Value can be overridden by script Editing zones Zones for which a certificate is sensitive A new certificate is automatically sensitive to all editing zones. If this is not changed, any zone touched in any following session makes the certificate dirty. It is advisable to narrow the certificate’s editing zones down to avoid it becoming dirty unnecessarily. Zones touched during a session The active session starts without any editing zones set. For each modification applied to the PDF file during that session, appropriate editing 499 Enfocus Switch 10 zones must be added. Adding an editing zone to a session has the following effect on any certificates that are sensitive to that zone: • If the certificate resides in a previous session it becomes dirty. This is a consequence of the definitions in the Certified PDF 2 file format specification; there is no need to update the certificate. • If the certificate resides in the active session, its state is automatically reset to “Unknown”. According to the Certified PDF 2 file format specification a certificate can never become dirty due to an editing zone listed for the session during which the certificate was added. Resetting the certificate state is the only way to indicate that the certificate may no longer represent the state of the file. Existing functions Job class The getEmbeddedDataset() function offers an additional optional argument and additional semantics related to Certified PDF 2. If the cp2 argument is false or missing, the function behaves as before. If the cp2 argument is true, the function returns a CP2 dataset if the backing file is a PDF file, otherwise it returns an XMP dataset. The behavior is summarized in the table below. A returned CP2 dataset adheres to all semantics of an XMP dataset. For example metadata fields from multiple sources are synchronized into a unified XMP data model. getEmbeddedDataset( writable: Boolean, cp2 : Boolean ) : Dataset When the getEmbeddedDataset() function is invoked on a job for the first time in a certain entry point, it returns a dataset of the type listed in the table below. If the function is called again on the same job in the same entry point, it returns the embedded dataset object that was created in the first call, ignoring the value of the “writable” and “cp2” arguments in the repeat calls. CP2 Writable File format False False False True Any Supported for update True True False True Type of dataset returned Read-only XMP Writable XMP Not supported for update Read-only XMP PDF Read-only CP2 Other than PDF Read-only XMP PDF Writable CP2 Other supported for update Writable XMP Read-only XMP Not supported for update Dataset class The following functions offer slightly expanded semantics. getModel( ) : String 500 Returns "CP2” for a CP2 dataset; otherwise behaves as before. Enfocus Switch 10 createDefaultMap( ) : Map For a CP2 dataset, the “cp2” prefix (with corresponding namespace) is always included in the map, even if the underlying XMP does not define it (because if does not contain Certified PDF 2 metadata or because it uses another prefix). Otherwise the function behaves as before. XMP data model The following functions offer slightly expanded semantics. For a CP2 dataset, an appropriate Certified PDF 2 signature is written to the backing file, in addition to updating the XMP and CP2 data structures. These changes are affected through incremental save. Otherwise, the function behaves as before. finishWriting( ) External datasets Since external datasets can never have the “CP2” data model, functions applying solely to external datasets are not affected by this specification. Specifically, the model arguments in the Job.createDataset() and Job.sendToLog() functions do not support “CP2”. Classes Changing CP2 metadata Function availability The functions described in this chapter are marked as presented in the following table. Marker [R] [W] Description Indicates a function that reads from the CP2 dataset but never changes it Indicates a function that changes (or may change) the CP2 dataset Availability The function is available for both read-only and writable datasets The function is available only for writable datasets Invoking a function marked with [W] on a read-only dataset is a programming error and has unpredictable results. Objects are references The objects (sessions, certificates, users, data maps and AltText objects) represent references to the corresponding objects in the dataset. Any change to an object immediately affects the dataset – assuming the change is allowed according to the rules set forth for each function. Note: The scripting API is constructed such that all objects – even new ones – are stored in the dataset before being returned to the script. There are no constructors, only factory methods that preserve this rule. Localized text The Certified PDF 2 specification supports localization by allowing several text properties to contain alternate text strings in multiple languages. The scripting API offers two ways to handle the values of such localized properties. 501 Enfocus Switch 10 Work with a single value For each localized property the scripting API offers a getter and a setter working with a single string value: • The getter returns one of the available alternates, selected by preference in the following order: the English language string, the default string, or any other language string. The getter returns a non-empty string as long as there is at least one alternate string. • The setter sets the specified string as the English language string and erases all other alternates (to avoid discrepancies between the meaning of existing alternates and the new string). This is the preferred mechanism for script programs running in an environment where localization in languages other than English is not relevant. Work with all alternates For each localized property the scripting API also offers a getter that returns an AltText object, representing the complete set of alternate strings. The AltText class offers methods to access any language alternate, both for reading and writing. An AltText object serves as a reference to its underlying localized property, so it can be used to update the property. Consequently there are no setters accepting an AltText object. This is the preferred mechanism for script programs running in an environment that needs localization in languages other than English. Session class A Session object represents a session stored in a CP2 dataset. Getters [R] getStartTime( ) : Date Returns the time when this session was started (CP2:start_time), or null if the property is absent. getEndTime( ) : Date Returns the time when this session was ended (CP2:end_time), or null if the property is absent. getZones( ) : String[] Returns an unordered list of the editing zone strings specifying the areas of the PDF file that were changed during this session (CP2:zones), or an empty list if the property is absent. getComment( ) : String Returns the user-supplied comment that describes the changes to the PDF file during this session (CP2:comment). This function returns the English language alternate, or the empty string if the property is absent. getCommentLocalized( ) : AltText Returns the user-supplied comment that describes the changes to the PDF file during this session (CP2:comment). This function returns the complete set of language alternates, which is empty if the property is absent. For the active session, the returned AltText object is writable. getChangeDescriptions( ) : String[] Returns an ordered list of descriptions of the changes to the PDF file during this session (CP2:change_desc), or an empty list if the property is absent. This function returns the English language alternate for each item. getChangeDescriptionsLocalized( ) Returns an ordered list of descriptions of the changes to the PDF file during this session (CP2:change_desc), or an : AltTextList empty list if the property is absent. This function returns 502 Enfocus Switch 10 the complete set of language alternates for each item. The returned AltText objects are read-only. getUser( ) : User Returns the user object referenced by this session (through CP2:user_id_ref), or null if the session doesn’t reference a user. getDataMap( ) : DataMap Returns a data map referencing the collection of private data for this session (CP2:data), which is empty if the property is absent. For the active session, the returned DataMap object is writable. getToolID( ) : String Returns the unique identifier for the toolkit or library that created this session (CP2:tool_id), or the empty string if the property is absent. getToolVersion( ) : String Returns the version string for the toolkit or library that created this session (CP2:tool_version), or the empty string if the property is absent. getToolDescription( ) : String Returns the human-readable description of the toolkit or library that created this session (CP2:tool_desc). This function returns the English language alternate, or the empty string if the property is absent. getToolDescriptionLocalized( ) : AltText Returns the human-readable description of the toolkit or library that created this session (CP2:tool_desc). This function returns the complete set of language alternates, which is empty if the property is absent. The returned AltText object is read-only. getApplicationID( ) : String Returns the unique identifier for the application that created this session (CP2:appl_id), or the empty string if the property is absent. getApplicationVersion( ) : String Returns the version string for the application that created this session (CP2:appl_version), or the empty string if the property is absent. getApplicationDescription( ) : String Returns the human-readable description of the application that created this session (CP2:appl_desc). This function returns the English language alternate, or the empty string if the property is absent. getApplicationDescriptionLocalized( Returns the human-readable description of the application that created this session (CP2:appl_desc). This function ) : AltText returns the complete set of language alternates, which is empty if the property is absent. The returned AltText object is read-only. getCertificates( ) : CertificateList Returns a list of all certificates associated with this session, in order of appearance in the dataset. The list may be empty. Setters [W] These functions may be invoked only on the active session. Invoking them on any other session is a programming error and has unpredictable results. 503 Enfocus Switch 10 setComment( value : String ) Sets the user-supplied comment that describes the changes to the PDF file during this session (CP2:comment). This function sets the English language alternate and erases all other alternates. To set other language alternates, use appropriate setters on an AltText object obtained with getCommentLocalized(). addChangeDescription( value : String ) Appends the specified string to the list of descriptions of the changes to the PDF file during this session (CP2:change_desc). This function sets the English language alternate for the new item, omitting any other alternatives. addNewChangeDescriptionLocalized( Appends a newly created item to the list of descriptions of the changes to the PDF file during this session ) : AltText (CP2:change_desc), and returns a reference to the new item. The returned AltText object is empty, and it is writable. Use appropriate setters on the returned AltText object to set any language alternates. Certificate class A Certificate object represents a certificate stored in a CP2 dataset. Getters [R] 504 getClassID( ) : String Returns the vendor-neutral class identifier of this certificate (CP2:class_id). This may be one of the “built-in” identifiers described in the Certified PDF 2 specification (the empty string for generic certificates, or “Preflight” for preflight certificates) or another value agreed between third-party vendors. It is recommended to register such other values with Enfocus. getClassVersion( ) : String Returns the version string for the data type of this certificate’s class properties (CP2:class_version), or the empty string if the property is absent. The scripting API doesn’t support access to class properties. getTypeID( ) : String Returns the unique identifier for the type of this certificate (CP2:type_id), or the empty string if the property is absent. This identifier indirectly specifies the data type of the certificate’s private properties, and is used by a conforming application to select a certificate handler implementation that can interpret the contents of these properties. getTypeVersion( ) : String Returns the version string for the type of this certificate (CP2:type_version), or the empty string if the property is absent. This version string indirectly specifies the version of the certificate’s private properties, and can be used by a certificate handler implementation while interpreting these private properties. Enfocus Switch 10 getTypeDescription( ) : String Returns the human-readable description of this certificate’s type and version (CP2:type_desc). This function returns the English language alternate, or the empty string if the property is absent. getTypeDescriptionLocalized( ) : AltText Returns the human-readable description of this certificate’s type and version (CP2:type_desc). This function returns the complete set of language alternates, which is empty if the property is absent. For a certificate associated with the active session, the returned AltText object is writable. getImplementationID( ) : String Returns the unique identifier for the certificate handler implementation that created this certificate (CP2:impl_id), or the empty string if the property is absent. getImplementationVersion( ) : String Returns the version string for the certificate handler implementation that created this certificate (CP2:impl_version), or the empty string if the property is absent. getImplementationDescription( ) : String Returns the human-readable description of the certificate handler implementation that created this certificate (CP2:impl_desc). This function returns the English language alternate, or the empty string if the property is absent. getImplementationDescriptionLocalized( Returns the human-readable description of the certificate handler implementation that created this ) : AltText certificate (CP2:impl_desc). This function returns the complete set of language alternates, which is empty if the property is absent. For a certificate associated with the active session, the returned AltText object is writable. getSession( ) : Session Returns the session during which this certificate was created (referenced through CP2:session_id_ref). getStatementDescription( ) : String Returns the human-readable description of the statement made by this certificate (CP2:statement_desc). This function returns the English language alternate, or the empty string if the property is absent. getStatementDescriptionLocalized( ) : AltText Returns the human-readable description of the statement made by this certificate (CP2:statement_desc). This function returns the complete set of language alternates, which is empty if the property is absent. For a certificate associated with the active session, the returned AltText object is writable. getState( ) : String Returns the state of this certificate (CP2:state) as one of the following string values: “Errors”, “Warnings”, “Info”, “Success”, or “Unknown”. For a new certificate the state is initialized to “Unknown”. In most cases this should be replaced by an appropriate value. 505 Enfocus Switch 10 getStateDescription( ) : String Returns the human-readable description of the state of this certificate (CP2:state_desc). This function returns the English language alternate, or the empty string if the property is absent. getStateDescriptionLocalized( ) : AltText Returns the human-readable description of the state of this certificate (CP2:state_desc). This function returns the complete set of language alternates, which is empty if the property is absent. For a certificate associated with the active session, the returned AltText object is writable. getZones( ) : String[] Returns an unordered list of the editing zone strings specifying the type of changes to which this certificate is sensitive (CP2:zones), or an empty list if the property is absent (which means that the certificate is not sensitive to any changes in the PDF file). For a new certificate this property is initialized to the single editing zone “All”. It is advisable to narrow the certificate’s editing zones down to avoid it becoming dirty unnecessarily. getDataMap( ) : DataMap Returns a data map referencing the collection of private data for this certificate (CP2:data), which is empty if the property is absent. For a certificate associated with the active session, the returned DataMap object is writable. getDataDescription( ) : String Returns the human-readable description of this certificate’s private properties taken as a whole (CP2:data_desc). This function returns the English language alternate, or the empty string if the property is absent. getDataDescriptionLocalized( ) : AltText Returns the human-readable description of this certificate’s private properties taken as a whole (CP2:data_desc). This function returns the complete set of language alternates, which is empty if the property is absent. For a certificate associated with the active session, the returned AltText object is writable. 506 getFingerPrint( ) : String Returns the fingerprint representing a unique identifier for this certificate’s configuration (CP2:fingerprint), or the empty string if the property is absent. The fingerprint allows determining whether or not two configurations are equivalent without accessing the contents of class or private properties. getTime( ) : Date Returns the time when this session was created (CP2:time), or null if the property is absent. For a new certificate this property is initialized to the current system time; it can’t be updated. isDirty( ) : Boolean Returns true if this certificate certificate’s editing zones overlap with any of the editing zones touched in a later session (excluding the certificate’s own session), false otherwise. Enfocus Switch 10 isValid( ) : Boolean Returns true if this certificate is valid, false otherwise. A certificate in any session other than the active session is valid if and only if all of the following conditions apply: • The certificate resides in a Certified PDF file with a valid signature. • The certificate’s state is not “Unknown”. • The certificate is not dirty, that is, its editing zones do not overlap with any of the editing zones touched in a later session (excluding the certificate’s own session). A certificate in the active session is valid if and only if its state is not “Unknown”. This is because it is assumed that the certificate will be saved in a file with a valid signature and because the editing zones in the active session never make the certificate dirty. Setters [W] These functions may be invoked only on certificates residing in the active session. Invoking them on any other certificate is a programming error and has unpredictable results. setClassVersion( value : String Sets the version string for the data type of this certificate’s class properties (CP2:class_version). The scripting API does not support ) access to class properties. setTypeID( value : String ) Sets the unique identifier for the type of this certificate (CP2:type_id). This identifier indirectly specifies the data type of the certificate’s private properties, and is used by a conforming application to select a certificate handler implementation that can interpret the contents of these properties. setTypeVersion( value : String Sets the version string for the type of this certificate (CP2:type_version). This version string indirectly specifies the ) version of the certificate’s private properties, and can be used by a certificate handler implementation while interpreting these private properties. setTypeDescription( value : String ) Sets the human-readable description of this certificate’s type and version (CP2:type_desc). This function sets the English language alternate and erases all other alternates. To set other language alternates, use appropriate setters on an AltText object obtained with getTypeDescriptionLocalized(). setImplementationID( value : Sets the unique identifier for the certificate handler implementation that created this certificate (CP2:impl_id). String ) setImplementationVersion( value : String ) Sets the version string for the certificate handler implementation that created this certificate (CP2:impl_version). setImplementationDescription( Sets the human-readable description of the certificate handler implementation that created this certificate (CP2:impl_desc). value : String ) This function sets the English language alternate and erases all other alternates. To set other language alternates, use 507 Enfocus Switch 10 appropriate setters on an AltText object obtained with getImplementationDescription(). setStatementDescription( value Sets the human-readable description of the statement made by this certificate (CP2:statement_desc). This function sets the : String ) English language alternate and erases all other alternates. To set other language alternates, use appropriate setters on an AltText object obtained with getStatementDescriptionLocalized(). setState( value : String ) Sets the state of this certificate (CP2:state). The state must be specified as one of the following values (or a case-insensitive variation thereof): “Errors”, “Warnings”, “Info”, “Success”, or “Unknown”. Any other value is interpreted as “Unknown”. For a new certificate the state is initialized to “Unknown”. In most cases this should be replaced by an appropriate value. setStateDescription( value : String ) Sets the human-readable description of the state of this certificate (CP2:state_desc). This function sets the English language alternate and erases all other alternates. To set other language alternates, use appropriate setters on an AltText object obtained with getStateDescriptionLocalized(). setZones( value : String[] ) Sets an unordered list of editing zone strings specifying the type of changes to which this certificate is sensitive (CP2:zones). An empty list indicates that the certificate is not sensitive to any changes in the PDF file. For a new certificate this property is initialized to the single editing zone “All”. It is advisable to narrow the certificate’s editing zones down to avoid it becoming dirty unnecessarily. setDataDescription( value : String ) Sets the human-readable description of this certificate’s private properties taken as a whole (CP2:data_desc). This function sets the English language alternate and erases all other alternates. To set other language alternates, use appropriate setters on an AltText object obtained with getDataDescriptionLocalized(). setFingerPrint( value : String Sets the fingerprint representing a unique identifier for this certificate’s configuration (CP2:fingerprint). The fingerprint ) allows determining whether or not two configurations are equivalent without accessing the contents of class or private properties. User class A User object represents a user stored in a CP2 dataset. Getters [R] getName( ) : String getCompany( ) : String getStreet( ) : String getPostalCode( ) : String getCity( ) : String getState( ) : String 508 Returns the corresponding property of this user’s contact information, or the empty string if the property is absent. Enfocus Switch 10 getCountry( ) : String getEMail( ) : String getPhone( ) : String getFax( ) : String getUserMessage( ) : String Returns the user-supplied message associated with this user (CP2:message). This function returns the English language alternate, or the empty string if the property is absent. getUserMessageLocalized( ) : AltText Returns the user-supplied message associated with this user (CP2:message). This function returns the complete set of language alternates, which is empty if the property is absent. For the active user, the returned AltText object is writable. Setters [W] These functions may be invoked only on the active user. Invoking them on any other user is a programming error and has unpredictable results. setName( value : String ) setCompany( value : String ) Sets the corresponding property of this user’s contact information. setStreet( value : String ) setPostalCode( value : String ) setCity( value : String ) setState( value : String ) setCountry( value : String ) setEMail( value : String ) setPhone( value : String ) setFax( value : String ) setUserMessage( value : String ) Sets the user-supplied message associated with this user (CP2:message). This function sets the English language alternate and erases all other alternates. To set other language alternates, use appropriate setters on an AltText object obtained with getUserMessageLocalized(). DataMap class A DataMap object represents a collection of private data associated with a session or certificate stored in a CP2 dataset. Each data map retains a reference to its underlying data structure, so it can be used for both reading and writing. Private data items can be stored in three different ways. Each storage type has associated semantics as described in the following table. Storage type test Storage form Plain text string Encoding Unicode Recommended for brief segments of human-readable text 509 Enfocus Switch 10 Storage type base64 ref Storage form Encoding Base64 encoded Binary stream PDF object data stream Binary (i.e. outside of the XMP packet) Recommended for short data streams longer data streams Note: The scripting API fully supports the “ref” storage type; it implements the appropriate methods to read and write data from and to PDF objects and registers these methods with the C++ toolkit. Getters [R] isEmpty( ) : Boolean Returns true if the collection is empty, false otherwise. The collection is empty if the underlying property is absent or if no private data items are listed for the property. getTags( ) : String[] Returns an unordered list of tags used to identify private data items in this collection. The list is empty if the collection is empty. hasTag( tag : String ) : Boolean Returns true if the collection contains a private data item with the specified tag, false otherwise. isString( tag : String ) : Boolean Returns true if the collection contains a private data item with the specified tag, and that item has storage type “text”. Otherwise the function returns false. isBinary( tag : String ) : Boolean Returns true if the collection contains a private data item with the specified tag, and that item has storage type “base64” or “ref”. Otherwise the function returns false. isPDFObject( tag : String ) : Boolean Returns true if the collection contains a private data item with the specified tag, and that item has storage type “ref”. Otherwise the function returns false. getString( tag : String ) : String Returns the contents of the private data item with the specified tag as a string, or null if there is no such item or if the item does not have storage type “text”. getBinary( tag : String ) : ByteArray Returns the contents of the private data item with the specified tag as a byte array, or null if there is no such item or if the item does not have storage type “base64” or “ref”. If the private data has storage type “base64” it is decoded to binary form before returning. Setters [W] These functions may be invoked only on data maps associated with the active session or with a certificate in the active session. Invoking them on any other data map is a programming error and has unpredictable results. put( tag : String, contents : String ) 510 Places a private data item of storage type “text” in the collection with the specified tag and contents. If an item with the same tag already existed, it is replaced by this new item. Enfocus Switch 10 put( tag : String, contents : ByteArray, asPDFObject : Boolean ) Places a private data item of storage type “base64” or “ref” in the collection with the specified tag and contents. If an item with the same tag already existed, it is replaced by this new item. If asPDFObject is false, the item is of storage type “base64” and the binary data is encoded as Base64 before being stored in the XMP packet. If asPDFObject is true, the item is of storage type “ref” and the binary data is stored as a PDF stream object, using one or more lossless encodings as determined by the implementation. Note: The intention is to avoid introducing new types of stream encodings to the PDF file which could trigger preflight errors; refer to the implementation of Certified PDF 1 in this respect. remove( tag : String ) Removes the private data item with the specified tag from the collection. If there is no such item, this function does nothing. AltText class An AltText object represents a collection of language alternates for a localized property of a session, certificate or user stored in a CP2 dataset. Each AltText object retains a reference to its underlying data structure, so it can be used for both reading and writing. Getters [R] isEmpty( ) : Boolean Returns true if the collection of alternates is empty, false otherwise. The collection is empty if the underlying property is absent or if no alternates are listed for the property. getLocalizedText( genericLang Returns one of the collection’s alternates according to the rules : String, specificLang: String ) described for the getLocalizedText() function in the XMP data model. : String getText( ) : String Returns one of the collection’s alternates, selected by preference in the following order: the English language string, the default string, or any other language string. The getter returns a non-empty string as long as there is at least one alternate string. Setters [W] These functions may be invoked only on AltText objects associated with the active session or with a certificate in the active session. Invoking them on any other AltText object is a programming error and has unpredictable results. Adds or replaces one of the collection’s alternates according setLocalizedText( value : String, genericLang : String, specificLang: to the rules described for the setLocalizedText() function in the XMP data model. String ) setText( value : String ) Sets the specified string as the English language string and erases all other alternates from the collection (to avoid discrepancies between the meaning of existing alternates and the new string). List classes Due to limitations in implementation, the scripting API is unable to return an array of sessions, users, certificates, or AltText objects. Instead, it returns a helper object of the corresponding list class, that is, SessionList, UserList, CertificateList, or AltTextList respectively. 511 Enfocus Switch 10 These helper classes offer functions to access the items in the list, identical to the functions offered by the list classes in the flow element module (JobList etc). Implementation note on Exceptions The scripting API does not throw exceptions. All C++ toolkit exceptions must be caught within each scripting API function. In some cases the scripting API function description may describe what to do if an exception is caught (for example, return a null object). In many other cases, the scripting API states that the result is undefined or there simply is no described (or obvious) behavior. The recommended exception handling is as follows: • Issue an error message to the Switch message log, describing as clearly as possible what the problem is and what caused it. • Provide stable behavior, even if the requested function cannot be executed. For example, when writing to a read-only object, do nothing at all other than issuing an error message. • Avoid performing an operation partially; try to execute every operation completely or not at all. 512 Enfocus Switch 10 19. Data Collecting Wizard 19.1 Task description The Data collecting wizard tool helps in collecting data from files which may be required by the support team when they need more information on the setup. The data from the following files are collected by the tool and sent to the support team after creating a zip package: • • • • • • • • Exported sflows Preference files Job tickets logs .db3 file Information about Switch files installed in user's system (layout, name, size, modification date) Relevant registry/ plist records Information from Support tab in About dialog box Job datasets 19.2 Challenges When collecting data, its size is the biggest challenge. Even though the folders "backing" and "ProblemFiles" are skipped as user's jobs are not included in data collection, the size of the data may still be big. This is because the .db3 files may be a few GB in size and the jobtickets may e a 100MB or more. As all these files allow a high level of compression, the zipped package will be smaller by 5 or 10 times when compared to the original size. In order to address the challenge posed by the data size, • • • • Users are allowed to select parts of the data they want to include in the zip package with the help of checkboxes. The progress user interface provides information on what data is being included/ compressed in the zip package at a given moment. Users can stop the data collection process if it is consuming too much time, with the "Abort" functionality. Users can utilize the PitStop Connector to send the zip package to the Enfocus Support team. Exporting .sflow ".sflow" is created by the Server only upon request. Flows in Switch installation are a combination of XML and Property sets in various folders. When a user chooses "Export" in Designer UI, the XML and Property sets are combined in .sflow by Server. The logic is difficult to extract outside Server and it is also important to have the tool as an independent application to enable data collection even when Switch is not launched anymore. 513 Enfocus Switch 10 Therefore the tool exists in two places: as a functional part of Designer and also as a standalone executable. The standalone Wizard is called PowerSwitchDataCollector.exe or PowerSwitchDataCollector.app. When the flavor of the Switch is Full or Light, the name of the wizard corresponds to the flavor. For example: FullSwitchDataCollector.exe and LightSwitchDataCollector.exe etc. The standalone Wizard is added into Switch installers (both on Mac and Windows) and can be found near Designer executable/bundle. The tool is implemented as a wizard. The wizard is placed in a separate library which is used by both the designer and the external executable. When the wizard is invoked from Designer UI (by a menu item) it works in extended mode and allows exporting .sflows. When it is invoked from standalone executable, it does not allow creating ".sflow". It collects raw flow XMLs and Property sets. 19.3 GUI The GUI visible to the user when the Data Collecting Wizard is invoked from a standalone tool is slightly smaller than the GUI which is visible when invoked from the Designer UI. This is because of the unavailability of certain features when invoked from a standalone tool. Wizard in Designer In the Designer UI, navigate to File > Collect application data to invoke the wizard. The Welcome dialog box of the Data Collecting Wizard appears. Follow the steps given below to select the data and zip it: 1. Click Next button in the Welcome dialog box. Click Next button in the subsequent dialog box. 2. Select checkboxes to include the corresponding data items in the zip package. All items are selected by default, some items are disabled so users cannot uncheck them. They are present in the UI to enable users to view what data is being sent to Enfocus support team. When users are not able to upload files because of size, they can uncheck some of the data items and try again to upload. The options available are: 514 Enfocus Switch 10 a. ‘Logs’ – Server logs in .db3 file (entire folder "<app_data_root>\logs"). This checkbox is enabled so users can deselect it if required. b. ‘Preferences’ – Switch preferences XML (entire folder "<app_data_root>\settings"). This checkbox is disabled by default. c. ‘Internal jobtickets’ – All *.ijt files (entire folder "<app_data_root>\tickets"). This checkbox is disabled by default. d. ‘Datasets’ – jobs datasets (entire folder "<app_data_root>\datasets"). This checkbox is enabled so users can deselect it if required. e. ‘Application settings’ – Switch settings extracted from registry (on Windows) or plist files (on Mac). The extracted data is put into ‘ApplicationSettings.txt’ file. On Mac actual plist files are also included into zip. This checkbox is disabled by default. f. ‘Layout description’ – the description of Switch installation files. It is put into file ‘Report.txt’. It includes listing of all files and folders with their attributes (size, modification date, permissions etc) from Switch installation folder. This checkbox is disabled by default. 3. Click Browse button to select the path where the resulting zip package should be stored and click Next button. 4. If the wizard was launched from the Designer UI, a file named "AboutDialog.txt is created which contains information extracted from About dialog box in Designer (Support info tab and Licensing tab). Note: The "AboutDialog.txt file cannot be generated when the wizard is launched from a standalone executable. 5. The next dialog box enables users to select flows to be included in the zip package. If the wizard was launched from the Designer UI, all the flows present in the Flows pane are listed in alphabetical order. All the flows are selected by default, users can uncheck the ones they do not want to include in the zip package. However, no advanced features (like grouping, sorting, flags etc) are supported. If the wizard is launched from a standalone executable only one option, Export All Flows is provided as shown below: Users can choose to either export all flows or none. Select and click Next button. 515 Enfocus Switch 10 Note: Flows are not exported as "sflows" files but as raw data, that is the following folders are placed as is in the zip package: "<app_data_root>\flows" and "<app_data_root>\PropertySets" Note: It is recommended that Switch is not processing when data is being collected. Therefore at startup, the standalone wizard verifies if Switch is running or not. When the wizard is launched from the designer and starts collecting data, it deactivates all active flows. The data is collected after all the flows are stopped. The flows are reactivated after completion of data collecting. 6. View summary of all the options selected so far and click Commit button. Data collecting process starts . The progress is represented by a progress bar and a status text above the progress bar. Users can click the Abort button to terminate the collecting process. Note: Aborting can be performed only between steps, for example: between flows export and logs export. The Wizard waits until the previous step is finished and only then aborts the whole collecting process. Therefore after clicking Abort users have to wait for some time before aborting commences. 7. After successful completion of the collecting process, the dialog box displays the following message Data collecting has finished and the path where the resulting zip package is stored is displayed. 8. If any errors or warnings are present, it will also be displayed in the same window. 9. When the wizard is launched from a standalone executable and the Switch application is running, an error is displayed in the dialog box as shown below: 516 Enfocus Switch 10 The Next button is disabled. Exit the Switch application and relaunch the wizard from the standalone executable and proceed as explained earlier. 19.4 Resulting zip package The structure of the resulting zip package is very simple, each data part is placed in a separate sub-folder. For example: PowerSwitch Data 2010-08-10 10-46-11.zip ApplicationData datasets flows logs PropertySets settings tickets ExportedFlows Report Settings The content of ‘ApplicationData’ sub-folder mirrors the contents of actual Switch application data root. 517 Enfocus Switch 10 Index A Activating extra client license 22 Activation licenses 21 Advanced topics 86, 184 alttext class 511 AppleScript 139 compiled binaries 139 extensions 139 Application 233 Archive hierarchy 224 Assemble job 229 B Basic concepts 76 C Certificate class 504 Certified PDF 255 challenges 513 Checkpoint 270 Checkpoint via mail 273 compatibility 143 Compress 237 Configuration 145 Connections Checkpoints 270, 273 Contact Enfocus 14 D Data collecting wizard 513 Database 438 datamap class 509 E Execute command 234 existing functions 500 Export metadata 287 F Features 15, 91, 93, 177, 178 email info 93 Features (continued) flow elements 178 hierarchy info 91 overview 177 File type 251 Files compressing 237 extensions 194 filters 97 formats 313 hold 104 images 301 mapped drives 182 merging pages 239 messages 110 prefixes 57, 193 sorting 253 sorting rules 65 splitting 241 submitting 269 types 194, 251 uncompressing 237 XML schema 110 Finding your way 31, 153 Flows 13, 37, 41, 48, 51, 61, 66, 67, 68, 69, 70, 72, 73, 74, 75, 76, 78, 79, 80, 81, 82, 103, 104, 111, 132, 145, 150, 159, 178, 184, 210, 213, 237, 256, 258, 280, 365, 444 activating 73 active 103 adding 70 canvas 37, 145 Checkpoints 159 communication 258 compatibility 75 configuring elements 80 connections 79, 213 connections on hold 104 creating 51, 61 deactivating 73 design 82 designing 76, 145, 184 editing 78 elements 78, 79, 80, 145, 178, 213, 237, 256, 258, 280, 444 elements pane 37 executing 51 execution 103 exporting 74 external property editors 365 filtering 48 finishing 67 flow library 13 flows pane 41 Index Flows (continued) importing 74 layout 82 library 13 locking 72 managing 61 markers 69 metadata 280 new 61 organizing 68 processes 111 processing 280 properties 70, 81, 184 removing 70 running 103, 210 scripts 132 selecting flow elements 80 sending notifications 66 setting markers 69 Submit points 150 tools 237 unlocking 72 validating connections 79 viewing 103 wizard 67 Folder 216 Folders 44, 78, 87, 88, 99, 182, 216, 219, 220, 224, 225, 237 compressing 237 connections 78 filters 99 folders pane 44 hierarchy 220, 224, 225 inserting 78 job folders 88 mapped drives 182 problem jobs 219 subfolders 87 FTP processing results 320 proxy 186 receiving 258 sending 261 FTP receive 258 FTP send 261 G Groups markers 70 GUI logic 514 H health indicator health indicator 114 Help 12, 13 applicability 12 getting more 13 Hold job 243 I Inject job 246 Installing language packs 17 locating installers 17 upgrading 29 versions 29 Installing Switch 16 Introduction 12 J JDF pickup 281 Job dismantler 226 Jobs 88, 95, 96, 97, 104, 105, 114, 118, 125, 150, 151, 157, 163, 165, 210, 211, 212, 219, 227, 229, 237, 243, 246, 248, 252, 253, 255, 257, 276, 277, 279, 288, 311, 326 arrival stamps 212 assembling 229 Checkpoints 151, 326 compressing 237 confirmation 279 connections 105 deleting 257 email info 95 file filters 97 hand-off 96 hold 104 holding 105, 243 injecting 246 job folders 88 logging info 288 metadata 118, 311 multi-jobs 229 packing 276 priorities 211 problem jobs 114, 219 renaming 248 replacing 163 sample jobs 125 scheduling 210, 212 sorting 252, 253, 255 statistics 114 Submit points 150 submitting 157 tickets 210 ungrouping 227 unpacking 277 users 150 jobs information 114 K Knowledge base 14 Enfocus Switch 10 Opaque pickup 284 Preferences 17, 90, 184, 186, 187, 188, 189, 191, 357 application data 189 error handling 188 execution modes 357 file types 186 FTP proxy 186 internal communication 191 language packs 17 mode of operation 90 originals 90 processing 187 user interface 184 Problem jobs 219 Problems activation 176 categories 112 connections 79 deactivation 176 error handling 188 error messages 175 execution problems 114 file types 186 licenses 173 licensing 152 problem alerts 188 problem jobs 114, 219 problem processes 116 program hangs 176 researching 113 retrying 113 status 111 text encoding 352 trusted storage 176 process 99 Properties 46, 70, 81, 85, 93, 96, 119, 122, 132, 184, 290, 349, 353, 358, 359, 361, 365, 445, 483 condition 122 conditional 122 configurator 349 editing 445 email info 93, 96 entry points 445 flow elements 81 flows 70, 184 properties pane 46 property definitions 358 property editors 359, 361, 365 property sets 349 script expression 132 scripting 353 text 119 updating 483 validating 81, 361 variables 119, 290 P R Pack job 276 packmanager 23 Recycle bin 257 Reference 166 Regular expressions 196, 381 L Licensing 19, 21, 27, 152, 166, 173, 348 activation 21 issues 152 repairing licenses 173 third-party applications 27, 348 List classes 511 Log job info 288 Logging 44, 107, 109, 110, 190, 288, 320 automated daily export 110 filtering 109 job info 288 log messages 107, 110 messages 109 messages pane 44 processing results 320 sorting 109 M Mail Checkpoints 273 message schemas 319 processing results 320 receiving 263 sending 185, 267 Mail receive 263 Mail send 267 Merge PDF pages 239 Metadata 118, 127, 280, 287, 290, 291, 298, 299, 300, 301, 302, 305, 306, 311, 314, 317, 322, 476 client fields 322 embedded 311 exporting 287 external metadata 314 flow elements 280 location paths 127 pickup 317 variables 290, 291, 298, 299, 300, 301, 302, 306 metadata handling 143 Monitor confirmation 279 N network activity 114 Network 432 new classes 501 O Index Rename job 248 resulting zip package 517 roles 150 Running Switch 16, 18, 19, 29, 181 first time 19 limited user 18 service 181 versions 29 S Script element 256 Scripting API 134, 367 AppleScript 205, 206, 207 array 371 Attr 431 AttrList 431 boolean 374 built-in functions 388 built-in objects 371 built-in operators 390 built-in types 371 ByteArray 410 Comment 431 comparing 124, 295 concepts 130 configurators 347 Connection 462 ConnectionList 476 control statements 400 CP2 data model 493 data types 292, 293 Dataset 477 DataSource 440 Date 374 declarations 398 developing scripts 333 Dir 417 Document 427 Element 429 elements 256 entry points 444 Environment 449 examples 207 execution groups 357 execution mode 343 execution modes 355, 356, 447 File 412 FileStatistics 486 fixture package 342 functions 378 JavaScript 138, 201, 368, 379 JDF data model 479 Job 463 job group 303 JobList 476 languages 138 Scripting (continued) limited to 347 List 431, 476 main script properties 353 Map 476 Math 386 Node 426 NodeList 431 nodes 426 Number 378 OASIS 435 Object 379 Occurrence 474 Opaque 486 operators 124 overview 130 Point 379 Process 422, 425 queries 481, 482 read-only access 312 read-write access 312 Rect 379 reference 367 referring 140 RegExp 381 regular execution 444 regular expressions 196, 381 result set 442, 443 script declaration 137, 353 script expressions 132, 133 script library 14 script package 136 scripted plug-in 138 scripted plug-ins 344, 345 Size 383 SOAP 432 Statement 441 Stats group 308 String 383 string manipulations 297 Switch 458 Switch group 310 syntax 292 testing 342 testing scripts 340 Text 430 text encoding 408, 438 variables 291, 296, 298, 303, 308, 310, 312 VBScript 141 writing scripts 340 XPath 327 XPath expressions 426 session class 502 Set hierarchy path 225 Sort files in job 253 Sort job 252 Split multi-job 229 Split PDF in pages 241 Submit hierarchy 220 Submit point 269 Enfocus Switch 10 Support 14 Switch product family 15 Switch server 156, 181 Switch User Group 14 Switch Watchdog 181 SwitchClient 50, 143, 150, 152, 153, 155, 156, 159, 164 access rights 150 communicating 143 connecting 156 connections 156 installing 152 jobs 159 log messages 164 preparing 143, 153 running 153 system requirements 152 SwitchClient notifications 156 SwitchScripter 49, 333, 334, 335, 336, 339, 340, 343 declaration pane 335 entry points 343 fixture pane 336 message pane 340 program pane 339 properties pane 339 toolbar 334 workspace window 333 System requirements 16 T Task description 513 Tasks execution slots 210 Third_party applications configurators 347 Third-party applications 13, 23, 25, 27, 91, 183, 233, 285, 344, 346, 347, 348, 349, 350, 351, 446 Apago PDFspy 285 application discovery 446 application library 13 automatic detection 25 communication 350, 351 configurators 91, 347 detecting 25 detection 25 detection feedback 25 discovery 348 generic application 233 guidelines 347 library 13 licensing 27, 348, 446 properties 349 submitting 344 support 346 version requirements 183 Tips 175 Trial 20 Troubleshooting 175 Tutorial 51 U Uncompress 237 Ungroup job 227 Unpack job 277 Upgrading 29, 30 user class 508 User interface 155 user preferences 155 Users managing 148 Utility module 408 V VBScript 141 W Welcome to Switch 12 Windows service 182 workload management activity monitor 114 Workspace application components 31 canvas 37, 76 dashboard pane 112 designer 32 elements pane 37 external property editors 365 files pane 39 flow element module 444 flows pane 41 folders pane 44 messages pane 44, 108 ordering rows 69 overview 32 preferences 184 progress pane 45 properties pane 46 search menu 49 statistics pane 47 text 120 toolbar 36 users pane 48 X XML 426, 478 XML pickup 280 XMP 302, 330, 331, 481 location paths 330 XMP pickup 282 XSLT transform 288