1
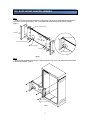
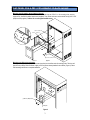
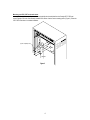
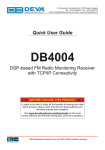
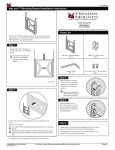
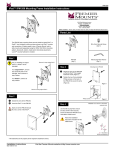
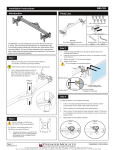
INSTALLATION MANUAL
PLASMA DISPLAY MOUNT MODEL
3130 E. Miraloma Ave. Anaheim, CA 92806 Phone: 800 368-9700 Fax: 800 832-4888
VISIT US AT WWW.MOUNTS.COM
FPA RACK MOUNT ADAPTER ASSEMBLY
Step 1
Invert the FPA rack mount bracket and place on a flat surface. Take the two (2) side brackets and secure them to
the FPA rack mount using the Eight (8) 10/32” x 5/8” phillips head screws and eight (8) flat washers (supplied).
(Figure 1)
(4)10/32" X 5/8" phillips screw
Side braket
(4)10/32" x 5/8" phillips screw
(4)10/32" x 5/8" phillips screw
Cable access hole
Flat washer
Cable accsess hole
Figure 1
Step 2
Secure the fully assembled rack mount to your cabinet using the four (4) 10/32” x 5/8” phillips head screws and four
(4) flat washers (supplied). (Figure 2)
(4)Flat washers
(4)10/32" X 5/8" phillips screw
Figure 2
2
FLAT PANEL, SOA & PRP / PRT ASSEMPLY TO RACK MOUNT
Mounting your flat panel to the rack mount ( flat only )
Secure your flat panel to the rack mount from the back side using the VESA 75 or 100 mounting points, securing
tightly with (4) four M4X10 phillips head screws (supplied). Then secure rack mount to the cabinet with (4)10/32” x 5/8”
phillips screws (supplied). Caution: Do not over tighten the M4 screws.
(4)M4 x 10 phillips screw
VESA 100
VESA 75
VESA 100
VESA 75
(4)Flat washers
(4)10/32" x 5/8" phillips screw
Figure 3
Flat panel
Mounting your SOA to the rack mount
Using the four (4) M8 x 10 phillips head screws (supplied) use the offset series of mounting points. Take the wall
plate from the prestige SOA and secure it tightly to the rack mount already installed in the cabinet. (Figure 3) Follow
SOA mounting instructions to complete installation.
(4)M8 x 10 phillips screws
Wall plate
Figure 4
3
Mounting your PRP / PRT to the rack mount
Using the four (4) M8 x 10 phillips head screws (supplied) take the wall plate from the Prestige PRT / PRP and
secure it tightly to the rack mount already installed in the cabinet. Use the center mounting points. (Figure 5) Follow the
PRT / PRP instructions to complete installation.
(4)M8 x 10 phillips screw
Wall plate
Figure 5
4