1
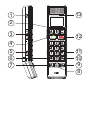
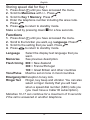
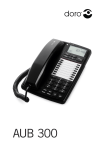
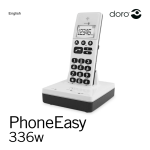
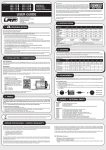
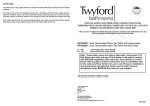
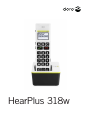
HearPlus 318w
1
13
2
3
12
4
5
6
7
11
10
9
8
English
1
2
3
4
5
6
7
Audio amplification/Boost
Speed dials ABC
Volume control
Talk key/OK
Tone adjustment
* and ringer on/off
Redial
8 Phonebook
9 Caller ID
10#/Flash key and key lock
11Headset socket
12Disconnect and on/off
13Visual ring indicator
English
Operation
Making a call
1. Enter the telephone number you want to call. Delete
with L .
2. Press q to call the number.
3. End the call with L .
Receiving a call
1. Wait for the handset to ring.
2. Answer with q. End the call with L .
Please note!
To access a flash key during a call, press down #.
You can answer an incoming call with any key except *.
You will hear a warning signal if the telephone is unable to
connect to the line.
The problem might be that the batteries are low or that the
handset is too far from the base unit.
Redialling
Press
one or more times to scroll among the 10 most
recently dialled numbers. You can also scroll inside the
list with +/- (on the side).
Press q to call or press L to quit.
Switching on/off
Press down L for several seconds to switch the
handset on/off.
Key lock
The key lock is switched on/off by holding down #
until the adjoining symbol is shown.
The key lock is also deactivated whenever the handset is
placed in the base unit.
English
Ringer on/off
The handset ringer is switched on/off by holding
down * until the adjoining symbol is shown.
Paging
Press
on the base unit to generate a paging
signal in the handset. The signal will cease
automatically in few moments or after L is pressed on
the handset or
on the base unit.
Audio control
There are several ways this product can adjust the sound
while calls are in progress:
Normal volume control for the handset. Press + to
turn up and – to turn down.
Press this key to switch the boost function on/off.
will light up in the display when this function
is active. As a rule the boost function will be
deactivated after each call to avoid harming
people with normal hearing. This safety feature is
adjustable – see Settings.
Adjusting frequency range/sound quality. Please
note! This will only work when the boost function
has been activated. Hold down
for approx.
2 seconds and adjust the sound quality with +/-.
Wait a few seconds to finish the adjustment.
Warning!
The handset volume can be turned up to a very high
level. The boost function should only be used by
people with impaired hearing. On some lines the
highest volume in combination with boost can cause
feedback; try turning down the volume slightly.
English
Hearing loop
The handset has an inbuilt hearing loop for anyone who
wishes to use a hearing aid with the phone. Select the
T mode on the hearing aid to activate the hearing aid’s
telecoil.
Memories
The telephone has 3 speed dial memories.
You can store 100 names and phone numbers in the
Phonebook.
When a phone number is stored on one of these (see
Settings) fewer keys need to be pressed to make a call.
The speed dials are marked A, B, C.
To call/check a speed dial number
1. Choose the speed dial you want (A-C) by pressing that
key.
2. The stored number will be shown in the display.
3. Press q to call or press L to quit.
Calling from the Phonebook
1. Press b .
2. Scroll among the entries with b or +/- (on the side).
You can quick search the Phonebook by pressing the
appropriate number key one or more times for the first
letter of the name.
3. Press q to call the number.
English
Caller ID
In the display you can see who is calling before you
answer the call or see up to 10 numbers that have called
while you were not at home. If the number has been
stored in the memory the stored name will be shown
instead.
Incoming numbers are stored in the order the calls are
received, and the sequence number is shown next to
each phone number.
If the memory is full each new call will replace the oldest
phone number received. New numbers are indicated with
.
Please note!
You must have a Caller ID subscription from your service
provider for this feature to work.
Reading and calling
1. Press
to scroll among the numbers received.
You can also scroll inside the list with +/- (on the side).
2. Press q to call or press L to quit.
Messages
In addition to phone numbers the display can show:
????? No information received, e.g. an overseas call.
!!!!!
Number withheld.
a
Message indication for the voice mail service
from your service provider*.
*Message indication can be deleted manually by deleting
the corresponding entry in the list.
Deleting phone numbers
1. Scroll to the position you want with .
2. Press down L until the number disappears.
English
Settings
Connection
1. Connect the telephone cord to a wall socket and to the
T socket on the back of the base unit.
2. Connect the mains adapter to the electrical socket and
to the Y socket on the back of the base unit.
3. Insert batteries in the handset with the plus and minus
terminals as shown.
4. Charge the handset with the keypad facing outwards
(for 24 hours the first time).
5. Set time/date & language following the description below.
6. Set the correct Flash time to 100 (see below).
7. Lift the handset and check that you can hear a dialling
tone.
Date/time
1. Press down
until H is shown.
2. Set time (HH:MM). Press q (=OK).
3. Set date (DD.MM.YY). Press q.
Language
1.
2.
3.
4.
Press down b until you have accessed the menu.
Scroll to Language with +/- (on the side). Press q.
Scroll to the setting that you want. Press q.
Press L to return to standby mode.
Flash timing
1. Press down b until you have accessed the menu.
2. Scroll to Flash timing with +/- (on the side). Press q.
3. Scroll to the setting you want (100 for most EU
countries, 300 for France/Portugal). Press q.
4. Press L to return to standby mode.
English
Range
The adjoining symbol will flash when the handset
has lost contact with the base unit.
Normally the range of the telephone will vary between
50 and 300 metres depending on whether the radio waves
carrying the call are being restricted by obstacles in their path.
You can improve the range by turning your head so that the
handset is in better alignment with the base unit. The quality
of the call will become increasingly poor as the range limit is
reached and finally the connection will be lost.
Battery
When the batteries are almost out of power the
adjoining symbol will flash and you will hear a
warning tone.
Batteries are perishable so when you use the telephone
regularly you should expect call time and standby
time to be somewhat reduced in comparison to the
specifications. When the batteries are fully charged (10
hours) they should last for approx. 120 hours of standby
or approx. 15 hours of call time. These times will apply at
normal room temperature.
Full battery capacity will only be reached when the
batteries have been charged 4-5 times. It is not possible
to overcharge the batteries or to damage them by leaving
them charging for too long - the base unit has an inbuilt
charging mechanism that prevents this from happening.
Please note!
Do not place the base unit close to other electrical
equipment or expose it to direct sunlight or other strong
heat sources! This reduces the risk of any interference. The
appliance will become warm while charging is in progress:
this is normal and not dangerous. Only use original
batteries. The guarantee will not cover damage caused by
the use of incorrect batteries.
English
Base unit indicator
It is permanently lit when the base unit is connected and
it flashes when the telephone is ringing.
Memories
The telephone has 3 speed dial memories.
You can store 100 names and phone numbers in the
Phonebook.
The speed dials are marked A, B, C. Extra large text is
used when there are fewer than 8 letters.
Special signs/functions
There are several letters assigned to each number key.
0......................... [Space]
L. .................... Delete
(hold down)..... Store pause in telephone number
Storing speed dials
1. Hold down the A-C key you want until b ABCDE... is
shown.
2. Press the appropriate letter key one or more times for
the name you want.
3. Press q. b 123... is shown.
4. Enter the telephone number including the area code.
5. Press q. The number has now been stored.
If you subscribe to a Caller ID service you can also select
a special VIP melody for the speed dials – see Functions/
Ringer Set/VIP ring (ABC).
However the first ring signal may be normal before the
number is compared with the Phonebook.
10
English
Storing numbers in the Phonebook.
1.
2.
3.
4.
Press down b until you have accessed the menu.
Scroll to Memories with +/-. Press q.
Scroll to Add entry. Press q.
Press the appropriate letter key one or more times for
the name you want. Press q.
5. Enter the telephone number including the area code.
Press q.
6. Continue to add numbers or press L to return to
standby mode.
Changing telephone numbers/names
1.
2.
3.
4.
5.
6.
Press down b until you have accessed the menu.
Scroll to Memories with +/-. Press q.
Scroll to Edit Entry. Press q.
Scroll among the entries with b or +/-. Press q.
Correct the name/number. Press q.
Press L to return to standby mode.
Delete entries
1.
2.
3.
4.
5.
6.
Press down b until you have accessed the menu.
Scroll to Memories with +/-. Press q.
Scroll to Delete Entry or Delete List. Press q.
Scroll to the entry you want with b or +/-. Press q.
Confirm by pressing q.
Press L to return to standby mode.
11
English
Storing speed dial for Key 1
1.
2.
3.
4.
Press down b until you have accessed the menu.
Scroll to Memories with +/-. Press q.
Scroll to Key 1 Memory. Press q.
Enter the telephone number including the area code.
Press q.
5. Press L to return to standby mode.
Make a call by pressing down 1 for a few seconds.
Functions
1.
2.
3.
4.
Press down b until you have accessed the menu.
Scroll to the function you want, e.g. Language. Press q.
Scroll to the setting that you want. Press q.
Press L to return to standby mode.
Language
Select the display text language that you
want.
Memories
See previous description.
Flash timing 600 = New Zealand
300 = France/Portugal
100 = Great Britain and other countries
Tone/Pulse Must be set on tone in most countries.
Emergency NoException to key lock.
Ringer Set Ringer, key beep and vibrator. You can also
select a ringer melody that you will hear
when a speed dial number (ABC) calls you
(you must have a Caller ID subscription).
Melodies 10-17 can continue for a maximum of 8 seconds
if the call is answered in another telephone.
12
English
Contrast
The contrast in the display can be adjusted.
Key Backlit The keys’ backlighting can be switched
on/off.
Auto Answer A call is answered by just lifting the handset
from the base.
Auto On-hook
The call is ended automatically after 15
minutes unless a random key is pressed.
This is a great help if you sometimes forget
to hang up.
Boost Set
If Stay As Set is activated the powerful
amplification is retained for all future calls.
This setting should only be activated if all
users have impaired hearing that requires
powerful amplification. The normal setting
is Return Off.
Reset Hand Resetting the handset.
Multihandset Programming of the PIN code (for
resetting), System PIN (for registration) and
functions for systems with more than one
handset/base unit. Registration of extra
handsets is described separately.
13
English
To register a new handset.
Each new extra handset must be registered to the base
unit it will be using. Each base unit can manage up to 3
different handsets.
You will find more information in the Multihandset section.
1. Hold down the base unit’s paging key
until the
indicator flashes.
2. Press down b until you have accessed the menu.
3. Scroll to Multihandset. Press q.
4. Scroll to Register. Press q.
5. Scroll to a base unit (√ =previously reg). Press q.
6. Enter system PIN (0000 on delivery). Press q.
7. After a few seconds (max 30) available handset
numbers for the handset will be shown.
Select one of these by pressing the appropriate number
key.
14
English
Multihandset
General information about Multihandset (+1...)
When you buy your telephone the handset has already
been registered to the accompanying base unit at the
factory. If you will be using several handsets with one
base unit, make sure that the base unit is placed centrally
so the range is similar for all the handsets.
You can register up to 3 handsets to one base unit.
This model is also GAP (Generic Access Profile)
compatible which means that both the handset and base
unit can be used with most other GAP compatible units
from other manufacturers. However, the GAP-protocol
does not guarantee that all functions will work.
Internal calls
When several handsets are using the same base unit
internal calls can be made between the handsets.
1. Press down
until INT is shown.
2. The display will show available handset numbers.
3. Press the appropriate key 1- 3 for the handset you
wish to call.
Transferring calls between handsets
1. An external call is connected.
2. Connect an internal call as described above.
3. Press L to transfer the call.
15
English
Miscellaneous
Troubleshooting
Check that the telephone cord is undamaged and properly
connected. Disconnect any extra equipment, extension
cords and other telephones. If the appliance works now,
there must be some fault in the other equipment. You could
test the telephone on another telephone line (e.g. at your
neighbour’s house). If the appliance works there, the fault
is most likely in your telephone line. You should report this
to your service provider.
No number is displayed when the telephone rings
- You must have a Caller ID subscription with your
service provider.
- This is not normally possible for a telephone switchboard.
The telephone does not work
- Check that the mains adapter and the telephone cord
are connected to the base unit and to the appropriate
wall socket.
- Check that tone is set, see Functions section in the manual.
- Check that the batteries in the handset are charged.
Warning tone during calls/Connection not possible
- The batteries may be running low (charge the unit).
- The handset may be almost out of range – move closer
to the base unit.
The telephone continues to ring
- Some of the ringer types (10-17) do not follow the line
signal. This means that the signal can continue for up to
8 seconds after the call has been answered.
16
English
If the telephone still does not work, please contact the place
of purchase. You must be able to show your receipt.
Specific Absorption Rate (SAR)
This appliance complies with applicable international
safety requirements for exposure to radio waves.
This telephone measures 0.001 W/kg (measured over
10g tissue).
The maximum limit according to WHO is 2W/kg
(measured over 10g tissue).
Declaration of conformity
Doro hereby declares that the product Doro HearPlus
318w conforms to the essential requirements and other
relevant provisions contained in the Directives 1999/5/
EU(R&TTE) and 2002/95/EC(ROHS).
A copy of the manufacturer’s declaration is available at
www.doro.com/dofc.
17
English
Guarantee
This product is guaranteed for a period of 12 months
from the date of purchase. In the unlikely event of a fault
occurring during this period, please contact the place of
purchase. Proof of purchase is required for any service or
support needed during the guarantee period.
This guarantee will not apply to a fault caused by an
accident or a similar incident or damage, liquid ingress,
negligence, abnormal usage, non-maintenance or any other
circumstances on the user’s part. Furthermore, this guarantee
will not apply to any fault caused by a thunderstorm or any
other voltage fluctuations. As a matter of precaution, we
recommend disconnecting the device during a thunderstorm.
Batteries are consumables and are not included in any
guarantee. This guarantee does not apply if batteries
other than DORO original batteries have been used.
UK
If you cannot resolve the fault using the faultfinder
section, technical support is available by email on tech@
doro-uk.com
-premium rate telephone number: 0905 895 0854,
calls cost 50 pence per minute (prices correct at the
time of publication).
You can also contact us in writing (regarding any Spares
or Technical query):
Customer Services
Doro UK Ltd
1 High Street
Chalfont St Peter
Buckinghamshire
SL9 9QE
Further contact details are available on our website:
www.doro-uk.com.
18
English
Version 1.3