1
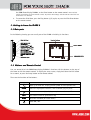
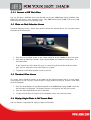
User Manual
Version 1.0
Table of Contents
Important Safety Precautions ..............................................................................................3
Cleaning LCD Screen...........................................................................................................3
1. Introduction .................................................................................................................4
1.1. Key features .......................................................................................................4
1.2. Package content..................................................................................................4
1.3. Getting Started ...................................................................................................4
2. Getting to know the PLANO 8 ..........................................................................................5
2.1 Main parts ...........................................................................................................5
2.1. Buttons and Remote Control .................................................................................5
3. Key Operating Screens ....................................................................................................6
3.1. Card Selection Screen...........................................................................................6
3.1.1. Connect a USB Flash Drive..................................................................................7
3.2. Photo or Clock Selection Screen.............................................................................7
3.3. Thumbnail View Screen.........................................................................................7
3.4. Display Single Photo in Full Screen Mode ................................................................7
4. Slide Show and Photo Options .........................................................................................8
4.1. Rotate Photos .....................................................................................................8
4.2. Enlarge Photos....................................................................................................8
4.3. Delete Photos .....................................................................................................8
5. General Settings ............................................................................................................8
5.1. Adjust the LCD Colour ..........................................................................................8
5.2. Settings Menu.....................................................................................................9
6. Frequently Asked Questions ...........................................................................................10
7. Warranty conditions .....................................................................................................11
8. Contact/Service ...........................................................................................................11
Important Safety Precautions
Always follow these basic safety precautions when using your JOBO Photo Display PLANO 8. This will
reduce the risk of fire, electric shock, and injury.
Warning:
Warning
•
To reduce the risk of fire or shock hazard, do not expose this product to rain or moisture.
•
To prevent the risk of electric shock, do not remove the cover. There are no user serviceable
parts inside. Refer all servicing to qualified personnel.
•
The JOBO Photo Display PLANO 8 is for indoor use only.
•
Unplug the JOBO Photo Display PLANO 8 before performing care and maintenance.
•
Do not block the ventilation holes on the back of the JOBO Photo Display PLANO 8 at anytime.
•
Keep your Multimedia JOBO Photo Display PLANO 8 out of direct sunlight and heat sources.
•
Protect the power cord. Route power cords so that hey are not likely to be walked on or pinched
by items placed on or against them. Pay particular attention to the point where the cord
attaches to the JOBO Photo Display PLANO 8.
•
Only use the AC adapter included with the JOBO Photo Display PLANO 8. Using any other power
adapter will void your warranty.
•
Unplug the power cord from the outlet when the unit is not in use.
Cleaning LCD Screen
Treat the screen gently, the screen is made of glass and can be scratched or broken. To clean
fingerprints or dust from the LCD screen, it is recommended to use a soft, non-abrasive cloth such as
a camera lens cloth to clean the LCD screen. If you use a commercial LCD Cleaning Kit, do not apply
the cleaning liquid directly to the LCD screen. Clean the LCD screen with cleaning cloth moistened
with the liquid.
1. Introduction
Congratulations on your purchase of the JOBO Photo Display PLANO 8! Before operating the unit,
please read this manual thoroughly and retain it for future reference. You can display your digital
photos directly from your memory card, no computer is needed! Simply insert a memory card into
the Photo Display PLANO 8 turn on the power, then all images will be shown automatically as a
slideshow.
1.1. Key features
•
•
•
•
•
•
•
•
•
•
•
•
•
•
•
•
Display: 8 inch (20.32 cm) colour TFT LCD
Resolution: 800 x 600 pixels
Contrast ratio: 400:1
Brightness: 230 cd/m²
Aspect ratio 4:3 (original & optimized mode)
Card slots for SD, SDHC, MMC, MS, xD
USB Host & USB 2.0 High Speed
Supported file format: JPEG
Full screen, thumbnail, 4in1 window or slide show mode
Slide show with adjustable transition effects and time intervals
Rotate and zoom function
Clock and Calendar with slide show mode
Setup menu, power saving function
Wall mount, foldable stand
Dimensions: 213 x 164 x 24.3 mm
Weight: 520 g
1.2. Package content
•
•
•
•
JOBO Photo Display PLANO 8 (PDJ080)
AC Power Adapter (5V, 2A)
Remote control
This manual
1.3. Getting Started
The JOBO Photo Display PLANO 8 is easy to set up. Just follow these steps:
1. Connect Photo Display PLANO 8 with the AC Power Adapter to a power supply.
2. Insert a memory card into the memory card slot. Note: The card will only fit in one direction; do
not force it. The card should fit snugly when properly inserted.
3. Pull out adjustable Stand to adjust the viewing angle.
4. Press the Power ON button on the back of the JOBO Photo Display PLANO 8 . The frame will
automatically start a slide show of the photos on the card.
5. To display photos individually, press the Exit button to open the Thumbnail Screen window.
Use the Up and Down arrows to choose a photo. Press the Play button (>/ll) on the top of
the JOBO Photo Display PLANO 8, or the Enter button on the remote control. Note: Pull the
plastic tab sticking out of the remote control. It protects the battery, and the remote control will not
work unless it is removed.
6. To restart the Slide Show, press the Play button (>/ll) again, or press the Slide Show button
on the remote control.
2. Getting to know the PLANO 8
2.1 Main parts
In the following drawing you can see all parts of the PLANO 8 including its functions:
2.1. Buttons and Remote Control
You can control all of the JOBO Photo Display PLANO 8’s functions with the buttons on the top of
the frame or with the remote control. To display the setup screen, simply hold down the Exit button
for a second, or press the Setup button on the remote control.
These are the functions of the buttons:
Button
Action
Move up or move left, display previous photo or select previous file.
ENTER
Select the highlighted selection, start slideshow, play or pause
Move down or move right, display next photo or select next file.
EXIT
Exit current screen or go back one step
MENU
Go to the main OSD (on screen menu)
Power ON / OFF
In addition you can operate the PLANO 8 with the infrared remote control. Here is a description of
the remote control:
3. Key Operating Screens
The key operating screens will guide you through the most important functions of the PLANO 8.
3.1. Card Selection Screen
In the card selection menu you can choose between memory cards or the USB pen drives being
inserted.
1. To open the card select menu, either insert a new card, or press the Exit button repeatedly
to back through the screens until you see it.
2. Press the Left and Right arrows to select the desired memory card, or built-in memory.
3. Press Enter to make the selection. The Mode Selection Screen opens.
3.1.1. Connect a USB Flash Drive
You can also plug a USB Flash Drive into the USB port on your JOBO Photo Display PLANO 8, then
follow the same steps in Card Selection Screen. Your JOBO Photo Display PLANO 8 will treat a USB
Flash Drive the same way it sees memory cards.
3.2. Photo or Clock Selection Screen
The Mode-Selection-Screen is shown after you have chosen the memory source. You can either select
the Photo or the Clock mode.
1. Press the Left and Right arrows on the remote control or on the PLANO8 to select the mode.
2. Press Enter to make the selection. If you selected Photo, the thumbnail screen opens. It is
described below.
If you selected any of the other file types, a screen listing all of the files with the chosen
type. You can select one in the same manner as a photo.
3. To go back to the Mode Selection Screen, press Exit.
3.3. Thumbnail View Screen
This screen shows thumbnail versions of all photos on the selected memory source; up to 6 photos
are displayed at a time. Use this screen to select a single photo to display, or to start a Slide Show
of all of the photos.
1. Press the Arrow Buttons on the Remote Control or the JOBO Photo Display PLANO 8 until the
desired photo is highlighted. The photo's filename is displayed at the top of the screen.
2. Press the Slide Show button to start a slideshow.
3. To stop the Slide Show and return to the Thumbnail screen, press the Exit button.
3.4. Display Single Photo in Full Screen Mode
You can choose a single photo to display, without a Slide show.
1. With the Thumbnails screen displayed, press Enter to display the selected photo on the full
screen.
1. Press the Left Arrow to return to the previous photo.
2. Press the Right Arrow to display the next photo.
3. To stop the display and return to the Thumbnail screen, press the Exit button.
4. Slide Show and Photo Options
The digital Photo Frame provides many options for customizing the display, and managing files.
These options are available when viewing photos only.
Photoss
4.1. Rotate Photo
You can rotate a photo displayed full-screen using the Remote Control.
Press the rotate button to rotate the photo 90 counter clockwise.
Photoss
4.2. Enlarge Photo
To magnify a photo displayed full-screen, press the Zoom button.
• The photo doubles in size each time you press the button until it is 16 x normal size.
•
Then it will return to normal size.
•
While the photo is in enlarged, use the Arrow buttons to move the photo so you can see the
portions that aren't currently visible.
Photoss
4.3. Delete Photo
Use the Remote control to a photo from the built-in memory.
1. Press the Setup butt0n.Asetup menu opens.
2. Press the Up or Down arrow to select Delete Photo.
3. Press Enter. A confirmation message is displayed.
Caution: The photo will be deleted immediately; the deleted photos can’t be restored.
4. Press Exit to close the menu.
5. General Settings
5.1.
5.
1. Adjust the LCD Colour
Choose this option to adjust the Brightness, Contrast, Tint, and Colour of the display.
1. Press the Setup button. A setup menu opens.
2. Press the Up or Down arrow to select Adjust LCD Colour.
3. Press Enter. A second menu opens.
4. Use the Arrow buttons to select an option to adjust.
5. Use the Right and Left arrows to adjust the option. The display changes.
6. Use the Arrow buttons to select another option to adjust.
7. When the display looks the way you want it to, press Exit to close the menu.
Settingss Menu
5.2. Setting
You can control all of the viewing options in the Setup Menu using the buttons on the top of the
frame or the remote control. You can display the on-screen Setup Menu any time the Photo Display
when it is not displaying Photos, by pressing the Setup button.
1. To show the Setup menu during a photo, press the Exit button, then the Setup button.
2. When the Setup menu opens, use the Up and Down arrows to choose an option.
3. Press Enter to select the option. A second menu opens, listing the available settings. A
white square shows the current setting.
4. Use the Up and Down arrows to choose the desired setting.
5. Press Enter to select the setting. The second menu closes.
6. You can make as many changes as you wish in the same manner. When you are finished,
press the Exit button to close the Settings Menu and return to the Thumbnails screen.
7. The following table lists the display options in the Setup Menu, their options, and a
description of their actions.
Option
Language
Magic Window
Display Image Size
Slide Show Transition
Slide show speed
Slide show shuffle
Power Saving
Setting
English
German
French
Spanish
Portugal
Italian
Dutch
ON
OFF
Original
Optimal
Normal
Random
Fade
Curtain
Open Door
Cross Comb
Feast
Medium
Slow
ON
OFF
2 Hours
4 Hours
8 Hours
No power saving
Description
The on screen menu can be set
to 7different languages
Displays 4 photos at a time in a
slide show mode
The image can be shown in
original or optimized mode
Select the transition effect for
the slideshow
Select the time interval
between the single slides
Images will be displayed in a
row or randomly
The unit will turn off
automatically after the selected
time to save energy
Factory Default
-
Resets all setting to the factory
default. Note: There is no
additional warning!
6. Frequently Asked Questions
Q: How do I set up my JOBO Photo Display PLANO 8'?
8'?
A: It is very simple to get your JOBO Photo Display PLANO 8 out of the box and running in just a few
minutes. Just plug the power adapter into the JOBO Photo Display PLANO 8 and into a standard Wall
Socket. Insert a memory card into the appropriate card slot on the side of the JOBO Photo Display
PLANO 8, and turn it on. Your first slide show will automatically start to play.
Q: What memory cards can the JOBO Photo Display PLANO 8 Read'?
A: Compatible memory cards include Secure Digital, MultiMedia Card"', Memory Stick", MemoryStick
Pro", Memory Stick Duo"', Memory Stick Pro Duo", and xD card.
Q: I set up the JOBO Photo
Photo Display PLANO 8;
8; why won't it turn on?
on
A: The Adapter might not securely be connected to the Photo Display or the power switch is not on.
Q: I have a memory card in the JOBO Photo Display PLANO 8;
8; why can't I view my photos?
A: First, make sure that the memory card is one of the formats listed above and that the files on the
card are JPEG images files. Second, turn the JOBO Photo Display PLANO 8 Off and make sure that the
memory card is inserted all the way into the card slot and is facing the correction. Third, turn on
the frame. After a couple of seconds, you should see your first photo. Press Exit to open the card
selection screen and select the card. Then select photos, you should see the Thumbnails screen
listing all photos on the card. If you don't, you may want to try another card.
Note: Some digital cameras save images in other formats. Please refer to your camera's manual if your photos
are not JPEG files.
Q: Why is the picture display slower with some pictures and faster with others?
A: Higher resolution pictures load more slowly. Try using lower resolution pictures or down scaling
your images. See your camera‘s operating manual for details on down scaling your photos.
Q: Can I insert multiple memory cards'?
A: Yes. Turn on the unit before inserting any card. The Card Selection Screen lets you choose
between all available memory cards.
Q: Does the JOBO Photo Display PLANO 8 support all JPEG files?
A: No, it supports JEPG files taken from a digital camera. The JOBO Photo Display PLANO 8 may not
read all images files downloaded from the Internet or from other software graphic applications.
7. Warranty conditions
This product is subject to the legal warranty periods relating to manufacturing faults and defects.
Substance of the warranty:
1. In the event of malfunctioning caused by manufacturing defects JOBO AG will repair or
replace the defective product at its own discretion.
2. JOBO AG and its suppliers do not assume any liability for data losses occurring during
operation of the device or consequential damage resulting from this. Under no
circumstances will JOBO AG assume liability for any direct, concrete or special damage or
consequential damage like for example damage to or loss of property or devices, loss of
profits or sales, costs for spare parts, expenditure or inconvenience caused by the
interruption of service or any other damage. The user will be exclusively responsible for
the loss, damage or destruction of data during the operation of a JOBO product. Under no
circumstances will JOBO AG be liable for the recreation of such data. Under no
circumstances can claims be lodged that exceed the purchase price of the product.
3. The following repairs are not covered by the warranty and must be paid for separately:
- Malfunctions after the end of the legal warranty periods
- Change of battery after the end of the warranty period
- Change of hard disk after the end of the warranty period
- Malfunctions due to incorrect operation by the user (if device is not used as described
in the manual)
- Malfunctions caused by other devices
- Changes or damage to the device not caused by the manufacturer; especially, warranty
claims will lapse if the device has been opened by anyone other than by a JOBO AG
repair workshop
- Damage caused by natural disasters (acts of God)
- A hard disk change during the warranty period must only be performed by JOBO. Such
a change by any other party will entail the loss of all warranty claims.
If you want to make any claims under the warranty you are asked to contact the Technical Service of
JOBO AG. You will be expected to quote the serial number of the JOBO product and may also have to
submit proof of purchase to show that the warranty period has not yet elapsed.
8. Contact/Service
If you have any questions on or need help with our products please do not hesitate to get in touch
with our Technical Service. You can reach our service people by phone under the telephone number
indicated below from Monday through Thursday from 9:00 am to 4:00 pm and on Friday from 9:00
am to 1:00 pm. Independently of these service times you can also get in touch by e-mail, fax or
mail:
JOBO AG
Koelner Strasse 58
D-51645 Gummersbach
Tel. 0049 2261 545-72
Fax: 0049 2261 545-42
E-Mail: [email protected]
www.jobo.com