1
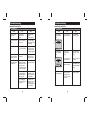
Table Of Contents
R4000
PC & AV MUSIC REMOTE WITH
ULTRASENSE™ AIR-MOUSE TECHNOLOGY
United States Version
GYR4101US
A
Introduction . . . . . . . . . . . . . . . . . . . . . . . . . . . . . . . . . . . . . . . . . . . . . . . . . . . . . . . . . 1
Battery Installation and Information . . . . . . . . . . . . . . . . . . . . . . . . . . . . . . . . . . . . . . . 1
Battery Saver . . . . . . . . . . . . . . . . . . . . . . . . . . . . . . . . . . . . . . . . . . . . . . . . . . . . . . . 1
Gyro Operation . . . . . . . . . . . . . . . . . . . . . . . . . . . . . . . . . . . . . . . . . . . . . . . . . . . . . . 2
Product Diagram . . . . . . . . . . . . . . . . . . . . . . . . . . . . . . . . . . . . . . . . . . . . . . . . . . . . . 3
Button Cluster Locations . . . . . . . . . . . . . . . . . . . . . . . . . . . . . . . . . . . . . . . . . . . . . . . . 3
RCU Mode Selection . . . . . . . . . . . . . . . . . . . . . . . . . . . . . . . . . . . . . . . . . . . . . . . . . . . 6
Transport Control . . . . . . . . . . . . . . . . . . . . . . . . . . . . . . . . . . . . . . . . . . . . . . . . . . . . 7-8
Menu Navigation . . . . . . . . . . . . . . . . . . . . . . . . . . . . . . . . . . . . . . . . . . . . . . . . . . . 9-10
Gyro Activation/Select . . . . . . . . . . . . . . . . . . . . . . . . . . . . . . . . . . . . . . . . . . . . . . . . 11
Channel/Volume Control & Media Center Green Button . . . . . . . . . . . . . . . . . . . . . . 11-12 MCE Shortcut Buttons . . . . . . . . . . . . . . . . . . . . . . . . . . . . . . . . . . . . . . . . . . . . . . . . . 13
Numeric Keypad . . . . . . . . . . . . . . . . . . . . . . . . . . . . . . . . . . . . . . . . . . . . . . . . . . . . 14
Shortcut Buttons . . . . . . . . . . . . . . . . . . . . . . . . . . . . . . . . . . . . . . . . . . . . . . . . . . . . 15
Connect . . . . . . . . . . . . . . . . . . . . . . . . . . . . . . . . . . . . . . . . . . . . . . . . . . . . . . . . . . . 16
Backlighting . . . . . . . . . . . . . . . . . . . . . . . . . . . . . . . . . . . . . . . . . . . . . . . . . . . . . . . 17
Power/Standby Toggle Button . . . . . . . . . . . . . . . . . . . . . . . . . . . . . . . . . . . . . . . . . . 17
RF Receiver & Synchronization . . . . . . . . . . . . . . . . . . . . . . . . . . . . . . . . . . . . . . . . . . 18
Setting Up & Synchronizing The Remote & The PC, Receiver Installation . . . . . . . . . . . . 18
USB Features & Compatibility . . . . . . . . . . . . . . . . . . . . . . . . . . . . . . . . . . . . . . . . . . . 19
Programming the Remote . . . . . . . . . . . . . . . . . . . . . . . . . . . . . . . . . . . . . . . . . . . . . 20
Find Out If You Need to Program the Remote . . . . . . . . . . . . . . . . . . . . . . . . . . . . . . . 20
Programming Methods . . . . . . . . . . . . . . . . . . . . . . . . . . . . . . . . . . . . . . . . . . . . . . 20-22
Using Automatic Code Search . . . . . . . . . . . . . . . . . . . . . . . . . . . . . . . . . . . . . . . . . . . 20
Using Direct Entry . . . . . . . . . . . . . . . . . . . . . . . . . . . . . . . . . . . . . . . . . . . . . . . . . . . 21
Volume Punch Through . . . . . . . . . . . . . . . . . . . . . . . . . . . . . . . . . . . . . . . . . . . . . . . 22
Learning . . . . . . . . . . . . . . . . . . . . . . . . . . . . . . . . . . . . . . . . . . . . . . . . . . . . . . . . 23-24
Learning Tips . . . . . . . . . . . . . . . . . . . . . . . . . . . . . . . . . . . . . . . . . . . . . . . . . . . . . . . 23
Code Learning & Learning Commands . . . . . . . . . . . . . . . . . . . . . . . . . . . . . . . . . . 23-24
Clearing an Individual Learned Function . . . . . . . . . . . . . . . . . . . . . . . . . . . . . . . . . . . 24
Deleting All Learned Functions . . . . . . . . . . . . . . . . . . . . . . . . . . . . . . . . . . . . . . . . . . 25
Music Mode . . . . . . . . . . . . . . . . . . . . . . . . . . . . . . . . . . . . . . . . . . . . . . . . . . . . . . . . 25
Gyration Music Service Application . . . . . . . . . . . . . . . . . . . . . . . . . . . . . . . . . . . . . . . 25
Music Display Navigation . . . . . . . . . . . . . . . . . . . . . . . . . . . . . . . . . . . . . . . . . . . . . . 26
Troubleshooting . . . . . . . . . . . . . . . . . . . . . . . . . . . . . . . . . . . . . . . . . . . . . . . . . . . 27-30
Remote Code List . . . . . . . . . . . . . . . . . . . . . . . . . . . . . . . . . . . . . . . . . . . . . . . . . . 31-50
A
Introduction
Gyro Operation
This users’ manual describes the operation of the R4000 PC & AV Music Remote Control Unit
with UltraSense™ Air-Mouse Technology (RCU). The RCU contains an embedded micro gyro
for motion sensing and in-air control of a floating cursor. This RCU features IR code database
and IR learning capabilities to universally control standard home theater devices such as TVs,
VCRs, Digital Video Recorders (DVR), DVD players, CD players, cable/SAT boxes, etc. Using the
Music Display on the RCU, you can browse through your audio files and listen to your music
on the PC without going to your computer. This RCU links directly to your Windows Media
Player® or iTunes® Audio library. The RCU is also equipped with a 2.4 GHz RF transceiver to send cursor movement information
and other commands to the PC via a USB transceiver. The radio frequency (RF) transceiver
delivers a range of up to 100 feet with no line-of-sight requirement. The 800 possible
channels of the RF transceiver provide high resistance to interference from other radio devices.
Battery Installation and Information
The R4000 PC & AV Music RCU requires four AAA Alkaline batteries. To install the batteries:
1. Remove the battery compartment cover.
2. Insert the batteries, matching the batteries to the (+) and (-) marks inside the battery
compartment.
3. Replace the battery compartment cover and snap it into place.
Battery Saver
The RCU saves battery power by automatically going into a low-power state if no button is
pressed after a few seconds. See the Gyro section for gyro battery saver mode.
Product Registration Information
Keep your sales receipt to obtain warranty parts and service and for proof of purchase. Attach it
here and record the serial number in case you need it. The serial number is located on the product.
Model Number _______________________________
Serial Number ______________________ Purchase Date _____________
Dealer/Address/Phone ________________________________________
1
A
The RCU provides in-air control of the PC’s
cursor via patented gyroscopic motion
sensing technology. This means mouse-like
cursor control, from anywhere in the
room, without the need of a flat surface. There is no line-of-sight requirement
so you don’t have to point the RCU at the PC
you are controlling. Remember the
following things when using the in-air cursor
control feature of the RCU:
•Use your thumb to press the gyro and
mouse buttons. •Click the center button to activate the
gyro motion-sensing control. Single click
and hold to move the cursor and release
it to “park” the cursor where you want it. Double click the center button and release it
for continuous cursor movement similar to a
standard mouse.
•The right and left buttons function like
standard mouse right-click and left-click
buttons.
•Move the cursor by flexing your wrist, not
your arm or body, much as you would with
a flashlight; side to side and up and down. Placing your arm on an armrest or on your
lap will make this motion more comfortable.
•The RF Transmit LED indicates when gyro
motion or other information is being
sent. The LED does not illuminate when
transmitting IR information.
2
A
Product Diagram
Button Cluster Locations
Product Diagram
Button Cluster
A Power (standby),
Music Display Button,
Backlighting
A
B
C
D
B RCU mode selection
and power
E
F
G
C Transport control
H
I
Function
Power/Standby: Places
the PC into Standby (or power
off dependant on the PC
configuration)
“Music Display Button”
Start Music display interaction
with PC
Backlight: Turns on and off the
backlight
RF Status LED is located at top
left corner (next to Gyration
company name)
Selects RCU mode
TV: IR legacy control
PC: RF communication to PC
Cable/Satellite: IR legacy
control
Auxiliary: IR legacy control
Standard AV control for selected
transport or Windows Media
Player, iTunes, Windows Media
Center, DVR, etc. (Play, pause,
stop, etc)
Includes IR control of legacy
devices if supported in IR
database
Button Cluster Locations
(continued)
Button Cluster
D Menu navigation
Standard menu navigation: up,
down, left, right, OK. Includes MS required buttons:
BACK: RF=Back, IR=Last
MORE: RF= More Info, IR=None
Includes other buttons:
INPUT: RF=none, IR=TV Input
selection
MENU: RF=DVD Menu, IR=Menu
E Gyro button cluster
Center button activates gyro
for in-air cursor control. Outer
buttons function like standard left
and right mouse buttons.
F Volume and Channel
control, eHome (Vista
MCE Green Button),
Mute
Standard volume up/down,
channel up/down, Vista Media
Center eHome, and volume mute.
G Media Center shortcuts
Shortcuts buttons to easily
navigate within the Media Center
environment. Recorded-TV, Live TV, My
Pictures, Guide
A
B
C
D
E
F
G
H
I
A
3
Function
A
4
RCU Mode Selection
Product
Product Diagram
Diagram (continued)
(continued)
Button Cluster Locations
Button Cluster
H Alpha-numeric keypad
A
B
Function
Standard 0-9 keys with alpha
characters, plus *, space, #,
CLEAR, and ENTER I US: Hotkeys
My Videos, Mail, Web, My
Radio, Favorites
(For US/North
American Remotes only)
A Puts RCU into TV control mode for
communicating with TV via IR protocol.
H
B Puts RCU into PC control mode for
communicating with the PC via RF protocol.
A
C
F
E
B
G
C
D
C . Puts RCU into Cable / Satellite control mode
for communicating with Cable or Satellite
box via IR protocol.
D . Puts RCU into Aux mode for communicating
with an auxiliary device via IR protocol.
F
E . PC, TV, CAB/SAT, AUX mode: Powers
on/off the selected device.
PC Mode: Issues a standby command. If
the system is active, the first button pressed
puts it into standby mode. If the system is
already in standby mode, a button press
will awaken. G
F
D
E
Music Display Button - Turns on Display and
puts RCU into Music control mode for playing
music stored on your PC.
H
Backlight – Toggles the backlight for the
G button keys. If the Display is active, the
Display backlight will turn on or off.
I
H Transmit LED indicator for RF transmission only
5
6
Transport Control
Transport Control
A
F
E
H
B
G
C
D
D
TV, CAB/SAT, AUX
Mode or Music Mode:
F F
TV, CAB/SAT, AUX
Mode or Music Mode:
PC Mode
A
Puts selected device into
Stop mode, if supported
Stops media playback and positions pointer to start
of media
B
Puts selected device into
Pause mode, if supported
First button press will pause the media at present
position. Subsequent button presses toggles between
pause and playback at present position pointer.
C .
Puts selected device into
Fast Forward mode, if
supported
Fast Forwards media.
D .
Skip command, if
supported by selected
device
Skips ahead an increment:
CD and Playlists skip to next song. DVD skips to next
chapter. Slide show skips to next picture. DVR skips
29 seconds.
E
Puts selected device into
Play mode, if supported
Start (if paused, continue) playback of media at
present position pointer. Used by Media Center for
Media Center media, DVR, CD/DVD, playlists and
slide shows.
7
D
PC Mode
F
Replay command, if
supported by selected
device
Move the position pointer back an increment:
CD and Playlist: skips back to previous song. DVD:
skips back to previous chapter. Slide show: skips back
to previous picture. DVR skips back 7 seconds
G
Puts selected device
into Reverse mode, if
supported
Rewinds media.
H
Puts selected device into Records the TV show to disk. Starts recording at the
Record mode, if supported beginning of the show as defined by on-screen TV
program guide (if the pause buffer enables it)
8
Menu Navigation
A
Menu Navigation
C
B
D
F
E
TV, CAB/SAT, AUX
Mode or Music Mode:
A
BACK - IR: Goes
back one location (if
supported)*
H
TV, CAB/SAT, AUX
Mode or Music mode:
PC Mode
Goes back one location of the user interface
MORE - IR: Provides
more information (If
supported)
Provide information if available for the focus point
C .
Menu Navigation Up*
Moves the focus point up one location, if at top of the
screen takes no action
D .
Menu Navigation Right* Moves focus point right one position, if at rightmost
position takes no action
E
Menu Navigation Down* Moves the focus point down one location, if at bottom of
the screen takes no action
* See Music Display Navigation
B
G
I
PC Mode
F
Menu Navigation Left*
Moves focus point left one position, if at leftmost position
goes back 1 page in the user interface
G
Menu OK
Performs action indicated by focus point
Performs action indicated
by focus point*
H .
Menu
IR: Setup menu
I
TV Input
No action
IR: (TV Mode) Cycles
through the TV inputs.
No action in other modes
Media Center “DVD Menu”
* See Music Display Navigation
Section for information on using
the Music Display
Section for information on using
the Music Display
9
A
10
A
Gyro Activation/Select
Channel/Volume Control & Media
Center Green Button
C
A
B
A
Performs a left-mouse button-click
B
Performs a right-mouse button-click
C
Activates gyroscope for motion-sensing cursor control, motion-sensing menu
navigation, or other motion-sensing features. Single click and hold to move the
cursor and release it to “park” the cursor where you want it. Double click the
center button and release it for continuous cursor movement similar to a standard
mouse.
F
Channel/Volume Control & Media
Center Green Button
A
Goes to Windows Vista
Media Center Home
page, launches Media
Center if not running
already.
B
D
B
Increment the current
channel by 1
Increment the current channel by 1. If in a list view,
move up a page in the list.
C .
Decrement the current
channel by 1
Decrement the current channel by 1. If in a list view,
move down a page in the list.
D
Mute selected device, if
applicable
Mute the entire PC volume, toggle mute state
E
Increment the current
volume by 1 unit
Increment the current PC volume by 1 unit. If muted,
un-mute the volume first.
F
Decrement the current
volume by 1 unit
Decrement the current volume by 1 unit. If muted,
un-mute the volume first.
Goes to Windows Vista Media Center Home page,
launches Media Center if not running already.
A
11
C
PC Mode
TV, AUX or CAB/SAT Mode
PC Mode
TV, AUX or CAB/SAT Mode
A
E
A
12
MCE Shortcut
Shortcut Buttons
Buttons
MCE
A
C
B
Numeric Keypad
D
A
PC, TV, AUX or CAB/SAT Mode
PC Mode
A - Recorded-TV No action
Shortcut to the Windows Media Center
“Recorded TV” page
B - Live TV
Brings Media Center Live TV to the front
No action
C - My Pictures . No action
D - Guide
Shortcut to the Windows Media Center
“My Pictures” page
Shows the EPG (electronic
program guide) for the
particular device selected
Invokes the on-screen Media Center TV
programming guide
13
A
C
B
D
E
PC Mode
PC, TV, AUX or CAB/SAT mode
A Standard 1-9, alphanumeric
Standard 1-9, alphanumeric
B Inserts a * symbol, if supported by the
. selected device
*
C Inserts a # symbol, if supported by the
selected device
#
D Clear, if supported by the selected device
Clear
E Enter, if supported by the selected device
Enter
14
A
Shortcut Buttons
Connect
A
A
B
C
D
E
A
My Videos: Microsoft defined button - Shortcut to the Windows Media
Center “My Videos” page
B
.
Mail: Launches default email program on the PC
C
Web: Launches default web browser on the PC
D
My Radio: Microsoft defined button - Shortcut to the Windows Media Center
“My Radio”
E
Favorites: Displays the Web Browser “favorites” (favorite URL addresses). Only active when the Web browser is the focus.
Connect: Located on the back side of
the RCU. Connects (Binds) the RCU to the
Gyration USB RF Receiver
(requires a pen-tip to activate the button
since it is below the surface)
A
Music Display While
Connecting
Music Display Upon Unsuccessful
Connection, See Troubleshooting
Section For More Information
A
15
A
16
Music Display Upon
Successful Connection
Backlighting
RF Receiver & Synchronization
The RCU Mode Selection buttons (TV, PC, CAB/SAT, and AUX) are lit when pressed;
these buttons light up (for 2-3 seconds) whenever they are pressed to indicate which Control
Mode the remote is in. There is no automatic backlighting on any of the RCU buttons. The “Backlight” button
controls the backlight of the RCU buttons and the Display. Upon pressing the “Backlight”
button, the main RCU keys will be backlit. If the Display is active (by pressing the Display
button), the Display will also become backlit. The backlight acts as a toggle and can also be used to turn off all backlighting. Additionally,
the backlighting will timeout after a short amount of time (timeout occurs after last button
pressed and the backlight turns off if no other button is pressed within 10 seconds).
Communication between the RCU and the PC is done via an RF transceiver which is plugged
into a standard USB port in the PC. In order for this to work, you need to synchronize, or
“bind” your remote and PC. See below for the binding procedure.
Receiver Installation
The RCU requires a USB RF transceiver be plugged into a USB port in the PC in order to
access RF and gyro functions. The USB extension cable can be used to maximize the range
of the RCU by placing the USB RF transceiver away from other electrical components. A
USB RF transceiver does not need to be plugged in to use the IR remote functions. See the
diagram below.
If the backlighting seems dim, the batteries may need to be replaced.
Power / Standby Toggle Button
This button turns the selected device on or off or toggles its power state from standby to
active. The device is selected with the RCU Mode Switches; PC, TV, CAB/SAT, and AUX.
In PC mode, this button issues a standard Windows® STANDBY command. Various options
for this command can be set up in Windows. Go to Start/Control Panel/Power Options/
Advanced and then set a function for the STANDBY command. In the default configuration,
if the PC is already on, press this button to put the PC into standby mode. If the PC is in
standby mode, press and hold this button for 2 - 3 seconds to wake up the PC.
Setting
Up & Synchronizing The
Remote & The PC
After inserting the batteries in the remote control unit,
1. Hold the remote in close proximity to the PC. 2. Press the CONNECT button on the RF Dongle transceiver which is plugged into
the PC USB port. 3. Press the CONNECT button on the underside of the RCU. 4. The Display screen on the RCU will indicate a successful connection.
5. If a successful connection is not made, repeat steps 1 - 3
17
A
18
A
USB Features
Programming the Remote
• Connects to PC via standard USB 1.1 or USB 2.0 connection
• PC operating systems supported: Windows Vista, Windows XP MCE, and Windows XP
• LED to indicate bind sequence and radio activity
• Connect button, pen-push type
USB Compatibility
The transceiver uses a standard USB Type A connector for connection to any standard USB
port of a computer. The transceiver is a certified USB compatible 2.0 device, running at low
speed. It is certified to run on Windows Vista, Windows XP MCE, and Windows XP.
Transceiver Compatibility
Matrix with Gyration Products
This transceiver is compatible with the following Gyration products:
R4000 (The Music Service and Music Display functions of this remote require use of the
included R4000 RF Receiver to fully function)
Gyration Go Mouse
Gyration Go Mobile keyboard
Gyration Go Full size keyboard
Gyration Media Center Universal Remote Control
Gyration GyroTransport
A
19
The RCU can be programmed to operate many brands of IR controllable devices via the
IR functions of the RCU. Devices include TVs, DVD Players, Cable/Satellite Boxes, etc. Please see the Remote Code List for all devices supported.
Find Out If You Need to Progam the Remote
To determine whether the remote needs to be programmed to operate your device, do the
following (using the TV as an example)
1. Turn on the TV.
2. Point the remote at the TV.
3. Press the TV button.
4. Press the ON/OFF button to see if the TV responds. If the TV doesn’t respond, you must
program the remote to operate it.
Programming Methods
There are two ways to program the remote control: the Menu Based Programming Method
and the Direct Programming Method.
Menu Based Programming Method
To enter the Menu Based Programming Method, press
and hold the device mode button of the particular device to be programmed. After three seconds, the main
menu will appear on the display. All programming
steps can now be completed by following the on-screen
menu. Here is an example main menu that will be displayed after holding down the TV device mode button:
Direct Programming Method: The Direct Programming Method allows you to perform
one particular programming step directly, as outlined below. To program the remote control to
operate other components you may choose between Automatic Code Search and Direct Entry.
Using Automatic Code Search: The following instructions can be used to program the
RCU to operate each of your components. If you want to stop the automatic code search without
programming any of your components, press CLEAR and the indicator on the RCU turns off.
1. Turn on the device you want to operate (TV, DVD player, etc.)
2. Press and hold the device button you want to program (TV, AUX, etc.). While holding
the device button, press and hold ON/OFF button until the device button on the RCU
turns on, then release both buttons. When the RCU has successfully entered search mode
all devices buttons turn on. NOTE: This step must be completed within 2 seconds to
activate Automatic Code Search without entering the Menu Program Method.
A
3. Point the remote at the device.
20
Programming Methods
(continued)
4. Press and release PLAY, then wait 5 seconds or until the device button stops flashing. At
this point the RCU is searching for the correct code to program. If, after 5 seconds, the
device you want to operate does not turn off, press PLAY again to tell the RCU to search the
next set of codes. Continue pressing and releasing PLAY until the device turns off or you
have searched through all of the codes. The device buttons flash when all codes have been
searched, the device button turns off, and after 30 seconds the RCU exits the Automatic
Code Search mode.
If the component you want to control does turn off:
1. Press and release REVERSE, then wait 2 seconds. Repeat this step until the component
turns back on.
2. To finish, press STOP and the devices buttons on the RCU turn off. The RCU will automatically
exit the Automatic Code Search mode.
Using Direct Entry
1. Turn on the device you want to operate (TV, DVD player, etc.)
2. Look up the brand and code number(s) for the device in the Remote Code List at the end
of this booklet. 3. Press and hold the device button you want to program ((TV, AUX, etc.) on the RCU.
4. Enter the 4-digit code from the Remote Code List. 5. Release the device button, if all the mode buttons flash, you have entered an invalid
code. Otherwise, point the RCU at the device, and then press the ON/OFF button to see
if the device responds to the command.
• If you get no response, repeat these steps using the next code listed for your brand, until the device responds to the remote commands.
• If you try all the codes for your device brand and none work, try the automatic code search method. If automatic code search doesn’t find the code, the remote is not compatible with your component.
Because the RCU controls more than one device, you must first “tell” it which device you
wish to operate. For example, if you wish to operate the TV, you must first press the TV
mode button on the RCU to put it in the TV mode.
The RCU stays in the chosen mode until you change it. If the RCU is in the TV mode, you
must change the mode in order to operate other components. For example, if you are in
the TV mode and you wish to turn off the Cable Box, you must first press the CAB/SAT
button then the On/Off button. Return to the TV mode by pressing the TV mode button.
A
21
Programming Methods
(continued)
Volume Punch Through
The Volume Punch Through feature allows you to control the volume without exiting the
current mode. When Punch Through is enabled, the VOL+, VOL-, and MUTE keys will
always control the Punch Through device. By default the TV is the Volume Punch Through
device. To disable Volume Punch Through, see the “Disabling Volume Punch Through”
Section below. Note: Volume Punch Through only applies to the three IR Mode Device Buttons (TV,
CAB/SAT, and AUX).
Note: The remote must be programmed via Automatic Code Search or Direct Entry
before enabling Volume Punch Through.
To change the Volume Punch Through device or enable Volume Punch Through:
1. Press and hold the device button of the device you want to Punch Through .
(TV, AUX, etc.) on the RCU.
2. Press and hold the VOL- button until all device buttons on the RCU turn on, .
then release both buttons. Volume Punch Through is now enabled for the selected device. NOTE: The steps to enable
Volume Punch Through must be completed within 2 seconds to activate without entering
the Menu Program Method. Disabling Volume Punch Through
To disable Volume Punch Through:
1. Press and hold any device button (TV, AUX, etc.) on the RCU.
2. While holding the device button, press and hold the MUTE button until all of the device
buttons turn on.
Volume Punch Through is now disabled.
NOTE: The steps to disable Volume Punch Through must be completed within 2 seconds to
successfully disable without entering the Menu Program Method.. Note: If an invalid button is pressed, all device buttons blink 4 times and turn off. At this
point, you must start over.
Once Volume Punch Through is disabled, the VOL+, VOL-, and MUTE keys will control
the device currently selected by the Device button (PC, TV, CAB/SAT, or AUX). To
enable Volume Punch Through, see the “Volume Punch Through” Section above.
A
22
Learning
Learning
The RCU has the ability to learn the commands of other remote control
units, such as TV remotes or VCR remotes. This allows the most-used
commands on those remotes to be combined on the RCU. These original
remote control units are also known as source remotes. Learning is not
active in the PC mode.
Learning Tips
1. All learned functions for a mode can be erased if you program a different
device to that mode.
2. Perform the learning process in low-light areas because too much
ambient light might cause interference with the infrared (IR) signals
of the remotes.
3. Use fresh batteries in both the RCU and the original remote. 4. Set the two remotes on a table or other flat surface, and .
Remotes should
don’t move them around while learning.
not be
more than
Codes from the Remote Code List include basic functionality for . 2” apart
Code Learning
each component they control. Once you have programmed in the .
code for your specific component (using either the Automatic Code .
Search or Direct Entry method), you can customize the RCU to perform
certain functions from your original remote(s) that were not embedded
in the preset code. The RCU has the ability to learn and store commands
from your original remote(s) under the mode(s) of your choice. Learning Commands
For the following section, the TV remote control unit will be used as an
example. Learning from other types of remotes will be done in a .
similar way.
1) First press and hold the device button on the RCU for the component
remote you are learning from (the TV button on the RCU, for
example) then press and hold the RECORD button on the RCU.
2) Keep pressing both buttons until all device mode buttons turn on. Release both buttons. The selected device button will remain on
indicating which device is being programmed.
NOTE: The first two steps to learn commands must be completed within 2
seconds to learn without entering the Menu Program Method.
A
23
(continued)
3) On the RCU, press and release the button where you want to store the new function (the
device button turns off).
Note: If you press an invalid button on the remote, the device mode button flashes 4 times
to alert you. You’ll have to repeat step 3.
4) Position the source remote facing the bottom of the RCU no more than 2 inches apart. Press and hold the button of the source remote that has the functionality you are
recording. Keep pressing the button until the RCU device mode button light turns on (the
source function has been saved to the TV mode on the RCU). Note: If all device mode buttons flash 4 times, the function wasn’t learned. Try again
starting with Step 1.
5)The RCU remains in the “learning mode” so you can continue adding functions to
different buttons by repeating steps 3 and 4. 6)Press CLEAR to exit the learning mode.
Clearing an Individual Learned Function
To delete a learned button function, use the procedure below.
1. Press and hold the device mode button (the device button lights). Then press and hold
the STOP button. Hold both buttons depressed until all device mode buttons turn on.
NOTE: This step to must be completed within 2 seconds to be able to clear an individual
learned function without entering the Menu Program Method. 2. Release both buttons. The device mode button turns on indicating that the RCU is now in
the Clear Learned Function mode for that device.
3. Press and release the button where learning is to be cleared. The device mode button
blinks off then back on indicating that the function was cleared successfully. 4. Repeat Steps 1 through 3 until all the buttons’ learned functions have been cleared.
Note: If an invalid button is pressed, the device mode button flashes 4 times, the
selected component button stays on, and the RCU remains in Clear Learned Function
mode. Repeat Step 3 to continue the clearing process.
5. Press the CLEAR button to return the RCU to normal operation.
Deleting All Learned Functions - One Device
To delete all learned functions for one device at one time, use the procedure below.
1. Press and hold the device mode button (the device button lights). Then press and hold
the CLEAR button. Hold both buttons depressed until all device mode buttons turn on.
NOTE: This step to must be completed within 2 seconds to be able to clear all learned
A
24
functions from a device without entering the Menu Program Method.
2. Release both buttons. The device mode button turns on indicating that the RCU is now in
the Deleting All Learned Functions mode for that component.
3. Press and release 1, 2, 3 and all of the learned keys for that device will be erased. Any
other key will exit the Deleting All Learned Functions mode.
Note: Pressing the CLEAR button while in this mode will not delete the learning functions,
but it will exit this delete mode.
Music Display Navigation
When you press the Music Display button ( button) the Display powers up and displays
the top level menu structure. (If service application is running and within range, see the
Troubleshooting section for more details).
Music Mode
Music mode is a revolutionary new way for you to search through and play your favorite
songs that you have already setup on your Windows PC. It links directly to your
Windows Media Player or iTunes Audio library so that you can browse through your audio
files and listen to your music without going to your computer.
Note: This mode of the RCU is intended for use on the Windows operating system using
the Windows Media Player application (version 10 or higher) or iTunes application (version
7.5 or higher). Operation on other operating systems has not been verified.
Gyration Music Service Application
The RCU comes with a software application that runs in the background (as a “service”) on
the computer (PC) and interfaces to the Windows Media Player or iTunes music database. The
application communicates the music database information to the RF transceiver attached to
the computer. The information is then transmitted via RF to the RCU and shown on the display. Gyration Music Service Application is required
for operation of the Music display. This Software
service is provided via an installation CD. Check
for software updates at www.gyration.com.
D uring installation of the software service,
you will select the default music interface,
Windows Media Player or iTunes. The music
interface can be changed at any time by
clicking on the tray icon, where there are
two menu items (Windows Media Player and
iTunes), with a check mark next to the active
one. You simply click on the other one to change the setting.
To move up and down the screen, use the UP and DOWN arrow keys.
To enter a menu level, use either the right (or OK) button. To back out of a level, use the
left (or Back) button. You can play the whole album by pressing the Play button at this
level, or enter the album and select a specific song.
Note: As you navigate through the menu the heading changes on the top line.
While a song is playing, the MP3 Tag information (called Metadata) will be shown on the
display along with a progress bar, the current running time and the time left for that song.
This software service can be enabled/disabled manually by the user. The service is set to
“enabled” by default (upon system boot). Disabling the service has no effect on normal
RCU operation (TV, PC, CAB/SAT, and AUX modes), but will make the display inoperable.
25
26
Troubleshooting
Troubleshooting
Adjusting the Contrast on the Display
To adjust the contrast on the Display, perform the following steps:
1. With the Display screen active, press and hold the button located beneath the Display screen. 2. Continue to hold the button after the Display screen turns off for 5 more seconds. 3. The Display Contrast adjustment screen will appear. 4. Use the menu navigation up and down arrows to adjust to the desired appearance. 5. Press any button to exit. 6. If no button is pressed, the display will time out in about 5 seconds. Note: The contrast settings range from 0 (lightest) to 21 (darkest). Low levels of the
contrast setting may cause the unit to have no visible display.
Note: The contrast value is stored, even when removing the batteries.
Common Problems and Solutions
Cursor Control Issues
Problem
The Display screen does not
match or show the updates to
the Windows Media Player or
iTunes audio library.
Reinstalling the R4000 Installation Software
To reinstall the R4000 Installation Software service application, perform the .
following steps:
1. With Windows® running on your computer, insert the CD into your CD/DVD-ROM drive. 2. If the CD window does not open automatically, double-click the My Computer icon on
your desktop, and then double-click the CD/DVD-ROM drive containing the CD. 3. Locate the install package provided on the CD for your RCU. 4. Follow the instructions provided by the CD to extract and install the application.
The Menu Navigation buttons
are non-responsive while the
Display screen is active.
The cursor does not move
when the “Motion by
Gyration” button is pressed.
A
27
Cause
Solution
The Gyration Music Service
Application did not update
correctly.
Restart Application, by clicking
the Gyration Music Service
(green) icon on the Windows
Taskbar, and clicking “Restart.”
The Display screens needs to
be manually refreshed.
Press the button to return
to the Main Menu.
The Display screens needs to
be manually refreshed.
Use the menu navigation
buttons to move up or down
from the current level in the
Display screen.
The Gyration Music Service
Application has lost contact
with the remote control.
Refresh the Display screen by
pressing the button for
three seconds to shut off the
Display screen, then pressing
the button again to turn
the Display screen back on.
The remote control is out of
range with the computer. (Display shows: out of range)
Place the remote control closer
to the computer.
The remote control and
computer are not connected.
.
Connect the RCU with your
computer.
The batteries are low.
Replace the batteries.
A
28
Troubleshooting
Troubleshooting
Common Problems and Solutions
Common Problems and Solutions
Cursor Control Issues
Cursor Control Issues
Problem
Cause
Solution
The cursor movement is
choppy or erratic.
There may be radio
interference near the
computer.
Move any electronic devices
away from PC
(i.e., speakers, radio, etc.).
The cursor moves too fast or
too slow.
The speed or acceleration is
not set properly.
Change the cursor tracking
speed under the Mouse settings
in the Control Panel.
The cursor drifts on the
screen.
The remote control sensor
may require self-recalibration.
Place the remote control on a flat
surface for 5 or more seconds. The
gyroscope will perform a self-steady
routine to identify and eliminate drift.
The cursor moves even when
I’m not pressing the “Motion
by Gyration” center button
You are in continuous cursor
movement mode.
Press the “Motion by Gyration” button
to exit this mode. See the Gyro
Operation section for more details.
The Power/Standby button
does not wake the computer
out of Standby mode.
If the computer is placed into
Hibernation or Shutdown mode,
and then the AC power is removed,
the internal receiver loses its
power and cannot wake the system
(even if AC power is reapplied).
Turn on the computer manually
using the system Power button.
If the BIOS setting for Wake
from USB is disabled, the
system will not turn back on
via the remote control. Enable the wake from USB option
in the system BIOS. For information on accessing the system BIOS,
see your Owner’s Manual. The Power/Standby button
may need to be held down for
PC to recognize it.
Press and hold the Power/
Standy button for 2 -3 seconds
to wake the PC. See the
Power / Standby Toggle Button
section for more details.
29
A
Problem
Cause
Solution
The text “NO LINK” is
displayed on the Display
screen.
The remote control and
computer are not connected.
Connect the R4000 Music Remote with your computer.
The text “NO SERVICE” is
displayed on the Display
screen.
There may be radio
interference near the
computer.
Move any electronic devices
away from PC (i.e., speakers,
radio, etc.).
The remote control is out of
range with the computer.
Place the remote control closer
to the computer.
The Gyration Music Service
Application is not enabled.
To re-enable the Application, click
the Gyration Music Service (red)
icon on the Windows Taskbar and
click “Start.”
All text in the remote control
Display screens will be in
English until a successful
connection to the computer
has been made.
Connect the R4000 Music
Remote with your computer.
The text on the Display Screen
is in English (if applicable).
30
A
Remote Code List
Remote Code List
Brand
Code
TV
Abex
1098
Acer
1041
Admiral
1001 Adventura 1100
Aiko
1015
Aiwa
1034
Akai
1002
Alleron
1044
Amtron
1036
Anam National1003 AOC
1004 Apex
1074 Audiovox
1036
Bell & Howell 1001 Benq
1042 Bradford
1036
Broksonic
1114 Candle
1004 Celebrity
1002
Citizen
1004 Colortyme
1004
Concerto
1004
Contec/Cony 1011 Craig
1036
Crown
1036 Curtis Mathes 1000 CXC
1036
Daewoo
1004 Daytron
1004 Dell
1141 Brand
TV
Dimensia
Electroband
Electrohome
Emerson
Envision
ESA
Fisher
Fujitsu
Funai
Futuretech
Gateway
GE
Goldstar
Grunpy
Hallmark
Harvard
Hisense
Hitachi
IMA
Infinity
Janeil
JBL
JC Penney
JCB
Jensen
JVC
1099
1036
1005
1088 1111 1119
1045
1136
1121
1007 1100
1007 1015 1036 1073 1097
1012 1036
1053
1004 1014 1045 1073 1097
1005 1013 1015 1016 1097 1106 1135
1097
1142 1146
A
31
Code
1000
1002
1002 1004 1080 1004
1046
1043 1029 1036 1036
1038
1000 1070 1004 1036 1004
1036
1112
1004 1132 1036
1053
1100
1053
1000 1063 1002
1004
1011 1131
1003 1004 1018 1021
1011 1013 1025 1031 1033 1036 1044 1045 1097 1102 1107
1045 1047 1103
1044
1044
1003 1004 1008 1021 1048 1049 1063 1068 1144
1005 1011 1018 1050 1090 1091 1097 1098
1044
1011 1012 1030 1051 1084 1085 1086 1102 1133 1134
1004 1005 1007 1012 1021 1048 1049 1058 1068 1072 1073 1075 1097 1098
1012 1026 1049 1054 1055 1080 1117 1130 A
32
Remote Code List
Remote Code List
Brand
Code
TV
Kawasho
1002 Kenwood
1004 Kloss Novabeam1036 KTV
1036 LG
1005
Loewe
1053
Logik
1001
Luxman
1004
LXI
1000 Magnavox 1004 1147
Majestic
1001
Marantz
1004 Megatron
1004 Memorex
1001 MGA
1004 Midland
1049 Minutz
1048
Mitsubishi
1004 Montgomery Ward1001
Motorola
1003 MTC
1004 Multitech
1036
NAD
1004 NEC
1003 NET-TV
1040
Nikko
1004 NTC
1015
Onwa
1036
Optimus
1085
Brand
Code
TV
Optonica
1064 Orion
1023 Panasonic
1003 Philco
1003 1059
Philips
1003 1059 Philips Magnavox1148
Pilot
1097
Pioneer
1004 Portland
1004 Price Club
1073
Prima
1113
Prism
1049
Proscan
1000 Proton
1004 Quasar
1003 Radio Shack 1000 Radio Shack/Realistic
RCA
1000 1067 1115 Realistic
1000 Sampo
1004 Samsung
1004 1094 Sansui
1023 Sanyo
1045 Scotch
1004
Scott
1004 1004
1018
1056 1057 1100
1097
1004 1045 1053 1058 1068 1075
1007 1018 1053 1056 1057 1059 1060 1110 1051 1053
1051
1004 1005 1022 1045
1005 1018 1021 1047 1061
1068 1097 1098
1005 1018 1021 1032 1047 1061
1099
1005 1073
1058 1075 1085
1004 1005
1015
33
A
1099
1033 1107
1010 1049 1053 1096 1123 1140 1152
1004 1005 1007 1011 1018 1053 1056 1057 1007 1011 1017 1018 1037 1053 1056 1057 1063 1095 1126 1129 1148
1085 1102
1005 1015 1035 1097
1008 1068
1011
1039 1049 1045
1004 1011 1003 1004 1068 1071 1143 1151
1045
1097 1098 1005 1011 1097 1098
1107 1122
1103
1062 1069
1036 1045 1064 1097 1098
1005 1008 1018 1028 1052 1065 1076 1082 1102 1104 1106 1108 1120
1014 1018 1019 1072 1073 1078 1011 1033 1036 1044
34
A
Remote Code List
Remote Code List
Brand
TV
Sears
Sharp
Signature
Simpson
Sony
Soundesign
Squareview
SSS
Starlite
Supre-Macy
Supreme
Sylvania
Symphonic
Tandy
Tatung
Technics
Techwood
Teknika
TMK
Toshiba
Totevision
Universal
Victor
Vidtech
Viewsonic
Brand
Code
TV
Viking
1100
Wards
1000 1001 1004 1005 1018 1031 1044 1048 1053 1056 1057 1059 1060 1063 1064
White Westinghouse 1013
Yamaha
1004 1005 1018
Zenith
1001 1020 1081 1089 1118 1125
TV/DVD Combo (TV)
Apex
1074
Broksonic
1114
RCA
1076 1115
Sansui
1122
Sylvania
1150
Toshiba
1116
TV/DVD Combo (DVD)
Apex
3095
Broksonic
3053
RCA
3099 3063
Sansui
3071
Sylvania
3092
Toshiba
3054
TV/VCR Combo (TV)
Broksonic
1121
GE
1070
Quasar
1062 1069
RCA
1028
Samsung
1078
Sylvania
1145
Toshiba
1006
Zenith
1118
Code
1000 1068 1004 1138 1001
1007
1002 1004 1105
1036
1036
1100
1002
1004 1060 1024 1099
1003
1049
1004 1001 1060 1004
1006 1101 1097
1048 1055
1004 1149
1004 1012 1018 1044 1045 1047 1055 1058 1075 1103 1105
1009 1011 1025 1064 1077 1092 1097 1099 1153
1037 1109 1128 1137
1007 1036 1044
1007 1018 1027 1046 1053 1056 1057 1059 1124 1145 1150
1031 1036 1105
1049
1004 1005 1007 1011 1012 1015 1036 1044 1073 1096 1097
1045 1058 1073 1075 1079 1083 1087 1093 1116 1127
1063
1005
A
35
A
36
Remote Code List
Remote Code List
Brand
Code
TV/VCR Combo (VCR)
Broksonic
2098
GE
2069
Quasar
2067 2068
RCA
2065
Samsung
2070
Sylvania
2064
Toshiba
2063
Zenith
2060
TV/DVD/VCR Combo (TV)
Panasonic
1123 1152
RCA
1151
Sharp
1153
Sylvania
1027 1124
Toshiba
1087 1101
TV/DVD/VCR Combo (DVD)
Panasonic
3075 3076
RCA
3077
Sharp
3086
Sylvania
3064 3078
Toshiba
3094 3093
TV/DVD/VCR Combo (VCR)
Panasonic
2072 2073
RCA
2046
Sharp
2055
Sylvania
2050 2071
Toshiba
2059 2056
DVD
Aiwa
3026 3131
Apex
3001 3056 3057 3095 3098
Audiovox
3132
Code
Brand
DVD
Blaupunkt 3136
BOSE
3122 Broksonic
3053 Clarion
3100
Classic
3101
CyberHome 3083
Daewoo
3058 Denon
3040 Emerson
3059 Fisher
3112 GE
3041 Go Video
3046 GPX
3114
Harman Kardon3125
Hitachi
3000 Irradio
3017
JVC
3047 Kenwood
3019 Konka
3029
Lasonic
3081
Magnavox 3002 Marantz
3034
Memorex
3003
Mintek
3004
Mitsubishi
3021 NAD
3059 Nakamichi 3116
Norcent
3005 Onkyo
3006
Oritron
3009
37
A
3130
3072
3062 3137 3138
3110 3133
3073
3134
3079 3118
3124 3127 3129
3027 3126
3090 3096 3097 3115
3039
3018
3030 3123
3139
3117
38
A
Remote Code List
Remote Code List
Brand
DVD
Panasonic
Philips
Pioneer
Polaroid
Proscan
Qwestar
RCA
Sampo
Samsung
Sansui
Sanyo
Sharp
Sherwood
Sony
Sylvania
Techwood
Toshiba
Yamaha
Zenith
CD
Denon
JVC
Onkyo
Pioneer
RCA
Sony
Yamaha
Brand
Code
Digital Network Recorder
Sony
2001
DVR
Panasonic
2004
Philips
2002
RCA
2000
RePlay
2003
Tivo
2000
PVR
Tivo
2087
VCR
Admiral
2027
Adventura 2047
Aiko
2048
Aiwa
2047
Akai
2081 2084
American High 2042
Asha
2035
Audio Dynamics 2031 2032
Audiovox
2036
Beaumark 2034 2035
Bell & Howell 2033
Broksonic
2034 2078 2098
Calix
2036
Candle
2035 2036 2037 2039 2040
Canon
2042
Carver
2062
CCE
2048 2061
Citizen
2035 2036 2037 2039 2040 2048
Colortyme
2031
Colt
2061
Code
3066 3018 3008
3007
3010 3009
3010 3119
3012 3071
3050 3013 3121
3014 3103 3064 3141
3023 3094 3028
3052 3075 3076
3032 3045 3051 3091 3109
3033 3118
3048 3055 3063 3077 3099 3107 3118
3049 3074 3085 3102
3120
3015 3044 3086
3020 3022 3065 3067 3068 3069 3070 3087 3108 3113
3078 3092
3025 3037 3038 3054 3080 3084 3088 3093 3135
VCR Code
3128
2104
2099
2100
2101
2102 2106
2105
2103
A
39
Tuner Code
A
40
Remote Code List
Remote Code List
Code
Brand
VCR
Craig
2035 2036 2044 Curtis Mathes 2026 2031 2035 Cybernex
2035
Daewoo
2037 2039 2047 DBX
2031 2032
Dimensia
2026
Dynatech
2047
Electrohome 2036 2049
Electrophonic 2036
Emerson
2034 2036 2037 Fisher
2033 2044
Fuji
2042 2084
Funai
2028 2047
Garrard
2047
GE
2026 2035 2042 Go Video
2043 2045 2088 Goldstar
2031 2036 2040
Gradiente
2047
Harley Davidson 2047
Harman Kardon 2031
Harwood
2061
Headquarter 2033
Hi-Q
2044
Hitachi
2038 2058 2081
Instant Replay 2042
JC Penney 2031 2032 2033 2062 2062
JCL
2042
Jensen
2058 2081
Code
Brand
VCR
JVC
2030 Kenwood
2031 KLH
2061
Kodak
2036 LG
2036
Lloyd’s
2047
Logik
2061
LXI
2036
Magnavox 2042 Magnin
2036
Marantz
2031 Marta
2036
Matsushita 2042
MEI
2042
Memorex
2027 MGA
2049
MGN Technology2035
Midland
2057
Minolta
2058
Mitsubishi
2049 Montgomery Ward
Motorola
2027 MTC
2035
Multitech
2035 NEC
2031 Nikko
2036
Noblex
2035
Olympus
2042
Optimus
2027 2061
2040 2042
2048 2085
2042 2047 2049 2076 2097
2069
2092
2034 2035 2036 2042 2058 2061 2031 2032 2033 2040 2081 2093
2032 2033 2040 2081
2042
2062 2077
2032 2033 2040 2042 2062
2033 2035 2036 2042 2044 2047 2077
2058
2027
2042
2047 2057 2061
2032 2033 2040 2081
2036
42
41
Remote Code List
Remote Code List
Brand Code
VCR
Panasonic
2042 Pentax
2058
Pentex Research2040
Philco
2042 Philips
2042 Pilot
2036
Pioneer
2032 Polaroid
2041
Portland
2039
Proscan
2026
Protec
2061
Pulsar
2077
Quarter
2033
Quartz
2033
Quasar
2042 Radio Shack 2027 Radio Shack/Realistic
Radix
2036
Randex
2036
RCA
2026 Realistic
2027 Ricoh
2090
Runco
2077
Samsung
2035 Sanky
2027 Sansui
2032 Sanyo
2033 Scott
2034 Sears
2033 Sharp
2027 Shintom
2061 Brand Code
VCR
Shogun
2035
Signature
2027
Singer
2042 2061 2090
Sony
2051 2074 2084
STS
2042
Sylvania
2042 2047 2050 Symphonic 2028 2047
Tandy
2033
Tashiko
2036
Tatung
2081
Teac
2047 2081
Technics
2042 2079
Teknika
2036 2042 2047
TMK
2035
Toshiba
2037 2052 2053 Totevision
2035 2036
Unitech
2035
Vector Research 2031 2032 2037
Victor
2032
Video Concepts 2031 2032 2037
Videosonic 2035
Wards
2027 2035 2036 2061
White Westinghouse 2028
XR-1000
2042 2047 2061
Yamaha
2031 2032 2033 Zenith
2029 2060 2077 DVD/VCR Combo (DVD)
Broksonic
3072
Daewoo
3062
Emerson
3073
2072 2073 2079 2080 2082 2083
2062
2062 2091
2058
2067 2068
2036
2033 2035 2036 2042 2044 2047 2049
2035 2042 2046 2058 2065 2066 2086 2094
2033 2035 2036 2037 2042 2044 2047 2049
2037 2054 2077
2081
2035 2044 2037
2036 2042 2039 2049 2084
2057 2070 2075 2095
2096
2044 2058
2055
43
2062 2064 2071
2056 2058 2059 2063
2037 2042 2044 2047 2049 2058 2040 2081
2084 2089 2090
44
Remote Code List
Remote Code List
Brand
Code
DVD/VCR Combo (DVD)
Go Video
3046 3127 3129
Hitachi
3126
JVC
3047 3097
Panasonic
3066
Philips
3051
Polaroid
3007
RCA
3048
Samsung
3049 3085 3074
Sanyo
3050
Sony
3065 3067
Toshiba
3080 3084
Zenith
3052 3128
DVD/VCR Combo (VCR)
Broksonic
2078
Daewoo
2085
Emerson
2076
Go Video
2092 2043 2045
Hitachi
2038
JVC
2093 2030
Panasonic
2082
Philips
2091
Polaroid
2041
RCA
2094
Samsung
2095 2054 2075
Sanyo
2096
Sony
2051 2074
Toshiba
2052 2053
Zenith
2089 2029
Brand
Cable Box
ABC
4000 Adelphia
4049
Antronix
4006 Archer
4007 Cable Vision 4050
Cabletenna 4006
Cableview
4005
Colour Voice 4010 Comcast
4051 Comtronics 4012
Contec
4014
COX
4053
Eastern
4015
GC Electronics 4007
GE
4000 Gemini
4016 General Instrument
General Instruments
Hamlin
4018 Hitachi
4001
Jerrold
4001 Magnavox 4023
Memorex
4024
Motorola
4052 Movie Time 4025
NEC
4003
NSC
4025
Oak
4014 Panasonic
4042 Philips
4009 Pioneer
4031 45
A
Code
4001 4002 4004 4046
4007
4008
4011
4052
4001
4017
4051
4001 4048
4019 4020 4026 4033 4039 4047
4016 4021 4022 4046 4048
4053 4054
4027
4045
4010 4011 4013 4017 4023 4028 4029 4030
4032
46
A
Remote Code List
Brand
Cable Box
Proscan
4000 RCA
4005 Realistic
4007
Regal
4020 Regency
4015
Rembrandt 4001
Samsung
4032
Scientific Atlanta4004 Signal
4016
Signature
4001
Sony
4050
Sprucer
4045
Standard Component
Starcom
4016 Stargate
4016
Starquest
4016
TIME WARNER 4055
Tocom
4002 Tusa
4016
TV86
4025
Unika
4006 United Cable 4046
Universal
4006 View Star
4014 Zenith
4044
SAT
Alphastar
5023
Chaparral
5002 DIRECTV
5069
Dishnet
5022
Remote Code List
Code
4001
4041 4043 4045 4048
4033 4047
4034 4035 4036 4049
4037 4038
4046
4021
4007
4007 4008
4023 4025
5003
A
47
Brand
Code
SAT
DISH Network 5061 5065 5066 Drake
5004 5005
Echostar
5030
GE
5000 5001 5016 General Instruments 5006 5007 Hitachi
5026 5027
Hughes
5036 5058 5069
Hughes Network 5069
Hughes Network Systems 5031 5069
JVC
5025
Mitsubishi
5043 5045
Panasonic
5019 5049 5052 Philips
5028 5039 5048 Pioneer
5053
Primestar
5020
Proscan
5000 5001 5016 RCA
5000 5001 5016 5058 5059
Realistic
5009
Samsung
5044 5046 5058
Sony
5017 5035 5037 STS
5032
STS1
5010
STS3
5012
STS4
5013
Toshiba
5014 5018 5050
Uniden
5015 5029
Zenith
5051 5064
5067 5068
5033 5034 5056
5008
5054
5057 5058 5063
5033 5034
5024 5033 5034 5040 5041 5055 5038 5042 5047 5060 5062
A
48
Remote Code List
Brand
Audio
Aiwa
6000 BOSE
6007 Carver
6000 Citizen
6060
Denon
6008
Fisher
6036
GE
6062
Goldstar
6050 Harman Kardon 6000 Hitachi
6068
JBL
6009
JVC
6010 Kenwood
6011 Linn
6000
Magnavox 6000 Marantz
6000 Nakamichi 6046
NEC
6067
Onkyo
6018 Optimus
6042
Panasonic
6035
Philips
6000
Pioneer
6021 Proton
6069
Quasar
6035
RePlay
6062
RCA
6024 Sansui
6000
Sharp
6063 Sherwood
6027 Remote Code List
Code
6001 6002 6004 6005 6006 6007 6037 6054
6071
6036
6055
6009 6047
6052 6058
6012 6049 6056
6069
6034
6039 6040 6051
6022 6043 6044 6057 6070
6025 6026 6059
6064 6065 6066
6045
49
A
Brand
Audio
Sony
6017 6081
Teac
6053
Technics
6016 Toshiba
6061
Victor
6058
Wards
6000 Yamaha
6003 HTIB (DVD)
BOSE
3130
JBL
3043
Koss
3060
Onkyo
3024
Philips
3036
Pioneer
3016
RCA
3042
Sony
3108 Venturer
3011
HTIB (AUDIO)
BOSE
6071
JBL
6072
Koss
6074
Onkyo
6075
Philips
6077
Pioneer
6078
RCA
6079
Sony
6081 Venturer
6082
Code
6028 6029 6030 6031 6032 6033 6054 6080 6035
6021
6014 6015 6021 6041
3113
6080
50
A
Notes
US Patent Numbers: 5,440,326; 5,898,421; 5,825,350 and other pending patents GYR4101US .
All trademarks and copyrights are property of their respective owners.
© 2008 MOVEA, INC. • 680 N. McCarthy Blvd., Suite 120 • Milpitas, CA 95035 USA • www.gyration.com
Made in China. DL02907-001 Rev B
A
51
A