1
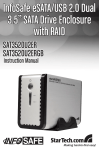
InfoSafe eSATA/USB 2.0 Dual
2.5” SATA Drive Enclosure w/
RAID
SAT2520U2ER
FCC Compliance Statement
This equipment has been tested and found to comply with the limits for a Class B digital device, pursuant to part 15 of the FCC Rules. These limits are designed to provide reasonable
protection against harmful interference in a residential installation. This equipment generates,
uses and can radiate radio frequency energy and, if not installed and used in accordance with
the instructions, may cause harmful interference to radio communications. However, there is
no guarantee that interference will not occur in a particular installation. If this equipment does
cause harmful interference to radio or television reception, which can be determined by turning
the equipment off and on, the user is encouraged to try to correct the interference by one or
more of the following measures:
• Reorient or relocate the receiving antenna.
• Increase the separation between the equipment and receiver.
• Connect the equipment into an outlet on a circuit different from that to which the receiver
is connected.
• Consult the dealer or an experienced radio/TV technician for help.
Use of Trademarks, Registered Trademarks, and other Protected Names and Symbols
This manual may make reference to trademarks, registered trademarks, and other protected
names and/or symbols of third-party companies not related in any way to StarTech.com. Where
they occur these references are for illustrative purposes only and do not represent an endorsement of a product or service by StarTech.com, or an endorsement of the product(s) to which
this manual applies by the third-party company in question. Regardless of any direct acknowledgement elsewhere in the body of this document, StarTech.com hereby acknowledges that all
trademarks, registered trademarks, service marks, and other protected names and/or symbols
contained in this manual and related documents are the property of their respective holders.
Instruction Manual
Table of Contents
Introduction ................................................................................... 1
Features.......................................................................................1
Package Contents........................................................................1
SAT2520U2ER................................................................................. 2
Software Installation...................................................................... 3
Silicon Image SteelVine Manager................................................3
Installation....................................................................................3
Changing the Password................................................................5
DriveClone....................................................................................6
Installation....................................................................................6
Configuring the One-Touch Backup Button................................. 8
How to Setup RAID functions........................................................ 10
Installation....................................................................................10
RAID Mode DIP Switch Setting....................................................11
File System Expansion for Windows............................................ 15
Overview.......................................................................................15
Procedure.....................................................................................15
File System Expansion for Macintosh.......................................... 17
Overview.......................................................................................17
Procedure.....................................................................................18
i
Instruction Manual
File System Expansion for Linux.................................................. 20
Overview.......................................................................................20
Procedure.....................................................................................20
Technical Support.......................................................................... 24
Warranty Information..................................................................... 24
ii
Instruction Manual
Introduction
Thank you for purchasing a StarTech.com SAT2520U2ER InfoSafe
eSATA/USB 2.0 Dual 2.5” SATA Drive Enclosure w/RAID. Offering a
complete, hardware-based solution for external RAID storage, this rugged
enclosure can be connected to a host computer through either USB or
eSATA, and can power both 2.5” hard drives without requiring an external
power adapter.*
Features
• Easy to use GUI software offers simple RAID configurations
• Simple plug and play installation
• Maximum data transfer rates of up 480Mbps ( USB2.0) and 3.0Gbps (eSATA)
• One button backup feature
• Can draw power from a second USB port*
• Supports dual (two) SATA I/II 2.5” HDD
• Supports eSATA port multiplier with PM compatible eSATA card
Package Contents
• 1 X Carrying Pouch
• 1 X Driver/Software CD
• 1 X Enclosure
• 1 X eSATA Cable
• 1 X Instruction Manual
• 1 X Power Adapter
• 1 X USB + USB to DC5V Cable
* Some larger/faster hard drives may require an external power adapter.
1
Instruction Manual
SAT2520U2ER
System Ready/
Backup LED
HDD-1 LED
HDD-0 LED
Change Mode Button
Backup Button
eSATA Port
Mini USB Switch
RAID Mode
Configuration Switch
HDD Eject Buttons
DC Input (5V)
Power Switch
HDD-1 Access & Failure LED
Green: HDD-1 working. Red: HDD-1 failed.
Green/Red twin lights blinking means that RAID(1) is being built, or rebuilt.
HDD-0 Access & Failure LED
Green: HDD-0 working. Red: HDD-0 failed.
Green/Red twin lights blinking means RAID(1) is being built, or rebuilt.
System Ready/Backup LED
Green: System ready. If there is no indication, the system or hard drive health may have a problem.
Red : Red blinking means data backup is in operation. (optional function)
2
Instruction Manual
Software Installation
The following section will outline the necessary steps to install the
software included with the SAT2520U2ER. Once the hard drives have
been inserted into the SAT2520U2ER, you may wish to open the Device
Manager to properly format the drives.
Silicon Image SteelVine Manager
Installation
1. To install the necessary driver files and Graphical User Interface (GUI), browse to x:\Sil 5744\Win_SteelVine_V5.1.20, where x denotes the drive letter assigned to the CD/DVD-ROM drive, and double-click on the Setup application file.
3
Instruction Manual
2. Click Next to continue with the installation. When prompted to accept the License Agreement, select “I Agree” and click Next.
3. Select the destination for the Steelvine application, then click Next to start the installation process. When the installation is complete, click Close to shut down the Setup program.
4. To verify the installation, click Start > Programs > Silicon Image > 57xxSteelVine > SteelVine Manager to run the program.
4
Instruction Manual
Changing the Password
1. Open the SteelVine Application.
2. Click file and select “Change Password.” A window should appear prompting you to enter the former (default) password. By default the password is “admin.”
3. The program will ask you to enter a new password twice. Once you have done so, click OK. The application should notify you that the
password was successfully changed.
For more detailed instructions pertaining to the operation of Silicon
Image’s SteelVine Manager, refer to the user’s manual included on the
SAT2520U2ER installation CD.
5
Instruction Manual
DriveClone
Installation
1. To install the DriveClone™ software, browse to x:\Sil5744\
DriveClone(TM) 3 Personal, where x denotes the drive letter assigned to the CD/DVD-ROM drive, and double-click on the DCPer3_OTB_
Multi application.
2. Select your language preference and click Next when the installation screen appears.
3. Carefully read the software license agreement. If you accept the terms of the software license agreement, select I accept to continue.
6
Instruction Manual
4. Enter your personal information and serial number. The serial number is located on the back of the Driver and Software CD sleeve.
5. DriveClone will be installed in the path displayed. You will have the
option to select another location to install DriveClone.
6. Click Next and DriveClone will be installed in the destination folder.
7. Select Restart Now to complete the installation. DriveClone will restart the computer. Note: You cannot launch DriveClone until your computer has restarted.
7
Instruction Manual
Configuring the One-Touch Backup Button
1. Start the DriveClone Program. Select Back Up then click Files Backup.
2. You can create a new full file backup or select Incremental File Backup box to select a former job and create incremental file backup.
3. If you have selected Incremental File Backup, you can choose to
examine the details of all created backup jobs, modify the time and
date to run scheduled Incremental File Backup, click Back Up Now to
run Incremental File Backup immediately, or delete jobs that are no
longer required.
4. Enter a name for your new job.
5. Select the file(s) you want to back up. You can also click Add Files/
Folders or Add File Types to add file type, folder or individual file to back up according to your needs.
6. Click Next to continue. You can set the maximum number of backup versions you want to back up in this step. DriveClone will always store a fixed number of the most recent backup versions you set.
Add Files/Folders: Click this to select the files or folders you want to add from Windows® Explorer.
Add File Types: Click this to enter Select File Types interface, shown as below.
7. Select a location on a hard drive, or USB storage medium to store the backup file. Click Next to continue.
Calculate Space: Click Calculate Space to calculate the space
required to store the backup file in the destination location.
8. You can now review the information and settings specified. After re
viewing your selections, click Start Backup to start backing up the file(s).You can also click Previous to modify your selections. Some files may not be able to be copied if they are in use by other applications. It is recommended that you close all applications and files you want to back up prior to start the backup job.
8
Instruction Manual
9. To configure the one Button Backup function, open the SteelVine
Manager. Click the Edit menu and select Backup Button.
10. Click browse to locate x:\Program Files\FarStone\DriveClone\
CBP\EFBTasks.exe.
11.
The DriveClone Main Console window will prompt you to select which File Backup Schedule you would like to use with the Backup Button. Select your desired File Backup Schedule (created above) to complete the Backup Button configuration process.
For more detailed instructions on how to configure DriveClone, refer to
the user’s manual included on the SAT2520U2ER installation CD.
9
Instruction Manual
How to Setup RAID functions
Installation
1. Use a screw driver to loosen the two screws and slide in the 2.5” HDDs.
Note: If you want to build RAID functions, you must install two hard drives at the same time.
2. Set the RAID mode on the DIP SW
Display
RAID Status
RAID Configuration
4
2
1
0
BIG (span)
OFF
OFF
OFF
1
JBOD (single)
OFF
OFF
ON
2
FAST (strip)
OFF
ON
OFF
3
SAFE (mirror)
OFF
ON
ON
4
SAFE33
ON
OFF
OFF
5
SAFE50
ON
OFF
ON
6
RESERVED
ON
ON
OFF
7
GUI ONLY
ON
ON
ON
a) To set the operating mode according to the above table:
i) Connect the USB or eSATA data and power cable to your system, then, turn on the power from the RAID box rear panel. Wait until both hard drives are powered on.
ii) Press the RAID Change Mode SW once to finish setting the RAID mode. [*Note: If you want to use the default model setting (or re
place HDDs), you still must press the RAID Model Change SW once].
3. Once the selected RAID mode is ready, you may partition/format the RAID-built HDDs. After the HDDs have been formatted, they are ready to use.
10
Instruction Manual
RAID Mode DIP Switch Setting
1. BIG(Span) Mode
DIP SW-1: OFF, SW-2: OFF, SW-4: OFF
Installed drives are configured to offer maximum storage space (con
catenated), but no additional performance or data redundancy.
2. JBOD(Single) Mode (default)
DIP SW-1: ON, SW-2: OFF, SW-4: OFF
The installed drives will be configured as JBOD (Single)(Just a Bunch Of Disks). The number of available drives is equal to the number of physical drives.
11
Instruction Manual
3. FAST(Striped) Mode
DIP SW-1: OFF, SW-2: ON, SW-4: OFF
A storage policy configuration in which I/O processing is balanced evenly to all disks in a method known as striping, equivalent to RAID 0. Fast offers the best performance in terms of speed, but no data redundancy.
4. SAFE(Mirror) Mode
DIP SW-1: ON, SW-2: ON, SW-4: OFF
A storage policy configuration in which all data written to the hard drive is duplicated (mirrored) onto the second physical disk to protect against data loss due to disk failure. Equivalent to RAID 1. Safe mode provides the highest level of data protection, but reduces the amount of storage space by half since all data must be stored twice.
12
Instruction Manual
5. SAFE33 Mode
DIP SW-1: OFF, SW-2: OFF, SW-4: ON
The RAID Mode is SAFE33, wherein 30% of each HDD is used to build a SAFE(mirror) RAID and also use the rest of the capacity to build a second BIG(Span) HDD. In this mode, two physical drives will be recognized, one is SAFE(mirror) and the other is BIG(Span).
6. SAFE50 Mode
DIP SW-1: ON, SW-2: OFF, SW-4: ON,
This configuration takes 50% of both drives to build a SAFE(mirror) RAID; the remaining drive capacity is used to build a BIG(span) RAID. In this mode, the system recognizes two physical drives - one SAFE(mirror) and the other, BIG(span).
7. Reserved Mode
DIP SW-1: OFF, SW-2: ON, SW-4: ON
No RAID function set.
13
Instruction Manual
8. GUI ONLY Mode
DIP SW-1: ON, SW-2: ON, SW-4: ON
This mode offers configuration through the GUI(Graphic Utility Inter-
face). Using this mode, you can allow different RAID combinations. This mode It is reccomended for professional & advanced users.
For more detailed information regarding the use of these Storage Policies,
refer to the Silicon Image SteelVine Manager user’s manual.
Connection notes:
After you set or change the RAID Mode, press the “Change Mode Button” once. It is also necessary to press the “Change Mode Button” once,
even if you use the default RAID Mode.
Once the enclosure has been connected to the host computer, it will be
visible from the Device Manager (Windows). The device will not be visible
from ‘my computer’ until after the drive has been formatted and partitioned.
USB: To ensure a sufficient amount of power is provided for the enclosure, both the USB and USB to DC5V connectors on the included 1 X
USB + USB to DC5V Cable must be connected to available USB ports
on the rear panel of the computer.
eSATA: In order for SAT2520U2ER to function without using the external
power adapter, a USB connection to the host computer is required. As
such, please connect the (included) USB and USB to DC5 cable to two
available USB ports on the rear panel of the computer.
14
Instruction Manual
File System Expansion for Windows
Overview
This appendix describes the procedure to expand file systems that have
been created on volumes that have increased in size, using Microsoft
Windows while preserving your existing data. After you have added more
hard disk drives to increase the storage capacity of a BIG volume, you
must use the supplemental procedures to allow the expanded capacity to
be recognized by the Windows file System.
A command-line utility named “Diskpart.exe” (“Disk Partition”) enables
you to manage hard disk partitions and volumes. This utility is included
as part of Windows XP Professional Edition, Windows 2003 Server and
Windows Vista™. For Windows 2000 or Windows XP Home Edition, you
must download the “diskpart” utility from Microsoft’s website.
Additional third-party products (such as Acronis Disk Director Suite 10.0)
are available to perform similar volume management activities, but those
products are very sophisticated and are not included in this manual.
Procedure
Before you can use DiskPart.exe commands on a hard drive disk partition/volume, you must first list and then select the partition/volume to
extend their capacity to match the virtual hard drives created using the
DIP switches.
1. Open a command prompt window by clicking Start > Run, then type
in “cmd”.
15
Instruction Manual
2. At a command prompt, type diskpart.
3. Type list volume to display the existing volumes on the computer.
4. Type select volume <volume_number> where “<volume_number>” is number of the volume that you want to extend. In this case that will be “2”:
5. Type extend
6. Type exit to quit Diskpart.exe
The volume size will be updated to reflect the expanded physical stor-
age capacity while maintaining all of the existing data that is stored on the volume. The result of extending the hard disk partition/volume is illustrated below.
Before extend:
After extend:
16
Instruction Manual
Note: Before the hard drive partition/volume has been extended the
“152.67GB Unallocated” was not accessible for data usage. After using
the diskpart utility to extend the hard drive partition/volume capacity, the
Windows host side matches the virtual hard drive partition/volume using
the DIP switches.
For more information about the diskpart utility, please see the documentation on Microsoft’s website at: http://www.microsoft.com/resources/documentation/windows/xp/all/proddocs/en-us/diskpart.mspx?mfr=true
File System Expansion for Macintosh
Overview
This appendix describes the procedures needed with Apple Mac OS X
for expanding file systems that have been created on volumes that have
increased in size, while preserving all of your existing data. After you
have added more hard disk drives to increase the storage capacity of a
BIG volume, you must use the supplemental procedure described below
to allow the expanded capacity to be recognized by Mac OS X.
The following example illustrates a hard disk growing from a JBOD to a
BIG Storage Policy.
A software tool named VolumeWorks from SubrosaSoft (available
from http://www.subrosasoft.com/OSXSoftware/index.php?main_
page=product_info&products_id=6) can be used to grow the partition that
was created in JBOD Storage Policy to a BIG Storage Policy disk.
SubrosaSoft VolumeWorks easily organizes your hard drive by creating,
resizing, copying your partitions on a Mac OS X (10.3 or higher) system.
There are other third-party products are available to perform similar
volume management activities, but those products are very sophisticated
and are not described in this manual.
17
Instruction Manual
Procedure
To grow the partition/volume using VolumeWorks:
Please note: VolumeWorks can only resize HFS+ partitions. The second
drive, when growing from JBOD to BIG must not have any partition information on it. It must be a raw disk with no data of any kind.
1. Start VolumeWorks
2. Click on the volume that you want to extend, then click on the Reparti tion button on the bottom.
18
Instruction Manual
3. Now, click on the Resize button on the bottom
4. Now, move the slider all the way to the right within the Resize dialog box. (Maximum resize)
Once you click on Start, it will execute the volume resize request.
The new storage capacity will be added to the existing drive while maintaining the data on the volume.
19
Instruction Manual
File System Expansion for Linux
Overview
The following describes how to expand file systems (Linux) that have
been created on volumes that have increased in size, while preserving
all of your existing data. After you have added more hard disk drives to
increase the storage capacity of a BIG volume, you must use the supplemental procedure described below to allow the expanded capacity to be
recognized by Linux.
The following example illustrates a hard disk growing from a JBOD to a
BIG Storage Policy.
A software tool named GNU Parted (available from http://www.gnu.org/
software/parted/parted.html) can be used to grow the partition that was
created in a JBOD Storage Policy to a BIG Storage Policy disk.
GNU Parted easily organizes your hard drive by creating, resizing, copying your partitions on a Linux system.
Procedure
Growing partition/volume with GNU Parted:
To extend a volume, follow these steps:
1. Start parted by typing parted /dev/hdc. (where /dev/hdc is the device path of the hard disk for the system) This will bring up the parted console indicated by the parted prompt.
# parted / dev / hdc
(parted)
20
Instruction Manual
2. Type print within the parted console to bring up the volume and disk information.
(parted) print
Disk geometry for /dev/hdc: 0.000-800000.000 megabytes
Disk label type: msdos
Minor
Start
End
Type
Filesystem
Flags
1
0.063
400000.000
primary
ext2
3. Use the resize command extend the size of volume 1 listed above.
(parted) resize 1 0.063 400000
4. Type print to verify the resize of volume 1.
(parted) print
Disk geometry for /dev/hdc: 0.000-800000.000 megabytes
Disk label type: msdos
Minor
Start
End
Type
21
Instruction Manual
Filesystem
Flags
1
0.063
800000.000
primary
ext2
The new space should be added to the existing drive while maintaining
the data on the volume. Before resize:
(parted) print
Disk geometry for /dev/hdc: 0.000-800000.000 megabytes
Disk label type: msdos
Minor
Start
End
Type
Filesystem
Flags
1
0.063
400000.000
primary
ext2
After resize:
(parted) print
Disk geometry for /dev/hdc: 0.000-800000.000 megabytes
Disk label type: msdos
Minor
22
Instruction Manual
Start
End
Type
Filesystem
Flags
1
0.063
800000.000
primary
ext2
23
Instruction Manual
Technical Support
StarTech.com’s lifetime technical support is an integral part of our commitment to provide industry-leading solutions. If you ever need help with your
product, visit www.startech.com/support and access our comprehensive
selection of online tools, documentation, and downloads.
Warranty Information
This product is backed by a one year warranty. In addition, StarTech.
com warrants its products against defects in materials and workmanship for the periods noted, following the initial date of purchase. During
this period, the products may be returned for repair, or replacement with
equivalent products at our discretion. The warranty covers parts and labor
costs only. StarTech.com does not warrant its products from defects or
damages arising from misuse, abuse, alteration, or normal wear and tear.
Limitation of Liability
In no event shall the liability of StarTech.com Ltd. and StarTech.com USA
LLP (or their officers, directors, employees or agents) for any damages
(whether direct or indirect, special, punitive, incidental, consequential, or
otherwise), loss of profits, loss of business, or any pecuniary loss, arising
out of or related to the use of the product exceed the actual price paid
for the product. Some states do not allow the exclusion or limitation of
incidental or consequential damages. If such laws apply, the limitations or
exclusions contained in this statement may not apply to you.
24
StarTech.com has been making “hard-to-find easy” since 1985,
providing high quality solutions to a diverse IT and A/V customer
base that spans many channels, including government, education
and industrial facilities to name just a few. We offer an unmatched
selection of computer parts, cables, A/V products, KVM and Server Management solutions, serving a worldwide market through our
locations in the United States, Canada, the United Kingdom and
Taiwan.
Visit www.startech.com today for complete information about all
our products and to access exclusive interactive tools such as the
Cable Finder, Parts Finder and the KVM Reference Guide.