1
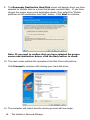
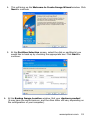
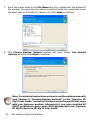
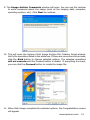
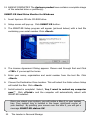
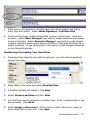
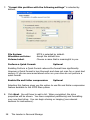
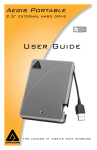
User Guide
T he L eader
in
P ersonal S torage
Copyright © Apricorn, Inc. 2009. All rights reserved.
Windows is a registered trademark of Microsoft Corporation.
All other trademarks and copyrights referred to are the property of their respective
owners.
Anytime (GB) is used in this document: One gigabyte (GB) = one billion bytes;
accessible capacity will be less and actual capacity depends on the operating
environment and formatting.
Distribution of substantively modified versions of this document is prohibited
without the explicit permission of the copyright holder.
Distribution of the work or derivative work in any standard (paper) book form for
commercial purposes is prohibited unless prior permission is obtained from the
copyright holder.
DOCUMENTATION IS PROVIDED AS IS AND ALL EXPRESS OR IMPLIED
CONDITIONS, REPRESENTATIONS AND WARRANTIES, INCLUDING ANY IMPLIED
WARRANTY OF MERCHANTABILITY, FITNESS FOR A PARTICULAR PURPOSE OR
NON-INFRINGEMENT, ARE DISCLAIMED, EXCEPT TO THE EXTENT THAT SUCH
DISCLAIMERS ARE HELD TO BE LEGALLY INVALID.
2
The Leader in Personal Storage
TABLE OF CONTENTS
1. Introduction ................................................................................
4
System Requirements ......................................................................
4
Getting
product...............................................
5
Package Contents ..........................................................................
5
Front Panel ..................................................................................
6
Rear Panel ....................................................................................
6
2. Hard Drive Installation ..................................................................
7
3.Connecting
9
to know your
your
Apricorn
Aegis Desktop ...........................................................
4. Software .....................................................................................
Before
your
10
Backup! .......................................................................
10
Vista ...........................................
11
Windows ................................................................
12
EZ Gig II
install instructions for
EZ Gig II
for
Cloning
your
Hard Drive
with
Disk Clone ..........................................
13
Imaging
your
Hard Drive
with
Create Image Wizard .............................
18
Smart-ER Hard Drive Monitor
Microsoft SyncToy™1.4
Initializing
Windows
Reformatting
............................................
24
Mac ..................................................................
25
Hard Drive .............................................................
26
Hard Drive ...........................................................
29
you
5.Disconnecting
22
23
for
your
Windows ......................................
............................................
for
SuperDuper! Backup Software
Synchronize! X
for
your
for
Mac
Aegis Desktop .......................................................
32
6.Contacting Technical Support ...........................................................
33
RMA Policy ...................................................................................
33
Warranty Conditions ......................................................................
34
7. FAQs ...........................................................................................
35
www.apricorn.com
3
1. INTRODUCTION
Thank you for purchasing your Aegis Desktop system.
Engineered for desktop and notebook applications, the Aegis Desktop offers both
eSATA & USB 2.0 external connections for a wider range of compatibility.
The Aegis Desktop is for use with SATA (Serial Advanced Technology Attachment)
hard drives connected to any system that offers a eSATA or USB Type B port for
USB 2.0/1.1 compatibility.
Backing up your invaluable data has never been easier. The ultra-cool fan keeps
the enclosure at optimal temperatures which will extend the life of your hard drive
and data.
System Requirements
Hardware:
Pentium II CPU or Apple G3 or later
128MB RAM
CD ROM or CD-RW drive
For use with SATA: Open eSATA port
For use with USB: Open USB 2.0/1.1 Port
Operating systems:
Microsoft: Windows Vista Home Basic/Premium, Ultimate & Business
Windows XP Home and Professional
Windows 2000 Professional
Mac:
OS 9.2 or higher
OS X 10.2 and later
4
The Leader in Personal Storage
GETTING TO KNOW YOUR APRICORN PRODUCT
Package Contents
PC
EZ Gig II Backup & Disaster Recovery Software
SMART-ER - Hard Drive Monitor
Microsoft SyncToy® 1.4 download
Mac
ShirtPocket SuperDuper! - Backup Software
Synchronize! X - Synchronization software
Apricorn Data Protection Suite
AC Adapter
eSATA to eSATA Cable
Aegis Desktop Enlosure
USB Cable
www.apricorn.com
5
Front Panel
LED activity/
Power Indicator
Light
On/Off Switch
Rear Panel
eSATA Cable
Connection
USB Cable
Connection
AC Adapter
Connection
6
The Leader in Personal Storage
2. HARD DRIVE INSTALLATION
Aegis Desktop Kit hard disk drive installation instructions (the kit is shipped
without a Serial ATA hard disk drive). If you purchased an Aegis Desktop with a
hard drive already installed, please proceed to page 9.
Please follow the steps as below for installing your HDD into the Aegis Desktop
enclosure.
1. With the logo side of the drive
down, remove the rubber pads
and screws.
2. Gently lift off the cover to
expose the existing hard drive.
(upgrade only) skip to step 5 if
you are installing a new disk.
WARNING: DO NOT TURN CASE UPSIDEDOWN ONCE THE COVER HAS BEEN
REMOVED AND THE HARD DRIVE IS STILL CONNECTED.
3. Lay the case on a flat surface and slide the hard drive completely away from
the connector before gently lift it out of the case.
Slide the HDD
www.apricorn.com
7
4. Remove drive from bracket and
replace with new drive.
5. Place hard drive with label side up
and connector side away from the
hard drive stop and replace srews.
6. Set hard drive in case and push the hdd drive firmly into connector.
Push the HDD
7. Place the case back on the
8
The Leader in Personal Storage
8. Proceed to the section on
initializing, partitioning and
formatting your new hard drive.
3. CONNECTING YOUR Aegis Desktop
You have two choices for setting up your Aegis Desktop. You may use either the
eSATA to eSATA cable or the USB cable provided:
For use with the eSATA cable on a system with a pre-installed eSATA card:
1. Start by turning off your computer.
3. Connect the eSATA cable to the eSATA port at the rear of the Aegis Desktop
and the other end to an available port on your pre-installed eSATA card
4. Connect the AC adapter at the rear of the Aegis Desktop and then plug
into an available wall outlet or power strip.
5. Turn the Aegis Disktop ON using the ON/OFF switch located on the rear
panel. The indicator light will come on to let you know that the Aegis Desktop
is powered.
6. Now, power up your computer.
For use with the USB cable:
1. Connect the USB cable to the USB port at the rear panel of the Aegis
Desktop and to an available USB Port on your computer.
2. Connect the AC adapter at the rear panel of the Aegis Desktop and then
plug into an available wall outlet or power strip.
3. Turn the Aegis Disktop ON using the ON/OFF switch located on the rear
panel. The indicator light will come on to let you know that the Aegis Desktop
is powered.
www.apricorn.com
9
4. SOFTWARE
Before You Backup!
With more of your work and personal life becoming digitized, backups are essential.
Backups protect and preserve precious data, music files, digital photos, digital
videos and other important computer documents from being lost forever.
The following next few steps are recommendations to consider before backing up,
to help the process run smoothly:
1. Ensure there are no file system errors by running Windows Check Disk
(or a similar check disk utility) on your computer’s internal hard disk drive.
2. Defragment your computer’s internal hard disk drive by using Windows
Disk Defragmenter (or a similar disk defragmenter utility).
3. Make copies of any important files or data to another drive.
4. Hard drive backups work best when done on a regular basis. Take a moment
to establish a backup plan that works for you.
Disk Clone and Disk Image will both create a full backup of your system.
Use Disk Image and create a full backup each day, week or month depending
on how critical your data is and how far back you would like to recover a
version of the files you are working with.
Use Disk Clone and create a full backup if you are upgrading to a larger hard
drive or anytime you want or need to have an exact bootable clone of your
hard drive.
5. Once you have decided upon your plan, proceed to the appropriate sections
in this manual to either use Disk Clone or Disk Image.
10
The Leader in Personal Storage
EZ Gig II installation instructions for Windows Vista:
Windows Vista’s User Account Control helps stop unauthorized changes to
your computer. The User Account Control window pops up in Administrator
Approval Mode whenever a program tries to install on your Windows Vista
system. If the User Account Control window does not pop up, please skip
to the EZ Gig II installation.
When the User Account Control window pops up there will be a warning
symbol and message that reads, “A program needs your permission
to continue.” The instructions will read “If you started this program,
Continue.”
Please click the Continue button and proceed to the EZ Gig II main
installation screen.
Change the default “Power Options” for Windows Vista operating
systems:
By default Windows Vista operating system will “Turn display off” after
20 minutes and “Put the computer to sleep” after 1 hour of keyboard or
mouse inactivity. It will take more than 20 minutes to backup most of
today’s larger hard drives. If the system goes into display is turned off or
the computer goes to sleep during the backup, your backup may fail. This
will not damage your original hard drive in any way but you will have to
restart the backup. To avoid this issue change the default “Power Options”
before starting the backup on Windows Vista Systems.
From your Window Vista Start menu type “Power Options” in the “Start
Search bar” and the “Power Options” program will be listed in the results
window. Alternately you can go to Start Menu – Control Panel – Power
Options. Click on “Power Options” to launch the program. On the left
window click on “Choose when to turn off display” and make the changes
as listed below.
Turn Display Off
Put computer to sleep Never
Never
Once you have completed the backup go to “Power Options” and restore
the default settings.
www.apricorn.com
11
EZ Gig II for Windows
1. Insert Apricorn CD into your CD-ROM drive.
2. Setup screen will pop up. Click Install EZ GIG II button.
3. EZ Gig II installation screen will pop up.
4. Follow instructions for installation.
12
The Leader in Personal Storage
Read all instructions carefully before cloning. This is only a
quick overview of how to use Disk Clone in Typical Mode. For
detailed instructions including the custom options read Chapter
10 “Transferring the system to a new disk” located in the EZ Gig
II User Guide located on the Apricorn software CD that came with
your Apricorn product. Alternately if you have installed EZ GIG II
on Windows, go to: start/All Programs/Apricorn/ Apricorn EZ Gig
II/Apricorn EZ Gig II User Guide
Cloning your hard drive with Disk Clone
EZ Gig II allows you to clone your hard drive from inside the Windows
operating system or by booting directly to the Apricorn Software CD provided
with the product you purchased. If your system is running normally we
recommend that you clone your hard drive by starting up the program inside
the Windows operating system.
1. Ensure your Apricorn product is connected to your computer.
2. To start EZ Gig II, click Start > Programs > Apricorn > EZ Gig II and
click on Apricorn EZ Gig II. This will open the main screen of EZ Gig II.
You can also click on the Apricorn EZ Gig II icon on the Desktop.
3. On the main screen double click on the Clone Disk icon to open Disk Clone
Wizard.
www.apricorn.com
13
4. When you see the Welcome to the Disk Clone Wizard! screen. Click
Next to continue.
5. The Clone Mode screen will appear. Select typical and click Next to
continue.
6. If the hard disk drive to receive the cloned data is new or blank, proceed
to step 10. If the hard disk drive to receive the cloned data either contains
data or is formatted, proceed to step 7.
14
The Leader in Personal Storage
7. The Source Hard Disk screen will appear. Select the appropriate source
hard disk. The interface and disk size can be used to help identify the
correct disk number. Click Next to continue.
8. The Destination Hard Disk screen will appear. Select the appropriate
destination hard disk. The destination hard disk is typically your new hard
disk drive. Click Next to Continue.
www.apricorn.com
15
9. The Nonempty Destination Hard Disk screen will appear when you have
selected to transfer data to a drive that already contains data. If you have
chosen the proper source and destination drives, then select the “Delete
partitions on the destination hard disk” button. Click Next to continue.
Note: If you need to confirm that you have selected the proper
source and destination drives, click the Back button to check.
10.The next screen outlines the operations that Disk Clone will perform.
Click Proceed to continue with cloning your hard disk drive.
12.The computer will reboot and the cloning process will now begin.
16
The Leader in Personal Storage
Do not turn your computer off during this process. However,
your computer will reboot itself during the clone process (this
is normal) and you should let the process continue until you see
the congratulations screen. When the congratulations screen
appears, turn off your computer using the power button. Then
unplug the Apricorn product from the computer. DO NOT REBOOT
THE COMPUTER WITH A CLONED HARD DRIVE IN THE Apricorn
product. To do so may alter some settings of the Windows
operating system.
13.You have completed the cloning process and now have an exact bootable
clone of your hard drive.
www.apricorn.com
17
Read all instructions carefully before cloning. This is only a quick
overview of how to use Create Image Wizard in Typical Mode
using the default options. For detailed instructions including
how to set the options manually read Chapter 5 “Creating
Backup Archives” located in the EZ Gig II User Guide located on
the Apricorn software CD that came with your Apricorn product.
Alternately if you have installed EZ GIG II on Windows, go to:
start/All Programs/Apricorn/ Apricorn EZ Gig II/Apricorn EZ Gig
II User Guide
Imaging your hard drive with Create Image Wizard
1. Under certain conditions, Apricorn EZ Gig II may require your
computer to reboot. Please save all work before starting Apricorn
EZ Gig II.
2. To start EZ Gig II, click Start > Programs > Apricorn > EZ Gig II and
click on Apricorn EZ Gig II. This will open the main screen of EZ Gig II.
You can also click on the Apricorn EZ Gig II icon on the Desktop.
3. Double Click on the Backup icon from the main screen to open Create
Image Wizard.
18
The Leader in Personal Storage
4. This will bring up the Welcome to Create Image Wizard window. Click
Next to continue.
5. At the Partition Selection screen, select the disk or partition(s) you
would like to back up by checking the appropriate box. Click Next to
continue.
6. At the Backup Image Location window, find your Apricorn product
(it may have the name Apricorn, and the drive letter will vary depending on
the configuration of your computer).
www.apricorn.com
19
7. Enter the image name in the File Name text box, located near the bottom of
the window. You can enter any name you wish. It might be a good idea to use
the date, such as E:\Jan26 for January 26. Click Next to continue.
8. The Choose Backup Options window will open. Select Use Default
Options and then click Next to continue.
Note: For detailed instructions on how to set the options manually
read Chapter 5 “Creating Backup Archives” in the “Apricorn EZ
Gig II User Guide” located on the Apricorn software CD that came
with your Apricorn product. Alternately if you have installed EZ
GIG II on Windows, go to: start/All Programs/Apricorn/ Apricorn
EZ Gig II/Apricorn EZ Gig II User Guide
20
The Leader in Personal Storage
9. The Image Archive Comments window will open. You can use this window
to write comments about the image (such as the imaging date, computer,
operating system, etc.). Click Next to continue.
10. This will open the Apricorn Disk Image Archive File Creation Script window.
Verify the operations listed in the white box. If there are corrections to be made,
click the Back button to change selected options. The selected operations
will not execute until the Proceed button is clicked. If everything is correct,
you can click the Proceed button to create the image file.
11. When Disk Image completes the selected options, the Congratulations screen
will appear.
www.apricorn.com
21
12. BACKUP COMPLETE!!! The Apricorn product now contains a complete image
of the selected drive or partition(s).
SMART-ER Hard Drive Monitor for Windows
1. Insert Apricorn CD into CD-ROM drive.
2. Setup screen will pop up. Click SMART-ER button.
3. The SMART-ER Setup program will appear (pictured below) with a text file
containing your serial number. Click <Next>
4. The License Agreement Dialog appears. Please read through first and Click
<YES> if you accept the terms.
5. Enter your name, organization and serial number from the text file. Click
<Next>
6. Choose the Destination Drive location. This will select the folder where Setup
will install the files. Click <Next>
7. Install wizard is complete! Select ‚ Yes, I want to restart my computer
now.™ Click <Finish> and the computer will automatically reboot with
SMART-ER installed.
Once you reboot your system, you will notice a Blue S in your system
tray. Your system tray is located in the lower right-hand corner of
your desktop. By pointing your mouse over the blue S, you will get a
message SMART-ER status: OK
22
The Leader in Personal Storage
Microsoft SyncToy 1.4 download
®
Microsoft SyncToy 1.4 for Windows is available as a free download from the
Microsoft Download Center. The easy to use, customizable application helps
you copy, move, rename, and delete files between folders and computers.
To make it easy for you to find and download, we have created a link that is
accessible from the Apricorn Software CD.
www.apricorn.com
23
SuperDuper! Backup Software for Mac
1. Insert Apricorn CD into your CD-ROM drive
2. When the Apricorn CD appears on your desktop, double click to open.
3. Double click on the SuperDuper!.dmg icon
4. This will open the package and mount a drive on your desktop.
5. Open this drive by clicking on the newly created disk icon. The below
window will open on your screen.
6. To install SuperDuper! drag SuperDuper! icon to Applications and
run.
7. Follow the instructions included on the SuperDuper! User’s Guide to
setup.
24
The Leader in Personal Storage
Synchronize! X for Mac
1. Insert Apricorn CD into your CD-ROM drive
2. When the Apricorn CD appears on your desktop, double click to open.
3. Double click on the Synchronize!X.dmg icon
4. This will open the package and mount a drive on your desktop.
5. Open this drive by clicking on the newly created disk icon. The below
window will open on your screen.
6. To install Synchronize! X drag Synchronize! X icon to Applications
and run.
7. Follow the instructions included on the Synchronize! X User Guide for
setup.
www.apricorn.com
25
Initializing Your Hard Drive (self installed hard drives only)
1. To initialize your hard drive, you will need to go to Disk Management in
Windows. To get to Disk Management in Windows 2000, XP and Vista, right
click “My Computer” and click on “Manage” in the list. If you purchased
an Aegis Desktop that already has a hard drive, you do not need to
use this section because the drive is already formatted for FAT32.
2. Double-click on Computer Management.
3. In Computer Management, you will find Disk Management under the
Storage section. Double-click on Disk Management. Windows XP has
a wizard to initialize new hard drives and may appear at this point. If the
wizard does not appear, follow the remaining instructions.
4. You will be able to easily identify the new drive in Disk Management. The
drive will show up as Unknown and Unallocated with a red no entry
sign on the disk number. If you do not see a red no entry sign on the disk
number, skip to “Partitioning/Formatting Your Hard Drive” in the next
section.
26
The Leader in Personal Storage
5. Right click on the section to the left where the drive number and red no
entry sign are located. Select Write Signature / Initialize Disk
6. There are two types of disk storage that you can choose from: basic and
dynamic. Select Basic Storage if you want to create partitions and logical
drives on the disk. Select Dynamic Storage if you want to create simple
volumes (dynamic disks cannot access MS-DOS or Microsoft Windows 98 or
earlier versions). If you need further information on disk storage, please go
to the Microsoft website.
Partitioning/Formatting Your Hard Drive
1. Once you have selected your disk storage type, you will need to partition/
format your drive.
2. Right click on the drive and select New Partition.
3. A Partition Wizard will initiate. Click Next.
4. Select Primary partition and click Next.
5. You will then need to decide on a partition size. Enter a partition size in the
box provided. Click Next.
6. Select Assign a drive letter. Fill in the drive letter. Be sure to select a
drive letter that is not in use. Click Next.
www.apricorn.com
27
7. “Format this partition with the following settings” is selected by
default.
File System: NTFS is selected by default.
Allocation unit size: Accept the default size.
Volume Label: Choose a name that is meaningful to you.
Perform a Quick Format: Optional
Enabling Perform a Quick Format reduces the format time significantly.
However a Quick Format is less thorough and does not scan for or mark bad
sectors. If you are concerned about errors on your drive do not perform a
quick format.
Enable file and folder compression:
Optional
Selecting this feature gives you the option to use file and folder compression
feature available to the NTFS files system.
8. Click Next. You will have to wait a bit. When completed, the drive
properties will be shown. You have completed partitioning and formatting
your new hard drive. You can begin cloning or imaging (see relevant
sections for instructions).
28
The Leader in Personal Storage
Reformatting Your Hard Drive
Your Aegis Desktop’s hard drive is preformatted with the FAT32 Windows File
System. While the FAT32 file system is visible to the largest number of operating
systems, FAT32 does have limitations. You cannot save a file larger than 4GB. In
Windows 2000 and XP, the partition size is limited to 32GB. The Aegis Desktop
will be usable in your system, however we recommend that you reformat the hard
drive in the following ways for the following operating systems:
To Reformat in Windows 2000 or XP (NTFS File System):
Caution: Reformatting your hard drive will destroy any data on the hard
drive. Backup any data before you continue with this operation.
1. Make sure the Aegis Desktop is plugged into the USB port.
2. Open My Computer or Windows Explorer.
3. Right click on the Aegis Desktop drive and select Format.
4. This will open the format window:
a. In the File system drop down box, select NTFS.
b. Use Default allocation unit size.
c. Under Format options:
i.
Select Quick Format (optional)
ii. Do not Enable Compression. (optional)
d. Click on the Start button.
5. The drive will now be reformatted.
6. To verify the reformatting of the drive:
a. Go to My Computer or Windows Explorer, right click on the Aegis
Desktop drive, and select Properties from the list.
b. This will open the Aegis Desktop hard drive properties. The File System should now read NTFS.
www.apricorn.com
29
To Reformat in OS 9.x:
Caution: This will destroy any data on the hard drive. Backup any data
before you continue with the reformatting of the Aegis Desktop hard
drive.
1. Make sure the Aegis Desktop is plugged into the USB port.
2. Disable the file exchange in the Extensions Manager:
a. From the Apple Menu, select Control Panel, then Extensions
Manager.
b. From the list: uncheck the on/off button next to the File Exchange.
c. Click Restart.
Your Macintosh will restart and you will get the following message:
“This disk is unreadable by this computer
Do you want to initialize the disk?”
3. Enter Aegis Desktop into the Name box.
4. From the drop down list, select Mac OS Extended and click the Initialize
button. After the drive is initialized the drive named Aegis Desktop will appear
on your desktop.
5. To confirm that the Aegis Desktop hard drive is properly formatted, select the
Aegis Desktop drive, then Select: File, Get Info, General Information. The
drive should read Mac OS Extended.
6. You can now enable the file exchange extension.
a. From the Apple Menu, select Control Panel, Extensions Manager.
b. Check the on/off box next to File Exchange.
c. Click Restart.
30
The Leader in Personal Storage
To Reformat in Mac OS 10:
Caution: This will destroy any data on the hard drive. Backup
any data before you continue with the reformatting of the Aegis
Desktop hard drive.
1 Make sure the Aegis Desktop is plugged into the USB port. The drive
should appear as a drive on your desktop.
2.
Open the “Applications” folder on your hard drive, go to the “Utilities”
folder and select Disk Utilities.
3. Select the drive from the list:
a. A description of the drive appears in the window.
b. Connection bus should be USB 2.0.
4. Select the Erase tab on the top of the window.
5. From the volume format drop down list, select the Mac OS Extended.
6. Enter Aegis Desktop into the Name box.
7. Select the check box next to Install Mac OS 9 Drivers. This will allow
you to see your Aegis Desktop hard drive if you boot to Mac OS 9.x
8. Click the Erase button: An alert will appear to confirm the erase
process.
9. Click the Erase button to start the formatting process.
10.To confirm that the Aegis Desktop hard drive is properly formatted,
Select the Aegis Desktop drive, then Select: File, Get Info. The format
should read Mac OS Extended.
www.apricorn.com
31
5.DISCONNECTING
Windows 2000, XP and Vista
1. Click on the Safely Remove Hardware icon
in the system tray.
2. Follow the computer screen instructions to remove your Aegis Desktop
from your computer.
To protect against unexpected data loss, Windows verifies that all files
on the disk are closed before allowing the USB or FireWire device to be
removed. If you receive an error message that says “The device cannot
be stopped right now. Try stopping the device again later.” Close
all programs that are using files from the drive, then repeat steps 1 and
2.
Macintosh
1. The drive will need to be dismounted. This can be done by dragging the
drive to the Trash Can.
2 Wait a few seconds. Once the LED has turned off, you can safely remove
the drive.
To protect against unexpected data loss, OS X verifies that all files on the
disk are closed before allowing the device to be removed. If you receive
an error message that says “The disk “Aegis Desktop ” is in use and
could not be ejected”. Close all the programs that are using files from
the drive, then repeat steps 1 and 2.
32
The Leader in Personal Storage
6. CONTACTING TECHNICAL SUPPORT
Apricorn provides the following helpful resources for you:
1. Hardware Installation Section of the User’s Guide.
2. Apricorn’s Website (http://www.apricorn.com)
This gives you the ability to check for up-to-date information.
3. E-mail us at [email protected].
4. Or call the Technical Support Department at 1-800-458-5448.
Apricorn’s Technical Support Specialists are available from 8:00 a.m. to
5:00 p.m., Pacific Time from Monday through Friday.
RMA POLICY
An RMA (Return Merchandise Authorization) tracking number must be issued by
Apricorn. If you need to return or replace your Aegis Desktop, Apricorn requires
that you perform the following steps:
1. Simply call Apricorn’s technical support department with your Aegis Desktop
part number and a description of the problem(s) you are experiencing.
2. If the Apricorn representative finds cause for a return, they will issue an RMA
number. Please write this number down.
3. Fill out an RMA authorization form with your package. The RMA form is available
on-line at http://www.apricorn.com/support/rma.php.
4. Please send the prepaid package to the following address, make sure the
RMA# is written on the exterior of the package:
Apricorn
RMA#: __________
12191 Kirkham Road
Poway, CA 92064
The purchaser shall be responsible for any loss or damage to the returned product
until it is received by Apricorn. Purchaser should consider obtaining insurance with
respect to shipping the product.
www.apricorn.com
33
WARRANTY CONDITIONS
1-Year Warranty:
Apricorn offers a 1-year warranty on the Aegis Desktop against defects in materials
and workmanship under normal use. The warranty period is effective from the
date of purchase either directly from Apricorn or an authorized reseller.
Disclaimer and terms of the warranties:
The warranty becomes effective on the date of purchase and must
be verified with your sales receipt or invoice displaying the date
of product purchase.
Apricorn will, at no additional charge, repair or replace defective
parts with new parts or serviceable used parts that are equivalent
to new in performance. All exchanged parts and products replaced
under this warranty will become the property of Apricorn.
This warranty does not extend to any product not purchased
directly from Apricorn or to any product that has been damaged
or rendered defective:
1. As a result of accident, misuse,
Neglect, abuse or failure and/or inability to follow the written
instructions provided in this instruction guide: 2. By the use of
parts not manufactured or sold by Apricorn; 3. By modification of
the product; or 4. As a result of service, alteration or repair by
anyone other than Apricorn and shall be void. This warranty does
not cover normal wear and tear.
No other warranty, either express or implied, including any warranty
or merchantability and fitness for a particular purpose, has been
or will be made by or on behalf of Apricorn or by operation of
law with respect to the product or its installation, use, operation,
replacement or repair.
Apricorn shall not be liable by virtue of this warranty, or otherwise,
for any incidental, special or consequential damage including any
loss of data resulting from the use or operation of the product,
whether or not Apricorn was apprised of the possibility of such
damages.
34
The Leader in Personal Storage
7. FAQs
1. What is SATA or Serial ATA?
SATA or Serial ATA (Serial Advanced Technology Attachment) is the natural
successor for the Parallel ATA interface that is commonly used today.
2. Why SATA or Serial ATA?
The following are considered major features of SATA:
w 150MB/s maximum transfer rate (300MB/s and 600MB/s planned for the
future).
w Hot-Swappable
w Two power saving modes: partial and slumber
w Overlapping commands
w Tagged command queueing
w Seven wire data cable (compared to the 40 pin connectors used today)
w Cable length of 1m
3. Will I be able to still use a SATA drive like the current drives?
The procedure for formatting disks and creating partitions remains the same.
4. Where can I find out more about SATA?
There is a Serial ATA organization with a website address of www.serialata.
org.
5. Why can’t I hot swap my Aegis Desktop when connected with the
eSATA cable?
It is true that SATA standards allow for hot swapping external SATA hard drives,
however some motherboard manufacturers may not have included support
for all of the SATA standards on the first release of their products. If you are
experiencing problems when trying to hot swap your Aegis Desktop, check
with your motherboard manufacturer for a bios update or a SATA controller
patch to fix the problem.
www.apricorn.com
35
6. The Aegis Desktop power LED is on, but the drive is not automatically
detected by the operating system.
a. The mass storage device drivers are not installed correctly or there is a
resource conflict in the system. Use the Windows Add New Hardware Wizard
to detect the drive, or, if the drive has already been installed, use the Windows
Update Device Driver Wizard. Be sure that there are no resource conflicts in
the Windows Device Manager before installing the drive.
b. Or you may need to partition your drive. Please see the section on
partitioning/formatting your hard drive.
7. What software is included with my Aegis Desktop?
PC Software Includes: EZ Gig II, Microsoft SyncToy 1.4 download and
SMART-ER
EZ Gig II for Windows is one of the most powerful yet easy to use backup
utilities available. EZ Gig II is the second generation of the award winning EZ
Gig Data Transfer Utility. It now supports transferring data via USB, PC Card,
FireWire, or internal IDE Bus. EZ Gig II is comprised of two modules:
Disk Clone is ideal for users who require an exact copy of their hard drive.
A cloned copy of a hard drive can be used for disaster recovery backup, or as
a hard drive upgrade.
Disk Image takes a snapshot of your entire system and compresses it into
a file up to half its original size. This method takes up less space, thus allowing multiple backups to a single drive. The Image option also allows for the
restoration of individual files or folders and a password to be assigned to a
backup image, providing security for your data. A detailed description for
each image can be entered giving the user total flexibility to retain backups
from multiple dates, or multiple computers.
Microsoft® SyncToy 1.4 is available as a free download from the Microsoft
Download Center. The easy to use, customizable application helps you copy,
move, rename, and delete files between folders and computers.
SMART-ER
By polling the S.M.A.R.T. data from a hard drive, SMART-ER gives the user
advanced warning of a hard drive failure with a pop up message or e-mail to
the IT administrator. Using less than 1MB of system resources, SMART-ER also
monitors the hard drive free space and is compatible with Windows PC with
IDE Hard Drives.
36
The Leader in Personal Storage
MAC Software Includes: ShirtPocket SuperDuper! and Synchronize! X for
Mac.
Synchronize! X for Mac is a file synchronization and backup utility for
personal data on Mac OS X. Synchronize! X will backup your personal data to
another disk, so that it is safe. It can sync your home folder with a file server,
or your PowerBook, or a FireWire disk, so that the newest files are in both
locations.
SuperDuper! is the wildly acclaimed program that makes recovery painless,
because it makes creating a fully bootable backup painless. Its incredibly
clear, friendly interface is understandable, easy to use. And it runs beautifully
on both Intel and Power PC Macs! SuperDuper’s interface confirms all your
actions in simple, clear language to ensure that the end result is exactly what
you intended.
8. What is the difference between “cloning” and “imaging”?
Disk Cloning is a bit for bit copy of one drive to another. In doing so, a Clone
can boot and run the operating system. The data is exactly the same on both
drives.
Disk Imaging copies the data on the drive and stores it as a file. This file
can be compressed to a smaller size to take up less space. The Image is not
bootable.
9. Can I make a clone of my drive and put it in a different machine?
A clone is for disaster recovery purposes (i.e. when your drive fails and you
need to get back up and running). No, you should not make a clone of your
drive and put it in another or multiple machines. There are licensing issues for
the software on your machine.
10.Is it possible to restore a single file from an image stored on my Aegis Desktop?
Yes. EZ Gig II allows you to mount an image as a “virtual” hard drive. You can
access this “virtual” drive as if it were a physical hard drive. You would use
your Windows Explorer or My Computer and copy the file or folder and
paste it on to your hard drive.
www.apricorn.com
37
11.Why am I unable to save a file larger then 4GB on to my Aegis
Desktop?
Fat 32 has a file size limitation of 4GB. If you are using Windows 98 SE or ME,
FAT32 is the only option you have available. If you are using Windows 2000
or XP, you can reformat the drive to NTFS. By reformatting the drive to NTFS,
you eliminate the 4GB limitation, but you will also lose any data stored on the
drive. Either reformat to NTFS before using it for the first time, or backup the
data before reformatting.
12.I am unable to format my 40GB or larger Aegis Desktop with FAT 32
in Windows 2000 or XP?
Windows 2000 and XP limit a FAT32 partition to 32GB. If you choose to format
the drive in a larger partition, you will need to use the NTFS file system.
13. Can I boot Windows to my USB Device?
No. Because of limitations (both hardware and software) Windows is currently
prevented from booting and running off a USB drive.
14. What is Electrostatic Discharge (ESD)?
You experience occurrences of static electricity everyday. For example, walking
across a carpeted floor in a heated room during winter generates sufficient static
electricity to create a strong shock when you touch the metal door knob. This
can be very damaging to electronic devices which are sensitive to electrostatic
discharge (ESD).
38
The Leader in Personal Storage
15. How can I prevent Electrostatic Discharge (ESD)?
The following are very basic considerations for ESD prevention and you should
consult your computer or mother board manufacturer’s documentation for more
detailed information about taking proper ESD precautions.
• Avoid carpets in cool, dry areas. Leave
packaging until ready to be installed.
modules in their anti-static
• Dissipate static electricity before handling any system components (PC
cards, memory modules) by touching a grounded metal object, such as the
system unit unpainted metal chassis.
•
If possible, use antistatic devices, such as wrist straps and floor mats.
• Always hold a PC card or memory module by its edges. Avoid touching the
contacts and components on the memory module.
• Take care when connecting or disconnecting cables. A damaged cable can
cause a short in the electrical circuit.
• Prevent damage to the connectors by aligning connector pins before you
connect the cable. Misaligned connector pins can cause damage to system
components at power-on.
• When disconnecting a cable, always pull on the cable connector or strainrelief loop, not on the cable itself.
16. What is Microsoft® SyncToy 1.4 download?
®
Microsoft SyncToy 1.4 for Windows is available as a free download from the
Microsoft Download Center. The easy to use, customizable application helps
you copy, move, rename, and delete files between folders and computers.
To make it easy for you to find and download, we have created a link that is
accessible from the Apricorn Software CD.
www.apricorn.com
39
12191 Kirkham Road
Poway, CA, U.S.A. 92064
1-858-513-2000