1
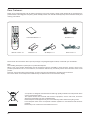
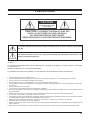
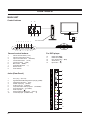
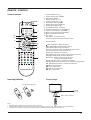
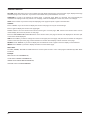
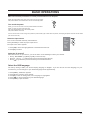
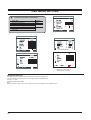
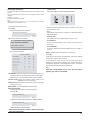
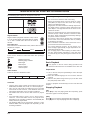
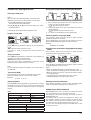
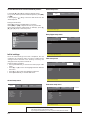
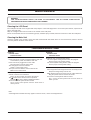
DVT 1926
DVT 2226
USER MANUAL
ENGLISH PART
Dear Customer:
Thank you for purchasing this LCD TV. When opening the box for the first time, please check whether all the accessories are
present. Before connecting parts and power, please carefully read the user manual and always keep these instructions handy and
close by your LCD TV.
FAV
OK
LIST
Instruction Manual X 1
DVD
EXIT/q
l
n
AV Cable X 1
AUDIO
DISC MENU SUBTITLE
X
EPG/GOTO SLOW
f
e
REPEAT
A-B
d
c
Remote control X 1
Batteries X 2
AC Adaptor X 1
Power cord X 1
Please check the accessories when open the package. If anything damaged or lacked, consult with your local dealer .
Note:
This handling description is printed prior to product development.
When a part of the product specification must be changed to improve operability or other functions, priority is given to the
product specification itself. In such instances, the instruction manual may not entirely match all the functions of the actual
product.
Therefore, the actual product and packaging, as well as the name and illustration, may differ from the manual.
The screen shown as an example in this manual may be different from the actual screen display.
Your product is designed and manufactured with high quality materials and components which
can be recycled and reused.
This symbol means that electrical and electronic equipment, at their end-of-life, should be
disposed of separately from your household waste.
Please dispose of this equipment at your local community waste collection/recycling centre.
In the European Union there are separate collection systems for used electrical and electronic
products.
Please help us to conserve the environment we live in!
E2
PRECAUTIONS
CAUTION
RISK OF ELECTRIC SHOCK
DO NOT OPEN
CAUTION: TO PREVENT THE RISK OF ELECTRIC
SHOCK, DO NOT REMOVE COVER (OR BACK).
NO USER-SERVICEABLE PARTS INSIDE.
REFER SERVICING TO QUALIFIED SERVICE PERSONNEL.
This symbol indicates that dangerous voltage constituting a risk of electric shock is present within
this unit.
This symbol indicates that there are importtant operating and maintenance instructions in the
literature accompanying this unit.
CAUTION
TO ENSURE CONTINUED SAFETY DO NOT REMOVE ANY COVERS OR ATTEMPT TO GAIN ACCESS TO THE INSIDE
OF THE PRODUCT.
REFER ALL SERVICING TO QUALIFIED PERSONNEL.
TO PREVENT FIRE OR SHOCK HAZARD, DO NOT EXPOSE THIS APPARATUS TO RAIN OR MOISTURE.
•
•
•
•
•
•
•
•
•
•
•
•
•
•
•
Do not install the unit in an unstable space.
Do not exposed the unit to where there are extremes of temperature (below 5°C or exceeding 35°C) or moisture.
Do not expose the unit to directly sunlight or heat nearby.
Do not install this unit in a confined space, such as a bookcase or built-in cabinet.
The ventilation should not be impeded by covering the ventilation openings with items, such as newspapers, table-cloths,
curtains, etc..
Do not place this unit in any liquid.
Do not insert any tiny object into the unit through the ventilation.
The apparatus shall not be exposed to dropping or splashing. No object filled with liquids, such as vases, shall be placed
on the apparatus.
Never touch the TV screen or antenna / power cord during thunderstorms. Stop use it during thunderstorms.
Do not step on the power cord, or twist the power cord wire.
This product should not be adjusted or repaired by anyone except properly qualified personal when an abnormal condition
or trouble happens. Please consult with the qualified service person.
Always remove the batteries and store in a dry place if the remote control is not to be used for a long time.
Avoid drop down the remote control and damage it.
Always power this unit from an outlet with the same rating (voltage and frequency) as indicated on the rating label at the
back of this unit.
When not in use, disconnect the power cord from the outlet. Grasp the plug, not the cord, when disconnecting the unit.
E3
CONTROLS
MAIN UNIT
Control buttons
11
10
12
13
14
8
9
1
2
VOL
3
4
CH
5
6
MENU
SOURCE
7
Disc In/Out Slot
General control buttons
For DVD player
1.
2.
3.
4.
5.
6.
7.
8.
9.
10.
11.
12.
13.
14.
DC-12V
HDMI
VGA
2
3
SCART
AC in plug (DC-12V)
High-Definition Multimedia interface input plug (HDMI)
VGA interface input plug (VGA)
SCART output plug (SCART)
S-video input jack (S-VIDEO)
Composite audio & video input jacks (R/L/VIDEO)
PC audio input jack (PC AUDIO )
Audio ouput jack ( )
Antenna/Cable TV network port (RF 75 )
Coaxial output jack (COAXIAL OUT)
1
4
5
6
PC
AUDIO
R
1.
2.
3.
4.
5.
6.
7.
8.
9.
10.
VIDEO S-VIDEO
Jacks (Rear Panel)
NEXT button (e)
PREV button (f)
Play / Pause button (l)
STOP button (n)
Eject button (q)
L
Volume decrease button (- VOL)
Volume increase button ( VOL+ )
Input source select button (SOURCE)
Channel down button (p CH )
Channel up button (CH o )
Menu button (MENU)
Power/Standby button (z)
Remote sensor
Power indicator
7
COAXIAL
RF(75 )
OUT
8
E4
9
10
REMOTE CONTROL
Control buttons
1
2
3
4
14
5
FAV
13
6
12
7
8
9
OK
LIST
11
10
DVD
EXIT/q
l
n
AUDIO
DISC MENU SUBTITLE
X
EPG/GOTO SLOW
e
f
REPEAT
A-B
d
c
Inserting Batteries
*
1. Power/Standby button (z)
2. Sleep function button (SLEEP)
3. Mute button (MUTE)
4. Number buttons (0, 1~9)
5. Channel review button ( )
6. Sound mode button (S.STD)
7. Display mode button (DISPLAY)
8. Arrow buttons (o, a, p, b)
9. Confirm/Menu button (OK LIST)
10. Channel select buttons (- PROGRAM +)
11. Volume control buttons (- VOLUME +)
12. Menu source select button (SOURCE)
13. Picture mode buttons (P.STD)
14. 10+ / FAV:
Muti-digitals (for DVD function)
Favorite channel list button (For DTV function)
*. Special buttons:
/EXIT: DVD Eject / Menu exit button
INFO: DVD/DVB information display button
DVD SETUP: DVD setup menu button
AUDIO I/II: Audio language / NICAM mode select button
l : DVD play/pause / Teletext mix button
n: DVD stop / Teletext cancel button
DISC MENU: Disc menu display/ Teletext size/room button
SUBTITLE: DVD subtitle / Teletext hold button
EPG/GOTO: Electronic program guide/ Go to
/ Teletext index display button
SLOW: DVD slow motion / Teletext reveal button
REPEAT: DVD repeat playback button / Teletext subpage button
A-B: DVD A-B repeat button / Teletext On/Off button
f: Red / Preview button
e: Cyan / Next button
d: Yellow / Forward button
c: Blue / Next button
Control Range
Two “R03/AAA” batteries
Remote
sensor
30 30
Within approx. 8 metres
FAV
OK
LIST
DVD
EXIT/q
l
n
AUDIO
DISC MENU SUBTITLE
X
EPG/GOTO SLOW
f
e
REPEAT
A-B
d
c
Note:
• Bright Sunlight or lighting may cause erratic remote operation.
• Always remove batteries if the remote control is not to be used for a month or more. Batteries left in it may cause damage.
• The buttons on the remote control perform similar function to similarly marked buttons on the main unit.
E5
Teletext Function
TXT/ MIX: Press this button once to enter teletext state and display teletext page; press this button again, display both image
and teletext page at the same time. If you want to exit teletext state, press this button once more.
SUBPAGE: It is refer to the subpage of teletext page, i.e subcode page. When it is pressed, the screen display the
requirement of subpage code entry. If there is on subpage, it will not be displayed. In most case, there is no subpage.
HOLD: Press “HOLD” if you want to keep the displaying of the page and press it again to exit hold state.
CANCEL:
Press “CANCEL” if you do not want to display the content of the page, but only the channel image.
Press it again to display the content of the page again.
Number buttons 0~9 on the remote control can be used to get to a certain page. "o/p" button on the remote control can be
used to display the content of previous or next page.
Press the RED/GREEN/YELLOW/CYAN button on the remote control, the page of relevant color displayed on the lower part
of the screen will be displayed.
SIZE: Press “SIZE” if you want to enlarge the content on the upper part of the page, and press the second time to enlarge the
content on the lower part of the page, and the third time to resume normal display of all the contents on the page.
REVEAL: Press “REVEAL” if you want to display the concealed text. Press it again to close the display of concealed text.
INDEX: Press “INDEX” if you want to display the index for all the teletext page.
FAST TEXT:
The RED, GREEN, YELLOW & CYAN buttons are used for quick access to color coded pages transmitted by FAST TEXT
broadcast.
Example:
RED selects CITY INFORMATION,
CYAN selects TRAVEL INFORMATION,
GREEN selects WEATHER INFORMATION,
YELLOW selects TV PROGRAMMING.
E6
BASIC OPERATIONS
Make sure all necessary connections are correctly connected before turn on the power.
Press the power switch (I/O) (rear of the unit) to turn on the power.
The power indicator turns red and the unit is in the standby mode.
Turn on/off the power
Press [z] to turn on the main unit. The power indicator turns blue.
Press [z] again can turn off the main unit.
The unit is automatically set to the standby mode.
The power indicator turns red.
If not to use the main unit for a long time, press the power switch (I/O) to shut down the power, and unplug the power cord from the AC outlet
(rear of the main unit).
Select the input source
Turn on the connected necessary external device.
Press [SOURCE] to select the proper input source.
The input source menu appears.
1. Press [o/p] to move the high-lighted bar to the desired source item.
2. Press [a] to confirm.
TV
AV
SVIDEO
SCART
VGA
PC
DVD
HDMI
Select the TV channel
After selected "TV" as input source, you can do either one of followings to select your channel.
• Press [- PROGRAM +] (or [oCH] or [CHp] on the main unit).
• Press [0, 1~9] (or [ -/-- ] combined) to input the channel number directly.
• Press [ ] to go back the previous channel you've watched last time.
Select the OSD language
The factory setting of OSD ( On Screen Display) language is “English”. If you are used to use other language, for your
convenience, you can change it to your desired language which supplied firstly.
1. Press [MENU], OSD menu appears.
2. Press [p] until Function” menu appears.
3. Press [a] to enter the setting menu, and Language” is high-lighted.
4. Press [b/a] to set the language to your desired language.
5. Press [MENU] to quit the menu.
E7
OSD MENU SETTING
Common procedure of operation:
To Do This
Display the Menu
Move through the Menu
Select an option to change
Select (Confirm) changed settings
Return to the upper menu or main menu
Exit the main menu
Exit menus
Press…
MENU
o,p
a
MENU
TV menu
Function menu
Picture menu
Sound menu
PC menu
Available only when "VGA" is
selected as input source.
Setting the Child lock
This option provides parents to audit their kids in the charge of using this TV.
You can expand the secondary menu as left figure shown in below directory:
Function v lock.
The default password is "2008".
Note:
When"Child Lock" is set to "On", all the input source except "PC(VGA)" is not available to use.
E8
Setting the Child lock
Source Lock:
This option provides parents to audit their kids in the charge of using
this TV.
You can expand the secondary menu as left figure shown in below
directory:
Function v lock.
The default password is "2008".
Note:
When"Child Lock" is set to "On", all the input source except
"PC(VGA)" is not available to use.
When Press [a] , the options expanded as below:
1) Press [o / p ] to select Lock”.
b
b
b
b
b
b
a
a
a
a
a
a
Select the input source item which you want to lock, and
set the value to "On".
2) Press [a].
Password enquiry picture appears.
Note:
y When either source's lock is setted, it's related item is not
able to adjusted.
Please Input Password.
––––
Exit
3) Enter the password of 4 digits .
Tuning Lock:
The channel tuning is disable when it is set to "On".
( The default setting is 0000”.)
TV on Source:
To set the default input source when you open the TV
main unit.
If you forget the password...
Input 2008” to enter it.
Avoid young kids know this password.
The sub-menu appears.
TV on Channel:
To set the default TV channel number when you power on
the TV.
Reset: (Set this option only when it is necessary.)
HOTEL SETTING
Hotel Mode
Volume Control
Tuner Control
MAX Volume
Change Password
Source Lock
Child Lock
Prog.Set
Prog. Num
Press [a].
b
b
b
b
b
OFF
OFF
100
OFF
OFF
a
a
a
a
a
b
b
b
OFF
OFF
0
a
a
a
a
It will quit the setup menu automatically, and all the settings
return to the original factory setting.
If your display is not normal, or the operations work
incorrectly, you can use this setting, then resume operations.
Confirm the operation is necessary before use it. For all the
data of internal memories will be cleared up.
Note:
When the "LOCK MODE" sets to "ON", the reset option
appears gray and it's unavailable.
Hotel Mode: Have the priority than other options below. To
set below options, this item must be set to "ON" firstly.
When it set to "On", all options below it are available.
Volume Lock: Keep the volume control status to be
available or to not to released.
Tuner Lock: All the buttons on the main unit come to abate
when it set to "On"
Max Volume: To set the maxinium volume value.
Change Password:
i) Press [ o / p ] to select Change Password”.
ii) Press [ a] .
Change Password
––––
Exit
iii) Press the number buttons to input a 4 digitals password.
Confirm Password
––––
Exit
iiii) Re-input the new password again.
After the new password is setted, it returns to the upper
level menu automatically .
E9
BUILD-IN DVD PLAYER OPERATIONS
The following types of discs can be played on this unit.
Disc type and logo mark
DVD
TM
CD
Region Number
Region number (Regional restriction code) is builtin to the unitand DVD video discs.Region number
“2” or “ALL” of DVD video discs can be used on
this unit.
DVD Video Disc
DVD video discs are divided into titles, and the titles are subdivided into chapters.
Title 1
Chapter 1
Title 2
Chapter 2
Chapter 1
Chapter 2
Chapter 3
Handling, Storing and Cleaning Discs
• Do not touch the disc door while it is moving.
• Never put anything except a 5-inch (12cm) or 3-inch
(8cm)DVD (or CD) into the disc in/out slot. Foreign
objects can damage the unit.
• Fingerprints and dust should be carefully wiped from
the signal surface of the disc (glossy side) with a soft
cloth. Wipe in a straight motion from the center to the
outside of the disc.
• Never use chemicals such as record cleaning sprays,
antistatic sprays or fluids, benzene or thinner to clean
the discs. These chemicals will permanently damage
the plastic surface of the disc.
• To remove a disc from its storage case, press down
on the center of the case and lift the disc out, holding
it carefully by the edges.
• Discs should be returned to their cases after use to
protect them from dust and scratches.
• To prevent warping the disc, do not expose it to
direct sunlight, high humidity or high temperatures for
extended periods of time.
• Do not apply paper or write anything on either side of
the disc. Sharp writing instruments, or the inks used
in some felt-tip pens, may damage the surfaces of the
disc.
There are the marks on some DVD video disc package.
Examples:
3
Multiple languages
2
Multi-language subtitles
3
Multi-angle
16:9 LB
Multi-aspect
1
Region number
Closed caption
Basic Playback
Audio CD Disc
Preparations
Audio CD discs are divided into tracks.
1. Turn on the TV and press [SOURCE] to select the input
source as "DVD",
2. Select the desired language for the on-screen menus if
required.
3. Insert the disc (label facing toward you) to the disc in/out
slot (side panel) until it clicks.
Track 1
Track 2
Track 3
Track 4
Track 5
CAUTION:
• Only the above types of discs can be played on this unit.
DVD-ROM, CD-ROM, CVD, VCD, etc. cannot beplayed.
• This unit can play back the DVD-R that has recorded
movie data as well. However, some DVD-Rs cannot be
played back depending on the recording conditions.
• The DVD-R that has no movie data cannot be played
back.
• The DVD-RW (Video mode) can be played back.
However, some DVD-RWs cannot be played back
depending on the recording conditions. The DVD-RW (VR
mode) cannot be played back.
• The DVD+R/+RW can be played back. However, some
DVD+R/+RWs cannot be played back depending on the
recording conditions.
E10
“ ” may appear on the TV screen during operation. This
icon means that the function is not available on the disc now.
It starts to playback automatically from the first file/track/
chapter.
Stopping Playback
[CD]
Press [l] to stop the playing back disc temporarily, press
this button again to resume playback.
[DVD]
Press [n] once to stop the playing back disc temporarily.
Press [n] twice to stop the playing back disc completely.
Various disc playing functions
Designated Range Repeat Playback(A-B Repeat)
Point A
Selecting a DVD menu
Point B
Notes:
•The operation may differ depending on the disc used.
•Selecting a menu may not be possible on some discs.
1.Press [DISC MENU] during playback.
The main menu screen will appear.
2.Press [4], [5], [b] or [a] (or the number buttons) to select
the desired menu.
3.Press [OK]. The selected menu playback starts.
Chapter (Track) Skip
1. Press [A-B] during playback at the beginning of the
section you want to repeat (Point A).
•“ A” appears on the TV screen.
2. Press [A-B] again at the end of the section you want to
repeat (Point B).
•“ AB” appears briefly on the TV screen.
3. To return to normal playback, press [A-B] again.
Selecting Subtitle Language [DVD]
Skipping forward
Press [e] during playback to skip to the next chapter (or
track).
“e” appears briefly on the TV screen.
A chapter (or track) is skipped each time the button is
pressed.
Skipping backward
Press [f] during playback to skip back to the beginning of
thechapter (or track) currently played.
“f” appears briefly on the TV screen.
Press the button again immediately to skip back to the
beginning of the previous chapter (or track).
Note:
You can skip only through the chapters, not over the title on
the DVD disc.
Title search [DVD]
Press [GOTO], the on-screen scroll-down menu for edit.
Press the number buttons to enter the title number.
Example:
T: 01/01 C: 01/15
This operation works only with discs on which multiple
subtitle languages are recorded.
Press [SUBTITLE] repeatedly during playback until the
desired subtitle language appears on the TV screen.
Example:
SUBTITLE 01/03 ENG
Selecting Audio Soundtrack Language(Multi-Language)
[DVD]
This operation works only with discs on which multiple
audiosoundtrack languages are recorded.
Hello!
Holà!
¡Hola!
Press [AUDIO] repeatedly during playback until the desired
language appears on the TV screen.
Notes:
• When the desired language is not selected even if the
button is pressed, the language is not available on the disc.
• When the power is turned on or the disc is replaced, select
the language again.
• If the language is not recorded on the disc, only the
available language on the disc will be heard.
Repeat playback
Selecting On-Screen Information
Press [REPEAT] during playback (or programmed or random
playback) of the title (or track) you want to repeat.Each time
the button is pressed, the repeat mode will be changedas
follows.:
Press [INFO] repeatedly to show the disc information(Title,
Chapter, Title elapsed playing time, Language, etc.).
[DVD]
With KODAK Picture CD, it is easy to turn film into pictures
you can email from your PC and view on the unit.
Just bring your film in for processing, and check the box for
KODAK Picture CD.
You will get back your prints and negatives as usual - plus
you will get a special CD that contains your pictures along
with software that lets you view, enhance, share, and print
your pictures from your PC and view them on the unit.
You can also view digital images from JPEG files on disc
created by your PC.
If you want to...
Repeat chapter (
CHAPTER)
TITLE)
Repeat title (
ALL)
Repeat all (
Repeat off
Press [REPEAT] ...
Once
Twice
Three times
Four times
[CD]
If you want to...
Repeat current track
Repeat all tracks
Repeat off
Press [REPEAT] ...
Once
Twice
Four times
KODAK Picture/JPEG CD Playback
E11
To start the slide show from the thumbnail pictures:
1.Press [o], [a], [p] or [b] to select the desired picture.
• To go to the next or previous thumbnail pictures, press[e]
or [f].
2. Press [OK] or [a] (Play) to start the slide show from the
selected picture.
During the slide show:
•Press [k] to pause. Press [a] (Play) to continue.
•Press [e] or [f], it skips to the next or previous file.
•If the picture appears upside down or sideways, press [o],
[a], [p] or [b] to flip / rotate the picture.
02 : 07
03 : 49
48 Kbps
Audio setup menu
General
Audio
DOLBY
Video
Preference
Speaker Setup Page
Downmix
Digital Output
Go To Speaker Setup Page
Dolby Digital setup menu
006 / 007
\ Wang \
General
…
Blue hills
Audio
DOLBY
Video
Preference
DOLBY
Video
Preference
Dolby Digital Setup Page
Sunset
Water lilies
Dynamic
Winter
West
Initial settings
Go To Dolby Digital Setup Page
Once the initial settings have been completed, the unit
canalways be operated under the same conditions.The
settings will be retained in the memory until they are
changed,even if the power is turned off.
Common setting procedure
• Press [DVD SETUP] to activate the DVD player OSD
menu.
• Press [a] or [b] to move and highlight between different
sub-menu.
• Press [o] or [p] to enter the highlighted sub-menu.
• Press [DVD SETUP] to exit the OSD menu..
Audio
General
Video Setup Page
Sharpness
Brightness
Contrast
DOLBY
Video
Preference
Low
00
00
Preference setup menu
General
Gerneral Setup Page
TV Display
Angle Mark
OSD Language
Captions
Screen Saver
Last Memory
Audio
Go To Video Setup Page
General setup menu
General
Video setup menu
Audio
DOLBY
Preference Setup Page
16:9
On
ENG
Off
On
Off
TV Type
Audio
Subtitle
Disc Menu
Parental
Password
Default
PAL
ENG
ENG
Go To Gerneral Setup Page
Go To Preference Page
IMPORTANT NOTICE
The factory setting of PIN Code is "0000".
If you forgot the password you've set, input the initial password "2008".
E12
Video
Preference
MAINTENANCE
WARNING:
FOR YOUR PERSONAL SAFETY, BE SURE TO DISCONNECT THE AC POWER CORD BEFORE
PROCEEDING WITH ANY MAINTENANCE OR CLEANING.
Cleaning the LCD Panel
The LCD panel should not be toughed with sharp objects. If dust and fingerprints is on the LCD panel surface, wipe them off
with a clean soft cloth.
Wipe in a straight motion from the center to the outside of the LCD panel.
Never use chemicals such as record cleaning sprays, antistatic sprays or fluids, benzene or thinner to clean the LCD panel.
Cleaning the Main Unit
Clean the outside of the unit with a clean soft cloth moistened with luke-warm water. Do not use benzene, thinner or alcohol
since they will mar the finish of the surface.
TROUBLESHOOTING
Symptom
Possible cause
Corrective active
Symptom
Possible cause
Corrective active
No Picture and sound.
Power cord is not correctly connected with the main unit.
Connected the power cord with the main unit.
Power cord is not plugged into an AC outlet.
Plug the power cord into an AC outlet.
The wrong input source is selected.
Select a correct input source.
The input source is failed to connect with the TV.
Make correct connections.
No picture only, or monochrome picture.
The color system setting doesn't match the program.
Set the proper color system setting.
The sound system setting doesn't match the program.
Set the proper sound system setting.
No sound only.
Volume control is set to minimum.
Press the VOL+ button to increase the volume.
button on the remote control is pressed.
The
Press the (or VOL+/-) button to release the volume.
An incorrect sound system mode is setted.
Set a correct sound system from the main menu to
match your TV.
Interfered sound or picture.
Some equipment that brings interference is nearby the TV.
Keep these things away from the TV.
Multi devices plug into the same one AC outlet collections.
Plug the power cord into another AC outlet.
An incorrect sound system mode is setted.
Set a correct sound system from the main menu to
match your TV.
Note:
A few bright dots and dark dots may appear on the TV screen, that is normal appearance.
E13
SPECIFICATIONS
DVT 1926
Connections
Display Features
Input:
Display Type
LCD
Screen Size
18.5 inch
Active Area
Aspect Ratio
Panel Resolution
Brightness
Contrast Ratio
Dot Pitch
Maximum Color
Response Time
409 (H) X 230 (V)
16:10
1366 (H) X 768 (V)
250 cd/m2
1000:1
0.3 (H) X 0.3 (V) mm
16.7 M
5 ms
Features
HD compatible
480I, 480P, 576I, 576P, 720P, 1080I, 1080P
TV Reception
TV System:
PAL / SECAM
Sound System B/G , I, D/K, L/L'
Antenna Impedance:
75 Ohm
Power Adapter 100-240V ~ 50/60 Hz
Power Consumption
Maximum
< 60W
1
1
Dimension(WxHxD)
455 x 350 x 167mm
Weight(N.W.)
Unit W/stand/speakers
4.1 Kg
Speaker Specification
650 nm / 795 nm
2
Speaker (Built-In)
Note:
Specifications subject to change without notice.
2 (3W, 6 Ohm)
Environment
Operating Temperature
Operating Humidity
E14
1
1
1
1
1
1
1
VGA Resolutions Supported
640 x 480@ 60Hz/75Hz
800 x 600@ 60Hz/75Hz
1024 x 768@ 60Hz/75Hz
1366 (H) X 768@ 60Hz
Unit W/stand/speakers
Power Requirements
DVD Features
Laser Wave Length
DVD Region Number
TV Tuner (RF 75Ω)
Composite Video Input (R/L/VIDEO)
S-Video Input (S-VIDEO)
SCART
VGA Input(VGA)
PC audio Input(PC AUDIO)
HDMI input (HDMI)
Output:
Coaxial output jack (COAXIAL OUT)
Earphone ( )
5°C-35°C
20%-80%
DVT 2226
Display Features
Connections
Display Type
LCD
Screen Size
21.6 inch
Active Area
Aspect Ratio
Panel Resolution
Brightness
Contrast Ratio
Dot Pitch
Maximum Color
Response Time
477 (H) X 268(V)
16:10
1280 (H) X 800 (V)
400 cd/m2
800:1
0.1165 (H) X 0.3495 (V) mm
16.7 M
5.8 ms
Input:
Features
HD compatible
480I, 480P, 576I, 576P, 720P, 1080I, 1080P
TV Reception
TV System:
PAL / SECAM
Sound System B/G , I, D/K, L/L'
Antenna Impedance:
75 Ohm
TV Tuner (RF 75Ω)
Composite Video Input (R/L/VIDEO)
S-Video Input (S-VIDEO)
SCART
VGA Input(VGA)
PC audio Input(PC AUDIO)
HDMI input (HDMI)
Output:
Coaxial output jack (COAXIAL OUT)
Earphone ( )
1
1
1
1
1
1
1
1
1
VGA Resolutions Supported
640 x 480@ 60Hz/75Hz
800 x 600@ 60Hz/75Hz
1024 x 768@ 60Hz/75Hz
1280 x 800@ 60Hz
Dimension(WxHxD)
Power Requirements
Unit W/stand/speakers
Power Adapter 100-240V ~ 50/60 Hz
Power Consumption
Maximum
< 72W
Weight(N.W.)
DVD Features
Laser Wave Length
DVD Region Number
650 nm / 795 nm
2
Unit W/stand/speakers
524 x 388 x 200 mm
4.7 Kg
Speaker Specification
Speaker (Built-In)
2 (3W, 6 Ohm)
Environment
Operating Temperature
Operating Humidity
Note:
Specifications subject to change without notice.
5°C-35°C
20%-80%