1
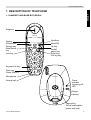
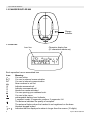
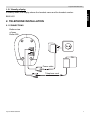
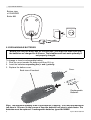
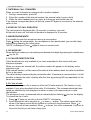
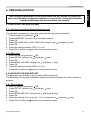
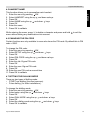
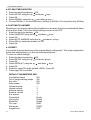
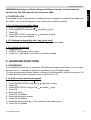
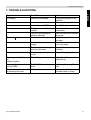
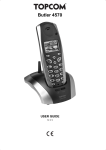
Butler 800/Twin
USER GUIDE
V.1.8
Important
To use ‘Caller ID’ (display caller), this service has to be activated on your phone line. Normally
you need a separate subscription from your telephone company to activate this function. If
you don’t have the Caller ID function on your phone line, the incoming telephone numbers will
NOT be shown on the display of your telephone.
This product is in compliance with the essential requirements and other relevant provisions of the R&TTE directive 1999/5/EC.
The Declaration of conformity can be found on :
http://www.topcom.net/support/cedeclarations.php
GB
The features described in this manual are published with reservation to
modifications.
Topcom Butler 800/Twin
Description of telephone
Handset and base Butler 800
Charger Butler 800
Display
Telephone installation
Connections
Rechargable batteries
Using the telephone
Setting menu language
Handset ON/OFF
Receiving a call
Making an external call
Making an internal call
Hand free mode
Internal call transfer
Display of call duration
Microphone mute
Pause key
Caller identification
Redial memory
Calling from the phonebook
Using the alphanumerical keypad
Using the menu
Personalisation
Adjusting the ring volume
Choosing the ring melody
Speaker volume during call
Activation / deactivation of beeps
Handset name
Changing the PIN code
Setting the dialling mode
Flash time duration
Automatic answer
Reset
Keypad lock
Advanced functions
Phonebook
Searching a handset from the base
Managing multiple handsets
Setting up an additional handset
Removing a handset
Setting up a handset on another base
Selecting a base
Trouble shooting
Topcom warranty
Warranty period
Warranty handling
Warranty exclusions
Technical characteristics
Topcom Butler 800/Twin
5
5
6
6
7
7
8
9
9
9
9
9
9
9
10
10
10
10
10
11
12
12
12
13
13
13
14
14
15
15
15
16
16
16
17
17
17
18
19
19
20
20
20
21
22
22
22
22
23
ENGLISH
1.
1.1
1.2
1.3
2.
2.1
2.2
3.
3.1
3.2
3.3
3.4
3.5
3.6
3.7
3.8
3.9
3.10
3.11
3.12
3.13
3.14
3.15
4.
4.1
4.2
4.3
4.4
4.5
4.6
4.7
4.8
4.9
4.10
4.11
5.
5.1
5.2
6.
6.1
6.2
6.3
6.4
7.
8.
8.1.
8.2.
8.3.
9.
3
Topcom Butler 800/Twin
SAFETY INSTRUCTIONS
• Only use the charger plug supplied. Do not use other chargers, as this may damage the
battery cells.
• Only insert rechargeable batteries of the same type. Never use ordinary, nonrechargeable batteries. Insert rechargeable batteries so they connect to the right poles
(indicated in the battery compartment of the handset).
• Do not touch the charger and plug contacts with sharp or metal objects.
• The operation of some medical devices may be affected.
• The handset may cause an unpleasant buzzing sound in hearing aids.
• Do not place the basic unit in a damp room or at a distance of less than 1.5 m away from
a water source. Keep water away from the handset.
• Do not use the telephone in environments where there is a risk of explosions.
• Dispose of the batteries and maintain the telephone in an environment-friendly manner.
• As this telephone cannot be used in case of a power cut, you should use a mainsindependent telephone for emergency calls, e.g. a mobile phone.
• This telephone uses rechargable batteries. You have to dispose of the batteries in an
environment friendly manner according to your country regulations.
NiMH
CLEANING
Clean the telephone with a slightly damp cloth or with an anti-static cloth. Never use cleaning
agents or abrasive solvents.
The CE symbol indicates that the unit complies with the essential requirements of the
R&TTE directive.
4
Topcom Butler 800/Twin
Topcom Butler 800/Twin
ENGLISH
1. DESCRIPTION OF TELEPHONE
1.1 HANDSET AND BASE BUTLER 800
Earpiece
Butler 800
Display
Phonebook/
Escape key
Mute/Delete
key
Line-key
Handfree
Menu/OK
1
4
7
GHI
S
PQR
Keypad lock key
Flash key
Power ON/OFF
Microphone
Internal call
R
2
5
8
0
3
6
9
DEF
ABC
Up Key
Redial/
pause key
Down Key
Call log Key
O
MN
JKL
YZ
WX
TUV
INT
Butler 800
Power
indicator
Incoming call
LED
Charge
indicator
Paging Key
Set-up subscription
(press and hold )
Topcom Butler 800/Twin
5
Topcom Butler 800/Twin
1.2 CHARGER BUTLER 800
Butler 800
Charge
indicator
1.3 DISPLAY
Icon line
Character display line.
(12 characters maximum)
Each operation has an associated icon
Icon:
Meaning:
You are online
EXT
You are in external communication
INT
You are in internal communication
New numbers in call list
Indicate answered call
Indicate unanswered call
Hands free mode activated
You are opening your address book.
You are in the menu.
rechargeable battery level indicator
1 segment: weak, 2 segments: medium, 3 segments: full.
The antenna indicates the quality of reception.
The antenna flashes when the handset is not registered on the base.
Handset keypad locked
or
Indicates that the displayed number is longer than the screen (12 digits)
6
Topcom Butler 800/Twin
Topcom Butler 800/Twin
ENGLISH
1.3.1 Standby display
In stanby mode, the display shows the handset name and the handset number:
B800 HS1
2. TELEPHONE INSTALLATION
2.1 CONNECTIONS
Bottom view
of base
Butler 800
TEL
Power cable
Telephone cord
Topcom Butler 800/Twin
7
Topcom Butler 800/Twin
Bottom view
of CHARGER
Butler 800
Power cable
2.2 RECHARGABLE BATTERIES
Before you use your butler 800 for the first time, you must first make sure that
the batteries are charged for 6-8 hours. The telephone will not work optimally if
not properly charged.
To change or insert a rechargeable battery:
1. Slide the cover towards the bottom and then lift it up.
2. Insert the batteries respecting the (+ and -) polarity.
3. Replace the battery cover
Cover
Back view of hand-set
+
-
-
+
Rechargeable
Batteries
Note: The maximum standby time of the batteries is approx. 100 h and the maximum
talk time is 10 hours! In the course of time the batteries will start to drain faster. The
batteries must be replaced. 2 rechargeable batteries, type AAA NiMH!
8
Topcom Butler 800/Twin
Topcom Butler 800/Twin
3.1 SETTING MENU LANGUAGE
1. Enter the menu by pressing /OK
2. Select HANDSET using the up and down keys
3. Press OK
4. Select LANGUAGE using the up and down keys
5. Press OK
6. Select the language of choice by means of the up and down
7. Press OK to validate
ENGLISH
3. USING THE TELEPHONE
keys.
3.2 HANDSET ON/OFF
• Turn ON handset: Press the key on the handset. The handset will search the base.
• Turn OFF handset: Press for 3 sec. The display will go OFF.
3.3 RECEIVING A CALL
When the handset rings, press to answer. You are then connected to your correspondent.
If the hand-set is on the base when the telephone rings, you just need to pick up the handset to answer the call (if the option autoanswer is activated: See 4.9. Automatic answer).
If you press when the telephone rings, you answer the call automatically and activates the
handfree mode.
3.4 MAKING AN EXTERNAL CALL
Normal:
1. Press
2. Enter telephone number
Block dialling:
1. Dial your correspondents number
2. Press
To correct a number use the
key to delete an entered digit
3.5 MAKING AN INTERNAL CALL
1. Press INT
2. Enter the number of the internal handset (1 to 2)
3.6 HAND FREE MODE
You can speak with your correspondent without picking up the handset.
To activate or deactivate the hands free mode, press the key during a call.
To adjust the volume, refer to the chapter “ Personalisation “- adjusting speaker volume.
Topcom Butler 800/Twin
9
Topcom Butler 800/Twin
3.7 INTERNAL CALL TRANSFER
When you want to transfer an external call to another handset:
1. During a conversation, press INT
2. Select the number of the internal handset, the external caller is put on hold.
3. When the other handset picks up, press to hang up and transfer the call.
If the internal corespondent does not pick-up, press INT again to reconnect to the external
caller on line.
3.8 DISPLAY OF CALL DURATION
The call duration is displayed after 15 seconds, in minutes - seconds.
At the end of each call, the total call duration is displayed for 5 seconds.
3.9 MICROPHONE MUTE
It is possible to mute the microphone during a conversation.
Press during the conversation, the microphone is then deactivated, you can talk freely
without being heard by the calling party.
“MUTE” is displayed. Press again to return to normal mode.
3.10 PAUSE KEY
When dialling a number you can add a pause between two digits by pressing the redail/pause
key for 2s.
3.11 CALLER IDENTIFICATION
Caller identification is only available if you have subscribed to this service with your
telephone operator.
When you receive an external call, the callers number will appear on the display as the
telephone rings.
If the network sends it, or if the name of the caller is in the address book, the caller is identified
by his or her name.
The caller identity is replaced by the call duration after 15 seconds in communication. It is still
possible to display the caller’s identity after this time by pressing OK-key repeatedly for the
name and number.
3.11.1 List of calls
Your telephone keeps a list in memory of the last 30 calls received. This function is only
available if your are subscribed to the caller ID information. The correspondents that have
called are identified by their telephone number or name in the same way as in caller
identification.
The presence of new / unanswered calls is indicated by the flashing
-icon on the display.
To consult the list of calls:
1. Press
. If there are no calls in the list ‘EMPTY’ will appear.
2. Scroll through the calls using the up or down
arrows. The callers names will be
shown if the name is send by the network or is stored in the phonebook. When is
shown, this call is been aswered. When is shown, the call is unaswered. If you are at
the end of the list you will hear a beep tone.
10
Topcom Butler 800/Twin
3. If you press OK, the telephone number will be shown. Note: if the telephone number is
longer then 12 digits, press OK again to see the complete number.
4. Press OK again to see the time and date when the call is received**
5. Pressing OK again will give you the option to add this entry in the phonebook if it’s not
already stored:
• Press OK when ‘ADD’ is shown on the display. Enter or modify the name and press
OK. Enter or modify the telephonenumber and press OK. Select the melody (1-3)
which will be heard when this number is calling by means of the up/down keys and
press OK. The entry will be stored in the phonebook.
6. To call back a correspondent, simply press the key when their telephone number or
name are displayed.
If a caller is in the phonebook, they are identified by their name in the list of calls.
** Only when the network send the time/date together with the telephone
number!!! On networks with caller id in DTMF, no time and date will be
displayed.
3.11.2 Delete an entry or all entries in the call list
You can delete each entry separately or all entries at ones:
• When scrolling through the calls, press:
- the mute key
short to delete this entry only. DELETE appears on the screen.
- the mute key
long (2 sec.) to delete all entries: DELETE ALL appears on the screen.
• Press OK to delete current/all entr(y)(ies), or to cancel the delete operation.
3.12 REDIAL MEMORY
Your telephone keeps a list of the 5 last calls (of 32 digits) you have made in memory; The
correspondents called are identified by their telephone number or by their name if they
appear in the phonebook.
To consult the redial list:
1. Press
2. Scroll through the calls with the up and down arrows.
3. To call by the selected correspondent, simply press when their telephone number or
name is displayed.
Note: When name is displayed, you can toggle between name and number by
pressing the OK key!
Topcom Butler 800/Twin
11
ENGLISH
Topcom Butler 800/Twin
Topcom Butler 800/Twin
3.13 CALLING FROM THE PHONEBOOK
To call a correspondent whose name you have saved in the phonebook:
1. Press to enter the phonebook
2. Press the first letter of the name. The first name that starts with this letter or the nearest
letter in the alphabet will be displayed.
3. Go through the list of names with the up and down keys. The list scrolls in an
alphabetical order.
4. Press to dial the number of the correspondent whose name is displayed.
To see the number before dialling, carry out steps 1 to 3 from before and press Ok.
3.14 USING THE ALPHANUMERICAL KEYPAD
With your telephone you can also enter alphanumeric characters. This is useful for entering
a name into the phonebook, giving a name to a handset, …
To select a letter, press the corresponding key as many times as is necessary. For example
to select an ‘A’, press ‘2’ once, to select a ‘B’, press ‘2’ twice and so on. To select ‘A’ and then
B consecutively, select ‘A’, wait until the cursor moves on to the next character, then press
‘2’ twice.
To select a space, press 1.
To select a dash, press ‘1’ twice.
The keypad characters are as follows:
Key First Second Third Fourth Fifth
press press press press press
1
space
1
2
A
B
C
2
3
D
E
F
3
4
G
H
I
4
5
J
K
L
5
6
M
N
O
6
7
P
Q
R
S
7
8
T
U
V
8
9
W
X
Y
Z
9
3.15 USING THE MENU
A wide range of telephone functions are accessible through a user friendly menu.
1. To enter the menu, press /OK
2. Scroll through the selections using the up and down keys, the selections scroll in a
loop ( you return to the first after the last).
3. To validate a selection, press OK
4. To return to the previous menu, press
12
Topcom Butler 800/Twin
Topcom Butler 800/Twin
ENGLISH
4. PERSONALISATION
Note: Every programmation is confirmed at the end by a double or single long
beep. A double beep confirms the validation of your choice. A long beep signifies
that the modification has not been taken into account.
4.1 ADJUSTING THE RING VOLUME
4.1.1 Handset ringvolume External/internal calls
The handset ringvolume for internal or external calls can be set separately:
1. Enter the menu by pressing /OK
2. Select HANDSET using the up and down keys
3. Press OK
4. Select INT RING VOL or EXT RING VOL using the up and down keys
5. Press OK
6. Select the desired volume (OFF or 1 to 3 )
7. Press OK to confirm or to return to the previous menu.
4.1.2 Base ring
1. Enter the menu by pressing /OK
2. Select SETUP using the up and down keys
3. Press OK
4. Select BASE VOLUME using the up and down keys
5. Press OK
6. Select the desired volume (OFF or 1 to 3 )
7. Press OK to confirm or to return to the previous menu.
4.2 CHOOSING THE RING MELODY
The base and each handset can ring with a different melody.
The handsets can ring with a different melody according to whether the call is internal or
external.
4.2.1 Base melody
1. Enter the menu by pressing /OK
2. Select SETUP using the up and down keys
3. Press OK
4. Select BASE MELODY using the up and down keys
5. Press OK
6. Select the melody of your choice ( 1 to 3 ) using the up and down
7. Press OK to confirm or to return to the previous menu.
Topcom Butler 800/Twin
keys
13
Topcom Butler 800/Twin
4.2.2 Handset melody, external call
1. Enter the menu by pressing /OK
2. Select HANDSET using the up and down keys
3. Press OK
4. Select EXT MELODY using the up and down keys
5. Press OK
6. Select the melody of your choice ( 1 to 3 ) using the up and down
7. Press OK to confirm or to return to the previous menu.
4.2.3 Handset melody, internal call
1. Enter the menu by pressing /OK
2. Select HANDSET using the up and down keys
3. Press OK
4. Select INT MELODY using the up and down keys
5. Press OK
6. Select the melody of your choice ( 1 to 3 ) using the up and down
7. Press OK to confirm or to return to the previous menu.
4.3 SPEAKER VOLUME DURING CALL
During conversation, press the up or down
keys
keys
key to change the volume accordingly.
Note: The handsfree volume is also adjust together with the receiver in the
handset as above described.
4.4 ACTIVATION / DEACTIVATION OF BEEPS
The handsets can emit beeptone when a key is pressed, when the batteries are low or when
the handset is out of range.
4.4.1 Key pressed beeptone on/off
1. Enter the menu by pressing /OK
2. Select HANDSET using the up and down keys
3. Press OK
4. Select BEEP using the up and down keys
5. Press OK
6. Select KEYTONE using the up and down keys
7. Press OK
8. Select ON to activate, OFF to deactivate
9. Press OK to confirm.
4.4.2 Low battery
Proceed as before, but select at point 6 "LOW BATTERY" instead of "KEYTONE".
4.4.3 Handset out of range
Proceed as before, but select at point 6 "OUT RANGE" instead of “KEYTONE".
14
Topcom Butler 800/Twin
Topcom Butler 800/Twin
While entering the name, press ‘c’ to delete a character and press and hold
menu without taking any modifications into account.
ENGLISH
4.5 HANDSET NAME
This function allows you to personalise each handset.
1. Enter the menu by pressing /OK
2. Select HANDSET using the up and down keys
3. Press OK
4. Select NAME using the up and down keys
5. Press OK
6. Enter the name
7. Press OK to validate
to exit the
4.6 CHANGING THE PIN CODE
Certain functions are only available to users who know the PIN code. By default this is PIN
code = 0000.
To change the PIN code:
1. Enter the menu by pressing /OK
2. Select SETUP using the up and down keys
3. Press OK
4. Select PIN CODE using the up and down keys
5. Press OK
6. Enter the old 4 figure PIN code.
7. Press OK
8. Enter the new 4 figure PIN code
9. Press OK
10. Enter the new PIN code a second time
11. Press OK to validate
4.7 SETTING THE DIALLING MODE
There are two types of dialling mode:
• DTMF/Tone dialling (the most common)
• Pulse dialling ( for older installations )
To change the dialling mode:
1. Enter the menu by pressing /OK
2. Select setup using the up and down keys
3. Press OK
4. Select DIAL MODE using the up and down keys
5. Press OK
6. Select the dialling mode using the up and down keys
7. Press OK to validate
Topcom Butler 800/Twin
15
Topcom Butler 800/Twin
4.8 FLASH TIME DURATION
1. Enter the menu by pressing /OK
2. Select SETUP using the up and down keys
3. Press OK
4. Select RECALL using the up and down keys
5. Choose RECALL 1 for short flash time (100ms) or RECALL 2 for long flash time (250ms)
4.9 AUTOMATIC ANSWER
When there is a incoming call and the handset in on the base, the phone automatically takes
the line when lifted. This is the default setting, but can be set OFF:
1. Enter the menu by pressing /OK
2. Select HANDSET using the up and down keys
3. Press OK
4. Select AUTO ANSWER using the up and down keys
5. Select ON (for automatic answer) or OFF
6. Press OK
4.10 RESET
It is possible to return the phone to the original default configuration. This is the configuration
which was installed when you first received the telephone.
To return to default settings:
1. Enter the menu by pressing /OK
2. Select SETUP using the up and down keys
3. Press OK
4. Select DEFAULT using the up and down keys
5. Press OK
6. Enter the 4 digit PIN code (default =0000). Press OK.
7. Press again OK to validate
DEFAULT PARAMETERS ARE:
Low battery beeps
ON
Out of range warning beeps
ON
Key click
ON
Auto answer
ON
Internal melody
1
Internal volume
3
External melody
1
External volume
3
Ear volume
3
Phonebook
Empty
Call log list
Empty
Redial list
Empty
Pin code
0000
Dial mode
DTMF
Keypad lock
OFF
16
Topcom Butler 800/Twin
Topcom Butler 800/Twin
4.11 KEYPAD LOCK
The keypad can be locked so that no settings can be changed or no telephone number can
be dialed. The -icon will appear on the screen when keypad is locked.
4.11.1 Locking the keypad by Menu
1. Enter the menu by pressing /OK
2. Select HANDSET using the up and down keys
3. Press OK
4. Select KEY LOCK? using the up and down keys
5. Press OK to lock the keypad
4.11.2 Locking the keypad by the *-key (quick lock)
Press and hold the ‘*’-key for 3 seconds. The keypad will be locked.
4.11.3 Unlock the keypad
1. Press any key
2. PRESS * will appear on the screen
3. Press the ‘*’ key within 3 seconds to unlock the keypad
5. ADVANCED FUNCTIONS
5.1 PHONEBOOK
The Phonebook allows you to memorise 50 telephone numbers and names. You can enter
names of up to 12 characters length and numbers of up to 20 digits length.
To call a correspondent whose number is stored in the phonebook, refer to the section 3.13
To enter alphanumerical characters, refer to the section 3.14.
5.1.1 Add an entry into the phonebook
1. Enter the menu by pressing /OK
2. Select PHONE BOOK using the up and down keys
3. Press OK
4. Select ADD ENTRY using the up and down keys
5. Press OK
6. Enter the name
7. Press OK to validate.
8. Enter the telephone number
9. Press OK to validate
10. Select the desired melody (1-3) by means of the up/down key
11. Press OK to Validate
Topcom Butler 800/Twin
17
ENGLISH
WARNING! Returning to default settings will delete all entries in the phonebook
and call log. The PIN code will also be reset to 0000.
Topcom Butler 800/Twin
5.1.2 Modify a name or number
To modify a number in the phonebook:
1. Enter the menu by pressing /OK
2. Select PHONE BOOK using the up and down keys
3. Press OK
4. Select MODIFY ENTRY using the up and down keys
5. Press OK
6. Move through the list of names with the up and down keys. The list scrolls in
alphabetical order.
7. Press OK when you find the name to modify
8. Use the ‘
’ key to go back and enter the new name
9. Press OK to validate
10. Enter the new telephone number
11. Press OK to validate
Warning, if you enter the Phonebook first with the key and modify a telephone
number with the
key, the modification will be taken into account only for this
call and will not be stored in the phonebook!
5.1.3 Deleting an entry
To delete an entry:
1. Enter the menu by pressing /OK
2. Select PHONE BOOK using the up and down keys
3. Press OK
4. Select DELETE ENTRY using the up and down keys
5. Press OK
6. Move through the list of names using the up and down keys the list scrolls in
alphabetical order.
7. Press OK when you find the name you wish to delete
8. CONFIRM appears, press OK to confirm or to stop.
5.2 SEARCHING A HANDSET FROM THE BASE
When the paging button on the base is pressed all the handsets will ring. This ringing will
help you locate a lost handset. By simply pressing one of the handset keys the ringing stops.
18
Topcom Butler 800/Twin
Topcom Butler 800/Twin
6. MANAGING MULTIPLE HANDSETS
ENGLISH
6.1 SETTING UP AN ADDITIONAL HANDSET
You only need to register a 2nd handset in case your 2nd handset does not
link with the base anymore or when you have bought a new one !!!
You can register new handsets on the base if these handsets support the DECT GAP
protocol.
The base can support a maximum of 2 handsets. If you already have 2 handsets, and you
wish to add another one or change one handset, you must first delete a handset, then
associate the new handset.
To register any handset, the base must be put into a special registration mode:
1. Press and hold the paging key of the base for 6 seconds.
2. The base will then emit a beeptone. The base is now ready to register a new handset.
You have 90 seconds after pressing the button to register a new handset.
After putting the base into registration mode, start the procedure on the new handset:
if your additional handset is a Butler 800
3. Enter the menu by pressing /OK
4. Select REGISTER using the up and down keys
5. Press OK
6. Select REG BASE using the up and down keys
7. Enter a base number ( from 1 to 4 ). The flashing numbers are already in use.
8. Enter the Base PIN code (0000 by default )
9. Press OK. The handset will start searching for the DECT base
10. If the handset has located the base, it will display the base identification number, validate
the
base registration by pressing OK or stop by pressing .
11. If the handset does not locate the base, it will return to the standby mode after a few
seconds.
Try again by changing the base number and check that you are not in a environment
where there
is interference. Move closer to the base.
if your handset is another model
After starting the registration procedure on the base, refer to the handset manual to find out
how to register the handset. The handset must be GAP compatible.
The icon and the text "NOT REG" flashes on the display when the handset is not
associated with the base.
When a handset is associated with a base, it is attributed a handset number by the base. It
is this number that is displayed on the handset after the name and must be used for internal
calls.
Topcom Butler 800/Twin
19
Topcom Butler 800/Twin
DECT GAP Profile only guarentees that basic calling-functions will work correctly
between different brands/types. There’s a possibility that certain services (like
CLIP) will not work correctly.
6.2 REMOVING A HANDSET
You can remove a handset with a base to allow another handset to be registered
1. Enter the menu by pressing /OK
2. Select SETUP using the up and down keys
3. Press OK
4. Select DEL HANDSET using the up and down keys
5. Press OK
6. Enter the 4 digit base PIN code
7. Press OK
8. Select the handset to be removed
9. Press OK to validate
6.3 SETTING UP A HANDSET ON ANOTHER BASE
If you want to use a Butler 800 handset with a base of another model. The base must be GAP
compatible.
1. To put the base in registration mode, refer to the base user manual.
2. Carry out operations 3 to 10 from the paragraph 6.1.
6.4 SELECTING A BASE
The handsets can be registered up to 4 bases simultaneously.
To select a base:
1. Enter the menu by pressing /OK
2. Select REGISTER using the up and down keys
3. Press OK
4. Select SELECT BASE using the up and down keys
5. Press OK
6. Select a base or select AUTO using the up and down keys
7. Press OK
When selecting the base, the currect selected base in indicated by a blinking base number.
If you select ‘Auto’ the handset will automatically search for another base when you are out
of range!
20
Topcom Butler 800/Twin
Topcom Butler 800/Twin
Symptom
No display
ENGLISH
7. TROUBLE SHOOTING
Solution
Check the position of the
batteries
Recharge the batteries
Handset turned OFF
Turn ON the handset
No tone
Telephone cord badly con- Check the telephone cord
nected
connection
The line is occupied by
Wait until the other handset
another handset
hangs up
Handset out of range
Bring the handset closer to
The icon flashes
the base
The base has no power
Check the mains connecsupply
tion to the base
The handset is not regisRegister the handset on
tered on the base
the base
Base or handset do not ring The ringing volume is zero Adjust the ringing volume
or low
Tone is good, but there is The dialling mode is wrong Adjust the dialling mode
no
(pulse/tone)
communication
Not possible to transfer a The FLASH time is too
Set the unit to Long Flash
call on PABX
short
time
Telephone does not react Manipulation error
Remove the batteries and
to pressing the keys
put them back in place
Topcom Butler 800/Twin
Possible cause
Batteries uncharged
21
Topcom Butler 800/Twin
8. TOPCOM WARRANTY
8.1. WARRANTY PERIOD
The Topcom units have a 24-month warranty period. The warranty period starts on the day
the new unit is purchased. The warranty on batteries is limited to 6 months after purchase.
Consumables or defects causing a negligible effect on operation or value of the equipment
are not covered.
The warranty has to be proven by presentation of the original purchase receipt, on which the
date of purchase and the unit-model are indicated.
8.2. WARRANTY HANDLING
A faulty unit needs to be returned to a Topcom service centre including a valid purchase note.
If the unit develops a fault during the warranty period, Topcom or its officially appointed
service centre will repair any defects caused by material or manufacturing faults free of
charge.
Topcom will at its discretion fulfil its warranty obligations by either repairing or exchanging
the faulty units or parts of the faulty units. In case of replacement, colour and model can be
different from the original purchased unit.
The initial purchase date shall determine the start of the warranty period. The warranty period
is not extended if the unit is exchanged or repaired by Topcom or its appointed service
centres.
8.3. WARRANTY EXCLUSIONS
Damage or defects caused by incorrect treatment or operation and damage resulting from
use of non-original parts or accessories not recommended by Topcom are not covered by
the warranty.
Topcom cordless phones are designed to work with rechargeable batteries only. The
damage caused by the use of non-rechargeable batteries is not covered under warranty.
The warranty does not cover damage caused by outside factors, such as lightning, water and
fire, nor any damage caused during transportation.
No warranty can be claimed if the serial number on the units has been changed, removed or
rendered illegible.
Any warranty claims will be invalid if the unit has been repaired, altered or modified by the
buyer or by unqualified, non-officially appointed Topcom service centres.
22
Topcom Butler 800/Twin
Topcom Butler 800/Twin
•
Standard:
•
•
•
•
•
•
•
•
•
•
•
•
•
•
Frequency range:
Number of channels:
Modulation:
Speech coding:
Emission power:
Range:
Base power supply:
Handset Batteries:
Handset autonomy:
Talk time:
Charging time:
Normal conditions of use:
Dialling mode:
Flash time
Topcom Butler 800/Twin
ENGLISH
9. TECHNICAL CHARACTERISTICS
DECT (Digital Enhanced Cordless Telecommunications)
GAP (Generic Access Profile)
1880 MHZ to 1900 MHz
120 duplex channels
GFSK
32 kbit/s
10 mW (average power per channel)
max 300 m in open space /10-50 m inhouse
230 V / 50 Hz for the base
2 rechargeable batteries AAA, NiMh 550mAh
100 hours in standby
10 hours
6-8 hours
+5 °C to +45 °C
Pulse / Tone
100 or 250 ms
23
U8006360