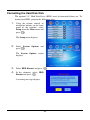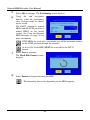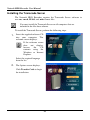
1
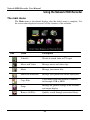
!∀! #∃ %&%%&%
∃!#∋!#
%& (%)∗&++ % ,( (
(& ∃(+& !∀!#∀−
./&01221
%+341252&1221
&
61
7 &
&−&8/118∗1981&∀
(%%∃(∃
&∃++ #∃ +7%%+−%&!∀! #∃ +%+∗∗7 ! #∃ :%++3
(∃%!∀! #∃ 4; %%+&
<7&+&! #∃ +7%(
∃3+(%4&%(+%&%+
+=%7%+
%+&7∃%%%+7%+
∃ %%∃&%%
, &%∃+&+&%+( +%(;7
%&&(+%%7+
<%+>314%+&3/4% +(% + %&∃∋
%
&:&7(%%
∃% &7%(+ &%∃ ∃% + :
%&%+ %∃%<(+∃+ ( %
∃ &7++%(&( %∃ (%:
%+&∃ ))
#;!&)−∀))
8 %+7 ∃%%+ %+%∃∃
! #∃ ?#+?&∃ &%+7&?7∃#+?#+
%((7%+ >%&7+#+&(∃∋
++3& ??4 ?%?
(%+&∃(∃%=%+#+
&#+( %7∃#+3(+∃∃%
+#+4<#+
1;%%∃(∃#+:%(&%&(% %
%∃ %%+ %=7 ∃%%=+(%#+% +#+
;%+% +%&%%%%,+
/;%%%%#+%&+7∃#+&%∃
71∃(&(% >
4; %+%+ %+
∃4;%7%∃∃ & (#+%&∃ + 4+ %( %&%&+(
%%& % +%+%3 &%+%
(%4%∃+& +(%3,>
#+ (∃ %&%7∃#+≅
4
≅ %7 ∃ 7(#+&∃∃ %
7 (&&& %%∃
7−%∃ 7∃#+&∃ ∃
& , &(%+ & +%+7 %∃%%=&,+ ∃(( (7∃#+
&+++7∃#+#+37∃#+4( +
∃∃+7
9;%%∃#+37∃&/4∃Α,∃ 1/
∃((% +>
4% +∗∃ &∃∃1/∃(
%+=&
∃4%&( %&+(%%&+%% %+
∃& ∗∃ %+&∃∃1/∃(
%+=&
4%%(∃+3 ( %
∃ %%(+∃Α,∃ &∃∃∃(4
777+
,∃ 7& & % & ,∃ (& ,&∃ %+ %∃3∃%
4Α3 &7 &4+%,∃ & ,∃ ∃,∃ ∃Α∃%+%+ &+≅( %
∃&(+ % +∃Α
Β;%%&%&∃ &∃#+,, %(%%&%&
∃ ∃#+(& %%+(&((&
+&% ( + 6;≅&%(+(&+ +%%∃
#+((7∃∃% %&∃%%+∃+#+
3%7∃#+4&%%& %+&∃+
%+#+7∃
Χ%∃#+3%7∃#+4& %( + %&∃%#+∃Α;%%:,
++;∃ + ∃%
∆&≅Α+ ++%3 4&
%3∃%&+4&%,%
%∃% %%∃ +%∃ +&
≅%%∃#+ , & % %∗∃#+∃% ( % %+%& %%% %∃ ∃ %
∃#+
% ( ∃ % &∃ %
%
%+%%+ ( %% =
++%∃%& ∃%∃ % (
+∃+∃+% %=
∋ +∃+%% 7+ % ∃ (∃≅
5∃∋#+∃%∃%%+&+ %+ #+%, ++ ∃ , +&∃
%+, & ∃%
2
%∃ (∋(! #∃ ( ∃
(&∃% ∃ (+(++(∃#+(∃ ?% (?&
%( +(% (∃ ∃%
#+%(∃&%%%((∃ ∃%
18%#++∃&7
%+∃%
&
=7,
∃+∃%+ (+ ((++
+ %
<;
11−∀#!)
!&<;
#!&Ε#)−;
##−<Ε#<<)<!#;!))∋##.)
#!??<∀<;
;Φ)&Ε#)#)&∀)!&−∀)&#)
<
−;)
#∀#∀#ΦΓ∀;)
#
#!<;∀∀)#!#.)
.&;∀∀
;
.!&#
1/.∀Γ∀)−;##−<!)<!<;#;!)&;
#;<;)
;)∋)−∀#!#)−.&−−;∀
)!&∀)!;
!&#&)Γ∀)!!∀
∀−;∀#!
3∀)!−∀)
))−!))∀∀)−;;∀)
#
∀
#!#<;#!4&.
∀)#;
−).)
#−;
∀)!
Network HDD Recorder and
Media Manager
t ¡‒ ☂ l \ ‹ · \
Preface
Ce rtific a tion
FCC Verification Notice (USA only)
This device complies with Part 15 of the FCC Rules. Operation is subject to the
following two conditions:
(1) this device may not cause harmful int erference, and
(2) this device must accept any interference received, including interference that
may cause undesired operation.
Class A
This equipment has been tested and found to comply with the limits for a
Class A digital device pursuant to Part 15 of the FCC Rules. These limits
are designed to provide reasonable protection against harmful
interference when the equipment is operated in a commercial environment.
This equipment generates, uses, and can radiate radio frequency energy and, if
not installed and used in accordance with the manufacturer’s instruction manual,
may cause harmful interference with radio communications. Operation of this
equipment in a residential area is likely to cause harmful interference, in which
case you will be required to c orrect the interference at your own expense.
CE Declaration of Conformity (EUROPE only)
This product has been tested in accordance to, and complies with the
European Low Voltage Directive (73/23/EEC) and European EMC
Directive (89/336/EEC).
The product has been marked with the CE Mark to illustrate its compliance.
1
Preface
Safety Information
Do not disassemble the recorder except as instructed during optional HDD (Hard
Disk Drive) installation. Disassembly may cause malfunction or fire or invalidate
the warranty.
Keep magnetic materials such as speakers and batteries away from the recorder
to avoid accidental HDD data corruption.
Do not expose the recorder to abnormal environmental conditions like smoke or
dust, water, humidity or oils.
Ensure that a free airflow i s maintained around the recorder.
Use only the supplied power adapter and cable.
Do not drop or apply pressure to the recorder to avoid damage to the HDD.
Copyright
This publication, including all photographs, illustrations and software, is protected
under international copyright laws, with all rights reserved. Neither this manual nor
any of the material contained herein may be reproduced without the written
consent of the manufacturer.
Trademarks
Other product names mentioned herein are used for identif ication purposes only
and may be trademarks and/or registered trademarks of their respective owners.
Limitation of Liability
While reasonable efforts have been made to ensure the accuracy of this manual,
the manufacturer and distributor assume no liability resulting from errors or
omissions in this manual or from the use of the information contained herein.
2
Preface
T a ble of Cont e nt s
USER’S MANUAL ........................................................................................... I
Preface ……………………………………………………………… …3
GETTING STARTED ..................................................................................... 6
Network HDD Recorder introduction ------------------------------------- 6
What’s in the box -------------------------------- ------------------------------- 6
Optional items -------------------------------- -------------------------------- -- 7
Network HDD Recorder Tour ---------------------------------------------- 7
Front View -------------------------------- -------------------------------- ------ 7
Power LED Behavior -------------------------------- -------------------------------- - 8
Rear View -------------------------------- -------------------------------- ------- 8
Remote control -------------------------------- -------------------------------- - 9
INSTALLATION ........................................................................................... 11
Installing the remote batteries --------------------------------------------11
Attaching the stand ---------------------------------------------------------- 11
Installing the optional hard disk drive -----------------------------------12
Making connections --------------------------------------------------------- 15
Input connection -------------------------------- ------------------------------- 15
Output connection -------------------------------- ----------------------------- 15
Peripheral Connection -------------------------------- ----------------------- 15
Connecting to a Network -------------------------------- --------------------- 16
Powering on the recorder -------------------------------- -------------------- 17
Using the standby mode -------------------------------- ----------------------------- 18
Formatting the Hard Disk Disk -------------------------------------------19
Installing the Transcode Server ------------------------------------------22
Adding Content to Transcode Server -------------------------------- ------- 25
USING THE NETWORK HD D RECORDER ............................................ 28
The main menu --------------------------------------------------------------- 28
Menu elements -------------------------------- -------------------------------- - 29
Supported file formats -------------------------------- ------------------------ 29
The Video In Menu ---------------------------------------------------------- 30
Viewing Video -------------------------------- -------------------------------- - 30
Recording Video -------------------------------- ------------------------------- 30
3
Recording Using Time-Shift -------------------------------- ----------------- 32
Using Scheduled Recording -------------------------------- ------------------ 32
Managing Movies and Video ----------------------------------------------34
Playing Movies and Video -------------------------------- ------------------- 34
Using AB_Repeat -------------------------------- -------------------------------- ---- 35
Renaming Movie and Video Files -------------------------------- ----------- 35
Deleting Movies and Video Files -------------------------------- ------------ 36
Managing Music -------------------------------------------------------------- 37
Playing Music -------------------------------- -------------------------------- - 37
Creating a Playlist -------------------------------- ---------------------------- 38
Renaming Music Files -------------------------------- ------------------------ 39
Deleting Music Files -------------------------------- -------------------------- 39
Managing Photos ------------------------------------------------------------ 40
Viewing Photos -------------------------------- -------------------------------- 40
Preparing Slideshows -------------------------------- -------------------------------- 40
Renaming Photo Files -------------------------------- ------------------------ 41
Deleting Photos Files -------------------------------- ------------------------- 41
Copying Files -----------------------------------------------------------------43
Deleting Multiple Files -------------------------------- ----------------------- 44
Managing System Settings ------------------------------------------------45
Video and Audio Options -------------------------------- --------------------- 45
Aspect Ratio -------------------------------- -------------------------------- ----------- 45
Brightness-------------------------------- -------------------------------- -------------- 45
Contrast -------------------------------- -------------------------------- ---------------- 45
Speaker-------------------------------- -------------------------------- ----------------- 45
Night Mode -------------------------------- -------------------------------- ------------ 45
S/PDIF -------------------------------- -------------------------------- ----------------- 45
Recording Options -------------------------------- ---------------------------- 46
Quality -------------------------------- -------------------------------- ----------------- 46
REC Device -------------------------------- -------------------------------- ----------- 46
Network Options -------------------------------- ------------------------------ 47
Wired LAN Setup -------------------------------- -------------------------------- ---- 47
Using DHCP IP ………………………………………………………… .47
Using Fixed IP ………………………………………………………… ..47
Wireless LAN Setup -------------------------------- -------------------------------- - 48
Using Ad Hoc (Peer-to-Peer) Mode -------------------------------- -------- 49
System Options -------------------------------- -------------------------------- 52
Menu Language -------------------------------- -------------------------------- ------- 52
Time -------------------------------- -------------------------------- -------------------- 52
HDD Format -------------------------------- -------------------------------- ---------- 52
Restore Default -------------------------------- -------------------------------- ------- 52
Photo Options -------------------------------- -------------------------------- - 53
Slide Show Timing -------------------------------- -------------------------------- --- 53
Transition Effect -------------------------------- -------------------------------- ------ 53
Background Music -------------------------------- -------------------------------- --- 53
Browsing All Media ---------------------------------------------------------- 53
APPENDIX A ................................................................................................. 54
Updating Firmware ---------------------------------------------------------- 54
APPENDIX B ................................................................................................. 55
Troubleshooting -------------------------------------------------------------- 55
Connection Issues -------------------------------- ----------------------------- 55
No image or a faulty image is disp layed on my screen. ------------------------- 55
My recorder cannot access the internal HDD. -------------------------------- ---- 55
My recorder cannot access external USB HDDs. -------------------------------- 55
External HDD access is slow. -------------------------------- ----------------------- 55
I cannot connect to the network. -------------------------------- -------------------- 56
Operation Issues -------------------------------- ------------------------------ 56
I cannot copy files to my internal HDD. -------------------------------- ----------- 56
I cannot play/display some files. -------------------------------- ------------------- 56
I cannot record content from CD/DVDs. -------------------------------- ---------- 56
I cannot play .wmv format files. -------------------------------- -------------------- 56
My AVI caption file doesn’t display. -------------------------------- -------------- 57
During network playback, the display freezes o r jumps. ------------------------ 57
During Wireless network playback of .rmvb files, the message “Media is Removed
Stop Playback, Confirm OK” displays. -------------------------------- ------------ 57
Network HDD Recorder User Manual
Getting started
Network HDD Recorder introduction
The Network HDD Recorder is designed for a s imple, trouble-free installation
combining a feature rich media management package with versatile recording
capabilities. The compact design and connection flexibility make it ideal for home
or office use, supporting wired and WiFi connectivity for simple, secure access to
your media content.
What’s in the box
Unpack the Network HDD Recorder package and ensure the following items
are included.
Network HDD Recorder unit
DC adapter
User manual
Remote control (batteries not included)
Power cable
RCA cable
Software CD
Component cable
Stand
If any item is missing or damaged, please contact your dealer.
6
Optional items
WiFi Dongle
3.5” Hard Disk Drive
PowerLine Ethernet bridge
For more information see Installing the optional hard disk drive on
page 12 and Wireless LAN Setup on page 47.
Network HDD Recorder Tour
Front View
1
No.
Item
Description
2
3
1.
Power LED
(green/orange)
Shows power status and errors
(see below for more details)
2.
IR receiver
Receives remote control IR
signal
3.
Read/Write
LED
Lights during HDD read/write
4.
Play mode
LEDs
Displays the current play mode
5.
Home
Go to the main OSD menu
6.
Play/Stop
Play/Stop the current media
7.
Direction
buttons
Navigate through OSD menus
8.
SD/MMC/MS
card slot
Insert SD/MMC/MS memory
cards
9.
Power button
Press to power on or off
10.
USB port
Insert USB devices such as the
optional WiFi Dongle
4
5
6
7
8
9
10
7
Network HDD Recorder User Manual
Power LED Behavior
LED state
System condition
Solid green
Power on and operation normal
Solid orange
Standby
Alternating:
System starting up – approximately 7 seconds
Green (0.5 secs)
OR
Orange (1.5 secs)
System shutting down – 10 to 13 seconds
Start up and shutdown times depend on HDD size
Alternating:
Green (0.5 secs)
Orange (0.5 secs)
System error, for example overheating or fan failure
Rear View
No.
Item
Description
1.
Cooling fan
Regulates HDD temperature
2.
Mini USB port
Connect to PC USB port
3.
Component In
jacks
Connect Component input
devices
4.
AV In jacks
Connect AV input devices
5.
Component Out
jacks
Connect Component output
devices
6.
AV Out jacks
Connect AV output devices
8
9
7.
HDMI Out port
Connect HDMI devices
8.
SPDIF jack
Connect SPDIF devices
10
9.
Optical port
Connect optical devices
11
10.
LAN port
Connect RJ-45 Ethernet
cable to LAN
11.
USB host ports
Connect USB devices
12.
DC power jack
Connect DC power adapter
1
2
3
4
5
6
7
12
8
Remote control
No.
Item
Description
1.
Power
Power on/off the recorder
2.
TV System
Cycle through NTSC Interlace, NTSC
Progressive, PAL Interlaced and PAL
Progressive output
3.
Video In
Display input source
4.
Record
Begin/resume recording
5.
Time-Shift
Pauses live TV and begins recording
for later viewing
6.
USB
Access USB content
7.
ScheduleRec
Display and edit the recording schedule
8.
INS_
Replay
Rewind the current media 10 seconds
and replay
9.
Select
Highlight media in media lists for
copying, deleting and renaming
10.
Repeat
Repeat the previous track
11.
Search
Search current playback by title,
chapter or time
12.
NEXT
Skip to the next track of the DVD or
HDD title
13.
PREV
Return to the previous track of the
DVD or HDD title
14.
Pause/Step
Pause current playback. Press to
advance frame-by-frame.
15.
Slow
Engage slow motion playback. Press
Play to return to normal speed.
16.
Return
Go back one menu level.
17.
VOL-
Decrease the playback volume.
18.
Delete
Delete the selected media from the
media lists.
9
Network HDD Recorder User Manual
No.
Item
Description
1.
Home
Display the main menu
2.
Source
Cycle through input sources
(see note below)
3.
Display
Displays media information during
playback and recording
4.
Menu
hotkeys
Quick access to the media menu
5.
HDD
Access HDD content
6.
Network
Access network content
7.
CM skip
Forward the current media for 30
seconds
8.
Audio
Select an audio track from DVD or
HDD files
9.
AB_
Repeat
Repeat a specific part of a movie
continuously
10.
Subtitle
Activate subtitles of a DVD title
(if available)
11.
FRWD
Fast rewind the current playback.
Press repeatedly to increase speed.
12.
FFWD
Fast-forward the current playback.
Press repeatedly to increase speed.
13.
Zoom_in
Zoom in on the currently displayed
image.
14.
Zoom_out
Zoom out from the currently
displayed image.
15.
Stop
Stops the current playback.
16.
Navigate/
Enter
Navigate in menus and select or
confirm items.
17.
VOL+
Increase playback volume.
18.
Numeric
pad
Numeric pad.
19.
Mute
Toggles mute on/off.
Press “Source” repeatedly to cycle through 480p, 576p, 720p 50Hz,
720p 60 Hz, 1080i 50Hz and 1080i 60 Hz input.
10
Installation
Installing the remote batteries
The remote control unit does not contain batteries when shipped. To insert the
batteries, perform the following steps:
1. Remove the battery compartment cover by pushing the
locking catch and lifting the cover in the direction of
the arrow.
2. Insert the batteries taking note of the polarity (+/ -) as
shown.
3. Replace the cover and click the locking catch into its
place as shown.
Attaching the stand
The Network HDD Recorder is supplied with an upright stan d attachment
providing additional stability. To install the stand, perform the following steps:
1. Place the stand on a dust-free, level surface.
2. Insert the recorder into the stand as shown.
The indicator arrow points toward the
front of the recorder.
11
Network HDD Recorder User Manual
Installing the optional hard disk drive
The recorder does not include an HDD as standard. To install the optional 3.5”
SATA HDD, perform the following steps:
1. Remove the nine (9) screws from the
rear of the recorder as shown.
2. Carefully remove the back panel and
disconnect the fan cable as shown.
3. Slide the casing off as shown.
4. Remove the securing screw from the
HDD tray and slide the tray in the
direction shown.
12
5. Lift the HDD tray off as shown.
6. Insert the HDD into the HDD tray
and secure the four (4) screws to
hold the HDD in its place.
Ensure that the HDD is
inserted the correct way (up,
label is visible).
7. Place the HDD tray back onto its
place as shown.
8. Slide back the HDD tray as shown
and replace the securing screw.
13
Network HDD Recorder User Manual
9. Connect the two (2) HDD cables to
the HDD and to the board as shown.
10. Slide the casing back onto its place
as shown.
You may need to apply
pressure to the front panel
as shown when locating the
casing.
11. Reconnect the fan cable and replace
the back panel.
12. Replace the nine (9) securing screws
into the rear of the recorder.
14
Making connections
Your Network HDD Recorder has a full set of Input and Output ports for
maximum connection versatility.
Input connection
The following diagram demonstrates the
ports used for input connections. Input
devices include DVD players, TV
Box/Set-Top-Box and VHS recorders
(SDTV only).
Component to DVD
AV to VCR
Output connection
The following diagram demonstrates the
ports used for output connec tions.
Output devices include displays,
projectors and stereos.
Component to TV
AV to projector
The SPDIF jack and optical port
can be used to support high
quality digital sound output.
Sophisticated audio equipment
may only require a connection
through the optical port. Pleas e
refer to your audio devices' user
manual for more details.
15
SPDIF and Optical
LAN to network
Network HDD Recorder User Manual
Peripheral Connection
The following diagram demonstrates the
ports used for connecting peripheral
devices. Peripherals include external
HDDs and USB devices such as the
optional WiFi Dongle.
Mini USB to PC
USB host to external
HDD or pen drive
Connecting to a Network
Your Network HDD Recorder supports the connection to an existing Local
Area Network (LAN) with or without Dynamic Host Configuration Protocol
(DHCP).
1. Connect a standard
RJ-45 Ethernet cable
to the LAN port.
2. Connect the other
end to a switch, hub,
or router.
See Wired LAN Setup on page 46 for more details.
16
Powering on the recorder
1.
After creating the desired connections, perform the following steps to power
on the recorder:
Connect the power cable and
DC power adapter.
2. Plug the power cable into a power outlet.
3. Plug the DC adapter into the power jack on the rear panel of the recorder.
The Power LED lights green
and the startup splash screen
displays.
The startup splash screen may differ from the example above.
Depending on the connection method selected, you may need to
manually select your TVs' display mode to view the picture.
In the course of normal operation, the first On -Screen Display (OSD)
screen displayed is the Main menu.
The first time you power on the
recorder (or after resetting to
factory defaults) the Setup
(First Time) screen displays.
17
Network HDD Recorder User Manual
4. Using the remote control or navigation buttons on the front panel of the
recorder, select the desired Menu Language from the submenu and press
.
5. The Time menu is highlighted. Select Manual from the submenu. Enter the
date and time as directed then press
to confirm.
The Network menu is highlighted. Select DHCP IP or FIX IP
from the submenu to configure network settings. See Wired LAN
Setup on page 46 for more details.
6.
If you do not want to configure network settings now,
select Cancel from the submenu to continue.
7. Press
settings.
displays.
to confirm network
The Main menu
Using the standby mode
The recorder provides Standby mode to temporarily power down the unit.
During extended periods of inactivity, the recorder should be
unplugged from the power outlet.
To enter the Standby mode, perform the following steps:
1.
Press the
recorder.
2.
The Power LED lights orange and the recorder enters the Standby
mode.
button on the remote control or front panel of the
The HDD fan continues to run for a few seconds in Standby mode.
To exit the Standby mode, perform the following steps:
1.
Press the
recorder.
2.
The Power LED lights green and the startup splash screen displays.
3.
The Main OSD menu displays after a few seconds.
button on the remote control or front panel of the
18
Formatting the Hard Disk Disk
The optional 3.5” Hard Disk Drive (HDD) must be formatted before use. To
format your HDD, perform the following steps:
1. Using the remote control or
navigation buttons on the front
panel of the recorder, select
Setup from the Main menu and
press
.
The Setup menu displays.
2. Select System Options and
press
.
The System Options screen
displays.
3. Select HDD Format and press
.
4. In the submenu, select HDD
Format and press
.
A warning message displays.
19
Network HDD Recorder User Manual
5. Select OK to continue. The Partitioning screen displays.
6. Using
the and navigation
buttons, select the partitioning
ratio. Changes made are shown
on the screen.
The FAT32 partition is named
HDD1 and the NTFS partition is
named HDD2 on the media
screens. See Using the Network
HDD Recorder on page 28 for
more information.
NTFS HDDs are read-only; you cannot save, delete or rename content
on the NTFS partition through the recorder.
7.
At least 10% of the HDD MUST be reserved for the FAT32
format.
Select Next to continue.
The Hard Disk Format screen
displays.
8. Select Format to begin formatting the HDD.
The formatting time varies depending on the HDD capacity.
20
The Congratulations screen
displays once the formatting
process has been completed.
9.
Select OK to complete the
process.
21
Network HDD Recorder User Manual
Installing the Transcode Server
The Network HDD Recorder requires the Transcode Server software to
run .rm, .rmvb, H.264, and .mkv format files.
You must install the Transcode Server on all computers that are
included in the file share scheme.
To install the Transcode Server, perform the following steps:
1. Insert the supplied software CD
into your computer.
welcome screen displays.
The
If the welcome screen
does not
display,
browse
the
CD
contents using the
Windows or Internet
Explorer.
Select the required language
from the list.
2. The Options screen displays.
Click Transfer Code to begin
the installation.
22
The Transcode Setup Wizard
screen displays.
3. Click Next.
The Select Installation Folder
screen displays.
4. Click Next to use the default installation folder or Browse to a specific
location.
5. The Ready to Install screen
displays.
23
Network HDD Recorder User Manual
6. Click Install to begin the
installation.
A successful installation will be
displayed by the Completion
screen.
7. Click Finish and reboot your computer to complete the installation.
After rebooting, the Transcode Server program starts automatically and the
main menu displays.
Depending on the
Firewall software
installed on your
computer, you may
need to unblock
Transcode Server in
the exceptions List.
See your Firewall user
manual for more
information.
An icon is installed in your
taskbar, indicating that
Transcode Server is currently
running.
After installing Transcode Server, if the globe icon does not
display in the taskbar, click the Start button on the desktop and go
to All Programs Transcode Server Transcode Server to
launch the program manually.
24
Adding Content to Transc ode Server
After installing Transcode Server on all network computers, you must add the
folders containing the .rm, .rmvb, H.264, and .mkv format files. Adding the
folders to Transcode Server allows the recorder to read the specialized format
files.
Transcode Server is not required to access standard formats. See
Supported file formats on page 29.
To add folders to Transcode Server, perform the following steps:
1. Double-click the Transcode Server i con in the task bar to open Transcode
Server.
2. Select the Net Share Dialog
tab. The Net Share Dialog
screen displays all shared
folders on the source computer.
3. Click Add to include content in
the Net Share Dialog screen.
The first time you add content
to Transcode, a warning
message displays.
25
Network HDD Recorder User Manual
4. Click OK and follow the
instructions to share a folder
manually using Windows.
Refer to Windows
Help in Start Help
and Support for more
information on sharing
folders.
Net Share Dialog displays the
manually shared folder.
5. Click Add to display the
browser screen.
26
6. Browse to the location of the content folder and click OK.
You must add each folder individually.
The new folder is added to the
Net Share Dialog box.
27
Network HDD Recorder User Manual
Using the Network HDD Recorder
The main menu
The Main menu is the default display after the initial setup is complete. Use
the seven icons displayed to access all the features of the recorder.
Icon
Menu
Description
Video In
Watch or record video or TV input
Movie and Video
Manage movie and video clips
Music
Manage your music files
Photo and Slideshow
Manage your photos and create slideshows
Copy Files
Copy media from one location to another,
for example USB to HDD
Setup
Manage the general settings of the recorder
and output display
Browse All Files
Quickly search through your entire library
28
Menu elements
The media menus consist of four panels disp laying information about the
currently selected media type and location. See the following example screen.
1
3
2
4
No.
Item
Description
1
Menu name
Displays the current menu name.
2
Navigation panel
Displays the media file location, name and file
type.
3
Detail panel
Displays the selected media information. Photos
and videos display a preview in this panel.
4
File panel
Displays file name and size information.
Supported file formats
Media type
Supported file formats
Video
.avi, .mpg, .vob, .asf, .ifo , .dat, .mp4, .ts, .DivX HD, .Xivd
Audio
.mp3, .wma, .pcm, .wav
Image
.jpg, .bmp
29
Network HDD Recorder User Manual
If Transcode Server is installed on the source computer, .rm, .rmvb,
.wmv, H.264, and .mkv video formats are also supported.
Transcode Server does not support playbac k for these formats from the
internal HDD. You must play them from their original network
location.
The Video In Menu
Press the Video In button on the remote control or select Enter
Video Bypass and Record Mode from the Main menu to view and
record the video or TV signal. See Input connection on page 15 for connection
information.
Viewing Video
To view video from an input source, perform the following steps:
1.
Ensure that the input source is connected correctly and that the signal
is good. See Making connections on page 15.
2.
Press Video In on the remote control to view the content currently
playing on the input source.
When using the Component cab le from the input source, press the
Source button on the remote control to display the signal.
Recording Video
To record video from an input source, perform the following steps:
Ensure that the input source is connected correctly and that the signal
is good. See Making connections on page 15.
Press
on the remote control to begin recording.
Video is recorded to an automatically created folder called My
Recordings on the device specified in Recording Options on page 45.
ecording continues until you press
on the remote or until there is
no free space left on the internal HDD.
30
Recording using Time-Shift
The Time-Shift feature allows you to pause live TV feed for viewing at a later
date. To start Time-Shift recording, perform the following steps:
Press Video In on the remote control to view the TV feed you intend to record.
Press Time-Shift on the remote control.
The live program is paused on -screen and recording begins.
Press
to play the recorded content.
Recording continues until you press
on the remote control or the
30 minutes Time-Shift recording buffer is used up.
Using Scheduled Recording
Scheduled Recording allows you to set dates and times when the recorder
automatically records live TV feeds. To program Schedules, perform the
following steps:
1. Press Schedule-REC on the
remote control.
The Schedule screen displays
the current schedules.
2. Using the remote control or navigatio n buttons on the front panel of the
recorder, select Edit from the Schedule menu and press
3. The Schedule Editor screen
displays.
31
.
Network HDD Recorder User Manual
4. Enter the desired schedule information and press
5. Select Confirm to edit the
schedule.
The new entry is added to the
Schedule screen.
32
.
Managing Movies and Video
Press the Movie button on the remote control or select Play Movies and
Video Clips from the Main menu to access the Movies menu.
The Movie menu only displays
video
content
(.avi, .mpg, .vob, .asf, .ifo, .dat,
.mp4,
.ts,
.DivX
HD
and .Xivd). Other types of media
are hidden.
Playing Movies and Video
1.
Using the remote control or navigation buttons on the front panel of the
recorder, select the desired media in the Navigation panel and press
.
The selected content begins to playback.
2. Press Pause/Step to pause playback, press
to resume or press
to
return to the Movies menu.
During playback, press Search
3. on the remote control to use the
Search feature.
The Playback Search screen
displays.
can search the current movie or video for a specific Title, Chapter or
4. You
elapsed Time.
33
Network HDD Recorder User Manual
Using AB_Repeat
AB_Repeat allows you to watch your favorite part of a movie on a continuous
loop. To use AB_Repeat, perform the following steps:
AB_Repeat is only available for DivX, Xvid (avi), VOB and TS file
formats.
Locate the starting point of the loop during playback and press
AB_Repeat to mark the start of the loop.
Continue playback until the end of the desired loop is reached.
Press AB_Repeat once more to mark the end of the loop.
The repeat loop begins where you first pressed AB_Repeat and
continues to where you pressed AB_Repeat for the second time.
Press AB_Repeat for a third time to return to the standard movie
playback mode.
Renaming Movie and Video files
You can only rename content from a FAT32 partition. NTFS content
is read-only.
1.
Using the remote control or navigation buttons on the front panel of
the recorder, select the desired media in the Navigation panel and
on the remote.
press
2.
Select Rename from the submenu and press
.
The virtual keyboard displays.
3.
Enter the new name using the Navigation panel and select OK.
The media is renamed and the Movie menu displays.
34
Deleting Movies and Video files
You can only delete content from a FA T32 partition. NTFS content is
read-only.
Using the remote control or navigation buttons on the front
panel of the recorder, select the desired media in the Navigation panel
and press
on the remote.
Select Delete from the submenu and press
.
Confirm to delete displays.
Select OK to delete the selected file(s).
The media is deleted and the Movie menu displays.
If you want to delete multiple files from a specific location, use the
Recycle feature in the Copy Files menu. See Deleting multiple files
on page 43.
35
Network HDD Recorder User Manual
Managing Music
Press the Music button on the remote control or select Play Music from the
Main menu to access the Music menu.
The Music menu only displays audio content ( .mp3, .wma, .wmv
.pcm and .wav). Other types of media are hidden.
Playing Music
1.
Using the remote control or navigation buttons on the front panel of
the recorder, select the desired media in the Navigation panel and
press
.The selected content begins to playback.
to resume or press
2. Press Pause/Step to pause playback, press
to return to the Music menu.
3. During playback, press Repeat on the remote control to cycle through
the Repeat features:
Press once to repeat the last audio file.
Press twice to repeat all audio files in the current folder.
Press three times to turn off the repeat mode.
36
Creating a Playlist
The Playlist is used to store your favorite music media in a single, easy to
access list. You can add music to the Playlist from HDD and USB without
moving the content from the original location.
To create a Playlist, perform the following steps:
Using the remote control or navigation buttons on the front panel of the
1. recorder, select the desired media in the Navigation panel and press Select.
Repeat for all media that you
want to include in the playlist.
2. Press Search on the remote control. Add Selects to List displays and the
selected content is added to the Playlist.
3. Press
on the remote control until My Media Center displays.
4. Select Playlist to view the
current Playlist.
To remove content
from the Playlist, press
Select on each file then
press Search to
remove the content.
Press Play to begin playback or use the Playlist as background music for a
slideshow. See Preparing Slideshows on page 39.
37
Network HDD Recorder User Manual
Renaming Music files
You can only rename content from a FAT32 partition. NTFS content
is read-only.
1. Using the remote control or navigation buttons on the front panel of
the recorder, select the desired media in the Navigation panel and
press
on the remote.
2. Select Rename from the submenu and press
.
The virtual keyboard displays.
3. Enter the new name using the Navigation panel and select OK.
The media is renamed and the Music menu displays.
Deleting Music files
You can only delete content from a FAT32 partition. NTFS content is
read-only.
1. Using the remote control or navigation buttons on the front panel of
the recorder, select the desired m edia in the Navigation panel and
on the remote.
press
.
2. Select Delete from the submenu and press
Confirm to delete displays.
3. Select OK to delete the selected file(s).
The media is deleted and the Music menu displays.
If you want to delete multiple fi les from a specific location, use the
Recycle feature in the Copy Files menu. See Deleting multiple files
on page 43.
38
Managing Photos
Press the Photo button on the remote control or select Display Photo and
Slideshow from the Main menu to access the Photo menu.
The Photo menu only displays image content ( .jpg and .bmp). Other
types of media are hidden.
Viewing Photos
Using the remote control or navigation buttons on the front
panel of the recorder, select the desired media in the Navigation panel
and press
.
The selected content displays.
Press
to return to the Photo menu.
While browsing photos, you can rotate the current photo clockwise or
counter-clockwise to have a view rotated 90 degrees by pressing the
or navigation buttons.
and
buttons cycle through the five zoom options:
The
Fit (to screen), 2X, 4X, 8X and 16X magnification.
Preparing Slideshows
Your Network HDD Recorder enables you to create slideshows, with or without
musical background.
To create your own slideshows, perform the following steps:
1.
Collect all photo files to appear in the slideshow and save them in the
same directory.
39
Network HDD Recorder User Manual
You can save slideshow content in your HDD, USB or network
folders as long as all the desired photos are loc ated in the same folder.
2.
Press the Setup button on the remote control or select Enter Setup
Menu from the Main menu.
3.
Select Change Photo Options
4.
Select the interval between slides from 2 seconds to 5 minutes and
press
.
Slide Show Timing and press
.
The default interval, Off, disables the slideshow feature.
5.
Select a Transition Effect to customize the transition between slides.
For example, selecting Left to Right replaces the next image over the
current image by sliding from the left side of the screen to the right.
6.
Select Background Music to add a musical background to the slide
show:
Off - no musical background
Folder - the background files MUST be located in the same folder
as the photo content
Playlist - the background files are played from a Playlist.
See Creating a Playlist on page 37.
7.
to start the
Navigate to the desired photo directory and pr ess
slideshow.
Renaming Photo files
You can only rename content from a FAT32 partition. NTFS content
is read-only.
Using the remote control or navigation buttons on the front panel of
the recorder, select the desired media in the Navigation panel and
press
on the remote control.
Select Rename from the submenu and press
.
The virtual keyboard displays.
Enter the new name using the Navigation panel and select OK.
The media is renamed and the Photo menu displays.
40
Deleting Photos files
You can only delete content from a FAT32 partition. NTFS content is
read-only.
1.
Using the remote control or navigation buttons on the front panel of
the recorder, select the desired media in the Navigation panel and
press
on the remote control.
2.
Select Delete from the submenu and press
3.
Select OK to delete the selected file(s).
The media is deleted and the Photo menu displays.
. Confirm to delete displays.
If you want to delete multiple files from a specific location, use the
Recycle feature in the Copy Files menu. See Deleting multiple files
on page 42
41
Network HDD Recorder User Manual
Copying Files
Press the button on the remote control or select Copy Files Between
Storage Media from the Main menu to access the File Copy menu.
To copy files from one location to another, perform the following steps:
In the Source panel, select the device containing the original content
and press
.
In the Destination panel, select the device to receive the copied
.
content and press
In the Source panel, navigate to the original content and press Select
to highlight the required file.
You can copy multiple files by navigating to each file in turn and
pressing Select to highlight them.
Press on the remote control or recorder front panel to move to the
Destination panel.
Select the destination or create a new directory and press on the remote
control or recorder front panel. Proceed to copy selected files displays.
Select OK to copy the files to the selected destination.
42
Deleting multiple files
The Recycle feature allows you to quickly delete multiple files from a specified
location without deleting them individually through the media menus.
To recycle files, perform the following steps:
1. In the Source panel, select the device containing the desired content
.
and press
.
2. In the Destination panel, select Recycle and press
3. In the Source panel, navigate to the desired content and press Select
to highlight the required files.
4.
5.
Press on the remote control or recorder front panel.
Proceed to delete selected files displays.
Select OK to delete the selected files.
43
Network HDD Recorder User Manual
Managing System Settings
Press the Setup button on the remote control or select Enter Setup Menu
from the Main menu to access the Setup menu.
Video and Audio Options
Video and Audio options are used to
alter the appearance of the output signal
and set the audio output mode.
Aspect Ratio
Set the output screen size to suit the display device. Select from Pan Scan 4:3,
Letterbox 4:3 or 16:9.
Brightness
Set the output screen brightness to suit the display device (range 0 to 50).
Contrast
Set the output screen contrast to suit the display device (range 0 to 50).
Speaker
Select the number of speaker channels to suit the audio o utput device. Select
from 2 channels or 5.1 channels for Dolby Digital surround sound.
Night Mode
Night Mode is designed to dampen sound when noise pollution shall be
avoided.
On - loud or persistent sound is dampened automatically
Comfort - sudden or unexpected sound is dampened automatically
Night Mode is only available with sophisticated audio equipment.
S/PDIF
Set the S/PDIF mode to suit the audio output device. Select from RAW,
LPCM, RAW (by HDMI) or LPCM (by HDMI).
44
Recording Options
Recording options set the recording
quality and where recorded content is
saved.
Quality
Set the video recording quality. On a sliding scale from high to low quality,
select from:
Setting
Quality
Memory Used
High Quality (HQ)
Highest
Most
Lowest
Least
Short Play (SP)
Extended Play (EP)
Long Play (LP)
Super Long Play (SLP)
HQ recordings use the most disk space while SLP mode uses the least.
REC Device
Set the destination device of recordings made from all sources. Select from
HDD, USB#1, USB#2 or USB#3.
45
Network HDD Recorder User Manual
Network Options
Network options define wired (LAN) and wireless (WLAN) connection
information.
Wireless connection is only available with having an optional WiFi
Dongle accessory installed.
Wired LAN Setup
Your Network HDD Recorder supports conne ction to the LAN through DHCP
IP or Fixed (Static) IP.
Using DHCP IP
To configure a LAN connection using DHCP IP, perform the following steps:
Ensure that all cable connections are secure and that the local network is active.
Using the remote control or na vigation buttons on the front panel of
the recorder, select Wired LAN Setup and press
.
Select DHCP IP (Auto) and press
. DHCP (AUTO) displays.
Select OK and press
. Save Network Setting displays.
Select OK and press
. A testing screen displays.
When the test is complete, the Network Options screen displays.
A successful connection is established when ON and an IP
address display in the submenu.
Using Fixed IP
To configure a LAN connection using Fixed IP, perform the following steps:
1.
2.
Ensure that all cable connections are secure and that the local network is active.
Using the remote control or navigation buttons on the front panel of
the recorder, select Wired LAN Setup and press
.
46
3.
4.
5.
6.
7.
8.
9.
Select Fixed IP (Manual) and press
.
A submenu displays IP Address, Subnet Mask and Default
Gateway.
Enter a valid IP address from your LAN, typically 192.168.1. n
(where n=1 to 254).
The Subnet Mask is entered automatically and should not be changed.
Enter a Default Gateway IP address if known, otherwise leave the
default.
. Save Network Setting displays.
Press
Select OK and press
. A testing screen displays.
When the test is complete, the Network Options screen displays.
A successful connection is established when ON and an IP
address display in the submenu.
If the connection fails, try using another IP address.
See your Router User Manual for more information on LAN
connection using Fixed or Static IP addresses.
Wireless LAN Setup
The optional WiFi Dongle provides wireless access to
the recorder. Plug the dongle in to a USB slot on the
recorder as shown.
Using the remote control or navigation buttons on the
1. front panel of the recorder, select Setup from the Main
2.
menu and press
.
Select Network Options
Wireless Setup and press
.
The Connect or Modify
submenu displays.
Select Modify and press the
3. Mode screen displays.
navigation button. The Get Connection
47
Network HDD Recorder User Manual
4. Select Infrastructure (AP) and press the
navigation button. The Get
SSID Name screen displays.
5. Select Auto to scan for available Service Set Identifiers (SSIDs). A list of
available SSIDs displays, showing security method and signal strength.
6. Select the desired SSID from the list and press the
navigation button.
The Confirm SSID Name screen displays.
navigation button to confirm the SSID. The WLAN Security
screen displays. The Network HDD Recorder supports an Open System
connection (not recommended) and WEP and WPA secure connections.
7. Press the
You must select the security method supported by the target SSID
or the connection will fail.
8. Select the Wireless Security method used by the target SSID and press the
navigation button. A confirmation screen displays.
9. Press the
10.
navigation button to proceed.
If your SSID does not use security features, the Wireless Address Setup
screen displays. Select the connection method and follow the onscreen
prompts to test and complete the connection, OR
If your SSID uses security features, select WEP or WPA and enter the
security key specified by the SSID. Select the connection method and
follow the onscreen prompts to test and complete the connection.
A successful connection is established when an IP address is displayed
and the signal strength monitor shows a positive signal.
Connection time may vary depending on network traffic and
connection speeds.
See your Wireless AP User Manual for more information on
Wireless networks.
48
Using Ad Hoc (Peer-to-Peer) Mode
The Ad Hoc (or Peer -to-Peer) mode allows the Network HDD Recorder to
communicate directly with other wireless devices such as notebooks, without
the need to connect to a wireless Access Point.
Before proceeding, ensure that the optional WiFi Dongle is installed in
the recorder and the peer wireless device (or notebook) is active.
To enable the Peer-to-Peer mode, perform the following steps:
Using the remote control or navigation buttons on the front panel of the
.
1. recorder, select Setup from the Main menu and press
2. Select Network Options
Wireless Setup and press
.
The Connect or Modify
submenu displays.
3. Select Modify and press the
navigation button. The Get Connection
Mode screen displays.
4. Select Peer to Peer (Ad Hoc) and press the
navigation button.
The Save and Startup screen displays.
5. Select Manual and press the
navigation button. The Ad Hoc Setup
screen displays.
6. Select Wireless SSID and press
. Enter the SSID of the peer wireless
device (or notebook) and select OK.
In some cases, the Wireless SSID is filled in automatically.
Ensure that the SSID displayed corresponds with the intended peer
device you want to connect to.
49
Network HDD Recorder User Manual
The Ad Hoc Setup screen
displays.
7. Press the
navigation button to display the Save and Startup screen.
8. Select OK and press
. Ad Hoc Testing begins.
When the connection is
verified, the Test OK screen
displays the connection
information.
9. Press
. The Network Options screen displays showing the Ad Hoc IP
address.
10. Access the Browser and navigate to Network
wireless device from the list and press
.
An authentication screen displays.
11. Enter the username and password in the fields
provided if the peer notebook requires logon
information,
OR
Select OK and press
. When Logon
Successful displays, access shared folders on the
peer notebook through the Browser in the usual
way.
50
Workgroup. Select the
System Options
System Options are used to configure
device settings such as the OSD Menu
Language and Time and to perform
system maintenance.
Menu Language
To change the OSD language, perform the following steps:
1. Using the remote control or navigation buttons on the front panel of
the recorder, select Menu Language and press
.
.
2. Select the desired language from the submenu and press
The selected language change is applied immediately.
Time
To set the recorder time, perform the following steps:
1. Using the remote control or navigation buttons on the front panel of
.
the recorder, select Time and press
2. Select Manual from the submenu and enter the current date and time.
3. Press
to confirm the changes.
HDD Format
Format the optional HDD before use. See Formatting the Hard Disk Disk on
page 19 for more details.
Restore Default
You can restore the recorder factory default settings using this option.
To return the recorder to factory settings, perform the following steps:
1. Using the remote control or navigation buttons on the front panel o f
the recorder, select Restore Default and press
.
2. Select OK from the submenu and press
.
3. All manual settings are returned to default and the Setup (First Time)
screen displays.
51
Network HDD Recorder User Manual
Photo Options
Photo options are used to configure
photo display settings suc h as Slide
Show Timing and Background Music.
Slide Show Timing
Set the interval between slides in a photo slideshow.
Transition Effect
Set the transition effect between slides in a photo slideshow.
Background Music
Set the source of musical background for slide shows. See Preparing
Slideshows on page 39 for more information.
Browsing All Media
Press the Browser button on the remote
control or select Browse All Files from
the Main menu to access the Browser
menu.
Using the remote control or navigation buttons on the front panel of the
recorder, you can browse all available content in all locations, regardless of its
type.
52
Appendix A
Updating Firmware
Firmware describes any type of software that controls the internal workings of
a device. Firmware updates are created for a number of reasons, most
commonly to correct operational bugs or to introduce enhanced functions.
From time-to-time, new versions of firmware become available and the
recorder should be kept up-to-date with the latest firmware version.
To update the recorder firmware, perform the following steps:
1.
Power off and unplug the recorder.
2.
Create a bootable USB flash drive (or USB key).
3.
Save the latest firmware update package to the USB key.
Ensure that you decompress (or extract) the files before you save them
to the USB key.
4.
Insert the USB key into any USB port on the recorder. See Network
HDD Recorder Tour on page 7 for port locations.
5.
Hold down the Play/Stop button on the front of the recorder and plug
in the power cable.
Continue holding the Play/Stop button until the output
display shows the Updating Firmware screen.
Do not turn off power or unplug the recorder during the upgrade
process.
6.
Follow the on-screen prompts to complete the upgrade.
53
Network HDD Recorder User Manual
Appendix B
Troubleshooting
Connection Issues
No image or a faulty image is displayed on my screen.
If the display output settings are incorrect, the resulting image may be faulty.
1.
Check if all cable connections are secure and correctly assigned.
2.
Press TV System on the remote to cycle through the settings until a
normal screen is displayed. There are six output settings, 480i / 576i /
480P / 576P / 720P / 1080i.
Some HDMI displays only support 720P or above.
3.
Connections to external HDDs are not saved when the recorder is
powered off. You must reconnect to the HDD to continue viewing.
My recorder cannot access the internal HDD.
1.
Check if all cable connections are secure and correctl y assigned.
2.
Ensure that the HDD was formatted before use. If it has not been
formatted yet, see Formatting the Hard Disk Disk on page 19.
My recorder cannot access external USB HDDs.
1.
If your computer runs Windows 98SE or Windows ME, you require a
specialized USB driver.
2.
From the computer desktop, click Start Control Panel System
Hardware Device Manager Disk Drives and select Properties
for the USB drive:
For Windows 98SE—check Removal
For Windows ME—check Moveable
External HDD access is slow.
1.
Check if all cable connections are secure and correctly assi gned.
2.
Check the PC USB driver version. Version 1.1 causes a transmission
lag when used with the recorder.
3.
Use USB 2.0 to correct the problem.
54
I cannot connect to the network.
1.
Check if all cable connections are secure and correctly assigned.
2.
Check if the LAN/WLAN settings in the Setup menu are matching to
the local network. Refer to your router or wireless access point User
Manual for more information.
3.
If you use a firewall, for example Windows Firewall, ensure that the
connection from the recorder to the ne twork is not blocked.
If necessary, you can create firewall exceptions for specific
devices. Refer to your firewall User Manual for more
information.
Operation Issues
I cannot copy files to my internal HDD.
FAT32 format HDDs cannot write single files larg er than 4 GB. Check
the size of the file you are copying.
NTFS format HDDs cannot be written to from the recorder; they are read -only.
I cannot play/display some files.
Check if the recorder supports the file format. See Supported file formats on page
29.
I cannot record content from CD/DVDs.
Check if the source CD/DVD has a copy protection. Some original
CDs/DVDs have a copy write protection and cannot be copied by any means.
Try copying content from another CD/DVD withput copy protection to ensure
that the recorder is operating correctly.
I cannot play .wmv format files.
.wmv files can only be played over a network using the supplied Transcode
Server software.
1.
Install the Transcode Server software us ing the supplied CD. See
Installing the T on page 22.
2.
Add the desired content to Net Share Dialog and retry the operation.
See Adding Content to T on page 25.
55
Network HDD Recorder User Manual
My AVI caption file doesn’t display.
This can occur when the name of the AVI file you want to play does not
correspond with that of the caption file.
1.
Ensure that the extension of the caption file is supported ( .smi or .srt)
by the source.
2.
If they are not supported, convert the file on your computer by using a
conversion program.
During network playback, the display freezes or jumps.
Network High Definition playback may be problematic due to network speed
irregularities. To resolve the issue, perform the following steps:
Copy the content to a USB drive using the Copy File menu.
Copy the content from the USB drive to the recorder's internal HDD.
Playback the content from the internal HDD.
During Wireless network playback of .rmvb files, the mess age
“Media is Removed Stop Playback, Confirm OK” displays.
This message displays when the Wireless connection is disrupted and
connection is lost. To resolve the issue, perform the following steps:
1.
Press Select on the remote to acknowledge the message.
2.
Reconnect the Wireless link. See Wireless LAN Setup on page 47
3.
Replay the media file.
The recorder does not support playback of .rmvb format files from the
internal HDD.
www.lc-power.com
56