1
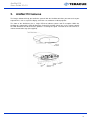
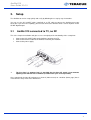
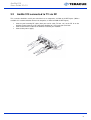
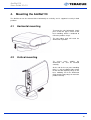
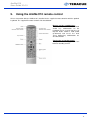
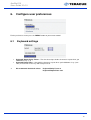
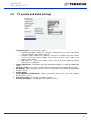
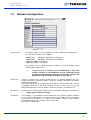
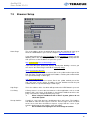
AmiNet110
User Guide V1.0.3
AMINET110
User Guide V1.0.3
Teracue AG
Schlossstr. 18
85235 Odelzhausen
Germany
Tel:
Fax:
+49 (0)8134-555-10
+49 (0)8134-555-199
[email protected]
www.teracue.com
Document Version 1.0.3/071018
1
AmiNet110
User Guide V1.0.3
COPYRIGHT
This document may not be reproduced in any form, in whole or in part, without
the prior permission of Teracue. Copyright © 2007 by Teracue, all rights
reserved.
DISCLAIMER
This publication supersedes all previous publications.
Information and specification in this documentation is subject to change
without notice. Please make sure you have the latest document version.
User guides are located at:
www.teracue.com/support
If you find some points in this user guide unclear then please let us know, so
we can improve this documentation.
Thank you! Mail to: [email protected]
All information within this document is confidential to Teracue costumers and
should not be copied or distributed to non Teracue customers.
TRADEMARKS
All Teracue products are registered trademarks licensed to Teracue.
All other logos and trademarks both marked and not, may be trademarks or
registered trademarks and therefore property of their respective owners.
2
AmiNet110
User Guide V1.0.3
I.
Information about the manual
This user guide is designed to help users to setup and to get to know and
understand the AmiNet110 set-top-box. The functionality and the advanced
features of the AmiNet110 are described in this documentation.
If you received this publication as a PDF, then it is a good idea to print it out for future reference.
It is best to use this user guide directly in front of your computer, by doing so you try out everything at
once.
.!.
Important features are marked by this sign.
.!.
The set-top-box configured set by factory default at DHCP, unless otherwise specified
in the Teracue STB IP configuration sheets.
3
AmiNet110
User Guide V1.0.3
II.
Content
1.
YOUR AMINET110 ...................................................................................................................................... 5
2.
AMINET110 FEATURES ............................................................................................................................ 6
3.
SETUP ........................................................................................................................................................... 7
3.1
3.2
3.3
4.
AMINET110 CONNECTED TO TV, NO RF................................................................................................ 7
AMINET110 CONNECTED TO TV VIA RF ................................................................................................ 8
AMINET110 CONNECTED TO TV VIA TERACUE A/V, TO AMPLIFIER VIA SP-DIF AND TO VCR VIA RF. 9
MOUNTING THE AMINET110................................................................................................................. 10
4.1
4.2
5.
HORIZONTAL MOUNTING ....................................................................................................................... 10
VERTICAL MOUNTING ............................................................................................................................ 10
USING THE AMINET110 REMOTE CONTROL ................................................................................... 11
5.1
5.2
5.3
5.4
6.
CHANNEL CONTROL .............................................................................................................................. 12
VIDEO CONTROL ................................................................................................................................... 12
W EB CONTROL ...................................................................................................................................... 12
CHANGING / RESETTING THE USER PREFERENCES .............................................................................. 12
CONFIGURE USER PREFERENCES.................................................................................................... 13
6.1
6.2
7.
KEYBOARD SETTINGS............................................................................................................................ 13
TV SYSTEM AND AUDIO SETTINGS ........................................................................................................ 14
ADVANCED PREFERENCES ................................................................................................................. 15
7.1
LOGIN .................................................................................................................................................... 15
7.2
NETWORK CONFIGURATION.................................................................................................................. 16
7.3
BROWSER SETUP.................................................................................................................................. 18
7.4
VIDEO SETUP ........................................................................................................................................ 20
7.5
PROXY SETUP ....................................................................................................................................... 22
7.6
CHANNELS............................................................................................................................................. 23
7.7
TRUSTED DOMAINS ............................................................................................................................... 24
7.8
SOFTWARE VERSION ............................................................................................................................ 25
7.9
HARDWARE INFORMATION .................................................................................................................... 25
7.10 SMARTCARD USAGE ............................................................................................................................. 26
7.11 UPDATE SOFTWARE.............................................................................................................................. 26
7.12 IDENTITY ................................................................................................................................................ 27
7.13 INFRA-RED CONFIGURATION ................................................................................................................ 27
7.13.1 Setting the Remote Control....................................................................................................... 27
7.13.2 Setting the Set Top Box............................................................................................................. 28
7.14 REBOOT................................................................................................................................................. 28
8.
AV OUTPUT/MINI-DIN PIN ASSIGNMENT........................................................................................... 29
9.
CE, CSA, FCC CONFORMANCE ........................................................................................................... 30
10.
TECHNICAL SPECIFICATIONS ......................................................................................................... 30
4
AmiNet110
User Guide V1.0.3
1.
Your AmiNet110
Your AmiNet110 IP based set-top-box is a state of the art gateway to the next generation of interactive
digital television services. It gives you access to video streaming, video on-demand, multicast video
and the World Wide Web on a standard television.
The AmiNet110 is a compact, low-cost digital video set-top box designed for standalone applications
and for use with iCue™ publishing systems for delivery of professional DVD-quality video.
The AmiNet110 is simple to setup and use. After unpacking your box should include the following:
This user guide
1 x AmiNet110
1 x Power supply
1 x Stand
1 x IR Remote Control
3 x AAA Batteries
And depending of your order either:
1 x A/V SCART cable (which is delivered in the Product no. A110-5133)
or
1 x A/V RGB/Composite cable (which is delivered in the Product no. A110-5268)
or
1 x A/V S-Video/Composite cable (which is delivered in the Product no. A110-5251)
Optional accessories:
IR keyboard
A/V S-Video cable
A/V RGB cable
5
AmiNet110
User Guide V1.0.3
2.
AmiNet110 features
The images below will help you familiarize yourself with the AmiNet110 before you connect it to your
output device, such as a plasma display, television set, monitor or a video projector.
The front of the AmiNet110 has a single LED that indicates power and IR reception. While the
AmiNet110 is powered the LED will illuminate. During IR reception (when you use the remote control)
the LED will flicker to indicate that the product is receiving the signal. The front of the unit also has a
slot for SmartCard usage (not supplied).
6
AmiNet110
User Guide V1.0.3
3.
Setup
The AmiNet110 can be setup quickly and easily by following these step-by-step instructions.
You can use the A/V SCART cable (supplied) or an RF cable to connect the AmiNet110 to your
television. If you have the capability, you can also connect the AmiNet110 to a stereo amplifier via the
SP-DIF digital output.
3.1
AmiNet110 connected to TV, no RF
This is the simplest installation and gives access to majority of the functionality of the set-top-box.
.!.
Connect the A/V SCART cable to the AmiNet110 and to your TV.
Connect the Ethernet cable to the AmiNet110 and to your network.
Connect the power supply.
The first time it is powered up it is possible that the box will spend a few moments
updating itself with the latest software (available from your service provider).
Once completed, the box will navigate to a channel (video stream) or a website (home page) that is
entered in the setup menu of the AmiNet110.
7
AmiNet110
User Guide V1.0.3
3.2
AmiNet110 connected to TV via RF
This scenario should be used if your television has no composite, S-Video or SCART inputs. (Where
available it is recommended to connect via composite, S-Video or RGB SCART inputs).
Connect your incoming RF cable (from your aerial, cable TV box, etc.) to the RF In on the
AmiNet110 and connect an RF cable from AmiNet110´s RF Out to your television.
Connect the Ethernet cable to the AmiNet110 and to your network.
Connect the power supply.
8
AmiNet110
User Guide V1.0.3
3.3
AmiNet110 connected to TV via Teracue A/V, to
amplifier via SP-DIF and to VCR via RF
This scenario gives you access to all the functionality of the AmiNet110. Digital audio is delivered to
your home theatre system via SP-DIF, video is delivered to your television via the A/V SCART lead,
and your existing RF signal is passed through the AmiNet110 directly to your VCR.
Connect the A/V SCART CABLE to the AmiNet110 and your television.
Connect a SP-DIF cable to the AmiNet110 and your digital audio capable amplifier.
Connect the incoming RF signal from your aerial/cable box to the RF In on the AmiNet110.
Connect RF cable from the RF Out on the AmiNet110 to the RF Input on your VCR.
Connect the Ethernet cable to the AmiNet110 and to your service providers Network Access
point.
Connect the power supply.
9
AmiNet110
User Guide V1.0.3
4.
Mounting the AmiNet110
The AmiNet110 can be mounted either horizontally or vertically, and is supported securely in both
positions.
4.1
Horizontal mounting
To mount the unit horizontally simply
place it onto the upper surface of the
base moulding, which is contoured to
reflect the products shape.
The two rubber pads will retain the
AmiNet110 in position.
4.2
Vertical mounting
To
ensure
more
stability
the
AmiNet110 can also be mounted
vertically.
At the end of the rear panel moulding
there is a pair of elliptical holes which
fit onto the two elliptical prongs on the
base moulding. Push the AmiNet110
firmly onto the two prongs to mount the
product vertically.
10
AmiNet110
User Guide V1.0.3
5.
Using the AmiNet110 remote control
All user interaction with the AmiNet110 is handled via the supplied remote control or with the optional
keyboard. The supplied IR remote control is illustrated below:
Buttons and key combinations:
The buttons on the IR remote control
and/or key combinations on the
keyboard can be used to turn the set
top box on/off, control a VoD (Video
on-demand) and access the web.
These buttons/key combinations are
described below.
Turning the set-top-box on/off:
The power button toggles the box
between Standby and On.
11
AmiNet110
User Guide V1.0.3
5.1
Channel Control
In addition to the video on-demand controls, the remote control has the following functions that control
video streams (multicast video) as well:
5.2
0…9 – Change the channel to the number selected.
CH +/- Increases / Decreases the channel number.
VOL +/- Increases / Decreases the volume.
MUTE – Toggles the sound on/off.
Video Control
The following buttons / keyboard keys can be used to control video on-demand (Only supported by
iCue™ systems):
5.3
Stop [ ] – Stops video and makes the screen go black.
REW [ ] – Rewinds the video.
FF [ ] – Forwards the video.
Play/Pause [/] – Toggles between normal play and pause. Will resume normal play from
FF or Rew.
Web control
The following buttons can be used to control access to the web:
5.4
SELECT – Tilt to move the mouse pointer/highlight and press to select.
HOME – Display your home page.
BACK – Return to the previous web page.
FORWARD – Move to the next web page (if you have previously moved back at least one
page).
PAGE UP – Scroll page up.
PAGE DOWN – Scroll page down.
STOP – Abort the attempt to load the requested website.
RELOAD – Reload the current page to refresh it.
Changing / resetting the user preferences
Pressing the MENU key takes you to the user preferences page. Enter the new value required and
click on the ‘Save Changes’ button. The user preferences will be changed and a ‘Preferences update
OK’ message will be displayed. You can leave the preferences unchanged by selecting Channel.
12
AmiNet110
User Guide V1.0.3
6.
Configure user preferences
For the preferences menu press the ’MENU’ button on your remote control.
6.1
.!.
Keyboard settings
Keyboard Repeat Delay Factor – The time that elapse before characters repeat when you
hold down a key. (1-4)
Keyboard Repeat Rate – How quickly characters repeat when you hold down a key. (0.2 –
30cs) A value of 0 means keys will not repeat at all.
We recommend the default values:
Keyboard Delay Factor: 4
Keyboard Repeat Rate: 30cs
13
AmiNet110
User Guide V1.0.3
6.2
TV system and audio settings
TV Display format – There are three choices:
1. Standard (4:3) Mode – Widescreen content is viewed full screen, some of the picture
at the left and right edges will be cropped.
2. Letterbox mode – Widescreen content is viewed in a letterbox, black bars will be
present at the top and the bottom of the picture and the entire width of the
transmission is visible.
3. Widescreen TV – If you have a Widescreen TV (16:9) select this option to properly
utilize your TV’s geometry.
Video output format – The AmiNet110 is able to provide Composite, S-Video and RGB video
output.
Frequency Table – Here you can choose between the broadcast and cable frequency table.
RF Channel – When using RF, you can select a channel where the AmiNet110 will be found
on your TV/VCR.
Use RF Output
Volume Minimum and Maximum – These set constraints on the Vol +/- keys. (Not supported
due to license issues)
Primary Language – First choice for subtitle selection.
Secondary Language – Second choice for subtitle selection.
14
AmiNet110
User Guide V1.0.3
7.
7.1
Advanced preferences
Login
Most of the administrative features are found and activated in AmiNet110 Management. To open the
AmiNet110 Management, you must use either the optional IR keyboard or a USB keyboard. Press
ALT+M on the keyboard. This will open a password dialog box.
.!.
Type ‘leaves’ to enter the AmiNet110 Management.
Here is the list of submenus. The content of these submenus is described in the following chapters.
.!.
To apply and save all changes, enter the password (‘snake’) and press the submit
button.
15
AmiNet110
User Guide V1.0.3
7.2
Network Configuration
Ethernet Link:
This option enables users to configure the STB´s network port characteristics.
You can choose between these options:
100MbTX-FD
(100 Mbit/s, Twisted Pair, Full Duplex)
100MbTX-HD
(100 Mbit/s, Twisted Pair, Half Duplex)
10Mb-FD (10 Mbit/s, Full Duplex)
10Mb-HD(10 Mbit/s, Half Duplex)
This option has been added especially to address specialized network and/or
administration requirements.
.!.
In most cases it is sufficient (and recommended) to leave this
setting on AUTO, so the AmiNet110 and the connected switch
can deal out the preferred connection on their own. (AUTO is the
default link mode setting up to firmware version 0.9.4)
DHCP Info:
If there is a DHCP Server in your network you can use dynamic routing. In this case
you do not need the settings IP-address, Netmask, Gateway and DNS. For dynamic
routing check the button.
If you chose DHCP it is easy to find out your IP-address. Select ‘DHCP Info’ (so that it
is highlighted blue like in the picture above) and press ‘Return’ and you get the
Information about your current IP-address, Netmask, Gateway, and DNS Server.
Hostname:*
The Hostname is to identify your AmiNet110 in a Network. For Example: ‘AmiNet110’
.!.
Empty spaces cannot be entered
IP Address:*
The IP-address is an identifier for your AmiNet110 in the TCP/IP network. Networks
use the TCP/IP protocol route messages based on the IP-address of the destination.
The format of an IP-address is a 32-bit numeric address written as four numbers
separated by periods. Each number can be zero to 255.
For example, 192.168.90.1
16
AmiNet110
User Guide V1.0.3
Netmask:*
A netmask is a 32-bit mask used to divide an IP-address into subnet and specify the
networks available hosts. For example, 255.255.255.0 is the netmask for a class-C
IP-address like 192.168.90.1
Gateway:*
The gateway is commonly the address of a network device such as a network router.
For example, 192.168.1.1
Domain:
A domain is a group of network resources assigned to a group of users. Domains are
commonly used to divide global areas of a corporation and/or corporation
departments. A domain may need to be specified when mapping a network computer
or drive.
DNS:
The DNS service on a network server that helps to identify domain names. If a domain
name is not found within the local database, the server may query other domain
server to obtain the address of a domain name. Enter here the IP-address of the DNS
Server.
Time Server:
A time server provides a master time for all the clients in your network. Every device
will be automatically set to the same time, according to the master reference time. If
there is a time server in your network, you can enter the IP-address here.
Time Zone:
For Example: GMT +1
Packet ordering:
.!.
Packet reordering is only useful in a network where packet delivery is known
to be asynchronous. It should not be used otherwise as it will cause issues.
To save all changes enter the password (‘snake’) and press the submit button.
17
AmiNet110
User Guide V1.0.3
7.3
Browser Setup
Home Page:
This is the address of the site which will open when the AmiNet110 starts up or
when the HOME button is pressed. For example: http://www.teracue.com
If you want to display the iCue™ websites on your AmiNet110, please type the
following URL in the ‘Home Page’ text field, but in the yellow marked part of the
URL you must set the IP-address of your iCue system:
http://172.16.116.2/teracue/Amino/login.aspx
If you want that your AmiNet110 displays directly after booting a stream, you
can enter in the ‘Home Page’ text field the auto-play string:
igmp://239.252.20.100:4444
(Auto-play string for a multicast stream; But in the yellow marked part of the
URL you must set your desired multicast IP-address and the port number which
are separated through a colon sign.)
udp://172.16.30.130:3535
(Auto-play string for a unicast stream; But in the yellow marked part of the
URL you must set the unicast IP-address of your AmiNet110 and the port
number which are separated through a colon sign.)
Help Page:
This is the address of the site which will open when the HELP button is pressed.
Use Proxy:
A Proxy Server is a server that sits between a client application, such as a web
browser and a real server. If this button is checked the AmiNet110 will use the
proxy server witch is configured under proxy setup.
.!.
When using the AmiNet110 with a iCue™ System, please do not
check this option.
Accept Cookies:
A cookie is a message given to a web browser by a web server. The Cookies:
web browser stores the message in a text file. The message is then sent back
to the server each time the browser requests a page from the server. If you
want the AmiNet110 to store cookies check this button.
.!.
We recommend accepting the use and storage of cookies.
18
AmiNet110
User Guide V1.0.3
Disk Cache:
This should be always be set to 0.
RAM Cache:
Specifies how much memory is to be set aside for caching web pages and
graphics. This is a compromise between the memory required to handle very
large pages and that kept as cache. For example: 300
Keyboard
This will change your used keyboard layout. You have the choice Layout
between United States (QWERTY) and European (QWERTZ) keyboard layout.
.!.
When using the original IR-Keyboard (optional), use the
adjustment ‘United States’.
.!.
To save all changes, enter the password (“snake”) and press the submit button.
19
AmiNet110
User Guide V1.0.3
7.4
Video Setup
Default Video Server:
The AmiNet110 supports different video servers.
TV Standard:
Not all TV receivers work in the same way. Different countries use
different types of broadcast TV systems, most of which are to varying
extents incompatible with each other. The AmiNet110 is able to
output/display NTSC and PAL standards and their sub-standards.
Please select your TV standard.
.!.
Requires reboot
Video Trick – Play Scale:
The ratio (2 - 12) of the fast forward and rewind speed to the normal
play speed.
No RTSP event timeout:
The number of seconds that need to pass before the software should
assume that loss of RTSP has occurred.
RTSP End of media event timeout:
No IGMP event timeout:
The number of seconds that need to pass before the software should
assume that there is no video joining.
IGMP End of media event timeout:
.!.
The number of seconds that need to pass before the software
should assume that all the content has been received.
The number of seconds that need to pass before the software
should assume that the video is interrupted during playback.
We recommend the default values:
Setting the last four options (‘No RTSP event timeout’, ‘RTSP End of media event
timeout’, ‘No IGMP event timeout’ and ‘IGMP End of media event timeout’) to the value
‘0’ means the STB will remain listening indefinitely.
20
AmiNet110
User Guide V1.0.3
The following options only affect the browser interface. The video output signal will not be changed.
Full screen mode
The full screen mode enlarges the browser to full screen.
Left margin
Percentage of full screen width, the left browser margin (edge) will be
cropped.
Right margin
Percentage of full screen width, the right browser margin (edge) will be
cropped.
Top margin
Percentage of full screen height, the top browser margin (edge) will be
cropped.
Bottom margin
Percentage of full screen height, the bottom browser margin (edge) will be
cropped.
.!.
To save all changes, enter the password (‘snake’) and press the submit button.
.!.
Any change in the Video Setup menu requires a reboot.
21
AmiNet110
User Guide V1.0.3
7.5
Proxy Setup
A proxy server is a kind of buffer between your computer and the internet resources you are
accessing. Proxies accumulate and save files that are most often requested by many of internet users
in a special database called ‘cache’.
Therefore, proxy servers are able to increase the speed of your connection. The AmiNet110 supports
three kinds of proxy servers: HTTP, HTTPS (secure proxy) and FTP.
Enter the address of the proxy server as the follows: host:port
Example: ‘192.168.90.1:24’
.!.
For loading some sites it is better if no proxy server is used. Under ‘Don’t use proxy for
the following:’ you can specify specific sites when the proxy server will not be used.
.!.
To save all changes, enter the password (‘snake’) and press the submit button.
22
AmiNet110
User Guide V1.0.3
7.6
Channels
In this menu you can define the channel allocation of the AmiNet110. All together 999 channels are
available to you. You can cover the channels either with a website, HTML page or with a video stream
(e.g. generated by a Teracue encoder or originating from an iCue™ system.
Syntax for a HTML page:
For example:
http://IP-Address/folder/page.html
http://172.16.116.2/teracue/Amino/login.aspx
Syntax for a video stream:
igmp://Multicast-Address:Port
For example: igmp://239.252.20.100:4444
Other syntax options include:
udp://IP-address_of_your_AmiNet110_for_receiving_UNICAST:Port
For example: udp://172.16.30.130:3535
.!.
To save all your changes, enter the password (‘snake’) and press the submit button.
23
AmiNet110
User Guide V1.0.3
7.7
Trusted Domains
The AmiNet110 supports JavaScript and Macrovision. Under this menu you can specify for which sites
you want to admit the use of JavaScript and Macrovision. JavaScipt is a compact, object-based
scripting language for developing client and server internet applications. Macrovision is a video copy
protection method. If it is used the video picture will turn dark and return to normal again in periodic
cycles.
.!.
To save all changes, enter the password (‘snake’) and press the submit button.
24
AmiNet110
User Guide V1.0.3
7.8
Software Version
This menu displays information about the firmware version that is installed on your AmiNet110.
7.9
Hardware Information
Under this menu you will find an overview of the hardware components of your AmiNet110.
25
AmiNet110
User Guide V1.0.3
7.10 SmartCard Usage
The AmiNet110 comes with a SmartCard reader. With a SmartCard you can control the access of your
set-top-box. If the button is checked a user needs to insert a valid SmartCard in order to use the settop-box.
.!.
To save all changes, enter the password (‘snake’) and press the submit button.
7.11 Update Software
This menu is for updating the software of your AmiNet110.
.!.
Choosing this option will delete all files in the system. You should only use this if you
are able to download new software to the box.
.!.
Do not use this function if you do not know exactly what you are doing.
26
AmiNet110
User Guide V1.0.3
7.12 Identity
The Identity page provides details about the internal serial number and the MAC Address.
.!.
Do not use this function if you don’t know exactly what you are doing.
7.13 Infra-Red Configuration
It is possible to program the STB and the Remote Control so that they are ‘paired’, allowing several
STBs with their Remote Controls to co-exist in the same environment. This is particularly useful in
multitrade shows for example, where there may be several STBs receiving IR-signals from several
RCs.
The Remote Control pre-fixes a number (0 to 15) to each STB command. This number is set by
default to 0, but can be programmed on the Remote Control itself to another number, 1 to 15.
The Set Top Box, providing it is running software release 0.9.0 or later, can also be programmed to
respond to codes prefixed with a number in addition to 0. All STBs respond to code 0. Therefore any
STB will always respond to a default Remote Control.
Please ask [email protected] for the most current IR-code list.
7.13.1
Setting the Remote Control
On the Remote Control, hold down the STB and OK keys until the STB button lights up permanently.
Then press the three-digit code corresponding to the chosen code. This number must be in the range
000 to 015. The Remote Control will now pre-fix all STB commands with this code.
27
AmiNet110
User Guide V1.0.3
7.13.2
Setting the Set Top Box
To set the additional pre-fix code, go to the Infra Red Configuration page. Set the additional chosen
code as a three-digit number (000 to 015). (Note that navigation on this page is sometimes difficult –
use the Arrow Keys on your IR Keyboard rather than the Mouse)
Save your choice in the normal way. Your Remote Control is now paired to that STB.
7.14 Reboot
Clicking on ‘Reboot’ will reboot the AmiNet110.
28
AmiNet110
User Guide V1.0.3
8.
AV Output/Mini-DIN Pin Assignment
The AmiNet110 is equipped with a Mini-DIN connector on the rear panel that allows a variety of
different AV Cable to be supplied to suit the locale and customer. This is designed to allow RGB and
CVBS to be present simultaneously. Note that S-Video is multiplexed onto the RGB and CVBS
signals. Therefore when S-Video is selected CVBS is disabled.
The assignment of the 10 Pin Mini-DIN is as follows, depending which video
output format you have chosen.
Pin
Signal
1
2
6
AUDIO-L
RGBSTATUS
CVBS/Y
GND
VIDEOSTATUS
RED/C
7
8
9
10
GND
AUDIO-R
GREEN/Y
BLUE
Pin
1
2
Signal
AUDIO-L
RGBSTATUS
CVBS/Y
GND
VIDEOSTATUS
RED/C
GND
AUDIO-R
GREEN/Y
BLUE
3
4
5
3
4
5
6
7
8
9
10
Pin
1
2
3
4
5
Signal
AUDIO-L
RGBSTATUS
CVBS/Y
6
GND
VIDEOSTATUS
RED/C
7
8
9
10
GND
AUDIO-R
GREEN/Y
BLUE
S-Video
+ CVBS
AUDIO-L
CVBS
GND
CHROMA
(C)
GND
AUDIO-R
LUMA (Y)
RGB
AUDIO-L
SYNC
GND
RED
GND
AUDIO-R
GREEN
BLUE
SCART
AUDIO-L
RGB-STATUS
CVBS/LUMA
(Y)
GND
VIDEOSTATUS
RED/CHROMA
(C)
GND
AUDIO-R
GREEN
BLUE
29
AmiNet110
User Guide V1.0.3
9.
CE, CSA, FCC conformance
The AmiNet110 is labeled with the
CE, CSA and FCC seal.
Operating Environment:
EMC Conformance:
Safety Approvals:
ETS 300-019-1-3 Class 3.1
EN55022. FCC Part 15. (electromagnetic compatibility)
Safety certification to EN60950 (electrical safety requirements), and
ELSVD. CE, CB and CSA safety approval.
10. Technical Specifications
Size:
113 x 35 x 110 mm
Weight:
266 Grams
Construction:
One-piece Aluminium Extrusion
Power:
5V, 500mA 2.5 watts 1.75 Watts standby
MTBF:
49,000 hours
CPU:
IBM x25xx SoC, 252 MHz, 350 MIPs Integrated Power PC Architecture
Memory:
OTP protected Boot ROM for Security keys, and Boot Loader system (256K Bytes) 16
Mbytes Flash Memory for software storage. Compressed filing system 64 Mbytes
SDRAM for software execution and data
USB:
USB 1.1 host interface with both low speed 1.5 Mbps and full speed 12 Mbps output. 5
Volt 500mA power output with overload protection
Ethernet:
10/100 BaseT with auto sensing and link/activity LED. Max data throughput circa 25
Mbps.
IR Receiver:
Infrared receptor, 56KHz carrier at 900 nm wavelength. Front panel LED indicates
activity
Rear panel:
10 Pin Mini-DIN socket (see details and cable options above)
S/P-DIF output for 5.1 Dolby
RF Input/Output Modulator with loop through, configurable for Standard Definition PAL
and NTSC
USB Interface
Ethernet-Port, RJ-45
Power Input
30