1
SPT 1500
Product Reference Guide
SPT 1500 Product Reference Guide
70-33757-01
Revision A — July, 1998
2
Symbol Technologies, Inc. One Symbol Plaza, Holtsville N.Y. 11742
SPT 1500
Product Reference Guide
70-33757-01
Revision A
July, 1998
1998 by Symbol Technologies, Inc. All rights reserved.
No part of this publication may be reproduced or used in any form, or by any electrical or
mechanical means, without permission in writing from Symbol. This includes electronic or
mechanical means, such as photocopying, recording, or information storage and retrieval
systems. The material in this manual is subject to change without notice.
The software is provided strictly on an “as is” basis. All software, including firmware,
furnished to the user is on a licensed basis. Symbol grants to the user a non-transferable and
non-exclusive license to use each software or firmware program delivered hereunder (licensed
program). Except as noted below, such license may not be assigned, sublicensed, or otherwise
transferred by the user without prior written consent of Symbol. No right to copy a licensed
program in whole or in part is granted, except as permitted under copyright law. The user
shall not modify, merge, or incorporate any form or portion of a licensed program with other
program material, create a derivative work from a licensed program, or use a licensed
program in a network without written permission from Symbol. The user agrees to maintain
Symbol’s copyright notice on the licensed programs delivered hereunder, and to include the
same on any authorized copies it makes, in whole or in part. The user agrees not to
decompile, disassemble, decode, or reverse engineer any licensed program delivered to the
user or any portion thereof.
Symbol reserves the right to make changes to any software or product to improve reliability,
function, or design.
Symbol does not assume any product liability arising out of, or in connection with, the
application or use of any product, circuit, or application described herein.
No license is granted, either expressly or by implication, estoppel, or otherwise under any
Symbol Technologies, Inc., intellectual property rights. An implied license only exists for
equipment, circuits, and subsystems contained in Symbol products.
Symbol, Spectrum One, and Spectrum24 are registered trademarks of Symbol Technologies,
Inc. Other product names mentioned in this manual may be trademarks or registered
trademarks of their respective companies and are hereby acknowledged.
Symbol Technologies, Inc.
One Symbol Plaza
Holtsville, New York 11742-1300
http://www.symbol.com
iv
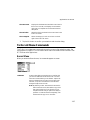
Contents
About This Guide
Introduction . . . . . . . . . . . . . . . . . . . . . . . . . . . . . . . . . . . . . . . . . . . . . . . . . . . . . . . . . . . . . . . . . . . xv
Chapter Descriptions . . . . . . . . . . . . . . . . . . . . . . . . . . . . . . . . . . . . . . . . . . . . . . . . . . . . . . . . . . . . xv
Notational Conventions . . . . . . . . . . . . . . . . . . . . . . . . . . . . . . . . . . . . . . . . . . . . . . . . . . . . . . . . . xvii
Service Information . . . . . . . . . . . . . . . . . . . . . . . . . . . . . . . . . . . . . . . . . . . . . . . . . . . . . . . . . . . . xvii
Symbol Support Center . . . . . . . . . . . . . . . . . . . . . . . . . . . . . . . . . . . . . . . . . . . . . . . . . . . . . . xvii
Europe . . . . . . . . . . . . . . . . . . . . . . . . . . . . . . . . . . . . . . . . . . . . . . . . . . . . . . . . . . . . . . .xviii
Asia . . . . . . . . . . . . . . . . . . . . . . . . . . . . . . . . . . . . . . . . . . . . . . . . . . . . . . . . . . . . . . . . .xviii
Chapter 1.
Getting Started with the SPT 1500
Introduction . . . . . . . . . . . . . . . . . . . . . . . . . . . . . . . . . . . . . . . . . . . . . . . . . . . . . . . . . . . . . . . . . . 1-1
Parts of the SPT 1500 . . . . . . . . . . . . . . . . . . . . . . . . . . . . . . . . . . . . . . . . . . . . . . . . . . . . . . . . . . . 1-2
Installing the Batteries . . . . . . . . . . . . . . . . . . . . . . . . . . . . . . . . . . . . . . . . . . . . . . . . . . . . . . . . . . 1-4
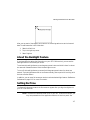
About the Backlight Feature . . . . . . . . . . . . . . . . . . . . . . . . . . . . . . . . . . . . . . . . . . . . . . . . . . . . . . 1-7
Setting the Time . . . . . . . . . . . . . . . . . . . . . . . . . . . . . . . . . . . . . . . . . . . . . . . . . . . . . . . . . . . . . . . 1-7
Setting the Current Date . . . . . . . . . . . . . . . . . . . . . . . . . . . . . . . . . . . . . . . . . . . . . . . . . . . . . . . . . 1-8
Connecting the Cradle . . . . . . . . . . . . . . . . . . . . . . . . . . . . . . . . . . . . . . . . . . . . . . . . . . . . . . . . . . 1-9
Palm SPT 1500 Desktop Software . . . . . . . . . . . . . . . . . . . . . . . . . . . . . . . . . . . . . . . . . . . . . . . . 1-10
System Requirements . . . . . . . . . . . . . . . . . . . . . . . . . . . . . . . . . . . . . . . . . . . . . . . . . . . 1-11
Desktop Software Installation . . . . . . . . . . . . . . . . . . . . . . . . . . . . . . . . . . . . . . . . . . . . 1-11
Chapter 2.
Working with Your SPT 1500 Terminal
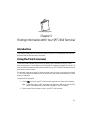
Introduction . . . . . . . . . . . . . . . . . . . . . . . . . . . . . . . . . . . . . . . . . . . . . . . . . . . . . . . . . . . . . . . . . .
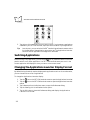
Selecting Applications. . . . . . . . . . . . . . . . . . . . . . . . . . . . . . . . . . . . . . . . . . . . . . . . . . . . . . . . . . .
Switching Applications . . . . . . . . . . . . . . . . . . . . . . . . . . . . . . . . . . . . . . . . . . . . . . . . . . . . . . . . . .
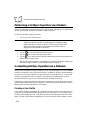
Changing the Applications Launcher Display Format. . . . . . . . . . . . . . . . . . . . . . . . . . . . . . . . . . .
2-1
2-1
2-2
2-2
v
SPT 1500 Product Reference Guide
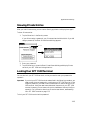
Displaying Applications by Category . . . . . . . . . . . . . . . . . . . . . . . . . . . . . . . . . . . . . . . . . . . . . . . . 2-3
Using the On-Screen Keyboard . . . . . . . . . . . . . . . . . . . . . . . . . . . . . . . . . . . . . . . . . . . . . . . . . . . . 2-4
Writing With the Stylus . . . . . . . . . . . . . . . . . . . . . . . . . . . . . . . . . . . . . . . . . . . . . . . . . . . . . . . . . . 2-5
Opening the Memo Pad Application . . . . . . . . . . . . . . . . . . . . . . . . . . . . . . . . . . . . . . . . . . . . . . . . 2-6
Writing Letters With Graffiti . . . . . . . . . . . . . . . . . . . . . . . . . . . . . . . . . . . . . . . . . . . . . . . . . . 2-6
Graffiti Tips . . . . . . . . . . . . . . . . . . . . . . . . . . . . . . . . . . . . . . . . . . . . . . . . . . . . . . . . . . . . . . . 2-8
The Graffiti Alphabet . . . . . . . . . . . . . . . . . . . . . . . . . . . . . . . . . . . . . . . . . . . . . . . . . . . . . . . 2-10
Writing Capital Letters With Graffiti . . . . . . . . . . . . . . . . . . . . . . . . . . . . . . . . . . . . . . . . . . . 2-11
Writing Numbers With Graffiti . . . . . . . . . . . . . . . . . . . . . . . . . . . . . . . . . . . . . . . . . . . . . . . 2-11
Graffiti Numbers . . . . . . . . . . . . . . . . . . . . . . . . . . . . . . . . . . . . . . . . . . . . . . . . . . . . . . . . . . 2-11
Writing Punctuation Marks With Graffiti. . . . . . . . . . . . . . . . . . . . . . . . . . . . . . . . . . . . . . . . 2-12
Additional Graffiti Punctuation . . . . . . . . . . . . . . . . . . . . . . . . . . . . . . . . . . . . . . . . . . . . . . . 2-13
Writing Symbols and Extended Characters. . . . . . . . . . . . . . . . . . . . . . . . . . . . . . . . . . . . . . . 2-13
Writing Accented Characters . . . . . . . . . . . . . . . . . . . . . . . . . . . . . . . . . . . . . . . . . . . . . . . . . 2-14
Accent Strokes . . . . . . . . . . . . . . . . . . . . . . . . . . . . . . . . . . . . . . . . . . . . . . . . . . . . . . . . . . . . 2-14
Additional Non-English Characters . . . . . . . . . . . . . . . . . . . . . . . . . . . . . . . . . . . . . . . . . . . . 2-14
Navigation Strokes . . . . . . . . . . . . . . . . . . . . . . . . . . . . . . . . . . . . . . . . . . . . . . . . . . . . . . . . . 2-15
Graffiti ShortCuts. . . . . . . . . . . . . . . . . . . . . . . . . . . . . . . . . . . . . . . . . . . . . . . . . . . . . . . . . . 2-15
Using Application Controls . . . . . . . . . . . . . . . . . . . . . . . . . . . . . . . . . . . . . . . . . . . . . . . . . . . . . . 2-16
Using Menus . . . . . . . . . . . . . . . . . . . . . . . . . . . . . . . . . . . . . . . . . . . . . . . . . . . . . . . . . . . . . . . . . 2-17
Choosing a Menu . . . . . . . . . . . . . . . . . . . . . . . . . . . . . . . . . . . . . . . . . . . . . . . . . . . . . . . . . . 2-18
Graffiti Menu Commands . . . . . . . . . . . . . . . . . . . . . . . . . . . . . . . . . . . . . . . . . . . . . . . . . . . 2-18
Edit Menu Commands . . . . . . . . . . . . . . . . . . . . . . . . . . . . . . . . . . . . . . . . . . . . . . . . . . 2-19
Choosing Fonts . . . . . . . . . . . . . . . . . . . . . . . . . . . . . . . . . . . . . . . . . . . . . . . . . . . . . . . . . . . . . . . 2-20
Using Categories . . . . . . . . . . . . . . . . . . . . . . . . . . . . . . . . . . . . . . . . . . . . . . . . . . . . . . . . . . . . . . 2-21
Using Categories in Lists. . . . . . . . . . . . . . . . . . . . . . . . . . . . . . . . . . . . . . . . . . . . . . . . . . . . . 2-22
Defining a New Category . . . . . . . . . . . . . . . . . . . . . . . . . . . . . . . . . . . . . . . . . . . . . . . . . . . . 2-23
Renaming Categories . . . . . . . . . . . . . . . . . . . . . . . . . . . . . . . . . . . . . . . . . . . . . . . . . . . . . . . 2-25
Attaching Notes. . . . . . . . . . . . . . . . . . . . . . . . . . . . . . . . . . . . . . . . . . . . . . . . . . . . . . . . . . . . . . . 2-26
Marking Private Entries . . . . . . . . . . . . . . . . . . . . . . . . . . . . . . . . . . . . . . . . . . . . . . . . . . . . . 2-26
Beaming Information to Other SPT 1500 Terminals . . . . . . . . . . . . . . . . . . . . . . . . . . . . . . . . . . . 2-27
Chapter 3.
Finding Information With Your SPT 1500 Terminal
Introduction. . . . . . . . . . . . . . . . . . . . . . . . . . . . . . . . . . . . . . . . . . . . . . . . . . . . . . . . . . . . . . . . . . . 3-1
Using the Find Command . . . . . . . . . . . . . . . . . . . . . . . . . . . . . . . . . . . . . . . . . . . . . . . . . . . . . . . . 3-1
Using Phone Lookup . . . . . . . . . . . . . . . . . . . . . . . . . . . . . . . . . . . . . . . . . . . . . . . . . . . . . . . . . . . . 3-2
Phone Lookup Tips . . . . . . . . . . . . . . . . . . . . . . . . . . . . . . . . . . . . . . . . . . . . . . . . . . . . . . 3-3
vi
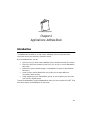
Chapter 4.
Applications: Address Book
Introduction . . . . . . . . . . . . . . . . . . . . . . . . . . . . . . . . . . . . . . . . . . . . . . . . . . . . . . . . . . . . . . . . . . 4-1
Getting Started With Address Book Entries . . . . . . . . . . . . . . . . . . . . . . . . . . . . . . . . . . . . . . . . . . 4-2
Creating an Address Book Entry . . . . . . . . . . . . . . . . . . . . . . . . . . . . . . . . . . . . . . . . . . . . . . . 4-2
Editing an Address Book Entry . . . . . . . . . . . . . . . . . . . . . . . . . . . . . . . . . . . . . . . . . . . . . . . . 4-4
Deleting an Address Book Entry . . . . . . . . . . . . . . . . . . . . . . . . . . . . . . . . . . . . . . . . . . . . . . . 4-5
Working With Address Book Entries. . . . . . . . . . . . . . . . . . . . . . . . . . . . . . . . . . . . . . . . . . . . 4-5
Looking Up Address Book Entries . . . . . . . . . . . . . . . . . . . . . . . . . . . . . . . . . . . . . . . . . . 4-5
Choosing Types of Phone Numbers. . . . . . . . . . . . . . . . . . . . . . . . . . . . . . . . . . . . . . . . . . . . . 4-6
Assigning Address Categories . . . . . . . . . . . . . . . . . . . . . . . . . . . . . . . . . . . . . . . . . . . . . . . . . 4-7
Sorting by Name or Company. . . . . . . . . . . . . . . . . . . . . . . . . . . . . . . . . . . . . . . . . . . . . . . . . 4-7
Changing Address Entry Details . . . . . . . . . . . . . . . . . . . . . . . . . . . . . . . . . . . . . . . . . . . . . . . 4-8
Beaming Address Entries to Other SPT 1500 terminals . . . . . . . . . . . . . . . . . . . . . . . . . . . . . . 4-9
Address Book Menu Commands . . . . . . . . . . . . . . . . . . . . . . . . . . . . . . . . . . . . . . . . . . . . . . . . . 4-10
Record Menu . . . . . . . . . . . . . . . . . . . . . . . . . . . . . . . . . . . . . . . . . . . . . . . . . . . . . . . . . . . . 4-10
Options Menu . . . . . . . . . . . . . . . . . . . . . . . . . . . . . . . . . . . . . . . . . . . . . . . . . . . . . . . . . . . . 4-12
Chapter 5.
Applications: Calculator
Introduction . . . . . . . . . . . . . . . . . . . . . . . . . . . . . . . . . . . . . . . . . . . . . . . . . . . . . . . . . . . . . . . . . .
Using the Calculator Screen . . . . . . . . . . . . . . . . . . . . . . . . . . . . . . . . . . . . . . . . . . . . . . . . . . . . . .
Special Calculator Buttons. . . . . . . . . . . . . . . . . . . . . . . . . . . . . . . . . . . . . . . . . . . . . . . . . . . .
Calculator Menu Commands . . . . . . . . . . . . . . . . . . . . . . . . . . . . . . . . . . . . . . . . . . . . . . . . .
Recent Calculations. . . . . . . . . . . . . . . . . . . . . . . . . . . . . . . . . . . . . . . . . . . . . . . . . . . . . . . . .
5-1
5-1
5-2
5-2
5-2
Chapter 6.
Applications: Date Book
Introduction . . . . . . . . . . . . . . . . . . . . . . . . . . . . . . . . . . . . . . . . . . . . . . . . . . . . . . . . . . . . . . . . . . 6-1
Scheduling an Event . . . . . . . . . . . . . . . . . . . . . . . . . . . . . . . . . . . . . . . . . . . . . . . . . . . . . . . . . . . . 6-2
Rescheduling an Event . . . . . . . . . . . . . . . . . . . . . . . . . . . . . . . . . . . . . . . . . . . . . . . . . . . . . . . . . . 6-6
Setting an Alarm for an Event. . . . . . . . . . . . . . . . . . . . . . . . . . . . . . . . . . . . . . . . . . . . . . . . . . . . . 6-6
Scheduling Repeating Events . . . . . . . . . . . . . . . . . . . . . . . . . . . . . . . . . . . . . . . . . . . . . . . . . . . . . 6-7
Considerations for the Repeat Function . . . . . . . . . . . . . . . . . . . . . . . . . . . . . . . . . . . . . . . . . . . . . 6-8
Marking a Private Event . . . . . . . . . . . . . . . . . . . . . . . . . . . . . . . . . . . . . . . . . . . . . . . . . . . . . . . . . 6-9
Deleting an Event . . . . . . . . . . . . . . . . . . . . . . . . . . . . . . . . . . . . . . . . . . . . . . . . . . . . . . . . . . . . . . 6-9
Changing the Date Book View . . . . . . . . . . . . . . . . . . . . . . . . . . . . . . . . . . . . . . . . . . . . . . . . . . . . 6-9
Working in Week View . . . . . . . . . . . . . . . . . . . . . . . . . . . . . . . . . . . . . . . . . . . . . . . . . . . . . 6-10
Spotting Event Conflicts in Week View . . . . . . . . . . . . . . . . . . . . . . . . . . . . . . . . . . . . . . . . . 6-11
Working in Month View . . . . . . . . . . . . . . . . . . . . . . . . . . . . . . . . . . . . . . . . . . . . . . . . . . . . 6-12
Date Book Menu Commands . . . . . . . . . . . . . . . . . . . . . . . . . . . . . . . . . . . . . . . . . . . . . . . . . . . . 6-13
vii
SPT 1500 Product Reference Guide
Record Menu . . . . . . . . . . . . . . . . . . . . . . . . . . . . . . . . . . . . . . . . . . . . . . . . . . . . . . . . . . . . . 6-13
Options Menu . . . . . . . . . . . . . . . . . . . . . . . . . . . . . . . . . . . . . . . . . . . . . . . . . . . . . . . . . . . . 6-14
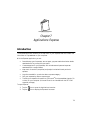
Chapter 7.
Applications: Expense
Introduction. . . . . . . . . . . . . . . . . . . . . . . . . . . . . . . . . . . . . . . . . . . . . . . . . . . . . . . . . . . . . . . . . . . 7-1
Creating an Expense Item . . . . . . . . . . . . . . . . . . . . . . . . . . . . . . . . . . . . . . . . . . . . . . . . . . . . . . . . 7-2
Changing the Expense Item Date . . . . . . . . . . . . . . . . . . . . . . . . . . . . . . . . . . . . . . . . . . . . . . . . . . . 7-3
Entering Receipt Details. . . . . . . . . . . . . . . . . . . . . . . . . . . . . . . . . . . . . . . . . . . . . . . . . . . . . . . . . . 7-3
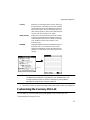
Customizing the Currency Pick List . . . . . . . . . . . . . . . . . . . . . . . . . . . . . . . . . . . . . . . . . . . . . . . . . 7-5
Show Options. . . . . . . . . . . . . . . . . . . . . . . . . . . . . . . . . . . . . . . . . . . . . . . . . . . . . . . . . . . . . . 7-6
Transferring Your Data to Microsoft Excel . . . . . . . . . . . . . . . . . . . . . . . . . . . . . . . . . . . . . . . . . . . 7-7
Printing an Expense Report . . . . . . . . . . . . . . . . . . . . . . . . . . . . . . . . . . . . . . . . . . . . . . . . . . . . . . . 7-7
Using Expense Report Templates. . . . . . . . . . . . . . . . . . . . . . . . . . . . . . . . . . . . . . . . . . . . . . . . . . 7-11
Expense Menu Commands . . . . . . . . . . . . . . . . . . . . . . . . . . . . . . . . . . . . . . . . . . . . . . . . . . . . . . 7-12
Record Menu . . . . . . . . . . . . . . . . . . . . . . . . . . . . . . . . . . . . . . . . . . . . . . . . . . . . . . . . . . . . . 7-12
Options Menu . . . . . . . . . . . . . . . . . . . . . . . . . . . . . . . . . . . . . . . . . . . . . . . . . . . . . . . . . . . . 7-12
Chapter 8.
Applications: HotSync®
Introduction. . . . . . . . . . . . . . . . . . . . . . . . . . . . . . . . . . . . . . . . . . . . . . . . . . . . . . . . . . . . . . . . . . . 8-1
The HotSync Process and the HotSync Manager . . . . . . . . . . . . . . . . . . . . . . . . . . . . . . . . . . . . . . . 8-1
Performing a HotSync Operation for the First Time . . . . . . . . . . . . . . . . . . . . . . . . . . . . . . . . . . . . 8-2
Conducting a Local HotSync Operation . . . . . . . . . . . . . . . . . . . . . . . . . . . . . . . . . . . . . . . . . . . . . 8-4
Selecting HotSync Setup Options . . . . . . . . . . . . . . . . . . . . . . . . . . . . . . . . . . . . . . . . . . . . . . . . . . . 8-4
Customizing HotSync Application Settings . . . . . . . . . . . . . . . . . . . . . . . . . . . . . . . . . . . . . . . . . . . 8-7
Conducting a HotSync Operation via Modem . . . . . . . . . . . . . . . . . . . . . . . . . . . . . . . . . . . . . . . . . 8-9
Preparing Your Computer for a Modem HotSync Operation . . . . . . . . . . . . . . . . . . . . . . . . . . 8-9
Preparing Your SPT 1500 Terminal for a Modem HotSync Operation . . . . . . . . . . . . . . . . . . . . . 8-10
Selecting the Conduits for a Modem HotSync Operation . . . . . . . . . . . . . . . . . . . . . . . . . . . . 8-11
Performing a HotSync Operation via a Modem: . . . . . . . . . . . . . . . . . . . . . . . . . . . . . . . . . . . . . . 8-12
Conducting HotSync Operation via a Network . . . . . . . . . . . . . . . . . . . . . . . . . . . . . . . . . . . . . . . 8-12
Creating a User Profile . . . . . . . . . . . . . . . . . . . . . . . . . . . . . . . . . . . . . . . . . . . . . . . . . . . . . . 8-12
Using File Link . . . . . . . . . . . . . . . . . . . . . . . . . . . . . . . . . . . . . . . . . . . . . . . . . . . . . . . . . . . . 8-14
Chapter 9.
Applications: Mail
Introduction. . . . . . . . . . . . . . . . . . . . . . . . . . . . . . . . . . . . . . . . . . . . . . . . . . . . . . . . . . . . . . . . . . . 9-1
Setting Up Mail on the Desktop. . . . . . . . . . . . . . . . . . . . . . . . . . . . . . . . . . . . . . . . . . . . . . . . . . . . 9-1
Synchronizing Mail with your E-Mail Application . . . . . . . . . . . . . . . . . . . . . . . . . . . . . . . . . . 9-3
viii
Opening Mail on your SPT 1500 Terminal . . . . . . . . . . . . . . . . . . . . . . . . . . . . . . . . . . . . . . . 9-4
Viewing Messages . . . . . . . . . . . . . . . . . . . . . . . . . . . . . . . . . . . . . . . . . . . . . . . . . . . . . . . . . . 9-4
Message Fonts . . . . . . . . . . . . . . . . . . . . . . . . . . . . . . . . . . . . . . . . . . . . . . . . . . . . . . . . . 9-5
Displaying Full Header Information. . . . . . . . . . . . . . . . . . . . . . . . . . . . . . . . . . . . . . . . . 9-5
Creating Messages. . . . . . . . . . . . . . . . . . . . . . . . . . . . . . . . . . . . . . . . . . . . . . . . . . . . . . . . . . 9-5
Looking Up an Address . . . . . . . . . . . . . . . . . . . . . . . . . . . . . . . . . . . . . . . . . . . . . . . . . . . . . . 9-8
Adding Message Details . . . . . . . . . . . . . . . . . . . . . . . . . . . . . . . . . . . . . . . . . . . . . . . . . . . . . 9-9
Setting a Priority . . . . . . . . . . . . . . . . . . . . . . . . . . . . . . . . . . . . . . . . . . . . . . . . . . . . . . 9-10
Sending a Blind Carbon Copy . . . . . . . . . . . . . . . . . . . . . . . . . . . . . . . . . . . . . . . . . . . . 9-10
Adding a Signature to Your Message . . . . . . . . . . . . . . . . . . . . . . . . . . . . . . . . . . . . . . . 9-11
Requesting Confirmations . . . . . . . . . . . . . . . . . . . . . . . . . . . . . . . . . . . . . . . . . . . . . . . 9-12
Sending Messages . . . . . . . . . . . . . . . . . . . . . . . . . . . . . . . . . . . . . . . . . . . . . . . . . . . . . . . . . 9-12
Editing an Unsent Message . . . . . . . . . . . . . . . . . . . . . . . . . . . . . . . . . . . . . . . . . . . . . . . . . . 9-12
Draft Messages . . . . . . . . . . . . . . . . . . . . . . . . . . . . . . . . . . . . . . . . . . . . . . . . . . . . . . . . . . . 9-13
Filing a Message . . . . . . . . . . . . . . . . . . . . . . . . . . . . . . . . . . . . . . . . . . . . . . . . . . . . . . . . . . 9-14
Deleting Messages . . . . . . . . . . . . . . . . . . . . . . . . . . . . . . . . . . . . . . . . . . . . . . . . . . . . . . . . . 9-15
Removing a Message From the Deleted Folder. . . . . . . . . . . . . . . . . . . . . . . . . . . . . . . . 9-15
Purging Deleted Messages . . . . . . . . . . . . . . . . . . . . . . . . . . . . . . . . . . . . . . . . . . . . . . . 9-16
Message List Options . . . . . . . . . . . . . . . . . . . . . . . . . . . . . . . . . . . . . . . . . . . . . . . . . . . . . . 9-16
Folders . . . . . . . . . . . . . . . . . . . . . . . . . . . . . . . . . . . . . . . . . . . . . . . . . . . . . . . . . . . . . . 9-16
Date Column . . . . . . . . . . . . . . . . . . . . . . . . . . . . . . . . . . . . . . . . . . . . . . . . . . . . . . . . . 9-17
Sorting the Message List. . . . . . . . . . . . . . . . . . . . . . . . . . . . . . . . . . . . . . . . . . . . . . . . . 9-18
HotSync Options. . . . . . . . . . . . . . . . . . . . . . . . . . . . . . . . . . . . . . . . . . . . . . . . . . . . . . . . . . 9-18
Creating Special Filters . . . . . . . . . . . . . . . . . . . . . . . . . . . . . . . . . . . . . . . . . . . . . . . . . . . . . 9-21
Ignoring or Receiving Messages . . . . . . . . . . . . . . . . . . . . . . . . . . . . . . . . . . . . . . . . . . . 9-21
Defining Filter Strings . . . . . . . . . . . . . . . . . . . . . . . . . . . . . . . . . . . . . . . . . . . . . . . . . . . . . . 9-22
High-Priority Messages . . . . . . . . . . . . . . . . . . . . . . . . . . . . . . . . . . . . . . . . . . . . . . . . . . . . . 9-24
Truncating Messages . . . . . . . . . . . . . . . . . . . . . . . . . . . . . . . . . . . . . . . . . . . . . . . . . . . . . . . 9-25
Mail Menu Commands . . . . . . . . . . . . . . . . . . . . . . . . . . . . . . . . . . . . . . . . . . . . . . . . . . . . . 9-25
Message Menu . . . . . . . . . . . . . . . . . . . . . . . . . . . . . . . . . . . . . . . . . . . . . . . . . . . . . . . . 9-26
Options Menu . . . . . . . . . . . . . . . . . . . . . . . . . . . . . . . . . . . . . . . . . . . . . . . . . . . . . . . . 9-27
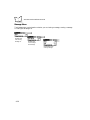
Chapter 10.
Applications: Memo Pad
Introduction . . . . . . . . . . . . . . . . . . . . . . . . . . . . . . . . . . . . . . . . . . . . . . . . . . . . . . . . . . . . . . . . .
Working With Memos . . . . . . . . . . . . . . . . . . . . . . . . . . . . . . . . . . . . . . . . . . . . . . . . . . . . . . . . .
Reviewing Memos . . . . . . . . . . . . . . . . . . . . . . . . . . . . . . . . . . . . . . . . . . . . . . . . . . . . . . . . .
Arranging Memos . . . . . . . . . . . . . . . . . . . . . . . . . . . . . . . . . . . . . . . . . . . . . . . . . . . . . . . . .
Manually arranging the Memo List . . . . . . . . . . . . . . . . . . . . . . . . . . . . . . . . . . . . . . . . . . . .
Choosing a Memo Category . . . . . . . . . . . . . . . . . . . . . . . . . . . . . . . . . . . . . . . . . . . . . . . . .
Marking a Private Memo . . . . . . . . . . . . . . . . . . . . . . . . . . . . . . . . . . . . . . . . . . . . . . . . . . .
Deleting a Memo. . . . . . . . . . . . . . . . . . . . . . . . . . . . . . . . . . . . . . . . . . . . . . . . . . . . . . . . . .
Memo Pad Menu Commands . . . . . . . . . . . . . . . . . . . . . . . . . . . . . . . . . . . . . . . . . . . . . . . .
10-1
10-2
10-3
10-3
10-4
10-4
10-4
10-5
10-5
ix
SPT 1500 Product Reference Guide
Record Menu . . . . . . . . . . . . . . . . . . . . . . . . . . . . . . . . . . . . . . . . . . . . . . . . . . . . . . . . . 10-5
Options Menu . . . . . . . . . . . . . . . . . . . . . . . . . . . . . . . . . . . . . . . . . . . . . . . . . . . . . . . . . 10-6
Chapter 11.
Applications: Preferences
Introduction. . . . . . . . . . . . . . . . . . . . . . . . . . . . . . . . . . . . . . . . . . . . . . . . . . . . . . . . . . . . . . . . . . 11-1
Buttons Preferences . . . . . . . . . . . . . . . . . . . . . . . . . . . . . . . . . . . . . . . . . . . . . . . . . . . . . . . . . . . . 11-2
Pen Preferences . . . . . . . . . . . . . . . . . . . . . . . . . . . . . . . . . . . . . . . . . . . . . . . . . . . . . . . . . . . . 11-2
HotSync® Buttons Preferences . . . . . . . . . . . . . . . . . . . . . . . . . . . . . . . . . . . . . . . . . . . . . . . . 11-4
Digitizer Preferences . . . . . . . . . . . . . . . . . . . . . . . . . . . . . . . . . . . . . . . . . . . . . . . . . . . . . . . . . . . 11-5
Formats Preferences . . . . . . . . . . . . . . . . . . . . . . . . . . . . . . . . . . . . . . . . . . . . . . . . . . . . . . . . . . . . 11-5
Country Default . . . . . . . . . . . . . . . . . . . . . . . . . . . . . . . . . . . . . . . . . . . . . . . . . . . . . . . . . . . 11-5
Time, Date, Week Start and Numbers Formats . . . . . . . . . . . . . . . . . . . . . . . . . . . . . . . . . . . 11-6
General Preferences . . . . . . . . . . . . . . . . . . . . . . . . . . . . . . . . . . . . . . . . . . . . . . . . . . . . . . . . . . . . 11-6
Setting the Current Time . . . . . . . . . . . . . . . . . . . . . . . . . . . . . . . . . . . . . . . . . . . . . . . . . . . . 11-6
Setting the Current Date . . . . . . . . . . . . . . . . . . . . . . . . . . . . . . . . . . . . . . . . . . . . . . . . . . . . . 11-7
Auto-Off Delay. . . . . . . . . . . . . . . . . . . . . . . . . . . . . . . . . . . . . . . . . . . . . . . . . . . . . . . . . . . . 11-8
System, Alarm and Game Sounds . . . . . . . . . . . . . . . . . . . . . . . . . . . . . . . . . . . . . . . . . . . . . . 11-8
Modem Preferences . . . . . . . . . . . . . . . . . . . . . . . . . . . . . . . . . . . . . . . . . . . . . . . . . . . . . . . . . . . . 11-9
Network Preferences and Palm TCP/IP Software . . . . . . . . . . . . . . . . . . . . . . . . . . . . . . . . . . . . . 11-10
Selecting a Service. . . . . . . . . . . . . . . . . . . . . . . . . . . . . . . . . . . . . . . . . . . . . . . . . . . . . . . . . 11-11
Entering a User Name. . . . . . . . . . . . . . . . . . . . . . . . . . . . . . . . . . . . . . . . . . . . . . . . . . . . . . 11-11
Entering a Password . . . . . . . . . . . . . . . . . . . . . . . . . . . . . . . . . . . . . . . . . . . . . . . . . . . . . . . 11-12
Adding Telephone Settings . . . . . . . . . . . . . . . . . . . . . . . . . . . . . . . . . . . . . . . . . . . . . . . . . . 11-13
Entering a prefix. . . . . . . . . . . . . . . . . . . . . . . . . . . . . . . . . . . . . . . . . . . . . . . . . . . . . . . . . . 11-14
Disabling Call Waiting . . . . . . . . . . . . . . . . . . . . . . . . . . . . . . . . . . . . . . . . . . . . . . . . . . . . . 11-14
Using a Calling Card . . . . . . . . . . . . . . . . . . . . . . . . . . . . . . . . . . . . . . . . . . . . . . . . . . . . . . 11-15
Connecting to your Service . . . . . . . . . . . . . . . . . . . . . . . . . . . . . . . . . . . . . . . . . . . . . . . . . . 11-16
Creating Additional Service Templates . . . . . . . . . . . . . . . . . . . . . . . . . . . . . . . . . . . . . . . . . 11-16
Adding Detailed Information to a Service Template . . . . . . . . . . . . . . . . . . . . . . . . . . . . . . . 11-17
Idle Timeout . . . . . . . . . . . . . . . . . . . . . . . . . . . . . . . . . . . . . . . . . . . . . . . . . . . . . . . . . . . . . 11-18
Defining Primary and Secondary DNS . . . . . . . . . . . . . . . . . . . . . . . . . . . . . . . . . . . . . . . . . 11-19
IP Address . . . . . . . . . . . . . . . . . . . . . . . . . . . . . . . . . . . . . . . . . . . . . . . . . . . . . . . . . . . . . . 11-19
Creating a Login Script. . . . . . . . . . . . . . . . . . . . . . . . . . . . . . . . . . . . . . . . . . . . . . . . . . . . . 11-20
Deleting a Service Template . . . . . . . . . . . . . . . . . . . . . . . . . . . . . . . . . . . . . . . . . . . . . . . . . 11-22
Network Preferences Menu Commands. . . . . . . . . . . . . . . . . . . . . . . . . . . . . . . . . . . . . . . . . . . . 11-22
Service Menu . . . . . . . . . . . . . . . . . . . . . . . . . . . . . . . . . . . . . . . . . . . . . . . . . . . . . . . . . . . . 11-23
Options Menu . . . . . . . . . . . . . . . . . . . . . . . . . . . . . . . . . . . . . . . . . . . . . . . . . . . . . . . . . . . 11-23
Displaying expanded Service Connection Progress messages. . . . . . . . . . . . . . . . . . . . . . . . . 11-24
Viewing the Network Log . . . . . . . . . . . . . . . . . . . . . . . . . . . . . . . . . . . . . . . . . . . . . . . . . . 11-24
Adding a DNS Number . . . . . . . . . . . . . . . . . . . . . . . . . . . . . . . . . . . . . . . . . . . . . . . . . . . . 11-24
Owner Preferences . . . . . . . . . . . . . . . . . . . . . . . . . . . . . . . . . . . . . . . . . . . . . . . . . . . . . . . . . . . . 11-24
ShortCuts Preferences . . . . . . . . . . . . . . . . . . . . . . . . . . . . . . . . . . . . . . . . . . . . . . . . . . . . . . . . . 11-25
x
Creating a ShortCut . . . . . . . . . . . . . . . . . . . . . . . . . . . . . . . . . . . . . . . . . . . . . . . . . . . . . . 11-25
Editing a ShortCut. . . . . . . . . . . . . . . . . . . . . . . . . . . . . . . . . . . . . . . . . . . . . . . . . . . . . . . . 11-26
Deleting a ShortCut. . . . . . . . . . . . . . . . . . . . . . . . . . . . . . . . . . . . . . . . . . . . . . . . . . . . . . . 11-27
Chapter 12.
Applications: Security
Introduction . . . . . . . . . . . . . . . . . . . . . . . . . . . . . . . . . . . . . . . . . . . . . . . . . . . . . . . . . . . . . . . . .
Assigning a Password . . . . . . . . . . . . . . . . . . . . . . . . . . . . . . . . . . . . . . . . . . . . . . . . . . . . . . . . . .
Hiding Private Entries. . . . . . . . . . . . . . . . . . . . . . . . . . . . . . . . . . . . . . . . . . . . . . . . . . . . . . . . . .
Showing Private Entries . . . . . . . . . . . . . . . . . . . . . . . . . . . . . . . . . . . . . . . . . . . . . . . . . . . . . . . .
Locking Your SPT 1500 Terminal . . . . . . . . . . . . . . . . . . . . . . . . . . . . . . . . . . . . . . . . . . . . . . . .
Changing or Deleting a Password . . . . . . . . . . . . . . . . . . . . . . . . . . . . . . . . . . . . . . . . . . . . . . . . .
Recovering from a Forgotten Password . . . . . . . . . . . . . . . . . . . . . . . . . . . . . . . . . . . . . . . . . . . .
12-1
12-1
12-2
12-3
12-3
12-4
12-5
Chapter 13.
Applications: To Do List
Introduction . . . . . . . . . . . . . . . . . . . . . . . . . . . . . . . . . . . . . . . . . . . . . . . . . . . . . . . . . . . . . . . . .
Opening the To Do List . . . . . . . . . . . . . . . . . . . . . . . . . . . . . . . . . . . . . . . . . . . . . . . . . . . . . . . .
Working With To Do Items . . . . . . . . . . . . . . . . . . . . . . . . . . . . . . . . . . . . . . . . . . . . . . . . . . . . .
Setting Priority . . . . . . . . . . . . . . . . . . . . . . . . . . . . . . . . . . . . . . . . . . . . . . . . . . . . . . . . . . .
Checking Off a To Do Item. . . . . . . . . . . . . . . . . . . . . . . . . . . . . . . . . . . . . . . . . . . . . . . . . .
To Do Item Details . . . . . . . . . . . . . . . . . . . . . . . . . . . . . . . . . . . . . . . . . . . . . . . . . . . . . . . .
Choosing a To Do Category . . . . . . . . . . . . . . . . . . . . . . . . . . . . . . . . . . . . . . . . . . . . . . . . .
Setting a Due Date. . . . . . . . . . . . . . . . . . . . . . . . . . . . . . . . . . . . . . . . . . . . . . . . . . . . . . . . .
Deleting a To Do Item. . . . . . . . . . . . . . . . . . . . . . . . . . . . . . . . . . . . . . . . . . . . . . . . . . . . . .
To Do Show Options . . . . . . . . . . . . . . . . . . . . . . . . . . . . . . . . . . . . . . . . . . . . . . . . . . . . . .
To Do List Menu Commands . . . . . . . . . . . . . . . . . . . . . . . . . . . . . . . . . . . . . . . . . . . . . . . . . . . .
Record Menu . . . . . . . . . . . . . . . . . . . . . . . . . . . . . . . . . . . . . . . . . . . . . . . . . . . . . . . . . . . .
Options Menu . . . . . . . . . . . . . . . . . . . . . . . . . . . . . . . . . . . . . . . . . . . . . . . . . . . . . . . . . . . .
13-1
13-1
13-2
13-3
13-3
13-4
13-4
13-4
13-5
13-6
13-7
13-7
13-8
Chapter 14.
Applications: Laser Scanner and Laser Pointer
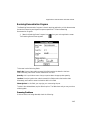
Introduction . . . . . . . . . . . . . . . . . . . . . . . . . . . . . . . . . . . . . . . . . . . . . . . . . . . . . . . . . . . . . . . . . . 141
Scanning with the SPT 1500 . . . . . . . . . . . . . . . . . . . . . . . . . . . . . . . . . . . . . . . . . . . . . . . . . . . . . . 141
SimpleScan Application . . . . . . . . . . . . . . . . . . . . . . . . . . . . . . . . . . . . . . . . . . . . . . . . . . . . . . 141
Demo Scan Application . . . . . . . . . . . . . . . . . . . . . . . . . . . . . . . . . . . . . . . . . . . . . . . . . . . . . . 142
Demo Scan Menu Options . . . . . . . . . . . . . . . . . . . . . . . . . . . . . . . . . . . . . . . . . . . . . . . . 143
Scanning Bar Codes using Demo Scan . . . . . . . . . . . . . . . . . . . . . . . . . . . . . . . . . . . . . . . 144
Receiving Demonstration Program . . . . . . . . . . . . . . . . . . . . . . . . . . . . . . . . . . . . . . . . . . . . . 145
Scanning Problems . . . . . . . . . . . . . . . . . . . . . . . . . . . . . . . . . . . . . . . . . . . . . . . . . . . . . . 145
xi
SPT 1500 Product Reference Guide
Battery Implications While Using the Laser Scanner . . . . . . . . . . . . . . . . . . . . . . . . . . . . 146
Pointer Mode Laser Settlement Time . . . . . . . . . . . . . . . . . . . . . . . . . . . . . . . . . . . . . . . . . . . 148
Chapter 15.
Installing and Removing Applications
Introduction. . . . . . . . . . . . . . . . . . . . . . . . . . . . . . . . . . . . . . . . . . . . . . . . . . . . . . . . . . . . . . . . . . 15-1
Installing Applications . . . . . . . . . . . . . . . . . . . . . . . . . . . . . . . . . . . . . . . . . . . . . . . . . . . . . . . . . . 15-1
Installing Games . . . . . . . . . . . . . . . . . . . . . . . . . . . . . . . . . . . . . . . . . . . . . . . . . . . . . . . . . . . 15-4
Removing Applications. . . . . . . . . . . . . . . . . . . . . . . . . . . . . . . . . . . . . . . . . . . . . . . . . . . . . . 15-4
Removing Palm Desktop Software . . . . . . . . . . . . . . . . . . . . . . . . . . . . . . . . . . . . . . . . . . . . . 15-5
Chapter 16.
Getting Help With Your SPT 1500 Terminal
Introduction. . . . . . . . . . . . . . . . . . . . . . . . . . . . . . . . . . . . . . . . . . . . . . . . . . . . . . . . . . . . . . . . . . 16-1
Displaying Online Tips . . . . . . . . . . . . . . . . . . . . . . . . . . . . . . . . . . . . . . . . . . . . . . . . . . . . . . . . . 16-1
SPT 1500 Diagnostics Utility . . . . . . . . . . . . . . . . . . . . . . . . . . . . . . . . . . . . . . . . . . . . . . . . . . . . . 16-2
System Information Test. . . . . . . . . . . . . . . . . . . . . . . . . . . . . . . . . . . . . . . . . . . . . . . . . . . . . 16-3
Bar Code Scanner Test . . . . . . . . . . . . . . . . . . . . . . . . . . . . . . . . . . . . . . . . . . . . . . . . . . . . . . 16-4
Serial Port Test . . . . . . . . . . . . . . . . . . . . . . . . . . . . . . . . . . . . . . . . . . . . . . . . . . . . . . . . . . . . 16-5
Digitizer Alignment Test. . . . . . . . . . . . . . . . . . . . . . . . . . . . . . . . . . . . . . . . . . . . . . . . . . . . . 16-6
System Diagnostics Test . . . . . . . . . . . . . . . . . . . . . . . . . . . . . . . . . . . . . . . . . . . . . . . . . . . . . 16-6
Troubleshooting . . . . . . . . . . . . . . . . . . . . . . . . . . . . . . . . . . . . . . . . . . . . . . . . . . . . . . . . . . . . . . 16-7
Installation Troubleshooting . . . . . . . . . . . . . . . . . . . . . . . . . . . . . . . . . . . . . . . . . . . . . . 16-7
HotSync® Troubleshooting. . . . . . . . . . . . . . . . . . . . . . . . . . . . . . . . . . . . . . . . . . . . . . . 16-7
General Troubleshooting . . . . . . . . . . . . . . . . . . . . . . . . . . . . . . . . . . . . . . . . . . . . . . . . . . . . 16-9
Security Troubleshooting . . . . . . . . . . . . . . . . . . . . . . . . . . . . . . . . . . . . . . . . . . . . . . . . . . . 16-11
Applications Troubleshooting . . . . . . . . . . . . . . . . . . . . . . . . . . . . . . . . . . . . . . . . . . . . 16-11
Technical Support, Service and Repair. . . . . . . . . . . . . . . . . . . . . . . . . . . . . . . . . . . . . . . . . . . . . 16-12
Technical Support. . . . . . . . . . . . . . . . . . . . . . . . . . . . . . . . . . . . . . . . . . . . . . . . . . . . . . . . . 16-13
Chapter 17.
Maintaining Your SPT 1500 Terminal
Introduction. . . . . . . . . . . . . . . . . . . . . . . . . . . . . . . . . . . . . . . . . . . . . . . . . . . . . . . . . . . . . . . . . . 17-1
Caring for Your SPT 1500 Terminal . . . . . . . . . . . . . . . . . . . . . . . . . . . . . . . . . . . . . . . . . . . 17-1
Battery Considerations . . . . . . . . . . . . . . . . . . . . . . . . . . . . . . . . . . . . . . . . . . . . . . . . . . 17-2
Resetting Your SPT 1500 Terminal . . . . . . . . . . . . . . . . . . . . . . . . . . . . . . . . . . . . . . . . . . . . 17-3
Appendix A.
Expense Templates
xii
Appendix B.
Creating a Custom Expense Report
Introduction . . . . . . . . . . . . . . . . . . . . . . . . . . . . . . . . . . . . . . . . . . . . . . . . . . . . . . . . . . . . . . . . . . B-1
About Mapping Tables. . . . . . . . . . . . . . . . . . . . . . . . . . . . . . . . . . . . . . . . . . . . . . . . . . . . . . . . . . B-1
Customizing Existing Sample Templates . . . . . . . . . . . . . . . . . . . . . . . . . . . . . . . . . . . . . . . . . B-2
Determining the Layout of the Expense Report . . . . . . . . . . . . . . . . . . . . . . . . . . . . . . . . . . . . B-4
Labels. . . . . . . . . . . . . . . . . . . . . . . . . . . . . . . . . . . . . . . . . . . . . . . . . . . . . . . . . . . . . . . . B-4
Sections . . . . . . . . . . . . . . . . . . . . . . . . . . . . . . . . . . . . . . . . . . . . . . . . . . . . . . . . . . . . . . B-4
Analyzing Your Custom Expense Report . . . . . . . . . . . . . . . . . . . . . . . . . . . . . . . . . . . . . . . . B-5
Programming the Mapping Table . . . . . . . . . . . . . . . . . . . . . . . . . . . . . . . . . . . . . . . . . . . . . . B-6
Using Applications Other Than Microsoft Excel . . . . . . . . . . . . . . . . . . . . . . . . . . . . . . . . . . B-10
Expense File Details. . . . . . . . . . . . . . . . . . . . . . . . . . . . . . . . . . . . . . . . . . . . . . . . . . . . . . . . B-11
Appendix C.
Non-ASCII Characters for Login Scripts
Introduction . . . . . . . . . . . . . . . . . . . . . . . . . . . . . . . . . . . . . . . . . . . . . . . . . . . . . . . . . . . . . . . . . .
Use of ^char . . . . . . . . . . . . . . . . . . . . . . . . . . . . . . . . . . . . . . . . . . . . . . . . . . . . . . . . . . . . . . . . . .
Carriage Return and Line Feed . . . . . . . . . . . . . . . . . . . . . . . . . . . . . . . . . . . . . . . . . . . . . . . .
Literal Characters . . . . . . . . . . . . . . . . . . . . . . . . . . . . . . . . . . . . . . . . . . . . . . . . . . . . . . . . . .
C-1
C-1
C-1
C-2
xiii
SPT 1500 Product Reference Guide
xiv
About This Guide
Introduction
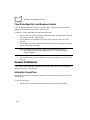
The SPT 1500 Product Reference Guide provides information about the SPT 1500 terminal
and its accessories.
Chapter Descriptions
Topics covered in this guide are as follows:
t
t
t
t
t
t
Chapter 1, Getting Started with Your SPT 1500, explains the physical buttons and
controls on your SPT 1500 terminal, how to install the batteries, start your SPT 1500
terminal for the first time, and set up your Palm™ Desktop software.
Chapter 2, Working with Your SPT 1500 Terminal, explains how to open
applications, use the on-screen keyboard, write with the stylus and use common
features on your SPT 1500 terminal.
Chapter 3, Finding Information with Your SPT 1500 Terminal, explains how to
locate information on your SPT 1500 terminal with the Find command and the
Phone Lookup command.
Chapter 4, Applications: Address Book, explains the use of the Address Book
application, which enables you to keep names, addresses, phone numbers and other
information about your personal or business contacts.
Chapter 5, Applications: Calculator, explains the use of the Calculator application,
which allows you to perform simple calculations on your SPT 1500.
Chapter 6, Applications: Date Book, covers the use of the Date Book application,
which enables you to quickly and easily schedule appointments or any kind of
activity associated with a time and date.
xv
SPT 1500 Product Reference Guide
t
t
t
t
t
t
t
t
t
t
t
t
t
t
xvi
Chapter 7, Applications: Expense, explains the use of the Expense application,
enables you to keep track of your expenses and then transfer the information to a
spreadsheet on your computer.
Chapter 8, HotSync, describes the use of the HotSync utility, which allows you to
synchronize data between the SPT 1500 and your computer.
Chapter 9, Applications: Mail, describes the use of the Mail application which
enables you to manage your e-mail while away from your desk.
Chapter 10, Applications: Memo Pad, explains the Memo Pad application, which
provides a place to take notes that are not associated with Date Book, Address Book
or To Do items.
Chapter 11, Applications: Preferences, describes the Preferences screens, which
enable you to customize the configuration options on your SPT 1500 terminal.
Chapter 12, Applications: Security, covers the security options available for
protecting your SPT 1500 from unauthorized users.
Chapter 13, Applications: To Do List, describes using the To Do List application,
which is a convenient place to create reminders and prioritize the things that you
have to do.
Chapter 14, Applications: Laser Scanner and Laser Pointer, covers the use of the
laser scanner and laser pointer applications.
Chapter 15, Installing and Removing Applications, explains how to install and
remove applications on your SPT 1500 terminal and how to remove the Palm™
Desktop software from your computer.
Chapter 16, Getting Help with your SPT 1500, describes methods for
troubleshooting problems with the SPT 1500, and contact phone numbers for
technical support.
Chapter 17, Maintaining Your SPT 1500, provides information to help you take
proper care of your SPT 1500 terminal and prolong battery life. It also discusses how
to reset your SPT 1500 terminal.
Appendix A, Expense Templates, provides illustrations of the four expense templates
that come with the Palm™ Desktop software.
Appendix B, Creating a Custom Expense Report, explains how to modify existing
Expense application templates, and how to create your own custom expense report
templates for use with the Expense application.
Appendix C, Non-ASCII Characters for Login Scripts, provides information to
enable you to create custom login scripts that require non-ASCII characters. This
information is for advanced users only.
About This Guide
Notational Conventions
This document uses these conventions:
¥ ÒterminalÓ refers to the SPT 1500.
¥ ÒUserÓ refers to anyone using an application on the SPT 1500.
¥ ÒYouÓ refers to the End User, System Administrator or Technical Support person
using this manual as a reference to install, conÞgure, operate, maintain and
troubleshoot the SPT 1500.
¥ Italics are used to highlight speciÞc items in the general text, and to identify
chapters and sections in this and related documents.
¥ Bullets (¥) indicate:
- lists of alternatives or action items.
- lists of required steps that are not necessarily sequential.
¥ Numbered lists indicate a set of sequential steps, i.e., those that describe step-bystep procedures.
Service Information
If you have a problem with the SPT 1500 equipment, contact the Symbol Support Center. If
your problem cannot be resolved over the phone, you may need to return your equipment for
servicing. If that is necessary, you will be given special directions.
Note: Symbol Technologies is not responsible for any damages incurred
during shipment if the approved shipping container is not used.
Shipping the units improperly can possibly void the warranty. If the
original shipping container has not been kept, contact Symbol to have
another sent to you.
Symbol Support Center
In the USA and Canada, for service information, warranty information or technical
assistance, call:
SYMBOL SUPPORT CENTER
1-800-659-2240
xvii
SPT 1500 Product Reference Guide
If you purchased your Symbol Product from a Symbol Business Partner, contact that Business
partner for service.
Europe
Wokingham, England
European Headquarters
0734-771-222 (Inside UK)
+441-734-771222 (Outside UK)
Asia
Singapore
Symbol Technologies Asia, Inc.
337-6588 (Inside Singapore)
+65-337-6588 (Outside Singapore)
xviii
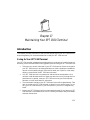
Chapter 1
Getting Started with the SPT 1500
Introduction
This chapter explains the physical buttons and controls on your SPT 1500 terminal, how to
install the batteries, start your SPT 1500 terminal for the first time, and set up your Palm™
Desktop software.
1-1
SPT 1500 Product Reference Guide
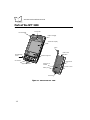
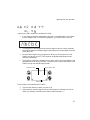
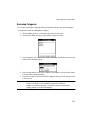
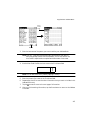
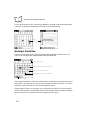
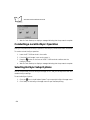
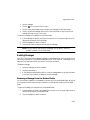
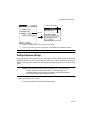
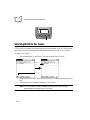
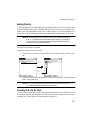
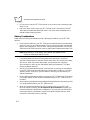
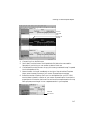
Parts of the SPT 1500
Left Scan Trigger
Decode LED
Right Scan Trigger
Touchscreen Display
Stylus
Power/Backlight
control
IR Port/ Scan
Window
Graffiti Writing Area
Scroll Button
Reset Button
Application Buttons
Battery Door
Release
Battery Door
Serial Port
Figure 1-1. Parts of the SPT 1500
1-2
Contrast Control
Getting Started with the SPT 1500
SPT 1500
Touchscreen
Display
Displays the applications and information stored in your SPT
1500 terminal. It is touch-sensitive and responds to the stylus
or your finger.
Graffiti¨
writing area
The area where you write strokes using the Graffiti alphabet.
See Writing With the Stylus on page 2-5 for details about how
to write Graffiti character strokes.
Application
buttons
Activate the individual SPT 1500 terminal applications that
correspond to the icons on the buttons: Date Book, Address
Book, To Do List and Memo Pad. You can reassign these
buttons to activate any application on your SPT 1500
terminal. See Buttons Preferences on page 11-2.
Note: If your SPT 1500 terminal is off, pressing any
application button activates the SPT 1500 terminal
and opens the corresponding application.
Scroll button
Displays text and other information that extends beyond the
area of the SPT 1500 terminal screen. Pressing the lower half
of the scroll button “scrolls down” to view information below
the viewing area, and pressing the upper half of the button
“scrolls up” to view the information above the viewing area.
Power button
Turns your SPT 1500 terminal on or off and controls the
backlight feature. If your SPT 1500 terminal is turned off,
pressing the power button turns the unit on and returns you to
the last screen you were viewing.
If your SPT 1500 terminal is turned on, pressing the power
button turns the unit off, helping to conserve battery life.
Holding the power button down for about two seconds turns
the backlight on or off.
Stylus
Slides in and out of the slot on the back side of the SPT 1500
terminal. To use the stylus, remove it from the slot and hold it
as you would a pen or pencil.
Important:
Always use the point of the stylus for tapping
or making strokes on the SPT 1500 terminal
screen. Never use an actual pen, pencil or
other sharp object to write on the SPT 1500
terminal screen.
1-3
SPT 1500 Product Reference Guide
IR port
Uses infrared technology to transmit data to and receive data
from other SPT 1500 terminals and other Palm Computing®
devices. See Beaming Information to Other SPT 1500
Terminals on page 2-27 for more information.
Reset button
Under normal use, you should never have to use the reset
button. See Resetting Your SPT 1500 Terminal on page 173for information about how to use the reset button.
Contrast
control
Adjusts the appearance of the screen for the clearest screen
display. Depending on the lighting conditions or temperature
of the environment where you use your SPT 1500 terminal,
you may need to adjust the setting of the contrast control.
Battery door
Covers the batteries that power your SPT 1500 terminal. See
Installing the Batteries for information on removing the
battery door and installing batteries.
Serial port
door
Protects the serial port that fits into the connector of the SPT
1500 terminal cradle to ensure that the connection surface of
the serial port remains clean and clear of debris.
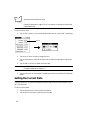
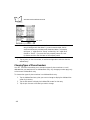
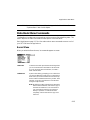
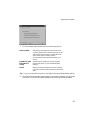
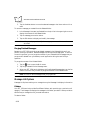
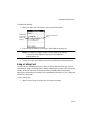
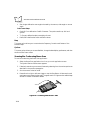
Installing the Batteries
To use your SPT 1500 terminal, you must install two AAA alkaline batteries. The batteries
fit behind the battery door on the back of the SPT 1500 terminal.
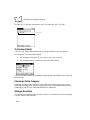
To install the batteries in your SPT 1500:
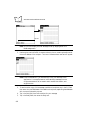
1. Press the latch on the battery door and lift the battery door away from the SPT 1500
terminal.
Press tab to
open
2. Install the two AAA alkaline batteries into the battery compartment.
1-4
Getting Started with the SPT 1500
Note: a diagram in the interior of the battery compartment shows the orientation of
the + and - ends of the batteries. When correctly installed, the clips in the
battery compartment secure the batteries in place.
3. Insert the battery door back into place so that it is flush with the back of the SPT
1500 terminal and “clicks” into position.
Caution
Do not force the battery door. When the batteries are correctly installed, the
battery door clips smoothly into place. If you feel resistance when replacing
the battery door, make sure the door is aligned with the slots on the back of
your SPT 1500 terminal, and that the batteries are firmly seated in the battery compartment.
1-5
SPT 1500 Product Reference Guide
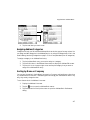
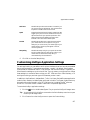
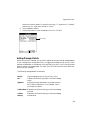
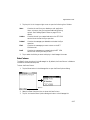
Calibrating the Screen
The first time you start your SPT 1500 terminal the calibration screen automatically appears.
Follow the steps in this section to align the internal circuitry of your SPT 1500 terminal with
its touch-sensitive screen.
To calibrate your SPT 1500:
1. Press the green power button on the front panel of your SPT 1500 terminal to display
the calibration screen.
Power
button
Note: If necessary, adjust the contrast control located on the side of the SPT 1500
terminal, so the alignment screen is clear and readable.
2. Remove the stylus from its storage slot on the back of the SPT 1500 terminal.
3. Tap the exact center of each target that appears on the screen with the tip of the
stylus.
1-6
Getting Started with the SPT 1500
After you tap each of the targets, continue with the following sections to set the time and
date.To recalibrate after initial calibration:
1. Select the Prefs Icon
2. Tap in the right-top corner
3. Select Digitizer
About the Backlight Feature
If you have difficulty seeing the information on your SPT 1500 terminal, you can use the
backlight feature to illuminate your screen.
To activate the backlight feature, press the green power button and hold it down for about
two seconds. Release the button when the backlight turns on.
To turn off the backlight feature, press and hold the green power button for about two
seconds. The backlight feature also turns off automatically (after a period of inactivity) with
the Auto-off after feature.
In addition, you can use a full-screen pen stroke to activate the backlight feature. See Buttons
Preferences on page 11-2 for more information.
Setting the Time
The General Preferences screen is the first screen to appear after you align the digitizer on
your SPT 1500 terminal.
Note: If the General Preferences screen is not on your SPT 1500 terminal screen, you
may have pressed one of the application buttons on the front panel. See
1-7
SPT 1500 Product Reference Guide
General Preferences on page 11-6 for information on displaying the General
Preferences screen.
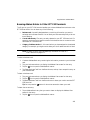
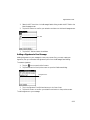
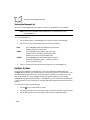
To set the current time:
1. Tap the Set Time box in the General Preferences screen to open the Set Time dialog.
Tap here
2. Tap the up or down arrows to change the hour.
3. Tap the minutes box, and then tap the arrows to adjust the settings for the current
time.
4. Tap the AM or PM box to select the time of day.
Note: Your SPT 1500 terminal can also display time based on a 24-hour clock. See
Formats Preferences on page 11-5.
5. Tap the OK button to close the Set Time dialog and return to the General Preferences
screen.
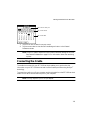
Setting the Current Date
The Set Date box in the General Preferences screen is used to set the current date for your
SPT 1500 terminal.
To set the current date:
1. Tap the Set Date box to open the Set Date dialog.
2. Tap the arrows at the top to select the current year.
1-8
Getting Started with the SPT 1500
Tap arrows to select year
Tap to select month
Tap to select date
3. Tap a month box to select the current month.
4. Tap the current date to close the Set Date dialog and return to the General
Preferences screen.
Note: You do not need to adjust the other General Preference settings at this time.
See General Preferences on page 11-6 for information about the remaining
options.
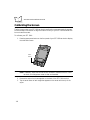
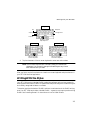
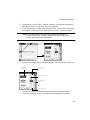
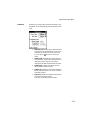
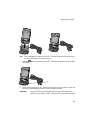
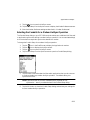
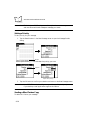
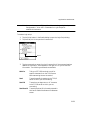
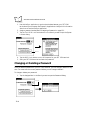
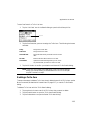
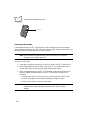
Connecting the Cradle
The cradle that comes with your SPT 1500 terminal enables you to synchronize the
information on your SPT 1500 terminal and the Palm Desktop software using HotSync®
technology.
To connect the cradle, turn off your computer and plug the cable from the SPT 1500 terminal
cradle into the serial communications port on your computer.
Note: You may require a 9-pin to 25-pin adapter.
1-9
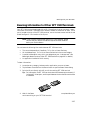
SPT 1500 Product Reference Guide
Figure 1-2. Connecting the Cradle
Note: Your SPT 1500 terminal requires a dedicated port. It cannot share a port with
an internal modem or other device. If you are unsure about the exact location
of the serial port on your computer, refer to the user’s manual supplied with
the computer.
Palm SPT 1500 Desktop Software
Palm SPT 1500 Desktop terminal software extends many of the functions of your SPT 1500
terminal to your computer. Although using Palm Desktop software is optional, when you use
it with your SPT 1500 terminal and the built-in HotSync technology, you can fully
synchronize the information on your SPT 1500 terminal with the information on your
computer. Changes you make on your SPT 1500 terminal or Palm Desktop appear in both
places after you synchronize.
With Palm Desktop software you can:
t
t
t
1-10
Work with your SPT 1500 terminal applications on your computer. Palm Desktop
duplicates the Date Book, Address Book, To Do List and Memo Pad applications on
your SPT 1500 terminal, so you can view, enter and modify any data stored on your
SPT 1500 terminal.
Back up the data stored on your SPT 1500 terminal with HotSync technology and
synchronize the data with Palm Desktop. Synchronization is a one-step procedure
that ensures your data is always safe and up-to-date. See Chapter 8, Applications:
HotSync® for information about using this feature.
Import and export data, so you can easily transfer data from other Windows
applications into Address Book or Memo Pad.
Getting Started with the SPT 1500
t
Print your Date Book, Address Book, To Do List and Memo Pad information on any
Windows-compatible printer.
System Requirements
To install and operate Palm Desktop, your computer system must meet the following
requirements:
Minimum Requirements
t
t
t
t
t
t
t
t
Windows 95 or Windows NT 4.0
IBM-compatible 486 computer or higher
8 MB RAM (memory) minimum, 16 MB recommended
12 MB available hard disk space
VGA monitor or better
CD-ROM drive
Mouse
One available serial port
Optional Equipment
t
t
Modem (such as Palm Pilot Modem)
Windows-compatible printer
Desktop Software Installation
The following instructions guide you through installing SPT 1500 Palm Desktop software.
After you install the software, refer to the Help menu for complete information about how
to use Palm Desktop.
To ensure a safe and uninterrupted installation of the Palm Desktop software, please do the
following before installing:
t
t
t
t
Connect the cradle to your computer.
If you have placed your SPT 1500 terminal in the cradle, remove it during software
installation.
Exit all programs, including those that run automatically at startup, such as fax
software, virus protection software, screen-saver software, and application toolbars
such as Microsoft Office.
Do not simply copy the Palm Desktop files to your hard drive. You must use the
installer to place the files in their proper locations and to decompress the files.
1-11
SPT 1500 Product Reference Guide
To install Palm Desktop software:
1. Insert the SPT 1500 Desktop Software CD into the CD-ROM drive on the
development PC (D: on most computers).
2. If your CD-ROM supports the auto-run feature, an installation menu automatically
appears on your desktop. If your CD-ROM does not support auto-run, navigate to
your CD-ROM drive (D:), to Palmsfw/disk1 and double-click on setup.exe. The
Welcome Screen appears.
3. Follow the directions as the installation program guides you through the install
process.
1-12
Chapter 2
Working with Your SPT 1500 Terminal
Introduction
This chapter explains how to open applications, use the on-screen keyboard, write with the
stylus, perform scanning, and use common features on your SPT 1500 terminal.
Selecting Applications
Your SPT 1500 terminal is equipped with a variety of applications. All the applications
installed on your SPT 1500 terminal appear in the Applications Launcher. You can use the
Applications Launcher to open any application installed on your SPT 1500 terminal. You can
also open the four main applications — Date Book, Address Book, To Do List and Memo
Pad — with the buttons on the front panel your SPT 1500 terminal.
Tip:
When you press the buttons on the front panel, you have instant access to the
selected application. You don’t need to turn on your SPT 1500 terminal first.
In addition to providing a way for you to open applications, the Applications Launcher
displays the current time, battery level and application category.
To open applications:
1. Tap the
icon on the SPT 1500 terminal screen to open the Applications Launcher.
2-1
SPT 1500 Product Reference Guide
2. Tap the icon of the application that you want to open. If you have many applications
installed on your SPT 1500 terminal, tap the scroll bar to see all of your applications.
Tip:
As a shortcut, you can write the Graffiti® handwriting software character stroke
for the first letter of the application you want to use. The Applications Launcher
scrolls to the first application that begins with that letter.
Switching Applications
When working in any application, you can tap the
icon or press the buttons on the front
panel to switch to any other application. Your SPT 1500 terminal saves your work in the
current application and displays it when you return to the current screen.
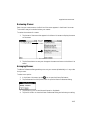
Changing the Applications Launcher Display Format
By default the Applications Launcher displays each application as an icon. As an alternative,
you can choose to show a list of applications.
To change the Applications Launcher display:
1. Tap the
icon on the SPT 1500 terminal screen to open the Applications Launcher.
2. Tap the
icon on the SPT 1500 terminal screen to open the Applications Launcher
menus.
3. Tap Preferences from the Options menu to open the Preferences dialog.
4. Tap the View By pick list and select the List option.
5. Tap the OK button to close the Preferences dialog and display the Applications
Launcher in list format.
2-2
Working with your SPT 1500
Displaying Applications by Category
The category feature enables you to limit the number of applications that appear on the
screen. You can assign categories to your applications and then choose to display a single
category or all your applications.
To display applications by category:
1. Tap the
icon on the SPT 1500 terminal screen to open the Applications Launcher.
2. Tap the
icon on the SPT 1500 terminal screen to open the Applications Launcher
menus.
3. Tap Category from the App menu to open the Category dialog.
4. Tap the pick list next to each application to assign it to a category.
Tip: To create a new category, tap Edit Category from the pick list to open the Edit
Categories dialog. Tap the New button, enter the category name, and then tap
the OK button to add the category. Tap OK to close the Edit Categories dialog.
2-3
SPT 1500 Product Reference Guide
5. Tap the Done button to close the Category dialog and return to the Applications
Launcher.
6. Tap the pick list in the upper-right corner of the screen and select the application
category you want to display.
Tip: You can also tap the
icon to scroll through the application categories.
Using the On-Screen Keyboard
You can activate the on-screen keyboard any time you need to enter text or numbers on your
SPT 1500 terminal. Note that you cannot enter Graffiti characters while using the on-screen
keyboard.
To use the on-screen keyboard:
1. Open any SPT 1500 terminal application (such as the Memo Pad application, as
described in the previous section).
2. Tap any record name, or tap the New button.
3. Tap the left target to open the Alpha keyboard, or tap the right target to open the
Numeric keyboard.
Tap here for letters
keyboard
2-4
Tap here for numbers
keyboard
Working with your SPT 1500
Alpha
Tab
Backspace
Caps lock
Carriage return
Caps shift
Tap here to display
Alpha keyboard
Numeric
Tap here to display
Numeric keyboard
International
Tap here to display
International keyboard
4. Tap the characters of the on-screen keyboard to enter text and numbers.
Note: The on-screen keyboard also includes a dialog for international
characters. You can switch among the three dialogs at any time to
enter the exact text you need.
After you finish, tap the Done button to close the on-screen keyboard and place the text in
your SPT 1500 terminal application.
Writing With the Stylus
Your SPT 1500 terminal includes Graffiti handwriting software as the primary system for
entering text and numbers. Graffiti is a system where simple strokes you write with the stylus
are instantly recognized as letters or numbers.
This section explains the basics of Graffiti, and how to make strokes in the Graffiti writing
area. Your SPT 1500 terminal also includes Giraffe — a game you can use to practice writing
Graffiti. See “Installing Games” for instructions on how to install Giraffe.
2-5
SPT 1500 Product Reference Guide
Opening the Memo Pad Application
The Memo Pad application is ideal for practicing the Graffiti alphabet. This section explains
how to open the Memo Pad and use it to practice Graffiti. A complete explanation of the
Memo Pad application appears in Chapter 10, Applications: Memo Pad.
To open the Memo Pad application:
1. Press the
button on the front of your SPT 1500 terminal to open the Memo Pad
application.
2. Tap the New button to open a new Memo Page.
New
memo
cursor
Tap
New
Write in Graffiti area
Note: A cursor appears in the upper-left corner of the Memo Page to indicate where
new text will appear.
Writing Letters With Graffiti
Most people find they can enter text quickly and accurately with only minutes of practice.
Graffiti includes any character you can type on a standard keyboard. The Graffiti strokes
closely resemble those of the regular alphabet which makes it quick and easy to learn. For
example, the following Graffiti strokes are portions of the regular alphabet equivalents.
2-6
Working with your SPT 1500
A
F
K
4
5
T
There are four basic concepts for success with Graffiti:
t
If you draw the character shape exactly as shown in the tables later in this chapter
(like the shapes shown in the following diagram), you achieve 100% accuracy.
t
The heavy dot on each shape shows where to begin the stroke. Certain characters
have similar shapes, but different beginning and end points. Always begin the stroke
at the heavy dot.
Most characters require only a single stroke. When you lift the stylus from the
Graffiti writing area, your SPT 1500 terminal recognizes and displays the text
character immediately.
The Graffiti writing area is divided into two parts: one for writing the letters of the
alphabet and one for writing numbers. The small marks at the top and bottom of the
Graffiti writing area indicate the two areas.
t
t
Write letters here
Write numbers here
Division marks
To write letters of the alphabet with Graffiti:
1. Tap the screen where you want your text to go.
2. Use the table on the next page to find the stroke shape for the letter you want to
create. For example, the stroke shown below creates the letter “n.”
2-7
SPT 1500 Product Reference Guide
Note:
There are two different stroke shapes available for some letters. For these
letters, choose the one that’s easiest for you.
Lift stylus here
Start stroke at
heavy dot
As you’ll see later, you use these shapes to create both upper- and lowercase letters.
1. Position the stylus in the left-hand side of the Graffiti writing area.
2. Start your stroke at the heavy dot, and draw the stroke shape as it appears in the
table.
Note: Don’t try to draw the dot shape itself. The heavy dot is there to show the
starting point of the stroke.
3. Lift the stylus from the screen at the end of the stroke shape.
That’s all there is to it! When you lift the stylus from the screen, your SPT 1500 terminal
recognizes your stroke immediately and prints the letter at the insertion point on the screen.
As soon as you lift the stylus from the screen, you can begin the stroke for the next character
you want to write.
Caution
You must begin the character strokes in the Graffiti writing area. If you do
not make Graffiti strokes in the Graffiti writing area, your SPT 1500 terminal does not recognize them as text characters.
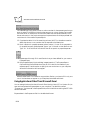
Graffiti Tips
When writing with Graffiti, keep these tips in mind:
t
2-8
Accuracy improves when you write large characters. You should draw strokes that
nearly fill the Graffiti writing area.
Working with your SPT 1500
t
t
t
To delete characters, simply set the insertion point to the right of the character you
want to delete and make the backspace stroke (a line from right to left) in the Graffiti
writing area.
Write at natural speed. Writing too slowly can generate recognition errors.
Do not write on a slant. Vertical strokes should be parallel to the sides of the Graffiti
writing area.
2-9
SPT 1500 Product Reference Guide
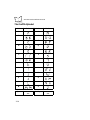
The Graffiti Alphabet
Letter
Strokes
Letter
A
N
B
O
C
P
D
Q
E
R
F
S
G
T
H
U
I
V
J
W
K
X
L
Y
M
Z
Space
Back Space
2-10
Strokes
Working with your SPT 1500
Carriage
Return
Period
tap twice
Writing Capital Letters With Graffiti
Note: You make capital letters with the same stroke shapes as the basic alphabet
characters. To make capital letters, you must first “shift” to caps — just as you
press the Shift key on a keyboard — and then write the character strokes.
Graffiti includes a Smart Shifting feature which automatically capitalizes the
first letter when you create a new entry (by tapping a New button or a blank
line).
To draw the first letter of a word as a capital letter use the Caps Shift stroke:
Caps
Shift
Tip:
When Caps Shift is active, an “up arrow” symbol appears in the lower-right corner
of the SPT 1500 terminal screen.
To enter only capital letters (Caps Lock) use the Caps Lock stroke:
Caps
Lock
Tip: When Caps Lock is active, an underlined “up arrow” symbol appears in the lowerright corner of the SPT 1500 terminal screen. To return to lowercase, make the Caps
Shift stroke.
Writing Numbers With Graffiti
Writing numbers with Graffiti is similar to writing letters of the alphabet, except that you
make the character strokes on the right-hand side (numbers side) of the Graffiti writing area.
Graffiti Numbers
Number
Strokes
Number
Strokes
2-11
SPT 1500 Product Reference Guide
0
5
1
6
2
7
3
8
4
9
Writing Punctuation Marks With Graffiti
Graffiti can create any punctuation symbol that you can enter from a standard keyboard. All
punctuation marks begin with a single tap on the Graffiti writing area. When you make this
tap, you activate Punctuation Shift and a dot appears to show it is active. The next stroke you
make with the stylus creates a punctuation mark.
Punctuation shift
Symbol
Stroke
Symbol
Period
.
Dash
—
Comma
,
Left Paren
(
Apostrophe
'
Right Paren
)
Question
?
Slash
/
Exclamation
!
Dollar
$
2-12
Stroke
Working with your SPT 1500
Additional Graffiti Punctuation
@
#
%
^
&
*
<
\
{
}
[
]
~
`
>
;
–
+
=
|
:
"
tab
Note: When Punctuation Shift is active, you can make a symbol stroke
anywhere in the Graffiti writing area (the letters or numbers side).
Writing Symbols and Extended Characters
All symbols and extended characters begin with the stroke in the Graffiti writing area of your
SPT 1500:
Symbol
Shift
When the Symbol Shift is active, a slanted shift symbol appears in the lower-right corner of
the screen. The next stroke that you make creates the symbol or extended character.
,
+
–
X
:
=
,
c
Y
=
ƒ
∅
,,
.
?
!
,,
•
2-13
SPT 1500 Product Reference Guide
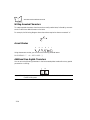
Writing Accented Characters
To create accented characters, draw the stroke normally used to letter, followed by an accent
stroke. Graffiti then adds the accent to the letter.
For example, the following diagram shows the strokes required to draw an accented “e.”
=e
Accent Strokes
a
a
a
a
a
a
Using these accent strokes, you can write the following accented letters:
à á â ã ä å è é ê ‘“’ ” • ò — ô õ ö ù ú û ü – ÿ
Additional Non-English Characters
You can write the following characters in the lowercase alphabet mode without any special
punctuation or shifting:
c
ae
Note: You must write these non-English characters in the left side of the
Graffiti writing area.
2-14
Working with your SPT 1500
Navigation Strokes
In addition to character symbols, Graffiti includes special strokes that you can use to navigate
within text or fields in your SPT 1500 terminal applications.
Command
Stroke
Move cursor right
Move cursor left
Previous field
(Address Book only)
Next Field
(Address Book only)
Open Address Record
(Address Book only)
Graffiti ShortCuts
Graffiti’s ShortCuts make entering commonly used words or phrases quick and easy.
ShortCuts are similar to the Glossary or Autotext features of some word processors.
Graffiti comes with several predefined ShortCuts, and you can also create your own. Each
ShortCut can represent up to 45 characters. For example, you might create a ShortCut for
your name, or for the header of a memo. See ShortCuts Preferences on page 11-25 to learn
about creating your own ShortCuts.
To use a ShortCut, draw the ShortCut stroke followed by the ShortCut characters. When you
draw the ShortCut stroke, the ShortCut symbol appears at the insertion point to show that
you are in ShortCut mode.
ShortCut
Your SPT 1500 terminal includes the following predefined Graffiti ShortCuts:
2-15
SPT 1500 Product Reference Guide
Entry
ShortCut
Entry
ShortCut
Date stamp
ds
Breakfast
br
Time stamp
ts
Lunch
lu
Date / time stamp
dts
Dinner
di
Meeting
me
For example, if you want to enter the current date and time, you would draw the following
strokes:
Using Application Controls
SPT 1500 applications include several types of controls. Once you become familiar with using
these controls, you can easily select options and navigate through your SPT 1500 terminal
applications. The following table lists the controls and how to use them.
Check box. When a check mark appears in a check box, the
corresponding option is active. If a check box is empty, tap
it to insert a check mark. If a check box is checked, tapping
it removes the check mark.
Scroll arrows.Tap the up arrow to display the previous page
of information, or tap the down arrow to display the next
page. These arrows perform the same function as pressing
the upper and lower portions of the scroll button on the
front panel of the SPT 1500 terminal.
Pick list.Tap the arrow to display a list of choices, and then
tap an item on the list to select it.
2-16
Working with your SPT 1500
Button.Tap a button to perform a command. Buttons
appear with different text depending on their function. In
most cases, tapping a button opens or closes a dialog. A
dialog is a screen that appears on your SPT 1500 terminal,
prompting you to enter information or make settings. A
dialog always contains an OK, Cancel or Done button, so
you can close the dialog when you are through with it. The
on-screen keyboard is an example of a dialog.
Scroll bar. Drag the slider to scroll the display one line at a
time. To scroll to the previous page, tap the arrow at the top
of the scroll bar. To scroll to the next page, tap the arrow at
the bottom of the scroll bar.
Using Menus
Menus are a special set of commands that are available in most of your SPT 1500 terminal
applications (Memo Pad, Date Book, etc.). The exact commands that appear in the menus
depend on the application that is currently running on your SPT 1500 terminal.
Some menu commands are common to all SPT 1500 terminal applications. The common
menu commands are described in this section; other menu commands are described in the
chapters within this manual about each SPT 1500 terminal application.
To activate the menus:
1. Open a SPT 1500 terminal application (such as the Memo Pad, as described earlier
in this chapter).
2. Tap the
icon to open the menus for the application at the top of the screen.
2-17
SPT 1500 Product Reference Guide
Tap the Menus icon
In this example, three menus are available: Record, Edit and Options. The Record menu is
selected and contains the “New Memo,” “Delete Memo” and “Beam Memo” commands.
Choosing a Menu
After you activate the menus for an application, tap the menu that contains the command you
want to use.
The menus and menu commands that are available depend on the application that is currently
running on your SPT 1500 terminal. Also, the menus and menu selections vary depending on
which part of the application is currently on the screen. Using the Memo Pad application as
an example, the menus are different for the Memo List screen and the Memo screen.
Graffiti Menu Commands
Most menu commands have Graffiti “Command stroke” equivalents — similar to keyboard
commands on computers. The command letters appear on the right side of the menu
commands.
2-18
Working with your SPT 1500
Menu commands
Command letters
To use the Graffiti menu commands, draw the Command stroke followed by the
corresponding command letter. When you draw the Command stroke, the Command symbol
appears just above the Graffiti writing area to indicate that you are in Command mode.
Command
For example, to activate the Select All command in the previous diagram, draw the
Command stroke, followed by the letter “s.”
Note: You do not have to tap the
icon or access the menus when you use
the Graffiti menu commands. However, since the Command mode is
active for approximately two seconds, you must write the letter
character immediately to activate the menu command.
Edit Menu Commands
The Edit menu is available with any screen where you enter or edit text. In general, the Edit
Menu commands available in the Edit menu apply to text that you select in an application.
To select text in an application:
1. Tap the beginning of the text that you want to select.
2. Drag the stylus over the text to highlight it (in black).
Note: You can drag across the text to select additional words, or drag down
to select a group of lines.
The following commands may appear in an Edit menu:
2-19
SPT 1500 Product Reference Guide
Undo
Reverses the action of the last edit command. For
example, if you used the Cut command to remove text,
the Undo command replaces the text you removed.
Cut
Removes the selected text and stores it temporarily in
the memory of your SPT 1500 terminal. You can paste
the text you cut into another area of the SPT 1500
terminal application or into a different SPT 1500
terminal application.
Copy
Copies the selected text and stores it temporarily in the
memory of your SPT 1500 terminal. You can paste the
text that you copy into another area of the SPT 1500
terminal application or into a different SPT 1500
terminal application.
Paste
Inserts the text that you cut or copied at the selected
point in your SPT 1500 terminal application. The Paste
command replaces any selected text. If you did not
previously cut or copy text, the Paste command does
nothing.
Select All
Selects all of the text on the current record or screen.
This enables you to cut or copy all of the text and paste
it elsewhere.
Keyboard
Opens the on-screen keyboard. When you finish with
the on-screen keyboard, tap the Done button.
Graffiti Help
Opens the dialogs that show the Graffiti character
strokes. Use this command any time you forget a stroke
for a particular character.
Choosing Fonts
In most of your SPT 1500 terminal applications, you can change the font style to make the
text on the screen easier to read. You can even choose a different font style for each
application that supports this feature.
Note: The Expense application does not support changing fonts.
To change the font style:
1. Open a SPT 1500 terminal application.
2-20
Working with your SPT 1500
2. Tap the
icon to open the menus at the top of the screen.
3. Tap Font from the Options menu to open the Select Font dialog.
Tap here for large font
Tap here for bold font
Tap here for small font
4. Tap the font style you want to use.
5. Tap the OK button to close the dialog and return to the application with the new font
style.
Small font
Large font
Bold font
Using Categories
Categories can help you group Address entries, To Do items or Memos for easy review. You
cannot, however, assign categories to Date Book events.
When you first create an entry, it is “Unfiled,” which means it does not belong to any
particular category. You can leave an entry as Unfiled or assign it to a category at any time.
2-21
SPT 1500 Product Reference Guide
Either way, the entry is always available until you delete it. The category you choose is used
only for sorting and reviewing records. The category you select does not affect the actual
contents of the record.
Note: The use of categories is optional. You do not need to assign categories
to use SPT 1500 terminal applications.
To assign a category to an entry:
1. Tap a To Do item or Memo, or tap an Address Book entry then tap the Edit button
in the Address View screen.
2. Tap the Details button to open the Details dialog.
3. Tap the Category pick list to display a list of available categories.
4. Tap the category that you want to assign to the entry.
5. Tap the OK button to close the Details dialog and activate your setting.
Using Categories in Lists
After you assign categories to your entries, you can easily display lists of your entries by
category.
To use categories in a List screen:
1. Tap the category pick list in the upper-right corner of the List screen.
2-22
Working with your SPT 1500
Tap here
2. Tap the category of entries that you want to view.
Note: The List screen changes to show only the records that you filed in the
selected category.
3. Repeat the previous steps, and tap All in the category pick list to restore the list of
all Address Book entries.
Tip: Pressing the application button on the front panel of the SPT 1500 terminal
toggles through the available categories.
Defining a New Category
Your SPT 1500 terminal comes with two default categories: Business and Personal. In
addition, the Address Book contains the QuickList category, designed as a “quick reference”
of commonly used names, addresses and phone numbers (such as doctor, lawyer, etc.).
You can change the names of these default categories, or add new categories to suit your
needs. You can define up to 15 categories for each application.
To define a new Address Book category:
1. Tap the category pick list in the upper-right corner of the screen.
2-23
SPT 1500 Product Reference Guide
Tap here
2. Tap the Edit Categories item to open the Edit Categories dialog.
3. Tap the New button to open another Edit Categories dialog.
4. Enter the name of the new category, and tap the OK button to close the Edit
Categories dialog.
5. Tap the OK button to close the first Edit Categories dialog and view your new
category in the pick list.
Note: You can edit any of your records and file them in the new categories
as appropriate.
2-24
Working with your SPT 1500
Renaming Categories
You can also use the Edit Categories dialog to change the names of any existing category.
To change the name of an Address Book category:
1. Tap the category pick list in the upper-right corner of the screen.
2. Tap the Edit Categories item to open the Edit Categories dialog.
3. Tap the category that you want to rename, and then tap the Rename button to open
another Edit Categories dialog.
4. Enter the new name that you want to assign to the category, and tap the OK button
to close the Edit Categories dialog.
5. Tap the OK button to close the first Edit Categories dialog and view the new name
in the pick list.
Note: You can “merge” two or more Categories by assigning them the same
name. For example, if you change the name of the “Personal”
category to the name “Business,” all entries formerly in the Personal
category appear in the Business category.
2-25
SPT 1500 Product Reference Guide
Attaching Notes
SPT 1500 terminal applications (except the Memo Pad) enable you to attach a note to an
entry. A note is anything that you want to write, and can be up to several thousand characters
long. For example, if you have an appointment in the Date Book application, you could
attach a note with directions to the location.
To attach a note to an entry:
1.
2.
3.
4.
Display the entry where you want to add a note.
Tap the Details button to open the Details dialog.
Tap the Note button to open the Note dialog.
Write Graffiti character strokes (or use the on-screen keyboard) for the text you want
to appear in the note. Use the Carriage Return stroke to move down to new lines in
the note.
5. Tap the Done button to close the note and return to the application screen. A small
note icon appears at the right side of any item that has a note attached. To review or
edit a note, tap the
icon.
Note icon
Marking Private Entries
In SPT 1500 terminal applications you can mark individual entries as Private. Private entries
remain visible and accessible until you change the SPT 1500 terminal Security setting to hide
all Private entries. See Chapter 12, Applications: Security for complete information about
how to activate and use the SPT 1500 terminal Security settings.
To mark an entry as Private:
1. Display the entry that you want to mark as Private.
2. Tap the Details button to open the Details dialog.
3. Select the Private check box to insert a check mark and mark the entry as Private.
2-26
Working with your SPT 1500
Beaming Information to Other SPT 1500 Terminals
Your SPT 1500 terminal is equipped with an IR (infrared) port that you can use to “beam”
information from one SPT 1500 terminal to another, and also to other Palm III users. The IR
port is located at the top of the SPT 1500 terminal, next to the laser scanner behind the red
shield. See Figure 1-1 for location of the IR port.
Note: If you are using a device other than an SPT 1500 terminal, please
confirm that your device includes the required infrared hardware
before you use this feature.
You can beam the following information between SPT 1500 terminals:
t
t
t
t
The current Address Book, Date Book, To Do List or Memo Pad entry
All the Address Book, To Do List or Memo Pad entries in the current category
A special Address Book entry which you designate as your “business card” (see
Beaming Address Entries to Other SPT 1500 terminals on page 4-9 for details)
An application installed in RAM memory.
To beam information:
1. Locate the entry, category, business card or application you want to beam.
2. Tap the Beam command from the Record menu to open the Beam Status dialog.
3. Point the IR port directly at the IR port of the receiving SPT 1500 terminal.
Tip: For best results, the SPT 1500 terminals should be between approximately 2
inches and 5 inches apart, and the path between the two devices must be clear
of obstacles.
4. Wait for the Beam Status dialog to indicate that the transfer is complete before you
continue working on your SPT 1500 terminal.
2-27
SPT 1500 Product Reference Guide
To receive beamed information:
1. Turn on your SPT 1500 terminal.
2. Point the IR port directly at the IR port of the transmitting SPT 1500 terminal to
open the Beam Status dialog.
3. Tap the Yes button to accept the transmission.
4. Wait for the Beam Status dialog to indicate that the transfer is complete, and then
tap the OK button to display the new entry.
Note: Incoming entries are filed under the “Unfiled” category.
2-28
Chapter 3
Finding Information With Your SPT 1500 Terminal
Introduction
This chapter explains how to locate information on your SPT 1500 terminal with the Find
command and the Phone Lookup command.
Using the Find Command
The Find command locates any text that you specify and is available in any SPT 1500
terminal application. You can search for whole words or the beginning letters of a word. The
Find command automatically searches all the data on your SPT 1500 terminal and lists which
applications contain the text.
For example, suppose you want to find a particular name, but aren’t sure where you stored
it. The Find command immediately lists all instances of that name and enables you to jump
directly to the name.
To use the Find command:
1. Tap the
icon from any SPT 1500 terminal application to open the Find dialog.
Tip: If you select text in a SPT 1500 terminal application before you tap the Find
button, the selected text automatically appears in the Find dialog.
2. Enter the text that you want to find in your SPT 1500 terminal.
3-1
SPT 1500 Product Reference Guide
Note: The Find command is not case-sensitive. In other words, searching for
the name “davidson” also finds “Davidson.” The Find command also
searches the contents of notes.
3. Tap the OK button to display a list of all instances of the text that you specified.
Note: As your SPT 1500 terminal searches for the text, you can tap the Stop
button at any time. You may want to do this if the entry you want
appears before your SPT 1500 terminal finishes the search. To
continue the search after you tap Stop, tap the Find More button.
4. Tap the text that you want to review to display the selected entry and its
corresponding SPT 1500 terminal application on the screen.
Using Phone Lookup
In addition to using the Find feature to locate text, you can search for and display phone
numbers with the Phone Lookup menu command. After you find a phone number, you can
paste it directly into a SPT 1500 terminal application.
For example, if you want to include a phone number in a memo, you could use the Phone
Lookup feature to find the phone number and transfer it directly into the memo.
To use the Phone Lookup command:
1. Display the entry where you want to insert a phone number. This can be an event in
the Date Book, a To Do List Item or a memo in the Memo Pad application.
3-2
Finding Information with your SPT 1500
Note: The Phone Lookup feature is not available in the Address Book and
Expense applications.
2. Tap the
icon to open the menus for your application.
3. Tap Phone Lookup from the Options menu to display the Phone Number Lookup
screen.
4. Tap the phone number you want to use.
Note: To find a phone number more quickly, you can enter the first letter of
the name you want to find in the Look Up line at the bottom of the
screen. The list automatically scrolls to the first name that starts with
that letter. You can continue to add letters to narrow your search.
5. Tap the Add button to close the Phone Number Lookup screen and paste the name
and phone number you selected into the entry you selected in step 1.
Phone Lookup Tips
You can also use the Graffiti® Command stroke “/L” to activate the Phone Lookup feature.
t
You can use Phone Lookup while entering text. For example, to insert the full name
and phone number for someone with the last name “Williams,” you would write the
Graffiti characters for “Wi” and then the Phone Lookup Command stroke “/L.”
Assuming you have only one Address Book entry that begins with “Wi,” your SPT
1500 terminal inserts the full name “Williams” (and the corresponding phone
number). If you have more than one name that begins with “Wi,” the Phone Lookup
screen appears.
3-3
SPT 1500 Product Reference Guide
t
3-4
The Phone Lookup feature also works for selected text. Drag to highlight the text,
and then write the Phone Lookup Command stroke Ò/L.Ó Your SPT 1500 terminal
replaces the selected text and adds the phone number to the name that it Þnds.
Chapter 4
Applications: Address Book
Introduction
The Address Book enables you to keep names, addresses, phone numbers and other
information about your personal or business contacts.
With the Address Book, you can:
Quickly look up or enter names, addresses, phone numbers and other information.
t
Enter up to five phone numbers (home, work, fax, car, etc.) or e-mail addresses for
each name.
t
Define which phone numbers appear in the Address List screen for each Address
Book entry.
t
Attach a note to each Address Book entry where you can enter additional
information about the entry.
t
Assign categories to your Address Book entries, so you can quickly sort and view
your entries in logical groups.
To open the Address Book, press the Address Book button on the front panel of the SPT 1500
terminal to display the Address Book on the screen.
t
4-1
N
LC
O
U L AT
3
ab
c
M E NU
R
C AT I O
12
LI
CA
AP
P
S
SPT 1500 Product Reference Guide
F IND
Address button
Getting Started With Address Book Entries
An Address Book entry is where you store name and address information about people or
businesses. Your SPT 1500 terminal makes it easy to create, edit and delete Address Book
entries.
Creating an Address Book Entry
You can create Address Book entries on your SPT 1500 terminal, or you can use the Palm™
Desktop software to create Address Book entries on your computer and download the entries
to your SPT 1500 terminal with the next HotSync® operation. See Chapter 8, Applications:
HotSync® for details.
Note: The Palm Desktop software also has data import capabilities that
enable you to load database files into the Address Book
on your SPT 1500 terminal. Refer to the online documentation
supplied with the Palm Desktop software for details.
To create a new Address Book entry:
1. Press the
button on the front of your SPT 1500 terminal to display the Address
List screen.
2. Tap the New button to display the Address Edit screen.
4-2
Applications: Address Book
Cursor
at Last
name
Tap New
3. Enter the last name of the person you want to add to your Address Book.
Note: Your SPT 1500 terminal automatically capitalizes the first letter of
each field (except numeric and e-mail fields). You do not have to use
the Graffiti® capital stroke to capitalize the first letter of the name.
4. Use the Next Field Graffiti stroke to move to the First Name field.
Next Field
Note: You can also move to any field by tapping it directly.
5. Enter the person's first name in the First Name field.
6. Repeat steps 4 and 5 to enter the other information that you want to include in this
Address Book entry.
7. Tap the arrows to move to the next page of information.
8. After you finish entering information, tap the Done button to return to the Address
List screen.
4-3
SPT 1500 Product Reference Guide
Tap Done
Tip:
You can create an Address Book entry that always appears at the top of the
list by beginning the Last name (or Company name) field with a blank space.
For example, you might create an “If Found Call” entry that contains your
name and phone number in case you lose your SPT 1500 terminal.
Editing an Address Book Entry
After you create an Address Book entry, you can update it or enter additional information
any time.
To edit an Address Book entry:
1. Tap the Address Book entry that you want to change to display the Address View
screen for that entry.
2. Tap the Edit button (or anywhere on the screen) to display the Address Edit screen.
3. Tap any field (Address, City, etc.) and enter or change the information.
4-4
Applications: Address Book
4. After you finish, tap the Done button to return to the Address
List screen.
Deleting an Address Book Entry
There are two ways to delete an entry: use the Menu Commands (described in the Record
Menu section of this chapter) or use the Address Entry Details dialog.
To delete an entry with the Address Entry Details dialog:
1. Tap the Address Book entry that you want to delete to display the Address View
screen for that entry.
2. Tap the Edit button to display the Address Edit screen.
3. Tap the Details button to open the Event Details dialog.
4. Tap the Delete button to open the Delete Address alert.
5. Tap the OK button to confirm you want to delete the entry.
Working With Address Book Entries
Your SPT 1500 terminal enables you to quickly find your Address Book entries, group them
by category, and display the entries by name or company name. You can also choose the type
of information you want your entries to include and exchange Address Book information
with other SPT 1500 terminal users.
Looking Up Address Book Entries
When working with the Address Book, the scroll button on the front panel of the SPT 1500
terminal makes it easy to navigate among your address entries. In the Address List screen, the
scroll button moves up or down an entire screen of address entries. If you hold down the
scroll button, you accelerate the scrolling so that it displays every third screen. In the Address
View screen, the scroll button moves to the previous or next address entry.
You can also use the Address List Look Up feature to quickly scroll to any of your Address
Book entries.
To Look Up an Address Book entry:
1. Display the Address List screen.
2. Enter the first letter of the name you want to find.
4-5
SPT 1500 Product Reference Guide
Look Up line
Note: The letter appears on the Look Up line and the list scrolls to the first
entry that begins with that letter. If you write another letter, the list
scrolls to the first entry that starts with those two letters. For example,
writing an “s” might scroll to “Sands,” and writing “sm” might scroll
further to “Smith.” If you sort the list by company name, the Look
Up feature scrolls to the first letter of the company name.
3. Tap any entry to view its contents, or use the carriage return stroke to view the
selected entry.
Choosing Types of Phone Numbers
Your SPT 1500 terminal enables you to choose the types of phone numbers or e-mail
addresses that you associate with an Address Book entry. Any changes you make apply only
to the current Address Book entry.
To choose other types of phone numbers in an Address Book entry:
1. Tap the Address Book entry that you want to change to display the Address View
screen for that entry.
2. Tap the Edit button to display the Address Edit screen for that entry.
3. Tap the pick list next to the label you want to change.
4-6
Applications: Address Book
Tap
triangle
4. Tap the new label you want to use.
Assigning Address Categories
Categories can help you file individual Address Book entries into groups for easy review. You
can assign and edit categories in the Address Book or by using the Categories pick list in the
Details dialog (see Using Categories on page 2-21 for a complete description of categories).
To assign a category to an Address Book entry:
1. Tap the Address Book entry you want to assign to a category.
2. Tap the Edit button in the Address View screen to display the Address Edit screen.
3. Tap the pick list in the upper-right corner and tap the category that you want to
assign to the Address Book entry.
Sorting by Name or Company
You can sort the entries in the Address List screen by Company and Last Name, rather than
by Last Name and First Name. These settings do not change your Address Book data in any
way; they merely change the view.
To sort the entries in the Address List screen:
1. Display the Address List screen.
2. Tap the
icon to open the Address Book menus.
3. Tap Preferences from the Options menu to open the Address Book Preferences
dialog.
4-7
SPT 1500 Product Reference Guide
4. Tap the setting that you want for the Address List screen.
5. Tap the OK button to display the Address List screen with your new setting.
Note: Entries with no company name sort by last name.
Changing Address Entry Details
The Address Entry Details dialog provides a variety of options that you can associate with an
Address entry.
To open the Address Entry Details dialog:
1. Tap an Address Book entry to display the Address View screen for that entry.
2. Tap the Edit button to display the Address Edit screen.
3. Tap the Details button to open the Address Entry Details dialog.
4. Select any of the following settings:
Show in List
Choose which type of phone or other information appears
on the Address List screen for the current entry. Your
options are: Work, Home, Fax, Other and E-mail.
Category
Assign the entry to a particular category. Your options
are: Business, Personal, QuickList, Unfiled and Edit
Categories.
Private
Hide this entry when the security features are turned on.
4-8
Applications: Address Book
Beaming Address Entries to Other SPT 1500 terminals
The IR port on your SPT 1500 terminal enables you to beam Address Book entries to other
SPT 1500 terminals. You can beam any of the following:
t
t
t
Business card. A specially designated entry containing information you want to
exchange with business contacts. You can send your business card quickly with onetouch beaming.
Current address entry. The entry currently selected on your SPT 1500 terminal. For
example, you may want to beam the name of a business contact to a coworker who
also uses a SPT 1500 terminal.
Category of address entries. All of the entries that you have assigned to the selected
category. For example, you might want to share your list of restaurants with a friend.
Note: For more on the IR port, see Beaming Information to Other SPT
1500 Terminals on page 2-27.
To select a business card:
1. Create an Address Book entry containing the information you want on your business
card.
2. Tap your business card entry to display the Address View screen for that entry.
3. Tap the
icon to open the Address Book menus.
4. Tap Select Business Card from the Record menu, and tap Yes to accept this entry as
your business card.
To beam a business card:
1. Tap your business card entry to display the Address View screen for that entry.
2. Tap the
icon to open the Address Book menus.
3. Tap Beam Business Card from the Record menu to beam your card to another SPT
1500 terminal.
Tip:You can press the
button for about two seconds to beam your card.
To beam the current entry:
1. Tap an Address Book entry that you want to beam to display the Address View
screen for that entry.
2. Tap the
icon to open the Address Book menus.
4-9
SPT 1500 Product Reference Guide
3. Tap Beam Address from the Record menu to beam the current entry to another SPT
1500 terminal through the IR port.
Tip: You can set the full-screen pen stroke to beam the current entry. See “Pen
Preferences” for details.
To beam the current category:
1. Display the Address List screen.
2. Tap the pick list in the upper-right corner and tap the category you want to beam to
display the entries in that category.
3. Tap the
icon to open the Address Book menus.
4. Tap Beam Category from the Record menu to beam the entries in the current
category to another SPT 1500 terminal through the IR port.
Address Book Menu Commands
The Address Book includes menu commands to make it fast and easy to perform common file
and editing tasks. This section explains the menu commands that are specific to the Address
Book.
Refer to Using Menus on page 2-17 for information about menu commands that are common
to all of your SPT 1500 terminal applications.
Record Menu
When you select the Record menu, its commands appear on the screen. The menu commands
are slightly different depending on the current screen.
Address List
Address View
4-10
Applications: Address Book
Delete Address
Opens an alert dialog prompting you to confirm deletion
of the current entry. Tap the OK button to delete the entry
from your SPT 1500 terminal, or tap the Cancel button to
close the alert dialog and keep the entry.
Note: By default, your SPT 1500 terminal removes the
entry from the Address Book, but retains a copy of
the entry and transfers it to an archive file on your
computer the next time you perform a HotSync
operation. To remove the entry completely, clear
the Save archive copy on PC check box.
Attach Note
Opens the Address Book Note dialog where you can
create a Note for the current entry.
Delete Note
Opens an alert dialog prompting you to confirm deletion
of the Note attached to the entry. Tap the OK button to
delete the Note, or tap the Cancel button to close the alert
dialog and keep the note.
Beam Address
Beams the current Address Book entry to another SPT
1500 terminal through the IR port.
Beam Category
Beams all Address Book entries in the current category to
another SPT 1500 terminal through the IR port.
Select Business
Card
Enables you to select the current Address Book entry as
your business card. To beam your business card to other
SPT 1500 terminals, use the Beam Business Card
command.
Beam Business
Card
Sends the current business card to another SPT 1500
terminal through the IR port. You can also initiate this
command by holding down the Address Book button for
at least two seconds. This is a convenient way to exchange
business cards with other SPT 1500 terminal users.
4-11
SPT 1500 Product Reference Guide
Options Menu
When you select the Options menu, its commands appear on screen.
Address View
Address List
Font
Opens the Select Font dialog where you can choose a
different font (text) style for your Address Book entries.
See Choosing Fonts on page 2-20 for details.
Preferences
Opens the Address Book Preferences dialog.
t
t
4-12
Remember last category. Determines how the
Address Book appears when you return from
another Palm application (Memo Pad, To Do
List, etc.). If you select this check box, the
Address Book shows the last category you
selected. When you clear it, the Address Book
shows the address entries for all categories.
List By. Determines whether address entries sort
by last name, first name or by company name,
last name in the Address List screen.
Applications: Address Book
Rename Custom
Fields
Enables you to define custom field names. Each Address
Book entry contains four “custom fields” that you can
rename. Any changes you make to the names of the
custom fields appear in all of your Address Book entries.
About Address
Book
Shows version (revision) information for the Address
Book application.
4-13
SPT 1500 Product Reference Guide
4-14
Chapter 5
Applications: Calculator
Introduction
The Calculator enables you to perform basic calculations. You can also store and retrieve
values in the Calculator’s memory.
PostScriptTo error
(undefined,
359.7931
open the Calculator
tap the
icon next to the
Graffiti area.
®
08.3333)
Using the Calculator Screen
The Calculator is designed to perform addition, subtraction, multiplication and division
operations.
To use the Calculator screen, use your fingers or the stylus to tap the Calculator buttons that
appear on the screen.
5-1
SPT 1500 Product Reference Guide
Special Calculator Buttons
The Calculator includes several buttons to help you perform calculations.
Clears the last number you entered. Use this button if you
make a mistake while entering a number in the middle of a
calculation. This button enables you to re-enter the number
without starting the calculation over.
Clears the entire calculation and enables you to begin a
fresh calculation.
Toggles the current number between a negative and
positive value. If you want to enter a negative number,
enter the number first and then press the +/- button.
Places the current number into Memory. Each
new number you enter with the M+ button is
added to the total already stored in memory. The number
that you add can be either a calculated value, or any
number you enter by pressing the number buttons. Pressing
this button has no effect on the current calculation (or
series of calculations); it merely places the value into
memory until it is recalled.
Recalls the stored value from memory and inserts it in the
current calculation.
Removes any value that is stored in the Calculator memory.
Calculator Menu Commands
The Calculator supports the Copy and Paste commands. You can use these commands to
copy a value from the Calculator and paste it into another application on your SPT 1500
terminal. Similarly, you can copy values from other applications on your SPT 1500 terminal,
such as Expense, and paste the values into the Calculator. For additional information on the
Copy and Paste commands, see Using Menus on page 2-17.
Recent Calculations
The Recent Calculations command enables you to review the last series of calculations, and
is particularly useful for confirming a series of “chain” calculations.
5-2
Applications: Calculator
To display the Recent Calculations:
1. Tap the
icon to open the Calculator menus.
2. Tap Recent Calculations from the Options menu to display the Recent Calculations
screen.
3. After you finish reviewing the dialog, tap the OK button to close the Recent
Calculations dialog and return to the Calculator.
5-3
SPT 1500 Product Reference Guide
5-4
Chapter 6
Applications: Date Book
Introduction
The Date Book enables you to quickly and easily schedule appointments or any kind of
activity associated with a time and date.
With the Date Book, you can:
Enter a description of your appointment and assign it to a specific time and date.
t
Display a chart of your appointments for an entire week. The Week View feature
makes it easy to spot any potential scheduling overlaps or conflicts.
t
Display a monthly calendar to quickly spot days where you have morning, lunch or
afternoon appointments.
t
Set an alarm to sound prior to the scheduled activity.
t
Create reminders for events that are based on a particular date, rather than time of
day. Birthdays and anniversaries are easy to track with your SPT 1500 terminal.
t
Attach notes to individual events for a description or clarification of the entry in your
Date Book.
To open the Date Book, press the Date Book button on the front panel of the SPT 1500
terminal.
t
6-1
N
LC
U L AT
O
3
ab
c
M E NU
R
C AT I O
12
LI
CA
AP
P
S
SPT 1500 Product Reference Guide
F IND
Date Book button
Scheduling an Event
An event can be any kind of activity that you associate with a day. When the Date Book screen
first appears, it shows the current date and a list of times for a normal business day. You can
enter a new event on any of the available time lines.
When you create an event, its description appears on the time line, and its duration is
automatically set to one hour. You can easily change the start time and duration for any event.
You can also include events in your Date Book that occur on a particular date but have no
specific start or end times, such as birthdays, holidays and anniversaries. These are referred
to as untimed events. Untimed events appear at the top of the Date Book screen with a
diamond in the time list. You can have several untimed events on a particular date.
To schedule an event for the current day:
1. Tap the time line that corresponds to your event in the Date Book screen.
Tap a time
line
Time bar
shows
duration
Enter event
6-2
Applications: Date Book
2. Use the stylus to write Graffiti® character strokes (or the on-screen keyboard) to
describe your event. You can enter up to 255 characters.
3. If your appointment is longer or shorter than an hour, tap the time of the event to
open the Set Time dialog. If your appointment is one hour long, skip to step 7.
Note: You can also open the Set Time dialog (to select a start time) by
making sure no event is selected, and then writing a number on the
number side of the Graffiti writing area.
Tap the time
of an event
4. Tap the time columns on the right side of the Set Time dialog to set the Start Time.
Start Time
highlighted
Tap to scroll to
earlier hours
Tap to change hours
Tap to change
minutes
Tap to scroll to later
hours
5. Tap the End Time box, and then tap the time columns to set the End Time.
6. Tap the OK button to confirm your selection and close the Set Time dialog.
6-3
SPT 1500 Product Reference Guide
7. Tap a blank area of the screen to de-select the event. A vertical line appears next to
the time, indicating the duration of the event.
To schedule an event for another day:
1. Select the date you want for the event by doing one of the following:
s Tap the day of the week that you want in the Date Bar at the top of the Date Book
screen. If necessary, tap the Previous week or Next week scroll bars to move to
another week.
Previous
week
Next
week
Tap to select the day of the
current week
s Tap the Go To button to open the Go to Date dialog. Select a date by tapping a
year, month and day in the calendar.
Previous year
Next year
Tap to scroll to
earlier hours
Tap to scroll to
earlier hours
Tap to select
current date
s Press the scroll button on the front panel of the SPT 1500 terminal to scroll to
another day. Press the upper half of the button to move to the previous day or the
lower half to move to the next day.
2. After you locate the date, follow the steps described in the previous section, To
schedule an event for the current day:.
To schedule an untimed event:
1. Select the date that you want for the event as described in the previous section, To
schedule an event for another day:.
2. Tap New to open the Set Time dialog.
6-4
Applications: Date Book
3. Tap OK, so that no start or end times are defined for the new event.
Note: You can also create a new untimed event by making sure no event is
selected, and then writing letters in the Graffiti writing area.
4. Enter a description for the event (which appears at the top of the Date Book screen).
New
untimed
event
No time
selected
5. Tap a blank area on the screen to de-select the untimed event.
Note: If you create an event and decide later that there is no particular start
or end time, you can easily change it to an untimed event. Tap the time
of the event in the Date Book screen, tap the No Time button, and
then tap the OK button to confirm your selection and close the Set
Time dialog.
6-5
SPT 1500 Product Reference Guide
Rescheduling an Event
You can easily make changes to your schedule with your SPT 1500 terminal.
To reschedule an event:
1. Tap the event you want to reschedule.
2. Tap the Details button to open the Event Details dialog for that event.
3. To change the time, tap the Time box and select the new time as described earlier in
this chapter.
4. To change the date, tap the Date box and select the new date as described earlier in
this chapter.
5. Tap the OK button to close the Event Details dialog and return to the Date Book
screen.
Setting an Alarm for an Event
The Alarm setting enables you to set an audible alarm for events in your Date Book. You can
set an alarm to sound minutes, hours or days before an event. The default Alarm setting is 5
minutes before the time of the event, but you can change this to any number of minutes, hours
or days.
When you set an alarm, an
icon appears to the far right of the event with the alarm. When
the alarm tone sounds, a reminder message also appears on the SPT 1500 terminal screen.
To set an alarm for an event:
1.
2.
3.
4.
5.
6-6
Tap the event to which you want to assign an alarm.
Tap the Details button to open the Event Details dialog for that event.
Select the Alarm check box in the Event Details dialog to activate the alarm.
Tap the Alarm units pick list to select Minutes, Hours or Days.
Select the “5” and enter any number from 0 to 99 (inclusive) as the numeric alarm
setting.
Applications: Date Book
Enter numeric
setting here
Tap here to
select alarm unit
6. Tap the OK button to close the Event Details dialog and return to the Date Book
screen.
Note: You can set a silent alarm for an untimed event. In this case, the alarm
triggers at the specified period of minutes, hours or days before
midnight (beginning) of the day of the untimed event. No audible
alarm sounds for an untimed event; instead, the reminder message
appears on the screen of the SPT 1500 terminal.
For example, you could create a reminder for an untimed event that occurs on February 4th.
If the alarm reminder is set for 5 minutes, the alarm reminder appears at 11:55 PM on the
night of February 3rd. The reminder remains on the screen until you turn on your SPT 1500
terminal and tap the OK button to dismiss it.
Scheduling Repeating Events
The Repeat function enables you to schedule events that recur at regular intervals. A birthday
is a good example of an event that repeats annually. Another example would be a weekly
guitar lesson that falls on the same day of the week and the same time of day. After you enter
a repeating event, a
icon appears to the far right of the event.
To schedule a repeating event:
1. Tap anywhere on the text of an event in the Date Book screen.
2. Tap the Details button to open the Event Details dialog.
3. Tap the Repeat box in the Event Details dialog to open the Change Repeat dialog.
6-7
SPT 1500 Product Reference Guide
Tap the
Repeat
box
4. Tap Day, Week, Month or Year in the Change Repeat dialog.
5. Enter a number that corresponds to how often you want the event to repeat in the
“Every” area. For example, if you select Month and enter the number “2,” the event
repeats every other month.
6. If you want to specify an ending date for the repeating event, tap the End on pick list
and tap Choose Date. Use the Date Picker to select an end date.
7. Tap the OK button to close the Change Repeat dialog and activate your settings.
Considerations for the Repeat Function
t
t
t
t
t
6-8
If you change the start date of a repeating event, your SPT 1500 terminal calculates
the number of days you have moved the event. Your SPT 1500 terminal then
automatically changes the end date to maintain the duration of the repeating event.
If you change the repeat type (e.g., daily to weekly) of a repeating event, past
occurrences (prior to the day on which you change the setting) are left alone and your
SPT 1500 terminal creates a new repeating event.
If you change the date of an occurrence of a repeating event (e.g., from January 14th
to January 15th) and apply the change to all occurrences, the new date becomes the
start date of the repeating event. Your SPT 1500 terminal adjusts the end date to
maintain the duration of the event.
If you change other repeat settings (e.g., time, alarm, private) of a repeating event
and apply the change to all occurrences, your SPT 1500 terminal creates a new event.
The start date of this new event is the day on which the setting is changed. Past
occurrences (prior to the day of the change) are left alone and not changed.
If you make a change to one occurrence of a repeating event (e.g., time), that
occurrence no longer shows the Repeat icon.
Applications: Date Book
Marking a Private Event
You can designate a specific event as “private.” When you activate the Security features, your
SPT 1500 terminal hides all private entries and you must enter a password to display them
on the screen.
To mark an event as private:
1.
2.
3.
4.
Tap the event you want to mark as private.
Tap the Details button to open the Event Details dialog for that event.
Select the Private check box.
Tap the OK button to close the Event Details dialog and return to the Date Book
screen.
Deleting an Event
There are three ways to delete an event from the Date Book application: simply delete the text
of the event, use the Menu Commands (described in the Record Menu section later in this
chapter), or use the Event Details dialog.
Note: If you delete the text of a repeating event, you delete all instances of
that event. If you use the Menu Command or the Event Details dialog,
you can delete one occurrence of the event (as an exception) or all
occurrences.
To delete an event with the Event Details dialog:
1.
2.
3.
4.
Tap anywhere in the text area of the event to delete.
Tap the Details button to open the Event Details dialog.
Tap the Delete button to open the Delete Event alert.
Tap the OK button to confirm you want to delete the event.
Changing the Date Book View
In addition to displaying the calendar for a specific day, you can also display your Date Book
by the week or month, and you can display the current time.
6-9
SPT 1500 Product Reference Guide
To toggle through the different views, press the Date Book button repeatedly to display the
next view.
To display the current time tap the date in the Date Book title bar to display the current time.
Tap the date
Current time displays
Note: After a few seconds, the title bar reverts to show the date.
Working in Week View
The Week View shows a chart of your events for an entire week. This view lets you quickly
review your appointments and available time slots.
In addition, the graphical display helps you spot overlaps and conflicts in your schedule.
To display the Week View:
1. Tap the Week View button in the Date Book screen to display the Week View.
Week view
2. Tap the navigation controls to move forward or backward a week at a time, or to
display details of an event.
Note: The Week View also shows untimed events and events that are before
and after the range of times shown.
6-10
Applications: Date Book
Previous
week
Next
week
Tap for that day
Bar indicates event above display
Dot indicates untimed event
Bar indicates event below display
3. Tap any of your events to show a description of the event.
Event details
Tap to show Event details
If you want to reschedule an event, tap and drag the event to a different time or day.
You can tap a blank time on any day to move to that day and have the time selected for a
new event. Or you can tap any of the days and dates that appear at the top of the Week View
to move directly to that day without selecting an event.
The Week View shows the time span defined by the Start Time and End Time in the Date
Book Preferences settings. If you have an event before or after this time span, a bar appears
at the top or bottom of that day's column, and these on-screen scroll arrows appear if your
scheduled events go beyond the displayed time range.
Spotting Event Conflicts in Week View
With the ability to define specific start and end times for any event, it’s possible to schedule
events that overlap (an event that starts before a previous event finishes).
6-11
SPT 1500 Product Reference Guide
In this case, any event conflict (time overlap) appears in the Week View as overlapping bars.
The Day View displays bracketed bars to the left of the conflicting times.
Event
conflicts
Working in Month View
The Month View screen shows which days have events scheduled. Dots and lines in the
Month View indicate events, repeating events and untimed events.
Previous/next month
Dashed line indicates daily repeating event
Dots on right side indicate events
Dot below date indicates untimed events
Month view button
Tap any day that appears in the Month View screen to move directly to that day with the Day
View screen. Tap the arrows at the top to move forward or backward a month. Tap the Go
to button to open the Date Picker and choose a different month.
When the Month View is on the screen, you can use the scroll button on the front panel of
the SPT 1500 terminal to move between months. Press the upper half of the button to display
the previous month, or press the lower half to display the next month.
6-12
Applications: Date Book
Note: You can control the dots and lines that appear in the Month View. See
“Options Menu” later in this chapter.
Date Book Menu Commands
The Date Book includes menu commands to perform common file and editing tasks. This
section explains the menu commands that are specific to the Date Book.
See Using Menus on page 2-17 for information about menu commands common to all of
your SPT 1500 terminal applications.
Record Menu
When you select the Record menu, its commands appear on screen.
New Event
Creates an event and opens the Set Time dialog where
you can choose start and end times for the new event.
If you do not enter start and end times, it creates a
blank untimed event.
Delete Event
Opens an alert dialog, prompting you to confirm that
you want to delete the current event. You must tap an
event before you use the Delete Event command. Tap
the OK button to delete the event from your SPT 1500
terminal, or tap the Cancel button to close the alert
dialog and keep the event.
Note: By default your SPT 1500 terminal removes the
event from the Date Book, but retains a copy of
the event and transfers it to an archive file on
your computer the next time you perform a
HotSync® operation. To remove the event
completely, clear the Save archive copy on PC
check box.
6-13
SPT 1500 Product Reference Guide
Attach Note
Opens the Note dialog, where you can create a Note
for the current event.
Delete Note
Opens an alert dialog, prompting you to confirm that
you really want to delete the Note attached to the
event. Tap the OK button to delete the Note from the
memory of your SPT 1500 terminal, or tap the Cancel
button to close the alert dialog and return to the Date
Book.
Purge
Opens an alert dialog, prompting you to confirm that
you want to purge events older than a certain time
period — based on the current date on the internal
clock on the SPT 1500 terminal. You can use the Purge
command to conserve memory on your SPT 1500
terminal. The default setting for the Purge alert is to
“Save archive copy on PC.” This setting removes
events from the Date Book, but retains copies and
transfers them to an archive file on your computer
during the next HotSync operation.
Note: The Purge command also deletes repeating
events if they end before the date that you
activate the Purge command.
Beam Event
Beams the current event to another terminal through
the IR port. See Beaming Information to Other SPT
1500 Terminals on page 2-27 for more information.
Options Menu
When you select the Options menu, its commands appear on screen.
Font
6-14
Opens the Select Font dialog where you can choose a
different font (text) style for your Date Book entries. See
Choosing Fonts on page 2-20 for details.
Applications: Date Book
Preferences
Enables you to set the range of times that appear in the
Date Book, and to automatically activate alarms for each
event.
t
t
t
t
t
Start/End Time. Enables you to define the start
and end times for the Date Book screens. If the
time slots you select do not fit on one screen,
you can tap the
arrows to scroll up and
down.
Alarm Preset. Automatically sets an alarm for
each new event. The alarm for untimed events is
defined by minutes, days or hours before
midnight of the date associated with the event.
Alarm sound. Controls the type of tone the
alarm generates when it sounds.
Remind me. Defines how many times the alarm
sounds. The choices are: Once, Twice, 3 times, 5
times and 10 times.
Play every. Defines how often the alarm sounds.
The choices are every: Minute,
5 minutes, 10 minutes and 30 minutes.
6-15
SPT 1500 Product Reference Guide
Display Options
Allows you to change the Date Book’s appearance and
which events display.
t
Show Time Bars. Activates the time bars that
appear in the Day View. The time bars show the
duration of an event and illustrate event
conflicts.
t
Compress Day View. Controls how times
appear in the Day View. When Compress Day
View is off, all time slots display. When it is on,
start and end times display for each event, but
blank time slots toward the bottom of the screen
disappear to minimize scrolling.
t
Month View settings. These check boxes apply
to the Month View of the Date Book. You can
activate any or all of these settings to show that
you have Timed, Untimed or Daily Repeating
events in the Month View only.
Phone Lookup
Activates the Phone Lookup feature. See Using Phone
Lookup on page 3-2.
About Date Book
Shows version (revision) information for the Date Book
application.
6-16
Chapter 7
Applications: Expense
Introduction
The Expense application enables you to keep track of your expenses and then transfer the
information to a spreadsheet on your computer.
With the Expense application you can:
Record dates, type of expenses, amount spent, payment method and other details
associated with any money that you spend.
t
Create categories for your expenses, such as business and personal expenses
associated with a range of dates.
t
Keep track of vendors (companies) and people involved with each particular
expense.
t
Log miles traveled for a particular date or expense category.
t
Sort your expenses by date or expense type.
t
Transfer your expense information to a Microsoft® Excel spreadsheet (version 5.0
or later) on your computer. (Microsoft Excel is not included with the SPT 1500
organizer package.)
To open Expense:
t
1. Tap the
2. Tap the
icon to open the Applications Launcher.
icon to display the Expense List screen.
7-1
SPT 1500 Product Reference Guide
Creating an Expense Item
Expense enables you to record the date, expense type and the amount that you spent. You
can sort your expense items into categories or add other information that you want to
associate with the item.
To create an expense item:
1. Tap the New button in the Expense List to create a new item.
Cursor of
new item
Tap New
Note: You can also create a new expense item by writing on the number side
of the Graffiti® pad while in the Expense List screen. The first number
you write begins your new expense item.
2. Enter the amount of the expense.
3. Tap the Expense Type pick list and select a type from the list.
Tap here
7-2
Applications: Expense
Note: As soon as you select an expense type, your SPT 1500 organizer saves
your entry. If you do not select an expense type, it does not save the
entry.
Tip:
A quick way to create a new expense item is to make sure that no expense
item is selected in the Expense List, write the first letter(s) of the expense
type, and then write the numerical amount of the expense item. This
technique takes advantage of the automatic fill feature. See Options Menu
later in this chapter for details.
Changing the Expense Item Date
Initially, expense items appear with the date you enter them on your SPT 1500 organizer. You
can use the Expense application to change the date associated with any expense item.
To change the date of an expense item:
1. Tap the expense item you want to change to highlight the date.
2. Tap the date of the selected item to open the Date dialog.
Tap date
3. Tap the date you want for the expense item.
For more information about the Date dialog, see Scheduling an Event on page 6-2.
Entering Receipt Details
The Expense application provides a variety of options that you can associate with an item.
These options appear in the Receipt Details dialog.
To open the Receipt Details dialog:
7-3
SPT 1500 Product Reference Guide
1. Tap the expense item you want to assign details.
2. Tap the Details button to open the Receipt Details dialog.
3. Select any of the following options:
Category
Defines the category for the Expense item. The default
Category is Unfiled when All is selected. Otherwise,
the default is the currently selected Category. An
expense item remains in the default category until you
change it.
Your SPT 1500 organizer provides two sample
categories, New York and Paris, to show how you
might sort your expenses according to different
business trips.
Choose Edit Categories from the pick list to change
existing or to create new expense categories. For
example, you might create a category for a range of
dates, such as a week or month, or you might delete or
rename the New York and Paris categories.
Type
Opens a pick list of the expense type options so that
you can change the expense type for any of your
expense items.
Payment
Enables you to choose the payment method used to
pay the expense item. If the item is prepaid (such as
airline tickets supplied by your company), you can
choose Prepaid to place your expense in the
appropriate company-paid cell of your printed
expense report spreadsheet. See Transferring Your
Data to Microsoft Excel later in this chapter for more
information.
7-4
Applications: Expense
Currency
Enables you to choose the type of currency used to pay
the expense item. The default currency unit is defined
in the Preferences dialog (see Preferences on page 7-13
later in this chapter). You can also display up to four
other common types of currency. See Customizing the
Currency Pick List on page 7-5 for details.
Vendor and City
Enable you to record the name of the vendor (usually
a company) associated with the expense and the city
where the expense took place. For example, a business
lunch might be at Rosie's Cafe (Vendor) in San
Francisco (City).
Attendees
Displays Attendees screen which resembles a memo in
the Memo Pad. You can use this screen to list the
people who attended the activity associated with the
expense or to make notes, such as the purpose of the
expense.
Tap here
Note: You can tap the Lookup button to display the names (and the
corresponding companies) of the people in your Address Book. The
Lookup button’s function is similar to the Phone Lookup feature
described in Using Phone Lookup on page 3-2.
4. Tap the OK button to close the Receipt Details dialog and activate your selections.
Customizing the Currency Pick List
You can select the currencies and symbols that appear in the Currency pick list.
To customize the Currency pick list:
7-5
SPT 1500 Product Reference Guide
1. Tap the Currency pick list in the Receipt Details dialog, and then tap the Edit
Currencies selection to open the Select Currencies dialog.
Tap Edit
currencies
2. Tap each Currency pick list to choose the country whose currency you want to
display on that line.
3. Tap the OK button to close the Select Currencies dialog and activate your selections.
Note: If the currency you want to use is not in the list of countries, you can
create your own custom country and currency symbol. See Expense
Menu Commands later in this chapter for details.
Show Options
The Show Options define the sort order and other settings that relate to your expense items.
To open the Show Options dialog:
1. Tap the Show button in the Expense List to open the Show Options dialog.
Tap Show
2. Select any of the following options:
7-6
Applications: Expense
Sort By
Enables you to sort the Expense entries by date or
expense type.
Distance
Enables you to display Mileage entries in miles or
kilometers.
Show Currency
Shows or hides the currency symbol in the expense list.
3. Tap the OK button to close the Show Options dialog and activate your selections.
Transferring Your Data to Microsoft Excel
After you enter your expenses into the Expense application on your SPT 1500 organizer, the
Palm™ Desktop software enables you to view and print the data with your computer.
Note: You need Microsoft Excel version 5.0 (or later) to view and print your
Expense data using one of the provided templates. Microsoft Excel is
not included with the SPT 1500 organizer package. The procedures in
this section also assume that you have installed the Palm Desktop
software. See Palm SPT 1500 Desktop Software on page 1-10 for
more information.
Printing an Expense Report
Palm Desktop makes it quick and easy to print your Expense data.
To print your expense report:
1. Perform a HotSync® operation to transfer your latest Expense data to your computer
and make it available to Palm Desktop. See Chapter 8, Applications: HotSync® for
details.
2. Click the Expense button in Palm Desktop to open Microsoft Excel and the Expense
Report configuration dialog.
Note: If you launch Expense from the Start menu (instead of Palm
Desktop), you must first choose your SPT 1500 organizer user name.
3. Click the expense category that you want to print.
7-7
SPT 1500 Product Reference Guide
Click to select
Categories
Tip:
You can press Shift+click to select multiple categories. To print the expenses
associated with all of your Expense categories, click the All button in the
Categories area.
4. If you want to define an end date for the expense report, enter the date in the End
Date area.
Note: If you do not specify an end date, all expense entries for the selected
categories appear — up to the date of the last HotSync operation with
your SPT 1500 organizer.
5. Click the Print button to display the expense report in the Print Preview window.
7-8
Applications: Expense
6. Click the Print button in the Microsoft Excel window to print your expense report.
To view your Expense data in a Microsoft Excel spreadsheet:
1. Perform a HotSync operation to transfer your latest Expense data to your computer
and make it available to Palm Desktop.
2. Click the Expense button in Palm Desktop to open Microsoft Excel and the Expense
Report configuration dialog.
Note: If you start Expense from the Start menu (instead of Palm Desktop),
you must first choose your SPT 1500 organizer user name.
7-9
SPT 1500 Product Reference Guide
Click to select
Categories
3. Click the expense category that you want to use.
Tip:
You can press Shift+click to select multiple categories. If you want to view the
expenses associated with all of your Expense categories, click the All button in
the Categories area.
4. If you want to define an end date for the expense report, enter the date in the End
Date area.
Note: If you do not specify an end date, all expense entries for the selected
categories will appear — up to the date of the last HotSync operation.
5. Click the Create button to display a Microsoft Excel spreadsheet containing your
Expense data.
7-10
Applications: Expense
At this point, your Expense data appears in Microsoft Excel spreadsheet form. You can enter
information, make formatting changes and save and print the file in the normal manner.
Using Expense Report Templates
Palm Desktop software comes with several expense report templates. When you use one of
these templates, you can edit your Expense data in Microsoft Excel. If you want to streamline
or customize your expense reports, you can change these templates. For example, you can
add your company name to a template. See Appendix A, Expense Templates for sample
templates and Appendix B, Creating a Custom Expense Report for details on changing
templates.
To view your Expense data using a Microsoft Excel template:
1. Display your Expense data in a Microsoft Excel spreadsheet as described in the
previous procedure.
2. Click the Options button to open the Expense Report Options dialog.
Enter name and
other information
Choose expense
template
3. Enter name, department and other information as necessary for your expense report.
4. Click the Templates menu, then click an expense template. See Appendix A, Expense
Templates for samples.
Note: If you want to create your own custom expense template and have it
appear in the Templates menu, refer to Appendix B, Creating a
Custom Expense Report.
7-11
SPT 1500 Product Reference Guide
5. Click the OK button to return to the Expense Report Options dialog.
Expense Menu Commands
The Expense application includes menu commands to perform common file and editing tasks.
This section explains the menu commands that are specific to the Expense application.
See Using Menus on page 2-17 for information about menu commands that are common to
all of your SPT 1500 organizer applications.
Record Menu
When you select the Record menu, its commands appear on screen.
Delete Item
Opens an alert dialog, prompting you to confirm that
you want to delete the current expense item. You must
tap an item before you can use the Delete Item
command. Tap the OK button to delete the item from
your SPT 1500 organizer, or tap the Cancel button to
close the alert dialog and keep the item.
Note: By default your SPT 1500 organizer removes the
item from the Expense application, but retains
a copy of the item and transfers it to an archive
file on your computer the next time you
perform a HotSync operation. To remove the
item completely, clear the Save archive copy on
PC check box.
Purge
Conserves memory on your SPT 1500 organizer by
deleting expense categories that you no longer use.
The Purge command prompts you to confirm that you
want to purge all the records from the selected
category.
Options Menu
When you select the Options menu, its commands appear on screen.
7-12
Applications: Expense
Preferences
Activates the Preferences dialog, which is used to activate
the automatic fill feature and to set the default currency
symbol.
t
t
Use automatic fill. Enables you to select an
expense type by writing the first letter of an
expense type in the Graffiti writing area. For
example, if you write the letter “T,” it enters the
“Taxi” expense type. Writing “T” and then “E”
enters “Telephone” which is the first expense
type beginning with the letters “TE.”
Default currency. Sets the default currency
symbol for the Expense application.
Custom Currencies Enables you to define additional currency symbols for the
Expense application.
Note: You need to use this command only if the
currency symbol you need is not available in the
Currency pick list of the Receipt Details dialog
(See “Entering Receipt Details” earlier in this
chapter).
About Expense
Shows version (revision) information for the Expense
application.
To define a custom currency symbol:
1. Choose Custom Currencies from the Options menu to open the Custom Currencies
dialog.
7-13
SPT 1500 Product Reference Guide
Tap a Country
button
2. Tap one of the four Country boxes to open the Currency Properties dialog.
3. Enter the name of the country and the symbol that you want to appear in the Expense
application, and then tap the OK button to define your setting.
4. Tap the OK button to close the Custom Currencies dialog.
Note: If you want to use your custom currency symbol as the default for all
Expense entries, choose the symbol in the Preferences dialog. If you
want to use your custom currency symbol only for particular expense
items, choose the symbol in the Receipt Details dialog associated with
those items.
7-14
Chapter 8
Applications: HotSync
¨
Introduction
HotSync® technology enables you to synchronize data between one or more SPT 1500
terminals and the SPT 1500 Palm™ Desktop software. To synchronize data, you must connect
your SPT 1500 terminal and Palm Desktop either directly with a cable or indirectly with a
modem or network.
With HotSync technology you can:
t
t
t
Synchronize the Date Book, Address Book, To Do List, Memo Pad and Expense
entries on your SPT 1500 terminal with the entries on your computer, and vice versa.
Manage individual or multiple SPT 1500 terminals with a centralized computer.
Keep your data safe by automatically creating backup copies each time your
synchronize.
The HotSync Process and the HotSync Manager
The HotSync process automatically synchronizes data between your SPT 1500 terminal and
Palm Desktop. Changes you make on your SPT 1500 terminal or Palm Desktop appear in
both places after a HotSync operation. HotSync technology synchronizes only the needed
portions of files, thus reducing synchronization time. You can synchronize your data by
connecting your SPT 1500 terminal directly to your computer with the cradle or indirectly
with a modem or network.
The HotSync Manager oversees the synchronization process. It runs in the background and
monitors a communications port on your computer for a HotSync command from a SPT
8-1
SPT 1500 Product Reference Guide
1500 terminal. When it “hears” a HotSync command, HotSync Manager synchronizes data
in the Date Book, Address Book, To Do List, Memo Pad, Mail and Expense applications. It
can synchronize the data even when Palm Desktop is not running!
Once you complete a few simple setup steps, performing a HotSync operation is as simple as
pressing a button. Follow the steps in the next section to complete the setup.
Performing a HotSync Operation for the First Time
The first time you synchronize your data, you need to enter user information on both the SPT
1500 terminal and the Palm Desktop. Once you enter this information and synchronize, the
HotSync Manager recognizes your SPT 1500 terminal and doesn’t ask for this information
again. If you are a System Administrator preparing several SPT 1500 terminals for a group
of users, see Creating a User Profile on page 8-12 before performing the following steps.
Important:
You must perform your first HotSync operation with a local, direct
connection, rather than using a modem.
To perform a HotSync operation for the first time:
1. Double-click the Palm Desktop icon on the Windows desktop (or select Palm
Desktop from the Start menu) to start the Palm Desktop software.
2. Click the
icon in the Windows System Tray to open the HotSync Manager menu.
Tip: The Windows System Tray is usually in the lower-right corner on your computer
display. The location may vary depending on the location of the taskbar and the
version of Windows you are using.
3. Click Local from the HotSync Manager menu to indicate that you are using the
cradle to synchronize.
4. Turn on the SPT 1500 terminal and slide it into the cradle.
8-2
Applications: HotSync
Tip: The curved edge on the bottom of the SPT 1500 terminal should align smoothly
with the cradle when it is inserted properly.
5. Press the
button on the front of the SPT 1500 terminal cradle to open the New
User dialog.
HotSync
button
6. Enter a user name for your SPT 1500 terminal and click the OK button to open the
HotSync Progress dialog and start the synchronization process.
Important:
Every SPT 1500 terminal should have a unique name. Never try to
synchronize more than one SPT 1500 terminal to the same user name.
8-3
SPT 1500 Product Reference Guide
7. Wait for Palm Desktop to display a message indicating that the process is complete.
Conducting a Local HotSync Operation
After you complete the first HotSync operation, the HotSync process is even faster and easier!
To conduct a local HotSync operation:
1. Insert the SPT 1500 terminal in the cradle.
2. If the HotSync Manager is not running, start it.
3. Press the
button on the front of the SPT 1500 terminal cradle to start the
HotSync process.
4. Wait for Palm Desktop to display a message indicating that the process is complete.
Selecting HotSync Setup Options
You can choose when you want HotSync Manager to run, and you can adjust the local and
modem HotSync settings.
To set the HotSync Options:
1. Click the
icon in the Windows System Tray to open the HotSync Manager menu.
2. Click Setup on the HotSync Manager menu to open the Setup dialog.
8-4
Applications: HotSync
3. Click the General tab and select one of the following options:
Always available
Adds HotSync Manager to the Startup folder and
constantly monitors the communication port for SPT
1500 terminal synchronization requests. With this
option, the HotSync Manager conducts
synchronizations even when Palm Desktop is not
running.
Available only when
Palm Desktop is
running
Starts HotSync Manager and monitors requests
automatically when you open the Palm Desktop
software.
Manual
Starts the HotSync Manager and monitors requests
only when you select HotSync Manager from the Start
menu.
Tip: If you’re not sure which option to use, keep the Always available default setting.
4. Click the Local tab to display the settings for the connection between your computer
and the SPT 1500 terminal cradle, and adjust the following options as needed.
8-5
SPT 1500 Product Reference Guide
Serial Port
Identifies the port Palm Desktop will use to
communicate with the cradle. This selection should
match the port number where you connected the
cradle.
Note: Your SPT 1500 terminal cannot share this port
with an internal modem or other device. If you
have trouble determining the correct serial
port, see Troubleshooting on page 16-7.
Speed
Determines the speed at which data is transferred
between your SPT 1500 terminal and Palm Desktop.
We suggest you try the As Fast As Possible rate first,
and adjust downward if you experience problems.
This setting allows the Palm Desktop and SPT 1500
terminal to find and use the fastest speed.
5. Click the Modem tab to display the Modem settings and adjust the following options
as needed.
8-6
Applications: HotSync
Serial Port
Identifies the port where the modem is located. If you
are unsure of the port assignment, look at the Modem
Properties in the Windows Control Panel.
Speed
Determines the speed at which data is transferred. We
suggest you try the As Fast As Possible rate first, and
adjust downward if you experience problems. This
setting allows the Palm Desktop and SPT 1500
terminal to find and use the fastest speed.
Modem
Identifies the modem type or manufacturer. Refer to
your modem manual or face plate for its type or
settings. If you’re not sure of your modem type or your
modem doesn’t match any that appear in the list,
choose Hayes Basic.
Setup String
Identifies the setup string for your particular modem.
Not all modems require a setup string. Refer to your
modem manual and enter the setup string if
recommended by the manufacturer.
6. Click OK to close the Setup dialog.
Customizing HotSync Application Settings
For each application you can define a set of options that determines how records are handled
during synchronization. These options are called a “conduit.” By default, Palm Desktop
synchronizes all files between the SPT 1500 terminal and the Palm Desktop. In general, you
should leave the settings to synchronize all files. The only reason you might want to change
these settings is to overwrite data on either your SPT 1500 terminal or Palm Desktop, or to
avoid synchronizing a particular type of file because you don’t use it.
In addition to the Date Book, Address Book, To Do List, Memo Pad and Expense application
conduits, Palm Desktop includes System and Install conduits. The System conduit backs up
the system information stored in your SPT 1500 terminal, including Graffiti® software
ShortCuts. The Install conduit is used to install Palm-compatible applications.
To customize HotSync application settings:
1. Click the
icon in the Windows System Tray to open the HotSync Manager menu.
Tip: You can also click the HotSync command on the Palm Desktop menu bar to open
the HotSync Manager menu.
2. Click Custom from the HotSync menu to open the Custom dialog.
8-7
SPT 1500 Product Reference Guide
3. Select the appropriate user name from the list at the top of the dialog.
4. Click an application in the Conduit list to choose the conduit you want to change.
5. Click the Change button to open the Change HotSync Action dialog.
6. Click the direction in which you want to write data, or click Do Nothing to skip data
transfer for an application.
Note: Changing the HotSync setting from the default affects only the next
HotSync operation. Thereafter, the HotSync Actions revert to their
default settings. To use a new setting on an ongoing basis, select the
Set As Default box. Thereafter, you can just click the Default button
in the Custom dialog to revert to the default settings.
7. Repeat steps 2 through 5 to change conduit settings for other applications or for a
different user name.
8. Click the OK button to close the Change HotSync Action dialog and activate your
settings.
8-8
Applications: HotSync
Conducting a HotSync Operation via Modem
You can use a modem to synchronize your SPT 1500 terminal when you are away from your
computer.
Note: You must conduct an initial local HotSync operation using the SPT
1500 terminal cradle before you perform a modem HotSync
operation.
To perform a HotSync operation via modem you need:
t
t
t
A modem connected to your computer
A modem connected to your SPT 1500 terminal with a special modem cable. (The
cradle is not used for a modem HotSync operation.) See Technical Support, Service
and Repair on page 16-12 for details on ordering this special cable.
The Palm Desktop software configured for use with a modem as described earlier in
this chapter in Selecting HotSync Setup Options on page 8-4
Preparing Your Computer for a Modem HotSync Operation
There are a few steps you must perform to prepare your computer for a modem HotSync
operation. Be sure to perform these steps before you leave your office so that your computer
is ready to receive a call from your SPT 1500 terminal. See Selecting HotSync Setup Options
on page 8-4 earlier in this chapter.
To prepare your computer for a modem HotSync operation:
1. Confirm that the computer modem is connected and turned on, and that no
communications applications, such as fax or telephony software, are running on a
COM port.
Note: Make sure the computer is disconnected from all online services, such
as America Online® (AOL) and CompuServe®. This helps to avoid
conflicts with the COM port.
2. Start HotSync Manager if it is not already running, and click Modem from the
HotSync Manager menu.
8-9
SPT 1500 Product Reference Guide
Preparing Your SPT 1500 Terminal for a Modem
HotSync Operation
To prepare your SPT 1500 terminal for a modem HotSync operation:
1. Turn on your SPT 1500 terminal and tap the
icon to open the Applications
Launcher.
2. Tap the
icon to open the HotSync screen.
3. Tap the Enter Phone # box under the Modem Sync icon to open the Phone Setup
dialog.
Note: If you have Network HotSync software installed on your SPT 1500
terminal, the Remote Setup dialog appears instead. See “Network
Preferences” for more information.
4. Enter the telephone number to access the modem connected to your computer.
5. If needed, enter a dial prefix (such as “9”) to access an outside line, and then tap the
Dial Prefix check box.
Tip:You can enter a comma in the field to introduce a “pause” in the dialing
sequence.
6. If the phone line you’re using for the SPT 1500 terminal has “Call Waiting,” select
the Disable call waiting check box to avoid an interruption during the modem
HotSync operation.
7. If you want to use a calling card to place the call, select the check box and enter the
calling card number.
8. Tap OK to return to the HotSync dialog.
8-10
Applications: HotSync
9. Tap the
icon to open the HotSync menus.
10. Tap Modem Setup from the Options menu to display the Modem Preferences screen.
11. Enter the Modem Preference settings as described in “Modem Preferences.”
Selecting the Conduits for a Modem HotSync Operation
The Conduit Setup dialog on your SPT 1500 terminal enables you to define which files and/
or applications synchronize during a modem HotSync operation. You can use these settings
to minimize the time required to synchronize data with a modem.
To change the Conduit Setup for a modem HotSync operation:
1.
2.
3.
4.
Tap the
icon in the Graffiti area to display the Applications Launcher.
Tap the
icon to display the HotSync screen.
Tap the
icon to open the HotSync menus.
Tap Conduit Setup from the Options menu to open the Conduit Setup dialog.
5. Tap the check boxes to de-select the files and/or applications that you do not want
to synchronize during a modem HotSync operation. The default setting is to
synchronize all files.
Note: Applications that do not have a database (such as games) do not
synchronize — even if you select the item in the Conduit Setup dialog.
6. Tap the OK button to close the Conduit Setup dialog and activate your settings for
the next modem HotSync operation.
8-11
SPT 1500 Product Reference Guide
Performing a HotSync Operation via a Modem:
After you prepare your computer and your SPT 1500 terminal, and select your Conduit Setup
options, you are ready to perform a Modem HotSync operation.
To perform a Modem HotSync operation:
1. Turn on your SPT 1500 terminal.
Note: If you are not using a PalmPilot modem, you need a special modem
cable and an external modem. Connect one end of the special modem
cable to the serial connector on the SPT 1500 terminal and the other
end to the external modem. Do not attempt to use other kinds of
cables, even if they appear to be similar.
2. Tap the
icon to open the Applications Launcher.
3. Tap the
icon to open the HotSync application.
4. Tap the
icon to dial the Palm Desktop modem and synchronize the applications
selected under Conduit Setup.
5. Wait for the HotSync operation to complete. If you have any problems conducting a
successful HotSync operation, see Troubleshooting on page 16-7.
Conducting HotSync Operation via a Network
When you use the Network HotSync software, you can take advantage of the LAN and WAN
connectivity available in many office environments. The Network HotSync software enables
you to perform a HotSync operation using a cradle that is connected to any PC on your LAN
or WAN (provided that the PC connected to the cradle also has the Network HotSync
software installed and your PC is on and the HotSync Manager is running).
The Network HotSync software is an optional component that you can download from the
Symbol website (http://www.symbol.com/palm). The files that you download also include a
setup program and documentation for this feature.
Creating a User Profile
If you need to configure a number of SPT 1500 terminals with specific information (such as
a company phone list) before distributing them to their actual users, you can create a User
Profile to load the data into a SPT 1500 terminal without associating that data with a user
name. The User Profile feature is designed only for the first-time HotSync operation, before
8-12
Applications: HotSync
you assign a User ID to a particular SPT 1500 terminal. See Using File Link on page 8-14 for
information about loading data after you assign a User ID.
To create a User Profile:
1. Open the Palm Desktop software.
2. Click Users from the Tools menu to open the Users dialog.
3. Click the Profiles button to open the Profiles dialog.
4. Click the New button to open the New Profile dialog.
5. Enter a name for the Profile and click the OK button to return to the Profiles dialog.
6. Repeat steps 3 and 4 for each Profile that you want to create, then click the OK
button to close the Profiles dialog and return to Palm Desktop.
7. Select the Profile from the User list and create the data for the Profile (e.g., company
phone list, etc.).
To use a Profile for the first-time HotSync operation:
8-13
SPT 1500 Product Reference Guide
1. Place the new SPT 1500 terminal in the cradle, and press the
button on the cradle
to open the Users dialog.
2. Click the Profiles button to open the Profiles dialog.
3. Choose the Profile that you want to load on the SPT 1500 terminal, and click the OK
button to open the following alert dialog:
4. Click the Yes button to transfer all the Profile data to the SPT 1500 terminal.
The next time you perform a HotSync operation, Palm Desktop will prompt you to assign a
User name to the SPT 1500 terminal.
Using File Link
The File Link feature enables you to synchronize the Address Book and Memo Pad
information on your SPT 1500 terminal with a separate external file such as a company
phone list. HotSync Manager stores the data in a separate category on your Palm Desktop
and your SPT 1500 terminal. You can configure the File Link feature to check for changes to
the external file when you perform a HotSync operation.
With File Link you can synchronize with data stored in any of the following formats:
Comma-separated (*.csv)
Memo Pad archive (*.mpa)
t
Address Book archive (*.aba)
t
Text (*.txt)
For information on how to set up a File Link, see the Palm Desktop Software online Help.
t
t
8-14
Chapter 9
Applications: Mail
Introduction
The Mail application enables you to manage your e-mail while away from your desk. The
key to Mail is that it truly synchronizes the mail in your desktop e-mail application with the
mail on your SPT 1500 terminal.
For example, if you delete messages from your Palm™ Mail, your next HotSync® operation
also deletes the messages from your desktop e-mail application — so you never have to delete
messages twice. Similarly, if you read a message on your SPT 1500 terminal and leave it in
your inbox, your next HotSync operation marks it as read on your desktop e-mail.
With Mail, you can:
t
t
t
t
Use your SPT 1500 terminal to send and/or retrieve e-mail messages from your
desktop e-mail application.
View, delete, file and/or reply to incoming mail.
Create outgoing messages as well as drafts of messages that you can complete later.
Create simple or complex filters, which allow you to decide the type of e-mail that
your SPT 1500 terminal retrieves from your desktop e-mail application.
Setting Up Mail on the Desktop
Before you use Mail for the first time, your desktop e-mail application should be up and
running. You must also set up the Palm™ Desktop software for use with your desktop e-mail
application.
9-1
SPT 1500 Product Reference Guide
Note: The following instructions assume that you have already installed
Palm Desktop software on your computer and that you did not set up
Mail during the installation. If you have not yet installed the Palm
Desktop software, the installation procedure will prompt you to set
up Mail as part of the Palm Desktop software installation.
To set up Mail:
1. Click Start on the Windows desktop to open the Start menu.
2. Point to Programs, point to Palm Desktop, and then click Palm Mail Setup to start
the setup procedure.
3. Follow the instructions on the screen to set up your SPT 1500 terminal for use with
your desktop e-mail application.
To select HotSync options:
1. Click the
icon in the Windows System Tray to open the HotSync menu.
2. Click Custom from the HotSync menu to open the Custom dialog.
Tip: You can also click Custom from the HotSync menu in Palm Desktop.
3. Click Mail in the Custom list box.
4. Click the Change button to open the Change HotSync Action dialog.
5. Click one of the following settings:
9-2
Applications: Mail
Synchronize
the files
Synchronizes the mail on your SPT 1500 terminal
and your desktop e-mail application.
Desktop
overwrites
handheld
Replaces the mail on your SPT 1500 terminal with
the mail in your desktop e-mail application. You
should use this option only if, for some reason, the
two inboxes get out of sync. This setting applies
for only one HotSync operation and then reverts
back to the default setting.
Do Nothing
Turns off communication between your SPT 1500
terminal and desktop e-mail application. This
setting applies for only one HotSync operation
and then reverts back to the default setting.
Set As Default Changes the default setting on an ongoing basis.
(When you first set up Mail, Synchronize the files
is the default setting.)
Tip: To turn off mail, select Do Nothing and then select the Set as Default check
box.
To change your Mail setup options:
1. Click the
icon in the Windows System Tray to open the HotSync menu.
2. Click Custom from the HotSync menu to open the Custom dialog.
Tip: You can also click Custom from the HotSync menu in Palm Desktop.
3. Click the Mail in the Conduit list to indicate that you want to change these settings.
4. Click the Change button to open the Change HotSync Action dialog for the Mail
conduit.
5. Modify your settings as needed.
6. Click the OK button to confirm your changes and close the Change HotSync Action
dialog.
Synchronizing Mail with your E-Mail Application
After you have enabled and configured Mail, you need to perform a HotSync operation to
synchronize Mail with your desktop e-mail application. For a complete explanation of how
to use the HotSync feature, see the Chapter 8, Applications: HotSync®.
9-3
SPT 1500 Product Reference Guide
Opening Mail on your SPT 1500 Terminal
1. Tap the
2. Tap the
icon to open the Applications Launcher.
icon to display the Message List screen.
Viewing Messages
The Message List lists your incoming messages, who sent them and the date they were
received. Messages you’ve read appear with a check next them and high-priority messages
appear in bold.
Previously read
Tap a message in the list to open it.
Header mode icons
Recipient
Subject
Sender
Time and date sent
Message body
Messages appear by default in the abbreviated mode. To switch from the abbreviated mode
to the full header mode, see Displaying Full Header Information on page 9-5.
To close a message, tap the Done button to close the message and return to the Message List.
9-4
Applications: Mail
Message Fonts
You can modify the way messages appear by changing the font (text) style. See Choosing
Fonts on page 2-20 for details.
Displaying Full Header Information
By default, Mail displays abbreviated header information. The abbreviated header displays
only the From and Subject fields. The full header provides complete information about the
sender, receiver and CC recipients, in addition to the subject and date the message was
created. Mail uses the header type you select for all your messages.
To display full header information:
1. Open a message.
2. Tap the Complete Header icon to display the full header.
Complete Header icon
Abbreviated Header icon
3. To redisplay the abbreviated header, tap the Abbreviated Header icon.
Creating Messages
You create messages with your SPT 1500 terminal the same way you create messages with
your desktop e-mail application: you identify the recipient(s) of the message, define a subject
and create the body of the message.
You create original messages and replies in the New Message screen. All messages must, at
the very least, contain information in the To and Subject fields.
To create a message:
1. Tap the New button in the Message List screen to display the New Message screen.
9-5
SPT 1500 Product Reference Guide
Tap New
Note: You can also display the New Message screen by tapping New from
the Message menu.
2. Use the stylus to write Graffiti® character strokes (or the on-screen keyboard) to enter
the e-mail address of the recipient. The cursor indicates where new text will appear.
Note: Enter the address as if you are entering it from your desktop e-mail
application. For example, network users sending a message to a user
on the same network do not need to add Internet information, such
as @3com.com.
3. To send a carbon copy of this message to additional recipients, tap in the CC field,
then enter the e-mail addresses of the additional recipients, separating the addresses
with a comma followed by a space.
4. Tap in the Subj field, then enter a subject for your message.
5. Tap in the Body field, then enter the body text.
9-6
Applications: Mail
Note: If the address, CC, subject or body of the message exceeds the
capacity of the screen display, tap the name of the field (for example,
“To”) to expand that field. Tap the Done button to return to the New
Message screen.
Tap the name of the field to open
Tap to return to New Message screen
To reply to a message:
1. Tap a message in the Message List to display it on the screen.
2. Tap the Reply button to open the Reply Options dialog.
3. Select who you want to receive the reply: only the Sender, All recipients and the
sender, or do you want to Forward the message to someone else.
4. Select whether you want to Include original text and Comment original text.
5. Tap OK to close the Reply Options dialog and display the New Message screen.
6. Enter your reply text.
9-7
SPT 1500 Product Reference Guide
Note: You have several message options including setting the priority. See
Adding Message Details on page 9-9 for details.
7. Tap Send to place your reply in the Outbox.
Looking Up an Address
To identify the recipient of a message, you need to enter that person’s e-mail address in the
appropriate field of the Message screen. You can do this either by entering the data directly
into the field or by using the Look Up command to access the information in your Address
Book.
To look up an address:
1.
2.
3.
4.
Tap either the To or CC field name to expand one of these fields.
Enter a few letters of the address you want to find.
Tap the Lookup button.
If the letters you enter identify a unique listing from your Address Book, your SPT
1500 terminal completes the address for you. If not, the Lookup dialog appears.
Note: You can also open the Look Up dialog in the New Message screen by
tapping Lookup from the Options menu or by using the Command
stroke /L.
Tap here
5. Enter the first letter of the entry you want to find to scroll to the first entry that begins
with that letter. If you write an additional letter, the list scrolls to the first entry that
9-8
Applications: Mail
starts with those two letters. For example, writing an “s” might scroll to “Sanders,”
and writing “sm” might scroll farther to “Smith.”
6. Tap an address to select it.
7. Tap the Add button to enter the address in the To or CC field.
Tap to select
Tap here to enter address in field
Adding Message Details
Before you send your message, you can attach additional attributes (called message details)
to your message, such as a signature block, or flagging the message as high-priority. These
features are dependent on the desktop e-mail application you use. If your e-mail application
does not support the message detail you select, your SPT 1500 terminal cannot attach that
attribute to your message.
The following message details are available:
Priority
Flags a message as high, normal or low priority.
BCC
Creates a blind carbon copy field in the New Message
screen.
Signature
Attaches previously defined text as a signature block.
See “Adding a Signature to Your Message” later in
this chapter for details.
Confirm Read Requests a confirmation telling you when the message
was read.
Confirm
Delivery
Requests a confirmation telling you when the message
was delivered.
9-9
SPT 1500 Product Reference Guide
Note: The Priority and BCC settings are valid only for the current message
and must be set with each subsequent message you create.
Setting a Priority
To set a priority for your message:
1. Tap the Details button in the New Message screen to open the Message Details
dialog.
Tap here
2. Tap the Priority pick list and select the priority you want.
Tap here
Tap to select priority
3. Tap the OK button to confirm your selection and return to the New Message screen.
Note: Your SPT 1500 terminal can flag messages with a specific priority only
if your desktop e-mail application supports this feature.
Sending a Blind Carbon Copy
To add a BCC field to your message:
9-10
Applications: Mail
1. Select the BCC check box in the Message Details dialog to add the BCC field to the
New Message screen.
2. Tap the OK button to confirm your selection and return to the New Message screen.
BCC field
3. Tap the BCC field and enter the address.
Adding a Signature to Your Message
Adding a signature to your message is a two-part process: first, you must create your
signature, then you must select the signature option from the Message Detail dialog.
To create a signature:
1. Tap the
icon to open the Mail menus.
2. Tap Preferences from the Options menu to open the Preferences dialog.
Add signature text
here
3. Tap in the Signature Text field and enter up to six lines of text.
4. Tap the OK button to confirm your selection and return to the previous screen.
To add a signature to your message:
9-11
SPT 1500 Product Reference Guide
1. Tap the Details button in the New Message screen to open the Message Details
dialog.
2. Select the Signature check box to add a signature to the end of your message.
3. Tap the OK button to confirm your selection and return to the New Message screen.
Note: The signature block does not display in your message; only your
recipient sees the signature block.
Requesting Confirmations
To receive a confirmation when your message is read:
1. Tap the Details button in the New Message screen to open the Message Details
dialog.
2. Select the Confirm Read check box to request a confirmation when the recipient
reads your message.
3. Tap the OK button to confirm your selection and return to the New Message screen.
To receive a confirmation when your message is delivered:
1. Tap the Details button in the New Message screen to open the Message Details
dialog.
2. Select the Confirm Delivery check box to request a confirmation that the recipient
received your message.
3. Tap the OK button to confirm your selection and return to the New Message screen.
Sending Messages
When you send messages from your SPT 1500 terminal, it stores them in the Outbox folder
until the next time you synchronize your SPT 1500 terminal with your computer. During
synchronization, all messages stored in the Outbox folder are transferred to the Outbox
folder in your desktop e-mail application. Messages created on your SPT 1500 terminal are
transmitted the next time you send mail from your desktop e-mail application.
After you create a message, tap the Send button in the New Message screen to send it.
Editing an Unsent Message
You can edit or make changes to a message that has not yet been sent, as long as you have
not yet performed a HotSync operation. When you edit a message, your SPT 1500 terminal
9-12
Applications: Mail
removes the message from the Outbox folder and takes you back to the New Message screen,
where you can edit the message and resend it, save it as a draft or cancel it.
To retrieve a message:
1. In the Message List screen, tap Outbox from the pick list in the upper-right corner
to display the messages contained in the Outbox.
Tap to display folder list
2. Tap the message you want to retrieve to display the message.
Tap here to
select
message
Tap to
modify
message
3. Tap the Edit button to remove the message from the Outbox folder and place it back
in the New Message screen.
Draft Messages
There are times when you may not want to immediately send a message you compose — for
example, you may want to add additional information before sending it. Your SPT 1500
terminal stores such messages in the Draft folder until you are ready to edit them. When you
edit a draft, it becomes a new message again.
9-13
SPT 1500 Product Reference Guide
Note: When you’re creating or editing a message, you can also save a
message as a draft by canceling it. When you cancel a message, SPT
1500 terminal opens a dialog asking if you want to save the message.
If you tap the Yes button, your SPT 1500 terminal saves a draft of
your message.
To save a message as a draft:
1. Create a message in the New Message screen.
2. Tap the
icon to open the Mail menus.
3. Tap Save Draft from the Message menu to move the message to the Draft folder.
To edit a message saved as a draft:
1. In the Message List screen, tap Draft from the pick list in the upper-right corner to
display a list of the messages in the Draft folder.
2. Tap the draft you want to display.
Tap here to
select
message
Tap to edit
draft in New
Message
screen
3. Tap the Edit button to move your draft to the New Message screen.
4. Enter your changes, then either save it again as a draft or tap the Send button to move
the message to your Outbox folder.
Filing a Message
Your SPT 1500 terminal can store any message you receive or create in the Filed folder. The
contents of this folder do not automatically synchronize with your desktop e-mail application
during a HotSync operation. However, your SPT 1500 terminal does store a back-up copy of
the Filed folder on your computer hard drive.
To file a message:
9-14
Applications: Mail
1.
2.
3.
4.
Open a message.
Tap the
icon to open the Mail menus.
Tap File from the Message menu to display the Message File Options dialog.
Tap No to save the message and move it to the Filed folder or tap Yes to file the
message and keep a copy in the Inbox.
To remove a message you created from the Filed folder:
1. In the Message List screen, tap Filed from the pick list in the upper-right corner to
display the contents of the Filed folder.
2. Tap the message you want to restore.
3. Tap the Edit button to display and modify the message.
Note: After you display and modify the message, you can send it, save it as
a draft, or return it to the Filed folder.
Deleting Messages
Your SPT 1500 terminal stores deleted message in the Deleted folder until you perform the
next HotSync operation. If you delete a message from SPT 1500 terminal, it is deleted on your
desktop e-mail application after you perform a HotSync operation.
To delete a message:
1. Open the message you want to delete.
2. Tap the Delete button.
3. If you selected the Preference option to confirm message deletion, tap the Yes button
to confirm that you want to delete the current message.
Removing a Message From the Deleted Folder
You can reverse the deletion of a message (by removing it from the Deleted folder) as long as
you have neither performed a HotSync operation nor purged the contents of the Deleted
folder.
To remove a message you received from the Deleted folder:
1. In the Message List screen, tap Deleted from the pick list in the upper-right corner to
display the contents of the Deleted folder.
2. Tap the message you want to restore.
9-15
SPT 1500 Product Reference Guide
3. Tap the Undelete button to move the selected message to the Inbox and mark it as
read.
To remove a message you created from the Deleted folder:
1. In the Message List screen, tap Deleted from the pick list in the upper-right corner to
display the contents of the Deleted folder.
2. Tap the message you want to restore.
3. Tap the Edit button to display and modify the message.
Note: After you display and modify the message, you can send it or save it
as a draft.
Purging Deleted Messages
Because your SPT 1500 terminal stores deleted messages in the Deleted folder until you
perform a HotSync operation, deleted messages can monopolize storage space. To avoid or
correct this problem, you can purge the contents of your Deleted folder. Messages that you
purge are still deleted from your desktop e-mail application during the next HotSync
operation.
To purge the contents of the Deleted folder:
1. Tap the
icon to open the Mail menus.
2. Tap Purge Deleted from the Message menu.
3. When your SPT 1500 terminal displays the Purge Deleted Messages alert, tap the Yes
button to confirm that you want to purge the contents of the Deleted folder.
Note: You cannot restore messages after you purge them.
Message List Options
Message List Options enable you to manage the way the Message List displays information.
Folders
Your SPT 1500 terminal provides five different folders, each pertaining to a particular mail
category. The Message List displays the messages in the folder you select. Folders provide an
efficient way to manage the mail you send and receive.
To select a folder:
9-16
Applications: Mail
1. Tap the pick list in the upper-right corner to open the following list of folders:
Inbox
Contains the mail from your desktop e-mail application
Inbox, minus any that you have excluded using filtering
options. See Creating Special Filters on page 9-21 for
details.
Outbox
Contains the mail you created and sent on the SPT 1500
terminal since the last HotSync operation.
Deleted
Contains the messages you deleted since the last HotSync
operation.
Filed
Contains the messages you want to store on the SPT
1500 terminal.
Draft
Contains the messages you created using the SPT 1500
terminal but are not yet ready to send.
2. Tap to select the folder you want to display in the Message List screen.
Date Column
The Date Column is optional in the Message List. By default, the Date Column is hidden to
increase the available screen space.
To show the Date Column:
1. Tap the Show button in the Message List to open the Show Options dialog.
Tap Show
2. Select the Show Date check box to show the Date Column.
3. Tap OK to close the Show Options dialog and return to the Message List.
9-17
SPT 1500 Product Reference Guide
Sorting the Message List
You can sort the Message List by the date it was sent, by the sender or by the subject.
Note: High-priority messages always appear first, no matter how you sort
your message list.
To sort the Message List:
1. Tap the Show button in the Message List to open the Show Options dialog.
2. Tap the Sort by pick list and select one of the following options:
Date
Sorts messages by date and displays the most recent
message at the top of the screen.
Sender
Sorts messages by the sender’s user name and
displays them in ascending alphabetical order —
based on the first word of the sender field.
Subject
Sorts messages by the subject and displays them in
ascending alphabetical order — based on the first
word of the subject field.
3. Tap OK to close the Show Options dialog and return to the Message List.
HotSync Options
HotSync Options enable you manage your e-mail more effectively by selecting which
messages download when you synchronize your computer and your SPT 1500 terminal. You
can define different settings for local and remote synchronization. For example, you may
want to download all of your messages during local synchronization and only urgent
messages during remote synchronization. Once defined, your SPT 1500 terminal determines
if synchronization is occurring locally or remotely and uses the appropriate HotSync Options
settings.
To activate the HotSync Options dialog:
1. Tap the
icon to open the Mail menus.
2. Tap HotSync Options from the Options menu to open the HotSync Options dialog.
3. Tap the Settings for pick list and select Local HotSync or Remote HotSync.
9-18
Applications: Mail
Tap here to
display
HotSync
options
Note: For more information about Local and Remote HotSync operations,
see the “HotSync” chapter.
4. Tap the filtering option you want to apply. The following filtering options are
available:
9-19
SPT 1500 Product Reference Guide
All
During synchronization, all of the messages in your
desktop e-mail Inbox synchronize with your SPT
1500 terminal and all messages in your SPT 1500
terminal Outbox are sent to your desktop e-mail
application.
Send Only
During synchronization, only the messages in your
SPT 1500 terminal Outbox are sent to your desktop
e-mail application where they are sent to their final
destination.
Filter
During synchronization, all messages in your SPT
1500 terminal Outbox are sent to your desktop email application, and messages in your desktop email Inbox that meet specific criteria download to
your SPT 1500 terminal. When you select the Filter
setting, the HotSync Options dialog opens and
displays additional filter settings. See Creating
Special Filters on page 9-21 for details.
Unread
During synchronization, only unread messages
download to your SPT 1500 terminal from your
desktop e-mail Inbox, and all messages in your Palm
Outbox are sent to your desktop e-mail application.
Note: The All setting does not mean that all information included in each
message downloads to your SPT 1500 terminal. Truncation settings
(explained in a following section) for long messages still apply. Also,
Mail never downloads any attachments to your SPT 1500 terminal.
The message and any text information appear, but the attachment is
left in your desktop e-mail application.
5. If you selected All, Send Only or Unread, tap the OK button to confirm your
selection and close the HotSync Options dialog. If you selected Filter, continue to the
next section.
9-20
Applications: Mail
Creating Special Filters
You can create special filters to control the type of messages that download to your SPT 1500
terminal during synchronization. Special filters work on the premise of ignoring or retrieving
messages that contain specific information in their header fields.
To create a special filter, you must decide whether you want to ignore or retrieve certain
messages. Then, based on that decision, you must tell your SPT 1500 terminal what it needs
to look for in the To, From, and Subject header fields to single out those messages.
Tap the Filter box in the HotSync Options dialog to display the filter settings.
Tap here to
display Filter
options
Ignoring or Receiving Messages
The first step in establishing a special filter is to determine whether you want to ignore or
retrieve messages that match the information you specify.
To define whether to ignore or receive messages, tap the pick list in the center of the HotSync
Options dialog and select one of the following settings:
9-21
SPT 1500 Product Reference Guide
Tap here
Select Filter option
Ignore
Messages
Containing
Tells your SPT 1500 terminal to exclude the
messages that meet the defined criteria and
download all other messages during
synchronization. In general, this filter
downloads more mail during synchronization
because it blocks only one defined subset of
mail.
Retrieve Only Tells your SPT 1500 terminal to include only
Messages
the messages that meet the defined criteria
Containing
and to ignore all other messages during
synchronization. This filter has the potential
to block more mail during synchronization
because it downloads only one subset of mail.
Defining Filter Strings
Messages are filtered based on the information contained in their To, From and Subject
header fields. The information that defines what your SPT 1500 terminal is looking for is
called a filter string. You create a filter string by listing the words you want your SPT 1500
terminal to find and separating them with either a comma or a space. Each word in the filter
string is joined by an implicit OR; because of this, you should not enter connecting words
such as AND or OR.
To create a more complex filter, you can define filter strings for the To, From and Subject fields
simultaneously. Your SPT 1500 terminal joins the filter strings for these fields using an
implicit AND. Once again, you should not add connecting words. Your SPT 1500 terminal
does that for you.
9-22
Applications: Mail
For example, suppose you want to receive only messages from John Smith ([email protected])
or Jack Jones ([email protected]) concerning the Apollo Project. You would create the
following filter strings:
To field filter string: [email protected], [email protected]
Subject field filter string: Apollo Project
Your SPT 1500 terminal interprets this as, “Accept messages about the Apollo Project from
John Smith or Jack Jones. Do not accept messages from other people. Do not accept messages
from John or Jack about any other subject.”
When you define a string, note that your SPT 1500 terminal searches for any instance of that
collection of characters. For example, if you create a filter that retrieves only messages
containing the string “info,” your SPT 1500 terminal considers “info,” “rainforest” and
“kinfolk” appropriate matches.
To define filter strings:
1. Tap a header field in the HotSync Options dialog.
Tap here to
insert
cursor
2. Enter your filter string for the selected header field using commas or spaces to
separate the words. Do not add connecting words, such as AND or OR, between
words in a string.
3. If your string exceeds the length of the field, tap the name of the field to display the
Notes screen for that header field. For more information about header field Notes
screens, see Creating Messages on page 9-5.
9-23
SPT 1500 Product Reference Guide
Enter
filter data
Tap here
Tap Done to
return to
HotSync
Options
4. Tap the Done button to return to the HotSync Options dialog.
5. Tap the OK button to confirm your filter strings and close the HotSync Options
dialog.
High-Priority Messages
The Retrieve All High Priority setting lets you retrieve messages marked high-priority, even
if those messages would have been blocked by a defined filter.
To retrieve high-priority messages:
1. Tap the Filter box in the HotSync Options dialog to display additional filter options.
2. Select the Retrieve All High Priority check box to retrieve all messages marked highpriority.
Tap
check
box
3. Tap OK to confirm your selection and close the HotSync Options dialog.
Note: This setting is applicable only if your e-mail application has the
capacity to flag high-priority messages.
9-24
Applications: Mail
Truncating Messages
The Truncate feature lets you set a point at which long messages truncate when downloading
to your SPT 1500 terminal. By default, this Truncate value is 4000 characters. By truncating
long messages, you reduce the time it takes to synchronize your desktop e-mail and Palm Mail
as well as the amount of storage space e-mail uses on your SPT 1500 terminal.
Note: Truncation is separate and independent from filtering.
To truncate messages:
1. Tap the Truncate button in the HotSync Options dialog to open the Truncate
Options dialog.
Tap to
select
maximum
length
Tap
Truncate
2. Tap to select the truncation setting you want. The values range from 250 characters
to 8000 characters.
Tip: If you select a low truncation value, you will have more room on your SPT
1500 terminal to store messages.
3. Tap OK to confirm your selection and return to the HotSync Options dialog.
Mail Menu Commands
The Mail application includes menu commands to make it fast and easy to perform common
file and editing tasks. This section explains the menu commands that are specific to the Mail
application.
See Using Menus on page 2-17 for information about menu commands that are common to
all of your SPT 1500 terminal applications.
9-25
SPT 1500 Product Reference Guide
Message Menu
The Message menu varies based on whether you are viewing a message, creating a message
or viewing the Message List.
Message Menu
when viewing
Message List
Message Menu
when creating a
New Message
Message Menu when
Viewing a Message
9-26
Applications: Mail
New
Displays the Create Message screen, where you can
create a new e-mail message.
Save Draft Saves the current message as a draft and moves it to the
Draft folder. Your SPT 1500 terminal stores Draft
messages until you send or delete them.
File
Moves the current message to the Filed folder. Your SPT
1500 terminal stores Filed messages until you delete
them.
Send
Moves the current message to the Outbox folder. Your
SPT 1500 terminal stores all sent messages in the
Outbox folder until you perform a HotSync operation.
Delete
Moves the current message to the Deleted folder. Your
SPT 1500 terminal stores deleted messages in the
Deleted folder until you perform a HotSync operation,
at which time it permanently removes deleted messages.
Purge
Deleted
Enables you to empty (purge) the contents of the Deleted
folder. Your SPT 1500 terminal stores deleted messages
in the Deleted folder until you perform a HotSync
operation. By purging deleted messages, you free up
storage space on your SPT 1500 terminal before your
next HotSync operation.
Note: The Purge Deleted command displays an alert,
prompting you to confirm that you want to purge
all messages from the Deleted folder. If you tap
Yes, all deleted messages are purged from the
memory of your SPT 1500 terminal.
Important: Messages that you purge are deleted from
your desktop e-mail application during the
next HotSync operation.
Options Menu
When you select the Options menu, its menu commands vary depending on whether you are
creating or editing a message.
9-27
SPT 1500 Product Reference Guide
Message List
New Message
Font
Enables you to adjust the size of the text on the
screen. This can make it easier to read the text or to
fit more text in the display area.
Preferences
Enables you to define a specific string of text as a
signature and to select whether or not your SPT
1500 terminal displays an alert when you delete a
message.
HotSync
Options
Opens a dialog, where you can select different ways
to filter messages synchronized between your
desktop e-mail application and your SPT 1500
terminal. You can create simple or complex filters to
control the type of messages downloaded to your
SPT 1500 terminal. In addition, you can define
separate settings for local and remote
synchronizations.
Look Up
Opens a dialog, which contains the Address List
from your Address Book. By tapping a selection,
you enter that address into the To field of any
message you are creating.
Note:The Look Up command is available only when
you are creating a message.
About Mail
Shows version (revision) information for the Mail
application.
9-28
Chapter 10
Applications: Memo Pad
Introduction
The Memo Pad provides a place to take notes that are not associated with Date Book,
Address Book or To Do items.
With the Memo Pad, you can:
Take notes or write any kind of message on your SPT 1500 terminal.
t
Drag and drop memos into popular computer applications like Microsoft Word,
when you synchronize using Palm™ Desktop software and HotSync® technology.
t
Assign categories for memos. This enables you to quickly view just your businessrelated memos, personal memos or any other category that you define.
t
Quickly jot down phone numbers and other types of information. Later, you can
copy and paste this information to other applications.
To open the Memo Pad, press the Memo Pad button on the front panel of the SPT 1500
terminal to display the Memo List screen.
t
10-1
N
LC
U L AT
O
3
ab
c
M E NU
R
C AT I O
12
LI
CA
AP
P
S
SPT 1500 Product Reference Guide
F IND
Memo Pad button
Working With Memos
A memo is where you enter, review and modify the individual Memo Pad entries. A memo
can contain up to 4,000 characters; the number of memos you can store is dependent only on
the memory available on your SPT 1500 terminal.
To create a new memo:
1. Open the Memo Pad application.
2. Tap the New button to create a new memo.
Tap New
Note: In the Memo List screen, you can also begin writing in
the Graffiti® writing area to create a new memo. The first letter is
automatically capitalized and begins your new memo.
3. Enter the text you want to appear in the memo. Use the carriage return stroke to
move down to new lines in the memo.
4. After you finish, tap the Done button to return to the Memo List screen.
10-2
Applications: Memo Pad
Reviewing Memos
Each time you create a memo, the first line of the memo appears in the Memo List screen.
This makes it easy to locate and review your memos.
To review the contents of a memo:
1. Tap the text of the memo that appears in the Memo List screen to display the memo
on the screen.
Tap a memo
to review
its contents
2. Review or edit the text in the memo.
3. Tap the Done button to save your changes to the memo and return to the Memo List
screen.
Arranging Memos
The Memo Preferences dialog enables you to sort your memos alphabetically or in any order
that you want.
To select a sort option:
1. In the Memo List screen, tap the
icon to open the Memo Pad menus.
2. Tap Preferences from the Options menu to open the Memo Preferences dialog.
3. Tap the Sort by pick list and choose Manual or Alphabetic.
4. Tap the OK button to close the Memo Preferences dialog and activate your setting.
10-3
SPT 1500 Product Reference Guide
Manually arranging the Memo List
If you choose the Manual option for the Sort by setting, you can manually rearrange the order
of the memos in the Memo List screen. When you rearrange your memos, your SPT 1500
terminal renumbers all the memos to reflect the new order.
Note: The Manual setting of the Memo Preferences is not transferred to
Palm Desktop. If you choose to display your memos alphabetically on
Palm Desktop and then perform a HotSync operation, the
arrangement of the memos on the SPT 1500 terminal will still be in
the order defined in the Memo Preferences setting.
To rearrange the order of your memos:
1. Select the Manual option in the Preferences dialog as described in the previous
procedure.
2. In the Memo List screen, tap and drag the memo to a new location in the list. When
you lift the stylus from the SPT 1500 terminal screen, the memo appears in its new
location.
Choosing a Memo Category
Categories are used to file individual memos items into groups for easy review. You can assign
and edit categories by using the Categories pick list (in the upper-right corner of the screen)
or the Details dialog. See Using Categories on page 2-21 for a complete description of
categories.
Marking a Private Memo
You can designate a specific memo as “private.” When you activate the Security features,
your SPT 1500 terminal hides all private entries and you must enter a password to display
them on the screen.
To mark a memo as private:
1. Tap the memo you want to mark as private to display it on the screen.
2. Tap the Details button to open the Memo Details dialog for that memo.
10-4
Applications: Memo Pad
3. Select the Private check box.
4. Tap the OK button to close the Memo Details dialog and return to the memo screen.
Deleting a Memo
There are three ways to delete a memo: simply delete the text of the memo, use the Menu
Command (as described in the Record Menu on page 10-5) or use the Memo Details dialog.
To delete a memo with the Memo Details dialog:
1.
2.
3.
4.
Tap the memo that you want to delete to display it on the screen.
Tap the Details button to open the Memo Details dialog.
Tap the Delete button to open the Delete Memo alert.
Tap the OK button to confirm that you want to delete the current memo.
Memo Pad Menu Commands
The Memo Pad includes menu commands to make it fast and easy to perform common file
and editing tasks. See Using Menus on page 2-17 for information about menu commands that
are common to all SPT 1500 terminal applications.
Record Menu
When you select the Record menu, its commands appear on screen.
Memo List
Memo screen
10-5
SPT 1500 Product Reference Guide
New Memo
Creates a new memo.
Delete Memo
Opens an alert dialog, prompting you to confirm
that you want to delete the current memo. Tap
the OK button to delete the memo from your
SPT 1500 terminal, or tap the Cancel button to
close the alert dialog and keep the memo.
Note:By default your SPT 1500 terminal
removes the memo from the Memo List,
but retains a copy of the memo and
transfers it to an archive file on your
computer the next time you perform a
HotSync operation. To remove the memo
completely, clear the Save archive copy on
PC check box.
Beam Memo
Beams the current memo to another SPT 1500
terminal through the IR port.
Beam Category
Beams all memos in the current category to
another terminal through the IR port.
Options Menu
When you select the Options menu, its commands appear on screen.
Memo List
Memo Screen
Font
Opens the Select Font dialog where you can
choose a different font (text) style for your
Memo Pad entries. See Choosing Fonts on page
2-20 for details.
Go to Top of Page Moves to the top (first) line of the memo.
10-6
Applications: Memo Pad
Go to Bottom of Moves to the bottom (last) line of the memo.
Page
Phone Lookup
Activates the Phone Lookup feature, which is
described in Using Phone Lookup on page 3-2.
Preferences
Activates the Memo Preferences dialog and
enables you to define the sort order for your
memos.
About Memo Pad Shows version (revision) information for the
Memo Pad application.
10-7
SPT 1500 Product Reference Guide
10-8
Chapter 11
Applications: Preferences
Introduction
The Preferences screens enable you to customize the configuration options on your SPT 1500
terminal.
With the Preferences screens, you can:
t
t
t
t
t
t
t
t
Set the current date and time, the auto shut-off interval, and the system, alarm and
game sounds.
Set the display format for dates, times and numbers.
Configure your SPT 1500 terminal for use with a modem.
Assign your name, phone number and other owner information to your SPT 1500
terminal.
Assign different applications to the buttons on the front panel of your SPT 1500
terminal.
Define a list of Graffiti® abbreviations.
Calibrate the screen on your SPT 1500 terminal.
Configure your SPT 1500 terminal for use with a network.
To open the Preferences screens:
1. Tap the
icon in the Graffiti area to open the Applications Launcher.
2. Tap the
icon to display the last Preferences screen you used.
3. Tap the pick list in the upper-right corner to select the Preferences screen you want
to view.
11-1
SPT 1500 Product Reference Guide
Buttons Preferences
The Buttons Preferences screen enables you to associate different applications with the
buttons on the front of the SPT 1500 terminal.
For example, if you find that you seldom use the To Do List application and often use the
Expense application, you can assign the To Do List button to start the Expense application.
Any changes you make in the Buttons Preferences screen become effective immediately; you
do not have to change to a different screen or application.
If you assign a different application to a button, you can still access the original application
using the Applications Launcher. See Selecting Applications on page 2-1.
To change the Buttons Preferences:
1. Tap the pick list next to the button you want to assign in the Buttons Preferences
screen to display a list of all the applications installed on your SPT 1500 terminal.
Tap arrow to show
pick list
2. Tap the application that you want to assign to the button.
Note: To restore all of the buttons to their factory settings, tap the Default
button.
Pen Preferences
The Buttons Preferences screen enables you to change the Button assignment of the full-screen
pen stroke. By default, the full-screen pen stroke activates the Graffiti Help dialog.
11-2
Applications: Preferences
Drag to top of screen
To change the Pen preferences:
1. Tap the Pen button in the Buttons Preferences screen to open the Pen dialog.
2. Tap the pick list and select one of the following settings for the full-screen pen stroke:
Backlight
Activates the backlight feature of the PalmPilot™
Personal, PalmPilot Professional Edition and
SPT 1500 terminal. You can use this setting
instead of the power button to turn the backlight
on and off.
Keyboard
Activates the on-screen keyboard for entering
text characters.
Graffiti Help
Activates a series of screens that show the
complete Graffiti pen stroke character set.
11-3
SPT 1500 Product Reference Guide
Turn Off & Lock Turns off and locks the SPT 1500 terminal. You
must assign a password to lock the SPT 1500
terminal. When locked, you need to enter the
password to use your SPT 1500 terminal.
Beam Data
Beams the current entry to another terminal.
3. Tap the OK button to complete your selection and return to the Buttons Preferences
screen.
HotSync Buttons Preferences
¨
The Buttons Preferences screen also enables you to associate different applications with the
HotSync button on the SPT 1500 terminal cradle and the HotSync button on the optional
PalmPilot Modem.
Any changes that you make in the HotSync Buttons dialog become effective immediately; you
do not have to change to a different screen or application.
To change the HotSync Buttons preferences:
1. Tap the HotSync button in the Buttons Preferences screen to open the HotSync
Buttons dialog.
2. Tap the pick list next to the button you want to assign to display a list of all the
applications installed on your SPT 1500 terminal.
Tap arrow to
show pick list
3. Tap the application that you want to assign to each button. The default setting for
each button is the HotSync setting, which means the cradle and optional PalmPilot
Modem perform their normal HotSync functions.
11-4
Applications: Preferences
Digitizer Preferences
The Digitizer Preferences screen activates the digitizer calibration screen. This is the same
screen that appears when you start your SPT 1500 terminal for the first time. A complete
description of how to use the digitizer calibration screen appears in Calibrating the Screen on
page 1-6.
Formats Preferences
Use the Formats Preferences screen to set the display format of the dates, times and numbers
on your SPT 1500 terminal.
Country Default
The country default sets date, time, week start day, and number conventions based on
geographic regions where you might use your SPT 1500 terminal. For example, in the United
Kingdom, time often is expressed based on a 24-hour clock. In the United States it is based
on a 12-hour clock with an AM or PM suffix.
All your SPT 1500 terminal applications use the Country default settings. You can, however,
customize your own preferences as described in Time, Date, Week Start and Numbers
Formats on page 11-6.
To set the country default:
1. Tap the country name in the Formats Preferences screen to open the Country pick
list.
2. Tap the setting you want to use.
11-5
SPT 1500 Product Reference Guide
Time, Date, Week Start and Numbers Formats
The Time setting defines the format for the time of day. The time format that you select
appears in all applications on your SPT 1500 terminal.
To select the Time, Date, Week start and Numbers format:
1. Tap the Time pick list in the Formats Preferences screen, and select the format that
you want for your SPT 1500 terminal.
2. Tap the Date pick list and select the format that you want for your SPT 1500
terminal.
3. Tap the Week starts pick list and select whether you want the first day of the week
to be either Sunday or Monday.
Note: This setting controls the Day, Week and Month views in the Date
Book application and all other aspects of your SPT 1500 terminal that
display a calendar.
4. Tap the Numbers pick list and select the format that you want for your SPT 1500
terminal.
General Preferences
The General Preferences screen is where you set the time, date, auto shut-off interval and
sounds for your SPT 1500 terminal.
Setting the Current Time
Use the Set Time button in the General Preferences screen to set the current time for your SPT
1500 terminal.
To set the current time:
1. Tap the time in the General Preferences screen to open the Set Time dialog.
11-6
Applications: Preferences
Tap here
2. Tap the up or down arrows to change the number for the hour.
3. Tap the minutes numbers, and then tap the arrows to adjust the settings for the
current time.
4. Tap the AM or PM box to select the time of day.
Note: Your SPT 1500 terminal can also display time based on a 24-hour
clock. See the Formats Preferences on page 11-5.
5. Tap the OK button to close the Set Time dialog and return to the General Preferences
screen.
Setting the Current Date
Use the Set Date button in the General Preferences screen to set the current date for your SPT
1500 terminal.
To set the current date:
1. Tap the date in the General Preferences screen to open the Set Date dialog.
2. Tap the arrows at the top to select the current year.
11-7
SPT 1500 Product Reference Guide
Tap arrows to select year
Tap to select month
Tap to select date
3. Tap a month box to select the current month.
4. Tap the current date to set the date, close the Set Date dialog and return to the
General Preferences screen.
Auto-Off Delay
Your SPT 1500 terminal has an automatic shutoff feature that turns off the power and
backlight after a period of inactivity. This feature helps conserve battery power in case you
forget to turn off your SPT 1500 terminal.
If you find that your SPT 1500 terminal shuts itself off before you finish reviewing the
information on the screen, you should increase the time setting of the automatic shutoff
feature.
To set the Auto-off delay:
1. Tap the Auto-off after setting in the General Preferences screen to open the pick list.
2. Tap the setting you want to use for the automatic shutoff feature. You can choose a
delay of 1 minute, 2 minutes or 3 minutes.
System, Alarm and Game Sounds
Your SPT 1500 terminal uses a variety of sounds. The System, Alarm and Game Sound
settings enable you to turn the sounds on or off, and to adjust the volume level.
To set the system and alarm sounds:
1. Tap the System Sound pick list in the General Preferences screen and select the sound
level.
11-8
Applications: Preferences
Note: When you turn off the System Sounds, you also turn off the “chime”
tones associated with the HotSync operation.
2. Tap the Alarm Sound pick list and select the sound level.
3. Tap the Game Sound pick list and select the sound level.
Note: The Game Sound setting works only with games that are programmed
to respond to this setting. Older games typically do not respond to
this setting.
Modem Preferences
The Modem Preferences screen enables you to define the settings for a modem directly
connected to the SPT 1500 terminal. These settings are for Palm applications that activate
and use a modem.
To define the Modem Preferences:
1. Tap the Touch Tone or Rotary box in the Modem Preferences screen.
Note: Select the Rotary setting only if you are certain that your telephone
service does not support Touch Tone dialing.
2. Tap the Modem pick list and select the type of modem connected to your SPT 1500
terminal.
11-9
SPT 1500 Product Reference Guide
Note: If the modem connected to your SPT 1500 terminal is not on the list,
choose Hayes Basic. In most cases, the Hayes Basic settings are close
enough for the SPT 1500 terminal to function correctly.
3. Tap the Speed pick list and select the maximum speed for the modem you selected in
step 2.
4. Tap the Speaker pick list and select the speaker volume that you want for the modem.
5. Tap the Flow Ctl (Flow Control) pick list and select either Automatic, On (Xon) or
Off (Xoff) flow control for the modem connection.
6. If necessary, edit the String text to change the modem setup string.
Network Preferences and Palm TCP/IP Software
The Network Preferences settings enable you to use the Palm TCP/IP software that comes
with your SPT 1500 terminal operating system. You can use the TCP/IP software to connect
with Internet Service Providers (ISPs) or dial-in (remote access) servers. Because the TCP/IP
software is a feature of the operating system, you configure all parameters relating to it from
the Preferences application.
To use Palm TCP/IP, you must configure both the Modem Preferences and the Network
Preferences settings.
Note: Modem Preferences settings enable your SPT 1500 terminal to use an
external modem (such as the PalmPilot Modem) to communicate with
remote devices. For example, you can communicate with your
computer if you are away on travel or your ISP server. See Modem
Preferences on page 11-9 for a complete explanation on how to
configure modem parameters.
After you configure both the Network and Modem Preferences, you can establish a PPP
(Point-to-Point Protocol), SLIP (Serial Line Internet Protocol) or CSLIP (Compressed Serial
Line Internet Protocol) connection with your ISP or dial-in server. You can do this either by
using menu commands from the Network Preferences screen or by using a third-party
application.
11-10
Applications: Preferences
Note: Palm TCP/IP provides the ability to connect to your ISP or dial-in
server, however, it does not come with any applications to view the
transmitted data. Visit the Symbol website (http://www.symbol.com/
palm) for information on third-party applications that take advantage
of TCP/IP.
Selecting a Service
Use the Service setting to choose the service template for your Internet Service Provider or a
dial-in server. Service templates are a set of ISP and dial-in server configuration settings that
you can create, save and reuse.
To select a service:
1. Tap the Service pick list in the Network Preference screen to display a listing of all
the predefined service templates.
Tap here to display a list
of service templates
2. Tap the service you want to use.
Entering a User Name
The User Name setting identifies the name you use when you log into your Internet Service
Provider or your dial-in server. Although this field can contain multiple lines of text, only two
lines appear on the screen.
To enter a user name:
1. Tap the User Name line in the Network Preferences screen to move the cursor to that
field.
2. Enter your user name.
11-11
SPT 1500 Product Reference Guide
Enter your user name
here
Note: Most dial-in servers do not accept spaces in the user name.
Entering a Password
The Password field identifies the password you use to log into your server or ISP. Your entry
in this field determines whether your SPT 1500 terminal prompts you to enter a password
each time you log into your network.
If you do not enter a password, your SPT 1500 terminal displays the word “Prompt” in this
field and asks you to enter a password during the login procedure. If you enter a password,
your SPT 1500 terminal displays the word “Assigned” in this field and does not prompt you
to enter a password during the login procedure.
Note: If you are concerned about security, select the Prompt option and do
not enter a password.
To enter a password:
1. Tap the Password box in the Network Preferences screen to open the Password
dialog.
11-12
Applications: Preferences
Enter password here
Tap here
2. Enter the password you use to log into your server.
3. Tap OK to confirm your entry and return to the Network Preferences screen.
Note: The Password field updates to display the word “Assigned.”
Adding Telephone Settings
When you select the Phone field, your SPT 1500 terminal opens a dialog where you define the
telephone number you use to connect with your ISP or dial-in server. In addition, you use this
dialog to define a prefix, disable Call Waiting and give special instructions for using a calling
card.
Note: The phone setup dialog works correctly for AT&T and Sprint longdistance services. However, because MCI works differently, MCI
customers need to put the calling card number in the Phone field and
the phone number in the Calling Card field.
To enter your server phone number:
1. Tap the Phone field to open the Phone Setup dialog.
11-13
SPT 1500 Product Reference Guide
Enter your ISP phone number
here
2. Enter the phone number you use to reach your ISP or dial-in server.
3. If you need to enter a prefix or disable Call Waiting, skip to those procedures. If not,
tap OK to confirm your selection and return to the Network Preferences screen.
Entering a prefix
A prefix is a number that you dial before the telephone number to access an outside line. For
example, many offices require that you dial “9” to dial a number outside the building.
To enter a prefix:
1. Select the Dial Prefix check box to activate this feature.
Select this box
if you need to
use a prefix
Enter your
prefix here
2. Enter the prefix you need on the Prefix line.
3. Tap OK to confirm your selection and return to the Network Preferences screen.
Disabling Call Waiting
Call Waiting can cause your session to terminate if you receive a call while you are connected.
If your telephone has Call Waiting, you need to disable this feature before logging into your
ISP or dial-in server.
11-14
Applications: Preferences
To disable Call Waiting:
1. Select the Disable call waiting check box to activate this feature.
Select this box
if you need to
disable Call
Waiting
Enter your disable code
here
2. Enter the code to disable Call Waiting on the Disable call waiting line.
Note: Each telephone company assigns a code to disable Call Waiting.
Contact your local telephone company for the code that is
appropriate for you.
3. Tap OK to confirm your selection and return to the Network Preferences screen.
Using a Calling Card
The Use Calling Card field enables you to use your calling card when dialing your ISP or
Intranet server. Keep in mind that there is usually a delay before you enter your calling card
number. When you define your calling card number, you need to add commas at the
beginning to compensate for this delay. Each comma delays transmission of your calling card
number for two seconds.
To use a calling card:
1. Select the Use Calling Card check box to activate this feature.
11-15
SPT 1500 Product Reference Guide
Select this box
to use a calling
card
Enter your
calling card
number here
2. Enter your calling card number on the Use Calling Card line.
Note: It’s a good idea to add at least three commas at the beginning of your
calling card number to compensate for the cue delay.
3. Tap OK to confirm your selection and return to the Network Preferences screen.
Connecting to your Service
After you set your Modem and Network Preferences, establishing a connection to your ISP
or dial-in server is easy.
Remember that you need a third-party application, such as a web browser or news reader, to
take advantage of this connection. Check the Symbol website (http://www.symbol.com/palm)
for the latest information about third-party applications that support Palm TCP/IP.
To establish a connection, tap the Connect button in the Network Preferences screen to dial
the current service and display the Service Connection Progress messages.
Tip:
To see expanded Service Connection Progress messages, press the lower half
of the Scroll button.
To close a connection, tap the Disconnect button in the Network Preferences screen to
terminate the connection between your SPT 1500 terminal and your service.
Creating Additional Service Templates
You can create additional service templates from scratch or by duplicating existing templates
and editing information. After you create a new or duplicate template, you can add and edit
settings.
To add a new service template:
11-16
Applications: Preferences
1. Tap the
icon in the Network Preferences screen to open the menus.
2. Tap New from the Service menu to create a new service template (called Untitled) to
the Service pick list and display it in the Network Preferences screen.
To duplicate an existing service template:
1. Tap the Service pick list in the Network Preference screen to open a list of all the
predefined service templates.
2. Tap the service you want to duplicate.
3. Tap the
icon to open the Network Preferences menus.
4. Tap Duplicate from the Service menu to add a copy of the service template to the
Service pick list and display it in the Network Preferences screen.
Adding Detailed Information to a Service Template
If you are using one of the predefined service templates, you will probably only need to enter
your user name and telephone number. If you are creating a new Service Templates, you may
need to provide additional information to your ISP or dial-in server. You use the Details
dialog to add additional information to a selected service template.
To select a connection type:
1. Tap the service you want to use in the Network Preferences screen.
2. Tap the Details button to open the Details dialog.
Select connection type
3. Tap the Connection type pick list and select one of the following connection types:
PPP
Point-to-Point protocol
SLIP
Serial Line Internet Protocol
11-17
SPT 1500 Product Reference Guide
CSLIP
Compressed Serial Line Internet Protocol
Note: If you are not sure, try PPP; if that doesn’t work, ask your Internet
Service Provider or your System Administrator for the correct
connection type.
Idle Timeout
The Idle Timeout setting defines how long your SPT 1500 terminal waits before dropping the
connection with your ISP or dial-in server when you switch out of a TCP/IP application.
To set the Idle Timeout:
1. Tap the Idle Timeout pick list and select one of the following options:
Immediate
Your SPT 1500 terminal drops the
connection to your ISP immediately when
you switch to another application.
1 minute
Your SPT 1500 terminal waits one minute
for you to open another application before it
drops the connection.
2 minutes
Your SPT 1500 terminal waits two minutes
for you to open another application before it
drops the connection.
3 minutes
Your SPT 1500 terminal waits three minutes
for you to open another application before it
drops the connection.
Power Off
Your SPT 1500 terminal keeps your PPP or
SLIP connection until you power off your
SPT 1500 terminal (or until it times out).
This option works best with the PalmPilot
Modem.
2. Tap the OK button to confirm your selection and return to the Network Preferences
screen.
11-18
Applications: Preferences
Defining Primary and Secondary DNS
The Domain Naming System (DNS) is a mechanism in the Internet for translating names of
host computers into IP addresses. When you enter a DNS number (or IP address), you are
identifying a specific server that handles the translation services.
Each IP address has four sections, separated by periods. In the Details dialog, you enter each
section separately. Each section of an IP address is made up of a number from 0 to 255;
numbers are the only allowable characters in this field.
Note: Ask your Internet Service Provider or System Administrator for the
correct Primary or Secondary DNS IP numbers.
Tip: Many systems do not require that you enter a DNS. If you are not sure, leave
the DNS field blank.
To enter a primary and secondary DNS:
1. Select the Query DNS check box.
2. Tap the space to the left of the first period in the Primary DNS field, then enter the
first section of the IP address.
Note: Each section must be a number from 0 to 255.
3. Tap the second section of the Primary DNS field, then enter the second section of the
IP address.
4. Tap the third section of the Primary DNS, then enter the third section of the IP
address.
5. Tap the last section of the Primary DNS field, then enter the last section of the IP
address.
6. Repeat steps 1 through 4 for the Secondary DNS number.
7. Tap the OK button to confirm your selection and return to the Network Preferences
screen.
IP Address
Everyone who logs on to the Internet needs to have a unique identifier (an IP address),
whether permanent or temporary. Some networks dynamically assign a temporary IP address
11-19
SPT 1500 Product Reference Guide
when clients log in. The IP Address field lets you identify whether your network provides
automatic (dynamic) temporary IP addressing.
Note: If your IP address is permanently assigned, you will need to get that
information from your System Administrator. If you are not sure,
select Automatic.
To identify dynamic IP addressing, select the IP Address check box to activate this option.
Tap to select automatic IP
address
To enter a permanent IP address:
1. Clear the IP Address check box to disable this option and display a permanent IP
address field below the check box.
2. Tap the space to the left of the first period then enter the first section of the IP address.
Note: Each section must be a number from 0 to 255.
3. Tap and enter the remaining sections of the IP address.
4. Tap the OK button to confirm your selection and return to the Network Preferences
screen.
Creating a Login Script
A login script is a series of commands, similar to an autoexec.bat file, that automates logging
into your ISP. You can create login script files by selecting commands from the Command
pick list in the Login Script dialog. Some commands from the Command pick list, such as
Send, require you to supply additional information. Those commands have a parameter field
so that you can add the necessary data.
11-20
Applications: Preferences
Note: You can also use non-ASCII and literal characters in your login script.
See Appendix C, Non-ASCII Characters for Login Scripts for
additional information.
To create a login script:
1. Tap the Script button in the Details dialog to open the Login Script dialog.
2. Tap the End pick list to open the Command list.
Tap here
3. Tap the command you want from the Command list. If the command requires
additional information, a field appears to the right of it for you to enter the
information. The following commands are available:
Wait For
Tells your SPT 1500 terminal to wait for
specific characters from the TCP/IP server
before executing the next command.
Send
Transmits specific characters to the TCP/IP
server to which you are connecting.
Send CR
Transmits a carriage return or LF character
to the TCP/IP server to which you are
connecting.
Send User ID
Transmits the User ID information entered in
the User ID field of the Network Preferences
screen.
11-21
SPT 1500 Product Reference Guide
Send Password Transmits the Password entered in the
Password field of the Network Preferences
screen. If you did not enter a password in the
Password field, this command prompts you
to enter one. The Password command is
usually followed by a Send CR command.
Delay
Tells your SPT 1500 terminal to wait a
specific number of seconds before executing
the next command in the login script.
Get IP
Reads an IP address and uses it as the IP
address for your SPT 1500 terminal. This
command is used with SLIP connections.
Prompt
Opens a dialog and prompts you to enter text
of some kind (for example, a password or a
security code).
End
Identifies the last line in the login script.
4. Repeat steps 2 and 3 until the login script is complete.
5. Tap OK to confirm your selection and return to the Details dialog.
Deleting a Service Template
To delete a service template:
1. Tap the Service pick list in the Network Preference screen to open a list of available
service templates.
2. Tap the service you want to delete.
3. Tap the
icon to open the menus for the Network Preferences screen.
4. Tap Delete from the Service menu to display the Delete Service alert.
5. Tap the OK button to confirm that you want to delete the service template.
Network Preferences Menu Commands
The Network Preferences screen includes menu commands to make it fast and easy to create
and edit service templates. This section explains the menu commands that are specific to the
Palm TCP/IP application.
11-22
Applications: Preferences
See Using Menus on page 2-17 for information about menu commands that are common to
all of your SPT 1500 terminal applications.
Service Menu
When you select the Service menu, its commands appear on screen.
New
Creates a new (empty) service template and adds
it to the Service pick list.
Delete
Deletes a selected service template from the
Service pick list.
Duplicate
Copies the selected service template and adds it
to the Service pick list.
Options Menu
When you select the Options menu, its command appears on screen:
View Log
Displays the Network Log screen
11-23
SPT 1500 Product Reference Guide
TCP/IP Troubleshooting
If you are having a problem establishing a network connection using Palm TCP/IP, check this
section and try the suggestions listed.
Displaying expanded Service Connection Progress messages
It’s helpful to identify at what point in the login procedure the connection fails. An easy way
to do this is to display the expanded Service Connection Progress messages. Expanded Service
Connection Progress messages describe the current stage of the login procedure. Press the
lower half of the Scroll button at any point during login to display these messages.
Viewing the Network Log
If viewing the expanded Service Connection Progress messages does not give you enough
information to find out why you cannot connect to your ISP or dial-in server, take a look at
the Network Log. The Network Log lists all of the communication that occurs between your
modem and your dial-in server during the login procedure. The information in the Network
Log can help your ISP or your System Administrator pinpoint where the login procedure
communication fails and why.
To view the Network Log:
1. From the Network Preferences screen, tap View Log from the Options menu to
display the Network Log screen.
2. Tap the up and down arrows of the scroll bar to see the entire Network Log.
3. After you finish, tap the Done button to return to the Network Preferences screen.
Adding a DNS Number
If your ISP or dial-in server requires a DNS number and you did not enter that information
in the Network Preferences screen, it will appear that you successfully logged into your
network. However, when you try to use an application or look up information, the
connection fails. If this occurs, try adding a DNS number. Ask your ISP or your System
Administrator for the correct Primary and Secondary DNS IP numbers.
Owner Preferences
The Owner Preferences screen enables you to record a name, company name, phone number
or any other information that you want associated with your SPT 1500 terminal.
11-24
Applications: Preferences
If you use the Security application to turn off and lock your SPT 1500 terminal with a
password, information that you put in the Owner Preferences displays the next time you turn
on your SPT 1500 terminal. See Chapter 12, Applications: Security for more information.
Enter the text that you want to associate with your SPT 1500 terminal in the Owner
Preferences screen. If you enter more text than will fit on one screen, a scroll bar
automatically appears on the right side of the screen.
If you assign a Password (with the Security application), the information in the Owner
Preferences screen “locks” and cannot be changed. In this case, an Unlock button appears at
the bottom of the screen.
To unlock the Owner Preferences screen:
1. Tap the Unlock button in the Owner Preferences screen to open the Unlock Message
dialog.
2. Enter the password that you defined in the Security application, and tap the OK
button.
ShortCuts Preferences
The ShortCuts Preferences screen enables you to define abbreviations for entering text with
Graffiti. This section describes how to create, edit and delete a shortcut. For details on the
use of ShortCuts, see the Graffiti ShortCuts on page 2-15.
Creating a ShortCut
You can create a ShortCut for any words, letters or numbers. All ShortCuts you create appear
on the list in the ShortCut Preferences screen. All the ShortCuts are available in any of your
11-25
SPT 1500 Product Reference Guide
SPT 1500 terminal applications and are backed up on your computer when you perform a
HotSync operation.
To create a ShortCut:
1. Tap the New button in the ShortCut Preferences screen to open the ShortCut Entry
dialog.
Tap New
2. On the ShortCut name line, enter the letters you want to use to activate the ShortCut.
3. Tap the ShortCut Text area and enter the text that you want to appear when you
write the ShortCut characters.
Tip:
You may want to add a space (space character) after the last word in your
ShortCut text. This way, a space automatically follows the ShortCut text.
4. Tap the OK button to close the ShortCut Entry dialog and define your ShortCut.
Tip:
To use a ShortCut, draw the ShortCut stroke followed by the ShortCut
characters. When you draw the ShortCut stroke, the ShortCut symbol
appears at the insertion point to show that you are in ShortCut mode.
ShortCut
Editing a ShortCut
After you create a ShortCut, you can modify it at any time.
To edit a ShortCut:
1. Tap the ShortCut you want to edit in the ShortCuts Preferences screen.
11-26
Applications: Preferences
2. Tap the Edit button to display the ShortCut Name and ShortCut text in the ShortCut
Entry dialog.
3. Make the changes you want and tap the OK button.
Deleting a ShortCut
If you no longer need a ShortCut, you can delete it from the list of ShortCuts.
To delete a ShortCut:
1. Tap the ShortCut you want to delete in the ShortCuts Preferences screen.
2. Tap the Delete button to display an alert dialog.
3. Tap the Yes button to confirm that you want to delete your ShortCut.
11-27
SPT 1500 Product Reference Guide
11-28
Chapter 12
Applications: Security
Introduction
Your SPT 1500 terminal comes with a Security application so that unauthorized users cannot
view the entries you wish to protect.
With the Security application you can:
Hide record entries you mark as “Private.” You can hide private entries with or
without a password. Without a password, private entries are hidden until you set the
Security application to show them. With a password, you must enter the password
to view the private entries.
t
Turn off and lock your SPT 1500 terminal so that it does not operate until you enter
the correct password.
To open the Security application:
t
1. Tap the
2. Tap the
icon to open the Applications Launcher.
icon to display the Security screen.
Assigning a Password
You can assign a password to protect your private entries and to lock your SPT 1500
terminal.
To assign a password:
1. Tap the Password box in the Security screen to open the Password dialog.
12-1
SPT 1500 Product Reference Guide
Tap here
2. Enter the password that you want for your SPT 1500 terminal.
3. Tap the OK button to open a confirmation dialog.
4. Enter the same password a second time, and tap the OK button to assign that
password to your SPT 1500 terminal.
Hiding Private Entries
You can hide the entries that you mark as private. If you assign a password, you must enter
it to show entries you mark as private. Note that your SPT 1500 terminal merely hides the
entries; it does not delete them.
To hide Private entries:
1. Tap the Hide box in the Security screen to open the Hide Records dialog.
Tap here
2. Tap the Hide box to hide entries you mark Private and to close the Hide Records
dialog.
12-2
Applications: Security
Showing Private Entries
After you hide Private entries, you can use the Security application to display them again.
To show Private entries:
1. Tap the Show box in the Security screen.
If you did not assign a password, your Private entries should be visible. If you did
assign a password, the Show Private Records dialog appears.
Tap here
2. Enter your password.
3. Tap the Show box to close the Show Private Records dialog and display Private
entries in your SPT 1500 terminal applications.
Locking Your SPT 1500 Terminal
You can also lock your SPT 1500 terminal, so that you need to enter your password to
operate it.
Important: If you lock your SPT 1500 terminal as described in the following procedure, you
need to enter the exact password to re-activate your SPT 1500 terminal. If you
forget the password, you need to use the reset button to resume using your SPT
1500 terminal. Using the reset button deletes all the entries in your SPT 1500
terminal; however, you can restore all synchronized data at the next HotSync®
operation. For information about how to use the reset button, see Resetting
Your SPT 1500 Terminal on page 17-3.
To lock your SPT 1500 terminal with a password:
12-3
SPT 1500 Product Reference Guide
1. Use the HotSync application to synchronize the data between your SPT 1500
terminal and your computer. See Chapter 8, Applications: HotSync® for information
about how to use the HotSync application.
2. Assign a password as described in Assigning a Password on page 12-1.
3. Tap the Turn Off & Lock Device button in the Security screen to open the System
Lockout dialog.
Tap here
4. Tap the Off & Lock button to turn off the power for your SPT 1500 terminal.
5. Start your SPT 1500 terminal and enter the password.
Changing or Deleting a Password
Once you define a password for your SPT 1500 terminal, you can change or delete it at any
time. You must enter the current password before you can change or delete it.
To change or delete your password:
1. Tap the Assigned box in the Security screen to open the Password dialog.
Tap here
12-4
Applications: Security
2. Enter the current password.
3. Tap the OK button to open a dialog that prompts you for a new password.
4. To change the password, enter the new password and tap the OK button. To delete
the password, tap the Delete button.
Recovering from a Forgotten Password
If you forget your password, you can delete the password from your SPT 1500 terminal.
Deleting a forgotten password also deletes all entries and files marked as Private.
Important: If you synchronize with your computer before deleting a forgotten password,
your SPT 1500 terminal restores your private entries the next time you perform
a HotSync operation, but it does not restore the password.
To delete a forgotten password:
1. Tap the Forgotten Password button in the Security screen to open the Delete
Password dialog.
2. Tap the Yes button to delete the password, as well as all records and entries marked
“Private.”
12-5
SPT 1500 Product Reference Guide
12-6
Chapter 13
Applications: To Do List
Introduction
The To Do List is a convenient place to create reminders and prioritize the things that you
have to do.
With the To Do List, you can:
t
t
t
t
t
t
Make a quick and convenient list of things to do.
Assign a priority level to each task.
Assign a due date for any or all of your To Do items.
Assign a category for any, or all of your To Do items. You can then view your To Do
List based on category (Business, Personal, etc.).
Sort your To Do items either by due date, priority level or category.
Attach notes to individual To Do items for a description or clarification of the task.
Opening the To Do List
Press the To Do List button on the front panel of the SPT 1500 terminal to display the To Do
List screen.
13-1
N
LC
U L AT
O
3
ab
c
M E NU
R
C AT I O
12
LI
CA
AP
P
S
SPT 1500 Product Reference Guide
F IND
To Do button
Working With To Do Items
A To Do item is a reminder of some task that you have to complete. Your SPT 1500 terminal
gives you control over the appearance, level of detail and the sort order of To Do items.
To create a To Do item:
1. Tap the New button in the To Do List screen to add an item to the list.
NewTo Do
item
Tap New
2. Enter the text you want to appear in the To Do item. The text can be longer than one
line.
3. Tap anywhere on the screen to de-select the To Do item.
Note: If no To Do item is currently selected, writing in the Graffiti® writing
area automatically creates a new To Do item.
13-2
Applications: To Do LIst
Setting Priority
Priority settings for To Do items enable you to arrange the tasks in your To Do List according
to relative levels of importance. The default setting for the To Do List is to arrange To Do
items by priority and due date, with priority 1 items at the top. If you have a number of To
Do items in your list, changing an item’s priority setting may move its position in the list.
Note: When you create a new To Do item, its Priority is automatically set to
level “1,” the highest (most important) level. However, if you select a
To Do item first, the new item appears beneath the selected item with
the same priority as the selected item.
Using the Priority feature is optional.
To set a Priority level for a To Do item:
1. Tap the Priority number on the left side of the To Do item to open the Priority pick
list.
Tap here
Tap to
select
priority
2. Tap the Priority number that you want to set for the To Do item (1 is most important
and 5 is least important).
Note: You can also change the Priority setting for a To Do item with the To
Do Details dialog described later in this chapter.
Checking Off a To Do Item
The To Do List makes it easy to mark tasks as you complete them. You can set the To Do List
to record the date that you complete the To Do item and you can choose to show or hide
complete To Do items. See To Do Show Options on page 13-6.
13-3
SPT 1500 Product Reference Guide
To check off a To Do item, tap the check box on the left side of the To Do item.
Completed To
Do item
To Do Item Details
The To Do Item Details dialog enables you to change individual To Do item settings.
To activate the To Do Item Details dialog:
1. Tap anywhere on the text of a To Do item in the To Do List screen.
2. Tap the Details button to open the To Do Item Details dialog.
The following sections describe the features and settings that are available in the To Do Item
Details dialog.
Choosing a To Do Category
Categories can help you file individual To Do items into groups for easy review. You can
assign and edit categories by using the Categories pick list in the Details dialog (see Using
Categories on page 2-21 for a complete description of categories).
Setting a Due Date
You can associate a due date with any To Do List item. You can also sort the items that appear
in the list based on their due date.
13-4
Applications: To Do LIst
To set a Due Date for a To Do List Item:
1. Tap the “No Date” text in the Details dialog to open the Due Date pick list.
Tap here
2. Tap the Due Date that you want to assign the To Do item. The following choices are
available:
Today
Assigns the current date.
Tomorrow
Assigns tomorrow’s date.
One week later
Assigns the date exactly one week from the current
date.
No Date
Removes the due date from the To Do item.
Choose date
Opens the Due Date dialog where you can chose
any due date that you want for the To Do item.
3. Tap the OK button to confirm your selection and close the To Do Details dialog.
Note: If you turn on the Show Due Dates option in the To Do Show options
dialog, you can tap directly on the due date in the To Do List to open
the pick list shown in step 2.
Deleting a To Do Item
There are three ways to delete a To Do item: simply delete the text of the To Do item, use the
Menu Command (as described in Record Menu on page 13-7), or use the To Do Details
dialog.
To delete a To Do item with the To Do Details dialog:
1. Tap anywhere in the text area of the To Do item that you want to delete.
2. Tap the Details button to open the To Do Item Details dialog.
3. Tap the Delete button to open the Delete To Do alert dialog.
13-5
SPT 1500 Product Reference Guide
4. Tap the OK button to confirm that you want to delete the To Do item.
To Do Show Options
The Show Options dialog enables you to control the appearance of the To Do List
application.
To change the Show Options settings:
1. Tap the Show button in the To Do List screen to open the To Do Preferences dialog.
2. Select any of the following settings:
Sort by
Enables you to sort the To Do items in one of the
following ways:
t
Priority, Due Date
t
Due Date, Priority
t
Category, Priority
t
Category, Due Date
Show Completed
Items
Displays your complete To Do items in the To Do List.
If you turn off this setting, your To Do items disappear
from the list when you complete (check) them.
Show Only Due
Items
Shows only the To Do items that are currently due,
past due or have no due date specified in the To Do
List. When this setting is active, To Do items that are
not yet due do not appear in the list until their due
date.
Record Completion Replaces the due date with the completion date when
Date
you complete (check) the item. If you do not assign a
due date to an item, the completion date still records
when you complete the item.
13-6
Applications: To Do LIst
Show Due Dates
Displays the due dates associated with To Do items in
the To Do List screen, and displays an exclamation
mark next to incomplete To Do items after the due
date passes.
Show Priorities
Shows the priority numbers for the To Do items in the
To Do List screen.
Show Categories
Shows the category for each To Do item on the far
right of the To Do List screen.
3. Tap the OK button to confirm your selections and close the dialog.
To Do List Menu Commands
The To Do List includes menu commands to perform common file and editing tasks. See
Using Menus on page 2-17 for information about menu commands that are common to all
SPT 1500 terminal applications.
Record Menu
When you select the Record menu, its commands appear on screen.
Delete Item
Opens an alert dialog, prompting you to confirm that
you want to delete the current To Do item. You must
select a To Do item before you can delete it. Tap the OK
button to delete the To Do item from your SPT 1500
terminal, or tap the Cancel button to close the alert
dialog and keep the To Do item.
Note: By default your SPT 1500 terminal removes the
item from the To Do list, but retains a copy of the
item and transfers it to an archive file on your
computer the next time you perform a HotSync®
operation. To remove the event completely, clear
the Save archive copy on PC check box.
13-7
SPT 1500 Product Reference Guide
Attach Note
Opens the To Do Note dialog where you can create a
note for the current To Do item.
Delete Note
Opens an alert dialog, prompting you to confirm that
you really want to delete the note attached to the To Do
item. You must select a To Do item before you can
delete its note. Tap the Yes button to delete the Note
from the memory of your SPT 1500 terminal, or tap the
No button to close the alert dialog and return to the To
Do List.
Purge
Deletes To Do items that you mark (check) as complete.
All complete To Do List items remain in the To Do List
until you use this command. The default setting is “Save
archive copy on PC.” This removes complete To Do
items from the To Do List, but retains copies and
transfers them to an archive file on your computer the
next time you perform a HotSync operation.
Beam Item
Beams the current To Do item to another SPT 1500®
terminal through the IR port.
Beam Category
Beams all To Do Items in the current category to
another SPT 1500 terminal through the IR port.
Options Menu
When you select the Options menu, its commands appears on screen.
Font
Displays the Select Font dialog where you can choose
a different font (text) style for your Address Book
entries. See Choosing Fonts on page 2-20 for details.
Phone Lookup
Activates the Phone Lookup feature, which is
described in Using Phone Lookup on page 3-2.
About To Do List
Shows version (revision) information for the To Do
List application.
13-8
Chapter 14
Applications: Laser Scanner and Laser Pointer
Introduction
The SPT 1500 has an integrated scanner which allows you to collect data by scanning bar
codes, provided you have a scanning application loaded on your terminal. The laser is emitted
from the top of the unit. The SPT 1500 also has a laser pointer application which allows you
to use the terminal as a laser pointer. The pointer is also emitted from the top of the terminal.
This section describes the use of the laser scanner and laser pointer applications.
Scanning with the SPT 1500
Included in the Software Development Kit are two demonstration programs: ScanDemo and
SimpleScan. These programs are designed to assist the applications developer in learning how
to write an application for the scanner. Source code for these programs is located in the
Samples subdirectory of the Scanner SDK directory, and the prc files are located in the prc
subdirectory of the Scanner SDK directory. If your terminal does not contain these
demonstration programs, contact your distributer.
To add SimpleScan.prc or ScanDemo.prc to the SPT 1500, you may either build a new
BigROM file or use the Palm Install Tool to designate the files to be added to the SPT 1500
during the next HotSync.
SimpleScan Application
The SimpleScan application is a basic scanning application. To scan bar codes with the SPT
1500 using SimpleScan:
1. Select the SimpleScan application icon from your main application screen.
14-1
SPT 1500 Product Reference Guide
2. Aim the terminal at the bar code.
3. Tap on the Scan button on the screen, or use the left or right trigger to activate the
scan beam.
The scan LED lights and the laser beam is emitted from the top of the terminal. Make sure
the beam covers the entire bar code. A successful decode is indicated by a green LED and a
beep. The bar code data is displayed on the screen. In the Bar Type field, the type of
symbology (e.g., Code 39) is displayed. In the Bar Data field, the actual collected bar code
data appears.
Demo Scan Application
The Demo Scan application allows you to customize your scanner’s features in addition to
scanning bar codes and using the laser pointer. To open the Demo Scan application, select the
Demo Scan icon from the main application screen. The Symbol Scanner Demo screen
appears. The following is an explanation of this screen and the available menu options.
The list of available symbologies
Allows you to select the symbologies to be recognized by the scanner by tapping on the box
next to the name of the desired symbology. When selected, the box has a check mark.
Pointer
When this option is checked, the scan enable box is checked and the trigger is pressed, the
laser pointer beam activates. The pointer remains on until the trigger is released. Alternately,
tap on the Scan box on the bottom of the screen. This activates the laser pointer for
approximately 30 seconds. To switch back to laser scanning, tap again on the Pointer box to
deactivate the laser pointer.
Scan Enable
When this option is clicked, and the trigger is pressed, the laser scanner beam activates. The
beam remains on for approximately 3 seconds. Alternatively, tap on the Scan button on the
bottom of the screen. This also activates the laser scanner for approximately 3 seconds.
LED
When this box is checked, the green LED lights for a few seconds. This serves as a test of the
LED.
Trigger Mode
This is a pull-down menu. The options are as follows:
14-2
Applications: Laser Scanner and Laser Pointer
t
t
t
Level: only the SPT 1500 scan trigger initiates the scan; the laser is turned off when
the trigger is released or the decode was successful.
Pulse: only the SPT 1500 scan trigger initiates the scan; the laser is turned off when
laser_on_time is reached or when the decode was successful.
Host: (default): The SPT 1500 scan trigger or the application’s ScanCmdStartDecode
command initiates the scan; the laser is turned off when the trigger is released, or
when laser_on_time is reached, the ScanCmdStopDecode command is called, or the
decode was successful.
Bar Type
Once a bar code is decoded, this field displays the type of the decoded bar codes (i.e., Code
39, Code 128, Code 93, etc.).
Bar Data
Once a bar code is decoded, displays the decoded data.
Demo Scan Menu Options
To customize some of these features, select your Menu icon to display the menu bar available
for this application. The following are the menu options:
Setup
This menu option allows you to customize the Hardware and Code Format setup.
Hardware Setup:
t
t
t
t
t
t
Beep on Good Decode: determines whether or not the terminal beeps to indicate a
successful decode.
Redundancy: determines whether or not the scanner uses redundancy.
Decode LED On Time: defines the length of time the decode LED remains on when
a symbol is decoded.
Laser On Time: defines the length of time the laser beam remains on when the trigger
is pressed.
Aim Duration: defines the length of time the laser pointer beam remains on when the
trigger is pressed or the scan button is tapped.
Linear Security: defines the linear security level to be used by the scanner; level 1, 2,
3, or 4.
14-3
SPT 1500 Product Reference Guide
Scan Angle: defines the scan angle to be used by the scanner; wide angle or narrow
angle.
Code Format Setup:
t
t
t
t
Code ID Char: defines the CodeID Character. The options are None, AIM and
Symbol.
Tx Format: defines the data transmission format.
Prefix/Suffix: defines the Prefix and Suffix values.
Beep
This menu option allows you to customize the Frequency, Duration and Pattern of the
scanner’s beep.
Options
This menu option allows you to reset Defaults, change the data display preferences, and view
the About Scan Demo screen.
Scanning Bar Codes using Demo Scan
To scan bar codes using the Demo Scan application:
1. Select the Demo Scan application icon from your main application screen.
The Symbol Scanner Demo screen appears.
2. If desired, customize your scanner’s features by selecting from the various options as
described in the previous paragraphs.
3. Aim the scanner at the bar code.
4. Press either the right or left scan trigger or tap the Scan Button. Make sure the red
scan beam covers the entire bar code. The green scan LED lights and an audible beep
sounds to indicate a successful decode.
Figure 14-1. Scanning with the SPT 1500
14-4
Applications: Laser Scanner and Laser Pointer
Receiving Demonstration Program
The Receiving Demonstration Program is a basic receiving application, which demonstrates
the terminal’s scanning and signature capture capabilities. To use the Receiving
Demonstration Program:
1. Select the Receiving Demo Program icon
The Receiving Demo Screen appears:
from your main application screen.
This screen has the following fields:
Item Code: Once an item code is scanned, this field contains the data for that item
code.Alternately, use Graffiti to enter the data for this field.
Quantity: this is a pull-down menu. Use your pen to select the appropriate quantity.
Location: Once the location bar code is scanned, this field contains the location data.
Alternately, use Graffiti to enter the location data in this field.
Please sign here: In this field, you may sign your name using the pen.
To submit the collected data, tap the Submit option. The fields clear and you may continue
collecting data.
Scanning Problems
If the bar code is not being decoded, check the following:
14-5
SPT 1500 Product Reference Guide
1. Make sure the bar code label is not defaced.
2. Make sure the bar code is of a symbology which can be read by the scanner.
3. Check that the scanner window is not dirty. If it is, gently clean it using a tissue or
other non-abrasive material. Do not spray any cleaner directly on the scanner
window.
4. Try another bar code. It is possible that your bar code is bad.
5. Check your application code.
6. Make sure the parameters are set correctly for the bar code being scanned; i.e.,
lengths, symbology, etc.
If you do not hear a sound after a good decode, check that the system sound option is set in
the general preferences screen, and that beep on good decode is set (checked) in Hardware
Set up in the Scan Demo application.
If you have checked all of these things and are still experiencing problems decoding your bar
codes, please contact Symbol Technologies Technical Support Center. See page xvii for
contact information.
Battery Implications While Using the Laser Scanner
If your battery becomes low while the scanning application is active, the scanning application
deactivates. The rest of the desktop applications continue to work until you receive further
low battery warnings. You should perform a HotSync at this point to avoid data loss.
14-6
Applications: Laser Scanner and Laser Pointer
Using the Laser Pointer Application
The SPT 1500 has a Laser Pointer application installed which allows you to use the unit as a
laser pointer. The laser is emitted from the top of the unit. To use the laser pointer:
1. Select the Laser Pointer Application Icon
from the application screen.
The Laser Pointer application screen appears.
2. Use the scanner triggers to activate the laser pointer.
Caution
No not look directly into the laser, and do not point the laser into anyone’s
eyes.
3. Sound effects can be changed by selecting “Choose Sound Effect” and then tapping
on the desired sound. Then check the Enable Sound Effects box to make effective
your selected sound effect.
14-7
SPT 1500 Product Reference Guide
Pointer Mode Laser Settlement Time
When the scan trigger is pressed while in pointer mode, the laser may oscillate initially, but
then immediately settles into a point. The oscillation is limited to a short time, which may
vary to some degree from terminal to terminal.
14-8
Chapter 15
Installing and Removing Applications
Introduction
This chapter explains how to install and remove applications on your SPT 1500 terminal and
how to remove the SPT 1500 Palm™ Desktop software from your computer.
Installing Applications
Your SPT 1500 terminal comes with the Date Book, Address Book, To Do List, Memo Pad,
Expense, Calculator and Mail applications installed and ready to use.
You can also install additional applications on your SPT 1500 terminal, such as games and
other Palm-compatible software. The Palm Install Tool makes it quick and easy to install
software on your SPT 1500 terminal during a HotSync® operation.
Note: Any game or application that you install on your SPT 1500 terminal
resides in RAM memory. A hard reset on the SPT 1500 terminal
automatically deletes these applications; you can also delete them
manually.
To install software on your SPT 1500 terminal:
1. Copy the application you want to install into the Add-on subfolder in your Palm
folder on your computer.
15-1
SPT 1500 Product Reference Guide
Note: If you prefer to copy the application into another folder, you need to
navigate to that folder before you complete step 5.
2. Double-click the Palm Desktop icon on your Windows desktop (or select Palm
Desktop from the Start menu) to open the Palm Desktop software.
3. Click the Install button to open the Palm Install Tool dialog.
Tip:
You can also access the Install Tool dialog by selecting Install Tool from the
Palm Desktop program group or by double-clicking any file with a PRC file
extension.
15-2
Installing and Removing Applications
4. Select the user name that corresponds to your SPT 1500 terminal in the User dropdown list.
5. Click the Add button to open the Open dialog.
6. Click the application(s) that you want to install on your SPT 1500 terminal.
7. Click the Open button to return to the Install Tool dialog.
Note: Review the list of applications you selected in the Install Tool dialog.
If you do not want to install an application, click it and then click the
Remove button. (This does not remove the application from your
computer, it simply removes it from the list of applications to install.)
15-3
SPT 1500 Product Reference Guide
8. Perform a local HotSync® operation to install the application(s) you selected in step
6. See Conducting a Local HotSync Operation on page 8-4 for details.
Installing Games
The CD-ROM that comes with your SPT 1500 terminal includes several games that you can
install with the Palm Install Tool. These games include:
t
t
t
t
t
HardBall
Puzzle
Giraffe
MineHunt
SubHunt
Note: Giraffe is a fun, easy way for you to practice writing Graffiti®.
After you install and start a game, the instructions appear in the Game menu. Depending on
the game, the Game menu may also contain commands to show high scores, to start a new
game or to set Preferences for the game.
Removing Applications
In the event that you run out of memory or decide that you no longer need an application
you installed, you can remove applications from your SPT 1500 terminal. You can remove
only add-on applications, patches and extensions that you install; you cannot remove the
applications that reside in the ROM portion of your SPT 1500 terminal.
To remove an add-on application:
1. Tap the
icon on the SPT 1500 terminal screen to open the Applications Launcher.
2. Tap the
icon on the SPT 1500 terminal screen to open the Applications Launcher
menus.
3. Tap Delete from the App menu to open the Delete dialog.
15-4
Installing and Removing Applications
4. Tap the application that you want to remove.
5. Tap the Delete button to display a confirmation message.
6. Tap the Yes button to indicate that you want to remove the application from your
SPT 1500 terminal.
7. Tap the Done button to close the Delete dialog and return to the Applications
Launcher.
Removing Palm Desktop Software
If you no longer want to use the Palm Desktop software, you can remove it from your
computer.
To remove the Palm Desktop software:
1. Select Settings and then Control Panel from the Start menu to open the Windows
Control Panel.
2. Double-click the Add/Remove Programs icon.
3. On the Install/Uninstall tab, select Palm Desktop from the list.
4. Click the Add/Remove button.
5. Click Yes to confirm that you want to remove the application.
15-5
SPT 1500 Product Reference Guide
15-6
Chapter 16
Getting Help With Your SPT 1500 Terminal
Introduction
There are several ways to get help with your SPT 1500 connected terminal. You can display
online tips on your SPT 1500 terminal and you can review the troubleshooting section in this
chapter and on your Palm™ Desktop Software for SPT 1500 CD. If you need additional
assistance, there are several ways to contact Symbol Technical Support. This chapter provides
details on each of these methods.
Displaying Online Tips
Many of the dialogs that appear on your SPT 1500 terminal contain an online tips icon in the
upper-right corner. Online tips contain a summary of what is required by the dialog, shortcuts
for using the dialog or other useful information.
Online tips always relate to the function that you are currently performing with your SPT
1500 terminal. Each dialog has its own online tips that relate to that specific dialog.
To use the online tips:
1. Tap the
icon in the upper-right corner of a dialog to open the Tips dialog.
16-1
SPT 1500 Product Reference Guide
2. After you review the Tips dialog, tap the Done button.
SPT 1500 Diagnostics Utility
The SPT 1500 Diagnostics Utility is used to ensure that your SPT 1500 Terminal is operating
properly. It can also assist you in troubleshooting problems you may encounter. The
Diagnostics Utility tests the various features of the terminal, and reports whether or not they
are operating properly.
To run the Diagnostics Utility, run the Diag Application, which appears on your Terminal’s
Main Application screen. The Main Diagnostics screen appears as shown in Figure 16-1,
illustrating five options:
System Information
t
Bar Code Scanner
t
Serial Port
t
Digitizer Alignment
t
System Diagnostics
Tapping on any of these options brings up screens of related information
t
16-2
Getting Help With Your SPT 1500 Terminal
Figure 16-1. Main Diagnostics Screen
System Information Test
The System Information option describes the system attributes of the terminal. Tapping this
option displays the System Information screen, illustrated in Figure 16-2:
Figure 16-2. System Information Screen
The attributes described on this screen are:
t
t
Manufacturer: The manufacturer of the terminal
RAM Size:
The amount of Random Access Memory
16-3
SPT 1500 Product Reference Guide
t
t
t
t
t
RAM Free:
ROM Size:
User:
OS Version:
Battery:
The amount of free Random Access Memory
The amount of free Read-Only Memory
The username of the terminal
The version of the Palm OS running on the terminal
The voltage level of the batteries.
Bar Code Scanner Test
The Bar Code Scanner option tests the integrated scanner. Selecting the Bar Code Scanner
option brings up the Bar Code Scanner Diagnostics Screen, page 1:
Figure 16-3. Bar Code Scanner Diagnostics: Page 1
To test the scanner, select the Scanner Enabled checkbox and the Scan checkbox. To test the
Laser Pointer, check the Scanner Enabled checkbox and the Aim checkbox. To ensure that a
specific type of bar code can be read, move to the next page by pressing the down button on
the terminal, or by tapping on the arrow in the lower left corner of the screen with the stylus.
On Page 2 of the Bar Code Scanner Diagnostics, select the bar code types you would like to
read.
16-4
Getting Help With Your SPT 1500 Terminal
Figure 16-4. Bar Code Scanner Diagnostics: Page 2
Serial Port Test
The Serial Port option tests the terminal’s serial port by sending a test message. The test’s
configuration screen is illustrated in Figure 16-5.
Figure 16-5. Serial Port Diagnostics Screen
To run the serial port test:
1. Place your terminal in a cradle attached to a computer.
2. Determine which communications port is used by HotSync.
To do this, right-click on the HotSync icon in your computer’s icon tray in the lower
16-5
SPT 1500 Product Reference Guide
3.
4.
5.
6.
7.
8.
9.
left-hand corner of the screen, and choose Setup. Select the Local tab and look at the
setting specified by Serial Port. You will need this information in subsequent steps.
Click OK to close the window.
Shut down HotSync manager on the computer. Right-click on the HotSync icon
again. This time, select Exit.
On your computer, run HyperTerminal, which appears in the Accessories directory
in the Windows Programs menu.
Start a new connection in HyperTerminal.
Set the HyperTerminal session to connect directly, and specify the communications
port determined in Step 2.
Adjust the communications parameters in HyperTerminal and on the terminal so
they are compatible (e.g., 57,600, 8 data bits, 1 stop bits, no parity).
On the terminal, click the Send Msg button to send a test message string from the
terminal to HyperTerminal on the computer. You may edit the message. You may
also select the Continuous check box to send the test message multiple times.
When the serial port is functioning properly, the messages sent from the terminal
should be displayed in HyperTerminal.
Digitizer Alignment Test
The Digitizer Alignment option tests the tracking of the stylus on the screen. To run this test,
tap the stylus in various places on the screen and crosshairs should appear under the stylus.
You may also move the stylus continuously across the screen and the crosshairs should track
the movement of the stylus.
System Diagnostics Test
The System Diagnostics option is an interactive test of all the terminal’s system features. This
test prompts you to perform different actions and listen for different sounds. The output of
the system diagnostics is a log file. To start system diagnostics, tap the Start button. You are
be prompted to begin. Selecting OK starts the test.
The test prompts you to press the different buttons on the terminal. Pressing the specified
button results in a series of short high-pitched sounds, denoting proper functioning. Pressing
an incorrect button or having the system timeout results in a low tone, denoting failure.
The test then produces a series of four tones to test the speakers and prompts you, asking
whether or not you heard all the tones. If you hear all four tones, answer Yes. If you don’t
hear all the tones, answer No.
16-6
Getting Help With Your SPT 1500 Terminal
The test also prompts you to scan a bar code with the scanner. Press the OK button and then
scan an item.
System Diagnostics also performs some tests which are not interactive. It reads the system
information, tests the serial port, tests the memory, and tests the timer.
A series of tones denotes the conclusion of the test.
At this point, view the log file by tapping on View Log. This brings up the multi-page test
results log. You can scroll through the log, one page at a time, by tapping on the arrow
buttons in the lower left-hand corner of the screen. Alternately, use the scroll bar on the righthand side of the screen.
Troubleshooting
If you encounter a problem with your SPT 1500 terminal, look in this section for the
description that most closely matches the symptoms you observe and try the suggestions
listed.
Important: For troubleshooting tips not included in this handbook, refer to either the
README.TXT file or the Help Notes file located in the Palm Desktop
directory. These files are also on the installation CD-ROM.
Installation Troubleshooting
Do not place your SPT 1500 terminal in the cradle while installing the Palm Desktop
software. If the SPT 1500 terminal is in the cradle, the installation program may incorrectly
detect that a modem is attached to one of your available serial ports.
HotSync¨ Troubleshooting
A Local HotSync operation does not complete successfully:
t
t
t
t
Make sure HotSync Manager is running. If HotSync Manager is running, exit and
restart it.
Make sure you selected Local from the HotSync Manager menu or the Palm Desktop
menu.
Check the cable connection between the SPT 1500 terminal cradle and the serial port
on your computer.
Make sure you selected the correct serial port on the Local tab in the Setup dialog.
It should be set to the port where you connected the SPT 1500 terminal cradle.
16-7
SPT 1500 Product Reference Guide
t
t
t
Try a lower baud rate setting on the Local tab in the Setup dialog.
Make sure you are not running another program — such as America On-line,
CompuServe or WinFax — that uses the serial port you selected in the Setup dialog
box.
Read the HotSync Log for the user account for which you are performing a HotSync
operation.
A Modem HotSync operation does not complete successfully:
Check the following on your computer:
t
t
t
t
t
t
t
t
t
t
Make sure your computer is turned on, and that it does not shut down automatically
as part of an energy-saving feature.
Make sure the modem connected to your computer is turned on and is connected to
the outgoing phone line.
Confirm that your modem doesn't have an auto-off feature enabled.
Make sure the modem is connected properly to a serial port on your computer and
is connected to the incoming phone line.
Confirm that the Setup String in the Setup dialog box configures your modem
correctly. You may need to select a different Modem Type or enter a custom Setup
String. Most modems have a Setup String that causes them to send initial connection
sounds to a speaker. You can use these sounds to check the modem connection.
Confirm that the Speed setting in the Setup dialog box is appropriate for your
modem.
If you have problems using the As Fast As Possible option or a specific speed, try
using a slower speed.
Make sure you selected Modem from the HotSync Manager menu.
Make sure you are not running another program — such as America Online,
CompuServe or WinFax — that uses the serial port you selected in the Setup dialog
box.
Make sure your modem resets before you try again. (Turn off your modem, wait a
minute, then turn it back on.)
Check the following on your SPT 1500 terminal:
Make sure you are using the Palm modem cable to connect to your modem.
Important: Do not attempt to use other cables to connect a SPT 1500 terminal to a
modem.
t
16-8
Getting Help With Your SPT 1500 Terminal
t
t
t
t
t
t
t
t
Check the modem cable connection between your SPT 1500 terminal and your
modem.
Confirm that your modem is turned on.
Make sure the modem you are using with your SPT 1500 terminal has an on-off
switch. Your SPT 1500 terminal cannot “wake up” a modem that has an auto-off
feature.
Make sure the dialing instruction dials the correct phone number.
If you need to dial an outside line prefix, make sure you selected the Dial Prefix
option on your SPT 1500 terminal and entered the correct code.
If the telephone line you are using has Call Waiting, make sure you selected the
Disable call waiting option under Modem Sync Phone Setup on your SPT 1500
terminal and entered the correct code.
Make sure the telephone line you are using is not noisy, which can interrupt
communications.
Make sure your modem resets before you try again. (Turn off your modem, wait a
minute, then turn it back on.)
General Troubleshooting
SPT 1500 terminal does not turn on:
t
t
t
Adjust the contrast control.
Make sure batteries are installed properly.
Replace the batteries. If your SPT 1500 terminal still does not operate, try a soft
reset; see Resetting Your SPT 1500 Terminal on page 17-3.
Low battery warning after replacing the batteries:
t
The battery warning message may appear immediately after replacing the batteries.
In addition, if you check the battery gauge in the Applications Launcher immediately
after replacing the batteries, the gauge may start at “empty” and slowly rise to “full.”
This is normal. It takes a few minutes for the battery gauge to accurately show the
condition of the batteries.
No sound:
t
Check the System Sound option in the General Preferences screen. If the option is set
to off, there will be no sound. See General Preferences on page 11-6 for more
information.
16-9
SPT 1500 Product Reference Guide
No Sound upon Good Decode:
t
Check that the system Sound option is set in the General Preferences screen and that
Beep on Good Decode is set (checked) in Hardware Setup in the Scan Demo
Application.
SPT 1500 terminal turns itself off:
t
Your SPT 1500 terminal is designed to turn itself off after a period of inactivity. This
period can be set at one minute, two minutes or three minutes. Check the “Auto-off
after” setting in the General Preferences screen, and change the setting if you need a
longer delay before the automatic shutoff feature activates. See General Preferences
on page 11-6 for more information.
SPT 1500 terminal doesn’t recognize my handwriting:
t
t
t
t
For your SPT 1500 terminal to recognize handwriting input with the stylus, you need
to use the Graffiti® character strokes. See Writing With the Stylus on page 2-5 for
information about how to write Graffiti character strokes.
Make the Graffiti character strokes in the Graffiti writing area — not on the display
part of the screen.
Make sure you are writing the strokes for letters in the left-hand side, and the strokes
for numbers in the right-hand side of the Graffiti writing area.
Make sure that Graffiti is not shifted into extended or punctuation modes. See
Writing With the Stylus on page 2-5 for information about shifting into and out of
punctuation modes.
Tapping the screen buttons or icons does not activate the corresponding feature:
t
Recalibrate the digitizer. Choose Digitizer from the Preferences application pick list
and follow the directions on the screen.
When I tap the
t
icon, nothing happens:
Not all applications or screens have menus. Try changing to a different application.
A message appears stating that your SPT 1500 terminal memory is full:
t
t
16-10
Delete unused memos and records. If necessary, you can save these records on your
computer using the Save Backup Copy option that appears in the Delete dialogs.
Purge the Date Book and To Do List applications. This deletes complete To Do items
and past Date Book events from the memory of your SPT 1500 terminal. Note that
you may need to perform a HotSync operation to recover the memory.
Getting Help With Your SPT 1500 Terminal
t
If you have installed additional applications on your SPT 1500 terminal, remove
them to recover memory.
Beamed data does not transmit:
t
Confirm that the SPT 1500 connected terminals are 5” apart or less, and that the
path between the two devices is clear of obstacles.
When receiving beamed data an out of memory message appears:
t
Your SPT 1500 terminal requires at least twice amount of memory available as the
data you are receiving. For example, if you are receiving a 30K application, you must
have at least 60K free.
Security Troubleshooting
I forgot the password, and my SPT 1500 terminal is not locked:
t
You can use the Security application to delete the password. If you do this, your SPT
1500 terminal deletes all entries marked as Private. However, you can perform a
HotSync operation before you delete the password: the HotSync process backs up all
entries, whether or not they are marked private. In this case, the following procedure
restores your private entries and lets you access them:
1. Use the Palm Desktop software and the SPT 1500 terminal cradle to synchronize
your data.
2. Tap the Forgotten Password button in the Security application to remove the
password and delete all Private entries.
3. Perform a HotSync operation to synchronize your data and restore the private
entries by transferring them from your computer to your SPT 1500 terminal.
I forgot the password and my SPT 1500 terminal is locked:
t
If you assign a password and lock your SPT 1500 terminal, you must perform a hard
reset to continue using your SPT 1500 terminal. See Resetting Your SPT 1500
Terminal on page 17-3 for details.
Applications Troubleshooting
The following troubleshooting tips are specific to the various SPT 1500 terminal applications.
16-11
SPT 1500 Product Reference Guide
Tapping the Today button doesn’t display the current date:
t
Your SPT 1500 terminal is not set to the current date. Make sure the Set Date box
in the General Preferences screen displays the current date. See General Preferences
on page 11-6 for more information.
Entries seem to be missing in various applications:
t
t
Check the Categories pick list (upper-right corner of the screen). Choose All to
display all of the records for the application.
Check the Security application and make sure that the Private Records setting is set
to Show private records.
Memo Pad application:
t
t
If you cannot manually arrange the order of the memos in the List screen, check the
Memo Preferences setting. Make sure that Sort by is set to Manual.
If you choose to view your memos alphabetically on Palm Desktop and then perform
a HotSync operation, the memos on your SPT 1500 terminal still appear in the order
defined in the Memo Preferences setting. In other words, the sort settings that you
use with Palm Desktop are not transferred to your SPT 1500 terminal.
Date Book application:
t
In the Week View, you cannot select overlapping events that have the same start time.
If you have two or more events with the same start time, choose the Day View for
the particular day to see the overlapping events.
Technical Support, Service and Repair
If you have a problem using your SPT 1500 terminal, make sure you have reviewed the
following:
The Troubleshooting section earlier in this chapter
t
The README file and Help Notes located in the folder where you installed the Palm
Desktop software on your computer (or on your installation CD)
t
The Palm Desktop software Online Help.
For further assistance, you can contact your regional technical support office by e-mail,
phone or fax. Before requesting support, please experiment a bit to reproduce and isolate the
problem. When you do contact support, please be ready to provide the following
information:
t
t
16-12
The version of Windows you are using.
Getting Help With Your SPT 1500 Terminal
t
t
The actual error message or state you are experiencing.
The steps you take to reproduce the problem.
Technical Support
United States and Canada
Phone:
Web site:
1-800-659-2240
http://www.symbol.com/palm
Outside North America, contact your local Symbol representative.
16-13
SPT 1500 Product Reference Guide
16-14
Chapter 17
Maintaining Your SPT 1500 Terminal
Introduction
This chapter provides information to help you take proper care of your SPT 1500 terminal
and prolong battery life. It also discusses how to reset your SPT 1500 terminal.
Caring for Your SPT 1500 Terminal
Your SPT 1500 terminal is designed to be reliable and to provide years of trouble-free service.
However, you should observe the following general tips when using your SPT 1500 terminal:
t
t
t
t
Take care not to scratch the screen of your SPT 1500 terminal. When working with
your SPT 1500 terminal, use the supplied stylus or plastic-tipped pens intended for
use with a touch-sensitive screen. Never use an actual pen or pencil or other sharp
object on the surface of the SPT 1500 terminal screen.
Your SPT 1500 terminal is not waterproof and should not be exposed to rain or
moisture. Under extreme conditions, water may enter the circuitry through the front
panel buttons. In general, treat your SPT 1500 terminal as you would a pocket
calculator or other small electronic instrument.
The touch-sensitive screen of your SPT 1500 terminal contains a glass element. Take
care not to drop your SPT 1500 terminal or subject it to any strong impact. Do not
carry your SPT 1500 terminal in your back pocket: if you sit on it, the glass may
break.
Protect your SPT 1500 terminal from temperature extremes. Do not leave your SPT
1500 terminal on the dashboard of a car on a hot day, and keep it away from heaters
and other heat sources.
17-1
SPT 1500 Product Reference Guide
t
t
Do not store or use your SPT 1500 terminal in any location that is extremely dusty,
damp or wet.
Use a soft, damp cloth to clean your SPT 1500 terminal. If the surface of the SPT
1500 terminal screen becomes soiled, clean it with a soft cloth moistened with a
diluted window-cleaning solution.
Battery Considerations
Please note the following considerations when replacing the batteries in your SPT 1500
terminal:
t
Under normal conditions, your SPT 1500 terminal batteries should provide several
months of use. You can conserve battery life by minimizing the use of the backlight
feature, and changing the “Auto-off after” setting that automatically turns the SPT
1500 terminal off after a period of inactivity (see General Preferences on page 11-6).
Note: When scanner is in use, battery life is shorter, and depends on the
number of scans performed per minute.
t
t
t
t
t
17-2
If the batteries become low while using the scanner application, the scanner
application de-activates, but the other functions still work until another low battery
alert occurs. When the scanner de-activates, you should perform a HotSync
synchronization to back up your data before replacing the batteries. This helps
prevent accidental data loss.
Similarly, if the batteries become low in the course of normal use, an alert appears
on the SPT 1500 terminal screen describing the low battery condition. If this alert
appears, perform a HotSync® synchronization to back up your data before you
replace the batteries.
When replacing the batteries, begin by turning your SPT 1500 terminal off (so there
is no screen display). Never remove the batteries while your SPT 1500 terminal is
turned on.
When replacing the batteries, always use good quality batteries of the same type. Use
only alkaline batteries with your SPT 1500 terminal.
When you remove the batteries, the built-in backup power of your SPT 1500
terminal maintains memory data for a period of up to one minute. Whenever you
remove the batteries, replace them immediately. If you encounter any difficulties in
the course of battery replacement, reinstall the original batteries and wait a few
minutes for the backup power to recharge.
Maintaining Your SPT 1500 Organizer
t
t
t
If the batteries drain to the point where your SPT 1500 terminal does not operate, it
stores your data safely for about a month. In this case, there is enough residual
energy in the batteries to store the data, but not enough to turn on your SPT 1500
terminal. If your SPT 1500 terminal does not turn on when you press the green
power button, you should replace the batteries immediately.
If you leave drained batteries in your SPT 1500 terminal for an extended period of
time, you can lose all of the stored data. If this happens, replace the batteries and use
the reset button to reset your SPT 1500 terminal. (See Resetting Your SPT 1500
Terminal on page 17-3.) After you reset your SPT 1500 terminal, perform a HotSync
operation to restore the data from your computer.
If your battery becomes low while the scanning application is active, the scanning
application deactivates. The rest of the desktop applications continue to work until
you receive further low battery warnings. You should perform a HotSync at this
point to avoid data loss.
Resetting Your SPT 1500 Terminal
Under normal circumstances, you will never have to use the reset button. However, on rare
occasions your SPT 1500 terminal may “hang” (no longer respond to buttons or the screen).
In this case, you need to perform a reset to get your SPT 1500 terminal running again.
Performing a Soft Reset
A soft reset tells your SPT 1500 terminal to stop what it’s doing and start over again. All
records and entries stored in your SPT 1500 terminal are retained with a soft reset. After a
soft reset, the Welcome to SPT 1500 terminal screen appears followed by the General
Preferences screen (to set time and date).
To perform a soft reset:
t
Use the tip of an unfolded paper clip (or similar object without a sharp tip) to gently
press the reset button inside the hole on the back panel of your SPT 1500 terminal.
17-3
SPT 1500 Product Reference Guide
Reset button
Performing a Hard Reset
A hard reset also tells your SPT 1500 terminal to start over again. With a hard reset all
records and entries stored in your SPT 1500 terminal are erased. Therefore, never perform a
hard reset unless a soft reset does not solve your problem.
Note: You can restore any data previously synchronized with your computer
during the next HotSync operation.
To perform a hard reset:
1. Hold down the green power button on the front panel of the SPT 1500 terminal.
2. While holding down the power button, use the tip of an unfolded paper clip (or
similar object without a sharp tip) to gently press the reset button.
3. When a message appears on the SPT 1500 terminal screen warning that you are
about to erase all the data stored on your SPT 1500 terminal, do one of the
following:
s Press the upper half of the scroll button on the front panel of the SPT 1500
terminal to complete the hard reset and display the Digitizer screen.
s Press any other button to perform a soft reset.
Note: With a hard reset, the current date and time are retained. Formats
Preferences and other settings are restored to their factory default
settings.
17-4
Appendix A
Expense Templates
Introduction
This appendix provides illustrations of the four expense templates that come with the Palm™
Desktop software. You may use or modify any of these templates when creating expense
reports with data from the Expense application.
A-1
SPT 1500 Product Reference Guide
Figure A-1. Sample 1
A-2
Expense Templates
Figure A-2. Sample 2
A-3
SPT 1500 Product Reference Guide
Figure A-3. Sample 3
A-4
Expense Templates
Figure A-4. Sample 4
A-5
SPT 1500 Product Reference Guide
A-6
Appendix B
Creating a Custom Expense Report
Introduction
This section explains how to modify existing Expense application templates, and how to
create your own custom expense report templates for use with the Expense application.
Note: This section assumes that you are familiar with Microsoft Excel or a
similar spreadsheet application. If you are not familiar with Microsoft
Excel, consult your company’s Information Services department or
another experienced user.
About Mapping Tables
Before creating or modifying an Expense template, it’s important to understand the function
of Palm™ Desktop’s Expense application. In simple terms, the Expense application is designed
to move Expense data from your SPT 1500™ terminal into a Microsoft Excel spreadsheet.
Each Expense item stored in your SPT 1500 terminal represents a group of related data. The
following data can be associated with an expense item:
t
t
t
t
t
Category
Payment Currency
Date
Vendor
Expense Type
B-1
SPT 1500 Product Reference Guide
City
Amount
t
Attendees
t
Payment Method
t
Note
When you perform a HotSync® operation between your SPT 1500 terminal and the Palm
Desktop on your computer, the Expense data is stored on your computer (in a file named
Expense.txt). When you open the Expense application in Palm Desktop, an Excel macro
starts, and populates an expense template with your data based on the rules specified in a
spreadsheet file named Maptable.xls.
t
t
The Maptable.xls file is an editable spreadsheet that functions as a “mapping table.” The
function of the mapping table is to guide the Excel macro in extracting the Expense data. The
mapping table tells the Excel macro how large the spreadsheet is and provides the data-cell
layout of the Excel template used for the Expense Report.
Customizing Existing Sample Templates
Four sample Expense Report templates come with Palm Desktop. These templates are stored
in the Templates folder (which is in the same folder as the Palm Desktop application).
If the layout of one (or more) of these templates is appropriate for your reporting needs, you
can easily customize the templates with your company name and other information.
To customize a sample Expense Report template:
1. Make a backup copy of the contents of the Templates folder.
2. Double-click the name of the sample template you want to modify to open it in
Microsoft Excel.
B-2
Creating a Custom Expense Report
3. Make any changes that you want to the names (or other information) in the sample
template.
Important: Do not insert rows or columns in the sample template. Doing so changes
the way your Expense data maps to the template and causes errors. If
you want to move the cells to a different location or add or delete rows
or columns, you will have to make changes to the Maptable.xls file.
Note: You can insert your own company logo without changing the
Maptable.xls file. However, if you change the file name, you need to
make a corresponding change in the Maptable.xls file.
You can also rename cells without changing the Maptable.xls file — provided that
the expense type corresponds to your SPT 1500 terminal data. For example, you can
change “Snack” to “Munchies” — and then all items entered on your SPT 1500
terminal as “Snack” will map to the cell(s) labeled “Munchies.”
4. Choose Save As from the File menu to open the Save As dialog.
5. Click the Save as type drop-down list and choose Template (*.xlt).
6. Navigate to the Templates folder (in the Palm Desktop directory).
Note: If you do not need to change the Maptable.xls file, save the template
file with its original file name (e.g., Sample2.xlt).
If you do need to change the Maptable.xls file, give your modified template a unique
name. Be sure to use the.xlt file suffix, which defines the file as a Microsoft Excel
template.
7. Click the Save button to save your modified template and make it available for future
use.
Note: If you need to modify the Maptable.xls file, you must do this before
you can use the modified template with your Expense data. To modify
the Maptable.xls file for your new template, see Programming the
Mapping Table on page B-6. Read all of the sections of this appendix
before making changes to the Maptable.xls file.
B-3
SPT 1500 Product Reference Guide
Determining the Layout of the Expense Report
This section describes the layout considerations for the Expense Report and explains the
terms used for creating the report.
Labels
There are two kinds of labels that you need to define for your report: day/date and expense
type. Each kind of label can be either Fixed or Variable. A Fixed label means that the label
always appears as a header at the beginning of a row or column. If a label is not Fixed, it is
variable.
For example, a list table of expenses could have variable labels in the rows for day/date, and
variable labels in the columns for expense type. In this case, neither day/date or expense type
information would be “fixed” (as a header). Instead, the date and expense type information
would be filled into the cells of the spreadsheet as appropriate.
Examples of both Fixed and Variable labels appear in the sample expense templates.
Sections
A Section is an area of the report that has common formatting. It is common for an Expense
report to have more than one Section. For example, the following sample Expense Report
named Sample3.xlt contains several Sections.
B-4
Creating a Custom Expense Report
Section 1
(not prepaid)
Section 2
(prepaid)
Section 3
Because your Expense data maps to row and column areas of your final report, different
Sections require different definitions for the data mapping. To create additional Sections with
different mapping, you create corresponding additional lines to the mapping table file named
Maptable.xls. This procedure is explained later in this appendix.
If a section contains cells for prepaid (company paid) expenses, you need to create an
additional line in the mapping table for “prepaid.” This will count as an additional section
in the mapping table. The only data that differs in the prepaid section (from the non-prepaid
section) is the row/column numbers for the expense type.
Analyzing Your Custom Expense Report
If you already have a custom Excel expense report, you can use it with a modified mapping
table. However, before you can create a Maptable.xls file that corresponds to your custom
Expense Report, you must first analyze the characteristics of your report.
Perform the following before you begin a custom mapping table:
t
Print a copy of your custom expense report. Activate the Row and Column Headings
option in the Sheet settings of the Page Setup command. This enables you to quickly
determine the size of the Section(s), as well as the numbers for the start rows and
columns.
B-5
SPT 1500 Product Reference Guide
t
t
t
On the printed copy, identify the data Sections. A Section is an area of data with
common row and column formatting. A yellow highlighter marking pen can make it
easy to see the Sections as you work with programming the mapping table. Your
custom Expense Report can contain any number of Sections, and the same data can
be repeated in any Section.
On the printed copy, identify the type of Labels that apply to each Section. Each
Section can have only one kind of Fixed or Variable Label for rows. Likewise, each
Section can have only one kind of Fixed or Variable Label for columns.
Place a copy of your custom Expense Report in the Templates folder (in the Palm
Desktop directory). Change the file name so it has the file extension.xlt (which
defines it as a Microsoft Excel Template). Make a note of the exact file name so it
can be defined in the mapping table file.
Programming the Mapping Table
Once you have analyzed the components of your custom Expense Report, you can program
the mapping table to fill the report with data from the SPT 1500 terminal.
To program a new custom mapping table:
1. Open a copy of the Maptable.xls file in Microsoft Excel.
Note: This file is located in the same folder as the Palm Desktop application.
Make a backup copy of this file before you make your modifications.
2. To map a new template, scroll to where you find the name of the original template
that you chose for your modifications. The name of the template appears in column
B of the Maptable.xls file, next to the cell highlighted in green that reads “Template
Name:”. If you did not modify an existing template, move to any table in the
Maptable.xls file.
3. Select all the rows associated with the template name. To select the rows, click and
drag on the row numbers (left side), so they appear highlighted.
B-6
Creating a Custom Expense Report
All rows
associated
with
template are
selected
4. Choose Copy from the Edit menu.
5. Scroll down to a blank area of the Maptable.xls file (below the rows used for
Sample4.xlt), and click on a row number to select a blank row.
6. Choose Paste from the Edit menu. A copy of the rows you selected in step 3 is pasted
into the Maptable.xls file.
7. Name the table. In the cell immediately to the right of the cell entitled Template
Name, enter the exact file name of your custom Expense Report template.
8. Define the number of Sections. Each row in a table defines how your SPT 1500
terminal data is placed in a Section of your custom Expense Report. Note that the
prepaid portion of a section has its own row and counts as a separate section for map
table purposes, even though it is not a separate section in your template.
Table with
four sections
B-7
SPT 1500 Product Reference Guide
You may add or delete rows as necessary so that the total number of rows
corresponds to the number of Sections in your custom Expense Report. To clear all
of the existing settings in a row, click to select the row and press Ctrl+Delete. Name
each row to correspond to a Section of your custom Expense Report.
9. Determine the Label settings. The orientation of the data fields (Row, Column)
appears in the yellow section of the table.
Determine whether the Rows will contain expense or date information, and place an
“x” in the appropriate cell. When you do this, you also define whether the label is
Fixed or Variable. You can place only one “x” in the Row section (columns 2–5).
Determine whether the Columns will contain expense or date information, and place
an “x” in the appropriate cell. When you do this, you also define whether the label
is Fixed or Variable. You can place only one “x” in the Column section (columns 6–
9).
10. Define the dimensions of the Section. The dimensions of the Section appear in the
green columns (10–13).
# of Rows Represents the total number of rows in the Section,
excluding any header or total rows. In other words, this
includes only the number of rows in the Section where
your SPT 1500 terminal data will be placed.
# of
Columns
Represents the total number of columns in the Section,
excluding any header or total columns. In other words,
this includes only the number of columns in the Section
where your SPT 1500 terminal data will be placed.
Start Row Is the number of the first row of the Section that will be
filled with your SPT 1500 terminal data.
Start
Column
B-8
Is the number of the first column of the Section that will
be filled with your SPT 1500 terminal data.
Creating a Custom Expense Report
11. Define the Dates and Intervals. The dates and intervals between dates appears in the
light blue columns (14–17).
In the Date cell, enter the row or column number where all the date information will
be placed.
In the Dates cell, enter the number of blank columns (or rows) separating the date
fields. If there are no blank columns (or rows) between date entries, leave this
number set to zero.
In the Start Day cell, enter the day of the week that starts the expense reporting
period. Enter a three-character abbreviation for the day (e.g., Sun, Mon, Tue).
In the Day cell, enter the row or column number where all the day information will
be placed. If the dates are in a row, enter the row number. If the dates are in a column,
enter the column number.
12. Define whether the Section is in list format. This setting appears in the light purple
columns (18–19).
13. If the Section will present the data in a list format, enter the word “yes”. Otherwise,
enter the word “no”. The following diagram shows data presented in a list format:
Only if your section is in list format: In the Expense Type cell, enter the number of
the row or column where the expense description will be placed. Expense amounts
can be entered in several different columns or rows if required by your template.
Expense type labels must all appear in the same column.
14. Enter the row or column numbers for the expense types that appear in the Section.
These settings appear in the aqua columns (20–48).
B-9
SPT 1500 Product Reference Guide
For these settings, simply enter the row or column number for the expense types that you
want to appear in the Section. Note that the same row or column number can be used
more than once. An example of this would be meals that encompass breakfast, lunch,
dinner and snacks. In the previous example, all expense items would be populated into
row/column 4 of the custom Expense Report.
15. Complete the table. All of the remaining columns (49–57) in the table are used to
define the column or row number that corresponds to the description.
16. Mark a Section for prepaid expenses (yellow column). If a row in the map table is
for prepaid (company paid) expenses, type a “yes” in the cell on that Section’s row.
Type “no” in all the cells of this column that do not pertain to prepaid expenses.
17. Repeat steps 9 through 15 for each Section that you have defined for your custom
Expense Report.
18. Map Expense Report Options dialog (magenta section). The Expense Report
Options dialog has five fields where you can fill in data for the header on your
expense report. Use this section to specify the row and column on your template
where this information will be mapped.
Because header data is not related to any particular Section, you have to fill in only one
row. If the item does not appear on your template, leave these cells blank.
Using Applications Other Than Microsoft Excel
You can use applications other than Microsoft Excel (such as Lotus 1-2-3 or Quattro Pro) to
open and manipulate the Expense data on your computer. The data file is named
“Expense.txt,” and is stored in the Expense folder, within the folder containing the SPT 1500
terminal user data.
Expense data in the Expense.txt file is in tab-delimited format.
B-10
Creating a Custom Expense Report
Expense File Details
The Expense.txt file contains four groups of data. It is easier to see these four distinct groups
of data if you open the file with a spreadsheet application.
Trips
Shows the number of Expense application
categories, and lists each one followed by an
“end” statement.
Currency
Shows how many currencies were used for the
Expense data, and lists the countries that
correspond to that currency.
Trip
Shows the number of expenses by category, and
lists the expenses for each category.
Expenses
Shows the total number of expenses, and lists
them chronologically.
B-11
SPT 1500 Product Reference Guide
B-12
Appendix C
Non-ASCII Characters for Login Scripts
Introduction
The following information enables you to create custom login scripts that require non-ASCII
characters. It is provided for advanced users who understand the use and requirements of
such characters in a custom login script.
Use of ^char
You may use the caret ( ^ ) to transmit ASCII command characters. If you send ^char, and
the ASCII value of char is between @ and _, then the character is automatically translated to
a single-byte value between 0 and 31. For example, ^M is converted to a carriage return. If
char is a value between a and z, then the character sequence is translated to a single-byte value
between 1 and 26. If char is any other value, then the character sequence is not subject to any
special processing.
For example, the string “Joe^M” transmits Joe, followed by a carriage return.
Carriage Return and Line Feed
You may include carriage return and line feed commands as part of the login script, when
entered in the following format:
<cr>
Sends or receives a carriage return
<lf>
Sends or receives a line feed
C-1
SPT 1500 Product Reference Guide
For example, the string “waitfor Joe<cr><lf>” waits to receive Joe followed by a carriage
return and line feed from the remote computer before executing the next command in the
script.
Literal Characters
The backslash ( \ ) character defines that the next character is transmitted as a literal
character, and is not subject to any special processing ordinarily associated with that
character.
Examples:
\^ Includes a caret as part of the string
\< Includes a < as part of the string
\\ Includes a backslash as part of the string
C-2
Index
A
Adding
Address Book entries . . . . . . . . . . . . . . 4-2
Adding message details . . . . . . . . . . . . . . . . 9-9
Address Book
beaming . . . . . . . . . . . . . . . . . . . . . . . . 4-9
business card . . . . . . . . . . . . . . . . . . . . 4-9
categories . . . . . . . . . . . . . . . . . . . . . . . 4-7
creating entry . . . . . . . . . . . . . . . . . . . . 4-2
deleting entries . . . . . . . . . . . . . . . . . . . 4-5
editing entry . . . . . . . . . . . . . . . . . . . . . 4-4
entry details . . . . . . . . . . . . . . . . . . . . . 4-8
features . . . . . . . . . . . . . . . . . . . . . . . . . 4-1
list by company . . . . . . . . . . . . . . . . . . 4-7
lookup entries . . . . . . . . . . . . . . . . . . . . 4-5
menu commands . . . . . . . . . . . . . . . . 4-10
opening . . . . . . . . . . . . . . . . . . . . . . . . 4-1
phone numbers . . . . . . . . . . . . . . . . . . . 4-6
Alarm
setting . . . . . . . . . . . . . . . . . . . . . . . . . . 6-6
Application
Date Book
menu commands . . . . . . . . . . . . . 6-13
Laser Pointer . . . . . . . . . . . . . . . . . . . .142
Applications
Address Book . . . . . . . . . . . . . . . . . xv, 4-1
Calculator . . . . . . . . . . . . . . . . . . . . . . 5-1
menu commands . . . . . . . . . . . . . . 5-2
special buttons . . . . . . . . . . . . . . . 5-2
using . . . . . . . . . . . . . . . . . . . . . . . 5-1
calculator
menu commands
recent calculations . . . . . . . . .5-2
Date Book . . . . . . . . . . . . . . . . . . . xv, 6-1
Changing the View . . . . . . . . . . . . 6-9
Deleting an Event . . . . . . . . . . . . . 6-9
event conflicts . . . . . . . . . . . . . . . 6-11
Marking Private Event . . . . . . . . . 6-9
Menu Commands
Options Menu . . . . . . . . . . . 6-14
menu commands
record menu . . . . . . . . . . . . 6-13
month view . . . . . . . . . . . . . . . . 6-12
Repeat Function . . . . . . . . . . . . . . 6-8
Rescheduling an Event . . . . . . . . . 6-6
Scheduling an Event . . . . . . . . . . . 6-2
Scheduling Repeating Events . . . . 6-7
Setting Alarm for an Event . . . . . . 6-6
Working in Week View . . . . . . . 6-10
Expense . . . . . . . . . . . . . . . . . . . . . xvi, 7-1
changing an expense item date . . . 7-3
creating an expense item . . . . . . . . 7-2
Customizing the Currency Pick
List . . . . . . . . . . . . . . . . . . . . 7-5
Entering Receipt Details . . . . . . . . 7-3
Expense Menu Commands
Options Menu . . . . . . . . . . . 7-12
About Expense . . . . . . . 7-13
Custom Currencies . . . . 7-13
Options menu
Preferences . . . . . . . . . . 7-13
Record Menu . . . . . . . . . . . 7-12
delete item . . . . . . . . . . 7-12
Purge . . . . . . . . . . . . . . 7-12
menu commands . . . . . . . . . . . . 7-12
Printing an Expense Report . . . . . 7-7
Show options . . . . . . . . . . . . . . . . 7-6
Index-1
SPT 1500 Product Reference Guide
Transferring data to Microsoft
Excel . . . . . . . . . . . . . . . . . . 7-7
using expense report templates . . 7-11
expense . . . . . . . . . . . . . . . . . . . . . . . . B-1
customizing templates . . . . . . . . . B-2
lotus 1-2-3 . . . . . . . . . . . . . . . . . B-10
Quattro Pro . . . . . . . . . . . . . . . . B-10
font style . . . . . . . . . . . . . . . . . . . . . . 2-20
HotSync . . . . . . . . . . 8-1, 8-3, 8-5, 8-8, 9-1
Conducting locally . . . . . . . . . . . . 8-4
conducting via Modem . . . . . . . . . 8-9
customizing application settings . . 8-7
performing for first time . . . . . . . . 8-2
preparing your computer for . . . . 8-9
Selecting HotSync Setup Options . 8-4
via a network . . . . . . . . . . . . . . . 8-12
installing . . . . . . . . . . . . . . . . . . . . . . 15-1
Laser Pointer . . . . . . . . . . . . . . . . . . . . 141
Laser Scanner . . . . . . . . . . . . . . . . . . . 141
Mail . . . . . . . . . . . . . . . . . . . . . . . . . . . 9-1
Adding a Signature . . . . . . . . . . . 9-11
creating messages . . . . . . . . . . . . . 9-5
opening on the SPT 1500 . . . . . . . 9-4
setting a priority . . . . . . . . . . . . . 9-10
setup . . . . . . . . . . . . . . . . . . . . . . . 9-1
synchronizing with email . . . . . . . 9-3
viewing messages . . . . . . . . . . . . . 9-4
mail
adding message details . . . . . . . . . 9-9
address lookup . . . . . . . . . . . . . . . 9-8
confirmation requests . . . . . . . . . 9-12
filing a message . . . . . . . . . . . . . 9-14
graffiti . . . . . . . . . . . . . . . . . . . . . 9-6
header information . . . . . . . . . . . . 9-5
high priority messages . . . . . . . . 9-24
hotsync options . . . . . . . . . . . . . 9-18
message fonts . . . . . . . . . . . . . . . . 9-5
sending messages . . . . . . . . . . . . 9-12
Manager . . . . . . . . . . . . . . . . . . . . . . . 2-2
Memo Pad . . . . . . . . . . . . . . . . . . . . . 10-1
Arranging Memos . . . . . . . . . . . 10-3
choosing a memo category . . . . . 10-4
Deleting a Memo . . . . . . . . . . . . 10-5
marking a memo private . . . . . . . 10-4
Index-2
menu commands . . . . . . . . . . . . . 10-5
options menu . . . . . . . . . . . 10-6
record menu . . . . . . . . . . . . 10-5
reviewing memos . . . . . . . . . . . . . 10-3
working with . . . . . . . . . . . . . . . . 10-2
Preferences . . . . . . . . . . . . . . . . . . . . . 11-1
buttons . . . . . . . . . . . . . . . . . . . . 11-2
changing pen preferences . . . . . . . 11-3
digitizer . . . . . . . . . . . . . . . . . . . . 11-5
formats . . . . . . . . . . . . . . . . . . . . 11-5
general
auto-off delay . . . . . . . . . . . 11-8
current date . . . . . . . . . . . . 11-7
current time . . . . . . . . . . . . 11-6
hotsync buttons . . . . . . . . . . . . . . 11-4
network and Palm TCP/IP . . . . . 11-10
owner . . . . . . . . . . . . . . . . . . . . 11-24
pen . . . . . . . . . . . . . . . . . . . . . . . 11-2
time,date, week,numbers . . . . . . . 11-6
preferences
general . . . . . . . . . . . . . . . . . . . . . 11-6
system,alarm,game sounds . 11-8
shortcuts . . . . . . . . . . . . . . . . . . 11-25
removing . . . . . . . . . . . . . . . . . . 15-4, 15-5
removing and installing . . . . . . . . . . . . 15-1
switching . . . . . . . . . . . . . . . . . . . . . . . 2-2
applications
mail
draft messages . . . . . . . . . . . . . . . 9-13
Applications Launcher . . . . . . . . . . . . . . . . 15-4
B
Backlight Feature . . . . . . . . . . . . . . . . . . . . . 1-6
Batteries
auto-off delay . . . . . . . . . . . . . . . . . . . 11-8
battery considerations . . . . . . . . . . . . . . . . 17-2
Beam Data . . . . . . . . . . . . . . . . . . . . . . . . 16-11
Beaming
Address Book categories . . . . . . . . . . . 4-10
Address Book entries . . . . . . . . . . . . . . 4-9
business card . . . . . . . . . . . . . . . . . . . . . 4-9
Date Book entries . . . . . . . . . . . . . . . . 6-14
Index
Business Card
beaming . . . . . . . . . . . . . . . . . . . . . . . . 4-9
selecting . . . . . . . . . . . . . . . . . . . . . . . . 4-9
C
Calculator
buttons . . . . . . . . . . . . . . . . . . . . . . . . . 5-2
clear entry . . . . . . . . . . . . . . . . . . . . . . 5-2
memory . . . . . . . . . . . . . . . . . . . . . . . . 5-2
menu commands . . . . . . . . . . . . . . . . . 5-2
recent calculations . . . . . . . . . . . . . 5-2
opening . . . . . . . . . . . . . . . . . . . . . . . . 5-1
recent calculations . . . . . . . . . . . . . . . . 5-2
using . . . . . . . . . . . . . . . . . . . . . . . . . . . 5-1
Calculator Application . . . . . . . . . . . . . . . . 5-1
Calculator Menu Commands . . . . . . . . . . . . 5-2
Calibrating the Screen . . . . . . . . . . . . . . . . . 1-5
Categories
Address Book entries . . . . . . . . . . . . . . 4-7
beaming . . . . . . . . . . . . . . . . . . . . . . . 4-10
Changing
Address Book entries . . . . . . . . . . . . . . 4-4
Changing the Date Book View . . . . . . . . . . . 6-9
Changing the Expense Item Date . . . . . . . . . 7-3
choosing a to do category . . . . . . . . . . . . . 13-4
Conducting a HotSync Operation via Modem 89
Conducting a local HotSync Operation . . . . 8-4
Conduits . . . . . . . . . . . . . . . . . . . . . . . . . . . 8-7
contacting Symbol . . . . . . . . . . . . . . . . . . . . xvii
Creating
Address Book entries . . . . . . . . . . . . . . 4-2
Customizing HotSync Application Settings . 8-7
D
Date Book . . . . . . . . . . . . . . . . . . . . . . . . . . 6-1
alarm . . . . . . . . . . . . . . . . . . . . . . . . . . 6-6
beaming entries . . . . . . . . . . . . . . . . . 6-14
Changing the view . . . . . . . . . . . . . . . . 6-9
Deleting an Event . . . . . . . . . . . . . . . . . 6-9
event conflicts . . . . . . . . . . . . . . . . . . . 6-11
event duration . . . . . . . . . . . . . . . . . . . 6-2
event start time . . . . . . . . . . . . . . . . . . . 6-2
features . . . . . . . . . . . . . . . . . . . . . . . . 6-1
Marking Private Event . . . . . . . . . . . . . 6-9
menu commands . . . . . . . . . . . . . . . . 6-13
record menu . . . . . . . . . . . . . . . . 6-13
month view . . . . . . . . . . . . . . . . . . . . 6-12
opening . . . . . . . . . . . . . . . . . . . . . . . . 6-1
Options Menu . . . . . . . . . . . . . . . . . . 6-14
private events . . . . . . . . . . . . . . . . . . . . 6-9
repeat event . . . . . . . . . . . . . . . . . . . . . 6-7
Rescheduling an Event . . . . . . . . . . . . . 6-6
rescheduling events . . . . . . . . . . . . . . . 6-6
Scheduling an Event . . . . . . . . . . . . . . . 6-2
scheduling event . . . . . . . . . . . . . . . . . 6-2
Scheduling Repeating Events . . . . . . . . 6-7
Setting an Alarm for an event . . . . . . . 6-6
switching views . . . . . . . . . . . . . . . . . . 6-9
untimed event . . . . . . . . . . . . . . . . . . . 6-2
week view . . . . . . . . . . . . . . . . . . . . . 6-10
Working in Week View . . . . . . . . . . . 6-10
Date Book Menu Commands . . . . . . . . . . 6-13
Deleting
Address Book entries . . . . . . . . . . . . . . 4-5
Deleting a To Do Item . . . . . . . . . . . . . . . 13-5
Deleting an Event . . . . . . . . . . . . . . . . . . . . 6-9
Demo Scan Application . . . . . . . . . . . . . . . 142
Details
Address Book . . . . . . . . . . . . . . . . . . . 4-8
Draft Messages . . . . . . . . . . . . . . . . . . . . . 9-13
E
Editing
Address Book entries . . . . . . . . . . . . . . 4-4
Entering Receipt Details . . . . . . . . . . . . . . . 7-3
Entries
Address Book . . . . . . . . . . . . . . . . . . . 4-2
beaming . . . . . . . . . . . . . . . . . . . . . . . . 4-9
Event
changing to untimed . . . . . . . . . . . . . . 6-5
conflicts . . . . . . . . . . . . . . . . . . . . . . . 6-11
Date Book scheduling . . . . . . . . . . . . . 6-2
deleting . . . . . . . . . . . . . . . . . . . . . . . . 6-9
in week view . . . . . . . . . . . . . . . . . . . 6-11
private . . . . . . . . . . . . . . . . . . . . . . . . . 6-9
Index-3
SPT 1500 Product Reference Guide
repeat . . . . . . . . . . . . . . . . . . . . . . . . . 6-7
setting alarm . . . . . . . . . . . . . . . . . . . . 6-6
start and duration . . . . . . . . . . . . . . . . 6-2
untimed . . . . . . . . . . . . . . . . . . . . . . . . 6-2
Excel . . . . . . . . . . . . . . . . . . . . . . . . . . . . . . B-1
Expense . . . . . . . . . . . . . . . . . . . . . . . . . . . B-1
features . . . . . . . . . . . . . . . . . . . . . . . . 7-1
layout . . . . . . . . . . . . . . . . . . . . . . . . . B-4
menu commands . . . . . . . . . . . . . . . . 7-12
opening . . . . . . . . . . . . . . . . . . . . . . . . 7-1
expense templates . . . . . . . . . . . . . . . . . . . . B-2
F
File
messages . . . . . . . . . . . . . . . . . . . . . . 9-14
File Link . . . . . . . . . . . . . . . . . . . . . . . . . . 8-14
using . . . . . . . . . . . . . . . . . . . . . . . . . 8-14
filing a message . . . . . . . . . . . . . . . . . . . . . 9-14
Finding
Address Book entries . . . . . . . . . . . . . . 4-5
Full Header . . . . . . . . . . . . . . . . . . . . . . . . . 9-5
modem settings . . . . . . . . . . . . . . . . . . . 8-7
options . . . . . . . . . . . . . . . . . . . . . . . . . 8-4
performing for first time . . . . . . . . . . . . 8-2
preparing your computer for . . . . . . . . . 8-9
purging deleted messages . . . . . . . . . . 9-16
Selecting setup options . . . . . . . . . . . . . 8-4
user profile . . . . . . . . . . . . . . . . . . . . . 8-12
using a modem . . . . . . . . . . . . . . . . . . . 8-9
via a network . . . . . . . . . . . . . . . . . . . 8-12
I
Infrared port . . . . . . . . . . . . . . . . . . . . . . 16-11
Installing Batteries . . . . . . . . . . . . . . . . . . . . 1-4
Installing games . . . . . . . . . . . . . . . . . . . . . 15-4
IP Address . . . . . . . . . . . . . . . . . . . . . . . . 11-17
K
Keyboard
pen stroke . . . . . . . . . . . . . . . . . . . . . . 11-3
L
G
Giraffe . . . . . . . . . . . . . . . . . . . . . . . . . . . 15-4
Graffiti . . . . . . . . . . . . . . . . . . . . 5-1, 9-6, 13-2
Graffiti Help
pen stroke . . . . . . . . . . . . . . . . . . . . . 11-3
H
HotSync 8-3, 8-5, 8-8, 8-9, 8-12, 8-13, 9-1, 9-3,
9-16, 9-18, 10-4, 11-4, 16-5, 17-2, 17-3
conducting a local operation . . . . . . . . 8-4
conduits . . . . . . . . . . . . . . . . . . . . . . . . 8-7
customizing . . . . . . . . . . . . . . . . . . . . . 8-7
customizing application settings . . . . . 8-7
features . . . . . . . . . . . . . . . . . . . . . . . . 8-1
File Link . . . . . . . . . . . . . . . . . . . . . . 8-14
first time . . . . . . . . . . . . . . . . . . . . . . . 8-2
HotSync Manager . . . . . . . . . . . . . . . . 8-1
local . . . . . . . . . . . . . . . . . . . . . . . . . . . 8-4
modem . . . . . . . . . . . . . . . . . . . . . . . . 8-9
modem conduit setup . . . . . . . . . . . . 8-11
Index-4
Laser Pointer Application . . . . . . . . . . . . . . 147
using . . . . . . . . . . . . . . . . . . . . . . . . . . 147
Laser Scanner
battery implications . . . . . . . . . . . . . . 146
Look Up
Address Book entries . . . . . . . . . . . . . . 4-5
Lotus 1-2-3 . . . . . . . . . . . . . . . . . . . . . . . . B-10
M
Mail
adding a signature . . . . . . . . . . . . . . . . 9-11
creating messages . . . . . . . . . . . . . . . . . 9-5
full header . . . . . . . . . . . . . . . . . . . . . . . 9-5
HotSync options . . . . . . . . . . . . . 9-2, 9-18
opening on SPT 1500 . . . . . . . . . . . . . . 9-4
priority . . . . . . . . . . . . . . . . . . . . . . . . 9-10
mail
address lookup . . . . . . . . . . . . . . . . . . . 9-8
graffiti . . . . . . . . . . . . . . . . . . . . . . . . . . 9-6
sending messages . . . . . . . . . . . . . . . . 9-12
maintenance . . . . . . . . . . . . . . . . . . . . . . . . 17-1
Index
Mapping Tables . . . . . . . . . . . . . . . . . . . . . . B-1
Marking a Private Event . . . . . . . . . . . . . . . 6-9
Memo Pad . . . . . . . . . . . . . . . . . . . . 10-1, 10-2
arranging memos . . . . . . . . . . . . . . . . 10-3
deleting memos . . . . . . . . . . . . . . . . . . 10-5
reviewing memos . . . . . . . . . . . . . . . . 10-3
memo pad
working with . . . . . . . . . . . . . . . . . . . 10-2
Memory
calculator . . . . . . . . . . . . . . . . . . . . . . . 5-2
purge date book . . . . . . . . . . . . . . . . . 7-12
Menus
Address Book . . . . . . . . . . . . . . . . . . . 4-10
Date Book . . . . . . . . . . . . . . . . . . . . . 6-13
Expense . . . . . . . . . . . . . . . . . . . . . . . 7-12
message fonts . . . . . . . . . . . . . . . . . . . . . . . . 9-5
messages
high priority . . . . . . . . . . . . . . . . . . . . 9-24
Microsoft Excel . . . . . . . . . . . . . . . . . B-1, B-10
Transferring data to . . . . . . . . . . . . . . . 7-7
Modem . . . . . . . . . . . . . 8-9, 8-10, 11-4, 11-10
HotSync . . . . . . . . . . . . . . . . . . . . . . . . 8-9
modem . . . . . . . . . . . . . . . . . . . . . . . . . . . 16-8
Modem Preferences . . . . . . . . . . . . 11-9, 11-10
Month
Date Book view . . . . . . . . . . . . . . . . . 6-12
N
Network . . . . . . . . . . . . . . . . . . . . . . . . . . 8-12
password . . . . . . . . . . . . . . . . . . . . . 11-12
primary DNS . . . . . . . . . . . . . . . . . . 11-19
TCP/IP . . . . . . . . . . . . . . . . . . . . . . . 11-10
New
Address Book entry . . . . . . . . . . . . . . . 4-2
new event . . . . . . . . . . . . . . . . . . . . . . . . . 6-13
notational conventions . . . . . . . . . . . . . . . . xvii
O
Opening
Address Book . . . . . . . . . . . . . . . . . . . . 4-1
Operation . . . . . . . . . . . . . . . . . . . . . . . . . . 8-9
Options
message list . . . . . . . . . . . . . . . . . . . . . 9-16
Options Menu . . . . . . . . . . . . . . . . . . . . . 6-14
About Date Book . . . . . . . . . . . . . . . . 6-16
Display options . . . . . . . . . . . . . . . . . 6-16
font . . . . . . . . . . . . . . . . . . . . . . . . . . 6-14
Phone Lookup . . . . . . . . . . . . . . . . . . 6-16
Preferences . . . . . . . . . . . . . . . . . . . . . 6-15
Options menu . . . . . . . . . . . . . . . . . . . . . . 7-12
oscillation . . . . . . . . . . . . . . . . . . . . . . . . . . 148
Owner Preferences . . . . . . . . . . . . . . . . . 11-24
P
Palm Desktop
customizing HotSync . . . . . . . . . . . . . . 8-7
File Link . . . . . . . . . . . . . . . . . . . . . . 8-14
HotSync options . . . . . . . . . . . . . . . . . 8-4
modem conduit setup . . . . . . . . . . . . 8-11
synchronization . . . . . . . . . . . . . . . . . . 8-1
system requirements . . . . . . . . . . . . . 1-10
Palm III
common data . . . . . . . . . . . . . . . . . . . 8-12
HotSync via modem . . . . . . . . . . . . . 8-10
Parts of the SPT 1500 . . . . . . . . . . . . . . . . . 1-2
Phone Lookup . . . . . . . . . . . . . . . . . . . . . 13-8
Phone Numbers
choosing type . . . . . . . . . . . . . . . . . . . . 4-6
Pointer . . . . . . . . . . . . . . . . . . . . . . . . . . . . 142
pointer
mode settlement time . . . . . . . . . . . . . . 148
Pointer Application
using . . . . . . . . . . . . . . . . . . . . . . . . . . 147
Power Off
pen stroke . . . . . . . . . . . . . . . . . . . . . 11-4
PPP . . . . . . . . . . . . . . . . . . . . . . . . . . . . . 11-17
Preferences
modem . . . . . . . . . . . . . . . . . . . . . . . 11-9
opening . . . . . . . . . . . . . . . . . . . . . . . 11-1
Preparing Your Computer for a
Modem HotSync Operation . . . . . 8-9
Printing
expense report . . . . . . . . . . . . . . . . . . . 7-7
expense reports . . . . . . . . . . . . . . . . . . 7-7
Printing an Expense Report . . . . . . . . . . . . 7-7
Private
Index-5
SPT 1500 Product Reference Guide
events . . . . . . . . . . . . . . . . . . . . . . . . . 6-9
Purge
date book events . . . . . . . . . . . . . . . . 7-12
Q
Quattro Pro . . . . . . . . . . . . . . . . . . . . . . . B-10
R
Record Menu . . . . . . . . . . . . . . . . . . . . . . 7-12
Record menu
Delete Event . . . . . . . . . . . . . . . . . . . 6-13
record menu . . . . . . . . . . . . . . . . . . . . . . . 6-13
attach note . . . . . . . . . . . . . . . . . . . . . 6-14
beam event . . . . . . . . . . . . . . . . . . . . 6-14
delete note . . . . . . . . . . . . . . . . . . . . . 6-14
New Event . . . . . . . . . . . . . . . . . . . . . 6-13
purge . . . . . . . . . . . . . . . . . . . . . . . . . 6-14
Records
Address Book . . . . . . . . . . . . . . . . . . . 4-2
beaming . . . . . . . . . . . . . . . . . . . . . . . . 4-9
Removing
Address Book entries . . . . . . . . . . . . . . 4-5
Date Book events . . . . . . . . . . . . . . . . . 6-9
Repeat Function . . . . . . . . . . . . . . . . . . . . . 6-8
reset
hard . . . . . . . . . . . . . . . . . . . . . . . . . . 17-4
soft . . . . . . . . . . . . . . . . . . . . . . . . . . 17-3
resetting your terminal . . . . . . . . . . . . . . . 17-3
SDK . . . . . . . . . . . . . . . . . . . . . . . . . . . . . . 141
Security
troubleshooting . . . . . . . . . . . . . . . . . 16-11
security . . . . . . . . . . . . . . . . . . . . . . . . . . 11-12
sending messages . . . . . . . . . . . . . . . . . . . . 9-12
service information . . . . . . . . . . . . . . . . . . xvii
setting a due date . . . . . . . . . . . . . . . . . . . . 13-4
Setting the Date . . . . . . . . . . . . . . . . . . . . . . 1-7
Setting the Time . . . . . . . . . . . . . . . . . . . . . . 1-7
Show Options . . . . . . . . . . . . . . . . . . . . . . . 7-6
SimpleScan.prc . . . . . . . . . . . . . . . . . . . . . . 141
soft reset . . . . . . . . . . . . . . . . . . . . . . . . . . 17-3
Sorting
Address Book . . . . . . . . . . . . . . . . . . . . 4-7
Special Calculator Buttons . . . . . . . . . . . . . . 5-2
SPT 1500 . . . . . . . . . . . . . . . . . . . . . . . . . . . B-1
Backlight Feature . . . . . . . . . . . . . . . . . 1-6
Calibrating the Screen . . . . . . . . . . . . . . 1-5
hard reset . . . . . . . . . . . . . . . . . . . . . . 17-4
Installing Batteries . . . . . . . . . . . . . . . . 1-4
Parts of Diagram . . . . . . . . . . . . . . . . . . 1-2
resetting . . . . . . . . . . . . . . . . . . . . . . . 17-3
soft reset . . . . . . . . . . . . . . . . . . . 17-3
Scanning with . . . . . . . . . . . . . . . . . . . 141
Setting Current Date . . . . . . . . . . . . . . . 1-7
Setting the Time . . . . . . . . . . . . . . . . . . 1-7
Starting
Address Book . . . . . . . . . . . . . . . . . . . . 4-1
T
S
Scan Enable . . . . . . . . . . . . . . . . . . . . . . . . 142
ScanDemo.prc . . . . . . . . . . . . . . . . . . . . . . . 141
Scanning . . . . . . . . . . . . . . . . . . . . . . . 141, 144
Demo Scan Application . . . . . . . . . . . . 142
menu options . . . . . . . . . . . . . . . . 143
scanning using . . . . . . . . . . . . . . . 144
problems . . . . . . . . . . . . . . . . . . . . . . . 145
receiving demo program . . . . . . . . . . . 145
Simplescan application . . . . . . . . . . . . 141
Scanning Problems . . . . . . . . . . . . . . . . . . . 145
Scheduling an Event . . . . . . . . . . . . . . . 6-2, 7-3
Scheduling Repeating Events . . . . . . . . . . . . 6-7
Index-6
TCP/IP . . . . . . . . . . . . . . . . . . . . . . . . . . . 11-10
Time
alarm setting . . . . . . . . . . . . . . . . . . . . . 6-6
setting event . . . . . . . . . . . . . . . . . . . . . 6-2
To Do List Menu Commands . . . . . . . . . . 13-7
To Do Show Options . . . . . . . . . . . . . . . . . 13-6
Toubleshooting
infrared communications . . . . . . . . . 16-11
Trigger Mode . . . . . . . . . . . . . . . . . . . . . . . 142
Troubleshooting
applications . . . . . . . . . . . . . . . . . . . 16-11
Date Book . . . . . . . . . . . . . . . . . . . . . 16-12
HotSync . . . . . . . . . . . . . . . . . . . . . . . 16-7
Index
creating . . . . . . . . . . . . . . . . . . . . . . . 8-12
installation . . . . . . . . . . . . . . . . . . . . . 16-7
Truncate . . . . . . . . . . . . . . . . . . . . . . . . . . 9-25
W
U
Untimed Events . . . . . . . . . . . . . . . . . . . . . . 6-2
User Profile . . . . . . . . . . . . . . . . . . . . . . . . . 8-2
Week
Date Book view . . . . . . . . . . . . . . . . . 6-10
Working in Week View . . . . . . . . . . . . . . . 6-10
Index-7