1
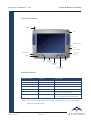
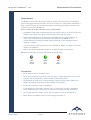
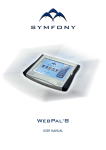
Symfony WebPal® 10
WebPal 10
®
USER MANUAL
User Manual
Page 1
Symfony WebPal® 10
Contents
Symfony WebPal® 10
Quick-Start Guide
Contents
Front-View Layout ............................................................................. 3
Button Functions ............................................................................... 3
Requirements ................................................................................... 4
Notes in setting up 802.11b-based wireless communication ........................... 4
Operation ........................................................................................ 5
Calibration ...................................................................................... 5
Configuring the WebPal® ........................................................................................................... 6
The External CompactFlash (CF) Slot ...................................................... 9
User Manual
Page 2
Symfony WebPal® 10
Layout & Button Functions
Front-View Layout
Antenna
Stylus
Network Connect
Power
Battery Charge
Power Input
Power Switch
USB Port
Speaker
Scroll
Tool
Microphone
Compact
Flash Bay
Headphone
Socket
Function Buttons
(see below)
Button Functions
Button Functions
Location
Requirement
Soft Keyboard
Left Most (K)
Enable/Disable
E-mail
Second from Left
Open/Close
Desktop
Third from Left
Open/Close
‘Home’ URL
Right Most
Jump to default URL
Rocker key
Left Side
Vertical scroll
Sleep mode*
Left Edge Side
Manual start/stop – Pull/
Quick Release of Power Switch
Power off/on
Left Edge Side
Off – Pull and Hold power switch for 4 sec.
On – Pull/Quick Release of Power Switch
* Note: You can recover from Sleep mode by tapping on the touch screen or by a Pull/Quick
Release of the Power Switch.
User Manual
Page 3
Symfony WebPal® 10
Requirements & Precautions
Requirements
The WebPAL 10 uses an 802.11b wireless module for wireless LAN connectivity. The technology is
direct sequencing spread spectrum (DSSS); the carrier frequency is 2.4 GHz and the bandwidth is 11
Mbps. Currently you must have (as basestations) 802.11b wireless Access Points or Gateways with
Internet access to use the WebPAL 10.
Notes in setting up the 802.11b-based wireless communication
•
The WebPAL 10 and an 802.11b basestation may work together right out of the box but this may
depend on the network environment connected to the access point or gateway.
•
The ESSID and WEP Parameter (if enabled) on the WebPAL 10 and the basestations have to
match. “ANY” for ESSID is universal and may be the default for the WebPAL 10. It is
recommended that you change this ESSID to match specifically to your basestation. WEP is
“Disabled” as default.
•
Click on the wireless LAN icon (see below) on the Windows CE Taskbar, to configure the wireless
module in the WebPAL 10.
•
Refer to the basestation operating manuals for setting up the 802.11b basestations.
NOTE: The wireless LAN icon changes colour based on the following:
GREY
Waiting
for Link
GREEN
Link
Active
RED
Link
Inactive
Precautions
•
Do not apply pressure to the display screen.
•
Do not touch the display screen directly with your fingers. You may damage the screen, and oil
from your skin may be difficult to remove. Please use the Stylus provided.
•
Avoid exposing the panel screen to direct sunlight or other heat source. Where possible, the
WebPAL 10 should be facing away from direct lighting to reduce glare.
•
Do not place anything on top of the WebPAL 10.
•
In the unlikely event that smoke, abnormal noise, or strange odour is present, immediately
switch the WebPAL 10 off. Please report the problem to your device provider immediately.
User Manual
•
Never tamper with the enclosure. You will lose any product warranty on the WebPAL 10.
•
Always handle your WebPAL 10 with care when moving around with it.
Page 4
Symfony WebPal® 10
Operation & Calibration
Operation
Power ON and OFF
To turn the WebPAL 10 on, push and quickly release the power switch to the left of the front bezel.
The power LED on the WebPAL 10 will then turn green indicating that the WebPAL 10 is ready to
use. To turn the WebPAL 10 off, push and hold the power switch for about 4 seconds, the power
light and display will go off. A beep will also sound. You can also use soft controls for Power mode
and Sleep mode access – use the “Device Shut Down” icon on the TaskBar.
Start Up
1. Turn on the power - after several seconds the Windows CE desktop will be displayed.
2. Choose from any of the displayed icons to activate the corresponding application.
Calibration
The Calibration Properties screen will appear if this is a new or reset device. When the WebPAL 10
prompts you to calibrate the touchscreen, use the Stylus (stored in the upper right corner of the
WebPAL 10) and tap where indicated on the touchscreen in accordance with the instructions.
(This document refers to “clicking” or “tapping” interchangeably. The latter is applicable when
the touchscreen is utilized).
NOTE: You can recalibrate at anytime using either:
User Manual
(1)
“Start” ! “Setting” ! “Control Panel” ! “Stylus” or
(2)
Pressing the “K” and E-mail buttons at the same time.
Page 5
Symfony WebPal® 10
Configuring the WebPAL®
Configuring The WebPAL®
1. Click “Start” on the Windows CE Taskbar, select “Settings”, and then click on “Control panel”.
2. The Control Panel displays several icons associated with utilities for configuring the WebPAL 10.
Many of these are self-explanatory. The most common utilities are discussed below.
a) Display Quality set up
i.
Click on “Display”. The Display Properties window will appear.
ii. You can use “Brightness” to adjust the brightness of the displayed images. Tap on the left
arrow to darken the display darker or on the right arrow to increase the brightness.
b) Network Configuration
i.
Double-click on the “Network” icon.
ii. Click on “Network”, the Network Configuration will appear.
iii. Click on “Adapters”, a list of the network drivers installed on your device will be displayed.
Select the adapter that you currently use, then click on “Properties”.
iv. You have two options: “Obtain an IP address via DHCP” or “Specify an IP address”.
v. When you select “Obtain an IP address via DHCP”, you are expecting that an IP address can
be automatically assigned to this device. Then click on “OK” at the top of the window for
confirmation.
vi. When you select “Specify an IP address”; you ask your network administrator for an address
and type it in the space provided (IP Address, Subnet Mask, and Default Gateway). In
addition, you have to specify additional “WINS” or “DNS” in “Name Servers”, then click on
“OK” at the top of the window for confirmation.
vii. You may need to set up a user name, password and Domain. Click “Identification” in
Network Configuration window, input your “Name”, “Password” and “Domain”. Windows
CE uses the information to identify your right to access the network. Then click “OK” at the
top of the window for confirmation.
c) Stylus Setup and Calibration
i.
Double-click “Stylus”; the Stylus Properties window will appear.
ii. You can test the “Double-Tap” function; follow the instructions to double click the two
squares right of the Window. If correct, click on “OK” at the top of the window for
confirmation.
iii. If you want to recalibrate or your device is not responding properly to your taps, select
“Calibration”, follow the instruction to recalibrate. When you are done, click on “OK” to
continue.
User Manual
Page 6
Symfony WebPal® 10
Configuring the WebPAL®
d) System Properties Set Up
i.
Click on “System”; the System Properties window will appear.
ii. Click “General”, the System information will be displayed. Then click on “OK” at the top of
the window for confirmation.
iii. Click “Memory”, you can adjust the allocation of unused RAM to run programs or for storage
(by moving the arrow to the right or left). After changes, click on “OK” at the top of the
window for confirmation.
iv. The System Properties Set Up procedure is completed.
Note: This feature may not be persistent over power cycles.
e) System Software Update
i.
Click on “Update”; the Update window will appear.
ii. Provide appropriate information in the blank fields, click “Update” button, and the device
will be updated with specified software from specified server automatically. Follow any
displayed instructions. After finishing with the loading process, click on “OK” at the top of
the window for confirmation.
CAUTION for “Update” Function
To avoid system crashes and irrecoverable states, you must:
• Use AC power instead of Battery power when the device software is being updated.
• NOT turn the system OFF when the device software is being updated.
NOTE:
It is advisable that you restart the device before performing the Update function, or at least close
all opened applications.
Reading and Sending E-mail
You may choose to use the local email client (Inbox) instead of a web-based email solution.
f) Inbox Configuration.
i.
Open the Inbox program.
ii. Go to the Services tab, select “Options”. After you click on “Options” you will see in a new
window five tabs, which are: “Services”, “Compose”, “Read”, “Delete” and “Storage”.
iii. Select “Services”, click “Add”, choose which type of email service do you have, “IMAP” or
“POP3”, and select one.
iv. In the Setup Mail definition (IMAP or POP3) you must provide the information required
“Connection”, “Server”, “User ID”, and “Password”. If you don’t have this information
contact your Network Administrator.
v. Click “Next”.
User Manual
Page 7
Symfony WebPal® 10
Configuring the WebPAL®
vi. In this window you can configure the “Connections Settings”. There are several options —
use the default values and click “Next”.
vii. The last window is the “Mail Inbox Preferences”. Select the options more suitable to your
needs — you either need to get the full copy messages or you want the headers only.
NOTE: Files in .TXT, .DOC, .DOT, .RTF, HTML, .GIF and .JPG formats may be read.
Accessing the Internet with the Internet Explorer
1. When you want to surf the web, click on “Internet Explorer” in the Desktop screen — the
WebPAL 10 will display the default web site (for example, MSN). You can change the default web
site by using IE browser, View in the menu bar, followed by Internet Options .
2. If you want to leave the Internet to go to Windows CE desktop and you want to keep the web
browser open, just “minimize” the browser window. You can click on the Window Taskbar any
time to return to the browser and web site.
Other Features of Interest
•
Terminal Clients: ICA and RDP
You may use the WebPAL 10 to connect to Citrix and Microsoft Terminal Servers.
(2) “Start” ! “Programs” ! “Terminal Client” ! “Citrix ICA” to connect to Citrix Terminal
Server.
(3) “Start” ! “Programs” ! “Terminal Client”! “Microsoft RDP” to connect to Microsoft
Terminal Server.
•
JVM: Java Virtual Machine.
Able to view and access Java-based applets and applications.
•
PDF Document Viewer.
•
Multi-Format Document Viewer.
•
Macromedia Flash 4.0.
•
Inking. Write messages or take notes using the touch screen for records or for transmittal via email as attachments.
•
Local Printing Support (EPSON USB Printers only). Use USB port on WebPAL 10. It is
recommended that the WebPAL 10 is under external power.
•
Network Printing Support (EPSON Parallel/USB and HP PCL Shared Printer). Print off of shared
PC printers (Print function is browser and other Applications).
•
IP Configuration Utility. You may view your assigned IP address or reset it.
“Start” ! “Programs” ! “IP Config” to view your IP address or reset it.
•
Charging Cradle. You can charge your WebPAL 10 directly or with the AC-DC adapter through the
charging cradle.
User Manual
Page 8
Symfony WebPal® 10
External CompactFlash (CF) Slot
Appendix: External CompactFlash (CF) Slot
This section discusses the usability of the external CF slot located along the left edge of the WebPAL
10. The CF slot is characterized by an opening to insert a CF card next to an ejector button. When a
CF card is inserted into an empty slot, the ejector button will protrude. Pushing on this protruded
button will eject the inserted card.
The CF slot is designed in the WebPAL 10 to provide a source of storage for email attachments, file
downloads, external (Windows CE-compatible) applications, etc. It is designated as “EXT CF Card”
in the file structure of the Windows CE device.
To display the contents of the inserted CF card, select: My Computer ! EXT CF Card.
This is in contrast with “FlashStorage” (My Computer ! FlashStorage) which is a dedicated storage
partition in the internal flash memory of the WebPAL 10.
IMPORTANT
Precautions when using the CF slot:
A. It is advisable that any external CF card be plugged into the External CF Slot before powering
ON the device. Similarly it is advisable to power OFF the WebPad before extracting the external
CF card.
B. The external CF card may be inserted or extracted without power cycling the WebPad IF the
following guidelines are strictly adhered to:
•
After inserting the CF card, invoke the CF Card Manager (Icon on Windows CE Desktop) and
select ATTACH. (You may wish to select DETACH before inserting the card in case the slot had
not been properly detached previously.)
•
To remove the CF card, invoke the CF Card Manager (Icon on Windows CE Desktop) and
select DETACH. Remove the card only after the acknowledgment message box is displayed.
CAUTION: Adhering to the above guidelines will help avoid the loss or corruption of information on
the internal and external flash memories. The manufacturer is not responsible for loss of data
associated with the use of the external CF card slot.
The external CF slot is expected to be compatible with a variety of CF cards from different
manufacturers. However the following brands are currently verified for use with the WebPAL 10.
Capacity Manufacturer
P/N
Apacer (www.apacer.com)
16MB – 256MB
AP-CF01611 to AP-CF25611
SanDisk (www.sandisk.com)
32MB – 128MB
SDCFB-32-455 to SDCFB-128-455
www.designworkshop.co.uk
Brand
User Manual
Page 9
SYMFONY LTD
Head Office Tel : +44(0)1296 640715
Email : [email protected]
UNITED KINGDOM
13 Market Hill, Whitchurch, Aylesbury,
Buckinghamshire HP22 4JB UK
Tel: +44(0)1296 640715 Fax:+44(0)1296 641244
MONACO
2 Lacets St. Lyon, 98000 Monaco
Tel: +377 9777 1236
www.symfony.co.uk