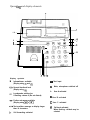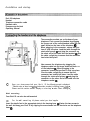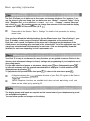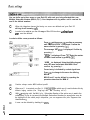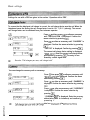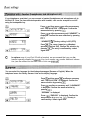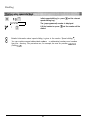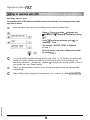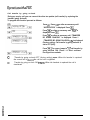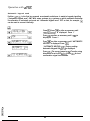
1
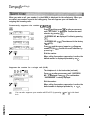
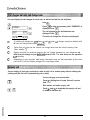
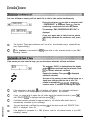
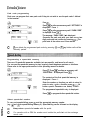
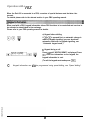
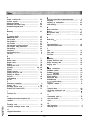
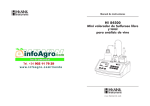
qcCOm Eurit 22 Opera t&g and display elements 1 2 - 6 - 5ooooooooooooq a 000000000000C ooooooooooooc 000000000000C ooooooooooooc 0000000000000 o 63 8 Display symbols Informationen available (Display using @ and @) Second functional level (Display using @) Loudspeaker switched on If flashing: volume 0 (Do not disturb) m Text input M Mute, microphone switched off A User A activated B User B activated Further sub-menus available (Display using Ici or I) C User C activated Text overflow: message on display longer than 14 characters # Call forwarding activated Call back activated When flashing: call-back may be selected Operating and display elements 1 The display Single line, alphanumerical display and display-symbol bar. 2 Foxkey (multi-function key) 3 User key Press I: Confirm input of settings, access sub-menus Press IFl/i : Select sub-menus, select ON/OFF (Y/N), telephone functions Activate the user A, B, C 4 Menu key (with @I : Info key) Select the various main menus. Press @ and @ : Call up additional information 5 SHIFT key (level change key) Second functional level/Press and hold: second functional level permanently activated 6 ESCAPE key (with @ : DELETE key) Press briefly: Jump back one menu level / Press and hold: Return to basic mode Press @ and @ : Delete characters from right to left / Delete entries in directory, unanswered calls list, etc./Press and hold: delete several characters 7 Call-back key (with @I : END key) Initiate an enquiry call, switch between two calls (brokering) Press @I and m : Clear call. 8 Park key (with @ : MUTE key) 9 Last number redial key (with @I : LOG key) Park and retrieve a call. Press @ and @ : Mute microphone. In basic mode: suppress number. Retrieve the last number dialled. Press @ and a : Retrieve answered calls 10 Loudspeaker key (with @I : Loudspeaker volume) 11 Dialling keypad Switch loudspeaker on and off. Press @ and @ : Adjust volume. Entering telephone numbers Press @ and dialling key: Speed dialling 12 Label/Emergency operation switch 13 LED indicator Label for speed-dial keys. Emergency operation switch is situated behind perspex cover. Lights if ringing tone is switched off or if “unconditional call forward” is selected (with at least 1 user defined). Contents ZCOII? Eurit 22 Euro-ISDN telephone Congratulations on your purchase of an Eurit 22. Thank you for choosing a Swiss quality product. Eurit 22 is designed for connection to the public Euro-ISDN network. If the Eurit 22 is to be connected to a PBX, please refer to the section “Operation with a PBX”. Please read this operating manual carefully to take full advantage of the features offered by your new Eurit 22. Keep this operating manual in a safe place! Important information about your Euro-ISDN connection This operating manual describes all the functions which you must request from your telecoms operator, some of which are subject to charge. The number of services you have at your disposal is dependent on the type of connection you have subscribed to. For detailed information about the services available on your ISDN connection please contact your telecoms operator. Operating and display elements . . . . . . . . . . . . . . . . . . . . . . . . . . . . . . . . . . . . . . . . . . . . . . . . . . ..~..................................... 1 Installation and startup ........................................................................................................ 5 5 5 6 6 Basic operating information ................................................................................................. Users .................................................................................................................................... Menus .................................................................................................................................. Display .................................................................................................................................. Acoustic signals .................................................................................................................... 7 7 7 7 8 Basic settings ......................................................................................................................... 9 Contents of the packet.. ....................................................................................................... Connecting the handset and the telephone .......................................................................... Placing the telephone ........................................................................................................... Emergency operation ............................................................................................................ 6 d s K 2 5 E Display on startup ................................................................................................................. Define a user ...................................................................................................................... Date and time ..................................................................................................................... Display contrast .................................................................................................................. Connection to a PBX ........................................................................................................... Call charge factor ............................................................................................................... Currency.. ........................................................................................................................... Operation with a headset (headphones and microphone set) ....... ....................................... Language ........................................................................................................................... Software version ................................................................................................................. Checksum .......................................................................................................................... 2 9 10 11 11 12 12 12 13 13 14 14 Contents User-specific settings ........................................................................................................... 15 Ringing tone ....................................................................................................................... Suppress number ................................................................................................................ Suppress call waiting.. ......................................................................................................... 15 Dialling ................................................................................................................................. On-hook dialling ................................................................................................................. Redialling ............................................................................................................................ Dial from the unanswered calls list ...................................................................................... Dialling a number from the LOG memory.. .......................................................................... Dialling from the directory .................................................................................................. Dialling using speed-dial keys.. ............................................................................................ Making a call ........................................................................................................................ Incoming calls ..................................................................................................................... Reject incoming calls.. ......................................................................................................... Display during the call ......................................................................................................... Listening by loudspeaker ..................................................................................................... Microphone mute ............................................................................................................... Directory ............................................................................................................................... 16 17 18 18 18 19 20 20 21 22 22 22 22 23 23 24 General information ........................................................................................................... New entry. .......................................................................................................................... Change entry.. .................................................................................................................... Delete an entry ................................................................................................................... 24 25 25 25 Extended features ............................................................................................................... 26 26 26 Call charges per user, call charge total ................................................................................ Enquiry call ......................................................................................................................... Brokering (switching between two calls) ............................................................................. Explicit Call Transfer (ECT) ................................................................................................... Three-way conference call ................................................................................................... Automatic call back if busy ................................................................................................. Call waiting /accept a second call.. ..................................................................................... Call forward.. ...................................................................................................................... Park call .............................................................................................................................. Speed dialling ..................................................................................................................... Special characters ............................................................................................................... Function list ........................................................................................................................ Register malicious calls (MCID) ............................................................................................ DTMF (Dual Tone Multi Frequency) dialling .......................................................................... Subaddresses ...................................................................................................................... 3 27 27 28 28 29 30 31 32 33 33 33 34 34 Contents Operation with a PBX ......................................................................................................... Keypad information ............................................................................................................ Settings for operation with a PBX ....................................................................................... Exchange access code ......................................................................................................... Incoming exchange access code .......................................................................................... Call transfer by going on-hook ........................................................................................... Call transfer using disconnect ............................................................................................. Automatic keypad send ...................................................................................................... Important information ........................................................................................................ Menu structure ................................................................................................................... Option: dialling from a PC (PC-Dialer) ................................................................................. Software Update ................................................................................................................. Safety precautions .............................................................................................................. Disposal .............................................................................................................................. Technical data ..................................................................................................................... Product conformity ............................................................................................................. Guarantee .......................................................................................................................... Index 35 35 36 36 37 38 39 40 41 41 43 43 43 44 44 44 44 45 . . . . . . . . . . . . . . . . . . . . . . . . . . . . . . . . . . . . . . . . . . . . . . . . . . . . . . . . . . . . . . . . . . . . . . . . . . . . . . . . . . . . . . . . . . ..*...............*..................... 4 Installation and startup Eurit 22 telephone Handset Telephone connection cable Handset cable Perspex cover for label Operating Manual The connection sockets are on the base of your telephone. First connect the handset by plugging the longer end of the coiled handset cable into the small socket on the base of the telephone 0. When plugging in the connector, ensure that you hear it click into place. Lead the cable through the strain-relief groove 0 and plug the connector on the short end of the cable into the handset 0. Give the cable a slight tug to ensure that the connector has locked into place. Now connect the telephone by plugging the telephone cable into the larger socket on the base of the telephone 0. When plugging in the connector, ensure that you hear it click into place. Give the cable a slight tug to ensure that the connector has locked into place. Lead the cable through the strain-relief groove 0 and plug the connector on the other end of the cable into the telephone socket 0. a Once you have connected your Eurit 22, the following prompt is displayed: “Please enter at least one MSN (subscriber number) including name <OK> ‘. Please read the section entitled “Display on startup I’ under “Basic Settings I’. Wall mounting Your Eurit 22 can also be wall-mounted. e For the wall-mounting kit please contact your local supplier Insert the plastic feet in the appropriate slots in the housing base 0. Fasten the two screws to the wall and hang your Eurit 22 by clipping the screw heads into the two holes on the telephone base 0. 5 Imtallation and startup Label for speed-dial numbers/functions Cut out a label from the back cover of this operating manual (or copy them) and enter the names associated with the speed-dial numbers/functions you have stored. Lay the label in the recess under the handset and fit the perspex cover. Before putting the telephone into operation, please read the Paragraph “Safety Precautions” in this manual. In view of the extensive range of surfacing materials used on furniture, it is impossible to guarantee that the various parts of the telephone, (e.g. the feet) will not leave marks. We therefore recommend that the telephone be placed on a non-slip mat. If the local 230 V mains supply for the network terminating unit (NTBA) fails, the ISDN connection is powered directly from the exchange (emergency operation). However, this remote power supply is only sufficient to power a single telephone set! Thus if several telephones are operated on the same connection, only one may be authorized for emergency operation; otherwise the ISDN connection is taken out of service. Assign emergency authorization to a telephone by pressing down and locking into place the switch under the perspex cover for the speed-dial keys. To deactivate emergency authorization, release the switch by pressing the toggle sideways. e During normal operation, the emergency telephone can be used to telephone as usual. c3 The programmed settings and the entries in the directory are maintained during a power failure. 0 During emergency operation, the display is switched off The ringing volume and the loudspeaker volume are reduced. a The emergency telephone signals the calls for all Multi Subscriber Numbers (MSN). 0 In order to telephone during emergency operation, the handset must be lifted before the number is dialled (the loudspeaker no longer functions). c3 The telephone authorized for emergency operation should be clearly labelled using a coloured sticker Basic operating information The Eurit 22 allows you to define up to three users on the same telephone. For instance, if you use the phone in your own home, you can define one user “Mother”, a second “Father” and a third “Daughter/Son’, or in an office environment one user “Company”, a second “Sales reps” and a third ‘Private”. By pressing @ you can change from one user to the next and the display indicates the symbol for the current user (A, B, C). a Please refer to the Section "Basic Settings” for details of the procedure for defining several users. Once you have defined the individual settings for the different users (see “Basic Settings”), your Eurit 22 handles a whole range of functions differently dependent on the selected user: Each time a call is made, the number of the active user is displayed on the telephone of the called person, and incoming calls are stored in the “missed calls” list of the appropriate user. Call charges are calculated and billed separately for each user. Calls can be separately forwarded (diverted) for each user depending on their requirements, etc. Your Eurit 22 is easy to use because for many functions you are guided via menus. Entries in the directory (and subsequent changes to these), settings and programming of your telephone are all done using menus. For the rapid selection of menus or sub-menus, simply press @ once. Subsequently press m as often as necessary until the required menu/sub-menu is displayed. Confirm selection of the displayed menu by pressing El. To jump back to the previous menu level press @I. To return to the main menu press @. 6 A diagram showing the complete menu structure of your Eurit 22 is given in the Section “lmportan t information I’. e Various telephone functions are available both when on-hook and during a call, and these can be called up by pressing El. The display shows what inputs are required and the current state of your telephone using a text line and additional symbols. You can follow queries and changes on the display. Basic operating information Your telephone provides additional information during use by emitting acoustic signals: Confirmation tone Your telephone confirms correct entry or adaptation of an entry with two short, high-pitched tones. Warning tone In the event of an incorrect action or input, a single, low-pitched tone is sounded. Basic settings The settings described below are user-independent and are valid for all users. To be able to use all the functions of your Eurit 22, you must define at least one user (i.e. enter at least one multiple subscriber number or MSN). For this reason the following prompt is displayed once your Eurit 22 has been started up: “Please enter at least one MSN (subscriber number) including name <OK>“. For details on defining users, see ‘Define a user”. If you wish to use the telephone before defining a user: Lift the handset (the prompt disappears) and enter the number. zm33- The selected number is displayed At the end of the call the date and time are displayed. r3 Remember to define at least one user at a later stage, to benefit from the full range of Eurit 22 functions. You can define up to three users on your Eurit 22, with each user being allocated their own Multiple Subscriber Number (MSN A, B, C). Your telephone will ring when a call is received for one of the defined numbers. c3 When the telephone leaves the factory no users are defined and your Eurit 22 will ring for all incoming calls. 0 In order to be able to use the full range of Eurit 22 functions, at least one user must be defined! In order to define a user proceed as follows: Press @. and then press IZI as often as necessary until “INSTALLATION” is displayed. Confirm the menu selection by pressing l3Kl. The message ‘SET MSN” is displayed. Confirm by pressing I. “MSN A” is displayed. Press m. Enter the number for MSN A and confirm by pressing IOK “USER _‘I is displayed. Using the dialling keypad, enter the name associated with MSN A and confirm by pressing I. Correct entry is indicated by a short signal tone. Press m to change to the menu for defining MSN B. MSN B and C can be defined by repeating the procedure described for MSN A. r3 Caution: always enter MSN without prefix! c3 When a call is received your Eurit 22 recognizes for which user it is and indicates this by different ringing melodies (see “Ringing tone” and “Incoming calls”). c3 With a// outgoing calls, the Multiple Subscriber Number of the active user is sent to the called party If you do not want the Multiple Subscriber Number for a particular user to be displayed on the called party’s telephone, you can suppress this (see “Suppress line identification I’). 0 A user can be deleted by deleting his MSN. $ 2 A F 2 10 When the telephone is first connected or after a power cut, the time display will flash. As soon as you make a call, the date and time are set and the display stops flashing. Any difference between the displayed time and the system time is corrected each time a call is made. You can also set the time and date manually: Press @I and then press m as often as necessary until “INSTALLATION” is displayed. Confirm the menu selection by pressing I. Press m as often as necessary until “DATE /TIME” is displayed. Confirm the menu selection by pressing (. The date is displayed. Enter today’s date and confirm by pressing IIKI. Correct entry is confirmed by a short signal tone. A time is displayed. Enter the actual time and confirm by pressing I. Correct entry is confirmed by a short signal tone. 6 When the telephone is first connected (and as long as no incoming calls have been received) the date and time are displayed. As soon as calls are received by your Eurit 22, the number of calls and the time are displayed. You can set the contrast of the display to one of seven levels. When the telephone leaves the factory the display contrast level is set to 4. 0i MENU mpN5mmqm &rmrmTm Press (-)I as often as necessary until “CONTRAST” is displayed. Confirm the menu selection by pressing I. The current contrast setting, represented by up to seven bars, is displayed. /CON:RRl m/El Press @ and then press B as often as necessary until “INSTALLATION” is displayed. Confirm the menu selection by pressing (. El Reduce or increase the display contrast one level at a time by pressing Icl/l until the required level has been reached. Confirm the selection by pressing I. The entry is confirmed by a short signal tone. Basic settings Settings for use with a PBX are given in the section “Operation with a PBX”. To ensure that the displayed call charge is correct, the call charge factor must be set. When the telephone leaves the factory the call charge factor is set to 12.1 1 (12.1 1 pfennig). The current call charge factor can be obtained from your telecoms operator. Press @ and then press Fl as often as necessary until “INSTALLATION’ is displayed. Confirm the menu selection by pressing I33 Press m as often as necessary until “CHARGES” is displayed. Confirm the menu selection by pressing El. “FACTOR” is displayed. Confirm by pressing IOK The current call charge factor setting is displayed “DM 0,121O”. Enter the correct call charge factor and confirm by pressing @IOK The entry is confirmed by a short signal tone. c3 See also "Call charges per user; call charge total" You can change the currency unit as necessary: Press @ then press i3l as often as necessary until “INSTALLATION” is displayed. Confirm the menu selection by pressing lKi. Press 141 as often as necessary until “CHARGES” is displayed. Confirm the menu selection by pressing IOK Press m as often as necessary until “CURRENCY’ is displayed. Confirm the menu selection by pressing I. “CURRENCY DM” is displayed. Enter the currency abbreviation (max. 4 characters) and confirm by pressing I. c3 Callchargesperuserandcallcharge total are displayedin the definedcurrency N 12 If you telephone a great deal, you can connect a headset (headphones and microphone set) to the Eurit 22. Once you have selected operation with headset, calls can be accepted or cut off using the loudspeaker key. Press @J and then press iXl as often as necessary until “INSTALLATION” is displayed. Confirm the menu selection by pressing IOK p$mET-jm Press m as often as necessary until “HEADSET” is displayed. Confirm the menu selection by pressing El. “HEADSET Y&l” (Factory setting is NO (OFF)) Press Ic. The cursor jumps to “Y” (Headset operation switched ON). Confirm the selection by pressing /. The entry is confirmed by a short signal tone. c3 for optimum use of your Eurit 22 with a headset, we recommend that you use the headset specially supplied by Ascom. Your local supplier can provide additional information (see the address on the back cover of this user manual). You can select the language for the displayed messages (German or English). When the telephone leaves the factory German is set as the display language. Press @ and then press I-)j as often as necessary until “INSTALLATION” is displayed. Confirm the menu selection by pressing I. Press m as often as necessary until “LANGUAGE” is displayed. Confirm the menu selection by pressing /. “GERMAN” is displayed. Press I, “ENGLISH” is displayed. Confirm the menu selection by pressing I. The entry is confirmed by a short signal tone. 13 You can display the software version of your telephone Press @ and then press C%l as often as necessary until “INSTALLATION” is displayed. Confirm the menu selection by pressing I. Press a as often as necessary until “SOFTWARE” is displayed. Confirm the menu selection by pressing (OK. “VERSION’ is displayed. Confirm the menu selection by pressing IOK The version number of the installed software is displayed. c3 If you have a question you need clarified, then before you call our Hotline (see back cover of this user manual for the address and phone number) please check the version number of your software. e Software-Update see “Option: dialling from a PC”. For hotline enquiries you can display the checksum: Press 53 then press (-)I as often as necessary until “INSTALLATION” is displayed. Confirm the menu selection by pressing CKI. rq-p-%m~m Press m as often as necessary until “SOFTWARE” is displayed. Confirm the menu selection by pressing loK. Press C3I as often as necessary until “CHECKSUM” is displayed. Confirm the menu selection by pressing (OK. “IN PROGRESS” is displayed. After a short time the checksum of your telephone is displayed. 14 ! User-speciJic settings User-specific settings can be made depending on the requirements of the individual users. e Before these setting can be made, at least one user must have been defined on your Eurit 22 (see “Defining a user”). Each user can select a ringing tone from a choice of seven melodies and set the volume in the range 0 to 7. Press @ and then press m as often as necessary until “RINGING TONE” is displayed. Confirm the menu selection by pressing I. &imrqm Press IXi and the number representing the selected melody is displayed (when the telephone leaves the factory “MELODY 1 ” is set). The melody represented by the number displayed is reproduced via the loudspeaker. When the melody you would like is played, confirm the selection by pressing El. The volume of the ringing tone can be set. The ringing volume set in the factory is displayed (maximum 7). Press 1cI to change the volume. The number of bars displayed (max. 7) indicate the current setting. Confirm the menu selection by pressing IOK The entry is confirmed by a short signal tone. c3 Ensure that a different melody is selected for each user so that it is possible to differentiate between the incoming calls. c3 Warning: If you select volume 0, your Eurit 22 no longer rings. The LED above m@ lights. 15 User-speci$c settings When you make a call, your number (i.e. their MSN) is displayed for the called party. When you are called, your number is sent to the calling party. You can suppress your call number for outgoing and incoming calls: Permanently suppress the number (CLIRKOLR) i 0 Press @ and then press 191 as often as necessary until “SETTINGS” is displayed. Confirm the menu selection by pressing I. MENU “SUPPRESS NO. ’is displayed. Confirm by pressing El. “SUPPRESS NO. Y&J’“, (The status set in the factory is MO (OFF)). Press Ic1 and the cursor jumps to “Y’(Suppress number is ON 0). Confirm the menu selection by pressing I. Dial the number. When calling line number suppression is active, the dialled number is displayed preceded by a “C ‘I. Suppress the number for a single call (CLIR) 03-U’1-‘31 I?UIII The telephone is in the basic state (on-hook). Press m as often as necessary until “SUPPRESS NO.” is displayed. Press @!I. The confirmation “SUPPRESSED” is shortly displayed. Dial the number. When calling line number suppression is active, the dialled number is displayed preceded by a “C ‘I. ti You can also suppress your number with Eurit 22 by pressing @ and @ in the basic state. : 2 K R 5 K 16 If you are engaged in a call, a second incoming call is indicated by an acoustic signal tone. Additional information about “Call waiting” is given in the section “Advanced features/Call waiting”. Each user can suppress “Call waiting” so as not to be disturbed during a conversation. Press @ and then press B as often as necessary until “SETTINGS” is displayed. Confirm the menu selection by pressing Bl. Press f3l as often as necessary until “CALL WAITING” is displayed. Confirm the menu selection by pressing IKI. “CALL WAITING y/N” is displayed (When the telephone leaves the factory YES is set (ON)). Press I, The cursor jumps to “N” (No) (Call waiting switched OFF). Confirm by pressing I. 17 Dialling Enter the number you wish to call. Press 0. When the called party answers lift the handset. a The function “Listening by loudspeaker” is not available. Your Eurit 22 stores the last 10 telephone numbers dialled in the redial memory, regardless of which user entered the numbers (the redial memory is user-independent). You can redial these numbers without having to enter them again: Press the redial key a as many times as necessary to select the number you want to call from the last 10 numbers dialled. Lift the handset or press @, 401 the number is dialled. J 4 0 When the redial memory is full, the oldest entry is overwritten. To delete a number from the redial memoq press @ and when the number to be deleted is displayed, press @. To disp/ay the call charge for a specific call press @ and @. When calling line number suppression is active, dialled numbers are also stored in the last number redial memory preceded by a 7’. DiaZZiqg All missed calls are recorded separately for each user in an unanswered calls list. Up to 30 calls (for all users) can be stored in the unanswered calls list. These “missed calls” can be dialled from the unanswered calls list without having to enter the number. If people have tried to call and you missed the calls, a message such as “2(3)” is displayed. The number in brackets means that a total of 3 calls to your Eurit 22 have not been answered. The number before the bracket indicates that 2 of these calls were intended for the user who is currently active m I 0Q w To access your personal unanswered calls list press IX. Confirm by pressing I. The number of the first call received is displayed, or if the number is in your directory, the name is displayed. (If the list contains more than one call you can scroll through the calls using IZ or Icl.) Lift the handset or press @I and the number is dialled. To display the date and the time at which a call was received press @ and @. A call is only registered in the unanswered calls list if the calling number was sent. If more than 30 calls are received, the oldest en try is deleted. Unanswered calls are deleted from the list if a call-back is successful. An entry in the unanswered call list can be deleted by pressing @ and then @. 19 Dialling Your Eurit 22 registers the last 10 calls which were received and answered (for all users). You can dial these numbers without having to enter the number. Press @ and B in order to select a number from the last answered numbers log. The number, or if the number of the calling party is in your directory the name of the last call answered is displayed. (If several calls are registered you can scroll through the list using m or ICI). Lift the handset or press @ and the number will be dialled. c3 By pressing @ and @ , date and time of the last received and answered calls can be displayed. Press @ and “DIRECTORY” is displayed. Confirm the menu selection by pressing IOK The first entry in the directory is displayed. You have two options to select a number from the directory: a) Enter the first letter of the name You are looking for the name “Norton”. Press key 8 twice. The first name beginning with the letter “N” will be displayed. Press /91 as often as necessary until the name you are looking for is displayed. Lift the handset or press @ and the number will be dialled. b) Scroll Press m or ICI to scroll through the directory (hold /-, or ICI down in order to scroll quickly). When the required name is displayed. Lift the handset or press @ and the number will be dialled. For detailed information about the directory (setting it up, editing entries, etc.) please refer to the section “Directory”. 20 Dialling @ 0 e.g. 7 0 #L73L734- - initiate speed dialling (i.e. press @ and the relevant speed-dialling key). The (preprogrammed) number is displayed. Lift the handset or press @I and the number will be dialled. Q Detailed information about speed dialling is given in the section “Speed dialling ‘I. Q You can combine several abbreviated numbers or abbreviated numbers and numbers from the directory This procedure can, for example, be used for provider selection (Call by Call). 21 Making a call When an incoming call is received, the ringing tone is dependent upon the called user. This permits incoming calls to be differentiated. The number of the calling party is displayed providing the caller permits this and the number is available. If the number is stored in the directory, the associated name is displayed. A, B or C in the far left corner of the display indicates for which user the call is intended. /% If the calling party has supressed his number no number is displayed. A, B or C in the far left corner of the display indicates for which user the call was intended. r#Jm-mTw If you do not want to answer an incoming call, press I. “REJECT CALL” is displayed. Confirm by pressing I. The call is rejected, the number of the caller is stored in the unanswered call list. During the call the display shows the call charges and duration. Press @ and @ to display the number of your call partner. After five seconds (or as soon as you press @) the call charge and duration are again displayed. 2 ;;: 5 w 22 A call can be listened to by other people in the room by switching to loudspeaker. 0 \1OL IQ During a conversation press a; you can now hear the conversation via the handset and the loudspeaker. If the conversation is to be continued via the handset only, press a a second time. At the end of the conversation replace the handset and listening by loudspeaker is automatically switched off. Adjust the volume during a call (handset and loudspeaker) On your terminal, the volume of both the handset and the loudspeaker is set to medium. During the conversation, either via the handset or the loudspeaker, you can change the volume (within the range 1 to 7). During the call press @ and @. The volume set in the factory is displayed (Volume 4). Press m or ICI, to adjust the volume. Press jOK to store the selected volume. 0 The volume can be set individually for each user. c3 If you on/y want to change the volume for the current call, do not press El but @ after you have altered the volume setting (temporary change). If you do not want the other party to hear you (for example while you talk to someone in the el-!orn), you can mute the handset microphone. During the call press @ and @. The microphone is switched off and “M” is displayed. To switch the microphone back on press @ and @ again. 23 Directory To permit simple and rapid selection of numbers, you can set up your own telephone directory with up to 40 names/numbers. The directory is available to all users. The kep on your dialling keypad are inscribed with a number and, above the number; a series of letters. To select a letter you must press the key the appropriate number of times. For example to select an “S”, you must press the key labelled 7 four times. Special characters: On key@: +U On key 0: _I I’ I On key 0: 8’10 : On key @: CI, space. To correct an incorrect entry press lI%l. The cursor jumps back one place to the left. Delete the character by pressing $jl and @ or overwrite the character: If long numbers/names are entered, 0) is displayed to indicate a display overflow. After the completion, the whole entry is displayed (the information scrolls across the display). When entering names, on/y capital letters may be used (special characters such as &, ii, etc. are not available). You can scroll through your directory by repeatedly pressing ICI and j91, Numbers in your directory must always be entered together with the dialling prefix. For operation in conjunction with a PBX note the following: - Always include the prefix when entering numbers in the directory The prefix allows the Eurit 22 to identify the number as external (exchange access code is automatically inserted). - To ensure that your Eurit 22 also recognizes numbers with no prefix (e.g. emergency numbers, provider prefix) as external numbers, press @ and 8, before entering the relevant number and an “X” will be inserted (for “Insert exchange access code”. See also “Speed dialling I’)). - Do not enter the exchange access code since this is automatically inserted (see “Operation with a PBX” under “Incoming exchange access code”). -- . 24 To enter a number in your directory while dialling: Enter the number and press I. js:oncqEIO. “STORE TEL NO” is displayed. Confirm by pressing I . E Enter the name and confirm by pressing I. l /@ Lift the handset or press @ to dial the number. You can also enter new numbers in your directory using the “Directory” menu: @[3:ncc:onrm &NriTN’ “:n’ lm e Press @ . ” DIRECTORY” is displayed. Press IOK Press ICI . “NEW ENTRY’is displayed. Press IOK Enter the number and name and confirm by pressing I. If you have 40 numbers/names stored in your directory (memory full), ,,NEW ENTRY” is no longer displayed. Search for the entry you wish to change. When it is displayed press @ and @. The number is displayed. Press ICI to change the position of the cursor, delete the number (digit-bydigit) using @ and @ or overwrite the existing digits and confirm by pressing I. The name is displayed; change the name and press I. The changed entry is displayed. Select the entry that you wish to delete. When it is displayed press @ and @. The entry is deleted and disappears from the display. c3 For reasons of security, it is only possible to delete one entry at a time. If you wish to delete the whole directory contents, you must delete each entry separately until “EMPTY” is displayed. 25 Extendedfeutm-es You can display the call charges for each user as well as the total for the telephone. Press @. pmym (:Il:t-K lWO( Press m as often as necessary until “CHARGES” is displayed. Press IX. The call charges for the activated user are displayed. Press I. The total call charges for all users are displayed. c3 To delete call charges per usel; press @ and @ (total call charges cannot be deleted until all user call charges have been deleted). c3 Check that you have set the correct call charge factor and the correct currency (see “Basic settings “1. c3 Please note that for technical reasons, the call charge displayed on your telephone can differ from the charge on your telecoms operator’s bill. The sum shown on the operator’s bill is binding. c3 Depending on your provider, call charge information may not be transmitted. In this case your Eurit 22 will not display charges per user/charge totals. You are talking to one party and wish to make a brief call to another party without clearing the existing call (the first call is automatically put on hold). You are carrying on a conversation. T 0 Press @, dialling tone is heard, first call is put on hold. Dial number and make enquiry call. Press @ and a to terminate the enquiry call and to return to the first call. 26 Ex tendedfed twes You have initiated an enquiry call and wish to alternate between the two calls. 0Y? Press @ to return to your first call. Press m again to return to the enquiry call. L3 During brokering (switching between two calls) the number of the active partner is briefly displayed. c3 To terminate an active connection during brokering, press @ and a. Please contact your telecoms operator for information about the introduction date for this service. You have initiated an enquiry call and wish to connect the two parties (call transfer). You have two possibilities: a) Two connections are active. Press m until “CALL TRANSFER’is displayed and then press I. The two parties are connected. Replace the handset. b) Two connections are active. Transfer the call simply by replacing the handset. Prerequisite for this procedure: “Transfer by going on-hook” must be set to “ON” (see under “Operation with a PBX”) You can also transfer a call using speed dialling (see “Speed dialling”) A call which was waiting during the call transfer procedure is signalled again when the handset is replaced (the call is not lost). Even after transfer, the call is still charged to the originating party If the telephone is connected to a PBX, please refer to the relevant section in your PBX operating manual. 27 Extendedfeatures You have initiated an enquiry call but would like to talk to both parties simultaneously During the call press m as often as necessary until “CONFERENCE” is displayed. Press (. You are conducting a conference call with two parties The message “END CONFERENCE WITH OK” is displayed. If you once again want to talk to the two parties individually (terminate the conference call), press El. c3 The function “Three-way conference call” can also be activated using a speed-dial key (see “Speed dialling”). c3 If the telephone is connected to a PBX please refer to the relevant section in your PBX operating manual. If the person you have called is busy, you can activate an automatic call-back as follows: The message “BUSY’ is displayed and the display symbol # flashes (call-back may be selected). Press IOK to activate automatic call-back. Replace the handset. The symbol # is displayed (call-back activated). * E e As soon as the person you were calling hangs up, a signal tone indicates that the line is free. The number is automatically redialled if you lift the handset within 15 seconds of hearing the signal. If the subscriber is busy but # is not flashing, this means the “automatic call back if busy” function is not offered by your provider and cannot be activated. a If you no longer wish to make the call, either leave the handset on-hook or press j-)l until “REJECT C4LL” is displayed and then press 1. 0 A call-back remains activated for approximately 40 minutes after which time it is automatically cancelled by the exchange. f3 You can deactivate a call-back by pressing m in the basic mode until “DELETE CALLBACK” is displayed. Press OK. c3 If the telephone is connected to a PBX, please refer to the relevant section in your PBX operating manual. 28 Extendedfeatures If during a call a second call is received, you are alerted to this by a short signal tone and the waiting caller’s number is displayed. You have two options: a) Accept the second call I Press I to accept the second call. or Press 191 until “ACCEPT CALL” is displayed and then press I. or Press @ and a to end the active connection and accept the waiting call. B) Reject call Press m until “REJECT CALL” is displayed and then press FZKI. Extendedfea tures A call can only be forwarded if at least one user has been defined! Every user can forward calls to up to three freely-selectable telephone numbers. Several types of call forwarding are available: Call forwarding unconditional All incoming calls are always forwarded immediately (A) Incoming calls are forwarded if they are not replied to within Call forwarding no reply 15 seconds (N) Incoming calls are forwarded if the user is busy (B). Call forwarding if busy 0 MENU &RLmmqlail Press @. Press I3 as often as necessary until “CALL FORWARD” is displayed. Press IOK Menu for setting unconditional call forwarding (Factory setting: Unconditional call forwarding is switched OFF NO)). (Press ( if you do not wish to change the setting). To activate call forwarding unconditional press ICI. The cursor jumps to “Y” (ON). Press /. Enter the number to which calls are to be forwarded. Press /. Menu for setting call forwarding if no reply (Factory setting: Call forwarding if no reply is switched OFF (NO)). (Press kZl if you do not wish to change the setting). To activate call forwarding if no reply press m. The cursor jumps to “Y” (ON). Press IOK Enter the number to which calls are to be forwarded. Press I. Menu for setting call forwarding if busy (Factory setting: Call forwarding if busy is switched OFF @JO)). (Press I if you do not wish to change the setting). To activate call forwarding if busy press Icj. The cursor jumps to “Y” (ON). Press IOK Enter the number to which calls are to be forwarded. Press I. The selected type(s) of call forwarding are indicated by an underlined character. The number to which calls are to be forwarded remains in memory even when the related type of call forwarding is deactivated. You can also forward a call using speed dialling (see “Speed dialling’). If the telephone is connected to a PBX, please refer to the relevant section in your PBX operating manual. Extendedfeutures You can park a call, for up to 3 minutes, and carry on the call on another telephone. It is even possible to unplug the telephone once the call is parked and to plug it in at another socket on the same ISDN connection to continue the conversation. You can park a call automatically or manually: Automatic parking The call is parked automatically. The programmed park code is used (see ‘Park code”). @l:“1L]& Press @ during the call. “CALL PARKED” is displayed and you can now replace the handset. Resume call On the other telephone press @. Lift the handset. a) The call is automatically retrieved or b) Enter the programmed park code and confirm by pressing I. Manual parking If you have not programmed a park code, you can enter a (temporary) park code each time you park or retrieve a call. Press @ during the call and enter your park code. Press lOKl. 18[ 0 PARK The message “CALL PARKED” is displayed. Replace the handset. I Press @ and enter your park code. Press I and the call can be retrieved. r3 A call can be parked for a maximum of three minutes. If the call is not retrieved within this time the connection is cleared. c3 You can also forward a call using speed dialling (see “Speed dialling”). Extendedfeatwes Park code programming Each user can program their own park code if they do not wish to use the park code 1 defined in the terminal. Press @. Press a as often as necessary until “SETTINGS” is displayed. Press I. Press m as often as necessary until “PARK CODE” is displayed. Press 1. The message “PARK CODE 1 ” is displayed. Overwrite the park code with your own one or two digit park code and confirm by pressing I. The park code of the active user is now stored. c3 If you delete the programmed park code by pressing @ und @, any further calls will be manually parked. Programming a speed-dial memory There are 12 speed-dial memories available (not user-specific, and hence for all users). You can use the speed-dial memory to store regularly used telephone numbers or functions. Please refer to the appropriate section in this operating manual for details. Press @. Press 191 as often as necessary until ‘SPEED DIAL” is displayed. Press IOK The contents of the first speed-dial memory is displayed. Press I. Enter the number or function you wish to store (in order to enter “F” for a function press @ 0, for further special characters see below). Press I. The programmed speed-dial entry is displayed. Press 191 to program further speed-dial entries. Select speed-dial number To carry out speed-dialling, press @ and the appropriate memory number (e.g. @ and @ for speed-dialling memory 9). Speed-dialling can be followed on the display. & 0’ s ;; w N8 c3 Always store a speed-dial number with the prefix. c3 For operation with a PBX the number must include the prefix but not the exchange access code. 32 Extendedfeatures Special characters are used for entering a number in the directory and the speed-dialling memory. These special characters allow additional information to be stored with the number. Special Character Meaning Fxx The function with the function code “xx” is initiated (see “Function list) The sub-address “xx..x” will be used. The access code is always inserted. The character sequence “xx..x” is sent as keypad information. Your number is suppressed for this call. zxx. .x X Kxx. .x C c3 xx..% represents your entry Function Description FOl FOZ(xx..xx) FO3(xx. xx) F04 (xx) F05 FO6 F07 Fl 1 (xx..xx) F2 1 (xx.xx) FZZ(xx.xx) F23(xxxx) F31 F32 F33 Manually reject incoming call Send DTMF Send keypad Park/retrieve the active connection using code xx (valid for all users) Register malicious call 3-party conference Transfer Dial number directly (no additional function permissible) Call forwarding unconditional to number xx..xx Call forwarding no reply to number xx..xx Call forwarding busy to number xx..xx Activate user A Activate user B Activate user C c3 xx.. xx represents your en try This service must be requested from your telecoms provider. c Malicious calls can be registered while they are in progress and up to 20 seconds after the caller has replaced the handset. The exchange registers the number of the called and calling lines, together with the date and time. c3 The function “Register call” can on/y be activated via speed-dialling. 33 Once a connection has been established, the telephone automatically switches to DTMF dialling. This allows you to activate specific functions by keying in codes such as for the remote control of an answering machine. The subaddress allows equipment which supports subaddresses to be remotely controlled. Eurit 22 does not evaluate subaddresses. EEEz or 00 -br&$mmmqm + p2mm-j -y @ Enter the telephone number. Press m as often as necessary until “SUBADDRESS” is displayed. Press laK and a “Z” is automatically inserted. Enter the subaddress. Lift the handset or press @. c3 Subaddresses can only be entered when on-hook dialling is used. c3 S&addresses in the directory or in the speed-dial memory can be inserted using special characters (see “Speed dialling ‘7. Enter the telephone number. Press m until ‘Send keypad” is displayed. Press IOK Enter the required keypad information. Keypad information is sent. c3 You can send keypad information during onhook dialling as well as during a call 34 Operation with a PBX When the Eurit 22 is connected to a PBX, a number of special features must be taken into account. For details please refer to the relevant section in your PBX operating manual. When used with a PBX, keypad information allows PBX functions to be controlled and services to be activated or deactivated in the exchange. Please refer to your PBX operating manual for details. a) Keypad before dialling If @ or @ is pressed first, an automatic change is made to keypad signalling (you can deactivate automatic switchover to keypad signalling, see “Automatic keypad send”). b) Keypad during a call Press m until “KEYPAD SEND” is displayed. Press I. Enter the information on the keypad, the keypad information is sent. (To exit the keypad send mode press LZI). c3 Keypad information can also be programmed using speed-dialling, see “Speed dialling”. Operation with a PBX Exchange access code For operation with a PBX without automatic external line selection, the exchange access code may have to be set. a Enter the digits to be used as an exchange access code for external calls. Press G&J. Press C3Il as often a5 necessary until ” INSTALLATION I’ is displayed. Confirm by pressing m. Press m as often as necessary until “PBX” is displayed. Press I. The message “ACCESS CODE” is displayed. Press I. Enter the access code (max. 4 digits) and confirm by pressing I. 0 If you have defined a public exchange access code, then in the directory (as well as with numbers for speed dialling) the prefix but not the access code must be entered. For emergency calls enter the special character “X” (access code must be entered) in front of the number Also see “Speed dialling”. Q Only if you have defined an access code, internal and external calls are discriminated automatically 0 When dialling using the keypad, the exchange access code is not dialled automatica& Operation with a PBX Incoming exchange access code Some PBXs automatically insert the exchange access code for incoming calls. With such PBXs the “Incoming access code” must be activated (ON) so that, for instance, your Eurit 22 correctly interprets numbers from your directory. 0 You can test whether or not you need to make this setting by having someone Cal/ you from an external telephone (after you have entered the access code) and then not answering the call. If the access code appears twice before the number of the calling party (Warning: “0” from the prefix is not an access code), then “Incoming access code” must be set to “ON”. Press &&I. Press @I as often as necessary until “INSTALLATION” is displayed. Press &f. Press 191 as often as necessary until “PBX” is displayed. Press /. &7Nmmmqm I:rrcun:rrc,l Press 19/ as often as necessary until “INCOMING ACCESS CODE” is displayed. Press I. The message “INCOMING ACCESS CODE Y&J” is displayed (Factory setting: ‘Incoming access code’ is set to “OFF” (NO).). Press jcI. The cursor jumps to “Y” (Incoming access code ON). Confirm by pressing IOK A confirmation signal tone is sounded. c3 If a message is longer than 14 characters, it is first displayed in an “abbreviated” form. If you wait a few seconds the rest of the message is displayed. Operution with u PBX Call transfer by going on-hook During an enquiry call you can connect the other two parties (call transfer) by replacing the handset (going on-hook). To program this function proceed as follows: Press @ . Press I-)I as often as necessary until “INSTALLATION” is displayed. Press I. Press m as often as necessary until “PBX” is displayed. Press IOK Press m as often as necessary until “TRANSFER BY GOING ON-HOOK” is displayed. Press I. “TRANSFER BY GOING ON-HOOK Y&J” is displayed (Factory setting: Call transfer by going on-hook is set to OFF (NO)). Press ICI, The cursor jumps to “Y” (call transfer by going on-hook ON). Press I. A short confirmation signal tone sounds. f3 “Transfer by going on-hook OFF” (factory setting) means: When the handset is rep/aced the current call is cleared, the call on hold is signalled. 0 ‘Transfer by going on-hook ON” means: When the handset is replaced the call is transferred. 2 ;; k 3 N 38 Operation with u PBX Call transfer using disconnect This setting is dependent on your PBX. You can check whether or not you need to program this setting: Connect the other two parties during an enquiry call by pressing m as often as necessary until “CALL TRANSFER” is displayed and confirming by pressing I. If it is not possible to transfer the call then you must activate “Transfer using disconnect”. E l Press @. Press m as often as necessary until “INSTALLATION’ is displayed. Press I. I Press IZI as often as necessary until “PBX” is displayed. Press I. I Press W as often as necessary until “TRANSFER USING DISCONNECT” is displayed. Press IOK The message “TRANSFER USING DISCONNECT Y/u” is displayed. (Factory setting: Transfer using disconnect is set to OFF &IO)). E l Press ICI, The cursor jumps to “Y” (Transfer using disconnect is set to ON (YES)). Press 1. A short confirmation signal tone sounds. Normally when used on a PBX, Explicit Call Transfer (Em is used (a Euro protocol). When “Transfer using disconnect is set to ON”, the Euro protocol is switched off. Ask your system manufacturer or check the details in your PBX operating handbook. Operation with a PBX Automatic keypad send If either @ or @ is the first key pressed, an automatic switchover is made to keypad signalling (“Automatic keypad send” ON). With some systems (e.g. systems on which automatic exchange line allocation is activated) you must set “Automatic keypad send” OFF so that, for example, @ can be used to connect internally: Press G&J. Press 191 as often as necessary until “INSTALLATION” is displayed. Press I. Press m as often as necessary until “PBX” is displayed. Press I. &nuncmqm Press m as often as necessary until “AUTOMATIC KEYPAD” is displayed. Press IOK “AUTOMATIC KEYPAD 41/N” (Factory setting: Automatic Keypad ON &ES)) is displayed. Press ICI, The cursor jumps to “N” (Transfer using disconnect is set to OFF &IO)). Press [. A short confirmation signal tone sounds. 40 lmportdnt information Basic state hL 1 Directory IsI S m i t h J o h n ],Lf t 1 New entry 1-1 t Number pq Name F... Menu point user-dependent nMenu point not user-dependent 41 Importdn t information II-%1 S e t M S N I%( MSN A 1%-/%1 I-%[ 1 MSN C U s e r n a m e 1 N u m b e r IsI U s e r n a m e 1 1x1 Number 1x1 Date User name I IDisplay contrast %( Set contrast ) t Ilncom.l% 1 I YIN 1 1 C h a r g e s 1%1Factor)&vl J-m t kCy%l Curren t l33m I I Headset [-%I Y/N I German 1 English 1 Abbreviation 1 c&m 1 LanAage L33mt I I%1 1 S o f t w a r e 1 J< I%~~~ SWversion I C h e c k s u m I%1 I n P r o g r e s s [al 42 Sum 1 Important information The Ascom PC-Dialer is a practical add-on for your Eurit 22, for making PC-supported telephone calls (CT1 - Computer Telephony Integration). The PC-Dialer software comes with a TAPI (Telephony Application Programming Interface) driver and allows you to connect your PC with the Eurit 22, download telephone directory entries from PC to Eurit 22, or display calling line identification automatically on screen. The TAPI driver allows you to connect Microsoft programs like Outlook, Access etc. directly to your Eurit 22. With Ascom PC-Dialer you can actualize the software of your Eurit 22. The software is available on the Ascom homepage (see the address on the back cover of this user manual). Personal protection - Your telephone is supplied with electrical power! Never use your telephone in the direct vicinity of water. - Do not touch the plug contacts with pointed and metal objects. - Never install or use your telephone in a room where there is any danger of explosion. - Never install or use your telephone with a damaged connection cable. Before installing the telephone and also at regular intervals, check the cable for damage. If damage is detected, have it repaired by an authorized service centre. Telephone protection If your telephone is not used correctly this could lead to damage and/or impaired functionality! - Repairs should only be carried out by trained staff. - Never open the telephone yourself. - Under no circumstances should you change the plug on the connector cable. - Avoid placing the telephone directly next to electrical household apparatus, electrical motors, radio, TV and video recorders (electromagnetic fields). - Protect your terminal from water, heavy dust and aggressive fluids and vapours. - Only plug the connection cable into the special telephone socket. - Never carry your telephone by its connector cable. - Do not expose your telephone to direct sunlight or other direct sources of heat. - Use your telephone only between temperatures of +5 “C to approx. +35 “C. - Place your telephone on a non-slip map. - Never drop your telephone. Care tips - Clean your telephone using a lightly dampened or antistatic cloth. - Do not use cleansing agents or chemical substances to clean your telephone. i$ ;; 2 2 : 43 Importdnt informdtion - Separate and sort the packing material as necessary and recycle the various types of material via you local disposal services. Never allow children to play with the packaging material. - Ensure that should it become necessary, your telephone is disposed of in accordance with the local environmental regulations. ISDN Connection Protocol Basic rate access connection DSSl (Euro-ISDN) Environmental requirements according to DIN IEC 721 Operation Transport Storage + 5.. + 45 “C -25.. + 70 “C -25.. + 55 “C Dimensions BxHxW 175x 160x45 mm Weight 562 g PC interface When used with the option “PC-Dialer” Eurit 22 can be connected to a PC. Data retention without power supply Greater than 10 years (no battery needed) Eurit 22 conforms to all relevant EU regulations. Conditions 2 ;; 2 3 N Your telephone is covered by a 24-month guarantee from the date of purchase. Keep the receipt as proof of the purchase date. Within the guarantee period, Ascom will repair free of charge all defects caused by faulty material or manufacturing errors, and reserves the right to choose whether to repair or replace the faulty telephone. This guarantee does not cover damage caused by incorrect use, wear and tear, or attempts by third parties to repair the unit. The guarantee does not cover single-use materials and defects which have a minimal effect on the use or the value of the telephone. All claims under this guarantee should be made with the appointed dealer from whom the telephone was purchased. 44 A Accept a second call .......................................... Acoustic signals ................................................... Adjust the volume ............................................. Automatic call back if busy ................................ Automatic keypad send ..................................... 29 8 23 28 40 B Brokering .......................................................... 27 Fall charge factor .............................................. Call charge total ................................................ Call charges ...................................................... Call forward ...................................................... Call Transfer ...................................................... Call transfer by going on-hook .......................... Call transfer using disconnect ............................ Call waiting ....................................................... Checksum ......................................................... Confirmation tone ............................................... Currency ............................................................. 12 26 26 30 27 38 39 29 14 8 2 D Date .................................................................. Define a user ..................................................... Delete a user ..................................................... Dialling .............................................................. Dialling from a PC ............................................. Directory .................................................... 20, Display ......................................................... 7, Display contrast ................................................. Display during the call ....................................... Display on startup ............................................... Disposal ............................................................ DTMF dialling .................................................... 11 10 10 34 43 24 22 11 22 9 44 34 L Label for speed-dial numbers/functions ............... 6 13 Language .......................................................... Listening by loudspeaker ................................... 23 LOG memory ..................................................... 20 M Menu structure.. ............... . ................................ Menus.. ............................................................... Microphone mute .......................... . ... . . ............. Mute ........ . ................ . . . . . . . . . .......... . .................... N New entry t.. ........ . . .... . ....... . ........... . ..... . ............. 25 0 On-hook dialling ............................................... Operation with a PBX ........................................ 18 36 P Park .................................................................. Park code .......................................................... PC-Dialer ........................................................... 31 32 43 R Redialling .......................................................... Register malicious calls ...................................... Reject incoming calls ......................................... Ringing tone ..................................................... 18 33 22 15 5 Safety precautions ............................................. 43 Software update ............................................... 43 Software version ............................................... 14 Special characters .............................................. 33 Speed dialling .................................................... 32 Speed-dial keys ................................................. 2 1 Subaddresses .................................................... 34 Suppress call waiting ......................................... 17 Suppress number .............................................. 16 E Emergency operation .......................................... 6 Enquiry call.. ...................................................... 26 Exchange access code .................................. 4, 36 Explicit Call Transfer (ECT) .................................. 27 F Function list.. ..................................................... 41 7 23 23 T Technical data ................................................... 44 Three-way conference call ............ . .. . .. . .............. 28 Time ......................... ..... ................................. 1 1 33 H Headphones and microphone set ...................... 13 Headset ............................................................. 13 U Unanswered calls list .................. . ...................... 19 Use with a PBX .................................................. 12 7 Users ................................................................... I Incoming calls ................................................... 22 Incoming exchange access code ........................ 37 W Wall mounting .................................................... Warning tone ...................................................... K Keypad information ........................................... 35 Kd 45 5 8 . . . Manufactured in Switzerland by: Ascom Business Systems AG Eichtal CH-8634 Hombrechtikon http://wwvv.ascom.com