1
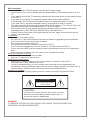
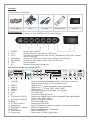
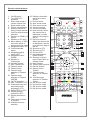
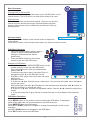
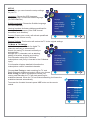
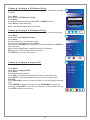
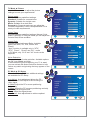
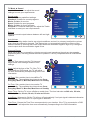
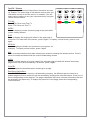
User’s Guide
SG-32T3
SG-40T3
SG-40X3
www.swedx.com
Design and specifications are subject to change without notice.
2
Design and specifications are subject to change without notice.
INDEX
Introduction
Basic operation
Contents
Control buttons
Connections on the rear of the LCD-TV
Remote control buttons
Basic Operation
Volume Control
OSD Menu Structure
OSD Menu Operation:
SETUP
TV Mode ► TV Settings
TV Mode ► TV Settings TV Mode ► DTV Manual Tuning
TV Mode ► TV Settings TV Mode ► ATV Manual Tuning
TV Mode ► TV Settings TV Mode ► Program Edit
TV Mode ► Picture
PC Mode ►PC-Setup
TV Mode ►Sound
Time
Lock
Text-TV / Teletext
TV base assembly with the TV
Wall mount assembly with the TV
Troubleshooting
Warranty and Service
Dead on Arrival (DOA)
How to get service
Limitation of liability
3
4
5
6
6
6
7
8
8
8
8
9
9
10
10
10
11
11
12
12
13
14
15
15
16
17
17
18
18
Design and specifications are subject to change without notice.
Introduction
Thank you for buying SWEDX LCD-TV. Please read this manual thoroughly before operating the
TV. Make sure the display was not damaged in transit. Should the TV be damaged, please
contact your dealer and do not install it. Check that you have all the accessories according to the
model.
Safety precaution
• Do not place the TV on unstable places, from which it may fell off.
• Do not expose the TV to extreme temperature and humid environment.
• Avoid subjecting the TV to direct sunlit and other heat sources.
• Do not put the TV into any liquid.
• Do not put anything inside the TV, or place water container on top of the TV.
• In thunder rainy days (especially with lightening), please plug out the power plug and antenna
plug.
• Do not step on the power cable, or tangle them together
• Avoid overload of the exterior electric outlet to prevent fire hazard of electric shock.
• Clean the TV with dry and soft cloth (without evaporative matter).
• lf your TV is broken, do not repair it by yourself, but contact the maintenance personnel.
• lf the remote control is left unused for a longtime, please take the batteries out and store them
in dry places.
• Avoid dropping the remote control.
• lf the LCD TV is installed for exhibition purpose, please do not place the overheated part on
the ground or carpet to prevent accident.
Please install the TV at proper position, such as wall or ceiling. Please install it under the
guidance of professional staff. (When used or exhibit, please do not place the TV horizontally or
vertically on the ground.)
This device complies with Part 15 of the FCC Rules. Operation is subject to the following two
conditions:
(1)this device may not cause harmful interference.
(2)this device must accept any interference received, including interference that may cause
undesired operation.
This equipment should avoid from water drops and things that fill with liquid, such as vases,
cannot be placed on this equipment.
This equipment is predeterminated to work constantly (unless adding switch on this equipment)
Please disconnect the power cord if this equipment will not be used for a long time.
Precautions When Displaying a Still Image
A still image may cause permanent damage to the TV screen.
• Do not display a still image on the LCD panel for more than 2 hours as it can cause screen
image retention.
This image retention is also known as "screen burn".
To avoid such image retention, reduce the degree of brightness and contrast of the screen
when displaying a still image.
• Watching the LCD TV in 4:3 format for a long period of time may leave traces of borders
displayed on the left, right and center of the screen caused by the difference of light emission
on the screen. Playing a DVD or a game console may cause a similar effect
to the screen. Damages caused by the above effect are not covered by the Warranty.
• Displaying still images from Video games and PC for longer than a certain period of time may
produce partial after-images.
To prevent this effect, reduce the ‘brightness’ and ‘contrast’ when displaying still images.
4
Design and specifications are subject to change without notice.
Basic operation
• Use AC 100-240V 50-60 Hz power outlet for the TV power supply.
• lf the screen of TV is not on, please press the power button on the remote control or on the
TV.
• lf you want to shut off the TV temporary, please press the power button on the remote control
or on the TV.
• lf you want to shut off the TV completely, please switch off the power ON/OFF.
• In TV/AV state, the TV will enter idle state if there is no signal input within 3 minutes.
• ln PC state, the TV will enter idle state if there is no signal input within 2 minutes.
• The setting and tuning of picture and sound will be saved when the TV is shut off, which will
be working in the pre-shut off state when the TV is turn on again.
• lf PC signal source is used, please first set the resolution of the PC display card as the
following modes: (1024*768 60 Hz, 800*600 60 Hz, 640*480 60 Hz)
• lf there is line-by-line output of the signal used by the user, signal source with line-by-line
output is recommended.
Preparation
• Put the TV on a stable surface.
• Do not fix the TV with others fixations than those provided or suggested by the manufacturer.
• If you have a wall mount, check that it is steady.
• Do not place any material on the TV.
• Do not block or cover the ventilation openings on the TV.
• The TV must be plugged with a tension source of 110-240 volts and 50-60 Hz.
• Power cord and cables must be properly routed and protected to prevent from stepping on
them.
• Keep the power cord away from any heat source. Possible fire hazard.
Heating sources and humidity
• Keep the TV dry and away from humidity.
• Keep the TV away from heat sources.
Cleaning and maintenance
• Unplug the TV before cleaning it. Do not use solvents or liquids to clean the TV.
• Only clean the TV with a soft and dry cloth.
• In case of troubleshooting, do not use spare parts other than those suggested by the
manufacturer. Using inadequate spare parts can lead to electric shocks, short-circuits fire or
others incidents. Please contact a technical authorized by SWEDX brand.
Departure in holidays
• Unplug the LCD-TV during lightning storms or when unused for long periods of time.
WARNING
RISK OF ELECTRIC SHOCK
DO NOT OPEN
CAUTION:
TO REDUCE THE RISK OF ELECTRIC SHOCK, DO NOT
REMOVE COVER(OR BACK). REFER SERVICING TO
QUALIFIED SERVICE PERSONNEL
WARNING:
TO REDUCE THE RISK OF FIRE OR ELECTRIC SHOCK, DO NOT EXPOSE THIS
APPARATUS TO RAIN OR MOISTURE.
5
Design and specifications are subject to change without notice.
Contents
Included items in SG-series:
ER
POW
TE
MU
I-II
EP
SLE
L
DUA
4
2
O.
INF
PSM
5
SSM
7
3
6
PIP
8
-/-
n
atio
rm
fo
In
0
PUT
P.IN
9
HDMI
RCE
SOU
1
LL
STI
ARC
/
e!
otic
N
PC
/CH
N
TIO
OSI
P.P
PRE
ME
IZE
LECT
P.S
S.SE
NU
-
PR+
VOL
T
ent
ENT
pon
EXI
TV
Com
ER
TTX
ON
+
rt
E
EX
SIZ
IND
RED
Sca
VOL
PR-
CEL
MIX
CAN
HO
E
PG
BLU
IDE
UP
GU
PG
EAL
UP
LOW
REV
SET
YEL
FAV
DTV
LD
E
IO
EEN
TIM
RAD
GR
TV/
DO
PIP
WN
PR+
PIP
PR-
2 x AAA Battery
Notice
AC Cable
LCD-TV
Remote Control
Control buttons:
The control buttons’s outlook on your SWEDX LCD-TV is the following:
CH-
CH+
VOL-
VOL+
ON/OFF
MENU
SOURCE
SELECT
EXIT
CHON/OFF
1
2
1. ON/OFF:
2. CH+/-:
3. Vol+/-:
4.
5.
6.
7.
4
3
5
CH+
VOL-
VOL+
MENU
SOURCE
SELECT
EXIT
6,7
Power switch ON/OFF
Zap the channels / Navigate the OSD menu
Decrease and increase the audio volume / Navigate the OSD menu / Adjust
values in the OSD
Activate the OSD menu / Select in the OSD menu or Sources
Activate the input source menu / Exit the OSD menu
Power indicator
Remote control Infra Red receiver
Select/Menu:
Source/Exit:
LED:
IR:
1 2
HDMI 2
HDMI 3
3
4
VGA
5
1. FW/USB
2.
3.
4.
5.
6.
7.
8.
HDMI 1
HDMI 2
HDMI 3
Scart 2
VGA
AV
Component (YPbPr)
9. CI Module / PCMCIA
10. Scart 1
11. PC/VGA Audio-in
12. Headphone
13. Digital Audio - Optical
14. DTV/ATV
15. Power Switch
16. Power Input
6
Component
7
8
9
10
Headphone
11 12
Digital
Audio
DVB
ATV
On/Off Switch
Optical
Input
Power Input
13
AC - 100-240 V @ 50/60 Hz
HDMI 1
CI Module / PCMCIA
AV
Scart 1
FW/USB
VGA
Audio-in
Scart 2
Connections on the rear of the LCD-TV
14 15 16
Input for quick/easy Firmware update. Consult your dealer for
latest firmware version or visit www.swedx.com
HDMI 1 input.
Note: Acceptable video signal 480i/p,
HDMI 2 input.
576i/p, 720p, 1080i, 1080p
HDMI 3 input.
Half Scart input terminal (S-video / Y/C signals)
PC (VGA) input
Composite video (AV) input
Component (YpBpR) input. Note: Acceptable video signal 480i/p,
576i/p, 720p, 1080i, 1080p
Input for CI-Module with card
Full Scart (RGB) input
Audio-input of PC/VGA
Input for Headphone (when connected, it will mute the speakers)
Output for digital audio
Input for digital/analog TV-Channels
Main On/Off Switch
Power Input 110-240 V @ 50-60Hz
6
Design and specifications are subject to change without notice.
Remote control buttons
1. On/Off button
2. Turn Off/On TV
speakers
3. Enter sleep mode in
certain chosen time
4. Select audio mode
5. Picture size selection
6. Number buttons for
direct channel access
7. One/Two-digit channel
selection
8. Shortcut to HDMI1,2,3
inputs.
9. Shortcut to PC input
10. Menu display. In OSD
sub-menu press to
access previous menu
11. Navigation button UP
12. Confirm/activate
button
13. Navigation/adjust
button LEFT
14. Navigation button
DOWN
15. Shortcut to
Component
16. Activate Teletext
17. Alter Teletext mix
18. Teletext cancel
19. Teletext index
20. Fast-text topic
selection in Teletext
RED
21. Fast-text topic
selection in Teletext
GREEN
22. List TV-channels
23. Alter TV/Radio in DTV
24. Choose primary and
secondary audio
language in DTV
25. Display EPG in DTV
26. Display favorite
channels in DTV
27. Display subtitles in
DTV
28. Flash when a button
is pressed
29. Available sources
selection
30. Display information
about the current
source
31. Picture freeze
32. Alter sound mode
33. Alter picture mode
34. Volume increase
35. Volume decrease
36. Next channel. When
the channel list is
displayed, it scrolls
down to next page in
the list.
37. Previous channel.
When the channel list
is displayed, it scrolls
up to previous page in
the list.
38. Shortcut to DTV.
39. Shortcut to ATV
40. Exit the OSD
41. Navigation/adjust
button RIGHT
42. Shortcut to Scart1
input. Press Twice to
access Scart2
43. Hold Teletext
44. Teletext size selection
45. Reveal Teletext
46. Display time in
Teletext
47. Fast-text topic
selection in Teletext
Blue
48. Fast-text topic
selection in Teletext
Yellow
49. N/A for this model
50. N/A for this model
51. N/A for this model
52. N/A for this model
7
POWER
SOURCE
1
2
3
4
5
28
29
MUTE
SLEEP
STILL
INFO.
DUAL I-II
ARC
PSM
SSM
30
31
32
33
1
2
3
+
34
VOL
6
7
8
9
10
4
5
7
8
-/--
35
9
+
PRE/CH
CH
36
0
HDM
37
I
DTV
AT
PC
V
MENU
EXIT
11
12
13
14
6
18
19
20
21
22
23
24
25
26
27
40
41
ENTER
Scart
Component
42
15
16
17
38
39
TTX ON
MIX
SIZE
HOLD
CANCEL
INDEX
TIME
REVEAL
RED
GREEN
YELLOW
BLUE
LIST
TV/RD
AUDIO
PIP S.SELECT
EPG
FAV
SUB-T
SIZE POSITION
43
44
45
46
47
48
49
50
51
52
Design and specifications are subject to change without notice.
Basic Operation
Input Source
Turning LCD-TV On And Off
Press Power button on the remote control or the On/Off button on the
control buttons. The LCD will turn on and will be ready to be used.
DTV
TV
SCART1
SCART2
AV
Component
PC-RGB
HDMI1
HDMI2
HDMI3
Select Source
Press Source button on the remote control. Then you can see the
source list menu shown to the right. Press Navigation Up/down
button on the remote control to select the source and confirm by
pressing Enter.
Exit
Enter
Volume Control
Press VOL+ / VOL- button on the remote control to adjust the
volume level.
Press MUTE button on the remote control when you need to mute the sound.
OSD Menu Structure
• OSD (On Screen Display) allows users to
control or adjust various features and
settings in accordance with his/her
preferences.
• Press the MENU button on the remote
control to see the main OSD menu.
29
TV SETTING
www.swedx.com
Auto Tuning
DTV Manual Tuning
ATV Manual Tuning
Program Edit
CI Information
Example of OSD Menu:
• Main Menu: Press the MENU/ENTER button on the
remote control to enter the main OSD menu.
First, select Main menu item you need with the
buttons ◄ & ►.
To select a main menu items, just press Enter or
Navigation button ▼ on the Remote Control.
Menu
Enter
Exit
• Sub Menu: Each menu item has its own sub menu
items to set.
• Sub Menu items:
A: If there is a ► part, the item has an under menu. You can enter the under menu and adjust
an item you need.
Select sub-menu item with ▲ & ▼ buttons on the remote control and press ◄ & ► buttons to
enter the submenu or change the value.
B: If there is no ► part, the item has adjustable values. Use the ◄ & ► buttons to adjuest the
values.
C: If the sub-menu item is grey colored, it means this item is not available in the particular
mode.
OSD Menu Operation:
MENU
Press MENU button on the remote control to access the OSD Menu. Pressing the
same button again will move you backward in the OSD structure.
Press ENTER button to confirm/select.
Use LEFT & RIGHT buttons to navigate or change the parameters of the current
sub-menu.
Use UP & DOWN buttons to navigate in the OSD Menu.
Press EXIT button to exit the OSD Menu.
8
ENTER
EXIT
Design and specifications are subject to change without notice.
SETUP
In this Menu you can choose the setup settings
for your TV.
SETUP
Language: Choose the OSD language
Audio Language: Choose the Audio Language
(for DVB channels)
Subtitle Language: Choose the Subtitle Language
(for DVB channels)
Hearing Impaired: Activate subtitles specialized for
hearing impaired persons (If the DVB channel
broadcasts such subtitles).
County: Choose your country will activate predefined
settings for the chosen county.
Language
Audio Language
Subtitle Language
www.swedx.com
English
English
English
Off
UK
Hearing Impaired
Country
Restore Setting
Menu
Exit
Enter
Restore Settings: This function will restore the TV to the original settings.
TV Mode ► TV Settings
In this Menu you can Search for digital TVchannels manually or automatically.
Search for analog TV-channels manually or
automatically.
Manage the TV channels such as deleting,
adding to favorites, skipping and locking.
Get information about your CAM and
subscriptions card (if any is inserted in the CI-Module
input).
CI Information displays detailed information the
subscriptions card for scrambled channels.
TV SETTING
www.swedx.com
Auto Tuning
DTV Manual Tuning
ATV Manual Tuning
Program Edit
CI Information
Choose Auto Tuning to start searching for TV- and
Exit
Radio Channels (digital and analog). When you choose
Auto Tuning you will be prompted to choose your
country and thereafter the TV will start searching for
available channels. When the TV has finished searching it will save the
available channels automatically.
Menu
Scan
Enter
Channel Tuning
To access the founded channels press LIST button on the remote
control.
TV
TV
DTV
Radio
:
:
:
0 Program(s)
0 Program(s)
0 Program(s)
Press <Menu> to skip.
Press <Exit> to exit.
Exit
9
Menu
Design and specifications are subject to change without notice.
TV Mode ► TV Settings ► DTV Manual Tuning
Use the DTV Manual Tuning to search for digital TV- and Radio channels
manually.
Press Menu
Move down to DTV Manual Tuning
Press Enter
Choose the frequency/channel with LEFT or RIGHT buttons
Press Enter to start searching
Scan
DTV Manual Tuning
VHF CH
Please select channel then
Press OK to search
Bad
Normal
Good
Make sure that the signal level is sufficient.
TV Mode ► TV Settings ► ATV Manual Tuning
Use the ATV Manual Tuning to search for analog TV-channels manually.
Press Menu
Move down to ATV Manual Tuning
Press Enter
Choose the position for channel storage
Choose the Audio system for the channel
Move down to SEARCH and use LEFT to scan backwards and RIGHT to
scan forwards.
Move down to Fine-Tune to make fine tuning if necessary
Skip function can be used to skip the channel
Use RED button to save the channel
Exit
Scan
Enter Menu
ATV Manual Tuning
Storage To
l
Current CH
1
Search
< >
Fine-Tune
< >
Skip
Yes
Frequency
Exit
Scan
TV Mode ► TV Settings ► Program Edit
Use the Program Edit to edit the program list.
Press Menu
Move down to Program Edit
Press Enter
Choose the desired channel
Press FAV on the Remote to add the channels to the favorite list
Press BLUE to skip the channel when you Zap the channels with
CH+/CHPress YELLOW to move the channel position in the list (Analog channels
only)
Press GREEN to rename the channel. Use UP/DOWN to change the
character. Use RIGHT to move to next character. (Analog channels only)
Press RED to delete the channel
1
System
470.00 Mhz
Save
Program Edit
DTV - CH 01
DTV - CH 02
DTV - CH 03
DTV - CH 04
ATV - CH 01
Delete Rename Move
10
Skip
FAV
Design and specifications are subject to change without notice.
TV Mode ► Picture
Use the Picture menu to adjust the picture
settings to meet your requirements:
PICTURE
Picture mode
Choose between predefined settings:
Standard: Suitable for a normal room
Dynamic: Suitable for a bright room
Movie: Suitable for a dark room
Personal: In Personal mode you can adjust the
Contrast, Brightness, Colour, Sharpness and Tint to
meet your own requirements.
Colour Temp
Choose between predefined settings (Normal, Cold,
Warm, Personal). In Personal mode you can adjust the
Colours Red, Green and Blue.
Aspect Ratio
Choose the desired Aspect Ratio. Available
options are Auto, 4:3, 16:9, Zoom1 and
Zoom2.
“Auto" function is available only in "ATV",
"DTV", "Scart1", "Scart2" and "AV", mode.
In PC Mode, only "16:9" and "4:3" mode can be
adjusted.
Picture Mode
Contrast
Brightness
Colour
Sharpness
Tint
Exit
www.swedx.com
Standard
50
50
50
50
50
Menu
Enter
PICTURE
Noise Reduction
Choose the level of noise reduction. Available options
are Off, Low, Middle and High.
If the broadcast signal received by your TV is weak,
you can activate the Noise Reduction feature to help
reduce any static and ghosting that may appear on the
screen.
Colour Temp
Red
Green
Blue
Aspect Ratio
Noise Reduction
Exit
www.swedx.com
Normal
50
50
50
Auto
Off
Menu
Enter
PC Mode ► PC-Setup
When the TV is in PC-Mode additional settings
are available for PC-Setup.
PICTURE
Auto Adjust: Auto adjustment allows the PC
screen of set to self-adjust to the incoming PC
video signal.
H-Offset: Adjust the PC’s screen positioning
horizontally
V-Offset: Adjust the PC’s screen positioning vertically
Clock: Adjust the signal clock
Phase: Adjust the signal phase
Auto Colour: Auto adjustment to achieve optimal
colours.
Auto Adjust
H-Offset
V-Offset
Clock
Phase
Auto Colour
Exit
11
www.swedx.com
50
50
0
50
Menu
Enter
Design and specifications are subject to change without notice.
TV Mode ► Sound
Use the Sound menu to adjust the sound
settings to meet your requirements:
Sound mode
Choose between predefined settings:
Standard: Suitable for normal programs
Movie: Suitable for movies
Sport: Suitable for sport programs
Music: Suitable for music program
Personal: In Personal mode you can adjust the Treble
and Bass to meet your own requirements.
Balance
Adjust the sound output balance between left and right
speaker.
SOUND
Sound Mode
Treble
Bass
Balance
Auto Volume
Surround Sound
Exit
www.swedx.com
Standard
50
50
50
Off
Off
Menu
Enter
Auto Volume
Each broadcasting station has its own signal conditions, and so it is not easy to adjust the volume
every time the channel is changed. This feature lets you automatically adjust the volume of the
desired channel by lowering the sound output when the modulation signal is high or by raising the
sound output when the modulation signal is low.
Surround Sound
When ON it delivers a compelling, virtual surround sound experience through any two-speaker
playback system, including internal television speakers. It is fully compatible with all multichannel
formats.
Time
Use the Time menu to set the TV time and
adjust some other settings related to time
settings.
TIME
Clock: Adjust the time of the TV. If the TV is
connected to a DVB signal, the TV will adjust
the time automatically corresponding to the DVB
information.
Off Time: Set a certain time to turn off the TV
automatically. The available time intervals are Once,
Everyday, Mon-Fri, Mon-Sat, Mon-Sun and Sunday.
On Time: Set a certain time to turn on the TV
automatically. The available time intervals are Once,
Everyday, Mon-Fri, Mon-Sat, Mon-Sun and Sunday.
--
-- -Off
Off
Off
On
Canary GMT
Clock
Off Time
On Time
Sleep Timer
Auto Sleep
Time Zone
Exit
www.swedx.com
Menu
--
Enter
Sleep Timer: Set the TV to turn off after a certain time. The time intervals are 240 min, 180 min,
120 min, 90 min, 60 min, 30 min, 20 min and 10 min.
Auto Sleep: When set to ON the TV will turn off automatically if no input signal is detected otherwise
the TV will remain ON even if no input signal is detected.
Time Zone: Choose the Time Zone correspondent to your location. If the TV is connected to a DVB
signal, the TV will adjust the time zone automatically corresponding to the DVB information.
12
Design and specifications are subject to change without notice.
Lock
Use the Lock menu to lock the SETUP menu or
block certain channels/programs:
LOCK
Lock System: Lock the settings SETUP menu.
Password will be required to make
modifications in the SETUP menu.
Lock System
Change Password
Change Password: Change the password. The
default password is 0000.
Off
Block Program
Parental Guide
Block Program: You can block certain channels and
these channels will not be views unless the password
is entered.
To lock/unlock a channel do the following:
Exit
Press Menu
Navigate to Lock menu with Left or Right buttons
Navigate down to Block Program
Press Enter
Navigate to the channel(s) you want to block and press GREEN to lock it
(lock icon appears). To unlock a locked channel navigate to it and press
GREEN (lock icon disappears).
Off
Menu
Scan
Enter
Block Program
DTV - CH 01
DTV - CH 02
DTV - CH 03
DTV - CH 04
ATV - CH 01
Exit
13
www.swedx.com
Lock MENU
Design and specifications are subject to change without notice.
Text-TV / Teletext
Most television stations provide written information services
via Teletext. The index page of the teletext service gives you
information on how to use the service. In addition, you can
select various options to suit your requirements by using the
remote control buttons.
TTX ON
MIX
SIZE
HOLD
CANCEL
INDEX
TIME
REVEAL
RED
GREEN
YELLOW
BLUE
TTX ON
Press TTX ON to enter Text-TV
Press TTX ON to exit Text-TV
INDEX
Used to display the index (contents) page at any time while
youare viewing teletext.
SIZE
Press to display the double-size letters in the upper half of
thescreen. For lower half of the screen, press it again. To display. normal screen, press it once
again.
REVEAL
Used to display the hidden text (answers to quiz games, for
example). To display normal screen, press it again.
MIX
Press to activate teletext mode after selecting the channel providing the teletext service. Press it
twice to overlap the teletext with the current broadcasting screen.
HOLD
Used to hold the display on a given page if the selected page is linked with several secondary
pages which follow on automatically. To resume, press it again.
CANCEL
Used to display the broadcast when searching for a page.
Red/Green/Yellow/Blue
If the FASTEXT system is used by a broadcasting company, the different topics covered on a
teletext page are colour coded and can be selected by pressing the coloured buttons. Press one of
them corresponding to the required. The page is displayed with other coloured information that can
be selected in the same way. To display the previous or next page, press the corresponding
coloured button.
14
Design and specifications are subject to change without notice.
TV base assembly with the TV
The TV base for the camo TV can be purchased from
your dealer or www.swedx.com
To assemble the base with the TV review the
illustration to the right. Use the screws included in the
base box.
Screws
Notice: Make sure to avoid any damages to the
LCD panel when you assemble the TV base.
Wall mount assembly with the TV
SWEDX offers several wall mount devices for the
camo TV which can be purchased from your dealer or
www.swedx.com
To assemble the wall mount with the TV review the
illustrations to the right. Use the screws included in
the wall mount box.
Notice: Make sure to avoid any damages to the
LCD panel when you assemble the wall mount.
Lock
screw
15
Design and specifications are subject to change without notice.
Troubleshooting
Before contacting SWEDX service or your dealer, perform the following simple checks. If you
cannot solve the problem using the instructions below, note the model and serial number of your
set and contact your local dealer.
No sound or picture
Check that the mains lead has been connected to a wall socket.
Check that you have pressed the POWER button on the front of the TV.
Check the picture contrast and brightness settings.
Check the volume.
Normal picture but no
sound
Check the volume.
Check whether the MUTE button has been pressed on the remote
control.
No picture or black and
white picture
Adjust the color settings.
Check that the broadcast system selected is correct.
Sound and picture
interference
Try to identify the electrical appliance that is affecting the set and
move it further away.
Plug your set into a different mains socket.
Blurred or snowy
picture, distorted sound
Check the direction, location and connections of your aerial.
This interference is often due to the use of an indoor aerial.
Remote control
malfunctions
“No signal”
message is displayed.
Replace the remote control batteries.
Clean the upper edge of the remote control (transmission window).
Check the battery terminals.
Turn off the TV and unplug the AC cable from the wall socket and
then plug the AC cable and turn on the TV.
Check that the signal cable is firmly connected to the source input.
Check that the source are turned on.
On PC mode, “Not
Supported Mode”
message is displayed.
Check the maximum resolution and the frequency of the video
adapter..
The image is too light
or too dark.
Adjust the Brightness and Contrast.
The image is Black and
White in Scart 2
Scart 2 has support for S-video and Y/C signal. Make sure that the
output signal from the source is in S-video or Y/C mode.
16
Design and specifications are subject to change without notice.
Warranty and Service
The following terms apply only to new "in the original carton" SWEDX products marketed and
distributed by SWEDX, which are purchased and used by the original consumer purchaser.
Depending on the model, your terms and conditions may be different from those shown below,
and this information is subject to change without prior notice. Unless specifically stated otherwise,
used and reconditioned products that are resold have no warranty from SWEDX and are
considered sold "AS-IS", however, the selling dealer may offer additional service options.
Warranty for SWEDX products:
Check with your dealer for the warranty period.
What the warranty covers:
SWEDX warrants your SWEDX display(s) against defects in material and workmanship during
the warranty period from SWEDX factory delivery date shown in the shipping documents. If a
product proves to be defective in material or workmanship during the warranty period, SWEDX
will, at its sole option repair or replace the product with a similar product, provided the purchaser
adheres to certain return authorization procedures and guidelines. SWEDX reserves the right to
charge customer in case of warranty conditions not are fulfilled.
Who the warranty protects:
This warranty is valid only for the first purchaser.
What the warranty does not cover:
1. Any product which the serial number has been defaced, modified or removed.
2. Damage, deterioration or malfunction resulting from:
A. Accident, misuse, neglect, fire, water, lightning, or other acts of nature, unauthorized
product modification, or failure to follow instructions supplied with the product.
B. Repair or attempted repair by anyone not authorized by SWEDX.
C. Any damage of the product due to shipment.
D. Removal or installation of the product.
E. Causes external to the product, such as electric power fluctuations or failure.
F. Use of supplies or parts not meeting SWEDX specifications.
G. Normal wear and tear.
H. Any other cause which does not relate to a product defect.
3. Cosmetic damage by purchaser, such as markings, discoloration, scratches, dents, anti-theft
devices markings, gouges or any other defacement.
4. Physically damaged products by purchaser, such as broken PCB, Housing, damaged LCD
Module.
5. No Defect Found (product returned to SWEDX as defective but failure is not duplicated by
SWEDX's test method.)
6. The product is not in accordance with the fault in the application
7. Timber is a lifelike natural material which can cause some little changes in the precision of the
produced product such as small openings line beside the connecting point and some other
small changes which are out of SWEDX control and don't make any effect for the product
functionality.
Dead on Arrival (DOA)
If the product fails within the manufacturer's DOA period, a replacement product will be offered.
Before contacting us:
In many cases, your TV may not need repair. Before you contact us, please consult the
troubleshooting section in your user's manual or SWEDX's FAQ web pages at
http://www.swedx.com to see if you can easily remedy the problem yourself.
17
Design and specifications are subject to change without notice.
How to get service:
For information on obtaining warranty service, contact SWEDX dealer (the place where you
bought your product) in first choice. If for any reason you can not contact your dealer, please
contact SWEDX Customer Service by visiting http://www.swedx.com.
SWEDX technical support services:
During the period of product warranty, we support your basic configuration, setup and
troubleshooting questions, and when required, we provide you with all instructions on how to
return your product for repair. For support inquiries, please visit http://www.swedx.com.
SWEDX reserves the right to make final decisions regarding problem determination and the
appropriate service option. Exchange units assume the remaining warranty of the original
product. Please refer to your SWEDX Limited Warranty Statement for complete terms and
conditions, as some models have other terms and conditions. Some limitations and restrictions
apply and these programs are subject to change without prior notice.
Limitation of liability
If your SWEDX product fails to work as warranted above, your sole and exclusive remedy shall
be repaired or replaced. SWEDX's maximum liability under this limited warranty is expressly
limited to the lesser of the price you have paid for the product or the cost of repairing or
replacement of any hardware components that malfunction in conditions of normal use. SWEDX
is not liable for any damages caused by the product or the failure of the product to perform,
including any lost profits or savings or special, incidental, or consequential damages. SWEDX is
not liable for any claim made by a third party or made by you for a third party.
This limitation of liability applies whether damages are sought, or a claim made, under this limited
warranty or as a tort claim (including negligence and strict product liability), a contract claim, or
any other claim. This limitation of liability cannot be waived or amended by any person. This
limitation of liability will be effective even if you have advised SWEDX.
18
Design and specifications are subject to change without notice.
www.swedx.com
19
Design and specifications are subject to change without notice.