1
Sun Java™ System
Content Delivery Server 5.0
Integration Guide
2005Q4
Sun Microsystems, Inc.
www.sun.com
Part No.: 819-3216-10
Submit comments about this document at: http://docs.sun.com/app/docs/form/comments
Copyright © 2005 Sun Microsystems, Inc., 4150 Network Circle, Santa Clara, California 95054, U.S.A. All rights reserved.
Sun Microsystems, Inc. has intellectual property rights relating to technology embodied in the product that is described in this document. In
particular, and without limitation, these intellectual property rights may include one or more of the U.S. patents listed at
http://www.sun.com/patents and one or more additional patents or pending patent applications in the U.S. and in other countries.
U.S. Government Rights - Commercial software. Government users are subject to the Sun Microsystems, Inc. standard license agreement and
applicable provisions of the FAR and its supplements.
This distribution may include materials developed by third parties.
Sun, Sun Microsystems, the Sun logo, JavaServer Pages, JSP, Javadoc, and Java are trademarks or registered trademarks of Sun Microsystems,
Inc. in the U.S. and other countries.
Products covered by and information contained in this service manual are controlled by U.S. Export Control laws and may be subject to the
export or import laws in other countries. Nuclear, missile, chemical biological weapons or nuclear maritime end uses or end users, whether
direct or indirect, are strictly prohibited. Export or reexport to countries subject to U.S. embargo or to entities identified on U.S. export exclusion
lists, including, but not limited to, the denied persons and specially designated nationals lists is strictly prohibited.
DOCUMENTATION IS PROVIDED "AS IS" AND ALL EXPRESS OR IMPLIED CONDITIONS, REPRESENTATIONS AND WARRANTIES,
INCLUDING ANY IMPLIED WARRANTY OF MERCHANTABILITY, FITNESS FOR A PARTICULAR PURPOSE OR NON-INFRINGEMENT,
ARE DISCLAIMED, EXCEPT TO THE EXTENT THAT SUCH DISCLAIMERS ARE HELD TO BE LEGALLY INVALID.
Copyright © 2005 Sun Microsystems, Inc., 4150 Network Circle, Santa Clara, California 95054, Etats-Unis. Tous droits réservés.
Sun Microsystems, Inc. détient les droits de propriété intellectuels relatifs à la technologie incorporée dans le produit qui est décrit dans ce
document. En particulier, et ce sans limitation, ces droits de propriété intellectuelle peuvent inclure un ou plus des brevets américains listés à
l'adresse http://www.sun.com/patents et un ou les brevets supplémentaires ou les applications de brevet en attente aux Etats - Unis et
dans les autres pays.
Cette distribution peut comprendre des composants développés par des tierces parties.
Sun, Sun Microsystems, le logo Sun, JavaServer Pages, JSP, Javadoc, et Java sont des marques de fabrique ou des marques déposées de Sun
Microsystems, Inc. aux Etats-Unis et dans d'autres pays.
Les produits qui font l'objet de ce manuel d'entretien et les informations qu'il contient sont regis par la legislation americaine en matiere de
controle des exportations et peuvent etre soumis au droit d'autres pays dans le domaine des exportations et importations. Les utilisations
finales, ou utilisateurs finaux, pour des armes nucleaires, des missiles, des armes biologiques et chimiques ou du nucleaire maritime,
directement ou indirectement, sont strictement interdites. Les exportations ou reexportations vers des pays sous embargo des Etats-Unis, ou
vers des entites figurant sur les listes d'exclusion d'exportation americaines, y compris, mais de maniere non exclusive, la liste de personnes qui
font objet d'un ordre de ne pas participer, d'une facon directe ou indirecte, aux exportations des produits ou des services qui sont regi par la
legislation americaine en matiere de controle des exportations et la liste de ressortissants specifiquement designes, sont rigoureusement
interdites.
LA DOCUMENTATION EST FOURNIE "EN L'ETAT" ET TOUTES AUTRES CONDITIONS, DECLARATIONS ET GARANTIES EXPRESSES
OU TACITES SONT FORMELLEMENT EXCLUES, DANS LA MESURE AUTORISEE PAR LA LOI APPLICABLE, Y COMPRIS NOTAMMENT
TOUTE GARANTIE IMPLICITE RELATIVE A LA QUALITE MARCHANDE, A L'APTITUDE A UNE UTILISATION PARTICULIERE OU A
L'ABSENCE DE CONTREFACON.
Contents
Preface
xi
1.
Introduction
2.
Billing Integration
3.
Billing Adapter Provided
2.2
Working with the Postpaid Service
Subscriber Integration
2–1
Subscriber Adapter Provided
3.2
Using a Subscriber Adapter
3.3
Working with LDAP
3–2
3–2
3–2
3.3.1.1
Subscriber Data for the Content Delivery Server
3.3.1.2
Sample Mapping File
Tuning LDAP
3–3
3–6
3–7
4–1
Using the MSISDN Number Through the WAP Gateway
WAP Gateway Configuration
5.1
3–1
Creating the Mapping File for LDAP
Single Sign-on Support
4.1
2–2
3–1
3.1
3.3.2
5.
2–1
2.1
3.3.1
4.
1–1
4–1
5–1
WAP Gateway Adapters Provided
5–1
iii
5.2
6.
5.1.1
Default WAP Gateway Adapter
5.1.2
Nokia Activ Server 2.0.1
5.1.3
Nokia Artus WAP Gateway
5.1.4
Openwave WAP Gateway
6.1
6.1.2
5–3
5–3
6–1
Push Sender Adapters
6–2
6.1.1.1
SMS Push for Messages
6–2
6.1.1.2
WAP Push for Messages
6–3
6.1.1.3
SMTP Push for Messages
6.1.1.4
SMS Push for Binary Content
Push Listener Adapter
6.2
Using a Push Adapter
6.3
Sample Registration File
6–3
6–4
6–5
6.3.1
Sample pushsenderfactory.xml
6.3.2
Sample pushlistenerfactory.xml
Overview of the Framework
6–5
6–5
7–1
7–1
7.1.1
Page Definitions
7.1.2
Style Sheets
7.1.3
Processes and Page Usage
Integration Guide • 2005Q4
6–3
6–3
Device-Specific User Interface Framework
7.1
iv
5–2
6–1
Push Adapters Provided
6.1.1
7.
5–2
Using a WAP Gateway Adapter
Push Delivery
5–2
7–2
7–8
7–9
7.1.3.1
Log In Process
7–9
7.1.3.2
View Content Process
7.1.3.3
Search for Content Process
7.1.3.4
Set Preferences Process
7.1.3.5
View Promotions Process
7–11
7–12
7–12
7–13
8.
9.
7.1.3.6
View the My Downloads List Process
7.1.3.7
View My Wish List Process
7.1.3.8
View the My Gifts List Process
7.1.3.9
Purchase Process
7–14
7–14
7–15
7.2
Generating Pages for a Specific Device
7.3
Modifying Pages for All Devices
7.4
Adding a Custom Page
7–17
7–18
7–19
Content Validation Workflows
8–1
8.1
Creating a Content Validation Adapter
8.2
Creating a Workflow
8.3
Defining Criteria for the Workflow
DRM Server Integration
7–13
8–1
8–3
8–4
9–1
9.1
Setting Up DRM Mobile
9.2
Configuring the Content Delivery Server to Use DRM Mobile
Index
9–1
9–2
Index–1
Contents
v
vi
Integration Guide • 2005Q4
Figures
FIGURE 7-1
Log In Process
7–10
FIGURE 7-2
View Content Process
FIGURE 7-3
Search for Content Process
FIGURE 7-4
Set Preferences Process
FIGURE 7-5
Purchase Process
7–11
7–12
7–13
7–15
vii
viii
Integration Guide • 2005Q4
Tables
TABLE 2-1
Billing Event Parameters
2–2
TABLE 3-1
Configuration Properties
3–3
TABLE 3-2
LDAP Properties 3–3
TABLE 3-3
Subscriber Data
TABLE 3-4
Data for Sample LDAP File
TABLE 7-1
XML Files for Subscriber Portal Pages
TABLE 7-2
Page Elements
TABLE 8-1
Content Validation Adapters
8–2
TABLE 9-1
Properties for DRM Mobile
9–2
3–4
3–6
7–2
7–4
ix
x
Integration Guide • 2005Q4
Preface
The Sun Java™ System Content Delivery Server Integration Guide describes the adapters
provided with the Content Delivery Server. These adapters enable you to integrate
the Content Delivery Server with common systems and protocols that you are using
in your enterprise.
Before You Read This Document
This guide is for system administrators who are responsible for integrating the
Content Delivery Server with their current infrastructure. It assumes some
knowledge of networking, database, and wireless technologies. You must have
successfully deployed the Content Delivery Server as described in the Sun Java
System Content Delivery Server Installation Guide before using the information in this
guide.
Note – Sun is not responsible for the availability of third-party web sites mentioned
in this document, and does not endorse and is not responsible or liable for any
content, advertising, products, or other materials available through such sites.
How this Document is Organized
This guide is divided into the following chapters:
■
Chapter 1 provides an overview of adapters that are provided to assist you in
integrating the Content Delivery Server with your existing infrastructure.
xi
■
Chapter 2 describes the billing adapters that are available for integrating the
Content Delivery Server with your billing system.
■
Chapter 3 describes the subscriber adapters that are available for integrating the
Content Delivery Server with your user data.
■
Chapter 4 describes how the Content Delivery Server supports single sign-on.
■
Chapter 5 describes the WAP gateway adapters that are available for configuring
the Content Delivery Server to support the WAP gateway that you use.
■
Chapter 6 describes the push adapters that are available for the Content Delivery
Server to support the delivery method that you use.
■
Chapter 7 describes how to create a version of the Subscriber Portal for a specific
device. A customized version is needed only if the Subscriber Portal pages do not
display correctly or when a device provides additional browser capabilities that
you want to use.
■
Chapter 8 describes how to create a customized submission verifier workflow to
validate content submitted to the Content Delivery Server and to add code for
Digital Rights Management (DRM).
■
Chapter 9 describes how to integrate the DRM server DRM Mobile with the
Content Delivery Server. A DRM server is needed only if you want to protect
content using Open Mobile Alliance (OMA) DRM 1.0 guidelines.
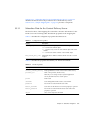
Typographic Conventions
Typefacea
Meaning
Examples
AaBbCc123
The names of commands, files,
and directories; on-screen
computer output
Edit your.login file.
Use ls -a to list all files.
% You have mail.
AaBbCc123
What you type, when contrasted
with on-screen computer output
% su
Password:
AaBbCc123
Book titles, new words or terms,
words to be emphasized.
Read Chapter 6 in the User’s Guide.
These are called class options.
You must be superuser to do this.
Replace command-line variables
with real names or values.
To delete a file, type rm filename.
a The settings on your browser might differ from these settings.
xii
Integration Guide • 2005Q4
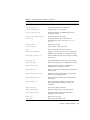
Related Documentation
The Sun Java System Content Delivery Server manuals are available as Portable
Document Format (PDF) and Hypertext Markup Language (HTML) files. These files
are available in the Documentation subdirectory of the directory where the Content
Delivery Server is installed as well as online at http://docs.sun.com.
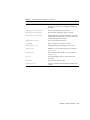
The following table summarizes the books included in the Content Delivery Server
documentation set.
Book Title
Description
Part Number
Sun Java System Content Delivery Server
Administration Guide
Describes how to manage content, devices, and
access to the Content Delivery Server.
819-3209-10
Sun Java System Content Delivery Server
Branding and Localization Guide
Describes how to customize the Subscriber Portal
and Developer Portal components of the Content
Delivery Server for the look and feel of your
enterprise. This guide also describes how to localize
the Content Delivery Server interfaces.
819-3210-10
Sun Java System Content Delivery Server
Capacity Planning Guide
Provides guidelines for determining what hardware
and software is needed to efficiently run the Content
Delivery Server.
819-3211-10
Sun Java System Content Delivery Server
Content Developer Guide
Describes how to submit content to the Content
Delivery Server.
819-3212-10
Sun Java System Content Delivery Server
Customization Guide
Describes the Content Delivery Server APIs that can
be used to create customized adapters for use in
integrating Content Delivery Server with the existing
infrastructure.
819-3213-10
Sun Java System Content Delivery Server
Error Messages
Describes error messages that are generated by the
Content Delivery Server and suggests actions to take
to resolve problems reported.
819-3214-10
Sun Java System Content Delivery Server
Installation Guide
Provides information about installing and
configuring the Content Delivery Server.
819-3215-10
Sun Java System Content Delivery Server
Migration Guide
Describes how to migrate from the previous version
of the Content Delivery Server to the current version.
819-3217-10
Sun Java System Content Delivery Server
System Management Guide
Provides information on running and maintaining
the Content Delivery Server.
819-3218-10
Preface
xiii
Sun Welcomes Your Comments
Sun is interested in improving its documentation and welcomes your comments and
suggestions.
To share your comments, go to http://docs.sun.com and click Send Comments.
In the online form, provide the document title and part number.
xiv
Integration Guide • 2005Q4
CHAPTER
1
Introduction
The Content Delivery Server is a software solution that helps you manage and
deliver applications and static content over-the-air (OTA) to your subscribers. Due to
the flexibility of the architecture, you do not need to change the way that you do
business to accommodate a proprietary solution. You can configure the Content
Delivery Server to work within your existing infrastructure.
Adapters are used in the following areas to integrate the Content Delivery Server
with your setup.
■
Billing. Billing adapters convert the information provided by the Content
Delivery Server to the format needed by your billing system.
■
Subscriber data. Subscriber adapters map external subscriber data to the data
required by the Content Delivery Server when processing subscriber-related
functions.
■
WAP gateway. Wireless application protocol (WAP) gateway adapters parse the
HTTP header from a WAP gateway to retrieve the MSISDN number, device
profile, and other attributes needed by the Content Delivery Server.
■
Push delivery. Push adapters serve as the interface between the Content Delivery
Server and your push implementation.
■
Content validation. Content validation adapters perform any preprocessing of
submitted content that is required before the content is accepted by the Content
Delivery Server.
You can also write customized adapters using the Content Delivery Server APIs if
none of the adapters provided meets your needs. The APIs are described in the Sun
Java System Content Delivery Server Customization Guide.
In addition to the adapters used to integrate the Content Delivery Server with
existing external systems, the following features enable you to integrate the Content
Delivery Server with existing processes:
■
The device-specific user interface framework enables you to tailor the pages of the
Subscriber Portal to suit the capabilities of the device on which it is viewed. This
framework helps to ensure the best possible experience for your subscribers.
1-1
1-2
■
Content validation workflows enable you to customize the process for accepting
content that is submitted to the Content Delivery Server. You can create different
workflows for specific types of content. You can use content validation adapters
provided with the Content Delivery Server or write your own adapters to
perform such functions as verifying the content or adding code for digital rights
management.
■
Integration with a digital rights management (DRM) server enables content to be
protected from unauthorized distribution and use based on the Open Mobile
Alliance (OMA) DRM 1.0 guidelines.
Integration Guide • 2005Q4
CHAPTER
2
Billing Integration
You do not need to change your billing implementation to use the Content Delivery
Server. You can configure the Content Delivery Server to work with your current
billing system through the use of billing adapters.
A billing adapter for postpaid or asynchronous billing converts the information
provided by the Content Delivery Server to the format needed by your billing
system. The Content Delivery Server posts billing events to a Java Message Service
(JMS) queue. You can receive these billing events using a JMS client. The JMS client
uses the billing adapter to format the information for your billing system.
A billing adapter for prepaid or synchronous billing is called by the Content
Delivery Server as the purchase is being processed. The adapter can dynamically
change the price of content, if desired, validate the purchase in real time, or manage
billing through an external system such as premium SMS.
You can create your own postpaid billing adapter using the Event Service API if the
adapter provided does not meet your needs. You can create your own prepaid
billing adapter using the Billing API. See the Sun Java System Content Delivery Server
Customization Guide for information on these APIs.
2.1
Billing Adapter Provided
For postpaid billing, the Content Delivery Server provides the Postpaid Service. This
service includes a JMS client that processes the billing events in the event queue and
generates a file that contains the information that your billing system can use to
charge subscribers. The file format can be XML, comma-separated values (CSV), or
name-value pairs. See Section 2.2, “Working with the Postpaid Service” on page 2-2.
No prepaid billing adapters are provided.
2-1
2.2
Working with the Postpaid Service
The Postpaid Service supports billing systems that charge subscribers after content
has been purchased. You can use the Postpaid Service instead of a customized billing
adapter if your billing system supports postpaid billing and processes records in one
of the following formats:
■
■
■
XML
CSV
Name-value pairs
To use the Postpaid Service, set the following properties in the
PostpaidService.properties file. This file is in the
$CDS_HOME/deployment/deployment-name/conf directory.
■
postpaid.handler.class. Set this property to the fully qualified name of the
class that you want to use. Use one of the following values:
■
com.sun.content.server.postpaid.impl.PostpaidDefaultHandler.
Use this class to generate billing records in either XML or name-value format.
■
com.sun.content.server.postpaid.impl.PostpaidCSVHandler. Use
this class to generate billing records in CSV format.
■
postpaid.record.class. Set this property to
com.sun.content.server.postpaid.PostpaidBillingRecord.
■
postpaid.template.filename. Set this property to the fully qualified name of
the file that defines the records that you want generated. Use one of the following
values:
■
deployment/deployment-name/conf/resources/default_record.xsl. Use
this file with PostpaidDefaultHandler to generate name-value records.
■
deployment/deployment-name/conf/resources/xml_record.xsl. Use this
file with PostpaidDefaultHandler to generate XML records.
■
deployment/deployment-name/conf/resources/csv_record.xsl. Use this
file with PostpaidCSVHandler to generate CSV records.
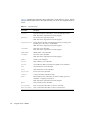
The following table shows the information provided for each billing event:
TABLE 2-1
2-2
Billing Event Parameters
Parameters
Description
billing-ticket
Billing ticket for this transaction.
campaign_coupon
Coupon code for a campaign.
campaign_id
String that identifies the campaign.
catalog-res-id
String that identifies the content edition.
Integration Guide • 2005Q4
TABLE 2-1
Billing Event Parameters (Continued)
Parameters
Description
content_binary_mimetype
MIME type of the content.
content_class_id
String that identifies the content item.
content_description
Long description of the content.
content_drm_type_id
String that identifies the DRM method used to
protect the content.
content_short_description
Short description of the content.
content-id
String that identifies the content that was
purchased. This value is the same as catalogres-id.
content_name
Name of the content.
current-status
Current status of this transaction.
date
Date on which the transaction occurred.
destination-address
Address to which content is sent, for example, the
MSISDN of the subscriber who requested content.
developer-content-id
Unique identifier used by the developer to identify
the content.
developer-id
String that identifies the developer of the content.
developer_name
Name of the developer who submitted the content.
download-confirm
Flag that indicates whether a confirmation is
required after a successful download.
download-count
Number of times the content can be downloaded for
the price paid.
download-current-count
Number of times the subscriber has downloaded
this content, including this time.
download-expiration
Flag that indicates whether the download period
has expired.
download-period
Time period during which the content can be
downloaded without additional charge to the
subscriber.
download-price
Price of the content purchased.
download-purchase
Flag that indicates this is a purchase request.
download-recurring
Flag that indicates whether the subscriber is
charged for each download.
event-log
Name of the event log.
event-msg
Message issued with the event.
Chapter 2
Billing Integration
2-3
TABLE 2-1
2-4
Billing Event Parameters (Continued)
Parameters
Description
event-source-type-id
Number that identifies the source of the event.
event-type
Numeric representation of the event that occurred.
event-type-id
String that identifies the type of event that occurred.
external_content_id
String that identifies the content to the billing
system.
external_group_id
String that identifies the group to which the content
belongs.
external-request-text
Text of the request from the subscriber, for example,
the MO push request content.
gift_message
Message included with the gift.
gifted_current_downloads
Number of times the recipient downloaded this gift,
including this time.
gifted_current_subscriptions
Number of subscription periods used by the
recipient, including this period.
gift_download_date
Date that the gift was first downloaded by the
recipient.
gift_expiration_date
Date by which the gift must be claimed by the
recipient.
gift_purchase_date
Date the gift was purchased by the giver.
gifted_downloads
Number of downloads included in the gift.
gifted_subscriptions
Number of subscription periods included in the gift.
is_on_device
Flag that indicates whether the content is already on
the device.
is-prepay
Flag that indicates whether the subscriber has
prepaid for the content.
locale
Subscriber’s locale.
msisdn
MSISDN for the subscriber device.
push-msgtext
Message sent to the subscriber’s device or email.
recipient_locale_code
Locale of the intended recipient of the content.
recipient_login_id
Login ID of the intended recipient of the content.
recipient_mobile_id
Mobile ID of the intended recipient of the content.
recipient_unique_device_id
Unique device ID of the intended recipient.
server-id
String that identifies the Vending Manager.
session-id
String that identifies the subscriber’s session.
Integration Guide • 2005Q4
TABLE 2-1
Billing Event Parameters (Continued)
Parameters
Description
source-address
Address of the external entity from which the
message was received, for example the MSISDN of
the SMSC.
subscription-expiration
Date that the subscription period ends.
subscription-frequency
How often the subscription price is charged.
subscription-recurring
Fag that indicates whether the subscriber should be
automatically charged for the next period when the
current subscription period ends.
subscription-price
Price of the subscription period.
timestamp
Time at which the transaction occurred.
unique-device-id
String that uniquely identifies the device used.
usage-count
Number of uses allowed for the price specified for
usage-price.
usage-price
Price charged for the number of uses specified for
usage-count.
user-id
String that identifies the user who initiated the
transaction.
username
Login name for the subscriber.
vending-res-id
String by which the Vending Manager identifies the
content.
Chapter 2
Billing Integration
2-5
2-6
Integration Guide • 2005Q4
CHAPTER
3
Subscriber Integration
The Sun Java System Content Delivery Server uses an Oracle database to manage
subscriber profiles. If you already have extensive subscriber data, you do not need to
duplicate this information. The Content Delivery Server can be configured to work
with your existing subscriber data.
A subscriber adapter maps external subscriber data to the data required by the
Content Delivery Server when processing subscriber-related functions.
The subscriber adapter provided with the Content Delivery Server is described in
Section 3.1, “Subscriber Adapter Provided” on page 3-1. You can create your own
subscriber adapter using the User Profile API. See the Sun Java System Content
Delivery Server Customization Guide for information on this API.
3.1
Subscriber Adapter Provided
Currently, the subscriber adapter provided with the Content Delivery Server
supports the Lightweight Directory Access Protocol (LDAP) format. The LDAP
subscriber adapter uses an XML file to map data between the Content Delivery
Server and your LDAP directory.
3-1
3.2
Using a Subscriber Adapter
To specify the subscriber adapter that you want to use, you must set the
module.security.subscriber.usermanager property to the fully qualified
class name of the subscriber adapter. This property is in the security.conf file
found in the $CDS_HOME/deployment/deployment-name/conf directory. Use one of
the values shown in the following table.
Adapter
Value for the module.security.subscriber.usermanager property
Oracle
com.sun.content.server.server.security.user.SubscriberImpl
Use this value to use the Content Delivery Server database to store all subscriber data. This is
the default setting.
LDAP
com.sun.content.server.server.security.user.ldap.ldapusermanager.LDAPUser
Manager
Use this value to use an external LDAP directory for subscriber data.
To use the subscriber adapter for LDAP, you must also provide an XML file that
describes the mapping to be used. This file is described in Section 3.3.1, “Creating
the Mapping File for LDAP” on page 3-2.
3.3
Working with LDAP
This section provides additional information on setting up your system to work with
the Content Delivery Server when your subscriber data is stored in an LDAP
directory. Section 3.3.1, “Creating the Mapping File for LDAP” on page 3-2 describes
how to create a file that maps the fields in the LDAP directory to the fields in the
Content Delivery Server. Section 3.3.2, “Tuning LDAP” on page 3-7 describes how to
set up LDAP to improve performance.
3.3.1
Creating the Mapping File for LDAP
To use subscriber data in an LDAP directory, you must create a mapping file in XML
that maps the data needed by the Content Delivery Server to the information in the
LDAP directory. The conf.xml file in the $CDS_HOME/deployment/
deployment-name/conf directory contains a sample mapping. Edit this file and save
your version to a new file in the same directory, for example, cdsmapping.xml.
3-2
Integration Guide • 2005Q4
Section 3.3.1.1, “Subscriber Data for the Content Delivery Server” on page 3-3
identifies the data that must be provided to the Content Delivery Server.
Section 3.3.1.2, “Sample Mapping File” on page 3-6 provides a sample file.
3.3.1.1
Subscriber Data for the Content Delivery Server
The first few lines of the mapping file contain the connection information for the
LDAP server. The following tables describe the properties in the mapping file.
TABLE 3-1 describes the configuration properties that must be set.
TABLE 3-1
Configuration Properties
Property
Description
search_scope
Scope of the search. Specify one of the following values:
• 0 - Searches the named object.
• 1 - Searches only one level of the named object. This is the
default.
• 2 - Searches the entire sub-tree of the named object.
max_search_wait_time
Maximum time in milliseconds that LDAP executes a search
request.
TABLE 3-2 describes the properties that define your LDAP environment.
TABLE 3-2
LDAP Properties
Property
Description
initial_context_factory
Fully qualified class name of the initial context factory.
provider_url
URL of the provider (LDAP server).
Note: If you are using Sun Java System Application
Server, the URL must not contain spaces.
prefix
Prefix used.
username
User distinguished name used to access LDAP.
password
Password associated with the user name.
master_username
User name for the master server. This property is optional.
master_password
Password associated with the master user name. This
property is optional.
object
One or more objects from LDAP.
Chapter 3
Subscriber Integration
3-3
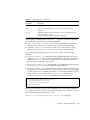
TABLE 3-3 identifies the subscriber data used by the Content Delivery Server. Add an
element with the field name in the XML file that you create. The required fields are
noted.
TABLE 3-3
Subscriber Data
Content Delivery
Server Field
3-4
Description
loginId
Login ID used by the subscriber to access the Subscriber Portal.
Note: This field is required and must be mapped.
password
Password for the login ID provided.
Note: This field is required and must be mapped.
uniqueDeviceId
Unique ID that identifies the subscriber by the device being used.
Typically, this is the same as the MSISDN.
Note: This field is required and must be mapped.
firstName
First name of the subscriber.
Note: This field is required and must be mapped.
middleName
Middle initial of the subscriber.
lastName
Last name of the subscriber.
Note: This field is required and must be mapped.
gender
Gender of the subscriber.
street1
Street address for the subscriber.
street2
Any additional address information required for the subscriber.
city
City information for the subscriber.
state
State information for the subscriber.
postalcode
Postal code for the subscriber.
country
Country where the subscriber resides.
email
Email address for the subscriber, used when sending password
reminders or campaign notifications.
Note: This field is required and must be mapped.
phone
Phone number for the subscriber.
activatedate
Date on which the subscriber account was activated.
deactivatedate
Date on which the subscriber account was deactivated.
Integration Guide • 2005Q4
TABLE 3-3
Subscriber Data (Continued)
Content Delivery
Server Field
Description
salutation
Salutation by which the subscriber prefers to be addressed.
enabled
Status of the subscriber. If no value is provided, the default is
enabled.
msisdn
TMSISDN number for the subscriber, used when sending messages
to the subscriber’s device.
Note: This field is required and must be mapped.
The mapping is contained in the <mapping>...</mapping> section of the XML
file. The mapping element has the following attributes:
■
isDeletable. Set to true to allow user records to be deleted by the Content
Delivery Server. Set to false to prevent user records from being deleted.
■
isAddable. Set to true to allow user records to be created by the Content
Delivery Server. Set to false to prevent user records from being created.
Each element in the mapping section can have one or more of the following
attributes:
■
isRequired. Set to true to indicate that the mapped field must not be null or
empty. Set to false to indicate that the mapped field can be null or empty. If this
attribute is set to true and a null or empty value is returned from the LDAP
directory, an error message is generated.
■
isModifiable. Set to true to allow the field to be modified by Content Delivery
Server. Set to false to prevent the field from being modified.
■
isMultiple. Set to true to indicate that more than one field in LDAP maps to
the field in the Content Delivery Server. If this attribute is true, you must include
a valuen element for each LDAP field, where n is a sequential number from 0 to
number of fields - 1. For example, if the uniqueDeviceId field maps to
handsetID and mobileID, you would add the following statements:
<uniqueDeviceID isMultiple=”true”>
<value0>handsetID</value0>
<value1>mobileID</value1>
</uniqueDeviceID>
The password element can also have the attribute isEncoded. Set this attribute to
true if the password is stored as an encoded string. Set to false if the password is
stored without encoding. The default is false.
See Section 3.3.1.2, “Sample Mapping File” on page 3-6 for an example.
Chapter 3
Subscriber Integration
3-5
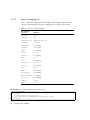
3.3.1.2
Sample Mapping File
TABLE 3-4 describes sample data that is mapped in the sample mapping file that
follows. Fields identified as having no mapping do not appear in the sample.
TABLE 3-4
CODE EXAMPLE 3-1
Data for Sample LDAP File
Content Delivery
Server Field
LDAP Field
loginId
SSN
password
pwd
uniqueDeviceId
handsetID, mobileID
firstName
givenName
middleName
(no mapping)
lastName
familyName
gender
(no mapping)
street1
street
street2
(no mapping)
city
city
state
(no mapping)
postalcode
zipcode
country
(no mapping)
email
email
phone
(no mapping)
activatedate
(no mapping)
deactivatedate
(no mapping)
salutation
(no mapping)
enabled
status
msisdn
msisdn
Sample Mapping File for LDAP Data
<ldapusermanager>
<config>
<search_scope>1</search_scope>
<max_search_wait_time>1000</max_search_wait_time>
</config>
3-6
Integration Guide • 2005Q4
CODE EXAMPLE 3-1
Sample Mapping File for LDAP Data (Continued)
<ldap>
<initial_context_factory>com.sun.jndi.ldap.LdapCtxFactory
</initial_context_factory>
<provider_url>ldap://t1:389/ou=Users,o=LDAPUserManager
</provider_url>
<prefix>uid=</prefix>
<username>cn=directory manager</username>
<password>ldappwd</password>
<master_username>cn=directory manager</master_username>
<master_password>ldappwd</master_password>
</ldap>
<object>
<obj0>top</obj0>
<obj1>person</obj1>
<obj2>organizationalPerson</obj1>
</object>
<mapping isDeletable=”true” isAddable=”true”>
<loginId isRequired=”true”>SSN</loginId>
<password isRequired=”true” isEncoded=”false”>pwd</password>
<uniqueDeviceId isRequired=”true” isModifiable=”true” isMultiple=”true”>
<value0>handsetID</value0>
<value1>mobileID</value1>
</uniqueDeviceId>
<firstName isRequired=”true”>givenName</firstName>
<lastName isRequired=”true”>familyName</lastName>
<street1>street</street1>
<city>city</city>
<postalcode>zipcode<postalcode>
<email isRequired=”true”>email</email>
<enabled isRequired=”true”>status</enabled>
<msisdn isRequired=”true” isModifiable=”true”>msisdn</msisdn>
</mapping>
</ldapusermanager>
3.3.2
Tuning LDAP
When using an LDAP directory as the subscriber database, you might want to create
an index on the attribute mapped to the unique device ID to improve performance.
See the documentation for the LDAP directory that you are using for instructions on
creating an index. Create the index on the attribute that is mapped to
uniqueDeviceId in the mapping file that you created.
Creating an index is resource intensive and could affect system performance. Choose
a time to create the index that is least likely to impact users.
Chapter 3
Subscriber Integration
3-7
3-8
Integration Guide • 2005Q4
CHAPTER
4
Single Sign-on Support
The Sun Java System Content Delivery Server supports single sign-on. Single sign-on
makes it possible for a subscriber who has signed on to an operator’s service to
access content provided by the Content Delivery Server without having to sign on
again.
4.1
Using the MSISDN Number Through the
WAP Gateway
Single sign-on is achieved through the use of the MSISDN number. This number is
provided through the WAP gateway that you have configured the Content Delivery
Server to use (see Section , “WAP Gateway Configuration” on page 5-1.) The Content
Delivery Server uses the MSISDN (Mobile Station Integrated Services Digital
Network) number to authenticate users.
4-1
4-2
Integration Guide • 2005Q4
CHAPTER
5
WAP Gateway Configuration
A WAP gateway serves as a translator between web protocols and wireless
protocols. You can configure the Content Delivery Server to work with the WAP
gateway of your choice.
A WAP gateway adapter parses the HTTP header from a WAP gateway to retrieve
the MSISDN number, device profile, and other attributes needed by the Content
Delivery Server.
The WAP gateway adapters provided with the Content Delivery Server are
described in Section 5.1, “WAP Gateway Adapters Provided” on page 5-1. You can
create your own WAP gateway adapter using the WAP Gateway API. See the Sun
Java System Content Delivery Server Customization Guide for information on this API.
5.1
WAP Gateway Adapters Provided
The Content Delivery Server provides a default WAP gateway adapter that can be
used with any WAP gateway that does not require the value returned for the unique
ID or MSISDN to be parsed. In addition, adapters for the following WAP gateways
are provided with the Content Delivery Server:
■
■
■
Nokia Activ Server 2.0.1
Nokia Artus WAP Gateway
Openwave WAP Gateway
5-1
5.1.1
Default WAP Gateway Adapter
The default WAP gateway adapter can be used with any WAP gateway that can use
the unique ID or MSISDN value in the format that it is received. If the value must be
parsed, you must use an adapter created specifically for the WAP gateway that you
are using.
To use the default adapter, follow these steps:
1. Set the default.unique.http_header.key property in the
$CDS_HOME/deployment/deploymentname/conf/SubscriberPortal.properties file to the key used to retrieve the
unique ID or MSISDN, for example:
default.unique.http_header.key=x-up-subno
2. Make sure that the adapter is registered.
See Section 5.2, “Using a WAP Gateway Adapter” on page 5-3 for instructions.
5.1.2
Nokia Activ Server 2.0.1
The Nokia Activ Server WAP gateway adapter parses the HTTP headers from the
Nokia Activ Server WAP gateway and passes the information to the Content
Delivery Server. To use this adapter, register the following class:
com.sun.content.server.service.gateway.nokia.NokiaActivServerWAPGateway
5.1.3
Nokia Artus WAP Gateway
The Nokia Artus WAP gateway adapter parses the HTTP headers from the Nokia
Artus WAP gateway and passes the information to the Content Delivery Server. To
use this adapter, register the following class:
com.sun.content.server.service.gateway.nokia.NokiaArtusWAPGateway
5-2
Integration Guide • 2005Q4
5.1.4
Openwave WAP Gateway
The Openwave WAP Gateway parses the HTTP headers from the Openwave WAP
gateway and passes the information to the Content Delivery Server. To use this
adapter, register the following class:
com.sun.content.server.service.gateway.openwave.OpenwaveWAPGateway
5.2
Using a WAP Gateway Adapter
To register the WAP gateway adapter that you want to use, add the class name to the
wapgateway.config file in the $CDS_HOME/deployment/deployment-name/conf
directory, for example:
module.gateway.id=
com.sun.content.server.service.gateway.nokia.NokiaActivServerWAPGateway
Include only the names of the adapters that you want to use. Remove adapters that
you are not using.
Chapter 5
WAP Gateway Configuration
5-3
5-4
Integration Guide • 2005Q4
CHAPTER
6
Push Delivery
Push technology makes it possible for subscribers to receive the link to content
without first having to request it from their device. Push technology can also be used
to push content directly to a device. The Sun Java System Content Delivery Server
supports WAP (Wireless Access Protocol) push, SMS (Short Message Service), and
SMTP (Simple Mail Transfer Protocol) push formats for messages, and SMS and
MMS push for content.
A push adapter serves as the interface between the Content Delivery Server and
your push implementation. Configure the Content Delivery Server to use the push
adapters that you need.
The push adapters provided with the Content Delivery Server are described in the
following sections. If these adapters do not provide the functionality that you need,
you can create your own push adapter using the Messaging API. See the Sun Java
System Content Delivery Server Customization Guide for information on this API.
6.1
Push Adapters Provided
The Content Delivery Server provides both push sender and push listener adapters.
Push sender adapters are used by the Content Delivery Server to send messages and
content to subscribers. Push listener adapters are used by the Content Delivery
Server to receive messages initiated by subscribers.
6-1
6.1.1
Push Sender Adapters
The Content Delivery Server supports SMS, WAP, and SMTP push formats for
messages. Several SMS formats are supported. Delivery of binary content using
either MMS or SMS is also supported, but you must write your own adapter for each
delivery method that you want to use.
6.1.1.1
SMS Push for Messages
The following forms of SMS push are supported:
■
Short Message Peer-to-Peer (SMPP)
When you have your own SMSC, use the following class as your adapter.
com.sun.content.server.server.msgserver.push.SMSPushMsgSender
■
SMS HTTP
When you are using HTTP for your SMS services, use the following class as your
adapter.
com.sun.content.server.server.msgserver.push.HTTPSMSPushMsgSender
If the SMSC that you use requires parameters different than those supported by
this adapter, you must write your own adapter using the Messaging API. See the
Sun Java System Content Delivery Server Customization Guide for information on this
API.
■
Computer Interface to Message Distribution (CIMD2)
When the SMSC that you use supports the CIMD2 protocol, use the following
class as your adapter.
com.sun.content.server.server.msgserver.push.SMSCIMD2PushMsgSender
For each protocol that you support, specify the adapter that you want to use in the
pushsenderfactory.xml file as described in Section 6.2, “Using a Push Adapter”
on page 6-4.
6-2
Integration Guide • 2005Q4
6.1.1.2
WAP Push for Messages
This adapter supports push delivery using WAP push. Use the class
com.sun.content.server.server.msgserver.push.WAPPushMsgSender as
your adapter. Specify this adapter in the pushsenderfactory.xml file as
described in Section 6.2, “Using a Push Adapter” on page 6-4.
If your WAP push proxy gateway (PPG) requires attributes other than what is
currently included in the message template, you must update the
wap_push_msg_template.xsl file. This file is in the
$CDS_HOME/deployment/deployment-name/conf directory.
6.1.1.3
SMTP Push for Messages
This adapter supports push delivery using SMTP. Use the class
com.sun.content.server.server.msgserver.push.SMTPPushMsgSender as
your adapter. Specify this adapter in the pushsenderfactory.xml file as
described in Section 6.2, “Using a Push Adapter” on page 6-4.
6.1.1.4
SMS Push for Binary Content
If you want to push binary content to devices, you must create your own adapter
using the Messaging API. Use the push category to determine whether binary
content or a message is sent. The constant PUSH_CONTENT_BINARY_CATEGORY
defined in the PushConstants class identifies messages that contain binary content.
See the Sun Java System Content Delivery Server Customization Guide for information
on the Messaging API and the PushConstants class.
If you write your own adapter, specify this adapter in the
pushsenderfactory.xml file as described in Section 6.2, “Using a Push Adapter”
on page 6-4.
6.1.2
Push Listener Adapter
The Content Delivery Server provides push listener adapters for an SMSC that
supports CIMD2 or SMPP. To use the CIMD2 adapter, specify the class
com.sun.content.server.server.msgserver.protocol.cimd2.CIMD2Push
MsgListener in the pushlistenerfactory.xml file as described in Section 6.2,
“Using a Push Adapter” on page 6-4.
Chapter 6
Push Delivery
6-3
To use the SMPP adapter, specify the class
com.sun.content.server.server.msgserver.protocol.smpp.SMPPPushMsg
Listener in the pushlistenerfactory.xml file as described in Section 6.2,
“Using a Push Adapter” on page 6-4.
6.2
Using a Push Adapter
Set up the Content Delivery Server to support the push sender adapter and the push
listener adapters that you want to use. To specify the push sender adapters, follow
these steps:
1. Register the adapters with the Content Delivery Server.
To register the adapters, create an XML file named pushsenderfactory.xml in the
$CDS_HOME/deployment/deployment-name/conf directory. Only one SMS push
adapter can be specified.
See Section 6.3.1, “Sample pushsenderfactory.xml” on page 6-5 for an example
of this file.
2. Include the adapter class and any dependent classes in your class path.
3. If you did not do so when you installed the Content Delivery Server, edit the
push properties in the MsgServices.properties and CommonMsg.properties
files in the $CDS_HOME/deployment/deployment-name/conf directory.
See the Sun Java System Content Delivery Server Installation Guide for additional
information.
To specify the push listener adapter that you want to use, follow these steps:
1. Register the adapter with the Content Delivery Server.
To register the adapter, create an XML file named pushlistenerfactory.xml in
the $CDS_HOME/deployment/deployment-name/conf directory.
See Section 6.3.2, “Sample pushlistenerfactory.xml” on page 6-5 for an
example of this file.
2. Include the adapter class and any dependent classes in your class path.
3. If you did not do so when you installed the Content Delivery Server, edit the
push properties in the PushListener.properties and
CommonMsg.properties file in the $CDS_HOME/deployment/deploymentname/conf directory.
See the Sun Java System Content Delivery Server Installation Guide for details.
6-4
Integration Guide • 2005Q4
6.3
Sample Registration File
This section includes samples of the pushsenderfactory.xml file and the
pushlistenerfactory.xml file. Use these files to register the push adapters that
you want to use.
6.3.1
Sample pushsenderfactory.xml
The pushsenderfactory.xml file is used to register the push sender adapters that
you choose to use. As shown in the following code example, the pushmsgsender
properties must include the fully qualified name of the push adapter class and the
protocol that the adapter supports.
The following sample registers an adapter for each type of push sender supported.
CODE EXAMPLE 6-1
Sample pushsenderfactory.xml File
<pushmsgsenderset>
<pushmsgsender0
class="com.sun.content.server.server.msgserver.push.TestSMSPushMsgSenderImpl"
protocol="sms"/>
<pushmsgsender1
class="com.sun.content.server.server.msgserver.push.WAPPushMsgSender"
protocol="wap"/>
<pushmsgsender2
class="com.sun.content.server.server.msgserver.push.SMTPPushMsgSender"
protocol="smtp"/>
<pushmsgsender3
class="com.sun.content.server.server.msgserver.push.MMSPushMsgSender"
protocol="mms"/>
</pushmsgsenderset>
6.3.2
Sample pushlistenerfactory.xml
The pushlistenerfactory.xml file is used to register the push listener adapter
that you choose to use. The pushmsglistener properties must include the fully
qualified name of the push adapter class and the protocol that the adapter supports.
Chapter 6
Push Delivery
6-5
The following sample registers the adapter for CIMD2.
CODE EXAMPLE 6-2
Sample pushlistenerfactory.xml File
<pushmsglistenerset>
<pushmsglistener0 class=
"com.sun.content.server.server.msgserver.protocol.cimd2.CIMD2PushMsgListener"
protocol="sms"/>
</pushmsglistenerset>
6-6
Integration Guide • 2005Q4
CHAPTER
7
Device-Specific User Interface
Framework
The Subscriber Portal component of the Content Delivery Server is a browser-based
application that can be accessed on a PC or on the subscriber’s device. Because the
browsers used by different devices have different capabilities, the Content Delivery
Server provides a framework for generating Subscriber Portal pages that are tailored
to the capabilities of the different devices. This framework applies only to the
version of the Subscriber Portal that runs on a subscriber’s device, not to the version
that runs on a PC.
The Content Delivery Server provides Subscriber Portal pages for devices that use
browsers based on WML and XHTML. The pages provided are suitable for many
devices. However, if you are supporting a device that does not correctly show the
pages of the Subscriber Portal or you want to take advantage of a device’s special
capabilities, you can create a version of the Subscriber Portal pages specifically for
that device.
Section 7.1, “Overview of the Framework” on page 7-1 describes the framework for
device-specific user interfaces. Section 7.2, “Generating Pages for a Specific Device”
on page 7-17 describes how to generate Subscriber Portal pages tailored to the
capabilities of a device. Section 7.3, “Modifying Pages for All Devices” on page 7-18
describes how to modify a page and propagate the change to all device-specific
versions of the page.
7.1
Overview of the Framework
The Subscriber Portal consists of pages created using JavaServer PagesTM technology
(JSPTM pages.) These JSP pages are generated from XML files that describe the pages
to be produced and XSL style sheets that describe how the page elements are to be
rendered. A version of the Subscriber Portal, that is, one set of JSP pages, is
7-1
generated for each style sheet. Each set of pages is stored in a subdirectory with the
same name as the name of the style sheet. These subdirectories are in the following
locations:
■
$CDS_HOME/deployment/deployment-name/sun/domains/server-domain/
server-name/applications/j2ee-modules/CDSSubscriberPortal/device
if you are using Sun Java System Application Server.
■
$CDS_HOME/deployment/deployment-name/weblogic/domains/server-domain/
applications/subscriber/device if you are using WebLogic Server.
server-domain is the value specified for the app.server.domain property in the
configuration file. server-name is the value specified for the app.server.name
property in the configuration file.
When the Catalog Manager administrator adds a device to the list of supported
devices, one of the capabilities specified for the device is the browser type. The
browser type specified for the device determines which version of the pages is used.
7.1.1
Page Definitions
The files that contain the page definitions for the device-based Subscriber Portal are
identified in the following table. These files are in the $CDS_HOME/deployment/
deployment-name/markup_generation/page-defs directory. The use of these files
is described in Section 7.1.3, “Processes and Page Usage” on page 7-9.
TABLE 7-1
7-2
XML Files for Subscriber Portal Pages
File Name
Description
_campaign.xml
Shows the details for an individual campaign.
_catalog_menu.xml
Shows lists of links and is used to show the lists of
categories, content, promotions, search results, My
Downloads, and My Wish List.
_confirm_unsubscribe.xml
Prompts the subscriber to confirm the request to
unsubscribe from an item of content.
_detail.xml
Shows the details for an item of content.
_device_error_msg.xml
Shows an error message.
_device_unsupported.xml
Notifies the subscriber that the device being used is
not supported.
_download.xml
Prompts the subscriber to download an item of
content.
_enter_coupon.xml
Prompts the subscriber to provide the information
needed to redeem a coupon.
Integration Guide • 2005Q4
TABLE 7-1
XML Files for Subscriber Portal Pages (Continued)
File Name
Description
_gift_cancel_confirm.xml
Prompts the subscriber to confirm the request to
cancel a gift subscription.
_gift_cancel_success.xml
Confirms that the gift subscription is cancelled.
_gift_details.xml
Shows the details for a gift that was sent to a
subscriber.
_locale_selection.xml
Prompts subscribers to select their language
preference.
_login.xml
Prompts the subscriber to log in.
_login_disabled.xml
Prevents the subscriber from logging in, and is shown
if the subscriber attempts to log in to an account that is
disabled, or if the wrong password is provided three
times in a row.
_main_menu.xml
Shows the main menu shown when the subscriber
logs in.
_manage_category.xml
Enables subscribers to select the categories that they
want to see.
_my_gifts_menu.xml
Shows the links for gifts a subscriber gave and gifts a
subscriber received. The associated link appears only
if a subscriber gave or received at least one gift.
_purchase_confirm.xml
Prompts the subscriber to confirm the request to
purchase content.
_search.xml
Prompts the subscriber for search criteria.
_share_content.xml
Enables the subscriber to share an item of content with
another subscriber.
_share_content_confirm.xml
Prompts the subscriber to confirm the request to share
content.
_share_content_receive.xml
Notifies the subscriber that the recipient has received
the content that the subscriber chose to share.
_share_content_success.xml
Confirms that the recipient of shared content received
that content.
_sms_sent.xml
Notifies the subscriber that the requested content is
sent in an SMS message.
_unsub_success.xml
Confirms that the subscriber no longer has a
subscription for an item of content.
_user_admin_menu.xml
Provides the options for administering an account,
such as setting the language and managing categories.
Chapter 7
Device-Specific User Interface Framework
7-3
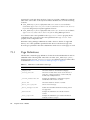
The pages for the device-based Subscriber Portal are defined once using XML. The
XML files are then processed with each existing style sheet to generate the JSP pages
for each version of the Subscriber Portal that is needed. The following table
describes the elements that can be used in each page.
TABLE 7-2
7-4
Page Elements
Element
Description
button
Provides a button for a form and is used to submit data. This
element appears under a form element. A button can contain the
following elements:
• label - The string displayed on the button. This element
generally contains a <jsp> tag that contains a <bean:message>
or <bean:write> tag.
• name - A string used to identify the button to the handler that
processes the form.
divider
Adds a horizontal line to a page.
field
Provides a field on a form in which a user can enter information and
appears under a form element. This element can have the attribute
multiple. Set this attribute to true to indicate that a field of type
select allows multiple items to be selected.
A field can contain the following elements:
• name - Name of the field. This name maps to the form bean.
• type - Type of field, for example, text, password, select, or text
area.
• label - Label that appears on the form. This element generally
contains a <jsp> tag that contains a <bean:message> or
<bean:write> tag.
• size - Size of the field.
• maxlength - Maximum length of the data a user can enter.
• value - Default value displayed for the field.
• option or optionlist - List of items for a field that is of type
select. See the description for option, optionlist in this
table.
form
Describes a form for the page and appears under the view element.
A view can have only one form. A form contains the following
elements:
• action - Action that is executed when the form is submitted.
• button - Button on the form. A form can contain multiple
buttons. See the description for button in this table.
• field - Field on the form. A form can contain multiple fields. See
the description for field in this table.
Integration Guide • 2005Q4
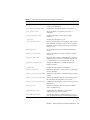
TABLE 7-2
Page Elements (Continued)
Element
Description
image
Provides an image for a page. Advanced devices can add images in
other places. An image can contain the following elements:
• name - Name of the file that contains the image. The style sheet
provides the path and the suffix for the image. For example, if the
image is in /web/images/logo.gif, set name to logo. Do not
include this element if the path element is included.
• path - URL path to the file that contains the image, for example,
http://server1.com/web/images/logo.gif. Do not
include this element if the name element is included.
• alt - Alternate text for an image. This element generally contains
a <jsp> tag that contains a <bean:message> or <bean:write>
tag.
link
Provides a link on the page and appears under either the navbar
element or as a list element. A link contains the following
elements:
• name - Text displayed on the page.
• url - URL to which the link points.
• accesskey - Flag that indicates whether to include a shortcut
key to access the item. Set to true to include an access key. Set to
false or omit the element to not include an access key. This
attribute is ignored if a browser cannot handle access keys.
For example, the following code segment shows a link to a page
outside of the Subscriber Portal.
<link>
<name>Yahoo</name>
<url><jsp>"http://wap.yahoo.com"</jsp></url>
</link>
list
Provides a list of items for a page and appears under the view
element. The list element contains one or more item elements. An
item element contain either a link element or a text element.
navbar
Provides a set of links that are displayed as a group, such as ok and
cancel or yes and no. These links are automatically separated by a
navspacer. The navbar element appears under the view element
and can have the attribute orientation. Valid value are
horizontal and vertical. The default is vertical.
Note: Some browsers might not have the capability to group the
links.
navspacer
Divides items in a navbar.
Chapter 7
Device-Specific User Interface Framework
7-5
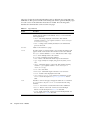
TABLE 7-2
Page Elements (Continued)
Element
Description
option,
optionlist
Describe the list of items included in a field of type select and
appear under the field element. Use option when the list of items
is known. Use optionlist when the list is dynamically generated.
An option contains the following elements:
• name - Name of the item.
• value - Value assigned to the item.
text
Provides the text for the page and appears under either the view
element or a list element. The text element generally contains a
<jsp> tag that contains a <bean:message> or <bean:write> tag.
This element can have the following attributes:
• alignment - Valid values are left, right, and center.
• type - Valid values are error and bold.
title
Provides the title used for the page and appears under the view
element. The title element generally contains a <jsp> tag that
contains a <bean:message> or <bean:write> tag.
view
Describes the page and is the top-most element. All other elements
are contained within it. For a WML-based browser, the view
represents a card. For an HTML-based browser, the view represents
the body.
This element can have the attribute main. Set this attribute to true
to include header and footer images on a page. Set to false to not
include header and footer images.
The following code example shows a page that contains a form.
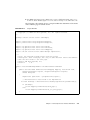
CODE EXAMPLE 7-1
Sample Page with Form
<?xml version="1.0"?>
<!-- Copyright (c) 2003 Sun Microsystems, Inc. All rights reserved -->
<!-- SUN PROPRIETARY/CONFIDENTIAL. -->
<!-- Use is subject to license terms. -->
<view>
<title>
<jsp><![CDATA[<bean:encodedmessage key="device.login.title"/>]]></jsp>
</title>
<jsp><![CDATA[<logic:messagesPresent>]]></jsp>
<text type="error">
<jsp><![CDATA[<html:encodederrors/>]]></jsp>
</text>
<jsp><![CDATA[</logic:messagesPresent>]]></jsp>
<jsp><![CDATA[<logic:messagesNotPresent>]]></jsp>
<jsp><![CDATA[</logic:messagesNotPresent>]]></jsp>
<form>
<action>
7-6
Integration Guide • 2005Q4
CODE EXAMPLE 7-1
Sample Page with Form (Continued)
<jsp>Web.getWeb().getActionURL(SubscriberConstants.ACTION_DEVICE_LOGIN,
null, response)</jsp>
</action>
<field>
<name>username</name>
<type>text</type>
<size>10</size>
<maxlength>40</maxlength>
<label>
<jsp><![CDATA[<bean:encodedmessage key="device.login.username"/>]]></jsp>
</label>
</field>
<field>
<name>password</name>
<type>password</type>
<size>10</size>
<maxlength>40</maxlength>
<label>
<jsp><![CDATA[<bean:encodedmessage key="device.login.password"/>]]></jsp>
</label>
</field>
<button>
<name>
<jsp><![CDATA[<%=SubscriberConstants.BUTTON_SUBMIT%>]]></jsp>
</name>
<label>
<jsp><![CDATA[<bean:encodedmessage key="device.login.loginLink"/>]]></jsp>
</label>
</button>
</form>
</view>
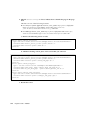
The following code example shows a page that contains links to other pages.
CODE EXAMPLE 7-2
Sample Page with Links
<?xml version="1.0"?>
<!-- Copyright (c) 2003 Sun Microsystems, Inc. All rights reserved -->
<!-- SUN PROPRIETARY/CONFIDENTIAL. -->
<!-- Use is subject to license terms. -->
<view>
<title>
<jsp><![CDATA[<bean:encodedmessage key="device.menu.main.title"/>]]></jsp>
</title>
<list>
<jsp><![CDATA[<logic:iterate id="element"
name="<%=SubscriberConstants.ATTR_MENU_LIST%>"
Chapter 7
Device-Specific User Interface Framework
7-7
Sample Page with Links (Continued)
CODE EXAMPLE 7-2
type="com.sun.content.server.server.webapps.common.ListItem"
indexId="index">]]></jsp>
<item>
<link>
<name>
<jsp><![CDATA[<bean:encodedwrite name="element"
property="name"/>]]></jsp>
</name>
<url>
<jsp>element.getUrl()</jsp>
</url>
<accesskey>
<jsp><![CDATA[<%=index.intValue()+1%>]]></jsp>
</accesskey>
</link>
</item>
<jsp><![CDATA[</logic:iterate>]]></jsp>
</list>
</view>
7.1.2
Style Sheets
Style sheets provide templates that describe how to render each element used to
define a JSP page. These elements are described in TABLE 7-2. Style sheets interpret
the XML page definitions and create the JSP pages for a given device or class of
devices.
Set up style sheets to render markup according to the capabilities of the device used.
For example, when an XML definition specifies a link, the style sheet for one type of
browser might render the link in color, where the style sheet for a different type of
browser might render the link with an underline.
The Content Delivery Server provides the following style sheets with the product.
These style sheets are in the $CDS_HOME/deployment/deployment-name/
markup_generation/stylesheets directory.
7-8
■
WML-1_1.xsl - Provides basic functionality for devices that support WML 1.1.
■
WML-1_2.xsl - Extends the style sheet for WML 1.1 to support WML 1.2
fuctionality, including access keys.
■
XHTML-Basic.xsl - Provides basic functionality for devices that support
XHTML.
■
XHTML-Color.xsl - Extends the style sheet for XHTML to include support for
header and footer images and Cascading Style Sheet (CSS) color schemes.
Integration Guide • 2005Q4
■
XHTML-AU.xsl - Extends the XHTML-Color style sheet to support the AU-System
browser.
■
XHTML-IAppli.xsl - Extends the XHTML-Color style sheet to support an iAppli
browser.
■
XHTML-NokiaSeries40.xsl - Extends the XHTML-Color style sheet to support
the browser on Nokia Series 40 devices.
■
XHTML-SE.xsl - Extends the XHTML-Color style sheet to support the browser
on newer Sony Ericsson devices.
■
XHTML-Alternate.xsl - Extends the XHTML-Basic style sheet to support the
browser on older devices or devices with less features.
■
XHTML-Symbian.xsl - Extends the XHTML-Color style sheet to support the
Symbian browser and larger images.
■
XHTML-UP.xsl - Extends the XHTML-Color style sheet to support the Openwave
UP browser.
■
XHTML-Motorola.xsl - Extends the XHTML-Color style sheet to support the
Mobile Internet Browser (MIB) 2.2 (or later) on newer Motorola devices.
These style sheets are suitable for many devices. However, if the pages of the
Subscriber Portal do not display well on a device, a new style sheet can be created to
define a different rendering of the elements. Only those elements that do not display
well need to be included in the new style sheet. For example, if a device uses the
XHTML-Alternate.xsl style sheet and only links and fields render poorly, create a
style sheet that imports XHTML-ALternate.xsl and includes definitions for only
links and fields.
7.1.3
Processes and Page Usage
The following sections describe the general process flow of the primary functions of
the Subscriber Portal. These descriptions identify the pages shown to subscribers on
their device and the files used to generate the pages. The files are described in
TABLE 7-1.
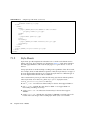
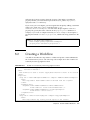
7.1.3.1
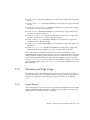
Log In Process
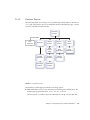
The following figure shows the process of logging in to the Subscriber Portal and the
options available after the subscriber is logged in. The description that follows the
figure identifies the XML file used for each page.
Chapter 7
Device-Specific User Interface Framework
7-9
CDS
Log In
Main
Menu
Get
Content
Search
Content
Promotions
(optional)
FIGURE 7-1
Log In
Error
Settings
My
Downloads
(optional)
My
Wish LIst
(optional)
My Gifts
(optional)
Log In Process
1. The CDS Log In page, generated from _login.xml, is the first page shown to the
subscriber.
2. If login is successful, the main page of the Subscriber Portal, generated from
_main_menu.xml, is shown. If the login fails, an error is shown on the CDS Log
In page. If the subscriber’s account is disabled, or the login fails three times in a
row, a page in which the login is disabled, generated from
_login_disabled.xml, is shown.
3. From the Main Menu page, the following actions are available:
7-10
■
View content, see Section 7.1.3.2, “View Content Process” on page 7-11.
■
Search for content, see Section 7.1.3.3, “Search for Content Process” on
page 7-12.
■
Set preferences, see Section 7.1.3.4, “Set Preferences Process” on page 7-12.
■
View promotions, if available, see Section 7.1.3.5, “View Promotions Process”
on page 7-13.
■
View My Downloads, if available, see Section 7.1.3.6, “View the My Downloads
List Process” on page 7-13.
■
View My Wish List, if available, see Section 7.1.3.7, “View My Wish List
Process” on page 7-14.
Integration Guide • 2005Q4
■
7.1.3.2
View My Gifts, if available, see Section 7.1.3.8, “View the My Gifts List
Process” on page 7-14.
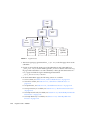
View Content Process
The following figure shows the process of viewing available content.
Get
Content
Select
Category
Select
Content
Purchase
Content
FIGURE 7-2
View Content Process
1. When the subscriber clicks Get Content on the Main Menu, the Select Category
page, generated from _catalog_menu.xml, is shown. This page shows the list of
categories that are available to the subscriber.
2. When the subscriber clicks a category name in the list of categories, the Select
Content page, generated from _catalog_menu.xml, is shown. This page shows
the list of content and content bundles that are available to the subscriber.
3. When the subscriber clicks an item of content in the content list, the Purchase
Content page, generated from _detail.xml, is shown. This page shows the
details for the item selected and provides the following options:
■
■
■
■
■
Purchase
Trial (if a trial is available)
I Have a Coupon
Buy for a Friend
Tell a Friend
Chapter 7
Device-Specific User Interface Framework
7-11
See Section 7.1.3.9, “Purchase Process” on page 7-15 for a description of these
options.
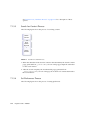
7.1.3.3
Search for Content Process
The following figure shows the process of searching content.
Search
Content
Enter
Search
Keyword
Search
Results
FIGURE 7-3
Search for Content Process
1. When the subscriber clicks Search Content on the Main Menu, the Search Content
page, generated from _search.xml, is shown. This page prompts the subscriber
for the search criteria.
2. After the search completes, the Search Results page, generated from
_catalog_menu.xml, is shown. This page shows the list of content that matches
the search criteria.
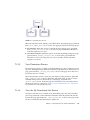
7.1.3.4
Set Preferences Process
The following figure shows the process of setting preferences.
7-12
Integration Guide • 2005Q4
Settings
Set
Language
FIGURE 7-4
Manage
Categories
Set Preferences Process
When the subscriber clicks Settings on the Main Menu, the Settings page, generated
from _user_admin_menu.xml, is shown. This page provides the following options:
7.1.3.5
■
Set Language. When this option is selected, the Set Language page, generated
from _locale_selection.xml, is shown. This page enables the subscriber to
select the language to be used.
■
Customize Categories. When this option is selected, the Manage Categories page,
generated from _manage_category.xml, is shown. This page enables the
subscriber to choose the categories to be shown and the order in which the
categories are shown.
View Promotions Process
The Promotions option is available on the Main Menu page only if campaigns are set
up in the Vending Manager. When the subscriber clicks Promotions, the Promotions
page, generated from _catalog_menu.xml, is shown. This page shows the list of
promotions that are available.
When the subscriber selects a promotion, the details for that promotion, generated
from _campaign.xml, are shown. When the subscriber clicks an item of content
included in the promotion, the Purchase Content page, generated from
_detail.xml, is shown. From this page, the subscriber can download the item or
purchase the item for a friend. See Section 7.1.3.9, “Purchase Process” on page 7-15
for information on the purchase process.
7.1.3.6
View the My Downloads List Process
The My Downloads list is available on the Main Menu page only if the subscriber
previously purchased content. When the subscriber clicks My Downloads, the My
Downloads page, generated from _catalog_menu.xml, is shown. This page shows
the list of content that the subscriber has purchased.
Chapter 7
Device-Specific User Interface Framework
7-13
When the subscriber selects an item of content, the Content Details page, generated
from _detail.xml, is shown. From this page, the subscriber can download the
item, purchase the item for a friend, or tell a friend about the item. See
Section 7.1.3.9, “Purchase Process” on page 7-15 for information on the purchase
process.
7.1.3.7
View My Wish List Process
My Wish List is available on the Main Menu page only if the subscriber added
content to the wish list when browsing content using the PC-based Subscriber Portal.
When the subscriber clicks My Wish List, the My Wish List page, generated from
_catalog_menu.xml, is shown. This page shows the list of content that the
subscriber has downloaded.
When the subscriber selects an item of content, the Purchase Content page,
generated from _detail.xml, is shown. See Section 7.1.3.9, “Purchase Process” on
page 7-15 for information on the purchase process.
7.1.3.8
View the My Gifts List Process
The My Gifts list is available on the Main Menu page only if the subscriber received
a gift or purchased a gift for another subscriber. When the subscriber clicks My Gifts,
the My Gifts page, generated from _my_gifts_menu.xml, is shown.
If the subscriber received a gift, the My Gifts page has a link for Gifts Received.
When the subscriber clicks the Gifts Received link, the Gifts Received page,
generated from _catalog_menu.xml, is shown. This page shows the list of content
that the subscriber received as gifts. When the subscriber selects an item of content,
the details for the gift, generated from _gift_details.xml, are shown. If the
subscriber wants to accept a gift, the Download Gift link is clicked and the
Download page, generated from _download.xml, is shown.
If the subscriber purchased a gift for another subscriber, the My Gifts page has a link
for Gifts Sent. When the subscriber clicks the Gifts Sent link, the Gifts Sent page,
generated from _catalog_menu.xml, is shown. This page shows the list of content
that the subscriber purchased as gifts. When the subscriber selects an item of
content, the details for the gift, generated from _gift_details.xml, are shown.
Gifts of content charged on a subscription basis have an option to cancel the gift. If
the subscriber cancels a gift subscription, a page confirming the request, generated
from _gift_cancel_confirm.xml, is shown. If the request completes
successfully, a notification page, generated from _gift_cancel_success.xml, is
shown.
7-14
Integration Guide • 2005Q4
7.1.3.9
Purchase Process
The following figure shows the process of purchasing content, either for download
or as a gift. The purchase process is initiated from the content details page, or when
an item is selected from the wish list.
Purchase
Content
Trial
(optional)
FIGURE 7-5
I Have a
Coupon
Buy for a
Friend
Tell a
Friend
Enter
Coupon
Code
Enter
Information
Enter
Information
Confirm
Purchase
Confirm
Purchase
Confirm
Purchase
Download
Content
Download
Content
Purchase
Purchase Process
The Purchase Content page provides the following options:
■
Trial. Subscribers can try out an item before purchasing it by clicking Trial. The
Download page, generated from _download.xml, is shown.
The trial option is available only if the administrator set up a trial for the item.
Chapter 7
Device-Specific User Interface Framework
7-15
■
Purchase. Subscribers can purchase content for themselves by clicking Purchase.
The Confirm Purchase page, generated from _purchase_confirm.xml, is
shown. If the subscriber confirms the purchase, the Download page, generated
from _download.xml, is shown. If the subscriber downloads content that is
delivered in an SMS message, a confirmation page, generated from
_sms_sent.xml, is shown.
If the subscriber already purchased the item, the purchase option is not available.
An option to unsubscribe is available if the subscriber has a subscription for the
item. When the subscriber unsubscribes, a confirmation page, generated from
_confirm_unsubscribe.xml, is shown. When the subscription is successfully
cancelled, a notification page, generated from _unsub_success.xml, is shown.
■
I Have a Coupon. If subscribers have a coupon code, they can purchase content at
a discount by clicking I Have a Coupon. The Enter Coupon Code page, generated
from _enter_coupon.xml, is shown. After a coupon code is entered, the
Confirm Purchase page and Download page are shown as described for the
Purchase option.
■
Buy for a Friend. Subscribers can purchase content as a gift for another subscriber
by clicking Buy for a Friend.
a. The Buy for a Friend page, generated from _share_content.xml, is shown.
b. After the information for the recipient is provided, the Confirm Purchase page,
generated from _share_content_confirm.xml, is shown.
c. If the request completes successfully, a notification page, generated from
_share_content_success.xml, is shown.
The message that the recipient of the gift receives includes a link to the gift. When
the recipient clicks the link and accesses the Subscriber Portal, a notification about
the gift, generated from _share_content_receive.xml, is shown.
■
Tell a Friend. Subscribers can notify another subscriber of content in which they
might be interested by clicking Tell a Friend. The Tell a Friend page, generated
from _share_content.xml, is shown. If the request completes successfully, a
notification page, generated from _share_content_success.xml, is shown.
The message sent to the friend includes a link to the content. When the recipient
clicks the link and accesses the Subscriber Portal, a notification about the content,
generated from _share_content_receive.xml, is shown.
7-16
Integration Guide • 2005Q4
7.2
Generating Pages for a Specific Device
Generate the device-specific pages on a test system to avoid disrupting the
production system. When you are sure that the generated pages are correct, move
the files created to your production system.
To generate a version of the Subscriber Portal that is tailored to a specific device or
set of devices, follow these steps:
1. Create an XSL style sheet in the $CDS_HOME/deployment/deployment-name/
markup_generation/stylesheets directory.
Give the new style sheet a name that identifies the device or device category for
which the generated pages will be used. Import a parent style sheet based on the
browser category that the device uses. For example, if the browser category is
XHTML, include the statement <xsl:import href="XHTML-Basic.xsl"/> in
the style sheet. Follow the structure of the parent style sheet. Templates are needed
only for those elements that do not render correctly, or to take advantage of
advanced capabilities that are offered on a device.
2. Run the command /bin/cdsi genmarkup -ss stylesheet where stylesheet is the
name of the style sheet that you created in Step 1. and does not include the .xsl
extension.
This command processes all of the XML files in the $CDS_HOME/deployment/
deployment-name/markup_generation/page-defs directory against the new style
sheet and generates a set of JSP pages. The results are placed in the $CDS_HOME/
deployment/deployment-name/markup_generation/jsps/stylesheet directory.
3. Move the directory that contains the generated JSP pages to the Subscriber Portal
application directory on each application server where you deployed a Subscriber
Portal.
■
For Sun Java System Application Server, $CDS_HOME/deployment/deploymentname/sun/domains/server-domain/server-name/applications/j2eemodules/CDSSubscriberPortal_1/device
■
For WebLogic Server, $CDS_HOME/deployment/deployment-name/weblogic/
domains/server-domain/applications/subscriberportal/device
4. Add the name of the style sheet to the $CDS_HOME/deployment/deployment-name/
conf/browser.config file.
This file maintains the list of supported browser types from which the Catalog
Manager administrator chooses when adding a device. For example, if you created a
style sheet named XHTML-newBrowser.xsl to support a new browser type, add
the following statement to the file:
device.markup.browser.option=XHTML-newBrowser
Chapter 7
Device-Specific User Interface Framework
7-17
7.3
Modifying Pages for All Devices
If you want to make changes to the version of the Subscriber Portal that is run on
mobile devices, you can change the page definitions and regenerate the JSP pages.
The changes that you make are only seen when the Subscriber Portal is accessed
from a mobile device. Changes made to the XML page definitions do not affect the
version of the Subscriber Portal that runs on a PC.
Make the changes on a test system to avoid disrupting the production system. When
you are sure that the generated pages are correct, move the files created to your
production system.
To change a page, follow these steps:
1. Edit an existing XML file in the $CDS_HOME/deployment/deployment-name/
markup_generation/page-defs directory or create a new file and add it to the
directory.
See Section 7.1.1, “Page Definitions” on page 7-2 for a description of the elements
that can be included in a file.
2. Run the command /bin/cdsi genmarkup -ss all.
This command processes all of the XML files in the $CDS_HOME/deployment/
deployment-name/markup_generation/page-defs directory against all of the
style sheets in the $CDS_HOME/deployment/deployment-name/
markup_generation/stylesheets directory and generates a new set of JSP
pages for each style sheet. Each set of pages is placed in the $CDS_HOME\
deployment\deployment-name\markup_generation\jsps\stylesheet directory,
where stylesheet is the name of the style sheet used to generate the pages.
3. Move the directories that contain the generated JSP pages to the Subscriber Portal
application directory on each application server where you deployed a Subscriber
Portal.
7-18
■
For Sun Java System Application Server, $CDS_HOME/deployment/deploymentname/sun/domains/server-domain/server-name/applications/j2eemodules/CDSSubscriberPortal_1/device
■
For WebLogic Server, $CDS_HOME/deployment/deployment-name/weblogic/
domains/server-domain/applications/subscriberportal/device
Integration Guide • 2005Q4
7.4
Adding a Custom Page
The version of the Subscriber Portal that runs on mobile devices was created using
Apache Struts (see http://jakarta.apache.org/struts/ for information on
this framework.) If you have a good understanding of Java technology, XML, and
Struts, you can add a page to the Subscriber Portal to customize the page flow.
As an example of customizing the page flow, this section describes the process for
adding a Terms and Conditions page before the main menu is shown. To add the
page, follow these steps:
1. Create the XML file that defines the page that you want to add. Save the file in the
$CDS_HOME/deployment/deployment-name/markup_generation/page-defs
directory.
See Section 7.1.1, “Page Definitions” on page 7-2 for information on the page
elements that you can use. The Terms and Conditions page for this example could be
defined as shown in the following code example.
CODE EXAMPLE 7-3
Terms and Conditions Page Definition
<?xml version="1.0"?>
<!-- Copyright (c) 2003 Sun Microsystems, Inc. All rights reserved -->
<!-- SUN PROPRIETARY/CONFIDENTIAL. -->
<!-- Use is subject to license terms. -->
<view>
<title>
<jsp><![CDATA[<bean:encodedmessage key="device.newPage.title"/>]]></jsp>
</title>
<text>
<jsp><![CDATA[<bean:encodedmessage
key="device. newPage.instructions"/>]]></jsp>
</text>
<navbar orientation="horizontal">
<link>
<name>
<jsp><![CDATA[<bean:encodedmessage
key="device. newPage.continue"/>]]></jsp>
</name>
<url>
<jsp>Web.getWeb().getActionURL("/device_direct_url.do",
null,response)</jsp>
</url>
</link>
</navbar>
</view>
Chapter 7
Device-Specific User Interface Framework
7-19
2. Add the strings used in the page definition to each language version of the
SubscriberPortalLocaleResource.properties file in the $CDS_HOME/
localization directory.
The name of the properties that you add corresponds to the values that you specified
for the key parameters, for example:
device.newPage.title=Terms and Conditions
device.newPage.instructions=Here are the latest updates to the site’s Terms and
Condition
device.newPage.continue=Continue
3. Generate all the pages for the Subscriber Portal.
a. Run the command: bin/cdsi genmarkup -ss all.
This command processes all of the XML files in the $CDS_HOME/deployment/
deployment-name/markup_generation/page-defs directory against all of the
style sheets in the $CDS_HOME/deployment/deployment-name/
markup_generation/stylesheets directory and generates a new set of JSP
pages for each style sheet. Each set of pages is placed in the $CDS_HOME/
deployment/deployment-name/markup_generation/jsps/stylesheet directory,
where stylesheet is the name of the style sheet used to generate the pages.
b. Move the directories that contain the generated JSP pages to the Subscriber
Portal application directory on each application server where you deployed a
Subscriber Portal.
■
For Sun Java System Application Server, $CDS_HOME/deployment/
deployment-name/sun/domains/server-domain/server-name/applications/
j2ee-modules/CDSSubscriberPortal_1/device
■
For WebLogic Server, $CDS_HOME/deployment/deployment-name/weblogic/
domains/server-domain/applications/subscriberportal/device
4. Create a handler that contains the business logic for the new page.
The handler must extend
com.sun.content.server.server.webapps.device.BaseDeviceHandler.
See the output of the Javadoc™ utility in the directory that contains the
documentation for the Content Delivery Server for information on this class.
Place the compiled class in a Java Archive (JAR) file in one of the following
locations:
■
7-20
For Sun Java System Application Server, $CDS_HOME/deployment/
deployment-name/sun/domains/server-domain/server-name/applications/
j2ee-modules/CDSSubscriberPortal_1/WEB-INF/lib
Integration Guide • 2005Q4
■
For WebLogic Server, $CDS_HOME/deployment/deployment-name/weblogic/
domains/server-domain/applications/subscriberportal/WEB-INF/lib.
The following code example shows a sample handler that determines if the Terms
and Conditions page should be shown
CODE EXAMPLE 7-4
Sample Handler
/*
* Copyright (c) 2004 Sun Microsystems, Inc. All rights reserved.
*/
package com.sun.content.server.cdsexample;
import javax.servlet.http.HttpServletRequest;
import javax.servlet.http.HttpServletResponse;
import
import
import
import
org.apache.struts.action.ActionForm;
org.apache.struts.action.ActionForward;
org.apache.struts.action.ActionMapping;
com.sun.content.server.subscriberapi.IApiContext;
/**
* Title: Sun Java[TM] System Content Delivery Server
* Description: Show a new page, but only if some External Service determines
* that the user needs to see this page.
* @author SUN Microsystems, Inc.
* @version
1.0
*/
public class CheckNewPageHandler extends BaseDeviceHandler
{
public ActionForward doExecute(ActionMapping mapping, ActionForm form,
HttpServletRequest request, HttpServletResponse response)
throws Exception
{
IApiContext apiContext = getApiContext(request);
// ExternalService class needs to be implemented
boolean showPage = ExternalService.showPage(apiContext.getMobileId());
if (showPage)
return mapping.findForward(“show_page”);
else
return mapping.findForward(“do_not_show_page”);
}
}
Chapter 7
Device-Specific User Interface Framework
7-21
5. Edit the struts-config.xml file to indicate how to handle the page in the page
flow.
This file is in one of the following locations:
■
For Sun Java System Application Server, $CDS_HOME/deployment/deploymentname/sun/domains/server-domain/server-name/applications/
j2ee-modules/CDSSubscriberPortal_1/WEB-INF
■
For WebLogic Server, $CDS_HOME/deployment/deployment-name/weblogic/
domains/server-domain/applications/subscriberportal/WEB-INF
a. Remove the following section of code:
<action path="/device_provision"
type="com.sun.content.server.server.webapps.device.ProvisionUserHandler">
<forward name="device_select_locale" path="/dv5.do"/>
<forward name="success" path="/dv42.do"/>
</action>
b. Add the following code in place of the section that you removed:
<action path="/device_provision"
type="com.sun.content.server.server.webapps.device.ProvisionUserHandler">
<forward name="device_select_locale" path="/dv5.do"/>
<forward name="success" path="/check_new_page.do"/>
</action>
<action path="/check_new_page"
type=" com.sun.content.server.cdsexample.CheckNewPageHandler">
<forward name="show_page" path="/device_show_new_page.do"/>
<forward name="do_not_show_page " path="/device_direct_url.do"/>
</action>
<action path="/device_show_new_page"
type="com.sun.content.server.server.webapps.device.ReturnSuccessHandler">
<forward name="success" path="/View?pg=_new_page.jsp"/>
</action>
6. Restart the server.
7-22
Integration Guide • 2005Q4
CHAPTER
8
Content Validation Workflows
Content submitted to the Sun Java System Content Delivery Server goes through a
validation process that is managed by the submission verifier workflows. A
workflow typically includes steps to validate the content. Content that does not
require special processing must be processed by the default workflow.
The workflows provided with Content Delivery Server are defined in the
$CDS_HOME/deployment/deployment-name/conf/
SubmissionVerifierWorkflows.xml file.
Workflows are provided for the following types of content:
■
■
■
■
Java technology-based applications (Java applications)
iAppli applications that use the DoJa library
Copyrighted externally hosted content
Other content
Use of the workflows provided with the Content Delivery Server is described in the
Sun Java System Content Delivery Server Installation Guide. If these workflows do not
meet your needs, you can create your own.
This chapter presents the following topics:
■
■
■
8.1
Creating a Content Validation Adapter
Creating a Workflow
Defining Criteria for the Workflow
Creating a Content Validation Adapter
A content validation adapter processes the content that is submitted to the Content
Delivery Server according to the purpose of the adapter. Any preprocessing that is
required before the content is accepted can be handled by an adapter. For example,
8-1
adapters can be used to verify that the content meets the guidelines established by
your enterprise, add code for digital rights management (DRM), or obfuscate the
code.
Each step in a workflow must include the name of the content validation adapter to
be run for that step. The following table describes the adapters provided with the
Content Delivery Server.
TABLE 8-1
Content Validation Adapters
Adapter
Description
APIFilterAdapter
Verifies that only APIs allowed by the developer
plan assigned to the developer who submitted the
content are used. It also determines which devices
support the APIs that the content uses.
MIDletValidationAdapter
Validates that the byte stream is a MIDlet
application archive file.
CopyrightAdapter
Ensures that copyrighted content is not stored
locally.
IAppliValidationAdapter
Validates that the byte stream is an iAppli
application archive file.
AddDerivedEditionAdapter
Stores the edition that is published, stocked and
downloaded.
MIDletSigningAdapter
Signs the MIDlet.
MIDletPermissionsAdapter
Adds permissions to the MIDlet-Permissions
and MIDlet-Permissions-Opt attributes that
are needed to run MIDlets that are instrumented
with connected DRM agents.
DRMAdapter
Instruments a MIDlet with the DRM agent.
MethodRedirectionAdapter
Redirects certain method calls to methods that
provide the special processing required by MIDlets
instrumented with DRM agents.
If none of the adapters provided meets your needs, you can create your own adapter
using the Content Validation API. See the Sun Java System Content Delivery Server
Customization Guide for information on the Content Validation API.
If the adapter that you write needs values that cannot be known at the time the
adapter is written, create a property file for the adapter. For example, if the adapter
needs to know the location of a utility that it uses, create a property file that contains
a property for the location. Set the location property to point to the directory that
contains the utility on the system on which the adapter runs. Write the adapter to
8-2
Integration Guide • 2005Q4
reference the location property when the location of the utility is needed. The
property file that you create must be placed in the $CDS_HOME/deployment/
deployment-name/conf directory.
If you create your own adapter, you must register the adapter by adding a statement
in the $CDS_HOME/deployment/deployment-name/conf/
SubmissionVerifierAdapters.xml file. If the adapter requires values in a
property file, specify the name of the file in the property-file attribute. For
example, if you create an adapter named MyValidationAdapter that requires a
property file named Validation.properties, add the following statement to the
file:
<adapter id="MyValidationAdapter"
name="sample.package.MyValidationAdapter"
propertyfile="Validation.properties"/>
8.2
Creating a Workflow
A workflow describes the steps taken to validate and protect content submitted to
the Content Delivery Server. The following code example shows the workflow for
externally hosted copyrighted content.
CODE EXAMPLE 8-1
Workflow for Externally Hosted Copyrighted Content
<workflow id="4" name="Copyrighted External Content Workflow"
activation="manual">
<desc>
This workflow is used to ensure copyrighted external content is not stored
</desc>
<step-list>
<step id="1" name="AddingDerivedEdition" adapter="AddDerivedEditionAdapter">
<desc>
This step adds a downloadable edition derived from the original
</desc>
<argument-list>
<argument name="AddDerivedEdition.EditionNameSuffix"
kind="indirect" value="editionnamesuffix""/>
<argument name="AddDerivedEdition.StoreOriginalBytes"
kind="direct" value="true"/>
</argument-list>
</step>
<step id="2" name="PreventingCopies" adapter="CopyrightAdapter">
<desc>
This step removes any locally stored copies of the content
Chapter 8
Content Validation Workflows
8-3
Workflow for Externally Hosted Copyrighted Content (Continued)
CODE EXAMPLE 8-1
</desc>
</step>
</step-list>
</workflow>
Each workflow that you define requires the following items:
■
A unique workflow ID.
■
A list of steps. Within the list, each step must have a unique ID and name and
specify the name of the adapter to be executed.
■
A step that executes AddDerivedEditionAdapter. This step stores the version
of the content that a subscriber downloads. There must be at least one step in
every workflow that executes this adapter. If your workflow modifies the content
to create the edition that is downloaded, AddDerivedEditionAdapter must be
executed after the steps that perform the modifications and the argument
AddDerivedEdition.StoreOriginalBytes must be set to false. Otherwise,
the modifications are lost.
If your workflow creates more than one edition, the edition delivered to the
subscriber depends on the capabilities of the device. If more than one edition
matches the device, the last edition created that matches is the one delivered. For
example, if steps 2, 5, and 7 in your workflow create unique editions of the
content and the device is capable of running the editions created in steps 2 and 7,
the edition created in step 7 is delivered.
■
8.3
An argument list. If the adapter used in a step requires arguments, the step must
include an argument list.
Defining Criteria for the Workflow
The workflow that is executed is determined by the criteria defined for the
workflow. See the section “Specifying Workflow Criteria” in the Sun Java System
Content Delivery Server Installation Guide for information on setting up the criteria for
the workflow that you created.
8-4
Integration Guide • 2005Q4
CHAPTER
9
DRM Server Integration
One of the options provided with the Content Delivery Server for protecting content
requires an application that implements the Open Mobile Alliance (OMA) Digital
Rights Management (DRM) 1.0 guidelines for managing digital rights. To use this
option, you must provide the application that the Content Delivery Server works
with. For this release, Content Delivery Server provides support for SafeNet DRM
Mobile as the OMA DRM 1.0 implementation.
This chapter describes how to integrate the Content Delivery Server with DRM
Mobile. For information on configuring DRM support in the Content Delivery
Server, see the Sun Java System Content Delivery Server Installation Guide. For
information on applying DRM to content, see the Sun Java System Content Delivery
Server Administration Guide.
9.1
Setting Up DRM Mobile
DRM Mobile can be obtained from SafeNet. See http://www.safenet-inc.com/
products/sentinel/DRM_Mobile.asp for information.
Install DRM Mobile on the server on which the Catalog Manager is deployed. Use
the instructions provided with DRM Mobile. DRM Mobile consists of a protection
component and a license component. Install both components with the Catalog
Manager.
Create an operator user in DRM Mobile for accessing the protection component and
the license component. If you do not want to use the same user name for both
components, create a content provider user to access the protection component and a
content distributor user to access the license component.
9-1
Note the user names and passwords for the users that you created as well as the
URL needed to access the DRM Mobile components. You need this information to
configure the Content Delivery Server to use DRM Mobile as described in the next
section.
9.2
Configuring the Content Delivery Server
to Use DRM Mobile
After you install DRM Mobile and set up the required users, set the properties
shown in the following table. These properties are in the $CDS_HOME/deployment/
deployment-name/conf/drmmobile.properties file. Set these properties in the
Catalog Manager deployment and in each Vending Manager deployment.
Note – This file contains unencrypted passwords. Set the file permissions to restrict
access to this file.
TABLE 9-1
Properties for DRM Mobile
Property
Description
protection.url
URL used to access the protection component of DRM Mobile.
protection.username
User name used to access the protection component of DRM Mobile.
protection.password
Password for the user name used to access the protection component
of DRM Mobile.
protection.uploadDirectory
Directory from which DRM Mobile accesses the unprotected content
and uses for temporary files created during the protection process.
These files are deleted when the protection process completes.
Note: The directory specified must be the same as the directory
specified for the java.io.tmpdir property in the DRM Mobile
protectionConfig.properties file.
protection.deployDirectory
Directory to which DRM Mobile writes the protected content.
Note: The directory specified must be the same as the directory
specified for the
com.dmdsecure.mobile.protection.deployment.FileConte
ntHost.outputPath property in the DRM Mobile
protectionConfig.properties file. See the DRM Mobile
documentation for information on the proper format for this value.
protection.domain
9-2
Integration Guide • 2005Q4
Domain name used to generate unique IDs for the protected content,
for example, using sun.com as the domain generates IDs similar to
cid:[email protected].
TABLE 9-1
Properties for DRM Mobile (Continued)
Property
Description
license.url
URL used to access the license component of DRM Mobile.
license.username
User name used to access the license component of DRM Mobile.
license.password
Password for the user name used to access the license component of
DRM Mobile.
license.rightsIssuerUrl
URL used to access the license for content when separate delivery is
used, for example, http://www.sun.com/cds?cid={cid} The
Content Delivery Server replaces the value inside the braces with the
content ID for the content that the subscriber is accessing.
If you did not enable the OMA DRM 1.0 method when you deployed and configured
the Content Delivery Server, use the following command to enable this method:
cdsi db import [-conf db-configuration-file] -cs enableomadrm10.sqli
db-configuration-file is the name of the database configuration file that
contains the information for creating the Catalog Manager schema. If dbconfiguration-file is not provided, the value specified for the DEFAULT_DB
variable in the init_env.sh script is used. For information on enabling DRM
methods, see Section 4.7.1, “Set the DRM Methods Supported,” in the Sun Java
System Content Delivery Server Installation Guide.
Chapter 9
DRM Server Integration
9-3
9-4
Integration Guide • 2005Q4
Index
Symbols
A
_campaign.xml file, 7-2, 7-13
_catalog_menu.xml file, 7-2, 7-11, 7-12, 7-13, 7-14
_confirm_unsubscribe.xml file, 7-2, 7-16
_detail.xml file, 7-2, 7-11, 7-13, 7-14
_device_error_msg.xml file, 7-2
_device_unsupported.xml file, 7-2
_download.xml file, 7-2, 7-14, 7-15
_enter_coupon.xml file, 7-2, 7-16
_gift_cancel_confirm.xml file, 7-3, 7-14
_gift_cancel_success.xml file, 7-3, 7-14
_gift_details.xml file, 7-3, 7-14
_locale_selection.xml file, 7-3, 7-13
_login.xml file, 7-3, 7-10
_login_disabled.xml file, 7-3, 7-10
_main_menu.xml file, 7-3, 7-10
_manage_category.xml file, 7-3, 7-13
_my_gifts_menu.xml file, 7-3, 7-14
_purchase_confirm.xml file, 7-3, 7-16
_search.xml file, 7-3, 7-12
_share_content.xml file, 7-3, 7-16
_share_content_confirm.xml file, 7-3, 7-16
_share_content_receive.xml file, 7-3, 7-16
_share_content_success.xml file, 7-3, 7-16
_sms_sent.xml file, 7-3, 7-16
_unsub_success.xml file, 7-3, 7-16
_user_admin_menu.xml file, 7-3, 7-13
adapter
push listener, 6-3
push sender, 6-2
subscriber, LDAP, 3-1
WAP gateway
default, 5-2
Nokia Activ Server 2.0.1, 5-2
Nokia Artus WAP gateway, 5-2
Openwave WAP gateway, 5-3
AddDerivedEditionAdapter adapter, 8-2, 8-4
API
Event Service, 2-1
Messaging, 6-1
User Profile, 3-1
WAP Gateway, 5-1
APIFilterAdapter adapter, 8-2
B
billing adapter, defined, 2-1
Billing API, 2-1
billing information, 2-2
billing integration, 2-1
binary content, push, 6-3
browser.config, 7-17
C
CIMD2
SMS push listener, 6-3
SMS push sender, 6-2
conf.xml file, 3-2
content validation adapter, 8-1
Index-1
content validation workflow, 8-1
conventions, typographical, xii
CopyrightAdapter adapter, 8-2
criteria, for workflow, 8-4
csv_record.xsl, 2-2
Nokia Activ Server 2.0.1, 5-2
Nokia Atrus WAP gateway, 5-2
O
Openwave WAP gateway, 5-3
organization of this guide, xi
D
default_record.xsl, 2-2
device-specific pages
generating, 7-17
modifying, 7-18
page elements, 7-4
device-specific user interface framework, 7-1
DRM Mobile, 9-1
DRMAdapter adapter, 8-2
E
Event Service API, 2-1
F
framework, user interface, 7-1
G
genmarkup command, 7-17, 7-18, 7-20
I
IAppliValidationAdapter adapter, 8-2
L
LDAP
mapping file for, 3-2
sample mapping file, 3-6
tuning, 3-7
LDAP subscriber adapter, 3-1
M
mapping file, LDAP, 3-2, 3-6
Messaging API, 6-1
MethodRedirectionAdapter adapter, 8-2
MIDletPermissionsAdapter adapter, 8-2
MIDletSigningAdapter adapter, 8-2
MIDletValidationAdapter adapter, 8-2
My Downloads, 7-13
My Gifts, 7-14
My Wish List, 7-14
Index-2
N
Integration Guide • 2005Q4
P
page elements, 7-4
pages, Subscriber Portal, 7-2
Postpaid Service, 2-2
PostpaidDefaultHandler, 2-2
preferences, set, 7-12
process
log in, 7-9
purchase, 7-15
search for content, 7-12
set preferences, 7-12
view content, 7-11
view My Downloads, 7-13
view My Gifts, 7-14
view My Wish List, 7-14
view promotions, 7-13
properties, DRM Mobile, 9-2
purchase, 7-15
push adapter
definition, 6-1
listener, 6-3
sender, 6-2
pushlistenerfactory.xml file, 6-4, 6-5
pushsenderfactory.xml file, 6-4, 6-5
S
security.config file, 3-2
single sign-on, 4-1
SMPP
SMS push listener, 6-4
SMS push sender, 6-2
SMS HTTP, 6-2
SMS push
binary content, 6-3
messages, 6-2
SMS push sender adapter, 6-2
SMTP push sender adapter, 6-3
struts-config.xml file, 7-22
style sheet, 7-8
subscriber adapter, defined, 3-1
subscriber adapter, LDAP, 3-1
subscriber integration, 3-1
Subscriber Portal
device-specific page elements, 7-4
generating pages for a device, 7-17
modifying pages, 7-18
pages, 7-2
process
log in, 7-9
purchase, 7-15
search for content, 7-12
set preferences, 7-12
view content, 7-11
view My Downloads, 7-13
view My Gifts, 7-14
view My Wish List, 7-14
view promotions, 7-13
style sheets for, 7-8
user interface framework, 7-1
criteria, 8-4
overview, 8-1
X
XHTML-Alternate.xsl, 7-9
XHTML-AU.xsl, 7-9
XHTML-Basic.xsl, 7-8
XHTML-Color.xsl, 7-8
XHTML-IAppli.xsl, 7-9
XHTML-Motorola.xsl, 7-9
XHTML-NokiaSeries40.xsl, 7-9
XHTML-SE.xsl, 7-9
XHTML-Symbian.xsl, 7-9
XHTML-UP.xsl, 7-9
XML file
pushlistenerfactory.xml, 6-4
pushsenderfactory.xml, 6-4
xml_record.xsl file, 2-2
T
tuning LDAP, 3-7
typographical conventions, xii
U
user interface framework, 7-1
User Profile API, 3-1
W
wait time, for LDAP, 3-3
WAP gateway adapter
default, 5-2
definition, 5-1
Nokia Activ Server 2.0.1, 5-2
Nokia Artus WAP gateway, 5-2
Openwave WAP gateway, 5-3
WAP Gateway API, 5-1
WAP push sender adapter, 6-3
wapgateway.config file, 5-3
WML-1_1.xsl, 7-8
WML-1_2.xsl, 7-8
workflow
creating, 8-3
Index-3
Index-4
Integration Guide • 2005Q4