1
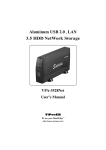
PLEASE READ THIS MANUAL CAREFULLY BEFORE USING
2.1 Cubic Feet Upright Freezer
UF-213SS (Stainless Steel)
UF-213W (White)
Thank you for your purchase. To ensure that you get the best results from your new freezer,
please take them time to read through the simple instructions in this booklet.
Please be sure that packaging materials are disposed in accordance with the current
environmental requirements.
PREPARING TO INSALL
READ THESE INSTRUCTIONS COMPLETELY AND CAREFULLY
Ventilation
There is need of good ventilation around the appliance for dissipation of
heat, high efficiency of refrigeration and low power consumption. For this
purpose, please allow a minimum of 4” around the unit for proper air
circulation
• A clear space should be left to open the door to 160º
Protection from Moisture
Avoid placing unit where heavy moisture is present, this is to minimize
possibility of metal parts rusting. Never spray water onto the unit.
Never spray water directly onto the unit – which may damage the insulation.
Protection from Heat
Keep unit away from any heat source and direct sunlight.
Location
Unit should be placed on a flat and solid ground, which can support the unit
when fully loaded. Adjust the leveling legs so the unit is firmly positioned on
the floor. Do not place unit near anything that may echo.
Keep Away from Danger
Do not place appliance near any combustibles such as gas, petrol, alcohol,
lacquer and etc. The above mentioned should not be stored in the freezer.
Moving
Secure all loose items (such as shelves and ice tray). Unit should never be
set horizontally, upside down or declined more than 45º.
1
SAFETY INSTRUCTIONS
WARNING!
Use this appliance only for its intended purpose as described.
Power Supply
This unit is applied with power supply of single-phase
alternating current of 115V~, 60Hz. If fluctuation of voltage is so
large that the voltage exceeds the above scope, it is suggested
to apply A.C. Automatic voltage regulator to the appliance. This
appliance is equipped with a 3-prong (grounding) plug which
mates with a standard 3-prong wall outlet. DO NOT, UNDER
ANY CIRCUMSTANCES, CUT OR REMOVE THE THIRD
(GROUND) PRONG FROM THE POWER CORD. If you have
only a 2-prong wall outlet, it is your responsibility to have it
replaced with a properly grounded 3-prong wall outlet.
Power Cord
Be sure the cord is not folded into coil during operation. Keep
cord away from the compressor (located at the back of the unit),
due to its high surface temperature when operating. We strongly
suggest against the use of an extension cord. However, if one
must be used, the extension cord must be UL-listed, with
grounding type plug and electrical rating matching that of the
unit. Contact the manufacturer immediately should the cord be
frayed or damaged.
Safety Precautions
When using electrical appliances, basic safety precautions should be followed, including the
following:
• Unit should be installed and positioned according to the Installation instructions.
• Do not allow young children to climb or play with the appliance.
• Never store gasoline, flammables or explosive substances in this appliance.
• Do not use electrical appliances inside the storage compartments.
• Clearance between the doors and cabinets are quite small, keep fingers out of these areas. Be
extra cautious when children are in the area.
• Turn the temperature control knob to the OFF (0) position and unplug before cleaning or
maintenance.
• Turn the temperature control knob to the OFF (0) position and unplug before replacing light bulb.
• To prevent risk of child entrapment, remove doors before disposing the freezer.
• Under federal law, refrigerants must be removed prior to product disposal. Check with the company
handling the disposal for further instructions.
• Do not place heavy or corrosive objects in the unit.
• Do not store bottled drinks in the freeze, to prevent being broken and damaging the unit.
• Do not touch food and containers in the freezer with wet hands.
• This appliance is not intended for use by persons (including children) with reduced physical,
sensory or mental capabilities, or lack of experience and knowledge, unless they have been given
supervision or instruction concerning use of the appliance by a person responsible for their safety.
2
DOOR REVERSAL
To take the door off, it is necessary to tilt the appliance backwards. Rest the appliance on something
solid below the top panel. We recommend you have someone to assist you
Be sure appliance is empty and unplugged.
Adjust the two leveling feet to the highest position.
DO NOT lay the appliance completely flat as this may damage the cooling system.
Tools Required
Phillips Screwdriver
3
PARTS IDENTIFICATION
1.
Cabinet assembly
7.
Steel wire shelf
2.
Compressor mounting panel
8.
Leveling leg
3.
Bottom hinge assembly
9.
Bottom hinge leveling leg
4.
Door
10.
Top hinge
5.
Door seal
11.
Top hinge cover
6.
Steel wire shelf
4
TEMPERATURE CONTROL
Setting the Temperature Control Knob
• The settings of the temperature control are: MIN, NOR, MAX and OFF".
• MAX is the coldest setting.
• When operating the unit for the first time, set dial to MAX for at least two hours before any food
storage.
• The normal (NOR) setting is the most suitable for general operation.
NOTE
• Turning the temperature control to “0” stops the cooling cycle, but does not shut off the unit.
• If the unit is unplugged, power lost or turned off, please wait 10 minutes before restarting the unit.
The unit will not start if you attempt to restart before this time delay.
• It is strongly suggested to place this appliance in the coolest area of the room, which can help
conserve energy consumption. If the ambient temperature is too high, the freezer may not be
able to target the set temperature.
Note: Figures in the manual are for reference only. The actual product may differ slightly.
5
FOOD SOTRAGE
Storing Frozen Food
• When using the freezer for the first time or after defrosting, turn the temperature control to MAX
setting for at least two hours before any food storage.
• All frozen food products purchased should be placed in the freezer as soon as possible to avoid
the frozen food from defrosting.
• Always follow manufacturers’ storage recommendations printed on packaging.
Freezing Fresh Food
• Ensure that your freezing operations are carried out under the most hygienic conditions as
freezing alone does not sterilize the food.
• It is advisable to freeze the food by packing into separate meal portions and not in bulk form.
• Never place hot or warm items into the freezer, wait until they’ve reached room temperature.
• Prior to storing the frozen food, pack securely in plastic bags, aluminum sheets or freezing
containers before placing into freezer.
CARE AND MAINTENANCE
DEFROSTING
Moisture contained in food and air may form a layer of frost inside the unit after a period of use.
Defrost when frost becomes ¼” thick.
Never use a sharp or metallic instrument to scrape off frost – this will damage the inner casing
or the cooling coils.
Defrosting is operated manually:
• Before defrosting, remove contents from the freezer.
• Turn the temperature control knob to OFF and unplug from wall socket.
• Leave the door open until ice and frost dissolves thoroughly.
• Wipe the interior dry with a soft cloth.
• To speed up the defrosting process, you may put a bowl of warm water (120ºF) into the chamber.
Do not use mechanical devices or other means to accelerate the defrosting process.
• Reconnect power and re-set the temperature control to desired setting.
DO NOT pour hot water directly into compartment or heat with hair dryer while defrosting, which may
deform the inner case.
MAINTENANCE
The freezer should be cleaned and maintained once a month.
• When performing maintenance, make absolutely sure that the power plug is disconnected.
Cleaning the Inside and Outside Cabinets
• Wipe the cabinets with a clean cloth.
• If dirty, dampen cloth with mild detergent and wipe clean with damp cloth.
• Dry with a clean, soft cloth.
• Polish the exterior with a small amount of glass wax
• Do not use scouring pads powdered cleaners, bleach, alcohol, kerosene, chemical cloth and etc.
• Do not spray water directly onto the unit.
• Be sure to frequently clean the sealing rubber bars on the door.
• If the plastic parts remain contaminated to oil for a long period of time, they will easily age and
possibly crack.
6
PROLONGED OFF PERIODS
If the freezer is not to be used for a long period of time, please disconnect unit from main power supply.
Clean and dry the inside as instructed. Leave the door ajar to prevent any mold and mildew growth.
USAGE TIPS:
• Try not to open the door too frequently, especially when weather is hot and humid.
• Close doors as soon as possible.
• Frequently check the unit has sufficient clearance for ventilation, especially behind the unit.
• For normal household use, it is recommended to set the thermostat in the middle setting.
• Before loading the appliance with fresh foods, make sure they are cooled to ambient temperature.
• Ice and frost layer increase energy consumption, defrost when frost is 3-5 mm thick.
TROUBLESHOOTING
2. The freezer is not turning on:
• Check if plug is inserted correctly and firmly into the wall socket.
• Check if there is power to the wall socket by plugging in another appliance.
• Check ambient temperature and control setting.
3. The freezer is noisy when running:
• Check if the freezer is leveled or in contact with another appliance or furniture.
4. The freezer does not cool sufficiently:
• If the door has been opened frequently, or it has been left open for a while, it will take time for the
freezer to reach it set temperature.
• Make sure there is sufficient clearance around the unit.
• The freezer if overfilled or the ambient temperature is high.
The following characteristics are normal and should not be looked upon as a problem:
• A gentle trickling (water) sound caused by coolant flowing through the pipe.
• Compressor operating at high temperature.
7
Your Guarantee
If this product is found to be faulty as a result of faulty materials or workmanship within one year
from date of purchase, it will be repaired free of charge.
This guarantee is subject to the following terms:
• Sunpentown must be notified of the fault.
• Proof of purchase must be presented to Sunpentown’s nominated representative.
• The warranty will be void if the product if modified, misused or repaired by an unauthorized
person.
• The warranty after repair will not be extended beyond the original one-year period.
• All replacement parts will be new or reconditioned.
• Parts, which are replaced, become the property of Sunpentown.
• The warranty applies for the use of the product in the USA only.
What is NOT COVERED:
• Warranty does not include freight charges.
• Incidental or consequential damage caused by possible defects with this product.
• Damage to product caused by improper power supply voltage, accident, fire, floods or acts of
nature.
• Failure of product resulting from unauthorized modifications to the product.
• Improper installation or failure to perform the necessary maintenance.
This GUARANTEE is in addition to your Statutory Rights
SUNPENTOWN INTERNATIONAL INC.
14625 Clark Avenue, City of Industry, CA 91745
Tel: 626.336.2299 · Fax: 626.336.7116
[email protected]
www.sunpentown.com
8