1
Sun Java System Application
Server Enterprise Edition 8.1
2005Q2 Installation Guide
Sun Microsystems, Inc.
4150 Network Circle
Santa Clara, CA 95054
U.S.A.
Part No: 819–2649–11
January 2008
Copyright 2008 Sun Microsystems, Inc.
4150 Network Circle, Santa Clara, CA 95054 U.S.A.
All rights reserved.
This product or document is protected by copyright and distributed under licenses restricting its use, copying, distribution, and decompilation. No part of this
product or document may be reproduced in any form by any means without prior written authorization of Sun and its licensors, if any. Third-party software,
including font technology, is copyrighted and licensed from Sun suppliers.
Parts of the product may be derived from Berkeley BSD systems, licensed from the University of California. UNIX is a registered trademark in the U.S. and other
countries, exclusively licensed through X/Open Company, Ltd.
Sun, Sun Microsystems, the Sun logo, docs.sun.com, AnswerBook, AnswerBook2, and Solaris are trademarks or registered trademarks of Sun Microsystems, Inc. in
the U.S. and other countries. All SPARC trademarks are used under license and are trademarks or registered trademarks of SPARC International, Inc. in the U.S. and
other countries. Products bearing SPARC trademarks are based upon an architecture developed by Sun Microsystems, Inc.
The OPEN LOOK and SunTM Graphical User Interface was developed by Sun Microsystems, Inc. for its users and licensees. Sun acknowledges the pioneering efforts
of Xerox in researching and developing the concept of visual or graphical user interfaces for the computer industry. Sun holds a non-exclusive license from Xerox to
the Xerox Graphical User Interface, which license also covers Sun's licensees who implement OPEN LOOK GUIs and otherwise comply with Sun's written license
agreements.
U.S. Government Rights – Commercial software. Government users are subject to the Sun Microsystems, Inc. standard license agreement and applicable provisions
of the FAR and its supplements.
DOCUMENTATION IS PROVIDED “AS IS” AND ALL EXPRESS OR IMPLIED CONDITIONS, REPRESENTATIONS AND WARRANTIES, INCLUDING ANY
IMPLIED WARRANTY OF MERCHANTABILITY, FITNESS FOR A PARTICULAR PURPOSE OR NON-INFRINGEMENT, ARE DISCLAIMED, EXCEPT TO
THE EXTENT THAT SUCH DISCLAIMERS ARE HELD TO BE LEGALLY INVALID.
Copyright 2008 Sun Microsystems, Inc.
4150 Network Circle, Santa Clara, CA 95054 U.S.A.
Tous droits réservés.
Ce produit ou document est protégé par un copyright et distribué avec des licences qui en restreignent l'utilisation, la copie, la distribution, et la décompilation.
Aucune partie de ce produit ou document ne peut être reproduite sous aucune forme, par quelque moyen que ce soit, sans l'autorisation préalable et écrite de Sun et
de ses bailleurs de licence, s'il y en a. Le logiciel détenu par des tiers, et qui comprend la technologie relative aux polices de caractères, est protégé par un copyright et
licencié par des fournisseurs de Sun.
Des parties de ce produit pourront être dérivées du système Berkeley BSD licenciés par l'Université de Californie. UNIX est une marque déposée aux Etats-Unis et
dans d'autres pays et licenciée exclusivement par X/Open Company, Ltd.
Sun, Sun Microsystems, le logo Sun, docs.sun.com, AnswerBook, AnswerBook2, et Solaris sont des marques de fabrique ou des marques déposées, de Sun
Microsystems, Inc. aux Etats-Unis et dans d'autres pays. Toutes les marques SPARC sont utilisées sous licence et sont des marques de fabrique ou des marques
déposées de SPARC International, Inc. aux Etats-Unis et dans d'autres pays. Les produits portant les marques SPARC sont basés sur une architecture développée par
Sun Microsystems, Inc.
L'interface d'utilisation graphique OPEN LOOK et Sun a été développée par Sun Microsystems, Inc. pour ses utilisateurs et licenciés. Sun reconnaît les efforts de
pionniers de Xerox pour la recherche et le développement du concept des interfaces d'utilisation visuelle ou graphique pour l'industrie de l'informatique. Sun détient
une licence non exclusive de Xerox sur l'interface d'utilisation graphique Xerox, cette licence couvrant également les licenciés de Sun qui mettent en place l'interface
d'utilisation graphique OPEN LOOK et qui en outre se conforment aux licences écrites de Sun.
CETTE PUBLICATION EST FOURNIE “EN L'ETAT” ET AUCUNE GARANTIE, EXPRESSE OU IMPLICITE, N'EST ACCORDEE, Y COMPRIS DES
GARANTIES CONCERNANT LA VALEUR MARCHANDE, L'APTITUDE DE LA PUBLICATION A REPONDRE A UNE UTILISATION PARTICULIERE, OU
LE FAIT QU'ELLE NE SOIT PAS CONTREFAISANTE DE PRODUIT DE TIERS. CE DENI DE GARANTIE NE S'APPLIQUERAIT PAS, DANS LA MESURE OU
IL SERAIT TENU JURIDIQUEMENT NUL ET NON AVENU.
080128@19028
Contents
Preface .....................................................................................................................................................9
1
Installing Application Server Software ........................................................................................... 15
About the Application Server Installation ........................................................................................ 15
Installation Components ............................................................................................................ 16
Installation Methods .................................................................................................................... 17
Installing Application Server Software ............................................................................................. 19
▼ To Install Application Server Software ...................................................................................... 19
Installing the Load Balancer Plug-in Component ........................................................................... 23
▼ To Install the Load Balancer Plug-in Component ................................................................... 23
Installing in Silent Mode ..................................................................................................................... 24
Creating the Installation Configuration File ............................................................................. 24
Running the Installer in Silent Mode ......................................................................................... 28
▼ To Install in Silent Mode ...................................................................................................... 28
2
Uninstalling Application Server Software ...................................................................................... 31
Running the Uninstallation Program ............................................................................................... 31
▼ To Run the Uninstallation Program on UNIX or Linux ......................................................... 31
▼ To Run the Uninstallation Program on Windows ................................................................... 32
Index ......................................................................................................................................................33
3
4
Tables
TABLE 1–1
TABLE 1–2
TABLE 1–3
Options for Installation ............................................................................................ 18
Installation Commands ............................................................................................ 19
Installation Configuration File Variables ............................................................... 25
5
6
Examples
EXAMPLE 1–1
Example Installation Configuration File ................................................................ 24
7
8
Preface
This Installation Guide provides instructions for installing the Sun JavaTM System Application
Server Enterprise Edition 8.1 2005Q2 software.
Who Should Use This Book
This guide is intended for system administrators, network administrators, evaluators,
application server administrators, web developers, and software developers who want to install
the Application Server software.
This guide assumes you are familiar with the following topics:
■
■
■
■
Installation of software products
UNIX, Linux, or Microsoft Windows, depending on your operating system
Client/server programming model
Internet and World Wide Web
Before You Read This Book
Before following the installation procedures described in this book, plan your topology using
the Sun Java System Application Server Enterprise Edition 8.1 2005Q2 Deployment Planning
Guide.
Application Server can be purchased by itself or as a component of Sun JavaTM Enterprise
System (Java ES), a software infrastructure that supports enterprise applications distributed
across a network or Internet environment. If you purchased ProductName as a component of
Java ES, you should be familiar with the system documentation at
http://docs.sun.com/coll/1286.1.
9
Preface
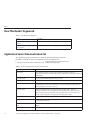
How This Book Is Organized
TABLE P–1
How This Book Is Organized
Chapter
Description
Chapter 1, “Installing Application Server Provides instructions for installing Application Server software.
Software,”
Chapter 2, “Uninstalling Application
Server Software,”
Provides instructions for uninstalling Application Server software.
Application Server Documentation Set
The Application Server documentation set describes deployment planning and system
installation. The URL for stand-alone Application Server documentation is
http://docs.sun.com/app/docs/coll/1310.1. For an introduction to Application Server,
refer to the books in the order in which they are listed in the following table.
TABLE P–2
10
Books in the Application Server Documentation Set
Book Title
Description
Release Notes
Late-breaking information about the software and the documentation. Includes a
comprehensive, table-based summary of the supported hardware, operating system, JDK, and
JDBC/RDBMS.
Quick Start Guide
How to get started with the Application Server product.
Installation Guide
Installing the software and its components.
Deployment Planning Guide
Evaluating your system needs and enterprise to ensure that you deploy the Application Server
in a manner that best suits your site. General issues and concerns that you must be aware of
when deploying the server are also discussed.
Developer’s Guide
Creating and implementing Java 2 Platform, Enterprise Edition (J2EETM platform)
applications intended to run on the Application Server that follow the open Java standards
model for J2EE components and APIs. Includes general information about developer tools,
security, assembly, deployment, debugging, and creating lifecycle modules.
J2EE 1.4 Tutorial
Using J2EE 1.4 platform technologies and APIs to develop J2EE applications.
Administration Guide
Configuring, managing, and deploying Application Server subsystems and components from
the Administration Console.
High Availability Administration
Guide
Post-installation configuration and administration instructions for the high-availability
database.
Administration Reference
Editing the Application Server configuration file, domain.xml.
Sun Java System Application Server Enterprise Edition 8.1 2005Q2 Installation Guide • January 2008
Preface
TABLE P–2
Books in the Application Server Documentation Set
(Continued)
Book Title
Description
Upgrade and Migration Guide
Migrating your applications to the new Application Server programming model, specifically
from Application Server 6.x and 7. This guide also describes differences between adjacent
product releases and configuration options that can result in incompatibility with the product
specifications.
Performance Tuning Guide
Tuning the Application Server to improve performance.
Troubleshooting Guide
Solving Application Server problems.
Error Message Reference
Solving Application Server error messages.
Reference Manual
Utility commands available with the Application Server; written in man page style. Includes
the asadmin command line interface.
Related Books
For other Sun Java System server documentation, go to the following:
■
■
■
Message Queue documentation
Directory Server documentation
Web Server documentation
The URL for all documentation about Java ES and its components is
http://docs.sun.com/prod/entsys.05q4.
Default Paths and File Names
The following table describes the default paths and file names that are used in this book.
11
Preface
TABLE P–3
Default Paths and File Names
Placeholder
Description
Default Value
install-dir
Represents the base installation
directory for Application Server.
Sun Java Enterprise System installations on the
SolarisTM platform:
/opt/SUNWappserver/appserver
Sun Java Enterprise System installations on the
Linux platform:
/opt/sun/appserver/
Other Solaris and Linux installations, non-root
user:
user’s home directory/SUNWappserver
Other Solaris and Linux installations, root user:
/opt/SUNWappserver
Windows, all installations:
SystemDrive:\Sun\AppServer
domain-root-dir
Represents the directory containing all
domains.
Sun Java Enterprise System installations on the
Solaris platform:
/var/opt/SUNWappserver/domains/
Sun Java Enterprise System installations on the
Linux platform:
/var/opt/sun/appserver/domains/
All other installations:
install-dir/domains/
domain-dir
Represents the directory for a domain.
domain-root-dir/domain-dir
In configuration files, you might see
domain-dir represented as follows:
${com.sun.aas.instanceRoot}
instance-dir
12
Represents the directory for a server
instance.
domain-dir/instance-dir
Sun Java System Application Server Enterprise Edition 8.1 2005Q2 Installation Guide • January 2008
Preface
Typographic Conventions
The following table describes the typographic changes that are used in this book.
TABLE P–4
Typographic Conventions
Typeface
Meaning
Example
AaBbCc123
The names of commands, files, and directories,
and onscreen computer output
Edit your .login file.
Use ls -a to list all files.
machine_name% you have mail.
AaBbCc123
What you type, contrasted with onscreen
computer output
machine_name% su
Password:
AaBbCc123
A placeholder to be replaced with a real name or The command to remove a file is rm
value
filename.
AaBbCc123
Book titles, new terms, and terms to be
emphasized (note that some emphasized items
appear bold online)
Read Chapter 6 in the User's Guide.
A cache is a copy that is stored
locally.
Do not save the file.
Symbol Conventions
The following table explains symbols that might be used in this book.
TABLE P–5
Symbol Conventions
Symbol
Description
Example
Meaning
[]
Contains optional arguments ls [-l]
and command options.
The -l option is not required.
{|}
Contains a set of choices for a -d {y|n}
required command option.
The -d option requires that you use
either the y argument or the n
argument.
${ }
Indicates a variable reference. ${com.sun.javaRoot}
References the value of the
com.sun.javaRoot variable.
-
Joins simultaneous multiple
keystrokes.
Control-A
Press the Control key while you press
the A key.
+
Joins consecutive multiple
keystrokes.
Ctrl+A+N
Press the Control key, release it, and
then press the subsequent keys.
13
Preface
TABLE P–5
Symbol Conventions
(Continued)
Symbol
Description
Example
→
Indicates menu item selection File → New → Templates
in a graphical user interface.
Meaning
From the File menu, choose New.
From the New submenu, choose
Templates.
Accessing Sun Resources Online
The docs.sun.comSM web site enables you to access Sun technical documentation online. You
can browse the docs.sun.com archive or search for a specific book title or subject. Books are
available as online files in PDF and HTML formats. Both formats are readable by assistive
technologies for users with disabilities.
To access the following Sun resources, go to http://www.sun.com:
■
■
■
■
■
■
Downloads of Sun products
Services and solutions
Support (including patches and updates)
Training
Research
Communities (for example, Sun Developer Network)
Third-Party Web Site References
Third-party URLs are referenced in this document and provide additional, related information.
Note – Sun is not responsible for the availability of third-party web sites mentioned in this
document. Sun does not endorse and is not responsible or liable for any content, advertising,
products, or other materials that are available on or through such sites or resources. Sun will not
be responsible or liable for any actual or alleged damage or loss caused or alleged to be caused by
or in connection with use of or reliance on any such content, goods, or services that are available
on or through such sites or resources.
Sun Welcomes Your Comments
Sun is interested in improving its documentation and welcomes your comments and
suggestions. To share your comments, go to http://docs.sun.com and click Send Comments.
In the online form, provide the full document title and part number. The part number is a
7-digit or 9-digit number that can be found on the book's title page or in the document's URL.
For example, the part number of this book is 819-2649.
14
Sun Java System Application Server Enterprise Edition 8.1 2005Q2 Installation Guide • January 2008
1
C H A P T E R
1
Installing Application Server Software
This chapter provides instructions for installing the Sun Java System Application Server
Enterprise Edition software. You can install interactively or use silent mode to replicate an
installation scenario on multiple machines.
The following topics are addressed:
■
■
■
■
“About the Application Server Installation” on page 15
“Installing Application Server Software” on page 19
“Installing the Load Balancer Plug-in Component” on page 23
“Installing in Silent Mode” on page 24
For any late-breaking updates to these instructions, check the Sun Java System Application
Server Enterprise Edition 8.1 2005Q2 Update 2 Release Notes.
For more information about configuring your application server after installation, refer to the
Sun Java System Application Server Enterprise Edition 8.1 2005Q2 Administration Guide.
The following location contains product downloads and other useful information:
http://www.sun.com/software/products/appsrvr/home_appsrvr.html
About the Application Server Installation
The Application Server product is made up of a number of software components and provides
different installation choices. Among the choices for installation are:
■
■
■
You can install from the product CD or from the download site.
You can install from the command-line interface or the graphical interface.
You can install interactively or in silent mode.
This section addresses the following topics:
■
“Installation Components” on page 16
15
About the Application Server Installation
■
“Installation Methods” on page 17
Installation Components
In general, you are installing the basic components that provide the functionality of the
Application Server product. You can choose not to install some of the components. Later, if you
want to add a component that you initially chose not to install, you can do an incremental
installation of that component, providing dependencies are met.
Note – A partial installation can be followed by any number of incremental installations. For
silent mode, you can do a partial initial installation, but any subsequent installations must be
done using an interactive method.
The installation program enforces component dependencies as specified for each component.
Once component dependencies are satisfied, component life cycles are independent. A
particular component can be installed dynamically through incremental installation without
corrupting other components. However, partial uninstallation is not supported.
The following installation components are included with the Application Server Enterprise
Edition product:
■
Application Server—Application Server software, including its command-line
administrative tools, and Sun JavaTM System Message Queue software.
Sun Java System Message Queue software is automatically installed with the Application
Server software here: install_dir/imq.
■
Domain Administration Server—Application Server software, including the Admin
Console, its graphical administrative tool.
■
Application Server Administration Client—asadmin utility.
Select the Administration Client component to install the command-line utility separately
on a machine where the Application Server is not installed. When you install the
Application Server or the Domain Administration Server, the Administration Client is also
installed.
■
Java 2 Software Development Kit—During installation, you can choose to reuse a Java 2
SDK that is already installed on your system as long as the Java 2 SDK version is correct. The
default installation location for each distribution is install_dir/jdk.
Refer to the Sun Java System Application Server Enterprise Edition 8.1 2005Q2 Update 2
Release Notes to identify which version of the Java 2 SDK is supported.
16
Sun Java System Application Server Enterprise Edition 8.1 2005Q2 Installation Guide • January 2008
About the Application Server Installation
Note – The Sun Java System Application Server product is certified to work with Java 2 SDK
from Sun Microsystems. Third-party Java development kits, even with appropriate version
numbers, are not supported.
■
PointBase database server.
■
Sample applications—samples come with the source, schema, Ant build scripts, and EAR
files. Any existing data associated with the database-related samples is available in the
database. These sample applications are categorized as:
– Technology samples—Introduce various technical aspects of the Java 2 Platform,
Enterprise Edition (J2EETM) specification as well as the value added features of the
Application Server platform.
– Interoperability samples—Provide more detailed views on how these technologies come
together on the Application Server platform.
By default, the sample applications are installed at: install_dir/samples.
More information about samples at: install_dir/samples/index.html.
The following additional components are included with the Application Server product:
■
High-Availability Database Server (Enterprise Edition)—By default, the HADB Server is
installed at: install_dir/hadb.
To install the Application Server and an HADB server node on the same system, select both
components.
For more information on this component, refer to Chapter 2, “Installing and Setting Up
High Availability Database,” in Sun Java System Application Server Enterprise
Edition 8.1 2005Q2 High Availability Administration Guide.
■
Load balancer plug-in—This component is dependent on a pre-installed web server.
Supported web servers are listed in “Web Servers” in Sun Java System Application Server
Enterprise Edition 8.1 2005Q2 Update 2 Release Notes.
For additional information on this component and supported web servers, refer to
“Installing the Load Balancer Plug-in Component” on page 23 and Chapter 4, “Configuring
Load Balancing and Failover,” in Sun Java System Application Server Enterprise
Edition 8.1 2005Q2 High Availability Administration Guide.
Installation Methods
Three methods of installation are available:
■
Graphical (interactive)—The installation program prompts you using a sequence of
graphical screens. This is the default method when you invoke the installation program
without options:
Chapter 1 • Installing Application Server Software
17
About the Application Server Installation
./bundle_filename
■
Command-line (interactive)—The installation program prompts you using a sequence of
command-line prompts and messages. To activate the interactive command-line mode,
invoke the installation program using the console option:
./bundle_filename -console
Use the command-line interface when installing:
– On a remote servers, using the Telnet terminal emulation protocol
– On “headless” systems without display devices
– In hardened Solaris environments
■
Silent mode—The installation program reads installation parameters from a supplied
configuration file. See “Installing in Silent Mode” on page 24 for more information on
generating the configuration file.
The setup command allows you to specify the method of installation, and allows you to create a
configuration file for silent installation. The syntax is:
bundle_filename [-console] [-savestate config_file] [-silent config_file] [-javahome
java_home_dir] [-h || -help]
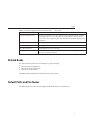
Table 1–1 describes the command options.
TABLE 1–1
Options for Installation
Option
Description
-console
Runs the installation using the command-line method.
-silent config_file
Runs the installation in silent mode. Installation parameters are read from an
existing installation configuration file. This option is mutually exclusive with the
savestate option.
The installation configuration file path must be explicitly provided; there is no
default file path. Refer to “Installing in Silent Mode” on page 24 for further
specifics on silent mode installation and the installation configuration file.
-savestate config_file
Runs the installation using either the graphical or command-line method and
creates an installation configuration file based on this installation. This option is
mutually exclusive with the silent option. If you do not specify this option, no
installation configuration file is created.
-javahome
java_home_dir
-h || -help
Displays the available command-line arguments for the installation command.
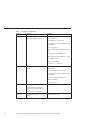
Table 1–2 identifies the command for each installation method.
18
Sun Java System Application Server Enterprise Edition 8.1 2005Q2 Installation Guide • January 2008
Installing Application Server Software
TABLE 1–2
Installation Commands
Installation Method
Installation Command
Graphical interface (default)
./bundle_filename
Command-line interface
./bundle_filename -console
Graphical interface for creating configuration file for silent
mode installation
./bundle_filename -savestate config_file
Silent mode based on an existing installation configuration
file
./bundle_filename -silent config_file
Display available Command-line arguments for the setup
command
./bundle_filename -help
Installing Application Server Software
This section provides instructions for installing the Application Server software.
▼
1
To Install Application Server Software
After you have planned the topology, run the installation program.
For more information on planning topology, see Sun Java System Application Server Enterprise
Edition 8.1 2005Q2 Deployment Planning Guide.
a. To run the installation program that uses the graphical interface, at the command prompt,
type:
./bundle_filename
b. To run the installation program that uses the command-line interface, at the command
prompt, type:
./bundle_filename -console
Note – If you are installing the load balancer plug-in, your web server must already be
installed. Refer to “Installing the Load Balancer Plug-in Component” on page 23.
2
Follow the installation wizard screens to accept the license agreement.
3
Specify the path to the Application Server installation directory or accept the default
installation directory.
Chapter 1 • Installing Application Server Software
19
Installing Application Server Software
4
Select the components to install.
If a component is disabled, the installation program has detected it as already installed on your
system.
If you do not already have your web server installed on the machine where you are installing the
load balancer plug-in, you cannot continue to install the load-balancer plug-in.
5
Choose to install the Java 2 SDK, or use a preinstalled Java 2 SDK.
■
If the correct version of the Java 2 SDK is installed, it is reused or you can enter the path to
another correct version.
■
If no Java 2 SDK is installed, you can choose to let the installation program install the Java 2
SDK package automatically.
■
If you choose to install the Java 2 SDK, a private copy is installed in install_dir.
The default Java 2 SDK installation path for all platforms is install_dir/jdk.
Note – The Application Server software is certified to work with Java 2 SDK from Sun
Microsystems. Third-party Java 2 SDK development kits, even with appropriate version
number, are not supported.
The default server domain directory is: install_dir/domains.
6
If you selected the load balancer plug-in component, identify your web server and its
installation directory.
7
In the Admin Configuration page (or at the command line), enter the following:
■
Admin User Name—Name of the user who administers the server
■
Password—Admin user’s password to access the Admin Server (8-character minimum)
■
Master Password—SSL certificate database password, used in operations such as Domain
Administration Server startup
■
Admin Port—Port number to access the Domain Administration Server
■
HTTP Port—Port number to access the default server instance
■
HTTPS Port—Secure port number to access the default server instance
Note – The installation program automatically detects ports in use and suggests unused ports for
the default settings.
The default ports are 4849 for the Admin Server, 8080 for the HTTP Server, and 8181 for the
HTTPS Server.
20
Sun Java System Application Server Enterprise Edition 8.1 2005Q2 Installation Guide • January 2008
Installing Application Server Software
8
In the Node Agent Configuration page, if you are installing the Node Agent only, and not the
Domain Administration Server, enter the following:
■
Admin User Name—Name of the user who administers the server
■
Admin Password—Admin user’s password (8-character minimum)
■
Master Password—SSL certificate database password, used in operations such as Node
Agent startup
■
Admin Host Name—Host name of the Domain Administration Server
■
Admin Port—Port number to access the default server instance
■
Node Agent Name—Defaults to the system host name
Note – The admin user name, admin password, master password, admin host name and admin
port parameters should correspond to the location and authentication information of the
Domain Administration Server, which is used to administer node agent and server instances on
this system.
If the Domain Administration Server is already installed on hostname.com using these values:
■
■
■
■
■
Admin User Name: admin
Admin Password: adminadmin
Master Password: masterpassword
Host Name: hostname
Admin Port: 4849
Enter these same values while installing Application Server on another system.
Because node agent names must be unique within each server domain, it is recommended that
you do not change the node agent name.
9
In the Installation Options page, select the options that you want.
If you select the “Upgrade from Previous Version” checkbox, the upgrade process begins after
installation is completed. For information about upgrading, see the Sun Java System Application
Server Enterprise Edition 8.1 2005Q2 Upgrade and Migration Guide.
10
The installation program verifies the available disk space on your machine.
If you do not have enough disk space, an error message is displayed. Consult the “Platform
Requirements” in Sun Java System Application Server Enterprise Edition 8.1 2005Q2 Update 2
Release Notes to identify the minimum disk space required.
11
In the Ready to Install page, verify the information on what is to be installed, and click Install
Now to start the installation (or enter yes at the command line).
Chapter 1 • Installing Application Server Software
21
Installing Application Server Software
12
When the installation is complete, read the installation summary page to determine the status
of the installation. If the installation is successful, click Finish.
If the installation is unsuccessful, consult the log files located at:
■
Install Log files:
– For Solaris SPARC and x86 root user:
/var/sadm/install/logs/Install_Application_Server_8EE_timestamp.log
– For Solaris SPARC and x86 non-root user:
/var/tmp/Install_Application_Server_8EE_timestamp.log
– ForLinux root and non-root user:
/var/tmp/Install_Application_Server_8EE_timestamp.log
– For Windows root and non-root user:
%TEMP%\\Install_Application_Server_8EE_timestamp.log
■
Low-level log files:
Solaris (root installation):
/var/sadm/install/logs/Sun_Java_System_Application_Server_
Enterprise_Edition_install.Btimestamp
– Solaris (non-root installation):
/var/tmp/Sun_Java_System_Application_Server_Enterprise_
Edition_install.Btimestamp
– Linux: /var/tmp/Sun_Java_System_Application_Server_Enterprise_
Edition_install.Btimestamp
– Windows: %TEMP%\\Sun_Java_System_Application_Server_Enterprise_
Edition_install.Btimestamp
13
Start the server.
See the Sun Java System Application Server Enterprise Edition 8.1 2005Q2 Quick Start Guide in
the install_dir/docs-ee directory or online for information about starting the server.
14
If you selected the HADB components:
■
Verify that you have successfully installed the HADB on each host by typing: hadbm --help
A list of all commands available using the hadbm utility is displayed. The hadbm utility is
located at install_dir/hadb/4/bin.
■
22
Configure your system for high availability. See the Sun Java System Application Server
Enterprise Edition 8.1 2005Q2 High Availability Administration Guide for information.
Sun Java System Application Server Enterprise Edition 8.1 2005Q2 Installation Guide • January 2008
Installing the Load Balancer Plug-in Component
Installing the Load Balancer Plug-in Component
Use this procedure to install the load balancer plug-in component without installing the other
Application Server components.
▼
To Install the Load Balancer Plug-in Component
1
Check the system hosting the web server and load balancer plug-in to see if a
previously-installed load balancer plug-in or reverse proxy plug-in is present. If it is, remove it
using the uninstallation program.
2
Verify that the supported web server is installed on the machines where you are going to install
the load balancer plug-in.
Note – You must install the web server and the load balancer plug-in using the same user
account.
Consult “Web Servers” in Sun Java System Application Server Enterprise Edition 8.1 2005Q2
Update 2 Release Notes to identify currently supported web server versions.
3
Identify your web server and the web server instance path.
The Installation Summary page is displayed indicating the installation status.
If the installation is unsuccessful, consult the installation log file located at:
■
Install Log files:
– For Solaris SPARC and x86 root user:
/var/sadm/install/logs/Install_Application_Server_8EE_timestamp.log
– For Solaris SPARC and x86 non-root user:
/var/tmp/Install_Application_Server_8EE_timestamp.log
– ForLinux root and non-root user:
/var/tmp/Install_Application_Server_8EE_timestamp.log
– For Windows root and non-root user:
%TEMP%\\Install_Application_Server_8EE_timestamp.log
■
Low-level log files:
– Solaris (root installation):
/var/sadm/install/logs/Sun_Java_System_Application_Server_
Enterprise_Edition_install.Btimestamp
– Solaris (non-root installation):
/var/tmp/Sun_Java_System_Application_Server_Enterprise_
Edition_install.Btimestamp
Chapter 1 • Installing Application Server Software
23
Installing in Silent Mode
– Linux: /var/tmp/Sun_Java_System_Application_Server_Enterprise_
Edition_install.Btimestamp
– Windows: %TEMP%\\Sun_Java_System_Application_Server_Enterprise_
Edition_install.Btimestamp
Installing in Silent Mode
Silent mode installation runs without any user input checking a configuration file to obtain the
installation information. The following topics are discussed:
■
■
“Creating the Installation Configuration File” on page 24
“Running the Installer in Silent Mode” on page 28
Creating the Installation Configuration File
The installation configuration file is created when you use the savestate option with the setup
command to start a interactive installation. During the interactive installation, your input is
collected and stored in the configuration file you specified. This forms the template for silent
installation, which you can use later to install the product on one or more machines. If needed,
you can modify the installation configuration file.
The following topics are addressed:
■
■
“Syntax for Creating the Installation Configuration File” on page 24
“Modifying the Installation Configuration File” on page 25
Syntax for Creating the Installation Configuration File
The syntax for creating an installation configuration file is as follows:
For the graphical method:
./bundle_filename -savestate filename
For the command-line method:
./bundle_filename -console -savestate filename
Refer to “Installation Methods” on page 17 for more detailed information.
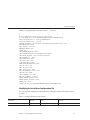
An installation configuration file looks similar to the following example.
EXAMPLE 1–1
Example Installation Configuration File
#
# Wizard Statefile created: Tue Aug 10 11:33:59 PDT 2004
# Wizard path: /var/tmp/sjsasAAA5ZaaaR/appserv.class
24
Sun Java System Application Server Enterprise Edition 8.1 2005Q2 Installation Guide • January 2008
Installing in Silent Mode
EXAMPLE 1–1
Example Installation Configuration File
(Continued)
#
# Install Wizard Statefile section for J2EE 1.4 SDK
# [STATE_BEGIN J2EE 1.4 SDK 6684bbcb8d348bf04952a1c7a625e26689a21146]
defaultInstallDirectory = /home/xyz/SUNWappserver
currentInstallDirectory = /opt/tmp
SELECTED_COMPONENTS = Domain Admin Server#Node Agent#PointBase Server 4.8#
USE_BUNDLED_JDK = FALSE
JDK_LOCATION = /usr/j2se
WEBSERVER_INSTALL_DIR =
PLUGIN_TYPE =
INST_ASADMIN_USERNAME = admin
INST_ASADMIN_PASSWORD = nklquxpcopmkjkjarvqzvanqzva
INST_MASTER_PASSWORD = npohjtiehancyynoucqzva123
INST_ASADMIN_PORT = 4849
INST_ASWEB_PORT = 8080
INST_HTTPS_PORT = 8181
STORE_ADMIN_AUTH = FALSE
ADMIN_PASSWORD_ENCRYPTED = TRUE
INST_JMS_PORT = 7676
INST_ORB_PORT = 3700
INST_ORB_SSL_PORT = 3820
INST_ORB_MUTUALAUTH_PORT = 3920
INST_JMX_PORT = 8686
INST_POINTBASE_PORT = 9092
INST_DAS_HOSTNAME = localhost
CREATE_SAMPLES_DOMAIN = FALSE
CREATE_DESKTOP_SHORTCUT = FALSE
UPDATE_PATH = FALSE
[STATE_DONE J2EE 1.4 SDK 6684bbcb8d348bf04952a1c7a625e26689a21146]
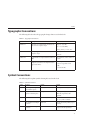
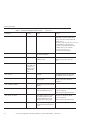
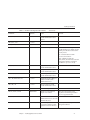
Modifying the Installation Configuration File
You can modify the installation configuration file by editing the variables and values described
in Table 1–3.
TABLE 1–3
Installation Configuration File Variables
Valid Values (if
applicable)
Variable Name
defaultInstallDirectory
Content
Comments
Default installation directory path
Chapter 1 • Installing Application Server Software
25
Installing in Silent Mode
TABLE 1–3
Installation Configuration File Variables
Valid Values (if
applicable)
Variable Name
(Continued)
Content
Comments
currentInstallDirectory
Selected installation directory path
You can specify an environment variable
which will be resolved at runtime. First
set/export SUN_APPSVR_HOME. Solaris OS
example: export
SUN_APPSVR_HOME=/myname/myinstallation.
In the installation configuration file,
provide the environment variable as the
installation directory. For example:
currentInstallDirectory =
$SUN_APPSVR_HOME$/myappsvr
SELECTED_COMPONENTS
List of product components
selected for installation
Modification is not recommended.
Whether to install JDK bundled
with the product
If this value is set to FALSE, the J2SE
path referenced by JDK_LOCATION is
used.
JDK_LOCATION
JDK path
Preinstalled JDK path, relevant only if
USE_BUNDLED_J2SE is set to FALSE.
WEBSERVER_INSTALL_DIR
Selected web server instance
directory path
Relevant only if the Load Balancer
Plug-in component is selected for
installation.
INST_ASADMIN_USERNAME
Administrator user name for initial
domain
INST_ASADMIN_PASSWORD
Administrator password for initial
Domain Administration Server
This entry is obfuscated by default.
SSL certificate database password
for asadmin operations such as
Domain Administration Server
startup and Node Agent startup
This entry is obfuscated by default.
USE_BUNDLED_JDK
TRUE FALSE
PLUGIN_TYPE
Sun ONE Web
Server, Microsoft
IIS Web Server
(Windows only),
Apache HTTP
Server
INST_MASTER_PASSWORD
INST_ASADMIN_PORT
26
0 - 65535
See also description of
ADMIN_PASSWORD_ENCRYPTED variable.
See also description of
ADMIN_PASSWORD_ENCRYPTED variable.
Administration server port number
for initial Domain Administration
Server
Sun Java System Application Server Enterprise Edition 8.1 2005Q2 Installation Guide • January 2008
Installing in Silent Mode
TABLE 1–3
Installation Configuration File Variables
Variable Name
Valid Values (if
applicable)
INST_ASWEB_PORT
0 - 65535
INST_HTTPS_PORT
0 - 65535
STORE_ADMIN_AUTH
TRUE FALSE
ADMIN_PASSWORD_ENCRYPTED
TRUE FALSE
(Continued)
Content
Comments
Server port number for initial
Domain Administration Server
instance
Obfuscated admin password flag
In initial statefile created by product
installer this flag is set to TRUE, since the
admin password value is obfuscated for
security reasons.
To override the value for admin
password, enter values of
INST_ASADMIN_PASSWORD and
INST_MASTER_PASSWORD in clear text and
set this flag to FALSE to enable silent
installation to process it correctly.
INST_JMS_PORT
0 - 65535
JMS port number for initial
Domain Administration Server
INST_ORB_PORT
0 - 65535
ORB port number for initial
Domain Administration Server
INST_ORB_SSL_PORT
0 - 65535
Secure ORB port number for initial
Domain Administration Server
INST_ORB_MUTUALAUTH_PORT
0 - 65535
Mutual authentication ORB port
number for initial Domain
Administration Server
INST_JMX_PORT
0 - 65535
JMX port number for initial
Domain Administration Server
INST_POINTBASE_PORT
0 - 65535
PointBase server port number
CREATE_SAMPLES_DOMAIN
TRUE FALSE
Whether to create additional
samples server domain.
Name of the Domain
Administration Server to be used to
administer the server.
INST_DAS_HOSTNAME
UPDATE_PATH
This value is disregarded because
Application Server Enterprise Edition
does not support this feature.
TRUE FALSE
Whether to update PATH
environment variable to include
Application Server bin directory.
Chapter 1 • Installing Application Server Software
Valid only for Windows platforms and is
disregarded otherwise.
27
Installing in Silent Mode
TABLE 1–3
Installation Configuration File Variables
Variable Name
Valid Values (if
applicable)
USE_BUNDLED_JDK
TRUE FALSE
(Continued)
Content
Comments
Whether to install and use bundled If this value is set to FALSE, the J2SE
J2SE
path referenced by JDK_LOCATION is
used.
Note – You cannot reuse the configuration file created for one distribution on other
distributions, editions, or versions of the Application Server software.
To view the results of the silent installation, refer to the log file.
Running the Installer in Silent Mode
To install the Application Server software in silent mode:
▼ To Install in Silent Mode
1
Review configuration file and verify that it contains what you want to use for your silent
installation.
2
Copy your installation configuration file to each machine where you plan to install the
Application Server software.
3
Copy the Application Server installation files to each machine where you plan to install the
Application Server software.
4
Navigate to the directory where you copied the installation files and your installation
configuration file.
5
Start silent installation at the command line using the following command format: ./
bundle_filename -silent config_file
The installation program reads the specified config_file, checks for adequate disk space, then
installs the product based on the data in config_file .
When the prompt is returned, the silent installation is complete and the installation
components are installed on your systems.
Review the log files located at:
■
Install Log files:
– For Solaris SPARC and x86 root user:
/var/sadm/install/logs/Install_Application_Server_8EE_timestamp.log
28
Sun Java System Application Server Enterprise Edition 8.1 2005Q2 Installation Guide • January 2008
Installing in Silent Mode
– For Solaris SPARC and x86 non-root user:
/var/tmp/Install_Application_Server_8EE_timestamp.log
– ForLinux root and non-root user:
/var/tmp/Install_Application_Server_8EE_timestamp.log
– For Windows root and non-root user:
%TEMP%\\Install_Application_Server_8EE_timestamp.log
■
Low-level log files:
– Solaris (root installation):
/var/sadm/install/logs/Sun_Java_System_Application_Server_
Enterprise_Edition_install.Btimestamp
– Solaris (non-root installation):
/var/tmp/Sun_Java_System_Application_Server_Enterprise_
Edition_install.Btimestamp
– Linux: /var/tmp/Sun_Java_System_Application_Server_Enterprise_
Edition_install.Btimestamp
– Windows: %TEMP%\\Sun_Java_System_Application_Server_Enterprise_
Edition_install.Btimestamp
6
Start the server.
You can start the Application Server software by using the instructions in the Chapter 1,
“Getting Started,” in Sun Java System Application Server Enterprise Edition 8.1 2005Q2
Administration Guide.
When the Admin Console is started, the initial page of the Application Server graphical
interface is displayed.
You are now ready to configure your system for high availability. To begin this process, see the
Sun Java System Application Server Enterprise Edition 8.1 2005Q2 High Availability
Administration Guide for information.
Chapter 1 • Installing Application Server Software
29
30
2
C H A P T E R
2
Uninstalling Application Server Software
All components in the current Application Server installation directory are automatically
selected for uninstallation.
Note –
■
If you installed Application Server as part of a Java Enterprise System installation, see the
Sun Java System Installation Guide for uninstallation instructions.
■
If you installed the stand-alone version of Application Server it is important to use the
uninstall routine described here. If you attempt another method, problems arise when you
try to reinstall the same version or when you install a new version.
■
If you do not stop all domains before the uninstallation, orphaned processes might exist on
your system after the uninstallation. On UNIX, identify the processes using the ps -ef
command and terminate them using the kill command.
Running the Uninstallation Program
To uninstall the Application Server software, perform the following steps.
▼
Before You Begin
1
To Run the Uninstallation Program on UNIX or Linux
Make sure that you have stopped all domains and other related processes, including deploytool,
command prompts using the installation directory or its subdirectories, and any applications
using JavaTM 2 Platform, Standard Edition (J2SETM platform) files bundled with the product.
Navigate to your Application Server installation directory.
31
Running the Uninstallation Program
2
▼
Before You Begin
●
Invoke the uninstall program as follows:
■
To use the uninstall that has a graphical interface, at the command prompt, type:
./uninstall
■
To use the uninstall that has a command-line interface, at the command prompt, type:
./uninstall -console
To Run the Uninstallation Program on Windows
Make sure that you have stopped all domains and other related processes, including deploytool,
command prompts using the installation directory or its subdirectories, and any applications
using Java 2 Platform, Standard Edition (J2SE platform) files bundled with the product.
Invoke the Uninstallation program in one of the following ways:
■
Under the Sun Microsystems, Application Server EE program group in the Start Programs
area of your desktop, click Uninstall.
■
Invoke the uninstall program through the Control Panel:
a. Navigate to the Control Panel.
b. Choose Add/Remove Programs.
c. From the list of installed programs, select Sun Java System Application Server Enterprise
Edition.
d. Click Remove.
32
Sun Java System Application Server Enterprise Edition 8.1 2005Q2 Installation Guide • January 2008
Index
A
I
admin port, 20
admin user name, 20
Application Server components, 16-17
applications, sample, 17
asadmin utility, installation, 16
command-line installation, 18
console option, 18
incremental installation, 16
installation configuration file
creating, 24
example, 24
installation methods, 17-19
installing
command line, 18, 19
graphical, 17, 19
incremental, 16
load balancer plug-in, 23
silent mode, 18, 24-29
D
J
default ports, 20
Domain Administration Server, 16
Java 2 SDK, 16, 20
javahome option, 18
G
L
graphical installation, 17
load balancer plug-in, 17
installing, 23
log files
installation, 22
low-level, 22
C
H
HADB., See High-Availability Database Server
help option, 18
High-Availability Database Server, 17
verifying installation, 22
HTTP port, 20
HTTPS port, 20
M
master password, 20
Message Queue, 16
33
Index
N
node agents, 21
P
password, 20
ports, default, 20
R
removing software installation, 31
reverse proxy plug-in, existing, 23
S
sample applications, 17
savestate option, 18, 24
silent installation, 18
silent option, 18
U
uninstalling, 31
partial, 16
upgrading, 21
W
web server, user account, 23
34
Sun Java System Application Server Enterprise Edition 8.1 2005Q2 Installation Guide • January 2008