1
Sun GlassFish Enterprise Server
2.1 Quick Start Guide
Sun Microsystems, Inc.
4150 Network Circle
Santa Clara, CA 95054
U.S.A.
Part No: 820–4334–10
December 2008
Copyright 2007 Sun Microsystems, Inc.
4150 Network Circle, Santa Clara, CA 95054 U.S.A.
All rights reserved.
Sun Microsystems, Inc. has intellectual property rights relating to technology embodied in the product that is described in this document. In particular, and without
limitation, these intellectual property rights may include one or more U.S. patents or pending patent applications in the U.S. and in other countries.
U.S. Government Rights – Commercial software. Government users are subject to the Sun Microsystems, Inc. standard license agreement and applicable provisions
of the FAR and its supplements.
This distribution may include materials developed by third parties.
Parts of the product may be derived from Berkeley BSD systems, licensed from the University of California. UNIX is a registered trademark in the U.S. and other
countries, exclusively licensed through X/Open Company, Ltd.
Sun, Sun Microsystems, the Sun logo, the Solaris logo, the Java Coffee Cup logo, docs.sun.com, Java, and Solaris are trademarks or registered trademarks of Sun
Microsystems, Inc. or its subsidiaries in the U.S. and other countries. All SPARC trademarks are used under license and are trademarks or registered trademarks of
SPARC International, Inc. in the U.S. and other countries. Products bearing SPARC trademarks are based upon an architecture developed by Sun Microsystems, Inc.
The OPEN LOOK and SunTM Graphical User Interface was developed by Sun Microsystems, Inc. for its users and licensees. Sun acknowledges the pioneering efforts
of Xerox in researching and developing the concept of visual or graphical user interfaces for the computer industry. Sun holds a non-exclusive license from Xerox to
the Xerox Graphical User Interface, which license also covers Sun's licensees who implement OPEN LOOK GUIs and otherwise comply with Sun's written license
agreements.
Products covered by and information contained in this publication are controlled by U.S. Export Control laws and may be subject to the export or import laws in
other countries. Nuclear, missile, chemical or biological weapons or nuclear maritime end uses or end users, whether direct or indirect, are strictly prohibited. Export
or reexport to countries subject to U.S. embargo or to entities identified on U.S. export exclusion lists, including, but not limited to, the denied persons and specially
designated nationals lists is strictly prohibited.
DOCUMENTATION IS PROVIDED “AS IS” AND ALL EXPRESS OR IMPLIED CONDITIONS, REPRESENTATIONS AND WARRANTIES, INCLUDING ANY
IMPLIED WARRANTY OF MERCHANTABILITY, FITNESS FOR A PARTICULAR PURPOSE OR NON-INFRINGEMENT, ARE DISCLAIMED, EXCEPT TO
THE EXTENT THAT SUCH DISCLAIMERS ARE HELD TO BE LEGALLY INVALID.
Copyright 2007 Sun Microsystems, Inc.
4150 Network Circle, Santa Clara, CA 95054 U.S.A.
Tous droits réservés.
Sun Microsystems, Inc. détient les droits de propriété intellectuelle relatifs à la technologie incorporée dans le produit qui est décrit dans ce document. En particulier,
et ce sans limitation, ces droits de propriété intellectuelle peuvent inclure un ou plusieurs brevets américains ou des applications de brevet en attente aux Etats-Unis
et dans d'autres pays.
Cette distribution peut comprendre des composants développés par des tierces personnes.
Certaines composants de ce produit peuvent être dérivées du logiciel Berkeley BSD, licenciés par l'Université de Californie. UNIX est une marque déposée aux
Etats-Unis et dans d'autres pays; elle est licenciée exclusivement par X/Open Company, Ltd.
Sun, Sun Microsystems, le logo Sun, le logo Solaris, le logo Java Coffee Cup, docs.sun.com, Java et Solaris sont des marques de fabrique ou des marques déposées de
Sun Microsystems, Inc., ou ses filiales, aux Etats-Unis et dans d'autres pays. Toutes les marques SPARC sont utilisées sous licence et sont des marques de fabrique ou
des marques déposées de SPARC International, Inc. aux Etats-Unis et dans d'autres pays. Les produits portant les marques SPARC sont basés sur une architecture
développée par Sun Microsystems, Inc.
L'interface d'utilisation graphique OPEN LOOK et Sun a été développée par Sun Microsystems, Inc. pour ses utilisateurs et licenciés. Sun reconnaît les efforts de
pionniers de Xerox pour la recherche et le développement du concept des interfaces d'utilisation visuelle ou graphique pour l'industrie de l'informatique. Sun détient
une licence non exclusive de Xerox sur l'interface d'utilisation graphique Xerox, cette licence couvrant également les licenciés de Sun qui mettent en place l'interface
d'utilisation graphique OPEN LOOK et qui, en outre, se conforment aux licences écrites de Sun.
Les produits qui font l'objet de cette publication et les informations qu'il contient sont régis par la legislation américaine en matière de contrôle des exportations et
peuvent être soumis au droit d'autres pays dans le domaine des exportations et importations. Les utilisations finales, ou utilisateurs finaux, pour des armes nucléaires,
des missiles, des armes chimiques ou biologiques ou pour le nucléaire maritime, directement ou indirectement, sont strictement interdites. Les exportations ou
réexportations vers des pays sous embargo des Etats-Unis, ou vers des entités figurant sur les listes d'exclusion d'exportation américaines, y compris, mais de manière
non exclusive, la liste de personnes qui font objet d'un ordre de ne pas participer, d'une façon directe ou indirecte, aux exportations des produits ou des services qui
sont régis par la legislation américaine en matière de contrôle des exportations et la liste de ressortissants spécifiquement designés, sont rigoureusement interdites.
LA DOCUMENTATION EST FOURNIE "EN L'ETAT" ET TOUTES AUTRES CONDITIONS, DECLARATIONS ET GARANTIES EXPRESSES OU TACITES
SONT FORMELLEMENT EXCLUES, DANS LA MESURE AUTORISEE PAR LA LOI APPLICABLE, Y COMPRIS NOTAMMENT TOUTE GARANTIE
IMPLICITE RELATIVE A LA QUALITE MARCHANDE, A L'APTITUDE A UNE UTILISATION PARTICULIERE OU A L'ABSENCE DE CONTREFACON.
090204@21808
Contents
Preface .....................................................................................................................................................5
1
Quick Start for Basic Features ............................................................................................................. 9
Getting Started ........................................................................................................................................9
▼ To Start the Domain on Solaris and Linux ................................................................................ 10
▼ To Start the Domain on Windows ............................................................................................. 10
▼ To Log On to the Admin Console .............................................................................................. 11
▼ To View the Domain Administration Server Log File ............................................................. 12
▼ To Start the Node Agent .............................................................................................................. 14
▼ To Add Cluster Support to a Domain ........................................................................................ 15
▼ To Start the Bundled Java DB Server ......................................................................................... 15
Administration Tools .......................................................................................................................... 16
Where to Go Next ................................................................................................................................ 18
2
Setting Up a Cluster ............................................................................................................................ 19
Creating a Cluster ................................................................................................................................ 19
▼ To Set Up a Cluster ...................................................................................................................... 19
Creating a Cluster that Spans Multiple Machines ........................................................................... 21
▼ To Create a Cluster With Instances On Different Machines .................................................. 21
Viewing Ports for Clustered Server Instances .................................................................................. 22
▼ To View Ports for Clustered Server Instances .......................................................................... 22
3
Deploying an Application ..................................................................................................................25
Deploying a Sample Web Application .............................................................................................. 25
▼ To Deploy the Hello Application Using Autodeploy ............................................................... 25
▼ To Deploy the Hello Application Using Admin Console ........................................................ 26
Deploying the Sample Enterprise Application to a Cluster ............................................................ 27
3
Contents
▼ To Deploy the Sample Enterprise Application Using Admin Console ................................. 27
▼ To Verify Application Deployment ........................................................................................... 28
4
Working with Load Balancers ............................................................................................................ 31
Setting up Load Balancing .................................................................................................................. 32
▼ To Set Up Load Balancing ........................................................................................................... 32
Starting Load Balancing ...................................................................................................................... 33
Verifying Load Balancing ................................................................................................................... 33
▼ To Verify Load Balancing ........................................................................................................... 33
High Availability and Failover Using the In-memory Replication Feature .................................. 34
5
Setting Up High Availability Failover ............................................................................................... 37
High-availability Clusters and HADB .............................................................................................. 38
HADB Preinstallation Steps ............................................................................................................... 38
▼ To Configure Your System for HADB ....................................................................................... 39
Installing HADB .................................................................................................................................. 40
▼ To Install HADB ........................................................................................................................... 40
Starting HADB ..................................................................................................................................... 41
▼ To Start HADB in a Java Enterprise System Installation on Solaris or Linux ....................... 41
▼ To Start HADB in a Java Enterprise System Installation on Windows .................................. 41
▼ To Start HADB in a Stand-Alone Installation on Solaris or Linux ........................................ 42
▼ To Start HADB in a Stand-Alone Installation on Windows ................................................... 42
Configuring a Cluster and Application for High Availability ........................................................ 42
Restarting the Cluster ......................................................................................................................... 42
▼ To Restart the Cluster .................................................................................................................. 42
Verifying HTTP Session Failover ...................................................................................................... 43
▼ To Verify HTTP Session Failover .............................................................................................. 43
4
Sun GlassFish Enterprise Server 2.1 Quick Start Guide • December 2008
Preface
This Quick Start Guide provides basic procedures to start the server, deploy an application, and
set up load balancing and failover.
This preface contains information about and conventions for the entire Sun GlassFishTM
Enterprise Server documentation set.
Sun GlassFish Enterprise Server Documentation Set
TABLE P–1
Books in the Enterprise Server Documentation Set
Book Title
Description
Documentation Center
Enterprise Server documentation topics organized by task and subject.
Release Notes
Late-breaking information about the software and the documentation. Includes a
comprehensive, table-based summary of the supported hardware, operating system, JavaTM
Development Kit (JDKTM), and database drivers.
Quick Start Guide
How to get started with the Enterprise Server product.
Installation Guide
Installing the software and its components.
Application Deployment Guide
Deployment of applications and application components to the Enterprise Server. Includes
information about deployment descriptors.
Developer’s Guide
Creating and implementing Java Platform, Enterprise Edition (Java EE platform) applications
intended to run on the Enterprise Server that follow the open Java standards model for Java
EE components and APIs. Includes information about developer tools, security, debugging,
and creating lifecycle modules.
Java EE 5 Tutorial
Using Java EE 5 platform technologies and APIs to develop Java EE applications.
Java WSIT Tutorial
Developing web applications using the Web Service Interoperability Technologies (WSIT).
Describes how, when, and why to use the WSIT technologies and the features and options
that each technology supports.
Administration Guide
System administration for the Enterprise Server, including configuration, monitoring,
security, resource management, and web services management.
5
Preface
TABLE P–1
Books in the Enterprise Server Documentation Set
(Continued)
Book Title
Description
High Availability Administration
Guide
Setting up clusters, working with node agents, and using load balancers.
Administration Reference
Editing the Enterprise Server configuration file, domain.xml.
Performance Tuning Guide
Tuning the Enterprise Server to improve performance.
Reference Manual
Utility commands available with the Enterprise Server; written in man page style. Includes
the asadmin command line interface.
Default Paths and File Names
The following table describes the default paths and file names that are used in this book.
TABLE P–2
Default Paths and File Names
Placeholder
Description
Default Value
as-install
Represents the base installation directory for
Enterprise Server.
SolarisTM and Linux installations, non-root user:
user’s-home-directory/SUNWappserver
Solaris and Linux installations, root user:
/opt/SUNWappserver
Windows, all installations:
SystemDrive:\Sun\AppServer
domain-root-dir
domain-dir
Represents the directory containing all
domains.
All installations:
Represents the directory for a domain.
domain-root-dir/domain-dir
as-install/domains/
In configuration files, you might see
domain-dir represented as follows:
${com.sun.aas.instanceRoot}
instance-dir
Represents the directory for a server instance.
domain-dir/instance-dir
samples-dir
Represents the directory containing sample
applications.
as-install/samples
docs-dir
Represents the directory containing
documentation.
as-install/docs
6
Sun GlassFish Enterprise Server 2.1 Quick Start Guide • December 2008
Preface
Typographic Conventions
The following table describes the typographic changes that are used in this book.
TABLE P–3
Typographic Conventions
Typeface
Meaning
Example
AaBbCc123
The names of commands, files, and
directories, and onscreen computer
output
Edit your .login file.
Use ls -a to list all files.
machine_name% you have mail.
What you type, contrasted with onscreen
computer output
machine_name% su
AaBbCc123
A placeholder to be replaced with a real
name or value
The command to remove a file is rm filename.
AaBbCc123
Book titles, new terms, and terms to be
emphasized (note that some emphasized
items appear bold online)
Read Chapter 6 in the User's Guide.
AaBbCc123
Password:
A cache is a copy that is stored locally.
Do not save the file.
Symbol Conventions
The following table explains symbols that might be used in this book.
TABLE P–4
Symbol Conventions
Symbol
Description
Example
Meaning
[]
Contains optional arguments ls [-l]
and command options.
The -l option is not required.
{|}
Contains a set of choices for a -d {y|n}
required command option.
The -d option requires that you use
either the y argument or the n
argument.
${ }
Indicates a variable
reference.
${com.sun.javaRoot}
References the value of the
com.sun.javaRoot variable.
-
Joins simultaneous multiple
keystrokes.
Control-A
Press the Control key while you press
the A key.
+
Joins consecutive multiple
keystrokes.
Ctrl+A+N
Press the Control key, release it, and
then press the subsequent keys.
7
Preface
TABLE P–4
Symbol Conventions
(Continued)
Symbol
Description
Example
Meaning
→
Indicates menu item
selection in a graphical user
interface.
File → New → Templates
From the File menu, choose New.
From the New submenu, choose
Templates.
Documentation, Support, and Training
The Sun web site provides information about the following additional resources:
■
■
■
Documentation (http://www.sun.com/documentation/)
Support (http://www.sun.com/support/)
Training (http://www.sun.com/training/)
Third-Party Web Site References
Third-party URLs are referenced in this document and provide additional, related information.
Note – Sun is not responsible for the availability of third-party web sites mentioned in this
document. Sun does not endorse and is not responsible or liable for any content, advertising,
products, or other materials that are available on or through such sites or resources. Sun will not
be responsible or liable for any actual or alleged damage or loss caused or alleged to be caused by
or in connection with use of or reliance on any such content, goods, or services that are available
on or through such sites or resources.
Sun Welcomes Your Comments
Sun is interested in improving its documentation and welcomes your comments and
suggestions.
To share your comments, go to http://docs.sun.com and click Feedback. In the online form,
provide the document title and part number. The part number is a seven-digit or nine-digit
number that can be found on the title page of the book or at the top of the document.
8
Sun GlassFish Enterprise Server 2.1 Quick Start Guide • December 2008
1
C H A P T E R
1
Quick Start for Basic Features
Welcome to the Quick Start Guide. This guide provides a set of sample procedures that you can
use to get started with the Enterprise Server.
Before using the procedures in this document you must have already installed the GlassFish
Communications Server software.
This section contains the following topics:
■
■
■
“Getting Started” on page 9
“Administration Tools” on page 16
“Where to Go Next” on page 18
Getting Started
This topic provides instructions for the following basic tasks: starting the Domain
Administration Server (DAS), logging into the Admin Console, examining the log files, and
starting the node agent. The steps are presented in the order that you should complete them.
■
■
■
■
■
■
■
“To Start the Domain on Solaris and Linux” on page 10
“To Start the Domain on Windows” on page 10
“To Log On to the Admin Console” on page 11
“To View the Domain Administration Server Log File” on page 12
“To Start the Node Agent” on page 14
“To Add Cluster Support to a Domain” on page 15
“To Start the Bundled Java DB Server” on page 15
9
Getting Started
▼
To Start the Domain on Solaris and Linux
To start the Domain Administration Server, start the default domain, domain1.
1
Add the as-install/bin/ directory to the PATH environment variable.
2
Start the server by entering this command:
asadmin start-domain domain1
When you are prompted for the user, admin password, and the master password, enter your
user name and the passwords that you provided during installation.
When the start up process is complete, the following message appears:
Domain domain1 started
Each domain has a corresponding profile: enterprise, cluster or developer. domain1 is created
with the default profile, which is defined in the AS_ADMIN_PROFILE variable defined in the
asadminenv.conf file. For more information on profiles see the “Usage Profiles” in Sun
GlassFish Enterprise Server 2.1 Administration Guide. If domain1 was created with developer
profile, when you log in to the Admin Console, you cannot use features such as clustering and
node agents. To use clusters and server instances, use the create-domain command to create a
domain with cluster profile. For information on creating domains, type asadmin
create-domain --help or see create-domain(1).
▼
To Start the Domain on Windows
To start the Domain Administration Server, start the default domain, domain 1.
10
1
From the Explorer window or desktop, right click My Computer.
2
Choose Properties to display the System Properties dialog.
3
Click the Advanced tab.
4
Click Environment Variables.
5
In the User variables section:
■
If a PATH variable exists, verify that as-install\bin exists in the path:
as-install\bin;other_entries. If as-install\bin does not exist in the PATH variable, add it.
■
If a PATH variable is not present, click New. In Variable Name, type PATH. In Variable Value,
type the path to the server’s bin directory: as-install\bin. Click OK to commit the change.
Sun GlassFish Enterprise Server 2.1 Quick Start Guide • December 2008
Getting Started
6
Add a new environment variable AS_ADMIN_USER and set it to the Administrative User Name
that you assigned during installation.
7
Click OK to commit the change and close the remaining open windows.
8
Start the Enterprise Server by clicking the Start Admin Server option within the Programs menu.
9
When a command prompt window opens to prompt you for the admin password and the master
password, enter the passwords that you provided during installation.
A window appears with a message telling that you the server is starting:
Starting Domain domain1, please wait.
Log redirected to domain_dir\domain1\logs\server.log...
When the startup process has completed, you see an additional message:
Domain domain1 started.
Press any key to continue ...
Each domain has a corresponding profile: enterprise, cluster, or developer. domain1 is created
with the default profile, which is defined in the AS_ADMIN_PROFILE variable defined in the
asadminenv.conf file. For more information on profiles see the “Usage Profiles” in Sun
GlassFish Enterprise Server 2.1 Administration Guide. If domain1 was created with developer
profile, when you log in to the Admin Console, you cannot use features such as clustering and
node agents. To use clusters and server instances, use the create-domain command to create a
domain with cluster profile. For information on creating domains, type asadmin
create-domain --help or see create-domain(1).
10
Press a key to close the message window.
▼
To Log On to the Admin Console
The Admin Console is a browser interface that simplifies a variety of administration and
configuration tasks. It is commonly used to:
■
■
■
■
Deploy and undeploy applications
Enable, disable, and manage applications
Configure resources and other server settings
Select and view log files
For further information about using the Admin Console, consult the online help or the Sun
GlassFish Enterprise Server 2.1 Administration Guide.
1
Open a browser, and type this URL in your browser:
http:// hostname:4848
Chapter 1 • Quick Start for Basic Features
11
Getting Started
If the browser is on a different system than the server, replace the hostname variable with the
hostname or IP address of the system that the Domain Admin Server is running on.
4848 is the Admin Console’s default port number. If you changed the port number during the
installation or if you have created a domain with another port number, use that number instead.
Note – If a popup window appears with a message such as Website Certified by an Unknown
Authority, click OK.
This message appears because your browser does not recognize the self-signed certificate that
the Domain Administration Server uses to service the Admin Console over the secure
transmission protocol.
2
When the Log in window appears, enter the admin user name and password.
3
Click Login.
In the left pane, select what you want to manage from the tree provided. In the right pane,
various administrative tasks are listed under the Common Tasks heading.
▼
To View the Domain Administration Server Log File
Enterprise Server instances and the Domain Administration Server produce annotated logs on
the file system. By default, all errors, warnings or useful informative messages are logged.
12
Sun GlassFish Enterprise Server 2.1 Quick Start Guide • December 2008
Getting Started
1
From the Common Tasks list in the right pane, click Search Log Files to launch a new browser
window for Log Viewer.
2
In the Log Viewer window, select“server”from the Instance Name drop-down list and click
Search.
The Domain Administration Server’s recent log file entries are displayed.
3
Scan the messages and look for any WARNING or SEVERE messages indicating that problems were
encountered during server startup.
You can close Log Viewer at any time. After you create clusters and deploy applications,
examine log files if any of the operations failed. Use Log Viewer to view the log files of any
running Enterprise Server instance in the domain.
Chapter 1 • Quick Start for Basic Features
13
Getting Started
▼
To Start the Node Agent
A node agent is a lightweight process running on each machine that participates in an
administrative domain. The node agent is responsible for starting and stopping server instances
on the host. It also communicates with the Domain Administration Server to create new
instances.
Note – You can use node agents only on domains with the cluster profile or enterprise profile. If
you are running only a developer domain, you need to create a domain with cluster profile
before you can create and use node agents. For information on creating domains, type asadmin
create-domain --help or see the create-domain(1) man page.
One node agent is needed on a machine for each administrative domain that the machine
belongs to. A default node agent called hostname may be created during installation. If not,
create a node agent, using the create-node-agent(1) command.
1
In a terminal window, type this command:
asadmin start-node-agent nodeagentname
Replace the variable nodeagentname with the name of the node agent you created. If your
default domain on port 4848 (domain1) is not running on cluster profile or enterprise profile,
use the --port option to specify the port of the cluster or enterprise domain.
2
When you are prompted, provide the master password.
The node agent starts and connects with the Domain Administration Server.
Note – Ensure that the Domain Administration Server is running before you start the node
agent. Check the server.log file of a cluster instance to identify problems related to starting
node agents or cluster instances.
If you have problems while starting a node agent or a cluster on Windows, see the Sun GlassFish
Enterprise Server 2.1 Release Notes for possible solutions to the problem.
After the node agent has been started once, you can view it in the Admin Console.
Next Steps
14
In this section you started the Domain Administration Server and confirmed that it is running.
You also logged in to the Admin Console and used the Log Viewer. You started the node agent.
You can stop the Quick Start trail here if you do not wish to continue, or you can go on to the
next section.
Sun GlassFish Enterprise Server 2.1 Quick Start Guide • December 2008
Getting Started
▼
To Add Cluster Support to a Domain
You can use the Admin Console add cluster support to a developer domain.
1
Log on to the Admin Console. For instructions, see “To Log On to the Admin Console”on page 11.
2
From the left pane, click Application Server.
3
Click the Add Cluster Support button in the General tab.
4
The Add Cluster Support page appears. Review the information on this page and click OK.
5
In the Restart Required Page, click the Stop Instance button to stop the domain.
6
Log in to the machine where the domain is installed and run the following command:
as-install/bin/asadmin list-domains. Verify that the domain was stopped.
7
Run the following command: as-install/bin/asadmin start-domain <domain-name>
The restarted domain supports clustering.
More Information
Troubleshooting
If the restarted domain does not show clustering capabilities, stop the domain, reboot the
machine on which the domain is installed, and restart the domain as shown in step 7.
▼
To Start the Bundled Java DB Server
The Enterprise Server includes a bundled Java DB server. To start it, use the following
procedure:
1
Make sure that you are logged in as the user that installed the database.
2
Run asadmin start-database.
For more information on the start-database command, see the start-database(1) man
page.
Chapter 1 • Quick Start for Basic Features
15
Administration Tools
Administration Tools
To enable administrators to manage server instances and clusters running on multiple hosts,
Enterprise Server provides these tools:
■
The Admin Console, a browser-based graphical user interface (GUI). You can launch the
Admin console by opening http:// hostname:4848 in your browser.
■
Command-line tools, such as the asadmin utility. See Table 1–1 for the complete list of
command-line tools. The asadmin utility is at as-install/bin.
■
Programmatic Java Management Extensions (JMXTM) APIs
These tools connect to a server called the Domain Administration Server, a specially designated
instance that intermediates in all administrative tasks. The Domain Administration Server
(DAS) provides a single secure interface for validating and executing administrative commands
regardless of which interface is used.
A domain is a collection of configuration data, deployed applications, and machines with a
designated administrator. The domain definition describes and can control the operation of
several applications, stand-alone instances, and clusters, potentially spread over multiple
machines. When the DAS is installed, a default domain called domain1 is always installed. You
work with the default domain in this guide.
Enterprise Server offers a variety of command-line tools for performing administrative
functions, in addition to the Admin Console. To launch a tool, type the name of the tool in a
command window. Table 1–1 lists tools by name in the first column and describes them in the
second column.
TABLE 1–1
16
Command-Line Tools
Name of Tool
Description
appclient
Launches the Application Client Container and invokes the client
application packaged in the application Java archive (JAR) file.
asadmin
Launches the Enterprise Server administration tool that provides a set of
subcommands for configuring the Enterprise Server software.
asant
Launches the Jakarta Ant tool, so that you can automate repetitive
development and deployment tasks.
asapt
Compiles Java sources with Java EE annotations. The tool automatically
invokes the wsimport command.
asupgrade
Enterprise Server administration tool for upgrading the Enterprise Server
software.
capture-schema
Extracts schema information from a database and produces a schema file
that the server can use for Container Managed Persistence (CMP).
Sun GlassFish Enterprise Server 2.1 Quick Start Guide • December 2008
Administration Tools
TABLE 1–1
Command-Line Tools
(Continued)
Name of Tool
Description
jspc
Compiles JSP pages.
package-appclient
Packages the application client container libraries and JAR files.
schemagen
Creates a schema file for each namespace referenced in your Java classes.
verifier
Validates the Java EE deployment descriptors with the DTDs.
This tool also provides a graphical user interface. To see the GUI, specify the
-u option.
Some Windows systems launch a driver verifier utility with the same name.
To launch the Enterprise Server verifier, you must be in the as-install/bin
directory.
wscompile
Takes the service definition interface and generates the client stubs or
server-side skeletons for JAX-RPC; or generates a Web Services Description
Language (WSDL) description for the provided interface.
wsdeploy
Generates an implementation-specific, ready-to-deploy WAR file for web
services applications that use JAX-RPC.
wsgen
Reads a web service endpoint class and generates all the required artifacts
for web service deployment and invocation.
wsimport
Generates JAX-WS portable artifacts, such as service endpoint interfaces
(SEIs), services, exception classes mapped from the wsdl:fault and
soap:headerfault tags, asynchronous response beans derived from the
wsdl:message tag, and JAXB generated value types.
xjc
Transforms, or binds, a source XML schema to a set of JAXB content classes
in the Java programming language.
Note –
■
To run these command-line tools on Windows, ensure that you have an environment
variable called PATH that points to the as-install/bin/ directory.
■
You can run the asadmin subcommands by prefixing asadmin with every sub command or
by entering the asadmin prompt (type asadmin and hit Return) in the as-install/bin/
directory.
Chapter 1 • Quick Start for Basic Features
17
Where to Go Next
Where to Go Next
The next steps of the Quick Start Guide are available in the following chapters.
■
Chapter 2, “Setting Up a Cluster”
Steps for creating a sample cluster. Skip to the next chapter if you are running a domain with
developer profile.
■
Chapter 3, “Deploying an Application”
Steps for deploying a sample web application. If you are using a domain with cluster
capabilities, you can perform the steps for deploying an enterprise application to a cluster.
Other resources for learning and using Enterprise Server are available. They include:
■
■
■
■
■
■
■
18
Product details at as-install/docs/about.html.
Sample applications at as-install/samples
Sun GlassFish Enterprise Server 2.1 Release Notes
Sun GlassFish Enterprise Server 2.1 Reference Manual (man pages)
Sun GlassFish Enterprise Server 2.1 Application Deployment Guide
The Java EE 5 Tutorial
Java BluePrints (http://java.sun.com/blueprints) guidelines for the Enterprise
Sun GlassFish Enterprise Server 2.1 Quick Start Guide • December 2008
2
C H A P T E R
2
Setting Up a Cluster
This chapter describes how to create and set up clusters. A cluster is a group of server instances
(typically on multiple hosts) that share the same configurations, resources, and applications. A
cluster facilitates load balancing across server instances and high availability through failover.
You can create clusters spanning multiple machines and manage them with the help of the node
agent process on each machine.
This chapter assumes that you are running a domain with cluster profile or enterprise profile.
This chapter has the following sections:
■
■
■
“Creating a Cluster ” on page 19
“Creating a Cluster that Spans Multiple Machines” on page 21
“Viewing Ports for Clustered Server Instances” on page 22
Creating a Cluster
This section explains how to create a cluster that contains two Enterprise Server instances, both
residing on a single machine.
▼
To Set Up a Cluster
This procedure creates the sample cluster one the same host on which the DAS is running.
Before You Begin
It is assumed that you have already started the node agent. When you specify instances during
cluster creation, associate the instance with a running node agent for the machine on which you
want the instance to run. If the node agent is not running, the instance will not start. Node agent
and instance names must be unique across clusters that are created in a domain.
19
Creating a Cluster
1
Log in to the Administration Console at http:// hostname:portnumber if you have not already
done so.
Replace the hostname variable with the name of the system that the Domain Administration
Server is running on. Replace portnumber with the port number of the cluster domain, domain1.
2
On the left pane, click the Clusters tab.
3
To create a cluster, do one of the following:
4
■
On the right-hand pane, click new and type cluster1 as the name. Click OK.
■
Use the following command: asadmin create-cluster --user admin --passwordfile
adminpassword.txt --host hostname -port 4848 cluster1
Click cluster1 . The General Information for this cluster appears.
Note – In the General tab on the right hand pane, ensure that the Heartbeat Enabled checkbox is
selected. You need GMS service to be running to be able to use the converged load balancer.
5
On the right pane, click the Instances tab. Click the New button to create two entries to specify
two instances for the cluster.
6
Type instance1. In the Node Agent field, nodeagent1 is selected by default.
7
Type instance2. In the Node Agent field, nodeagent1 is selected by default. Click Save.
Instead of steps 4,5, and 6 you can use the following asadmin commands:
8
■
asadmin create-instance --user admin --passwordfile adminpassword.txt --host
hostname -port 4848 --cluster cluster1 --nodeagent nodeagent1
--systemproperties
"JMX_SYSTEM_CONNECTOR_PORT=8687:IIOP_LISTENER_PORT=3330:IIOP_SSL_LISTENER_PORT=4440:IIOP_SSL_
MUTUALAUTH_PORT=5550:HTTP_LISTENER_PORT=1110:HTTP_SSL_LISTENER_PORT=2220"
instance1
■
asadmin create-instance --user admin --passwordfile adminpassword.txt --host
hostname -port 4848 --cluster cluster1 --nodeagent nodeagent1
--systemproperties
"JMX_SYSTEM_CONNECTOR_PORT=8688:IIOP_LISTENER_PORT=3331:IIOP_SSL_LISTENER_PORT=4441:IIOP_SSL_
MUTUALAUTH_PORT=5551:HTTP_LISTENER_PORT=1111:HTTP_SSL_LISTENER_PORT=2221"
instance2
To start the cluster,
■
20
Click the General tab and click the Start Cluster button.
Sun GlassFish Enterprise Server 2.1 Quick Start Guide • December 2008
Creating a Cluster that Spans Multiple Machines
■
Start the cluster and its instances by running the following command:
asadmin start-cluster --user admin --passwordfile adminpassword.txt --host
hostname --port 4848 cluster1
The two instances are started by default when you start the cluster.
Creating a Cluster that Spans Multiple Machines
▼
To Create a Cluster With Instances On Different
Machines
The following procedure demonstrates how to create a cluster that has two instances, instance3
and instance4, each running on different machines. The two machines are called schumi and
sr115. schumi is the machine that is denoted as the administrative node and is called the
Domain Administration Server (DAS).
Before You Begin
You must have already installed Enterprise Server on both machines.
1
Create and start a node agent (nodeagent2) on the DAS machine.
Use the following command: asadmin create-node-agent --user admin --host schumi
nodeagent2
2
Start the node agent on the DAS machine.
Use the following command: asadmin start-node-agent --user admin --host schumi
nodeagent2. For more information, see start-node-agent(1) command.
3
Create a start a node agent on another machine.
This example uses a second machine called sr115. On the second machine, at the invoke the
asadmin utility and use the following command: asadmin create-node-agent --user admin
--host schumi nodeagent3
Note – You need to provide the DAS machine name in the --host option.
4
Start the node agent on the second machine.
Use the following command: asadmin start-node-agent --user admin --host schumi
nodeagent3. For more information, see start-node-agent(1) command.
5
Log in to the Admin Console of the DAS machine at http:// das-machine-name:portnumber.
You can see that the two node agents are running if you click Node Agents on the left-hand tree
on the Admin Console.
Chapter 2 • Setting Up a Cluster
21
Viewing Ports for Clustered Server Instances
6
On the left pane, click the Clusters tab and click New.
7
Specify a name for the cluster.
This example creates a cluster with the name, mycluster.
8
In the Server Instances to be Created section, click New.
9
Type the instance name as instance3 and choose node agent, nodeagent3.
nodeagent3 was created on the machine called sr115 in step 2 of this procedure.
10
Type the instance name as instance4 and choose node agent, nodeagent2.
nodeagent2 was created on the DAS machine called schumi in step 1 of this procedure.
11
Click OK.
The cluster gets created.
12
In the left pane, click Clusters.
13
In the right pane, select the checkbox next to mycluster and click the Start Cluster button,
The cluster and the two instances start.
The two instances in mycluster are running on different machines and are controlled by
different node agents. You can view the two node agents and see each instance associated with
it.
If you deploy an application on mycluster, the application is accessible from two machines.
Viewing Ports for Clustered Server Instances
▼
To View Ports for Clustered Server Instances
You can view the ports numbers and override the default values for the clustered server instance
you created in the previous section, “Creating a Cluster ” on page 19. By default, the HTTP
ports are 38081 for instance1 and 38080 for instance2. If these ports were busy on your
machine when you created these clusters, or if you had already assigned these ports to other
instances and clusters, different port numbers were assigned.
To view the port numbers and optionally override the default values, follow these steps:
1
22
In the left pane, expand Clusters and click cluster1 to display the General Information page for
clusters.
Sun GlassFish Enterprise Server 2.1 Quick Start Guide • December 2008
Viewing Ports for Clustered Server Instances
2
Click the Instances tab to display instance1 and instance2, the instances that you created.
a. Click instance1 to examine this instance.
The HTTP and HTTPS ports assigned to the instance are displayed in the HTTP Ports field.
The SIP and SIPS Ports are displayed in the SIPS field.
Next Steps
In this section you have created a simple cluster on a single machine. You can also create
clusters spanning multiple machines using the same basic steps (as long as you have the
software installed and a node agent running on each machine).
Chapter 2 • Setting Up a Cluster
23
24
3
C H A P T E R
3
Deploying an Application
This chapter explains how to deploy an application. If you are running a domain with developer
profile, see “Deploying a Sample Web Application” on page 25. If you are running a domain
with cluster profile, see “Deploying the Sample Enterprise Application to a Cluster” on page 27.
This chapter presents the following sections:
■
■
■
“Deploying a Sample Web Application” on page 25
“Deploying the Sample Enterprise Application to a Cluster” on page 27
“To Verify Application Deployment” on page 28
Deploying a Sample Web Application
These procedures assume that you are running a domain with developer profile.
▼
To Deploy the Hello Application Using Autodeploy
The Hello application is contained in a Web ARchive (WAR) file in the samples/quickstart
directory. Packaged applications can also be in the form of a Java ARchive (JAR) or Enterprise
ARchive (EAR) file.
Alternatively, you can download this application from
https://glasfish.dev.java.net/downloads/quickstart/hello.war.
Copying to a domain’s autodeploy directory lets you put a pre-packaged application into use
immediately, with minimal effort.
1
Find as-install/samples/quickstart/hello.war or download from
https://glasfish.dev.java.net/downloads/quickstart/hello.war.
2
Copy hello.war to the as-install/domains/domain1/autodeploy/ directory.
25
Deploying a Sample Web Application
Tip – On Windows, you can create a shortcut to the autodeploy directory on your desktop, and
then drag and drop the hello.war file onto the shortcut.
When the server has finished deploying the application, it creates a file named
hello.war_deployed in the autodeploy directory. Depending on the speed of your system, the
process can take a few seconds. Until that file appears, a 404-File Not Found error occurs when
you try to visit the application page.
3
Access this URL to visit the application page: http://hostname:hostname/hello.
You see the application’s first page, which prompts you to fill in your name:
4
Type your name and click Submit.
The application displays a customized response, giving you a personal Hello.
▼
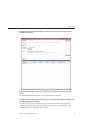
To Deploy the Hello Application Using Admin Console
1
Open the Admin Console in a web browser if you have not done so already.
2
In the left pane, click the Applications node to expand it.
3
Click Web Applications.
You can see the list of deployed web applications, if any.
4
26
Click Deploy.
Sun GlassFish Enterprise Server 2.1 Quick Start Guide • December 2008
Deploying the Sample Enterprise Application to a Cluster
5
You can use the Hello application bundled with the Enterprise Server or you upload the sample
you have downloaded from
https://glasfish.dev.java.net/downloads/quickstart/hello.war. Do one of the
following:
■
Select the option called Local packaged file or directory that is accessible to Application
Server and click Browse Files. Navigate to the as-install/samples/quickstart directory and
select hello.war.
6
If you have downloaded the Hello application, click Browse in the Packaged File to Upload text
box. Navigate to the directory to which you have downloaded the application.
7
Click OK.
The application appears in the Web Applications list.
8
To verify that it was deployed properly, in the Web Applications page, select the Hello
application and click Launch.
More Information
Deploying Applications Using CLI Commands
You can deploy applications using the asadmin deploy command. You can also use the asant
commands for deployment. For detailed information on deploying applications see the Sun
GlassFish Communications Server Application Deployment guide.
Deploying the Sample Enterprise Application to a Cluster
These procedures assume that you are running a domain with cluster profile. The procedures in
this chapter assume that you have already created a cluster called default-cluster, as
described in Chapter 2, “Setting Up a Cluster.” This section uses the clusterjsp sample
application to demonstrate HTTP load balancing capabilities.
▼
To Deploy the Sample Enterprise Application Using
Admin Console
1
Open the Admin Console in a web browser if you have not done so already.
2
Click Common Tasks on the left pane to go to the Common Tasks page, if you are not there
already.
3
On the right pane, under Common Tasks, click Deploy Enterprise Application (.ear).
Chapter 3 • Deploying an Application
27
Deploying the Sample Enterprise Application to a Cluster
4
If Enterprise Server is installed on your local machine, click Browse in the Packaged File to
Upload text box, and navigate to
as-install/samples/ee-samples/highavailability/apps/clusterjsp/clusterjsp.ear. If
you are accessing Admin Console remotely with Communications Server installed on another
machine, click Browse in the Local packaged file or directory that is accessible from the
Application Server text box. Navigate to as-install/samples/quickstart/clusterjsp/
clusterjsp.ear.
5
Click the Availability enabled check box to make your application highly available.
It is recommended that you set the heap size to a larger value, if you have available memory in
your system. For example, <jvm-options>-Xmx1000m</jvm-options>
6
In the Targets section of the page, select mycluster from the Available list, and click Add to
move it to the Selected list.
7
Click OK.
The clusterjsp application is now deployed to default-cluster. Before you launch this
application, you need to start the instances in the cluster.
Note – Ensure that you have enabled cookies in your browser before you deploy this application.
clusterjsp is a sample application. Please use with caution in a production environment.
More Information
Deploying Applications Using CLI Commands
You can deploy applications using the asadmin deploy command. See the deploy man page in
the Reference Manual. You can also use the asant commands for deployment. For detailed
information on deploying applications see Deploying Modules and Applications in the
Application Deployment Guide.
▼
1
To Verify Application Deployment
Type the following URL in your browser:
http://hostname:port/clusterjsp
Replace the hostname variable with the name of the system that the Domain Admin Server is
running on.
Replace the port variable with the value of HTTP-LISTENER-PORT for instance4. This example
uses http://hostname:38081/clusterjsp.
28
Sun GlassFish Enterprise Server 2.1 Quick Start Guide • December 2008
Deploying the Sample Enterprise Application to a Cluster
2
Add some session attribute data.
3
Examine the Session and Host information displayed. For example:
■
■
■
■
Executed From Server: localhost
Server Port Number: 38081
Executed Server IP Address: 198.19.255.255
Session Created: Tue Aug 23 15:26:07 PDT 2005
4
Add some session data and click the Add to Session button.
5
Repeat this procedure for instance instance3 by typing this URL in your browser:
http://hostname :38081/clusterjsp
Chapter 3 • Deploying an Application
29
30
4
C H A P T E R
4
Working with Load Balancers
This section provides instructions on how to set up the Web Server software to act as a load
balancer to the cluster of Application Servers. In addition, it provides steps for configuring a
load balancer and exporting it to the Web Server. The load balancer feature is available to you
only if you are running a domain with enterprise profile or cluster profile.
A load balancer is deployed with a cluster. A load balancer provides the following features:
■
Allows an application or service to be scaled horizontally across multiple physical (or
logical) hosts yet still presents the user with a single URL
■
Insulates the user from host failures or server crashes, when it is used with session
persistence.
■
Enhances security by hiding the internal network from the user
Enterprise Server includes load balancing plug-ins for popular web servers such as Sun JavaTM
System Web Server, Apache, and Microsoft Windows IIS.
To complete this section, you must have sufficient memory to run a Web Server on your system
in addition to the Domain Administration Server and the two instances you have created so far
in this guide. A system with 512 Mbytes to 1024 Mbytes of memory is recommended.
This topic presents the following steps:
■
■
■
■
“Setting up Load Balancing” on page 32
“Starting Load Balancing” on page 33
“Verifying Load Balancing” on page 33
“High Availability and Failover Using the In-memory Replication Feature” on page 34
31
Setting up Load Balancing
Setting up Load Balancing
Before you set up load balancing, you need to install the load balancer plug-in. These
procedures assume you are running a domain with cluster or enterprise profile.
▼
1
To Set Up Load Balancing
Create a load balancer using the Admin Console. Alternatively, you can use the asadmin
create-http-lb(1) command.
a. Click the HTTP Load Balancers node in the Admin Console.
b. Click New.
c. Type lb1 as the name of the load balancer, the host on which Web Server is installed, and the
Web Server instance port. In this sample scenarios Web Server host is localhost and the port
is 38000.
d. Select the Apply Changes Automatically check box. If you choose this option, you do not
have to export the load balancer configuration. All changes you make to the load balancer
configuration are propagated automatically.
e. Select cluster1 as target.
“Creating a Cluster ” on page 19 explains how to create a sample cluster (cluster1)
f. Click Save.
2
Enable cluster1 for load balancing:
asadmin enable-http-lb-server cluster1
3
See Also
32
Enable the clusterjsp application for load balancing:
asadmin enable-http-lb-application clusterjsp.
For information on advanced topics, such as changing the load balancer configuration or
creating health checkers, see the Chapter 4, “Configuring HTTP Load Balancing,” in Sun
GlassFish Enterprise Server 2.1 High Availability Administration Guide.
Sun GlassFish Enterprise Server 2.1 Quick Start Guide • December 2008
Verifying Load Balancing
Starting Load Balancing
Start load balancing by starting or restarting the Web Server.
■
If the Web Server instance serving as load balancer is not already running, start the Web
Server.
If you are using Web Server 7.0, use the wadm start-instance command.
For Web Server 6.1, run the start script in the <websvr-instance-dir> directory.
■
If the Web Server instance serving as load balancer is already running, stop the Web Server
and restart.
For Web Server 6.1, use the stop program in web_server_install_dir/https-hostname and
restart the server by running the start program.
For Web Server 7.0, use the wadm stop-instance followed by the wadm start-instance
command.
Verifying Load Balancing
Once the application is deployed and the load balancer is running, verify that the load balancing
is working.
▼
1
To Verify Load Balancing
To display the first page of the clusterjsp application, type this URL in your browser:
http://localhost:web_server_port/clusterjsp
Replace the localhost variable with the name of the system that the Web Server is running on.
Replace the web_server_port variable with the value of the port attribute of the LS element in
web_server_install_dir/https-hostname/config/server.xml. For this example, port 38000 is
used.
A page similar to what you saw in “To Verify Application Deployment” on page 28. appears.
2
Examine the Session and Host information displayed. For example:
■
■
■
■
3
Executed From Server: localhost
Server Port Number: 38000
Executed Server IP Address: 192.18.145.133
Session Created: Day Mon 05 14:55:34 PDT 2005
The Server Port Number is 38000, the Web Server’s port. The load balancer has forwarded the
request on the two instances in the cluster.
Chapter 4 • Working with Load Balancers
33
High Availability and Failover Using the In-memory Replication Feature
4
Using different browser software, or a browser on a different machine, create a new session.
Requests from the same browser are“sticky”and go to the same instance.
These sessions should be distributed to the two instances in the cluster. You can verify this by
looking at the server access log files located here:
■
Solaris Java Enterprise System installation:
/var/opt/SUNWappserver/nodeagents/nodeagent_name/instance1/logs
/access/server_access_log
/var/opt/SUNWappserver/nodeagents/nodeagent_name/instance2/logs
/access/server_access_log
■
Linux Java Enterprise System installation:
/var/opt/sun/appserver/nodeagents/nodeagent_name/instance1/logs
/access/server_access_log
/var/opt/sun/appserver/nodeagents/nodeagent_name/instance2/logs
/access/server_access_log
■
Windows Java Enterprise System installation:
as-install\nodeagents\nodeagent_name \instance1\logs\access\server_access_log
as-install\nodeagents\nodeagent_name\instance1\logs\access\server_access_log
■
Stand-alone Enterprise Server installations:
as-install/nodeagents/nodeagent_name/instance1/logs/access/server_access_log
as-install/nodeagents/nodeagent_name/instance2/logs/access/server_access_log
5
Add a name and value pair (Name=Name Value=Duke) for storing in HttpSession.
6
Click the Add to Session Data button.
7
Verify that the session data was added
High Availability and Failover Using the In-memory
Replication Feature
GlassFish v2 does not offer HADB. For high availability and failover, GlassFish offers the
in-memory replication feature. The following procedure illustrates this feature:
1. Restart the web server that has the load balancer plugin installed before deploying an
application. This ensures that requests are served by instances in the order set in the
loadbalancer.xml file. If you use the loadbalancer.xml file provided in this chapter,
instance1 serves the first request.
34
Sun GlassFish Enterprise Server 2.1 Quick Start Guide • December 2008
High Availability and Failover Using the In-memory Replication Feature
2. You have already deployed the clusterjsp web application, which stores session data. You
should be able to see that successive requests are served by the same instance that served the
first request and the session data is maintained across the requests.
3. Send few requests and note down the instance that served those requests and shutdown that
particular instance. Use this command to stop the instance: asadmin stop-instance
--user adminuser --password adminpassword instance1
4. Send in the next request and verify that the new data is stored and that the previously added
data is still there in the session. If one of the server serving requests is not available, another
server in the same cluster takes over the request with all earlier session data and completes
the request.
Chapter 4 • Working with Load Balancers
35
36
5
C H A P T E R
5
Setting Up High Availability Failover
With the configuration used in the previous chapter, if a server instance goes down, users lose
session state. This section, the second of two advanced topics, provides the steps for installing
the high-availability database (HADB), creating a highly available cluster, and testing HTTP
session persistence.
Enterprise Server supports both HTTP session persistence and persistence for Stateful Session
Beans. The procedures in this chapter cover high availability using in-memory replication or
HADB.
These steps assume you have already performed the steps in the previous sections of this Quick
Start. The steps are presented in the order that you should complete them. To use the HADB
feature, you need to be running a domain with enterprise profile.
Note – Completing the procedures in this section may require additional hardware resources.
This topic contains the following sections:
■
■
■
■
■
■
■
“High-availability Clusters and HADB” on page 38
“HADB Preinstallation Steps” on page 38
“Installing HADB” on page 40
“Starting HADB” on page 41
“Configuring a Cluster and Application for High Availability” on page 42
“Restarting the Cluster” on page 42
“Verifying HTTP Session Failover” on page 43
37
High-availability Clusters and HADB
High-availability Clusters and HADB
A highly availability cluster inSun GlassFish Enterprise Server integrates a state replication
service with the clusters and load balancer created earlier, enabling failover of HTTP sessions.
HttpSession objects and Stateful Session Bean state is stored in HADB, a high-availability
database for storing session state. This horizontally scalable state management service can be
managed independently of the application server tier. It was designed to support up to 99.999%
service and data availability with load balancing, failover and state recovery capabilities.
Keeping state management responsibilities separated from Enterprise Server has significant
benefits. Instances spend their cycles performing as a scalable and high performance JavaTM
Platform, Enterprise Edition 5 (Java EETM 5 platform) containers delegating state replication to
an external high availability state service. Due to this loosely coupled architecture, instances can
be easily added to or deleted from a cluster. The HADB state replication service can be
independently scaled for optimum availability and performance. When an application server
instance also performs replication, the performance of J2EE applications can suffer and can be
subject to longer garbage collection pauses.
Because each HADB node requires 512 Mbytes of memory, you need 1 Gbyte of memory to run
two HADB nodes on the same machine. If you have less memory, set up each node on a
different machine. Running a two-node database on only one host is not recommended for
deployment since it is not fault tolerant.
HADB Preinstallation Steps
This procedure covers the most common preinstallation tasks. For information on other
preinstallation topics, including prerequisites for installing HADB, configuring network
redundancy, and file system support, see Chapter 10, “Installing and Setting Up High
Availability Database,” in Sun GlassFish Enterprise Server 2.1 High Availability Administration
Guide.
The recommended system configuration values in this section are sufficient for running up to
six HADB nodes and do not take into consideration other applications on the system that also
use shared memory.
38
Sun GlassFish Enterprise Server 2.1 Quick Start Guide • December 2008
HADB Preinstallation Steps
▼
To Configure Your System for HADB
1
Get root access.
2
Define variables related to shared memory and semaphores
■
On Solaris:
a. Add these lines to the /etc/system file (or if these lines are in the file as comments,
uncomment them and make sure that the values match these):
set shmsys:shminfo_shmmax=0x80000000
set shmsys:shminfo_shmseg=36
set semsys:seminfo_semmnu=600
Set shminfo_shmmax to the total memory in your system (in hexadecimal notation the
value 0x80000000 shown is for 2 Gigabytes of memory).
If the seminfo_* variables are already defined, increment them by the amounts shown.
The default values for seminfo_semmni and seminfo_semmns do not need to be changed.
The variable shminfo_shmeg is obsolete after Solaris 8.
b. Reboot, using this command:
sync; sync; reboot
■
On Linux:
a. Add these lines to the /etc/sysctl.conf file (or if they are in the file as comments,
uncomment them). Set the value to the amount physical memory on the machine.
Specify the value as a decimal number of bytes. For example, for a machine having 2 GB
of physical memory:
echo 2147483648 > /proc/sys/shmmax
echo 2147483648 > /proc/sys/shmall
b. Reboot, using this command:
sync; sync; reboot
■
On Windows: No special system settings are needed.
Chapter 5 • Setting Up High Availability Failover
39
Installing HADB
3
If you used existing JDK software when you installed a standalone Enterprise Server, check the
JDK version.
HADB requires Sun JDK 1.4.1_03 or higher (for the latest information on JDK versions, see the
Sun GlassFish Enterprise Server 2.1 Release Notes). Check the version installed, and if it is not
done already, set the JAVA_HOME environment variable to the directory where the JDK is
installed.
4
If necessary after the reboot, restart the domain, Web Server, and node agent.
To restart the domain, use the command asadmin start-domain domain1.
To restart the Web Server, execute the start program in
web_server_install_dir/https-hostname.
To restart the node agent, use the command asadmin start-node-agent hostname. Replace
the variable hostname with the name of the host where the Enterprise Server is running.
Installing HADB
This section provides the steps for installing the high-availability database (HADB).
Note – If you plan to run the high-availability database on the Enterprise Server machine, and if
you installed HADB when you installed Enterprise Server, skip to “Starting HADB” on page 41.
You can install the HADB component on the same machine as your Enterprise Server system if
you have 2 Gbytes of memory and 1-2 CPUs. If not, use additional hardware. For example:
■
■
▼
40
Two 1 CPU systems with 512 Mbytes to 1 Gbyte memory each
One 1-2 CPU system with 1 Gbytes to 2 Gbytes memory
To Install HADB
1
Run the installer.
2
Choose the option to install HADB.
3
Complete the installation on your hosts.
Sun GlassFish Enterprise Server 2.1 Quick Start Guide • December 2008
Starting HADB
Starting HADB
This section describes starting the HADB management agent in most cases by running the
ma-initd script. For a production deployment, start the management agent as a service to
ensure its availability. For more information, see “Starting the HADB Management Agent” in
Sun GlassFish Enterprise Server 2.1 High Availability Administration Guide.
If starting a database with HADB nodes on several hosts, start the management agent on each
host.
▼
1
To Start HADB in a Java Enterprise System Installation
on Solaris or Linux
Change to the /etc/init.d directory:
cd /etc/init.d
2
Run the command to start the agent:
./ma-initd start
▼
To Start HADB in a Java Enterprise System Installation
on Windows
HADB is started by default when Sun Java System is configured and running. However, if you
need to start it manually, follow these steps:
1
Go to Start⇒Settings⇒Control Panel, and double click Administrative Tools.
2
Double click Services shortcut.
3
Select HADBMgmtAgent Service from the Services list.
4
From the Action menu, select Start.
Chapter 5 • Setting Up High Availability Failover
41
Configuring a Cluster and Application for High Availability
▼
To Start HADB in a Stand-Alone Installation on Solaris
or Linux
1
Change to the HADB bin directory in the Enterprise Serverinstallation: as-install/hadb/4/bin
2
Run the command to start the agent:
./ma-initd start
▼
1
To Start HADB in a Stand-Alone Installation on
Windows
In a terminal window, change to the HADB bin directory in the Enterprise Serverinstallation:
as-install\hadb\4.x\bin
The x represents the release number of HADB.
2
Run the command to start the agent:
ma -i ma.cfg
Configuring a Cluster and Application for High Availability
The FirstCluster cluster must be configured to use HADB and high-availability must be enabled
for the clusterjsp application before you can verify HTTP session persistence. Use the asadmin
configure-ha-cluster command to configure an existing cluster for high availability. For
more information on how to use this command, type configure-ha-cluster --help at the
asadmin command prompt or see the configure-ha-cluster(1) man page.
Restarting the Cluster
Before the changes made in the previous section take effect, the cluster's instances must be
restarted.
▼
42
To Restart the Cluster
1
In the Admin Console, expand the Clusters node.
2
Click FirstCluster.
Sun GlassFish Enterprise Server 2.1 Quick Start Guide • December 2008
Verifying HTTP Session Failover
3
In the right pane, click Stop Instances.
4
Once the instances are stopped, click Start Instances.
Verifying HTTP Session Failover
The steps for testing session data failover are similar for testing load balancing as described in
the topic “Verifying Load Balancing” on page 33. This time Session Data is preserved after
failure. Failover is transparent to the user because the sample application is configured for
automatic retry after failure.
▼
1
To Verify HTTP Session Failover
To display the first page of the clusterjsp application, type this URL in your browser:
http://localhost:web_server_port/clusterjsp
Replace the localhost variable with the name of the system that the Web Server is running on.
Replace the web_server_port variable with the value of the port attribute of the LS element in
web_server_install_dir/https-hostname/config/server.xml. For this example, port 38000 is
used.
A page similar to what you saw in “To Verify Application Deployment” on page 28 appears.
2
Examine the Session and Host information displayed. For example:
■
■
■
■
■
3
Executed From Server: localhost
Server Port Number: 38000
Executed Server IP Address: 192.18.145.133
Session ID: 41880f618e4593e14fb5d0ac434b1
Session Created: Wed Feb 23 15:23:18 PST 2005
View the server access log files to determine which instance is serving the application. The log
files are located here:
■
Solaris Java Enterprise System installation:
/var/opt/SUNWappserver/nodeagents/nodeagent_name/i1/logs/
access/server_access_log
/var/opt/SUNWappserver/nodeagents/nodeagent_name/i2/logs/
access/server_access_log
■
Linux Java Enterprise System installation:
/var/opt/sun/appserver/nodeagents/nodeagent_name/i1/logs/
access/server_access_log
Chapter 5 • Setting Up High Availability Failover
43
Verifying HTTP Session Failover
/var/opt/sun/appserver/nodeagents/nodeagent_name/i2/logs/
access/server_access_log
■
Windows Java Enterprise System installation:
as-install\nodeagents\nodeagent_name\i1\logs\access\server_access_log
as-install\nodeagents\nodeagent_name\i2\logs\access/server_access_log
■
Standalone Enterprise Server installations:
as-install/nodeagents/nodeagent_name/i1/logs/access/server_access_log
as-install/nodeagents/nodeagent_name/i2/logs/access/server_access_log
4
Stop the instance that is serving the page.
a. In the Admin Console, in the left pane, expand Clusters.
b. Click FirstCluster.
c. In the right pane, click the Instances tab.
d. Click the checkbox next to the server instance that served the request and click the Stop
button.
44
5
Reload the clusterjsp sample application page.
The session ID and session attribute data is retained.
6
Check the access log of the other instance, and notice that it is now servicing the request.
The state failover features work because the HTTP session is stored persistently in the HADB.
In addition to the HTTP session state, the Enterprise Server also can store the state of EJB in the
HADB.
Sun GlassFish Enterprise Server 2.1 Quick Start Guide • December 2008