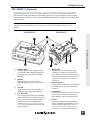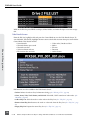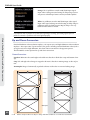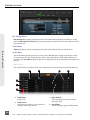
1
PIX 260i Rack Mount Production Video Recorder User Guide Firmware rev. 2.10 E7556 State Rd. 23 and 33, Reedsburg, WI, USA +1 (608) 524-0625 • Toll-Free: (800) 505-0625 • fax: +1 (608) 524-0655 www.sounddevices.com [email protected] PIX 260i User Guide Table of Contents Introduction 1 Manual Conventions . . . . . . . . . . . . . . . . . . . . . . . . . . . . . 1 Video Mode and Audio Mode . . . . . . . . . . . . . . . . . . . . . 1 Panel Descriptions 2 Front Panel. . . . . . . . . . . . . . . . . . . . . . . . . . . . . . . . . . . . . . 2 Rear Panel. . . . . . . . . . . . . . . . . . . . . . . . . . . . . . . . . . . . . . 3 PIX-CADDY 2 (Optional). . . . . . . . . . . . . . . . . . . . . . . . . . . 5 Menu and Navigation 6 Main View. . . . . . . . . . . . . . . . . . . . . . . . . . . . . . . . . . . . . . 6 Menu . . . . . . . . . . . . . . . . . . . . . . . . . . . . . . . . . . . . . . . . . . 7 Audio Screen. . . . . . . . . . . . . . . . . . . . . . . . . . . . . . . . . . . . 8 File List. . . . . . . . . . . . . . . . . . . . . . . . . . . . . . . . . . . . . . . . . 9 Metadata Screen. . . . . . . . . . . . . . . . . . . . . . . . . . . . . . . . 11 LCD. . . . . . . . . . . . . . . . . . . . . . . . . . . . . . . . . . . . . . . . . . . 12 Inputs and Outputs Video Inputs . . . . . . . . . . . . . . . . . . . . . . . . . . . . . . . . . . . 13 Video Outputs. . . . . . . . . . . . . . . . . . . . . . . . . . . . . . . . . . 13 Audio Inputs. . . . . . . . . . . . . . . . . . . . . . . . . . . . . . . . . . . 14 Audio Outputs. . . . . . . . . . . . . . . . . . . . . . . . . . . . . . . . . . 18 Ethernet 19 Video Monitoring Features 20 Exposure Assist . . . . . . . . . . . . . . . . . . . . . . . . . . . . . . . . . 20 Focus Assist . . . . . . . . . . . . . . . . . . . . . . . . . . . . . . . . . . . . 22 Zoom . . . . . . . . . . . . . . . . . . . . . . . . . . . . . . . . . . . . . . . . . 24 Flip Display. . . . . . . . . . . . . . . . . . . . . . . . . . . . . . . . . . . . . 24 Recording Sound Devices File Format. . . . . . . . . . . . . . . . . . . . . . . . File Splitting. . . . . . . . . . . . . . . . . . . . . . . . . . . . . . . . . . . . False Take. . . . . . . . . . . . . . . . . . . . . . . . . . . . . . . . . . . . . . Selecting Video File Resolution and Frame Rate . . . . . Selecting a Video Codec . . . . . . . . . . . . . . . . . . . . . . . . . Table of Contents 13 25 25 26 26 26 27 Interruption of Signal During Recording. . . . . . . . . . . . 27 Alignment of Audio and Video . . . . . . . . . . . . . . . . . . . 27 Audio Track Arming . . . . . . . . . . . . . . . . . . . . . . . . . . . . . 28 Audio Mode . . . . . . . . . . . . . . . . . . . . . . . . . . . . . . . . . . . 28 F Sampling Rate Modes. . . . . . . . . . . . . . . . . . . . . . . . . . 30 Video Scaling and Frame Rate Conversion 31 Up and Down Conversion. . . . . . . . . . . . . . . . . . . . . . . . 32 Playback Playback Operation . . . . . . . . . . . . . . . . . . . . . . . . . . . . . Shuttle Playback Mode . . . . . . . . . . . . . . . . . . . . . . . . . . Cue Marker. . . . . . . . . . . . . . . . . . . . . . . . . . . . . . . . . . . . Looping Playback. . . . . . . . . . . . . . . . . . . . . . . . . . . . . . . Playback Mode. . . . . . . . . . . . . . . . . . . . . . . . . . . . . . . . . Play List. . . . . . . . . . . . . . . . . . . . . . . . . . . . . . . . . . . . . . . . 34 34 35 35 36 36 37 Playback Rate of Audio Files. . . . . . . . . . . . . . . . . . . . . . 38 Non-Native File Playback. . . . . . . . . . . . . . . . . . . . . . . . . 38 Playing Back Files on a Computer . . . . . . . . . . . . . . . . . 38 i PIX 260i User Guide Synchronization and Timecode Sync Reference . . . . . . . . . . . . . . . . . . . . . . . . . . . . . . . . . 40 Timecode Reader . . . . . . . . . . . . . . . . . . . . . . . . . . . . . . . 40 Internal Ambient® Lockit: Timecode Generator with Sync Out. . . . . . . . . . . . . . . . . . . . . . . . . . . . . . . . . . . . . . . . . . . 41 Timecode Modes. . . . . . . . . . . . . . . . . . . . . . . . . . . . . . . . Timecode Frame Rate. . . . . . . . . . . . . . . . . . . . . . . . . . . . Timecode Input Sources. . . . . . . . . . . . . . . . . . . . . . . . . . Synchronization/Timecode Examples. . . . . . . . . . . . . . . Network Grouping Group Auto-Configuration. . . . . . . . . . . . . . . . . . . . . . . 47 Grouped Transport. . . . . . . . . . . . . . . . . . . . . . . . . . . . . . 47 External Control 49 49 49 53 55 Triggering Recording from SDI Flag Bits. . . . . . . . . . . . 56 GPIO (General Purpose Input / Output). . . . . . . . . . . . . 56 USB Keyboard. . . . . . . . . . . . . . . . . . . . . . . . . . . . . . . . . . 57 Storage and File Management Table of Contents Storage. . . . . . . . . . . . . . . . . . . . . . . . . . . . . . . . . . . . . . . . 58 Metadata. . . . . . . . . . . . . . . . . . . . . . . . . . . . . . . . . . . . . . 60 Saving and Loading Setup Files. . . . . . . . . . . . . . . . . . . . 67 Custom Default Settings and Setup Menu Option Visibility . . . . . . . . . . . . . . . . . . . . . . . . . . . . . . . . . . . . . . . . . . . . 67 58 Audio File Metadata. . . . . . . . . . . . . . . . . . . . . . . . . . . . . 61 File Management. . . . . . . . . . . . . . . . . . . . . . . . . . . . . . . 63 Setup Management and Firmware Upgrades 67 Factory Restore. . . . . . . . . . . . . . . . . . . . . . . . . . . . . . . . . 69 Firmware Upgrades . . . . . . . . . . . . . . . . . . . . . . . . . . . . . 69 Setup Menu Options Video/Audio Mode. . . . . . . . . . . . . . . . . . . . . . . . . . . . . . File Storage. . . . . . . . . . . . . . . . . . . . . . . . . . . . . . . . . . . . Video . . . . . . . . . . . . . . . . . . . . . . . . . . . . . . . . . . . . . . . . . Audio. . . . . . . . . . . . . . . . . . . . . . . . . . . . . . . . . . . . . . . . . Timecode/Sync. . . . . . . . . . . . . . . . . . . . . . . . . . . . . . . . . . LCD Monitor . . . . . . . . . . . . . . . . . . . . . . . . . . . . . . . . . . . 42 42 43 43 46 Grouped Settings . . . . . . . . . . . . . . . . . . . . . . . . . . . . . . . 47 Pushing Settings to Group. . . . . . . . . . . . . . . . . . . . . . . . 47 RS-422. . . . . . . . . . . . . . . . . . . . . . . . . . . . . . . . . . . . . . . . . Web Interface - PIXNET. . . . . . . . . . . . . . . . . . . . . . . . . . PIXNET Unit Page Main View and Menu Tabs . . . . . . . Triggering Recording from External Timecode. . . . . . . 39 70 70 70 71 72 73 75 On-Screen Display. . . . . . . . . . . . . . . . . . . . . . . . . . . . . . . Remote Control. . . . . . . . . . . . . . . . . . . . . . . . . . . . . . . . . Network. . . . . . . . . . . . . . . . . . . . . . . . . . . . . . . . . . . . . . . System . . . . . . . . . . . . . . . . . . . . . . . . . . . . . . . . . . . . . . . . Quick Setup. . . . . . . . . . . . . . . . . . . . . . . . . . . . . . . . . . . . 76 77 77 78 79 Button Shortcuts 79 Connector Pin Assignments 80 Appendix A - Supported Files 83 Specifications 84 SDI. . . . . . . . . . . . . . . . . . . . . . . . . . . . . . . . . . . . . . . . . . . . 84 HDMI . . . . . . . . . . . . . . . . . . . . . . . . . . . . . . . . . . . . . . . . . 84 Video Input Resolutions / Rates. . . . . . . . . . . . . . . . . . . . 84 Video Codecs and Files. . . . . . . . . . . . . . . . . . . . . . . . . . . 84 ii v. 2.10 Features and specifications are subject to change. Visit www.sounddevices.com for the latest documentation. PIX 260i User Guide Up/Down/Cross Conversion. . . . . . . . . . . . . . . . . . . . . . . Frame Rate Conversion . . . . . . . . . . . . . . . . . . . . . . . . . . LCD. . . . . . . . . . . . . . . . . . . . . . . . . . . . . . . . . . . . . . . . . . . Audio Recording. . . . . . . . . . . . . . . . . . . . . . . . . . . . . . . . Analog Audio . . . . . . . . . . . . . . . . . . . . . . . . . . . . . . . . . . Digital Audio. . . . . . . . . . . . . . . . . . . . . . . . . . . . . . . . . . . 84 84 84 85 85 85 File Storage. . . . . . . . . . . . . . . . . . . . . . . . . . . . . . . . . . . . Timecode and Sync. . . . . . . . . . . . . . . . . . . . . . . . . . . . . . Control. . . . . . . . . . . . . . . . . . . . . . . . . . . . . . . . . . . . . . . . Keyboard. . . . . . . . . . . . . . . . . . . . . . . . . . . . . . . . . . . . . . Power. . . . . . . . . . . . . . . . . . . . . . . . . . . . . . . . . . . . . . . . . Physical. . . . . . . . . . . . . . . . . . . . . . . . . . . . . . . . . . . . . . . . 85 86 86 86 86 86 Declaration of Conformity 87 Software License 88 Warranty and Technical Support 89 Table of Contents Warranty & Service. . . . . . . . . . . . . . . . . . . . . . . . . . . . . . 89 Technical Support / Bug Reports. . . . . . . . . . . . . . . . . . . 89 iii PIX 260i User Guide Copyright Notice and Release All rights reserved. No part of this publication may be reproduced, stored in a retrieval system, or transmitted in any form or by any means, electronic, mechanical, photocopying, recording, or otherwise, without the expressed written permission of SOUND DEVICES, LLC. SOUND DEVICES is not responsible for any use of this information. Microsoft Windows is a registered trademark of Microsoft Corporation. Macintosh, OSX, and ProRes are registered trademarks of Apple, Inc. DNxHD is a registered trademark of Avid, Inc. Other product and company names mentioned herein may be the trademarks of their respective owners. PIX 260i, and the sound waves logo are registered trademarks of Sound Devices, LLC. Limitation of Liability Table of Contents LIMITATION ON SOUND DEVICES’ LIABILITY. SOUND DEVICES, LLC SHALL NOT BE LIABLE TO THE PURCHASER OF THIS PRODUCT OR THIRD PARTIES FOR DAMAGES, LOSSES, COSTS, OR EXPENSES INCURRED BY PURCHASER OR THIRD PARTIES AS A RESULT OF: ACCIDENT, MISUSE, OR ABUSE OF THIS PRODUCT OR UNAUTHORIZED MODIFICATIONS, REPAIRS, OR ALTERATIONS TO THIS PRODUCT, OR FAILURE TO STRICTLY COMPLY WITH SOUND DEVICES, LLC’S OPERATING AND INSTALLATION INSTRUCTIONS. TO THE FULLEST EXTENT PERMITTED BY LAW, SOUND DEVICES SHALL HAVE NO LIABILITY TO THE END USER OR ANY OTHER PERSON FOR COSTS, EXPENSES, DIRECT DAMAGES, INCIDENTAL DAMAGES, PUNITIVE DAMAGES, SPECIAL DAMAGES, CONSEQUENTIAL DAMAGES OR OTHER DAMAGES OF ANY KIND OR NATURE WHATSOEVER ARISING OUT OF OR RELATING TO THE PRODUCTS, THESE TERMS AND CONDITIONS OR THE PARTIES’ RELATIONSHIP, INCLUDING, WITHOUT LIMITATION, DAMAGES RESULTING FROM OR RELATED TO THE DELETION OR OTHER LOSS OF AUDIO OR VIDEO RECORDINGS OR DATA, REDUCED OR DIMINISHED AUDIO OR VIDEO QUALITY OR OTHER SIMILAR AUDIO OR VIDEO DEFECTS ARISING FROM, RELATED TO OR OTHERewISE ATTRIBUTABLE TO THE PRODUCTS OR THE END USER’S USE OR OPERATION THEREOF, REGARDLESS OF WHETHER SUCH DAMAGES ARE CLAIMED UNDER CONTRACT, TORT OR ANY OTHER THEORY. “CONSEQUENTIAL DAMAGES” FOR WHICH SOUND DEVICES SHALL NOT BE LIABLE SHALL INCLUDE, WITHOUT LIMITATION, LOST PROFITS, PENALTIES, DELAY DAMAGES, LIQUIDATED DAMAGES AND OTHER DAMAGES AND LIABILITIES WHICH END USER SHALL BE OBLIGATED TO PAY OR WHICH END USER OR ANY OTHER PARTY MAY INCUR RELATED TO OR ARISING OUT OF ITS CONTRACTS WITH ITS CUSTOMERS OR OTHER THIRD PARTIES. NOTWITHSTANDING AND WITHOUT LIMITING THE FOREGOING, IN NO EVENT SHALL SOUND DEVICES BE LIABLE FOR ANY AMOUNT OF DAMAGES IN EXCESS OF AMOUNTS PAID BY THE END USER FOR THE PRODUCTS AS TO WHICH ANY LIABILITY HAS BEEN DETERMINED TO EXIST. SOUND DEVICES AND END USER EXPRESSLY AGREE THAT THE PRICE FOR THE PRODUCTS WAS DETERMINED IN CONSIDERATION OF THE LIMITATION ON LIABILITY AND DAMAGES SET FORTH HEREIN AND SUCH LIMITATION HAS BEEN SPECIFICALLY BARGAINED FOR AND CONSTITUTES AN AGREED ALLOCATION OF RISK WHICH SHALL SURVIVE THE DETERMINATION OF ANY COURT OF COMPETENT JURISDICTION THAT ANY REMEDY HEREIN FAILS OF ITS ESSENTIAL PURPOSE. iv v. 2.10 Features and specifications are subject to change. Visit www.sounddevices.com for the latest documentation. PIX 260i User Guide Introduction The PIX 260i is a rack-mountable, production video recorder with extensive audio and video processing capabilities. The foundation of the PIX 260i is hardware-based, 10-bit video up/down/cross conversion, and hardware-based encoding to Apple ProRes and Avid DNxHD codecs. These features allow for fast, reliable acquisition of video (at any standard HD or SD resolution and frame rate) and audio (up to 32 tracks from Analog, AES, HDMI, SDI, or Dante sources) to ready-for-edit, industry standard QuickTime .mov files. Files are recorded simultaneously on (up to) 4 separate, 2.5” SSD storage devices via two front panel PIX-CADDY slots and two rear panel eSATAp connections. This redundancy in local, removable storage devices, coupled with standard, Ethernet-based file transfer features further reduces steps in the production workflow. Gigabit Ethernet network ports enable remote access to recorded files and the ability to transfer them quickly into a post-production environment. Full-featured precision timecode and sync reference I/O using Ambient Clockit core technology is provided to allow tight synchronization with external equipment in complex multi-machine configurations. The PIX 260i supports various external control options: RS-422, GPIO, SDI flags, Timecode triggering, and an embedded web server for network-based remote control. Network Grouping functionality enables linked, frame-synchronized recording and playback of multiple PIX 260i units connected to a standard Ethernet network. Introduction This User Guide details installation and operation of the PIX 260i. This User Guide corresponds to PIX 260i firmware version 2.10. User Guide revisions are released at the same time as firmware updates and available online: http://www.sounddevices.com/products/pix260i/downloads/ Manual Conventions Several formatting features have been included to make navigating the guide easier. • Physical buttons on the PIX 260i are represented with capital letters (REC button, MENU, etc). All physical button names are detailed in the Panel Descriptions section. • Button combinations are represented with the plus (+) symbol. For example: “Press LCD + AUDIO” means to first hold down LCD, then press AUDIO, and finally release both buttons. • Setup Menu items are indicated with this text: [Menu Category - Parameter], where the menu category is one of the items in the list displayed when MENU is pushed, and the parameter is an item in the list displayed when that category is selected (by pressing in on the Control Knob). • Blue italicized text references sections of the user guide containing contextually relevant information. When viewing this document on a computer, this text can be clicked to jump to the named section. Video Mode and Audio Mode Throughout this User Guide, the terms Video Mode and Audio Mode will be used. The PIX 260i is capable of recording video and audio together into a QuickTime .mov file (Video Mode) or recording audio only to a .wav file (Audio Only Mode). The mode is determined by the Setup Menu option [System - Video/Audio Mode]. When set to [Video + Audio (QuickTime), the PIX 260i is in Video Mode. When set to Audio Only Poly (Wave) or Audio Only Mono (Wave) the PIX 260i is in Audio Mode. 1 PIX 260i User Guide Panel Descriptions Front Panel Panel Descriptions 1 2 15 14 3 4 5 13 1) Control Knob The Control Knob can be both turned and pressed. Use the Control Knob to navigate between menu settings and to select menu items. Pressing during playback or stop will toggle Shuttle mode. Turning while playback is paused will jog forward or backward by single frames. 2) AUDIO Button Displays the Audio Screen. From the Audio Screen: Select audio input sources, Arm/disarm tracks, Set audio input gain and delay, View audio input levels, and Edit audio track names. 3) LCD Button Toggles the On-Screen Display. Hold for 2 seconds to toggle LCD on/off. Press to return to the Main View. 4) Handle This handle is designed to provide a gripping point for tilting down the LCD. 6 7 8 12 9 11 5) LCD Display Displays operating information when the On-Screen Display (OSD) is active(See “On-Screen Display”, page 6), user interface, source video, and playback video. 5-inch display; 800x480 resolution. 6) FILES Button Displays the File List View. Press FILES + Fast Forward (>>) during record or playback to add a Cue Marker. Press FILES + Rewind (<<) to delete a Cue Marker. 7) MENU Button Displays the Setup Menu. 8) Play Button Plays the most recently recorded file when pressed. In the File List View, plays the selected file from the File List. Toggles Play and Pause in Playback mode. Press and hold Play to activate Loop Play (Video Mode). (See “Playback”, page 34) 9) Stop Button Stops an active recording or playback. When Stopped, hold the Stop button to display the next filename. 2 v. 2.10 10 Features and specifications are subject to change. Visit www.sounddevices.com for the latest documentation. PIX 260i User Guide 10) Fast Forward Button When Stopped, press to cue up the next file for Playback. During Playback or Pause, press once to jump to the next Cue Marker, press and hold to increase playback speed. Continue to hold for faster speeds. 13) Headphone Volume Knob Adjusts the overall volume of the headphones. NOTE: the headphone output is capable of ear-damaging levels. Take care when adjusting among signal sources. 14) Headphone Output 1/4” TRS stereo headphone connector. Can drive headphones from 8 to 100 ohms to very high headphone levels. 11) REC Button Begins recording. Optional: Splits the recording and begins writing a new file when pressed while recording. [System - Rec Button File Split] 12) Rewind Button When Stopped, press to cue up the previous file for Playback. During Playback and Pause, press once to jump to the previous Cue Marker or beginning of the file, press and hold to reverse playback speed. Continue to hold for faster reverse speeds. Panel Descriptions 15) USB Keyboard Input USB A female connector to connect a USB keyboard. Keyboards can be used to navigate, control, and enter metadata into the PIX 260i. Keyboards with integrated USB hubs are not compatible. Rear Panel 1 2 19 18 17 3 4 16 5 15 6 14 7 8 13 9 10 12 11 1) DC Power Input (XLR 4-pin) Accepts 10–27 volts DC. XLR 4-pin connector is wired pin-1 ground, pin-4 positive (+). 3) SYNC Input (BNC) Selectable Genlock or Wordclock input. Configured with Setup Menu option [Timecode/Sync - Sync Out]. 2) SYNC Output (BNC) Selectable genlock or wordclock output. Configured with [Timecode/Sync] Setup Menu options Sync Ref - Video Playback or Sync Ref - Audio Playback. 4) Timecode Output (BNC) SMPTE timecode output. 5) Timecode Input (BNC) SMPTE timecode input. 3 PIX 260i User Guide 6) Digital Audio AES I/O (DB-25) 8 channels of AES digital audio input and 8 channels of AES digital output. (See “Connector Pin Assignments”, page 80) 7) Ch. 1-8 Analog Audio Output (DB-25) 8 channels of balanced, line-level analog audio output. Configured with Setup Menu option [Audio - Line Output]. (See “Connector Pin Assignments”, page 80) 8) Ch. 1-8 Analog Audio Input (DB-25) 8 channels of balanced, line-level analog audio input. If both XLR and DB-25 signals are connected, the signal will be combined. (See “Connector Pin Assignments”, page 80) 9) Analog Audio Outputs (XLR) 2 channels of balanced, line-level analog audio outputs. Panel Descriptions 10) Analog Audio Inputs (XLR) 2 channels of balanced, line-level analog audio inputs. Same signal as DB-25 Analog Audio outputs channels 1 and 2. 11) Ethernet (RJ-45) Attaches to 1G or 100M Ethernet networks. Provides Dante connectivity (See “Dante Audio Inputs”, page 15), Network Grouping (See “Network Grouping”, page 46), web access for remote control (See “Web Interface - PIXNET”, page 49), and network file service. (See “Storage and File Management”, page 58) 12) RS-422 Control (DB-9) Connects to RS-422 Controllers for external control of the PIX 260i. (See “RS-422”, page 49) 13) External Drive Connections (eSATAp) Connector for approved 2.5-inch SATA drives. Sound Devices maintains a list of tested and approved media for use with PIX video recorders. Visit www.sounddevices.com/approved for an up-to-date list of tested and approved media. 14) SDI Video Input (BNC) SDI video input. Accepts 3G-SDI, HDSDI, or SD-SDI signal with up to 16 channels of embedded audio. 15) SDI Video Output (BNC) SDI video output. Provides 3G-SDI, HDSDI, or SD-SDI signal with up to 16 channels of embedded audio. 16) HDMI Video Input (HDMI) Accepts HDMI (1.4a) signal with 8 channels of embedded audio. The PIX 260i does not record or display content encoded with HDCP. 17) HDMI Video Output (HDMI) Provides HDMI (1.3) signal with 8 channels of embedded audio. Audio configured with Setup Menu option [Audio - HDMI/AES Output]. 18) GPIO Remote (Phoenix 10-pin) Logic contact points for remote control. (See “GPIO (General Purpose Input / Output)”, page 56) 19) USB Connection Connect to a Windows computer to load firmware with PIX Loader software (Available on the Sound Devices website). (See “Setup Management and Firmware Upgrades”, page 68) 4 v. 2.10 Features and specifications are subject to change. Visit www.sounddevices.com for the latest documentation. PIX 260i User Guide PIX-CADDY 2 (Optional) The PIX-CADDY 2 is an accessory to connect approved 2.5” drives to the front-panel drive bays. When removed from a PIX 260i, the PIX-CADDY 2 operates as a high-speed drive interface to Mac OS and Windows computers via the onboard FireWire800, USB 3.0, or the optional PIX-DOCK Thunderbolt interface. For reliable operation, it is imperative that the 2.5” drive be firmly screwed to the PIX-CADDY 2 with the supplied screws. Some thinner drives may require the use of the PIX-SHIM accessory to ensure a solid fit. PIX-CADDY CF PIX-CADDY 2 5 3 2 6 2 8 1) FireWire 800 FireWire 800 connector. Requires a powered FireWire 800 or 400 port. Backward compatible when using Firewire 800 to 400 cable. 2) eSATAp High-speed data transfer over 5V eSATAp. Requires a 5V powered eSATAp port. 3) USB 3.0 High-speed data transfer over USB 3.0 (backward compatible with USB 2.0). 4) 2.5” Drive Slot Connector for approved 2.5-inch SATA II and SATA III drives. Sound Devices maintains a list of tested and approved SSD’s or hard drives for use with PIX video recorders. Visit www.sounddevices.com/approved for an up-to-date list of tested and approved drives. Panel Descriptions 7 4 1 5) Activity LED Illuminates when recording, playing, reading, or writing to the attached 2.5” drive. Do not remove the caddy while the Activity LED is illuminated. LED does not illuminate when connected to a computer’s eSATA port. 6) Release Latches Secures the PIX-CADDY 2 to the recorder. Press both latches to remove the caddy assembly. 7) Screw Holes For reliable operation, it is imperative that the 2.5” drive be firmly screwed to the PIX-CADDY 2 with the supplied screws. 8) CF Slot Connector for approved CompactFlash media. Sound Devices maintains a list of tested and approved CF cards. Visit www. sounddevices.com/approved for an up-todate list of tested and approved drives. 5 PIX 260i User Guide Menu and Navigation Main View The Main View displays the live or playback video and the On-Screen Display. The Main View is the default view which appears when no other views or menus are selected. On-Screen Display The On-Screen Display (OSD) provides information superimposed over the Main View. From the Main View, LCD will toggle the OSD on and off. Items included in the OSD are configured with the Setup Menu option On-Screen Display. When factory settings are loaded from the Quick Setup menu item all OSD items are shown. 1 Menu & Navigation 2 11 3 12 4 13 5 6 14 7 8 9 15 10 16 On-Screen Display Menu Item Description 1. Audio Metering Levels of audio tracks 1 and 2. Shown here in Top (wide) mode. Can be re-positioned with Setup Menu option [On-Screen Display - Audio Metering] 2. Headphone Source Current headphone routing selection. 3. Date/Time The current time and date. 4. Group Number Displays the selected network group in [Network - Network Group] as well as the amount of units in that group in parentheses. 5. Input - Video Resolution and frame rate of the video input signal. 6. File Resolution/Rate Displays the resolution and frame rate of the file being recorded or played (Video Mode). In Audio Mode the file type (WAV) is displayed. The File Resolution/Rate field is displayed in different colors to indicate conversion methods. (See “Video Scaling and Frame Rate Conversion”, page 31) 7. File Codec The presently selected video codec (Video Mode) or WAV Poly/Mono (Audio Mode). This information will update for recording and playback. 8. Sync Reference The current source of synchronization. This information will update for recording and playback. 6 v. 2.10 Features and specifications are subject to change. Visit www.sounddevices.com for the latest documentation. PIX 260i User Guide Item Description 9. Cue Marker Cue marker and playback looping information is displayed here during record and playback. 10. Timecode Current timecode and frame rate of the recording or playing file. 11. Audio Source Audio sample rate, bit depth, and channel count. In Audio Mode, flashes red to indicate [Audio - Sample Rate] does not match [Timecode/Sync - Sync Ref - Audio Only]. 12. RS-422 Status RS-422 is displayed when [Remote Control - RS-422] is on. 13. IP Address Network IP address of the PIX 260i 14. Drive 1-4 (D1-D4) status Displays the status and remaining record time of each drive (when video input is present) or remaining space in GB (when no video input is present), Offline (when no media is present), Mounting (when media is becoming ready), No Fmt (when media is not formatted), Network (when drive mode is Ethernet File Transfer), or R/O (when drive mode is Read Only). An asterisk indicates that the drive is On in [File Storage - Drive record/Network Mode]. When recording, all drives that are being written to are displayed in red. When Stopped or in Playback, the green drive is the current default playback drive. Drive status field is orange when a drive is busy. 15. ABS Time Absolute Time: Displays the elapsed time of the file being recorded or played and the transport status (Stop, REC, Play, Fast Forward, and Rew). 16. File Name Name of the current file. Holding Stop shows the next file name Menu & Navigation Target drives, ABS Time, File Name, Timecode, and Cue Marker OSD fields change colors to indicate the various transport states, White = Stopped, Red = Record, Green = Play/Pause, Blue = Rew/Fast Forward/Shuttle. Menu Press MENU (keyboard: F1) to enter the Setup Menu. Most settings of the PIX 260i are accessed and changed from the Setup Menu. Navigate between menu items by turning the Control Knob and pressing it to select. When in a menu, press MENU to go back to the previous screen. The Setup Menu is not accessible when in Record or Playback. If the Setup Menu is open when record or playback is engaged, the Setup Menu will close and return to the Main View. 7 PIX 260i User Guide Audio Screen From any screen, press AUDIO (keyboard: F3) to view the Audio Screen. The Audio Screen displays all audio input levels and provides configuration of Track Arming, Track Naming, Input Source selection, Input Gain, and Input Delay. The Audio Screen by default displays 16 tracks at a time. This can be changed to 8, 16, or 32 track displays in [Audio - Audio Screen Meters]. To make adjustments in Audio Screens: 1. Rotate the Control Knob to move the blue highlighter to the desired track. 2. Press the Control Knob to focus the highlighter on parameters for the track. The highlighter will become orange. 3. Rotate the Control Knob to move the orange highlighter to the desired parameter. 4. Press the Control Knob to edit the highlighted parameter. 5. Rotate the Control Knob to adjust the value or setting. If editing Track Names, use the the onscreen keyboard or attached USB keyboard. 6. Press the Control Knob to save the new setting. The highlighter will become blue and once again highlight the entire track. Sync Source/Sample Rate Absolute Time Transport Status Menu & Navigation Headphone Source Highlighted Track Drive Statuses Timecode Value Timecode Frame Rate File Name Expanded Meters Press AUDIO while viewing an Audio Screen to toggle Expanded Meters. Input Source, Gain, and Delay parameters are removed to accommodate for higher resolution meters. Other audio related settings are accessible from the Setup Menu option Audio. 8 v. 2.10 Features and specifications are subject to change. Visit www.sounddevices.com for the latest documentation. PIX 260i User Guide File List Press FILES (keyboard: F2) to display the File List; A list of all of the recorded takes. Takes are arranged chronologically and grouped by Reel. Turn the Control Knob to highlight an item. Press Play to start playback of the highlighted take. Press the Control Knob (Press and hold for multi-file clips) to perform functions based on which item is highlighted. 1 2 3 4 6 1) Next Take Information for the next take. 2) Current Take Information for the current take. Item is red while recording. 3) Reel Group A group of clips organized by reel number. Takes below are part of the indicated reel. Number in brackets indicates number of clips in the reel. Press Control Knob to expand or collapse list of takes in this reels. 4) Multi-File Take Take consisting of multiple files. Number of files in the take represented by number in brackets. Press Control Knob to expand or collapse list of files in this take. Press and hold Control Knob to access take details for all files in the take. 7 Menu & Navigation 5 8 5) Take Represents a single take. Press Control Knob to view Take Details Screen or edit metadata. Press Play to play take immediately. 6) Name The name or number of the take, file, or reel. Number in brackets indicates amount of clips in the reel or amount of files in the take. 7) Date and Time Date and time the take or reel was created. 8) Size Total size of the take, file, or reel. The selected drive is displayed on the top of the screen. To view the contents of other drives, scroll to the top of the list; A pop up box appears with a list of all available drives. Select the desired drive and press the Control Knob. 9 PIX 260i User Guide While in the File List press FILES to collapse all Reel folders and multi-file clips to ease file navigation. Take Details Screen From the File List, highlight a file and press the Control Knob to view the Take Details Screen. To view Multi-file Take details, highlight the menu item with the file extension then press and hold the Control Knob. Take Details include: Menu & Navigation • Start timecode • Timecode frames-per-second • Timecode user bits • Video resolution and rate • File creation date and time • Video codec/ Broadcast Wave • Media • File size • Duration • Audio Format File functions are also available in the Take Details Screen: • Delete: Deletes the take or file (Confirmation dialog). (See “Deleting a File”, page 65) • Notes, Scene, Take, Track Names, and Circled: Edit iXML / bEXT metadata of audio takes. (See “Metadata”, page 60) • Add to Play List: Adds the audio or video take to the Play List. (See “Play List”, page 37) • Remove from Play List: Removes the audio or video take from the Play List. (See “Play List”, page 37) • Empty Play List: Empties the entire Play List. (See “Play List”, page 37) 10 v. 2.10 Features and specifications are subject to change. Visit www.sounddevices.com for the latest documentation. PIX 260i User Guide Metadata Screen The Metadata screen gives you quick access to certain metadata for the previous, current, and next WAV recordings, letting you change the data in an instant. The metadata you can edit includes: Scene Use any alphanumeric value to name the scene. Take Use numeric values to name the take. Circled Options include: Yes | No Notes Type any brief notes maually or select from a pre-defined, customizable list of 20 most commonly used phrases. To access the Metadata screen, do one of the following: • Press AUDIO + MENU. • From an attached keyboard, press Ctrl+M. Menu & Navigation If accessing the Metadata screen while recording, focus will be on the Scene field for the current take, so that field will be highlighted. If accessing the Metadata screen while in standby (stopped) mode, the Scene field for the next take will have the focus and appear highlighted. To navigate the Metadata screen, do any of the following: • Turn the Control knob to scroll vertically. • Press the REW or FF buttons to move horizontally. • From an attached keyboard, use the Arrow keys to navigate vertically or horizontally. • Press the Control knob to make a selection. Scrolling down and beyond the Notes field will display a customizable, predefined phrase list, letting you make quick notes with the most common wording. Scroll up to exit the list and return to the Metadata screen. 11 PIX 260i User Guide Phrase List Menu & Navigation The phrase list is a feature that lets you predefine a list of up to twenty most commonly used phrases, which can be added to WAV files as part of the Notes metadata. This list, once defined, can be used via the Metadata screen or the Take Details screen. To define the phrase list: 1. Press the MENU button. 2. Select File Storage > Phrase List Manager. The Phrase List appears. 3. Select Add New Phrase. 4. Enter the text for that phrase. Take Details Screen While detailed file information is available via the FILES button, the Metadata screen also provides quick access to viewing take details for the previous, current, or next WAV recordings. To access the Take Details View from the Metadata screen: 1. Use the Control knob to scroll up to the column header row: PREVIOUS CURRENT NEXT 2. Press the REW or FF buttons to move horizontally to select the previous, current or next take. 3. Push in the Control knob to display the details for the chosen take. LCD From the Main View, press LCD to toggle the On-Screen Display (OSD) on or off, press and hold LCD for two seconds to turn off the LCD, press again to turn on. From all other views, press LCD to return to the Main View. 12 The LCD Control Panel provides adjustments to the LCD backlight, button backlight, image brightness, image contrast, and image chroma. To access the LCD Control Panel, press LCD + Control Knob. The parameter with the orange slider bar is the selected parameter. To toggle through the parameters press the Control Knob. To adjust the setting, turn the Control Knob. Press LCD again to exit back to the Main View. v. 2.10 Features and specifications are subject to change. Visit www.sounddevices.com for the latest documentation. PIX 260i User Guide Inputs and Outputs Video Inputs The PIX 260i accepts video input signals over HDMI, HD-SDI, and single link 3G-SDI Level A and B. The PIX 260i does not accept analog video signals. See the specifications section for a complete list of supported frame rates. HDMI The PIX 260i accepts HDMI version 1.4a video and audio. Supported video resolutions and rates are listed in the Specifications section. The PIX 260i HDMI input accepts up to 10-bit, 4:4:4 video, up to 8 channels of embedded audio. The PIX 260i also accepts Sony’s proprietary timecode over HDMI. In Video Mode, the digital audio embedded in the HDMI stream (32 kHz – 192 kHz) is always re-sampled to 48 kHz. In Audio Mode it is re-sampled to the sample rate determined by the [Timecode/Sync - Sync Ref - Audio Only]. Inputs & Outputs 720p30/29.97, 720p25, and 720p24/23.976 are not supported on the HDMI input or the HDMI output. HDCP copy protection prevents direct digital-to-digital copying of copyrighted material. Protected DVDs, Blue-Rays and streaming content with HDCP encryption is not valid content and will be ignored by the PIX 260i. SDI The SDI input on the PIX 260i accepts video with embedded audio (up to 16 channels) and embedded SMPTE timecode. This connection accepts digital video up to 12-bit, with up to 4:4:4 color sampling. Unlike the HDMI interface, which auto-negotiates rates between devices, what comes out of a camera’s SDI output is received by the PIX 260i with no auto-negotiation or sample rate conversion. The PIX 260i supports 3G-SDI single link, but not dual-link HD-SDI. Timecode over SDI is not available when recording in standard definition Video Outputs Both HDMI and SDI outputs are active simultaneously. This allows for conversion from SDI to HDMI and HDMI to SDI. The output video signal source is the signal present at the currently selected video input (Setup Menu option [Video - Video Input]), except during video playback. The resolution and frame rate of the output stream is determined by the Setup Menu option [Video - File Resolution/Rate] setting, except during video playback. The SDI Output is capable of sending HD (4:2:2 10-bit) or 3G (4:4:4 12-bit), this is set in [Video - SDI Output Type].Video playback signal is sent to the HDMI and SDI Outputs. 13 PIX 260i User Guide Standard Definition video is always output using HD Mode because 3G does not support Standard Definition. The output video stream contains up to 16 tracks of embedded audio for SDI and 8 tracks for HDMI. Timecode and record start and stop flags are included on the SDI output. Timecode overlay can be added to the HDMI and/or SDI output signal in [Video - Video Output OSD]. The timecode overlay is displayed in various colors to indicate the current transport state of the PIX 260i: White = Stopped, Red = Record, Green = Playback. Audio Inputs The PIX 260i can record up to 32 tracks from a vast array of audio input sources in both Video and Audio modes: Input Type Count Connector(s) Gain Details Balanced, Line-level. Channels 1-2 on DB-25 connector are summed with respective XLR connectors. Inputs & Outputs Analog 8 1-8: DB-25 (CH 1-8 LINE IN) 1-2: XLR (LINE IN 1/2) AES Digital 8 -25 1-8: DB-25 (CH 1-8 AES IN/OUT) Off, to 50 dB Selectable between AES or HDMI with Setup Menu option [Audio - HDMI/AES Select] HDMI Digital 8 1-8: HDMI Input Off, -25 to 20 dB Selectable between AES or HDMI with Setup Menu option [Audio - HDMI/AES Select] [Timecode/Sync - Sync Ref - Audio Only] should be set to SDI when using any SDI Audio Inputs (Audio Only Mode). See Sample Rate Converters for details See Dante Audio Inputs for full details Off, -25 to 20 dB SDI Digital 16 1-16: SDI Input Off, -25 to 20 dB Dante 32 1-32: Ethernet Off, -25 to 20 dB Analog Audio Inputs The PIX 260i has eight, high-performance, line-level analog audio inputs. XLR (1-2) The XLR balanced inputs accept line-level signals. These inputs are shared with Channels 1 and 2 of DB-25 Analog Audio Input connector. Channels 1 and 2 of this connector are summed with channels 1 and 2 of the DB-25 connector, respectively. DB-25 (1-8) Eight analog, line-level inputs are provided on the DB-25 Analog Audio Input connector. This connector is wired in the Tascam fashion (See “Connector Pin Assignments”, page 80). Channels 1 and 2 of this connector are summed with channels 1 and 2 XLR Analog Audio Inputs, respectively. Digital Audio Inputs The PIX 260i accepts digital audio from HDMI, SDI, and AES/EBU inputs. In Video Mode, all audio is sampled at the sample rate determined by the video input stream, typically 48kHz. In Audio Mode, the sample rate is determined by the [Audio - Audio Mode Sample Rate] when [Timecode/Sync - Sync Ref - Audio Only] is set to Internal. AES3 The PIX 260i accepts AES3 (AES/EBU) digital signals with sampling rates from 32 kHz up to 192 kHz and bit depths up to 24-bits. In Video mode, AES3 inputs are sample rate converted 14 v. 2.10 Features and specifications are subject to change. Visit www.sounddevices.com for the latest documentation. PIX 260i User Guide to 48 kHz. In Audio Mode, the sample rate conversion is determined by Setup Menu option [Timecode/Sync - Sync Ref- Audio Only]. see Audio Mode HDMI / SDI Embedded Audio The PIX 260i accepts 8 channels of embedded digital audio on the HDMI Video Input or 16 channels of digital audio on the SDI input. Dante Audio Inputs Dante delivers an easy-to-setup, self-configuring, plug-and-play digital audio network that uses standard Internet Protocols over 100Mb and/or Gigabit Ethernet. Dante reliably distributes multichannel digital audio with sub-millisecond latency and sample-accurate record and playback synchronization over CAT 5 cabling. Up to 32 Dante audio channels can be selected in any combination from any Dante audio device on the same Dante network. Should they be necessary, sample rate converters are automatically activated for all Dante audio inputs. An input Source can be set to an available Dante channel from the PIX 260i or from the Dante Controller application (Available from Audinate’s website: http://www.audinate.com/) running on a computer attached to the network. To select a Dante source from the PIX 260i, follow the instructions in the Choosing Audio Sources section of this guide (See “Choosing Audio Sources”, page 16). To route Dante channels with the Dante Controller application: Inputs & Outputs 1. Open the Dante Controller application. 2. Select the Routing tab. This table displays Dante devices with available outputs (“Dante Transmitters”) horizontally, and Dante devices with available inputs (“Dante Receivers”) vertically. PIX 260i units will be represented by their PIX names per Setup Menu option [Network - This PIX’s Name]. 3. Click the plus symbol (+) where the column of the desired Dante transmitting device intersects with the row of the PIX 260i you wish to set input sources on. This expands the table to display a matrix of the transmitting device’s outputs to the PIX 260i’s inputs. 4. Click the slots in the matrix where you wish to route or un-route audio channels. A green circle with a check mark will appear in slots that are routed. 15 PIX 260i User Guide Inputs & Outputs Dante Redundancy When [Network - Dante Redundancy Mode] is set to On, the PIX 260i’s Primary and Secondary Ethernet ports both transmit Dante Audio data over separate networks. This provides a fail safe of the Dante system if one of the networks should fail. In Dante Redundancy Mode, two separate networks must be run and they CANNOT be connected to one another. Connect any computer running Dante Controller to the PIX 260’s PRI Ethernet network. See http://www.audinate.com/ for further information on the Dante protocol. Sample Rate Converters Dante, AES, and HDMI inputs all have Sample Rate Converters. These help ensure syncronization of digital audio from multiple sources. SDI Audio Inputs do not have Sample Rate Converters. When using SDI Audio in Audio Only mode the [Timecode/Sync - Sync Ref - Audio Only] should be set to Video Input (SDI/HDMI). Any other configuration could result in undesired audio artifacts such as clicks and pops. In Video Mode, SDI audio cannot be used when using HDMI as the Video Input source. Choosing Audio Sources Audio Input Source is selected in the Audio Screen in the Source column. To setup an input: 1. Press AUDIO to access the Audio Screen. If the Source column is not visible, press AUDIO again to reveal it. 2. Rotate the Control Knob to select the desired track. 16 v. 2.10 Features and specifications are subject to change. Visit www.sounddevices.com for the latest documentation. PIX 260i User Guide 3. Press the Control Knob to focus the highlighter on the selected track’s parameters. The highlighter will become orange and focus on a single column in the track. 4. Rotate the Control Knob to highlight the Source column. 5. Press the Control Knob to open the Audio Source options window. Select the general type of input to be used from Off, Line In, HDMI/AES In, or SDI In and press the Control Knob again to open up all options for that input type. 6. Press the Control Knob to make a selection and exit the Audio Input Source options window. Dante sources must be connected in order to select them as audio input sources. For quick general audio source configurations use [Audio - Audio Input Quick Setup]. (See “Setup Menu Options”, page 70) Input Gain Control Audio Input Gain is set in the Audio Screen in the Gain column. To adjust the gain of an audio track: 1. Press AUDIO to access the Audio Screen. If the Gain column is not visible, press AUDIO again to reveal it. 2. Rotate the Control Knob to select the desired track. Inputs & Outputs 3. Press the Control Knob to focus the highlighter on the selected track’s parameters. The highlighter will become orange and focus on a single column in the track. 4. Rotate the Control Knob to highlight the Gain column. 5. Press the Control Knob to edit the gain value. Turn the Control Knob to adjust the gain in 1 dB increments. Gain is adjusted in real time. The available gain range depends on the audio input source. (See “Audio Inputs”, page 14) 6. Once the desired gain value is set, press the Control Knob to exit the gain window. Input Gain can be linked in [Audio - Input Gain Linking]. When linked, adjust any channel’s gain value to adjust the gain of all channels. Gain offsets from channel to channel are maintained. If this is not desired, unlink the gain and set all gain values to the same value, then re-link input gain. Input Delay Control Audio Input Delay is set in the Audio Screen in the Delay column. Delay is adjustable from 0 to 400 mS. To adjust the delay of an audio track: 1. Press AUDIO to access the Audio Screen. If the Delay column is not visible, press AUDIO again to reveal it. 2. Rotate the Control Knob to select the desired track. 3. Press the Control Knob to focus the highlighter on the selected track’s parameters. The highlighter will become orange and focus on a single column in the track. 4. Rotate the Control Knob to highlight the Delay column. 5. Press the Control Knob to edit the delay value. Turn the Control Knob to adjust the delay in 1 mS increments. 6. Once the desired delay value is set, press the Control Knob to exit the delay window. Input Delay can be linked in [Audio - Input Delay Linking]. When linked, adjust any channel’s delay value to adjust the delay of all channels. Delay offsets from channel to channel are maintained. If this is not desired, unlink the delay and set all delay values to the same value then re-link input delay. 17 PIX 260i User Guide Audio Outputs Analog Audio Outputs The eight analog outputs of the PIX 260i are active-balanced, line-level outputs (+18dBu max). At factory default, the source of the Analog Line Outputs 1-8 is tracks 1 to 8, respectively. Any of the available 32 Tracks can be sent to the Line Outputs. Line Output routing is set in [Audio - Line Output]. Digital Audio Outputs (HDMI/AES) AES and HDMI Outputs are active at all times but these two outputs share the same source. At factory default, the source of the HDMI/AES Outputs 1-8 is tracks 1 to 8, respectively. Any of the available 32 Tracks can be sent to the HDMI/AES Outputs. HDMI/AES Output routing is set in [Audio - HDMI/AES Output]. Dante Audio Outputs Tracks 1-32 are permanently routed to Dante Outputs 1-32 respectively. Up to four PIX 260i units can be daisy-chained using their built-in internal Ethernet switches. If using five or more PIX 260i units, Sound Devices recommends using an external Ethernet Switch in a star configuration. SDI Audio Outputs Inputs & Outputs The SDI video output embeds up to 16 channels of digital audio. At factory default, the source of the SDI Audio Outputs 1-16 is tracks 1 to 16, respectively. Any of the availabe 32 Tracks can be sent to the SDI Output. SDI Output routing is set in: [Audio - SDI Output]. Headphone Output The PIX 260i is capable of driving headphones to extremely high sound pressure levels. Hearing experts advise against exposure to high sound pressure levels for extended periods. The PIX 260i’s headphone output is a flexible tool for monitoring audio. The headphone level is adjusted using the Headphone Volume Knob. To quickly select a headphone source, press and hold AUDIO then turn the Control Knob. The Headphone Source can also be selected in the Setup Menu option [Audio - HP Source]. To solo a track, enter the Audio Screen, highlight the track, then press AUDIO + LCD. The solo headphone source will be indicated on the top-left of the Audio Screen (HP: Solo8 for example). To stop solo of a track, highlight the soloed track, then press AUDIO + LCD. Warning Bells are sent to the headphone monitor to alert the user of various states such as transport changes, and errors such as No Media Connected or No Input Signal Detected. The loudness of these warning bells is adjustable from Off, -60 to -12 dBFS in [System - HP Warning Bell Level]. At factory default, the warning bells are set to -40 dBFS. 18 v. 2.10 Features and specifications are subject to change. Visit www.sounddevices.com for the latest documentation. PIX 260i User Guide Ethernet The PRI and SEC Ethernet ports on the rear panel of the PIX 260i are used for a variety of PIX 260i functions/features: • Dante (32-Channel Audio I/O over network) (See “Dante Audio Inputs”, page 15) • PIX Grouping (See “Network Grouping”, page 46) • File Transfer (Samba) (See “Transferring Files”, page 65) • Web Browser Control (See “Web Interface - PIXNET”, page 49) Up to four PIX 260i units can be daisy-chained using their built-in Ethernet switches. If using five or more PIX 260i units, Sound Devices recommends using an external Ethernet Switch in a star configuration. The PIX 260i can either be allocated an IP address from a DHCP server (recommended) or over Linklocal networking. Link-local networking is a protocol which automatically allocates a 169.254.x.x IP address in the absence of any DHCP server. If a DHCP server is available, the PIX 260i will automatically use it if [Network - Auto IP Settings] is set to On. Ethernet Alternatively, the IP address can be configured manually. When Setup Menu option [Network - Atuo IP Settings] is set to Off, Setup Menu options [Network - IP Address], [Network - Subnet Mask], and [Network - Gateway] are enabled. When these settings are improperly set, the PIX 260i may be unreachable in the network or may cause conflicts resulting in other devices in the network being unreachable. Consult with an IT technician to determine the appropriate settings when connecting to a large network. The PIX 260i uses on-board Auto-MDIX (crossover detection) to allow for direct connection to a computer or to a network. Dante uses a separate IP Address which is configured automatically when connected to other Dante devices. This IP Address is displayed when connected to a computer running Dante Controller, a free-of-charge application available from Audinate. See the following link for details about Dante Controller’s capabilities. http://www.audinate.com/ In Dante Redundancy Mode, two separate IP Addresses are used by Dante. (See “Dante Redundancy”, page 16) 19 PIX 260i User Guide Video Monitoring Features The PIX 260i includes various monitoring features to assist with exposure and focus. These functions only affect signal on the LCD display and will never affect the recorded video or the video output signal. Exposure Assist LCD + FILES Video Monitoring Features Exposure assist features mark areas of the video image based on the exposure level. With over- or under-exposed areas of the image clearly marked, adjustments can be made on the camera to ensure that the signal reaching the recorder has a proper exposure. Exposure Assist is enabled by pressing LCD + FILES. When Exposure Assist is enabled, “EXP” is displayed on the OSD in yellow text. When exposure assist is enabled, False Color or Zebra stripes will be overlaid on the LCD monitor signal. The Setup Menu option [LCD Monitor - Exposure Assist] determines which mode will activate when exposure assist is toggled on. The following image is a luminance ramp signal displayed on a PIX 260i with no exposure assist enabled. Screen shots in the following sections show the effect of the various Exposure Assist features on this test signal. False Color False Color exposure assist mode replaces pixels with a specific color relative to the luminance level. The two types of False Color (selectable from Setup Menu option [LCD Monitor - Exposure Assist]) are 12-step and 4-step. 20 v. 2.10 Features and specifications are subject to change. Visit www.sounddevices.com for the latest documentation. PIX 260i User Guide 12-step 100-108 Red 95-99 Orange 85-94 Yellow 79-84 Light Yellow 59-78 Light Grey 53-58 Pink 49-52 Medium Grey 43-48 Green 23-42 Dark Grey 13-22 Light Blue 3-12 Blue 0-2 White Video Monitoring Features 12-step False Color mode divides the monitor signal into 12 luminance ranges and assigns a color to each. 4-step False Color mode divides the monitor signal into 4 ranges and assigns a color to all but one range (this range is displayed without chroma). The table below illustrates the colors as they relate to luminance levels (IRE). 4-step 101+ Red 99-100 Orange 3-98 N/A 0-2 Blue Zebras Zebra stripe exposure assist mode overlays diagonal stripes over areas that are in a defined luminance range (Zebra 1) or above a defined luminance threshold (Zebra 2). The range for Zebra 1 is 5% above and below the IRE value of Setup Menu option [LCD Monitor - Zebra 1 Level]. The range for Zebra 2 is everything above the IRE value of Setup Menu option [LCD Monitor - Zebra 2 Threshold]. The options for Zebra display (selectable from Setup Menu option [LCD Monitor - Exposure Assist]) are Zebra 1, Zebra 2, or both Zebra 1 and Zebra 2 simultaneously. 21 PIX 260i User Guide Zebra 2 70 IRE (+/- 5%) Zebra 1 85 IRE Video Monitoring Features Focus Assist LCD + MENU Focus Assist features mark sharp edges in the video image to assist in focusing on the desired subject. Focus assist is enabled pressing LCD + MENU. The word “FOCUS” is displayed in yellow text on the OSD when Focus Assist is enabled. There are two available Focus Assist modes: Peaking and Edge Enhance. Peaking Peaking finds sharp edges in a video (based on luminance) and replaces pixels in those areas to highlight the edges. The Setup Menu option [LCD Monitor - Peaking Sensitivity] sets sensitivity level of the Peaking filter. A setting of High will be more sensitive and highlight more edges. The Setup Menu option [LCD Monitor - Peaking Background Contrast] is used to adjust the area of the video image that is not highlighted while Peaking is enabled. The color of the Peaking marks can be set with the Setup Menu option [LCD Monitor - Peaking Color]. The following image comparison demonstrates the effect of Peaking on an image with a shallow depth-of-field and a short focal length (top) and a longer focal length (bottom). 22 v. 2.10 Features and specifications are subject to change. Visit www.sounddevices.com for the latest documentation. Video Monitoring Features PIX 260i User Guide Edge Enhance The Edge Enhance filter uses an algorithm which enhances the variation of the luminance of all edges present in the video image. The following image comparison demonstrates the effect of Edge Enhance on an image with a shallow depth-of-field and a short focal length (top) and a longer focal length (bottom). 23 PIX 260i User Guide Zoom LCD + AUDIO The Zoom function enlarges the video image to a 1:1 pixel ratio. To toggle Zoom on and off, press LCD + AUDIO. When Zoom is enabled, “ZOOM” is displayed on the OSD in yellow text and all other OSD elements are hidden. When zoomed, turning the Control Knob moves vertically and Rewind and Fast Forward buttons move left and right, respectively. Flip Display Video Monitoring Features Some mounting situations require the PIX 260i (or camera) to be upside-down. The LCD output can be vertically inverted to facilitate upside-down operation with the Setup Menu option [LCD Monitor - Verical Flip Display]. The Setup Menu option [LCD Monitor - Horizontal Flip Display] option reverses the LCD output signal hoizontally (mirror image). Vertical and Horizontal flipping affect the video image on the LCD screen only. Recorded content and HDMI/SDI outputs are not affected. 24 v. 2.10 Features and specifications are subject to change. Visit www.sounddevices.com for the latest documentation. PIX 260i User Guide Recording The PIX 260i can record video and audio together to a QuickTime .mov file (Video Mode) or audio only to a .wav file (Audio Mode). File type is selected in [System - Video/Audio Mode]. The PIX 260i can record to up to four drives simultaneously or in sequence (Setup Menu option [File Storage - Video Record Mode]). Each drive can be configured independently to be available for recording, available for playback (read-only), shared on the network via Samba, or switched to network sharing after becoming full (Setup Menu option [File Storage - Drive Record/Network Mode]). Any number of PIX 260i units can be assigned to one of four available network groups for frame synchronized record and playback of video on multiple units simultaneously (See “Network Grouping”, page 46). Pressing the REC button will start recording provided there is valid video signal present (Video Mode) or at least one audio track is armed (Audio Mode). Recording will continue until the Stop () button is pressed or until all available media is full. Record and Stop can also be triggered by other devices via a web browser, RS-422, GPIO, SDI Triggers, and Timecode. External control of such functions is set in Remote Control. (See “External Control”, page 50) (See “Synchronization and Timecode”, page 39) Recording While recording, the REC button will illuminate red and the OSD items Timecode, File Name, ABS Time, and drives actively recording turn red. The PIX 260i is a record-priority device and will enter record any time the REC button is pressed. If the PIX 260i is not ready to record when a record command is given, the PIX 260i will enter a Record Pending state. In this state the REC key will flash red. This is usually caused by file storage mounting or response time, loss of video input, or Play/Pause/ Shuttle. The Setup Menu is not accessible during recording and playback. The File List is not accessible during Playback. Sound Devices File Format During recording the PIX 260i writes to a temporary file format. Video files are written with the extension .SDV and audio files are written with the extension .SDA. When recording is stopped, the 25 PIX 260i User Guide file is “finalized” to a standard Quicktime (.MOV extension) for video takes or a standard Broadcast Wave format (.WAV extension) for audio takes. The Sound Devices file format allows for reliable recovery of content in situations where power was lost or a drive was removed during recording. Upon powering up, the PIX 260i will search for any .SDA or .SDV files on all drives and finalize them to their respective .WAV or .MOV formats. .SDV and .SDA files can also be recovered to .MOV and .WAV files on a Windows computer using the FileSafe utility. (See “FileSafe Utility and the Sound Devices File Format”, page 58) File Splitting When the Setup Menu option [System - REC button File Split] is set to On, pushing the REC button during recording will split the file manually. Recorded files are split automatically when the time of Setup Menu option [File Storage - QuickTime File Split every] is reached (Video Mode) or the file size of Setup Menu option [File Storage - Wave File Split Every] is reached (Audio Mode). In both cases, a new file will be created and grouped with the other files from the clip in the File View (see File Management and Metadata). Audio tracks on video files will not split seamlessly. Some small, brief clicks may occur on some audio tracks in split video files. The video content of video files will always split seamlessly. The audio content of .WAV files (Audio Mode) will always split seamlessly. Recording False Take To discard the last take and delete the file (False take), press Stop () button + Rewind (<<) button. A dialog box will appear warning that the last take will be deleted and indicate the file name. Use the Control Knob to highlight OK and press the Control Knob to confirm. Selecting Video File Resolution and Frame Rate The PIX 260i can record video in numerous resolutions and frame rates. The Setup Menu option [Video - File Resolution/Rate] sets the resolution and frame rate of recorded QuickTime files. This Setup Menu option also determines the resolution and frame rate of the live HDMI and SDI output signals, except during playback. The PIX 260i can record QuickTime files in the following resolutions and frame rates: • 1080 p 30 • 1080 p 29.97 • 1080 p 25 • 1080 p 24 • 1080 p 23.976 • 1080 i 60 • 1080 i 59.94 • 1080 i 50 • 1080 PsF 30 • 1080 PsF29.97 • 1080 PsF 25 • 1080 PsF 24 • 1080 PsF 23.976 • 720 p 60 • 720 p 59.94 • 720 p 50 • 720 p 30 ** • 720 p 29.97 ** • 720 p 25 ** • 720 p 24 ** • 720 p 23.976 ** • 576 i 50 * • 480 i 59.94 * When Setup Menu option [Video - File Resolution/Rate] is set to Same as Video Input, recorded QuickTime files and video output signals will be of the same resolution and frame rate as the input video signal. * Standard definition recording is only available for ProRes 422 HQ, ProRes 422, and ProRes 422 Proxy. 26 v. 2.10 Features and specifications are subject to change. Visit www.sounddevices.com for the latest documentation. PIX 260i User Guide ** Not supported over HDMI Progressive Segmented Frames (PsF) Some cameras output video signal in progressive segmented frames (PsF). PsF is a method for transmitting progressive video in an interlaced stream. A device generates PsF signal by splitting each frame into two segments. PsF segments are the same as interlaced fields in that one segment represents the even lines of a frame and the other segment represents the odd lines of a frame. PsF segments differ from interlaced fields in that there is no motion between each segment in a pair. The PIX 260i will automatically sense PsF signal from most cameras that output PsF over SDI. This is accomplished through the use of a flag inserted into the SDI signal by the camera. If a camera does not insert this flag into the SDI stream or if it outputs PsF signal over HDMI, then the Setup Menu option [Video - Input PsF Detect] can be set to Interpret 1080i as PsF. This will force the PIX 260i to treat all 1080i signal as if it were PsF and deinterlace it accordingly. Selecting a Video Codec Setup Menu option: [Video - Codec]. Recording The PIX 260i has two families of intra-frame, DCT-based codecs available: Apple ProRes and Avid DNxHD, with five levels of compression for ProRes and four levels of data compression available for DNxHD. Both codecs are intermediate codecs that assist the editing process by eliminating the need to transcode video before importing into Final Cut (ProRes) or Avid (ProRes or DNxHD). ProRes is a variable data rate codec and DNxHD is a fixed data rate codec. PIX 260i supports all compression levels and bit rates of ProRes and DNxHD and automatically records the correct bit rate dependent upon the video input resolutions and frame rate. The data rates indicated in the Setup Menu item [Video - Codec] indicate the maximum data rate at 1080p30. DNxHD 36 Mb/s only supports 1080p signal. Standard definition recording is only available for ProRes 422 HQ, ProRes 422, and ProRes 422 Proxy. Interruption of Signal During Recording In video mode, in the event that video signal is lost (an unplugged HDMI or SDI cable, for example) during recording, the PIX 260i will pause the recording and wait for video signal to be re-initialized. If video signal is re-initialized recording will begin again to a new file of the same name with an “A” appended to the end. Further interruptions of signal during that take will cause an alphabetic filename progression (“B”, “C”, etc). In Audio Mode, loss of video signal will have no affect on the transport state unless the video signal is the sync reference source. Alignment of Audio and Video An advantage to recording audio on the PIX 260i along with the video is the elimination of audio/ video sync problems in post. The PIX 260i has many options regarding audio sources along with the two options for video inputs, HDMI and SDI. Given this flexibility, care must still be taken to ensure good audio/video sync. 27 PIX 260i User Guide If recording camera audio embedded on HDMI or SDI, then the audio/video alignment will be excellent provided the alignment is proper on the camera. If recording audio using the dedicated audio inputs (Analog, AES, or Dante), then a delay may need to be dialed in. The reason for this is that some cameras have a delay of one or more frames from lens to SDI/HDMI output. The PIX 260i on the other hand has no appreciable delay between audio and video. This means that if the camera does have this delay, the audio will lead the video as recorded by the PIX 260i. Note that on some cameras, the lens-to-SDI/HDMI delay changes with resolution/ frame rate. The best practice is to test the audio/video sync using a clapper slate on a test file for each camera resolution/frame rate to be used on a project before starting. See Audio Input Delay Control for details Audio Track Arming Up to 32 Tracks of audio can be recorded in both Audio and Video modes. Armed audio tracks will have a red background in the Arm column. Unarmed audio tracks will have a black background in the Arm column. Tracks must be armed in the Audio Screen in order for them to be recorded. To arm or disarm Tracks for recording: 1. Press AUDIO to access the Audio Screen. 2. Rotate the Control Knob to select the desired track. 3. Press the Control Knob to focus the highlighter on the selected track’s parameters. The highlighter will become orange and focus on a single column in the track. Recording 4. Rotate the Control Knob to highlight the Arm column (The Arm column is the left-most column and displays the track number). 5. Press the Control Knob to access the Arm Menu. Turn the Control Knob to select On, Off, All On, or All Off. (All On and All Off will change the arming status of all tracks, regardless of which track is selected). Changing a track’s Input Source to Off will disarm the track. Audio Mode When Setup Menu option [System - Video/Audio Mode] is set to Audio Only Poly (Wave) or Audio Only Mono (Wave) the PIX 260i is in Audio Mode. In Audio Mode, the PIX 260i records only audio signal to uncompressed PCM .wav files. Polyphonic or Monophonic WAV Files Audio Only Poly (Wave) mode writes a single file to each target drive per take. All armed audio tracks are interleaved into a single file. Audio Only Mono (Wave) mode writes a file for each armed track to each target drive per take. Mono files will be named according to [File Storage - File Name Format] with the addition of an underscore (“_”) character followed by the track number at the end of the file name. If File Name Format is set to Reel-Scene-Take_Track Name, a WAV mono file will be given names in the following format: <Reel>-<Scene>-<Take>_<Track #Track Name>. For example, if Reel=141001, Scene=101A, Take=001, Track=01, and the Track 1 Name is Boom, then the file’s name would be 14001-101A-001_01Boom.WAV 28 v. 2.10 Features and specifications are subject to change. Visit www.sounddevices.com for the latest documentation. PIX 260i User Guide Mono Wave files can be written to a maximum of 2 SSD’s. Recording Mono Wave files to a mechanical (spinning) hard drive is not supported. Poly (Wave) File Format writes a single file to each target drive per take. All armed audio tracks are interleaved into a single file. If File Name Format is set to Reel-Scene-Take_Track Name, but WAV poly files are being recorded, the alternative format of Reel-Scene-Take will be used. Audio Mode Settings Certain Setup Menu options apply only to Audio Mode: • [Timecode/Sync - Sync Ref - Audio Only Mode]: This determines the sync reference source clock for audio mode. The source can be set to Internal, Word Clock (Sync In), AES1-2, Video Input (SDI/ HDMI), or Video Ref (Sync In). After changing the Sync Reference in Audio Mode, allow approximately 10 seconds before recording. • [Audio - Audio Mode Sample Rate]: This menu option only applies when the [Timecode/Sync - Sync Ref - Audio Only Mode] is set to Internal. The default sample rate is 48 kHz. Audio Mode allows for 44.1 kHz or 48 kHz recordings. Recording • [Audio - Audio Mode Bit Depth]: The bit depth of recorded audio in Audio Mode. The default Bit Depth is 24. Audio Mode allows for 16- or 24-bit recordings. • [Audio Mode - Pre-Roll Time]: In Audio Mode, a continuous audio buffer of up to 10 seconds is maintained. The Pre-Roll Time will be “added” to the front of all audio recordings. Timecode stamps are automatically adjusted to match the Pre-Roll time. Changing the armed status of any track, changing the value of Setup Menu option [Audio - Audio Mode Sample Rate], or changing the current audio synch reference will reset the preroll buffer. • [File Storage - Wave File Split Every]: The file size that will cause a .wav file split in Audio Mode. At factory default audio files will automatically split when the file size reaches 4 GB. Audio recordings can also be split when the file size reaches 2 GB. • [Timecode/Sync - Frame Rate (Audio Only)]: The frame rate that will be stored in the iXML and Bext area of the .wav file. The default frame rate is 29.97 non-drop. The available frame rate options are 23.976, 24, 25, 29.97, 29.97 drop-frame, 30, 30 drop-frame. If the synchronization source (Setup Menu option [Timecode/Sync - Sync Reference -Audio Only]) is lost while in record, the recording will stop. The Sync Reference OSD field will flash red if the synchronization source is not present. The Audio Input OSD field will flash red if there is a mismatch between the currently selected audio sync referenece sample rate and the [Audio - Audio Mode Sample Rate] setting. Playback of audio clips is the same as video clips. see Playback Operation 29 PIX 260i User Guide F Sampling Rate Modes 48.048k and 48.048kF The 48.048kF mode (F can stand for “fake”, “faux”, or “Fostex”) is a specific compatibility mode for use with the Fostex DV40 software (1.74 and previous), Avid, Final Cut Pro, and other post-production environments that do not recognize audio files written at 48.048 kHz. In this mode WAV files are recorded at a 48.048 kHz sampling rate but are stamped at 48 kHz. When played, they will play back 0.1% slower than real time. One use for the 48.048kF mode is to force a 0.1% speed reduction (pull down) of audio to match MOS-telecined film (24 fps-to-NTSC) in non-linear edit systems, such as Avid or Final Cut Pro. Since the file is stamped as a 48 kHz file, the edit system will play it back at 48 kHz and not at 48.048 kHz. This “audio pull down” will match the transferred picture without the need for an intermediate step through other software to create the pull down. The timecode frame rate (actual recording rate) is forced to 30 ND in 48.048kF mode. The audio file, however, is stamped with a 29.97 ND frame rate, along the 48 kHz sampling rate. It will appear as if the file was originally recorded at a 48 kHz sampling rate at a TC rate of 29.97 ND. Fostex DV40 When using files recorded in the 48.048kF mode in with a DV40 with early software, set the DV40 timecode frame rate to 29.97ND. Timecode stamps will properly match the original timecode start times. Recording 47.952k and 47.952kF Both 47.952 and 47.952kF settings use a record sampling rate of 47.952 kHz, 0.1% lower than 48 kHz. The 47.952kF mode, however, identifies the file as being recorded at 48 kHz. Additionally there are two frame rate options in 47.952kF mode. The timecode frame rate can be set to 23.97 while the file is identified as 24ND or it can be set to 29.97ND while the file is identified as 30ND. By default, when 47.952kF mode is selected the frame rate is changed to 29.97ND and identified as 30ND unless the Frame Rate was already set to 23.97 in which case it will remain at 23.97. 30 v. 2.10 Features and specifications are subject to change. Visit www.sounddevices.com for the latest documentation. PIX 260i User Guide Video Scaling and Frame Rate Conversion The PIX 260i features powerful, hardware-based video scaling, frame rate conversion, and de-interlacing. This allows for converting the resolution and frame rate of input video signal to the recorded file and to the HDMI and SDI outputs in real-time. Video Scaling and Frame Rate Conversion Video scaling and/or de-interlacing is active whenever the Setup Menu option [Video - File Resolution/Rate] is set to something other than Same as Video Input. Any supported input signal can be converted to any available resolution. When set to record progressive frames, the PIX 260i will convert incoming interlaced video to progressive frame video via its built-in, powerful, hardware-based de-interlacer. The PIX 260i will also convert progressive segmented frame (PsF) video to progressive video automatically if Setup Menu option [Video - File Resolution/Rate] is set to a progressive frame format (for example 1080p30). If Setup Menu option [Video - File Resolution/Rate] is set to interlaced format (for example 1080PsF30), the PIX 260i will record PsF signal unaltered, but the file will be stamped as interlaced. Frame rate conversion occurs whenever the frame rate of [Video - File Resolution/Rate] differs from the frame rate of the input video signal. Frame rate conversion is achieved by appropriately duplicating or dropping frames. The PIX 260i will auto-sense between integer and non-integer frame rates (for instance 30 frames vs. 29.97 frames). The PIX 260i will not frame rate convert between integer and non-integer frame rate values. For example, if the incoming video signal is 1080i59.94, it can be converted to 1080p29.97 or 720p59.94 but not 1080p30 or 720p60. The Setup Menu option [Video - File Resolution/Rate] contains entries with a combination of integer and non-integer frame rates (such as 1080p30/29.97). When any of these options are selected, the PIX 260i will record in the indicated integer frame rate if the input video is an integer frame rate or record in the indicated noninteger frame rate if the input video is a non-integer frame rate. Not all frame rate conversions are visually desirable. When the OSD Item File Resolution/Rate is red, the conversion of the frame rate of the input video will contain a finite amount of motion judder. For example, if the incoming video is 720p60 and [Video - File Resolution/Rate] is set to 720p50, the cadence of dropped frames may be noticeable depending on the content. Conversions that are simply 1:2 or 2:1 (such as 1080i59.94 to 1080p29.97) introduce no motion judder. For these conversions, the OSD Item File Resolution/Rate remains white. When the input video signal is 720p24 or 720p23.976, up-, down-, and cross-conversion is not available. 3:2 Pulldown Removal Many cameras which shoot with a shutter speed of 24/23.976 frames per second will output signal on the HDMI or SDI output at 60i/59.94i. To achieve this, the camera performs a “3:2 pulldown” process. The 3:2 pulldown process splits each frame into 2 fields and duplicates a field periodically. The PIX 260i is capable of removing 3:2 pulldown from a 60i/59.94i signal and converting it back to 24/23.976 progressive frames per second in real-time. The PIX 3:2 removal process actively views video fields looking for duplicates. When these duplicates are sensed, then this cadence is locked in and the appropriate extra fields are removed. The process depends on motion in the incoming video. The OSD item File Resolution/Rate changes from orange to white when this cadence is detected: 31 PIX 260i User Guide Orange: No 3:2 pulldown sensed in 60i/59.94i input signal. Input video is being converted to 24p/23.976p using a conversion process which drops frames and may introduce judder. White: 3:2 pulldown sensed in 60i/59.94i input video signal. Input video signal is being converted to 24p/23.976p using 3:2 pulldown removal which recreates 24p/23.976p as it is captured from the camera’s shutter. It is important that 3:2 pulldown be sensed before beginning a recording. If recording begins before 3:2 pulldown is sensed, 3:2 pulldown will not be applied properly. Video Scaling and Frame Rate Conversion Up and Down Conversion Standard-definition video resolution employs a 4:3 aspect ratio, and high-definition video resolution employs a 16:9 aspect ratio. Up-conversion is the process of fitting standard-definition video (with a 4:3 aspect ratio) into a high-definition, 16:9 frame. Down-conversion is the opposite process. The PIX 260i has various options for up and down conversion: Down-Conversion Letterbox: Maintains the same height and width ratio. Results in blank bar at top and bottom of image. Crop: Left and right side of image is cropped to fit into 4:3. Results in missing image at sides of picture. Anamorphic: Image is horizontally squashed to fit into 4:3. Results in a narrow looking image. 16 4 9 Letterbox 3 Crop Anamorphic 32 v. 2.10 Features and specifications are subject to change. Visit www.sounddevices.com for the latest documentation. PIX 260i User Guide Up-Conversion Anamorphic: Image is horizontally stretched to fit into 16:9. Results in a wide looking image. Pillarbox: Increases size and maintains same ratio. Results in blank bar at right and left of image and picture cropped at top and bottom. Zoom 14x9: Maintains same size but fills in remaining screen space with blank bar on the right and left of image. Zoom Wide: Increase size and maintains ratio to full screen 16:9. Results in top and bottom being cropped. 4 3 Anamorphic Video Scaling and Frame Rate Conversion 16 9 Pillarbox Zoom 14x9 Zoom Wide 33 PIX 260i User Guide Playback The PIX 260i has a very powerful playback engine that allows for playback of QuickTime .mov files and PCM .wav files whether the files were generated by the PIX 260i or elsewhere (See “Appendix A - Supported Files”, page 83). Playback video is shown on the onboard LCD display and is sent to the video outputs. The PIX 260i’s video playback clock is determined by the setting in [Timecode/Sync - Sync Reference -Video Playback]. Audio Only playback clock is determined by the setting in [Timecode/Sync - Sync Ref -Audio Only Mode]. Any number of PIX 260i units can be assigned to one of four available network groups for frame synchronized record and playback of video on multiple units simultaneously (See “Network Grouping”, page 46). Playback Operation The current Playback drive is indicated by the green Drive Status OSD field. From the Main View, pressing the Play () button after a recording will play the most recent file. Using the Rewind (<<) and Fast Forward (>>) buttons, previously recorded files can also be cued for playback. The file cued up for Playback is displayed in the File Name field of the OSD. To browse files on the Playback drive, press FILES. This will display the File List of the current Playback drive. Pressing Play () in the File List will play the currently highlighted file. Playback To browse files on another drive, scroll beyond the top of the File List to access the drive selection list. When a file is played, the drive it is played from will become the current Playback drive. When a new take is recorded, the lowest numbered drive it is written to will become the current Playback drive. In Playback Mode the Play () button and the OSD Items ABS Time, Timecode, Filename and Drive Indicator are green. While in Playback Mode, pause playback by pressing the Play () button again. The Play button flashes green to indicate playback is paused. Press the Stop () button any time to stop playback and exit Playback Mode. Frame-by-frame scrolling (similar to the traditional Jog function) is supported when playing back QuickTime .mov files. To scroll through a video file frame by frame, pause playback then turn the Control Knob to increase/decrease the video file in one frame increments. Various looping playback functions are supported. In Video Mode, a single file or a section of a file (defined by cue markers) can be continuously looped by entering Looping Playback Mode (See “Looping Playback”, page 36). Additionally, a list of files can be defined as a Play List and the Play List can also be looped (See “Play List”, page 37). Playback audio of both QuickTime .mov and PCM .wav files is routed to audio outputs as determined by output routing options in the [Audio] Setup Menu section. (See “Audio Outputs”, page 18) Fast Forward and Rewind Video Mode: Hold down the Fast Forward (>>) or Rewind (<<) button during playback for 2x (double) speed playback. When the Fast Forward (>>) or Rewind (<<) button is held for five seconds or more the playback will become 16x speed. Normal playback will resume when Fast Forward (>>) or Rewind (<<) is released. Audio Mode: Hold down the Fast Forward (>>) or Rewind (<<) button during playback scrub forward or backward. As the Fast Forward (>>) or Rewind (<<) button is held down, playback speed in that direction will increase (up to 50x). Release the button to resume playback in real time. 34 v. 2.10 Features and specifications are subject to change. Visit www.sounddevices.com for the latest documentation. PIX 260i User Guide File Skip From Stopped Mode, press Fast Forward to skip to the next file on the current Playback drive. Press Rewind once to skip to the previous file on the current Playback drive. During Playback, press Fast Forward (>>) to jump to the next Cue Marker (if applicable) or begin playback of the next clip (if it exists). Press Rewind (<<) to jump to the previous Cue Marker (if applicable) or to the beginning of the current file. Immediately press Rewind (<<) again to skip to the previous file’s last Cue Marker (if applicable) or beginning. File Skip functions will work while a clip is playing and while it is paused. If the last file played was a sibling file of a mono WAV take, skipping will occur between that take’s sibling files rather than the default behavior of skipping between takes. When the first or final sibling file is navigated away from, file skipping will again occur between takes. Shuttle Playback Mode In Shuttle Playback Mode the PIX 260i is capable of playing back at various rates in forward and in reverse. To immediately enter Shuttle Playback Mode from the Main View, press the Control Knob. The cued file will begin playback at half speed (Fast Forwardx1/2). Shuttle Playback Mode can also be accessed while a file is playing back or when paused by pressing the Control Knob. Reverse 32 16 8 7 6 5 Playback When Shuttle Playback Mode is active, the OSD items ABS Time, Timecode, Filename, and Drive Indicator are displayed in blue. Turn the Control Knob to select playback direction and rate. The following table defines the playback directions and speeds available when turning the Control Knob in Shuttle Playback Mode. Forward 4 3 2 1 1/2 1/3 1/4 1/5 1/6 1/7 1/8 1/8 1/7 1/6 1/5 1/4 1/3 1/2 1 2 3 4 5 6 7 8 16 32 In Shuttle Playback Mode, the playback direction and speed will be indicated on the LCD if Setup Menu option [Display - ABS Time] is set to On. The Fast Forward (>>) and Rewind (<<) buttons will illuminate independently to indicate the playback direction. Press the Control Knob while in Shuttle Mode to pause playback. Press the Play () button while in Shuttle Mode to return to Playback Mode. Cue Marker During Record, Playback, Pause, or Shuttle mode, press FILES + Fast Forward (>>) to set a Cue Marker. To delete a Cue Marker, press FILES + Rewind (<<) . A dialog box appears asking Delete Cue Marker? Cue (number), select OK to delete and Cancel to ignore. Cue Markers added or deleted during record are applied to all available drives. Cue Markers added or deleted during playback or shuttle mode are only applied to the current playback drive. To quickly jump to the next or previous Cue Marker, press Fast Forward (>>) or Rewind (<<) respectively. The previous Cue Marker is displayed in the lower left-hand corner of the OSD when [On-Screen Display - Cue Marker] is On. The OSD field will be displayed in various colors depending on the current transport status: Red = Record, Green = Play, Blue = Rewind/Fast Forward/Shuttle. Content between consecutive cue markers is referred to as a “segment”. The beginning and end points of a file are effectively cue markers. A file with a single cue marker will have 2 segments (From the beginning of the file to Cue 1 and from Cue 1 to the end of the file). 35 PIX 260i User Guide Looping Playback Playback Looping is available in Video Mode only. Looping playback can be enabled for a segment or the entire clip. To toggle looping playback and begin looping the entire currently playing clip, hold Play () for 1 second. Loop: Clip will be displayed in the bottom left-hand corner of the OSD if [On-Screen Display - Cue Marker] is set to On. Loop: Clip will be followed by / Cue number when playback is within a segment (where number indicates the last cue marker). To loop a segment, press Play () + Fast Forward (>>) while playback is in that segment. The looped segment is displayed on the bottom lefthand corner of the OSD. To return to looping the entire clip, press Play () + Rewind (<<). Looping entire clip Looping a segment To exit looping, hold down Play () for 1 second. Playback Mode Playback By default, when a file is selected for playback, the PIX 260i will play the file immediately and stop playback when the end of the file is reached. The Setup Menu options [System - Playback Start mode] and [System - Playback mode] alter this behavior. When [System - Playback Start mode] is set to Pause on First Frame, a file will begin playback in a paused state on the first frame. This is useful for “loading” a clip so that playback can be manually triggered without any start up delay. The Setup Menu option [System - Playback mode] affects how playback will continue after the end of a file is reached (assuming no user transport commands are called): Playback mode Behavior Play Once Playback stops when the end of the file is reached. Play Once - Pause Playback pauses on last frame when the end of the file is reached. Play All Playback continues with the next file in the File List. This process is repeated until all files in the File List have been played at which point playback stops. Play All - Pause Playback pauses at the first frame of the next file. This process is repeated until all files in the File List have been played or Stop is pressed. Play All - Loop Playback continues with the next file in the File List. This process is repeated until all files in the File List have been played at which point playback begins at the beginning of the File List. Play List Playback continues with the next file in the Play List. This process is repeated until all files in the Play List have been played at which point playback stops. Play List - Pause Playback pauses at the first frame of the next file in the Play List. This process is repeated until all files in the Play List have been played or Stop is pressed. Play List - Loop Playback continues with the next file in the Play List. This process is repeated until all files in the Play List have been played at which point playback begins at the beginning of the Play List. It is recommended that files in the same Play List or reel be of the same resolution, frame rate, and codec. 36 v. 2.10 Features and specifications are subject to change. Visit www.sounddevices.com for the latest documentation. PIX 260i User Guide Play List Files can be added to a Play List to be played back in a specific order. Play List functions are accessed from the File Detail view of any file. By default, the PIX 260i will play files in the order that they are arranged in the File List. To play back files in the order of the Play List, [System - Playback Mode] must be set to one of the Play List modes. To add a file to the Play List: 1. Press FILES to view the File List. Playback 2. Highlight the desired file, then press the Control Knob to enter the Take Details view. (If the desired take is a multi-file clip, highlight the item with the bracket, then press and hold the Control Knob.) Add to Play List will add the file to the end of the Play List. Remove from Play List will remove the file from the Play List and decrease the position of all files above in the Play List. Empty Play List will clear the Play List completely (note that this function affects the entire Play List). Files in a Play List are indicated with a number in the File List: 37 PIX 260i User Guide It is recommended that files in the same Play List or reel be of the same resolution, frame rate, and codec. Playback Rate of Audio Files Audio files (WAV) are always played back at the sample rate of the PIX 260i. The sample rate that the file was originally recorded at (and that is stamped in the file’s header) will be ignored by PIX 260i during playback, and the PIX 260i will play the file at the current sample rate, as determined by Setup Menu option [Timecode/Sync - Sync Ref - Audio Only Mode]. When Setup Menu option [Timecode/Sync - Sync Ref - Audio Only Mode] is set to Internal, audio files will play back at the sample rate of Setup Menu option [Audio - Audio Mode Sample Rate], even in Video Mode. Non-Native File Playback The PIX 260i can playback QuickTime .mov files and PCM .wav files generated by third party applications and devices. Exporting QuickTime Files for 260i Playback When exporting QuickTime files for PIX 260i playback be sure to set audio to 48kHz. The PIX 260i cannot playback more than two QuickTime tracks of audio. If multi-channel audio is required, it is recommended that the multi-channel audio is interleaved into a single QuickTime audio track. Playing Back Files on a Computer Playback Video files recorded with the Apple ProRes codec require QuickTime to be installed. QuickTime can be downloaded from http://www.apple.com/quicktime/download/. See http://software.sounddevices.com/ Apple_ProRes_White_Paper_July_2009.pdf for more detailed information about the ProRes codec. Video files recorded with the Avid DNxHD codec require DNxHD drivers to be installed. Visit http:// www.avid.com/dnxhd to download DNxHD drivers, and for more detailed information about the DNxHD codec. Audio files are industry standard .wav files that adhere to the Broadcast Wave File standard (BWF). Each file includes the original broadcast extension (bext) and a complete iXML section. Sound Devices Wave Agent software is a free, powerful tool for working with Broadcast WAV Files. See www. waveagent.com. 38 v. 2.10 Features and specifications are subject to change. Visit www.sounddevices.com for the latest documentation. PIX 260i User Guide Synchronization and Timecode Synchronization of video, audio, and associated timecode while recording video and audio has long been a problematic area. Situations where several cameras are used can complicate issues further. There may be sync issues between two (or more) cameras and/or between audio recorders because of a) offset and b) drift. In a production environment (during recording), offset and drift are both terms to describe a timing problem between the timecode signal from two or more audio or video recorders. In a post-production environment (a non-linear editor application), offset and drift are both terms to describe a timing problem between two or more audio or video files. Synchronization & Timecode Offset (matching the beginning or “head” of a take) occurs because the beginning of takes are not aligned due to the absence or misuse of timecode. Drift (matching the end or “tail” of a take) occurs because different recorders (audio or camera) run at different rates - the beginning of files from each may have zero offset, but by the end they drift apart. The PIX 260i was designed with these problems in mind and includes the most comprehensive and powerful synchronization features available in a production recorder. These features can be used to alleviate or eliminate offset and drift problems in both production and post-production. While the PIX 260i’s design makes setting the parameters as easy as possible, a good understanding of synchronization is still necessary to properly operate the PIX 260i and ensure a trouble-free workflow. In a camera, the shutter, video circuitry, audio sampling, and timecode all run off of one “heartbeat” from its master internal clock. If this master clock is slightly fast, then the shutter, audio sampling, and timecode will be slightly fast. If the master clock is a slightly slow, the shutter, etc will also be slightly slow. When a PIX 260i’s video input is connected via HDMI or SDI to a camera or other video source, this “heartbeat” is passed through the HDMI or SDI. The PIX 260i video and audio circuitry can be clocked off of this incoming signal. In other words, the PIX 260i references this clock and synchronizes its own clock to it. The PIX 260i writes files based on this clock as well - each audio sample and video frame written out to the file is synchronized to the incoming video. This way, the PIX 260i is always completely in sync with the connected video source - there can never be any drift of audio or video between the camera and the PIX. (See “Sync Reference”, page 40) Drift problems in a workflow can arise when more than one camera is used on a shoot, as each camera is driven off of its own internal master clock. Since internal master clock speed will always vary from camera to camera (and vary based on temperature and time), each camera used will run at a slightly different shutter speed, audio sample rate, and timecode rate. This is also true when recording video on a camera and recording audio on a separate recorder, as each device has its own internal master clock. Particularly problematic are long takes where there may be significant drift from camera to camera from the beginning to the end of the take’s file. Even if the heads match, the tails of a take may not. These drift problems can be mitigated during recording by using a Genlock (or “Sync”) Input on a camera which takes over the camera’s internal master clock. Wiring several cameras’ Genlock Inputs together forces all of the cameras to run at the exact same rate with no drift. This same concept applies to audio recorders using the Word Clock input. Genlock inputs are available only on higher-end cameras and Word Clock inputs are available on higher-end audio recorders. Offset problems are easier to overcome than drift problems. By feeding each recording device with the same timecode signal, the files from different recording devices can all be in sync and there will be no offset in post-production. The PIX 260i can address the synchronization issues of both offset and drift (heads and tails) via its built-in Ambient® Lockit with Genlock Out and Timecode Reader. The PIX 260’s Ambient® Lockit features an internal clock which has an accuracy of +/-0.2ppm (½ frame per 24 hours). Numerous PIX 260i recorders can be used to maintain extremely tight synchronization. 39 PIX 260i User Guide Sync Reference The following table lists the available sources for sync reference. Depending on the current Mode (Audio or Video) and the transport state, some of these sources might not be available. Signal HDMI video Connection HDMI input OSD Sync: HDMI SDI video SDI input Sync: SDI Genlock SYNC IN Sync: VidRef Wordclock SYNC IN Sync: WCK AES channels 1-2 Digital Audio I/O (DB-25) Sync: AES1-2 Dante Ethernet Sync: Dante Internal None Sync: Int Synchronization & Timecode By default, the currently referenced synchronization source is always displayed on the OSD preceded by Sync:. When valid signal is present at the selected source, the OSD label will be displayed in white text. When no valid signal is present at the selected source, the OSD label will flash and the text will be red. Video Mode Synchronization Setup Menu option [Timecode/Sync - Sync Ref - Video Playback]. In Video Mode the PIX 260i’s sync source is always the incoming video signal when stopped and while recording. This is to ensure that the PIX 260i is always in sync with the incoming video source. During Playback of QuickTime files, the PIX 260i can reference its own Internal clock, Video Input (SDI/HDMI), or Genlock signal at the SYNC IN BNC. When [Timecode/Sync - Sync Ref - Video Playback] is set to Video Ref (Sync In), and no valid signal is present at the SYNC IN connector when playback is initiated, a warning dialog will appear on the LCD. When [Timecode/Sync - Sync Ref - Video Playback] is set to Video Input (SDI/HDMI), and the playback file’s resolution and rate are different than the Video Input, the PIX 260i will automatically use its Internal clock. The OSD label will flash with red text during playback to indicate that the sync source is not present. Audio Mode Synchronization Setup Menu option [Timecode/Sync - Sync Ref - Audio Only Mode]. In Audio Mode, the audio sync reference source is used for both Record and Playback. Sync reference for Audio Only mode can be the PIX 260i’s own Internal clock, Wordclock (Sync In), AES 1-2, Video Input (SDI/HDMI), or Video Ref (Sync In). The supported sample rates for audio synchronization are those available in the Setup Menu option [Audio - Audio Mode Sample Rate]. The PIX 260i will only lock to supported sample rates from any source (including external sources). When an unsupported sample rate is present at the sync reference source, the OSD label will flash red to indicate there is no synchronization occurring. Timecode Reader The PIX 260i includes a timecode reader which can accept incoming SMPTE timecode. The PIX 260i can read timecode from embedded SDI/HDMI or linear timecode fed into the TC IN BNC connector. The timecode reader is enabled whenever the Setup Menu option 40 v. 2.10 Features and specifications are subject to change. Visit www.sounddevices.com for the latest documentation. PIX 260i User Guide [Timecode/Sync - Timecode Mode] is set to any Ext TC mode which indicates that it will read external timecode. Timecode Reader operation is useful for simple cases where the PIX 260i’s timecode follows the camera timecode. The timecode of the PIX 260i’s file will match exactly with the camera’s file with zerodrift since the PIX 260i is always synchronized with video input during recording in Video Mode. see Video Mode Synchronization). In situations where a consistent offset is observed between PIX 260i files and other production recordings, the PIX 260i can offset the timecode stamp on each file. The Setup Menu option [Timecode/Sync - File Start TC Offset] allows for adjustment of the frame offset from -10 to +10 in increments of 1 frame. This setting does not affect timecode on the PIX 260i’s outputs. For shoots involving more than one camera or an audio recorder, using the PIX 260i’s Timecode Generator can be more beneficial than using the Timecode Reader to achieve good heads and tails sync between all recordings. Internal Ambient® Lockit: Timecode Generator with Sync Out Synchronization & Timecode The PIX 260i includes an internal Ambient® ACL-203 Lockit which can be used as a master sync/ timecode source for cameras or audio recorders. The Lockit is an ultra-high accuracy sync/timecode generator with < 0.2 ppm (½ frame per 24 hours) accuracy that is suitable as a master clock in all levels of productions. With its internal, rechargeable battery, accurate timecode is maintained for up to 2 hours after the PIX 260i is powered down. After 2 hours, the timecode value is reset. The battery is recharged automatically. Multi-camera shoots using cameras that accept genlock input can benefit from the PIX 260i’s built-in Ambient® Lockit as their master sync and timecode source. Files from multiple PIX 260i recorders will have very tightly synchronized recordings with matching heads and tails. Additionally, even multi-camera shoots utilizing lower-cost cameras (with no genlock or timecode) can benefit from the built-in Lockit. By using the Timecode Generator to stamp the beginning of each file, the heads of each take will match from several recorders, even if the tails drift due to using nongenlocked cameras. Setting the Sync Out The setting of this is parameter is found in Setup Menu option [Timecode/Sync - Sync Out]. When the Sync Out of the PIX 260i is not needed, set this option to Off. When using the Lockit to generate the Sync (genlock) for a camera, the frame rate and resolution must be set for the camera’s sync input. Consult the camera’s documentation for information of which rates are accepted. Additionally, there are two advanced modes under [Timecode/Sync - Sync Out]: Genlock, Follows Video In and Wordclock, Follows Video In. Genlock, Follows Video In can be used to slave another camera or audio recorder’s genlock input to the camera feeding the PIX. Likewise, Wordclock, Follows Video In can be used to slave an external audio recorder to the camera driving the PIX to achieve perfect audio sync with zero drift. Drift is less likely to be an issue when recordings are kept short. It is not possible to pass the Sync Input signal to the Sync Output (this is not a loopthrough). 41 PIX 260i User Guide Timecode Modes Freerun Timecode Mode Generator mode. Timecode runs continuously. The value can be set by “jamming value” in the Setup Menu option [Timecode/Sync - Jam Received TC] or by manually setting a value from the Setup Menu option [Timecode/Sync - Set Generator TC]. Freerun Auto Mute Functions the same as Freerun mode except timecode signal is muted from the timecode output when the PIX 260i is in Stopped mode. This allows rec-run functionality when Rec Run mode is not suitable (e.g. Multi-camera shoots). Record Run Timecode Mode Synchronization & Timecode Generator mode. The PIX 260i sends running timecode while recording and stationary timecode while not recording. Timecode in this mode defaults to the last stationary value at power-up. When switching to Record Run from another mode, the internal generator will stop at the last number generated. A user-defined value can be jammed into the internal generator from the Setup Menu option [Timecode/Sync - Set Generator TC]. 24 Hour Run Timecode Mode Generator mode. Timecode runs continuously. When this Time Code Mode is selected or when the time/date is altered, the timecode value is jammed to the value of the time-of-day clock. The value can be set by “jamming value” in the Setup Menu options [TIMECODE/SYNC - Jam Received TC] or [TIMECODE/SYNC - Jam Time Of Day]. The value can also be set manually from Setup Menu option [TIMECODE/SYNC - Set Generator TC]. 24h Run Auto Mute Functions the same as 24h Run mode except timecode signal is muted from the timeocde output when the PIX 260i is in Stopped mode. This allows rec-run functionality when Rec Run mode is not suitable (e.g. Multi-camera shoots). External Timecode Mode Reader mode. The PIX 260’s internal timecode generator follows an external timecode signal appearing at the BNC Timecode Input, timecode embedded on the SDI or HDMI input (See “SDI or HDMI Input Embedded Timecode”, page 43). If the external timecode is removed the internal generator continues to run to preserve continuous timecode. External Timecode Halt Mode Reader mode. Identical to normal External Timecode mode, except that when external timecode is removed (signal is lost), the internal timecode does not continue. When Setup Menu option [Remote Control - Rec Start/Stop] is set to Timecode, this mode will cause the PIX 260i to stop recording when timecode signal is disconnected or invalid (In addition to stopping when stationary timecode is received). Timecode Frame Rate When using external timecode and the incoming frame rate does not match the frame rate as set in Video - File Resolution/Rate, the timecode frame rate display will appear orange to notify the user. The PIX will still record using the File Resolution/Rate. 42 v. 2.10 Features and specifications are subject to change. Visit www.sounddevices.com for the latest documentation. PIX 260i User Guide Timecode Input Sources Timecode BNC The Timecode Input BNC accepts standard SMPTE timecode signal. SDI or HDMI Input Embedded Timecode The PIX 260i can use timecode embedded in the SDI or HDMI (Sony) input signal. [Timecode/Sync - Timecode Mode] must be set to Ext TC (SDI, HDMI). Synchronization/Timecode Examples The following examples illustrate common scenarios where timecode and synchronization can be employed with the PIX 260i and other devices. Synchronization & Timecode Single Video Camera, no Genlock SDI/HDMI In this scenario, the video camera is the master source of the video sync. The timecode can either be read from the camera or be generated by the PIX 260i. The accuracy of the recording is dependent on the internal clock accuracy of the camera. To receive timecode from the camera, set [Timecode/Sync - Timecode Mode] to one of the external timecode modes for cameras that output standard SMPTE timecode to the PIX 260i’s Timecode BNC. Alternatively, the PIX 260i can receive timecode from the SDI or HDMI input (if the camera sends timecode in this way) by setting [Timecode/Sync - Timecode Mode] to Ext TC (SDI, HDMI). The Setup Menu option [Timecode/Sync - Sync Out] can be set to several valid settings, including the following: • Off - sync signal is disabled. • Genlock, Follows Video In - Genlock for another camera or device is derived from the video signal of the single camera. • Wordclock, Follows Video In - Wordclock for an audio device is derived from the video signal of the single camera. Single Camera with Genlock Input, Genlocked from PIX SDI/HDMI Genlock In this scenario, the PIX 260i is the master source of video sync. Set the output of the sync generator to a selected rate and connect the PIX 260i Sync Out (Genlock) to the same camera. Feed the timecode output of the PIX 260i into the timecode input of the camera. 43 PIX 260i User Guide Multiple Cameras with Genlock Input, all Genlocked from a Single PIX A SDI/HDMI Genlock B A SDI/HDMI B In this scenario, a PIX 260i is the master sync source for multiple cameras, each with or without their own PIX acting as a recorder. Because of this locked connection, the cameras can be run indefinitely and be assured of frame-accurate sync with no possibility of drift. Synchronization & Timecode Set the output of the sync generator to a selected rate and connect the PIX 260i Sync Out (Genlock) and timecode output to multiple cameras (“mult” the genlock output). This connection uses the PIX 260i as both the video sync source and timecode source. Heads and tails sync for the camera and PIX files will be perfect. Camera #1 to PIX #1, Camera #2 to PIX #2, No Genlock A SDI/HDMI A B SDI/HDMI B In this scenario, each camera is its own master video sync source , but the PIX 260i is the source of the timecode. The PIX 260i records its files based on the camera’s clock. The heads will match perfectly, but the tails may drift depending on the cameras’ clocks. 44 v. 2.10 Features and specifications are subject to change. Visit www.sounddevices.com for the latest documentation. PIX 260i User Guide Camera to PIX with Wordclock Connection to Audio Recorder SDI/HDMI Wordclock INPUT MENU 3 1 2 5 4 7 6 8 HDD ARM R 788T C L D A E PWR ARM F B 0 dBFS IN CF EX REC 0 dBFS Synchronization & Timecode The wordclock output on the PIX 260i is synchronous with incoming video signal. The wordclock output can be used to sync external audio recorders to any camera. To enable wordclock output, set Setup Menu item [Timecode/Sync - Sync Out] to Wordclock, Follows Video In. 45 PIX 260i User Guide Network Grouping When multiple rack-mounted PIX video recorders (PIX 250i, PIX 260i, or PIX 270i) or the 970 Audio Recorder are in use on an Ethernet network, they can be grouped together for transport control and linking of most setup options. Setup Menu option [Network - Network Group] assigns the PIX 260i to one of four available groups. In this section, the term “unit” refers to PIX 250i, PIX 260i, or PIX 270i Video Recorders, or the 970 Audio Recorder, unless otherwise specified. There is no “master”/“slave” relationship in Network Groups. All units in a group are “master”. Transport commands and settings changes made on any unit in a group will ripple to all other units in the group. If a transport command or settings change has to be made to only one unit in a group, the unit must be temporarily removed from the group before making the change. To quickly toggle between No Group and the current group setting, press MENU + Control Knob. Requirements and considerations when setting up Network Groups: • The maximum number of units supported in a single group is currently 10. Increasing the amount of units in a group increases the time of response for grouped transport commands and auto-configuration. PIX Grouping • It is recommended that timecode be distributed individually to each unit in a group rather than “daisy-chained” through units in a group. • Allow all units in a group to auto-configure before proceeding with grouped operations. See the following section for details. (See “Group Auto-Configuration”, page 47) • For frame-synchronized recording, Setup Menu option [Video - File Resolution/Rate] must be set to Same as Video Input on all units in the group. (See “Grouped Transport”, page 47) • For frame-synchronized recording, video input signal to all units in the group must be of the same resolution and frame rate. (See “Grouped Transport”, page 47) • Shuttle, Fast Forward, and Rewind functions are linked, however frame-synchronization is not guaranteed while these functions are occurring. Frame synchronization will resume when returning to Playback/Pause mode. Normal (1x) playback, Pause, and Jog will always be frame synchronized. (See “Grouped Transport”, page 47) • Frame-synchronous recording and playback is possible on the PIX 260i and PIX 270i only. Although transport commands are transmitted to PIX 250i units in a group, recording and playback on PIX 250i units is not frame-synchronized. • Some settings are not linked even when units are in the same group. (See “Grouped Settings”, page 47) 46 v. 2.10 Features and specifications are subject to change. Visit www.sounddevices.com for the latest documentation. PIX 260i User Guide Grouped Settings A settings change of any unit in the group will be rippled through to all other units in the group, with some exceptions. The following settings and functions will always apply only to the unit that they are made on, and not ripple through to other units in the group (or be pushed when Setup Menu option [Network - Grouping - Push Settings to Group] is used): • All [Network] options. • All [Quick Setup] options. • [File Storage - Erase/Re-format] • [Timecode/Sync - Timecode Mode] • [Timecode/Sync - Jam Received TC] • [Timecode/Sync - Jam Time of Day] • [Timecode/Sync - Set Generator TC] • [Timecode/Sync - Set Generator UBits] • [System - Set Date/Time] • [System - Update Software] Pushing Settings to Group When a unit is assigned to a group, none of its settings are immediately changed. Subsequent settings changes to any unit in the group will be applied to all units in the group. To copy all settings from one unit to the rest of the units in the group, access Setup Menu option [Network - Grouping - Push settings to group]. This will copy all grouped settings to all other units in the group. Group Auto-Configuration PIX Grouping When changes are made to a Network Group, all units in the group must auto-configure. It is important to allow all units in the group to complete auto-configuration before proceeding with any grouped operations (Transport control, settings changes, etc). While configuring, units will display a dialog message: Configuring Network: Please Wait... Wait 10 seconds after this dialog has cleared before proceeding with grouped operations. Common tasks that will cause a group to auto-reconfigure: • A unit on the LAN is powered on or off. • A unit is connected or disconnected from the LAN. • A unit is added or removed from a group via [Network - Network Group]. Grouped Transport Transport control (Record, Play, Pause, Stop, Jog, Shuttle, Fast Forward, and Rewind) of grouped units is linked. Recording and playback is frame-synchronized among PIX 260i and PIX 270i units in a group. When a file is selected for playback, all units in the group will play the file of that same name if it exists. If no file of that name exists, grouped units will play the most recently played or recorded file. Adding and removing cue markers, jumping to cue markers, and looped playback is not supported in grouped units. These features can be effectively used in a grouped unit setup; However, manual setup on each unit in the group is required. Following are step-by-step instructions to using these features with grouped units. Failure to comply with these recommendations can result in undesired behavior if any one of these features is in use while units are grouped. This could include: • Out-of-sync playback between grouped units • Some units in the group dropping out of playback prematurely • Some units playing back the wrong file • Sluggish transport control response time 47 PIX 260i User Guide To effectively use Loop Play Mode with grouped units: 1. Press and hold Play until the OSD reads LOOP. 2. Repeat step 1 on all units in the group. Now when a clip is looped, the units will remain in sync. To effectively use Cue Markers with grouped units: 1. Playback a file. 2. Find the spot in the file in which a cue marker is to be placed. 3. Pause Playback. 4. Press FILES + Fast Forward to lay a cue marker. 5. Repeat step 4 for all units in the group. Now when jumping to a cue marker on one unit all units in the group will also jump to the cue point and remain in sync. To loop between cue points on grouped units: 1. With Loop Mode on and Cue Markers all set, locate the cue point in which the loop will begin. 2. Press Play + Fast Forward to change the Loop behavior from Loop Clip to Loop Segment mode. The OSD will display the loop points (for example Cue 1 - Cue 2). PIX Grouping 3. Repeat step 2 on all units in the group. All units in the group will now loop between the selected cue points and remain in sync. 48 v. 2.10 Features and specifications are subject to change. Visit www.sounddevices.com for the latest documentation. PIX 260i User Guide External Control RS-422 DNF ST300 JLC-ES450 SONY PDW-HR1 (Player Mode) RECORD Yes Yes n/a Stop RECORDING Yes Yes n/a Play Yes Yes Yes PAUSE Yes Yes Yes Stop Playback Yes No (Pause only) Yes Fast Forward Yes Yes Yes Rewind Yes Yes Yes JOG Yes Yes Yes SHUTTLE Yes Yes Yes Command T-BAR Yes n/a n/a REC and Play TIMECODE Yes Yes Yes GOTO (LOCATE to TIMECODE) Yes Yes n/a VAR n/a n/a Yes PREV n/a Yes Yes NEXT n/a Yes Yes IN ENTRY n/a Yes Yes OUT ENTRY n/a Yes Yes IN ENTRY TRIM n/a Yes Yes OUT ENTRY TRIM n/a Yes Yes IN ENTRY GOTO n/a Yes Yes OUT ENTRY GOTO Yes Yes Yes IN/OUT ENTRY DELETE Yes Yes Yes IN/OUT ENTRY RECALL Yes Yes Yes External Control The PIX 260i conforms to the Sony P2 (9-pin) machine control standard over RS-422. The PIX 260i acts as a slave only, not as a master. To enable RS-422 set [Remote Control - RS-422] to On. The following table lists all commands supported by the PIX 260i as well as how those commands are supported on three popular RS-422 controllers. * To access Fast ForwardV mode on the ES450, press SHIFT + F.FWD. Then use the F.FWD or Rewind keys for NEXT /PREV file selection. Web Interface - PIXNET When either the primary (PRI) or secondary (SEC) Ethernet ports on the PIX 260i rear panel are connected to an Ethernet network (via switch or router), or direct to a computer (ad-hoc), the PIX 260i can be controlled remotely via PIXNET. PIXNET is a built-in web server with an intuitive GUI and is accessed with an HTTP connection using a web browser. The interface is designed for use with 49 PIX 260i User Guide current versions of Chrome and Safari. Multiple PIX 260i’s can be accessed at the same time from the same web browser window using tabs. PIXNET only supports a single client (browser) connection to a PIX 260i at one time. Accessing PIXNET on a single PIX 260i from multiple clients simultaneously is not supported. Control access to PIX 260i units with Setup Menu option [Network - Authentication]. The PIX 260i’s web IP address must be determined before accessing PIXNET: 1. Make sure that the PIX 260i is powered on and connected to a network or directly to a computer via one of the rear panel Ethernet connectors. 2. The PIX 260i must have a unique name when controlling multiple PIX 260i units via PIXNET. Verify that the PIX 260i has a unique name in [Network - This PIX’s Name]. 3. The PIX 260i can automatically find a unique IP Address when [Network - Auto IP Settings] is set to On. This is the recommended method for setting up IP connections on the PIX 260i. If needed, the IP settings can be manually entered. To manually enter IP settings, set [Network - Auto IP Settings] to Off. Then manually enter [Network - IP Address - Subnet Mask -Gateway] values. 4. PIXNET supports connection to a single client. Control access to the PIX 260i by configuring a user name and password from Setup Menu option [Network - Authentication]. External Control 5. Open the web browser and enter the IP address displayed on the PIX 260i OSD or listed in [Network - IP Address] into the web browser’s address bar. Enter the credentials supplied in step 4 when prompted. 50 v. 2.10 Features and specifications are subject to change. Visit www.sounddevices.com for the latest documentation. PIX 260i User Guide PIXNET All Units Page When PIXNET is launched the first page displayed is the All Units Page. This is a quick overview of all units connected to the network. Information available is PIX Name, IP Address, File, Video Input details, Format details, and assigned Group number. From this page, a unit can be allotted to a particular group (See “Network Grouping”, page 46). Click on the Name to open the Unit Page for that particular unit. 2 3 4 5 1) Address Bar Type in PIX 260i IP Address to connect to PIXNET. 2) Unit Page Tabs Each Unit Page can be opened in a separate browser tab. 3) Unit Name Lists all units connected to the network. Click on a Name to open the Unit Page for a particular unit. 4) IP Address Displays the IP Address for all units currently on the network. 5) Take Details When unit is in Video Mode: Displays the resolution and frame rate that the unit is configured to record. When unit is in Audio Mode: Displays WAV Poly or WAV Mono. 6 7 External Control 1 8 6) Video Input Details Displays the resolution, frame rate, and source (SDI or HDMI) of incoming video signal. 7) Format Details When unit is in Video Mode: Displays details of the video codec the unit is set to record. When unit is in Audio Mode: Displays sample rate, but depth, and armed track count. 8) Group Displays Group settings for all units currently on the network. Group settings can be edited using the drop-down menu for each unit. 51 PIX 260i User Guide PIXNET Unit Page The Unit page allows for near full remote control of the 260i via the web browser. 2 3 4 5 6 7 8 9 1 10 11 22 21 12 20 13 19 14 18 17 External Control 1) All Units Page button Click to return to All Units Page. 2) Previous During playback, jumps to the beginning of the file or previous cue marker. In Stopped mode, loads previous file. 16 15 11) File Format Displays current file format (poly or mono WAV files). Click to change format. 12) Drive Status 1-4 Displays the drive status of all drives (D1-D4). 3) Rewind Acts as Rewind Button. When selected the clip will reverse at 2x speeds. 13) Absolute Time Time elapsed since beginning of current recording or currently playing file. 4) Play Functions as Play button. 14) Metadata Bar Click the word “Metadata” or the Arrow to expand or contract the Metadata View for previous, current, and next takes. 5) Stop Functions as Stop Button. 6) Unit Name and IP Address Displays the name and IP Address of the current unit. 7) Fast Forward Acts as Fast Forward button. When selected the clip advances at 2x speeds. 8) Next Jumps to the next file. 9) Record Functions as Record Button. 10) Group Displays current Group setting, quickly change designated group or remove from group using the drop-down menu. 15) Timecode Displays the current timecode value. 16) Frame Rate Displays the current timecode frame rate. 17) File Name Displays the current file name. 18) Menu Tabs Click on each tab to display the respective menu. 19) Armed Channel Count Displays the current amount of armed audio channels. This is the amount of tracks that will be contained in the next take recorded. 52 v. 2.10 Features and specifications are subject to change. Visit www.sounddevices.com for the latest documentation. PIX 260i User Guide 20) Bit Depth Displays the current audio bit depth. 22) Headphone Source Audio source for headphone output. 21) Sample Rate Displays the current audio sample rate. PIXNET Unit Page Metadata View To show the Metadata View, click the Arrow button located on far end of the Metadata bar, which acts as a toggle that expands or contracts the view for the previous, current, and next takes. External Control While metadata is visible, you can still scroll down to see the tabs—Clips, File Storage, Video, etc. While you may click any of the tabs to open them and view the data associated with the tabs, the Metadata View and the Clips data cannot be viewed simultaneously. If the Metadata View is expanded, clicking on the Clips tab will contract the Metadata View and display clip information. From this expanded view, you may edit the metadata—Scene, Take, Circled, and Notes—for the previous, current, and next takes. Changes made to the Notes field for the next take, however, will only apply to the very next recording. It is not retained for subsequent recordings after that one. PIXNET Unit Page Main View and Menu Tabs The Unit Page can display many different menus. The menus are accessed by clicking on the tabs of the Unit Page. Not all PIX 260i menu items or features are available from PIXNET. Main View The Main View is always the first to appear when a Unit Page is open and is displayed whenever no other tab is selected. The contents of this view are covered in detail in PIXNET Unit Page. Clips Menu The Clips Menu is the PIXNET version of the 260i File List. From the Clips Menu, select a drive. The currently selected drive contents are displayed. Reel, File name and location, creation date, and file size are all displayed. Click on the Play icon next to a file name to playback the file. Click the Gear icon to edit the next take’s scene, take, and notes metadata, or click the Pencil icon to edit the current or previous take’s scene, take, notes, and circled status. Click the Circled I icon to view QuickTime file details, including the start timecode stamp, timecode frames per second, user bits, duration, codec, and audio formats. 53 PIX 260i User Guide File Storage Menu File Storage Menu settings are displayed and can be edited directly from the web browser. In this menu the Ethernet File Transfer option can be remotely activated. This allows for remote transfer of files from the unit. Video Menu Video Setup Menu settings are displayed and can be edited directly from the web browser. External Control Audio Menu The Audio Menu provides quick access to the various PIX 260i audio settings and windows. These are separated by the views Audio Settings, Tracks, and Output Matrix. When Audio Settings is selected, the PIX 260i Audio Setup Menu options are displayed and can be edited directly from the web browser. Audio Tracks The Audio Tracks screen allows all the same adjustments as the Audio Screen on the PIX 260i itself: 1 2 3 4 7 6 5 1) Track Name Click to edit. 2) Track Source Hover cursor (or touch) to access menu of available audio input sources. 3) Gain Controls Slider and drop-down menu controls input gain level. 4) Input Delay Set delay of input signal in milliseconds. 54 v. 2.10 Features and specifications are subject to change. Visit www.sounddevices.com for the latest documentation. PIX 260i User Guide 5) Armed Track (On) Track is armed with an active input source and will be written during recording. Click to unarm. 7) Armed Track (Off) Track is armed with input source set to Off and will be not be recorded. Click to unarm. 6) Unarmed Track Track is not armed. Click to arm. Audio Output Matrix When Output Matrix is selected, a comprehensive track-to-output matrix appears. From this view route any track to any output. TC Menu Timecode/Sync Setup Menu settings are displayed and can be edited directly from the web browser. OSD Menu Timecode/Sync Setup Menu settings are displayed and can be edited directly from the web browser. Remote Menu External Control Remote Control Setup Menu settings are displayed and can be edited directly from the web browser. Network Menu Network Setup Menu settings are displayed and can be edited directly from the web browser. Changing settings in this menu can disconnect the web browser from PIXNET System Menu System Setup Menu settings are displayed and can be edited directly from the web browser. Triggering Recording from External Timecode The PIX 260i can be configured to start recordings when incoming timecode begins rolling and stop when it becomes stationary. This is generally referred to as Record Run timecode. The master timecode device should be setup in this manner. To configure the PIX 260i to follow Record Run commands: 1. Set Setup Menu option [Remote Control - Rec Start/Stop] to Timecode. 2. Make sure that the device that is sending timecode is configured to send stationary timecode while stopped and running timecode while recording. To cause the PIX 260i to stop recording when linear timecode signal is absent (disconnected), set Setup Menu option [Timecode/Sync - Timecode Mode] to Ext TC (LTC Halt). 3. Some cameras do not send the correct timecode in the first few seconds of a recording, or they send short bursts of timecode causing the PIX 260i to record short unintentional files or incorrect timecode values. The [Timecode/Sync - Auto Record Hold Off] feature is designed to eliminate these issues. When a hold off value is applied, the PIX 260i will begin capturing the moment timecode begins rolling but will only go into record if a valid timecode signal is present after the hold off time has elapsed. 55 PIX 260i User Guide Triggering from external timecode will not cause the PIX 260i to automatically stamp external timecode to recorded files. The timecode stamped to files is determined by the setting [Timecode/Sync - Timecode Mode] Triggering Recording from SDI Flag Bits Start and stop flags embedded in the SDI signal from some cameras can be used to start and stop recording of the PIX 260i. To enable this feature, set Setup Menu option [Remote Control - Rec Start/Stop] to the SDI Flag option that refers to the manufacturer of the connected camera. Setup Menu option [Timecode/Sync - Timecode Mode] must also be set to Ext TC (SDI,HDMI). GPIO (General Purpose Input / Output) The 10-pin Phoenix connector provides six GPIO logic points. These can be used as simple-closure inputs, and to drive LEDs or relays. The following table lists the pin assignments of the GPIO connector. Pin Function External Control - (-) Ground. Provides access to ground for triggering logic-low connections. 1 REC Input. Triggers PIX 260i record. 2 Play Input. Triggers PIX 260i play. 3 Stop Input. Triggers PIX 260i stop. 4 (unused) 5 (unused) 6 REC Output. Activates upon PIX 260i record. 7 Play Output. Activates upon PIX 260i play. 8 Stop Output. Activates upon PIX 260i stop. +5V +5V DC Output. Constant source of +5V for triggering logic high connections. GPIO inputs (pins 1, 2, and 3) and GPIO outputs (pins 6, 7, and 8) can be set to “logic high” or “logic low”. Logic high connections will trigger to the presence of +5V (GPIO input) or output +5V when the function is active (GPIO output). Logic low connections will trigger when connected to ground (GPIO input) or become connected to ground when the function is active (GPIO output). To configure GPIO connections as logic high or logic low, access Setup Menu option [Remote Control - GPIO Inputs] or [Remote Control - GPIO Outputs]. The GPIO Outputs can be used to drive LEDs with a proper series resistor. Resistor values will vary from LED to LED, 470 ohms is a good starting point. 56 v. 2.10 Features and specifications are subject to change. Visit www.sounddevices.com for the latest documentation. PIX 260i User Guide USB Keyboard The PIX 260i supports standard USB keyboards connected to the USB A connector on the front panel. The keyboard can be used to navigate menus, enter text, and control PIX 260i Transport functions. The following table shows common functions for an attached keyboard: Keyboards with integrated USB hubs are not supported. Function F1 Functions the same as MENU button. F2 Functions the same as FILES button. F3 Functions the same as AUDIO button. F4 Functions the same as LCD button. Menu Key Functions the same as MENU button. Ctrl + R Functions the same as the REC button. Ctrl + S Functions the same as the Stop button. Space Bar Functions the same as the Play button. Arrow Keys Up/Down function the same as Control Knob turn. Left/Right function as Escape and Enter keys respectively in Setup Menu. Left/Right function the same as Rewind and Fast Forward keys during playback. Return/Enter Functions the same as pressing the Control Knob. Ctrl + L Loop Mode toggle. Ctrl + Q Add Cue Marker Shift + Ctrl + Q Delete Cue Marker Ctrl + Alt + F10 Enters Menu Customization. (In Setup Menu only) Escape Exits / cancels current dialog. Page Up Page Down Moves the highlight to the top or bottom of displayed list elements. End Moves the highlight to the end of a list. Home Moves the highlight to the beginning of a list. External Control Key F1, F2, F3, and F4 keys can be pushed in combinations to activate button shortcuts, just like their respective buttons on the PIX 260i. See Shortcuts 57 PIX 260i User Guide Storage and File Management Storage The PIX 260i records on up to four separate storage devices simultaneously. There are two PIX-CADDY slots on the front panel that are accessed by pulling the LCD Handle forward and tilting the LCD down. Additionally, there are two eSATAp connections on the rear panel. The four drive connections are numbered 1 to 4. Functions on the PIX 260i will refer to the drives using these numbers. PIX-CADDY 2 and PIX-CADDY CF Drives 1 and 2 are PIX-CADDY slots behind the LCD on the Front panel. Storage & File Management The PIX-CADDY 2 and PIX-CADDY CF allow for simple, quick, and solid connection and removal of drives for file storage and exchange. When connected to a PIX 260i, whether powered on or off, the caddy’s USB 3.0 and FireWire 800 connections are disabled. When the caddy is removed, it operates as a high-speed data interface for transferring files from the drive to a computer. Only one data connection can be used at a time. See PIX-CADDY 2 documentation for details on attaching a 2.5” drive to the PIX-CADDY. The PIX-CADDY CF supports CF cards instead of 2.5” drives. It functions the same as the PIX-CADDY except that it does not support Video or Mono WAV File recording. eSATA Drives 3 and 4 are eSATAp connections on the Rear panel. These connections can be used to power an external drive via 5V eSATAp, or they can be used with powered external enclosures using an eSATA (non-powered) cable. It is important to use an approved drive and external enclosure to ensure proper performance. An up-to-date list of supported storage devices can be found online: http:// www.sounddevices.com/approved Supported Storage Devices Sound Devices maintains a list of storage devices that are approved for use with the PIX 260i. An upto-date list of supported storage devices can be found online: http://www.sounddevices.com/approved Approved mechanical drives are recommended for use only in stationary applications. Excessive vibration or motion may cause data corruption when using mechanical drives. The PIX 260i formats and writes to an exFAT filesystem. The exFAT filesystem is readable and writable by Mac OS X, Windows 8, Windows 7, and Windows Vista. Files stored in an exFAT filesystem are not restricted to 4GB, unlike FAT32 (a commonly utilized filesystem in other digital recorders). Storage devices to be used with the PIX 260i must be formatted by the PIX 260i. Drives formatted to UDF with earlier versions of PIX firmware can still be used in the current PIX 260i. Windows XP is not compatible with exFAT volumes by default. The Microsoft update KB955704 (http://www.microsoft.com/en-us/download/details.aspx?id=19364) will allow Windows XP to read and write to exFAT volumes. 58 v. 2.10 Features and specifications are subject to change. Visit www.sounddevices.com for the latest documentation. PIX 260i User Guide Mac OSX 10.6.4 and below does not support exFAT volumes. Formatting To format a drive: 1. Make sure the drive to be formatted is connected to the recorder and note which drive number it is. 2. Open Setup Menu option [File Storage - Erase/Re-format]. 3. Choose the Erase/Re-format: Drive Number for the drive to be formatted or Erase/Re-format: All Drives option. 4. A confirmation dialog will appear: “All data will be erased. Continue?”. Use the Control Knob to select OK. Storage & File Management 5. Use the displayed on-screen keyboard (or an external USB keyboard, if attached) to enter a volume label for the drive, and then use the Control Knob to select OK to initiate the format. When formatting all drives at once, the volume label is applied to all drives but each drive will be suffixed with a dash and drive number to distinguish between drives. Drive formatting can alternatively be initiated from PIXNET under the File Storage menu. Drive Modes Each of the four drive slots can be set to Read Only, Record, Ethernet File Transfer, or Switch to Network upon Full from the Setup Menu option [File Storage - Drive Record/Network Mode]. • Read Only: Drives in this mode will not be written to during recording. Any compatible files on the drive will still be available for playback and the drive can still be formatted. • Record: Drives in this mode will be written to for recording. This is the default mode. • Ethernet File Transfer: Drives in this mode will be shared to the network as a standard Samba share (see Ethernet File Transfer) and cannot be recorded to, formatted, or accessed for playback from the unit. • Switch to Network upon Full: Drives in this mode will be in Record mode until they are filled. Once filled, they will be put into Ethernet File Transfer mode. When [File Storage - Video Record Mode] is set to Simultaneous, a drive that becomes full will only mount as a network share when the last drive that is set to Switch to Network upon Full becomes full. Record Mode (Simultaneous or Sequential) The Setup Menu option [File Storage - Video Record Mode] determines how drives will be written to during recording. When set to Simultaneous (the default setting), all drives that are online and set to Record will be written to at the same time. When set to Sequential (available in Video Mode only), the lowest numbered drive that is online and set to Record mode will be written to. When that drive is full the recording will continue on the next available drive that is online and set to Record mode. If no drive is available, recording will stop. The order of drives when recording sequentially is from lowest (Drive 1) to highest (Drive 4). 59 PIX 260i User Guide Metadata Several parameters can be set within the Setup Menu File Storage to aid in the organization of files. Some of this metadata can be used in naming the file which is to be recorded. Folders are created on the drives based on the Reel number. QuickTime files contain reel and timecode metadata. Broadcast Wave files contain bEXT and iXML chunks that store various metadata information such as timecode, scene, take, notes, and audio track names. WAV file scene, take, and notes metadata can be edited on the PIX 260i, from the Take Details Screen (See “Take Details Screen”, page 10) or the Quick Metadata Screen (See “Metadata Screen”, page 11). PIX recorders support SMPTE-315M camera positioning metadata for ProRes recordings, but DNxHD files generated by the recorders will not contain SMPTE-315M metadata. CamID The CamID field consists of a single alpha character. It is intended to indicate which physical camera shot the content for the take. Storage & File Management Reel The reel can be considered a container for all assets generated during a recording session or day’s work. This field consists of a numeric value between 1 and 999. It is intended to indicate what reel the recording is part of. The PIX 260i will create a folder at the root level for each Reel. Recorded files are placed inside the current Reel folder. This value is alpha-numeric. Clip The Clip field consists of a numeric value between 1 and 999. It is intended to indicate what clip number the recording is. This field can be set manually and will increment each time a new file is recorded. The Clip number will reset to 1 when the Reel number is changed. Scene/Shot The Scene/Shot field consists of an alpha-numeric value. Use this field to indicate a descriptive name for the current scene or shot. To quickly increment the Scene/Shot value, press Stop + Fast Forward from the Main View. How the Scene/Shot value increments depends on the current setting of [File Storage - Scene Increment Mode]: Numeric: (Default) If the current Scene/Shot value does not have a number on the end, the number 1 will be appended. Otherwise, the last number will be incremented by 1. Character: If the current Scene/Shot value does not have an alpha character on the end, the letter “A” will be appended. Otherwise, the last letter will be incremented alphabetically. If the final character is “Z” it will be changed to “A” and - if an alpha character precedes it - that character will be incremented alphabetically; Otherwise a preceding “A” will be added so that the resulting Scene/ Shot value ends in “AA”. Off: Scene Increment shortcut will have no effect. 60 v. 2.10 Features and specifications are subject to change. Visit www.sounddevices.com for the latest documentation. PIX 260i User Guide Take The Take field consists of a numeric value between 1 and 999. It is intended to indicate what take number the clip is, relative to the scene. This field can be set manually and will increment each time a new file is recorded. The Take number will reset to 1 when the Scene name is changed. Audio Track Name (Audio Only) Audio Track Names are stored in the metadata of the Broadcast Wave File only. Audio Track Names are set in the Audio Screen in the Name column. To edit the name of an audio track: 1. Press AUDIO to access the Audio Screen. 2. Select the Name box for the desired track using the Control Knob to move vertically and Rewind and Fast Forward to move left and right. 3. Press the Control Knob to edit the track name. 4. Use the displayed on-screen keyboard (or an external USB keyboard, if attached) to enter a new track name, and then use the Control Knob to select OK to save and exit back to the Audio Screen. Storage & File Management Audio File Metadata PIX 260i Broadcast Wave Files include iXML (revision 1.5) data and bEXT chunk data. For bEXT and iXML-aware software applications this data is available. For applications that don’t recognize bEXT or iXML, this information is ignored. The following chart details the supported metadata parameters. • iXML: Metadata stored in the Broadcast Wave iXML chunk • bEXT: Metadata stored in the Broadcast Wave bEXT chunk • FMT: Metadata stored in the Broadcast Wave Format chunk 4 = supported Metadata Type Notes U = Entered by User M = Automatically Entered by the Machine Read Write Reel (Tape) iXML, bEXT U: [File Storage - Ree] 4 4 Scene iXML, bEXT U: [File Storage - Scene] or via editing next take metadata. 4 4 Take iXML, bEXT M: Automatic U: [File Storage - Take] or via editing next take metadata. 4 4 Notes iXML, bEXT U: via take metadata editing. 4 4 Circle Take iXML U: via take metadata editing. 4 4 File UID iXML M: Unique File Identifier File Sample Rate iXML, FMT U: [Audio - Audio Mode Sample Rate] 4 4 Digitizer Sample Rate iXML U: Actual sample rate of AD converter Bit Depth iXML, FMT U: [Audio - Audio Mode Bit Depth] 4 4 4 4 Channels iXML, FMT U: Total amount of armed tracks when take was recorded. 4 4 Frame Rate iXML, bEXT U: [Timecode/Sync - Frame Rate (Audio Only)] 4 4 TC Flag (ND or NDF) iXML, bEXT U: [Timecode/Sync - Frame Rate (Audio Only)] Start Time Code iXML, bEXT M: Stored as a sample count since midnight 4 4 4 61 PIX 260i User Guide Duration M 4 4 4 4 U-Bits iXML, bEXT U: [Timecode/Sync - Set Generator UBits] Time Code Sample Rate iXML M 4 Channel Index iXML M: Track Number 4 Interleave Index iXML M: Order of armed tracks. 4 Track Name iXML, bEXT U: via Track Names on Audio Screen Master Speed iXML M 4 Current Speed iXML M 4 Speed Note iXML M 4 Originator bEXT M 4 Creation Date bEXT M 4 4 4 4 Track Information 4 4 Speed Information Originator Information Storage & File Management Creation Time bEXT M Originator Reference bEXT M 4 Software Version bEXT M 4 Family UID iXML M: shared by files belonging to the same take 4 Total Files iXML M; number of files representing a take 4 File Set Index iXML M 4 iXML M 4 File Set Information File History Original File Name Editing Audio Metadata Audio metadata can be edited from the PIX 260i before, during, or after recording. Metadata edits to a take will ripple to that same take on all drives. To edit the Notes, Scene, Take, Track Names, or Circled field of any audio take: 1. Press FILES to access the File List. 2. Rotate the Control Knob to highlight a recorded take, the currently recording take (indicated with red text), or the next take (always on top of the list with a date label of “Next Take”): 62 v. 2.10 Features and specifications are subject to change. Visit www.sounddevices.com for the latest documentation. PIX 260i User Guide Next Take Current (recording)Take Storage & File Management Previous (recorded) Takes 3. Press the Control Knob to access the Take Details screen. (For multi-file entries, hold the Control Knob) 4. Rotate the Control Knob to select the desired field for editing. 5. Press the Control Knob and use the on-screen keyboard or attached USB keyboard to enter text. 6. When finished, Select OK on the on-screen keyboard or press Enter on an attached USB keyboard. Changes made to the currently recording take and to previously recorded takes will be written immediately. The special list item “Next Take”, represents the file name and metadata for the take that will be written the next time record is engaged. This entry does not represent a file on the drive. The Scene and Take fields of the next take can be edited. Values entered into Scene and Take fields of the next take will also be entered into Setup Menu options [File Storage - Scene/Shot] and [File Storage - Take] (respectively). To enter notes for the Next Take: 1. Press FILES. 2. Select the Next Take file. 3. Select the Notes option. 4. Enter text for the note. Data entered in the Notes field for the Next Take will only apply to the very next recording. It is not retained for subsequent recordings after that one. The Use Phrase option is also available when viewing take details from the File List, and it may be used to add common phrases into notes for the Previous, Current, or Next Takes. To use the phrase list: 1. Press FILES. 2. Select a file. 3. Select the Use Phrase option. 4. Select the phrase you want to use from the predefined list. 63 PIX 260i User Guide File Management The PIX 260i provides several tools for file management and metadata entry. File management of files to be recorded is managed in File Storage. File management for files previously recorded material is handled in the File List. See File List and Take Details for navigation and basic overview. File Size Limit To aid in maintaining manageable file sizes, the PIX 260i will automatically begin writing a new file after a set amount of minutes has elapsed in a recording (Video Mode) or after a file size limit has been reached (Audio Mode). The beginning of this new file will be seamless to the ending of the previous file. The Setup Menu option [File Storage - QuickTime File Split every] adjusts the amount of time before a file split occurs in Video Mode. In Audio Mode, the default file size is 4GB. This can be reduced to 2 GB in [File Storage - Wave File Split every]. File Naming Storage & File Management Files are named according to the file name format as set with Setup Menu option [File Storage - File Name Format]. The options for file name format include various combinations of Drive Name, CamID, Reel, Clip, Scene/Shot, and Take metadata fields. The file name format can also be prefixed with the PIX Name as defined in [Network - This PIX’s Name]. To prefix the file name with the PIX name, set [File Storage - File Name Prefix] to PIX Name. RED File Format When the Setup Menu option File Storage - File Name Format is set to RED File Format, the PIX 260i will: • Generate files that follow the same naming convention used by RED cameras. • Extract the CamID, Reel number, Clip number, and date from the SDI input signal from a RED camera and apply it to the file name and appropriate metadata fields of each recorded file. (See “Metadata”, page 60) Camera Letter A001_C002_0502.mov Reel Clip Number Date Arri File Format When the Setup Menu option [File Storage - File Name Format] is set to Arri File Format, the PIX 260i will: • Generate files that follow the same naming convention used by Arri cameras. • Extract the CamID, Reel number, and Clip number from the SDI input signal from the Arri camera and apply it to the file name and appropriate metadata fields of each recorded file. (See “Metadata”, page 60) Camera Index Clip Index B001C001_120601_R1RA.mov Reel Clip Counter Date Unique Camera ID 64 v. 2.10 Features and specifications are subject to change. Visit www.sounddevices.com for the latest documentation. PIX 260i User Guide Folder Structure All files generated by the PIX 260i are placed into a Reel folder. The Reel Folder name is defined by a setting in [File Storage - Reel Format], and the number is defined by the Reel metadata, which is set in [File Storage - Reel]. For the folder name, the default is Custom, which lets you set your own alphanumeric value for Reel folder names. The alternative option is Daily, which if chosen, automatically generates folder names based on the system’s date in the YYMMDD format, where Y is a two-digit numerical value for year, M for month, and D for the day. When using the RED or Arri File Formats, the PIX 260i will generate a Reel folder based on the camera’s reel metadata. Deleting a File Any file that appears in the Take List can be deleted directly from the PIX 260i. To delete a file: 1. Press FILES to enter the File List. Storage & File Management 2. Scroll with the Control Knob to highlight and select the file to be deleted. Once highlighted, press the Control Knob to enter the Take Details view. 3. Highlight and select the Delete option. A dialog will appear to confirm the deletion. Turn the Control Knob to highlight and select “OK”. Deleting a file removes it from the current drive only. If the same take was written to other drives, the file will remain on those drives unless manually deleted. Transferring Files USB, Firewire, Thunderbolt Files on PIX 260i formatted storage volumes can be copied to a computer by removing the storage device from the PIX 260i and connecting it to a computer. Storage devices formatted with the PIX 260i recorder use the exFAT filesystem. See File Storage The Firewire 800 and USB 3.0 connectors on the PIX-CADDY are disabled when the PIX-CADDY is attached to the PIX 260i. When attaching the PIX-CADDY to a computer, either the Firewire 800 or the USB 3.0 connection must be used; not both. Sound Devices recommends first copying files from the drive to the computer and then editing the files. It is not recommended to edit files directly off of the drive. Do not copy unsupported files from a computer (or any other host device) to a drive that is intended to be used by the PIX 260i. If this occurs, it is advisable to format the drive with the PIX 260i before making new recordings. See Appendix A for currently supported files Ethernet File Transfer (Samba) Samba is an industry standard networking protocol that enables files to be transferred between the PIX 260i and any device with access to the network (A computer running Mac OSX, Windows, or Linux for example). Ethernet File Transfer can be initiated remotely via PIXNET (web browser interface). Ethernet supports data rates up to a theoretical maximum of 1Gbps. In reality, data transfer speeds over Ethernet are dependent on network traffic and many other factors. To transfer files between the PIX 260i and another network device: 65 PIX 260i User Guide 1. Attach an Ethernet cable from either PIX 260i Ethernet port to a computer or a LAN (Local Area Network) connection. 2. Enter Setup Menu [File Storage - Drive Record/Network Mode] to access the Record/Network mode menu for all drives. 3. Select the drive to be mounted and set its mode to Ethernet File Transfer. This drive is now attached to the Network and unavailable to the PIX 260i for read or write actions. The Drive Status field on the OSD will read “Network” in this mode. 4. Now the drive is ready to be accessed via the network. The IP address to use for network access to the PIX 260i is shown on the OSD and in Setup Menu [Network - IP Address]. The user name and password are configured from Setup Menu option [Network - Authentication]. • Mac OSX: From the Finder, select Go > Connect to Server. Enter the PIX 260i address as “smb://[IP Address]” then click Connect. Enter the user name and password. Storage & File Management • Windows: Click the Start button (or press the Windows key on the keyboard). In the search box, enter the PIX 260i address as “\\[IP Address]”. Enter the user name and password. 5. Drives that are in Ethernet File Transfer mode will appear as folders in the mounted volume on the computer. When no drives are set to Ethernet File Transfer mode, a folder titled “No_ Drives_Attached” will appear instead. 6. Set the drive’s mode to Record to remove it from the network and make it available for recording and playback on the PIX 260i. Allow time for the drives to remount before Recording or Playing back files. The Drive Status OSD field will return to white when the drives are ready. FileSafe Utility and the Sound Devices File Format During recording, PIX recorders store data in a temporary file format with the extension .SDV (for video) or .SDA (for audio). When the recording is completed, the file is converted to its standard respective format (.MOV or .WAV). In the event of unintended drive removal or power loss during recording, these files can be recovered by the PIX recorder itself or with the FileSafe software utility. 66 v. 2.10 Features and specifications are subject to change. Visit www.sounddevices.com for the latest documentation. PIX 260i User Guide Upon powering up, the PIX recorder will search all connected drives for .SDV and .SDA files and convert them to their respective .MOV or .WAV format. The FileSafe utility (currently available for Windows OS) can be used to recover .SDA and .SDV files in the absence of a PIX recorder. Download the FileSafe utility from the Sound Devices website: http://www.sounddevices.com/products/filesafe/downloads/ Sound Reports Sound reports are comma-delineated CSV files based on WAV file metadata. The headers for these reports are customizable. You can create sound reports in a specific folder to a single drive only or in a current folder for all applicable drives. Setup Management & Firmware Upgrades Sound reports (CSV files) do not appear in the File list. To manage sound report headers: 1. Press MENU. 2. Select File Storage > Sound Report Info. 3. Modify each option as needed. To create a sound report in the current folder, do either of the following: • Press the AUDIO + FILES buttons simultaneously. • From an attached keyboard, press Ctrl+P. Sound reports created in current folders are saved for all applicable drives. To create a sound report on a specific Reel folder: 1. Press FILES. 2. Select the Reel folder in which you want to create the sound report. 3. Either press and hold the Control knob to enter the Folder Options menu, or from an attached keyboard, press the Right Arrow key. 4. Select Create Sound Report. The CSV file is created in the specified folder only on that drive. To view a sound report (CSV file): 1. Eject the drive from the unit and attach it to a computer. 2. Navigate to the Current or Reel folder in which the report was created. 3. Open the report in any application supporting CSV format, such as Excel for spreadsheets. Setup Management and Firmware Upgrades Saving and Loading Setup Files To save all of the current settings to a setup file, select the Setup Menu option [Quick Setup - Save Settings to Drive 1]. Use the on-screen keyboard (or attached USB keyboard) to enter a name for the setup file. This will save all of the current settings to an XML file at root of Drive 1. To load a previously saved setup file, select the Setup Menu option 67 PIX 260i User Guide [Quick Setup - Load Settings from Drive 1]. The setup XML file will have to be copied to the root of Drive 1 prior to attempting to load it. For a complete list of available Setup Menu options, see Setup Menu Options. Formatting a storage device will also remove any setup files that are on the drive. Setup files can be stored on a computer and copied back to the root of a PIX 260i drive to be loaded on the PIX 260i. Custom Default Settings and Setup Menu Option Visibility The Setup Menu option [Quick Setup - Load Factory Settings] loads a setup that is saved internally to the PIX when it leaves the factory. It is possible to alter this “factory” setup, so that the Setup Menu option [Quick Setup - Load Factory Settings] will load a custom default. Setup Management & Firmware Upgrades It is also possible to hide specific Setup Menu parameters and options. This is useful for Setup Menu options that are not commonly used in a particular workflow, or to simplify use when lending the unit to another user. To customize defaults and Setup Menu option visibility: 1. Attach a USB keyboard to the PIX 260i’s USB keyboard port. 2. Press MENU to enter the Setup Menu. 3. Press Ctrl + Alt + F10 on the keyboard. If this is the first time this action has been performed since powering the PIX 260i up, a password dialog will appear. Enter the password (the default password is “default”). 4. After the correct password has been entered, the Settings Customization Menu will appear. Select Edit Menu & Default Values. 5. The Setup Menu will be shown with a colored background. There will be check boxes next to each menu item. Navigate the menu with the Control Knob or keyboard arrows, as usual. 68 v. 2.10 Features and specifications are subject to change. Visit www.sounddevices.com for the latest documentation. PIX 260i User Guide Setup Management & Firmware Upgrades 6. To change the visibility of an item in the Setup Menu, press the spacebar on the keyboard while the item is highlighted. Checked items will be displayed in the Setup Menu and unchecked items will not be displayed. Crossed out items will be hidden 7. Settings changed at this point will become the default settings. 8. When finished, press Esc or F1 on the keyboard. This will show the Settings Customization Menu again. Select any of the save options. Keep a record of the password if it is changed. A lost password could result in undesirable limitations. The Settings Customization Menu option Reset to Factory Settings will make all Setup Menu items visible and revert default settings to factory defaults. Factory Restore To fully restore the unit to its factory firmware state, hold Fast Forward Stop while booting the PIX 260i up, until the Main View appears. This will load factory default settings and restore some settings that are normally not affected by performing [Quick Setup - Load Factory Settings], such as restoring the network user name and password to “guest”. Firmware Upgrades At times, Sound Devices makes firmware updates available for PIX 260i. These updates are easy to apply: 1. Download the new .prg file from the Sound Devices website. 2. Copy this file to an approved drive, and connect to the PIX 260i. 3. Ensure that the power source for the PIX 260i is reliable. Power loss during a firmware upgrade process can produce unexpected results. 69 PIX 260i User Guide 4. From the System menu in the Setup Menu, select Firmware Update. The PIX 260i will search for the .prg file and give the option to install the first file that it finds (cancelling this dialog will cause the PIX to search for another .prg on any attached storage devices). When the correct .prg file has been located, highlight the OK button and press the Control Knob to begin the firmware update. 5. The PIX will verify that the file is not corrupted, then it will update the firmware. When done the unit will need to be powered down and then back up. Firmware updates can take several minutes to complete. Never pull power during a firmware update. Various functions and ports may become inactive while firmware is updating. Setup Menu Options Setup Menu Options The Setup Menu controls a wide range of parameters for the PIX 260i. The parameters are organized into categories, making the Setup Menu easy to navigate. The following tables show the parameter name, a description, options available, and the factory default setting where applicable. Default settings can be altered. See Setup Management Video/Audio Mode # 1 Parameter Name Video/Audio Mode Description Options Switch between Video Mode (audio and video information recorded to QuickTime .mov files) and Audio »» Video + Audio (QuickTime) Only Mode (audio recorded to .wav files and video not • Audio Only Poly (Wave) recorded). Poly records a single file per take, with all armed tracks interleaved. Mono records a file for each • Audio Only Mono (Wave) track, per take. File Storage # 1 2 Parameter Name Description Options Record Mode Simultaneous mode records each take to all available drives. Sequential mode records takes to one drive until it is full or otherwise unavailable, then records to the next available drive. »» Simultaneous • Sequential Drive Record/Network Mode A sub-menu with 4 items representing each drive slot. Options presented here are available for each of the 4 drive slots. Off: Drive is not used. Record: Drive will be written to during recording and is unavailable for network file transfer. Ethernet File Transfer: Drive is available for network access via Samba and unavailable for recording and playback. Switch to Network upon Full: Drive is effectively in Record mode until it becomes full, at which point it is effectively in Ethernet File Transfer mode. • Off »» Record • Ethernet File Transfer • Switch to Network upon Full 70 v. 2.10 Features and specifications are subject to change. Visit www.sounddevices.com for the latest documentation. PIX 260i User Guide Parameter Name Description Options • 1 min • 5 min • 10 min • 15 min • 30 min • 1 hour • 2 hours • 3 hours »» 10 hours 3 QuickTime File Split Every Choose the maximum file recording time. When set time is exceeded a new .mov file is created automatically. Since ProRes and DNxHD codecs are variable bit rate, the file size of each file will vary, even though the running time will be the same. (Maximum file time is approximately 10 hours for 30fps video and less, and approximately 6 hours for 50fps video or more). 4 Wave File Split Every Choose the file size limit of .wav files. When the limit is reached, the PIX 260i will create a new .wav file (labeled sequentially) and continue recording. • 2 GB »» 4 GB 5 File Name Format The format for file names as they are written to the drive. »» Drive-Reel-Clip • Reel-Clip • CamID-Reel-Clip • Reel-Scene-Take • Scene-Take • RED File Format • Arri File Format 6 File Name Prefix Text to be placed before all other characters in each file name. PIX Name is set in [Network - This PIX’s Name] • Off »» PIX Name 7 CamID An identifying character for a camera »» A (single alpha to “Z”). 8 Reel Current Reel number. When the Reel number is altered, the Clip number is reset to 1 • 1 (numeric) 9 Clip Current Clip number. When the Reel number is altered, the Clip number is reset to 1 »» 1 (numeric) 10 Scene/Shot Current Scene name. When the Scene name is altered, the Take number is reset to 1. »» “Scene 1” (multi alphanumeric) 11 Take Current take number. When the Scene name is altered, the Take number is reset to 1. »» 1 (numeric) 12 Scene Increment Mode • Disabled The method used to increment the Scene/Shot value when Stop+Fast Forward is pressed on the Main View. »» Numeric • Character Erase/Reformat Format any or all attached drives. When all is selected, all drives will share the same volume label but each drive name will be suffixed with a unique drive number. 13 Setup Menu Options # • Erase/Re-format: Drive 1 • Erase/Re-format: Drive 2 • Erase/Re-format: Drive 3 • Erase/Re-format: Drive 4 • Erase/Re-format: All drives Video # 1 Parameter Name Video Input Description Physical source to derive recorded video from. Options • HDMI »» SDI 71 PIX 260i User Guide # Parameter Name Description Options The resolution and frame to be recorded and sent to video outputs. »» Same as Video Input • 1080p30/29.97 • 1080p25 • 1080p24/23.976 • 1080i60/59.94 • 1080i50 • 1080PsF30/29.97 • 1080PsF25 • 1080PsF24/23.976 • 720p60/59.94 • 720p50 • 720p30/29.97 • 720p25 • 720p24/23.976 • 576i50 (PAL) • 480i59.94 (NTSC) Codec The video codec to use for encoding. Note for DNxHD that the rates listed are assuming 1080p30. If a different resolution and frame rate is selected, the PIX 260i will use the corresponding DNxHD data rate. • DNxHD 220x 220Mb/s, 10bit • DNxHD 220 220Mb/s, 8bit • DNxHD 145 145Mb/s, 8bit • DNxHD 36 36Mb/s, 8bit • ProRes 4444 330Mb/s, 12bit • ProRes 422HQ 220Mb/s, 10bit »» ProRes 422 145Mb/s, 10bit • ProRes 422LT 100Mb/s, 8bit • ProRes 422Proxy 36Mb/s, 8bit 4 Up Conversion Method for converting SD input video to HD recorded content. • 4:3->16:9 Anamorphic »» 4:3->16:9 Pillar Box • 4:3->16:9 Zoom 14:9 • 4:3->16:9 Zoom Wide 5 Down Conversion Method for converting HD input video to SD recorded content. »» 16:9->4:3 Letterbox • 16:9->4:3 Crop • 16:9->4:3 Anamorphic 6 Input PsF Detect When set to “Auto”, the PIX will sense PsF signal based on a flag within the signal stream. Most devices »» Auto with SDI output will provide this flag, however some SDI outputs and all HDMI outputs will not provide this • Interpret 1080i as PsF flag. When sending PsF signal from these devices, choose “Interpret 1080i as PsF” 7 SDI Output Type HD output type employs SMPTE 292M / HD-SDI on SDI output. 3G output type employs SMPTE 424M / 3G-SDI on SDI output. »» HD (4:2:2 10-bit) • 3G (4:4:4 12-bit) Video Output OSD Superimpose the current timecode over the video signal on the selected output. Timecode value appears in lower left corner of the frame. »» Off • SDI out • HDMI out • SDI + HDMI out 2 3 Setup Menu Options 8 File Resolution/Rate Audio # 1 Parameter Name Audio Mode Sample Rate Description The sample rate of recorded .wav files Options • 44.1 kHz • 47.952k • 47.952kF »» 48k • 48.048k • 48.048kF 72 v. 2.10 Features and specifications are subject to change. Visit www.sounddevices.com for the latest documentation. PIX 260i User Guide Parameter Name Description Options • 16-bits »» 24-bits 2 Audio Mode Bit Depth The bit depth of recorded .wav files 3 Audio Mode Pre-Roll Time The amount of pre-record buffer for audio-only record- »» 2 secs ing. 0-10 seconds in 1 second increments. (numeric) 4 Input Gain Linking When Input Gain is linked, adjusting an Input’s gain adjusts all Input Gains by the same amount. Any offsets at the time of linking are maintained. »» Off • On 5 Input Delay Linking When Input Delay is linked, adjusting an Input’s delay adjusts all Input delays by the same amount. Any offsets at the time of linking are maintained. »» Off • On 6 HDMI/AES Select Choose between HDMI or AES for digital audio input. »» HDMI Inputs • AES Inputs 7 HP Source Choose the source for Headphone output and the 2 channel meters on the OSD. • 1,2 • 3,4 • 5,6 • 7,8 • 9,10 • 11,12 • 13,14 • 15,16 • 17,18 • 19,20 • 21,22 • 23,24 • 25,26 • 27,28 • 29,30 • 31,32 • All tracks summed - mono »» All tracks summed - stereo 8 Line Out Source Sub-menu. Choose output source for each line output (1-8) • Track 1 - Track 32 (per output) »» Track 1-8 (per output) 9 HDMI/AES Output Sub-menu. Choose output source for HDMI and AES outputs (1-8) • Track 1 - Track 32 (per output) »» Track 1-8 (per output) 10 SDI Output Sub-menu. Choose output source for SDI output (1-16) • Track 1 - Track 32 (per output) »» Track 1-16 (per output) 11 Audio Signal Generator Enable audio test to all outputs. »» Off • On 12 Audio Tone Level Level of audio test tone (dBFS) »» -20 dBFS (numeric -40 to 0) 13 Audio Screen Meters Amount of audio tracks displayed at a time in the Audio Screen. (All 32 tracks are accessible by scrolling) • 8 »» 16 • 32 Setup Menu Options # 73 PIX 260i User Guide # 14 Parameter Name Audio Input Quick Setup Description Choose from preset audio input source schemes. Options »» 1-8: Off • 9-16: Off • 17-24: Off • 25-32: Off • 1-32: Off • 1-8: Line In 1-8 • 9-16: Line In 1-8 • 17-24: LineIn 1-8 • 25-32: Line In 1-8 • 1-8: HDMI/AES In 1-8 • 9-16: HDMI/AES In 1-8 • 17-24: HDMI/AES In 1-8 • 25-32: HDMI/AES In 1-8 • 1-16: SDI In 1-16 • 17-32: SDI In 1-16 Timecode/Sync Setup Menu Options # Parameter Name 1 Sync Ref - Video Playback 2 3 Sync Ref - Audio Only Timecode Mode Description Options The reference for synchronization of playback clock for Video Mode. »» Internal • Video Ref (Sync In) • Video Input (SDI/HDMI) The reference for synchronization of recording and playback clocks for Audio Only mode. »» Internal • Wordclock (Sync in) • Video Ref (Sync In) • AES1-2 • Dante • Video Input (SDI/HDMI) Sets the running mode for the internal timecode generator and/or the method which the PIX 260i receives SMPTE timecode.. • Off • Freerun • Freerun Auto Mute • Record Run • 24h Run • 24h Run Auto Mute • Ext TC (LTC) • Ext TC (LTC Halt) »» Ext TC (SDI, HDMI) 4 Frame Rate (Audio Only) The frame rate of timecode stamped to .wav files (Audio Mode). This setting is ignored in Video Mode. • 23.976 • 24 • 25 »» 29.97 • 29.97 DF • 30 • 30 DF 5 Drop Frame Enable Enable or disable drop frame timecode. »» Off • On 74 v. 2.10 Features and specifications are subject to change. Visit www.sounddevices.com for the latest documentation. PIX 260i User Guide Parameter Name Description Options Sync Out Determines whether the signal on the Sync Output BNC is genlock or wordclock, and determines the sync reference for that signal. When settings of a resolution / frame rate are selected, the Sync Out BNC will supply genlock signal at the specified rate that reference the internal Ambient® Lockit. »» Off • 1080p30 • 1080p29.97 • 1080p25 • 1080p24 • 1080p23.976 • 1080i60/PsF30 • 1080i59.94/PsF29.97 • 1080i50/PsF25 • 1080PsF24 • 1080PsF23.976 • 720p60 • 720p59.94 (29.97) • 720p50 • 720p30 • 720p29.97 • 720p25 • 720p24 • 720p23.976 • 576i50 (PAL) • 480i59.94 (29.97 NTSC) • Genlock, Follows Video In • Wordclock, Follows Video In 7 Auto-Record Hold Off Sets the duration that a valid timecode signal has to be recognized by the PIX 260i before generating a new take when using external timecode to trigger recording (When [Remote Control - Rec Start/Stop] is set to Timecode. »» 0 sec (numeric 0-8) 8 Jam Received TC Opens a dialog that displays incoming timecode value in realtime (RxTC), incoming userbits (UB), transmitting/internal (Ambient® Lockit) timecode value (GENTC), and transmitting/internal userbits (UB). • Push Control Knob to jam internal timecode to incoming (RxTC) timecode. • Push MENU to back out. 9 Jam time Of Day Sets the internal timecode clock to the current time of day. 10 Set Generator TC Sets the Ambient® Lockit timecode generator value in HH:MM:SS.FF format. »» 00:00:00.00 (Timecode value) 11 UBits Format Sets the four-field format for the UBits Generator to the default, which is user definable fields, or so that the first three fields are automatically populated with numerical values based on the system date. When set to MM:DD:YY:UU or DD:MM:YY:UU, the system will populate the first three fields, so those fields will appear grayed out in the Set Generator UBits menu option, leaving only the last field (UU) to be customized daily by the user. »» UU:UU:UU:UU • MM:DD:YY:UU • DD:MM:YY:UU 12 Set Generator UBits Sets userbits of the Ambient® Lockit timecode generator. »» 00 00 00 00 (Hex: 00-FF for each slot) File Start TC Offset Sets the offset of the beginning timecode stamp of recorded files. Useful when there is a constant offset between camera and PIX 260i recorded files. The applied offset does not affect timecode output of the PIX 260i. »» 0 (numeric -10 to +10) 6 13 Setup Menu Options # 75 PIX 260i User Guide LCD Monitor # Parameter Name Description Options 1 Exposure Assist Sets the type of Exposure assist tool. »» False Color, 12-step • False Color, 4-step • Zebras 1 • Zebras 2 • Zebras 1+2 2 Focus Assist Sets the type of Focus Assist tool. »» Peaking • Edge Enhance 3 Zebra 1 Level Sets IRE level of Zebra 1. »» 70 IRE +/-5% (numeric 50-108) 4 Zebra 2 Threshold Sets the IRE threshold valued for Zebra 2. »» 85 IRE (numeric 70-108) Setup Menu Options 5 Peaking Color Sets the displayed peaking color. • White »» Red • Blue • Green • Yellow 6 Peaking Sensitivity Sets the general peaking sensitivity. • High »» Mid • Low 7 Peaking Background Contrast Sets the amount of background contrast when Focus Assist Peaking is active. »» 1x • 0.5x • 0.25x • No Background 8 Vertical Flip Display Flips the LCD and OSD vertically. »» Off • On 9 Horizontal Flip Display Flips the LCD video image horizontally. »» Off • On On-Screen Display # Parameter Name Description Options 1 ABS Time Display of absolute record time. »» On • Off 2 File Codec Display of current file codec »» On • Off 3 File Name Display of current file name »» On • Off 4 File Resolution/Rate Display of current file resolution »» On • Off 5 Audio Source Display of audio input levels for channels 1 and 2 »» On • Off 6 Input - Video Display of input audio source and channel count »» On • Off 7 Headphone Source Display of headphone audio source »» On • Off Display mode of audio meters for inputs 1 and 2 • Off »» Top (wide) • Top (thin) • Bottom (thin) • Left (thin) • Right (thin) 8 Audio Metering 76 v. 2.10 Features and specifications are subject to change. Visit www.sounddevices.com for the latest documentation. PIX 260i User Guide Parameter Name Description Options 9 Time/date Display of time of day and date »» On • Off 10 Timecode Display of current timecode value »» On • Off 11 Drive (D1) status Display status of Drive 1 »» On • Off 12 Drive (D2) status Display status of Drive 2 »» On • Off 13 Drive (D3) status Display status of Drive 3 »» On • Off 14 Drive (D4) status Display status of Drive 4 »» On • Off 15 RS-422 Status Display status of connected RS-422 controller »» On • Off 16 Cue Marker Display cue marker information during playback »» On • Off 17 Sync Reference Display current Sync Reference »» On • Off 18 Group Number Displays [Network - Group] setting »» On • Off 19 IP Address Displays current PIX 260i IP Address »» On • Off Setup Menu Options # Remote Control # Parameter Name Description Options 1 RS-422 Enable or disable RS-422 capability • On »» Off 2 RS422 Interface Device ID Set the DeviceID communicated to attached RS422 controllers. »» Sony BVW75 • Sound Devices »» Off • SDI Flag - RED • SDI Flag - Panasonic • SDI Flag - Panasonic (Varicam) • SDI Flag - Canon • SDI Flag - Sony • SDI Flag - Arri • SDI Flag - PIX • Timecode 3 Rec Start/Stop Determines what method the PIX 260i uses to automatically start and stop recordings. 4 GPIO Inputs Set GPIO inputs (pins 1, 2, and 3 on GPIO connector) »» Active low to active high or active low. Active high: Connecting the pin to +5V will activate the function. Active low: • Active high Connecting the pin to ground will activate the function. 5 GPIO Outputs Set GPIO outputs (pins 6, 7, and 8 on GPIO connector) to active high or active low. Active high: When the • Active low function is true, +5V will appear on the pin. Active low: »» Active high When the function is true, the pin will be grounded. 77 PIX 260i User Guide Network # Parameter Name Description 1 This PIX’s Name Sets name of PIX 260i. This must be unique within a network. 2 Grouping Sub-menu for network grouping settings. 2.1 Network Group Groups with other PIX 250i, PIX 260i, PIX 270i, and 970 units on the network. 2.2 Push Settings to Group Copies this unit’s settings to all other units in the group. All grouped settings will be pushed. (See “Grouped Settings”, page 47) 2.3 Synchronize audio channel settings Options »» PIX260 »» No Group • Group 1 • Group 2 • Group 3 • Group 4 Dante Redundancy Mode When On the PIX 260i’s Primary and Secondary Ethernet ports both transmit Dante Audio over separate networks. This provides a fail safe of the Dante system if one of the networks should fail. In Dante Redundancy Mode, two separate networks must be run and they CANNOT be connected to one another. Connect any computer running Dante Controller to the PIX 260’s PRI Ethernet network. 4 Auto IP Settings When On, the IP settings will automatically be provided by a DHCP (recommended), or Link-local when • Off no DHCP is present. When Off the IP Address, Subnet »» On Mask, and Gateway will have to be entered manually. 5 IP Address Displays IP Address, can be edited when Auto IP Settings is OFF. 6 Subnet Mask Displays Subnet Mask, can be edited when Auto IP Settings is OFF. 7 Gateway Displays Gateway, can be edited when Auto IP Settings is OFF. 8 Authentication Set the user name and password to be used for PIXNET and Samba drive access. 3 »» Off • On Setup Menu Options System # Parameter Name Description Options Power Determines power on and off method. When set to Always on, the PIX 260i will turn on and off when external DC is applied. When Use Power Switch is selected the PIX 260i is powered on and off using a key combination of AUDIO + Control Knob press. • Always On »» Use Power Switch 2 Initial View Sets which one of three screens will appear after the unit boots up. »» Main View (video) • AudioView (with Input Settings) • Audio View (with expanded meters) 3 HP Warning Bell Level Adjusts the level of the heaphone warning bell sound »» -40dBFS (Off, -60 to -12dBFS) 4 Time Zone Selects the international time zone »» (GMT-06:00) Central Time (US) (All GMT zones) 5 Daylight Saving Toggles daylight saving on or off for the time-of-day clock »» Off • On 1 78 v. 2.10 Features and specifications are subject to change. Visit www.sounddevices.com for the latest documentation. PIX 260i User Guide Parameter Name Description Options 6 Time Format Selects between 12 or 24 hour format for the time-ofday clock »» 12h • 24h 7 Date Format Selects between MM/DD/YY and DD/MM/YY date format »» MM/DD/YY • DD/MM/YY 8 Set Date/Time Set the time and date 9 Rec button File Split Whether or not a new file will be created when the REC button is pushed during recording. • On »» Off 10 Playback Start Mode Choose what to do when file playback is initiated. »» Play immediately • Pause on First Frame Playback Mode Determines Playback Mode. »» Play Once • Play Once - Pause • Play All • Play All - Pause • Play All - Loop • Play List • Play List - Pause • Play List - Loop 12 Playback Loop Enable Determines which method toggles playback looping mode. »» Hold Play Button 1 Second • Hold Play Button 2 Seconds • Hold Play Button 3 Seconds • Play Button Disabled 13 Shortcuts Displays a dialog that shows all shortcut button combinations. This is not a setting, but a helpful reference. 14 Version Info Displays a dialog indicating firmware version and serial number. This is not a setting, but a helpful reference. 15 Update Software Searches attached drives for a .prg firmware file and begins the firmware update process. 11 Button Shortcuts # Quick Setup # Parameter Name Description 1 Load Factory Settings Loads default setup 2 Load Settings From Drive 1 Loads selected setup from setup files saved on Drive 1. 3 Save Settings to Drive 1 Opens dialog to name and save current setup to Drive 1. Options 79 PIX 260i User Guide Button Shortcuts Button Combination AUDIO + Control Knob rotate AUDIO + LCD LCD + Control Knob press Stop + Rew Stop + Fast Forward MENU + FILES MENU + Control Knob Press Effect Change HP source. From the Audio view: Solo the highlighted channel in the headphones. Adjust LCD and button brightness. False take. Deletes last take and decrements Take Number. Scene increment. Changes the scene name by increasing it numerically or by alpha characters. Button lock options: Unlock Buttons, Lock Non-Transport Buttons, or Lock All Buttons. Toggle network grouping. If the unit is grouped, this shortcut will remove it from the group. IF the unit is not grouped, this shortcut will put it back into the group it was previously in. Hold LCD Turns off LCD display. LCD + Encoder Press LCD brightness menu. Connector Pin Assignments LCD + MENU Toggle Focus Assist on LCD display. LCD + FILES Toggle Exposure Assist on LCD display. LCD + AUDIO Toggle 1:1 zoom on the LCD display. FILES + Fast Forward FILES + Rew Hold Play Play + Fast Forward Play + Rew When in Record or Playback, sets a cue marker When in Record or Playback, deletes last cue marker Toggle playback looping. Begin looping between cue points when in loop playback mode Begin looping of clip when in loop playback mode Connector Pin Assignments Connector Pin Assignments Notes XLR-F (2) (Analog Audio inputs) 1–ground 2–signal (+) 3–signal (-) Mates with XLR-Male connector 20k ohm input impedance, line level, active-balanced XLR-M (2) (Analog Audio outputs) 1–ground 2–signal (+) 3–signal (-) Mates with XLR-Female connector 20k ohm input impedance, line level, active-balanced TRS (Headphone output) Tip–signal L Ring–signal R Sleeve–signal ground Mates with TRS jack. 80 v. 2.10 Features and specifications are subject to change. Visit www.sounddevices.com for the latest documentation. PIX 260i User Guide BNC (2) (Timecode input & output) Center pin–signal Sleeve–ground Mates with BNC male connector Unbalanced, coaxial connection, 75 ohm connectors recommended Mates with BNC male connector Unbalanced, coaxial connection, 75 ohm connectors recommended BNC (2) (Genlock or Wordclock input & output) HDMI (2) (HDMI input & output) Standard HDMI Mates with HDMI Type A Plug (male) eSATAp Female (2) Standard eSATAp Mates with eSATAp male connector USB-A (1) Keyboard Input Standard USB-A receptacle For use with USB Keyboards only. Data transfer is not supported DB-25 (1) (CH 1-8 LINE IN) 1–Input 8 signal (+) 2–Input 8 Ground 3–Input 7 signal (-) 4–Input 6 signal (+) 5–Input 6 Ground 6–Input 5 signal (-) 7–Input 4 signal (+) 8–Input 4 Ground 9–Input 3 signal (-) 10–Input 2 signal (+) 11–Input 2 Ground 12–Input 1 signal (-) 13–unused 14–Input 8 signal (-) 15–Input 7 signal (+) 16–Input 7 Ground 17–Input 6 signal (-) 18–Input 5 signal (+) 19–Input 5 Ground 20–Input 4 signal (-) 21–Input 3 signal (+) 22–Input 3 Ground 23–Input 2 signal (-) 24–Input 1 signal (+) 25–Input 1 Ground Mates with DB-25 Male Connectors wired in Tascam fashion DB-25 (1) (CH 1-8 LINE OUT) 1–Output 8 signal (+) 2–Output 8 Ground 3–Output 7 signal (-) 4–Output 6 signal (+) 5–Output 6 Ground 6–Output 5 signal (-) 7–Output 4 signal (+) 8–Output 4 Ground 9–Output 3 signal (-) 10–Output 2 signal (+) 11–Output 2 Ground 12–Output 1 signal (-) 13–unused 14–Output 8 signal (-) 15–Output 7 signal (+) 16–Output 7 Ground 17–Output 6 signal (-) 18–Output 5 signal (+) 19–Output 5 Ground 20–Output 4 signal (-) 21–Output 3 signal (+) 22–Output 3 Ground 23–Output 2 signal (-) 24–Output 1 signal (+) 25–Output 1 Ground Mates with DB-25 Male Connectors wired in Tascam fashion Connector Pin Assignments BNC (2) (SDI input & output) Mates with BNC male connector Unbalanced, coaxial connection 81 PIX 260i User Guide Connector Pin Assignments DB-25 (1) (CH 1-8 AES IN/OUT) 1–Digital Out 4 signal (+) 2–Digital Out 4 Ground 3–Digital Out 3 signal (-) 4–Digital Out 2 signal (+) 5–Digital Out 2 Ground 6–Digital Out 1 signal (-) 7–Digital In 4 signal (+) 8–Digital In 4 Ground 9–Digital In 3 signal (-) 10–Digital In 2 signal (+) 11–Digital In 2 Ground 12–Digital In 1 signal (-) 13–unused 14–Digital Out 4 signal (-) 15–Digital Out 3 signal (+) 16–Digital Out 3 Ground 17–Digital Out 2 signal (-) 18–Digital Out 1 signal (+) 19–Digital Out 1 Ground 20–Digital In 4 signal (-) 21–Digital In 3 signal (+) 22–Digital In 3 Ground 23–Digital In 2 signal (-) 24–Digital In 1 signal (+) 25–Digital In 1 Ground Mates with DB-25 Male Connectors wired in Tascam fashion Phoenix 10-pin (1) (GPIO) 1–Ground 2–Record Input 3–Playback Input 4–Stop Input 5–unused 6–unused 7–Record Output 8–Playback Output 9–Stop Output 10–+5V DC Output Logic points can be set to high or low. DB-9 (1) (RS-422) 1–Ground 2–Transmit A 3–Receive B 4–Receive Common 5–Spare 6–Transmit Common 7–Transmit B 8–Receive A 9–Ground Sony P2 (9-pin) machine control standard 8P6C-F (2) (Ethernet) Standard 8P8C For Ethernet Network connection, Ethernet file transfer, Dante, and PIX 260i grouping. Mates with Cat-5 USB-B (1) (Factory) Standard USB-B receptacle For Factory use only. Mates with USB Standard-B plug. 82 v. 2.10 Features and specifications are subject to change. Visit www.sounddevices.com for the latest documentation. PIX 260i User Guide Appendix A - Supported Files The PIX 260i supports the playback of various QuickTime .mov and Broadcast Wave .wav files. The PIX 260i will playback any file that it generates. Additionally, the PIX 260i can playback QuickTime and Broadcast Wave files generated by other 3rd party recorders/applications. The PIX 260i will import and playback up to 32 channels of polyphonic or monophonic Broadcast Wave files. The PIX 260i will import and playback High Definition QuickTime ProRes and DNxHD files generated by Avid and Final Cut Pro (currently tested with Avid 6 and Final Cut Pro 7 and X). 720 x 486 NTSC Standard Definition files are also supported. 720 x 480 NTSC Standard Definition files are not supported. Appendix A - Supported Files The PIX 260i supports up to 32 Tracks of audio in a QuickTime file. When exporting the QuickTime file for PIX 260i playback be certain to use only 2 audio streams (PIX 260i can handle up to 32 audio tracks over one QuickTime audio stream). 83 PIX 260i User Guide Specifications SDI Input • 4:4:4 or 4:2:2; 12, 10, or 8-bit • 3G-SDI (levels A and B), HD-SDI, or SDI Output • 4:4:4 or 4:2:2; 12, 10, or 8-bit • 3G-SDI (level A), HD-SDI, or SDI SMPTE 12M-1, 12M-2, 125M, 259M, 272M, 291M, 292, 296M, 299, 315M, 352M, 372, 424, 425 HDMI Input v1.4a, 4:4:4 or 4:2:2, RGB or YCbCr, 10 or 8-bit, HDCP-enabled Output v1.3, 4:2:2 8-bit, RGB and YCbCr Video Input Resolutions / Rates Input Resolutions / Rates Specifications • 1080p23.976/24/25/29.97/30 • 1080i50/59.94/60 • 1080PsF23.976/24/25/29.97/30 • 720p23.976/24/25/29.97/30 (SDI Only) • 720p50/59.94/60 • 576i50 (PAL) • 480i59.94 (NTSC) Video Codecs and Files Codecs • Apple ProRes 4444, 330 Mb/s, 12-bit • Apple ProRes 36, 100, 145, 220 Mb/s, 8 and 10-bit • Avid DNxHD 36, 100, 145, 220 Mb/s, 8 and 10-bit Files QuickTime wrapper (.MOV), Broadcast Wave (.WAV) Audio Only Up/Down/Cross Conversion Up/Down/Cross Conversion • From input: 480i, 576i, 720p, 720PSF, 1080i, 1080p, 1080PSF • To output and file: 480i, 576i, 720p, 720PSF, 1080i, 1080p, 1080PSF • Hardware based, 10-bit Frame Rate Conversion Frame Rate Conversion • 24, 25, 30, 50, 60 to 24, 25, 30, 50,60, 23.976, 29.97, 59.94 to 23.976, 29.97, 59.94, automatic 3:2 pull-down removal in 23.976 and 24 frame modes, other pull-down cadences include 2:2:2:4, 2:3:3:2, 3:2:3:2:2, and 2:2 • Hardware based, 10-bit LCD LCD • 5-inch LCD - IPS (In-Plane Switching), glossy, 800x480 pixel LCD display • Ultra wide viewing angle and color accuracy 84 v. 2.10 Features and specifications are subject to change. Visit www.sounddevices.com for the latest documentation. PIX 260i User Guide Audio Recording Record/Playback • 32 channels record/playback, simultaneous with video • Simultaneous Dante, Analog, HDMI or SDI, AES/EBU, selectable per channel Inputs • 8 Balanced, line-level inputs on DB-25. • Ch1,2 also on XLR Outputs • 8 Balanced, line-level outputs on DB-25. • Ch1,2 also on XLR Frequency Response 10Hz-20kHz, +/- 0.5dB re 1kHz THD + Noise 0.004% max (1kHz, 22Hz-22kHz) Input and Output Topology Fully electronically balanced, RF, ESD, short, and overload protected; pin-2 hot, pin-3 cold Line Output Clipping Level +18dBu Front Panel Headphone 1/4” with gain control Line Input Clipping Level +26dBu Input Impedance 10k Specifications Analog Audio Digital Audio Sample Rate / Bit Depth • 44.1 kHz, 47.0952 kHz, 48 kHz, 48.048 kHz • 24-bit AES3 • 8 channels in and out via DB-25, 110 ohm, 2 V p-p. • Accepts 32k, 44.1k, 48k, 96k, 192k sample rates. with SRC at input. HDMI • 8 channels embedded HDMI input • 8 channels embedded HDMI output. • Accepts 32k, 44.1k, 48k, 96k, 192k sample rates. SDI • 16 channels embedded SDI input • 16 channels embedded SDI output • 48k sample rate, with sample rate conversion Dante • 32 channels • 48kHz input and output File Storage Disk Format exFAT PIX-CADDY 2 mounted drives Two, front-mounted Sound Devices approved 2.5-inch drives (or Sound Devices approved CF cards with PIX-CADDY CF. Poly WAV recording only) eSATAp conected drives Two, rear panel eSATAp ports for drives meeting Sound Devices specifications, supplies 5V @ 2A See Sound Devices’ website for a list of approved media: www.sounddevices.com/approved 85 PIX 260i User Guide Timecode and Sync Modes Supported Freerun, 24 Hour run, Record run, External (LTC or SDI/HDMI) Frame Rates 23.976, 24, 25, 29.97DF, 29.97ND, 30DF, 30ND Accuracy • +/- 0.2ppm (½ frame per 24hrs) accuracy • Holds accurate timecode for 4 hours after power is removed Timecode Inputs / Outputs • SDI Input BNC • SDI Output BNC • HDMI Input Jack (Sony protocol) Sync Output • Analog bi-, tri-level sync / Genlock • Wordclock (Square wave, 48 kHz sampling rate, 3.3vp-p, 75 ohm) Sync Input • Analog bi-, tri-level sync / Genlock • Wordclock (Square wave, 48 kHz sampling rate, 3.3vp-p, 75 ohm) • Timecode Input BNC • Timecode Output BNC Control RS-422 Machine Control Ethernet Web-based control of settings and transport GPIO GPIO on 8 pins, Phoenix connector Specifications Keyboard USB Keyboard Front-panel USB host. Keyboards without hubs acceptable. Power External 10–27V, 60W max, via locking 4-pin XLR connector (pin-1 = ground, pin-4 = +). See Powering Physical Size (H x W x D) 3.3” x 8.6” x 10.3” (8.4 cm x 21.8 cm x 26.2 cm) Weight 7.5 lbs Operating Temperature -10° C to +40° C 86 v. 2.10 Features and specifications are subject to change. Visit www.sounddevices.com for the latest documentation. PIX 260i User Guide Declaration of Conformity According to EN ISO/IEC 17050-1:2004 Manufacturer’s Name: Sound Devices, LLC Manufacturer’s Address: E7556 State Rd. 23 and 33 Reedsburg, WI 53959 USA Declares under sole responsibility that the product as delivered Product Name: PIX Video Recorder Model Number: PIX 260i Product Options: This declaration covers all options of the above products Declaration of Conformity complies with the essential requirements of the following applicable European Directives, and carries the CE marking accordingly: EMC Directive (2004/108/EC) EN 55022:2010 EN 55103-2:2009 First date of CE approval October 25, 2012. This Declaration of Conformity applies to the above-listed products placed on the EU market after: October 25, 2012 Date Matt Anderson Director of Engineering 87 PIX 260i User Guide Software License End-user license agreement for Sound Devices PIX 260i Embedded Software / Firmware Important Read carefully: This Sound Devices, LLC end-user license agreement (“EULA”) is a legal agreement between you (either an individual or a single entity) and Sound Devices, LLC for the Sound Devices, LLC software product identified above, which includes computer software, embedded software, and may include associated media, printed materials, and “online” or electronic documentation (“SOFTWARE PRODUCT”). By using, installing, or copying the SOFTWARE PRODUCT, you agree to be bound by the terms of this EULA. If you do not agree to the terms of this EULA, do not use or install the SOFTWARE PRODUCT. Software Product License The SOFTWARE PRODUCT is protected by copyright laws and international copyright treaties, as well as other intellectual property laws and treaties. The SOFTWARE PRODUCT is licensed, not sold. Grant of license. This EULA grants you the following limited, non-exclusive rights: In consideration of payment of the licensee fee, Sound Devices, LLC, as licensor, grants to you, the licensee, a non-exclusive right to use this copy of a Sound Devices, LLC software program (hereinafter the “SOFTWARE”) on a single product and/or computer. All rights not expressly granted to licensee are reserved to Sound Devices, LLC. Software ownership. As the licensee, you own the hardware on which the SOFTWARE is recorded or fixed. Sound Devices, LLC shall retain full and complete title to the SOFTWARE and all subsequent copies of the SOFTWARE, regardless of the media or form on or in which the original copies may exist. The license is not a sale of the original SOFTWARE. Software License Copyright. All rights, title, and copyrights in and to the SOFTWARE PRODUCT (including, but not limited to, any images, photographs, animations, video, audio, music, text, and “applets” incorporated into the SOFTWARE PRODUCT) and any copies of the SOFTWARE PRODUCT are owned by Sound Devices, LLC or its suppliers. The SOFTWARE PRODUCT is protected by copyright laws and international treaty provisions. Therefore, you must treat the SOFTWARE PRODUCT like any other copyrighted material, except that you may make copies as only provided below. You may not copy the printed materials accompanying the SOFTWARE PRODUCT. Restrictions on use. Licensee may not distribute copies of the SOFTWARE or accompanying materials to others. Licensee may not modify, adapt, translate, reverse engineer, decompile, disassemble, or create derivative works based on the SOFTWARE or its accompanying printed or written materials. Transfer restrictions. Licensee shall not assign, rent, lease, sell, sublicense, or otherwise transfer the SOFTWARE to another party without prior written consent of Sound Devices, LLC. Any party authorized by Sound Devices, LLC to receive the SOFTWARE must agree to be bound by the terms and conditions of this agreement. Termination. Without prejudice to any other rights, Sound Devices, LLC may terminate this EULA if you fail to comply with the terms and conditions of this EULA. In such event, you must destroy all copies of the SOFTWARE PRODUCT and all of its component parts. Limited Warranty No warranties. Sound Devices, LLC expressly disclaims any warranty for the SOFTWARE PRODUCT. The SOFTWARE PRODUCT and any related documentation is provided “as is” without warranty or condition of any kind, either express or implied, including, without limitation, the implied warranties and conditions of merchantability, fitness for a particular purpose, or non-infringement. The entire risk arising out of use or performance of the SOFTWARE PRODUCT remains with you. No liability for damages. In no event shall Sound Devices, LLC or its suppliers be liable for any damages whatsoever (including, without limitation, damages for loss of business profits, business interruption, loss of business information, or any other pecuniary loss) arising out of the use of or inability to use this Sound Devices, LLC product, even if Sound Devices, LLC has been advised of the possibility of such damages. In any case, Sound Devices, LLC’s entire liability under any provision of this evaluation license shall be limited to the greater of the amount actually paid by you for the SOFTWARE PRODUCT or U.S. $5.00. Because some states/jurisdictions do not allow the exclusion or limitation of liability for consequential or incidental damages, the above limitation may not apply to you. Governing Law This agreement and limited warranty are governed by the laws of the state of Wisconsin. 88 v. 2.10 Features and specifications are subject to change. Visit www.sounddevices.com for the latest documentation. PIX 260i User Guide Warranty and Technical Support Warranty & Service Sound Devices, LLC warrants the PIX 260i Video Recorder against defects in materials and workmanship for a period of TWO (2) years from date of original retail purchase. This is a non-transferable warranty that extends only to the original purchaser. Sound Devices, LLC will repair or replace the product at its discretion at no charge. Warranty claims due to severe service conditions will be addressed on an individual basis. THE WARRANTY AND REMEDIES SET FORTH ABOVE ARE EXCLUSIVE. SOUND DEVICES, LLC DISCLAIMS ALL OTHER WARRANTIES, EXPRESS OR IMPLIED, INCLUDING WARRANTIES OF MERCHANTABILITY AND FITNESS FOR A PARTICULAR PURPOSE. Warranty & Technical Support SOUND DEVICES, LLC IS NOT RESPONSIBLE FOR SPECIAL, INCIDENTAL, OR CONSEQUENTIAL DAMAGES ARISING FROM ANY BREACH OF WARRANTY OR UNDER ANY OTHER LEGAL THEORY. Because some jurisdictions do not permit the exclusion or limitations set forth above, they may not apply in all cases. For all service, including warranty repair, please contact Sound Devices for an RMA (return merchandise authorization) before sending your unit in for repair. Product returned without an RMA number may experience delays in repair. When sending a unit for repair, please do not include accessories, including SSD/HDD, CF cards, batteries, power supplies, carry cases, cables, or adapters unless instructed by Sound Devices. Sound Devices, LLC Service Repair RMA #XXXXX E7556 State Road 23 and 33 Reedsburg, WI 53959 USA telephone: (608) 524-0625 Technical Support / Bug Reports For technical support and bug reporting on all Sound Devices products contact: Sound Devices, LLC E-mail: [email protected] web: www.sounddevices.com/support/ Telephone: +1 (608) 524-0625 / Toll-Free in the U.S.A.: (800) 505-0625 Fax: +1 (608) 524-0655 Sound Devices hosts a user support forum. The URL is: http://forum.sounddevices.com Sound Devices cannot guarantee that a given computer, software, or operating system configuration can be used satisfactorily with the PIX 260i Video Recorder based exclusively on the fact that it meets our minimum system requirements. 89 PIX 260i, v 2.10 - Printed in U.S.A.