1
4-480-657-11(1)
SONY.
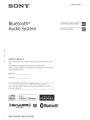
Bluetooth®
Audio System
Operating Instructions
Mode d'emploi
I
I
I
Owner's Record
The model and serial numbers are located on the bottom of the
unit.
Record these numbers in the spaces provided below.
Refer to these numbers whenever you call upon your Sony dealer
regarding this product.
Model No.
Serial No.
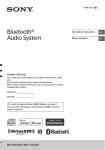
To cancel the demonstration (DEMO) display, see page 17.
Pour annuler l'affichage de demonstration (DEMO), reportezvous Ia page 19.
a
cillD~~
DIGITAL AU DID
I TEXT
I
Made for
~ iPod
WORKS WITH
[OJ iPhone
MfX.. NSOOOBT /MEX-GS610BT
PANDORA
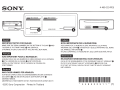
Be sure to install this unit in the dashboard of the
car for safety.
For installation and connections, see the
supplied installation/connections manual.
Warning
FOR THE CUSTOMERS IN THE USA. NOT
APPLICABLE IN CANADA, INCLUDING IN THE
PROVINCE OF QUEBEC.
POUR LES CLIENTS AUX ETATS-UNIS. NON
APPLICABLE AU CANADA, Y COMPRIS LA
PROVINCE DE QUEBEC.
This equipment has been tested and found to
comply with the limits for a Class B digital device,
pursuant to Part 15 of the FCC Rules.
These limits are designed to provide reasonable
protection against harmful interference in a
residential installation. This equipment
generates, uses, and can radiate radio frequency
energy and, if not installed and used in
accordance with the instructions, may cause
harmful interference to radio communications.
However, there is no guarantee that interference
will not occur in a particular installation. If this
equipment does cause harmful interference to
radio or television reception, which can be
determined by turning the equipment off and
on, the user is encouraged to try to correct the
interference by one or more of the following
measures:
- Reorient or relocate the receiving antenna.
- Increase the separation between the
equipment and receiver.
-Connect the equipment into an outlet on a
circuit different from that to which the receiver
is connected.
- Consult the dealer or an experienced radio/TV
technician for help.
You are cautioned that any changes or
modifications not expressly approved in this
manual could void your authority to operate this
equipment.
This device complies with Part 15 of the FCC Rules
and Industry Canada licence-exempt RSS
standard(s).
Operation is subject to the following two
conditions: (1) this device may not cause harmful
interference, and (2) this device must accept any
interference received, including interference that
may cause undesired operation of the device.
This transmitter must not be co-located or operated
in conjunction with any other antenna or
transmitter.
Under Industry Canada regulations, this radio
transmitter may only operate using an antenna of a
type and maximum (or lesser) gain approved for
the transmitter by Industry Canada. To reduce
potential radio interference to other users, the
antenna type and its gain should be so chosen that
the equivalent isotropically radiated power (e.i.r.p.)
is not more than that necessary for successful
communication.
This equipment complies with FCC/IC radiation
exposure limits set forth for an uncontrolled
environment and meets the FCC radio frequency
(RF) Exposure Guidelines and RSS-102 of the IC
radio frequency (RF) Exposure rules. This
equipment has very low levels of RF energy that it
deemed to comply without maximum permissive
exposure evaluation (MPE). But it is desirable that it
should be installed and operated keeping the
radiator at least 20 em or more away from person's
body (excluding extremities: hands, wrists, feet and
ankles).
CAUTION
The use of optical instruments with this product will
increase eye hazard.
For the State of California, USA only
Perchlorate Material- special handling may apply,
See
www.dtsc.ca.gov/hazardouswaste/perchlorate
Perchlorate Material: Lithium battery contains
perchlorate
Note on the lithium battery
Do not expose the battery to excessive heat such as
direct sunlight, fire or the like.
Warning if your car's ignition has no ACC
position
Be sure to set the AUTO OFF function (page 17).
The unit will shut off completely and
automatically in the set time after the unit is
turned off, which prevents battery drain. If you
do not set the AUTO OFF function, press and hold
OFF until the display disappears each time you
turn the ignition off.
Notes on BLUETOOTH function
Caution
IN NO EVENT SHALL SONY BE LIABLE FOR ANY
INCIDENTAL, INDIRECT OR CONSEQUENTIAL
DAMAGES OR OTHER DAMAGES INCLUDING,
WITHOUT LIMITATION, LOSS OF PROFITS, LOSS OF
REVENUE, LOSS OF DATA, LOSS OF USE OF THE
PRODUCT OR ANY ASSOCIATED EQUIPMENT,
DOWNTIME, AND PURCHASER'S TIME RELATED TO
OR ARISING OUT OF THE USE OF THIS PRODUCT, ITS
HARDWARE AND/OR ITS SOFTWARE.
IMPORTANT NOTICE!
Safe and efficient use
Changes or modifications to this unit not expressly
approved by Sony may void the user's authority to
operate the equipment.
Please check for exceptions, due to national
requirement or limitations, in usage of BLUETOOTH
equipment before using this product.
Driving
Check the laws and regulations on the use of
cellular phones and handsfree equipment in the
areas where you drive.
Always give full attention to driving and pull off the
road and park before making or answering a call if
driving conditions so require.
Connecting to other devices
When connecting to any other device, please read
its user guide for detailed safety instructions.
Radio frequency exposure
RF signals may affect improperly installed or
inadequately shielded electronic systems in cars,
such as electronic fuel injection systems, electronic
antiskid (antilock) braking systems, electronic
speed control systems or air bag systems. For
installation or service of this device, please consult
with the manufacturer or its representative of your
car. Faulty installation or service may be dangerous
and may invalidate any warranty that may apply to
this device.
Consult with the manufacturer of your car to ensure
that the use of your cellular phone in the car will not
affect its electronic system.
Check regularly that all wireless device equipment
in your car is mounted and operating properly.
Emergency calls
This BLUETOOTH car handsfree and the electronic
device connected to the handsfree operate using
radio signals, cellular, and land line networks as well
as user-programmed function, which cannot
guarantee connection under all conditions.
Therefore do not rely solely upon any electronic
device for essential communications (such as
medical emergencies).
Remember, in order to make or receive calls, the
handsfree and the electronic device connected to
the handsfree must be switched on in a service area
with adequate cellular signal strength.
Emergency calls may not be possible on all cellular
phone networks or when certain network services
and/or phone features are in use.
Check with your local service provider.
Table of Contents
Warning ................................... 2
Guide to Parts and Controls ................... 5
Getting Started
Detaching the Front Panel ..... ... ............
Setting the Clock ............................
Preparing a BLUETOOTH Device ................
Connecting an iPod/USB Device . ..............
Connecting Other Portable Audio Device ........
6
6
7
8
9
Listening to the Radio/SiriusXM
Listening to the Radio ........................ 9
Using Radio Data System (RDS) ............... 10
Listening to the SiriusXM Radio ............... 10
Playback
Playing a Disc . . . . . . . . . . . . . . . . . . . . . . . . . . . . .
Playing an iPod/USB Device ..................
Playing a BLUETOOTH Device .................
Searching and Playing Tracks .................
11
11
11
12
Listening to Pandora®
Preparing for Pandora®....... .. ............. 13
Streaming Pandora ® ........................ 13
Available Operations in the Pandora ®.......... 13
Handsfree Calling
Receiving a Call ............................ 14
Making a Call . ............................. 14
Available Operations during Call .............. 15
Useful Functions
App Remote with iPhone/ Android Phone ...... 15
Settings
Canceling the DEMO Mode . . . . . . . . . . . . . . . . . .
Basic Setting Operation . . . . . . . . . . . . . . . . . . . . .
GENERAL Setup ............................
SOUND Setup ..............................
EQ10 PRESET . . . . . . . . . . . . . . . . . . . . . . . . . . .
EQ10 SETIING . . . . . . . . . . . . . . . . . . . . . . . . . .
POSITION {listening position) ..............
RB ENH (rear bass enhancer) ..............
SW DIREC (subwoofer direct connection) ....
17
17
17
17
17
17
18
18
18
DISPLAY Setup . . . . . . . . . . . . . . . . . . . . . . . . . . . .
COLOR (preset color- dynamic color
illuminator) . . . . . . . . . . . . . . . . . . . . . . . . . . . .
CUSTOM-C (custom color) . . . . . . . . . . . . . . . .
SND SYNC (sound synchronization) ........
WHT MENU {white menu) ................
START-WHT {start white) ... . .............
BT {BLUETOOTH} Setup .....................
BT IN IT {BLUETOOTH initialize) .............
APP REM {App Remote) Setup ...............
19
19
19
19
19
19
19
19
19
Additional Information
Precautions ...............................
Maintenance. . . . . . . . . . . . . . . . . . . . . . . . . . . . . .
Specifications . . . . . . . . . . . . . . . . . . . . . . . . . . . . .
Troubleshooting ...........................
20
22
22
24
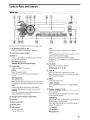
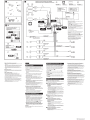
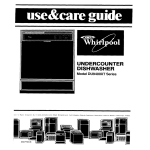
Guide to Parts and Controls
The number 3/C: (repeat) button has a tactile dot.
[I] Q {browse) {page 12, 13)
-OFF
Press and hold for 1 second to turn off the
power.
Press and hold for more than 2 seconds to turn
off the power and the display.
If the unit is turned off and the display
disappears, it is unable you to operate with the
remote.
Enter the browse mode during playback.
[gJ Front panel release button
~SEEK+/-
Tune in radio stations automatically. Press and
hold to tune manually.
~~~ {prev/next)
.,.../_... {fast-reverse/fast-forward)
~ Control dial
Rotate to adjust the volume.
ENTER
Enter the selected item.
Press SRC, rotate then press to change the
source.
VOICE {page 15)
Activate voice dial.
When the App Remote function is on, the voice
recognition is activated (Android™ phone only).
-APP
Press and hold for more than 2 seconds to
establish App Remote function (connection).
N-Mark
Touch the control dial with Android phone to
make BLUETOOTH connection.
[ID Receptor for the remote commander
[§] Disc slot
[1] Display window
[ID
~{disc eject)
liD
SRC {source)
Turn on the power.
Change the source.
[Q]
~{back)
Return to the previous display.
MODE {page 9, 11, 13, 15)
[j] CALL~
Enter the call menu. Receive/end a call.
Press and hold more than 2 seconds to switch
the BLUETOOTH signal.
[12] MENU
Open the setup menu.
-DSPL {display)
Press and hold, then press to change display
items.
~ Number buttons {1 to 6)
Receive stored radio stations. Press and hold to
store stations.
Call a stored phone number. Press and hold to
store a phone number.
ALBUM T/A
Skip an album for audio device. Press and hold
to skip albums continuously.
Press A to thumbs up, or T to thumbs down in
Pandora® (page 13).
C: {repeat)
~{shuffle)
MIC (page 15)
PAUSE
[H] PTY (program type)
Select PTY in RDS.
CAT (category)
Select radio channels in SiriusXM.
~ AUX input jack
[1§1 USB port
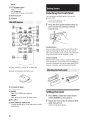
Getting Started
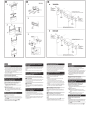
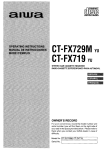
Detaching the Front Panel
You can detach the front panel of this unit to
prevent theft.
1
Press and hold OFF G).
The unit is turned off.
2
Press the front panel release button @,
then remove the panel by pulling it
towards you.
Caution alarm
If you turn the ignition switch to the OFF position
without detaching the front panel, the caution
alarm will sound for a few seconds. The alarm will
only sound if the built-in amplifier is used.
Serial numbers
Make sure the serial numbers on the bottom of the
unit and the back of the front panel are matched
correctly. Otherwise you cannot make BLUETOOTH
pairing, connection and disconnection by NFC.
The VOL (volume)+ button has a tactile dot.
Remove the insulation film before use.
[Z] ... (~ )/... (~)
M VOL (Volume) +/~SOUND
Open the SOUND menu directly.
~
-MENU
Press and hold to open the setup menu.
1
Press MENU, rotate the control dial to
select [GENERAL], then press it.
t
2
Rotate the control dial to select [CLOCKADJ], then press it.
(+)/.J (-)
12}] DSPL (display)/-SCRL(scroll}
Change display items. Press and hold to scroll a
display item.
6GB
Setting the Clock
The hour indication flashes.
3
Rotate the control dial to set the hour
and minute.
5
To move the digital indication, press SEEK+/-.
4
If passkey* input is required on the
BLUETOOTH device, input [0000].
* Passkey may be called "Passcode," "PIN code,"
"PIN number" or."Password," etc., depending on
the device.
After setting the minute, press MENU.
The setup is complete and the clock starts.
oQ=
To display the clock, press DSPL.
Preparing a BLUETOOTH Device
You can enjoy music, or perform handsfree calling,
by connecting a suitable BLUETOOTH device. For
details on connecting, refer to the operating
instructions supplied with the device.
Before connecting the device, turn down the
volume of this unit; otherwise, loud sound may
result.
I
.....
I
xxxx-
Input passkey
[0000]
When pairing is made,
6
0
stays lit.
Select this unit on the BLUETOOTH device
to establish the BLUETOOTH connection.
~" or r]" lights up when the connection is
made.
Note
While connecting to a BLUETOOTH device, this unit
cannot be detected from another device. To enable
detection, enter the pairing mode and search for this
unit from another device.
When connecting a BLUETOOTH device (cellular
phone, audio device, etc.) for the first time, mutual
registration (called "pairing") is required. Pairing
enables this unit and other devices to recognize
each other.
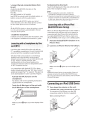
1
Place the BLUETOOTH device within 1 m
{3 ft} of this unit.
2
Press CALL, rotate the control dial to
select [PAIRING], then press it.
0
flashes.
The unit enters pairing standby mode.
3
Perform pairing on the BLUETOOTH
device so it detects this unit.
4
Select [Sony Car Audio] shown in the
display of the BLUETOOTH device.
If [Sony Car Audio] does not appear, repeat from
step 2.
DR-BT30Q
Sony
Car Audio
xxxxxxx
Perform step 2 to cancel the pairing mode after this
unit and the BLUETOOTH device are paired.
To use a paired device, connection with this unit is
required. Some paired devices will connect
automatically.
))
1
Press CALL, rotate the control dial to
select [BT SIGNL], then press it.
Make sure that
t
0
lights up.
2
Activate the BLUETOOTH function on the
BLUETOOTH device.
3
Operate the BLUETOOTH device to
connect to this unit.
~" or
oQ=
I
To cancel pairing
r]"
lights up.
Icons in the display:
J4i~"
r]"
T.ll
Lights up when a cellular phone is
connected to the unit.
Lights up when an audio device is
connected to the unit.
Indicates the signal strength status of
connected cellular phone.
To connect the last-connected device from
this unit
Activate the BLUETOOTH function on the
BLUETOOTH device.
Press SRC.
Select [BT PHONE] or [BT AUDIO].
Press ENTER to connect with the cellular phone, or
PAUSE to connect with the audio device.
Note
While streaming BLUETOOTH audio, you cannot
connect from this unit to the cellular phone. Connect
from the cellular phone to this unit instead.
Tip
With BLUETOOTH signal on : when the ignition is turned
to on, this unit reconnects automatically to the lastconnected cellular phone.
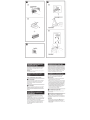
To install the microphone
For details on how to connect the microphone, refer
to the supplied "Installation/Connections" guide.
Confle;ctingwith a S'm;~rtphe,ae by 'O:ne
tou(b'(;NFC)'
To disconnect by One touch
Touch the N-Mark part of the unit with the N-Mark
part of the smartphone again.
Notes
• When making the connection, handle the
smartphone carefully to prevent scratches.
• One touch connection is not possible when the unit is
already connected to another NFC compatible device.
In this case, disconnect the other device, and make
connection with the smartphone again.
C9J'l:ne~i~Q•' "it~~/fl,, i,p~~Jl~/i'RQft
(BtU,EI:OO'fH Auto Pairing}
When an iPhone/iPod with iOSS or later installed is
connected to the USB port, the unit is paired and
connected with the iPhone/iPod automatically.
To enable BLUETOOTH Auto Pairing, make sure
[AUTO PAIRING] in BT setup is set to [ON] {page 19).
1
Activate the BLUETOOTH function on the
i Phone/i Pod.
2
Connect an iPhone/iPod to the USB port.
By touching the control dial on the unit with an
NFC* compatible smartphone, the unit is paired and
connected with the smartphone automatically.
* NFC (Near Field Communication) is a technology
enabling short-range wireless communication
between various devices, such as mobile phones and
IC tags. Thanks to the NFC function, data
communication can be achieved easily just by
touching the relevant symbol or designated location
on NFC compatible devices.
For a smartphone with Android OS 4.0 or lower
installed, downloading the app "NFC Easy Connect"
available at Google Play™ is required. The app may
not be downloadable in some countries/regions.
1
Activate the NFC function on the
smartphone.
For details, refer to the operating instructions
supplied with the smartphone.
2
Touch the N-Mark part of the unit with
theN-Mark part of the smartphone.
Make sure that
unit.
0
lights up on the display of the
Note
BLUETOOTH Auto Pairing is not possible if the unit is
already connected to another BLUETOOTH device. In
this case, disconnect the other device, then connect the
iPhone/iPod again.
Connecting an iPod/USB Device
1
2
Turn down the volume on the unit.
Connect the iPod/USB device to the unit.
To connect an iPod/iPhone, use the USB
connection cable for iPod (not supplied).
When connecting iPhone 5
Make sure that
unit.
0
lights up on the display of the
For MEX-GS610BT, the rear USB port is also
available.
Listening to the Radio/SiriusXM
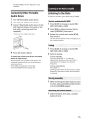
Connecting .Other Portable
Audio Device
1
Turn off the portable audio device.
2
Turn down the volume on the unit.
3
Connect the portable audio device to the
AUX input jack (stereo mini jack) on the
unit with a connecting cord (not
supplied)*.
* Be sure to use a straight type plug.
Listening to the Radio
To listen to the radio, press SRC to select [TUNER].
1
Press MODE to change the band (FM1,
FM2, FM3, AM1 or AM2).
2
Press MENU, rotate the control dial to
select [GENERAL], then press it.
3
Rotate the control dial to select [BTM],
then press it.
The unit stores stations in order of frequency on
the number buttons.
4
Press SRC to select [AUX).
1
Press MODE to change the band (FM1,
FM2, FM3, AM1 or AM2).
2
Perform tuning.
To match the volume level of the connected
device to other sources
To tune manually
Press and hold SEEK+/- to locate the
approximate frequency, then press SEEK+/repeatedly to fine adjust to the desired
frequency.
Start playback of the portable audio device at a
moderate volume, and set your usual listening
volume on the unit.
Press MENU and rotate the control dial.
Select [SOUND]~ [AUX VOL] (page 19).
To tune automatically
Press SEEK+/-.
Scanning stops when the unit receives a station.
Repeat this procedure until the desired station
is received.
1
While receiving the station that you want
to store, press and hold a number button
(1 to 6) until [MEM] appears.
1
Select the band, then press a number
button (1 to 6).
For SiriusXM activation, the Radio ID is required.
Using Radio Data System (RDS)
To display the SiriusXM Radio 10
1
2
Use PTY to display or search for a desired program
type.
1
2
Press PTY during FM reception.
Rotate the control dial until the desired
program type appears, then press it.
The unit starts to search for a station
broadcasting the selected program type.
Type of programs
NEWS {News), INFORM {Information), SPORTS
{Sports), TALK {Talk), ROCK {Rock), CLS ROCK
{Classic Rock), ADLT HIT {Adult Hits), SOFT RCK {Soft
Rock), TOP 40 {Top 40), COUNTRY (Country),
OLDIES (Oldies), SOFT (Soft), NOSTALGA
{Nostalgia), JAZZ (Jazz), CLASSICL (Classical),
RAND B {Rhythm and Blues), SOFT R B (Soft
Rhythm and Blues), LANGUAGE (Foreign
Language), REL MUSC (Religious Music), REL TALK
(Religious Talk), PERSNLTY (Personality), PUBLIC
(Public), COLLEGE (College), WEATHER (Weather)
During playback, press Q (browse) to enter the
browse mode.
Rotate the control dial to select the channel (0],
then press it.
seterti'fl9tfiafi,fl~lsfor;si,"ft.tsXM
1
Press Q (browse).
2
Rotate the control dial to select the
desired channel, then press it.
To select channels from categories
1
2
Press CAT.
Rotate the control dial to select the desired
category, then press it.
To store channels
1
While receiving the channel that you want to store,
press and hold a number button (1 to 6) until [MEM]
appears.
To receive the stored channel, press MODE to select
[SX1], [SX2] or [SX3], then press a number button {1
to 6).
To set a parental control
The CT data from the RDS transmission sets the
clock.
1
Set [CT-ON] in GENERAL setup (page 17).
Some SiriusXM channels contain content that is not
suitable for children. You can enable a parental
control passcode for these channels.
1
2
3
Press MENU and rotate the control dial.
Select [GENERAL]~ [PARENTAL]~
(LOCK SEL] ~ [LOCK-ON].
Enter the passcode, then press ENTER.
The initial passcode is [0000].
Listening to the SiriusXM Radio
To unlock the channels, select [OFF].
To listen to the SiriusXM, press SRC to select
[SIRIUSXM].
To change the passcode
1
2
3
Everything worth listening to is on SiriusXM, getting
over 130 channels, including the most commercialfree music, plus the best sports, news, talk and
entertainment. A SiriusXM Vehicle Tuner (sold
separately) and Subscription are required. For more
information, visit
www.siriusxm.com
To listen to SiriusXM Satellite Radio, a subscription
is required. Activate the SiriusXM Vehicle Tuner
using one of the two methods below:
• Online: Go to www.siriusxm.com/activaten ow
• Phone: Call1-866-635-2349
10GB
4
Press MENU and rotate the control dial.
Select (GENERAL]~ [PARENTAL]~ [CODE EDIT] .
Enter the current passcode on the current passcode
input display, then press ENTER.
The initial passcode is [0000].
Enter your new 4-digit passcode on the new
passcode input display, then press ENTER.
To change display items
Press and hold, then press DSPL to change as
follows:
Channel Number (Default)~ Channel Name~ Artist
Name~ Song Title~ Content Info~ Category Name
~Clock
To stop playback
Press and hold OFF for 1 second.
Playback
Playing a Disc
1
Playing an iPod/USB Device
In these Operating Instructions, "iPod" is used as a
general reference for the iPod functions on an iPod
and iPhone, unless otherwise specified by the text
or illustrations.
For details on the compatibility of your iPod, see
"About iPod" (page 20) or visit the support site on
the back cover.
MSC (Mass Storage Class)-type USB devices (such as
a USB flash drive, digital media player, Android
phone) compliant with the USB standard can be
used.
Depending on the digital media player or Android
phone, setting the USB connection mode to MSC is
required.
Notes
• For details on the compatibility of your USB device,
visit the support site on the back cover.
• Playback of the following MP3/WMA/WAV files is not
supported.
- lossless compression files
- copyright-protected files
- DRM (Digital Rights Management) files
- Multi-channel audio files
Connect an iPod/USB device to the USB
port {page 8).
Playback starts.
If a device is already connected, to start
playback, press SRC to select [USB] ([IPD]
appears in the display when the iPod is
recognized).
For MEX-GS610BT, press SRC to select [USB1] for
the USB port on the front, [USB2] for the USB
port on the rear.
2
Stop playback, then remove the device.
Caution for iPhone
Insert the disc {label side up).
Playback starts automatically.
1
To remove the device
Adjust the volume on this unit.
When you connect an iPhone via USB, phone call
volume is controlled by the iPhone, not the unit. Do
not inadvertently increase the volume on the unit
during a call, as sudden loud sound may result
when the call ends.
Press and hold MODE during playback until [MODE
IPOD] appears to enable operation by the iPod
directly.
Note that the volume can be adjusted only by the
unit.
To exit passenger control
Press and hold MODE until [MODE AUDIO] appears.
Playing a BLUETOOTH Device
You can play contents on a connected device that
supports BLUETOOTH A2DP (Advanced Audio
Distribution Profile).
1
Make BLUETOOTH connection with the
audio device {page 7).
2
3
Press SRC to select [BT AUDIO].
4
Operate the audio device to start
playback.
Adjust the volume on this unit.
Notes
• Depending on the audio device, information such as
title, track number/time and playback status may not
be displayed on this unit.
• Even if the source is changed on this unit, playback of
the audio device does not stop.
• [BT AUDIO] does not appear in the display while
running the "App Remote" application via the
BLUETOOTH function.
To match the volume level of the BLUETOOTH
device to other sources
Start playback of the BLUETOOTH audio device at a
moderate volume, and set your usual listening
volume on the unit.
Press MENU and rotate the control dial.
Select [SOUND]-+ [BTA VOL] (page 19).
4
Press ENTER to return to the QuickBrowZer mode.
The selected item appears.
Searching and Playing Tracks
5
Rotate the control dial to select the
desired item, then press it.
Playback starts.
Repe,at••Pf,ay'aricl, :stiuM~,, ptay
1 During playback, press C: (repeat) for
Repeat play, or ~ (shuffle) for Shuffle
play.
2
Press C: (repeat) or ~ (shuffle)
repeatedly to select the desired play
mode.
Playback in selected play mode may take time
to start.
Available play modes differ depending on the
selected sound source.
1
During CD, USB or BT audio device*1
playback, press Q (browse)*2 to display
the list of search categories.
When the track list appears, press ~ (back)
repeatedly to display the desired search
category.
*1 Available only for audio devices supporting
AVRCP (Audio Video Remote Control Profile} 1.4
or above.
*2 During USB playback, press Q {browse) for
more than 2 seconds to directly return to the
beginning of the category list.
2
Rotate the control dial to select the
desired search category, then press it to
confirm.
3
Repeat step 2 to search the desired track.
Playback starts.
To exit the Quick-BrowZe r mode
Press
Q
(browse).
1
2
Press Q (browse).
3
Rotate the control dial to select the item.
Press SEEK+.
The list is jumped in steps of 10% of the total
number of items.
12GB
Listening to Pandora®
Pandora® is available to stream music through your
iPhone, Android™ and BlackBerry® phones. You can
control Pandora® on a USB-connected iPhone or
BLUETOOTH connected Android/BlackBerry phone
from this unit.
The Pandora® service is not available in some
countries/regions.
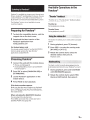
Available Operations in the
Pandora®
"Thumbs Up" or "Thumbs Down" feedback allows
you to personalize stations.
Thumbs Up
During playback, press •·
Preparing for Pandora®
1
To check for compatible devices, visit the
support site on the back cover.
2
Download the latest version of the
Pandora® application from
www.pandora.com
Thumbs Down
During playback, press T.
The station list allows you to easily select a desired
station.
1
During playback, press Q (browse).
For Android phone only
2
You cannot control Pandora® via the BLUETOOTH
function while running the "App Remote"
application via BLUETOOTH.
Press SEEK + to select the sorting order
[BY DATE] or [A TO Z].
3
Rotate the control dial to select the
desired station, then press it.
Playback starts.
Streaming Pandora®
1
Connect this unit with the mobile device.
• iPhone via USB (page 8}
• Android/BlackBerry phone via BLUETOOTH
function (page 7}
2
Press SRC to select [PANDORA USB] or
[BT PANDORA].
3
Launch Pandora® application on the
mobile device.
4
Press PAUSE to start playback.
The track or artist currently being played can be
bookmarked and stored in your Pandora® account.
1
During playback, press and hold MODE
until [BOOKMARK] appears.
2
Rotate the control dial to select [TRK]
(track) or [ART] (artist), then press it.
If the device number appears
Make sure that the same numbers are displayed
(e.g., 123456} in this unit and the mobile device,
then press ENTER on this unit and select [Yes] on
the mobile device.
When activating the BLUETOOTH function
You can adjust the volume level.
Press MENU and rotate the control dial. Select
[SOUND]-+ [BTA VOL] (page 19}.
13GB
2
Handsfree Calling
Rotate the control dial to select a name
or phone number from the call history,
then press it.
The phone call starts.
To use a cellular phone, connect it with this unit. For
details, see "Preparing a BLUETOOTH Device"
(page 7).
~
Cit,
1
Press CALL, rotate the control dial to
select [DIAL NUMBER], then press it.
2
Rotate the control dial to enter the
phone number, and lastly select [ ]
(space), then press ENTER*.
The phone call starts.
Receiving a Call
1
Press CALL when a call is received with a
ringtone.
* To move the digital indication, press SEEK+/-.
Note
[_]appears instead of[#] on the display.
The phone call starts.
Note
The ringtone and talker's voice are output only from the
front speakers.
1
To reject the call
Press CALL, rotate the control dial to
select [REDIAL], then press it.
The phone call starts.
Press and hold OFF for 1 second.
To end the call
Press CALL again.
You can store up to 6 contacts in the preset dial.
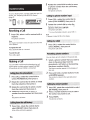
Making a Call
1
You can make a call from the phonebook or call
history when a cellular phone supporting PBAP
{Phone Book Access Profile) is connected.
Select a phone number that you want to
store in the preset dial, from the
phoneboo k, call history or by inputting
the phone number directly.
The phone number appears in the display of
this unit.
2
Press and hold a number button (1 to 6}
until [MEM] appears.
1
Press CALL, rotate the control dial to
select [PHONEBOOK], then press it.
2
Rotate the control dial to select an initial
from the initial list, then press it.
3
Rotate the control dial to select a name
from the name list, then press it.
1
Press SRC, rotate the control dial to select
[BT PHONE], then press it.
4
Rotate the control dial to select a
number from the number list, then press
it.
2
Press a number button (1 to 6) to select
the contact you want to call.
The phone call starts.
1
Press CALL, rotate the control dial to
select [RECENT CALL], then press it.
A list of the call history appears.
14GB
The contact is stored in the selected preset
number.
3
Press ENTER.
The phone call starts.
You can make a call by saying the voice tag stored
in a connected cellular phone that has a voice
dialing function.
1
Press CALL, rotate the control dial to
select [VOICE DIAL], then press it.
Alternatively, press ENTER while the App
Remote function is off.
2
Say the voice tag stored on the cellular
phone.
Your voice is recognized, and the call is made.
To cancel voice dialing
Press ENTER.
Available Operations during
Call
To preset the volume of the ringtone and
talker's voice
You can preset the volume level of the ringtone and
talker's voice.
Adjusting the ringtone volume:
Rotate the control dial while receiving a call.
Adjusting the talker's voice volume:
Rotate the control dial during a call.
To adjust the volume for the other party (Mic
gain adjustment)
Press MIC.
Adjustable volume levels: [MIC-LOW], [MIC-MID],
[MIC-Hl].
To reduce echo and noise (Echo Canceler/
Noise Canceler Mode)
Press and hold MIC.
Settable mode: [EC/NC-1], [EC/NC-2].
To transfer a call
In order to activate/deactivate the appropriate
device (this unit/cellular phone), press MODE or use
your cellular phone.
Useful Functions
App Remote with iPhone/
Android Phone
Downloading the "App Remote"
application is required from App
Store for iPhone or from Google
Play for Android phone.
Using the "App Remote"
application, the following
features are available:
- Operate the unit to launch and control
compatible applications on iPhone/ Android
phone.
- Operate iPhone/ Android phone with simple
finger gestures to control the source of the unit.
- Launch an application/audio source or search
the keyword on the application by saying a word
or phrase into the microphone (Android phone
only).
- Read out incoming text messages, SMS, email,
Twitter, Facebook, Calendar, etc., automatically,
and the text messages, SMS and email can be
replied (Android phone only).
- Adjust the sound settings (EQ10, Balance/Fader,
Listening Position) of the unit via iPhone/
Android phone.
Notes
• For your safety, follow your local traffic laws and
regulations, and do not operate the application while
driving.
• Available operations differ depending on the
applications. For details on available applications,
visit the support site on the back cover.
• App Remote ver. 2.0 via USB is compatible with iOS 5/
iOS 6 installed iPhones.
• App Remote ver. 2.0 via BLUETOOTH is compatible
with Android devices with Android 2.2, 2.3, 3.*, 4.0, 4.1
or 4.2 installed.
• Voice recognition function does not work depending
on your smartphone. In that case, go to [Settings]select [Voice Recognition].
• SMS/E-maii/Notification reading is available for
Android devices with TIS engine installed.
• The "Smart Connect" application, provided by Sony
Mobile Communications, is necessary for Twitter/
Facebook/Calendar, etc., notification read out.
Note
Depending on the cellular phone, handsfree connection
may be cut off when call transfer is attempted.
To check the status of SMS/email*
Ia flashes when a new SMS/email is received, and
stays lit when there are unread messages.
* Available only for a cellular phone supporting
MAP (Message Access Profile).
15GB
Establishing the App Remote
connection
1
2
3
Connect iPhone to the USB port or
Android phone with the BLUETOOTH
function.
Launch the "App Remote" application .
Press and hold APP on the unit for more
than 2 seconds.
Activating voice recognition (Android
phone only)
By registering applications , you can control an
application by voice command. For details, refer to
the help of the application.
To activate voice recognition
1
2
Press ENTER to activate voice recognition.
Say the desired voice command into the
microphone when [Say Source or App] appears on
the Android phone.
Connection to iPhone/ Android phone starts.
For details on the operations on iPhone/
Android phone, see the help of the application.
If the device number appears
Make sure that the same numbers are displayed
(e.g., 123456) in this unit and the mobile device,
then press ENTER on this unit and select [Yes] on
the mobile device.
To terminate connection
Press and hold APP.
Selecting the source or application
You can operate the unit to select the desired
source or application on your smartphone .
1 Rotate the control dial to select the desired source
or application, then press it.
•
l'l.-
t··
II
0
CD
TUNER
(J~
~~
AUX
BT Phone
;0
,,;1
<zi.•
1:00
Notes
• Voice recognition may not be available in some cases.
• Voice recognition may not work properly depending
on the performance of the connected Android phone.
• Operate under conditions where noise such as engine
sound is minimized during voice recognition .
When a music or video application is
selected*
Press 1 or 2 to enter HID mode, and press SEEK+/to select a playback item, then press ENTER to start
playback.
~·;
*
~
Available only for an Android phone supporting
HID (Human Interface Device Profile).
USB
•
Making sound settings
You can adjust the settings for EQ, BAL/FAD/SW
Level and Position via your smartphone .
MUSIC
To select another source or application, press SRC
then rotate the control dial to select the desired
source or application.
Announcement of various information by
voice guide (Android phone only)
When SMS/E-mail, Twitter/Face book/Calend ar
notifications , etc., are received, they are
automatical ly announced through the car speakers.
•
••
TUNER
-~
AUX
6.-
; ..
"'
.ti'i
oj;
0
1234567890123
N!·\·V
~.1essagt>
~,~·
BT Phone
~
;.§
USB
•
MUSIC
For details on settings, refer to the help of the
application.
16GB
For details on settings, refer to the help of the
application.
AUTO OFF
Settings
Canceling the DEMO Mode
You can cancel the demonstration display which
appears while this unit is turned off.
1
2
3
Press MENU, rotate the control dial to
select [DISPLAY], then press it.
Rotate the control dial to select [DEMOOFF], then press it.
Press ~ (back) twice.
The display returns to normal reception/play
mode.
Basic Setting Operation
You can set items in the menu to the following
procedure.
The following items can be set depending on the
source and setting.
1
2
Press MENU.
Rotate the control dial to select the setup
category, then press it.
Setup categories are follows:
• GENERAL setup (page 17)
• SOUND setup (page 17)
• DISPLAY setup (page 19)
• BT (BLUETOOTH) setup (page 19)
• APP REM (App Remote) setup (page 19)
3
AUX-A (AUX audio)
Activates the AUX source display: [ON], [OFF].
(Available only when the unit is turned off.)
CT (clock time)
Activates the CT function: [ON], [OFF] (page 10).
Rotate the control dial to select [DEMO],
then press it.
The setting is complete.
4
Shuts off automatically after a desired time
when the unit is turned off: [NO], [30S] (30
seconds), [30M] (30 minutes), [60M] (60
minutes).
Rotate the control dial to select the
options, then press it.
BTM (page 9)
PARENTAL
Sets the parental lock to [ON], [OFF], and edits
the passcode (page 10). (Available only when
the SiriusXM Vehicle Tuner is connected.)
SXM RESET (SiriusXM reset)
Initializes the SiriusXM Connect Tuner settings
(preset channels/parental lock): [ON], [OFF].
(Available only when the SiriusXM Vehicle Tuner
is connected).
SOUND Setup
C.AUDIO+ (clear audio+)
Reproduces sound by optimizing the digital
signal with the Sony recommended sound
settings: [ON], [OFF]. (Automatically sets to [OFF]
when [EQ10 PRESET] is changed).
EQ10 PRESET
Selects an equalizer curve from 10 equalizer
curves or off: [RAND B], [ROCK], [POP], [DANCE],
[HIP-HOP], [ELECTRONICA], [JAZZ], [SOUL],
[COUNTRY], [CUSTOM], [OFF].
The equalizer curve setting can be memorized
for each source.
EQ10 SETTING
To return to the previous display
Press ~ (back).
GENERAL Setup
CLOCK-ADJ (clock adjust) (page 6)
Sets [CUSTOM] of EQ10.
BASE
Selects a preset equalizer curve as a basis for
further customizing: [BAND1] 32Hz, [BAND2] 63
Hz, [BAND3] 125Hz, [BAND4] 250Hz, [BANDS]
500Hz, [BAND6] 1 kHz, [BAND7] 2kHz, [BANDS]
4kHz, [BAND9] 8 kHz, [BAND10] 16kHz.
The volume level is adjustable in 1 dB steps,
from -6 dB to +6 dB.
CAUT ALM (caution alarm)
Activates the caution alarm: [ON], [OFF]
(page 6 ). (Available only when the unit is turned
off.)
BEEP
Activates the beep sound: [ON], [OFF].
17GB
POSITION (listening position)
SET FIR POS (set front/rear position)
Simulates a natural sound field by delaying the
sound output from front/rear speaker to suit
your position.
FRONT L (0): Front left
FRONT R (f)): Front right
FRONT (E)): Center front
ALL (0): In the center of your car
CUSTOM: Position set by App Remote
OFF: No position set
ADJ POSITION* (adjust position)
Fine-tunes the listening position setting.
Adjustable range: [+3]- [CENTER]- [ -3].
SET SW POS* (set subwoofe r position)
NEAR(@): Near
NORMAL( @): Normal
FAR(@): Far
BALANCE
Adjusts the sound balance: [RIGHT-15][CENTER)- [LEFT-15].
FADER
Adjusts the relative level: [FRONT-15]- [CENTER]
- [REAR-15].
OSEE (digital sound enhancem ent engine)
Improves digitally compressed sound by
restoring high frequencies lost in the
compression process.
This setting can be memorize d for each source
other than the tuner.
Selects the OSEE mode: [ON], [OFF].
LOUDNESS
Reinforces bass and treble for clear sound at low
volume levels: [ON], [OFF].
AAV (advanced auto volume)
Adjust the playback volume level of all playback
sources to the optimum level: [ON], [OFF].
RB ENH (rear bass enhancer)
Rear Bass Enhancer enhances the bass sound by
applying a low pass filter setting to the rear
speakers. This function allows the rear speakers
to work as a subwoofe r if one is not connected.
(Available only when [SW DIREC] is set to [OFF].)
RBE MODE (rear bass enhancer mode)
Selects the rear bass enhancer mode: [1], [2], [3],
[OFF].
LPF FREQ (low pass filter frequency)
Selects the subwoofe r cut-off frequency: [50Hz],
[60Hz], [80Hz], [100Hz], [120Hz].
LPF SLOP (low pass filter slope)
Selects the LPF slope: [1], [2], [3).
SW DIREC (subwoofe r direct connection)
You can use the subwoofe r without a power
amplifier when it is connected to the rear
speaker cord. (Available only when [RBE MODE]
is set to [OFF].)
Be sure to connect a 4 - 8 ohm subwoofe r to
either of the rear speaker cords. Do not connect
a speaker to the other rear speaker cord.
SW MODE (subwoofe r mode)
Selects the subwoofe r mode: [1], [2], [3], [OFF].
SW PHASE (subwoofe r phase)
Selects the subwoofe r phase: [NORM], [REV].
SW POS* (subwoofe r position)
Selects the subwoofe r position: [NEAR],
[NORMAL], [FAR].
LPF FREQ {low pass filter frequency)
Selects the subwoofe r cut-off frequency: [50Hz],
[60Hz], [80Hz], [100Hz], [120Hz].
LPF SLOP (low pass filter slope)
Selects the LPF slope: [1], [2], [3].
S.WOOFER (subwoofe r)
SW LEVEL (subwoofe r level}
Adjusts the subwoofe r volume level:
[+10 dB]- [0 dB]- [-10 dB].
([ATI] is displayed at the lowest setting.)
SW PHASE (subwoofe r phase)
Selects the subwoofe r phase: [NORM], [REV].
SW POS* (subwoofe r position)
Selects the subwoofe r position: [NEAR],
[NORMAL], [FAR].
LPF FREQ (low pass filter frequency)
Selects the subwoofe r cut-off frequency: [50Hz],
[60Hz], [80Hz], [100Hz], [120Hz].
LPF SLOP (low pass filter slope)
Selects the LPF slope: [1], [2], [3].
HPF (high pass filter)
HPF FREQ (high pass filter frequency)
Selects the front/rear speaker cut-off frequency:
[OFF], [50Hz], [60Hz], [80Hz], [100Hz], [120Hz].
HPF SLOP (high pass filter slope)
Selects the HPF slope (effective only when [HPF
FREQ] is set to other than [OFF]): [1], [2], [3].
18GB
AUX VOL {AUX volume level)
Adjusts the volume level for each connected
auxiliary device: [+18 dB]- [O dB]- [ -8 dB].
This setting negates the need to adjust the
volume level between sources.
BTA VOL {BLUETOOTH audio volume level)
Adjusts the volume level for each connected
BLUETOOTH device: [+6 dB]- [0 dB]- [-6 dB].
This setting negates the need to adjust the
volume level between sources.
* Does not appear when [SET F/R POS] is set to [OFF].
DISPLAY Setup
DEMO (demonstration)
Activates the demonstration: [ON], [OFF].
DIMMER
Changes the display brightness.
AT (auto)
Dims the display automatically when you turn
lights on. (Available only when the illumination
control lead is connected.)
ON
Dims the display.
OFF
Deactivates the dimmer.
COLOR (preset color - dynamic color illuminator)
Sets a preset color for the display and buttons
on the main unit.
Selects from 12 preset colors, 1 customized color
and 5 preset patterns.
CUSTOM-( (custom color)
Registers a customized color for the display and
buttons.
BASE
Selects a preset color as a basis for further
customizing: [RGB RED], [RGB GRN],
[RGB BLUE].
Adjustable color range: [O]- [32] ([O] cannot be
set for all color ranges).
DAYNIGHT
Sets a different color for DAY /NIGHT mode
according to the dimmer setting.
-[DAY]: [DIMMER] sets to [OFF] or [AUTO] (turn
off the head light).
-[NIGHT]: [DIMMER] sets to [ON] or [AUTO] (turn
on the head light).
SND SYNC (sound synchronization)
Selects the color with sound synchronization:
[ON], [OFF].
START-WHT (start white)
When SRC is pressed, the display and buttons on
the main unit turn white once, then change to
the customized color: [ON], [OFF].
AUTO SCR (auto scroll)
Scrolls long items automatically: [ON], [OFF].
BT (BLUETOOTH) Setup
This setup menu can be also opened by pressing
CALL.
PAIRING (page 7)
PHONEBOOK (page 14)
REDIAL (page 14)
RECENT CALL (page 14)
VOICE DIAL (page 15)
DIAL NUMBER (page 14)
RINGTONE
Selects whether this unit or the connected
cellular phone outputs the ringtone: [1] (this
unit), [2] (cellular phone).
AUTO ANS (auto answer)
Sets this unit to answer an incoming call
automatically: [OFF], [1] (about 3 seconds), [2]
(about 10 seconds).
AUTO PAIRING
Start BLUETOOTH pairing automatically when
iOS device version 5.0 or later is connected via
USB: [ON], [OFF].
BT SIGNL (BLUETOOTH signal) (page 7)
Activates the BLUETOOTH function: [ON], [OFF].
BT INIT {BLUETOOTH initialize)
Initializes all the BLUETOOTH related settings
(pairing information, preset number, device
information, etc.).
When disposing the unit, initialize all the
settings.
APP REM (App Remote) Setup
Establish and terminate App Remote function
(connection).
WHT MENU (white menu)
You can display the menu more clearly (white)
without concern for color setting: [ON], [OFF].
19GB
Additional Information
Precautions
• Cool off the unit beforehand if your car has been
parked in direct sunlight.
• Do not leave the front panel or audio devices
brought in inside the car, or it may cause
malfunction due to high temperature in direct
sunlight.
• Power antenna (aerial) extends automatically.
• If the multi-session disc begins with a CD-DA
session, it is recognized as a CD-DA disc, and
other sessions are not played back.
• Discs that this unit CANNOT play
- CD-R/CD-RW of poor recording quality.
- CD-R/CD-RW recorded with an incompatible
recording device.
- CD-R/CD-RW which is finalized incorrectly.
- CD-R/CD-RW other than those recorded in
music CD format or MP3 format conforming to
IS09660 Levei1/Level 2, Joliet/Romeo or multisession.
Moisture condensation
Should moisture condensation occur inside the
unit, remove the disc and wait for about an hour for
it to dry out; otherwise the unit will not operate
properly.
D
Folder (album)
~ MP3/WMA file (track)
To maintain high sound quality
Do not splash liquid onto the unit or discs.
®
@
• Do not expose discs to direct sunlight or heat
sources such as hot air ducts, nor leave it in a car
parked in direct sunlight.
• Before playing, wipe the discs
with a cleaning cloth from the
center out. Do not use
solvents such as benzine,
thinner, commercially
available cleaners.
• This unit is designed to play
back discs that conform to the
Compact Disc {CD) standard.
DuaiDiscs and some of the music discs encoded
with copyright protection technologies do not
conform to the Compact Disc (CD) standard,
therefore, these discs may not be playable by this
unit.
• Discs that this unit CANNOT play
- Discs with labels, stickers, or sticky tape or
paper attached. Doing so may cause a
malfunction, or may ruin the disc.
- Discs with non-standard shapes (e.g., heart,
square, star). Attempting to do so may damage
the unit.
- 8 em {3 1/4 in) discs.
Notes on CD-R/CD-RW discs
• The maximum number of: {CD-R/CD-RW only)
-folders {albums): 150 (including root folder)
-files (tracks) and folders: 300 (may less than
300 if folder/file names contain many
characters)
-displayable characters for a folder/file name: 32
(Joliet)/64 (Romeo)
20GB
®
®
(j)
• You can connect to the following iPod models.
Update your iPod devices to the latest software
before use.
Compatible iPhone/iPod models
Compatible Model
USB
iPhone 5
0
iPhone 4S
0
iPhone 4
0
iPhone 3GS
0
iPhone 3G
0
iPod touch (5th generation)
0
iPod touch {4th generation)
0
iPod touch {3rd generation)
0
iPod touch {2nd generation)
0
iPod classic
0
iPod nano {7th generation)
0
iPod nano {6th generation)
0
iPod nano (5th generation)
0
iPod nano {4th generation)
0
iPod nano (3rd generation)
0
• "Made for iPod" and "Made for iPhone" mean that
an electronic accessory has been designed to
connect specifically to iPod or iPhone,
respectively, and has been certified by the
developer to meet Apple performance standards.
Apple is not responsible for the operation of this
device or its compliance with safety and
regulatory standards. Please note that the use of
this accessory with iPod or iPhone may affect
wireless performance.
What is BLUETOOTH technology?
• BLUETOOTH wireless technology is a short-range
wireless technology that enables wireless data
communication between digital devices, such as
a cellular phone and a headset. BLUETOOTH
wireless technology operates within a range of
about 10 m {33ft). Connecting two devices is
common, but some devices can be connected to
multiple devices at the same time.
• You do not need to use a cable for connection
since BLUETOOTH technology is a wireless
technology, neither is it necessary for the devices
to face one another, such is the case with infrared
technology. For example, you can use such a
device in a bag or pocket.
• BLUETOOTH technology is an international
standard supported by millions of companies all
over the world, and employed by various
companies worldwide.
On BLUETOOTH communication
• BLUETOOTH wireless technology operates within
a range of about 10 m {33ft).
Maximum communication range may vary
depending on obstacles (person, metal, wall, etc.)
or electromagnetic environment.
• The following conditions may affect the sensitivity
of BLUETOOTH communication.
-There is an obstacle such as a person, metal, or
wall between this unit and BLUETOOTH device.
-A device using 2.4 GHz frequency, such as a
wireless LAN device, cordless telephone, or
microwave oven, is in use near this unit.
• Because BLUETOOTH devices and wireless LAN
(IEEE802.11b/g) use the same frequency,
microwave interference may occur and result in
communication speed deterioration, noise, or
invalid connection if this unit is used near a
wireless LAN device. In such as case, perform the
following.
-Use this unit at least 10 m {33ft) away from the
wireless LAN device.
-If this unit is used within 10 m {33ft) of a
wireless LAN device, turn off the wireless LAN
device.
- Install this unit and BLUETOOTH device as near
to each other as possible.
• Microwaves emitting from a BLUETOOTH device
may affect the operation of electronic medical
devices. Turn off this unit and other BLUETOOTH
devices in the following locations, as it may cause
an accident.
-where inflammable gas is present, in a hospital,
train, airplane, or petrol station
-near automatic doors or a fire alarm
• This unit supports security capabilities that
comply with the BLUETOOTH standard to provide
a secure connection when the BLUETOOTH
wireless technology is used, but security may not
be enough depending on the setting. Be careful
when communicating using BLUETOOTH wireless
technology.
• We do not take any responsibility for the leakage
of information during BLUETOOTH
communication.
• Connection with all BLUETOOTH devices cannot
be guaranteed.
-A device featuring BLUETOOTH function is
required to conform to the BLUETOOTH
standard specified by BLUETOOTH SIG, and be
authenticated.
- Even if the connected device conforms to the
above mentioned BLUETOOTH standard, some
devices may not be connected or work
correctly, depending on the features or
specifications of the device.
-While talking on the phone hands free, noise
may occur, depending on the device or
communication environment.
• Depending on the device to be connected, it may
require some time to start communication.
Others
• Using the HLUETOOTH device may not function on
cellular phones, depending on radio wave
conditions and location where the equipment is
being used.
• If you experience discomfort after using the
BLUETOOTH device, stop using the BLUETOOTH
device immediately. Should any problem persist,
consult your nearest Sony dealer.
If you have any questions or problems concerning
your unit that are not covered in this manual,
consult your nearest Sony dealer.
21GB
Maintenance
Specifications
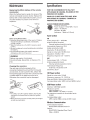
Replacing the lithium battery of the remote
commander
FOR THE CUSTOMERS IN THE USA. NOT
APPLICABLE IN CANADA, INCLUDING IN THE
PROVINCE OF QUEBEC.
When the battery becomes weak, the range of the
remote commander becomes shorter. Replace the
battery with a new CR2025 lithium battery. Use of
any other battery may present a risk of fire or
explosion.
+side up
POUR LES CLIENTS AUX ETATS-UNIS. NON
APPLICABLE AU CANADA, Y COMPRIS LA
PROVINCE DE QUEBEC.
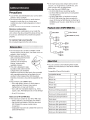
AUDIO POWER SPECIFICATIONS
CEA2006 Standard
Power Output: 17 Watts RMS x 4 at 4
Ohms< 1% THD+N
SN Ratio: 80 dBA
(reference: 1 Watt into 4 Ohms)
Tuner section
Notes on the lithium battery
• Keep the lithium battery out of the reach of children.
Should the battery be swallowed, immediately
consult a doctor.
• Wipe the battery with a dry cloth to assure a good
contact.
• Be sure to observe the correct polarity when installing
the battery.
• Do not hold the battery with metallic tweezers,
otherwise a short-circuit may occur.
WARNING
Battery may explode if mistreated.
Do not recharge, disassemble, or dispose of in
fire.
Cleaning the connectors
The unit may not function properly if the
connectors between the unit and the front panel
are not clean. In order to prevent this, detach the
front panel (page 6) and clean the connectors with
a cotton swab. Do not apply too much force.
Otherwise, the connectors may be damaged.
FM
Tuning range: 87.5 -107.9 MHz
Antenna (aerial) terminal:
External antenna (aerial) connector
Intermediate frequency: 25 kHz
Usable sensitivity: 8 dBf
Selectivity: 75 dB at 400 kHz
Signal-to-noise ratio: 80 dB (stereo)
Separation: 50 dB at 1 kHz
Frequency response: 20- 15,000 Hz
AM
Tuning range: 530 -1,710 kHz
Antenna (aerial) terminal:
External antenna (aerial) connector
Intermediate frequency:
9,115 kHz or 9,125 kHz/5 kHz
Sensitivity: 26 11V
CD Player section
Signal-to-noise ratio: 120 dB
Frequency response: 10 - 20,000 Hz
Wow and flutter: Below measurable limit
Corresponding codec: MP3 (.mp3) and WMA (.wma)
USB Player section
Notes
• For safety, turn off the ignition before cleaning the
connectors, and remove the key from the ignition
switch.
• Never touch the connectors directly with your fingers
or with any metal device.
Interface: USB (High-speed)
Maximum current:
MEX-NSOOOBT: 1 A
MEX-GS610BT: 1 A (front), 2.1 A (rear)
The maximum number of recognizable tracks:
10,000
Corresponding codec:
MP3 (.mp3), WMA (.wma) and WAV (.wav)
Wireless Communication
Communication System:
BLUETOOTH Standard version 3.1
Output:
BLUETOOTH Standard Power Class 2
(Max. +4 dBm)
22GB
Maximum communication range:
Line of sight approx. 10 m (33 ft)*1
Frequency band:
2.4 GHz band (2.4000- 2.4835 GHz)
Modulation method: FHSS
Compatible BLUETOOTH Profiles*2:
A2DP (Advanced Audio Distribution Profile) 1.3
AVRCP (Audio Video Remote Control Profile) 1.5
HFP (Handsfree Profile) 1.6
PBAP (Phone Book Access Profile)
SPP (Serial Port Profile)
MAP (Message Access Profile)
HID (Human Interface Device Profile)
*1 The actual range will vary depending on factors such
as obstacles between devices, magnetic fields
around a microwave oven, static electricity,
reception sensitivity, antenna (aerial)'s performance,
operating system, software application, etc.
*2 BLUETOOTH standard profiles indicate the purpose
of BLUETOOTH communication between devices.
Power amplifier section
Output: Speaker outputs
Speaker impedance: 4- 8 ohms
Maximum power output: 55 W x 4 (at 4 ohms)
General
Outputs:
Audio outputs terminal (front, rear, sub)
Power antenna (aeriai)/Power amplifier control
terminal (REM OUT)
Inputs:
SiriusXM input terminal
Remote controller input terminal
Antenna (aerial) input terminal
MIC input terminal
AUX input jack (stereo mini jack)
USB port:
MEX-N5000BT: front
MEX-GS610BT: front, rear
Power requirements: 12 V DC car battery (negative
ground (earth))
Dimensions:
Approx. 178 mm x 50 mm x 177 mm
(71/s in x 2 in x 7 in) (w/h/d)
Mounting dimensions:
Approx. 182 mm x 53 mm x 160 mm
(71/4 in x 2 1/s in x 6 5/16 in) (w/h/d)
Mass: Approx. 1.2 kg (2 lb 11 oz)
Package contents:
Main unit (1)
Remote commander (1): RM-X231
Microphone (1)
Parts for installation and connections (1 set)
Optional accessories/equipment:
SiriusXM Vehicle Tuner: SXV100
Design and specifications are subject to change
without notice.
Copyrights
((<Siriusxm>))
READY
SiriusXM Connect Vehicle Tuner and Subscription
sold separately.
www.siriusxm.com
Sirius, XM and all related marks and logos are
trademarks of Sirius XM Radio Inc. All rights
reserved.
The Bluetooth® word mark and logos are registered
trademarks owned by Bluetooth SIG, Inc. and any
use of such mC)rks by Sony Corporation is under
license. Other trademarks and trade names are
those of their respective owners.
The N-Mark is a trademark or registered trademark
of NFC Forum, Inc. in the United States and in other
countries.
Windows Media is either a registered trademark or
trademark of Microsoft Corporation in the United
States and/or other countries.
This product is protected by certain intellectual
property rights of Microsoft Corporation. Use or
distribution of such technology outside of this
product is prohibited without a license from
Microsoft or an authorized Microsoft subsidiary.
iPhone, iPod, iPod classic, iPod nano, and iPod
touch are trademarks of Apple Inc., registered in
the U.S. and other countries. App Store is a service
mark of Apple Inc.
MPEG Layer-3 audio coding technology and patents
licensed from Fraunhofer liS and Thomson.
Pandora, the Pandora logo, and the Pandora trade
dress are trademarks or registered trademarks of
Pandora Media, Inc., used with permission.
Google, Google Play and Android are trademarks of
Google Inc.
BlackBerry® is the property of Research In Motion
Limited and is registered and/or used in the U.S.
and countries around the world. Used under license
from Research In Motion Limited.
Your dealer may not handle some of the above
listed accessories. Please ask the dealer for detailed
information.
23GB
Troubleshooting
The following checklist will help you remedy
problems you may encounter with your unit.
Before going through the checklist below, check
the connection and operating procedures.
For details on using the fuse and removing the unit
from the dashboard, refer to the installation/
connections manual supplied with this unit.
If the problem is not solved, visit the support site on
the back cover.
No power is being supplied to the unit.
If the unit is turned off and the display
disappears, the unit cannot be operated with the
remote commander.
-Turn on the unit.
~
No sound.
~ The position of the fader control [FADER] is not
set for a 2-speaker system.
No beep sound.
An optional power amplifier is connected and
you are not using the built-in amplifier.
Radio reception
Stations cannot be received.
The sound is hampered by noises.
~ The connection is not correct.
-If your car has built-in radio antenna (aerial} in
the rear/side glass, connect an REM OUT lead
(blue/white striped} or accessory power supply
lead (red} to the power supply lead of a car's
antenna (aerial} booster.
-Check the connection of the car antenna
(aerial}.
-If the auto antenna (aerial} will not extend,
check the connection of the power antenna
(aerial} control lead.
Preset tuning is not possible.
The broadcast signal is too weak.
~
PTY displays[--------].
current station is not an RDS station.
~ RDS data has not been received.
~The station does not specify the program type.
~The
~
The contents of the memory have been erased.
~ The power supply lead or battery has been
disconnected or not connected properly.
Stored stations and correct time are erased.
The fuse has blown.
Makes a noise when the position of the ignition
is switched.
~The leads are not matched correctly with the car's
accessory power connector.
During playback or reception, the demonstration
mode starts.
~ If no operation is performed for 5 minutes with
[DEMO-ON] set, the demonstration mode starts.
-Set [DEMO-OFF) {page 19}.
The display disappears from/does not appear in
the display window.
~The dimmer is set to [DIM-ON) (page 19}.
~ The display disappears if you press and hold OFF.
-Press OFF on the unit until the display appears.
~The connectors are dirty (page 22}.
The operation buttons do not function.
The disc will not eject.
~ Press PTY /CAT and ~ {back}/MODE for more
than 2 seconds to reset the unit.
The contents stored in memory are erased.
For your safety, do not reset the unit while you
are driving.
24GB
The disc does not play back.
~ Defective or dirty disc.
~The CD-R/CD-RW is not for audio use (page 20}.
MP3/WMA files cannot be played back.
The disc is incompatible with the MP3/WMA
format and version. For details on playable discs
and formats, visit the support site.
~
MP3/WMA files take longer to play back than
others.
~ The following discs take a longer time to start
playback.
-A disc recorded with a complicated tree
structure.
-A disc recorded in Multi Session.
-A disc to which data can be added.
The sound skips.
~ Defective or dirty disc.
You cannot play back items via a USB hub.
unit cannot recognize USB devices via a USB
hub.
~This
A USB device takes longer to play back.
~ The USB device contains files with a complicated
tree structure.
The sound is intermittent.
-+ The sound may be intermittent at a high-bit-rate
of more than 320 kbps.
Pandora® connection is not possible.
-+ Shut down the Pandora® application on the
mobile device, and then launch it again.
Application name is mismatched with the actual
application in App Remote.
-+ Launch the application again from the "App
Remote" application.
One touch connection (NFC) is not possible.
-+ If the smartphone does not respond to the
touching.
-Check that the NFC function of the smartphone
is turned on.
-Move theN-Mark part of the smartphone
closer to the N-Mark part on this unit.
- If the smartphone is in a case, remove it.
-+ NFC receiving sensitivity depends on the device.
If One touch connection with the smartphone
fails several times, make BLUETOOTH connection
manually.
The connecting device cannot detect this unit.
-+ Before the pairing is made, set this unit to pairing
standby mode.
-+ While connected to a BLUETOOTH device, this
unit cannot be detected from another device.
-Disconnect the current connection and search
for this unit from another device.
-+ When the device pairing is made, set the
BLUETOOTH signal output to on (page 7).
Connection is not possible.
-+ The connection is controlled from one side (this
unit or BLUETOOTH device), but not both.
-Connect to this unit from a BLUETOOTH device
or vice versa.
The name of the detected device does not
appear.
-+ Depending on the status of the other device, it
may not be possible to obtain the name.
No ringtone.
-+ Adjust the volume by rotating the control dial
while receiving a call.
-+ Depending on the connecting device, the
ringtone may not be sent properly.
-Set [RINGTONE] to [1] (page 19).
-+ The front speakers are not connected to the unit.
-Connect the front speakers to the unit. The
ringtone is output only from the front speakers.
The talker's voice cannot be heard.
-+ The front speakers are not connected to the unit.
-Connect the front speakers to the unit. The
talker's voice is output only from the front
speakers.
A call partner says that the volume is too low or
high.
-+ Adjust the volume accordingly using mic gain
adjustment (page 15).
Echo or noise occurs in phone call conversations.
-+ Lower the volume.
-+Set EC/NC Mode to [EC/NC-1] or [EC/NC-2]
(page 15).
-+ If the ambient noise other than the phone call
sound is loud, try reducing this noise.
E.g.: If a window is open and road noise, etc., is
loud, shut the window. If an air conditioner is
loud, lower the air conditioner.
The phone is not connected.
-+ When BLUETOOTH audio is played, the phone is
not connected even if you press CALL.
-Connect from the phone.
The phone sound quality is poor.
-+ Phone sound quality depends on reception
conditions of cellular phone.
- Move your car to a place where you can
enhance the cellular phone's signal if the
reception is poor.
The volume of the connected audio device is low
(high).
-+ Volume level will differ depending on the audio
device.
-Adjust the volume of the connected audio
device or this unit.
The sound skips during playback of a
BLUETOOTH audio device.
-+ Reduce the distance between the unit and the
BLUETOOTH audio device.
-+ If the BLUETOOTH audio device is stored in a case
which interrupts the signal, remove the audio
device from the case during use.
-+ Several BLUETOOTH devices or other devices
which emit radio waves are in use nearby.
-Turn off the other devices.
- Increase the distance from the other devices.
-+ The playback sound stops momentarily when the
connection between this unit and the cellular
phone is being made. This is not a malfunction.
The connected BLUETOOTH audio device cannot
be controlled.
-+ Check that the connected BLUETOOTH audio
device supports AVRCP.
25GB
Some functions do not work.
-+ Check if the connecting device supports the
functions in question.
A call is answered unintentionally.
-+ The connecting phone is set to answer a call
automatically.
Pairing failed due to time out.
-+ Depending on the connecting device, the time
limit for pairing may be short.
-Try completing the pairing within the time.
BLUETOOTH function cannot operate.
-+ Turn off the unit by pressing OFF for more than 2
seconds, then turn the unit on again.
No sound is output from the car speakers during
handsfree call.
-+ If the sound is output from the cellular phone, set
the cellular phone to output the sound from the
car speakers.
Pandora® connection is not possible.
-+ Shut down the Pandora® application on the
mobile device, and then launch again.
Application name is mismatched with the actual
application in App Remote.
-+ Launch the application again from the "App
Remote" application.
While running the "App Remote" application via
BLUETOOTH, the display automatically switches
to [BT AUDIO].
-+ The "App Remote" application or BLUETOOTH
function has failed.
-Run the application again.
NO DEV (no device)
-+ [USB] is selected as source without a USB device
connected. A USB device or a USB cable has been
disconnected during playback.
-Be sure to connect a USB device and USB cable.
NO MUSIC
-+ The disc or USB device does not contain a music
file.
-Insert a music CD.
-Connect a USB device with a music file in it.
OVERLOAD
-+ USB device is overloaded.
- Disconnect the USB device, then change the
source by pressing SRC.
-The USB device has a fault, or an unsupported
device is connected.
PUSH EJT (push eject)
-+ The disc cannot be ejected.
- Press ~ (eject).
READ
-+ The unit is reading all track and album
information on the disc.
-Wait until reading is complete and playback
starts automatically. Depending on the disc
structure, it may take more than a minute.
USB NO SUPRT (USB not supported)
-+The connected USB device is not supported.
-For details on the compatibility of your USB
device, visit the support site.
[L L L L] or [ I I
I
I]
-+ During reverse or fast-forward, you have reached
the beginning or the end of the disc and you
cannot go any further.
[_]
ERROR
-+The disc is dirty or inserted upside down.
- Clean or insert the disc correctly.
-+A blank disc has been inserted.
-+ The disc cannot play due to a problem.
- Insert another disc.
-+ USB device was not automatically recognized.
-Connect it again.
-+ Press ~to remove the disc.
HUB NO SUPRT {hubs not supported)
-+ USB hub is not supported on this unit.
IPD STOP (iPod stop)
-+ When repeat play is not set, playback of the last
track in album finished.
The music application in the iPod/iPhone is
terminated.
-Press PAUSE to start playback again.
26GB
-+ The character cannot be displayed.
For BLUETOOTH function:
BT BUSY {BLUETOOTH busy)
-+The phonebook and the call history of the cellular
phone are not accessible from this unit.
-Wait for a while, an_d then try again.
ERROR
-+ BT Initialize failed.
-+ Phonebook access failed.
-+ Phonebook content was changed while
accessing the cellular phone.
-Access the phonebook in the cellular phone
again.
MEM FAILURE (memory failure)
OPEN APP (open application)
~
~
This unit failed to store the contact in the preset
dial.
- Make sure that the number you intend to store
is correct (page 14 ).
The "App Remote" application is not running.
-Launch the iPhone's application.
For Pandora® operation:
MEMORY BUSY
~This
unit is storing data.
-Wait until storing has finished.
CANNOT SKIP
~
NO DEV (no device)
~
~
BLUETOOTH audio source is selected without a
BLUETOOTH audio device connected. A
BLUETOOTH audio device has been disconnected
during a call.
-Be sure to connect a BLUETOOTH audio device.
BLUETOOTH phone source is selected without a
cellular phone connected. A cellular phone has
been disconnected during a call.
- Be sure to connect a cellular phone.
Skipping tracks on Pandora® is not allowed.
-Wait until the commercial ends.
-Pandora® limits the number of skips allowed on
their service. Wait until the next track begins, or
select another station on the list.
ERROR
~
~
"Thumbs" feedback failed.
-Try "Thumbs Up/Down" again.
Bookmarking failed.
-Try bookmarking again.
NO STATION
P EMPTY (preset number empty)
~
~
The preset dial is empty.
There is no station on your Pandora® account.
-Create the station on the mobile device.
UNKNOWN
NOT ALLOWED
~
~
Name or phone number cannot be displayed
when browsing phonebook or call history.
WITHHELD
~
Phone number is hidden by caller.
~
For App Remote operation:
APP --------(application)
~
Connection with the application is not made.
-Establish iPhone connection again.
APP DISCNCT (application disconnected)
~
App Remote connection is not made.
-Establish the App Remote connection
(page 16).
APP MENU (application menu)
~
Button operation cannot be performed while a
menu on iPhone/ Android phone is open.
-Exit the menu on iPhone/ Android phone.
OPEN APP (open application)
When connecting via the USB port.
Pandora® does not launch.
-Launch the Pandora® application on the
iPhone.
~
OPEN APP (open application), PRESS PAUSE
When connecting via the BLUETOOTH function.
~ Pandora® does not launch.
-Launch the Pandora® application on the mobile
device, then press PAUSE.
PAN NO SUPRT (Pandora® not supported)
~
APP NO DEV (application no device)
~
The device with the application installed is not
connected.
-Connect the device, then establish iPhone
connection.
APP SOUND (application sound)
~
Button operation cannot be performed while a
sound menu on iPhone/ Android phone is open.
-Exit the sound menu on iPhone/Android
phone.
"Thumbs" feedback is not allowed.
-Wait until the commercial ends.
-Some functions, such as Shared Station, do not
permit feedback. Wait until the next track
begins, or select another station on the list.
Bookmark is not allowed.
-Wait until the commercial ends.
-Select another track or station, then try it again.
The connected device is not supported.
- For details of compatible devices, visit the
support site.
PAN RESTRICT (Pandora® licensing restriction)
~
Pandora® is not available outside your country.
PLEASE LOGIN, PANDORA APP (Pandora®
application)
~ Not logged into your Pandora® account.
-Disconnect the device, and log into your
Pandora® account, then connect the device
again.
27GB
--:-~
Network connection is unstable or lost.
-Make the network connection again on the
device.
-Wait until the network connection is
established.
For SiriusXM operation:
CH LOCKED (channel locked)
The selected channel is locked by the parental
control function. Enter the passcode to unlock
the channel.
~
CH UNAVAIL (channel unavailable)
The selected channel is not available.
~ The active channel has become unavailable.
~
CHAN UNSUB (channel unsubscribed)
~ There is no subscription to the selected channel.
~ The subscription to the active channel has been
terminated.
CHK ANT (check antenna)
The antenna (aerial) is not being used properly.
-Make sure the antenna (aerial) is connected
and being used properly.
~
CHECK TUNER (check tuner)
The SiriusXM Vehicle Tuner is not functioning
properly.
-Disconnect the SiriusXM Vehicle Tuner, and
connect it again.
~
MEM FAILURE {memory failure)
This unit failed to store the channel in the preset
dial.
- Make sure that the channel you intend to store
is correct.
~
SUBSCRIPTION UPDATED - ENTER TO CONTINUE
Your subscription has been updated.
- Press ENTER.
~
If these solutions do not help improve the situation,
consult your nearest Sony dealer.
If you take the unit to be repaired because of CD
playback trouble, bring the disc that was used at
the time the problem began.
28GB
Support site
Site d'a stance
If vot~ have any questions or for the latest support
information on this produd, please visit
the web site below:
Si vous avez des questions ou si vous souhaitez consulter
les toutes dernieres informations techniques sur ce
produit, rendez-vous sur fe site Web suivant :
http:/ /esupport.sony.com
http:/ /www.sony.com/caraudio
1
Read Troubleshooting in these
Operating Instructions.
2
Please contact (U.S.A. only);
Call
URL
1-800-222-7669
http:/ /www.SONY.com
http:/ /www.sony.net/
1111111111111111111111111111111111111111111111111111111
©2013 Sony Corporation
Printed in Thailand
*
4 4 8 0 6 5 7 1 1
*
(1)
SONY.
Bluetooth®
Audio System
4-480-658-11(1)
Installation/Connections
•
lnstallation/Connexions
•
1111111111111111111111111111111111111111111111111111111
* 4 4 8 0 6 5 8 1 1 * (1)
©2013 Sony Corporation Printed in Thailand
Connection example (IIJ)
Cautions
Be sure to install this unit in the dashboard of the
car as the rear side of the unit becomes hot during
use.
• This unit is designed for negative ground (earth) 12 V
DC operation only.
• Do not get the leads under a screw, or caught in
moving parts (e.g. seat railing).
• Before making connections, turn the car ignition off
to avoid short circuits.
• Connect the yellow and red power supply leads
only after all other leads have been connected.
• Run all ground {earth} leads to a common ground
{earth} point.
• Be sure to insulate any loose unconnected leads
with electrical tape for safety.
• The use of optical instruments with this product will
increase eye hazard.
Subwoofer Easy Connection {fA-C)
You can use a subwoofer without a power amplifier
when it is connected to a rear speaker cord.
MEX-GS610BT only (f:J-A)
not supplied (f:J-B)
*3 Do not connect a speaker in this connection (f:J-C).
*1
*2
Notes
• Be sure to connect the ground (earth) lead before connecting the
amplifier (f:J-A).
• The alarm will only sound if the built-in amplifier is used (f:J-A).
• Be sure to connect a 4 - 8 ohm subwoofer. Do not connect a
speaker to the other rear speaker cord (f:J-C).
Cannection diagram (@}}
0
To a metal surface of the car
First connect the black ground (earth) lead, then connect the
yellow and red power supply leads.
f) To the power antenna {aerial} control lead or
power supply lead of antenna {aerial} booster
Notes
• It is not necessary to connect this lead if there is no power
antenna (aerial) or antenna (aerial) booster, or with a
manually-operated telescopic antenna (aerial).
• When your car has a built-in FM/AM antenna (aerial) in the
rear/side glass, see "Notes on the control and power supply
leads."
Notes on the power supply lead {yellow)
• When connecting this unit in combination with other
stereo components, the connected car circuit's
rating must be higher than the sum of each
component's fuse.
• When no car circuits are rated high enough, connect
the unit directly to the battery.
To AMP REMOTE IN of an optional power
amplifier
This connection is only for amplifiers and a power antenna
(aerial). Connecting any other system may damage the unit.
Parts list ([I])
• The numbers in the list are keyed to those in the
instructions.
• The bracket CD and the protection collar@) are
attached to the unit before shipping. Before
mounting the unit, use the release keys ®to
remove the bracket CD from the unit. For details, see
"Removing the protection collar and the bracket
(IEJ)" on the reverse side of the sheet.
• Keep the release keys ® for future use as they are
also necessary if you ~emove the unit from your
car.
Caution
Handle the bracket
fingers.
CD carefully to avoid injuring your
E) To a car's illumination signal
Be sure to connect the black ground (earth) lead to a metal
surface of the car first.
0
To the +12 V power terminal which is energized
in the accessory position of the ignition switch
Notes
• If there is no accessory position, connect to the +12 V power
{battery) terminal which is energized at all times.
Be sure to connect the black ground (earth) lead to a metal
surface of the car first.
• When your car has a built-in FM/AM antenna (aerial) in the
rear/side glass, see "Notes on the control and power supply
leads."
0
To the +12 V power terminal which is energized
at all times
Be sure to connect the black ground (earth) lead to a metal
surface of the car first.
D
<D
e
Equipment used in illustrations {not supplied)
Appareils utilises dans les illustrations (non fournis)
®
~
Frontspt>ilker
Hi!Ut-parll'UiiiVilnt
.,
®
Rear s~aker
Hilut·parleur arrit re
Power amplifier
Amplificatt>ur de pui ssanct>
Smartphone••, IPod/ iPhone••,
USB device
Tefephone intelligent••, iPod/
iPhone••, peripheriqu e USB
Satt>lliteradiotuner
(SiriusXM) 'J
Syntoni seurradiosatellite
(SiriusXM)•J
/
®
Subwoofer
Cainon de graves
.,
~
® 0
0
. , RCApincord(not supplled).
''Dependingonthetypeofccu,useanadaptorforawired
remotecontrot (notsupplied)
"' not supplied
' • Fordetails oninstalling themiuophone,see'lnstallingthe
microphone( l))'onthereverseside.
' ' Whetherinuseornot.route themicrophone inputcord
such thatitdoesnotinterferewithdriving.Securethecord
withac lamp,etc., ifitis installedaroundyour feet.
•• To connect a smartphone to the main unit, an appropriate
cable(notsupplied) isrequired.
•> To connect an iPod/iPhone. use the USB connection cable
for iPod{notsupplied).
fAA
~··
''Cordon .'1 broche RCA(non fourni).
' l Selonletypedevoiture,ilpourra itl!tremkessai red'utiliser
un adaptateur pour t€h?commande c.lblee {nDfl fourni).
• ! nonfourni
•• Pourlesdetailssurl'installationdumicrophone.
reterez -vous.'l « lnstallationdumicrophone( IJ ) ~ auverso
'IQu'ilsoitenusageounon,acheminezlecordond'entree
dumicrophonedetellesortequ'ilnegenepasvotre
conduite. Fi~ez le co rdon .'li'Ciide d'une attache, etc, s'il est
installeautour devospieds.
••Pourraccorderunt€1€phoneintelligent.'ll'appareil
principal,unc.lbleapproprie(nonfourni)estrequis
•• PourraccorderuniPod/iPhone,utilisez lec.lblede
rilcmrdement USB pour iPod {non fourni)
e ..:::.~uU:ply
current0.4 A
Courantmax .fourni0,4A
__________________=.. 0
White
Blanc
~·~';,
Gauche
''"
White / bla ck striped
Rayebl anclnoir
B
Gray
Gris
Right
Droit
Gray/ black striped
Raveg ris/noir
Green
V•rt
O
Red
'-"-'-"·~·------------------~-- . . C)
Green/ black striped
Raye vert/ nolr
Yellow
BATIERY
Right
Droit
Notes on the control and power supply l ea ds
• REM OUT lead (blue/white striped) supplies +12 V DC when you turn
on th e unit.
• When your car has buiiHn FM/AM antenna (aerial) in the rear/side
g lass, connect REM OUT lead (blue/white str iped) or the accessory
powersupplyle ad(red)to thepowerterminal oftheexisting
antenna(aerial)booster. Fordetails. consultyou r deater.
• A power <1ntenn<1 (a erial ) without a relay box c<Jnnot be used with
this unit.
Memory hold conn ection
When the yellow power supply lead is wnn&ted. power will always
be supplied to the memory circuit even when the ignit ion switch is
turned off.
Notes on speaker connection
• Beforeconn!?ctrngthespe<~kers,turnt h eunit off.
• Use spe<Jkers with an impedcmce of 4 to 8 ohms, and with
adequatepowerhandlingcapacitiestoavoiditsdamage
• Donotconnectthespeakerterminals tothecarchassis, orconnect
thete rmrnalsoftherightspeakerswiththoseoftheleftspeaker
• Donotconne<ttheground(earth) leadofthisunittothenegative
l - )termrn alofthespeaker.
• D<lnotattempttoconnectthespeakers inparallel
• Connedonlypassivespeakers. Connectingactivespeakers(with
built-in amplifiers) to the speaker termmals may damage the umt
• Toavoidamalfunction. donotusethebuilt-inspeaker leads
installedinyourcariftheunitsharesacommonnegative(-)lead
for the right and left speakers.
• Donotconne<ttheunit'sspeakerleadstoeachother
Exemple de raccordement ([IJ)
Mises en garde
lnstallez cet appareil su r le ta bleau de bard de Ia
voiture, car l'arriE!re de l'apparei l chauffe en cours
d'utilisatio n
• Cet appareil est exclusivement cont;u pou r
fonct ion ner sur une tension de 12 V CC avec masse
negative.
• Evitez de fi xer des vis su r les cables ou de coincer
ceux-ci da ns des pieces mobiles (pa r exemple,
armature de si€ge).
• Avant d'effect uer les raccordements. coupez le
moteur pour E!viter un court-circuit.
• Raccordez les cables d'a li mentatio n jaune et rouge
seule ment apres avoir terminE! taus les autres
raccordeme nts.
• Rassemblez tousles cables de mise Ia masse en
un point de masse commun.
• Pour des ra isons de securite, veillez isoler avec du
ruban isolant tout c.3 ble libre non raccorde.
• L'utilisation d'instru ments optiques avec ce produit
augmente les risques pour les yeux.
a
Raccordement facile d'un caisson de graves (fi·C)
Vous po uvez utiliser un caisson de graves sans
amplifica teur de pui ssance lorsque vous effectuez le
raccorde ment un cordon de haut-parleur arri€re.
a
., MEX-GS610BTuniquement(f,I-A)
' 1 nonfourni(fJ-B)
'' Ne raccordez pas un haut-parleur iiVec cette conne~1on (fi · C).
Remarques
• Racco rdez d'abord le ccible de mise .'!Ia masse avant de raccorder
l'amplificateur(6-A)
• L'alarme est €mise uniquement lorsque l'amplificateur integre est
utilise( f)-A}
• Assurez·vous de raccorderun ca isson de graves de 4- B ohms. Ne
raccordezpasdehaut-parteurill'autrecordondehaut-parleur
arriere{ f) -C)
Schema de raccordement (@])
0
a
f) Au c.lble de commande d'antenne electrique ou
au c.lble d'alimentation de l'amplificateur
d'antenne
a
plusded~tails,consultezvotredE>tail l ant.
• Uneantenneelectrique sansboitierderelaisnepeut pasetre
utilisfieaveccetappa reil
Raccord ement pour Ia COflservati on dE> Ia rmlmoire
Lorsque lec3bled'alimentation j auneest raccorde.lecircu it dela
memoire est aliment € en permanence mflme si Ia cle de contact est
surlapositiond'arrl!t
Remarques sur le raccordement des haut-parleurs
• Avantderaccorderleshaut·parleurs.eteignezl'appareil.
• Utilisezdeshaut-parleursayant uneimpedancede4i1Bohmsavec
unecapacit€E>Iectriquead€quatepour€viter de lesendommager
• Neraccordezpaslesbornesdusystemedehaut -parleursau
ch~ssisdelavoitureetneraccordezpaslesbomesduhaut- pilrleu r
droit.'lcellesduhaut-parleurgauche
• Neraccordezpasleccibledemise.llamassedecetappareil illa
borneneg ative( - )duhaut-parleur.
• N'essayezpasderaccorder leshaut -parleUJsenparaltfle.
• Raccordezuniquementdeshaut·parleurspassifs. Leraccordement
de haut-parleurs actifs(avec amplificateurs integres) aux barnes
deshaut-parleurspeutendommagerl'appareil
• Pour eviter tout probll~me de tonctionnement, n'utilisez pas les
diblesdeshaut-parleurs integresinstalht!sdansvotrevoituresi
l'appareilpossedeunc.'iblenegatifcommun(- }pourles
haut-parleursdtoitetgauche.
• Ne ra ccordez pasentreeu~lesc3blesdeshaut - parleurs de
l'appareil.
d'antenne~ lectr iquenid'ampi i fica teurd'antenne,ouavecune
Au niveau de AMP REMOTE IN de l'ampliflcateur
de puissance en option
Ce raccordement s'applique uniquement au~ amplificateurs eta
uneantenneelectrique.Lebranchement detoutautresystE>m e
risqued'endommager t'appareil
Liste des composants ([j])
Q Vers le connecteur du signal d'eclairage de Ia
voiture
Raccordez d'abord le ccible de mise a Iii masse nair a un point
met a ll iqueduv~hicu l e .
OA Ia borne d'alimentation +12 V qui est
alimentE!e quand Ia de de contact est sur Ia
position accessoires
a
Attention
Manipu lez le su pport <D avec so in pou r eviter de vous
blesser aux doigts.
Remarques sur In ciibles de commande et d'alimentatton
• LecableREMOUT(ray€bleu/blanc)fourni t unealimentationde
+12VCC iorsquevousmettezl'appareilenmarche
•Lorsquevotrevoitureestequip€ed'uneantenneFM/AMint€g r€e
dans lavitrearri€re/laterale.raccordezlec.lbleREMOUT(ray€
bleulblanc)oulec3bled'alimentationdesaccessoires(rouge).'lla
borne d"alimentation de l'amplificateur d'antenne e~ istant. Pour
antennet€1escopiquemanuelle
• Si votre voiture est equipee d'une antenne FM/AM int~ree
danslavitrearriE!re/laterale.voir«Remarquessur lesciiblesde
commandeetd'alimentation ».
a
a
0
Remarqut> §
• lln'est pasnecessairederaccorderceclibles'iln'yapas
Remarques sur le c.lble d'alimentation (jaune)
• Lorsque cet appa reil est raccorde d'aut res
elements sh~reo, Ia valeur nom ina le du circuit de Ia
voiture raccorde doit etre superieure a Ia somme des
fusib les de chaque element.
• Si aucun circuit de Ia voiture n'est assez puissant,
raccordez directement l'appareil Ia batterie.
• Les numeros de Ia liste correspondent ceux des
inst ructi ons.
• Le support <D et le tour de protection@ sont fixes a
l'appareil en usine. Avant le montage de l'a pparei l,
utilisez les clf>s de df>blocage ®pour detacher le
support CD de l'appareil. Pou r de plus am ples
informations, reportez-vous Ia section« Retrait du
tour de protection et du support (EJ) "a u verso.
• Conservez les ciE!s de dE!blocage ® pour une
utilisation ulterieure car vous en aurez egalement
besoin pour retirer l'appareil de votre vehicule.
A un point metallique de Ia voiture
Branchezd'abordlec.'ibledemise.'l lamassenoiret, ensuite,les
cablesd'a lrmentationjauneetrouge.
0 ..
Remarques
• S'il n'yapasdepositionaccessoires,raccordezlaborne
d'illimentation (ba tteri e) ~12 V qui est alimentee en
permanence
Raccordez d'abord le clible de mise .'!Ia masse noir un point
metalliqueduv€hicule.
• Si votre voiturt> est equip€e d'une antenne FM/AM int€gree
danslavitrearriE>re/laterale.voir•Remarquessur lesdblesde
a
commandeetd'alimentation ~
8
A Ia borne d'allmentation +12 v
qui est
alimentee en permanence
Rilccordezd'abordleciibledemiseillilmassenoir.'l unpoint
metalliqueduv€hicule.
http://www.sony.net/
1
Unit: mm (in)
Unite : mm (po)
1
A
TOYOTA
S x maK. Bmm
('/n x •ho po maK.)
2
Sxmax.Bmm
(''""'ho pomax.)
~
Bracket
Support
Cl aws
Griffes
B
+
.
NISSAN
3
l'ioteri eur.
o.,hbOO<~
Tableau debord
1
.·--
.·
ve rs le tableau de bordfla co nsole centrale
~-:•
\..
Precautions
• Choose the installation location carefully so that the
un it will not interfere with norma l driving operat ions.
• Avoid installing t he unit in areas subject to d ust, dirt.
excessive vib ration, or high tem peratures, such as in
direct sunlight or near heater d ucts.
• Use only t he supplied mounting hardware for a safe
and secure installation.
Mounting the unit in a Japanese
car (ffi])
You may not be able to install this un it in some ma kes
of Japanese cars. In such a case, consult your Sony
dealer.
Nooo
Topreventmalfunction,installonlywiththesuppliedsnews@.
How to detach and attach the
front panel (ill)
Mounting angle adjustment
Adjust the mounting angle to less than 45°.
Removing the protection collar
and the bracket (8])
Before installing t he unit, remove the protection
collar @ and the bracket CD from the unit.
1
Remove the protection collar @.
Pinch both edges of the protect ion collar@, then
pull it out .
2
Remove the bracket (j).
Insert both release keys® together between
the unit and t he bracket Q) until they click.
8 Pu ll down the bracket CD. then pu ll up the unit
to separate.
Before installing the unit, detach the front panel.
6-A To detach
Before detaching the front panel, be su re to press an d
ho ld OFF. Press t he f ront panel release button, and
pull it off towa rds you.
6-B To attach
Engage part@ of the front pa nel wit h part @ of t he
unit, as illustrated, and push t he left side into position
unti l it clicks.
0
Mounting example ([§])
Installation In the dashboard
• Beforeinstalling,makesurethatthecatchesonbothsidesofthe
bracket <Dare bent inwards 2 mm ('/ n in). lfthe catches are straight
orbentoutwards, theunitwillnotbeinstalledsecurelyandmay
springout(I!J·l )
• Bendtheseclawsoutwardforatightfit,if necessaryfii!J-2)
• Make sure that the 4 catches on the protection collar@ are
properlyengagedintheslotsoftheun~~( IJ -3 ).
Sxmax. 8mm
('/ux max. •f,o ln)
dimension
S x max. 8mm
(''""'/,. pomax.)
Fuse replacement (ill)
When replacing t he f use, be sure t o use one matching
the amperage rating stated on the original fuse. If the
fuse blows, check the power connect ion and replace
the fuse. If the fuse blows aga in after replacement,
there m ay be an interna l malfu nction . In such a case,
cons ult your nearest Sony dealer.
Installing the microphone
([]])
To capture your voice during handsfree call ing, you
need to install the m icrophone@.
Cautions
• Keep t he m icrophone away from extremely hi gh
tem peratures and humidity.
• It is extremely dangerous if t he cord becomes
wound around the steering column or gearstick. Be
sure to keep it and other pa rts from obst ruc ting your
d riving.
• If airbags or any other shock-a bsorbing equip ment
is in your ca r. contact the store where you pu rchased
t his un it, or the car dealer, before installati on.
IJ·A Installing on the sun visor
Warning if your car's ignition has
no ACC position
Be sure to set t he Auto Off funct ion. For details, see
the suppl ied Operating Instructions.
The unit w ill shut off completely and automatica lly in
the set ti me after the unit is tu rned off, which prevents
battery drain.
If you do not set the Auto Off functio n, press and hold
OFF unt il the display d isappears each time you tu rn
the ignition off.
Install cl ips (not suppl ied) and adj ust the length and
position of the cord so that it does not obstruct you r
d rivi ng .
1!)-B Installing on the dashboard
Install a cli p (not supplied ) and adjust t he length and
positio n of the cord so t hat it does not obstruct your
driving .
Notes
• Before attaching the double-sid ed tape 0 . clean t he
su rface of t he das hboard with a d ry cloth.
• Adju st the microphone angle to the proper position.
Precautions
• Choisissez so ig neusement !'emplacem ent
d'i nstallation pour que l'appa reil ne gene pas le
conducteu r pendant Ia cond uite.
• Evitez d'installer l'appareil dans un endroit expose
Ia poussiere, a Ia salete, a des vibrati ons excessives
au des temperatu res @levees com m e en plein
soleil ou p roximite de cond uits de chauffage.
• Pour ga rantir un montage sOr. n'util isez q ue le
materiel fourni.
a
a
a
Reglage de l'angle de montage
R€glez l'i nclinaison
a un angle inf@rie ur a 45• .
Retrait du tour de protection et
du support (GJ)
Avant d'installer rappareil, retirez le tour de
protection @ et le support G) de l'appareil.
1
Retirez le tour de protection @ .
Pincez les deux bards du tour de protection @, puis
sortez-le.
2
Retirez le support CD.
0 lnsere2 les cles de d@blocage@ en m eme
temps entre J'appareil et le support CD jusqu'au
d@clic.
Tirez le support CD vers le bas, puis tirez sur
l'appareil vers le haut pour les separer.
e
Exemple de montage ([§])
Installation dans le tableau de bard
Remarques
• Avantl'installation,assurez·vousquelesloquetsdesdeu)(c6tE!sdu
support CD sont bien plies de 2 mm ('t, po) vers l'interieur. Si les
loquetssontdroitsoupliE!sversl'e)(tE!rieur,l'appareilnepeutpas
etrefi)(f!solidementetpeutsedE!tacher(IJ-1)
• Sinecessaire.pliezcesgriffesversl'eKtE!rieur pourassureruneprise
correcte(IJ-2)
• Assurez-vous que les 4 loquets situes sur le tour de protection@
sontcorrectementengagesdans l es fentesdel'.:~pparei l ( 1£1·3 )
m
6
A
A
~.
OFF
B
~
"'
Cllps(notsupplled)
Clips(nonfournis)
B
~
~,
0
~,
m
Fuse (lOA)
Fusible(lOA)
Clip {not supplied)
Clip (non fourni)
Montage de l'appareil dans une
voiture japonaise (!I])
Cet appareil ne peut pas etre installe dans certain es
voitures japonaises. Consultez, dans ce cas, vot re
dE!taillant Sony.
Remarqu e
Poureviter tout problf>medefonctionnement,utilisezuniquement
lesvis@fourniespour lemontage
Retrait et fixation de Ia fa~ade
(ill)
Avant d'installer l'appareil, retlrez Ia fa~ade.
f.li·A Pour Ia retirer
Avant de retirer Ia fa~ade, n'oubliez pas de maintenir
enfoncee Ia touche OFF. Ap puyez su r Ia touche de
dE!verrouillage de Ia fa<;ade, puis faites glisser Ia
fa<;:ade vers vous.
f.ll-8 Pour Ia fixer
Engagez Ia partie@ de Ia fac;:ade dans Ia partie@ de
l'appareil, comme illustre, puis appuyez sur le cOt e
gauche jusq u'au d€clic indiquant que Ia fa<;ade est en
position.
Avertissement si le contact de
votre vehicule ne com porte pas
de position ACC
Veillez a n2gler Ia fonc t ion Auto Off. Pour obteni r
davantage d'informations, reportez-vous au mode
d'emploi fourni .
L'apparei l s'E>teint compiE!tement et au tomatiquement
apres le laps de tem ps choisi une fois l'a ppa reil arrete
afin d'E>viter que Ia batteri e ne se d€cha rge.
Si vous ne r€glez pas Ia fonction Auto Off, appuyez sur
Ia touche OFF et maintenez-la enfoncee jusqu'a ce
que l'affich age dispara isse a chaqu e fois que vous
coupez le contact.
Remplacement du fusible (!I])
a
Lorsque vo us remplacez le fu sible, veillez utiliser un
fu sible dont l'intensit€, en amperes, correspond a Ia
valeur indiquee sur le fu sible usage. Si le fusible grille,
v€rifi ez le branchement de !'alim entation et remplacez
le fusible. Si le nouveau fusible g rille €galement, il est
possible que l'appareil soil d€fectueux. Dans ce cas,
consultez votre detaillant Sony le plus proche.
Installation du microphone (@])
Pour capturer votre voix durant les appels mains
li bres, vous devez installer le microphone@.
M ises en garde
• N'exposez pas le microphone a des temperatures
extremement €levees eta l'hu m idit€.
• Veillez ce que le cordon ne soit pas enrou le au tour
du volant ou du levier de vitesses. Cec i peut s'averer
extremement dangereux. Veillez ace que le cordon
et les autres pieces ne genent pas votre conduite.
• Si un systeme de coussins de securit€ gonflables ou
tout autre €quipement absorbant les chocs est
present dans votre v€h icule, contactez le magasin
oU vous avez achete cet appareil ou votre
concessionna ire avant !'i nstallation.
a
liJ-A Fixation sur le pare-soleil
lnstallez les clips {non fournis) et ajustez Ia longueu r
et Ia position du cordon de fa<;on ace qu' il ne g&ne
pas Ia cond uite.
I!J·B Fixation sur le tableau de bord
ln stallez un cl ip {non fou rni ) et ajustez Ia longueur et
Ia position du cordon de fa<;on ce qu'il ne gene pas
Ia conduite.
a
Remarques
• Avant de fixer l'adhesif double face 0 . nettoyez Ia
surface du tableau debord avec un chiffo n sec.
• R€glez I'angle du microphone afin dele positionner
correctement.
·
SONy;
4-467-585-01
For Dealers
For display purposes it is necessary to secure
the front panel to the unit as shown below.
Secure the screw on the left side of the unit.
© 2013 Sony Corporation
Printed in Thailand
SONY:
4-485-223-11(1)
-
(fjj ~
0
MEX-XXXXXXX
!!!!J"l
\L_\::=====ts::!::
SERIAL
NO.I
-
0
MEX-XXXXXXX
X-XXX-XXX-XX
SERIAL
NO.I
0
Eh!.!'NI
X-XXX-XXX-XX
'W'IBi'
'WIIb'rl•'
IMPORTANT NOTICE FOR DEALER:
NOTA IMPORTANTE PERIL RIVENDITORE:
MAKE SURE THE SERIAL NUMBERS ON THE BOTTOM OF THE UNIT 0 AND
THE REAR OF THE FRONT PANEL G) ARE IDENTICAL.
OTHERWISE THE NFC FUNCTION OF THIS UNIT WILL NOT WORK.
ASSICURARSI CHE iL NUMERO Dl SERlE RIPORTATO SULLA PARTE
INFERIORE DELL'UNITA 0 SIA IDENTICO A QUELLO RIPORTATO SUL RETRO
DEL PANNELLO ANTERIORE G).
IN CASO CONTRARIO, LA FUNZIONE NFC DELL'UNITA NON SARA ATTIVA.
'if"'f'F'
AVIS IMPORTANT POUR LE REVENDEUR:
ASSUREZ-VOUS QUE LES NUMEROS DE SERlE INDIQUES SOUS L'APPAREIL
0 ETA L'ARRIERE DE LA FA<:;ADE G) SONT IDENTIQUES.
SINON, LA FONCTION NFC DE CET APPAREIL NE POURRA PAS
FONCTIONNER.
P•&;ilmi'
Nederlands
BELANGRIJKE KENNISGEVING VOOR VERDELER:
GA NA OF DE SERIENUMMERS OP DE ONDERKANT VAN HET APPARAAT
EN OP DE ACHTERKANT VAN HET VOORPANEEL G) IDENTIEK ZIJN.
IS DIT NIET HET GEVAL, DAN ZAL DE NFC-FUNCTIE VAN DIT APPARAAT
NIET WERKEN.
0
WICHTIGER HINWEIS FOR HANDLER:
ACHTEN SIE DARAUF, DASS DIE SERIENNUMMERN AN DER UNTERSEITE
DES GERATS 0 UNO AN DER RUCKSEITE DER FRONTPLATTE G)
0BEREINSTIMMEN.
ANDERNFALLS FUNKTIONIERT DIE NFC-FUNKTION DIESES GERATS NICHT.
©2013 Sony Corporation
Printed in Thailand
1111111111111111111111
*
4 4 8 5 2 2 3 1 1
*
(1)
SONY.
Garantie d'un an protegeant les
consommateurs
Preuve d'achat :
La presente garantie limitee s'applique au produit acompter de Ia date d'achat
originelle au detail. Par consequent, le proprietaire doit presenter une preuve
d'achat originelle au detail.
Sony du Canada lttie (Sony), so us reserve des modalites et conditions indiquees
aux presentes, garantit le present produit contre tout detaut de fabrication ou
toute detaillance des materiaux entrant dans sa fabrication pour Ia periode de
garantie specifiee. Si un defaut de fabrication ou une detaillance des materiaux
survient pendant Ia periode de garantie specifiee, Sony veillera a reparer le
produit en y effectuant tous les rem placements de pieces necessaires par des
pieces neuves ou remises aneuf et ce, sans frais quant aux pieces ou a Ia
main-d'CEuvre.
Produit vises par Ia presente garanlie :
La presente garantie limitee s'applique aux produits Sony suivants, et peut
aussi s'appliquer a d'autres produits s'ils font partie de l'emballage d'origine
du produit :
La peri ode de garantie est Ia suivante :
Main-d'CEuvre et pieces: UN an acompter de Ia date d'achat originelle au detail.
Conditions:
Modifications, reparations, abus non autorises, etc. :
La presente garantie limitee est nulle si : (i) l'unite a ete alteree, modifiee ou
installee aux fins d'usage commercial, ou niparee ou entretenue par une
personne autre qu'un centre de reparation auto rise par Sony afin d'effectuer de
tels services. (ii) le numero de serie de l'unite a ete altere ou retire, ou (iii)
I' unite a subi un accident, un mauvais usage, un abus ou a ete uti Iisee pour un
usage contraire aux directives du mode d'emploi. L'opinion de Sony acet effet
est sans appel.
Usage commercial ou location :
Ce produit n'est pas con~u pour usage commercial ou location. Advenant que
cette unite soil utilisee ades fins commerciales ou com me unite en location, Ia
periode de garantie limitee pour les pieces et Ia main-d'CEuvre est reduite a90
jours apres Ia date d'achat originelle. L'opinion de Sony acet effet est sans
appel.
Exclusions :
La presente garantie limitee exclut les armoires, accessoires ou piles brises ou
endommages; les antennes et stylets exposes, ou Ia detaillance de pieces
decoulant de leur usure normale. La presente garantie limitee exclut l'entretien
regulier des produits, tels que le nettoyage, Ia lubrification ou les verifications.
La presente garantie limitee ne couvre que l'equipement fourni avec le produit.
Elle ne couvre aucune assistance technique quant a l'usage d'equipement ou
de logiciel et ne couvre aucun logiciel, fourni ou non avec le produit. De tels
logiciel sont fournis " TELS QUELS " , sauf aux termes d'une garantie limite de
logiciel comprise dans l'emballage. Veuillez consulter les ententes d'usager
comprises avec le produit pour conna1tre vos droits et obligations relativement
aux logiciels.
La presente garantie n'est val ide qu'au Canada .
Livraison :
L'unite doit etre livree en personne a l'un des centres de reparation Sony du
Canada, ou expediee, dans son emballage d'origine ou un emballage equivalent
accordant un niveau de protection equivalent, ainsi que des directives indiquant
I' emplacement au Canada ou l'unite peut etre retournee. Si I' unite est expediee
aun centre de reparation, l'unite niparee sera retournee au client port paye.
Tousles accessoires compris avec l'unite doivent iltre enumeres individuellement
sur le bordereau d'expedition aux fins de documentation d'expedition. Les
accessoires detectueux doivent etre expedies a Sony atitre d'article distinct a
reparer. Sony n'est pas responsable des pertes ou dommages des articles en
transit expedies aux centres de reparation. Toute piece remplacee aux termes
de Ia presente garantie limitee devient Ia prop riete de Sony. Vous etes
responsable de laire une copie de sauvegarde de toutes donnees, logiciels
ou autres que vous auriez pu stocker ou conserver sur votre unite. II est fort
probable que des donnees, logiciels ou autres seront perdus ou relormates
pendant Ia reparation, et Sony n'est pas responsable de tels dommages ou
pertes.
Accessoires audio I video
Produits audio I video pour I' automobile
Cameras video et accessoires connexes
Cameras photos numeriques de type Cyber-shot® et accessoires connexes
Radios-reveil munis d'un lecteur CD
Lecteurs numeriques de mediasiLecteurs numeriques de musique
lmprimantes I scan'ners de photos numerisees
Enregistreurs numeriques de Ia parole
Enregistreurs numeriques acircuits integres
Systemes audio pour Ia maison
Systemes de cinema-maison
Lecteurs et enregistreurs video pour Ia maison
Produits de navigation mobile
Magnetophones amicrocassettes
Baladeurs Net MDIH-MMD
Baladeurs reseau
Lecteurs CD portables I munis d'un recepteur radio
Lecteurs DVD portables
Radios portables de type " casque d'ecoute stereo "
Enregistreursllecteurs portables aMiniDisques
Radios portables et lecteurs CD I avec lecteur cassettes
Radios portables
Recepteurs-enregistreurs radiophoniques combines
Magnetoscopesa cassettes et accessoires connexes
Baladeurs video
SAUF DANS LA MESURE 00 LA LOI APPLICABLE L'INTERDIT, TOUTES LES
AUTRES GARANTIES ET CONDITIONS, EXPRESSES OU IMPLICITES, RELEVANT OU NON D'UNE LOI, D'UN ACTE LEGISLATIF, D'HABITUDES
COMMERCIALES ETABLIES OU D'USAGES DU COMMERCE, Y COMPRIS,
NOTAMMENT TOUTE GARANTIE IMPLICITE DE QUALITE MARCHANDE OU
DE L'ADAPTAl31LITI~ A UNE FIN PARTICULIERE, SONT DESAVOUEES. SONY
NE SAURAIT EN AUCUN CAS ETRE RESPONSABLE D'UN MONTANT
SUPERIEUR AU PRIX REEL D'ACHAT DU PRODUIT; ET SONY NE SAURAIT EN
AUCUN CAS ETRE RESPONSABLE DE DOMMAGES SPECIAUX, ACCESSOIRES
OU CONSECUTIFS SUBIS RELATIVEMENT AU PRODUIT. SONY N'ASSUME Nl
N'AUTORISE AUCUN REPRESENTANT OU QUICONQUE AASSUMER EN SON
NOM UNE OBLIGATION OU RESPONSABILITE AUTRE QUE GELLES QUI SONT
EXPRESSEMENT DECRITES AUX PRESENTES. L'EXCLUSION DE GARANTIES
ET CONDITIONS IMPLICITES N'EST PAS AUTORISEE DANS CERTAINS
TERRITOIRES.
Enregistrement du produit :
Merci d'avoir choisi un produit Sony. Chez Sony, nous nous efforQons decreer
des produits de Ia plus haute qualite afin de renforcer votre experience et votre
satisfaction. Afin d'assurer le meilleur soutien qui soil avotre produit, nous
vous demandons de remplir une fiche d'enregistrement de produit sur le site
www.fr.SonyStyle.ca/enregistrement dans les quatre-vingt-dix (90) jours suivant
Ia date d'achat.
Pour obtenir de l'aide concernant le service ou obtenir des renseignements sur
le produit ou concernant I'enregistrement du produit, veuillez appeler le 1-877899-7669. Pour obtenir des renseignements concernant Ia garantie prolongee
Sony Care, veuillez appeler le 1-800-773-9667.
Pour le support technique et les mises ajour en ligne en tout temps, vous
pouvez visiter le
www.fr.sony.ca/sonyca/view/frenchlsupporLelectronics.shtml,
ou appeler le Centre d'information aIa clientele Sony au 1-877-899-7669.
SONY.
1111111111 II IIIII III II IIIII Ill II Ill II IIIII III II 11111111
4-447-347-51
Consumer 1 Year Warranty
Sony of Canada Ltd. ("Sony") hereby warrants, subject to the terms and conditions herein set forth, this product against defects in material and workmanship during the specified warranty period. In the event of a defect of material or
workmanship during the specified warranty period, Sony will repair the same,
effecting all necessary parts replacements with either new or refurbished parts,
without charge for either parts or labour.
The warranty period is as follows:
Labour and Parts: ONE year from the date of original purchase at retail.
Conditions:
Unauthorized Modification, Repair, Abuse , Etc.:
This limited warranty is void if: (i) the unit has been previously altered, modified, installed or mounted for commercial use, or repaired or serviced by anyone other than the service facilities authorized by Sony to render such services, (ii) the serial number on the unit has been altered or removed, or (iii) the
unit has been subject to accident, misuse, abuse or operated contrary to the
instructions contained in the Owner's Manual. The opinion of Sony with respect to this matter shall be final.
Commercial Use or Rental:
This product is not intended for commercial use or rental. Should this unit be
used at any time for commercial purposes or as a rental unit, the limited warranty period for parts and labour shall be 90 days from the date of original
purchase at retail. The opinion of Sony with respect to this matter shall be final.
Exclusions:
This limited warranty does not extend to broken or damaged cabinets, accessories, batteries, exposed antennas and styluses, or to parts wearing out due
to normal wear and tear. This limited warranty does not cover regular product
maintenance such as cleaning, lubrication or check-ups.
This limited warranty covers only the hardware components packaged with the
product. It does not cover technical assistance for hardware or software usage
and it does not cover any software products whether or not contained in the
product. Any such software is provided "AS IS" unless expressly provided for
in any enclosed software limited warranty. Please refer to the End User License
Agreements included with the product for your rights and obligations with respect to the software.
This limited warranty is valid only in Canada.
Delivery:
The unit must be delivered in person to one of the nearest Sony service facilities in Canada, or shipped, freight prepaid, in either its original package or
similar package affording an equal degree of protection and with instructions
indicating a location within Canada to which the unit may be returned . If shipped
to the service facility, the repaired unit will be returned to customer freight
prepaid. All accessories that are enclosed with the unit must be listed individually on the packing slip for the shipping documentation. Defective accessories
should be shipped to Sony as a separate repair item. Sony shall have no liability whatsoever for loss or damage in transit of items shipped to service facilities. Any parts replaced under this limited warranty will become the property of
Sony. It is your responsibility to back up any data, software or other materials you may have stored or preserved on your unit. It is likely that such data,
software, or other materials will be lost or reformatted during service and
Sony will not be responsible for any such damage or loss.
Subject Products:
This limited warranty is applicable to the following Sony
Products, and may also be applicable to other Sony products if enclosed in the
product's original packaging:
AudioNideo Accessories
Car AudioNideo Products
Camcorders and related accessories
Cyber-shot® Digital still Camera and related accessories
Clock Radio/with CD Players
Digital Media Players/ Digital Music Players
Digital Photo Printers/Scanners
Digital Voice Recorder
IC Chip Recorders
Home Audio Systems
Home Theatre System
Home Video Player and Recorders
Mobile Navigation Products
Microcassette recorder
Net MD/H-MMD Walkman
Network Walkman
Portable CD Players/ with Radio
Portable DVD Players
Portable Headset Stereo Radios
Portable MiniDisc Recorder/Players
Portable Radio CD Players /with Cassette
Portable Radio
Radio Cassette Combinations
Video Cassette Recorders and related accessories
Video Walkman
EXCEPT TO THE EXTENT PROHIBITED BY APPLICABLE LAW, ALL OTHER
WARRANTIES AND CONDITIONS, EXPRESS OR IMPLIED, WHETHER ARISING BY LAW, BY STATUTE, BY COURSE OF DEALING OR USAGE OF TRADE,
INCLUDING WITHOUT LIMITATION IMPLIED WARRANTIES OF MERCHANTABILITY, MERCHANTABLE QUALITY AND FITNESS FOR A PARTICULAR PURPOSE ARE DISCLAIMED. UNDER NO CIRCUMSTANCES SHALL SONY BE LIABLE FOR AN AMOUNT GREATER THAN THE ACTUAL PURCHASE PRICE OF
THE UNIT OR FOR ANY SPECIAL, INCIDENTAL OR CONSEQUENTIAL DAMAGES SUSTAINED IN CONNECTION WITH SAID UNIT AND SONY NEITHER
ASSUMES NOR AUTHORIZES ANY REPRESENTATIVE OR OTHER PERSON TO
ASSUME FOR IT ANY OBLIGATION OR LIABLILITY OTHER THAN SUCH AS IS
EXPRESSLY SET FORTH HEREIN. SOME JURISDICTIONS DO NOT ALLOW THE
EXCLUSION OF IMPLIED WARRANTIES AND CONDITIONS.
Product Registration:
Thank you for choosing a Sony product. At Sony, we strive to create products
of the highest quality to enhance your experience and enjoyment. To provide
the best support for your product, we request that you complete a product
registration form at www.SonyStvle.ca/registration within 90 days of purchase.
For service assistance, product information, or product registration please call:
1-877-899-7669. For information about a Sony Care Extended Warranty, please
call 1-800-773-9667.
For online product support and updates at any time, please visit:
www.sony.ca/sonyca/view/english/supporLelectronics.shtml,
or call the Sony Customer Information Centre at1-877-899-7669.
Proof of Purchase:
This limited warranty applies to the product from the original date of purchase
at retail. The owner must furnish proof of original purchase at retail.
4-447-347-51
Printed in Thailand
111111111111111111111111111111111111111111111111111111111111
4-44 7-747-02
SONY®
LIMITED WARRANTY(u.s.L~v~rAudio
1
Sony Electronics Inc. ("Sony") warrants this product against defects in material or workmanship for the time
periods and as set forth below when purchased directly from Sony or a Sony Retailer. Pursuant to this Limited
Warranty, Sony will, at its option, (i) repair the product using new or refurbished parts or (ii) replace the product
with a new or refurbished product. For purposes ofthis Limited Warranty, "refurbished" means a product or part
that has been returned to its original specifications. In the event of a defect, these are your exclusive remedies.
Labor: For a period of one (1) year from the original date of purchase of the product ("Labor Warranty"), Sony
will, at its option, repair or replace with new or refurbished product, product determined to be defective. If Sony
elects to replace the product after this Labor Warranty has expired but while the Parts Warranty below is still in
effect, it will do so for the applicable labor charge.
Parts: For a period of one (1) year from the original date of purchase of product ("Parts Warranty"), Sony will
supply new or refurbished replacement parts in exchange for parts determined to be defective.
This Limited Warranty covers only the hardware components packaged with the Product. It does not cover
technical assistance for hardware or software usage and it does not cover any software products whether or not
contained in the Product; any such software is provided "AS IS" unless expressly provided for in any enclosed
software Limited Warranty. Please refer to the End User License Agreements included with the Product for your
rights and obligations with respect to the software.
Instructions: To obtain warranty service, you must deliver the product, freight prepaid, in either its original
packaging or packaging affording an equal degree of protection to the Sony authorized service facility specified.
It is your responsibility to backup any data, software or other materials you may have stored or preserved on your unit. It is likely that such data, software, or other materials will be lost or reformatted
during service and Sony will not be responsible for any such damage or loss. A dated purchase receipt
from Sony or a Sony Retailer is required. For specific instructions on how to obtain warranty service for your
product,
Visit Sony's Web Site:
www.sony.com/support
Or call the Sony Customer Information Service Center
1-800-222-SONV(7669)
For an accessory or part not available from your authorized dealer, call:
1-800-488-SONY (7669)
Repair I Replacement Warranty: This Limited Warranty shall apply to any repair, replacement part or replacement product for the remainder of the original Limited Warranty period or for ninety (90) days, whichever is
longer. Any parts or product replaced under this Limited Warranty will become the property of Sony.
This Limited Warranty only covers product issues caused by defects in material or workmanship during ordinary
consumer use; it does not cover product issues caused by any other reason, including but not limited to product
issues due to commercial use, acts of God, misuse, limitations of technology, or modification of or to any part of
the Sony product or product purchased from other than Sony or a Sony Retailer. To determine if a retailer is part
of the Sony Retailer Network, please contact Sony's Customer Service Call Center or go to www.sony.com/
support. This Limited Warranty does not cover Sony products sold AS IS or WITH ALL FAULTS or consumables
(such as fuses or batteries). This Limited Warranty is invalid if the factory-applied serial number has been altered
or removed from the product. This Limited Warranty is valid only in the United States.
LIMITATION ON DAMAGES: SONY SHALL NOT BE LIABLE FOR ANY INCIDENTAL OR CONSEQUENTIAL
DAMAGES FOR BREACH OF ANY EXPRESS OR IMPLIED WARRANTY ON THIS PRODUCT.
DURATION OF IMPLIED WARRANTIES: EXCEPT TO THE EXTENT PROHIBITED BY APPLICABLE LAW, ANY
IMPLIED WARRANTY OF MERCHANTABILITY OR FITNESS FOR A PARTICULAR PURPOSE ON THIS PRODUCT
IS LIMITED IN DURATION TO THE DURATION OF THIS WARRANTY.
Some states do not allow the exclusion or limitation of incidental or consequential damages, or allow limitations
on how long an implied warranty lasts, so the above limitations or exclusions may not apply to you. This Limited
Warranty gives you specific legal rights and you may have other rights which vary from state to state.
Printed in Thailand